
Terrys87 86 4Runner with a 2nd Chance
 Mar 4, 2014 | 05:17 AM
#1781
Thread Starter
Super Moderator
iTrader: (1)
Joined: Aug 2008
Posts: 11,787
Likes: 28
From: Anderson Missouri
Lol Cyberhorn...I did a donut by accident as well. Would you suggest putting on another coat of resin to hide the texture of the fiberglass mat? Then smooth out and prime and paint with interior paint? Thanks!!!
Mar 4, 2014 | 06:15 AM
#1782
I like the idea of a rear heater, I always worry about the kids not being warm enough sitting in back. I wonder how hard it is to find one? I've never seen one in person, but this is the only first gen 4runner Ive seen the inside of, lol. Was that an SR5 only option? I wonder if the 2nd Gen 4 runners have that option and are interchangabe, and possibly easier to find?
I look forward to seeing how your dash pad turns out!
I look forward to seeing how your dash pad turns out!
Mar 4, 2014 | 12:20 PM
#1783
Registered User
Joined: Jul 2012
Posts: 2,365
Likes: 4
From: Idaho
I like the idea of a rear heater, I always worry about the kids not being warm enough sitting in back. I wonder how hard it is to find one? I've never seen one in person, but this is the only first gen 4runner Ive seen the inside of, lol. Was that an SR5 only option? I wonder if the 2nd Gen 4 runners have that option and are interchangabe, and possibly easier to find?
I look forward to seeing how your dash pad turns out!
I look forward to seeing how your dash pad turns out!
Mar 4, 2014 | 06:07 PM
#1784
Registered User
Joined: Dec 2008
Posts: 2,391
Likes: 1
From: tecumseh nebraska
our 97 has the rear heater and keeps the kid content. Options are endless on a nice rear heater on the 1st gen runners. Actually if you really want a arctic worthy one swap one out of a 12v big rig daycab. Prolly pick one up at a salvage yard for $150.
Mar 7, 2014 | 06:52 AM
#1785
Thread Starter
Super Moderator
iTrader: (1)
Joined: Aug 2008
Posts: 11,787
Likes: 28
From: Anderson Missouri
Hello Ed... I put another coat of resin on the dashpad. I am hoping I can come up with a way to get these things looking good. I have several that I could fix.
One of my first gens have one and I did have a 91 with the rear heater. I know some of the 3rd gens have them as well. My third 3rd gen doesnt. Sure wish it did. We burn up and to keep the dids warm. The 88 and 91 we had was so nice with the rear heater.
I see them occasionally in the boneyard. I have looked into putting one in my 86. It really doesnt look to be that bad to do. I got to figure out how to get the metal lines off of the underside that run to the heater core.
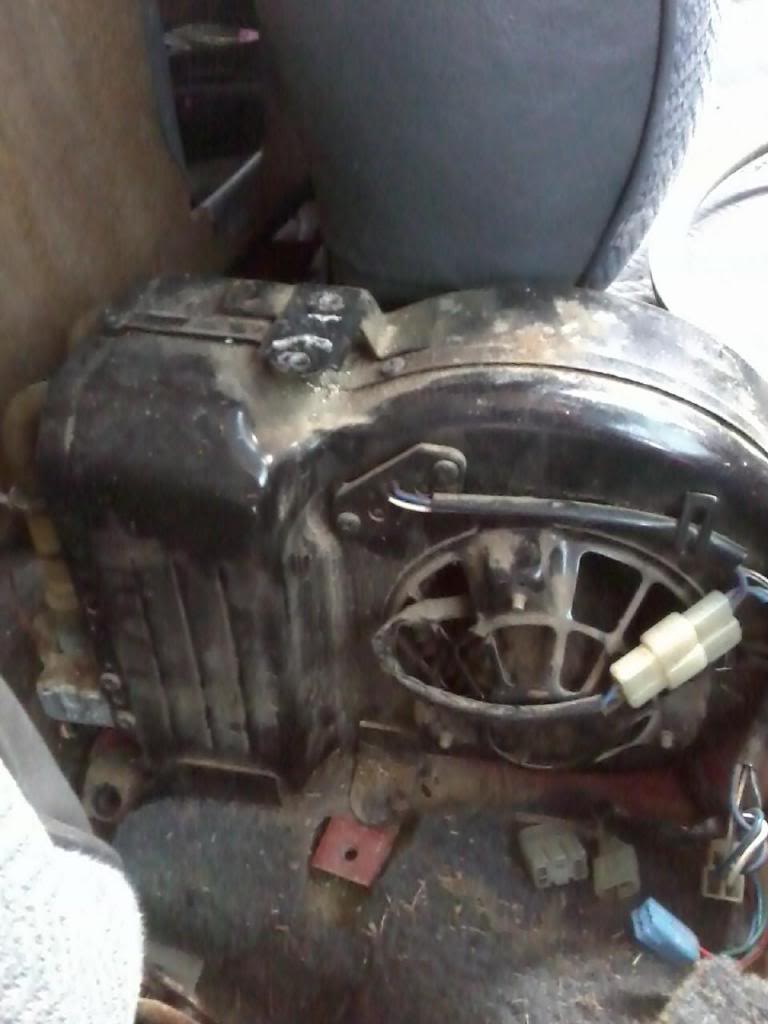
With your glove box open you can see a 10 and 20 amp fuse for your front heater. One with a rear heater has the exact same fuse assembly on it with a wiring extention. There is a "T" connection to add it to the water hoses on the firewall. I think it will be an easy add on. I will post it when I do it but will be a couple of months before I do it. It is getting done before next winter.
It warms up quicker then the front heater and once the truck is warm, I shut the front heater off and let the rear heater do all of the work. So much nicer then it bowing in your eyes.
Here is the heater itself. I think all of the mounting tabs are already in the body. Looks easy from what I have seen so far.
One of my first gens have one and I did have a 91 with the rear heater. I know some of the 3rd gens have them as well. My third 3rd gen doesnt. Sure wish it did. We burn up and to keep the dids warm. The 88 and 91 we had was so nice with the rear heater.
I see them occasionally in the boneyard. I have looked into putting one in my 86. It really doesnt look to be that bad to do. I got to figure out how to get the metal lines off of the underside that run to the heater core.
With your glove box open you can see a 10 and 20 amp fuse for your front heater. One with a rear heater has the exact same fuse assembly on it with a wiring extention. There is a "T" connection to add it to the water hoses on the firewall. I think it will be an easy add on. I will post it when I do it but will be a couple of months before I do it. It is getting done before next winter.
It warms up quicker then the front heater and once the truck is warm, I shut the front heater off and let the rear heater do all of the work. So much nicer then it bowing in your eyes.
Here is the heater itself. I think all of the mounting tabs are already in the body. Looks easy from what I have seen so far.
 Mar 7, 2014 | 06:57 AM
#1786
Thread Starter
Super Moderator
iTrader: (1)
Joined: Aug 2008
Posts: 11,787
Likes: 28
From: Anderson Missouri
Thanks Cyberhorn..I found a couple of white spots and think I have them covered now. I see some of the base models seem to have the rear heater more often then the SR5. Maybe not but could because of the nicer center console for the SR5.
Hello kornhuskerwizard...I might look into somehting like that furhter down the road. The front heaters just isnt enough for the size space they have to heat. Need to start looking for a 3rd gen heater as well.
Hello kornhuskerwizard...I might look into somehting like that furhter down the road. The front heaters just isnt enough for the size space they have to heat. Need to start looking for a 3rd gen heater as well.
Mar 7, 2014 | 06:59 AM
#1787
Thread Starter
Super Moderator
iTrader: (1)
Joined: Aug 2008
Posts: 11,787
Likes: 28
From: Anderson Missouri
I got to be in St. Louis this weekend. Hoping it is nice enough to hit the yards up there as there just isnt much here. Got another coat on the dash and hope I get it looking like what I am visualizing. Warmer days are supposed to be coming so can only hope. I am ready to get outside.
I added more to my Tools, Tips, and Tricks thread https://www.yotatech.com/forums/f122...tricks-278208/ always looking for more ideas if you have any.
I added more to my Tools, Tips, and Tricks thread https://www.yotatech.com/forums/f122...tricks-278208/ always looking for more ideas if you have any.
Last edited by Terrys87; Mar 7, 2014 at 07:01 AM.
Mar 7, 2014 | 07:12 AM
#1788
I got one of those Center consoles years ago when I was trying to restore my 86 4runner. I came across a 91 2nd Gen 4Runner and stripped the center console, could get the heater out as easy so I left it behind. I think it had a different front heater core, I just don't remember as I wasn't to interested being so far south. At the time it looked like it had and inlet and outlet going out and an inlet and outlet going to the rear heater core. I may be wrong, but that's my old brain trying to recall.
Hello Ed... I put another coat of resin on the dashpad. I am hoping I can come up with a way to get these things looking good. I have several that I could fix.
One of my first gens have one and I did have a 91 with the rear heater. I know some of the 3rd gens have them as well. My third 3rd gen doesnt. Sure wish it did. We burn up and to keep the dids warm. The 88 and 91 we had was so nice with the rear heater.
I see them occasionally in the boneyard. I have looked into putting one in my 86. It really doesnt look to be that bad to do. I got to figure out how to get the metal lines off of the underside that run to the heater core.
With your glove box open you can see a 10 and 20 amp fuse for your front heater. One with a rear heater has the exact same fuse assembly on it with a wiring extention. There is a "T" connection to add it to the water hoses on the firewall. I think it will be an easy add on. I will post it when I do it but will be a couple of months before I do it. It is getting done before next winter.
It warms up quicker then the front heater and once the truck is warm, I shut the front heater off and let the rear heater do all of the work. So much nicer then it bowing in your eyes.
Here is the heater itself. I think all of the mounting tabs are already in the body. Looks easy from what I have seen so far.
Mar 7, 2014 | 09:47 AM
#1789
Rear Sliding window
Terry,
Hope I'm not hijacking you thread. I know you've answered this a million times at least I think you have, but here's the question.
Do you have some sort of steps on taking apart those topper windows? The sliding I think from what I've read are held in place with some sort of butyl tape. And the rear glass has the same or a gasket but bolted on as well. If you've taken one apart and put one back together let me know how you did it and what you used to make it water tight.
Thanks
Still looking for a windshield.
 Mar 13, 2014 | 04:36 AM
#1791
Thread Starter
Super Moderator
iTrader: (1)
Joined: Aug 2008
Posts: 11,787
Likes: 28
From: Anderson Missouri
Hello junk4u..When the yards dry out, I want to see about getting a heater and see what it takes to get one out. Also want to get the temperture and compass out of a Dodge truck and a friend of mine has a Ford Lariat that has a factory voice recorder in the drivers visor that would come in handy. I will see if I can find those dimensions you are looking for. I have taken the glass out of the tops but never had to put them in. That butyl glue is some strong stuff.
Hello kelvinb...Glad the steps are working for you on getting the dash apart. When I came to Yotatech, someone would ask a question and the answer was always to go search. I still have a problem when I want to find things so I decided that I would try and post pictures and explanations on how I go about and do things. May not always be the best pictures and explantions but hopefully enough to get someone thru the process.
I spend alot of time adding information on my builds and I go back and do a lot editing to previous post when I find things that apply to that area. My 88 Runner build below is where I try to take a thread that someone new to Toyotas could go to that thread and fix alot of issues on theirs. Not everything is in a manual. Today I plan on editing the first page on this thread to show other fixes I have done and where to find them. It is just as enjoyable seeing someone else getting their truck the way that they want it to be as well. Glad to see the thread is helping you.
Mar 13, 2014 | 04:39 AM
#1792
Thread Starter
Super Moderator
iTrader: (1)
Joined: Aug 2008
Posts: 11,787
Likes: 28
From: Anderson Missouri
Mistys clutch is out and it will be a little bit til I get it swapped out. While I have it out, I am going to replace the Main Input Shaft Bearing on it. Just got the part in I found a thread that says it can be done. I have another transmission that I am going to give ti a try on. I will find that post and add it to this later today.
Link.. https://www.yotatech.com/forums/f116...eekend-271102/
Here is the bearing.
http://cobratransmission.com/index.p...ts_id=50048040

Link.. https://www.yotatech.com/forums/f116...eekend-271102/
Here is the bearing.
http://cobratransmission.com/index.p...ts_id=50048040

Last edited by Terrys87; Mar 13, 2014 at 05:32 AM.
Mar 13, 2014 | 05:23 AM
#1793
Mistys clutch is out and it will be a little bit til I get it swapped out. While I have it out, I am going to replace the Main Input Shaft Bearing on it. Just got the part in I found a thread that says it can be done. I have another transmission that I am going to give ti a try on. I will find that post and add it to this later today.
Here is the bearing.
http://cobratransmission.com/index.p...ts_id=50048040

Here is the bearing.
http://cobratransmission.com/index.p...ts_id=50048040
Hey terry,
I would like to see how you take that tranny apart. I have a transmission that was originally in the 87 4Runner that I would like to work on that won't engage in 4th gear (most likely syncro, but one of the threads around who had a similar problem said that a tranny shop said it was the input bearing), I have another I got out of 89 pickup that is still up in Okeechobee I got for free that I want to bring home that maybe I can rebuild. I know most of the time those whining sounds are sometimes the input bearing.
By the way Corbra Transmission is about 30 minutes from me or 10 miles. I pass that place on the way to the airport all the time. I haven't purchased anything from them, but I've heard they are pretty good. I would say I can run over pickup anything you need, but by the time they charge me the 7% tax and shipping it to you for +/-$6 you would only save maybe $2 or $3 dollars.
Last edited by junk4u; Mar 13, 2014 at 05:24 AM.
Mar 13, 2014 | 06:44 AM
#1794
Thread Starter
Super Moderator
iTrader: (1)
Joined: Aug 2008
Posts: 11,787
Likes: 28
From: Anderson Missouri
Thanks Junk4u..I got a feeling if I can get the first one done right and figured out that I will be ordering several more from them. I hear this will fix alot of issues on these.
Last edited by Terrys87; Mar 13, 2014 at 08:04 AM.
Mar 13, 2014 | 06:45 AM
#1795
Thread Starter
Super Moderator
iTrader: (1)
Joined: Aug 2008
Posts: 11,787
Likes: 28
From: Anderson Missouri
I still have some updating to do and get past the last page I mention below, but I refer to my builds as well for information. Will make it easier for others to find as well. It is on my first post on the first page.
Page 1 #8 Tail Light Conversion kit.
Page 6 #105 Old and new style block differences.
............#110 Removing Input Shaft Bearing.
Page 7 #121 Picture of Fuse Cover in cab.
............#130 Circuit Opening Relay and Wiper Relay. https://www.yotatech.com/forums/f199...l#post51874993
Page 10 #187 Maplight Install. https://www.yotatech.com/forums/f199...l#post51882262
Page 12 #226 Ground Wire Trick for Tailgate. https://www.yotatech.com/forums/f199...l#post51886756
Page 13 #255 Clearing the Fuel Return Line. https://www.yotatech.com/forums/f199...l#post51891043
Page 15 #282 Injector Information page. https://www.yotatech.com/forums/f199...l#post51892835
Page 16 #312 Diagnostic Jumper/Timing. https://www.yotatech.com/forums/f199...l#post51895203
Page 18 #341 Fixing/Adding Standard Cab Rearview Mirror. https://www.yotatech.com/forums/f199...l#post51898805
...........#350 Clearing Blinker Lenses. https://www.yotatech.com/forums/f199...l#post51899553
Page 21 #403 Helpful Youtube Videos. https://www.yotatech.com/forums/f199...l#post51905483
Page 24 #477 Diff Breather Extention. https://www.yotatech.com/forums/f199...l#post51914655
Page 39 #762 How I do my Bumper End Caps. https://www.yotatech.com/forums/f199...l#post51990242
...........#767 Rebuilding Front Brake Calipers. https://www.yotatech.com/forums/f199...l#post51992699
...........#775 Replacing Outer Axle Seal. https://www.yotatech.com/forums/f199...l#post51993295
Page 40 #789 Starter and Alternator Rebuild Videos. https://www.yotatech.com/forums/f199...l#post51994693
Page 44 #874 Door Pocket Upgrade (Vinyl). https://www.yotatech.com/forums/f199...l#post52003782
Page 47 #930 Door Pocket Upgrade (Cloth). https://www.yotatech.com/forums/f199...l#post52025955
Page 53 #1054 and #1055 SR5 Guage info. https://www.yotatech.com/forums/f199...l#post52067799
Page 56 #1109 Removing Windo Crank.https://www.yotatech.com/forums/f199...l#post52075032
Page 59 #1167 Removing "L" Trims. https://www.yotatech.com/forums/f199...l#post52080046
Page 60 #1186 Cleaning Windshield Cowl. https://www.yotatech.com/forums/f199...l#post52081142
Page 61 #1205 Replacing Seat Cable. https://www.yotatech.com/forums/f199...l#post52082716
Page 63 #1248 85/86 Fuel Pump Bypass. https://www.yotatech.com/forums/f199...l#post52091744
Page 65 #1289 22r Fuel Filter https://www.yotatech.com/forums/f199...l#post52094698
Page 66 #1306 Various Links. https://www.yotatech.com/forums/f199...l#post52095625
Page 73 #1454 Making tach work on SR5 Guage. https://www.yotatech.com/forums/f199...l#post52117333
Page 77 #1522 Parts Page. https://www.yotatech.com/forums/f199...l#post52117333
Page 78 #1557 Injectors differences. https://www.yotatech.com/forums/f199...l#post52136639
Page 82 #1624 Cleaning Intake Assembly. https://www.yotatech.com/forums/f199...l#post52147101
Last edited by Terrys87; Mar 14, 2014 at 03:51 AM.
Mar 13, 2014 | 07:49 AM
#1797
Just checking in... Check! Hahahaha. I actually I'm definitely going to call on you if that's possible the next 24 hours. Can you let me know when is a good time?
Thanks brother!
Thanks brother!
Mar 13, 2014 | 08:02 AM
#1798
Thread Starter
Super Moderator
iTrader: (1)
Joined: Aug 2008
Posts: 11,787
Likes: 28
From: Anderson Missouri
You can call now if you want. I am not sure which number you want me to call but I am just sitting here waiting for it to warm up. Hoping we get some California weather here in a few hours and might get to do some work later. Wahoo!!!
Last edited by Terrys87; Mar 13, 2014 at 08:06 AM.
Mar 13, 2014 | 12:41 PM
#1799


