
Terrys87 86 4Runner with a 2nd Chance
 Mar 13, 2014 | 05:08 PM
#1801
Those links are awesome, they should make a sticky of those links here so anyone visiting could see them. So if the ADMIN reads this it would be a plus for this site.
Thanks agin they are awesome.
Thanks agin they are awesome.
Mar 14, 2014 | 03:53 PM
#1802
Thread Starter
Super Moderator
iTrader: (1)
Joined: Aug 2008
Posts: 11,787
Likes: 28
From: Anderson Missouri
Thanks Gizler00 and Junk4u... I know there is a ton of information in these builds and this is about the only way I know where to find it more easily. I did this on my 88 Runner build a couple of years ago. Things are listed on the first page for it as well. The post# stay the same. Sometimes the page number will change as I go back and add more information to it as I find it. I have spent alot of time editing my previous post.
I wish there was a thread like this for 3rd Gen Runners. I have somethings that I will need to do to mine and it is slow going when I have to research and trial and error. I plan on starting a thread for 3rd Gens later this summer. Something like I have done in my 1st gen trucks would make it so much quicker.
I wish there was a thread like this for 3rd Gen Runners. I have somethings that I will need to do to mine and it is slow going when I have to research and trial and error. I plan on starting a thread for 3rd Gens later this summer. Something like I have done in my 1st gen trucks would make it so much quicker.
Mar 14, 2014 | 04:09 PM
#1803
Thread Starter
Super Moderator
iTrader: (1)
Joined: Aug 2008
Posts: 11,787
Likes: 28
From: Anderson Missouri
We got some warmer weather the past few days so I took adantage of it. Removing some more wire from the PO on the 86 extra cab and starting to get the carburator removed. If you ever want an easier carb to work on for these trucks, go with a Webber. So much less vacuum lines to deal with. Should start getting more done to it here shortly.
The dash project is still in the works, I hadnt forgotten about it. Maybe I will have some news on it in the next few days as well.
I finally got the brake pads and rotors on the 3rd gen. The rotors kept warping which is a known issue on these trucks. I would get them turned and shortly it would start again. I kept putting it off until the weather got nicer. No more shaky braking for me. I did not do the Tundra upgrade as I am waiting for the yards to dry out and just replacing the rotors and pads was a quicker fix. Hope I dont regret that later.
I took my 86 Runner out and I guess from the extreme cold to a fairly hot day, I sprung a leak at the hose connection. Got it fixed. Not sure why my antifreeze slushed up this past winter as this is what I had in it. Maybe the stuff just isnt as good as it used to be.
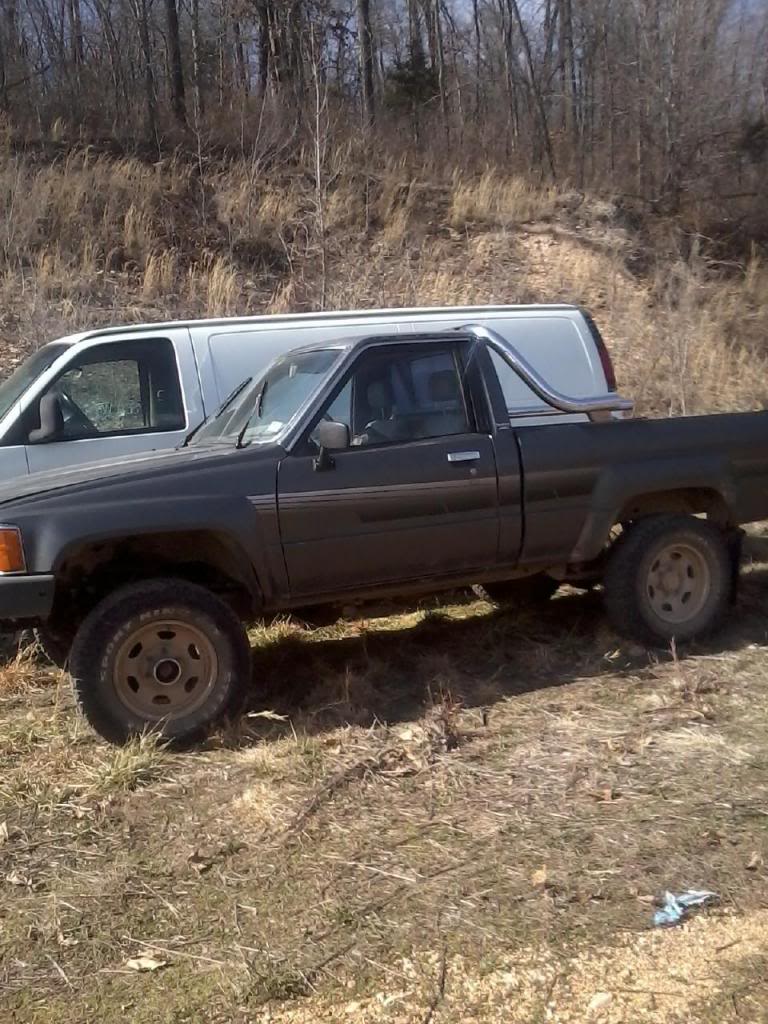
Found this truck today. The guy wants $1200 for it. Looks to be really solid. Needs motor. I have a good used motor or the rebuilt motor out of my 85. If it is still around this summer I might look at it for a flip. Was surprised at how rust free the bed was.

Last edited by Terrys87; Mar 14, 2014 at 04:46 PM.
Mar 15, 2014 | 06:15 AM
#1805
At one point I was looking at a toyota pickup like the one you show. I've seen them on CL for about the same price with motor, but the one you are looking at is probably in better condition. What I've been eyeing for some time is a sunraider camper. Those are the best made of fiberglass. If I ever get one, I would maybe try and convert to a 4x4 rather than the smaller ones they used to make them.
Here's what I'm talking about a 4x4 sunraider:http://www.toyotamotorhomes.com/4x4/ken4x4/IMG_3065.JPG
Here's what I'm talking about a 4x4 sunraider:http://www.toyotamotorhomes.com/4x4/ken4x4/IMG_3065.JPG
Last edited by junk4u; Mar 15, 2014 at 06:18 AM.
Mar 15, 2014 | 06:32 AM
#1806
Registered User
Joined: Dec 2008
Posts: 2,391
Likes: 1
From: tecumseh nebraska
I would pay $1200 for it if the other side looks as good as the drivers. and assuming the frames ok, hey Terry a guy told me that you can stagger the fuel tank to the drivers side one bolt hole on front and back and create a gap for debris to drop out where the frame is against the fuel tank.
Mar 15, 2014 | 06:43 AM
#1807
Thread Starter
Super Moderator
iTrader: (1)
Joined: Aug 2008
Posts: 11,787
Likes: 28
From: Anderson Missouri
Hello Cyberhorn..The dash is coming along. I am also going to try and see if I can just apply just the resin to another bad dash pad I have. I am ready to get shocks on mine soon.
Hello junk4u...That is the first extra cab camper I have seen. Looks nice. I have seen several Toyota Campers around here and even a couple of pre 79 campers. I like the looks of that one. Great post!!!
Hello kornhuskerwizard..That is something I have never thought of staggering the fuel tanks. That is one reason the get so much debris on the tank and frame. The truck looks just as good on the other side as well. If I wasnt so tall, I would want it for myself. It seems to be a nice little truck. If someone was intrested, I would look it over better and see if ther is any other problems with it. I have an excellent frame just incase something like that came up.
Mar 15, 2014 | 06:53 AM
#1808
Thread Starter
Super Moderator
iTrader: (1)
Joined: Aug 2008
Posts: 11,787
Likes: 28
From: Anderson Missouri
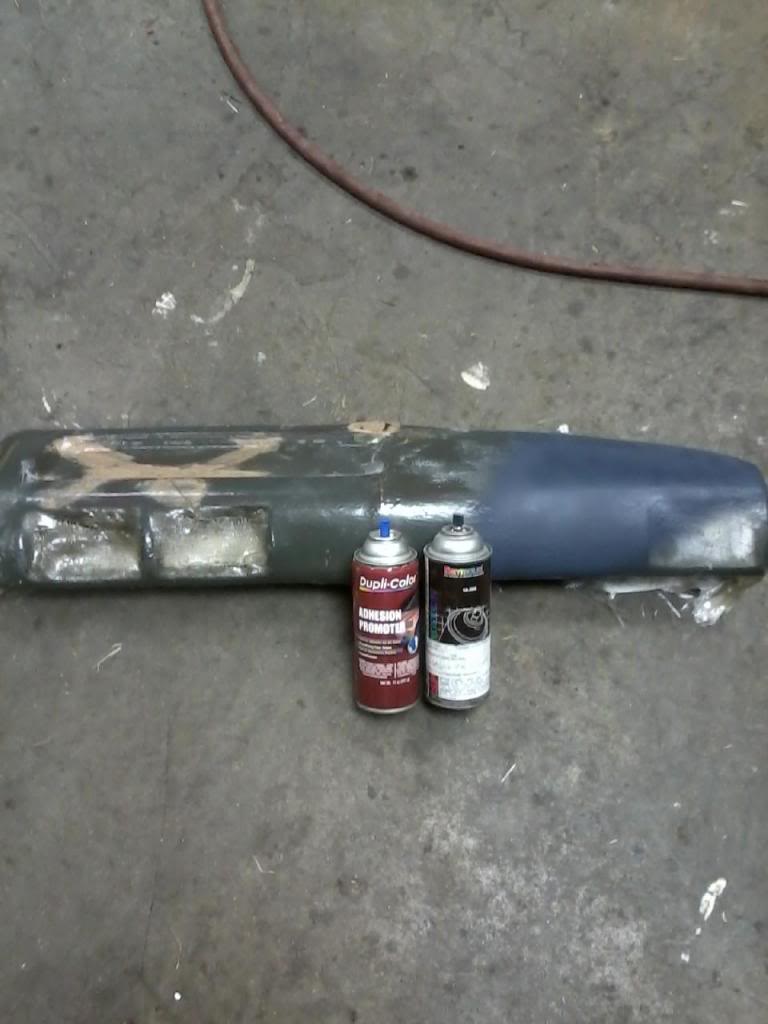
I worked on the dash pad some more. I put another coat of resin on it and haved used about half of a can. I then took a palm sander with 320 grit sandpaper and took out some runs in it. I then put some Adhesion Promoter on it and did a quick test. I think with some effort it will look ok. I also have a 2 other bad pads that I want to see just what just applying resin to would do.
For some reason my brakes get applied when I am at higher speeds. I eventually want to do the V6 upgrade but have not made it to the yards yet. A friend of mine gave me a brake booster so I cleaned it up and will install it later today and see if that fixes my problem.
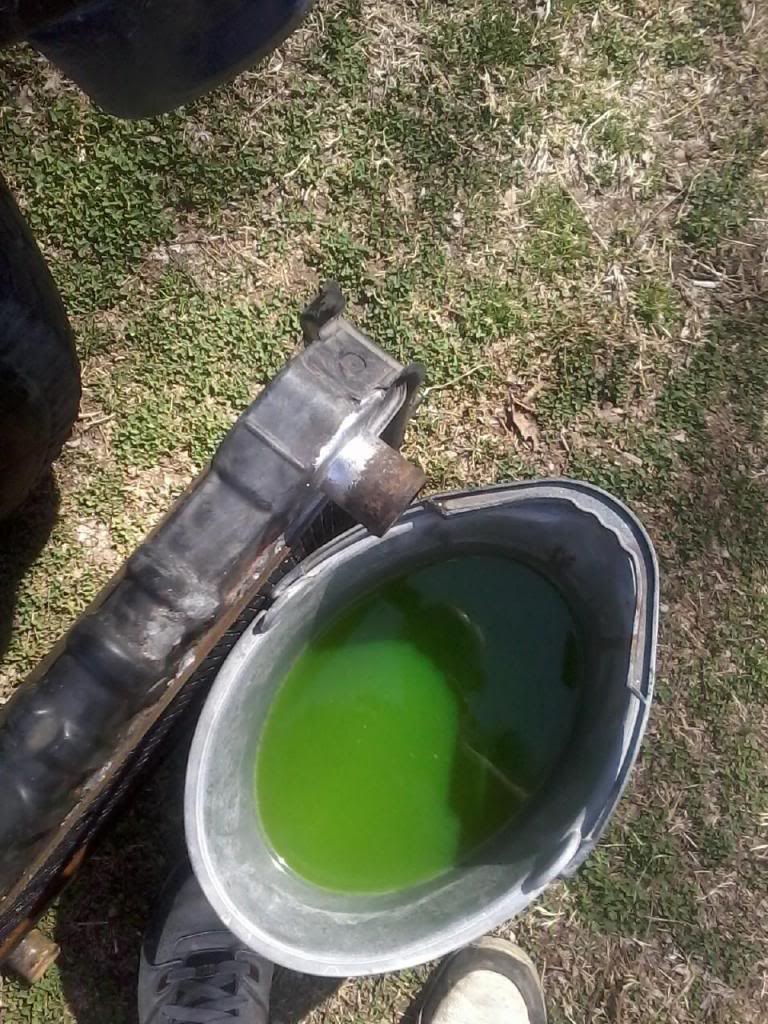
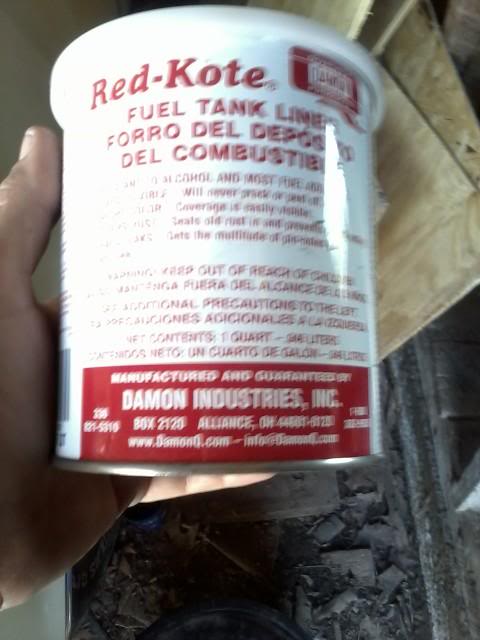
I also have been cleaning the tank to the 86 extra cab I have been working on. It tank was rusty. I soaked it in white vinegar and then sprayed it with high pressure water and got all of the trash out of it. I will dry it out with a hair dryer and then coat it with Red Kote.
A side note. I have cleaned the tank on my 85 as well. I still need coat my tank. But I have finally learned do NOT pull the bolt out of the bottom of the tank. I did on a 2 wheel drive tank one time and it messed up the threads. I cleaned my tank and looking inside the tank I could see my threads were clean. (Before cleaning, threads were built up with rust)
This time I thought it would be okay to pull the bolt and now my 85 is leaking fuel. Something else I get to deal with later. I will retap it and then seal it up and hopefully that will fix it.
Starting to get some things done the past few days. Will get out later and install my booster and see if I can actually drive the way I would like to.

For some reason my brakes get applied when I am at higher speeds. I eventually want to do the V6 upgrade but have not made it to the yards yet. A friend of mine gave me a brake booster so I cleaned it up and will install it later today and see if that fixes my problem.
I also have been cleaning the tank to the 86 extra cab I have been working on. It tank was rusty. I soaked it in white vinegar and then sprayed it with high pressure water and got all of the trash out of it. I will dry it out with a hair dryer and then coat it with Red Kote.
A side note. I have cleaned the tank on my 85 as well. I still need coat my tank. But I have finally learned do NOT pull the bolt out of the bottom of the tank. I did on a 2 wheel drive tank one time and it messed up the threads. I cleaned my tank and looking inside the tank I could see my threads were clean. (Before cleaning, threads were built up with rust)
This time I thought it would be okay to pull the bolt and now my 85 is leaking fuel. Something else I get to deal with later. I will retap it and then seal it up and hopefully that will fix it.
Starting to get some things done the past few days. Will get out later and install my booster and see if I can actually drive the way I would like to.
 Mar 15, 2014 | 01:16 PM
#1810
Thread Starter
Super Moderator
iTrader: (1)
Joined: Aug 2008
Posts: 11,787
Likes: 28
From: Anderson Missouri
Hello kornhuskerwizard.. You can get it at Oriellys for $20. You can seal over rust with it, I just like to try and get it as clean as possible. The vinegar will get it shiney if you work it enough. After cleaning it with vinegar, I rinse it out with water. You may get some flash rust, just a light coating that you may see in a bath tub if you dont coat is soon enough.
After I rinse it with a water hose, I put a hair dryer in the tank to dry it well. When the tank is dry, you will still get rust dust. It literally looks like cooking flour but is red. I blow that out with a high pressure air hose. I then coat it with Red Kote to seal up any dust and rust on the roof of the tank that I may have missed. It also will seal up pinholes up to a certain size that it mentions on the can. Just make sure the float assembly and pump assembly are out of it when you use it. One can will do 2 or 3 tanks.

After I rinse it with a water hose, I put a hair dryer in the tank to dry it well. When the tank is dry, you will still get rust dust. It literally looks like cooking flour but is red. I blow that out with a high pressure air hose. I then coat it with Red Kote to seal up any dust and rust on the roof of the tank that I may have missed. It also will seal up pinholes up to a certain size that it mentions on the can. Just make sure the float assembly and pump assembly are out of it when you use it. One can will do 2 or 3 tanks.
Last edited by Terrys87; Mar 15, 2014 at 01:17 PM.
Mar 15, 2014 | 10:33 PM
#1812
Thread Starter
Super Moderator
iTrader: (1)
Joined: Aug 2008
Posts: 11,787
Likes: 28
From: Anderson Missouri
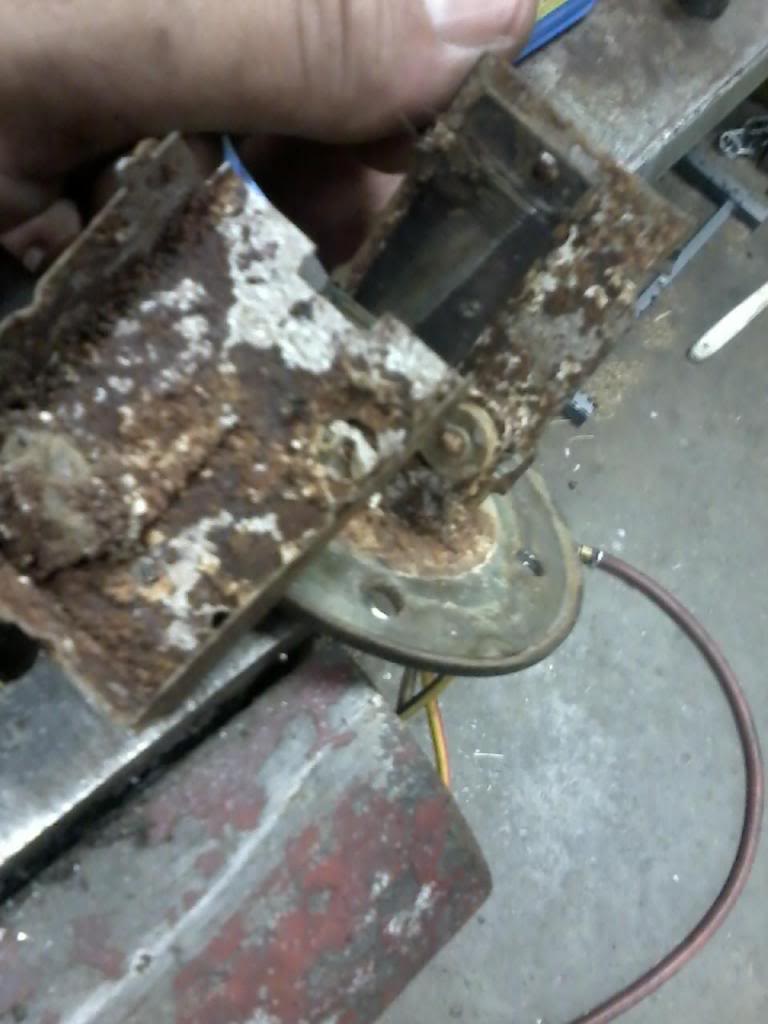
Hello kornhuskerwizard...I seen the fuel pump assembly that you posted on your build. Even though I haven't seen the tank you are working on and as bad as the pump assembly you showed. You will have veins of rust like blood veins in the tank. The "J" line on the pump assembly that is the Return line on the assembly will be clogged and the Return line on the frame will most likely be clogged as well.
The Fuel Rail will have some black nasty stuff in it as well. I try to mention in each of my threads just how bad the fuel system gets but it is scattered on each of my builds. I will try and combine it all in your post and add it to one of my links. I have seen it a time or two. Do NOT use a fuel system cleaner as not only the rust issue that you are dealing with, but you have 20 years of varnish built up and it will get past the fuel filter and into the injectors and then you have another big mess on your hands. Ask Jason about his experience with that. Something we are trying to work out to get together and get his mess fixed. I learned that one the hard way as well.
Something I am not showing in the information below is to use a gear oil bottle cap as a funnel and where you see me using an air hose to clear the line, before I cleared the line, I filled the line up with a rust dissolver and let it soak it way thru the line. It took a few days for it to work it way thru and I had to keep adding rust dissolver. The way I first checked it was to take a rubber hose and extended it to see if I could blow thru the lines with the pressure of my lungs, most likely you wont be able to. Once it is cleared you can.
If you just take an air hose to it, you have a good chance of compressing all the rust and stuff into a real tight blockage in my opinion. Bet you are thinking "Gosh Terry, You just made my day" I helped two different people last month thru PMs and they experienced the same thing. Originally thinking they just had fuel pump issues.
Once you get the entire fuel system cleaned then you can use cleaners in it. Any time a rusty tank issue comes up on the main page, I try to answer it and usually it turns into a bigger job then expected, but it isn't so bad after a while. I would allow 4-7 days to do the complete job just to allow soaking time on lines and tank.
Here is what I have on my 88Runner build so far.
I got a tank out of my parts truck and it was loaded with rust and so was the pump. I surprised the truck even ran. Filter was all plugged up. I spent quite a bit of time cleaning the tank out. First I drained it and tapped the outside with a rubber hammer to break the thick rust loose. Put a little water in to avoid sparks and put some chain and rocked it back and forth to get more loose and then I let it soak with some vinegar in it. I found this on the web. It actually came pretty clean. Have heard of using The Works toilet bowl cleaner from K Mart.
http://www.mopedarmy.com/wiki/Removi...rom_a_gas_tank Several products you can use.
http://www.ehow.com/how_4540637_remo...-gas-tank.html
http://www.vjmog.com/ftopict-3687.html
I have a friend that works in a parts store and he suggested Red Kote to coat the tank. I have coated it and am waiting for my new fuel pump to come in. I ready to get the tank in and see if this thing fires up.
I dont mess with tanks in the summer. The fumes are what are dangerous.
I bought the fuel pump off of ebay from "carpartswholesale" for $27.85 plus cheap shipping. Parts store wanted $150
This "J" line likes to get clogged. Check all of them, but most likely this one will be clogged.
New $25 dollar fuel pump. http://www.ebay.com/itm/New-Fuel-Pump-Gas-Truck-4-Runner-Toyota-Celica-89-88-87-86-Camry-91-90-85-MR2-/230691053648?pt=Motors_Car_Truck_Parts_Accessories&vxp=mtr&hash=item35b6422050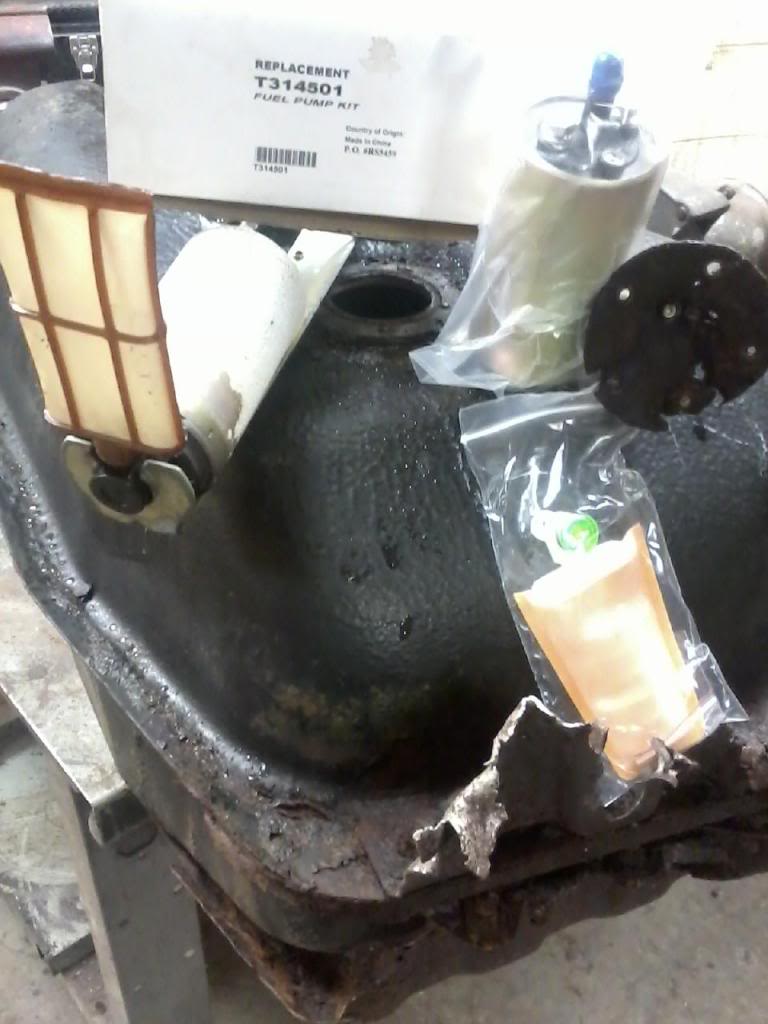
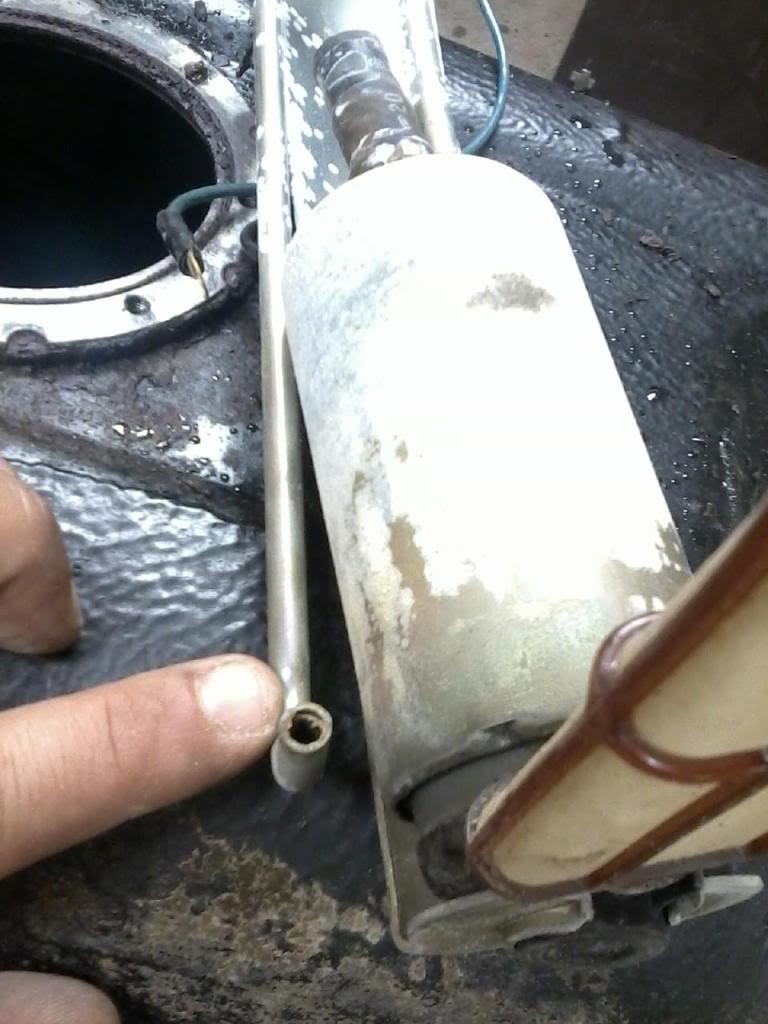
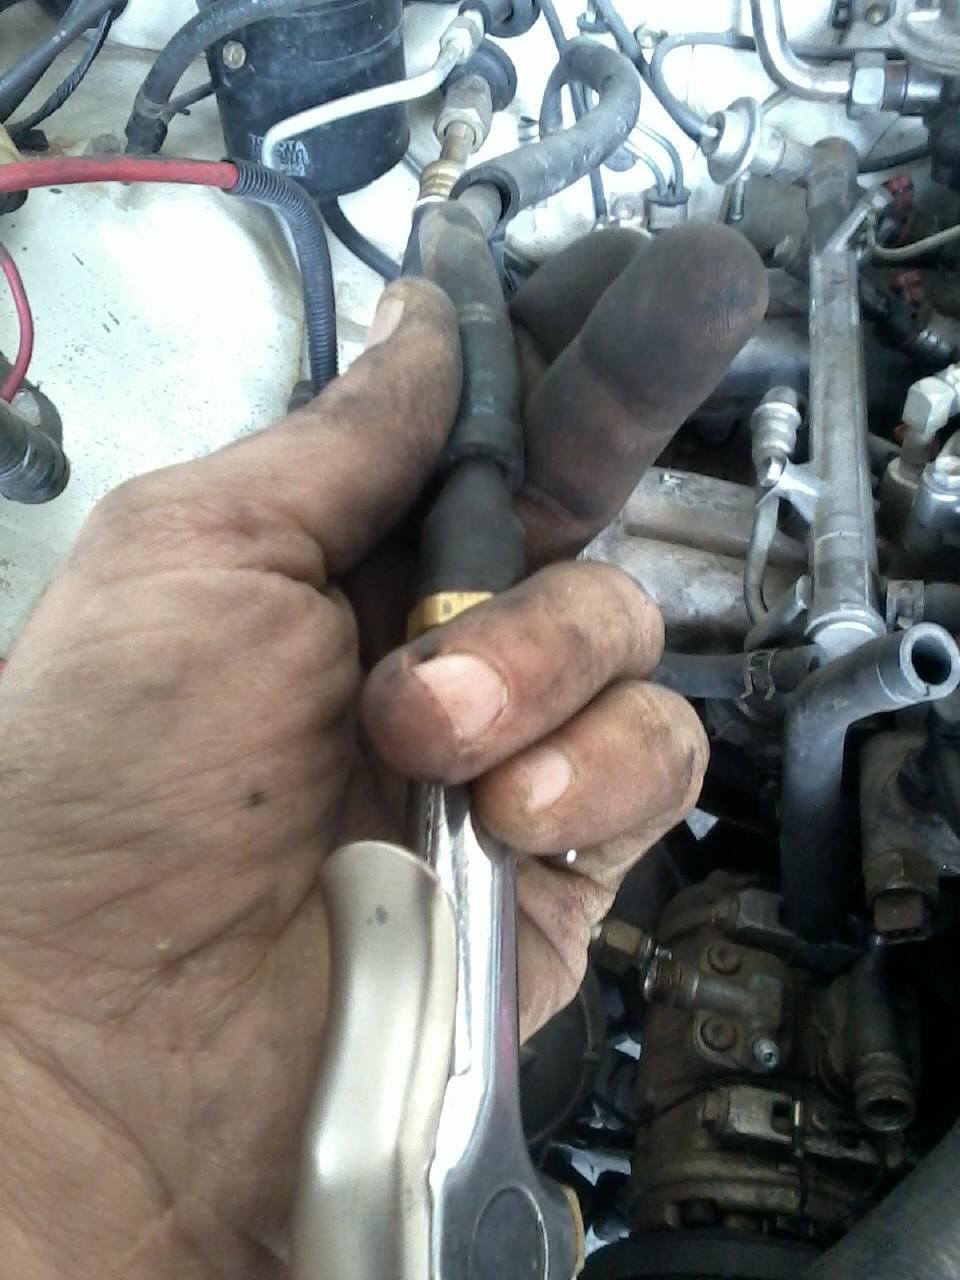
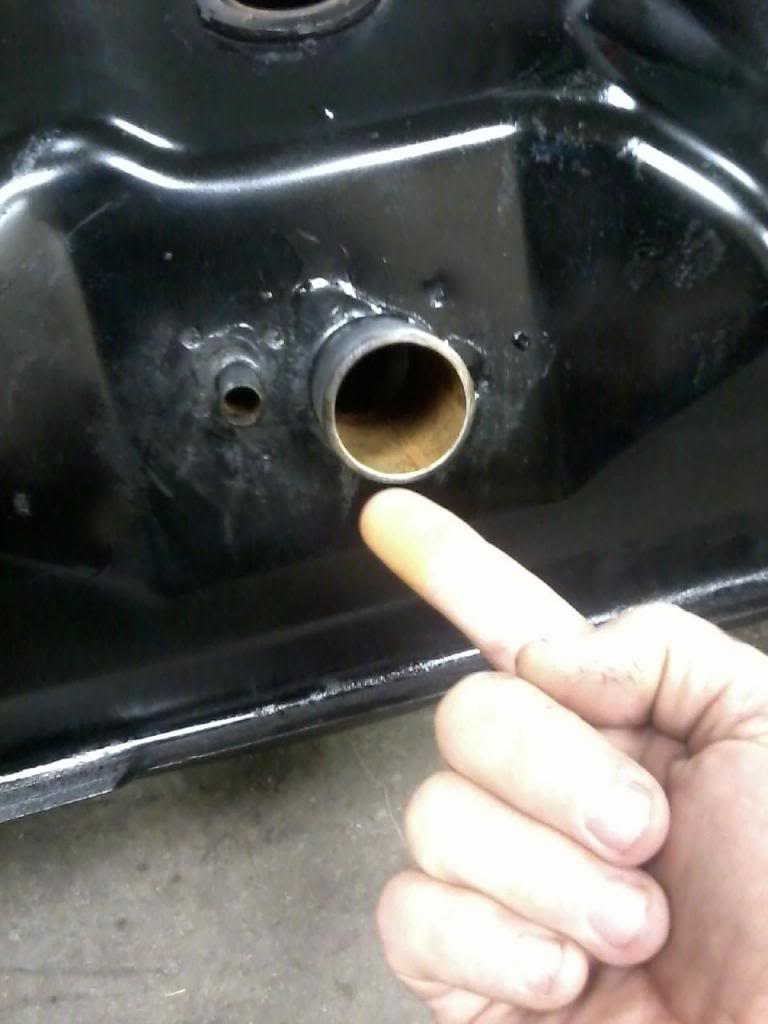
Here I am checking to see if one of the fuel return lines is clear. I pop the gas cap off and you will hear air or bubbles in the tank. I have seen these return lines clogged.
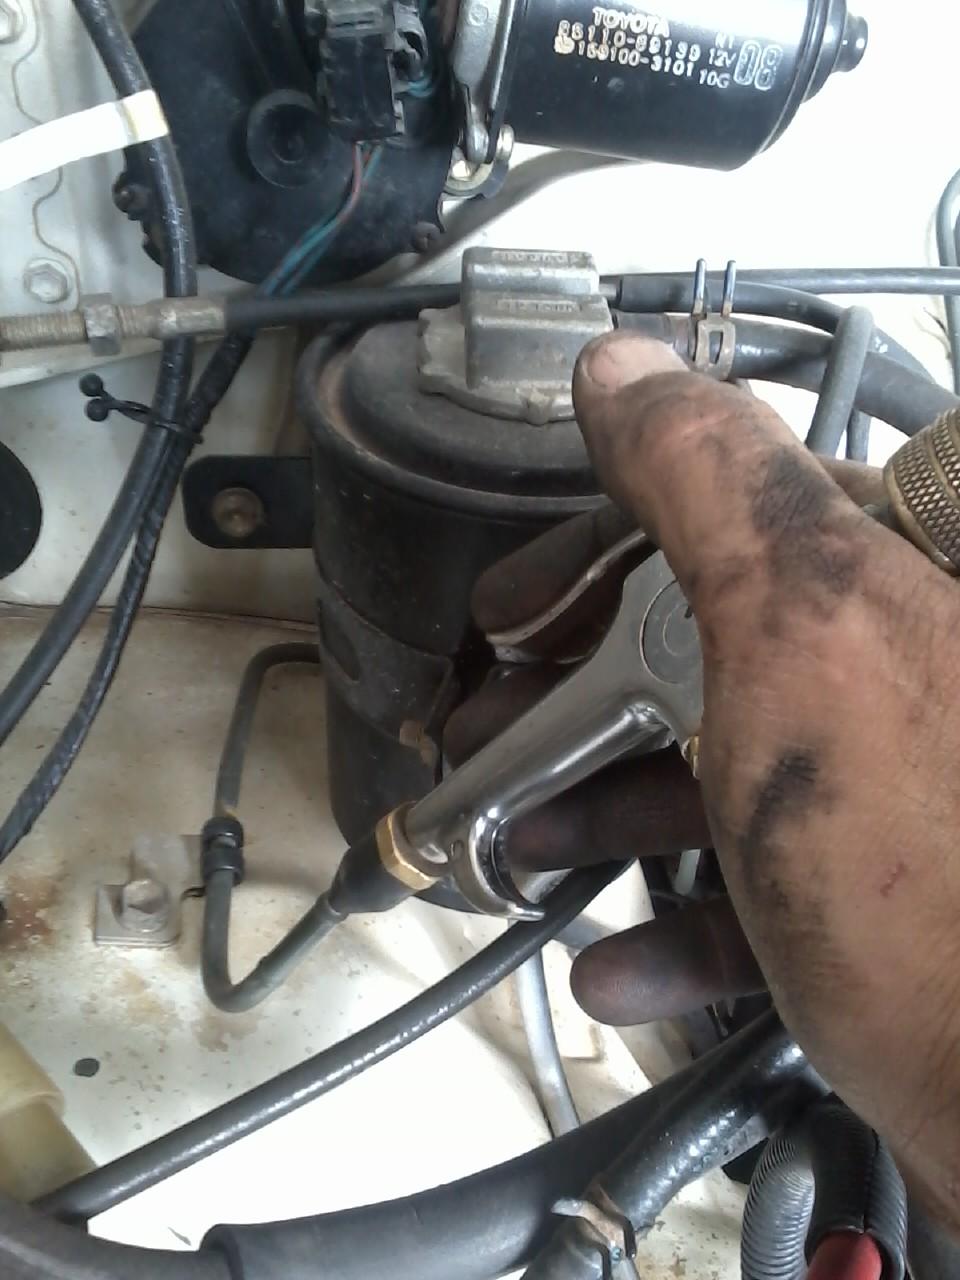
Checking the other line.
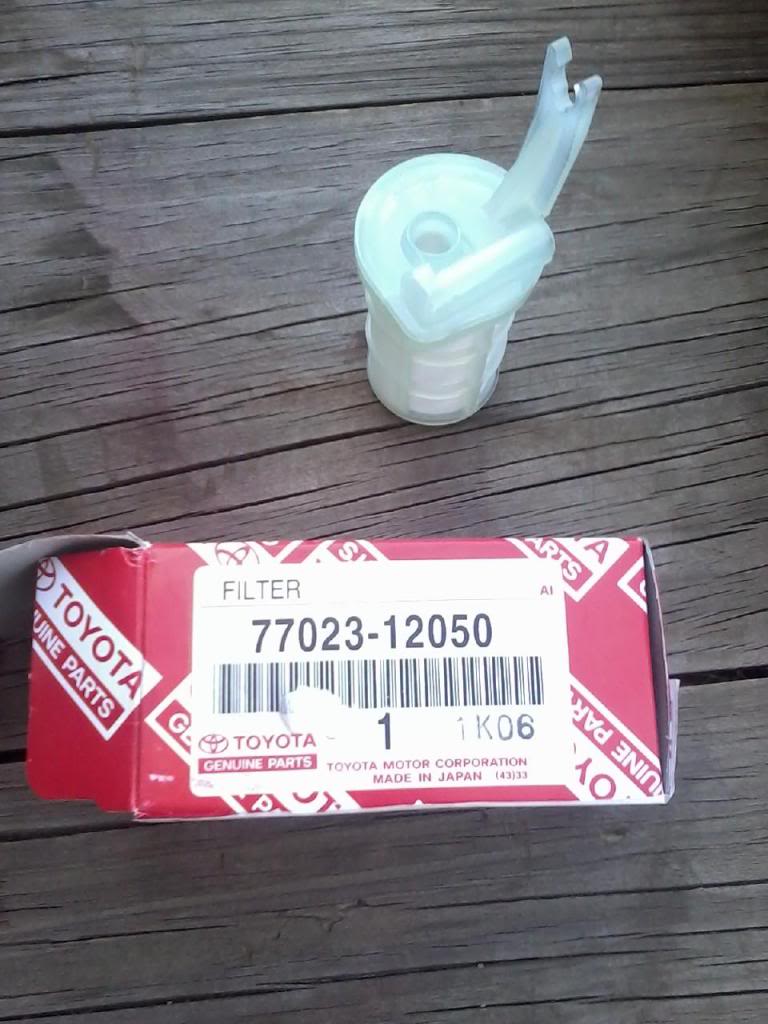
Part number for a new intank filter is #77023-12050. On ebay it is called a TOYOTA FACTORY NIB FUEL FILTER SUCTION TUBE DIESEL. It was selling for $4.50 when I finally found it. I paid $15 at Toyota. (83 pg 8) This filter is for carburated trucks.
External 22r Filter.
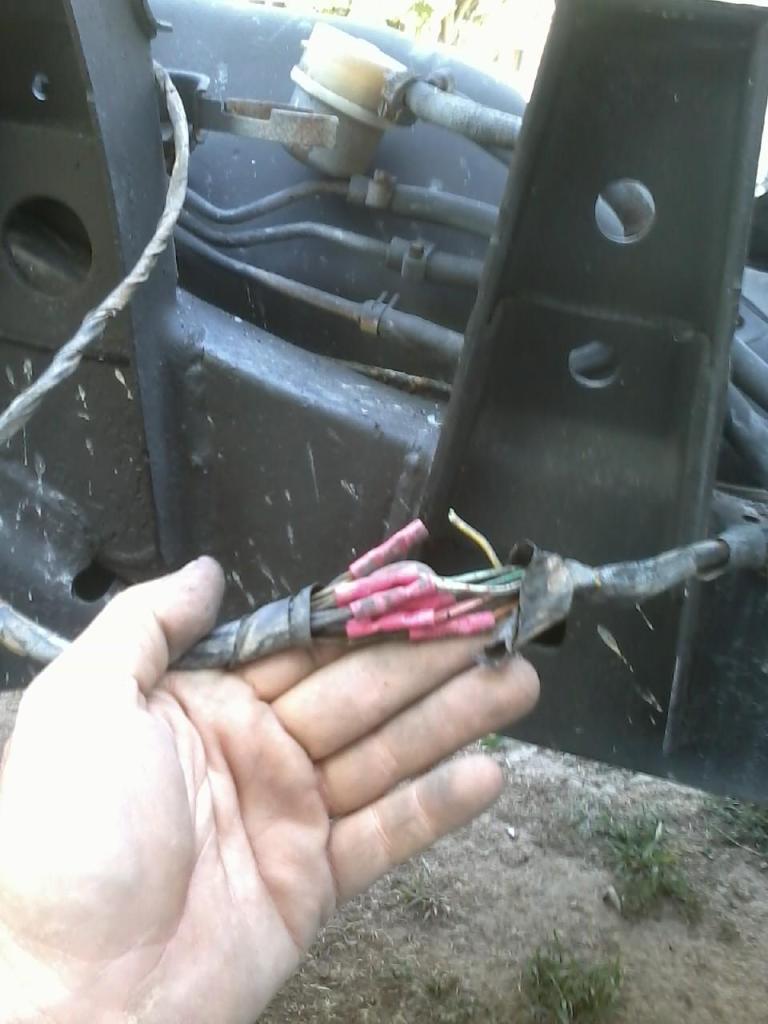
I knew I had a picture of the factory filter somewhere. Ignore the wonderful wiring hack job.
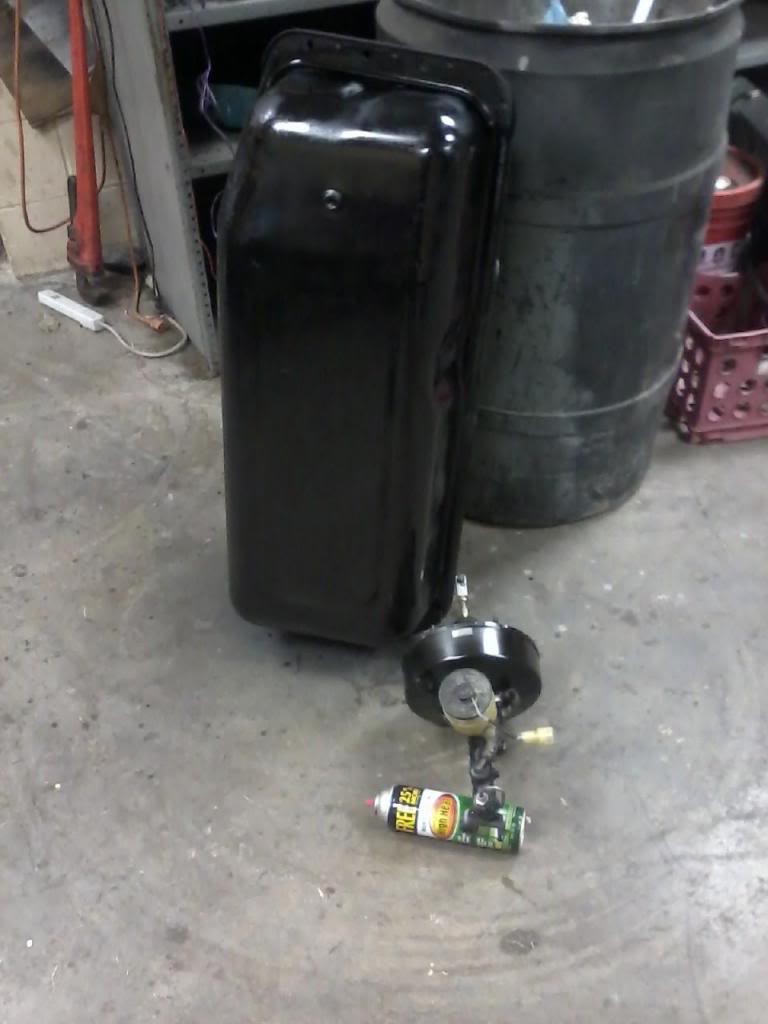
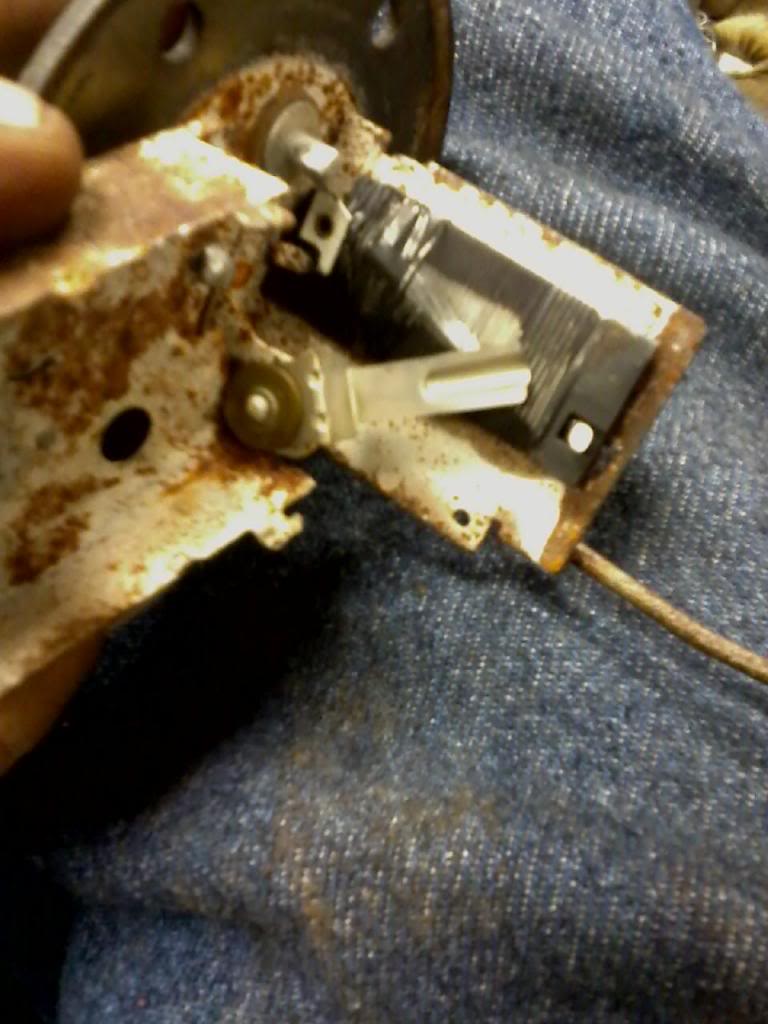
I took the assembly apart and cleaned the wiper that connects to the coil. The black coil by thumb just needed the corrosion cleaned off of the little wiper.
Here is a better view of the wiper that slides on the coil. It had some broken strands so is no good now. A spare that I had.
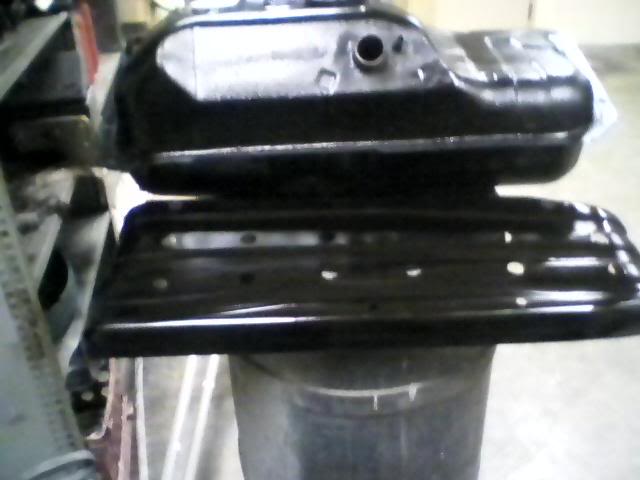
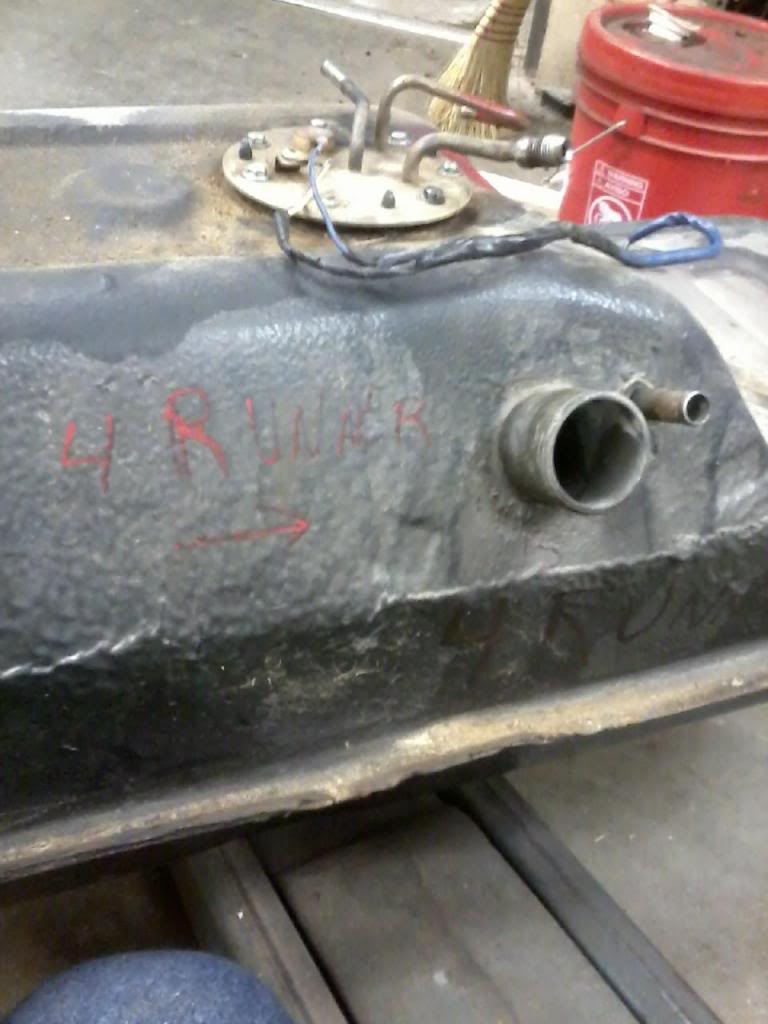
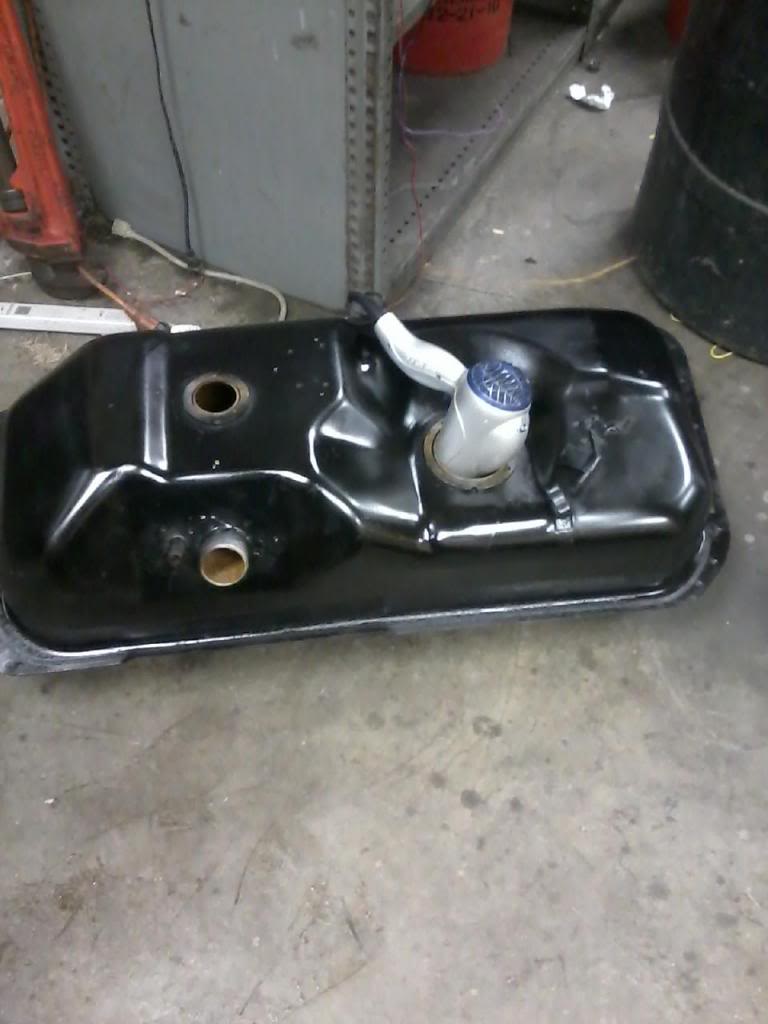
Here is a 4Runner tank. Mostly a reference for me. The big and small pipes are opposite of each other on trucks and 4Runners.
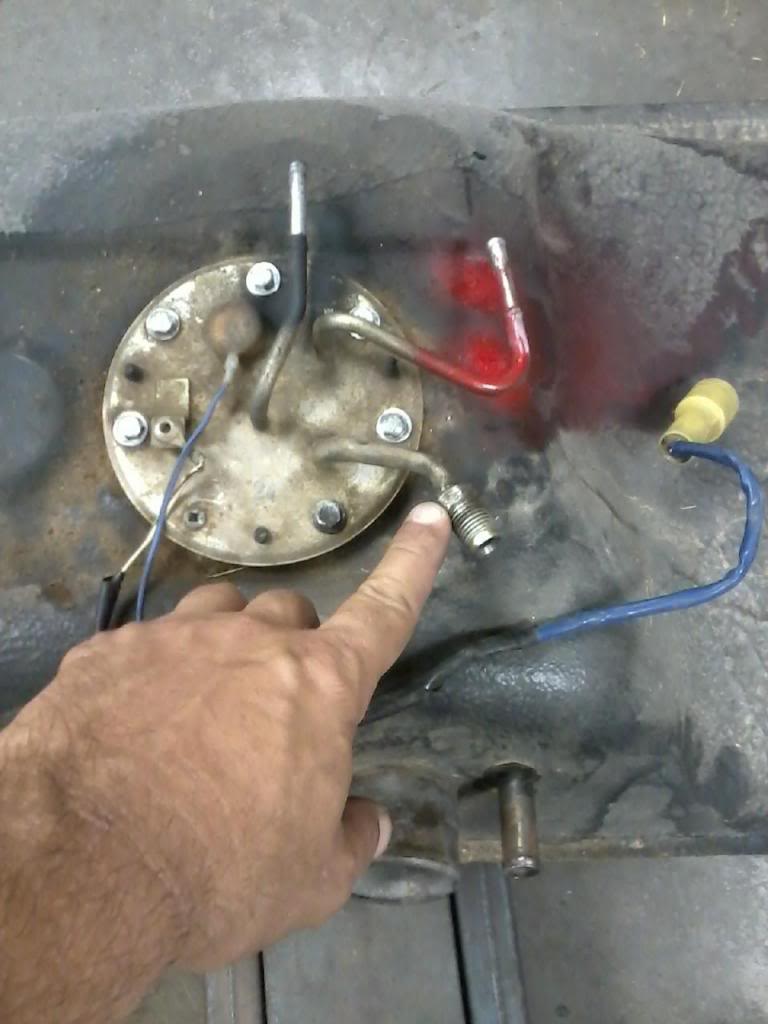
Another reference for me. The 14mm nut is stationary and the 19mm is the one that gets turned. Will add this to my fuel tank page for future reference for me.
The Fuel Rail will have some black nasty stuff in it as well. I try to mention in each of my threads just how bad the fuel system gets but it is scattered on each of my builds. I will try and combine it all in your post and add it to one of my links. I have seen it a time or two. Do NOT use a fuel system cleaner as not only the rust issue that you are dealing with, but you have 20 years of varnish built up and it will get past the fuel filter and into the injectors and then you have another big mess on your hands. Ask Jason about his experience with that. Something we are trying to work out to get together and get his mess fixed. I learned that one the hard way as well.
Something I am not showing in the information below is to use a gear oil bottle cap as a funnel and where you see me using an air hose to clear the line, before I cleared the line, I filled the line up with a rust dissolver and let it soak it way thru the line. It took a few days for it to work it way thru and I had to keep adding rust dissolver. The way I first checked it was to take a rubber hose and extended it to see if I could blow thru the lines with the pressure of my lungs, most likely you wont be able to. Once it is cleared you can.
If you just take an air hose to it, you have a good chance of compressing all the rust and stuff into a real tight blockage in my opinion. Bet you are thinking "Gosh Terry, You just made my day" I helped two different people last month thru PMs and they experienced the same thing. Originally thinking they just had fuel pump issues.
Once you get the entire fuel system cleaned then you can use cleaners in it. Any time a rusty tank issue comes up on the main page, I try to answer it and usually it turns into a bigger job then expected, but it isn't so bad after a while. I would allow 4-7 days to do the complete job just to allow soaking time on lines and tank.
Here is what I have on my 88Runner build so far.
I got a tank out of my parts truck and it was loaded with rust and so was the pump. I surprised the truck even ran. Filter was all plugged up. I spent quite a bit of time cleaning the tank out. First I drained it and tapped the outside with a rubber hammer to break the thick rust loose. Put a little water in to avoid sparks and put some chain and rocked it back and forth to get more loose and then I let it soak with some vinegar in it. I found this on the web. It actually came pretty clean. Have heard of using The Works toilet bowl cleaner from K Mart.
http://www.mopedarmy.com/wiki/Removi...rom_a_gas_tank Several products you can use.
http://www.ehow.com/how_4540637_remo...-gas-tank.html
http://www.vjmog.com/ftopict-3687.html
I have a friend that works in a parts store and he suggested Red Kote to coat the tank. I have coated it and am waiting for my new fuel pump to come in. I ready to get the tank in and see if this thing fires up.
I dont mess with tanks in the summer. The fumes are what are dangerous.
I bought the fuel pump off of ebay from "carpartswholesale" for $27.85 plus cheap shipping. Parts store wanted $150
This "J" line likes to get clogged. Check all of them, but most likely this one will be clogged.
New $25 dollar fuel pump. http://www.ebay.com/itm/New-Fuel-Pump-Gas-Truck-4-Runner-Toyota-Celica-89-88-87-86-Camry-91-90-85-MR2-/230691053648?pt=Motors_Car_Truck_Parts_Accessories&vxp=mtr&hash=item35b6422050
Here I am checking to see if one of the fuel return lines is clear. I pop the gas cap off and you will hear air or bubbles in the tank. I have seen these return lines clogged.
Checking the other line.
Part number for a new intank filter is #77023-12050. On ebay it is called a TOYOTA FACTORY NIB FUEL FILTER SUCTION TUBE DIESEL. It was selling for $4.50 when I finally found it. I paid $15 at Toyota. (83 pg 8) This filter is for carburated trucks.
External 22r Filter.
I knew I had a picture of the factory filter somewhere. Ignore the wonderful wiring hack job.
I took the assembly apart and cleaned the wiper that connects to the coil. The black coil by thumb just needed the corrosion cleaned off of the little wiper.

Here is a better view of the wiper that slides on the coil. It had some broken strands so is no good now. A spare that I had.

Here is a 4Runner tank. Mostly a reference for me. The big and small pipes are opposite of each other on trucks and 4Runners.

Another reference for me. The 14mm nut is stationary and the 19mm is the one that gets turned. Will add this to my fuel tank page for future reference for me.

Last edited by Terrys87; Jun 13, 2014 at 01:40 AM.
Mar 15, 2014 | 11:46 PM
#1813
Thread Starter
Super Moderator
iTrader: (1)
Joined: Aug 2008
Posts: 11,787
Likes: 28
From: Anderson Missouri
Here I have the tank getting dried out with a hair dryer. I let it run for a few hours or until it is dry. Helps to push out some dust. I have it drying outside. It should be safe now, but still a small chance that maybe some gas fumes could ignite. I don't smell or see any fumes, but like to be on the safe side.
The Flash Rust I was talking about. Nothing to be concerned about.

The Flash Rust I was talking about. Nothing to be concerned about.

Last edited by Terrys87; Mar 15, 2014 at 11:48 PM.
Mar 15, 2014 | 11:51 PM
#1814
Thread Starter
Super Moderator
iTrader: (1)
Joined: Aug 2008
Posts: 11,787
Likes: 28
From: Anderson Missouri
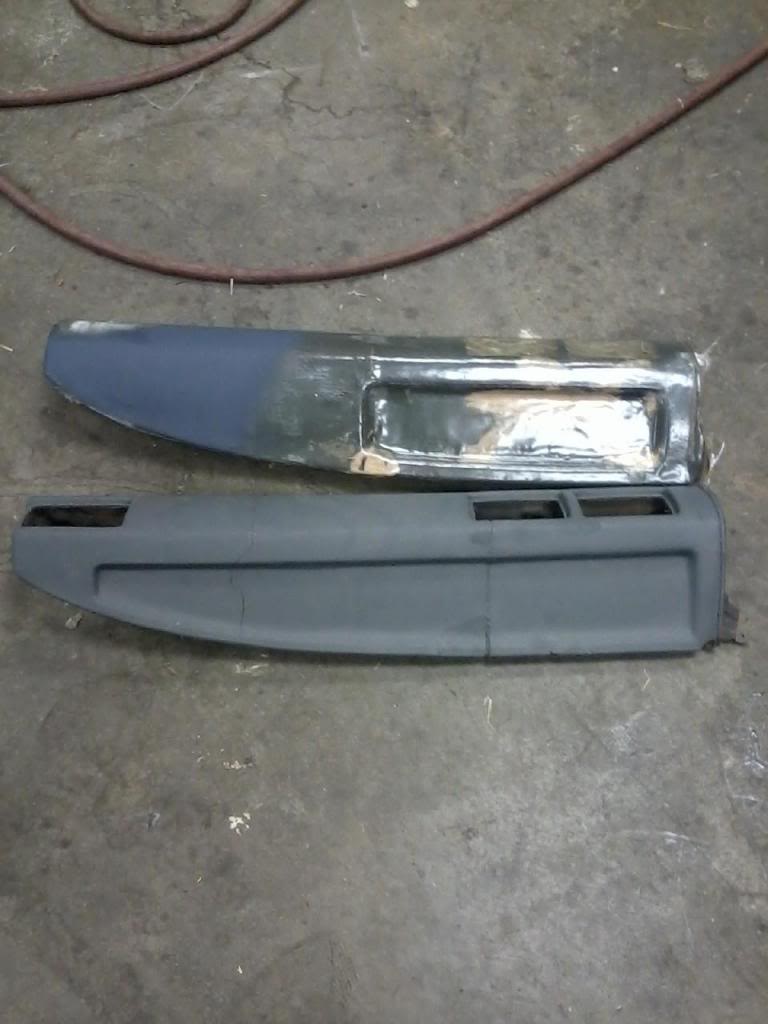
Here is Victim #2. I am just going to coat it with resin. Notice the difference in dash pockets. Some are half length and some are full length. As of now I already like this way better as it fills in hairline cracks and is easier to do. I wont know the results till I get both done.
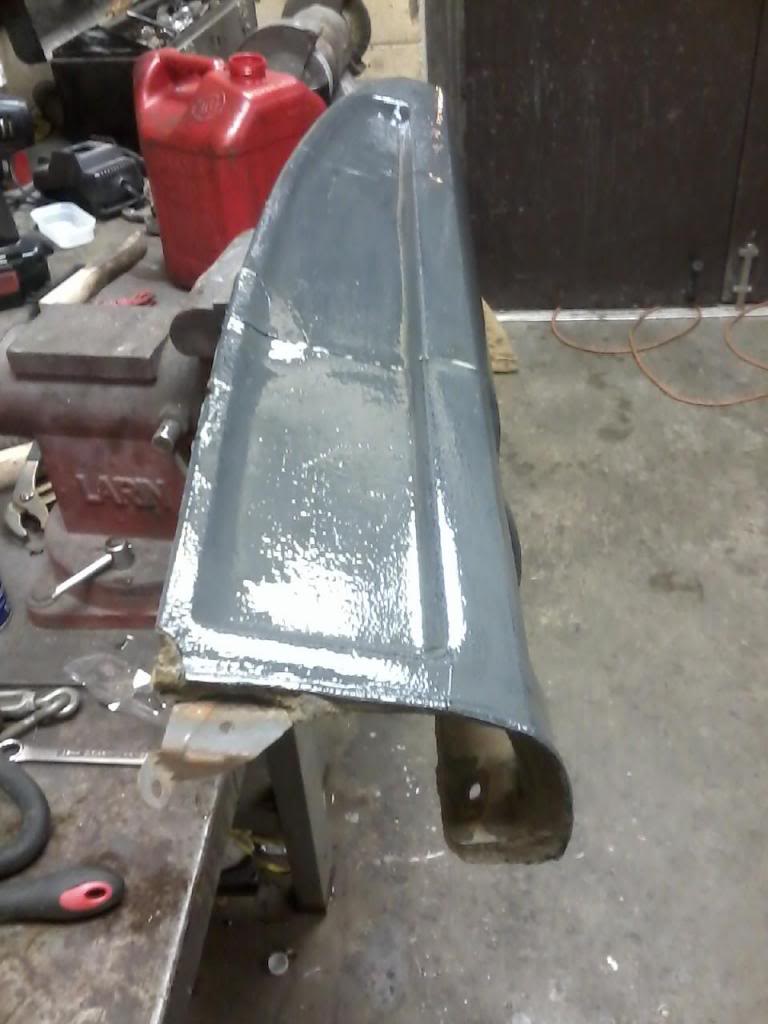
I think this will work. I may need to do a patch job in the center. Will wait for it to dry to see.

I think this will work. I may need to do a patch job in the center. Will wait for it to dry to see.
 Mar 16, 2014 | 12:00 AM
#1815
Thread Starter
Super Moderator
iTrader: (1)
Joined: Aug 2008
Posts: 11,787
Likes: 28
From: Anderson Missouri
Getting ready for Spring and Summer. I have done this in the past where I made a BBQ pit out of cinder blocks and cooked half a hog. Great Stuff!!! I make it 4 blocks long and 4 blocks high and 3 blocks wide. Got the idea from Cuban-Christmas.com They are showing how they made their pit anymore and here is the closest I could find.
Run some rebar across the top and cover with foil. Get the charcoal going in the center and when it is burning put it in the corners of the pit.

Jason was asking about the hot tub. Thought I would some information I have learned along the way. The black bar across the top is the Cradle. Makes covering and uncover so nice.
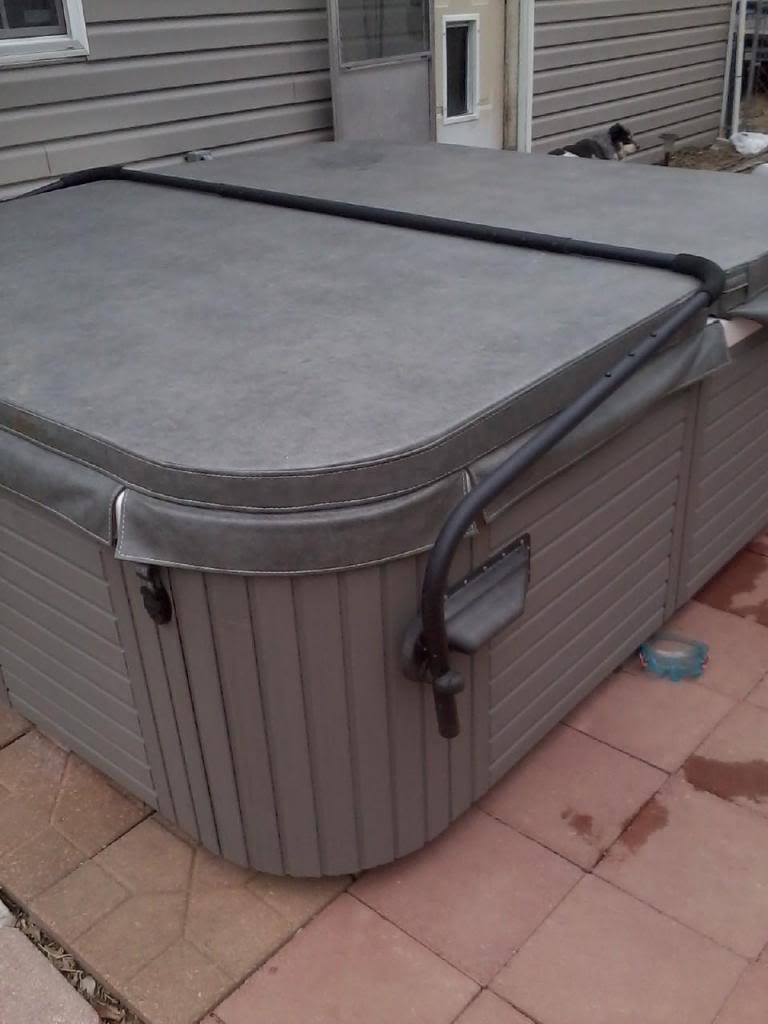
Fold it over the top and then flip the whole assembly to the end. Also I would suggest getting a 110 volt system. It wont run the jets and heat at the same time but I have never been in long enough to get cold. In fact I have been in to long and got to hot. Don't crank the heat up. A 220 volt system will run both jets and heat at same time but is expensive for electric.
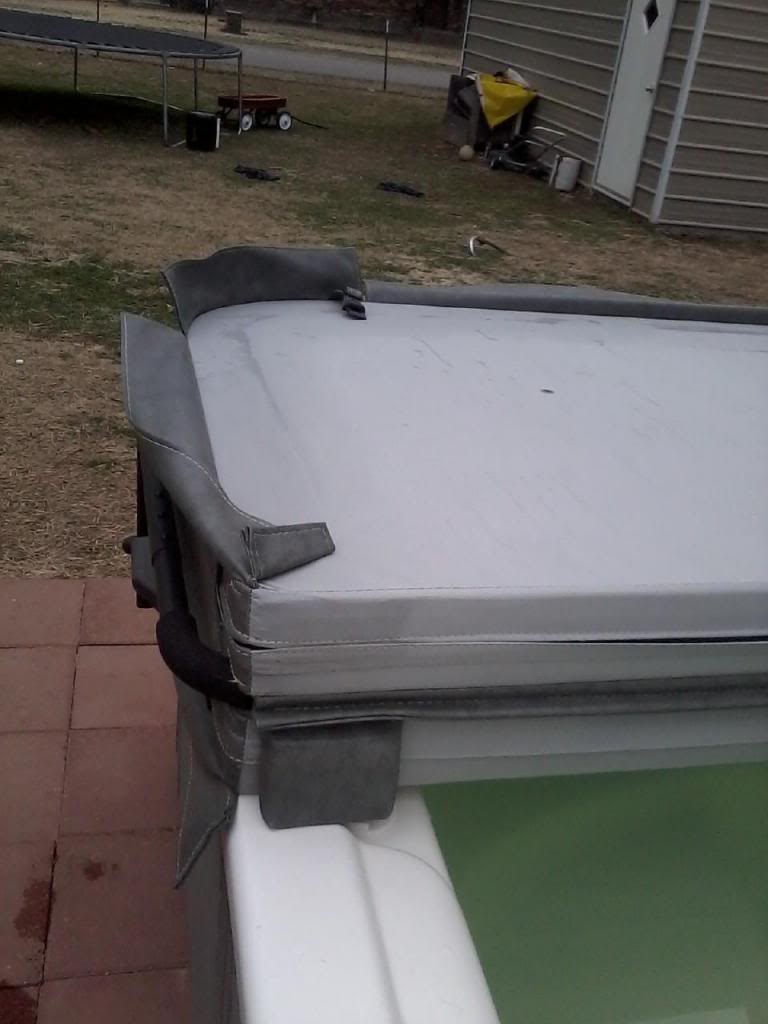
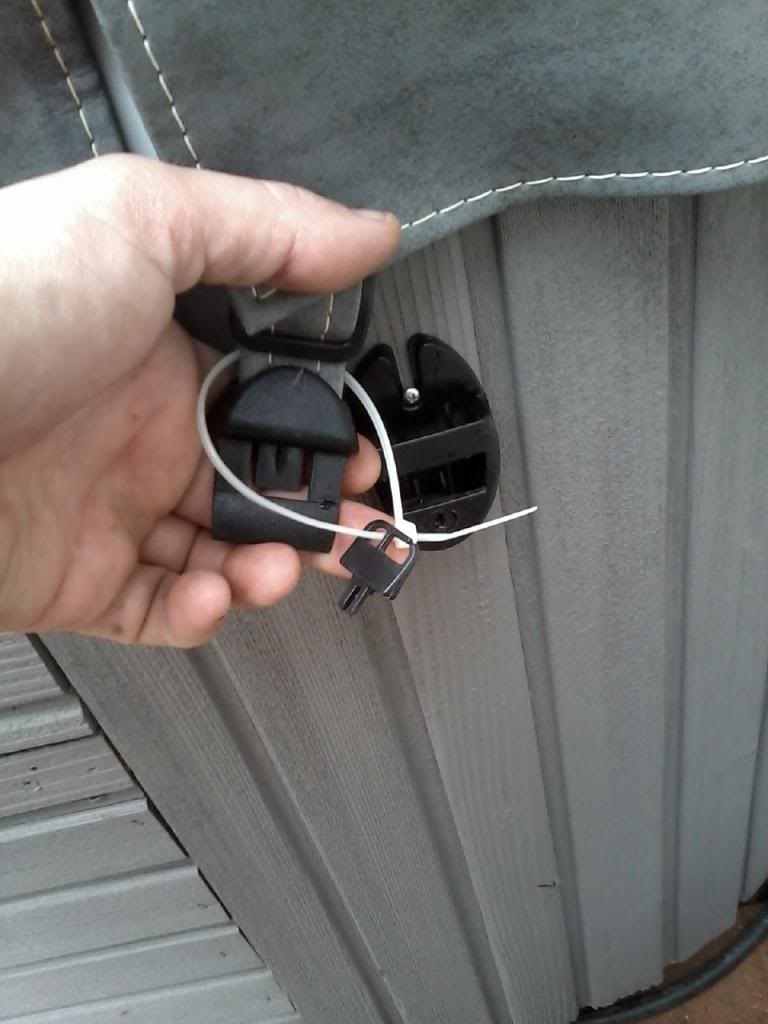
Get a cover with a locking system to keep the wind from blowing the cover off. Not a big deterent but we were on vacation one time and some kids helped themselves in and had grass and dirt everywhere.
Run some rebar across the top and cover with foil. Get the charcoal going in the center and when it is burning put it in the corners of the pit.

Jason was asking about the hot tub. Thought I would some information I have learned along the way. The black bar across the top is the Cradle. Makes covering and uncover so nice.

Fold it over the top and then flip the whole assembly to the end. Also I would suggest getting a 110 volt system. It wont run the jets and heat at the same time but I have never been in long enough to get cold. In fact I have been in to long and got to hot. Don't crank the heat up. A 220 volt system will run both jets and heat at same time but is expensive for electric.

Get a cover with a locking system to keep the wind from blowing the cover off. Not a big deterent but we were on vacation one time and some kids helped themselves in and had grass and dirt everywhere.
 Mar 16, 2014 | 01:53 AM
#1816
Thread Starter
Super Moderator
iTrader: (1)
Joined: Aug 2008
Posts: 11,787
Likes: 28
From: Anderson Missouri
FSM MT-18
http://www.drivetrain.com/parts_cata...ustration.html
http://www.pirate4x4.com/forum/toyot...nny-noise.html
Something great or a disaster in the making. I found a thread awhile back and is something I have always wondered about. https://www.yotatech.com/forums/f116...eekend-271102/ I would like a little more step by step and pictures so am giving it a try. Mistys tcase went bad and ruined this transmission a year ago. I kept it for a core charge or something to practice on. The shafts on these do get loose and have seen it several times. I got my bearing from Cobra Transmission that I mentioned earlier on in my thread.
Take out nine 14mm bolts holding Bell Housing on.
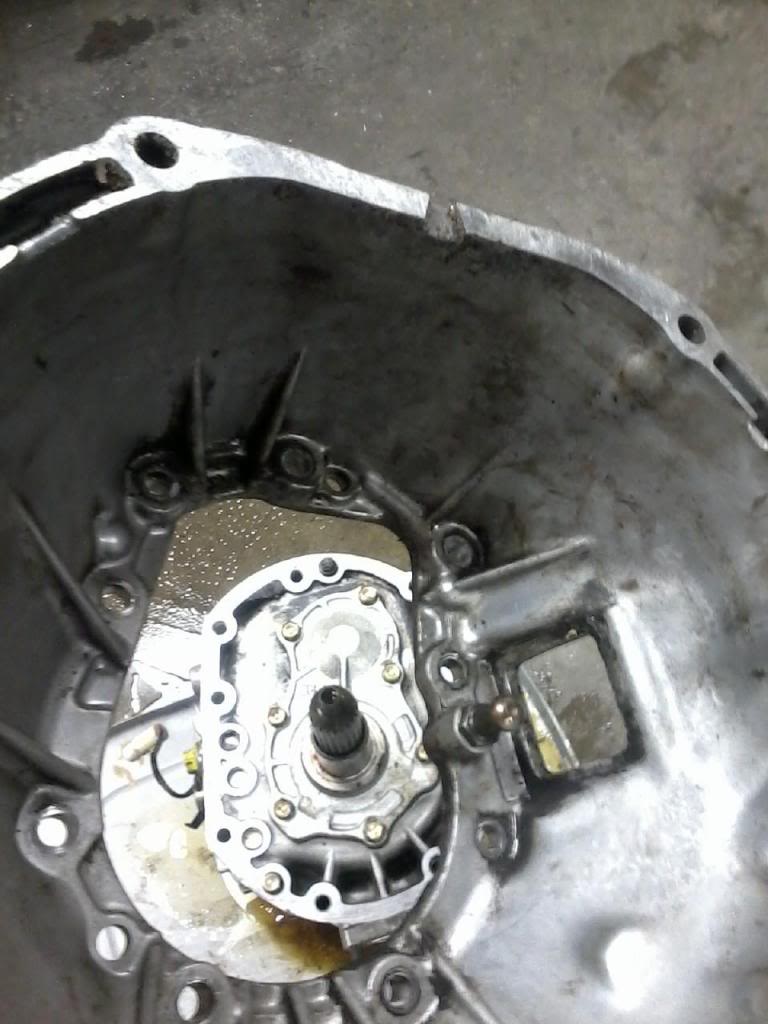
Remove seven 12mm bolts.
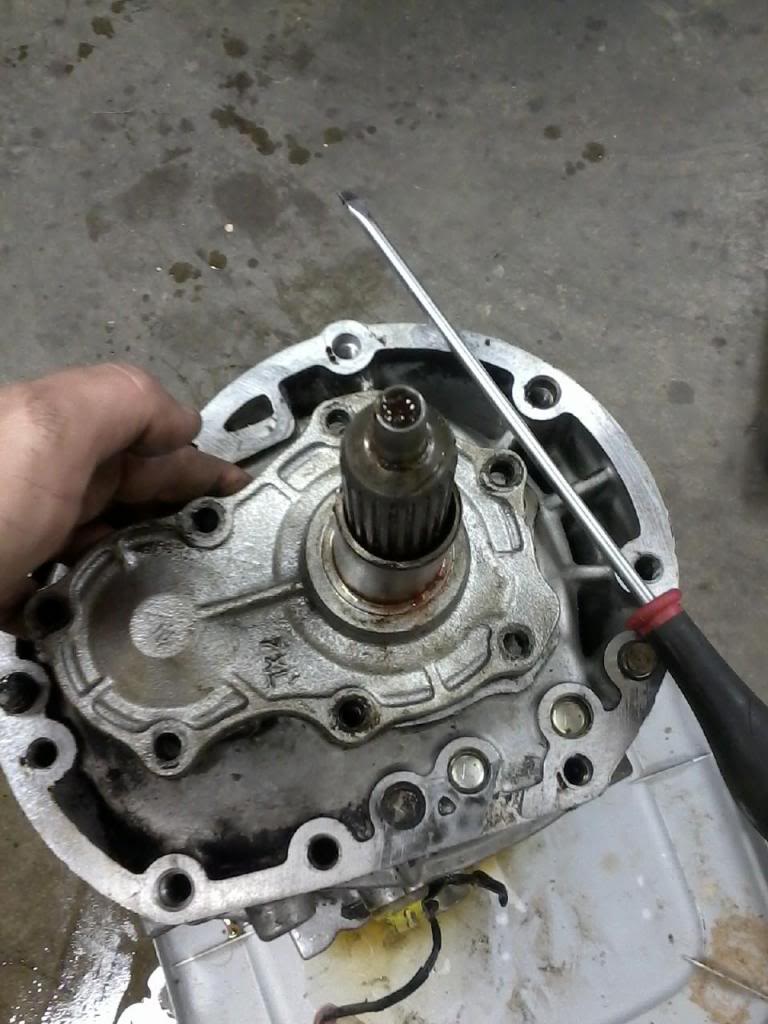
Remove Large Snap Ring.
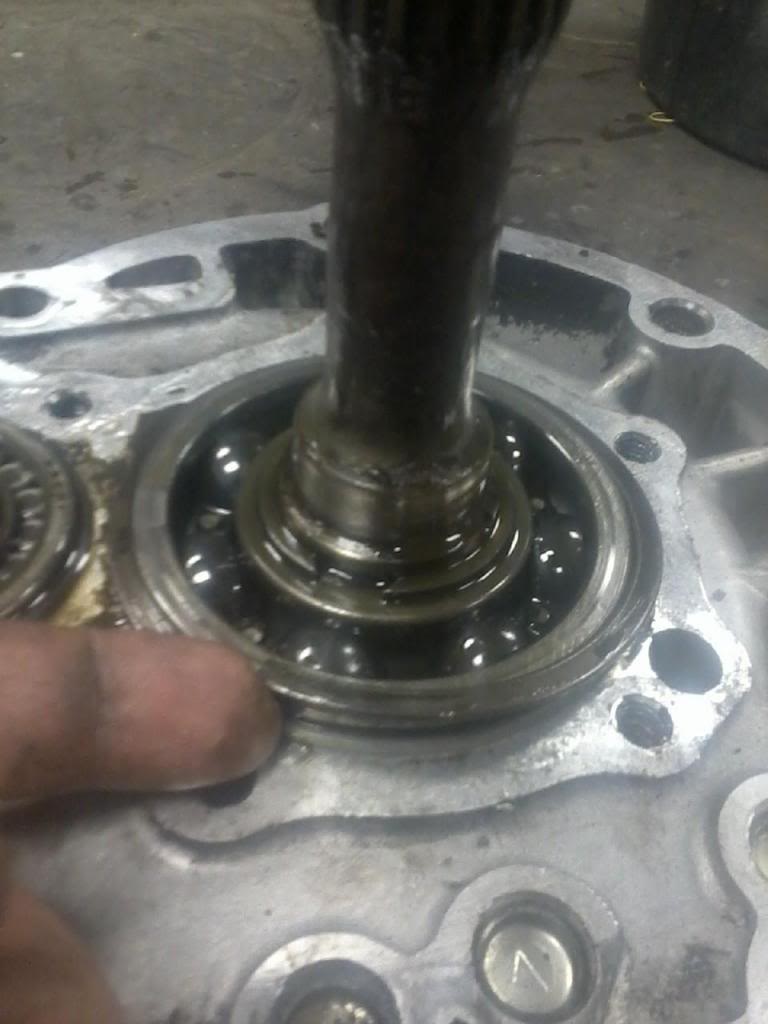
Here is where I am stuck at as I need a better pair of Snap Ring Pliers.
You will need to remove the other c-clip that is attached to the smaller shaft.
Then remove the nine 14mm bolts that holds the case together.

Then Thump it with a rubber hammer as per the Factory Service Manual.
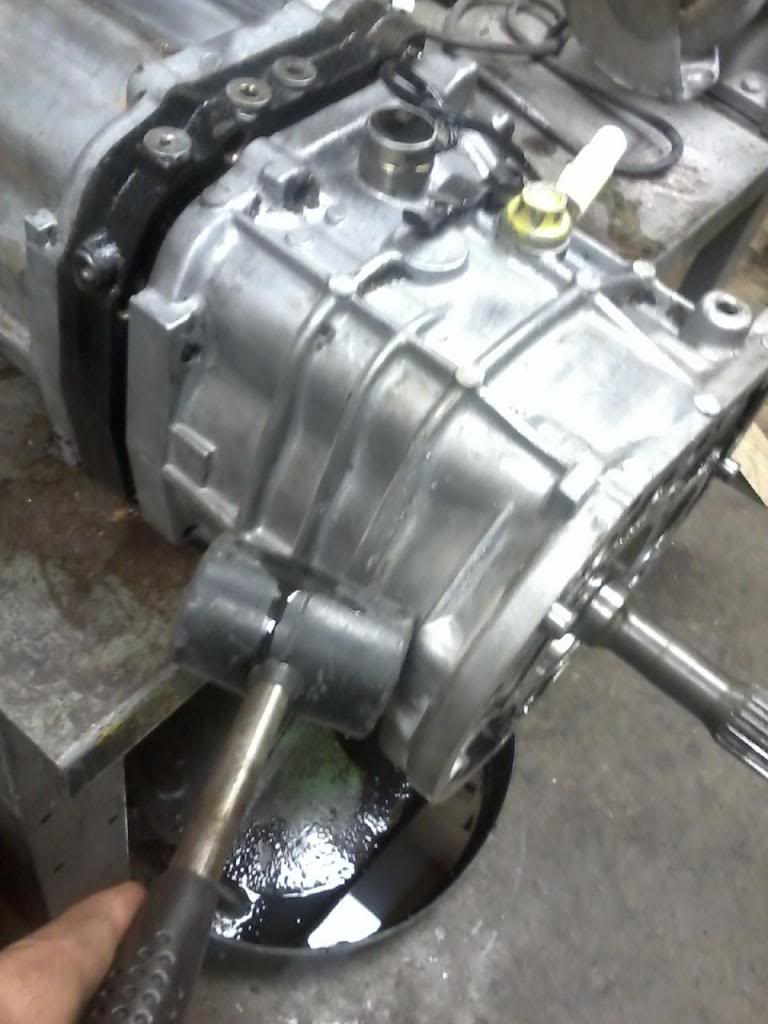
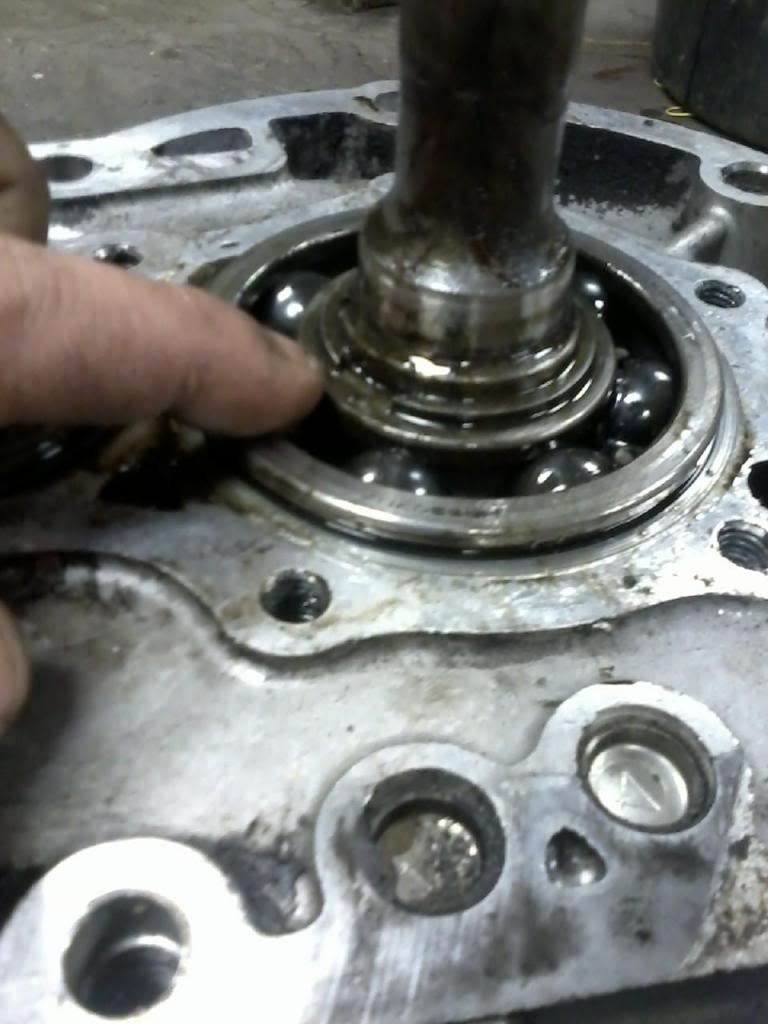
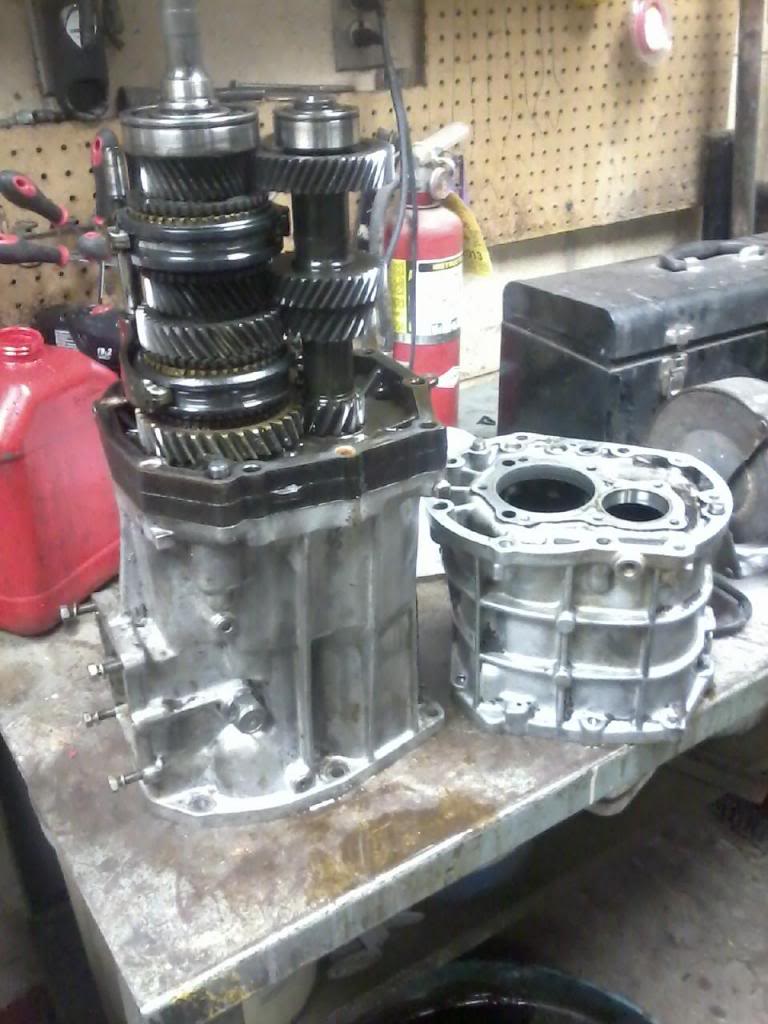
I stood the transmission on its end and it easily lifted off and separated. Really nothing to be concerned with up until now. I have talked to my machine shop that does my engine work and he say he has a press that could press a bearing on. He does not have the ability to pull the bearing.
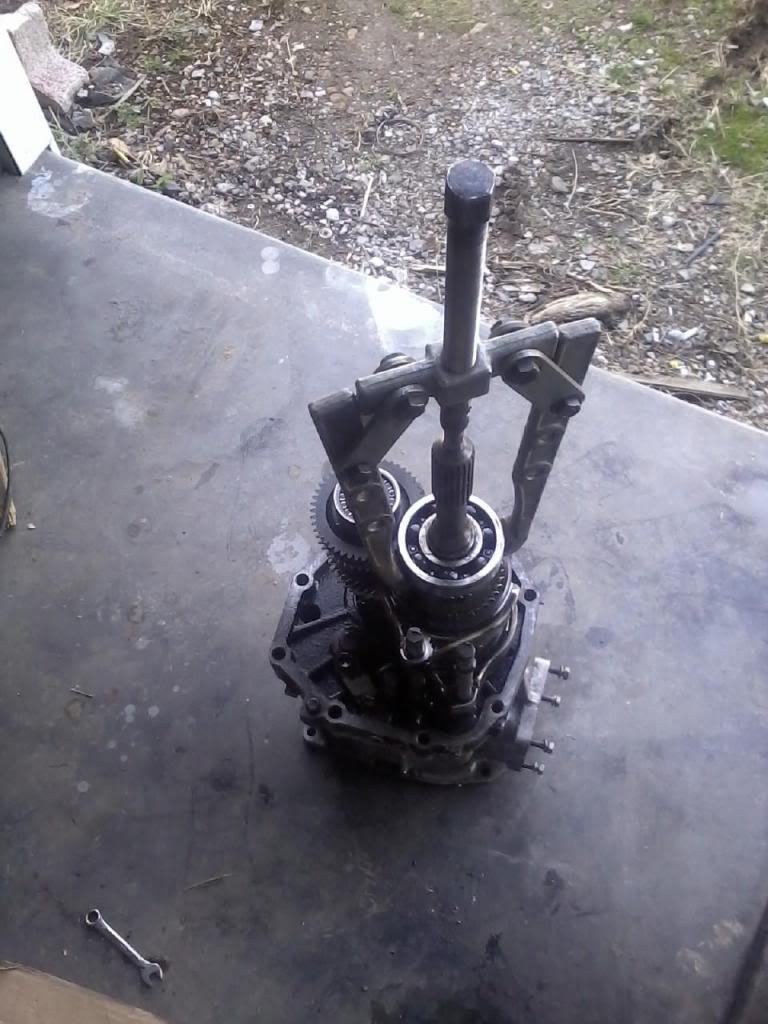
For that from what I am learning is that you can use a Bearing Separator and a Gear Puller or a Press to pull the bearing off. That is my next learning experience as I have never used a bearing separator and right now don't have access to a press. I hear Harbor Freight has a bearing separator so will check into that.
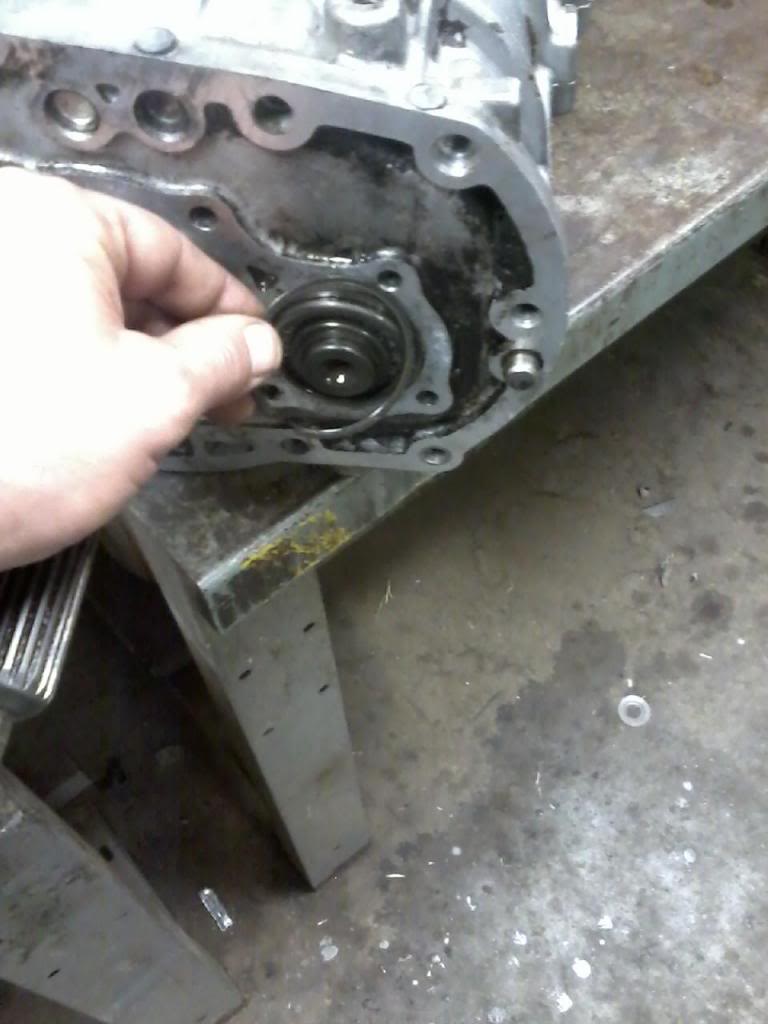
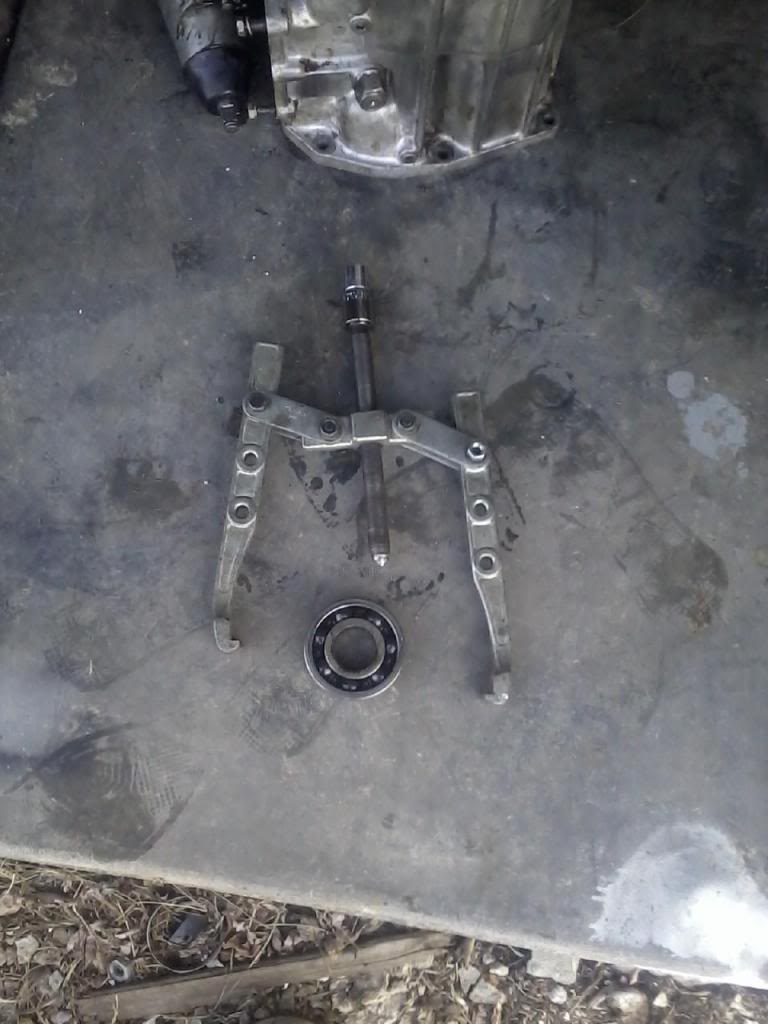
I found a tool rental place and for $10 a day rental. Later I went to a pawn shop and found a 3 prong tool for $15. I suggest using a 3 prong puller, but it worked!! Now I just need to see if my machine shop can press it on for me. Imp[act Wrench made the job so much easier as well. Thanks for the tip Jason, I was just going to wrench it the whole way. It didnt just pop right off like I thought it would.
Success, Wahoo!!
http://www.drivetrain.com/parts_cata...ustration.html
http://www.pirate4x4.com/forum/toyot...nny-noise.html
Something great or a disaster in the making. I found a thread awhile back and is something I have always wondered about. https://www.yotatech.com/forums/f116...eekend-271102/ I would like a little more step by step and pictures so am giving it a try. Mistys tcase went bad and ruined this transmission a year ago. I kept it for a core charge or something to practice on. The shafts on these do get loose and have seen it several times. I got my bearing from Cobra Transmission that I mentioned earlier on in my thread.
Take out nine 14mm bolts holding Bell Housing on.

Remove seven 12mm bolts.

Remove Large Snap Ring.

Here is where I am stuck at as I need a better pair of Snap Ring Pliers.

You will need to remove the other c-clip that is attached to the smaller shaft.

Then remove the nine 14mm bolts that holds the case together.

Then Thump it with a rubber hammer as per the Factory Service Manual.

I stood the transmission on its end and it easily lifted off and separated. Really nothing to be concerned with up until now. I have talked to my machine shop that does my engine work and he say he has a press that could press a bearing on. He does not have the ability to pull the bearing.
For that from what I am learning is that you can use a Bearing Separator and a Gear Puller or a Press to pull the bearing off. That is my next learning experience as I have never used a bearing separator and right now don't have access to a press. I hear Harbor Freight has a bearing separator so will check into that.

I found a tool rental place and for $10 a day rental. Later I went to a pawn shop and found a 3 prong tool for $15. I suggest using a 3 prong puller, but it worked!! Now I just need to see if my machine shop can press it on for me. Imp[act Wrench made the job so much easier as well. Thanks for the tip Jason, I was just going to wrench it the whole way. It didnt just pop right off like I thought it would.

Success, Wahoo!!

Last edited by Terrys87; Mar 18, 2014 at 12:07 PM.
Mar 16, 2014 | 05:55 AM
#1817
Registered User
Joined: Dec 2008
Posts: 2,391
Likes: 1
From: tecumseh nebraska
Great info and pics. Yes the return line was clogged on the pump housing assembly. I sprayed brake kleen in it and compressed air to clean it.I also used vinegar to clean the tank. Replaced the pump,sock,and filter. Shes back on the road and i made some cash doing it.
I like your homemade hog pit!!And the hottub as well.
Woke up to snow today.
I like your homemade hog pit!!And the hottub as well.
Woke up to snow today.
Mar 16, 2014 | 08:30 PM
#1820


That red kote stuff is a great find terry!! And available at Oreillys!! Even better.
Not sure on the snap ring , but it seemed as though it kept the shaft from going in to far, like you stated, when I had mine apart.
I have an extra one st the school. I can look at it tomorrow of you want me to.
Not sure on the snap ring , but it seemed as though it kept the shaft from going in to far, like you stated, when I had mine apart.
I have an extra one st the school. I can look at it tomorrow of you want me to.


