
Terrys87 86 4Runner with a 2nd Chance
 Mar 24, 2012 | 04:56 PM
#281
Thread Starter
Super Moderator
iTrader: (1)
Joined: Aug 2008
Posts: 11,787
Likes: 28
From: Anderson Missouri
When I was overseas, I was able to get some parts and one thing I got was 87 22re injectors, I think. I know there is some differences, but not sure what, especially an 88 has some injectors but the resistance rating is higher or lower.
Any ideas on how to tell the differnce? I think I remember in Dutchbellys build thread aboutsomeone explainig something to me about them.
I looked through my Haynes Manual and one problem to check is if fuel is getting to the injector. Since my truck sat for 5 years, I am thinking that maybe they have just gummed up and arent able to operate. I will eventually be sending my injectors out to Wtich hunter, but want to check and make sure there isnt some other possibilites of my problem.
Any suggestions?, I am all ears. I will be studying this further.
Mar 25, 2012 | 12:53 AM
#282
Thread Starter
Super Moderator
iTrader: (1)
Joined: Aug 2008
Posts: 11,787
Likes: 28
From: Anderson Missouri
This is going to be my Fuel Injector notes page.
Good wiring diagram...........https://www.yotatech.com/forums/f115...e-help-178975/
Different Injectors.............https://www.yotatech.com/forums/f116...ectors-127606/
Correct Ground Locations....https://www.yotatech.com/forums/f116...-guide-194413/
Pinout for ECU.... ..............http://media.photobucket.com/image/1...outdiagram.jpg
Add Ground to ECU by Trailgear..http://www.trail-gear.com/vbulletin/...ead.php?t=9973
Redo wire connections.
Externally Ground ECU.
Check all grounds........................................... .................................................. .........................Missing ground from Positive Cable. Will get one from bone yard. All other grounds installed, plus I added another ground.
Check wire harness ground on intake manifold.......................................... .......................................Checked Good
Check Solenoid Resistor. Haynes page 4-10 13.22b............................................ .............................Tested Good, supposed to have 2-3 Ohms, I have 3 Ohms.
Check EFI Main Relay Haynes page 4-9................................................. ........................................Tested Good Supposed to have 60-80, I have 71 Ohms.
Ohms for 86 Injectors are 1.5-3.0 all others are listed on page 4-2................................................. .....All tested 3 Ohms.
Run resistance checks on harness........................................... .................................................. .......Still running resisitance checks. Also I am soldering connections in harness.
#10 and #20 are apparently the ground pins on ECU. Hoping not have to go that far.
Here is something I found on Toyota Nation. Sounds alot like my problem.
[Quote]I found the problem!!! The ECU and Igniter are not component that fail very often, the problem is the wire. The main engine harness contains two wires from the ECU that are spliced and split into 4 wires at the injectors. For some reason Toyota decided to splice this circuit inside the largest portion of the wire bundle. The problem with this is that where the two wires (white with blue tracer, and white with red tracer) from the ECU are spliced with the four wires from the injectors(same colors as above), the insulation is removed exposing the copper conductor to potential corrosion and breakage. Upon inspection, these wires may appear to be fine, and may even ring out when tested with a continuity meter, but in my case, the corrosion had progressed beneath the wire insulation for 8-10 inches, and compromised the copper and it's ability to carry the pulse signal to ground through the ECU circuit.
The fix is to remove the tape and protective coating from the main harness between the intake manifold and the fuse box under the hood, you may notice green corrosion on the wires in question where the mechanical crimp splice is made. 10-12 inches of these wires may need to be removed and replaced with new copper conductors. Both sets of conductors from the injectors are common, so you'll need to figure out how to properly connect the two leads from the ECU to the 4 leads from the injectors. In my case I trimmed the wire back until I had good continuity to both ends, and soldered new leads on, encasing them in 3M scothcote electrical coating and heat shrink insulated tubing.
My 87 4Runner runs like a charm. I still can't believe Toyota engineered it that way, but this fix is much cheaper than replacing igniters and ECU's. Hope this helps anyone/everyone. [Quote}
Fuel pump is pumping. Also jumpered Fuel Pump and it would operate.
Changed Fuel Filter.
Ohmed out Main Relay. Mine you can hear and feel the relay operating. Ohmed out at 74, book has 60 +/_ 20. Two other relays had same results.
Visual and metered all fuses under hood. Will do kick panel later.
Have checked all grounds and they are good.
Checked Solenoid Resistor. Book says 2-3 Ohms, Mine was 3 Ohms same on another Solenoid Resistor. With key on I have 12 volts, key off I have 0 volts. I believe this is correct.
I trust my soldering and removed crimps in harness some time ago.
The Solenoid Resistor passed it test. So I will be giving some of the suggestions you guys have mentioned a try and also start looking into my fuel regulator and dampener. I have been looking at the Haynes and the FSM as well. I like having information from previous problems as a reference as to where to look in the manuals. That is my reference page in the back ground. It actuallys saves some time.

Still chugging along on my no start issue.This comes off of the Fuse box and provides power to the Solenoid Resistor. I tested all fuses under the hood, even the 80 amp fuse, with a multi meter just to make sure I hadnt missed one by doing the visual check. I am still not sure where power is sent from the fuse box but it is 12 volts when the key is on and 0 volts when key is off.

I also checked my Main Relay and 2 others that I have as spares. All 3 checked in at 74 ohms. The tolerance is 60 +/- 20.

My $3 noid light. I wasnt able to find one anywhere and this worked great. It flickered each time I cranked it. I just couldnt get any pictures of it lighted.
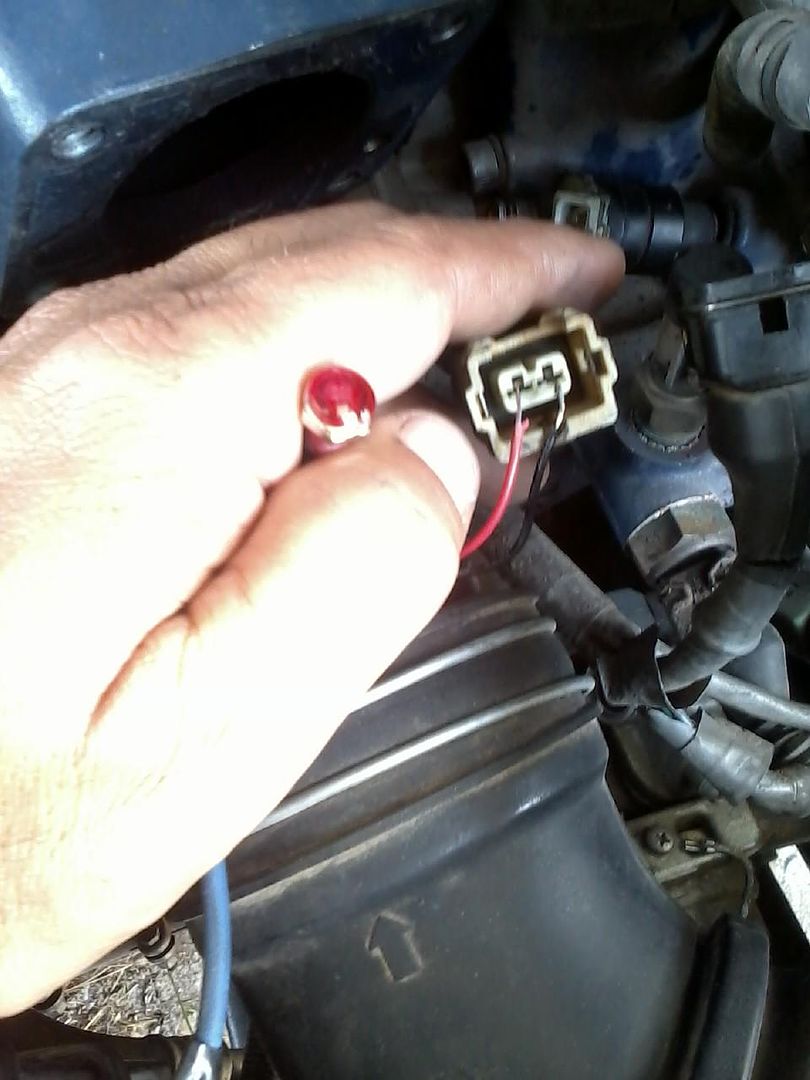
I used the 12 Volt red one. Radio Shack Part Number #276-0270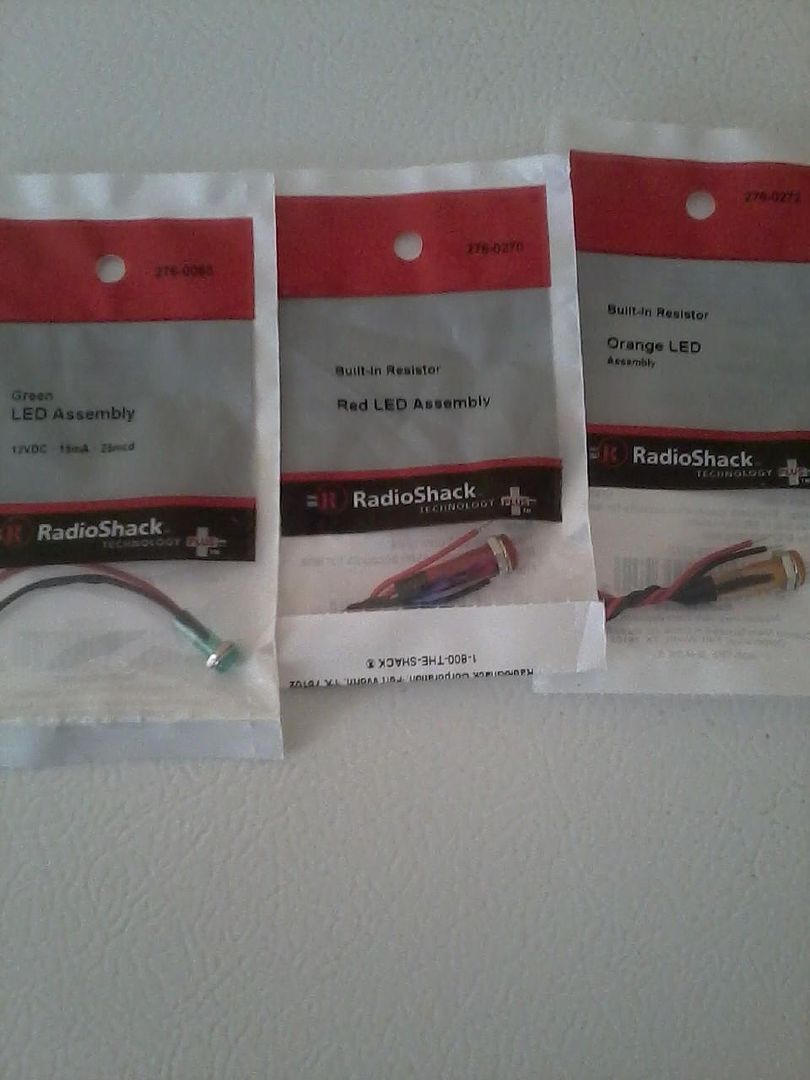
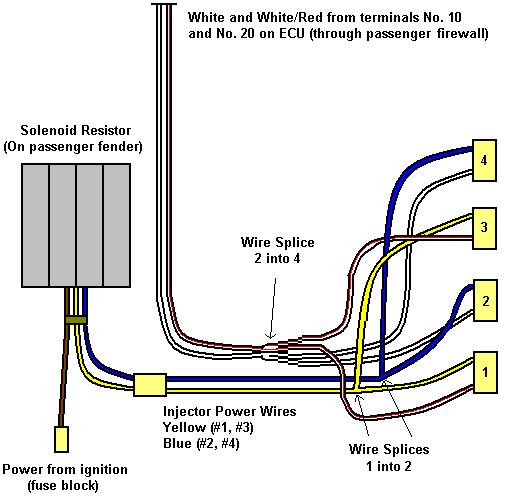
Here is a diagram of the electric system.
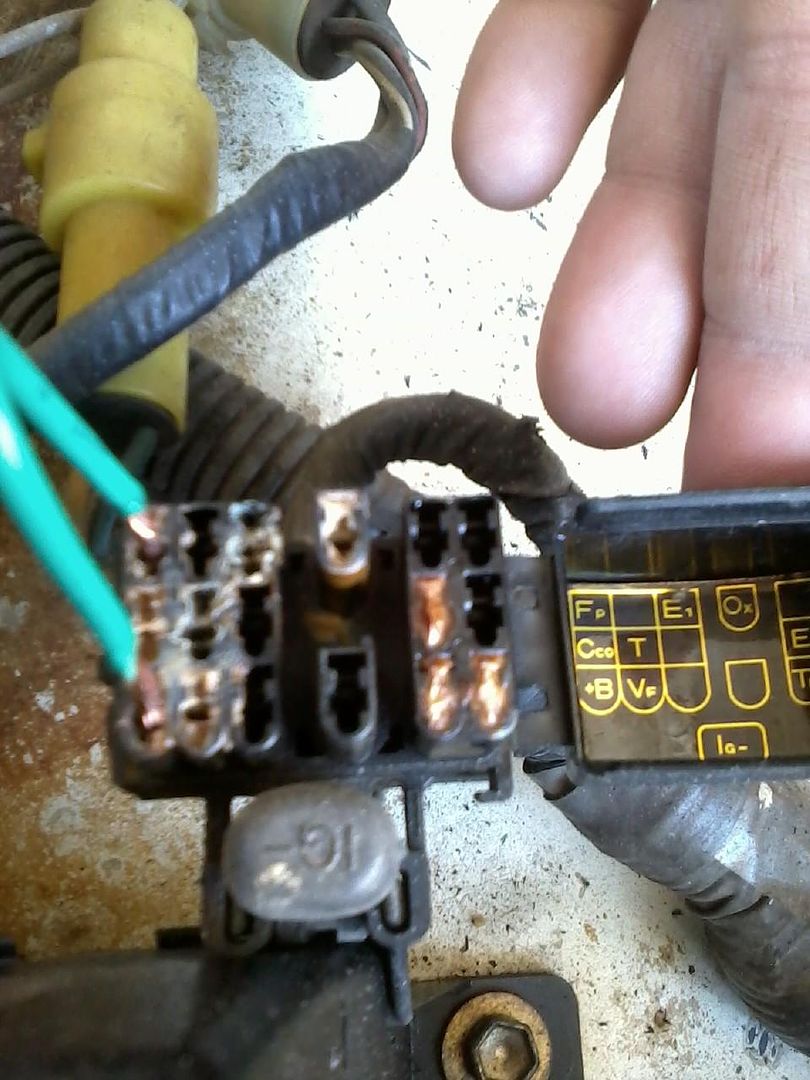
Fuel pump jumper test for 87 and newer.
Fp +B Fuel Pump Test for 87 and newer. Use a paper clip for better results.
Good wiring diagram...........https://www.yotatech.com/forums/f115...e-help-178975/
Different Injectors.............https://www.yotatech.com/forums/f116...ectors-127606/
Correct Ground Locations....https://www.yotatech.com/forums/f116...-guide-194413/
Pinout for ECU.... ..............http://media.photobucket.com/image/1...outdiagram.jpg
Add Ground to ECU by Trailgear..http://www.trail-gear.com/vbulletin/...ead.php?t=9973
Redo wire connections.
Externally Ground ECU.
Check all grounds........................................... .................................................. .........................Missing ground from Positive Cable. Will get one from bone yard. All other grounds installed, plus I added another ground.
Check wire harness ground on intake manifold.......................................... .......................................Checked Good
Check Solenoid Resistor. Haynes page 4-10 13.22b............................................ .............................Tested Good, supposed to have 2-3 Ohms, I have 3 Ohms.
Check EFI Main Relay Haynes page 4-9................................................. ........................................Tested Good Supposed to have 60-80, I have 71 Ohms.
Ohms for 86 Injectors are 1.5-3.0 all others are listed on page 4-2................................................. .....All tested 3 Ohms.
Run resistance checks on harness........................................... .................................................. .......Still running resisitance checks. Also I am soldering connections in harness.
#10 and #20 are apparently the ground pins on ECU. Hoping not have to go that far.
Here is something I found on Toyota Nation. Sounds alot like my problem.
[Quote]I found the problem!!! The ECU and Igniter are not component that fail very often, the problem is the wire. The main engine harness contains two wires from the ECU that are spliced and split into 4 wires at the injectors. For some reason Toyota decided to splice this circuit inside the largest portion of the wire bundle. The problem with this is that where the two wires (white with blue tracer, and white with red tracer) from the ECU are spliced with the four wires from the injectors(same colors as above), the insulation is removed exposing the copper conductor to potential corrosion and breakage. Upon inspection, these wires may appear to be fine, and may even ring out when tested with a continuity meter, but in my case, the corrosion had progressed beneath the wire insulation for 8-10 inches, and compromised the copper and it's ability to carry the pulse signal to ground through the ECU circuit.
The fix is to remove the tape and protective coating from the main harness between the intake manifold and the fuse box under the hood, you may notice green corrosion on the wires in question where the mechanical crimp splice is made. 10-12 inches of these wires may need to be removed and replaced with new copper conductors. Both sets of conductors from the injectors are common, so you'll need to figure out how to properly connect the two leads from the ECU to the 4 leads from the injectors. In my case I trimmed the wire back until I had good continuity to both ends, and soldered new leads on, encasing them in 3M scothcote electrical coating and heat shrink insulated tubing.
My 87 4Runner runs like a charm. I still can't believe Toyota engineered it that way, but this fix is much cheaper than replacing igniters and ECU's. Hope this helps anyone/everyone. [Quote}
Fuel pump is pumping. Also jumpered Fuel Pump and it would operate.
Changed Fuel Filter.
Ohmed out Main Relay. Mine you can hear and feel the relay operating. Ohmed out at 74, book has 60 +/_ 20. Two other relays had same results.
Visual and metered all fuses under hood. Will do kick panel later.
Have checked all grounds and they are good.
Checked Solenoid Resistor. Book says 2-3 Ohms, Mine was 3 Ohms same on another Solenoid Resistor. With key on I have 12 volts, key off I have 0 volts. I believe this is correct.
I trust my soldering and removed crimps in harness some time ago.
The Solenoid Resistor passed it test. So I will be giving some of the suggestions you guys have mentioned a try and also start looking into my fuel regulator and dampener. I have been looking at the Haynes and the FSM as well. I like having information from previous problems as a reference as to where to look in the manuals. That is my reference page in the back ground. It actuallys saves some time.

Still chugging along on my no start issue.This comes off of the Fuse box and provides power to the Solenoid Resistor. I tested all fuses under the hood, even the 80 amp fuse, with a multi meter just to make sure I hadnt missed one by doing the visual check. I am still not sure where power is sent from the fuse box but it is 12 volts when the key is on and 0 volts when key is off.

I also checked my Main Relay and 2 others that I have as spares. All 3 checked in at 74 ohms. The tolerance is 60 +/- 20.

My $3 noid light. I wasnt able to find one anywhere and this worked great. It flickered each time I cranked it. I just couldnt get any pictures of it lighted.

I used the 12 Volt red one. Radio Shack Part Number #276-0270

Here is a diagram of the electric system.
Fuel pump jumper test for 87 and newer.
Fp +B Fuel Pump Test for 87 and newer. Use a paper clip for better results.

Last edited by Terrys87; Mar 19, 2014 at 03:00 PM.
 Mar 25, 2012 | 12:07 PM
#284
Registered User
Joined: Apr 2010
Posts: 97
Likes: 1
From: KI, NC
Been a while. Just read through Nice work, one day I will make time to finish mine.
On the injectors check the harness where they splice the wires together. I helped a buddy chase down fuel problems and it turned out being the splices needed to be cleaned and redone. (Corrosion)
A noid light will help find out if you are getting power to the injector or not.
On the injectors check the harness where they splice the wires together. I helped a buddy chase down fuel problems and it turned out being the splices needed to be cleaned and redone. (Corrosion)
A noid light will help find out if you are getting power to the injector or not.
Last edited by takeitoutgetitdirty; Mar 25, 2012 at 12:10 PM.
Mar 25, 2012 | 01:18 PM
#285
Thread Starter
Super Moderator
iTrader: (1)
Joined: Aug 2008
Posts: 11,787
Likes: 28
From: Anderson Missouri
Thanks RMP8080..I am gettign a workout on this one. I deserve my Elecrical Unions license after this.
Hello takeitoutgetitdirty..Im starting to lean toward a noid light. I am going to unwrap the wire and solder them. THe way it sounds it probably needs it anyways, woud be nice if it solved my problem, but it should prevent a future problem down the road.
Hello takeitoutgetitdirty..Im starting to lean toward a noid light. I am going to unwrap the wire and solder them. THe way it sounds it probably needs it anyways, woud be nice if it solved my problem, but it should prevent a future problem down the road.
Mar 26, 2012 | 03:02 AM
#286
Thread Starter
Super Moderator
iTrader: (1)
Joined: Aug 2008
Posts: 11,787
Likes: 28
From: Anderson Missouri
I didnt do much but wanted to try a small test. Should be accurate I think. I put a jumper wire into the #1 injector and then ran a wire from the wiring harness #10 or #20 pin and did a resistance check hoping to check the entire circuit. I got 1 or .1 ohm, but either way I would think that means there is continuity through the whole circuit.
If someone understands circuits better, does that sound right?
I did do a resistance check on #1 injector and it was 3 ohms as it should be.
Today I will try doing resistance checks on all injectors and resistance checks on the wiring from the ECU and to the injectors. I also plan on unwrapping the injector wires and making sure I have good connections. 1 and 3 share an ECU wire and so does 2 and 4.
If I understand the circuit right, it is fairly simple. It has voltage at all times when key is on and the ECU completes the circuit to make the injector fire.
Power comes from the battery/fuse box to the soleniod resister.
Down one wire through the injector on the blue or yellow wire depending on which set of injectors.
Then up the White or White/Red wire to the ECU where it grounds when needed, thereby completing throught the circuit.
I did check all of my grounds. My positive battery cable doesnt have the ground wire in it like it is showing in the link in one of the above post.
I will be going to the boneyard later this week to get somethings and hopefully I can find a nice factory positive wire and get my one ground replaced. I did add a ground that ties body,motor and frame together. I will get it posted later.
I am thinking I will need to start taking voltage test next. I have been going thru the FSM and it has given me a few ideas. I am starting to run out of ideas. I am hoping splicing the wire in the loom will make a big difference as I have seen in some threads.
Here is how I think I checked the whole circuit. Wire from pin 10 or 20 isnt showing. This should test it, right???
Mar 26, 2012 | 11:38 AM
#287
Oh wow, .... THE MEMORIES! lol. Oh YES, ....^^^^^ 'THE GREMLINS ARE REAL, THEY'RE REAL I TELL YOU!.... hey, what's that white coat for?????' hahaha.
I will be back... Hopefully you'll have it all sussed by then... Just overwhelmed, bud... Hope you understand. I WILL have time today to check in and give ya more... Maybe the PM helped, too, not sure
You could just do a noid light test, next time, to verify/rule out action 'all the way TO the injectors', ya know? I have to say, however.... Almost EVERY thread where people got this deep into ECU and Injector schematics/testing.... it ended up being something related, but NOT AT ALL what the person thought..... Mine was AN injector, initially..... (first start up).... But that was just a frozen up one from MY BAD of not flushing the rail and line AFTER the filter... RC Injectors did their job PERFECTLY, as always, lol.
Far as my buddies... that's a different story. Even the one I hands on worked on.... Very similar to JasonTN's 'gremlin' encounter.... (Ignitor Connector' was disconnected on his)... The hands on most recent one was the dizzy 180* off.... BUT, since you're getting it to continue running with ether,..... I suppose that's not likely anymore. HOWEVER.. the ignitor has a VERY special relationship with the injectors... And not only effects spark heat.... but more importantly, SPARK TIMING. I'm NOT POSITIVE, but I think you can still have spark with that disconnected... YET, you will NOT have injector pulse THROUGH the ECU...... It's an 'incomplete' circuit if I'm right. You would have to ask JasonTN(refresh with his gremlin encounter)..... But I'm pretty sure he had spark.... BUT NO FUEL! YET, when he plugged that in,...VROOM!
OK, so it's not likely that you've forgotten to plug it in... But hey, Jason is a VERY capable/smart guy with LOTS of mechanical experience....and he forgot, so why not you, right? hahaha. (actually, I'm REALLY HOPING for something that simple..... I know... it's not always so simple )
)
I will be back... Hopefully you'll have it all sussed by then... Just overwhelmed, bud... Hope you understand. I WILL have time today to check in and give ya more... Maybe the PM helped, too, not sure
You could just do a noid light test, next time, to verify/rule out action 'all the way TO the injectors', ya know? I have to say, however.... Almost EVERY thread where people got this deep into ECU and Injector schematics/testing.... it ended up being something related, but NOT AT ALL what the person thought..... Mine was AN injector, initially..... (first start up).... But that was just a frozen up one from MY BAD of not flushing the rail and line AFTER the filter... RC Injectors did their job PERFECTLY, as always, lol.
Far as my buddies... that's a different story. Even the one I hands on worked on.... Very similar to JasonTN's 'gremlin' encounter.... (Ignitor Connector' was disconnected on his)... The hands on most recent one was the dizzy 180* off.... BUT, since you're getting it to continue running with ether,..... I suppose that's not likely anymore. HOWEVER.. the ignitor has a VERY special relationship with the injectors... And not only effects spark heat.... but more importantly, SPARK TIMING. I'm NOT POSITIVE, but I think you can still have spark with that disconnected... YET, you will NOT have injector pulse THROUGH the ECU...... It's an 'incomplete' circuit if I'm right. You would have to ask JasonTN(refresh with his gremlin encounter)..... But I'm pretty sure he had spark.... BUT NO FUEL! YET, when he plugged that in,...VROOM!
OK, so it's not likely that you've forgotten to plug it in... But hey, Jason is a VERY capable/smart guy with LOTS of mechanical experience....and he forgot, so why not you, right? hahaha. (actually, I'm REALLY HOPING for something that simple..... I know... it's not always so simple
)
Mar 26, 2012 | 12:22 PM
#288
Thread Starter
Super Moderator
iTrader: (1)
Joined: Aug 2008
Posts: 11,787
Likes: 28
From: Anderson Missouri
Hello Chef..Thanks for getting back with me. I still have a few things that I want to do before I start putting it back together. I am using the coil/igniter out of my pickup and put it back in when testing as I need the truck for gas mileage. I am putting the one to the distributory and then there are two by the igniter.
As far as the distributor, I did it like the video as it has been the best way for me to do it. I used to stab it in and then usually be a tooth off. Befroe the video, I found irabs way of doing it. But being 180 was my first thought and checked it. But another set of eyes is always nice as when you keep looking at the same thing, you tend to be blind to it.
There is no hurry. I have 500 other things going on myself and am only able to 30 minutes at a time if I am lucky. Been trying to get to the boneyard for 3 days now and it is looking like ateast another 3 days. 24 hours in a day isnt enough.
Mar 26, 2012 | 12:31 PM
#289
Thread Starter
Super Moderator
iTrader: (1)
Joined: Aug 2008
Posts: 11,787
Likes: 28
From: Anderson Missouri
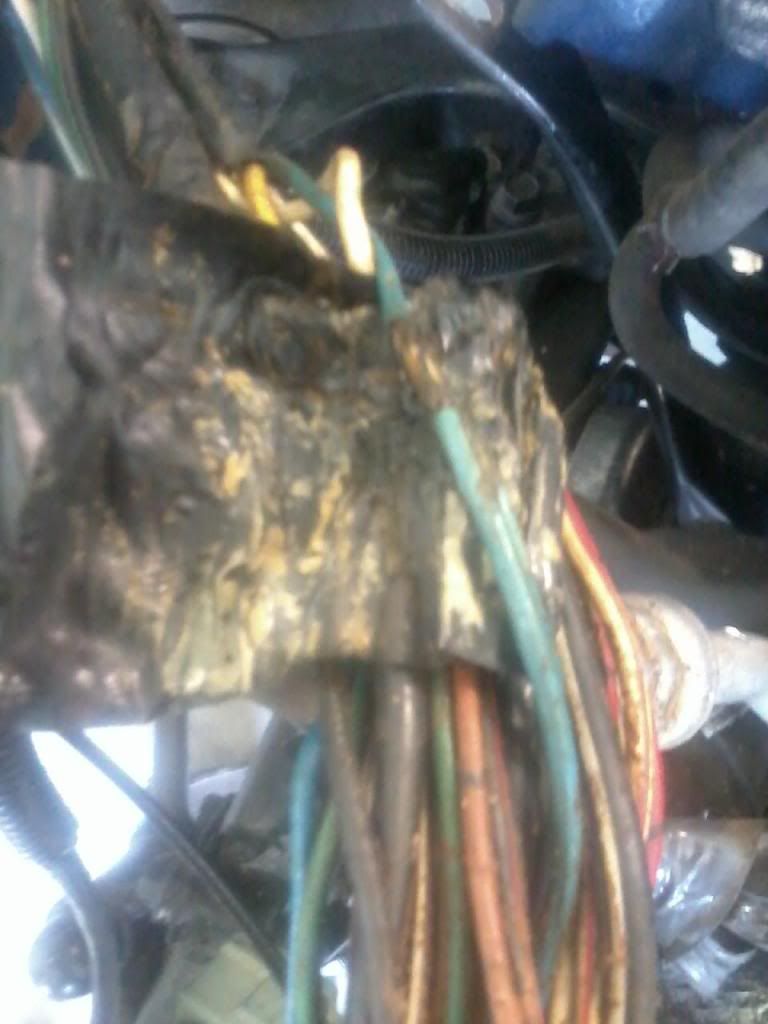
I have been doing alot of studying. ALOT...I have found several post on here and other forums about bad connections in the wiring harnes. This part of the harness I did not replace as it was not touched by mouse or PO.
I did see what they meant when they opened the harness up and it is actually a poorly done connection at the factory. I knew they existed like that under the dash and seen it several times. If you are in alot of water or some reason need to get into your loom at a late time. I would suggest redoing the connections on these as have seen several other post saying it made a diffeence. I am hoping for the same.
My truck is originally from Florida and spent alot of time on the beach as I have removed tons of sand from every part of the truck. Somehow it was actually in the harness loom.
Sand under tape.

I spread the wires out and used soap and water in a spray bottle to clean all sand and moisture out. There are about 4 more splices that are the same way and to head off future problems I am going to just solder,shrink wrap and tape them up. Will get them after I get these done so I can wrap it up and just do a little at a time.
I used zipties to help keep everything in order and marked my connections. Will remove zipties when rewrapped. One little slip and everything will get confusing quick.
Sand in factory splice. It is just crimped and black electrical tape.
I did see what they meant when they opened the harness up and it is actually a poorly done connection at the factory. I knew they existed like that under the dash and seen it several times. If you are in alot of water or some reason need to get into your loom at a late time. I would suggest redoing the connections on these as have seen several other post saying it made a diffeence. I am hoping for the same.
My truck is originally from Florida and spent alot of time on the beach as I have removed tons of sand from every part of the truck. Somehow it was actually in the harness loom.
Sand under tape.
I spread the wires out and used soap and water in a spray bottle to clean all sand and moisture out. There are about 4 more splices that are the same way and to head off future problems I am going to just solder,shrink wrap and tape them up. Will get them after I get these done so I can wrap it up and just do a little at a time.
I used zipties to help keep everything in order and marked my connections. Will remove zipties when rewrapped. One little slip and everything will get confusing quick.
Sand in factory splice. It is just crimped and black electrical tape.
Last edited by Terrys87; May 8, 2012 at 12:44 PM.
Mar 26, 2012 | 12:56 PM
#290
Thread Starter
Super Moderator
iTrader: (1)
Joined: Aug 2008
Posts: 11,787
Likes: 28
From: Anderson Missouri
It is not showing but in the previous pics, I used a magic marker and numbered my connectors.
I just want to try and get some info out on the injectors. DO NOT just grab an injector from another truck and throw it in. I am not sure if the connectors would let you, but they have different resistance readings. When I get this problem solved I plan on doing a nice little write up on how to go about trouble shooting this injector problem. Wrong injectors = new ECU.
In the links in the above post there are ways to identify which ones you have.
I did do som resistance checks on the wiring harness and the splices are giving good readings if I put some pressure on the probes. Maybe this is my problem. hmmmm? I can only hope.
I did resistance readings on my injectors and spares and all read 3 ohms as they should.
Mar 27, 2012 | 10:10 AM
#291
Thread Starter
Super Moderator
iTrader: (1)
Joined: Aug 2008
Posts: 11,787
Likes: 28
From: Anderson Missouri
This is my first video upload and only for 15 seconds. I dont have it set right to get out in time and to get to the throttle. Just got it RUNNING!!!!
My first Video Upload, bear with me. Click on picture.

My first Video Upload, bear with me. Click on picture.
Last edited by Terrys87; Feb 10, 2013 at 10:15 PM.
Mar 27, 2012 | 11:19 AM
#292
Keep in mind, ......... Different ECU also will usually involve "02 and Knock Sensor" issues.... That is, IF you're putting an 88+ ECU in an 87 or earlier 22RE rig(Not sure, but I'm FAIRLY certain that there's issues with Ignitor hook ups and more with the different year 3VZE's as well)...
GREAT WORK, Man! Happy digging and 'VROOM' WOOT! lol.
GREAT WORK, Man! Happy digging and 'VROOM'
WOOT! lol.
Mar 27, 2012 | 03:15 PM
#295
Thread Starter
Super Moderator
iTrader: (1)
Joined: Aug 2008
Posts: 11,787
Likes: 28
From: Anderson Missouri
Thanks Mark...I learned alot on this problem. This is one of the areas I have always dreaded getting into. I had the noid light left and some voltage checks left to do and then I would of been lost. Electrical and gears are not my strong points. But I did get a great boost of confidence and satisfation out of it.
Thanks Bill...I wasnt sure when it first started, been there before, but once it kept running, I almost bounced off the walls with excitement. I have so many hours in reading and searching the web. I even learned how to get around the FSM on here fairly well.
Thanks Bill...I wasnt sure when it first started, been there before, but once it kept running, I almost bounced off the walls with excitement. I have so many hours in reading and searching the web. I even learned how to get around the FSM on here fairly well.
Mar 27, 2012 | 03:22 PM
#296
Thread Starter
Super Moderator
iTrader: (1)
Joined: Aug 2008
Posts: 11,787
Likes: 28
From: Anderson Missouri
Thanks Jason..It was a big relief. I have had a few around here that wondered if it would be worth it. It is really a solid truck bodywise so I was willing to put the effort into it. It is all down hill from here. The hold up is the funds,but anything else from this point on I am not at all worried about.
I really plan on having it nicer then the 88 as this is my relaxation and the wife has her other projects she likes. It is idling bad, but I havent even set timing, still a hose or two off, and dont have my VSVs hooked up. Still missing a couple of exhaust bolts. It will get there. I am still on cloud 9. I got a workout on this problem. The 88 was the backhatch the 86 is injectors. Learning both fairly well.
I really plan on having it nicer then the 88 as this is my relaxation and the wife has her other projects she likes. It is idling bad, but I havent even set timing, still a hose or two off, and dont have my VSVs hooked up. Still missing a couple of exhaust bolts. It will get there. I am still on cloud 9. I got a workout on this problem. The 88 was the backhatch the 86 is injectors. Learning both fairly well.
Mar 27, 2012 | 03:33 PM
#297
Thread Starter
Super Moderator
iTrader: (1)
Joined: Aug 2008
Posts: 11,787
Likes: 28
From: Anderson Missouri
I still have aways to go. I have 3 days off this week and will be tying up alot of loose ends. I dont have the driveshafts in, shifter sticks,power steering and the list goes on. Wont be long till I start on bodywork. That is what I really enjoy doing. I can do motor work and dont mind it when it is in project stage,but once it is in daily driver stage, I tend not to like it as well.
I plan on eventually taking all of the information I learned and putting it into post that I would of liked to have found. Might save someone some trouble. The biggest problem I would say is the little clips that they use to hold the wires together, but I did have alot of moisture in the harness. I also have an external ground wire to the ECU. Dont know if it helped or is actually doing any good. I did mess up my door light switch as I was trying to use it as a temporary ground. Grrr. I broke the white button off trying to loosen it up.
I plan on eventually taking all of the information I learned and putting it into post that I would of liked to have found. Might save someone some trouble. The biggest problem I would say is the little clips that they use to hold the wires together, but I did have alot of moisture in the harness. I also have an external ground wire to the ECU. Dont know if it helped or is actually doing any good. I did mess up my door light switch as I was trying to use it as a temporary ground. Grrr. I broke the white button off trying to loosen it up.
Mar 27, 2012 | 04:11 PM
#299
Thread Starter
Super Moderator
iTrader: (1)
Joined: Aug 2008
Posts: 11,787
Likes: 28
From: Anderson Missouri
This truck hasnt ran in over 5 years. When I started it, it blew rust /dust out the exhaust pipe all over to the far side of the shed. Poouch was in the shop when it started and hauled butt out of there. He has been a cool little dog. I havent like a dog like this one in years.
Also got my gas vent line cleared. I then pourd more Marvel Myster Oil in the pipe, so I expect to change fuel filter at a later time after it has had time to run and get all of the lines clean.

Also got my gas vent line cleared. I then pourd more Marvel Myster Oil in the pipe, so I expect to change fuel filter at a later time after it has had time to run and get all of the lines clean.


