
Redeth's 1989 4Runner Resurrection
 Dec 18, 2013 | 02:43 PM
#2382
Registered User


Joined: Mar 2012
Posts: 7,125
Likes: 681
Happy BDay and glad you had a good time and got lots of things done, Richard!
Congrats to Faby, Rich!
Next project: SAS the scion
Thanks for sharing pics of that speaker. Good to know that a quality 4-inch would fit there. Worst gripe I have with my stereo is how tinny vocals sound. (I'm trying not to drill holes into the doors) I think a quality 4-inch in there would make vocals sound more human. Are you running that 4-incher straight from your stereo, un-amplified?
You got that right! Freakin'Rap! \m/ Maybe I'll mount horn speakers facing either side of the truck playing "Eruption" next time those guys drive up next to me - LOL!
Next project: SAS the scion
. ...Only thing to be proud of was my amp/Subwoofer. lol The sub was the only thing that made my system sound decent. But with cheap stock toyota speakers there was only so much that i could turn up the volume. So I swapped in these awesome 100watt pioneer 4" speakers and his stereo.


... Now i can tune out those A-holes that pull up next to me with their annoying rap music and tone them out with my heavy metal/hardcore music!
Dec 18, 2013 | 04:38 PM
#2383
Registered User
Joined: Dec 2008
Posts: 2,391
Likes: 1
From: tecumseh nebraska
I thought about putting speakers in my doors but theyre so thin you couldnt put a very deep speaker in without interfering with the window regulator and all that crap. It would be cool to build a fiberglass enclosure that fits against the door panel towards the front lower part. Hold like a 6.5 and tweeter. You can do it, you built the bumper!!
Dec 21, 2013 | 08:57 AM
#2384
Thread Starter
Registered User
Joined: Apr 2012
Posts: 2,817
Likes: 2
From: Los Angeles CA
Got lots to reply to you guys. But I gotta post this up for today's knock sensor installation first.
Plenum removal
https://www.yotatech.com/forums/f128...cement-233708/
https://www.yotatech.com/forums/show...252426&page=10
Manifold removal
https://www.yotatech.com/forums/f128...cement-233708/
Vacuum hose diagrams.
https://www.yotatech.com/forums/show...252426&page=12
Plenum removal
https://www.yotatech.com/forums/f128...cement-233708/
https://www.yotatech.com/forums/show...252426&page=10
Manifold removal
https://www.yotatech.com/forums/f128...cement-233708/
Vacuum hose diagrams.
https://www.yotatech.com/forums/show...252426&page=12
Dec 21, 2013 | 09:09 PM
#2385
Yo!..... sup? Haha. ... I figure you're dead center in the middle of a knock sensor marathon... Hope it's going well man.
By the way, looking at that one link, that was some good back and forth we had on some of your repairs!
Take care buddy
By the way, looking at that one link, that was some good back and forth we had on some of your repairs!
Take care buddy
Last edited by ChefYota4x4; Dec 21, 2013 at 09:10 PM.
Dec 22, 2013 | 11:27 AM
#2386
Registered User
Joined: Aug 2011
Posts: 1,507
Likes: 2
From: Fraser Valley, British Columbia
Thank you Andy. And yea i just got done installing the stereo about an hour ago. all i have to say is DAAAAAANG! what a huge difference between my cheap ancient Sony Xplod stereo and stock Toyota speakers. My stereo system wasn't too bad because the sub woofer made it sound much better. but damn now that i put that better stereo and some decent 4" speakers up front i am amazed at the difference. My sub woofer set up with your speakers and stereo sound much more better. Thank you very much for that present dude. I really appreciate it. I'm still trying to get the hang of all the buttons and settings without a instruction manual but so far i think i have the majority of it down already. And i didn't know the face changes color. That's awesome. I managed to make it match my Dash LED lights. I took some pictures of it. I'll post them up in my update post right now. Thanks again for those man. They sound awesome!
Great news. I'm glad you can enjoy them. I really liked them as well and would still be using them if I didn't want some other features for road trips.
Next try and hack some 6" rounds into the door.
I also love my Sirius receiver. I think it's my favorite mod. Having music in the middle of nowhere is awesome.
Your missus looks pretty fun. Mine does sweet stuff for me usually as well. My Bday is tomorrow so I've had a bit of a complex about it because of its proximity to Christmas so I really like it when she can.
Last edited by Red Wagon; Dec 22, 2013 at 11:35 AM.
Dec 22, 2013 | 06:16 PM
#2387
Registered User
Joined: Dec 2008
Posts: 2,391
Likes: 1
From: tecumseh nebraska
Hey rich i acquired a inclinometer with the dash pad and by the looks of yours you have leds in it for the lights. Is that the same bilb that the cluster takes?? I was just going to save myself the trouble and put them in before installing it.
Dec 22, 2013 | 09:42 PM
#2388
Thread Starter
Registered User
Joined: Apr 2012
Posts: 2,817
Likes: 2
From: Los Angeles CA
and that looks a hella lot better than what ive seen a few do with chains to hold the flap from going forward yet letting it sail a bit to the rear UGLY
the normal trucker stays most are a pair of rods |_|
but one milk truck up here had a cow head made of 1/4 rod an chromed to hold his flap its a nice touch
the normal trucker stays most are a pair of rods |_|
but one milk truck up here had a cow head made of 1/4 rod an chromed to hold his flap its a nice touch
Thanks for the props dude. I am satisfied with how they came out. and glad it was a simple fix vs having to weld and make brackets and junk.
Awesome job man! At least for now you should be ok... Let me know if in the future you want some stuff at the yards. I'm down to go with you!
Really stoked for you that you had a good time in the surprise! I've always really enjoyed it that people would go out of their way like that to do something of the sort for me. Its been a long time since I had one of those and now that I see yours, I'm hoping I can get a surprise party one of these years coming up! Lol. Very cool of Faby!
Dude, you almost have no time left... We have to go wheeling!
PS: RIGHTEOUS of Andrew! I forgot about that! Sweet tunes!
 As for the rotor i am not sure. I think they looked at the indented numbers on the rim of the rotor. i cant remember.
Thanks buddy.
Glad to hear you got your brakes fixed, that's gotta be a weight off your shoulders! I had to laugh when you said you were glad to finally get rid of your "cheapie Sony Xplod" stereo, I just put one in my 4runner, lol! It was free tho, and the CD player and aux input still works, so as long as I got music it's fine for now, ha, ha. I like the looks of your white LED lights, that's cool that the JVC matches! I'm want to do the LED dash gauge light swap someday,(but I want to do the SR5 gauge swap first) again Nice work as always!
Getting those brakes fixed definitely made me happy. (that was actually my birthday wish haha.) i was so fusterated with my brakes that i actually wished to be able to get these brakes fixed. and by the next day we fixed them.
lol might have just been perfect timing lolIt does need some work. but what can i say. After all it is a salvage title, and it is used. there is bound to be fixes here and there right? We did a tune up on her car last weekend, and also changed the Valve cover gasket that was leaking all over the back side of her engine. I'm sure you saw the insagram picuture of us doing this job.
Happy BDay and glad you had a good time and got lots of things done, Richard!
Congrats to Faby, Rich!
Next project: SAS the scion
Thanks for sharing pics of that speaker. Good to know that a quality 4-inch would fit there. Worst gripe I have with my stereo is how tinny vocals sound. (I'm trying not to drill holes into the doors) I think a quality 4-inch in there would make vocals sound more human. Are you running that 4-incher straight from your stereo, un-amplified?
You got that right! Freakin'Rap! \m/ Maybe I'll mount horn speakers facing either side of the truck playing "Eruption" next time those guys drive up next to me - LOL!
Oh dude go the extra mile and avoid cutting holes. You'll thank me later. Spend the extra 20-30 dollars and buy yourself a good pair of 4" speakers like JL, or Polk audio speakers. There are a lot of decent 4" speakers out there. I definitely recomend upgrading to a cheap brand. Anything is better then the stock speakers. but if you want some good sound quality you should definitely spend that $120 on some quality 4" speakers. Definitely want something that is going to be able to keep up with your bigger rear speakers.
As for my speakers. Yes i am running the speakers straight to the stereo. Most stereos now days have a small amp built into it already. I usually just wire them up like this and use the RCA cables to to the the amp which powers the sub. This is enough for my truck.
Though i do have 2 amps for my corolla's stereo system. one for the 4 speakers and one for the subwoofer. All kicker speakers and sub. That car sounds great.
But my older brother wired his eclipse like my truck. Powering his kicker sub with a 800w crunch amp and using 5 polk audio speakers all connected to the stereo itself and his system sounds a hell of a lot better and cleaner then either of my cars. Just something to think about thats all. I would much rather choose quality when it comes to speakers.
I thought about putting speakers in my doors but theyre so thin you couldnt put a very deep speaker in without interfering with the window regulator and all that crap. It would be cool to build a fiberglass enclosure that fits against the door panel towards the front lower part. Hold like a 6.5 and tweeter. You can do it, you built the bumper!!
Great news. I'm glad you can enjoy them. I really liked them as well and would still be using them if I didn't want some other features for road trips.
Next try and hack some 6" rounds into the door.
I also love my Sirius receiver. I think it's my favorite mod. Having music in the middle of nowhere is awesome.
Your missus looks pretty fun. Mine does sweet stuff for me usually as well. My Bday is tomorrow so I've had a bit of a complex about it because of its proximity to Christmas so I really like it when she can.
She is a great girl. She is super girly. But at the same time she isn't afraid to get a bit of oil and grease under her nails either.
Yes the lights are the same ones as the speedometer. I believe that altimeter takes 2 bulbs.
Dec 22, 2013 | 09:49 PM
#2389
Thread Starter
Registered User
Joined: Apr 2012
Posts: 2,817
Likes: 2
From: Los Angeles CA
I was gonna type up my knock sensor replacement experience tonight but after 2 days of getting my butt kicked for that job and typing up all the replies. I'm just exhaused. I will go ahead and do a short write up of my experience and post pix and videos tomorrow. Good night people.
Dec 22, 2013 | 11:13 PM
#2390
Registered User
Joined: Mar 2012
Posts: 7,125
Likes: 681
... Polk audio speakers...
... Yes i am running the speakers straight to the stereo. Most stereos now days have a small amp built into it already. I usually just wire them up like this and use the RCA cables to to the the amp which powers the sub. This is enough for my truck.
... Yes i am running the speakers straight to the stereo. Most stereos now days have a small amp built into it already. I usually just wire them up like this and use the RCA cables to to the the amp which powers the sub. This is enough for my truck.
Yeah, now that I know I'll just power fronts and rears directly with head unit. So far, my plan is:
(Polk audio seems to get good well-balanced reviews in terms of efficiency and sound quality (SQ) so I'm going for that.)
First replace fronts with 2-way, 4-inch Polk audio db401 like yours, to make vocals sound more human-like.
When budget allows, get Polk Audio 6.5-inch rears. My ideal "un-amplified" setup would really be Polk Audio 2-way component set DXi6501; mount mid-sub driver in rear and IF tweeter can mount on to A-pillar, I'll do it to bring treble to ear-level.
Last edited by RAD4Runner; Dec 22, 2013 at 11:17 PM.
Dec 23, 2013 | 02:16 AM
#2391
Looks like you had a great birthday. On your brakes, I disconnect the lines and use an air hose and flush them with fairly high pressure air. It can make a mess but it does knock alot of loose crap out of the lines. I have seen fluid that was probably the same that came from the factory in some of these trucks.
Good job on the Knock Sensor. I hear it can be tough on a 3.0.
Good job on the Knock Sensor. I hear it can be tough on a 3.0.
Dec 23, 2013 | 03:46 AM
#2392
Registered User
Joined: Feb 2013
Posts: 121
Likes: 0
From: Central CA
Hey man, I haven't been able to keep up with anybody at all but noticed Faby had picked up a tC. I loved mine and then saw someone joked about an SAS on one. While I don't know of anyone SAS'ing one (of course), I know of some guys that have definitely abused a few. Here's one of my favorites if you ever want to get a laugh.
Zombie Apoc tC
Happy belated BDay and hope all is well.
Zombie Apoc tC
Happy belated BDay and hope all is well.
Last edited by diableri; Dec 23, 2013 at 03:48 AM.
Dec 23, 2013 | 10:26 AM
#2393
Hahaha, I knew it, almost like I had a second sight as to where you were leaning over the top of the engine with the truck all lifted and on a ladder... Scary! Lol. Sorry it was such a pain in the ass, & I really hope it solves every issue that you need handled before smog... Great job buddy!
Dec 23, 2013 | 12:46 PM
#2394
Registered User
iTrader: (4)
Joined: May 2010
Posts: 720
Likes: 16
From: People's Republic of California
You've been busy Richard! Happy Birthday! Glad to see Faby a part of your life again! Didn't she buy a Taco side-step bed truck not long ago? now she's getting a Scion?
Text me if you need help at the yard or anything, I've been going pretty consistently because I have another project to do on the Camry...auto to manual swap.
Text me if you need help at the yard or anything, I've been going pretty consistently because I have another project to do on the Camry...auto to manual swap.
Dec 23, 2013 | 03:28 PM
#2395
Thread Starter
Registered User
Joined: Apr 2012
Posts: 2,817
Likes: 2
From: Los Angeles CA
Thanks, Richard.
Yeah, now that I know I'll just power fronts and rears directly with head unit. So far, my plan is:
(Polk audio seems to get good well-balanced reviews in terms of efficiency and sound quality (SQ) so I'm going for that.)
First replace fronts with 2-way, 4-inch Polk audio db401 like yours, to make vocals sound more human-like.
When budget allows, get Polk Audio 6.5-inch rears. My ideal "un-amplified" setup would really be Polk Audio 2-way component set DXi6501; mount mid-sub driver in rear and IF tweeter can mount on to A-pillar, I'll do it to bring treble to ear-level.
Looks like you had a great birthday. On your brakes, I disconnect the lines and use an air hose and flush them with fairly high pressure air. It can make a mess but it does knock alot of loose crap out of the lines. I have seen fluid that was probably the same that came from the factory in some of these trucks.
Good job on the Knock Sensor. I hear it can be tough on a 3.0.
Good job on the Knock Sensor. I hear it can be tough on a 3.0.
as for the knock sensor. Oh boy you have only heard of the drama. but let me tell ya, all thouse people in the write ups and always complaining about the dreaded code 2 knock sensor. They are most definitely in the right to be mad about it lol It was a very hard job.
Hey man, I haven't been able to keep up with anybody at all but noticed Faby had picked up a tC. I loved mine and then saw someone joked about an SAS on one. While I don't know of anyone SAS'ing one (of course), I know of some guys that have definitely abused a few. Here's one of my favorites if you ever want to get a laugh.
Zombie Apoc tC
Happy belated BDay and hope all is well.
Zombie Apoc tC
Happy belated BDay and hope all is well.
Thanks for the birthday wishes.
You've been busy Richard! Happy Birthday! Glad to see Faby a part of your life again! Didn't she buy a Taco side-step bed truck not long ago? now she's getting a Scion?
Text me if you need help at the yard or anything, I've been going pretty consistently because I have another project to do on the Camry...auto to manual swap.
Text me if you need help at the yard or anything, I've been going pretty consistently because I have another project to do on the Camry...auto to manual swap.
As for things i need from the junk yard go. I do need a new fan for the 3vze. Im just wondering if the 1990-95 4door 4runner fans are the same as the ones found int he 1st gen. because if that's the case then i can find one at just about any pick your part. I also need the screws that hold on the distributer cap. I saw that i lost one of the 3 screws. and the 2 that i do have are mismatched. I want to hit up the yards sometime soon.
Last edited by Redeth005; Dec 23, 2013 at 03:33 PM.
Dec 23, 2013 | 04:12 PM
#2396
Registered User
Joined: Mar 2012
Posts: 7,125
Likes: 681
Dec 26, 2013 | 12:07 PM
#2397
Thread Starter
Registered User
Joined: Apr 2012
Posts: 2,817
Likes: 2
From: Los Angeles CA
Ohhhh my god..... I just had the entire knock sensor write up finished. All done through my cell phone here at work. Wow... can't believe that just happened.
Well I'm gonna have to do his write up when I get home. Dang that sucks
Well I'm gonna have to do his write up when I get home. Dang that sucks
Dec 26, 2013 | 09:22 PM
#2400
Thread Starter
Registered User
Joined: Apr 2012
Posts: 2,817
Likes: 2
From: Los Angeles CA
Hi guys. I think I have finally lagged it long enough with typing out my Knock Sensor Code 52 fix experience. So I decided to make you guys a write up this morning and I accidentally deleted the entire thing! I had just finished everything when I clicked the back button on my phone. That’ll teach me to not do any more write ups through my phone.
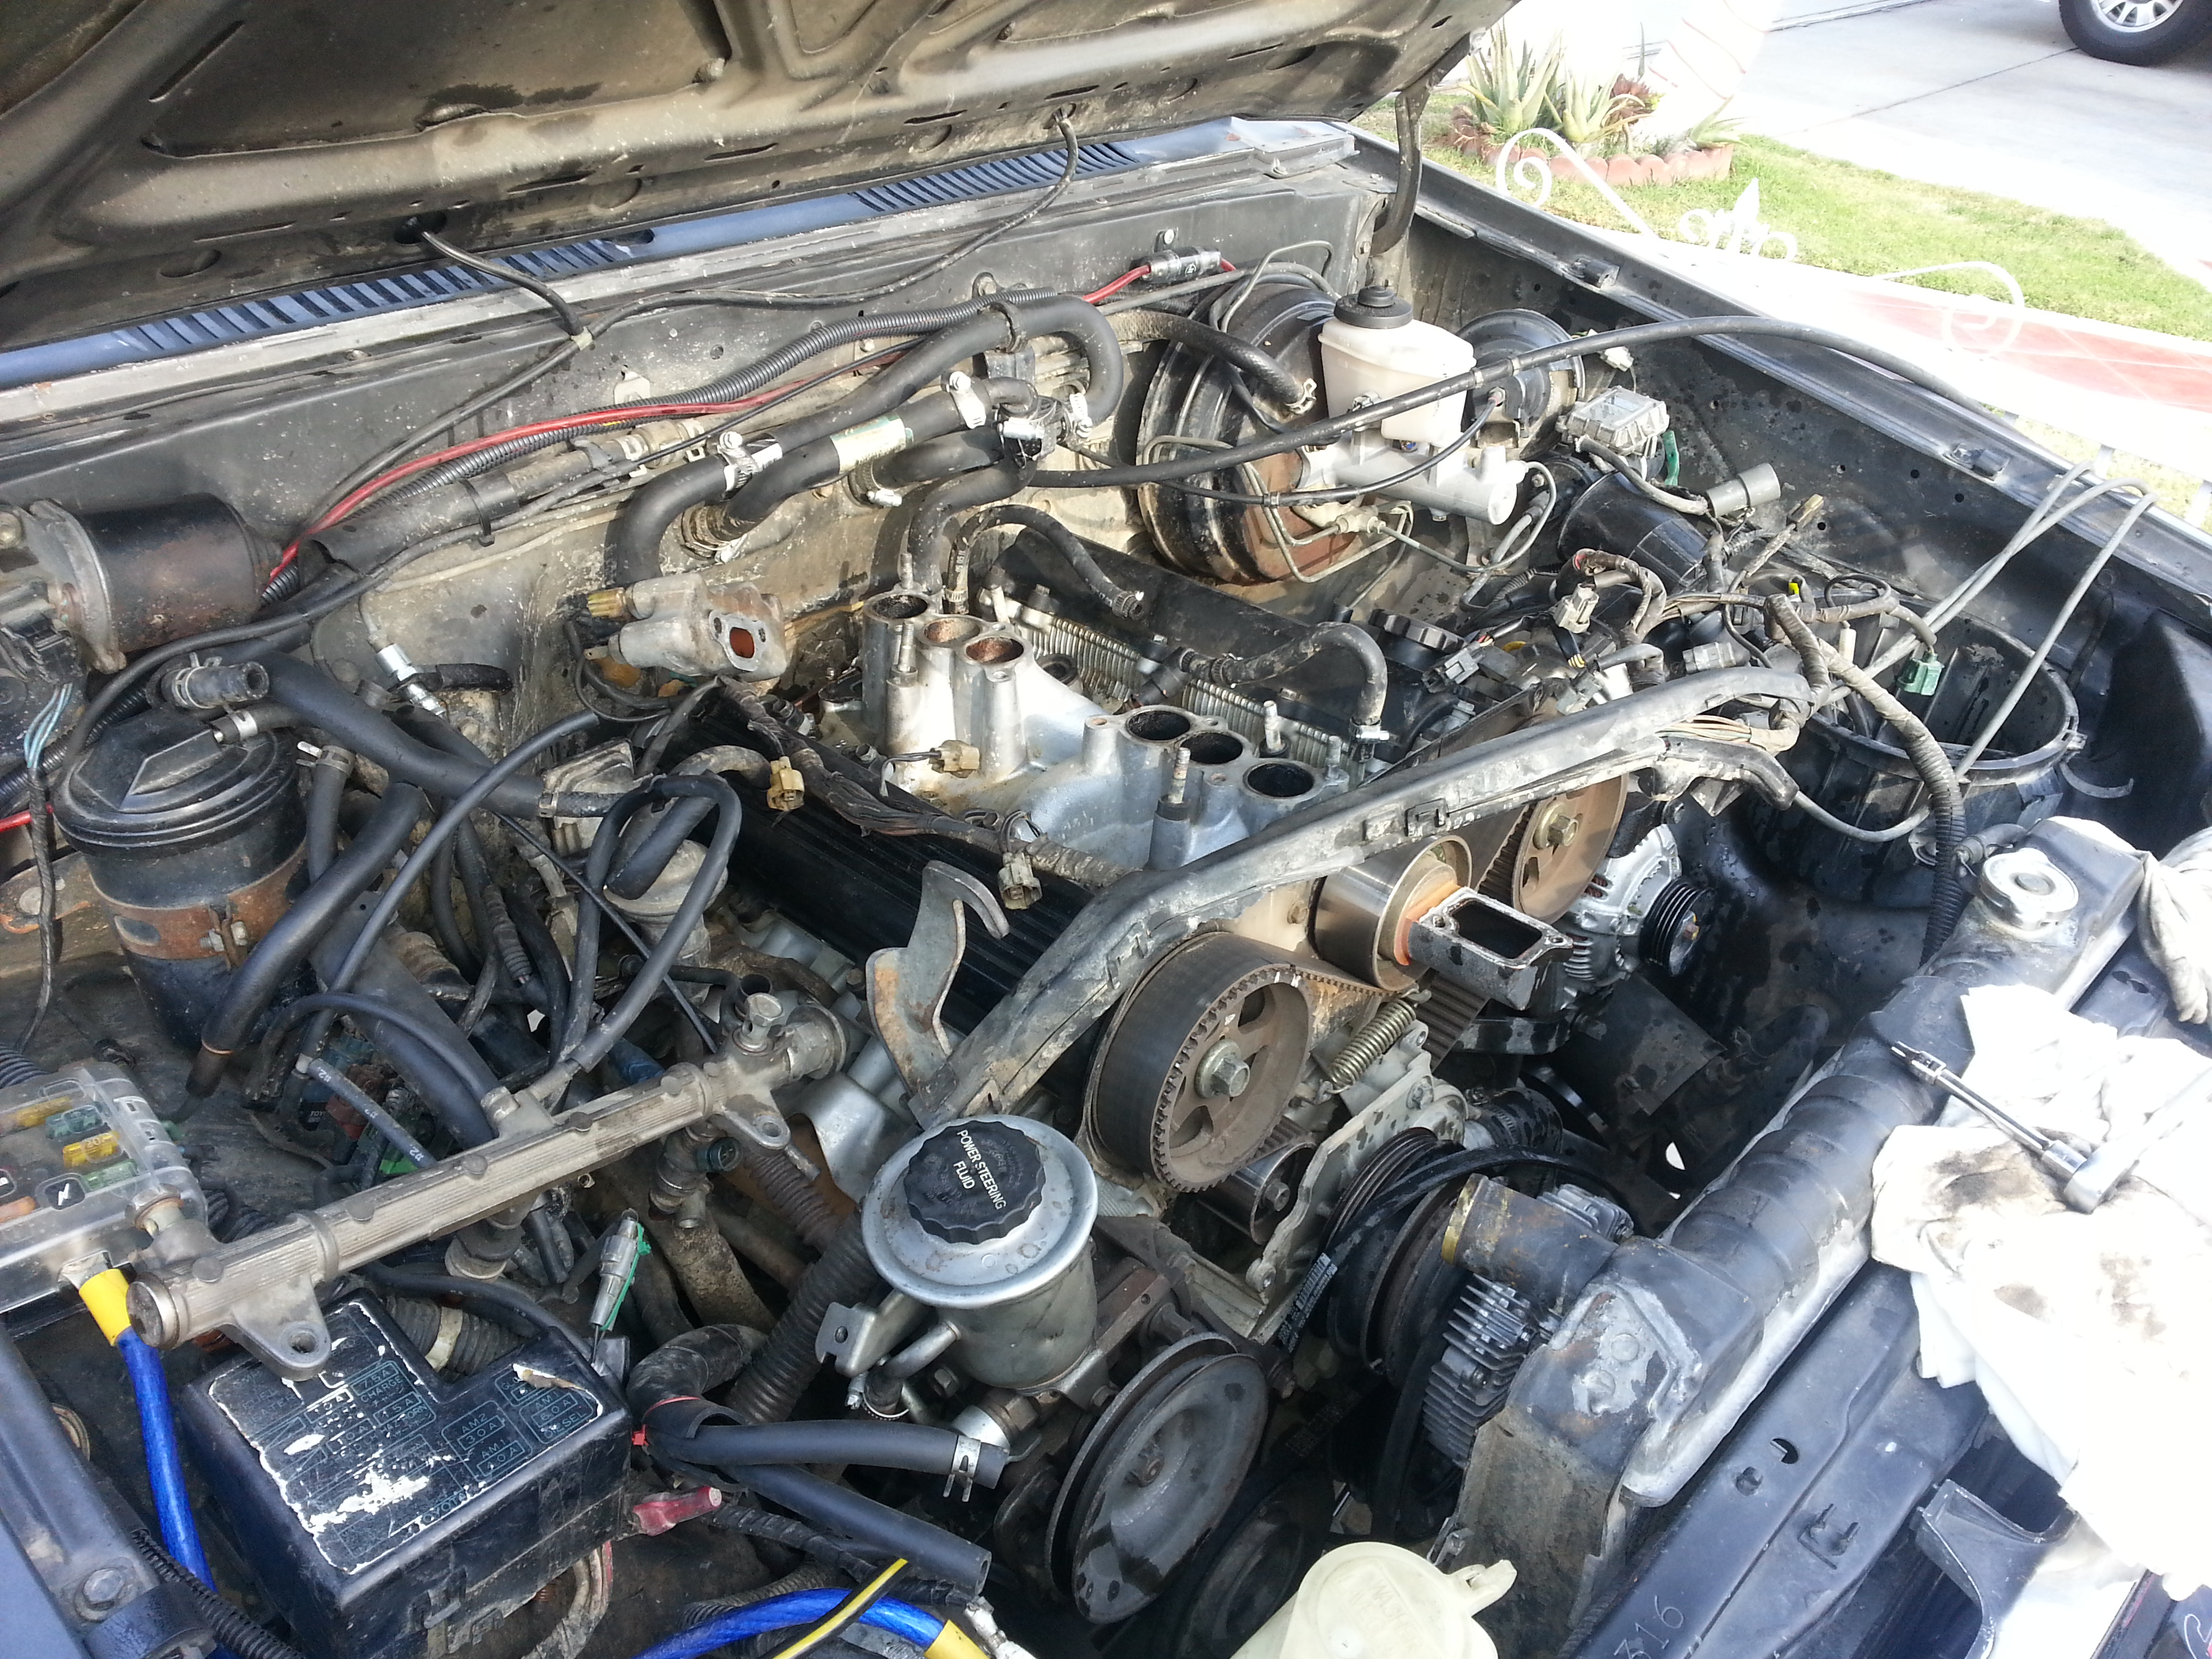
I just want to say that this knock sensor job has been the most difficult thing I have ever done on any motor. This is definitely one experience I don’t ever want to experience again. It was such a major pain in the ass to get it done. This job took me 2 days to complete; 11am-9pm on Saturday and 12pm-7:30pm on Sunday. Not to mention the worst experience of all was the fact that I have a 4-5” lift on this truck so I spent the entire job on a 1ft tall work stool hunched over my engine bay doing the entire job. Not to mention it was even worse considering how far out my bumper sticks out in front of the truck. This just called for making my experience much more miserable. I’m sure you guys can only imagine the back pain I had after this past weekend. It wasn’t so bad when the truck was at stock height but man…. This was too much lol The only thing that i had an advantage with was the fact that I had previously removed the intake plenum early last year to replace my BVSV so I more or less knew how to get to that point again which made up for about 1/4th of the entire job.
Anyway lets begin. I first made sure to wash the engine a few days before cleaning up all dust, mud, leaves really anything that could get in places you don’t want debris to get into such as the manifold. I then placed some plastic trays under the truck for when I pull the radiator hose, plenum, and manifold off the antifreeze can just drain onto those trays. I did my job in the drive way and I had our lawn to the left side and the neighbors lawn to the right. So I wanted to make sure I wasn’t gonna piss anybody off by killing their grass. Then I made some videos to show me where all my vacuum lines were connected to. I have all the vacuum diagrams already so I didn’t worry too much about labeling. I work better when I see things visually anyway. So I chose videos to refer back to.
I then removed the fan shroud which was held together by 4 10mm bolts. Followed by removing the fan which is held on to the fan clutch by 4 small 10mm nuts. I removed the top radiator hose and drained the antifreeze onto the trays below. After unplugging the vacuum hoses I removed the throttle cable and removed all the bolts and nuts that hold on the intake plenum EGR, etc… Majority if not all these bolts were 12mm. used an adjustable wrench for the bigger egr nuts. When removing the plenum make sure you hold the plenum level. Don’t tilt because it still has antifreeze in it. You don’t want it spilling into your manifold holes. I unfortunately forgot about this and it spilt all over. Here I had Faby working hard wiping up all the antifreeze that spilt.

After the plenumn was off I removed the top portion of that radiator hose connector. They are 2 parts. Held together by 2 nuts. Once that is off you can remove the timing belt dust shield This is held on with many 10mm bolts and nuts. In order to get to the dust shield bolt behind the power steering reservoir you’ll need to loosen the tensioner on that belt to move it out of the way.. I then removed the fuel rails and fuel injectors. I was actually scared to break these but I found out it wasn’t so bad. I belive the bolts are 17mm sockets. Keep in mind those things have gasoline inside them. And it will leak gas when you remove the bolts. Its fine don’t worry. This will also leak A LOT when the injectors are removed. Its no biggie. They will fill up again once you try to start up the truck at the very end of putting it back together. They wont continue to leak so no worry there.
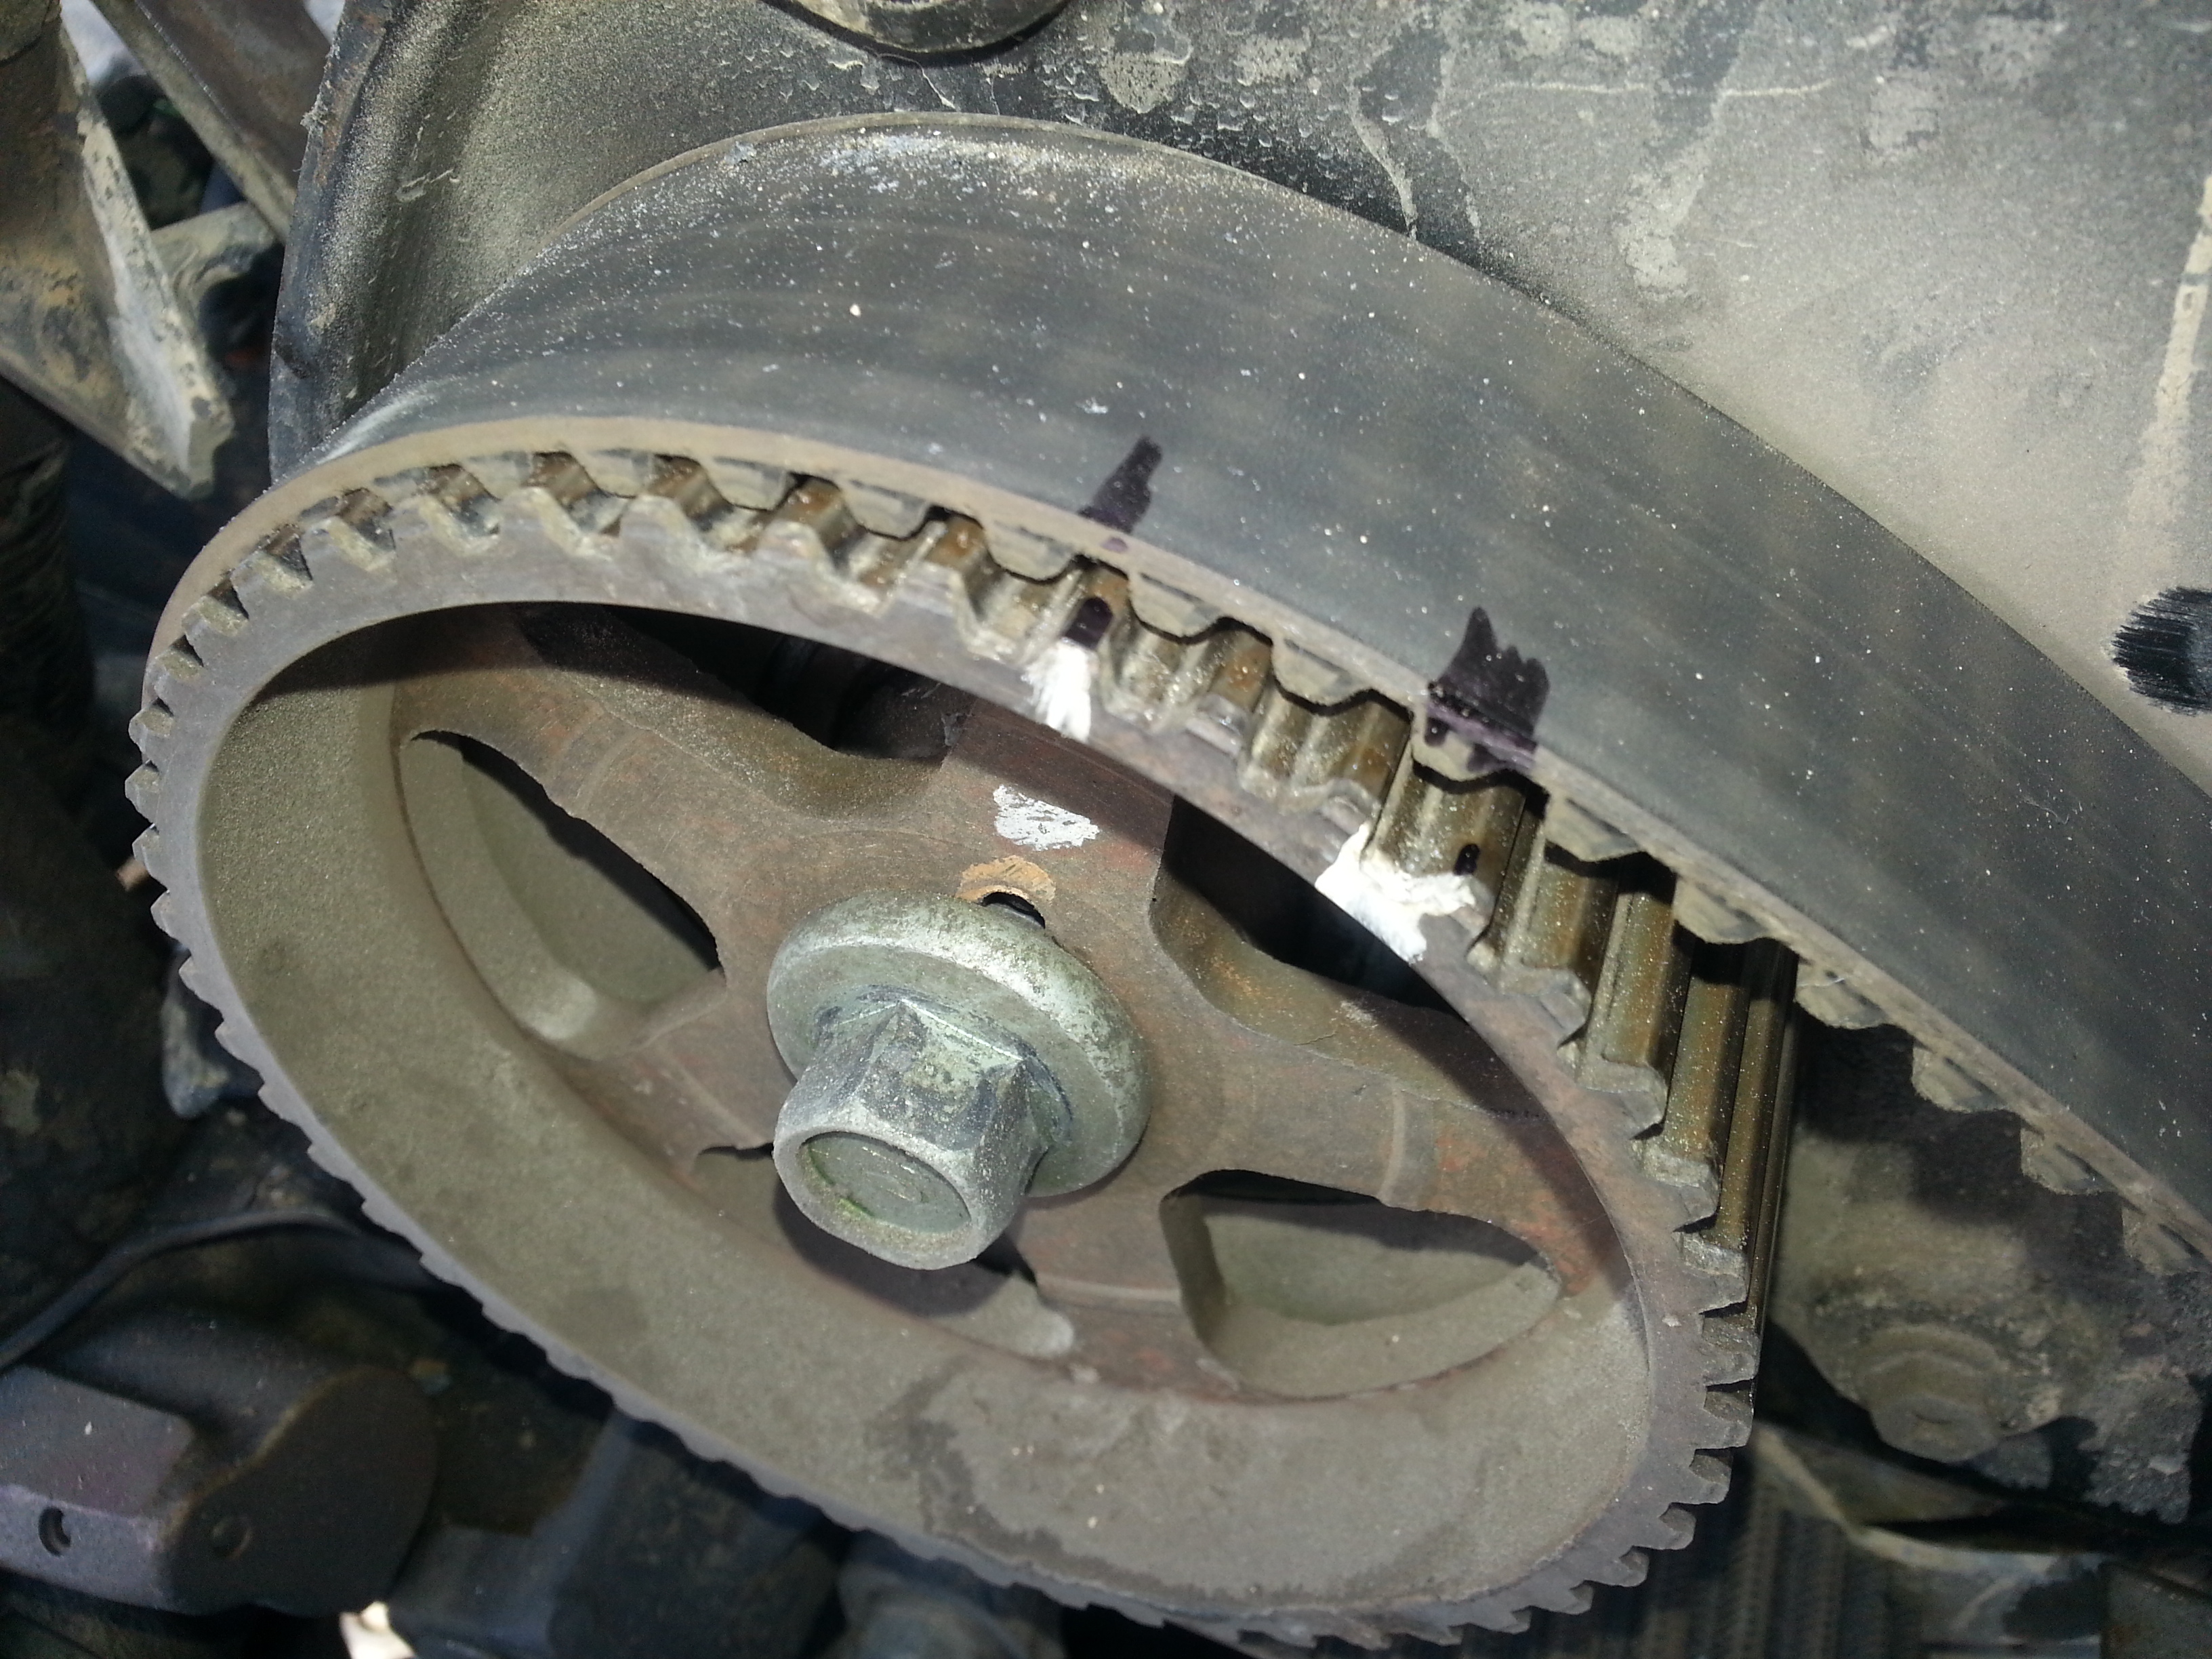
After removing the dust shield I made sure to mark the timing belt with the white markings that were already there; just in case. I later found out that by doing this I saved my ass BIG TIME! So don’t forget to mark the lines. I did this for both of the wheels to both heads.
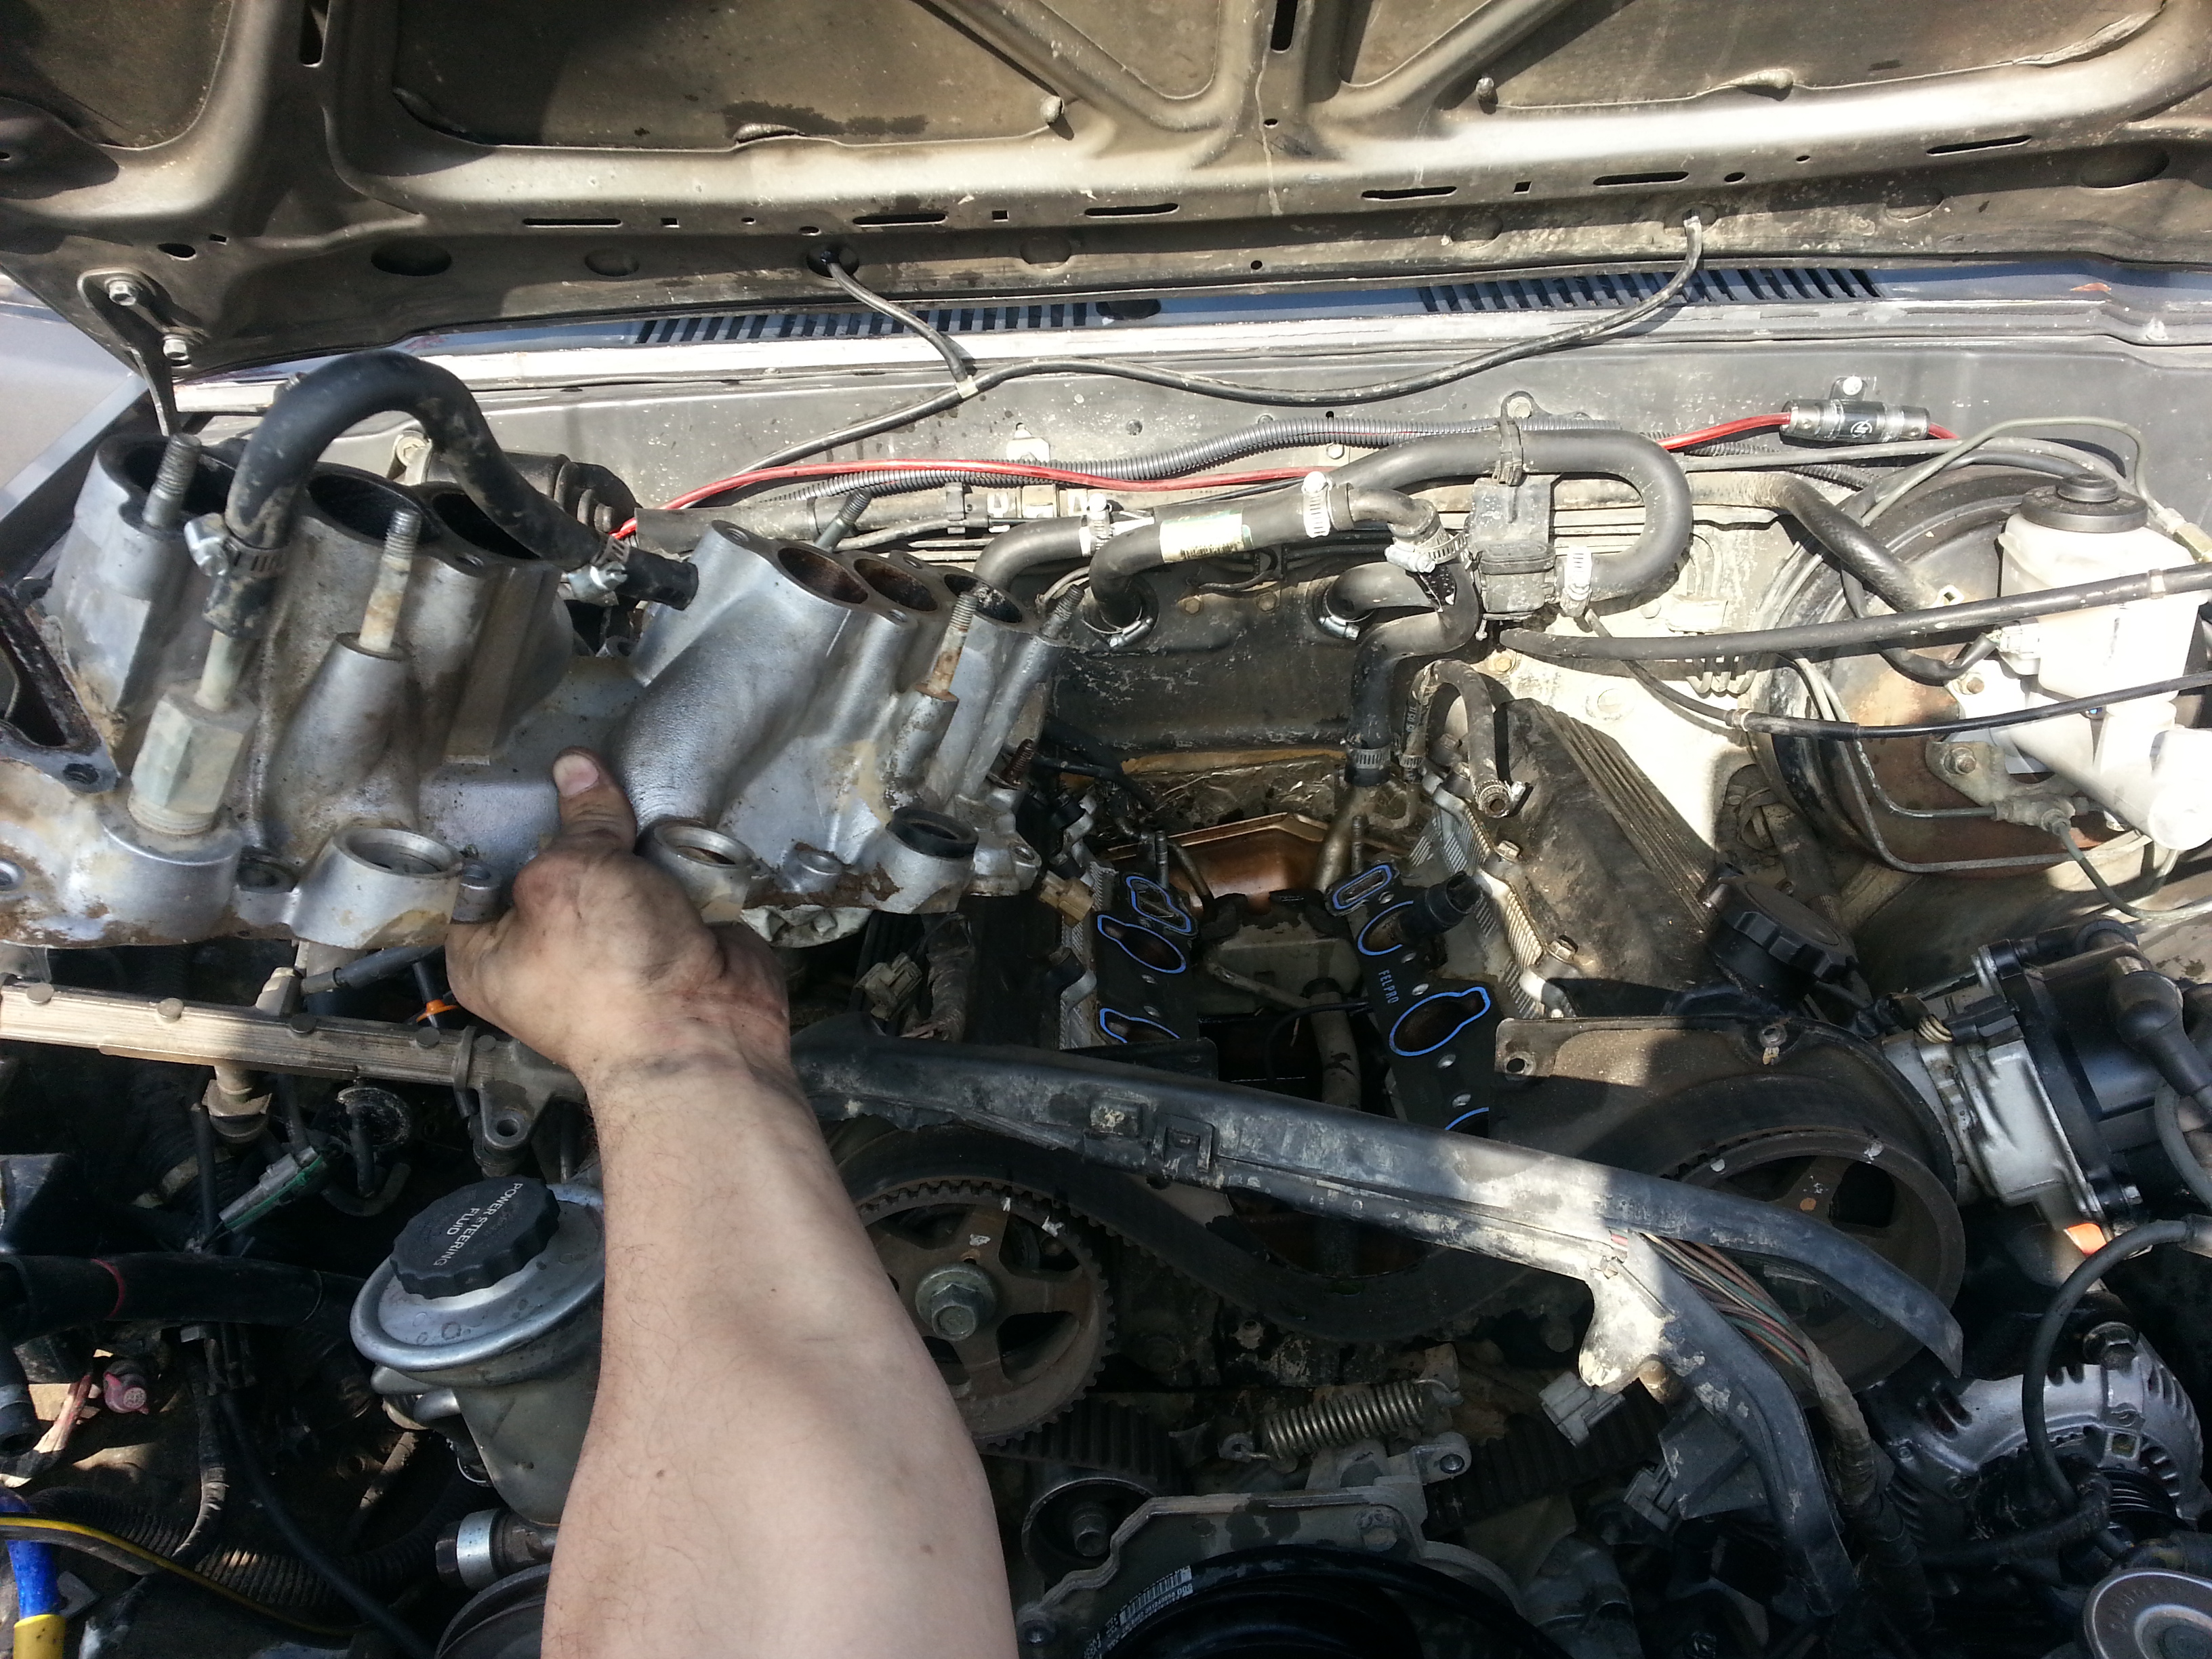
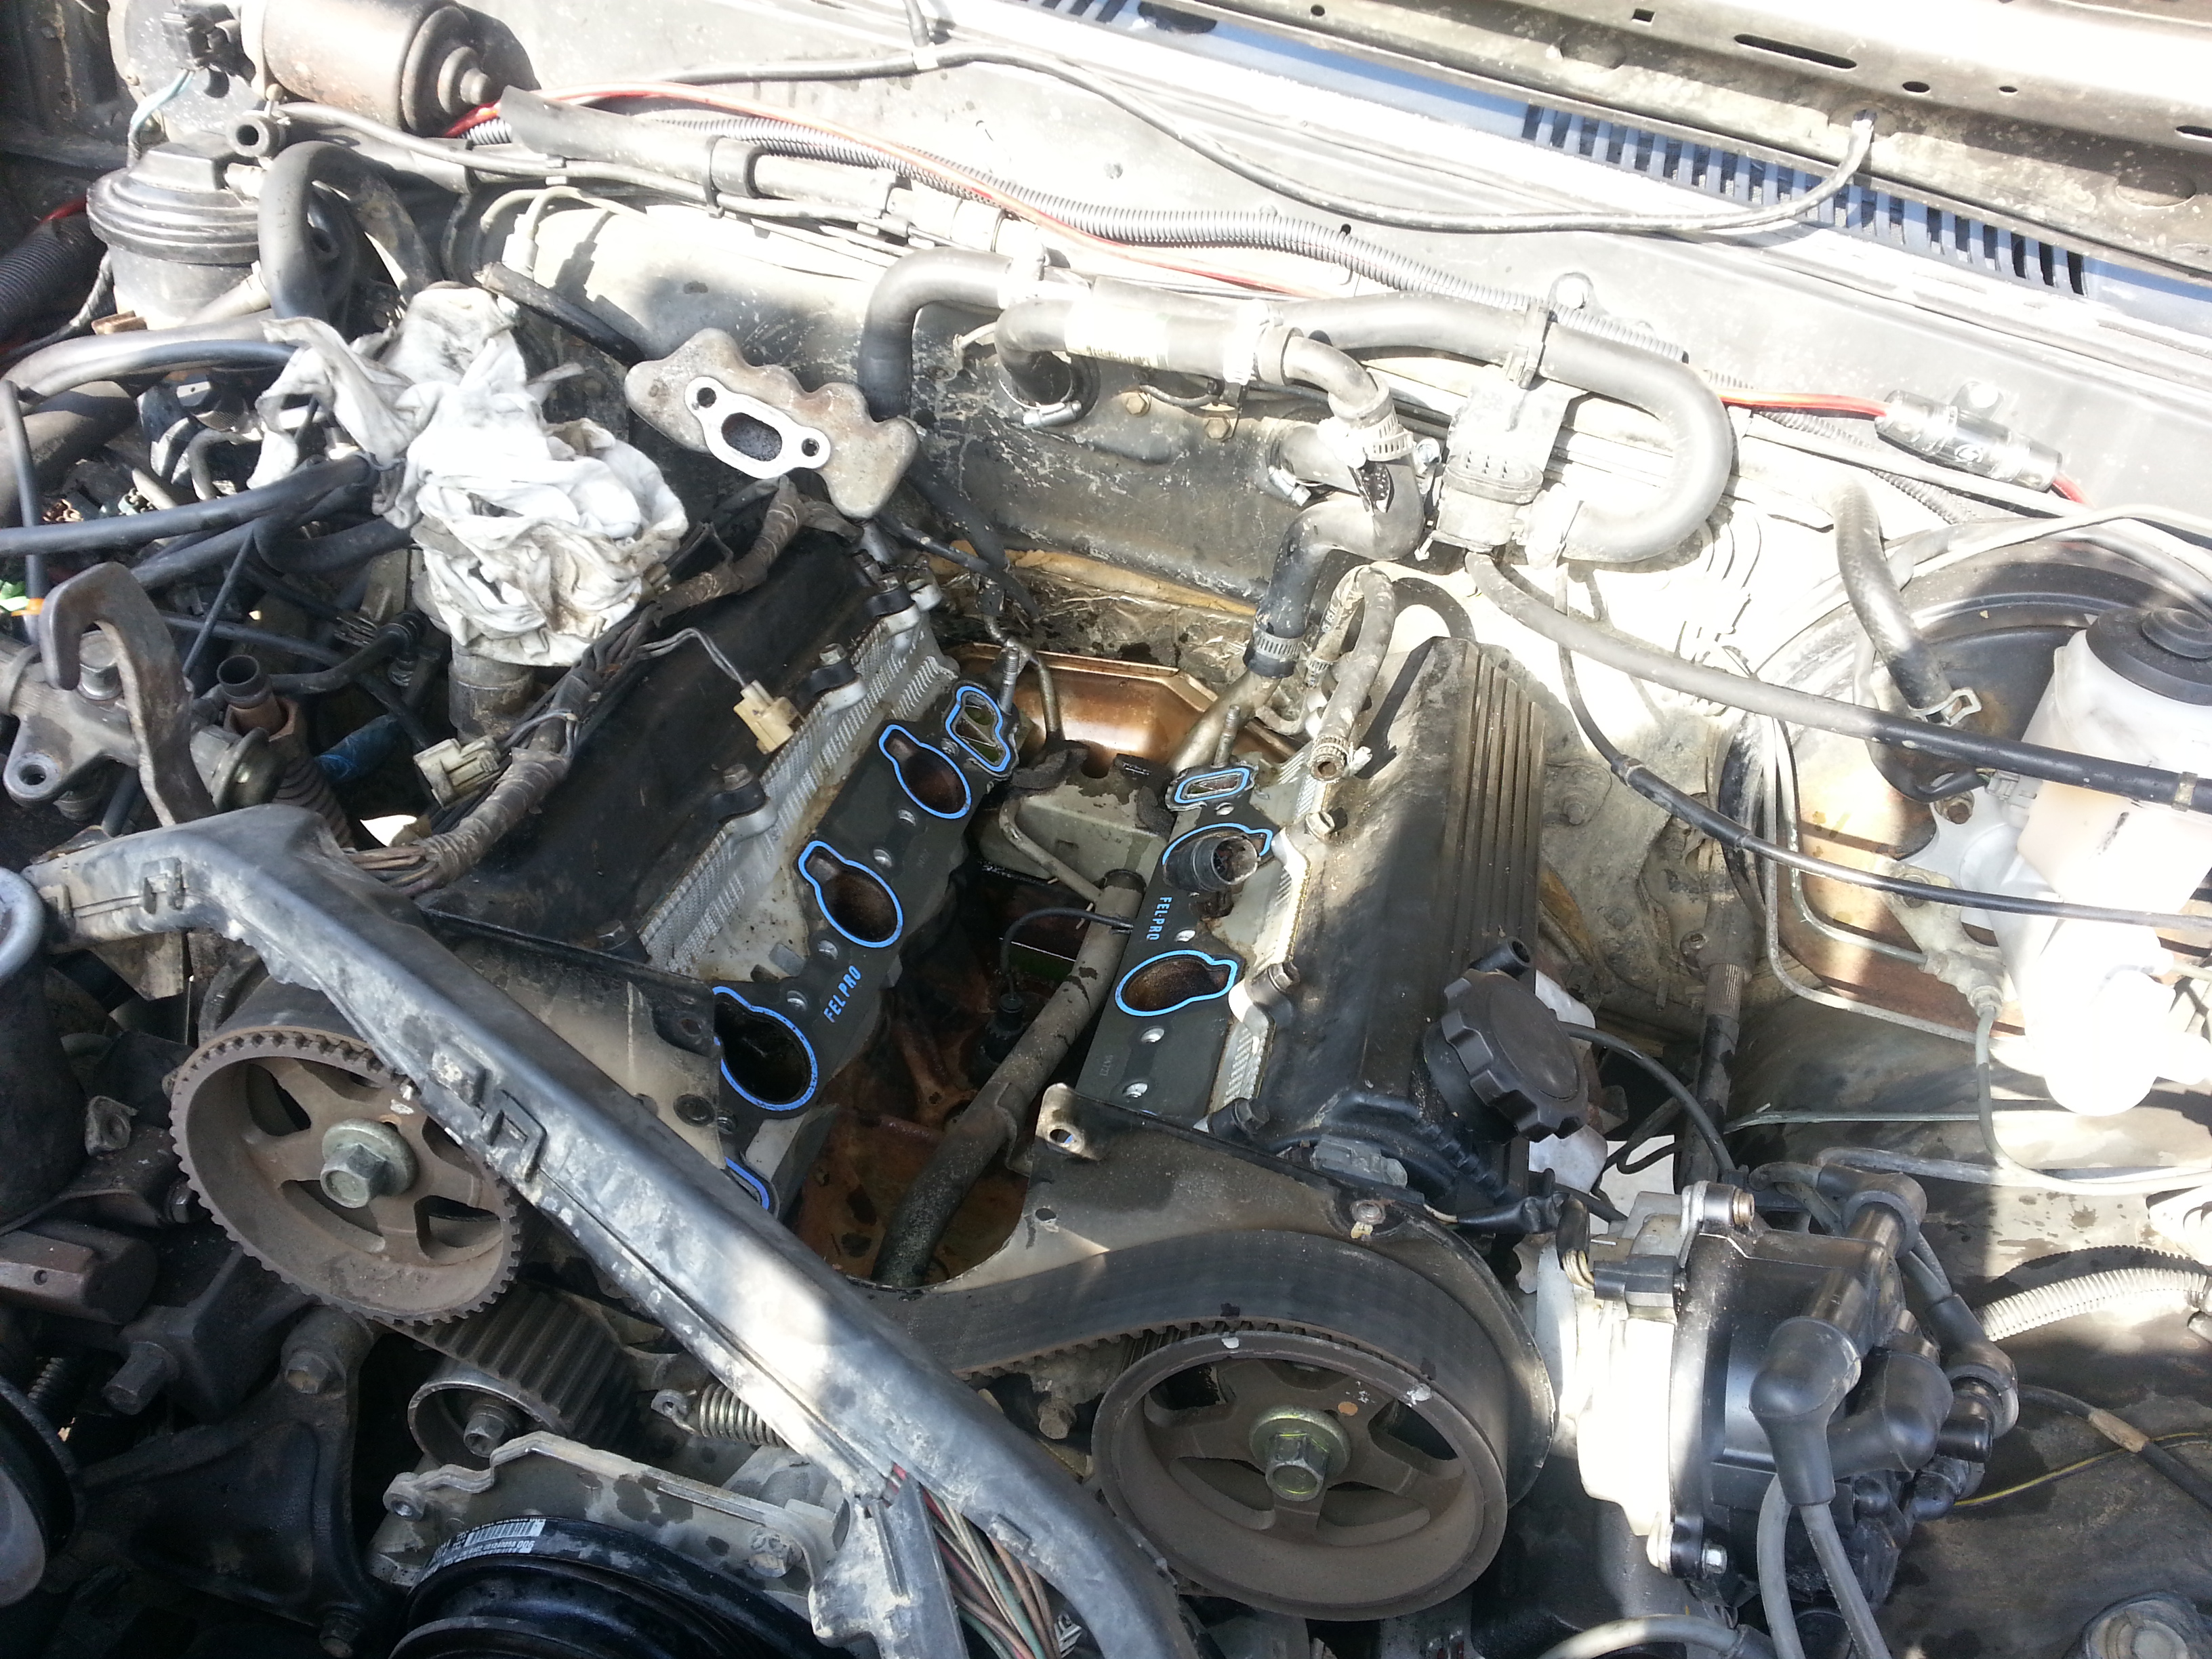
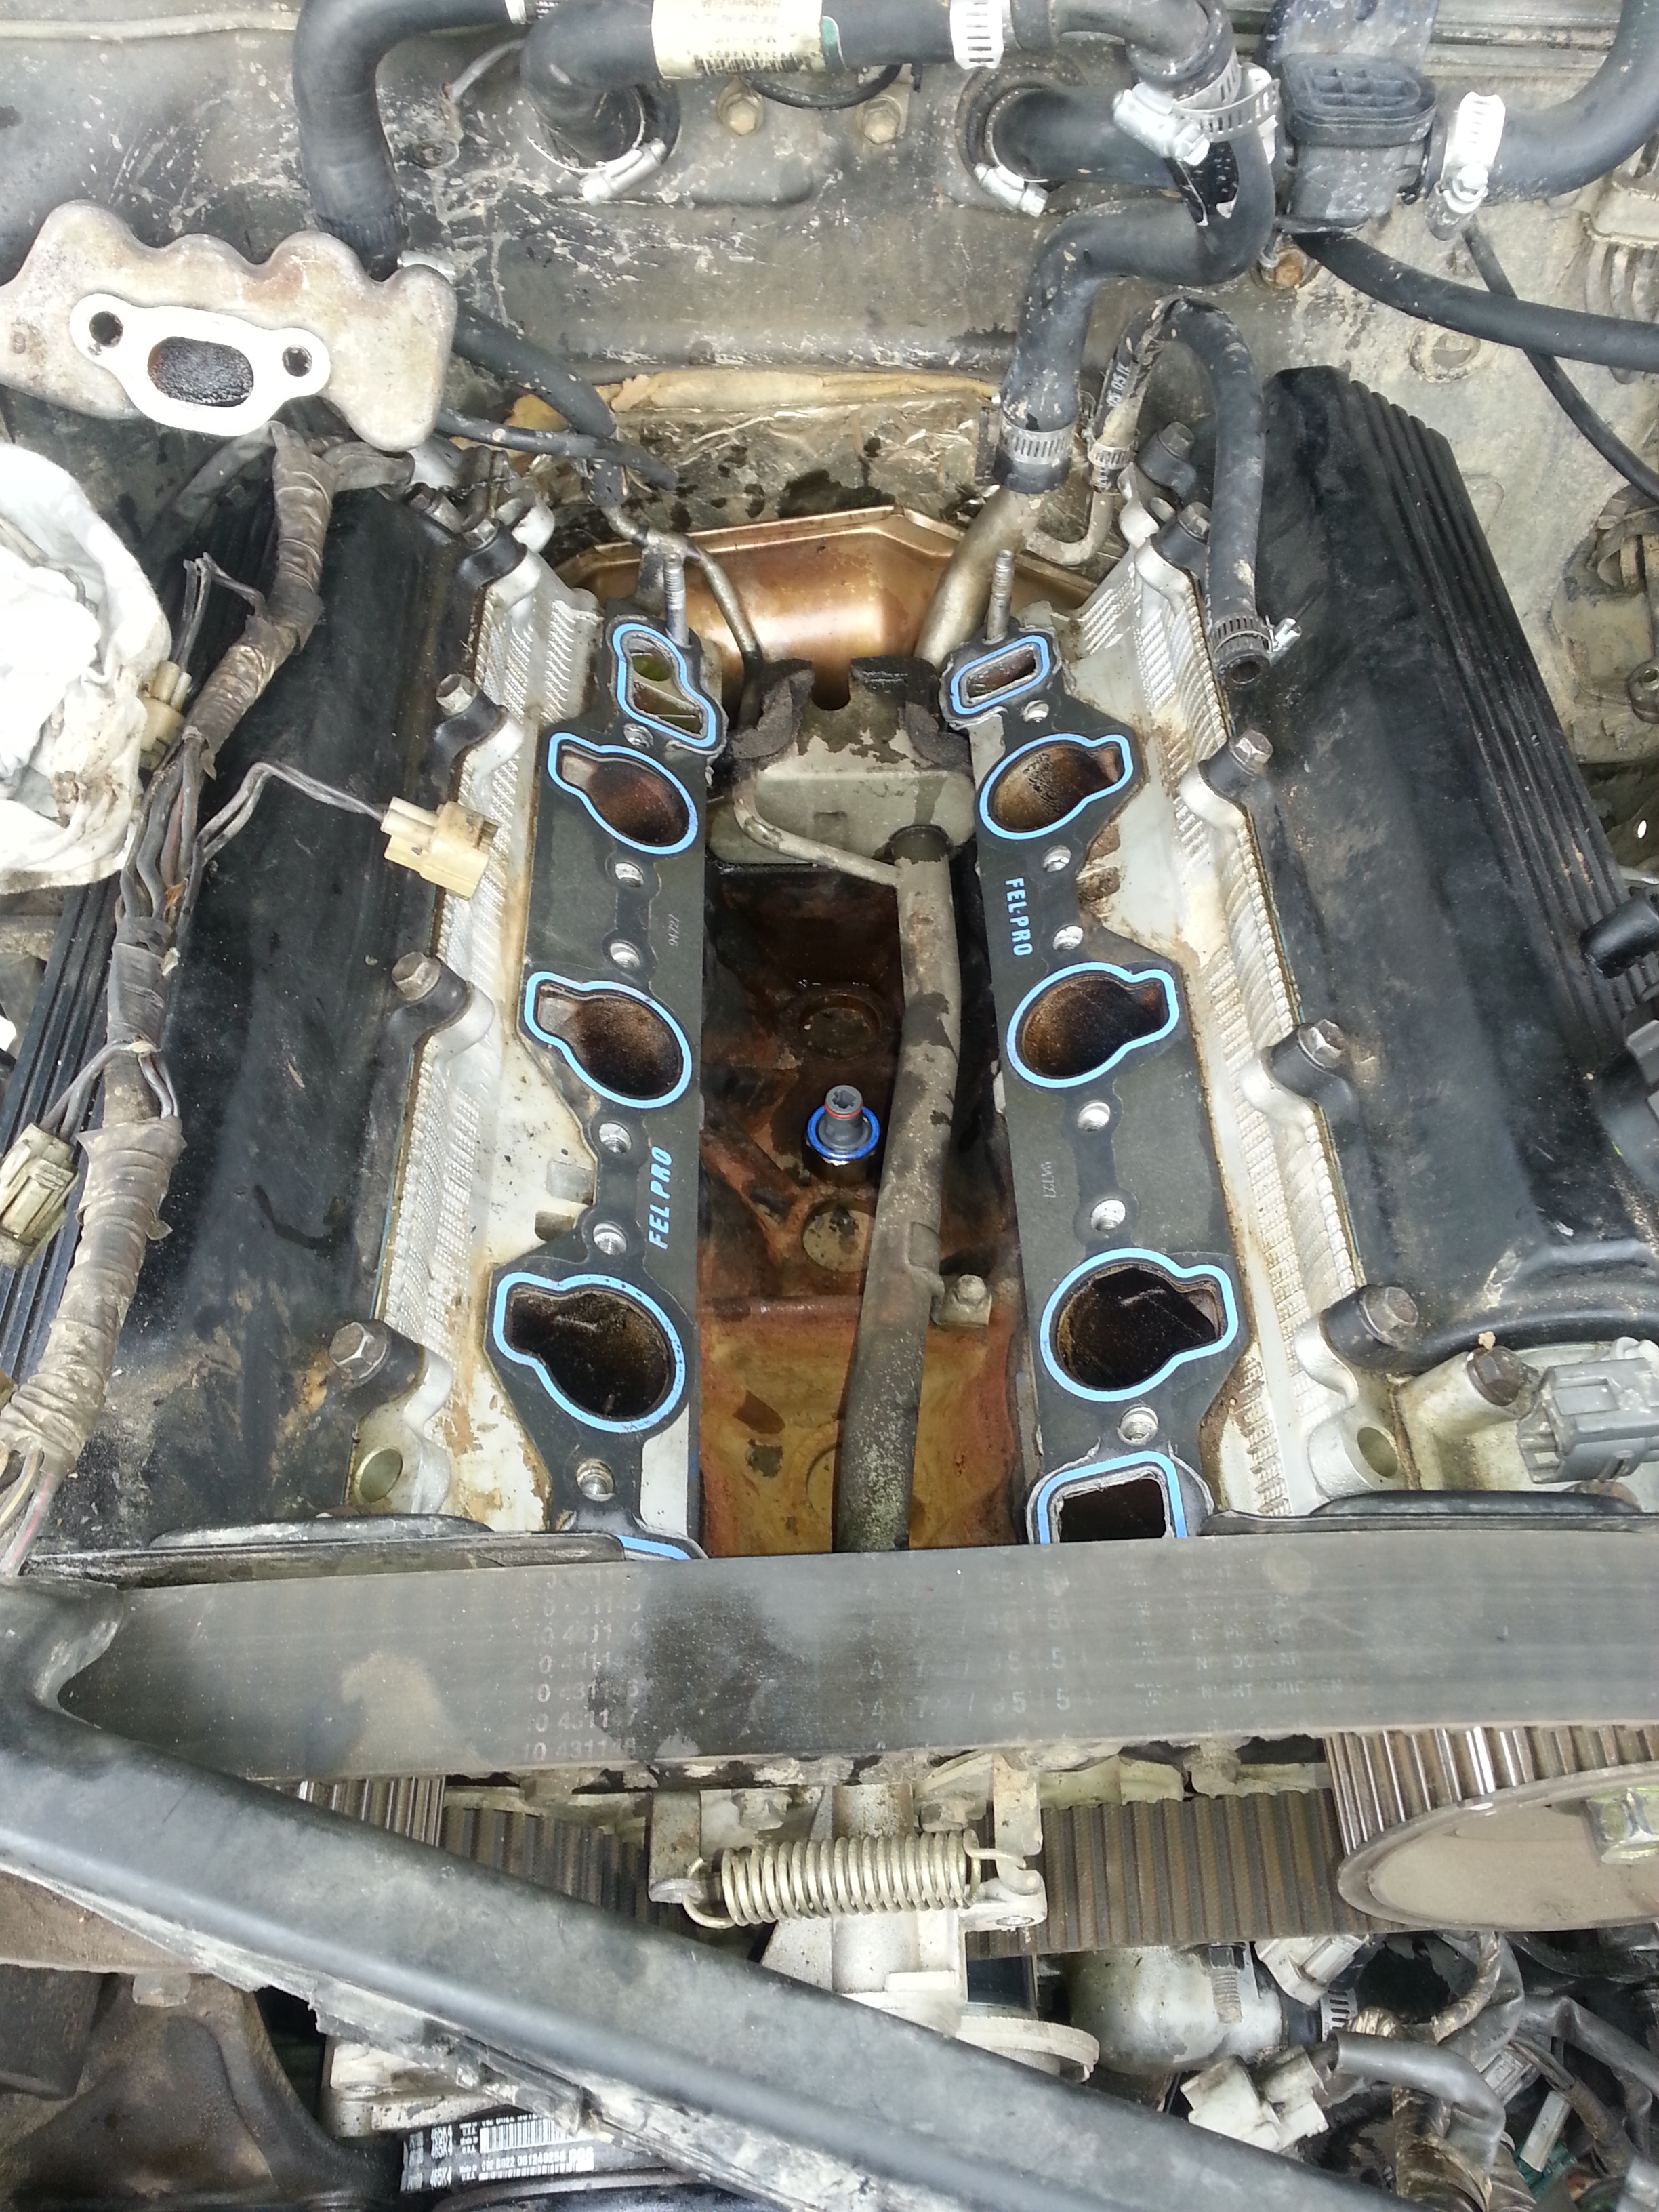
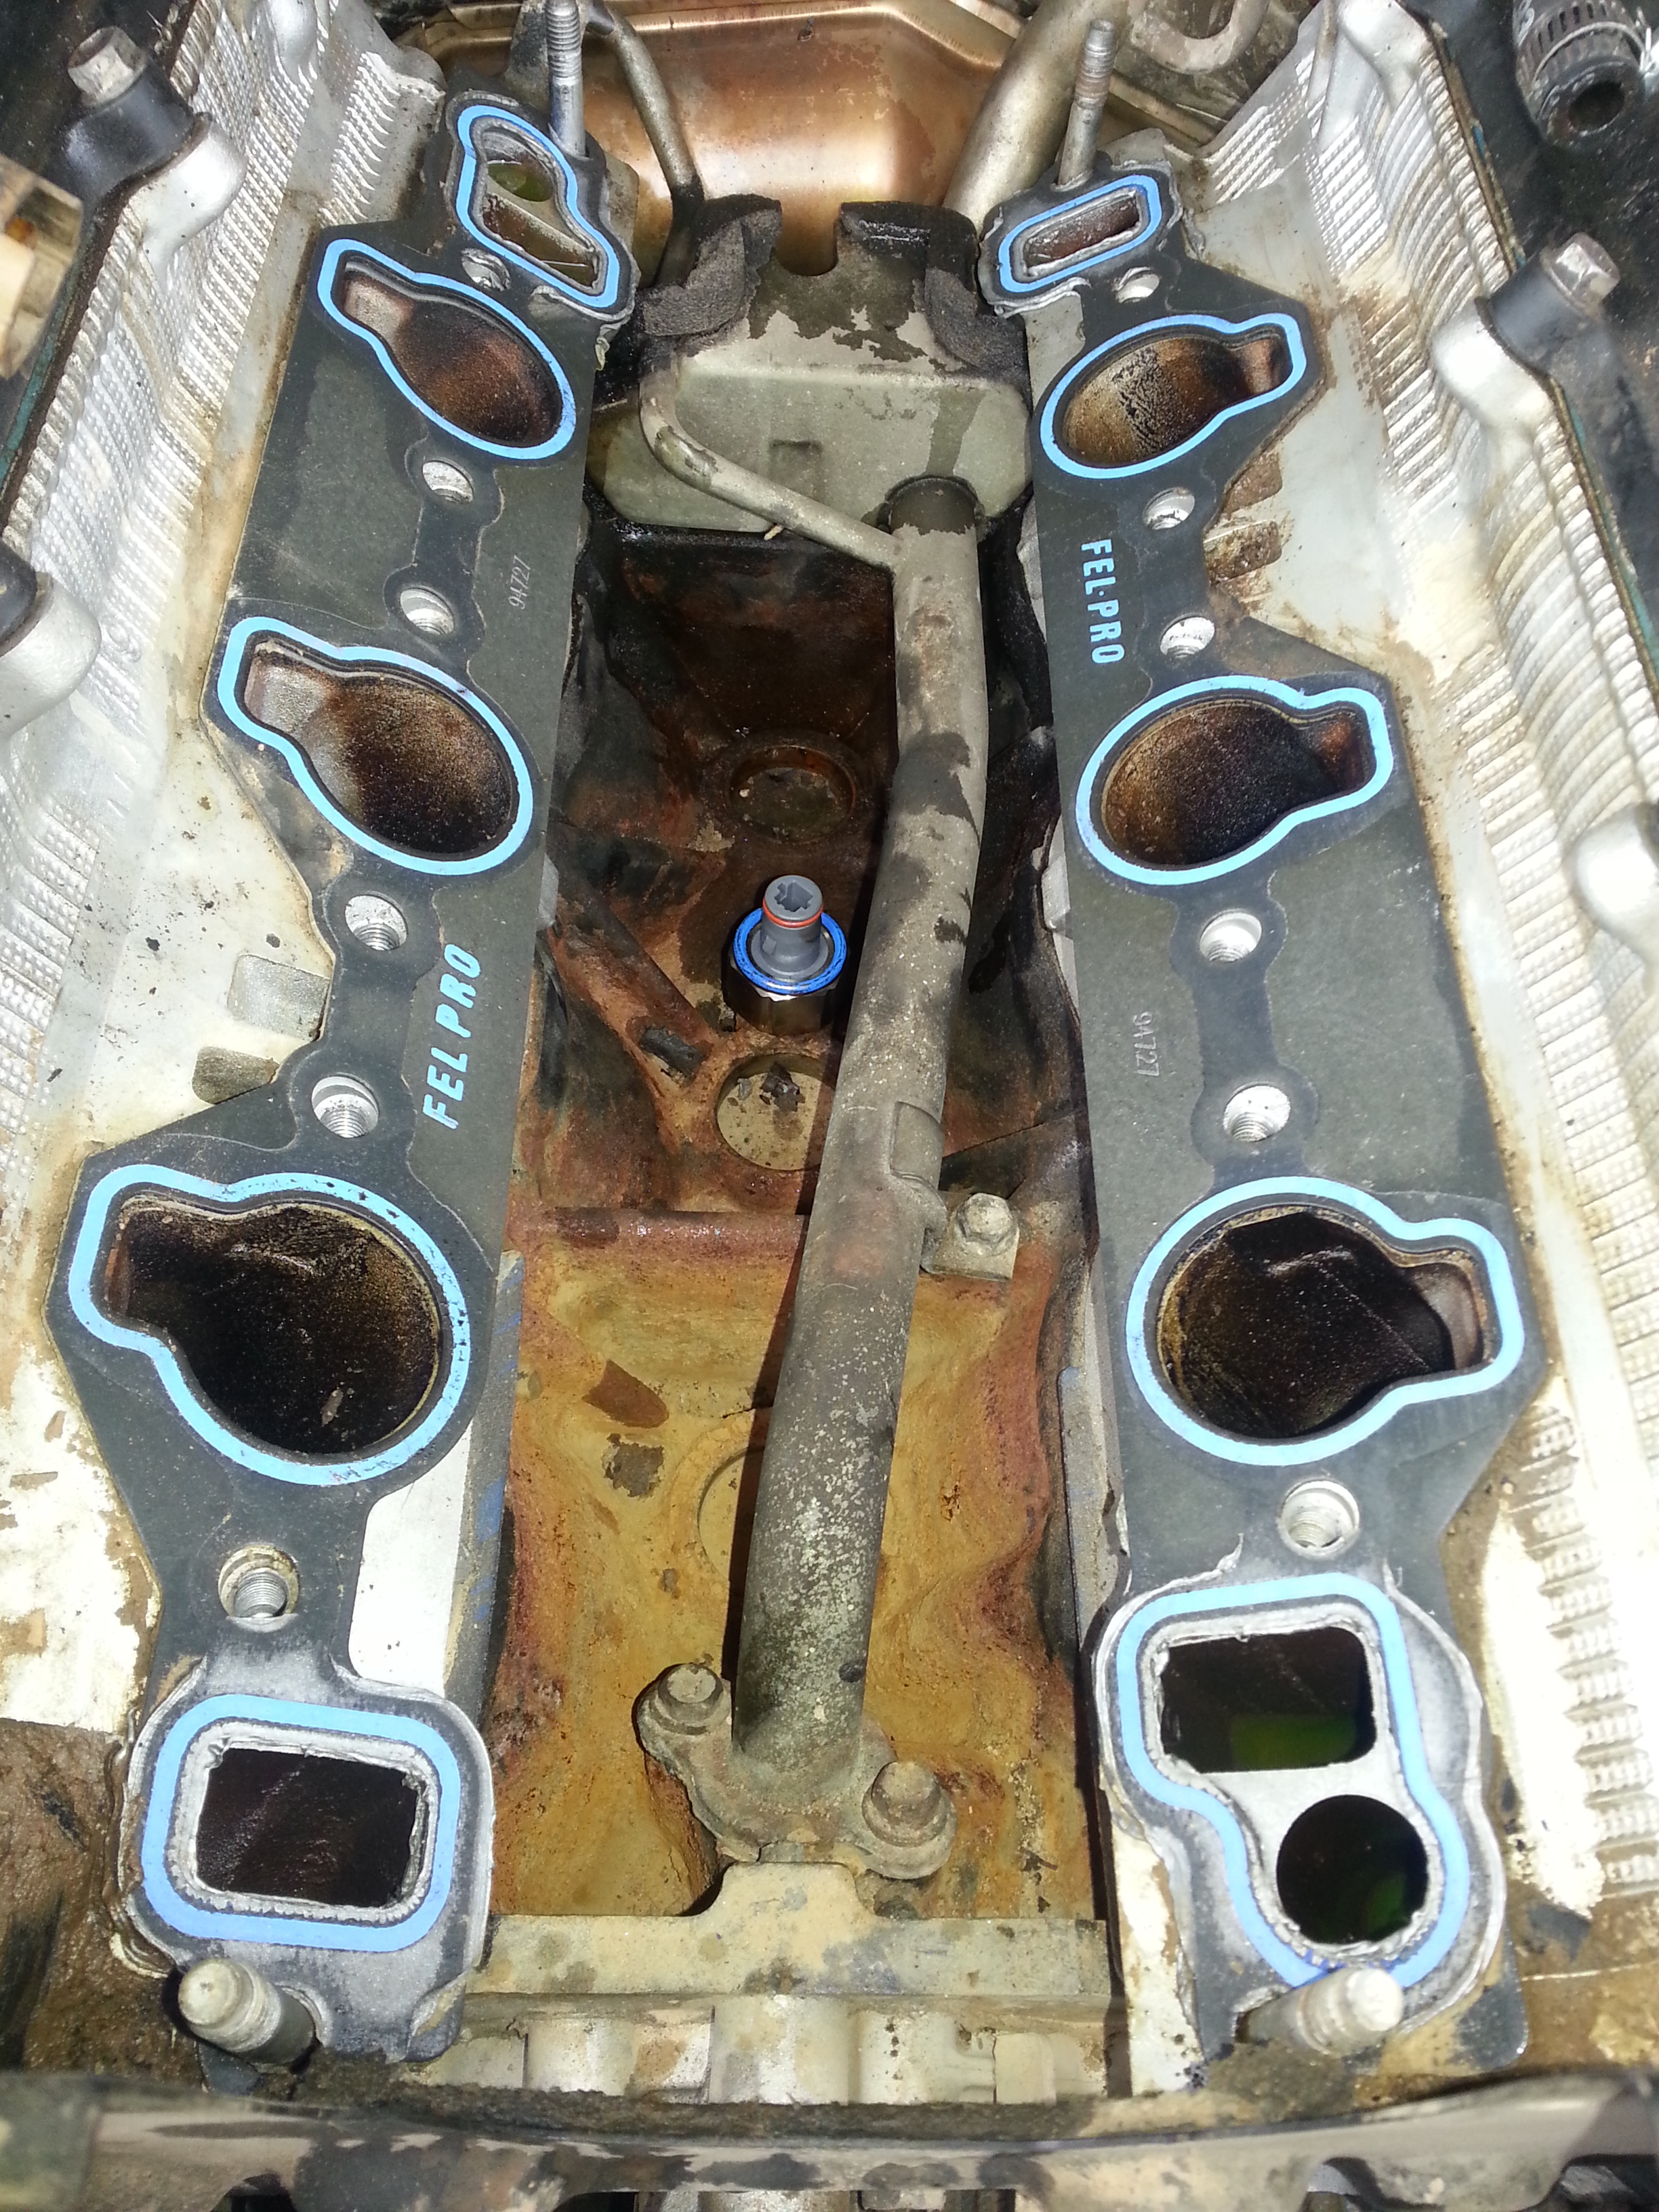
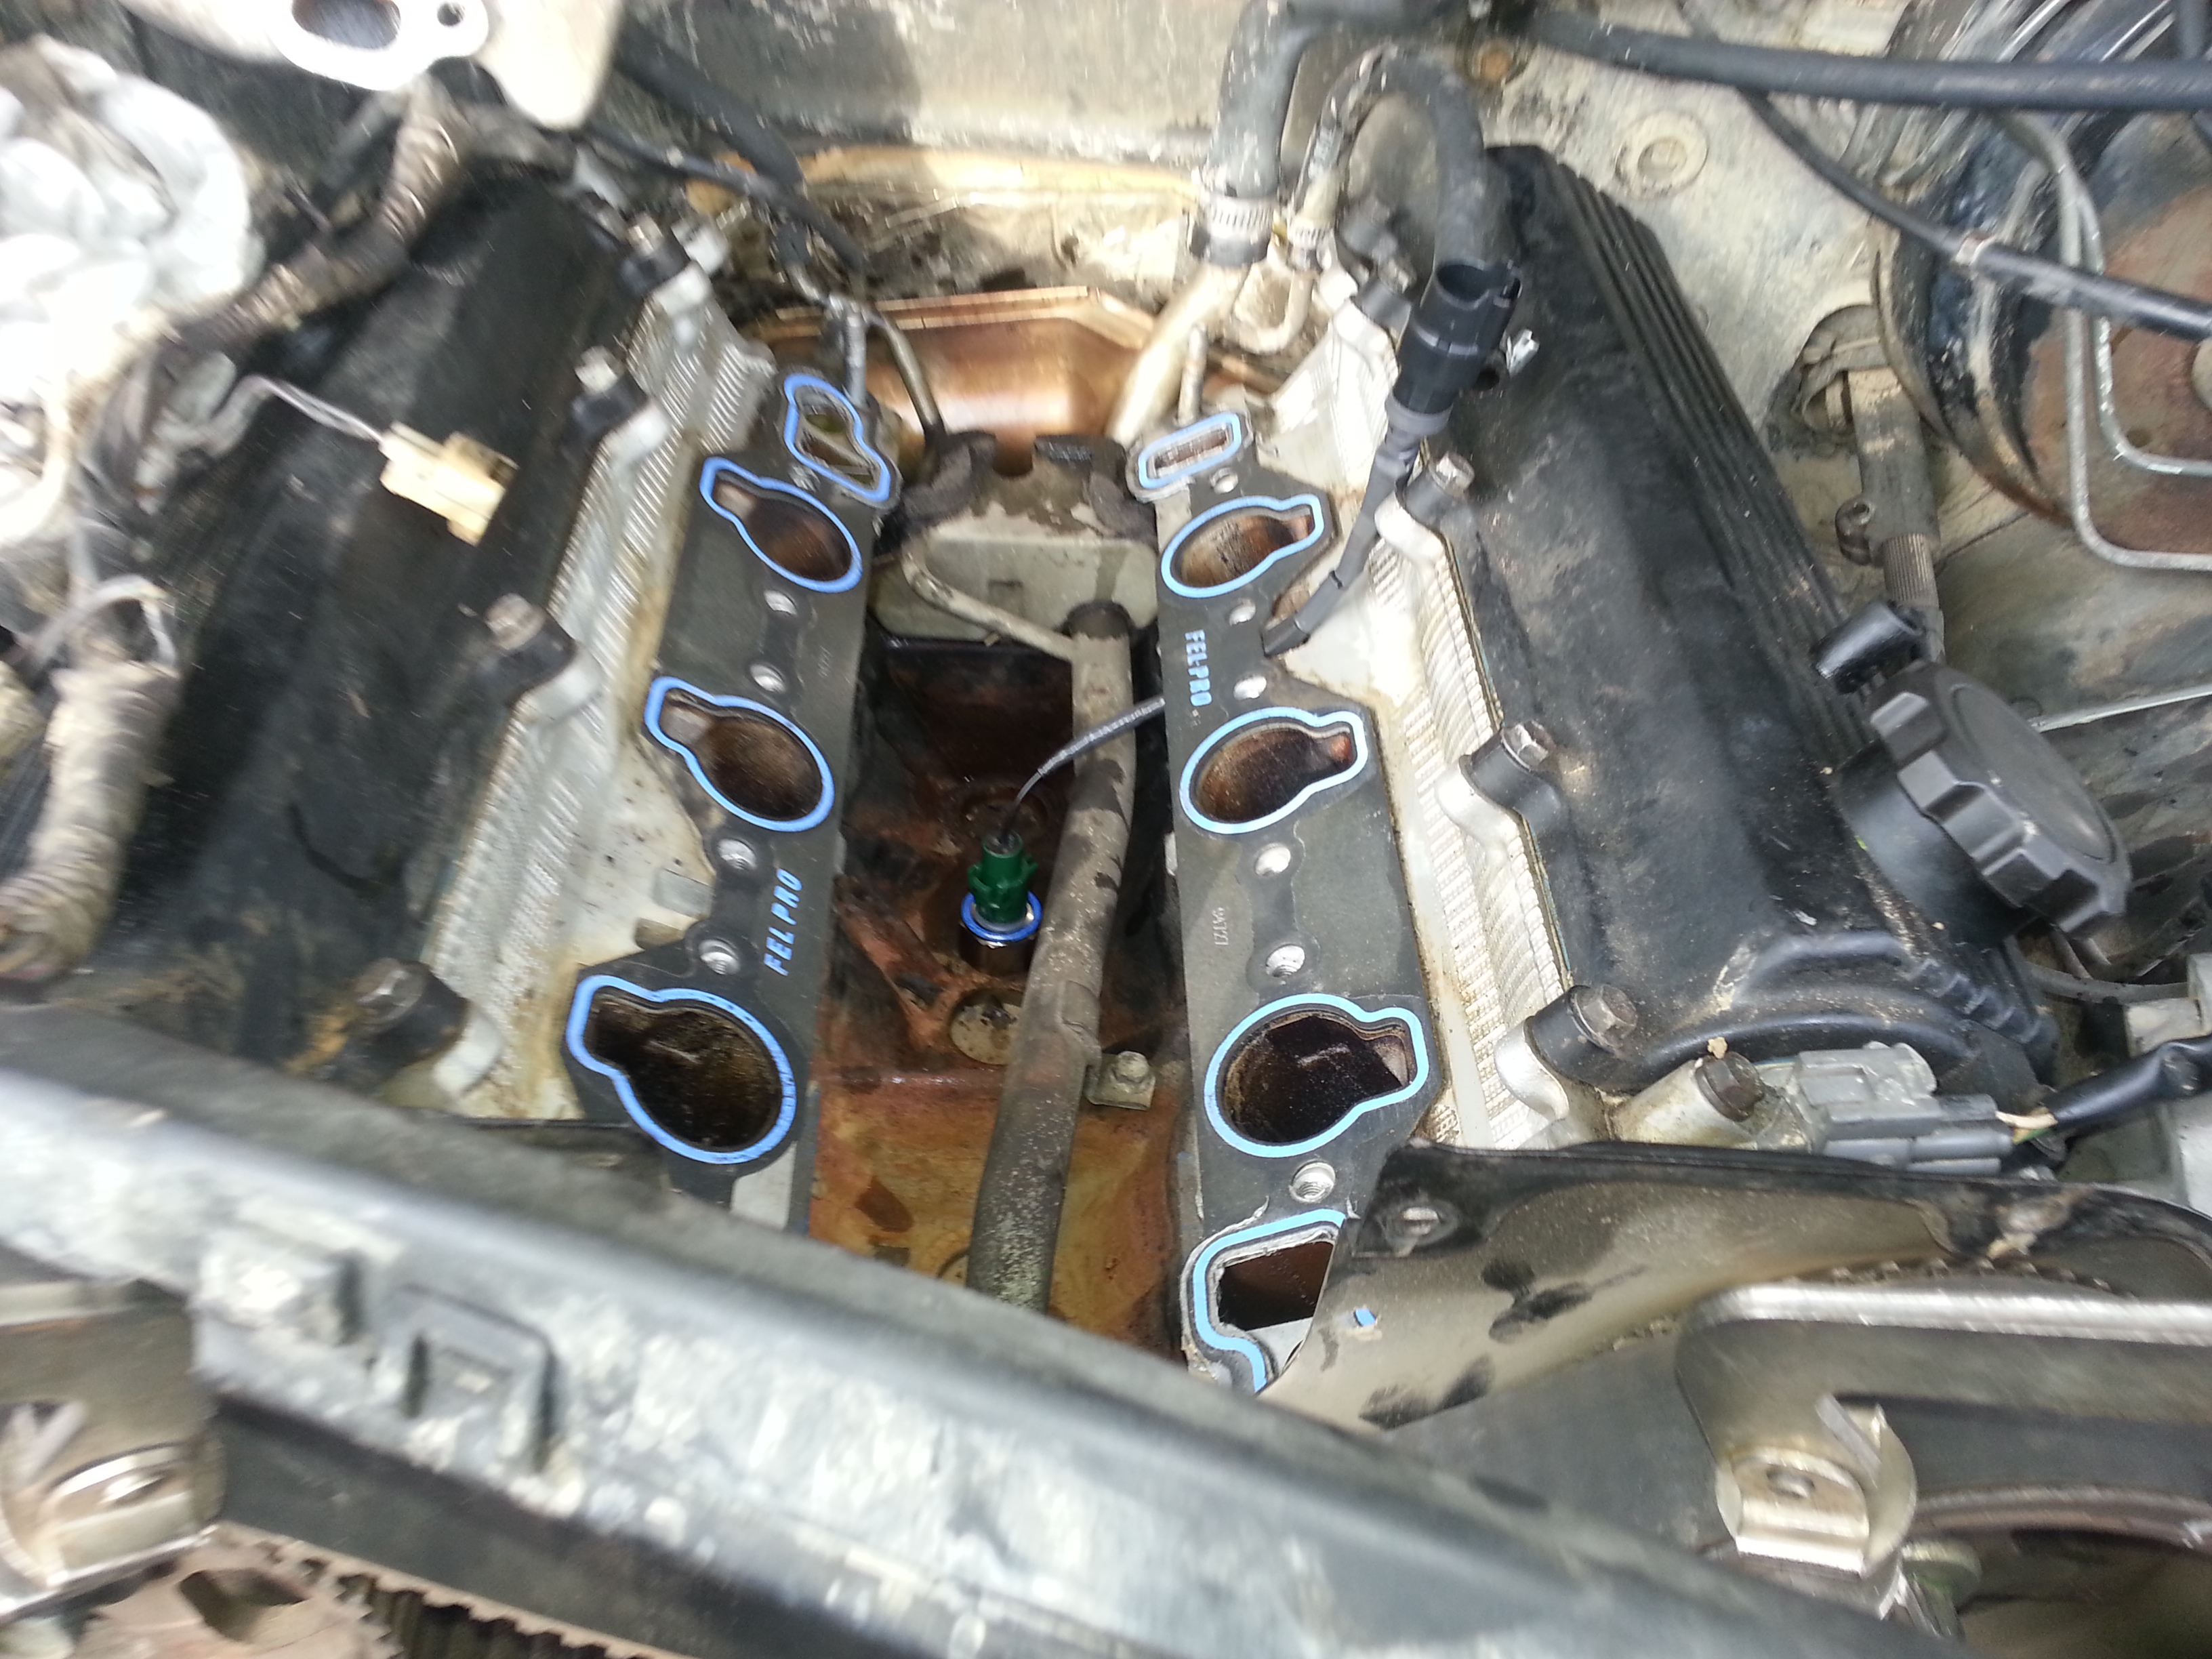
I then unclipped the cluster of sensors at the firewall toward the back of the engine. There is a cluster of about 5 sensors. Just unclip them and move the wires to the side. REMEMBER BE GENTLE WITH THE CLIPS AND WHEN MOVING THE WIRES. These trucks are old and all those parts are very fragile. I broke one clip and the wires cracked and broke the outer layer exposing wire for the injectors. I had to rewrap everything to avoid both wires making future contact. Used high temperature rated electrical tape. That cluster of sensors is held on by two 12mm nuts. Once that is removed you can take off all the manifold bolts and nuts the just pop it off. You do not have to take off the center wheel where the timing belt is. I took mine off but I later found it was unnecessary to do. Either way works. Just get the manifold off.
You can see here the Knock sensor is now exposed in the center of that engine block along with the wire.
Close up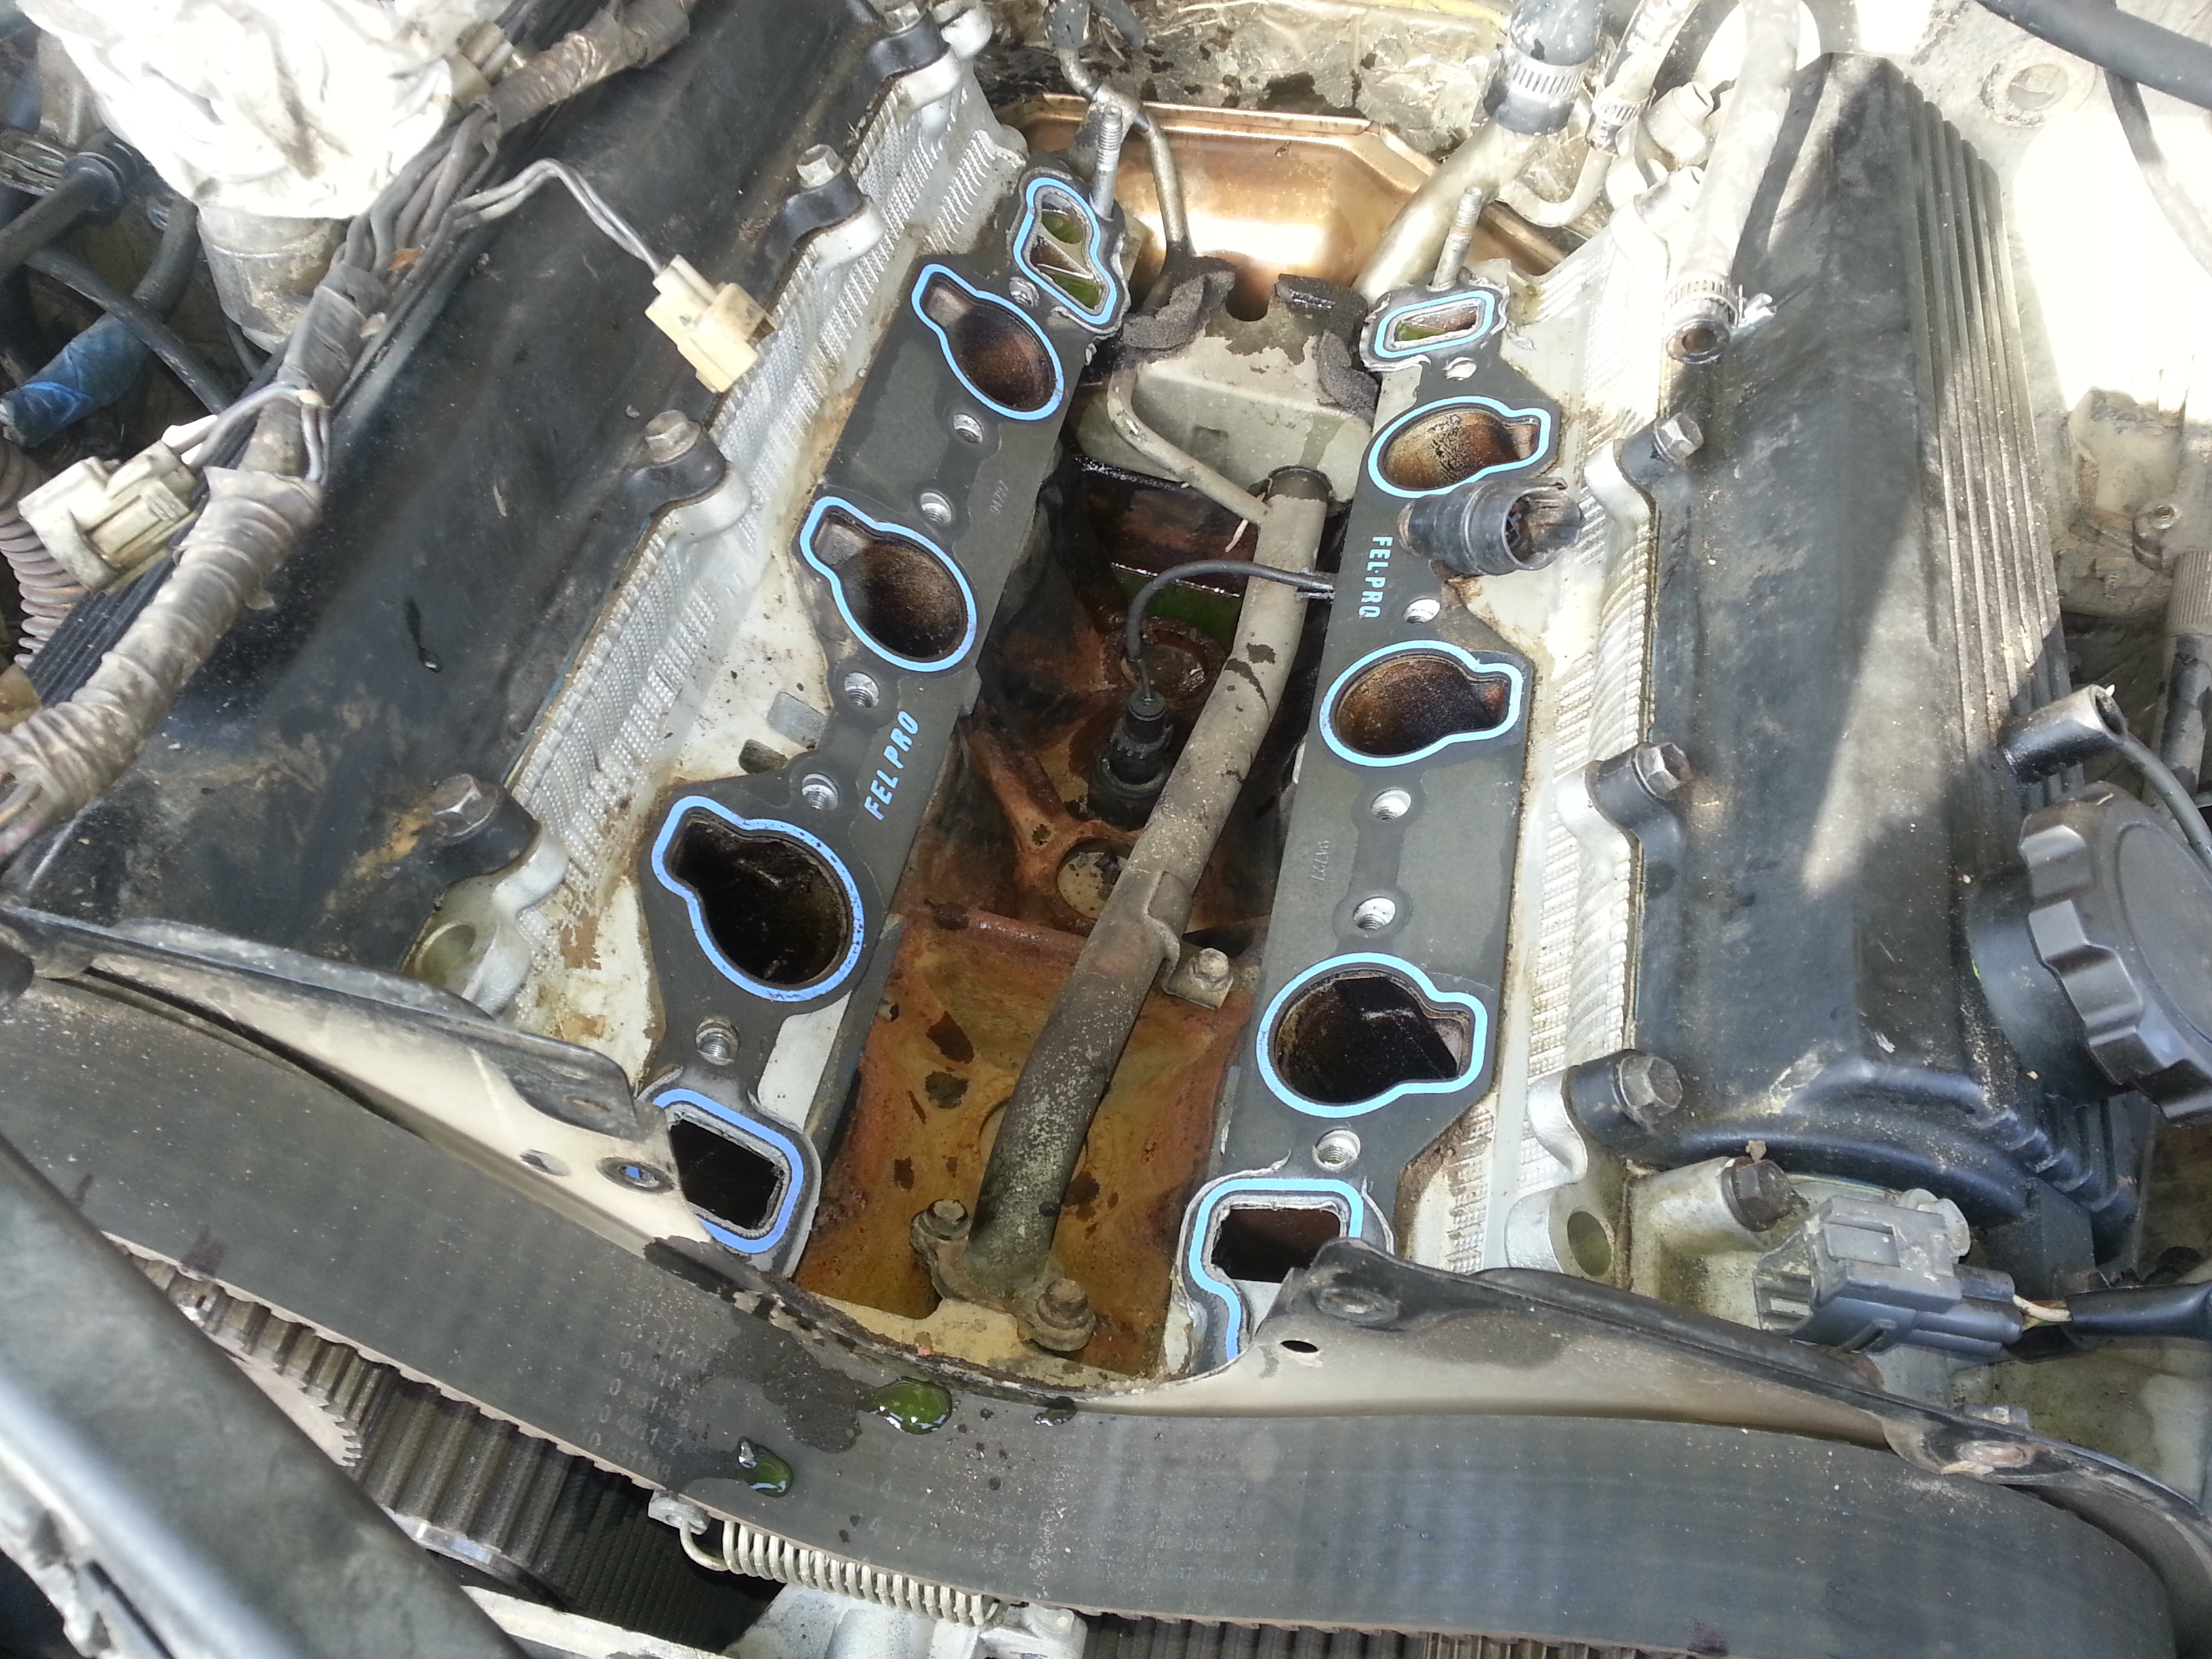
Then I had this happen….
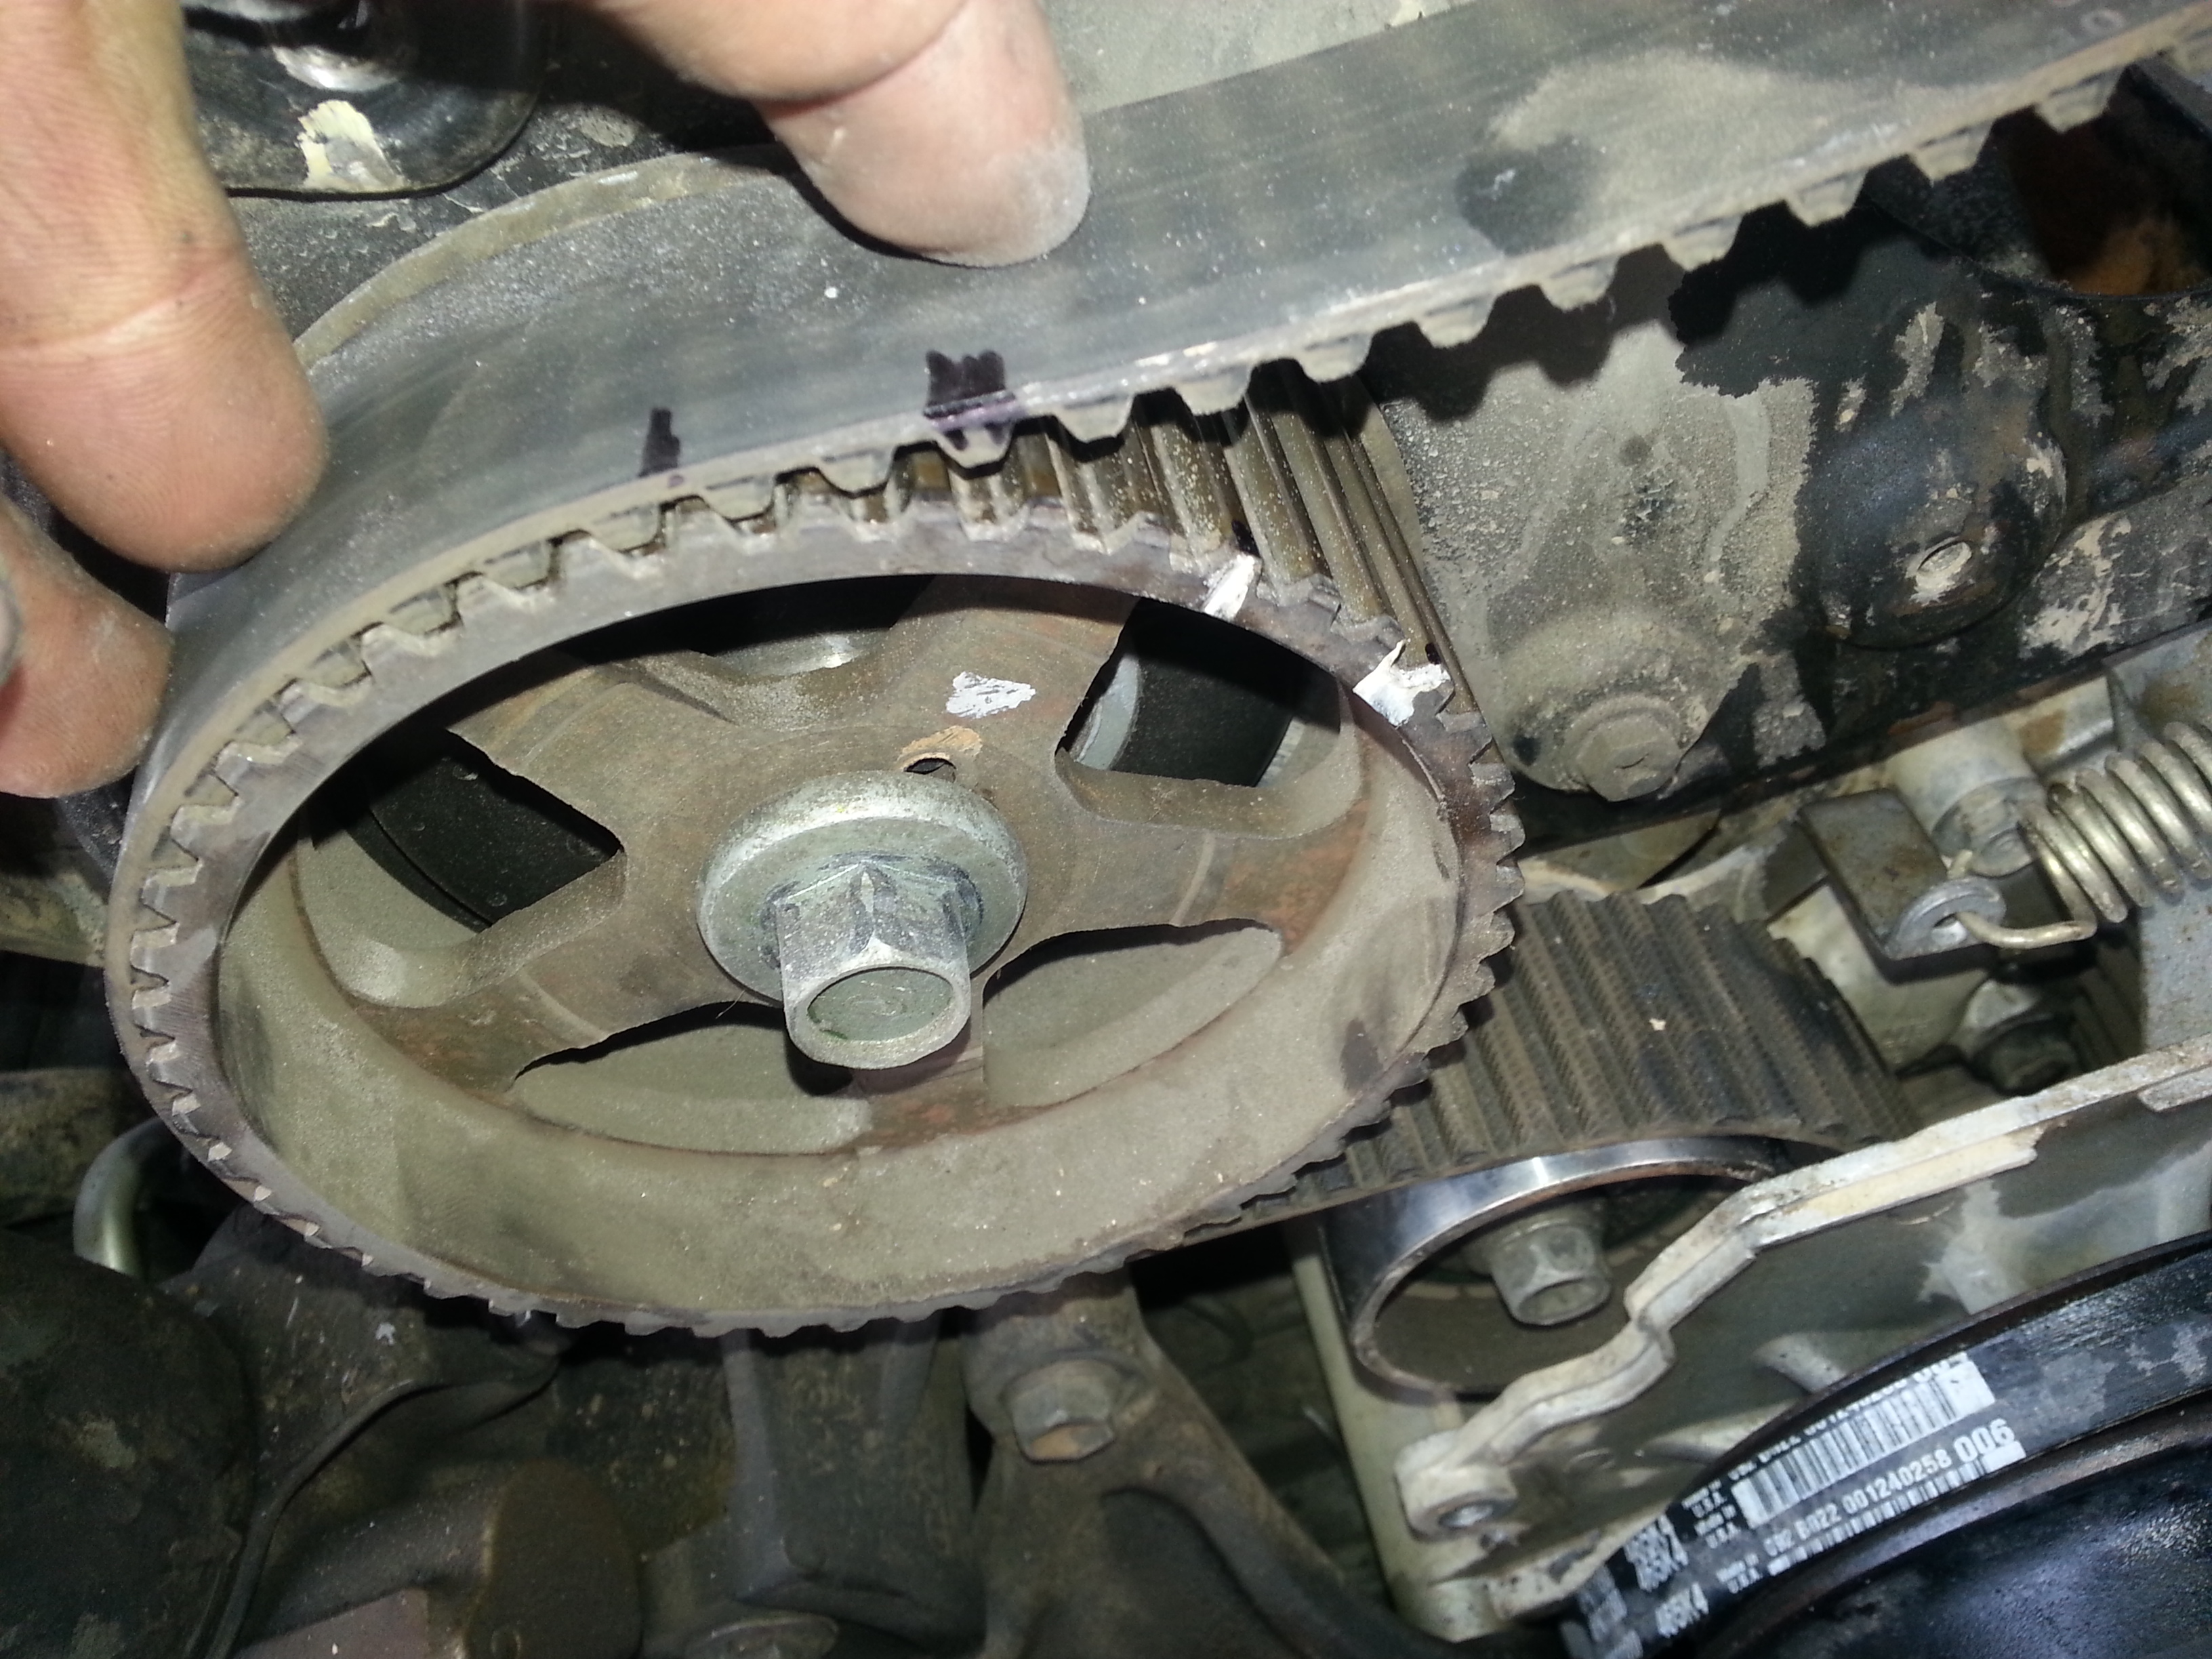
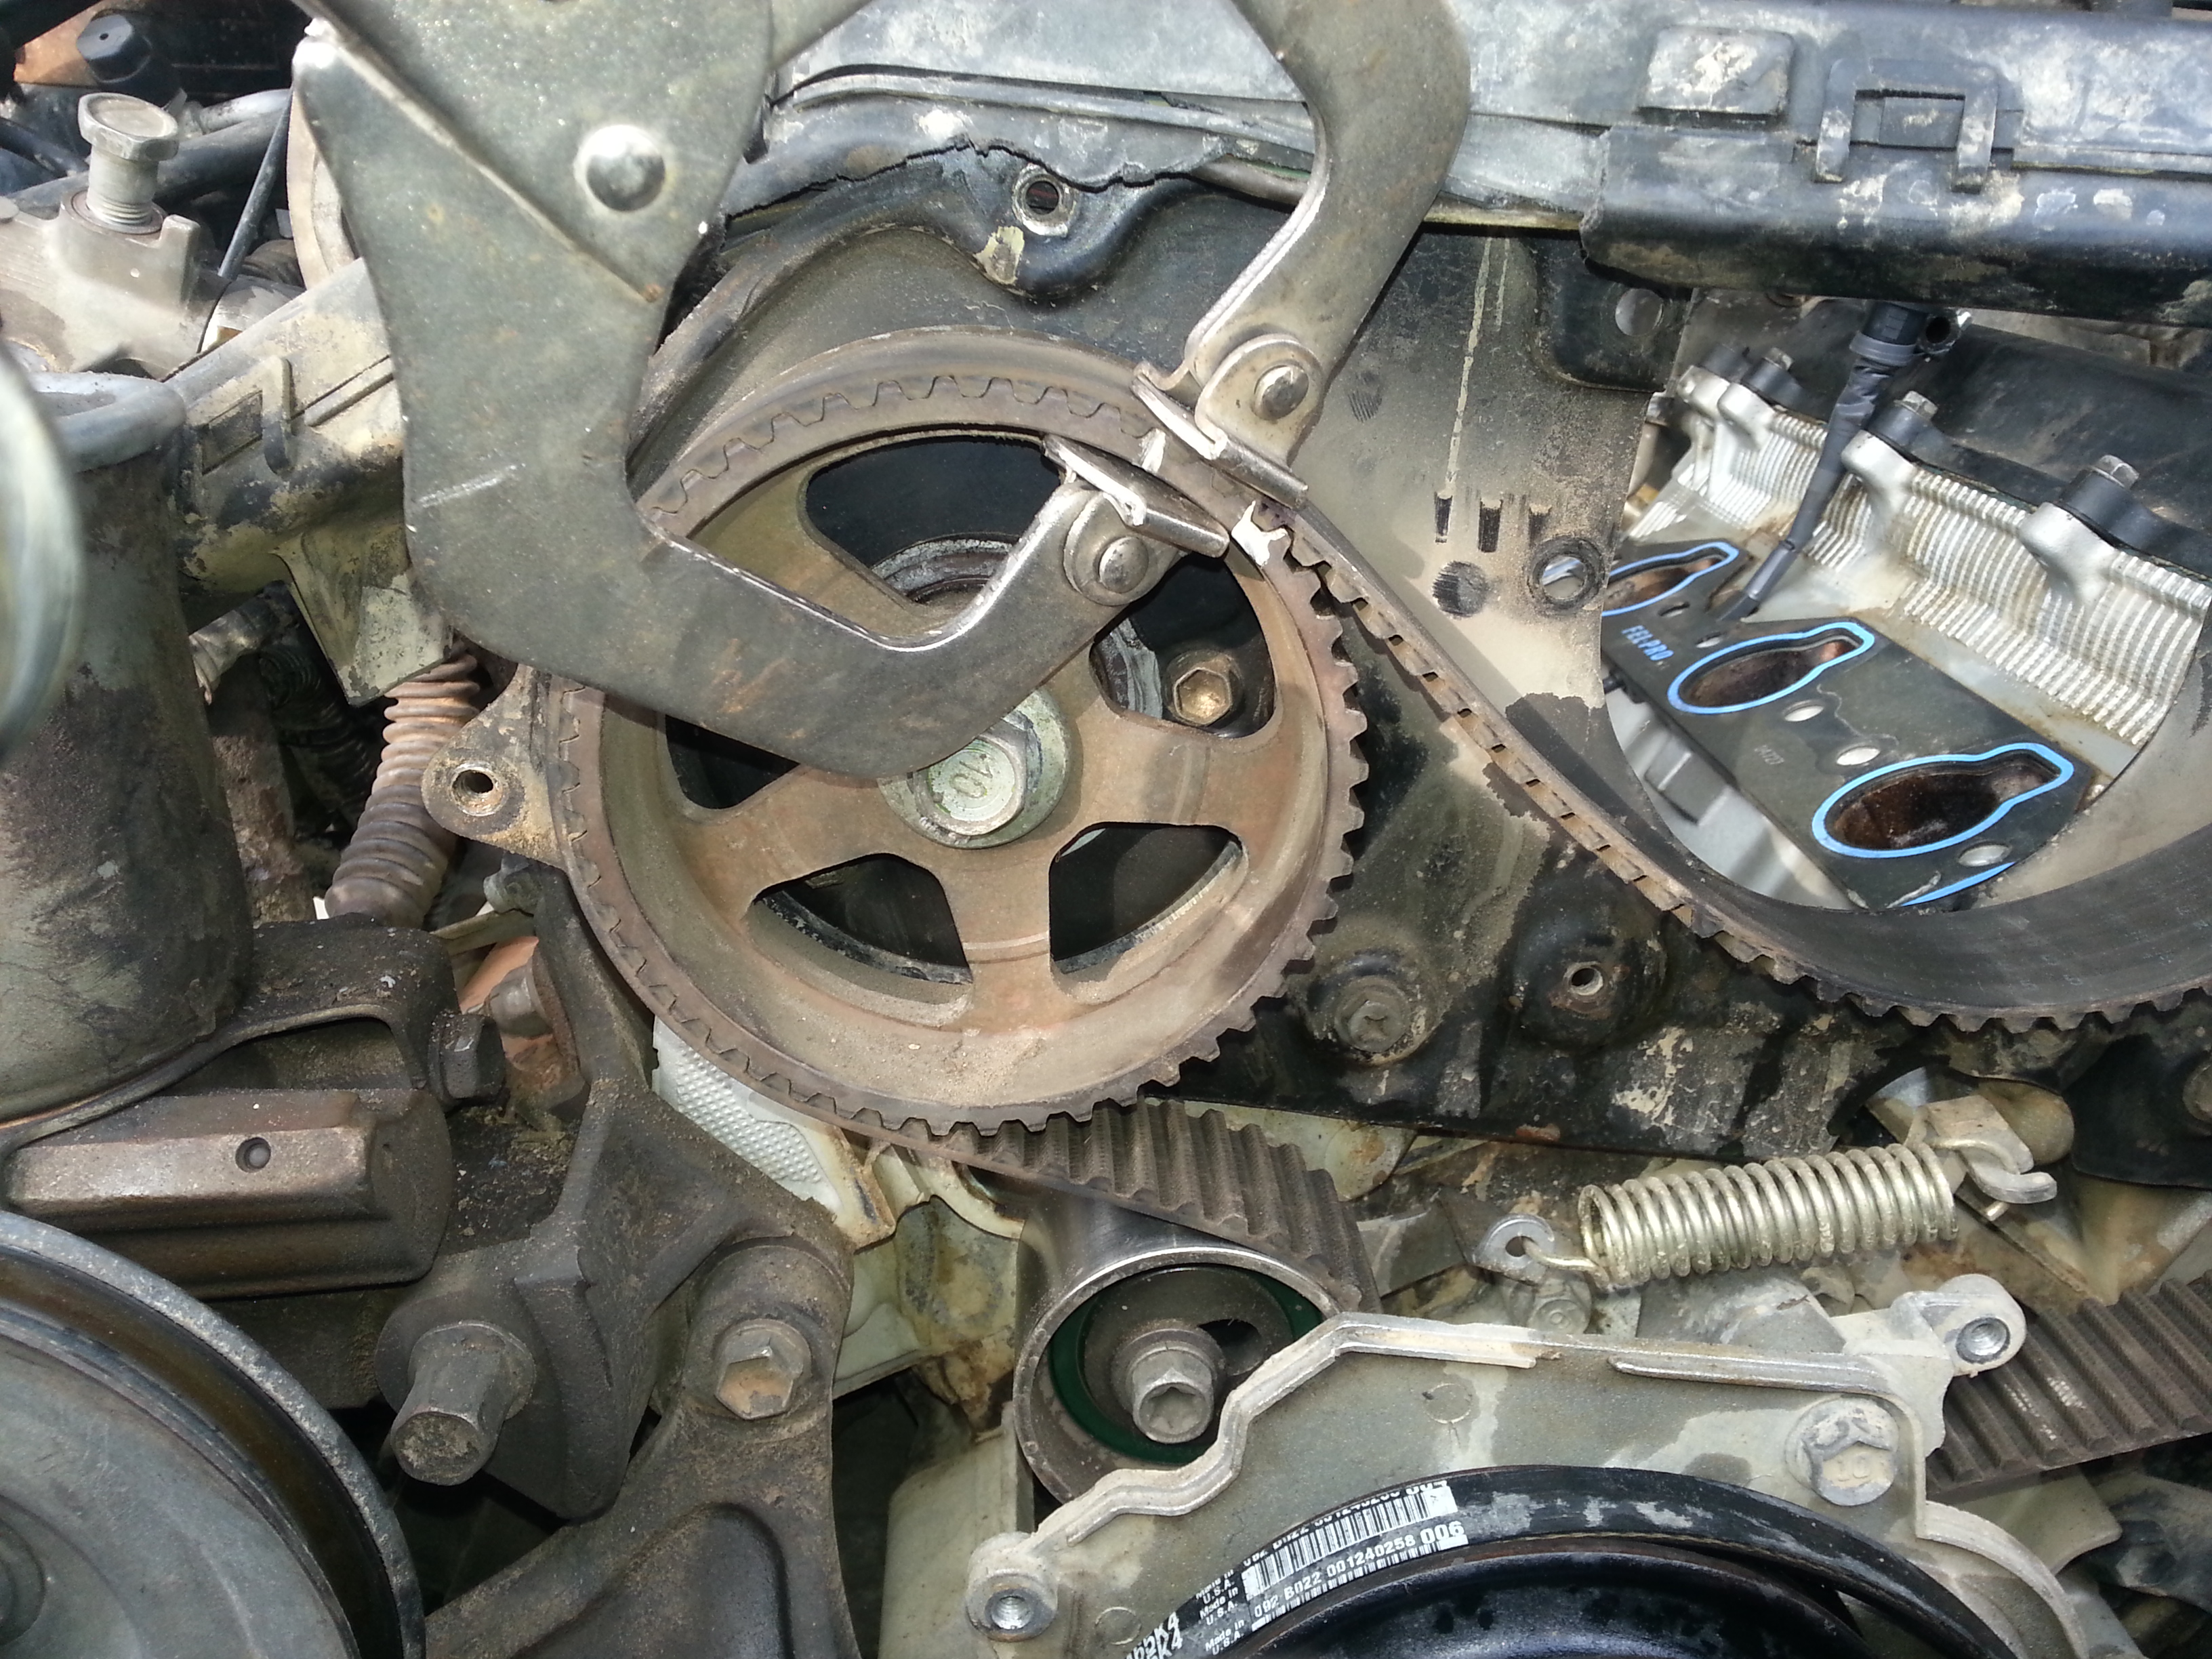
I was so scared when it happened. I had just leaned on the gear/wheel whatever it is called and found out it is spring loaded. I was crapping my pants I was so scared I had totally messed up my timing. But I found that I was able to just grab onto it with both hands and just twist it in the correct direction to align back up with the lines I had made earlier. THANK GOODNESS FOR THOSE LINES! I recommend to anybody doing this job to use pressure clamps like I did here from the get go. Don’t risk what happened to me. Just a note those wheels are a bit hard to turn. But with enough elbow grease you can move them just enough to put back to where you had them.
I used these pressure clamps.
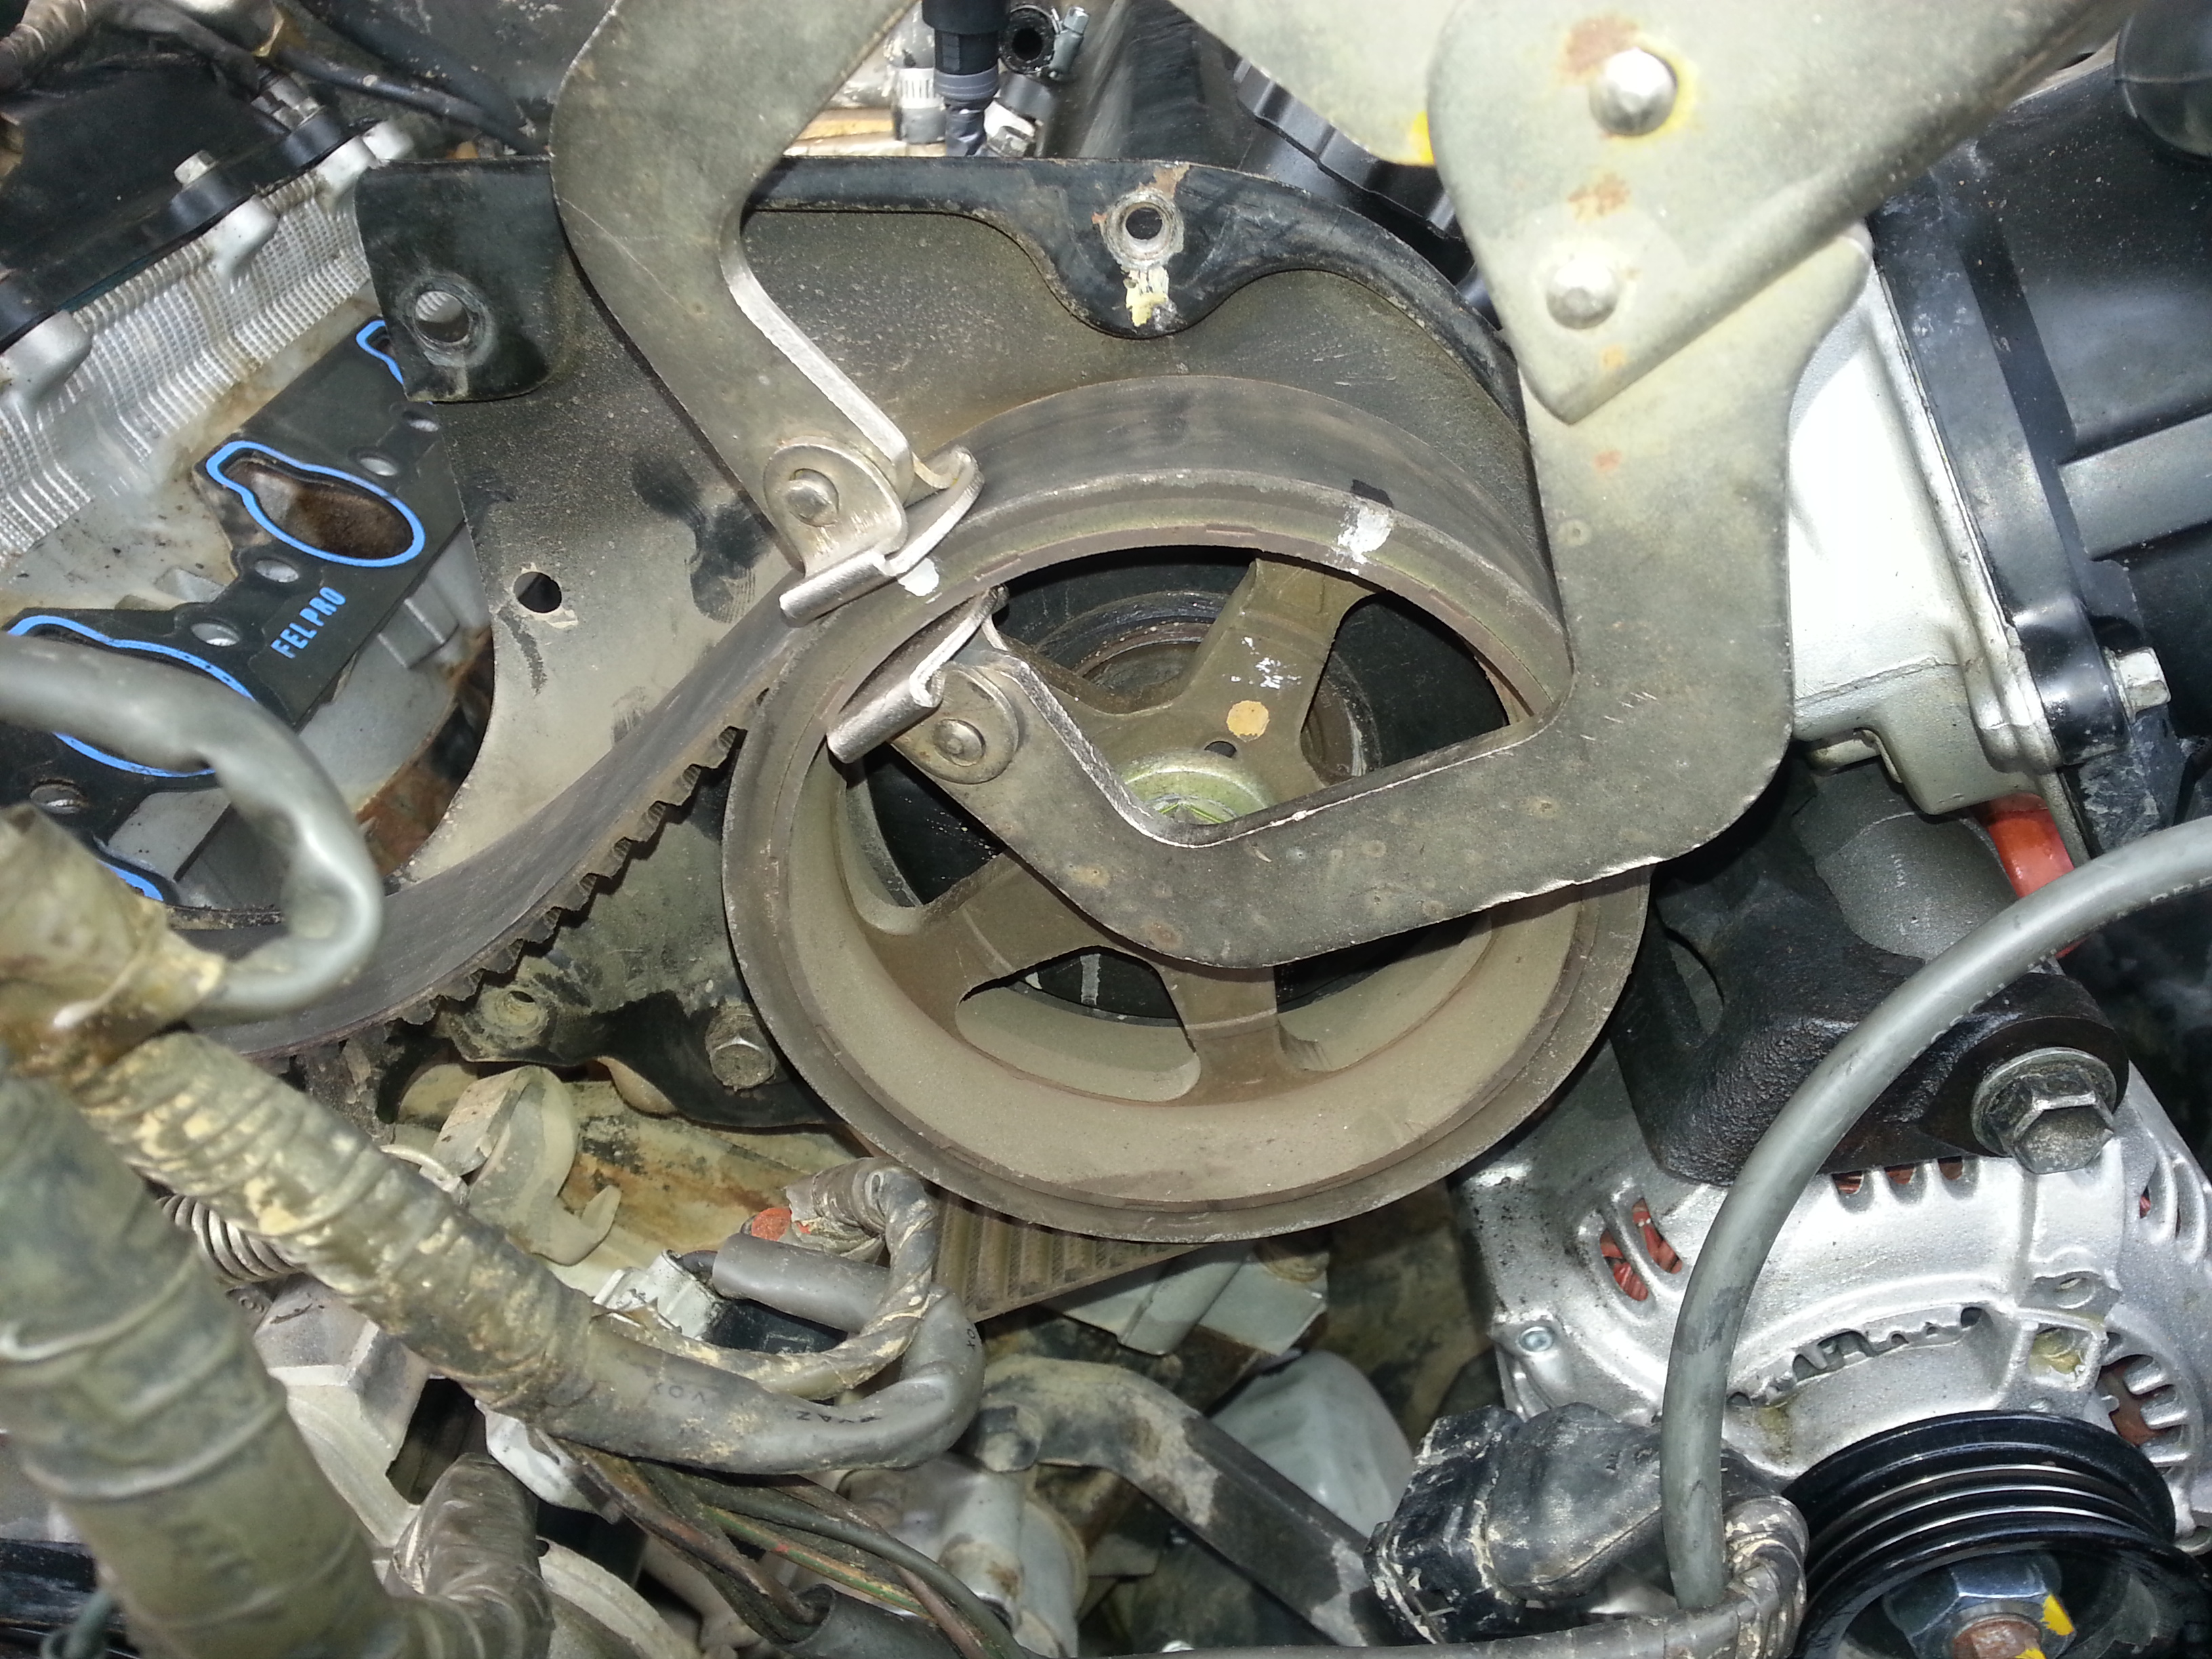
I then unclipped the knock sensor wire and then used a 17mm Deep socket to remove the knock sensor. If your truck has the original knock sensor like mine did the chances are your knock sensor is going to be extremely seized on that engine block like mine was! I used my big ratchet wrench with a thick pole as a breaker bar and that sucker still wouldn’t budge! After messing with is a couple of times the damn thing finally let loose but it didn’t give up a fight. Here we have both new and old Knock Sensors and their connector wires next to each other.

I installed the new knock sensor afterward.
Close up
I installed the new knock sensor wire. Make sure it is under the gasket. There is a small groove made for the wire to fit in.
After this it is pretty much the reverse of taking everything apart. But this is also where I ran into the most problems!
Before you put the manifold back on make sure to use that gasket silicone sealant on the 4 ports where the antifreeze passes through the heads and into the manifold. I used the grey gasket stuff, then put the manifold on. And as I tightened the cluster of sensors back onto the back of the manifold I accidentally overtightened one of the nuts to the stud that comes out of the manifold and I broke the stud right off! I immediately panicked. I thought my only option was going to have to replace the manifold with a junk yard manifold or take it to a machine shop to get removed and have a new stud installed into it. BUT luckily when I removed it I found the stud still had about 1/8” sticking out so we used our wire welder and welded a small ball to the tip of the stud so we could get a grip on the stud with some pressure clamps then we used my dads torch to heat up the manifold on that side to expand the metal. Once heated up the vise grips were able to turn the stud out with no problem. We removed it with no damage at all. Here is the picture. You can see the stud with the ball welded on the tip.

This happened at about 5pm on Saturday and I drove to a bolt store where id definitely find a replacement and then found that the store had closed about 10 min before arriving. So I checked Autozone, Oreily Auto parts, pepboys, ace hardware, even home depot and they were all CLOSED! So I drove back home and called the Toyota dealership. And they just so happened to have the ones I was looking for but they were all out of stock! My last choice was to call my girlfriends uncles shop. And lucky for me they had what I needed! So I made the drive to east LA and bought the pack of 3 studs and installed it there at the shop and used some high strength thread lock to hold it in the manifold Once we got home we installed the manifold and just left the job as it was. I continued the job on Sunday.
Sunday I installed the fuel rails only to drop a rubber washer tat goes to the fuel rails into one of the manifold holes. DARN IT so I took it apart again. to retrieve the rubber hose from the cylinder. And when I had it removed I found that I hadn’t noticed that I had dropped another one in the other side lol. So I took them both out then installed the manifold once again. and carefully installed the fuel rails, dust shield, wires clips, everything! Then the plenum and vacuum lines. I then installed the fan and the fan shroud and put the radiator hose back on and refilled the radiator with antifreeze. After tightening the belts all back up and rechecking everything twice I started the truck up. she worked fine. Then the truck began to smoke for a few minutes. But it wasn’t anything to be worried about. It was just the remaining antifreeze evaporating off the engine. Drove the truck around the block and pulled it back into the drive way. When I parked it I heard it was making some weird noise. So I checked and found the alternator belt finally messed up. so I had to remove the shroud, fan, power steering and ac belts to get to the alternator belt. After replaceing the belt again I re tirghtened everything once again and BAMN I broke yet another bolt. It was the bolt that for the tensioner to my alternator. And this one broke inside the hole. LUCKY for me my dad managed to get that one out using a 14mm spare nut and welding the inner part of the nut to the part of the bolt that was stuck in my alternator. Took it out easily after that. I used a small 14mm bolt with the same thread to replace the alternator bolt. It is holding on good so far. But I definitely want to replace that bolt with an alternator bolt because the head of the bolt is longer. Good for a socket wrench.
Oh yea I also changed out the spark plugs and spark plug wires. And swapped in a clean air filter while I was at it because mine was filthy.
Anyway that was all guys. Its like I said this was a pain in the ass job. I don’t ever want to go through that again!
I just want to say that this knock sensor job has been the most difficult thing I have ever done on any motor. This is definitely one experience I don’t ever want to experience again. It was such a major pain in the ass to get it done. This job took me 2 days to complete; 11am-9pm on Saturday and 12pm-7:30pm on Sunday. Not to mention the worst experience of all was the fact that I have a 4-5” lift on this truck so I spent the entire job on a 1ft tall work stool hunched over my engine bay doing the entire job. Not to mention it was even worse considering how far out my bumper sticks out in front of the truck. This just called for making my experience much more miserable. I’m sure you guys can only imagine the back pain I had after this past weekend. It wasn’t so bad when the truck was at stock height but man…. This was too much lol The only thing that i had an advantage with was the fact that I had previously removed the intake plenum early last year to replace my BVSV so I more or less knew how to get to that point again which made up for about 1/4th of the entire job.
Anyway lets begin. I first made sure to wash the engine a few days before cleaning up all dust, mud, leaves really anything that could get in places you don’t want debris to get into such as the manifold. I then placed some plastic trays under the truck for when I pull the radiator hose, plenum, and manifold off the antifreeze can just drain onto those trays. I did my job in the drive way and I had our lawn to the left side and the neighbors lawn to the right. So I wanted to make sure I wasn’t gonna piss anybody off by killing their grass. Then I made some videos to show me where all my vacuum lines were connected to. I have all the vacuum diagrams already so I didn’t worry too much about labeling. I work better when I see things visually anyway. So I chose videos to refer back to.

After the plenumn was off I removed the top portion of that radiator hose connector. They are 2 parts. Held together by 2 nuts. Once that is off you can remove the timing belt dust shield This is held on with many 10mm bolts and nuts. In order to get to the dust shield bolt behind the power steering reservoir you’ll need to loosen the tensioner on that belt to move it out of the way.. I then removed the fuel rails and fuel injectors. I was actually scared to break these but I found out it wasn’t so bad. I belive the bolts are 17mm sockets. Keep in mind those things have gasoline inside them. And it will leak gas when you remove the bolts. Its fine don’t worry. This will also leak A LOT when the injectors are removed. Its no biggie. They will fill up again once you try to start up the truck at the very end of putting it back together. They wont continue to leak so no worry there.

After removing the dust shield I made sure to mark the timing belt with the white markings that were already there; just in case. I later found out that by doing this I saved my ass BIG TIME! So don’t forget to mark the lines. I did this for both of the wheels to both heads.

I then unclipped the cluster of sensors at the firewall toward the back of the engine. There is a cluster of about 5 sensors. Just unclip them and move the wires to the side. REMEMBER BE GENTLE WITH THE CLIPS AND WHEN MOVING THE WIRES. These trucks are old and all those parts are very fragile. I broke one clip and the wires cracked and broke the outer layer exposing wire for the injectors. I had to rewrap everything to avoid both wires making future contact. Used high temperature rated electrical tape. That cluster of sensors is held on by two 12mm nuts. Once that is removed you can take off all the manifold bolts and nuts the just pop it off. You do not have to take off the center wheel where the timing belt is. I took mine off but I later found it was unnecessary to do. Either way works. Just get the manifold off.

You can see here the Knock sensor is now exposed in the center of that engine block along with the wire.

Close up

Then I had this happen….

I was so scared when it happened. I had just leaned on the gear/wheel whatever it is called and found out it is spring loaded. I was crapping my pants I was so scared I had totally messed up my timing. But I found that I was able to just grab onto it with both hands and just twist it in the correct direction to align back up with the lines I had made earlier. THANK GOODNESS FOR THOSE LINES! I recommend to anybody doing this job to use pressure clamps like I did here from the get go. Don’t risk what happened to me. Just a note those wheels are a bit hard to turn. But with enough elbow grease you can move them just enough to put back to where you had them.
I used these pressure clamps.


I then unclipped the knock sensor wire and then used a 17mm Deep socket to remove the knock sensor. If your truck has the original knock sensor like mine did the chances are your knock sensor is going to be extremely seized on that engine block like mine was! I used my big ratchet wrench with a thick pole as a breaker bar and that sucker still wouldn’t budge! After messing with is a couple of times the damn thing finally let loose but it didn’t give up a fight. Here we have both new and old Knock Sensors and their connector wires next to each other.

I installed the new knock sensor afterward.

Close up

I installed the new knock sensor wire. Make sure it is under the gasket. There is a small groove made for the wire to fit in.

After this it is pretty much the reverse of taking everything apart. But this is also where I ran into the most problems!
Before you put the manifold back on make sure to use that gasket silicone sealant on the 4 ports where the antifreeze passes through the heads and into the manifold. I used the grey gasket stuff, then put the manifold on. And as I tightened the cluster of sensors back onto the back of the manifold I accidentally overtightened one of the nuts to the stud that comes out of the manifold and I broke the stud right off! I immediately panicked. I thought my only option was going to have to replace the manifold with a junk yard manifold or take it to a machine shop to get removed and have a new stud installed into it. BUT luckily when I removed it I found the stud still had about 1/8” sticking out so we used our wire welder and welded a small ball to the tip of the stud so we could get a grip on the stud with some pressure clamps then we used my dads torch to heat up the manifold on that side to expand the metal. Once heated up the vise grips were able to turn the stud out with no problem. We removed it with no damage at all. Here is the picture. You can see the stud with the ball welded on the tip.

This happened at about 5pm on Saturday and I drove to a bolt store where id definitely find a replacement and then found that the store had closed about 10 min before arriving. So I checked Autozone, Oreily Auto parts, pepboys, ace hardware, even home depot and they were all CLOSED! So I drove back home and called the Toyota dealership. And they just so happened to have the ones I was looking for but they were all out of stock! My last choice was to call my girlfriends uncles shop. And lucky for me they had what I needed! So I made the drive to east LA and bought the pack of 3 studs and installed it there at the shop and used some high strength thread lock to hold it in the manifold Once we got home we installed the manifold and just left the job as it was. I continued the job on Sunday.
Sunday I installed the fuel rails only to drop a rubber washer tat goes to the fuel rails into one of the manifold holes. DARN IT so I took it apart again. to retrieve the rubber hose from the cylinder. And when I had it removed I found that I hadn’t noticed that I had dropped another one in the other side lol. So I took them both out then installed the manifold once again. and carefully installed the fuel rails, dust shield, wires clips, everything! Then the plenum and vacuum lines. I then installed the fan and the fan shroud and put the radiator hose back on and refilled the radiator with antifreeze. After tightening the belts all back up and rechecking everything twice I started the truck up. she worked fine. Then the truck began to smoke for a few minutes. But it wasn’t anything to be worried about. It was just the remaining antifreeze evaporating off the engine. Drove the truck around the block and pulled it back into the drive way. When I parked it I heard it was making some weird noise. So I checked and found the alternator belt finally messed up. so I had to remove the shroud, fan, power steering and ac belts to get to the alternator belt. After replaceing the belt again I re tirghtened everything once again and BAMN I broke yet another bolt. It was the bolt that for the tensioner to my alternator. And this one broke inside the hole. LUCKY for me my dad managed to get that one out using a 14mm spare nut and welding the inner part of the nut to the part of the bolt that was stuck in my alternator. Took it out easily after that. I used a small 14mm bolt with the same thread to replace the alternator bolt. It is holding on good so far. But I definitely want to replace that bolt with an alternator bolt because the head of the bolt is longer. Good for a socket wrench.
Oh yea I also changed out the spark plugs and spark plug wires. And swapped in a clean air filter while I was at it because mine was filthy.
Anyway that was all guys. Its like I said this was a pain in the ass job. I don’t ever want to go through that again!


