
Redeth's 1989 4Runner Resurrection
 Oct 22, 2013 | 11:24 PM
#2182
It looks great man! And congratulations on having a chance to work things out. I'm sure that was what you were hoping for... And if it works out, great! If not, at least you'll be going about it in a way that you won't set yourself up for a beating, emotionally! You guys had a lot of time together..... Might as well see if you can make it work. I'm telling you man, the ladies girlfriends can be 'Terminatorette's' when it comes to their friends relationships. Every relationship I've had the women have had friends like that. Twice, although they hated me during the entire relationship with my girl, they came after me once we broke up! Scandalous homie! Lol.
Best to ya!
Best to ya!
Oct 23, 2013 | 11:40 AM
#2184
Thread Starter
Registered User
Joined: Apr 2012
Posts: 2,817
Likes: 2
From: Los Angeles CA
Thanks Toyo. You think clear coat will fill the holes? I was thinking of probably just going over the welds a bit where the holes are to fill the holes and just grind them down to avoid the whole bondo stuff.
Me too Terry. I think its very inspiring when you see others work on projects like this. I will definitely be satisfied when its done. Ill have a pair or matching bumpers. And they will be the only ones of their kind on a 1st gen 4Runner. Hahaa
Thanks Mark. And about the chick. Dude her friend was just a royal Bitsh. I really disliked her. It was almost as if she was trying to cause problems between us. And well eventually suceeded. Just glad faby saw that. A bit late. But whatever just hope she learns from this experience to avoid future problems.
Omg and don't forget burns! I've accidentally touched a lot of hot surfaces lol my hands are getting a thick layer of skin from being burnt lol not to mention all the muscle soreness from grinding hours on end lol but yes you're right. Thank you man.
It looks great man! And congratulations on having a chance to work things out. I'm sure that was what you were hoping for... And if it works out, great! If not, at least you'll be going about it in a way that you won't set yourself up for a beating, emotionally! You guys had a lot of time together..... Might as well see if you can make it work. I'm telling you man, the ladies girlfriends can be 'Terminatorette's' when it comes to their friends relationships. Every relationship I've had the women have had friends like that. Twice, although they hated me during the entire relationship with my girl, they came after me once we broke up! Scandalous homie! Lol.
Best to ya!
Best to ya!
Omg and don't forget burns! I've accidentally touched a lot of hot surfaces lol my hands are getting a thick layer of skin from being burnt lol not to mention all the muscle soreness from grinding hours on end lol but yes you're right. Thank you man.
Last edited by Redeth005; Oct 23, 2013 at 11:42 AM.
Oct 24, 2013 | 08:07 PM
#2185
Thread Starter
Registered User
Joined: Apr 2012
Posts: 2,817
Likes: 2
From: Los Angeles CA
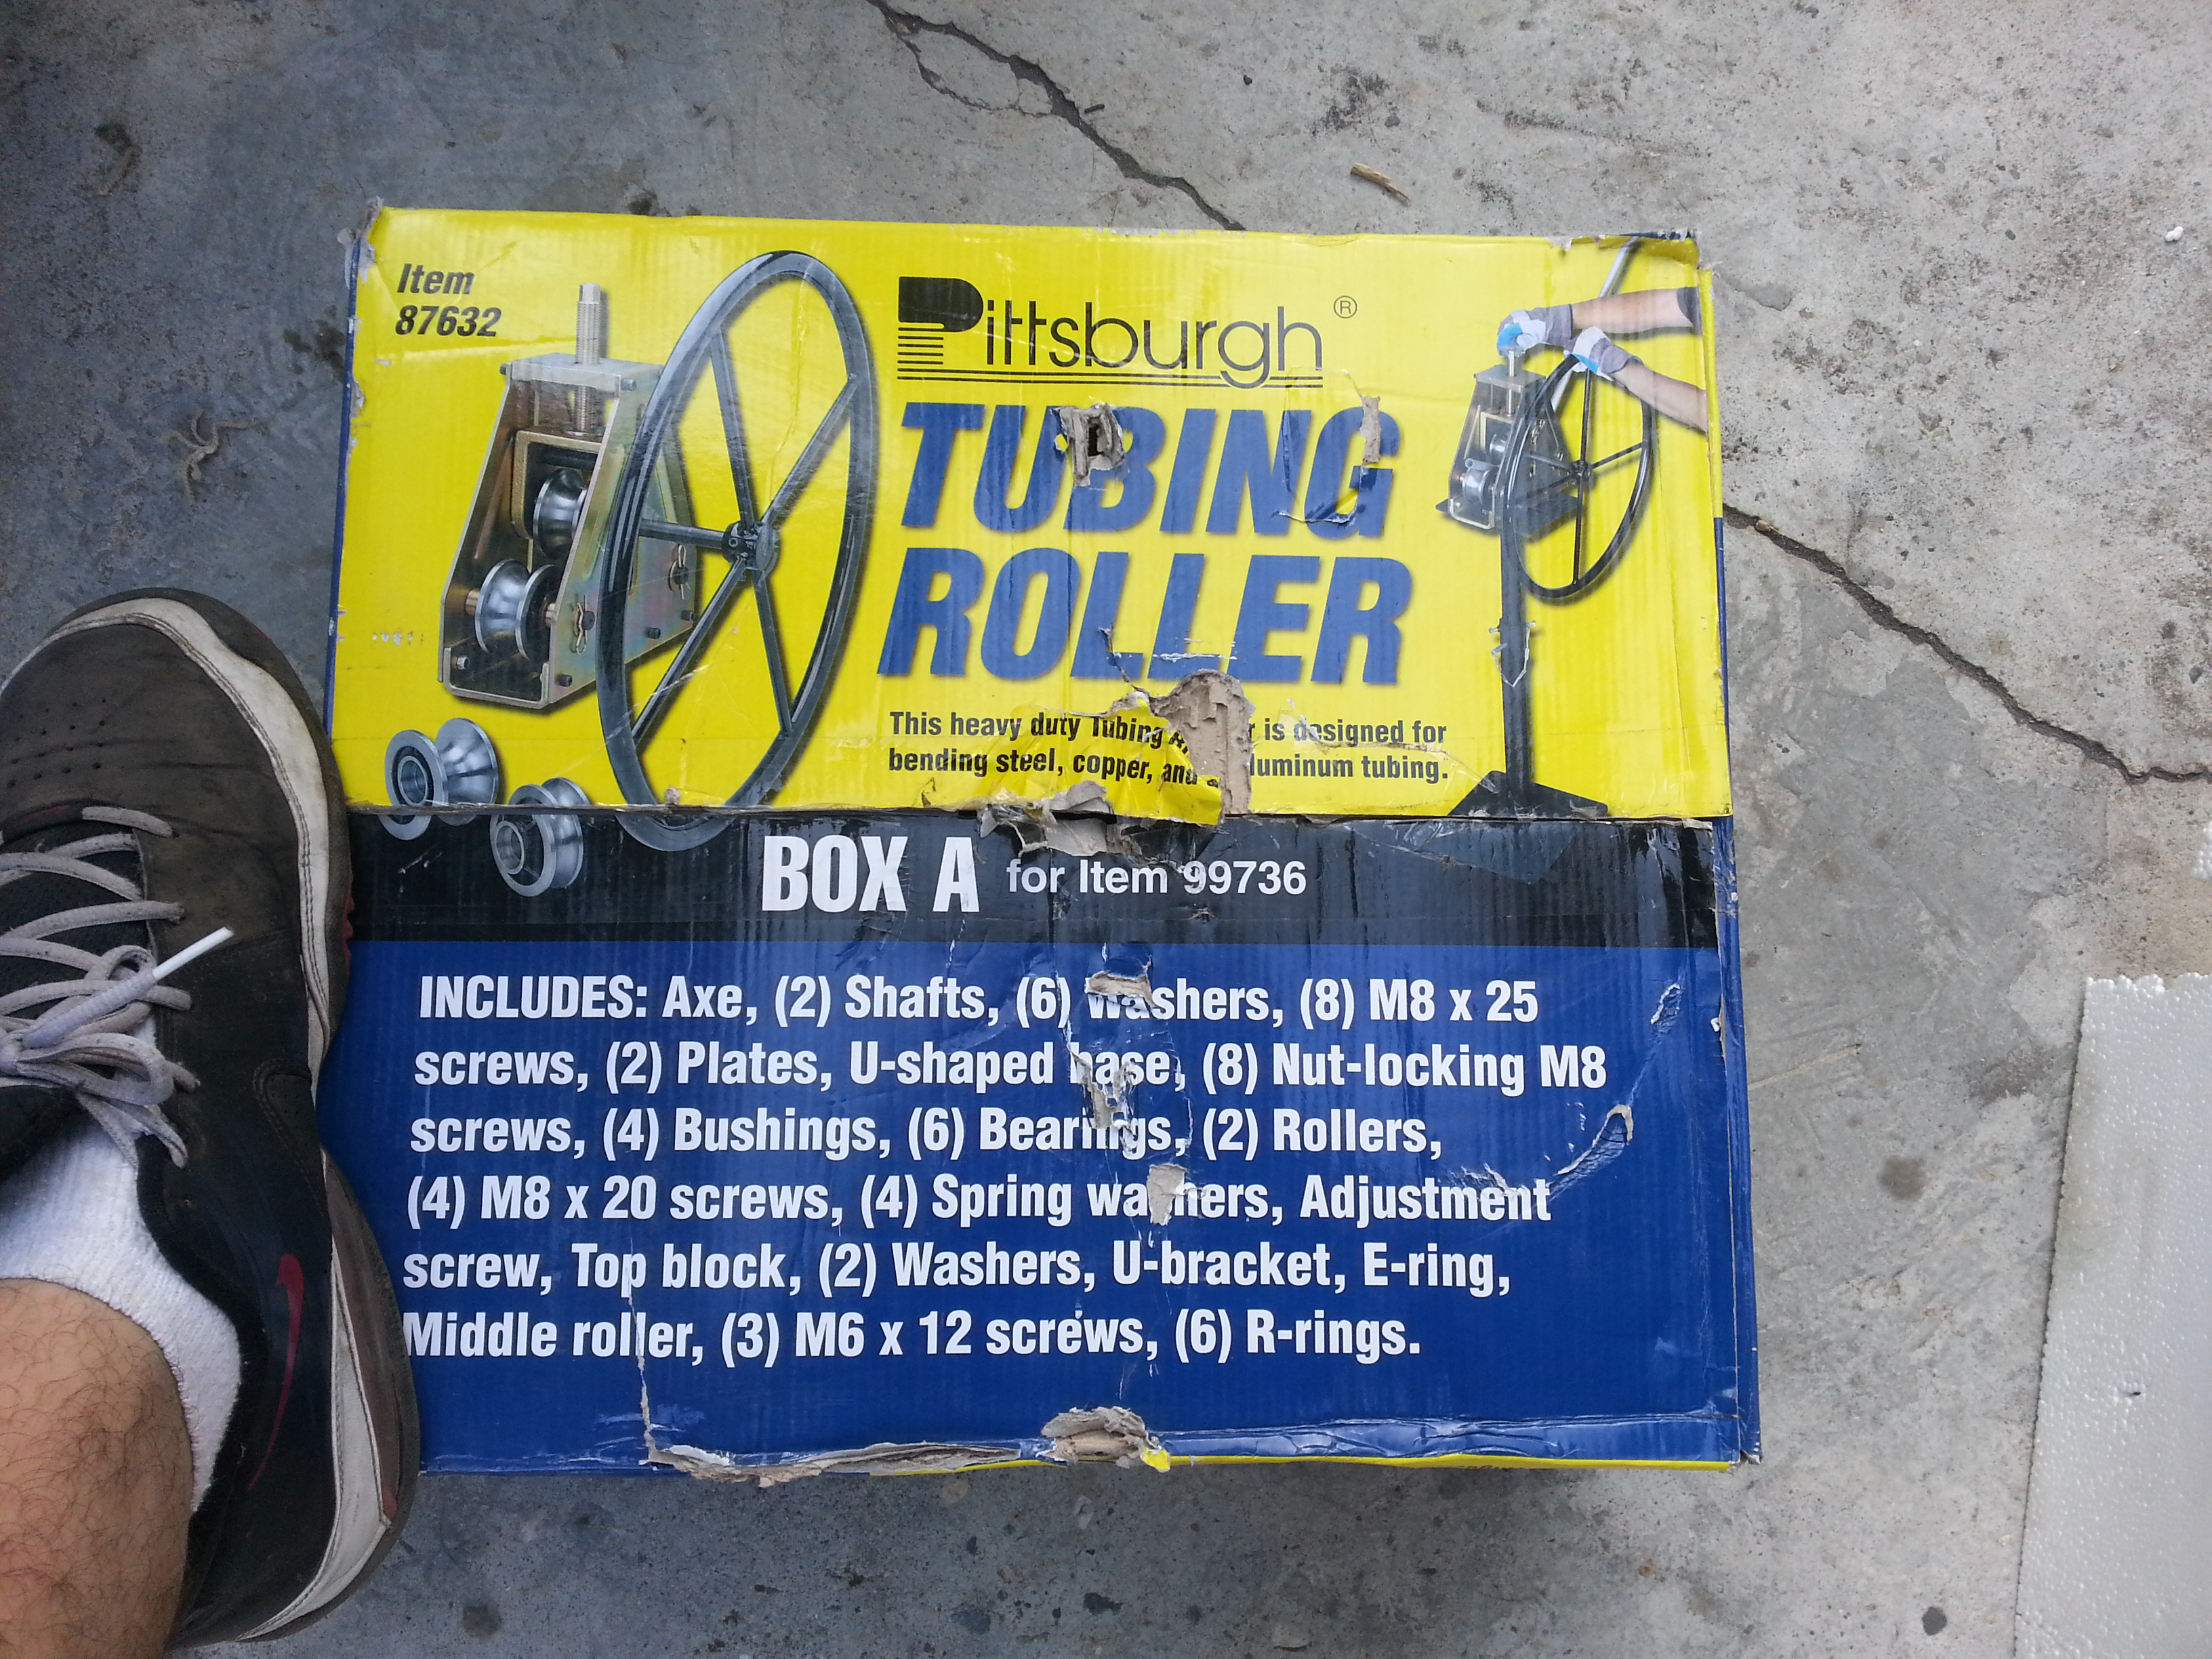
I bought the tube bender yesterday for $186. Then while at work received a complimentary email from Harbor Freight with this month's coupons. one including a 20% off coupon. So Today i returned the unopened boxes then re-bought them at the discounted price of approx $165ish. 
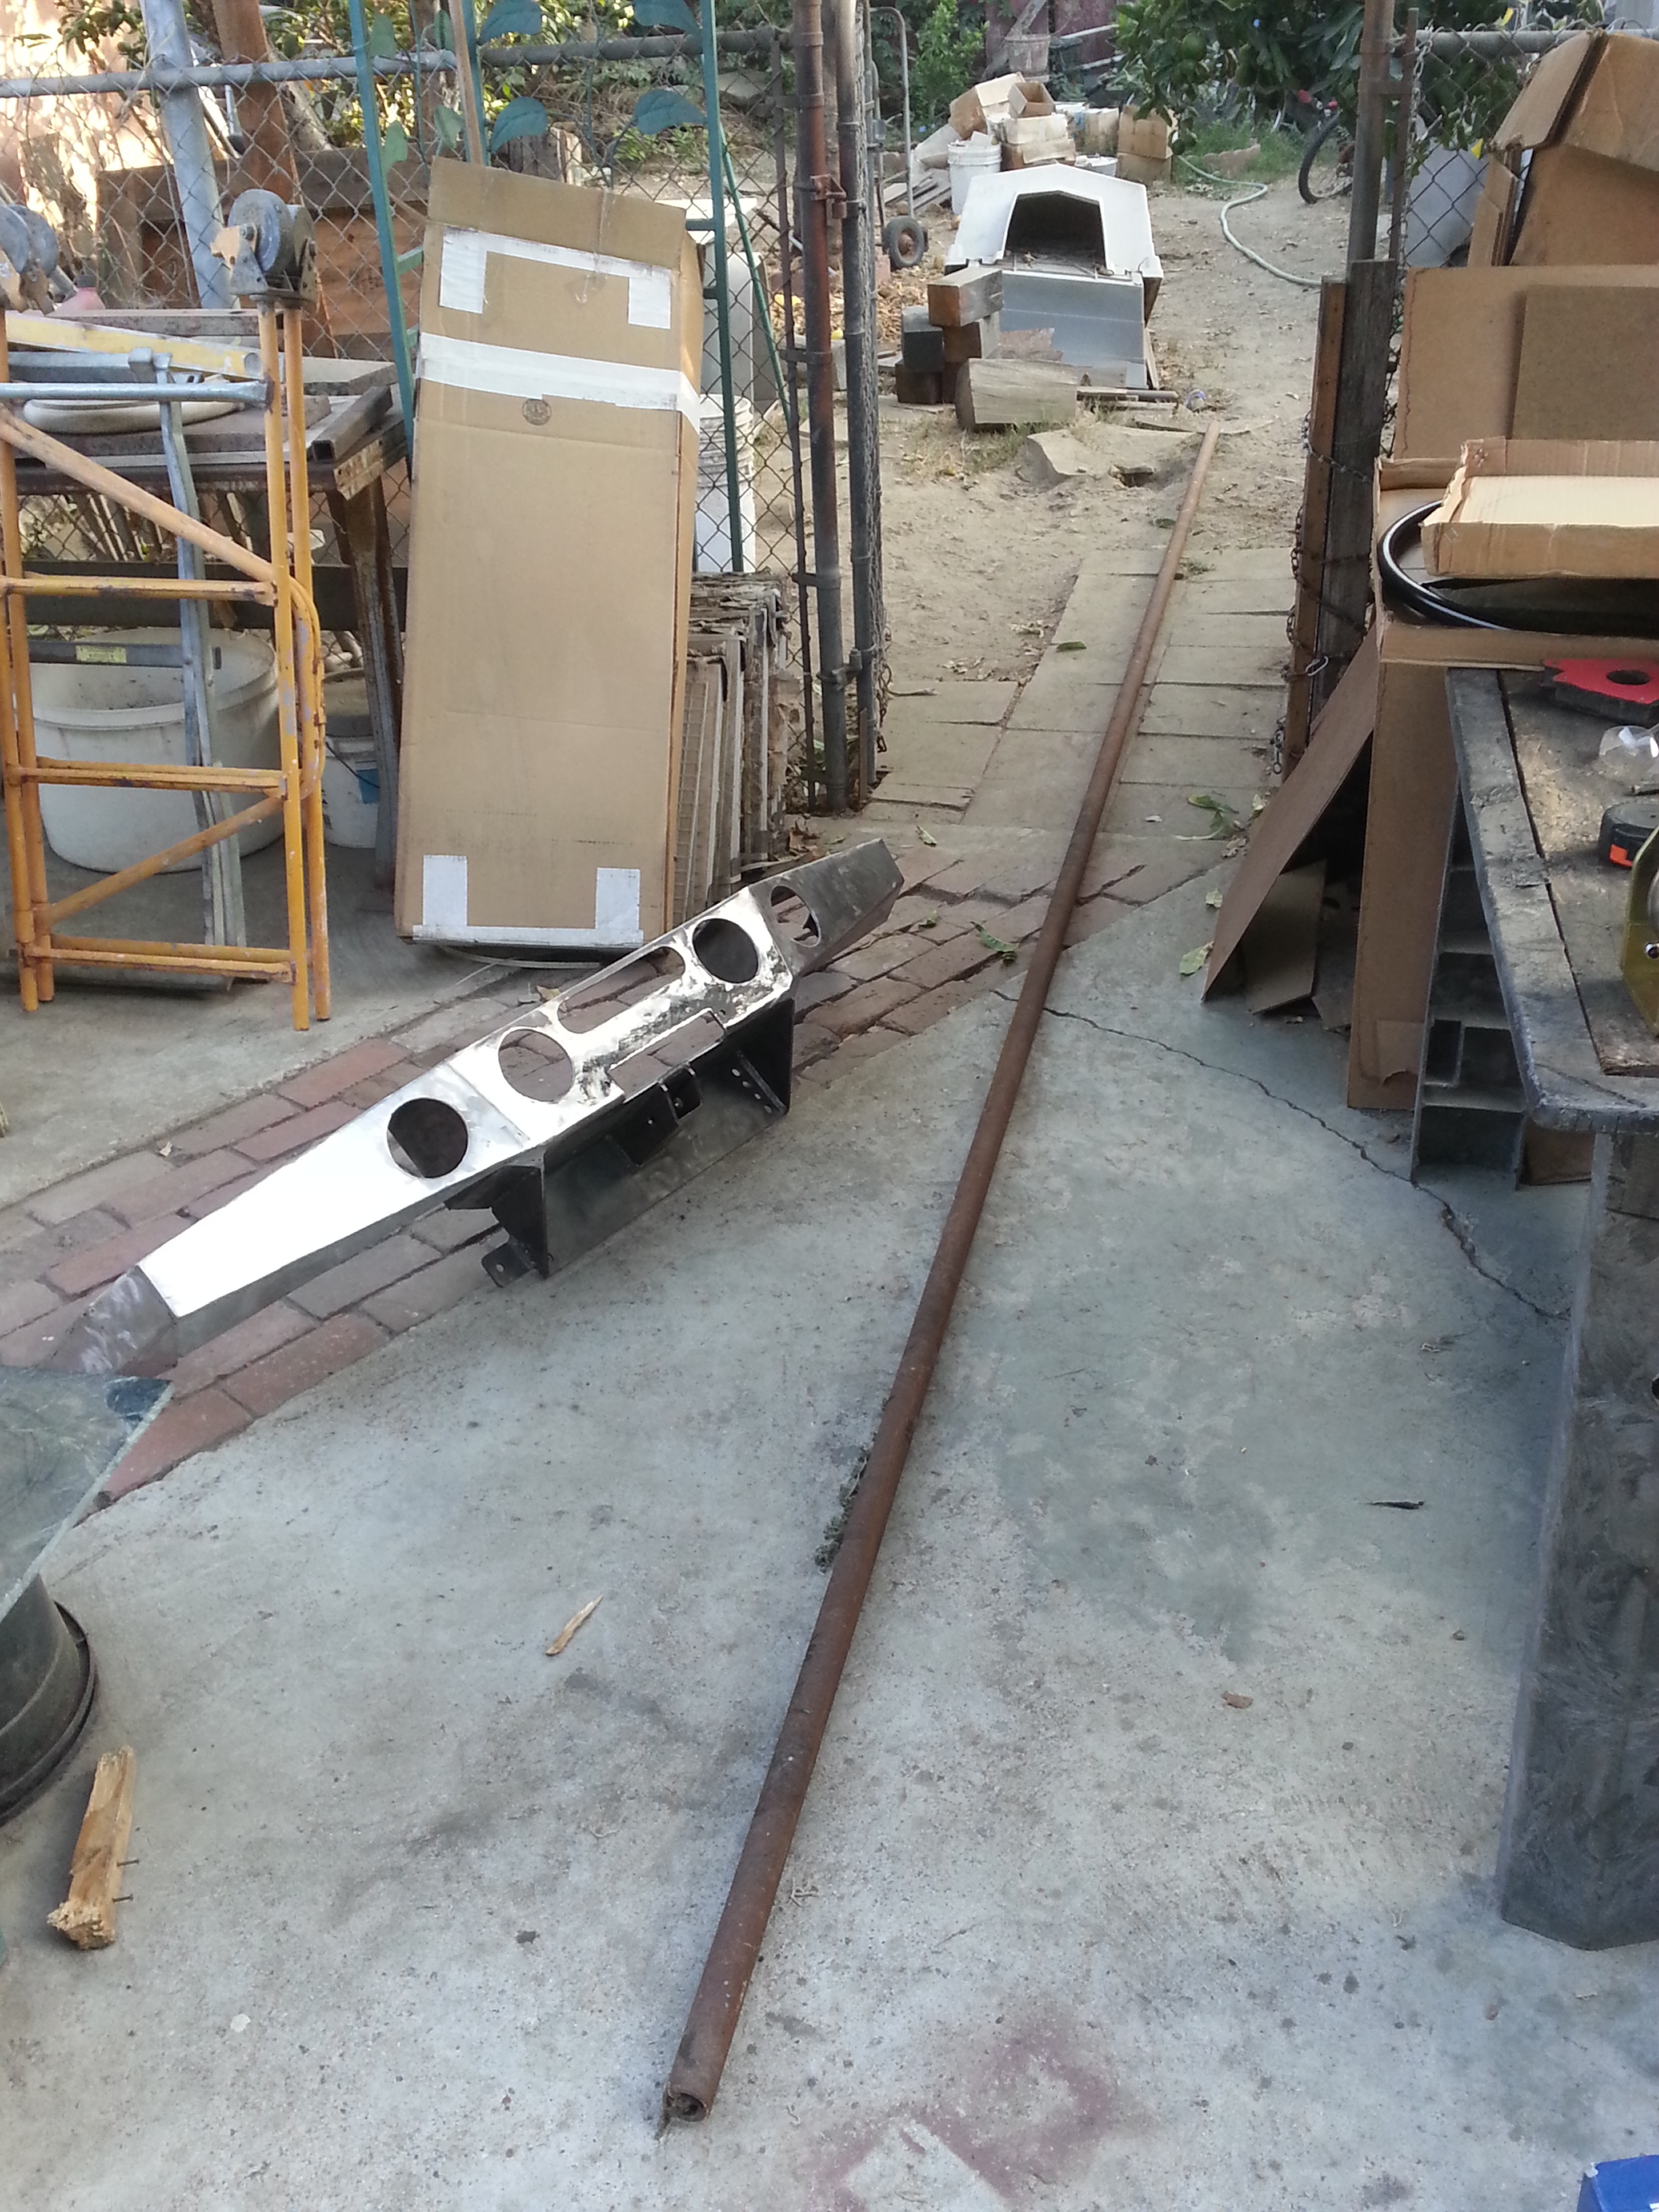
Went digging in my dads pile of metal in our back yard and found two 21ft pipes that were about 3/16 or 1/4" thick. This sucker was super heavy! and to top it off it was rusted to hell all over the exterior! and im sure inside too. but the steel is still good underneath. Nothing that cant me sanded off with the wire wheel.

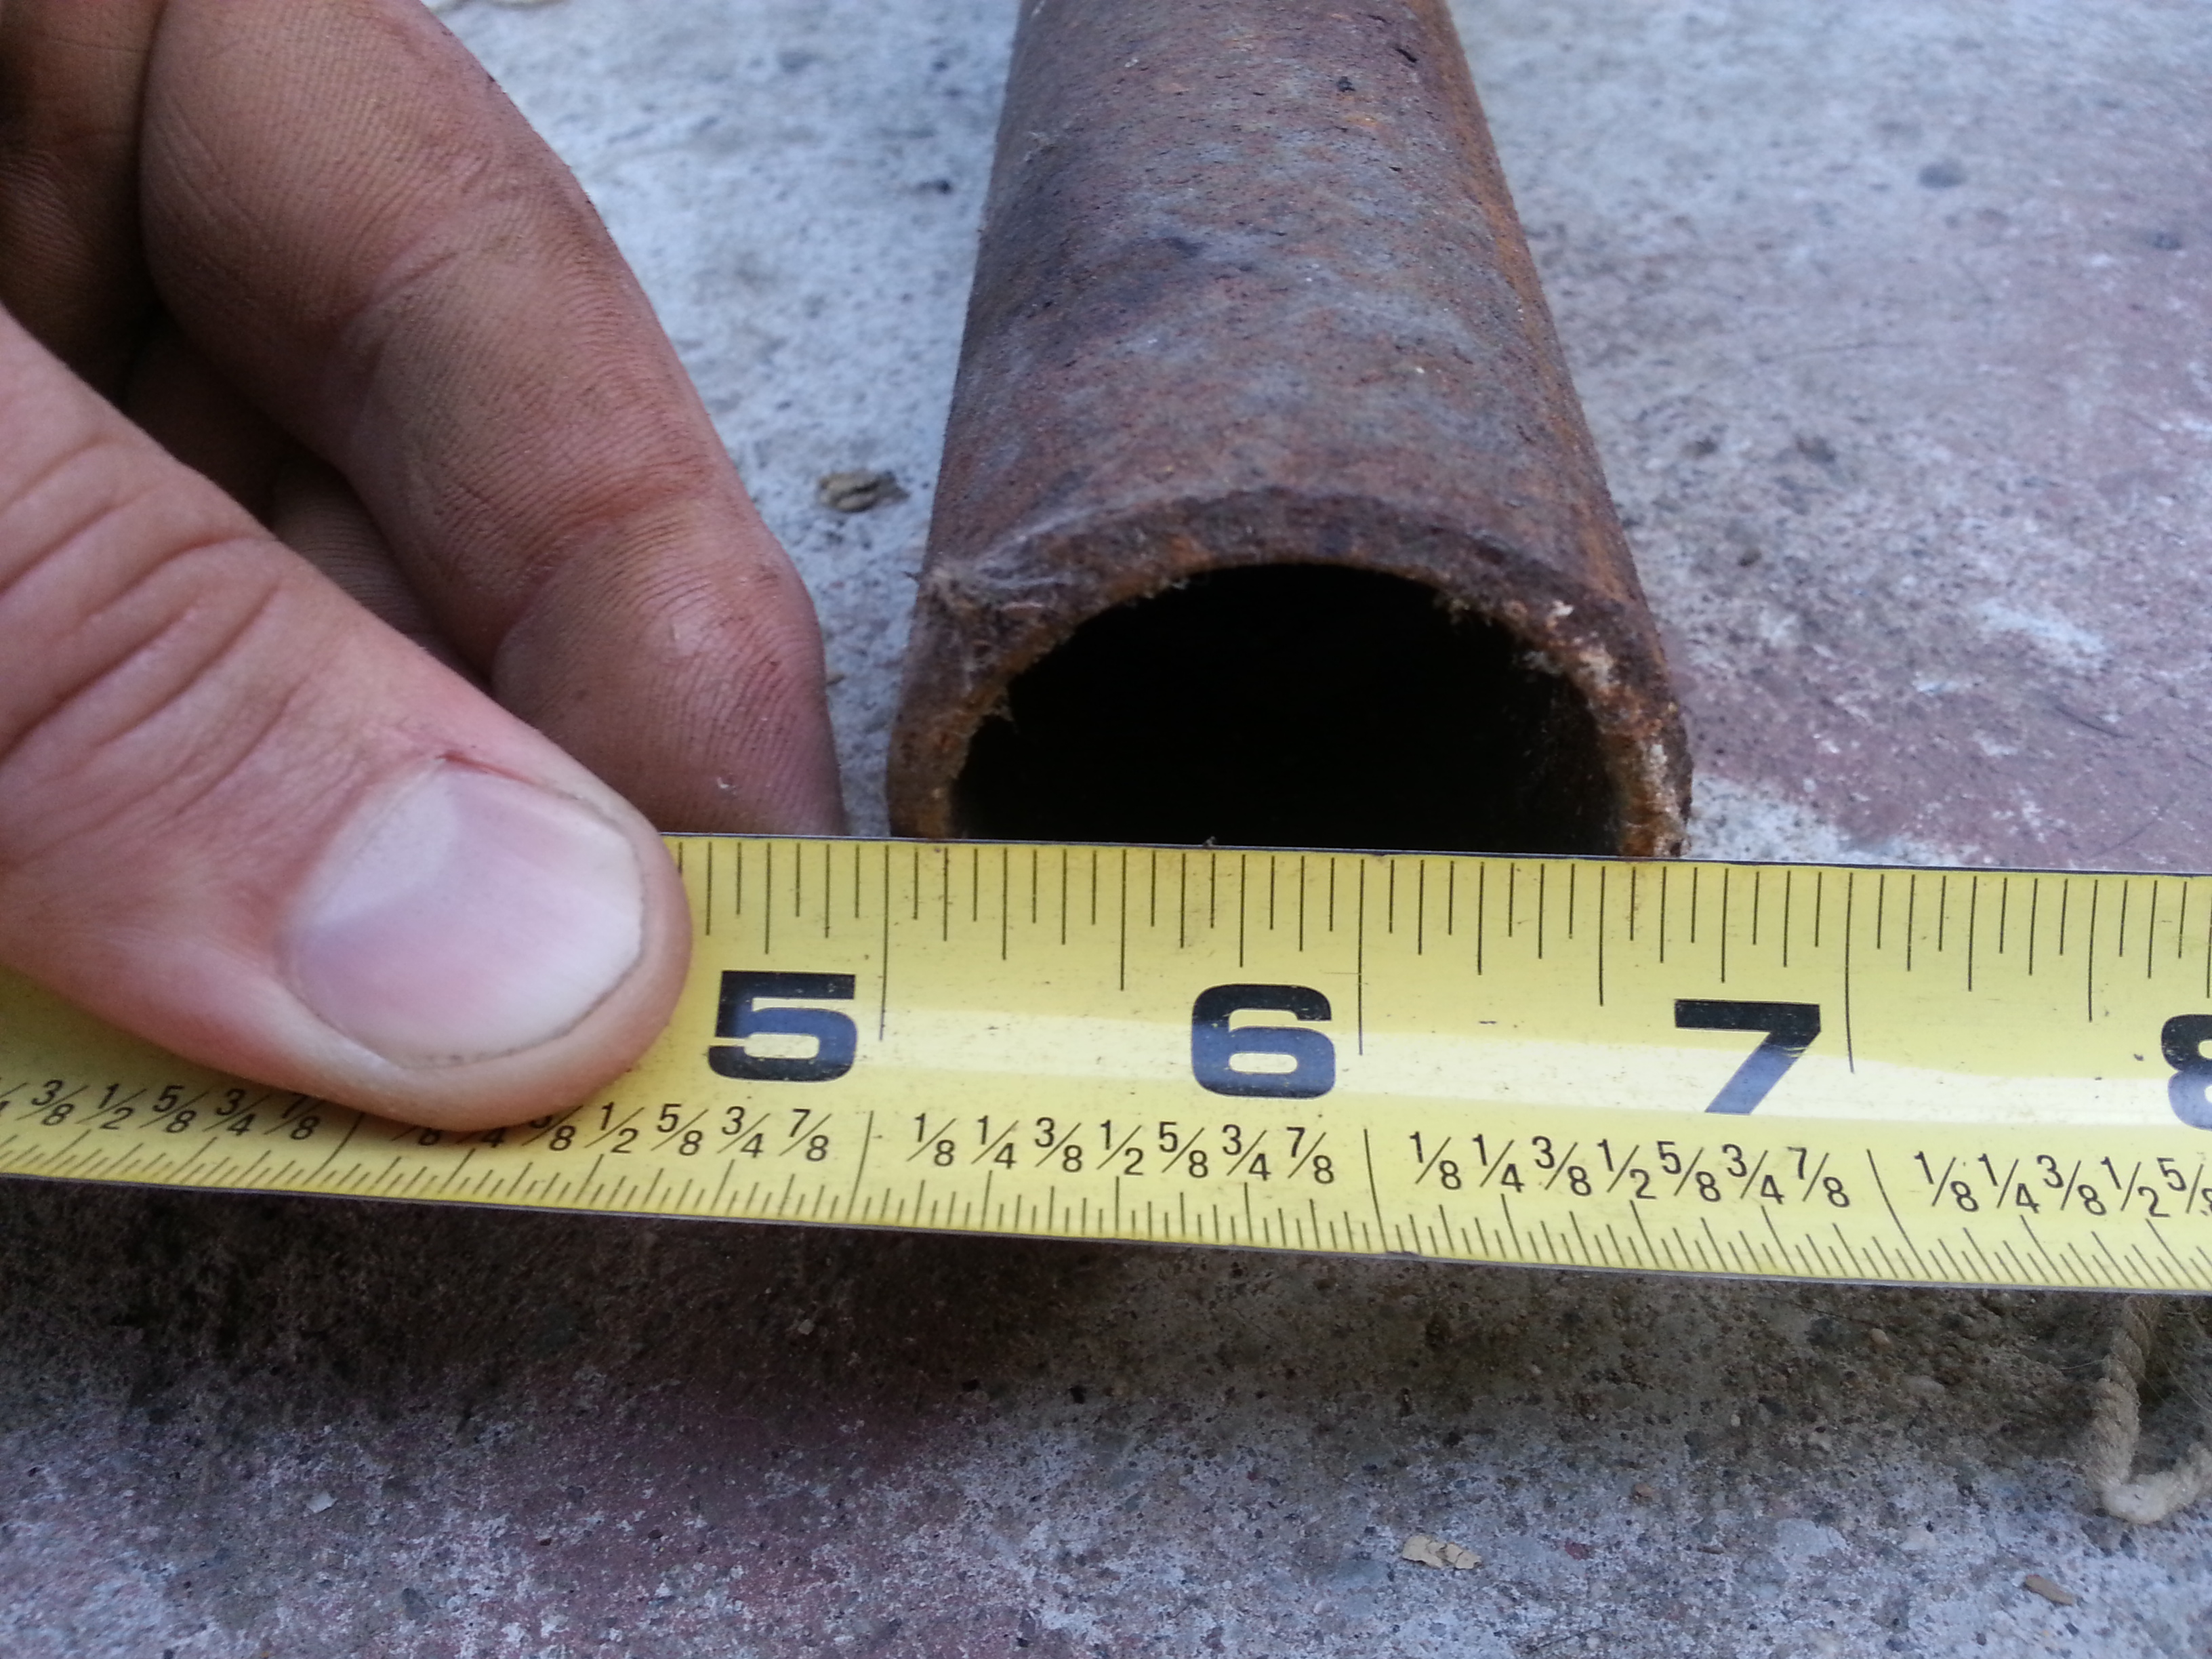
Dad says the tube is 1&1/2" thick but it looks more like 1&5/8" to me lol
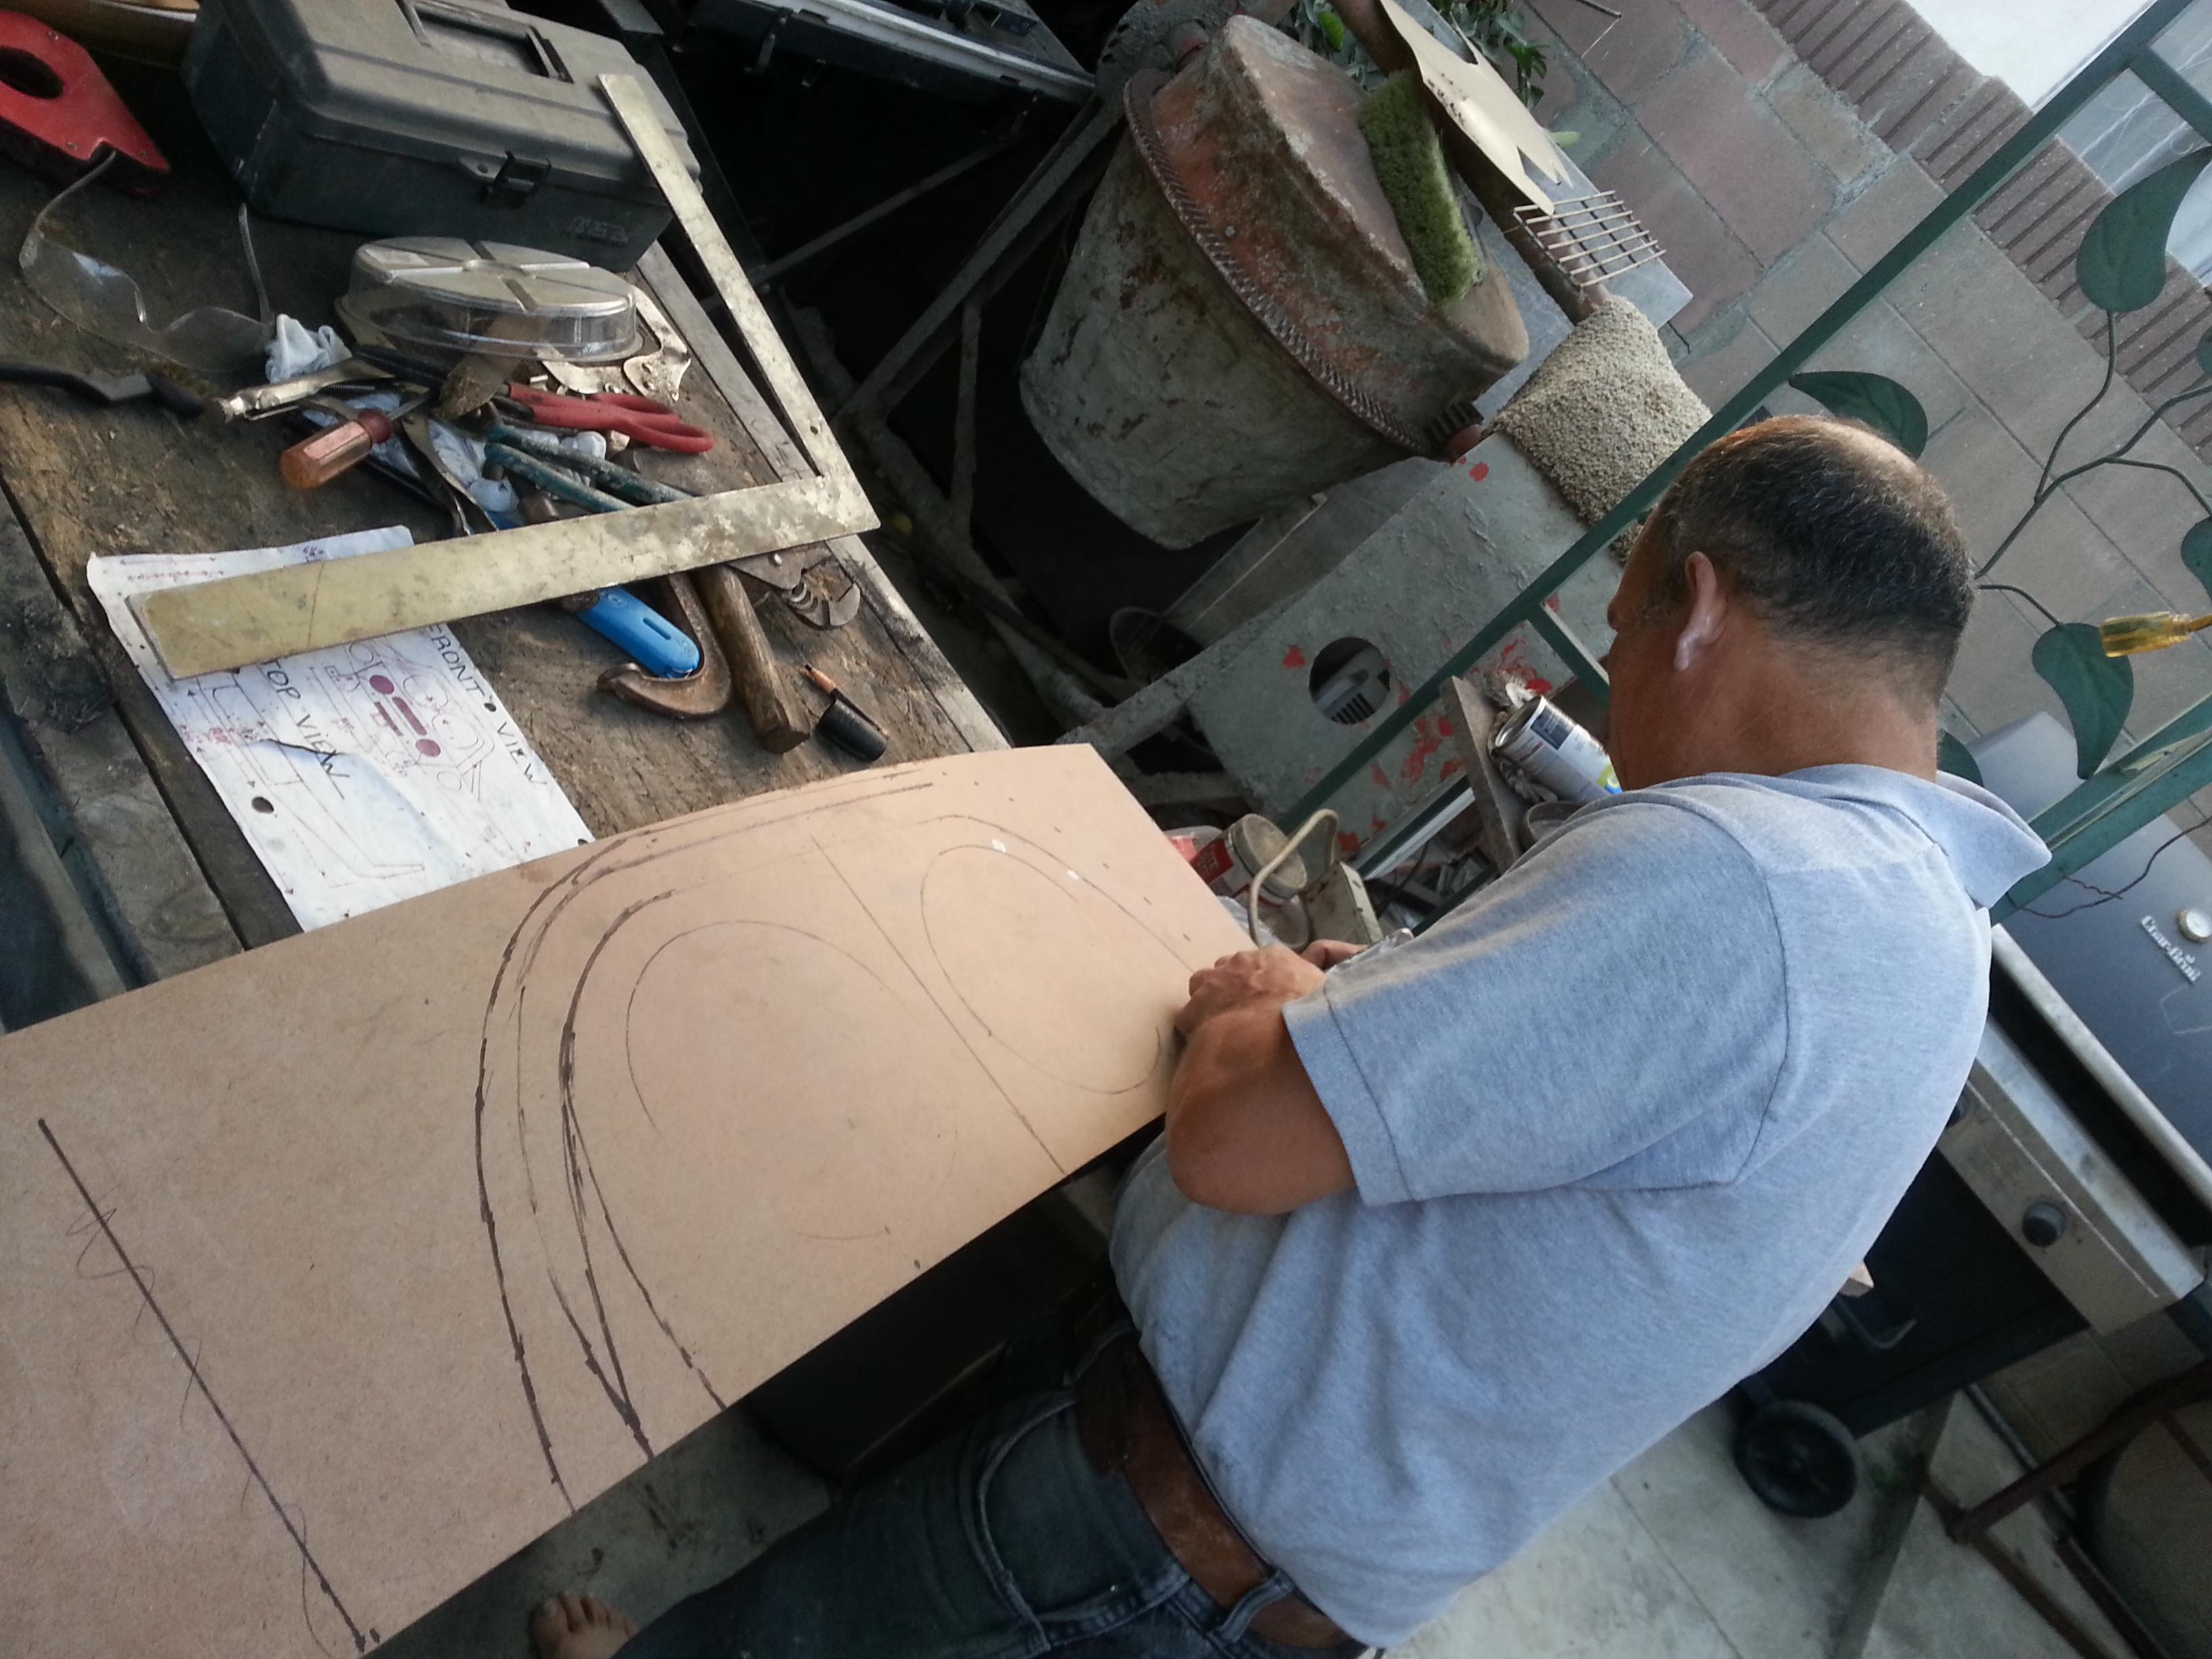
Gave my dad my design blueprint and let him work his magic with his mathematical skills. lol
We measured the exterior line with a tailor's measuring tape. came out to be 43".
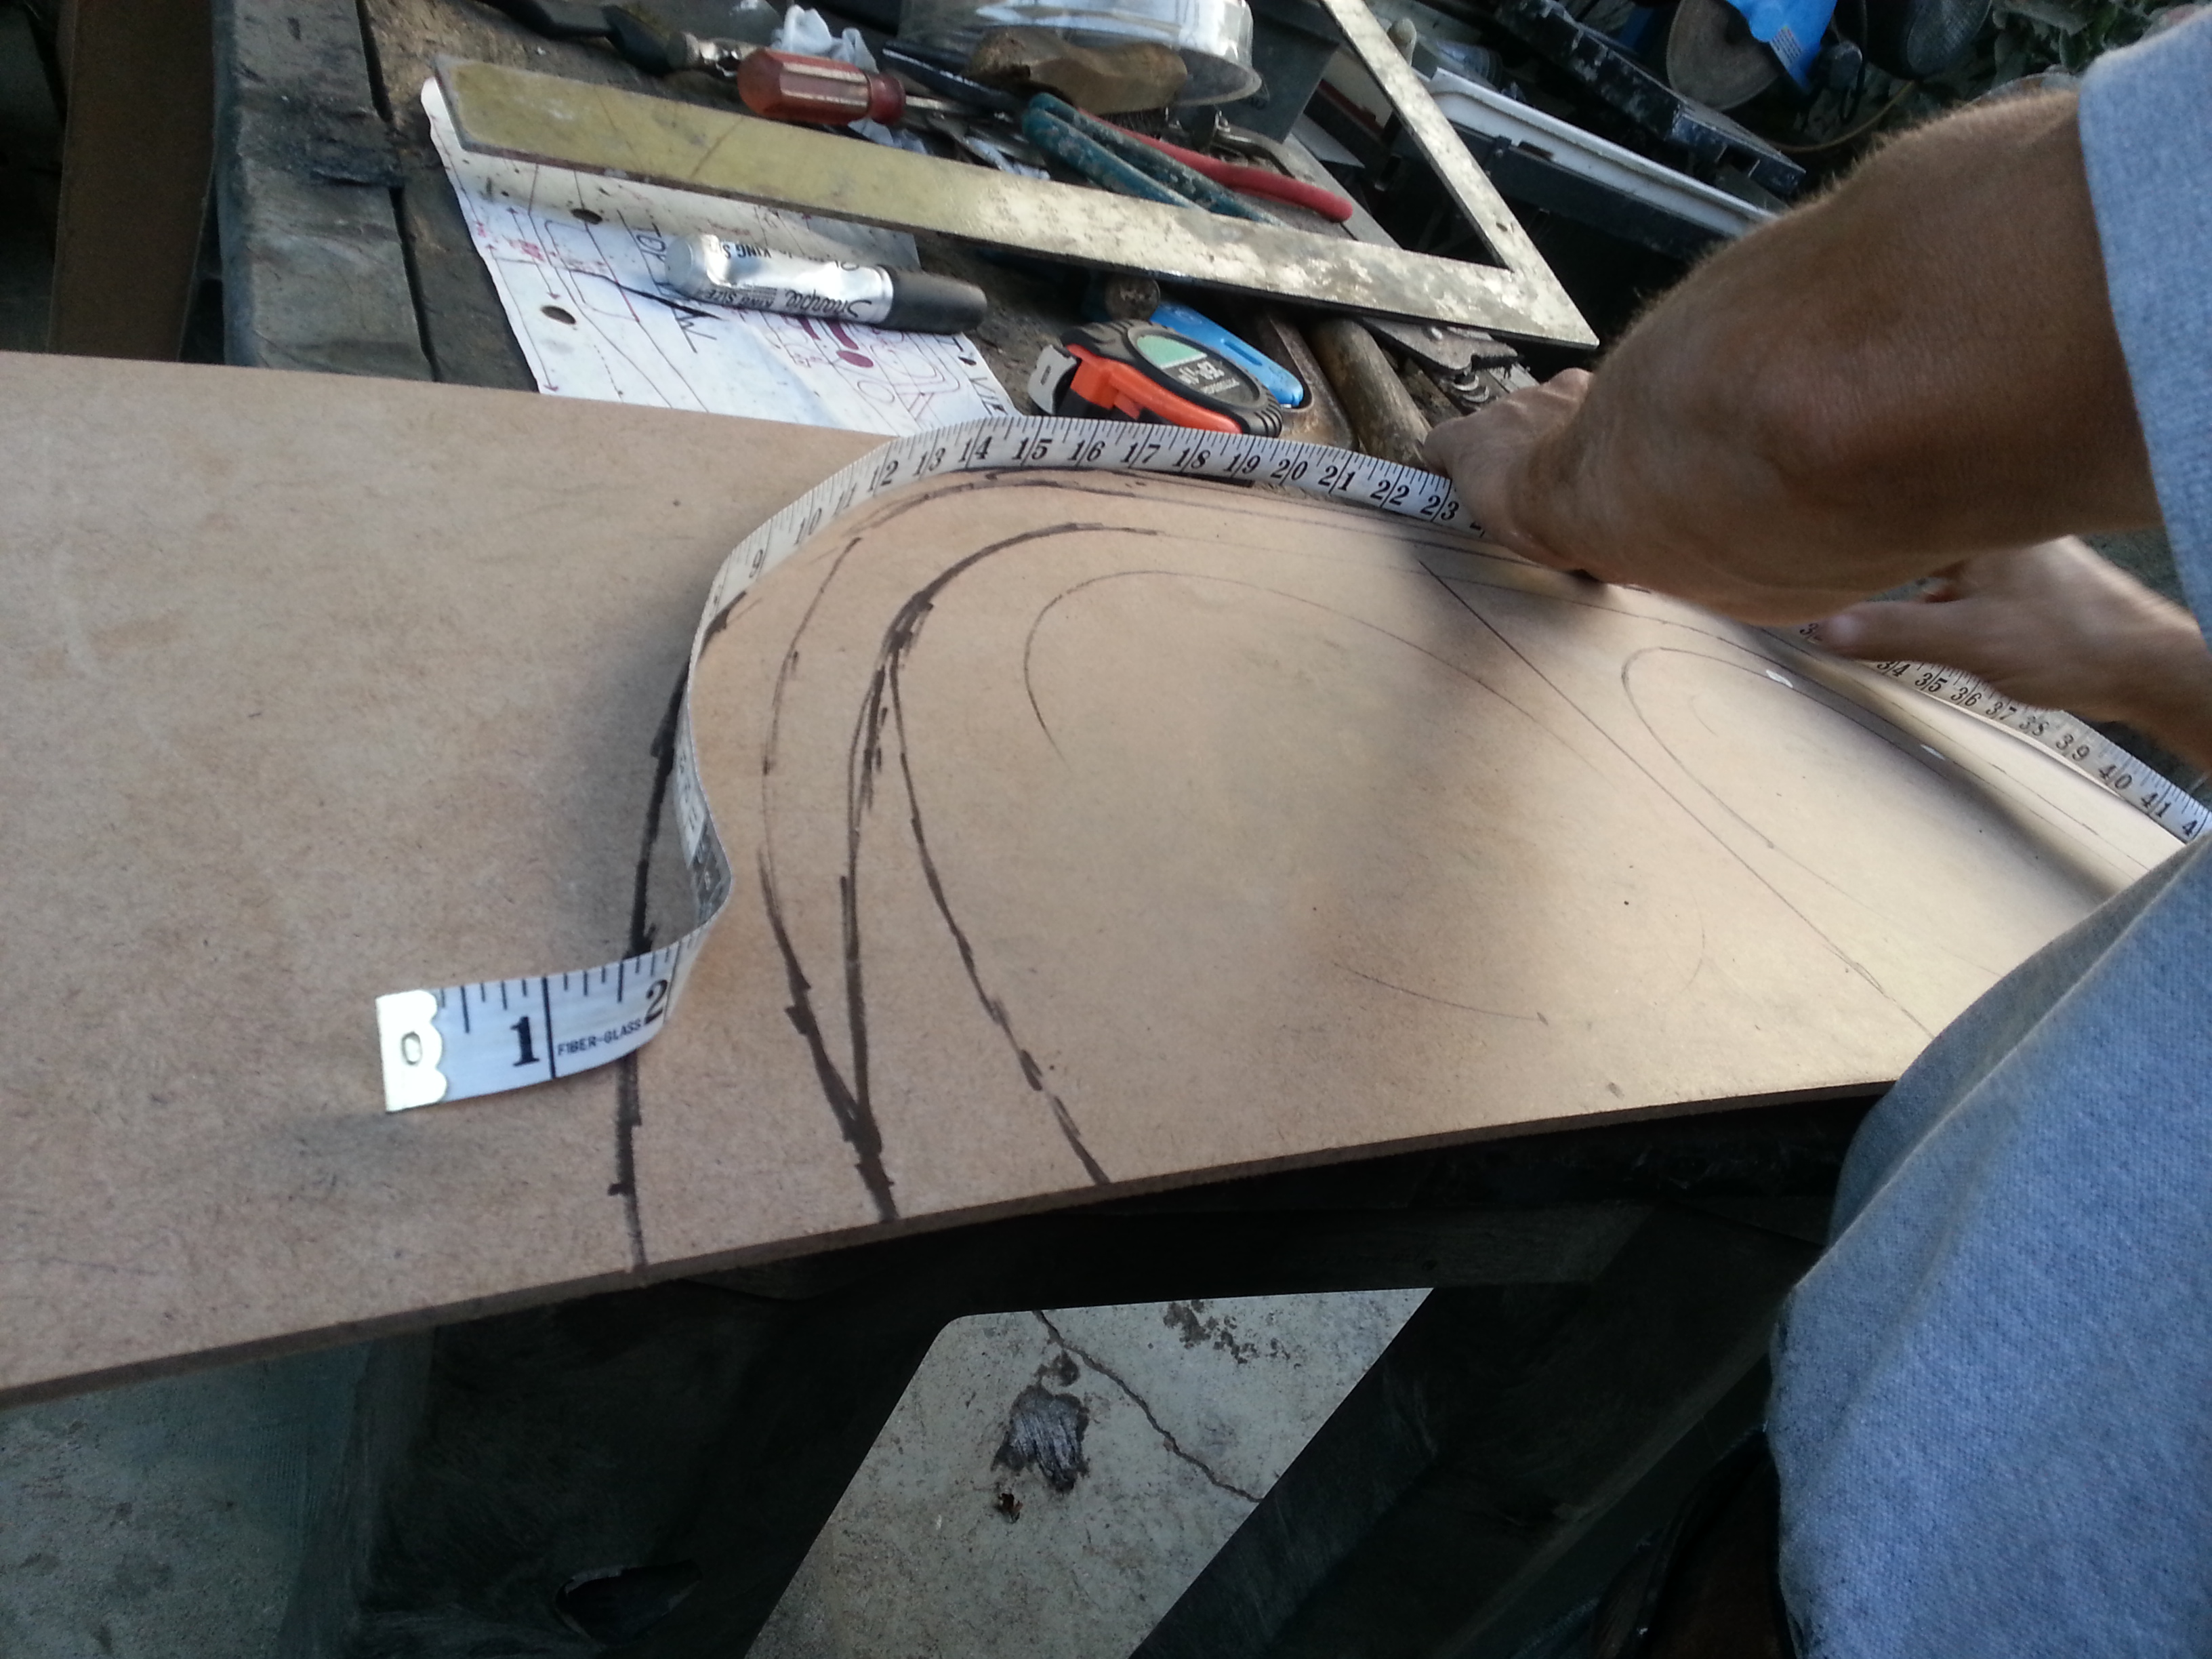
Grabbed the chop saw and cut the measured piece

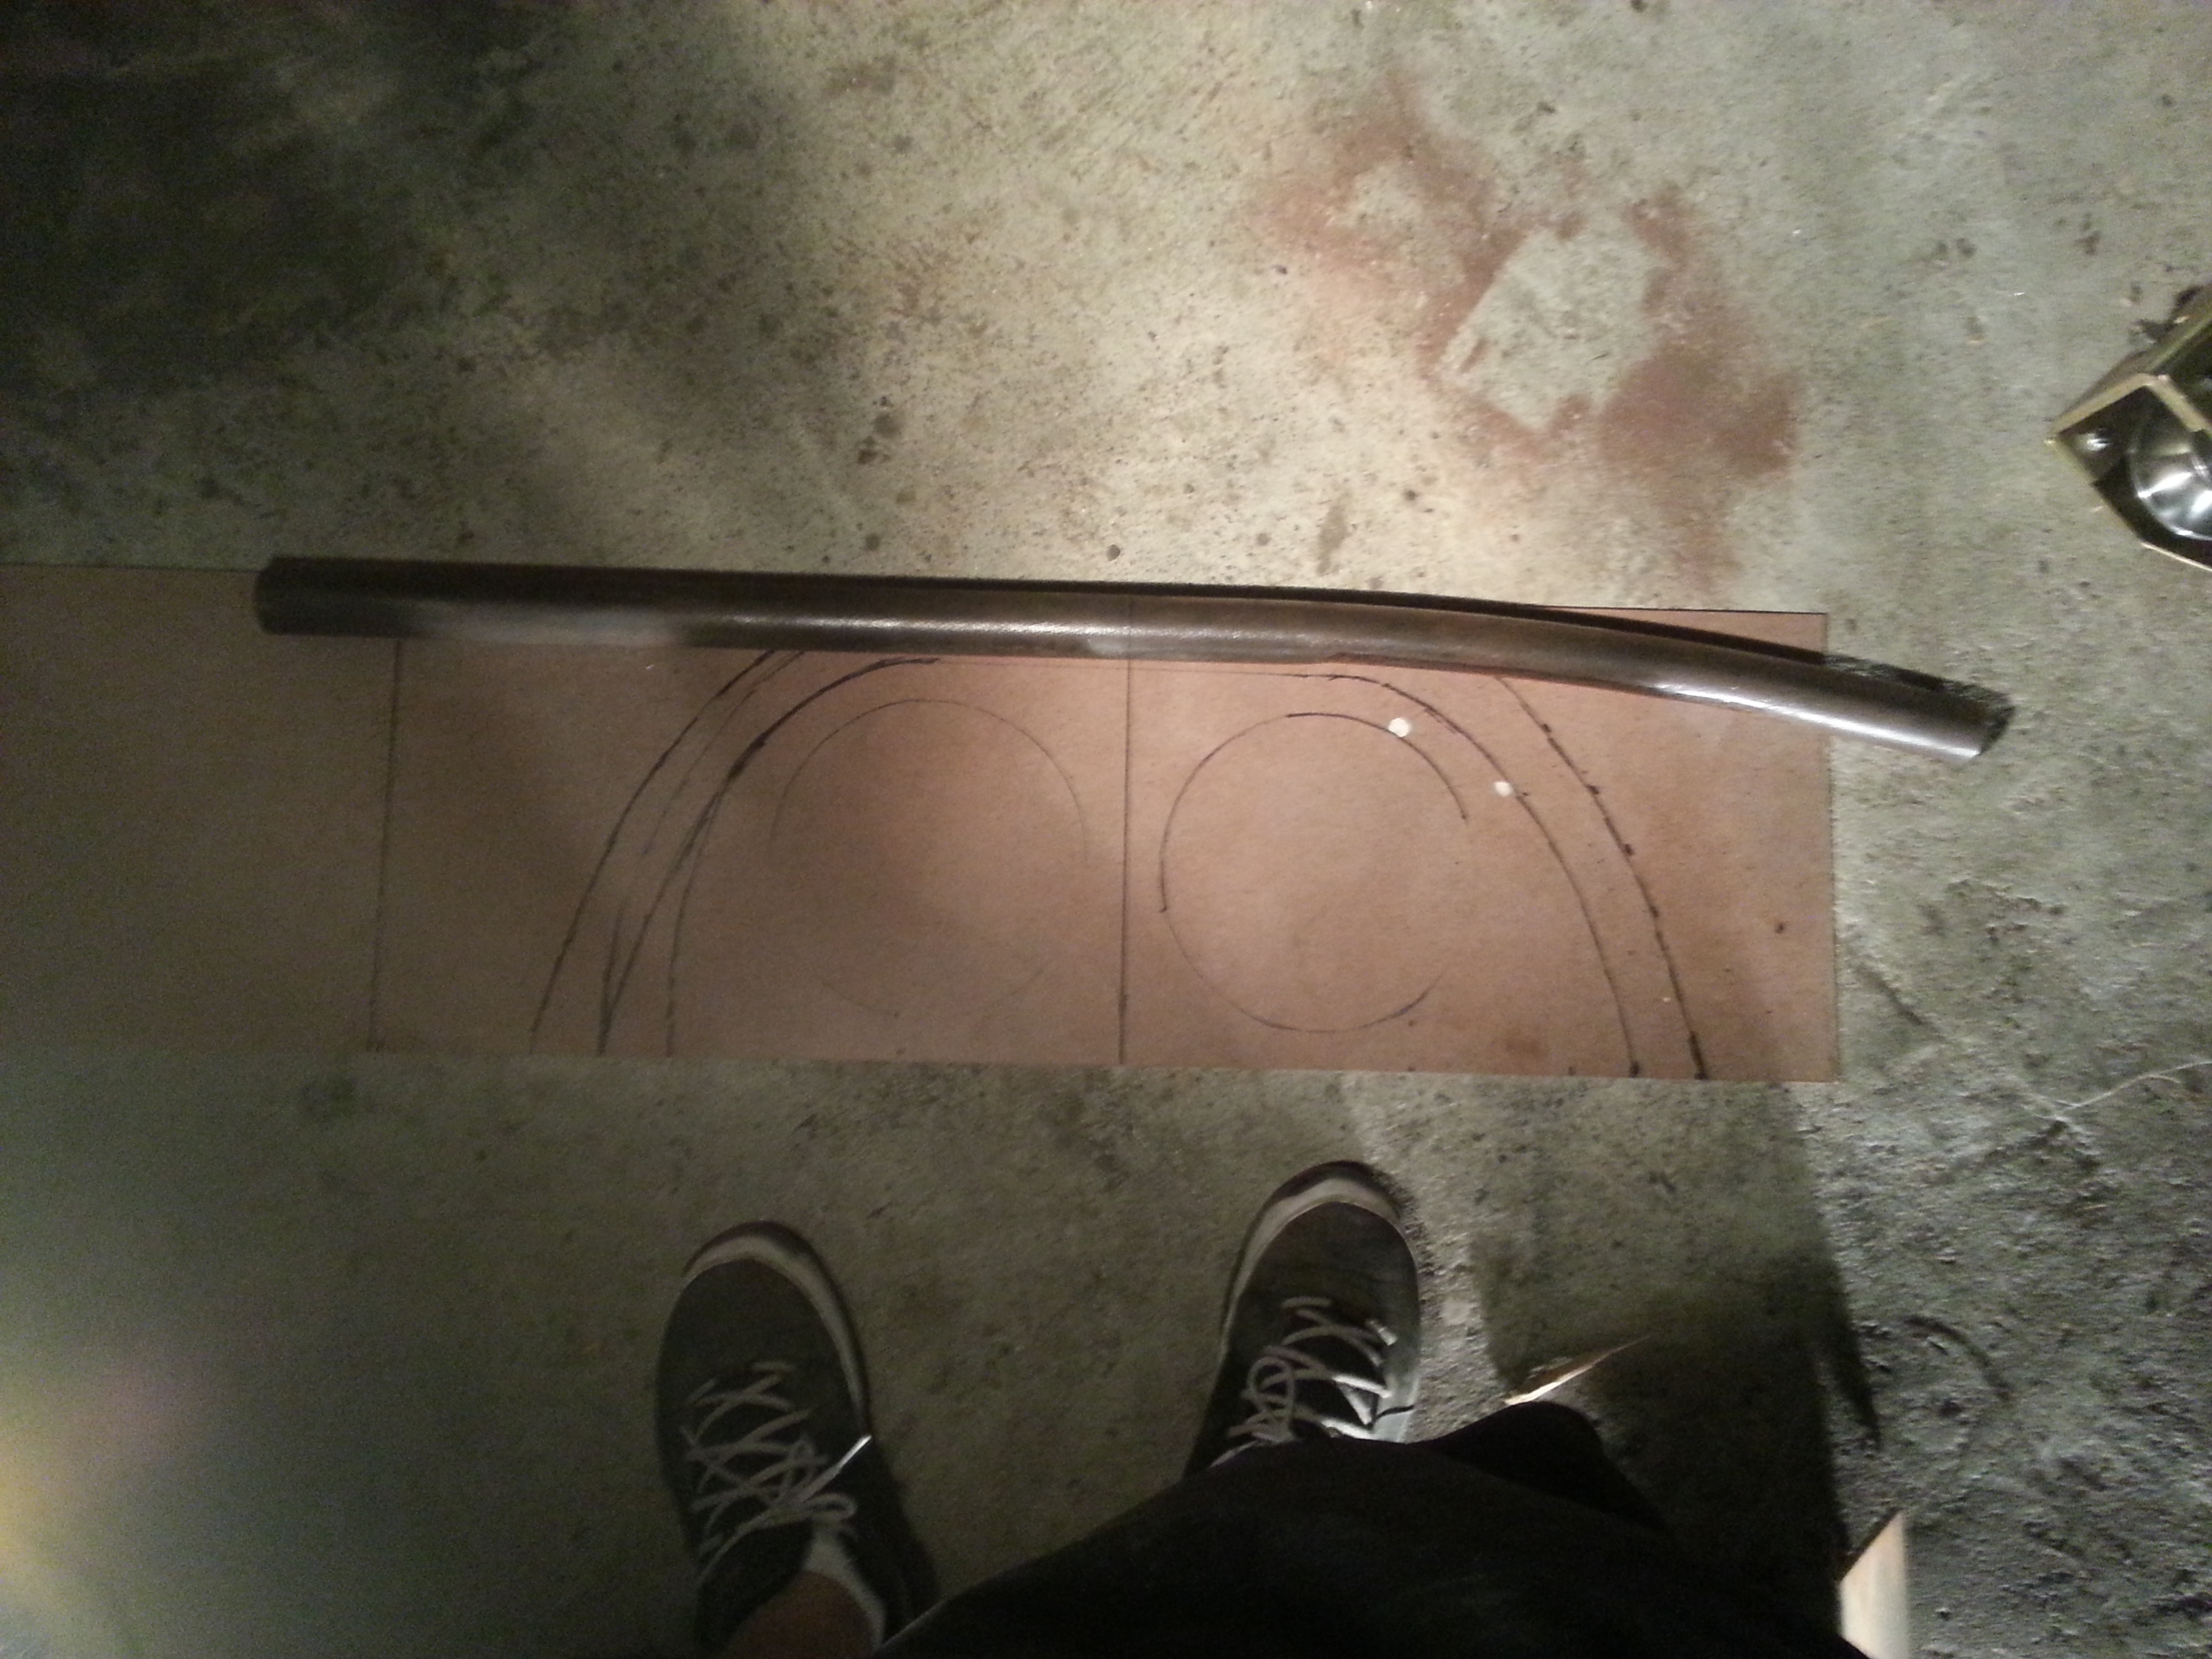
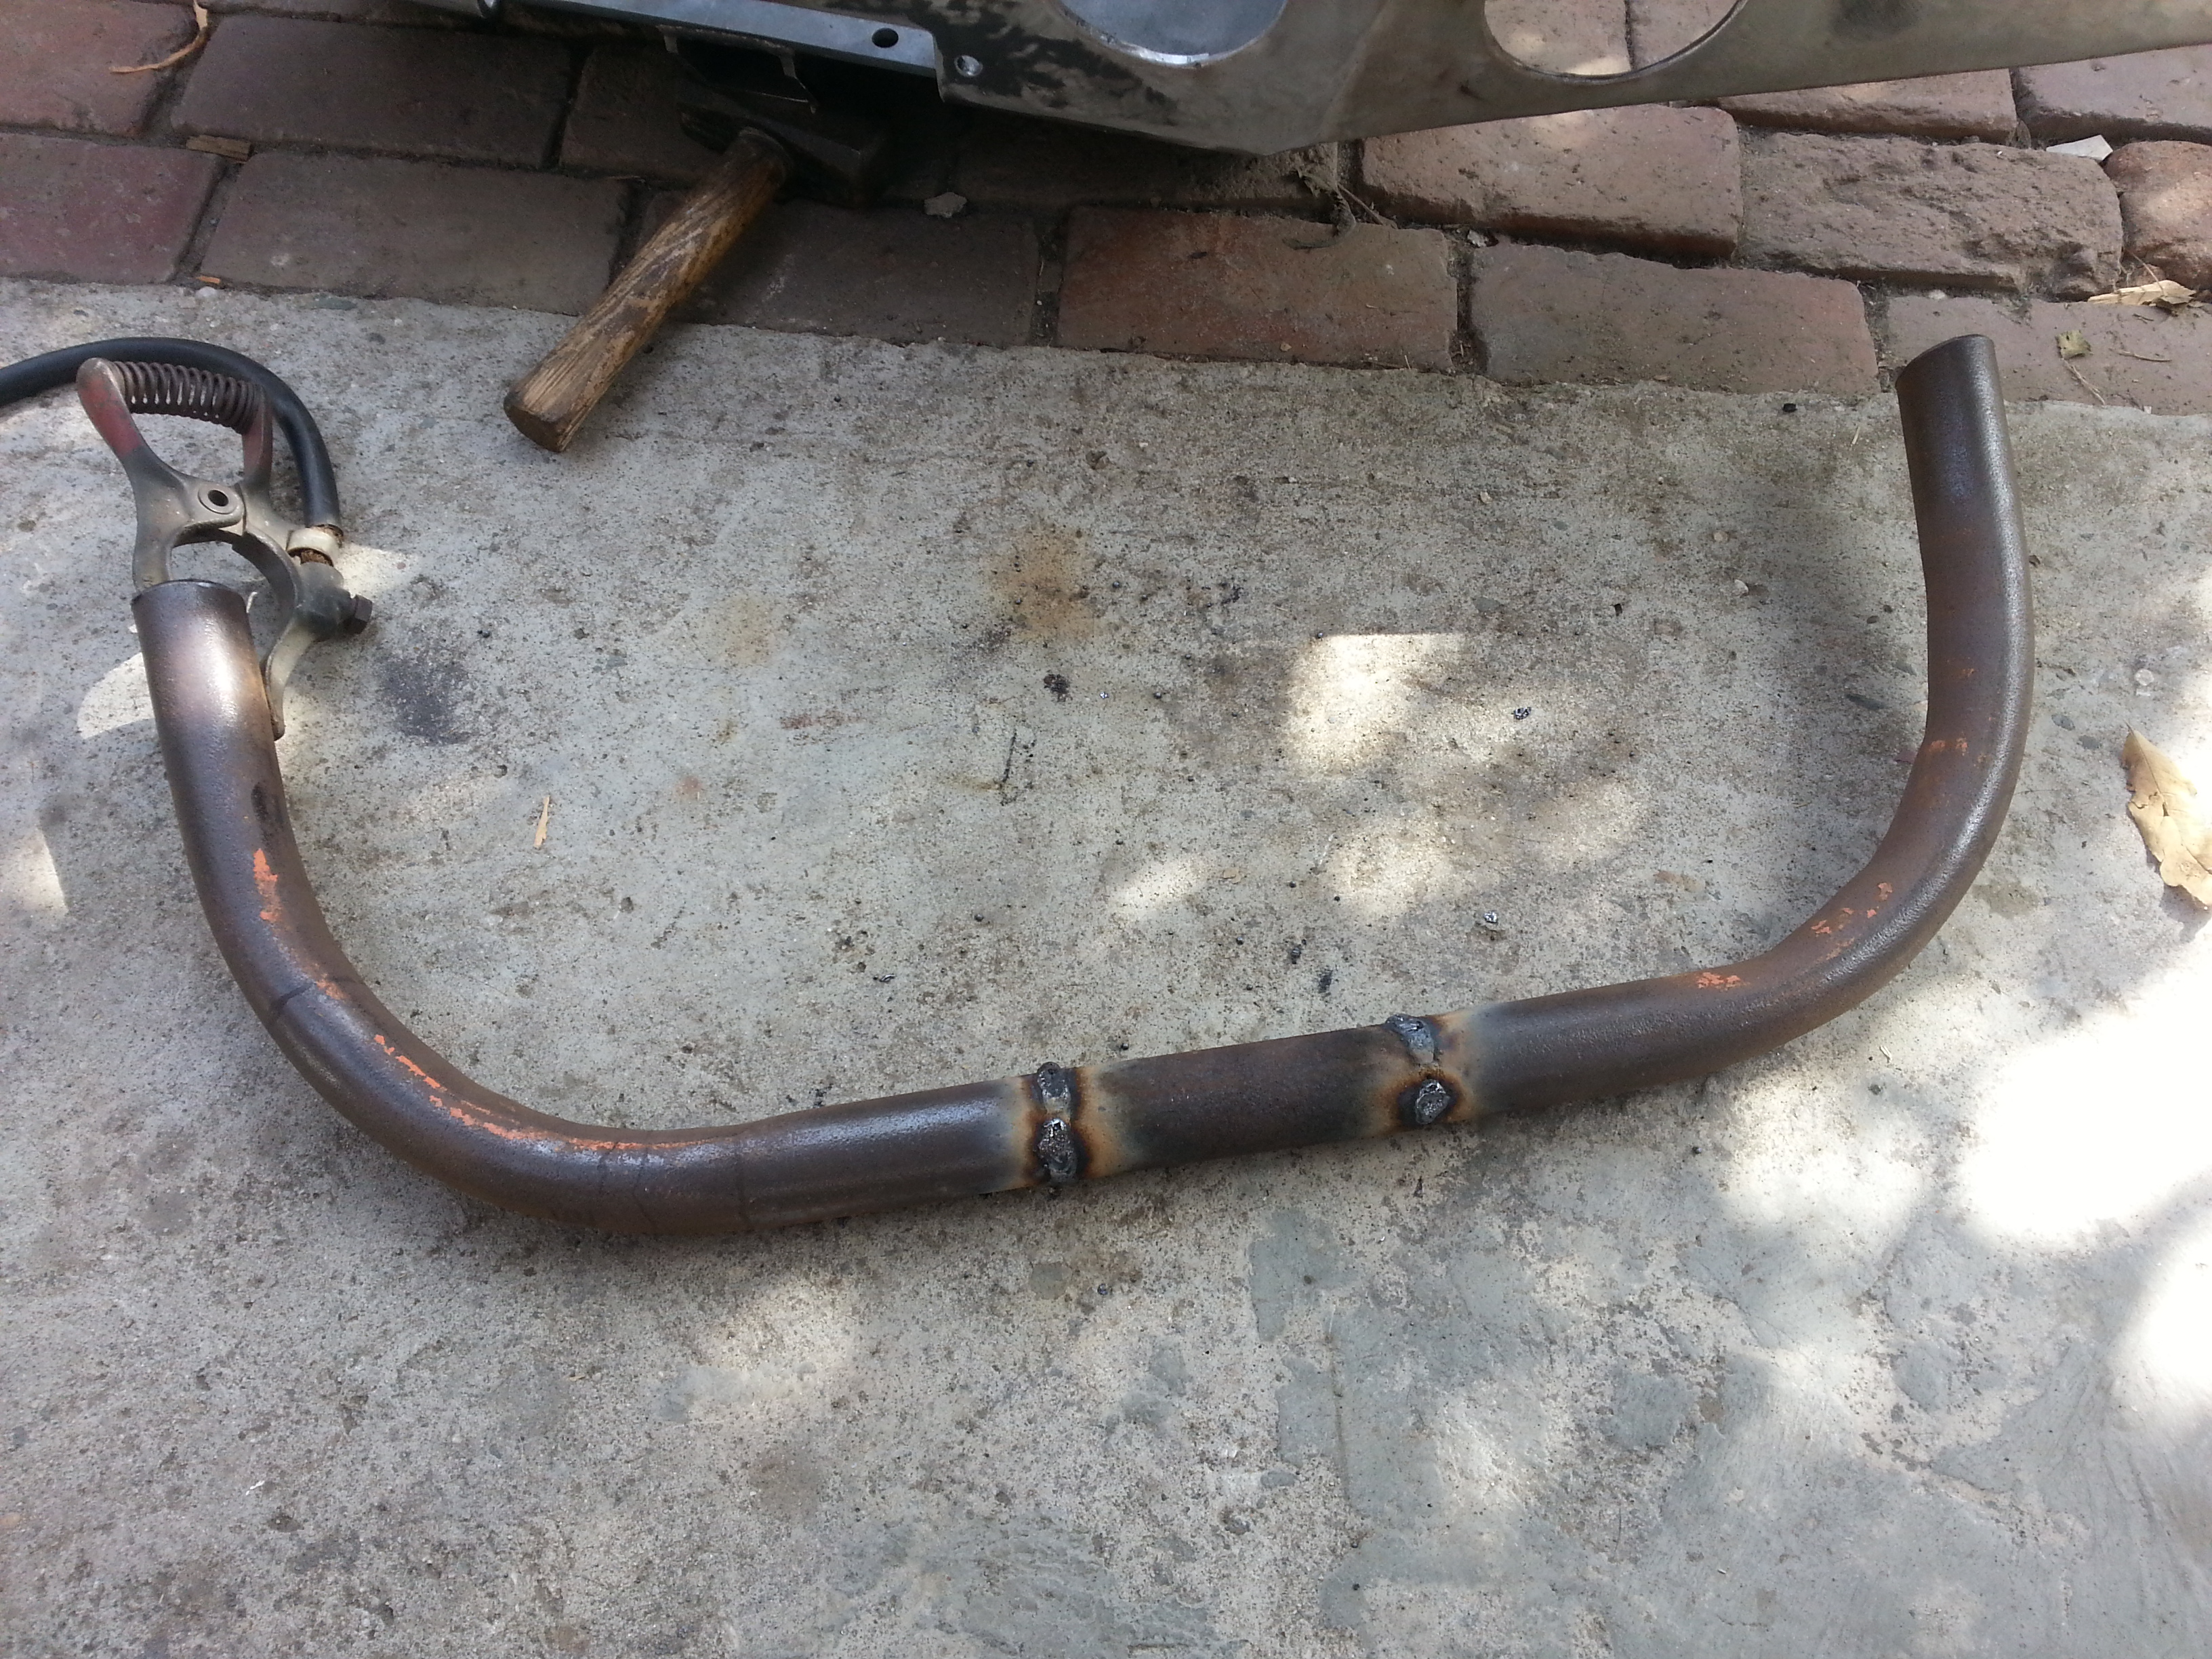
43" tube cut already and i passed the wire wheel all throughout the surface.

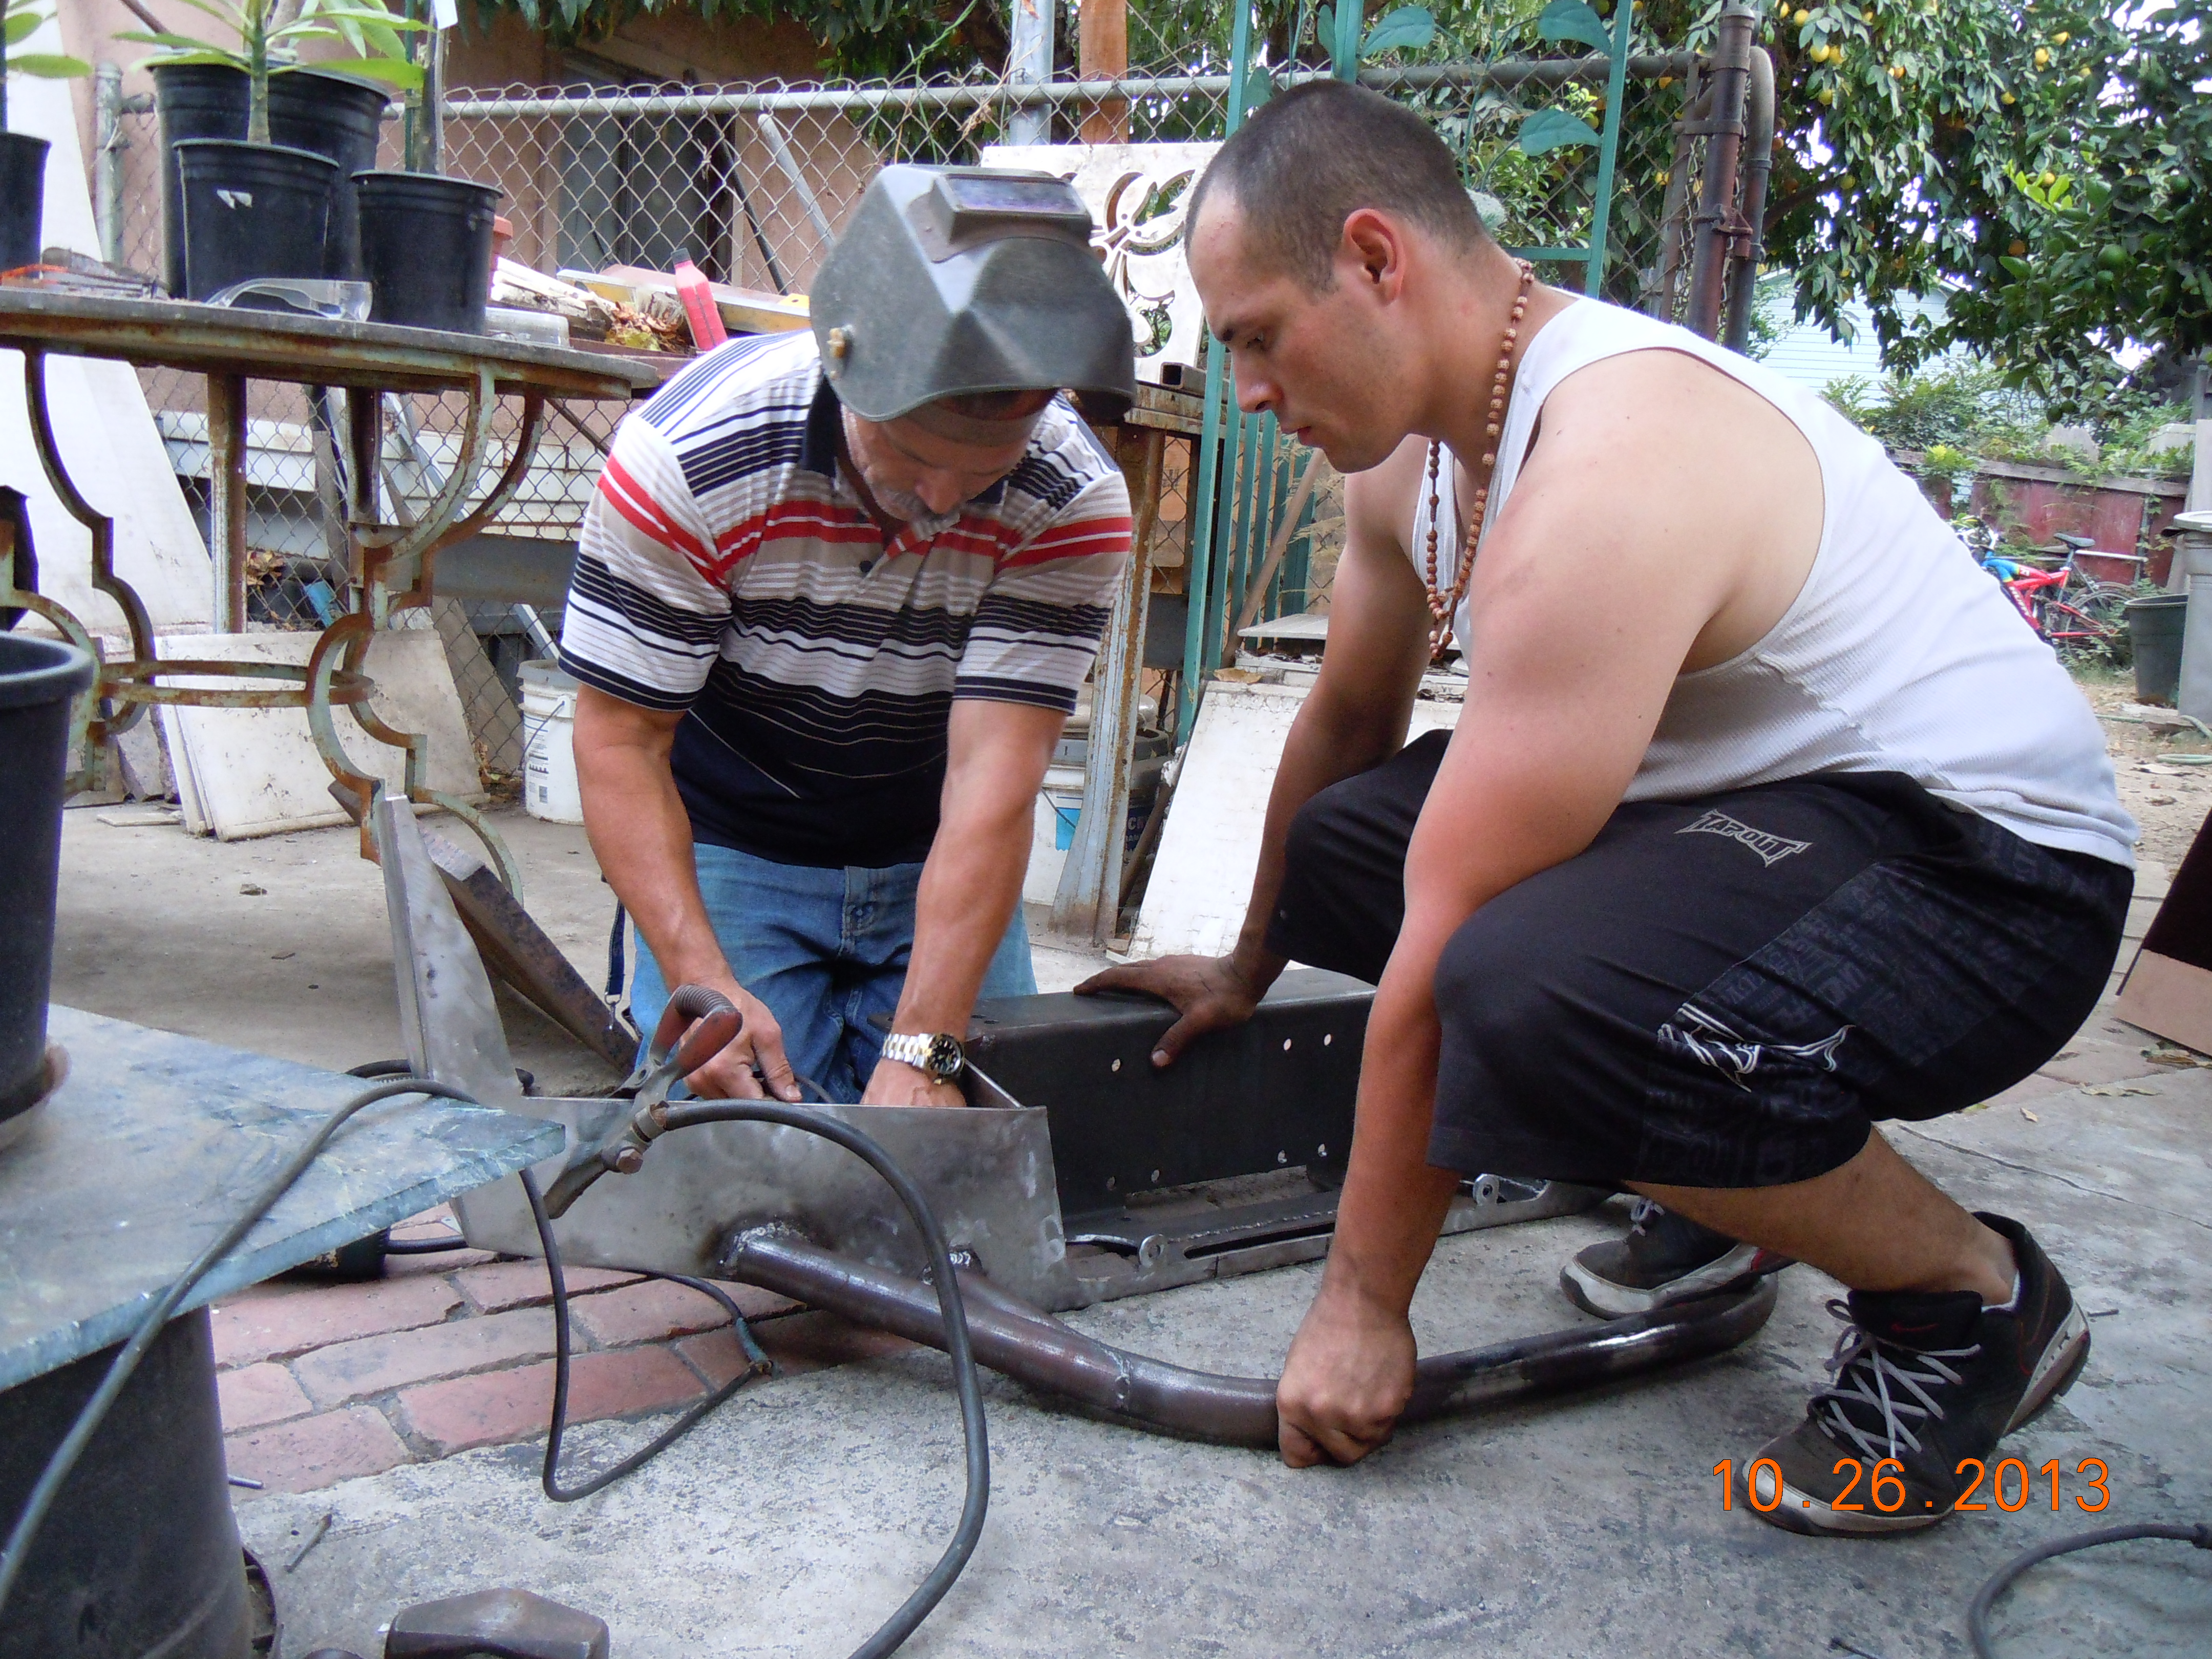
After 20 minutes of working that tube bender this is all we could do. lol I have to admit the tube bender works. but this product isn't very good for bending thick tube like this one. I'm sure it would work flawlessly for something thinner. But i want to make sure this grill guard isn't going to bend straight through my grill and through my radiator if i am ever to get into an accident. I want to make sure it will take a hit like a champ. And protect my front end. that's the whole point of making this bumper. So We are gonna skip working on this for tomorrow and jump back on it Saturday. We are going to use the Acetylene torch to heat up the metal then bend the tube. We are both sure that once the metal has been heated up the tube shouldn't have any problem bending anymore.
Btw don't let the curves scare you. Once the gussets are installed on the sides the center pipe wont look so funny. And in case you are wondering the center hole area where the 8" lights are gonna be is going to have a height of 10" from the top of the bumper to the bottom of the tube. So the top of this grill guard will not be much taller then the front of my hood. Will probably pass it up by 0.5-1" if any.
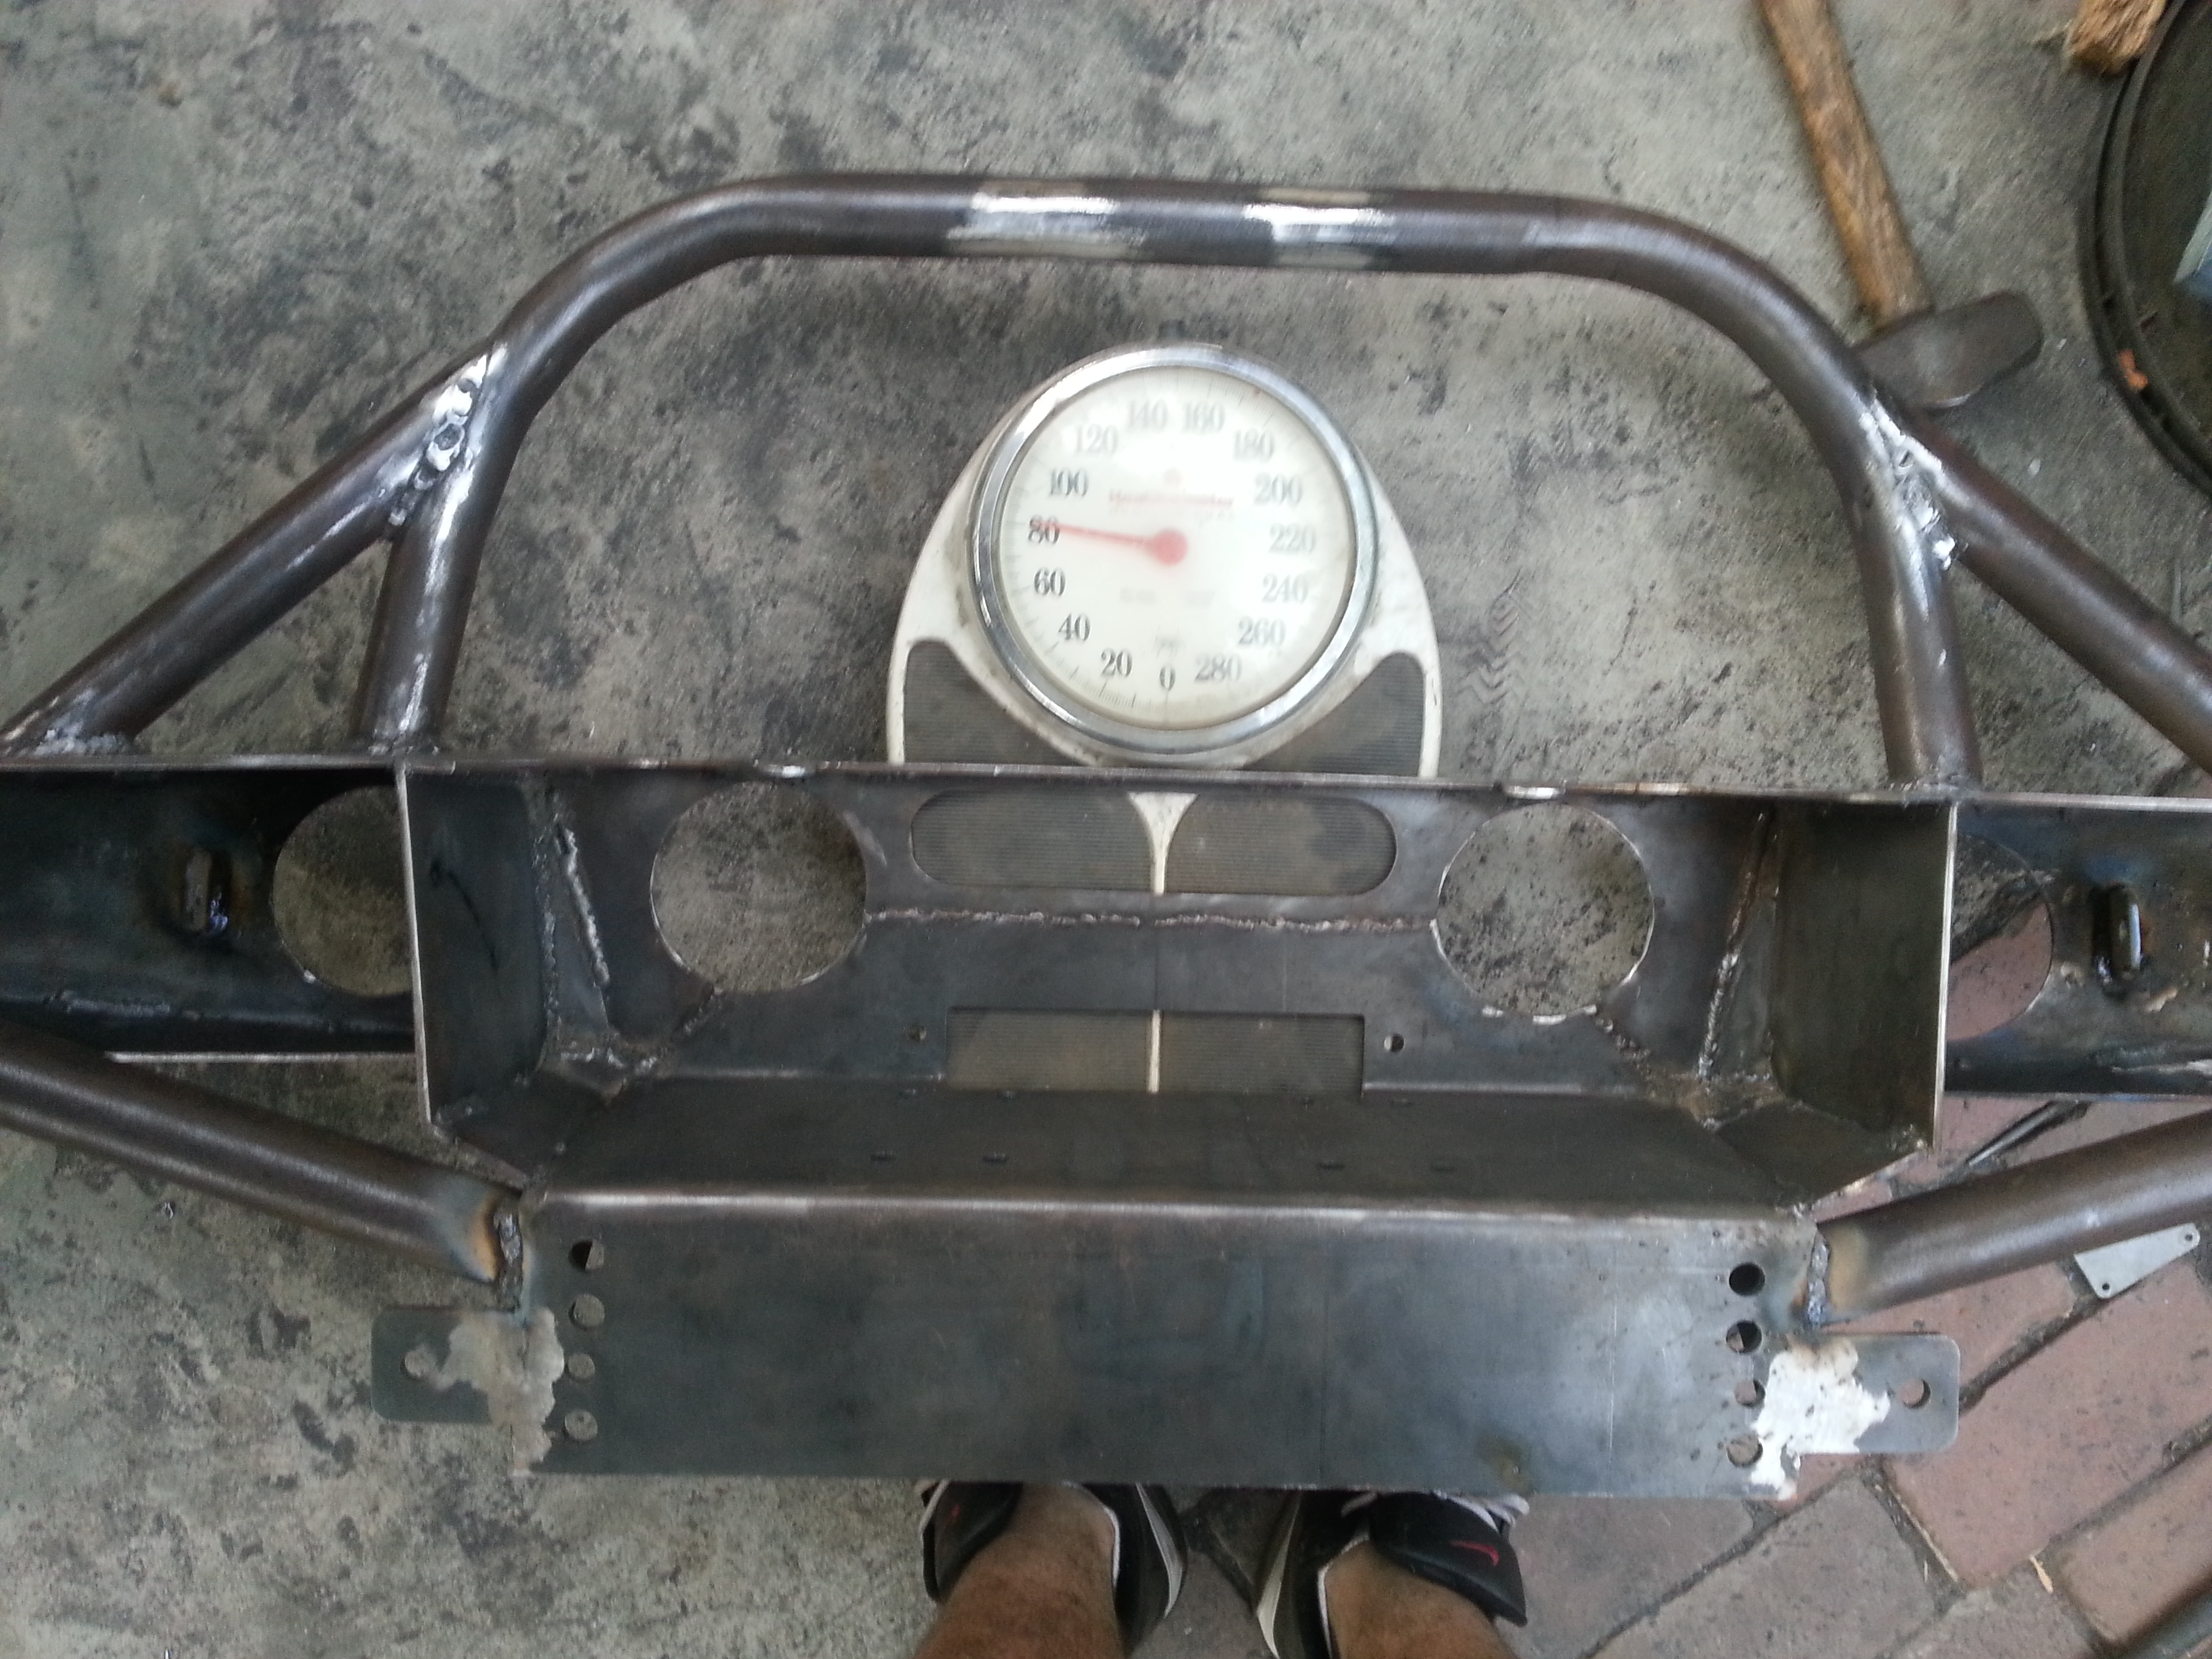
Also decided to weigh the bumper as it currently sits for you guys. I know i had a couple of friends/family and yotatech people ask me on my build thread how heavy this is.
So it's currently weighing at about 63 pounds.


Went digging in my dads pile of metal in our back yard and found two 21ft pipes that were about 3/16 or 1/4" thick. This sucker was super heavy! and to top it off it was rusted to hell all over the exterior! and im sure inside too. but the steel is still good underneath. Nothing that cant me sanded off with the wire wheel.


Dad says the tube is 1&1/2" thick but it looks more like 1&5/8" to me lol

Gave my dad my design blueprint and let him work his magic with his mathematical skills. lol

We measured the exterior line with a tailor's measuring tape. came out to be 43".

Grabbed the chop saw and cut the measured piece

43" tube cut already and i passed the wire wheel all throughout the surface.

After 20 minutes of working that tube bender this is all we could do. lol I have to admit the tube bender works. but this product isn't very good for bending thick tube like this one. I'm sure it would work flawlessly for something thinner. But i want to make sure this grill guard isn't going to bend straight through my grill and through my radiator if i am ever to get into an accident. I want to make sure it will take a hit like a champ. And protect my front end. that's the whole point of making this bumper. So We are gonna skip working on this for tomorrow and jump back on it Saturday. We are going to use the Acetylene torch to heat up the metal then bend the tube. We are both sure that once the metal has been heated up the tube shouldn't have any problem bending anymore.
Btw don't let the curves scare you. Once the gussets are installed on the sides the center pipe wont look so funny. And in case you are wondering the center hole area where the 8" lights are gonna be is going to have a height of 10" from the top of the bumper to the bottom of the tube. So the top of this grill guard will not be much taller then the front of my hood. Will probably pass it up by 0.5-1" if any.

Also decided to weigh the bumper as it currently sits for you guys. I know i had a couple of friends/family and yotatech people ask me on my build thread how heavy this is.
So it's currently weighing at about 63 pounds.

Last edited by Redeth005; Oct 24, 2013 at 08:08 PM.
Oct 24, 2013 | 08:57 PM
#2186
Registered User
Joined: Dec 2009
Posts: 2,762
Likes: 1
if the tube bending doesnt work, i would return it and hit up a machine shop that could do it for you. i know of a few local guys that has a tube bender i could pay a few bucks for them to do something quick for me.
anyways i forgot you had ask if there is any support for the wing (outer side of the bumper)
there isnt any support and alot like how yours is right now. the only support i see is the tube runs into the wings and goes down till it bottoms out. so that is the only support. i know your tube wont extend all the way to the sides so you might have to do something different if you were to add extra support there
Oct 24, 2013 | 08:57 PM
#2187

Registered User
Joined: Apr 2012
Posts: 18
Likes: 0
I don't mean to hijack the thread, but I figured I'd throw this question at a couple of fellow native Californians first given the fact that you're wheeling around in the same sort of terrain as me.
I'm about to buy new tires and I want to go from 32/11.5/15 Cooper Discoverer STT mud terrains to 33/10.5/15 all-terrains. I've been looking around at BF Goodrich A/T KOs but I'm not sold on BF Goodrich.
Let me know your guys' opinion on the matter or I could always move this to another thread. Thanks for any input. P.S. I'm running a detroit in the rear and it's a daily. So, I'm probably on the road 90% of the time.
Oct 25, 2013 | 04:56 AM
#2188
Registered User
Joined: Apr 2013
Posts: 478
Likes: 4
From: Louisiana
You should have bought the pipe bender (or kinker as most refer to it as), not a tubing roller. I fairly positive that is for thinner materials, plus I doubt you will ever get the bends your looking for out of a roller.
Here are the steps I built for my duramax using the harbor freight pipe bender.

(WOW that's a crappy picture!)
I plan to use the same bender to build some bumpers and sliders for my 4runner.
Here are the steps I built for my duramax using the harbor freight pipe bender.

(WOW that's a crappy picture!)
I plan to use the same bender to build some bumpers and sliders for my 4runner.
Last edited by bump530; Oct 25, 2013 at 04:57 AM.
Oct 25, 2013 | 05:07 AM
#2189


Looking good rich!
I am surprised that the bumper is only 63lbs. I would have figured it to be alot heavier.
I have used the Other Harbor freight bender to do some bumper stuff in the past and it works alot better than the roller. I think the one that BUMP530 is referring to is the one that I have. (Kinker)
Its not the best and really weird to use sometimes, but will bend the heavier pipe. Unfortunately you still have to but alot of A$$ and manipulation to get those darn things to work.
Cant wait to see it all finished up.
Getting close!!
Oct 25, 2013 | 05:26 AM
#2190
Registered User
Joined: Jul 2012
Posts: 2,365
Likes: 4
From: Idaho
we have the pipe bender not the roller it will with its hydrolic ram bend that thicker stuff into a curve
also anealing things a bit will help too (heat with a rosebud) before bending to relax the metal then once bent set with a hit of water
also anealing things a bit will help too (heat with a rosebud) before bending to relax the metal then once bent set with a hit of water
Oct 26, 2013 | 08:27 PM
#2191
Thread Starter
Registered User
Joined: Apr 2012
Posts: 2,817
Likes: 2
From: Los Angeles CA
Damn guys I have a massive update awaiting to post. Gonna be 33 pictures. Unfortunately for you guys I've got a Halloween party I'm getting ready for so you guys are all gonna have to wait muahahahahaaa lol
All I can say is that the bunper is all finished as far as bends and welds go. Still need to do touch ups here and there. But the grill gaurd, grill gaurd gussets 8" dick cepek mounting tabs and 4&1/4" led light mounting tabs and the supports for the sides to the winch plate have all been welded on already. This baby is near ready to go already. Anyway thanks for checking up on the thread. Please check back on the thread tomorrow afternoon. I should have everyhing posted by then.
All I can say is that the bunper is all finished as far as bends and welds go. Still need to do touch ups here and there. But the grill gaurd, grill gaurd gussets 8" dick cepek mounting tabs and 4&1/4" led light mounting tabs and the supports for the sides to the winch plate have all been welded on already. This baby is near ready to go already. Anyway thanks for checking up on the thread. Please check back on the thread tomorrow afternoon. I should have everyhing posted by then.
Oct 27, 2013 | 11:42 AM
#2192
Thread Starter
Registered User
Joined: Apr 2012
Posts: 2,817
Likes: 2
From: Los Angeles CA
Replies
if the tube bending doesnt work, i would return it and hit up a machine shop that could do it for you. i know of a few local guys that has a tube bender i could pay a few bucks for them to do something quick for me.
anyways i forgot you had ask if there is any support for the wing (outer side of the bumper)
there isnt any support and alot like how yours is right now. the only support i see is the tube runs into the wings and goes down till it bottoms out. so that is the only support. i know your tube wont extend all the way to the sides so you might have to do something different if you were to add extra support there
anyways i forgot you had ask if there is any support for the wing (outer side of the bumper)
there isnt any support and alot like how yours is right now. the only support i see is the tube runs into the wings and goes down till it bottoms out. so that is the only support. i know your tube wont extend all the way to the sides so you might have to do something different if you were to add extra support there

That tube roller was crap. we didnt even bother trying to heat the metal. we just took it back and bought the the bender instead; it worked flawlessly!
I don't mean to hijack the thread, but I figured I'd throw this question at a couple of fellow native Californians first given the fact that you're wheeling around in the same sort of terrain as me.
I'm about to buy new tires and I want to go from 32/11.5/15 Cooper Discoverer STT mud terrains to 33/10.5/15 all-terrains. I've been looking around at BF Goodrich A/T KOs but I'm not sold on BF Goodrich.
Let me know your guys' opinion on the matter or I could always move this to another thread. Thanks for any input. P.S. I'm running a detroit in the rear and it's a daily. So, I'm probably on the road 90% of the time.
I'm about to buy new tires and I want to go from 32/11.5/15 Cooper Discoverer STT mud terrains to 33/10.5/15 all-terrains. I've been looking around at BF Goodrich A/T KOs but I'm not sold on BF Goodrich.
Let me know your guys' opinion on the matter or I could always move this to another thread. Thanks for any input. P.S. I'm running a detroit in the rear and it's a daily. So, I'm probably on the road 90% of the time.
Since you plan to do more street Daily driving i would definitely recomend those over M/ts you'll get better overall mileage in the long run. Much better grip during rainy weather. etc etc... good luck with your choice man.
You should have bought the pipe bender (or kinker as most refer to it as), not a tubing roller. I fairly positive that is for thinner materials, plus I doubt you will ever get the bends your looking for out of a roller.
Here are the steps I built for my duramax using the harbor freight pipe bender.

(WOW that's a crappy picture!)
I plan to use the same bender to build some bumpers and sliders for my 4runner.
Here are the steps I built for my duramax using the harbor freight pipe bender.
(WOW that's a crappy picture!)
I plan to use the same bender to build some bumpers and sliders for my 4runner.
 Plus a 12,000 pound bender will definitely beat manual labor any time lol
Looking good rich!
I am surprised that the bumper is only 63lbs. I would have figured it to be alot heavier.
I have used the Other Harbor freight bender to do some bumper stuff in the past and it works alot better than the roller. I think the one that BUMP530 is referring to is the one that I have. (Kinker)
Its not the best and really weird to use sometimes, but will bend the heavier pipe. Unfortunately you still have to but alot of A$$ and manipulation to get those darn things to work.
Cant wait to see it all finished up.
Getting close!!
I am surprised that the bumper is only 63lbs. I would have figured it to be alot heavier.
I have used the Other Harbor freight bender to do some bumper stuff in the past and it works alot better than the roller. I think the one that BUMP530 is referring to is the one that I have. (Kinker)
Its not the best and really weird to use sometimes, but will bend the heavier pipe. Unfortunately you still have to but alot of A$$ and manipulation to get those darn things to work.
Cant wait to see it all finished up.
Getting close!!
 lol
lol THANK YOU ALL FOR YOUR INPUT. it definitely made my job much easier in doing this bumper's grill guard.
Oct 27, 2013 | 12:44 PM
#2193
Thread Starter
Registered User
Joined: Apr 2012
Posts: 2,817
Likes: 2
From: Los Angeles CA
Alright guys here is the update!
After seeing Bump530's picture and all of your guys's inputs, recommendations, personal experiences and such i was pretty much sold on getting the tube bender instead. So the following day after reading all your posts i took the Tube roller back to harbor freights and exchanged it for the 12,000 tube bender. http://www.harborfreight.com/12-ton-...der-32888.html
Here we are unwrapping our new product.

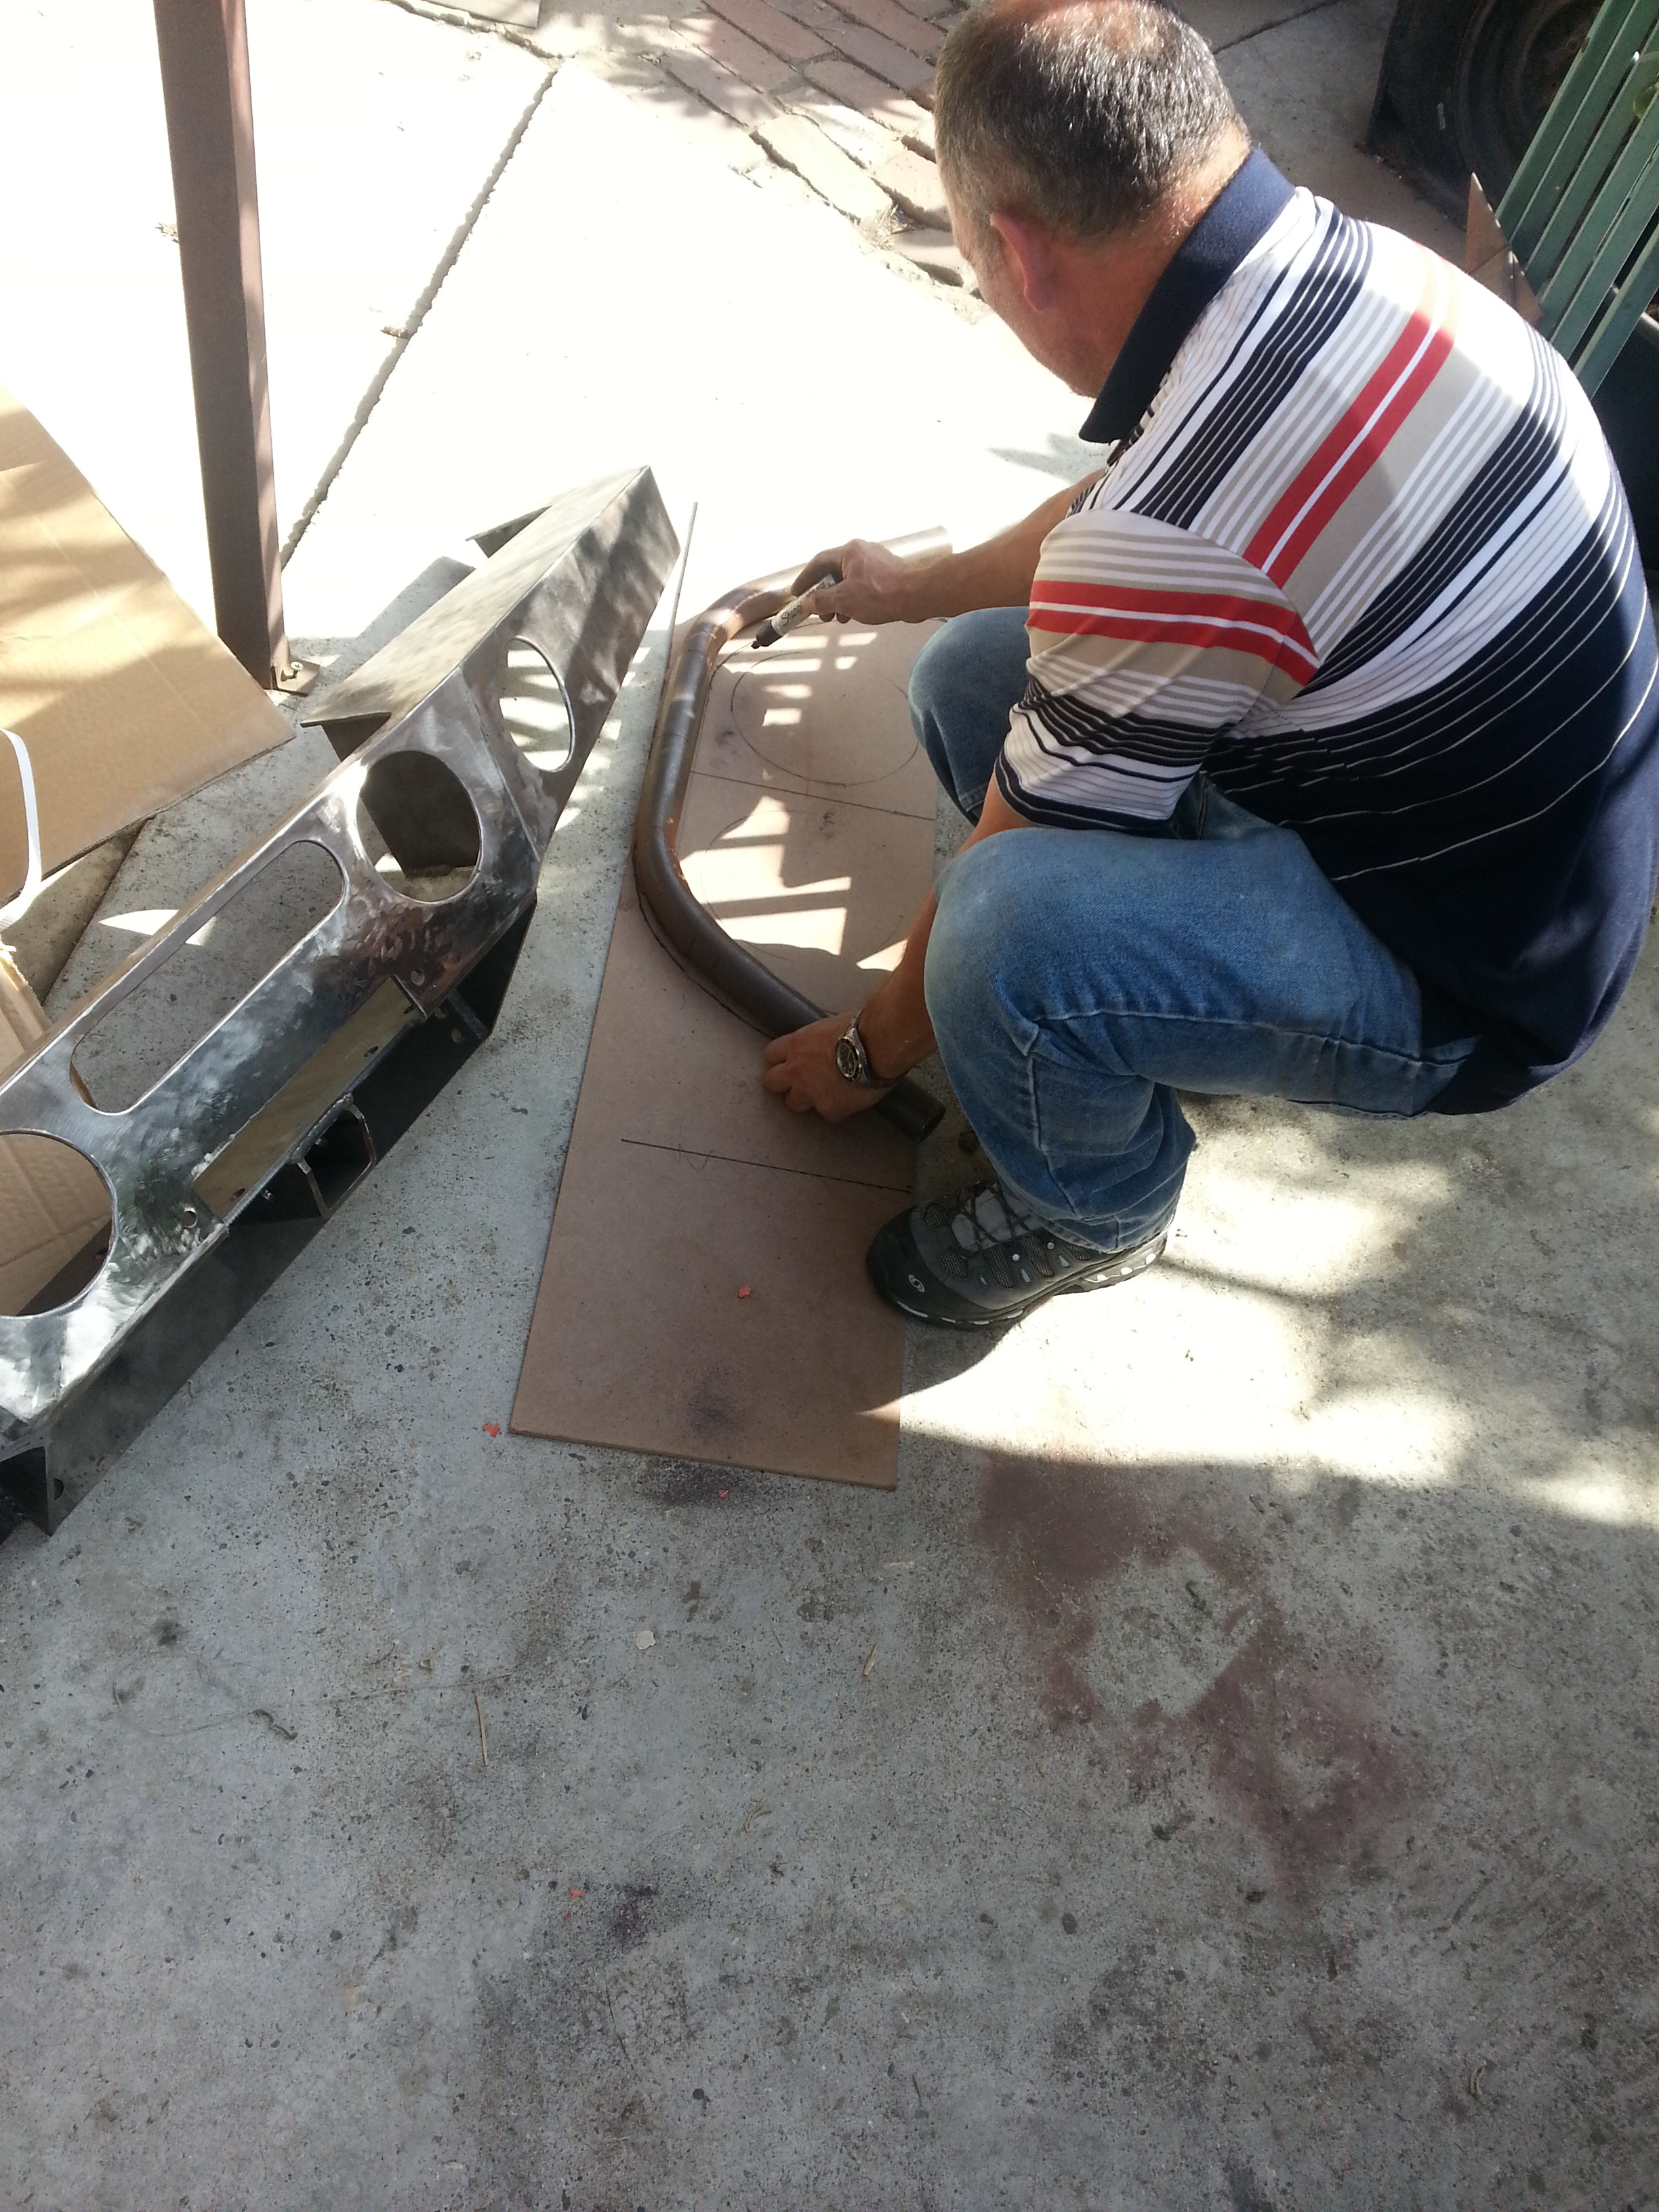
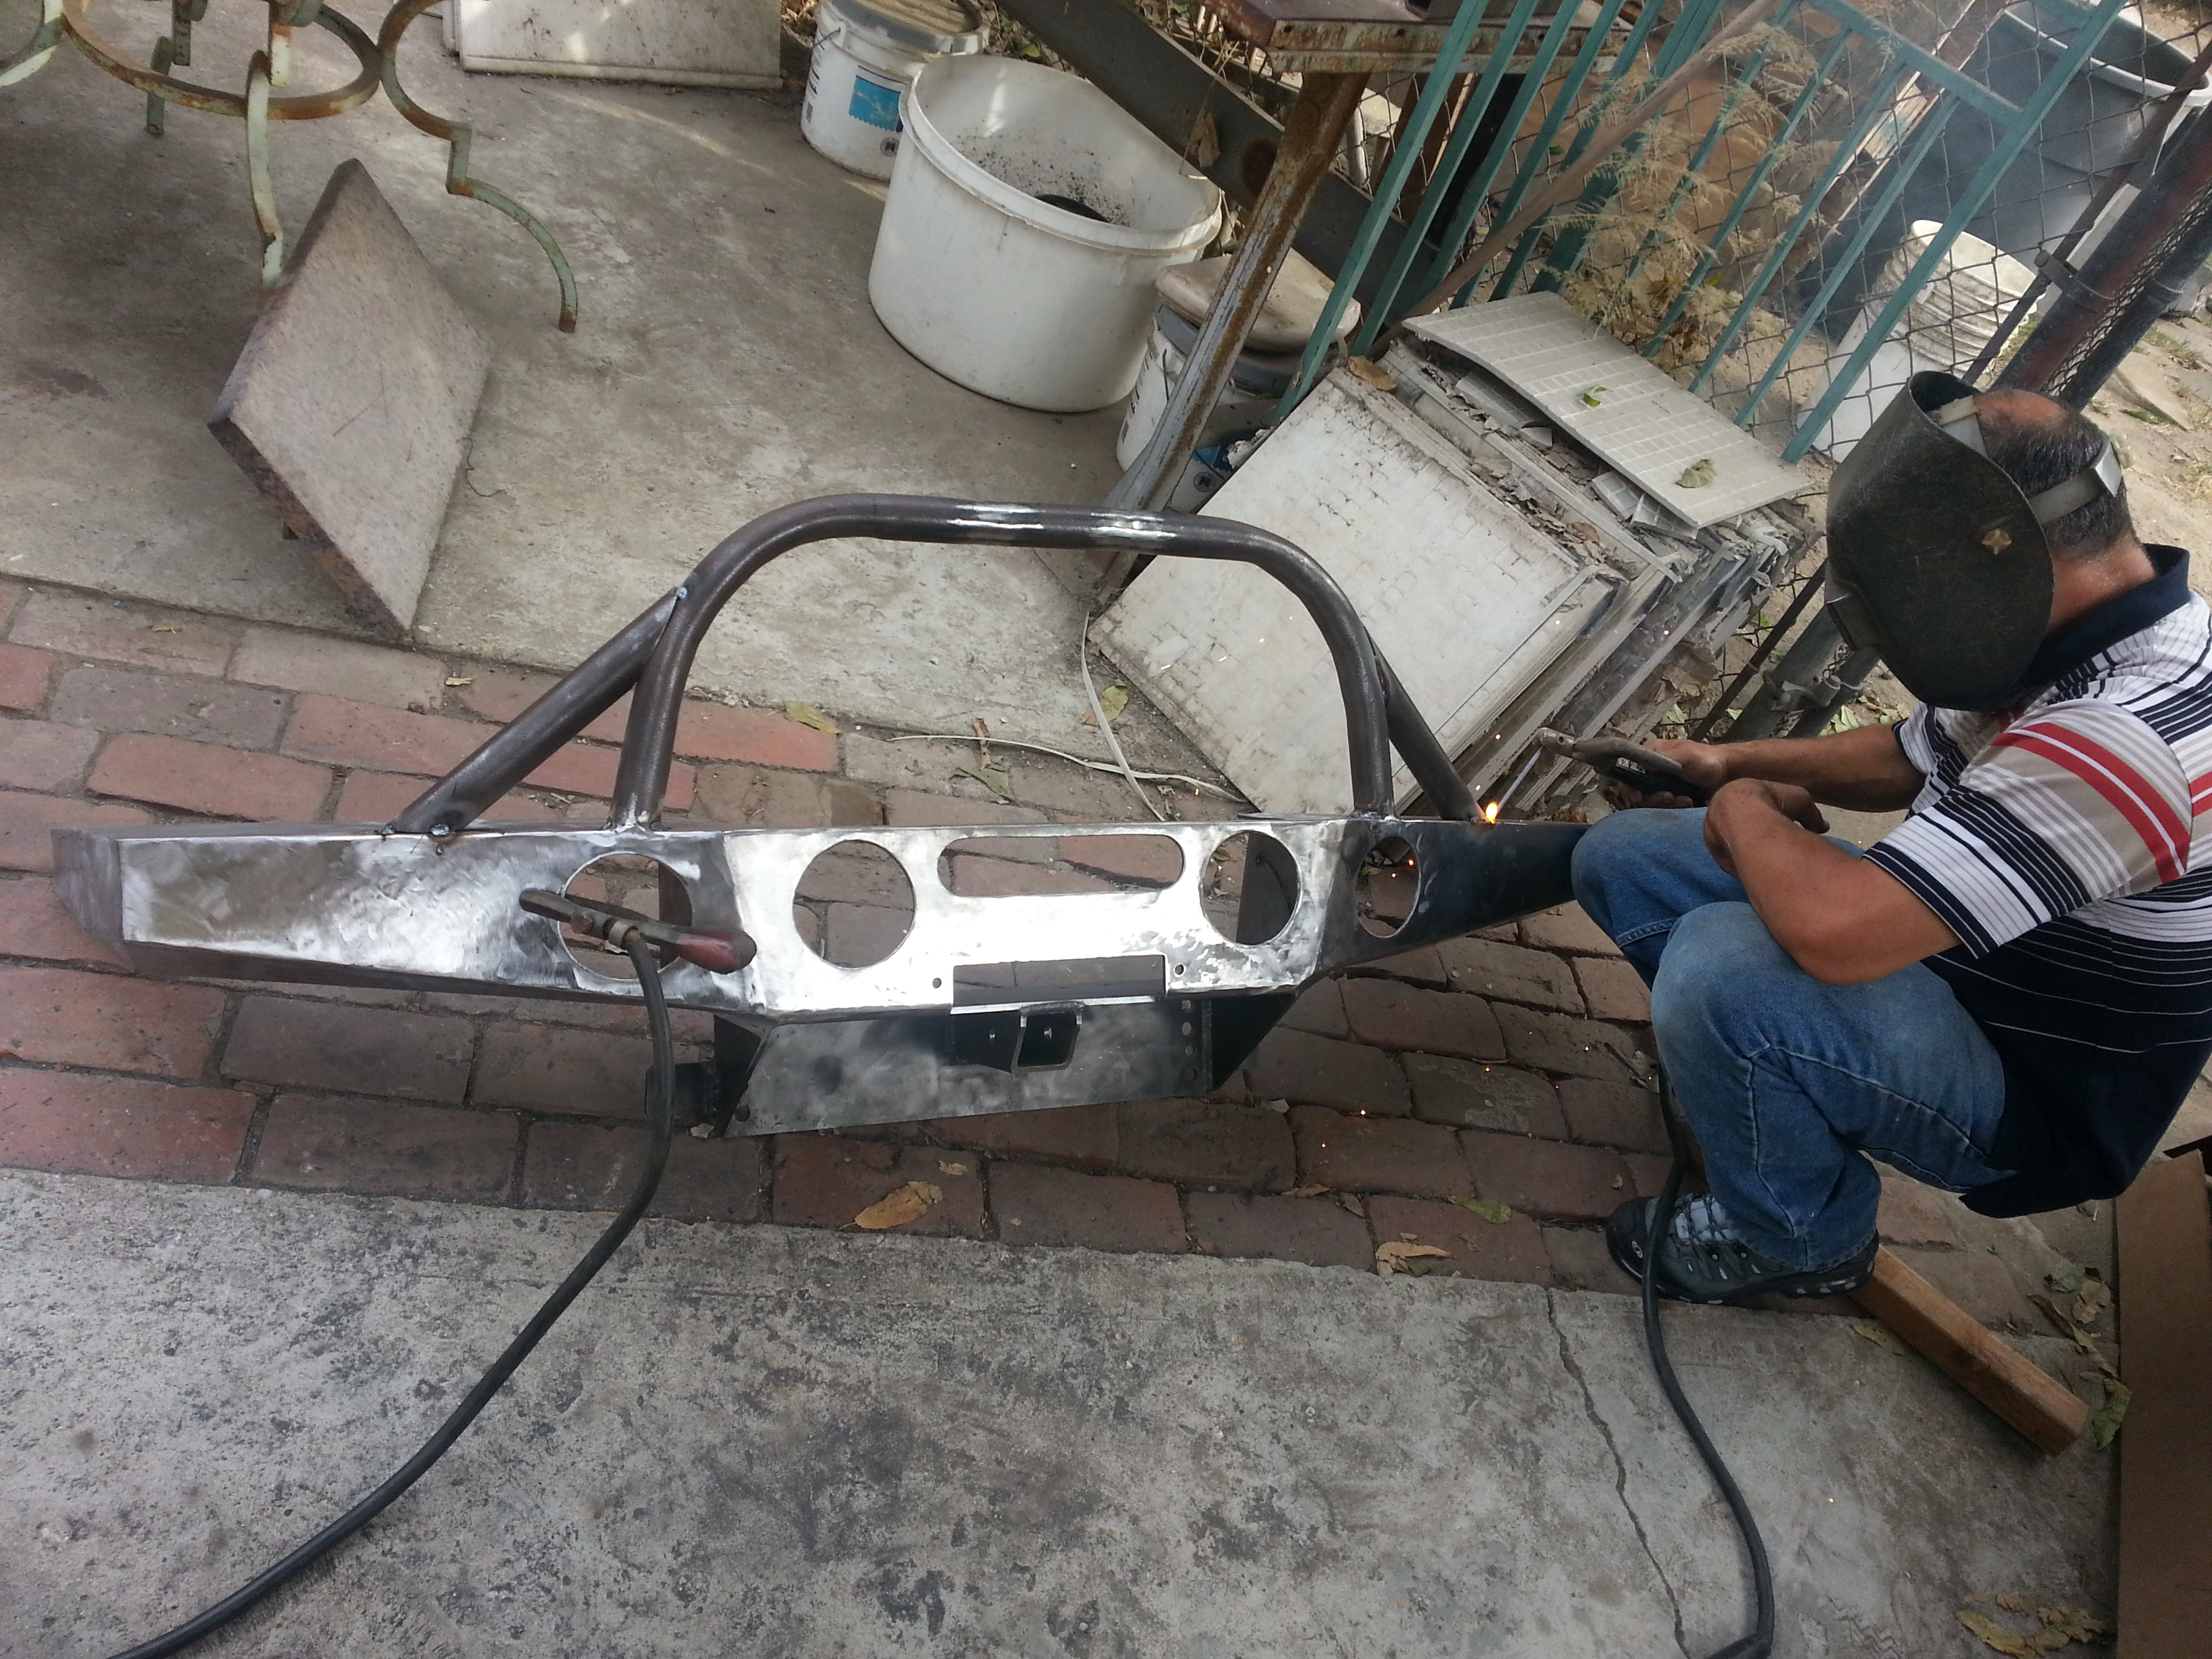
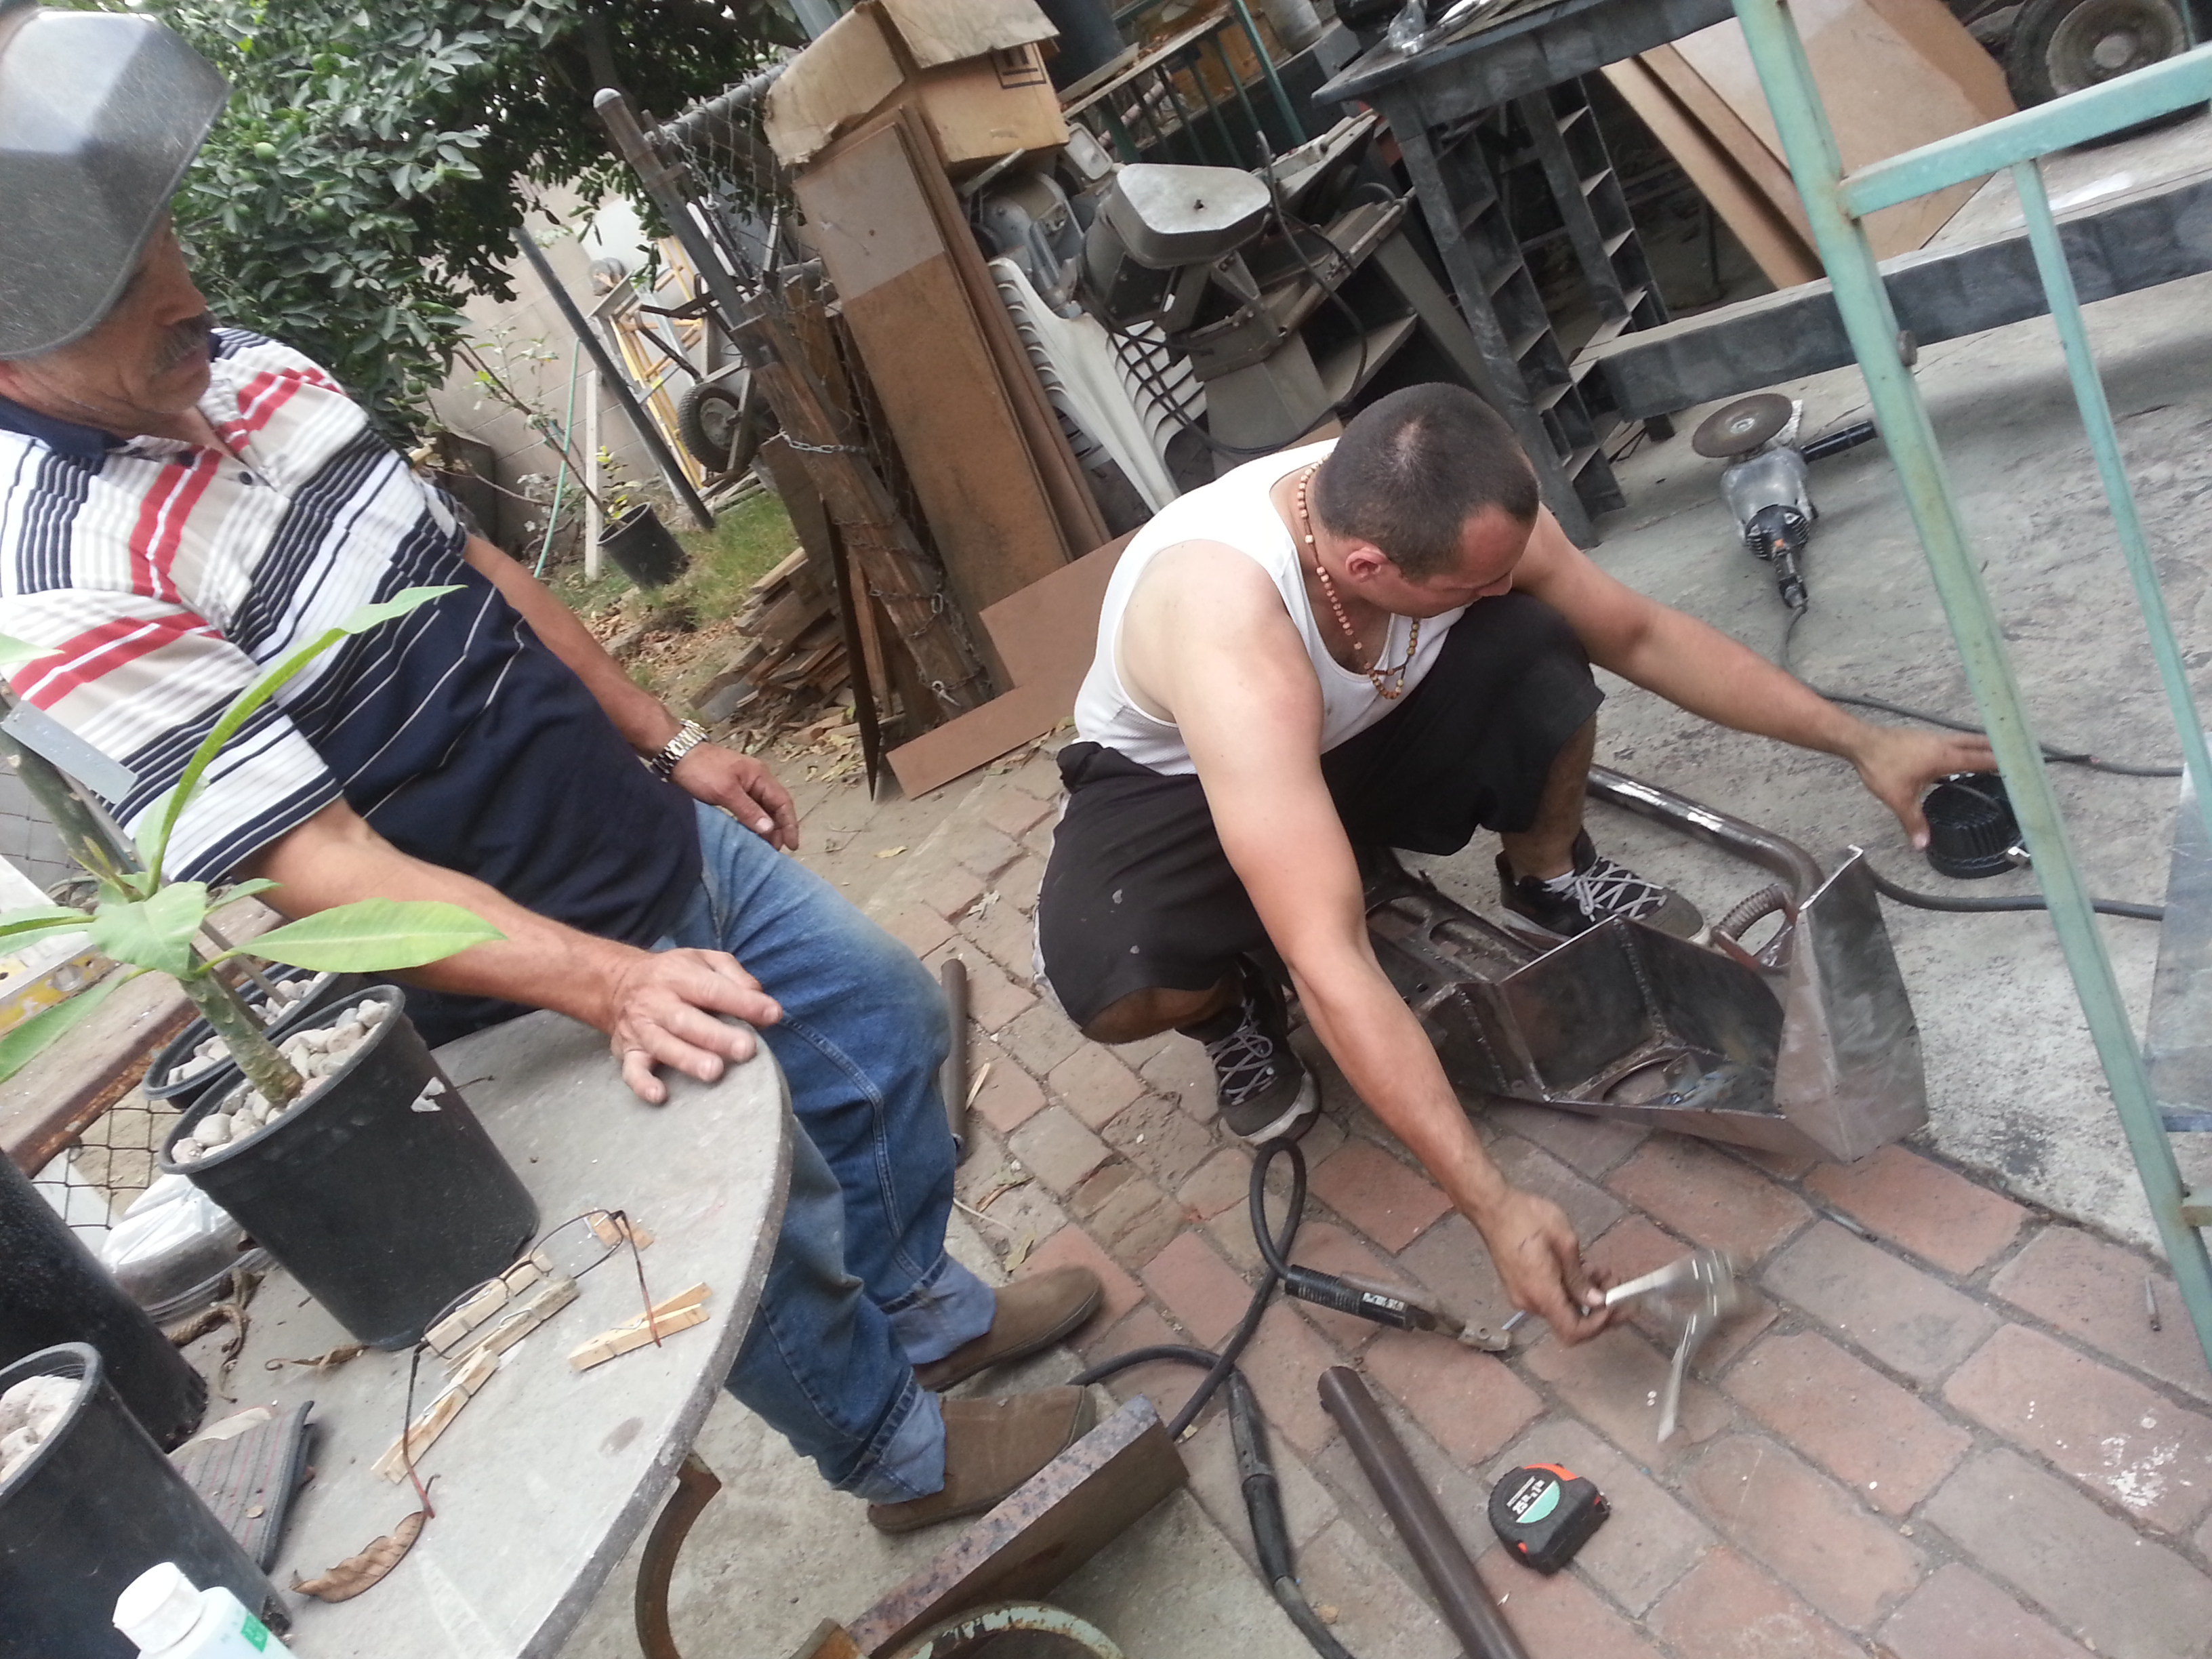
Marking up where to make our bends to match the template my dad drew for the grill guard.
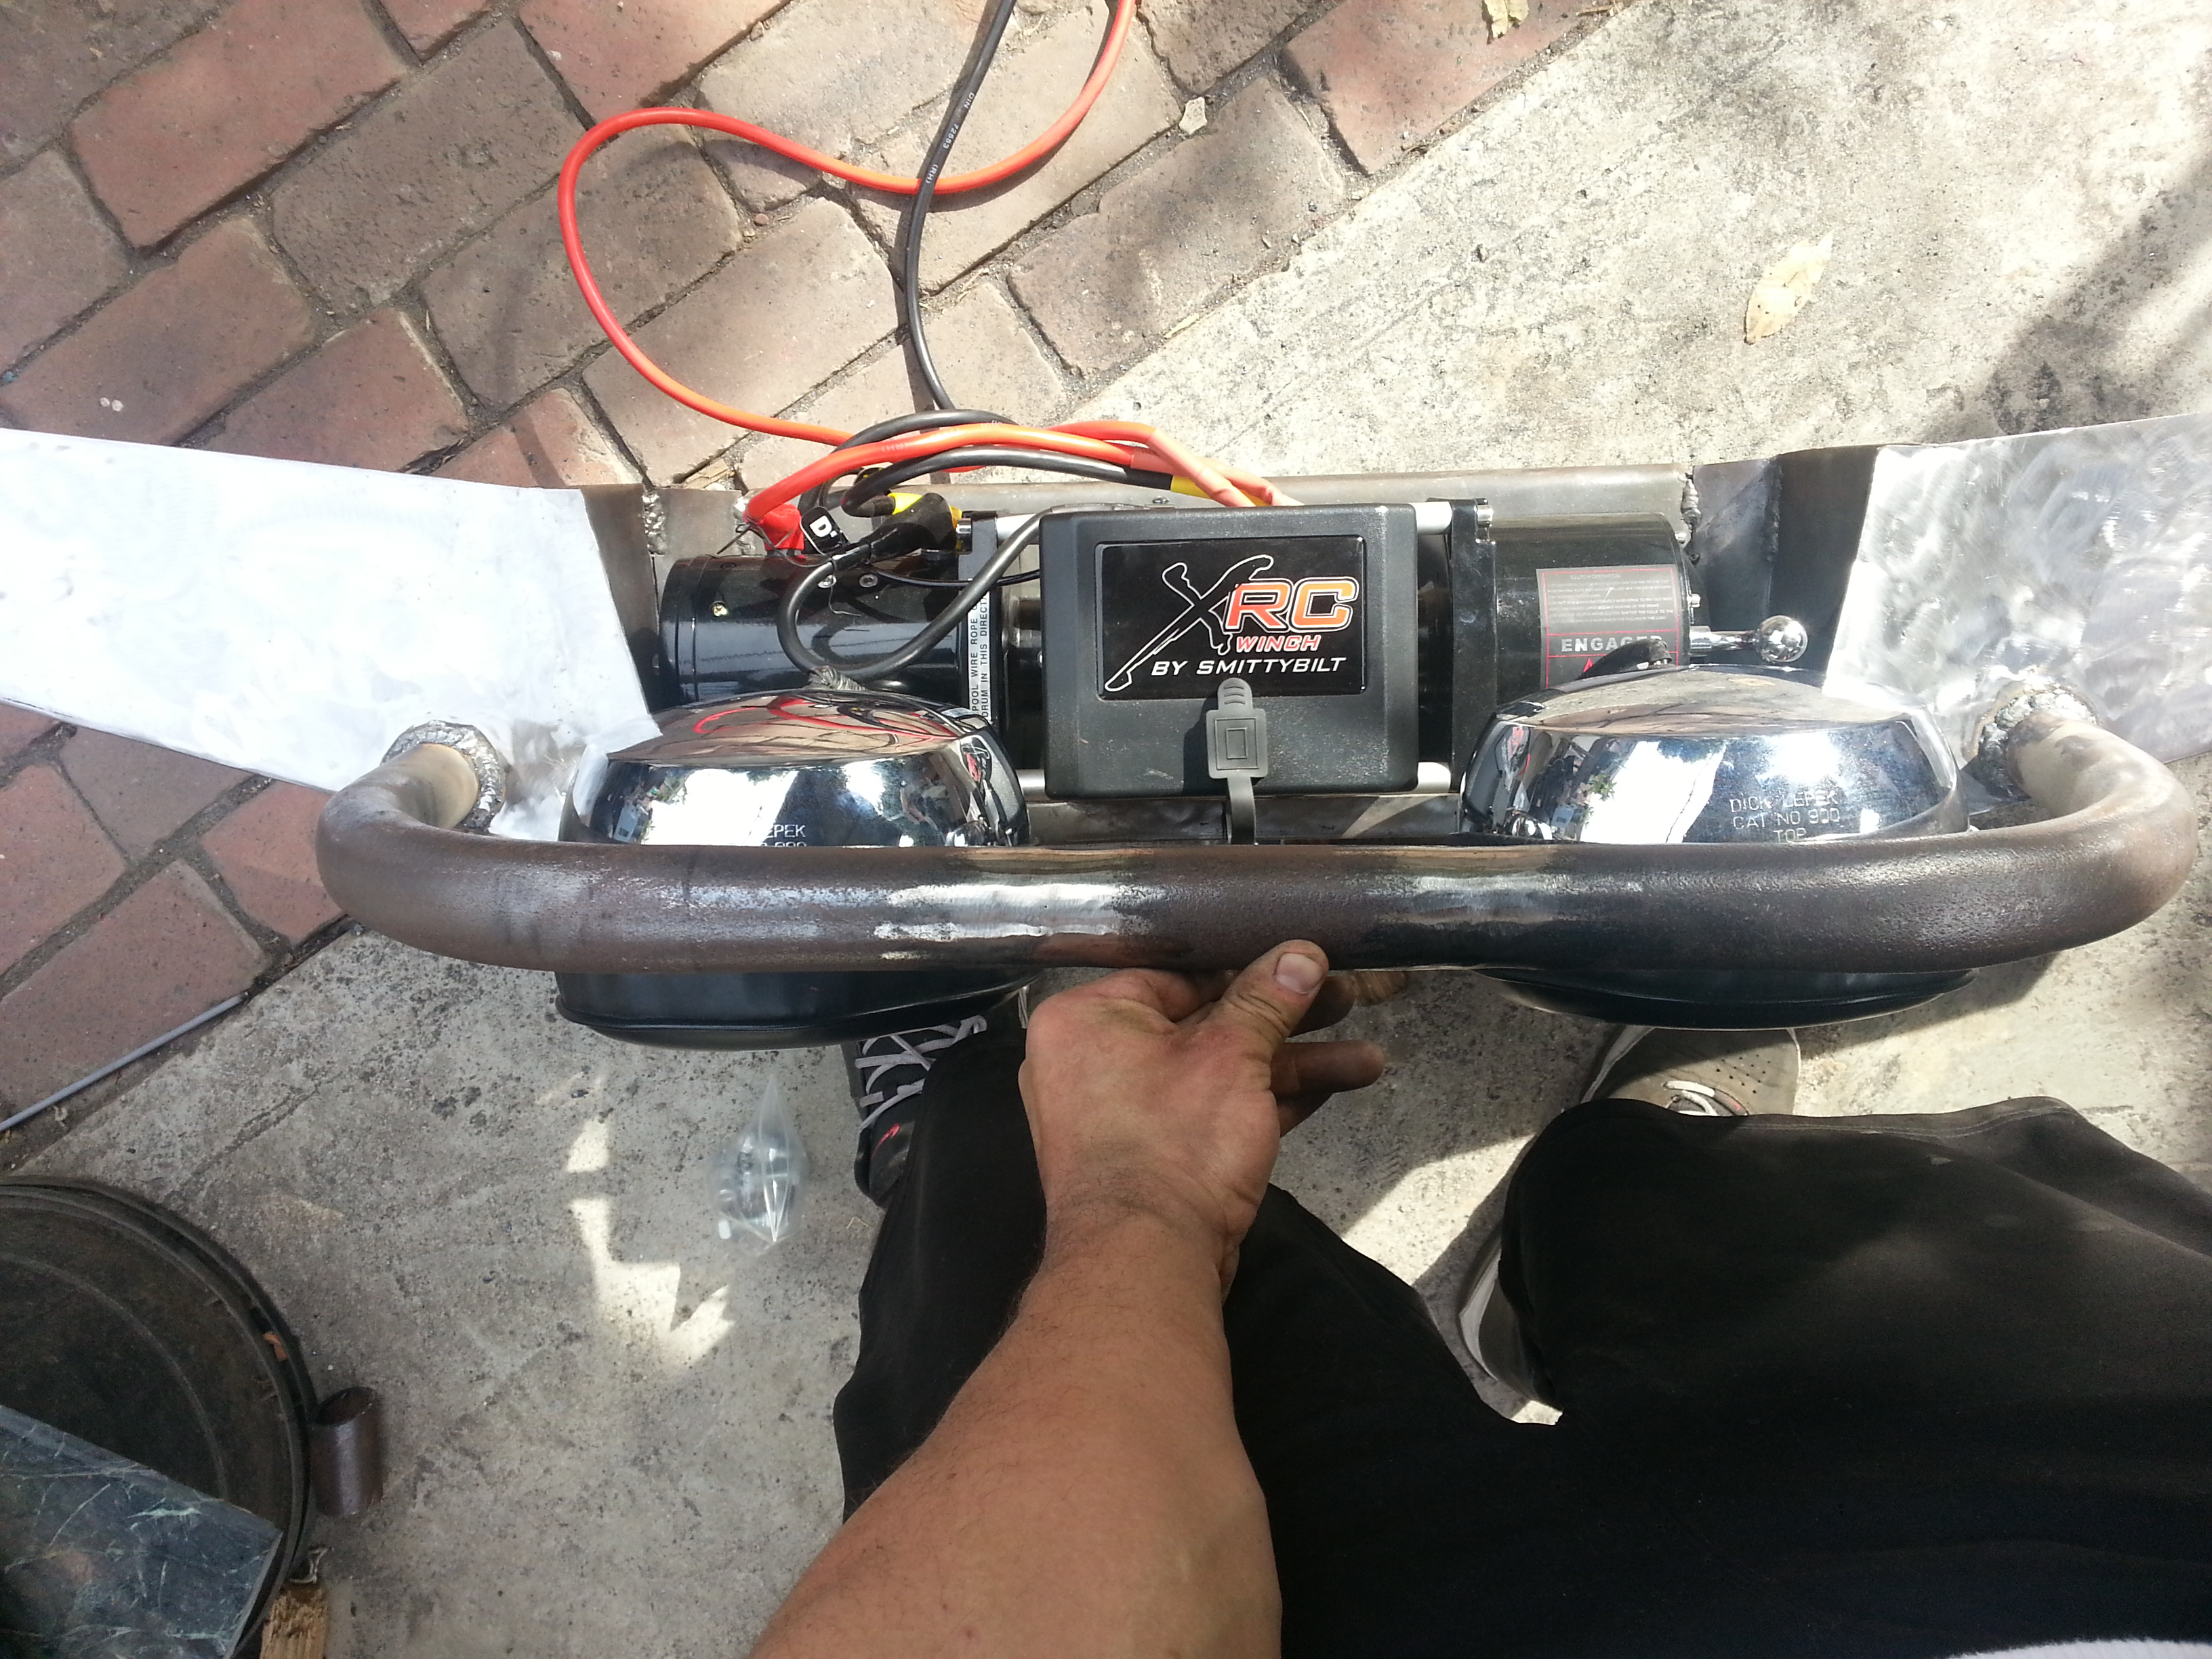
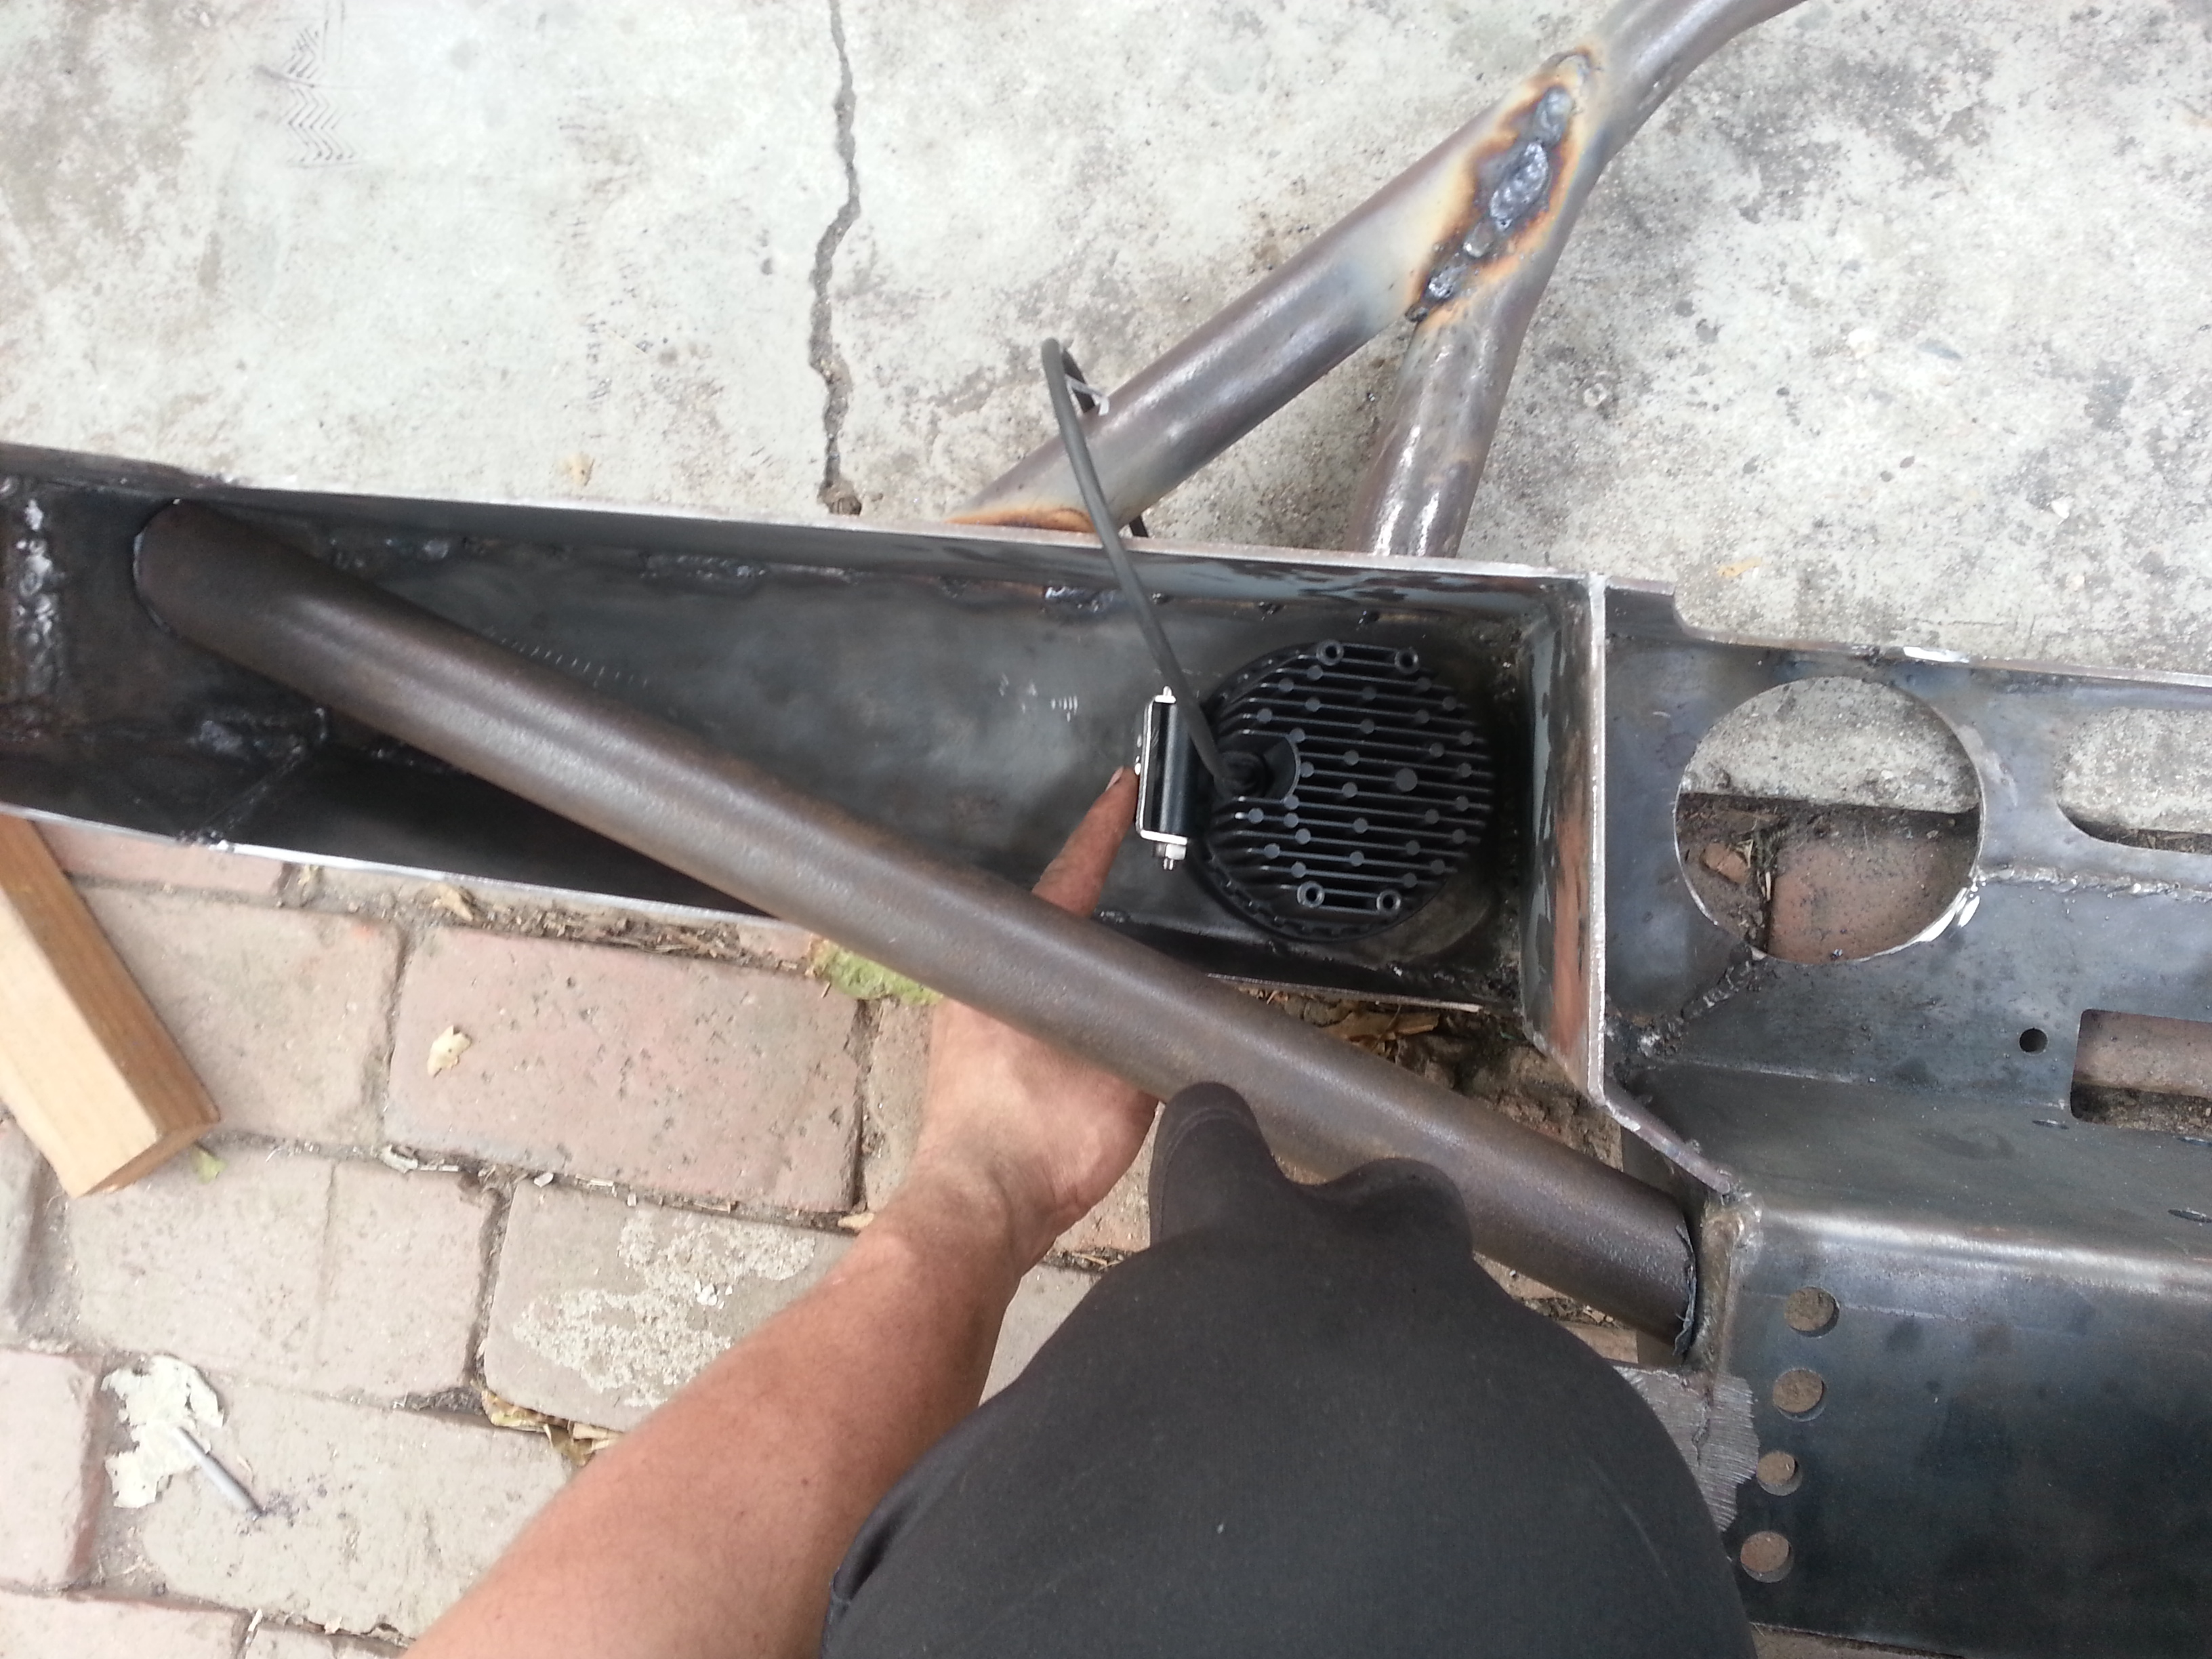
after the grill guard we immediately ran into a problem. I drew out my design according so Mark's 8" Dick Cepek offroad lights would fit. but i didnt take into consideration the Smittybilt xrc8 winch control box. It didnt matter where i placed the box it would continue to be in the way of the lights. So we ha to cut the center hoop to the grillguard in half and add another 6" to the width so we could fit the winch correctly and add the two 8" lights.
See what i mean:

Cleaned it up all nice.

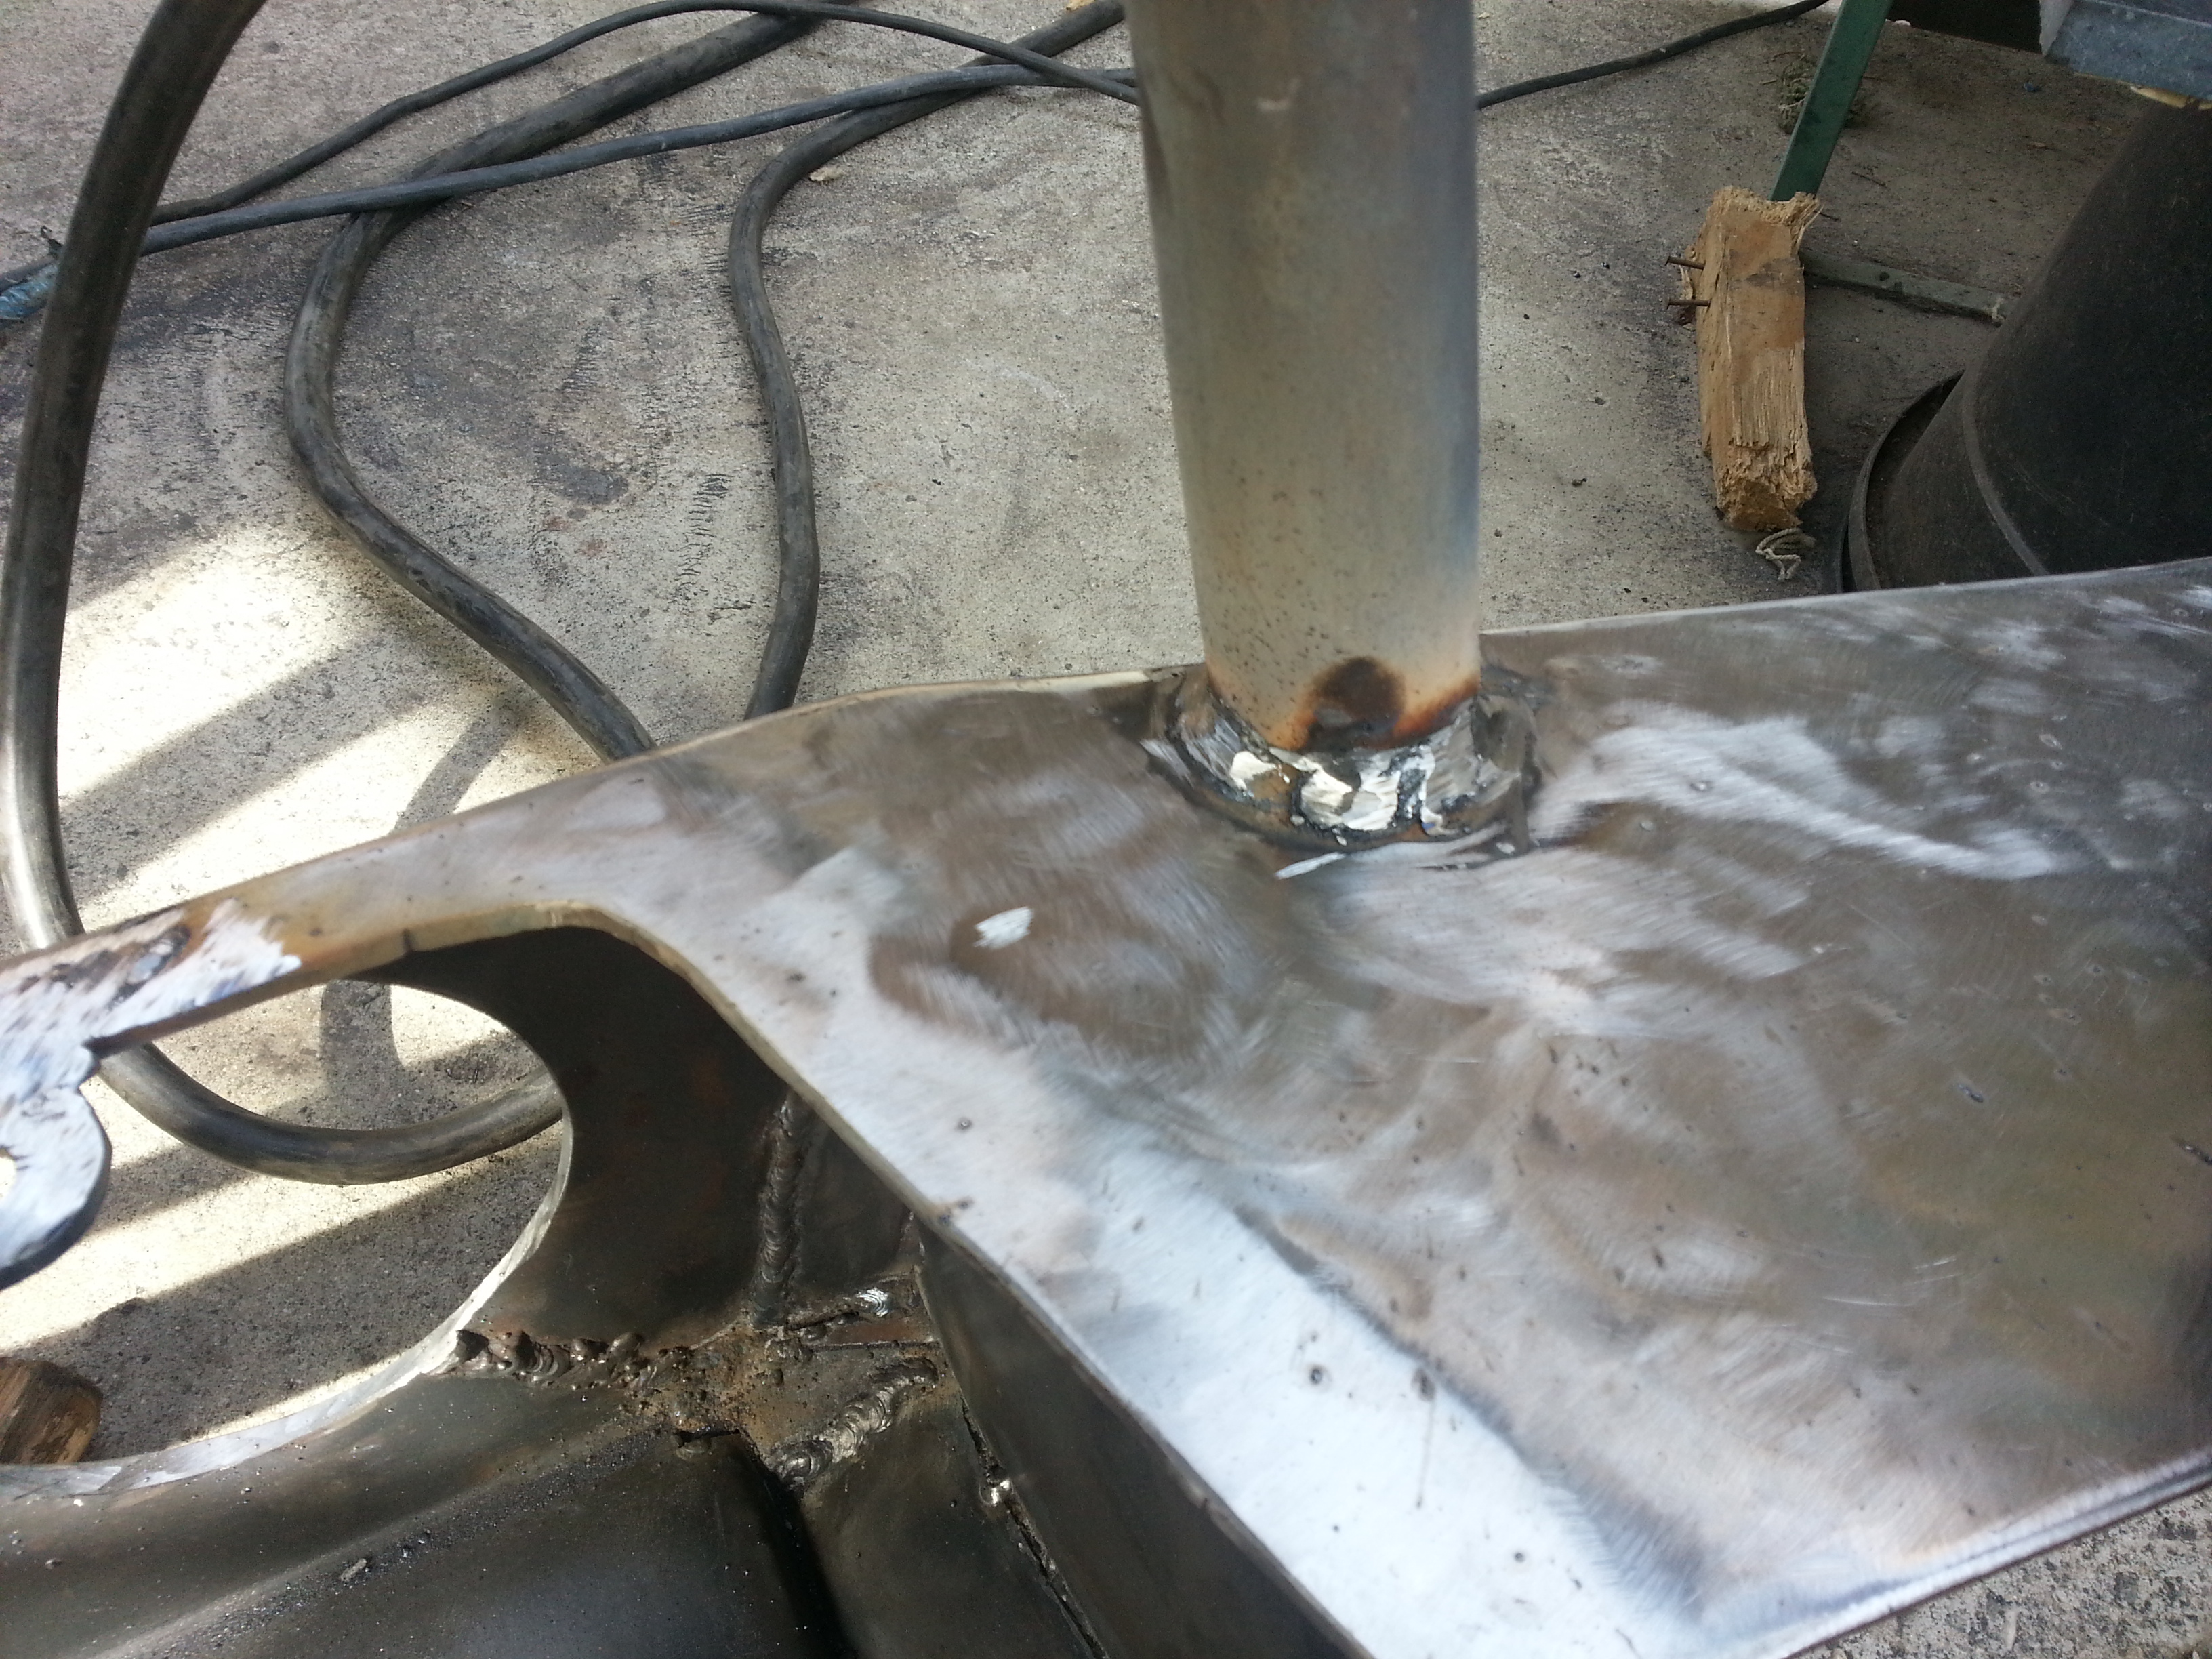
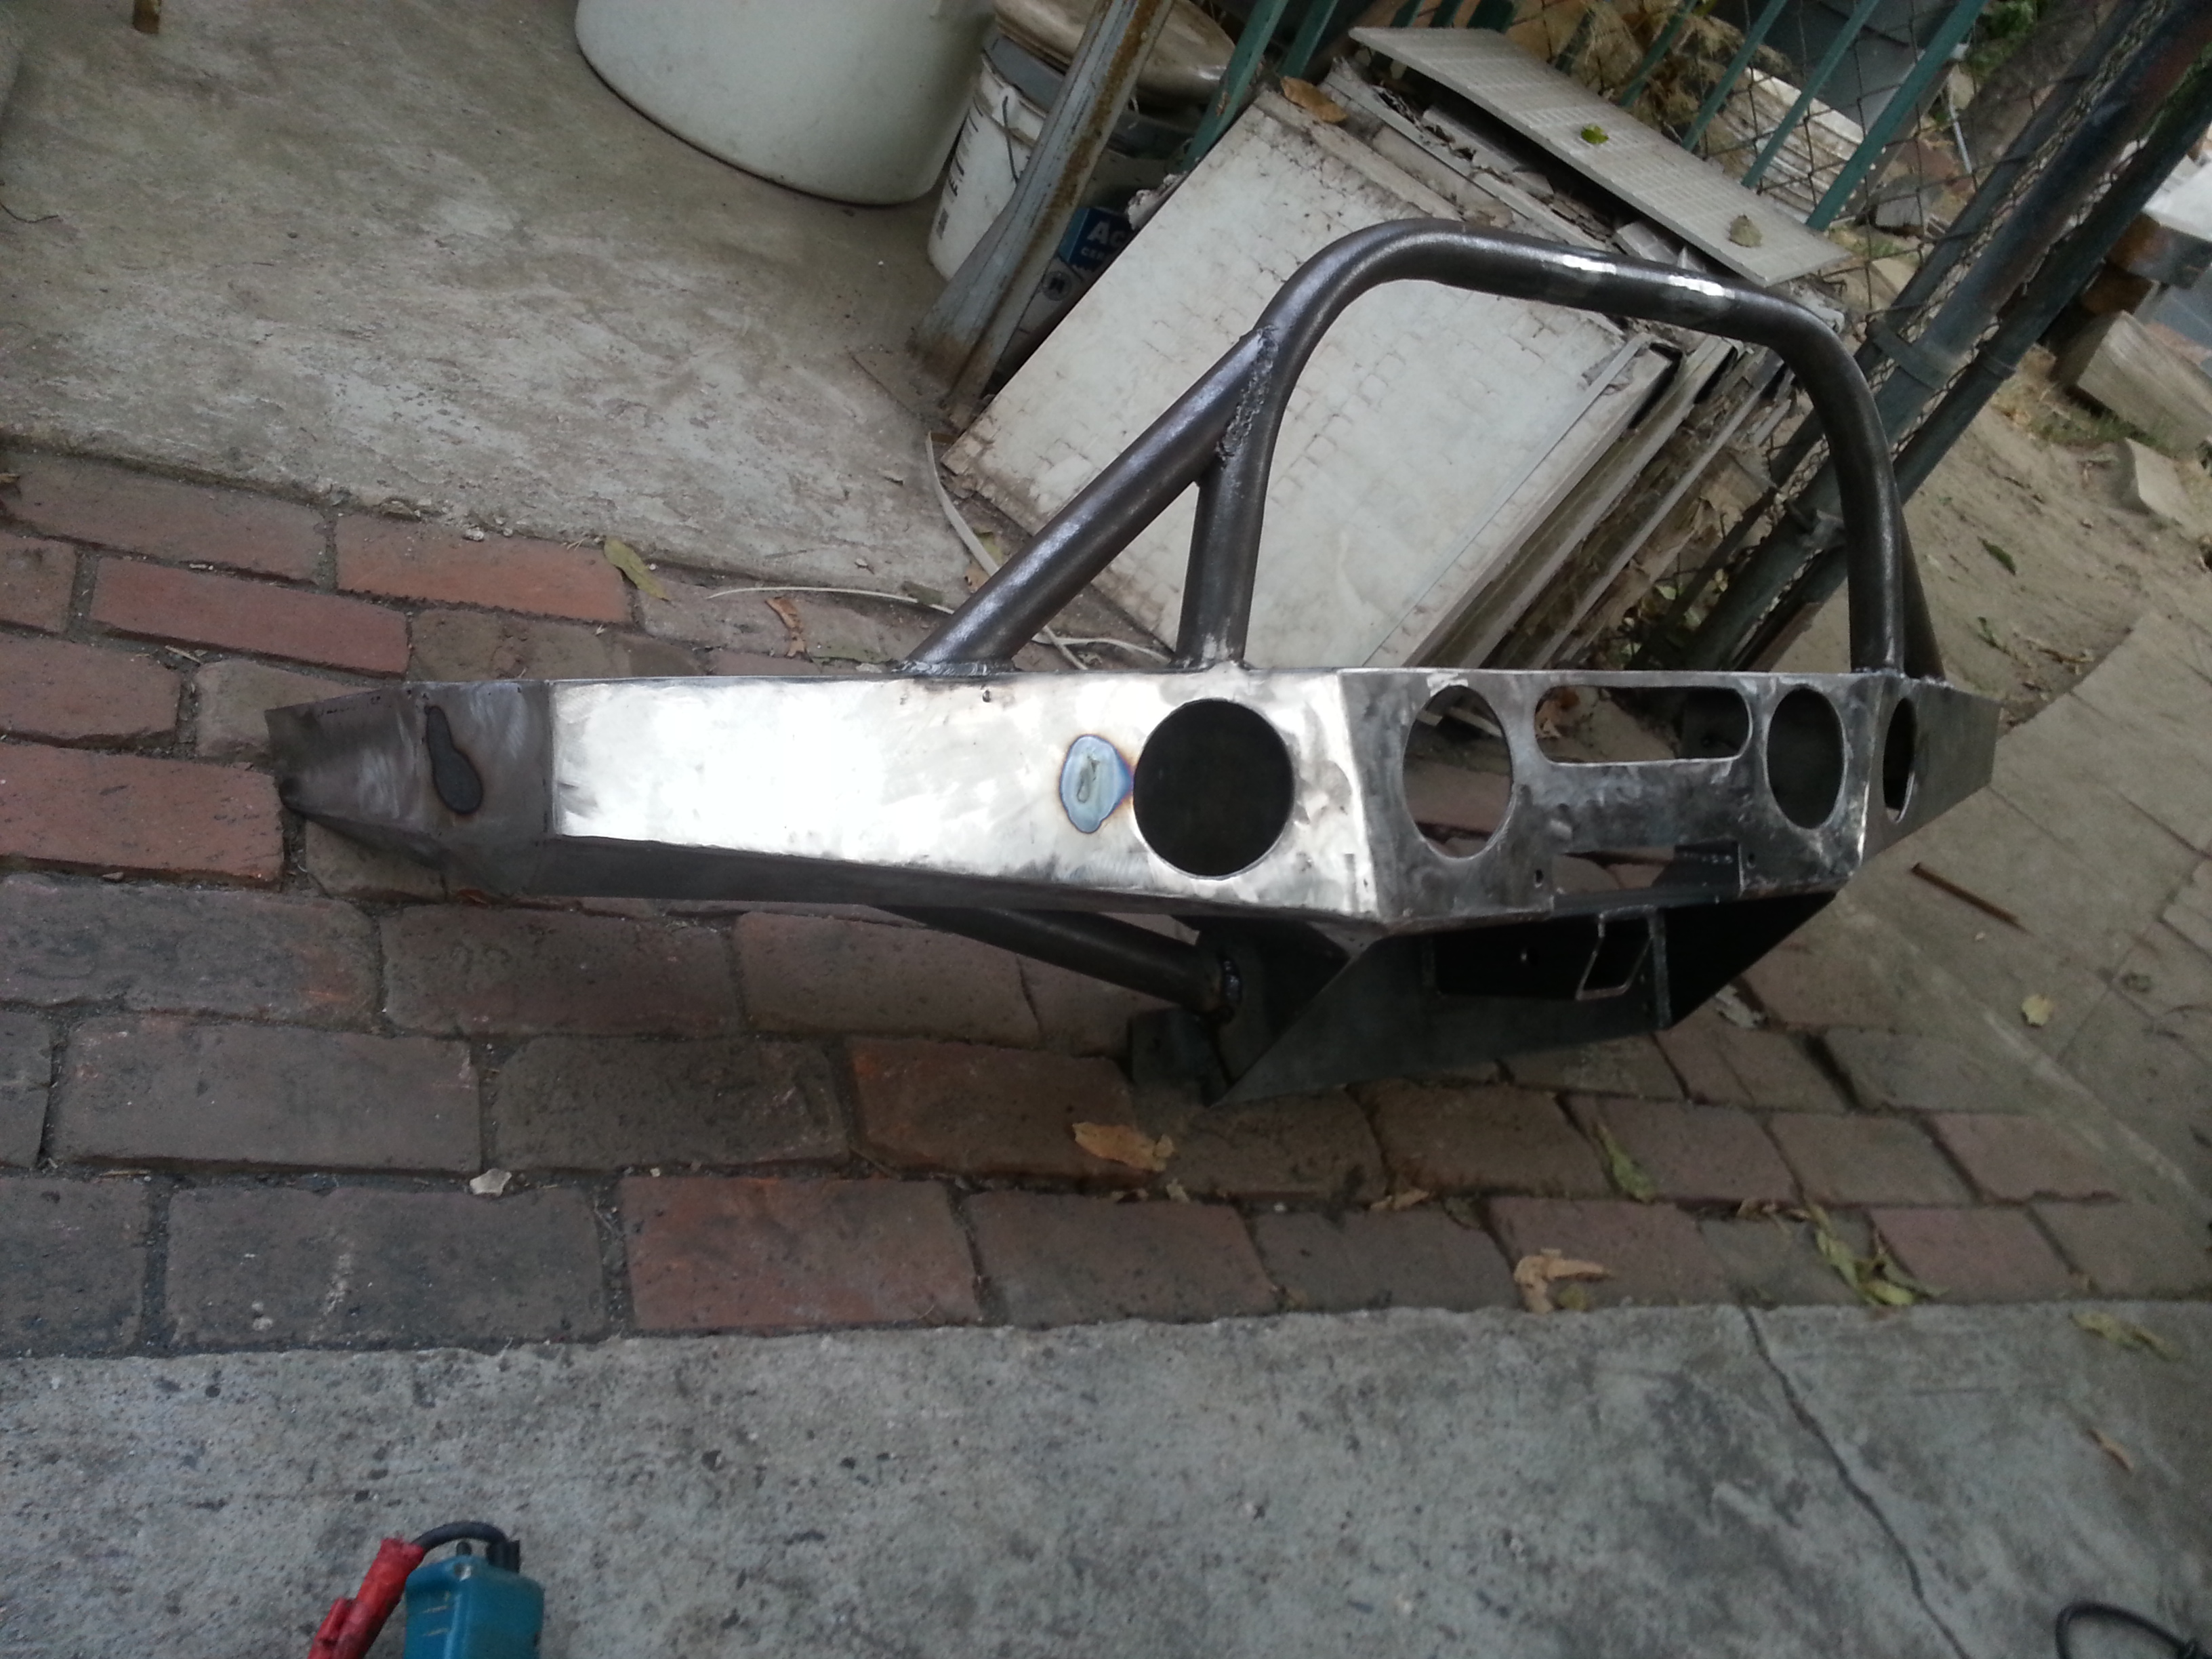
We welded on the center grill gaurd then ground it down a bit to prep for another weld layer.
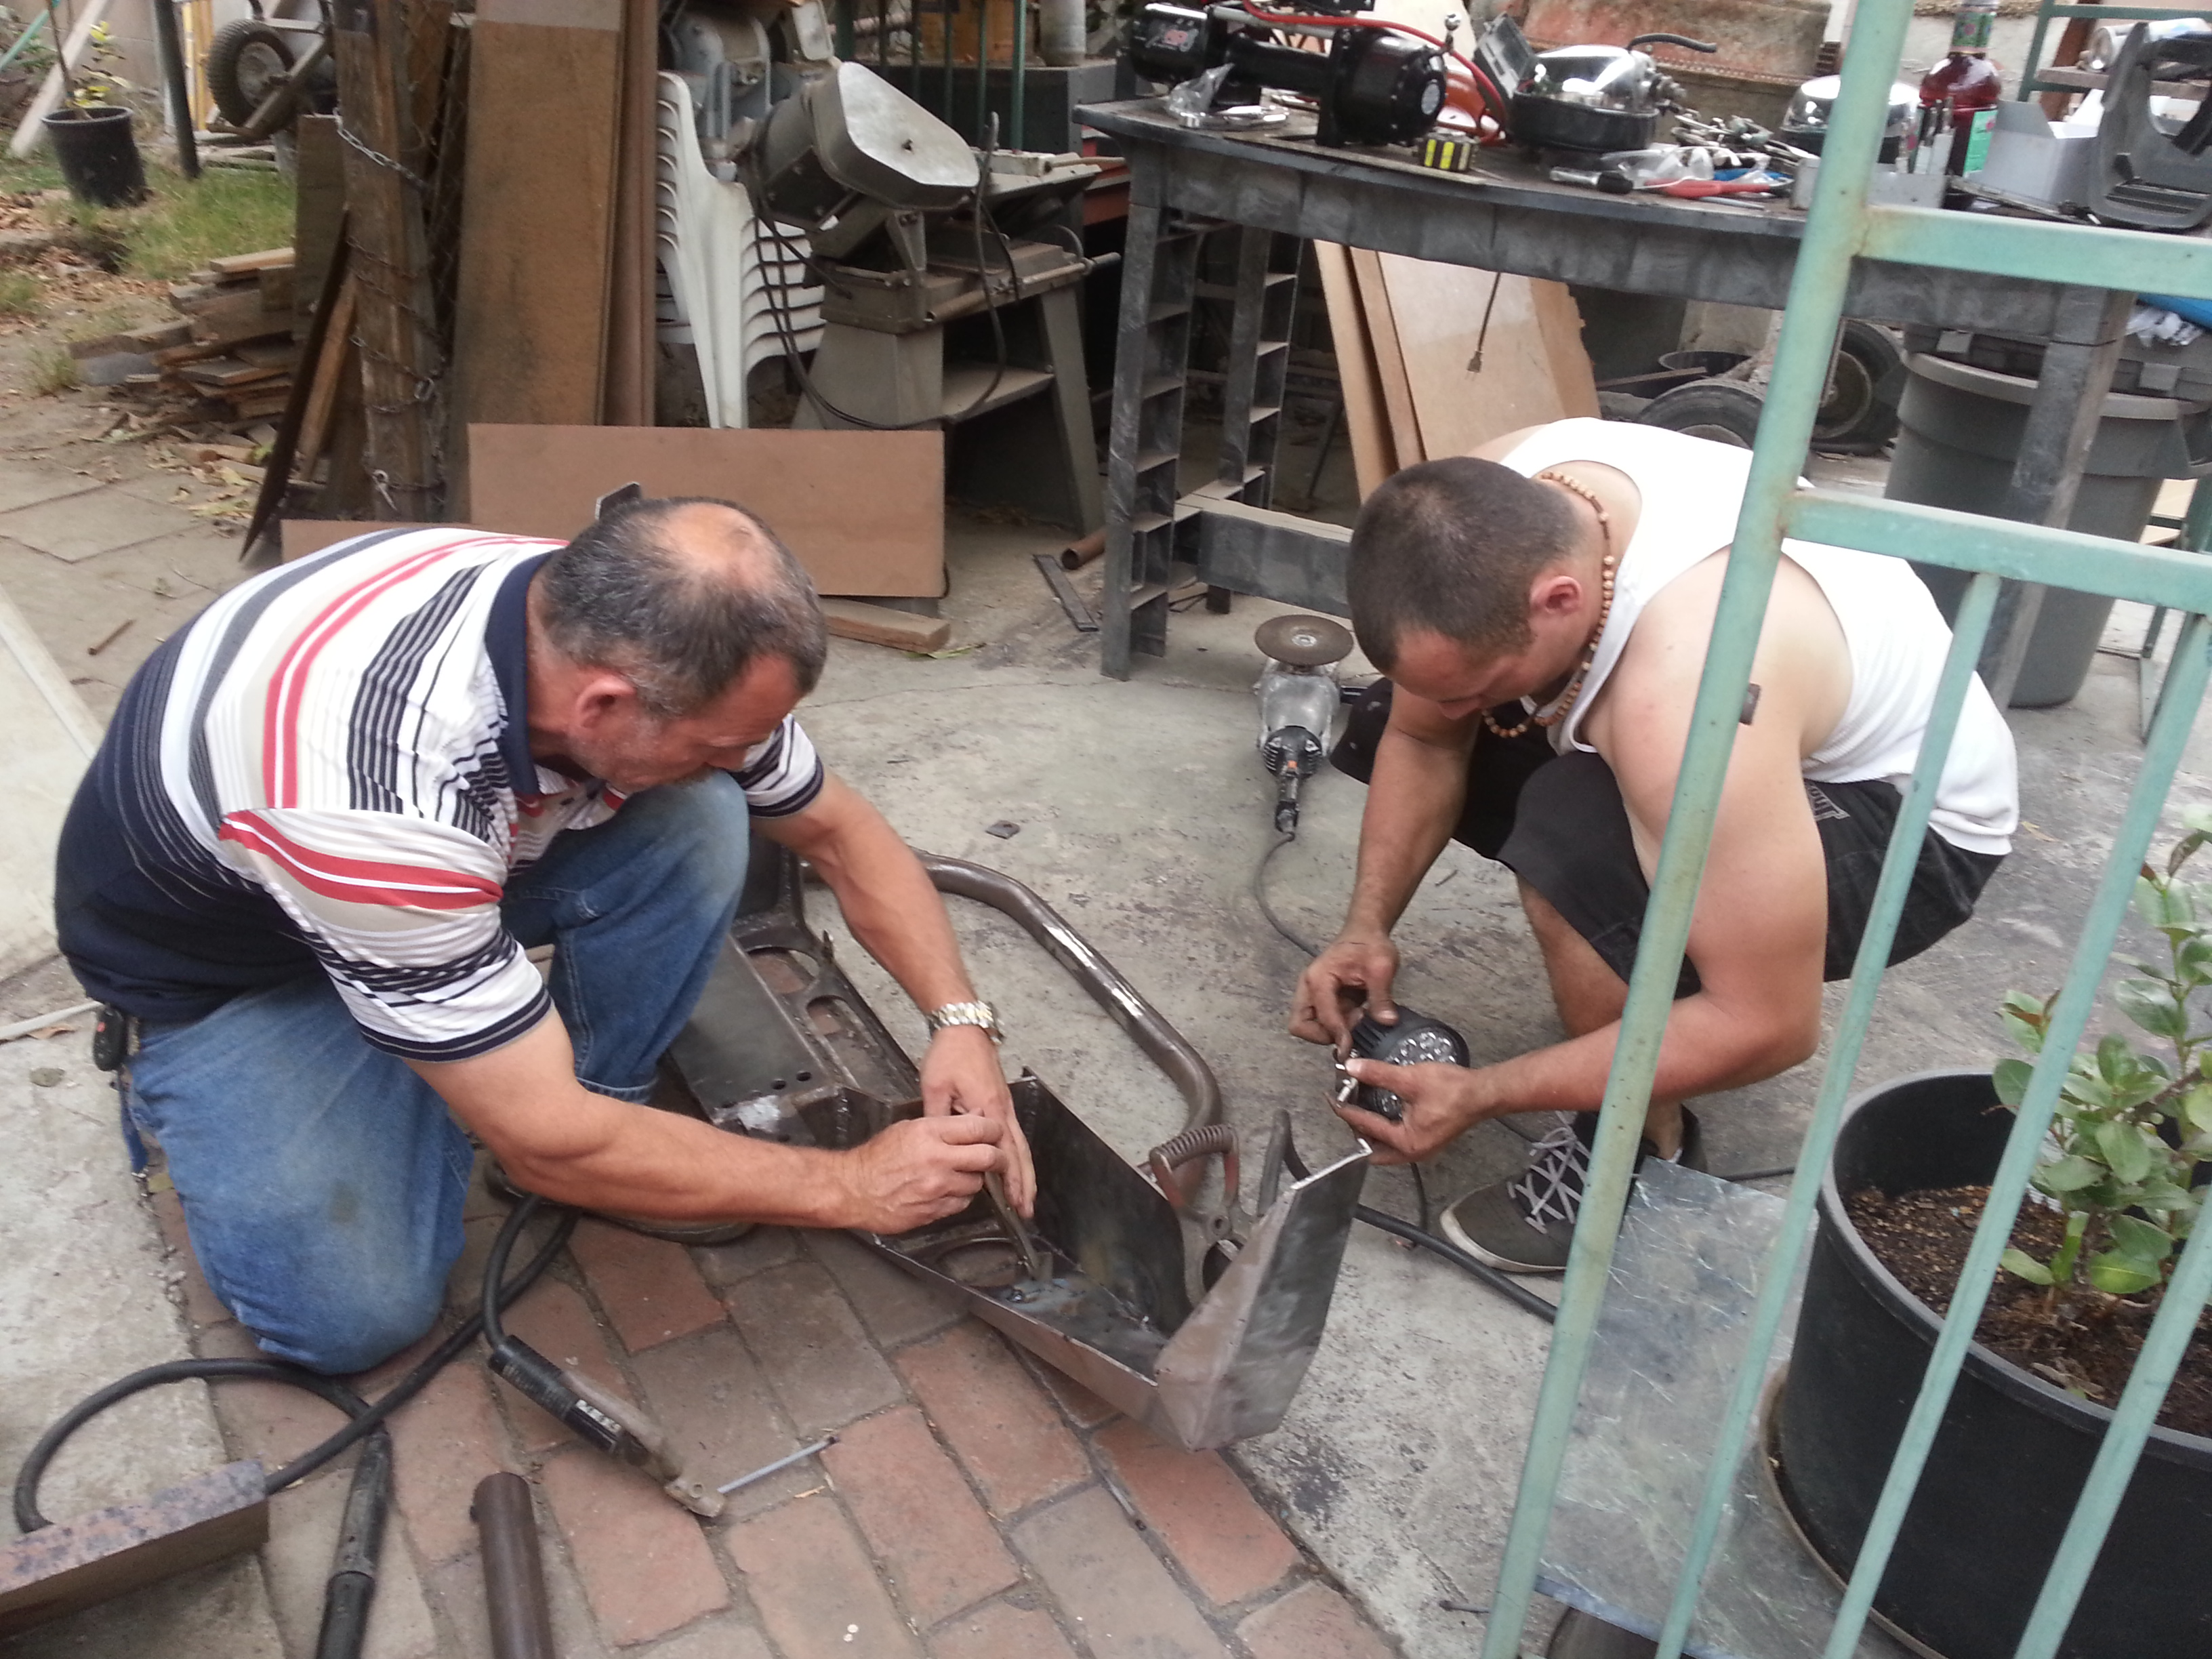
Made some light tabs for Mark's 8" Lights
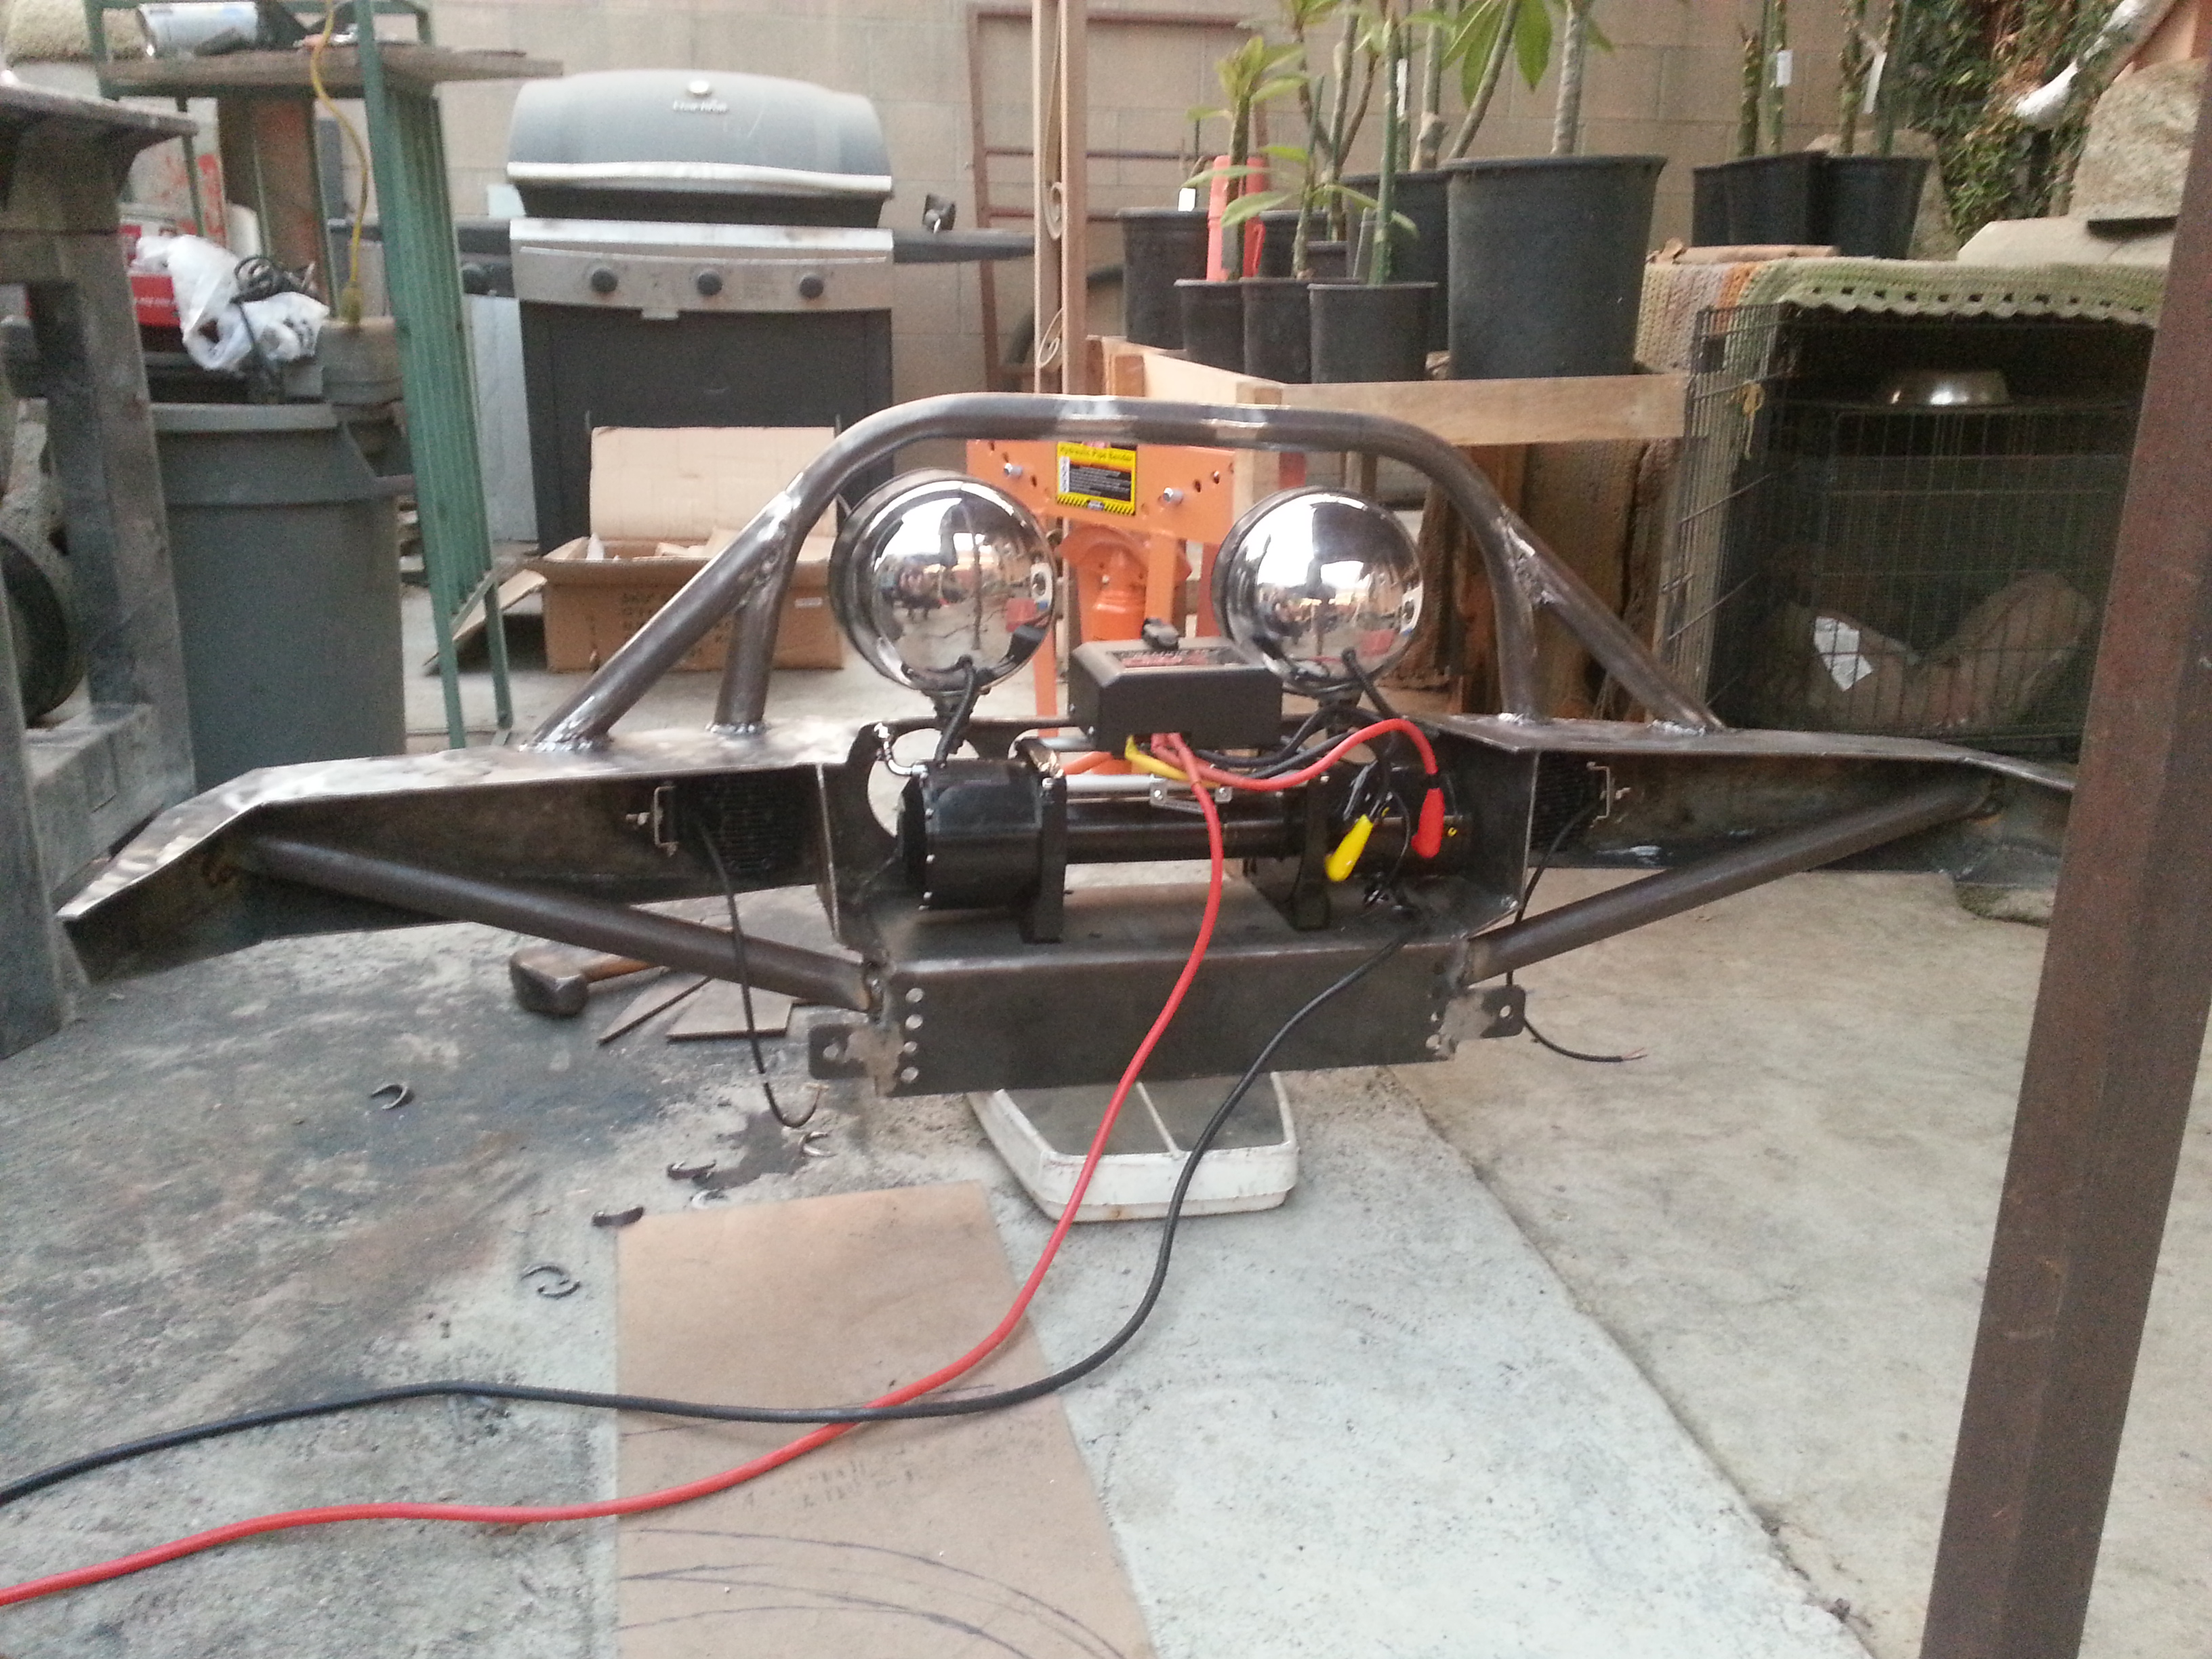
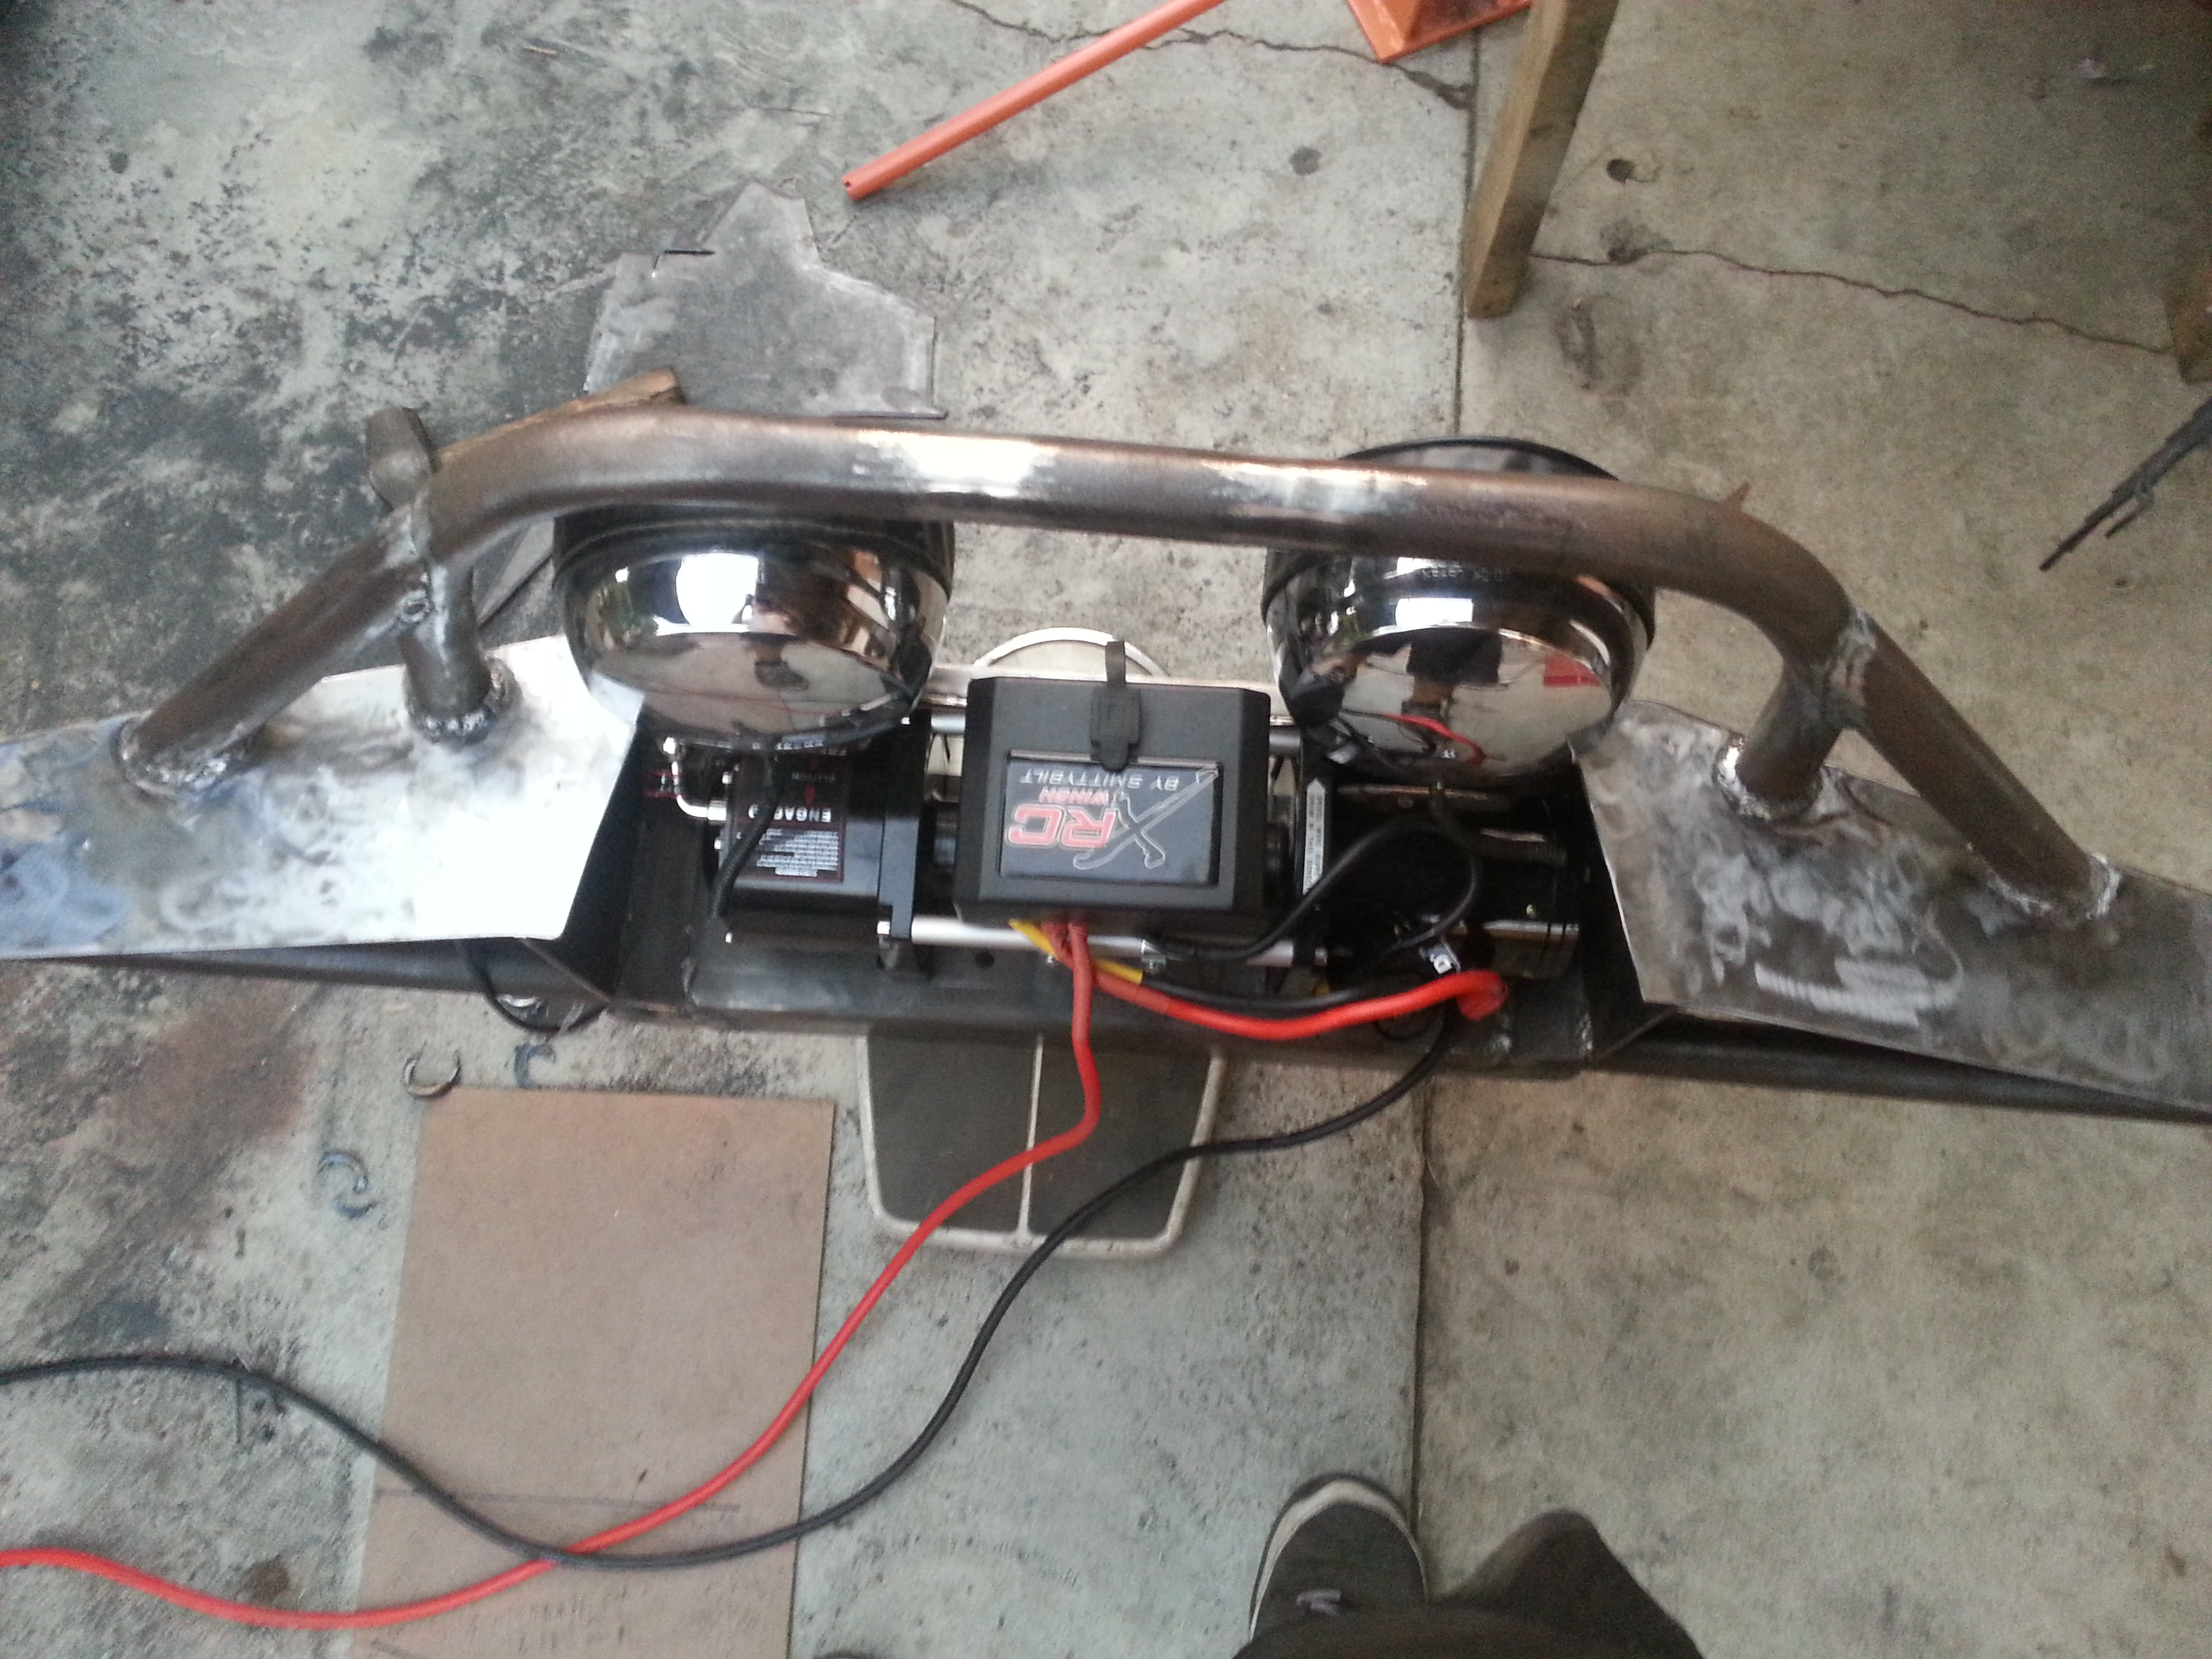
I got anxious and couldnt wait to see what it looked like so i added on the winch and Mark's lights.
We cleared the Winch control box.
I cut out the grill guard gussets

That's about where i want them.

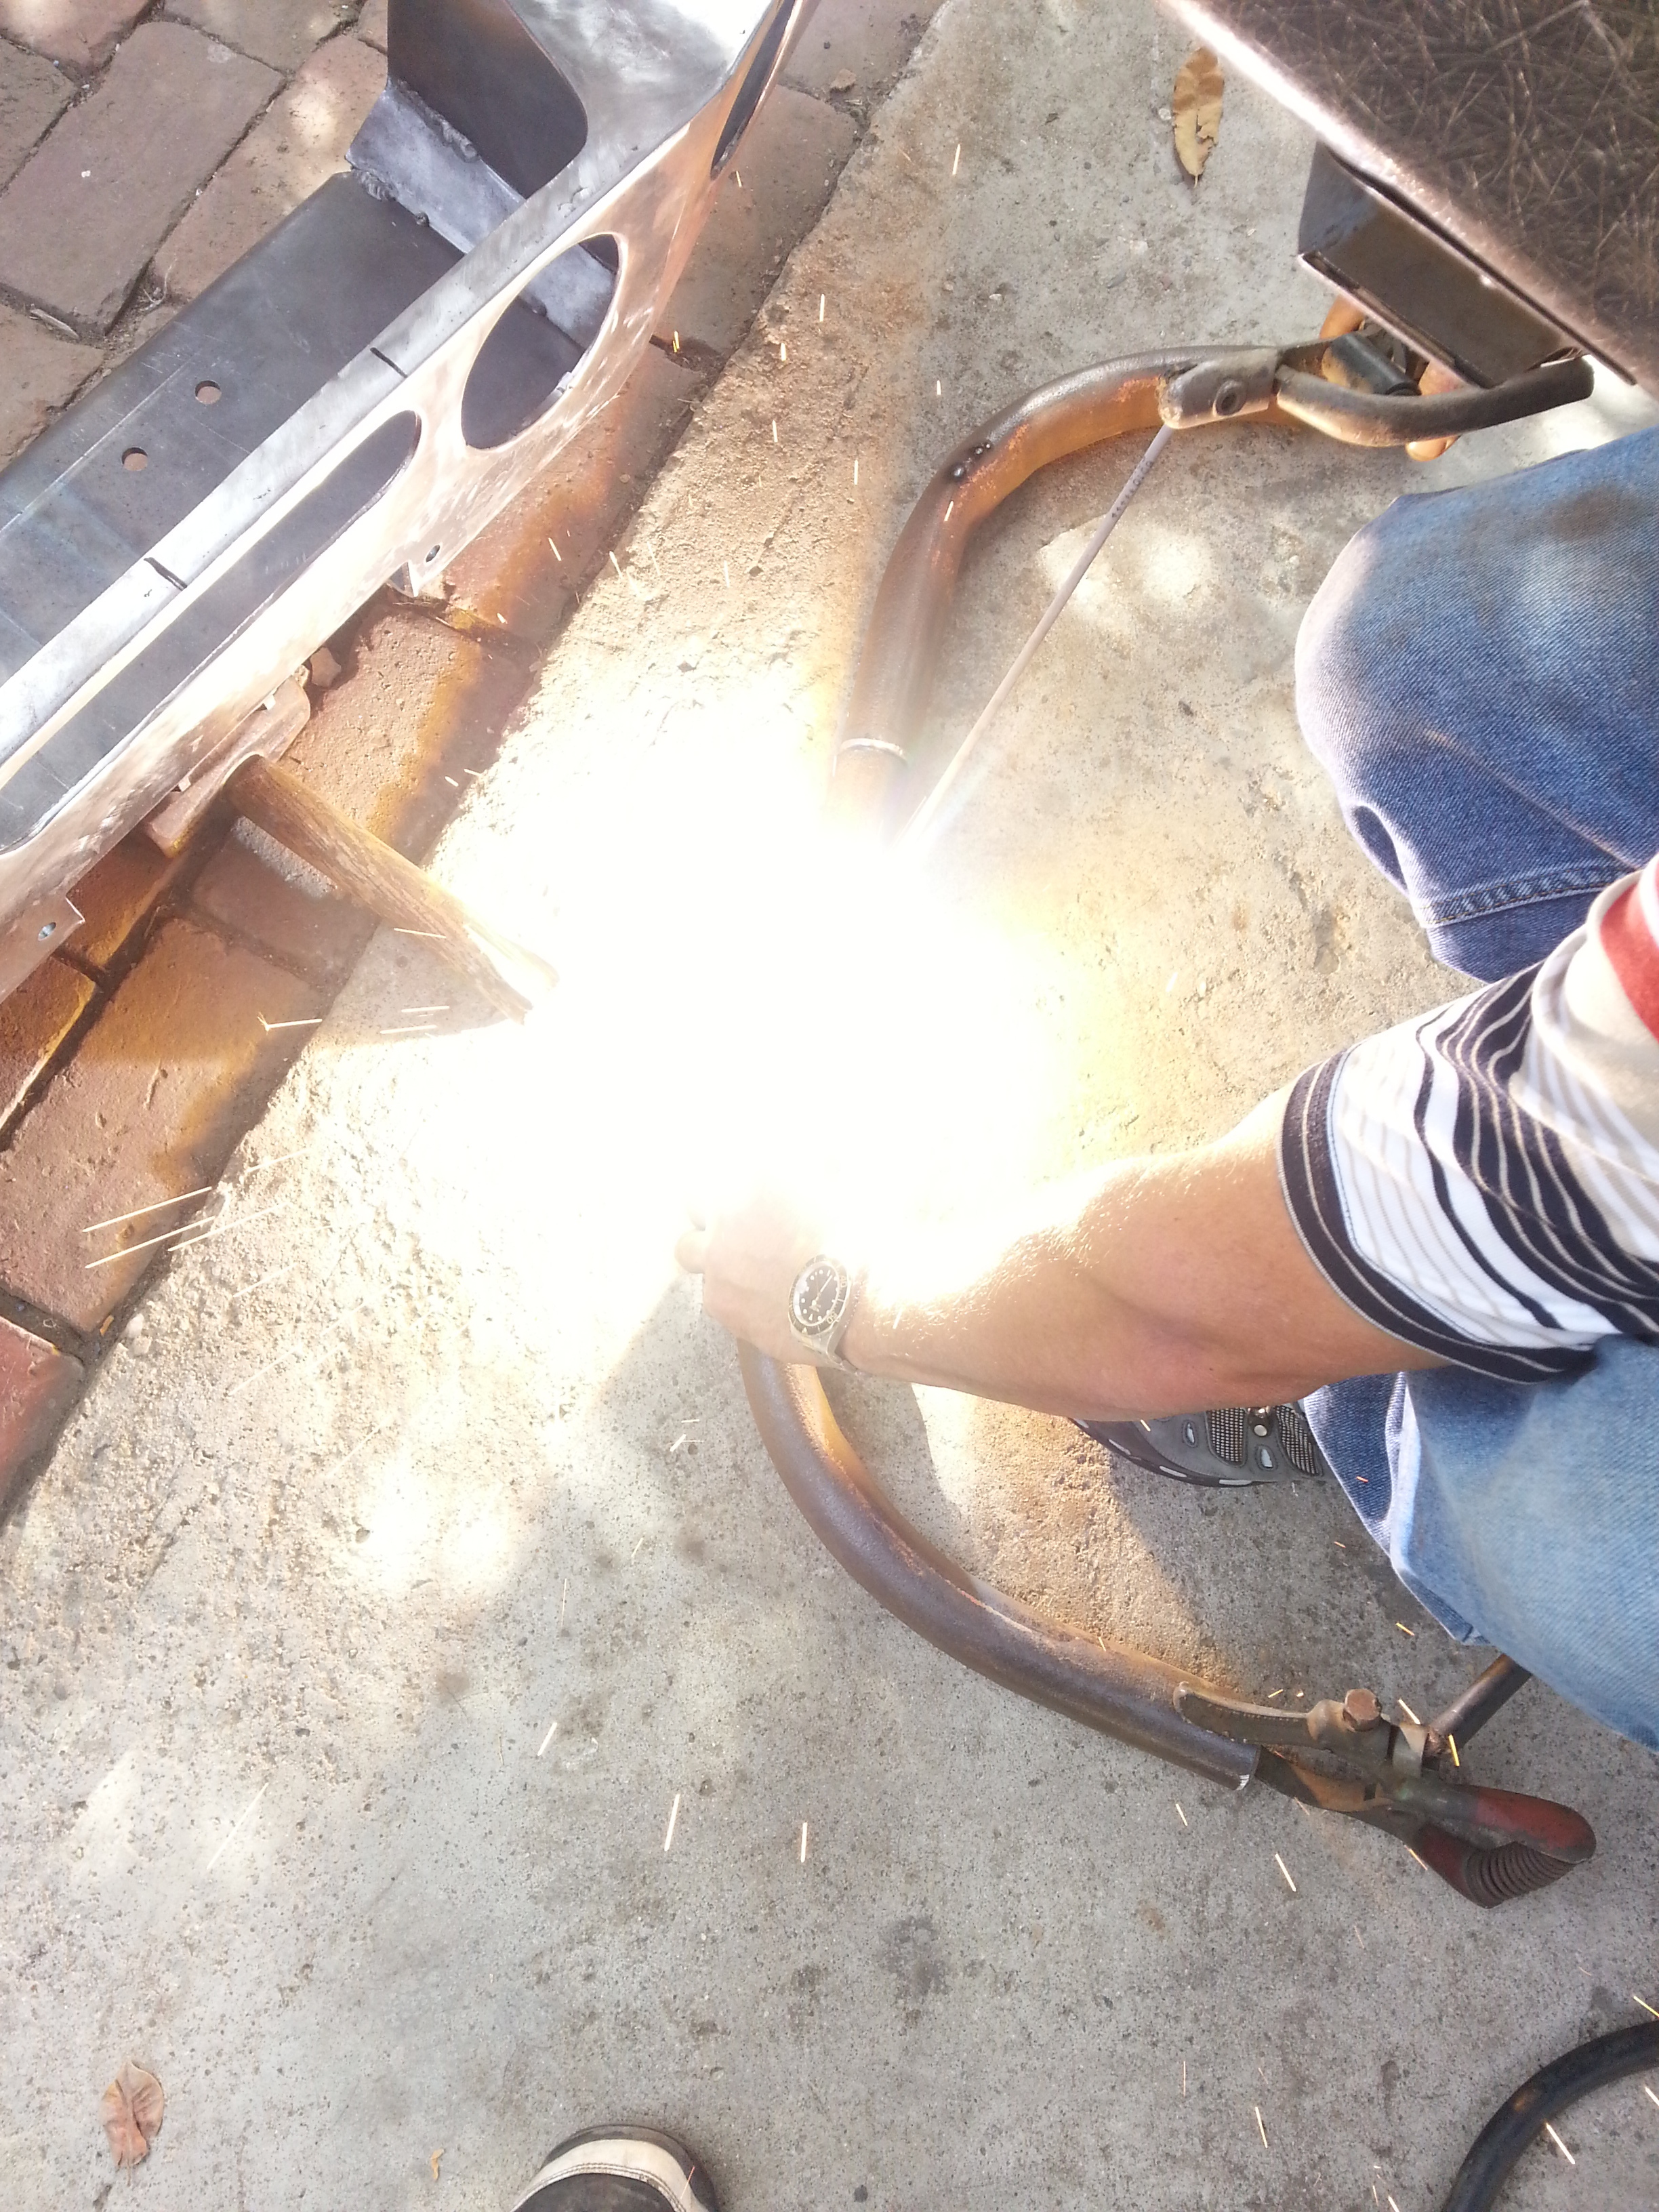
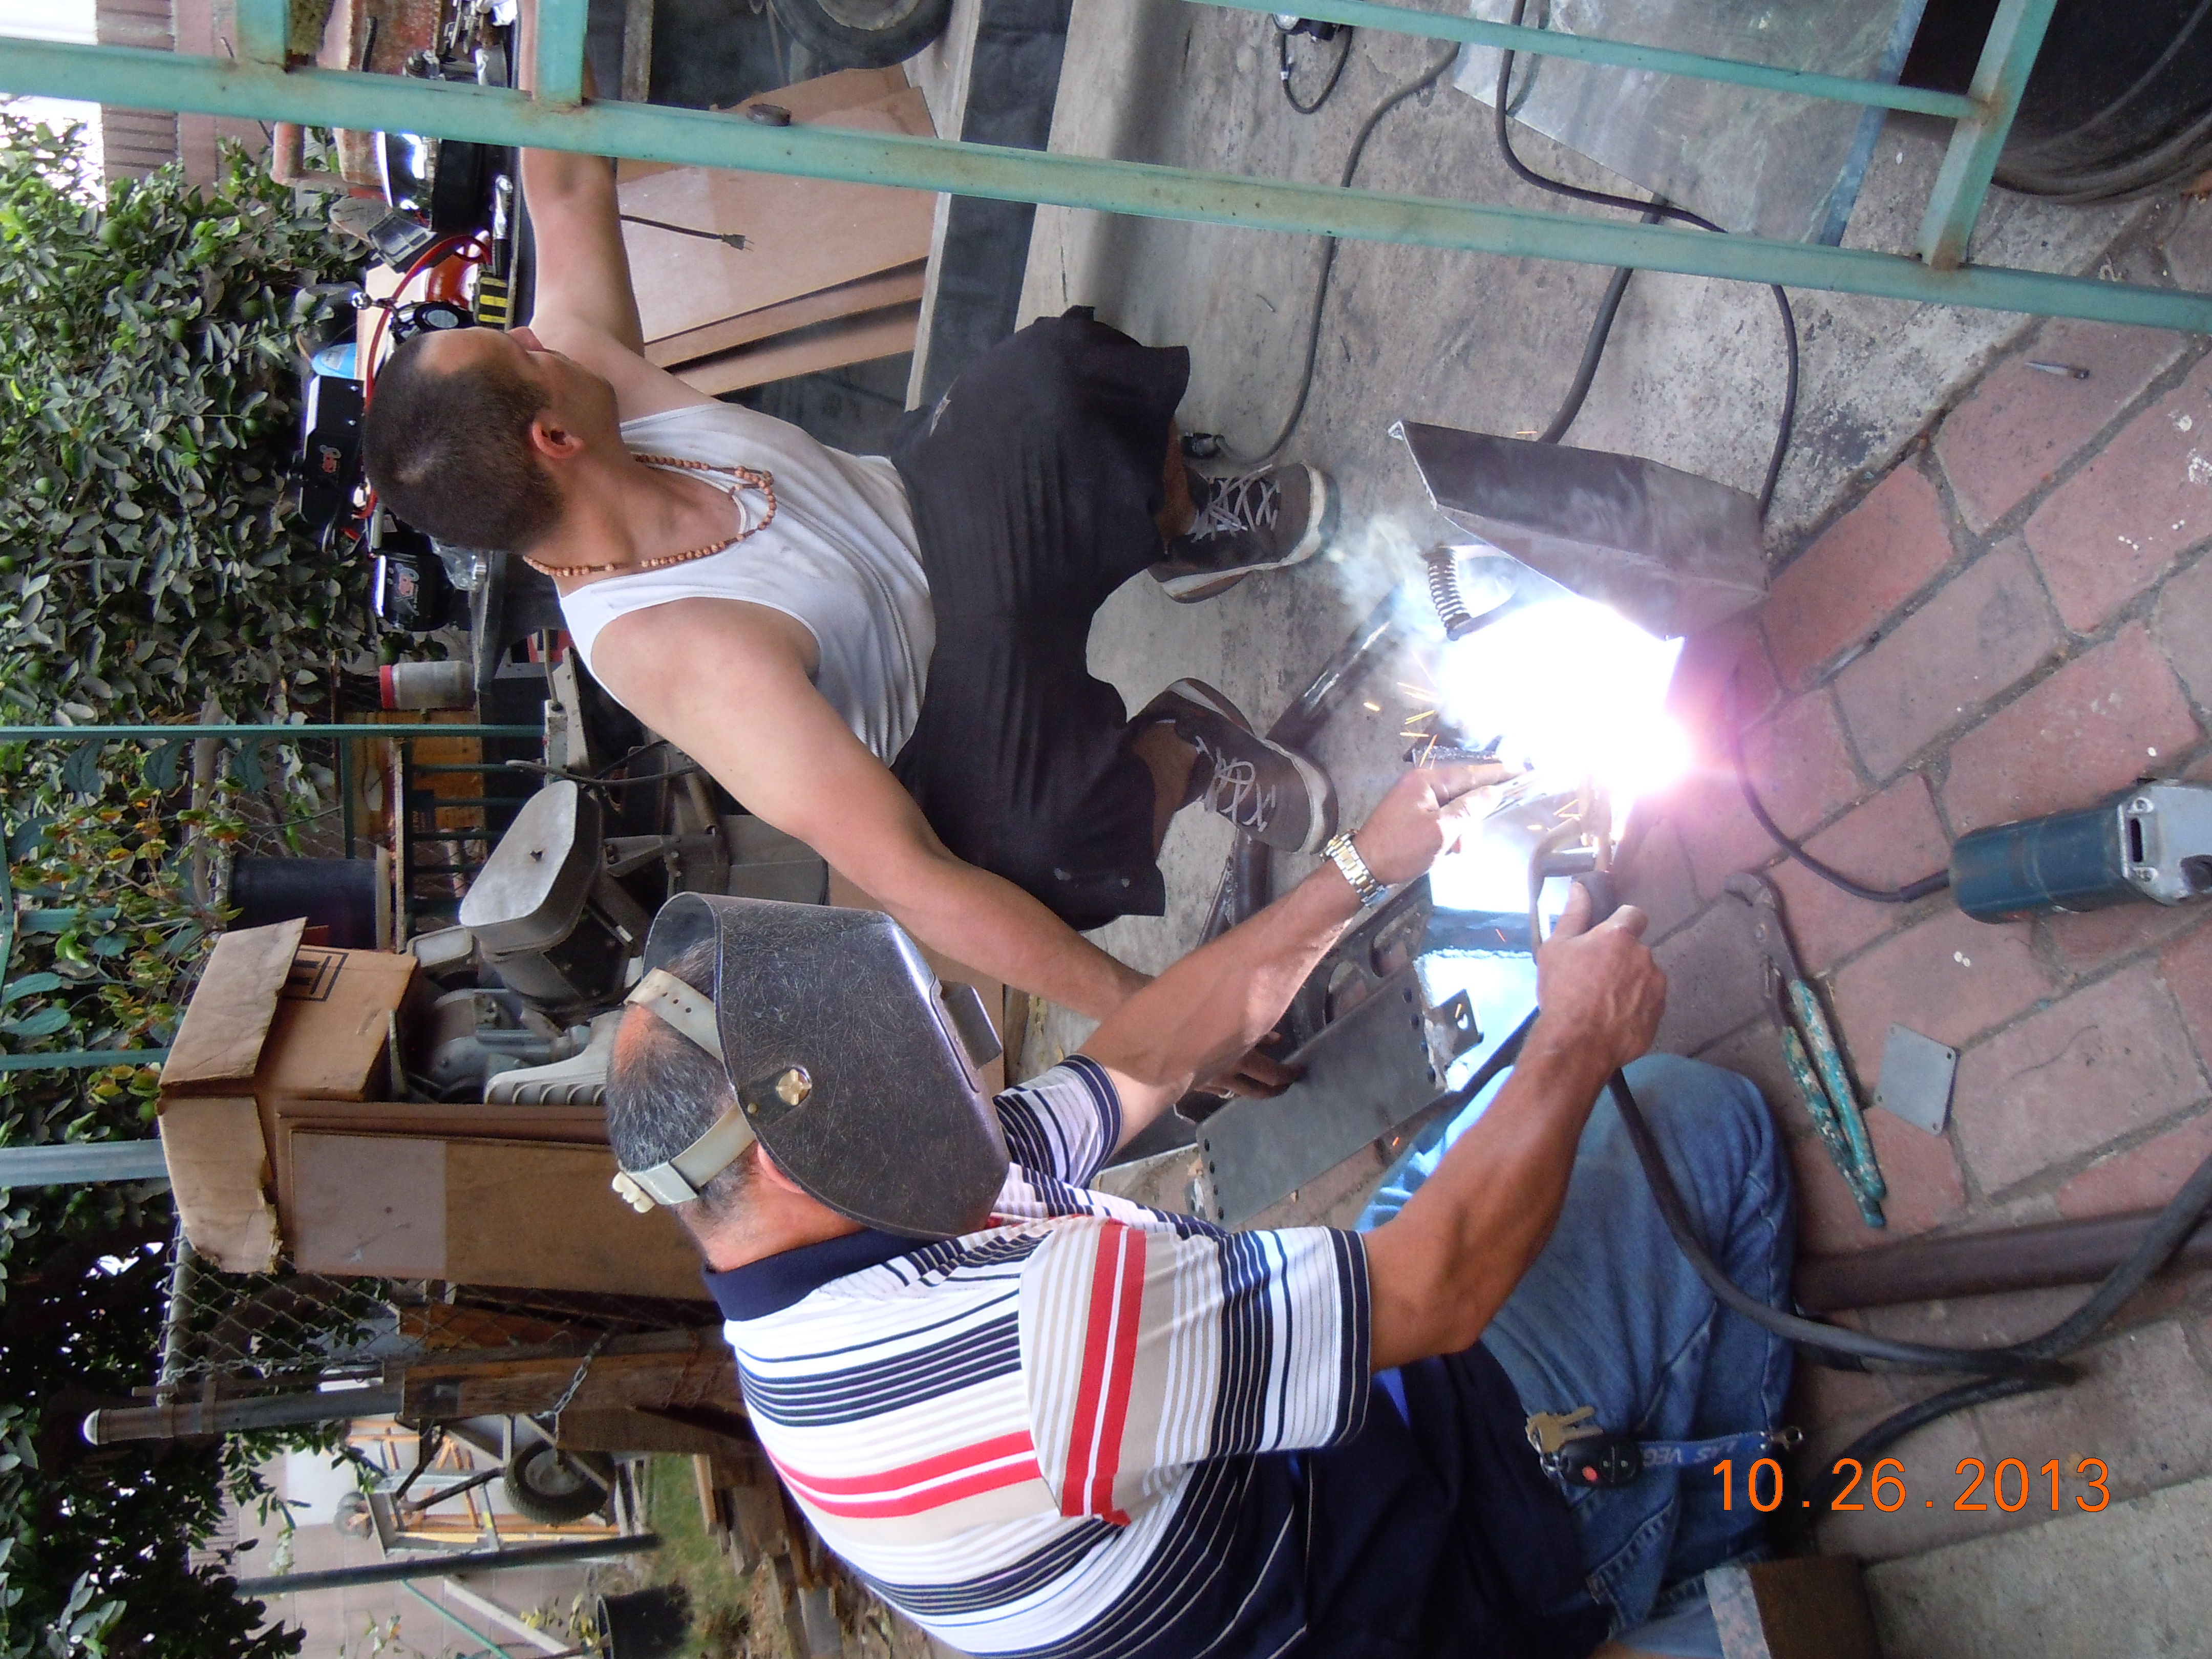
Dad at work welding the gussets on for me.
Cut out the side reinforcements. I took this idea off of Mark's AddictedOffroad bumper. Thanks for letting me get a closer look at your bumper man. im positive this will definitely hold up those sides.

Gotta fab up some tabs for my 4&1/4" LED lights
Here are my Light tabs that will hold up my LED lights

Here are a bunch of pictures my mom took of us working together. I decided to keep them so i can look back on all the father son time we had brainstorming exactly how these darn lights were gonna fit in the bumper without being in the way of the the side reinforcements.


Side reinforcements are all welded on now. And so are the LED light tabs.


Figured i'd show a close up in case you guys were curious to see how it looked.

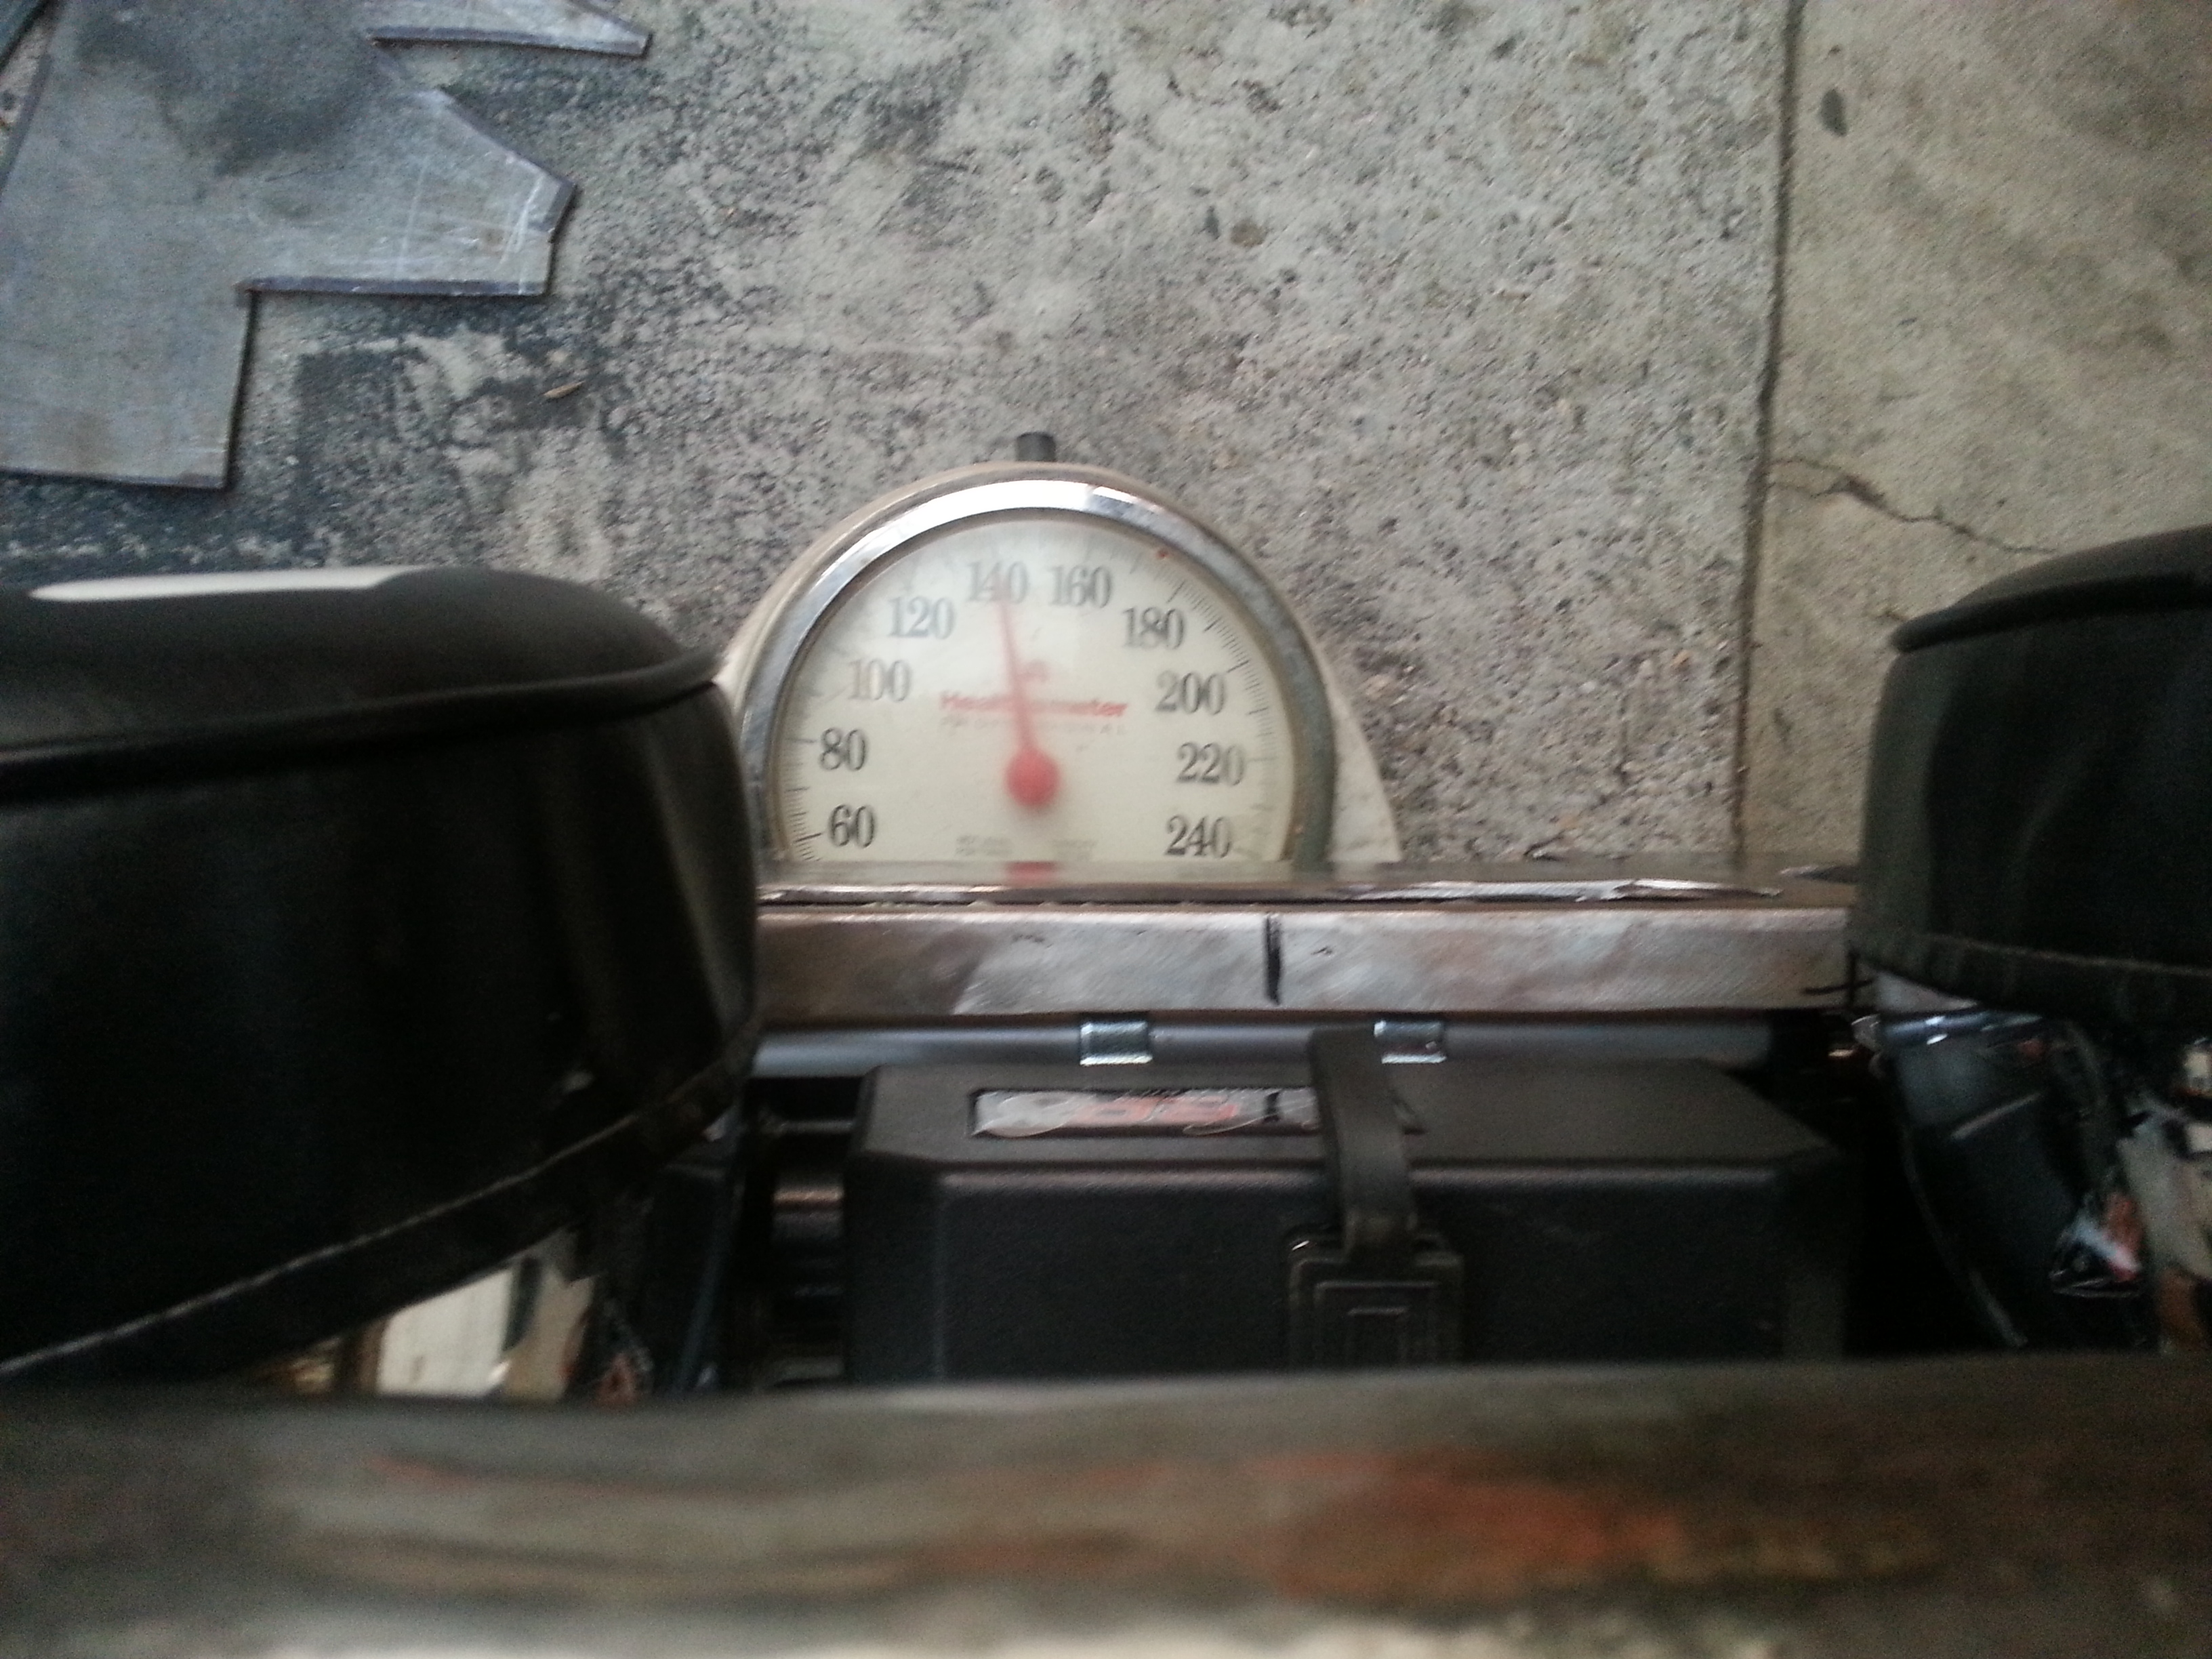
Re weighed the bumper again after we were done and it seems to have gained 20pounds. wow. tube can get heavy!
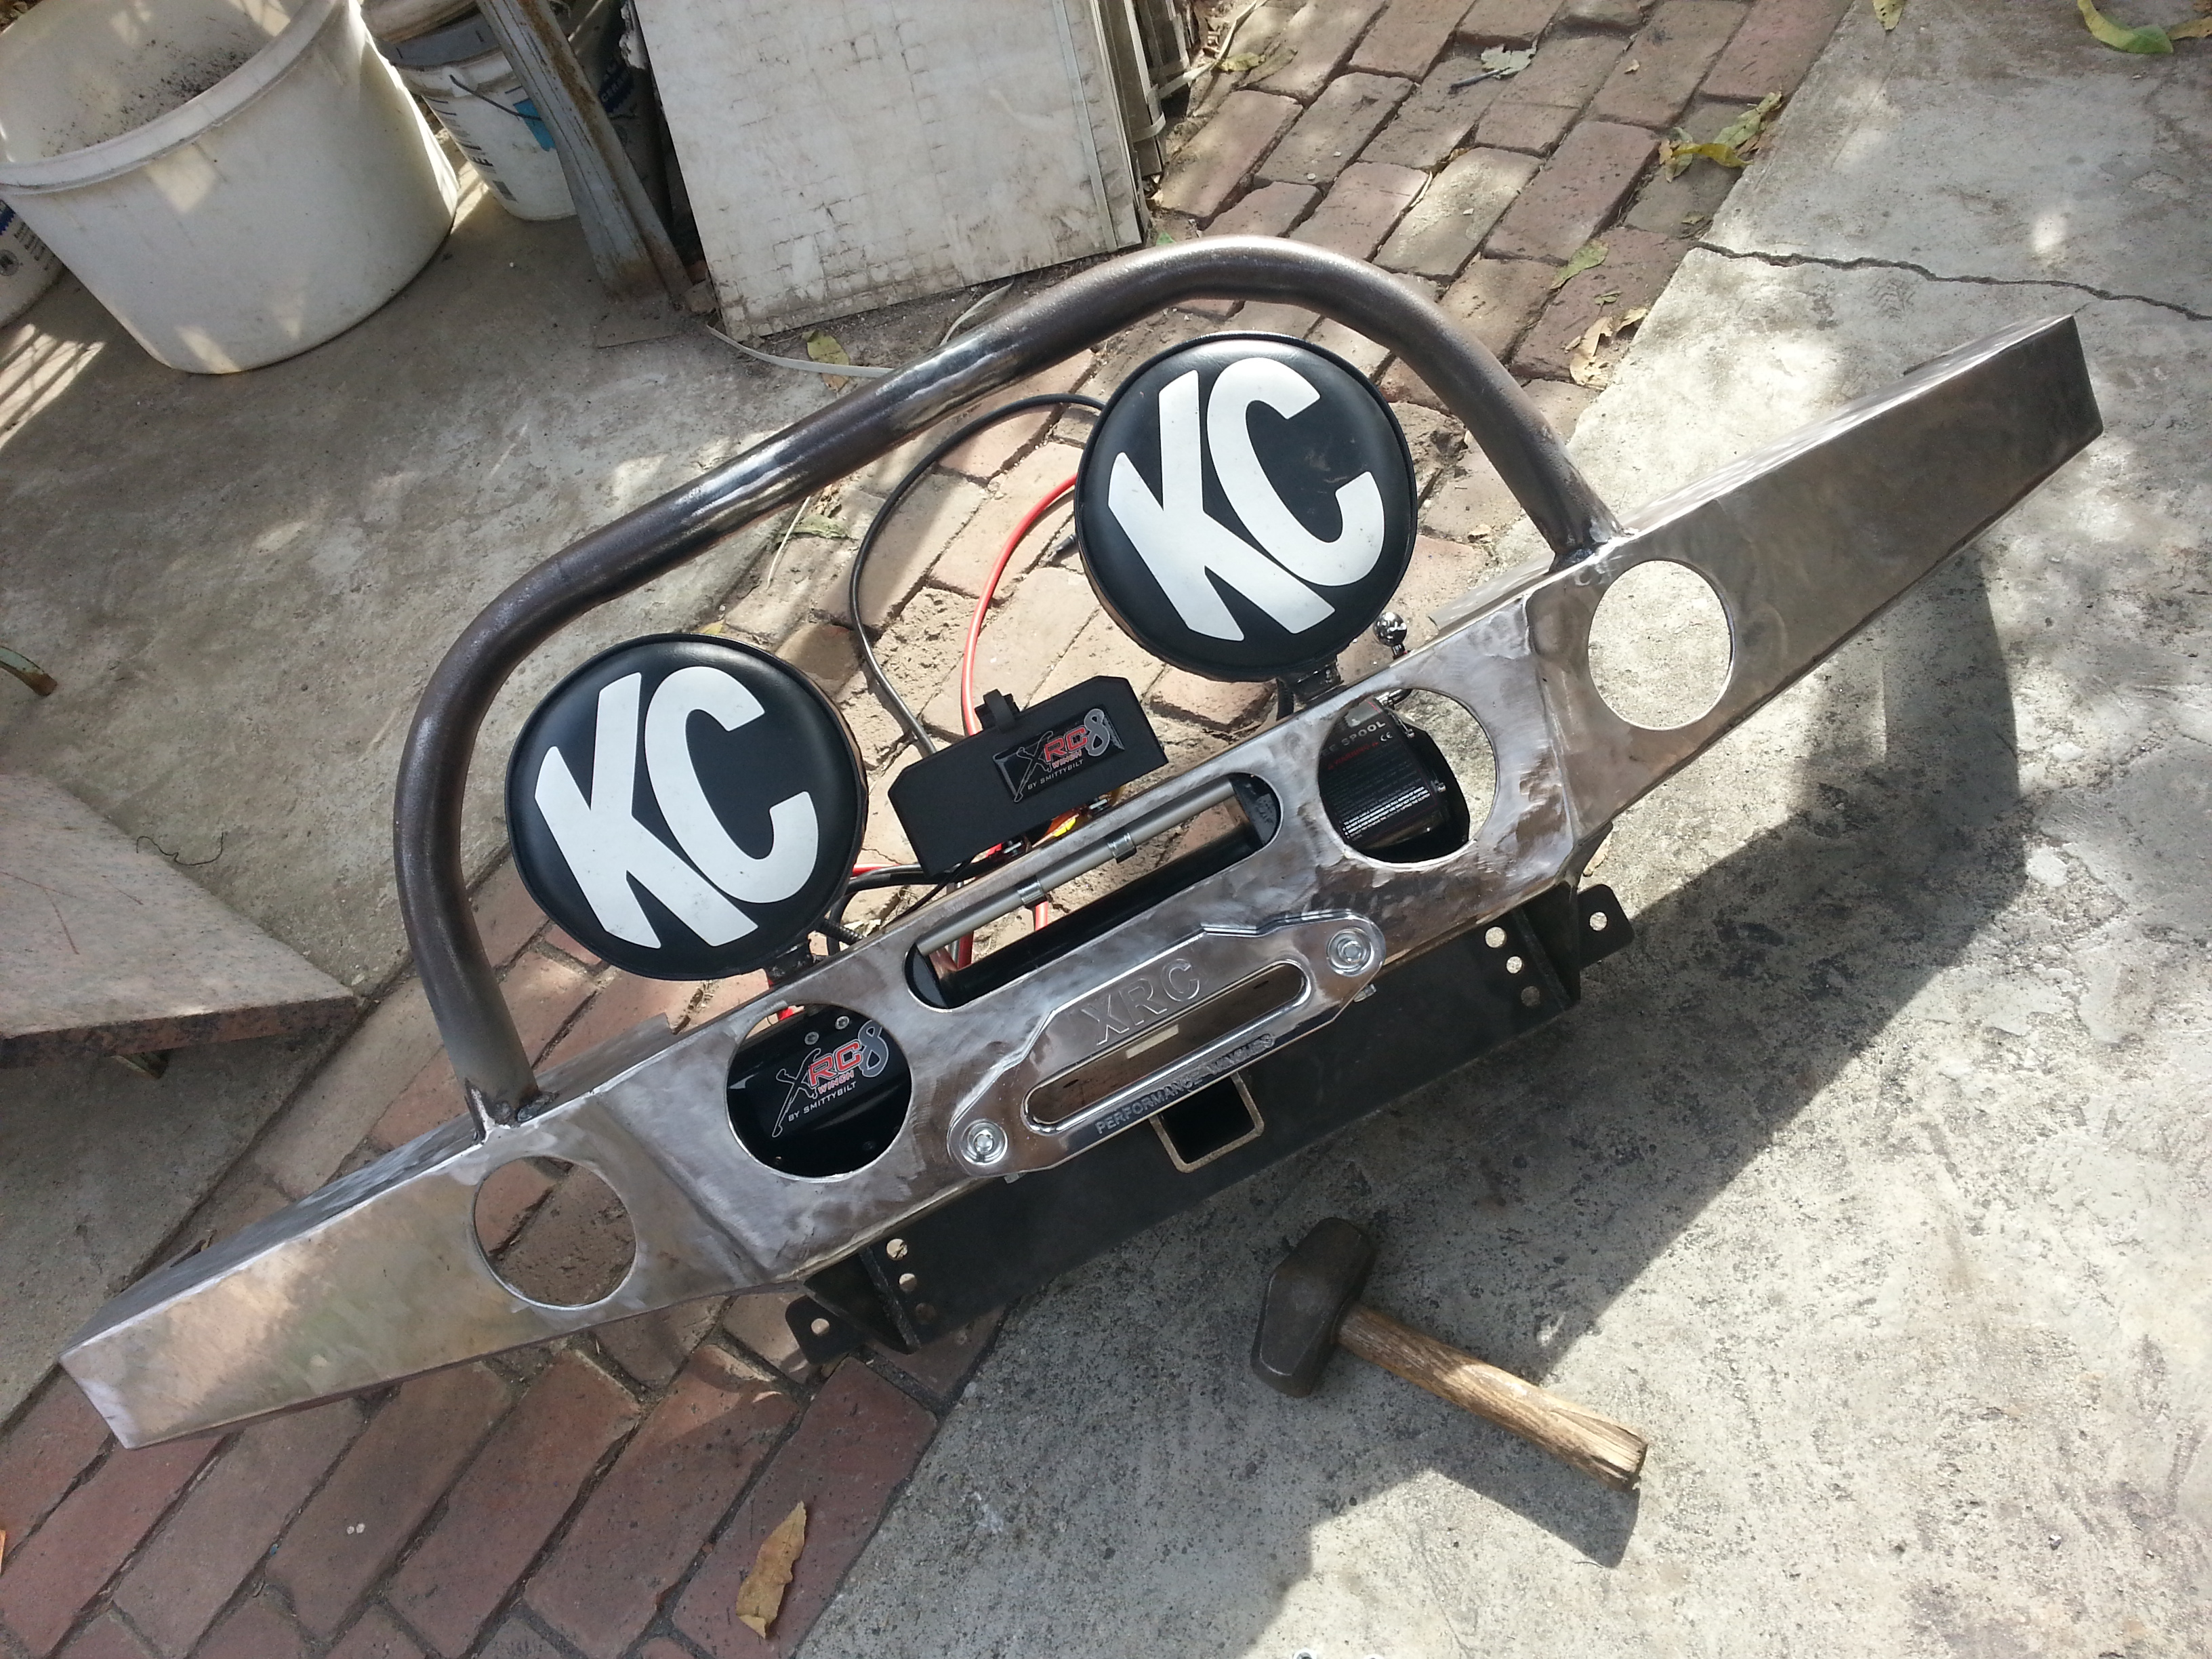
After we finished up i just had to dress up the bumper with some sexy offroad parts.
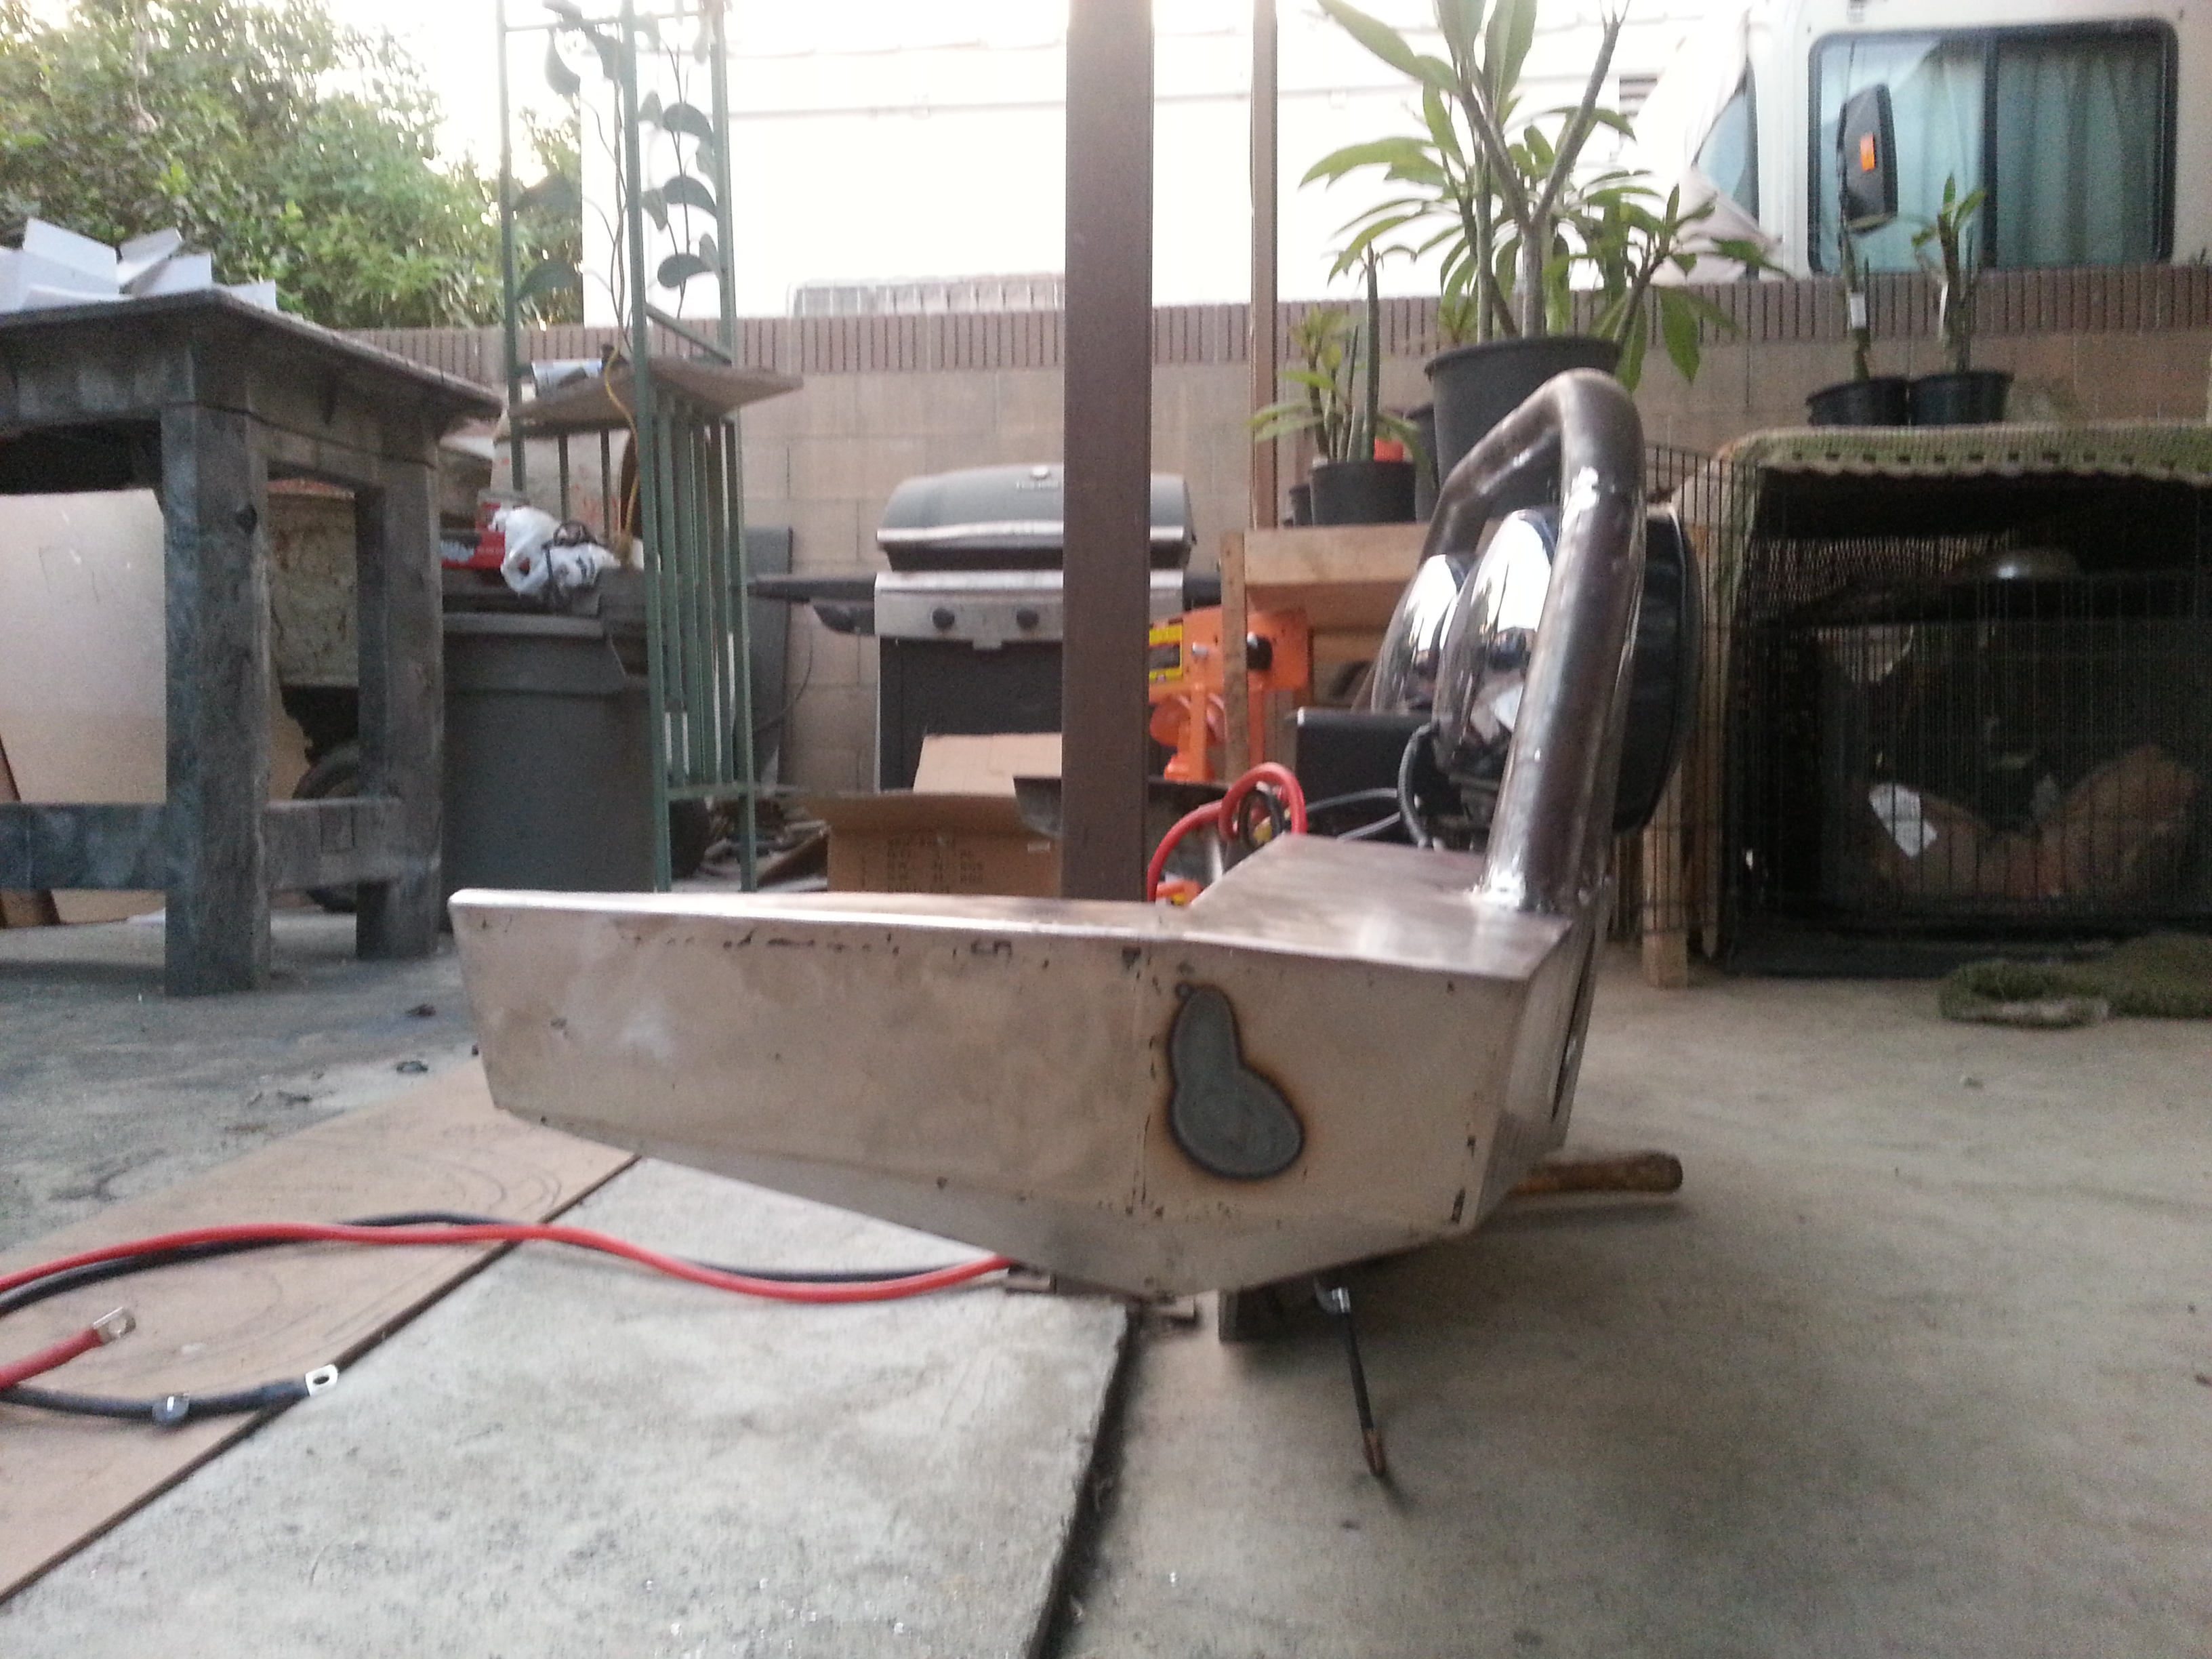
rear side:
Top view
Reweighed the bumper with all the stuff and wow! it is at 140pounds.
Couple of nice front shots
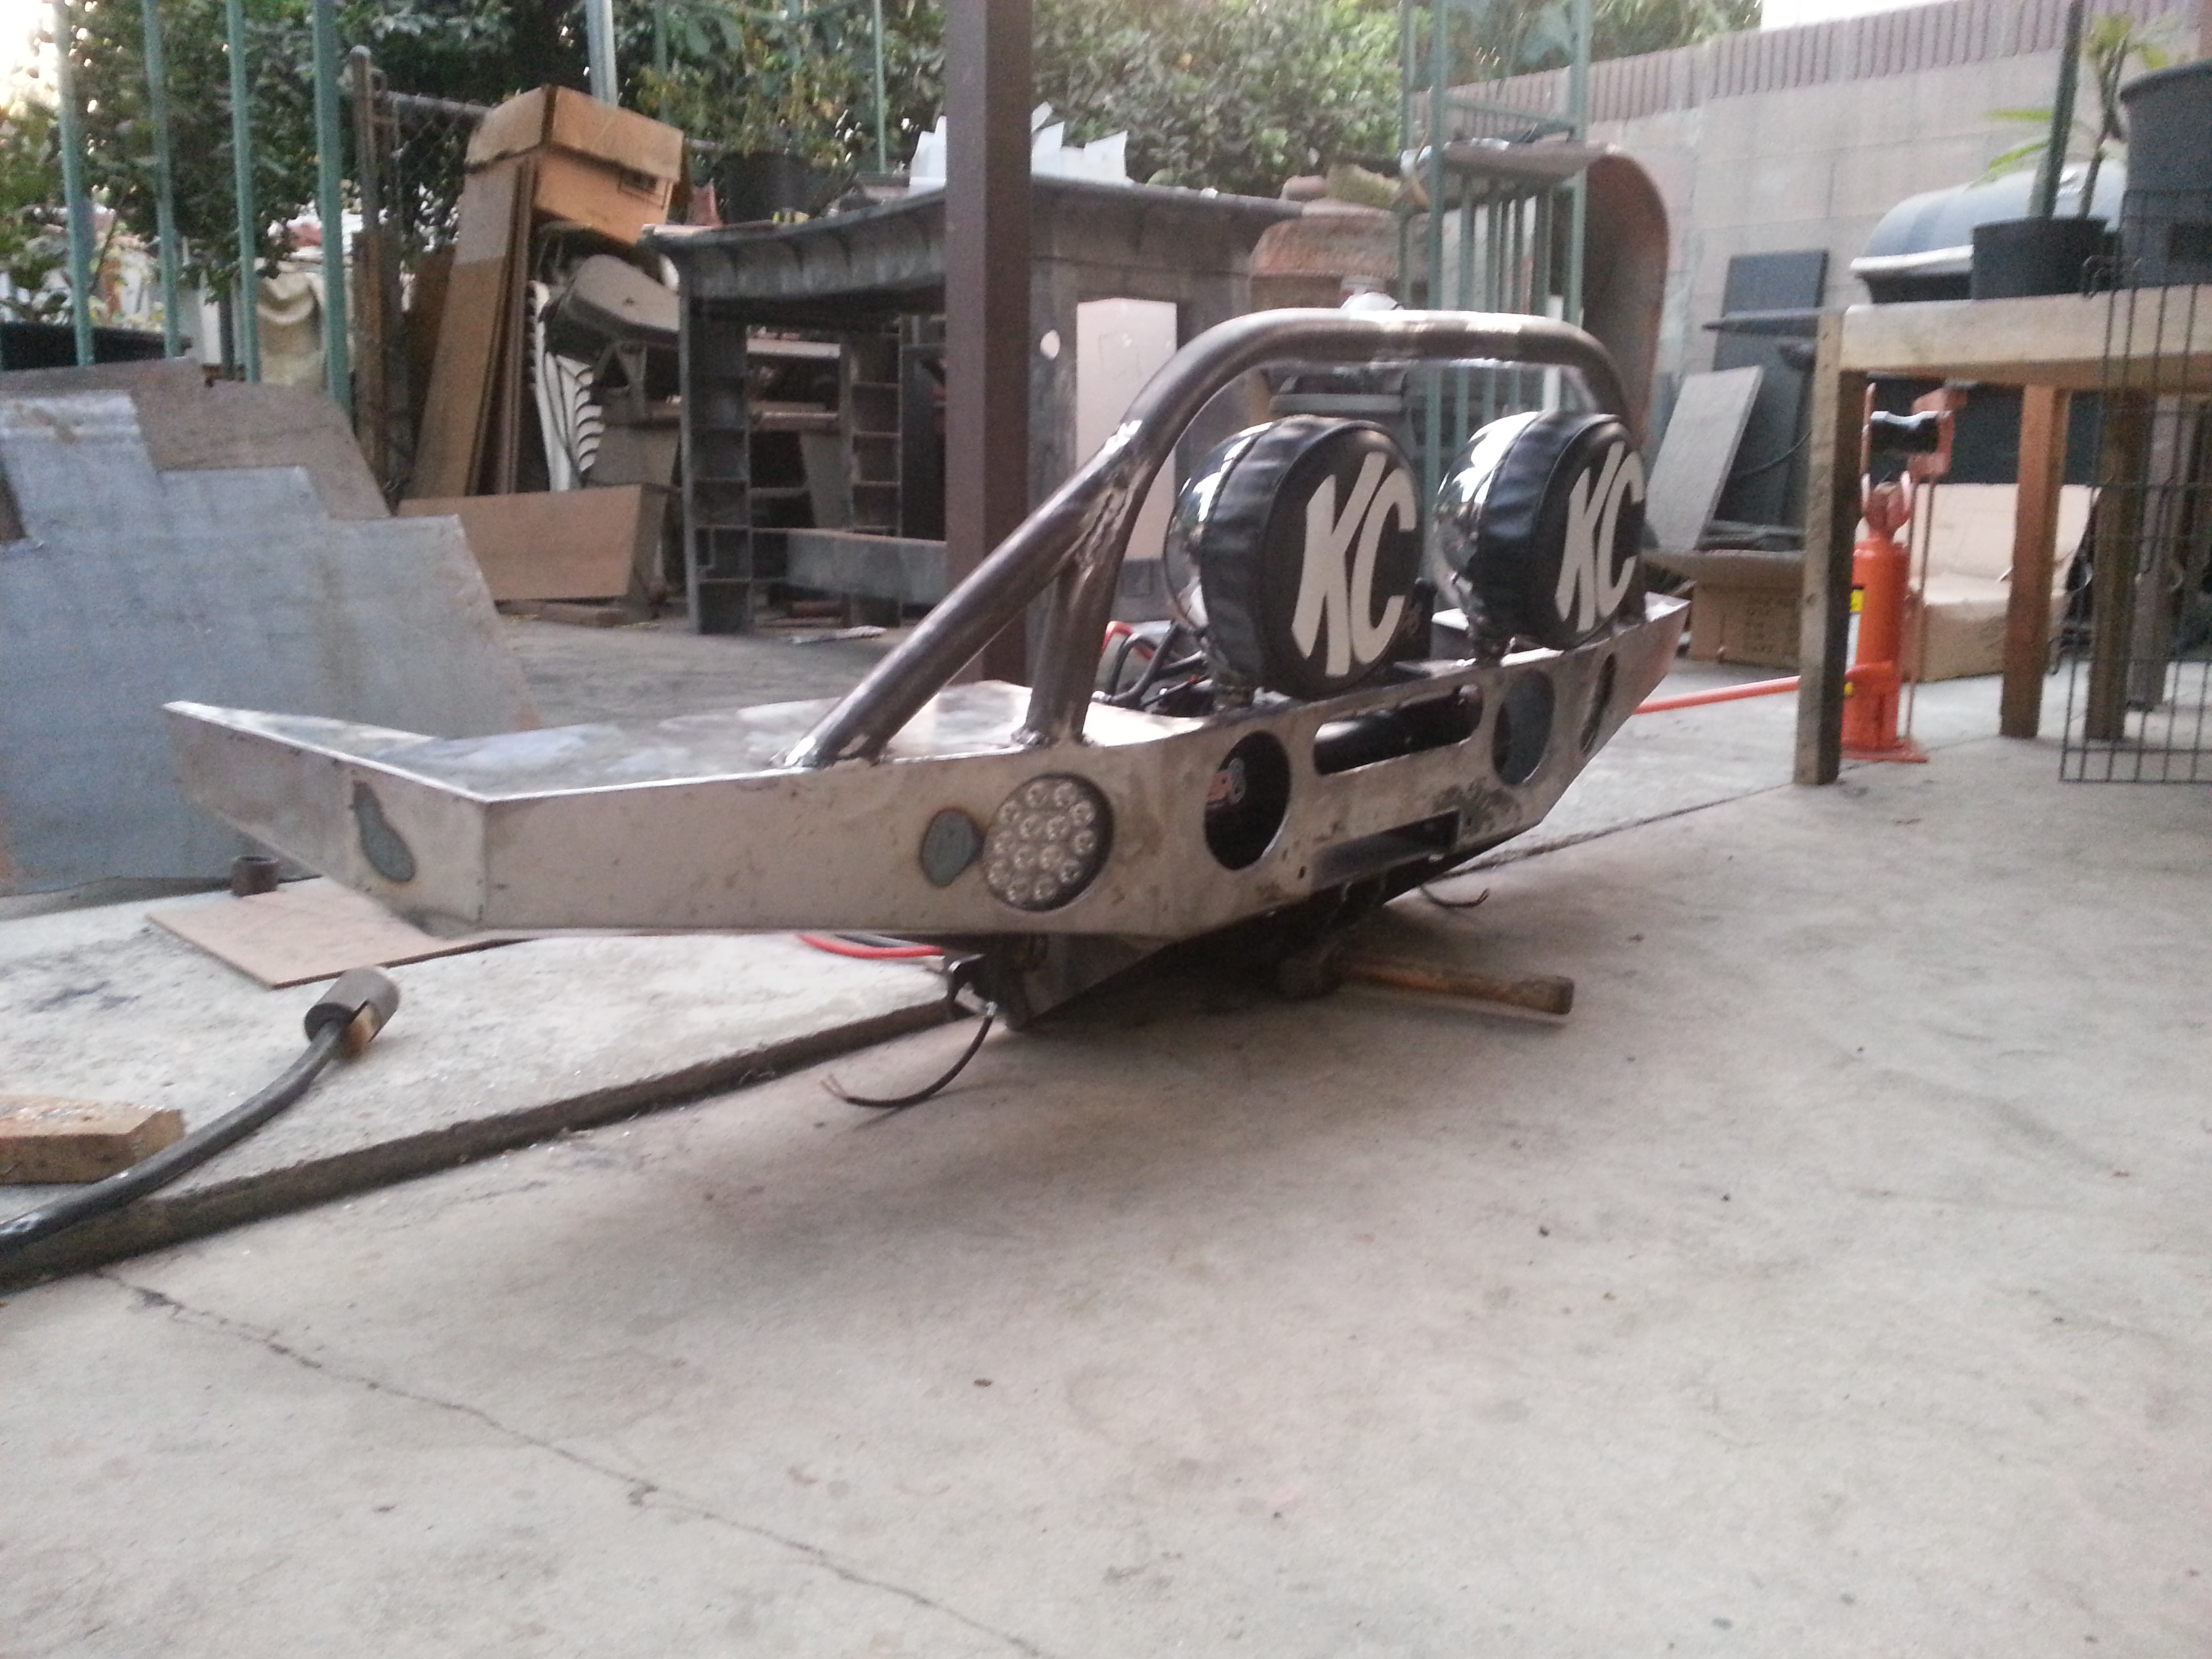

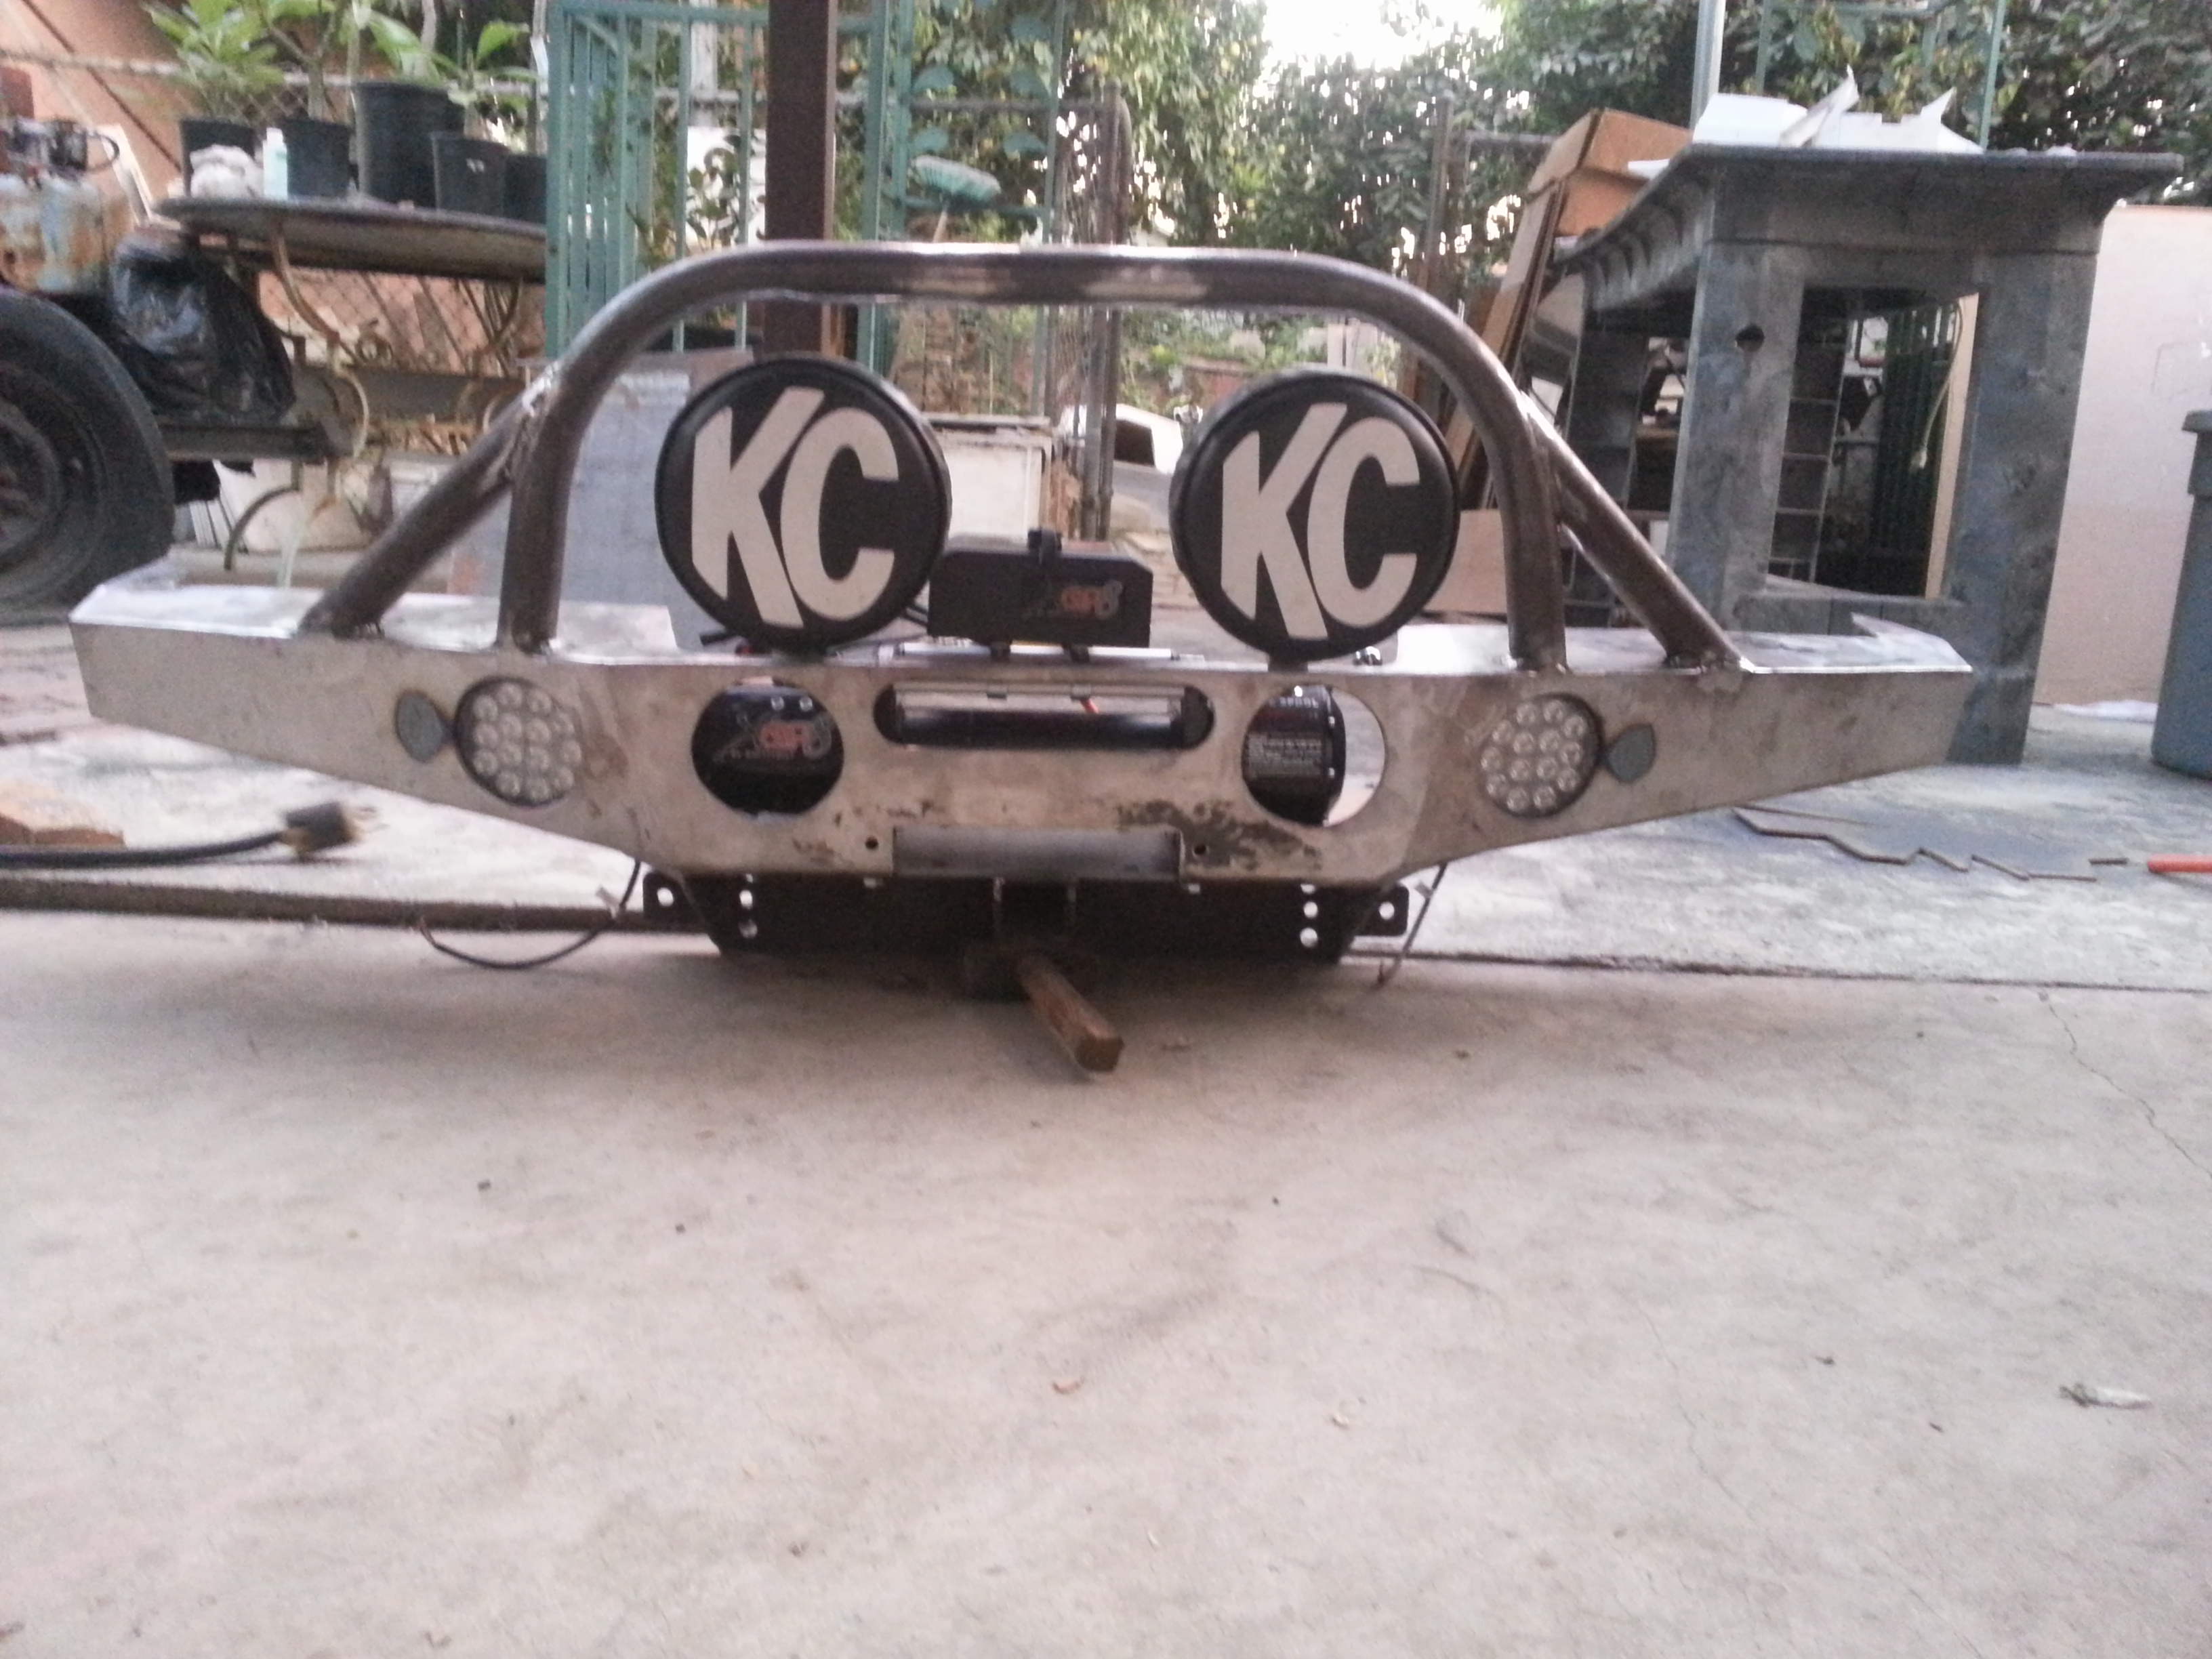
Side view showing how we angled the grill guard slightly forward.
-----------------------------------------------------------------------------------------------------------------------------------------------------------------
Man what an Update. that was a heck of a lot of pictures! lol All good. I always like being very thorough and showing many pix for you guys. This is just one step closer for my bumper being finished. All that is left is just to re weld in the areas where the plates were joined together and welded. I have a couple of small pores throughout the bumper that i wanna fill up. I have no clue on how to use bondo so i would rather just weld those tiny holes up and grind and sand them down to look clean. I will be doing that sometime this week. then i want to put on 2-3 coats of primer. Followed by about 4 coats of Matt black color to match my rear bumper and sliders.
Its coming along. Definitely happy with how it has all came along so far. I had to sit back and just look at the bumper for a minute yesterday. i was just amazed that my dad and i came out with such a clean looking bumper. Not trying to be cocky or anything. Just saying, for some reason i didn't expect it to come out this good. It's hard to believe we pulled off my design so exact and and made it look so damn clean. It was only a few weeks ago when it was just a drawing on a sheet of graph paper. What an awesome transformation.
Makes me happy to see i will be the only one in the world with 2 matching bumpers like this. And it makes me feel much better knowing we were able to incorporate everything i wanted in this bumper. Very grateful for having my dad and his skills and tools. Without him i would have had to settle for something else that wouldn't have been as satisfying for me. Love you dad! Gotta tell you though. This is probably the last time i will ever make a bumper. This front bumper was a heck of a lot worse to fab up. Although it was fun i doubt ill ever want to make one again. Unless it is to help out my lil brother(if he decides to buy a truck) And even at that it will be a pain in the arse again lol
Alright guys. this post is big enough already im out hope you all like.
After seeing Bump530's picture and all of your guys's inputs, recommendations, personal experiences and such i was pretty much sold on getting the tube bender instead. So the following day after reading all your posts i took the Tube roller back to harbor freights and exchanged it for the 12,000 tube bender. http://www.harborfreight.com/12-ton-...der-32888.html
Here we are unwrapping our new product.

Marking up where to make our bends to match the template my dad drew for the grill guard.

after the grill guard we immediately ran into a problem. I drew out my design according so Mark's 8" Dick Cepek offroad lights would fit. but i didnt take into consideration the Smittybilt xrc8 winch control box. It didnt matter where i placed the box it would continue to be in the way of the lights. So we ha to cut the center hoop to the grillguard in half and add another 6" to the width so we could fit the winch correctly and add the two 8" lights.
See what i mean:


Cleaned it up all nice.

We welded on the center grill gaurd then ground it down a bit to prep for another weld layer.

Made some light tabs for Mark's 8" Lights

I got anxious and couldnt wait to see what it looked like so i added on the winch and Mark's lights.

We cleared the Winch control box.

I cut out the grill guard gussets

That's about where i want them.

Dad at work welding the gussets on for me.

Cut out the side reinforcements. I took this idea off of Mark's AddictedOffroad bumper. Thanks for letting me get a closer look at your bumper man. im positive this will definitely hold up those sides.

Gotta fab up some tabs for my 4&1/4" LED lights

Here are my Light tabs that will hold up my LED lights

Here are a bunch of pictures my mom took of us working together. I decided to keep them so i can look back on all the father son time we had brainstorming exactly how these darn lights were gonna fit in the bumper without being in the way of the the side reinforcements.


Side reinforcements are all welded on now. And so are the LED light tabs.


Figured i'd show a close up in case you guys were curious to see how it looked.


Re weighed the bumper again after we were done and it seems to have gained 20pounds. wow. tube can get heavy!

After we finished up i just had to dress up the bumper with some sexy offroad parts.
rear side:

Top view

Reweighed the bumper with all the stuff and wow! it is at 140pounds.

Couple of nice front shots


Side view showing how we angled the grill guard slightly forward.

-----------------------------------------------------------------------------------------------------------------------------------------------------------------
Man what an Update. that was a heck of a lot of pictures! lol All good. I always like being very thorough and showing many pix for you guys. This is just one step closer for my bumper being finished. All that is left is just to re weld in the areas where the plates were joined together and welded. I have a couple of small pores throughout the bumper that i wanna fill up. I have no clue on how to use bondo so i would rather just weld those tiny holes up and grind and sand them down to look clean. I will be doing that sometime this week. then i want to put on 2-3 coats of primer. Followed by about 4 coats of Matt black color to match my rear bumper and sliders.
Its coming along. Definitely happy with how it has all came along so far. I had to sit back and just look at the bumper for a minute yesterday. i was just amazed that my dad and i came out with such a clean looking bumper. Not trying to be cocky or anything. Just saying, for some reason i didn't expect it to come out this good. It's hard to believe we pulled off my design so exact and and made it look so damn clean. It was only a few weeks ago when it was just a drawing on a sheet of graph paper. What an awesome transformation.
Makes me happy to see i will be the only one in the world with 2 matching bumpers like this. And it makes me feel much better knowing we were able to incorporate everything i wanted in this bumper.
Very grateful for having my dad and his skills and tools. Without him i would have had to settle for something else that wouldn't have been as satisfying for me. Love you dad! Gotta tell you though. This is probably the last time i will ever make a bumper. This front bumper was a heck of a lot worse to fab up. Although it was fun i doubt ill ever want to make one again. Unless it is to help out my lil brother(if he decides to buy a truck) And even at that it will be a pain in the arse again lol Alright guys. this post is big enough already im out hope you all like.
Oct 27, 2013 | 02:13 PM
#2195
Thread Starter
Registered User
Joined: Apr 2012
Posts: 2,817
Likes: 2
From: Los Angeles CA
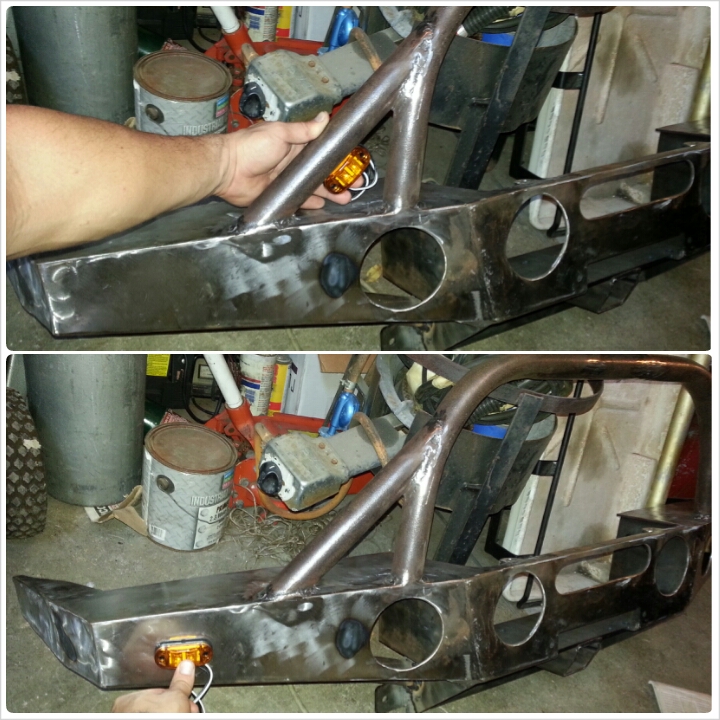
To answer your question about the turn signals. Yes I do plan to incorporate he lights. I bought the trailgear LED turn signals. I have 2 choices for how to mount these lights. I can either drill through the front plate face. And mount them there. Or weld the tabs provided to me by trailgear onto the inside of the gussets. And run the wires down through the top side of the plate down to the stock turn signal wires.
I honestly like the way it looks a lot more when mounted to the gusset. The lights stick out a little when mounted to the front. I don't know if I would like that in the long run.
Here are the 2 views of what I mean.
 Oct 27, 2013 | 02:37 PM
#2196
Awesome! That is freaking sick! I personally like it better on the plate, but I see what you mean as far as sticking out their. However, it can't hurt for it to be seen a little closer to the corners / risen a little bit, as for safety. But just all in all I think it looks cleaner as far as uniformity, where you're holding it on the front portion of the plate. Maybe you could make a little recessed box for to sit in so its not sticking out. Just mounted on the stairs for now on the gusset, that way you can always add it later in the front if you like it better. Don't forget you need resistors or those blinkers will flash super fast.... All of em. Or mod your blinker relay.
Oct 27, 2013 | 03:46 PM
#2198
Registered User
Joined: Jul 2012
Posts: 2,365
Likes: 4
From: Idaho
im putting this as a suggestion as ya have round holes why not get a round hole type LED an mount it in the bumper flush where the second picture shows you holding the TG unit on the front
or maybe even an oval one? or just like the small TG unit?
im just curious
or maybe even an oval one? or just like the small TG unit?
im just curious
Oct 28, 2013 | 12:29 AM
#2200
Your bumper turned out sick! Can't wait to see it all painted and mounted on your 4runner, you guys really did a fantastic job! I agree with Mark on the turn signals, think they look a little better on the plate, maybe sunk in like he mentioned so they don't stick out as far. I can't wait to replace my old Smittybuilt, after seeing your front and rear bumpers, I think I'm definitely leaning towards a plate style bumper rather than the tube style. once again nice job!


