
Redeth's 1989 4Runner Resurrection
 Mar 29, 2013 | 01:55 PM
#1181
Thread Starter
Registered User
Joined: Apr 2012
Posts: 2,817
Likes: 2
From: Los Angeles CA

theres a red severe duty water repelling grease ive been using for a long time but the label is kinda all goopey an unreadable... stuff is incredible for wheel bearings the hubs its great
for your ball joints tierods an Ujoints you'll need a grease gun they arent that expensive a manual one from HF is a great option grease in cartilages LOT better than the old hand load with a spoon ones
LOVE the paint job if you look at HF they have powder coating stuff for small parts you can do in an old oven ..or yours before cleaning so the cook of the house dont kill ya lol
seen several vids on it being done in a toaster oven for really small parts
CO, call my dealer parts guys and ask them to cgeck with the foreman.... They're pretty helpful there. They usually have a list of all the fipg's and lubes, like the cv restore kit with the 2 types of grease.... DCH TOYOTA of Torrance...
1 310-325-7500
I use extreme duty valvoline red, William, or SYN POWER by them. For guys who deal with freezing temps, the Lithium based seems to freeze up less than the SynPower. Think Mobil makes a highly chosen one as well.... Mobil1 maybe? I think Lucas has grease selections now at least at pepboys.... and do grab the extension hose and big gun.... worth every penny of 20 $ or so for a decent one.
Yep, u saw my spindles and hubs after lots of use and 20k miles.... bright red and teeeeeeny bit of discolorarion, not even brown/let alone black....... Of course, I have to add an important factor: I was running new japan bearings and races since that point of repack/etc.
Thanks Mark i'll look for that grease today as well. how many tubes do you think i need to buy for everything i gotta lube up??? i get off work in 10 minutes lol
Mar 29, 2013 | 09:23 PM
#1183
Thread Starter
Registered User
Joined: Apr 2012
Posts: 2,817
Likes: 2
From: Los Angeles CA
Thanks again Mark. Hope i wasn't to much of a bother calling you today 
As for the 54mm socket. Thanks for offering Mark. and you're right it is better to have my own. But my socket says the estimated delivery should be tomorrow. So i can wait 1 more day. thats fine. Thanks for the offer though.
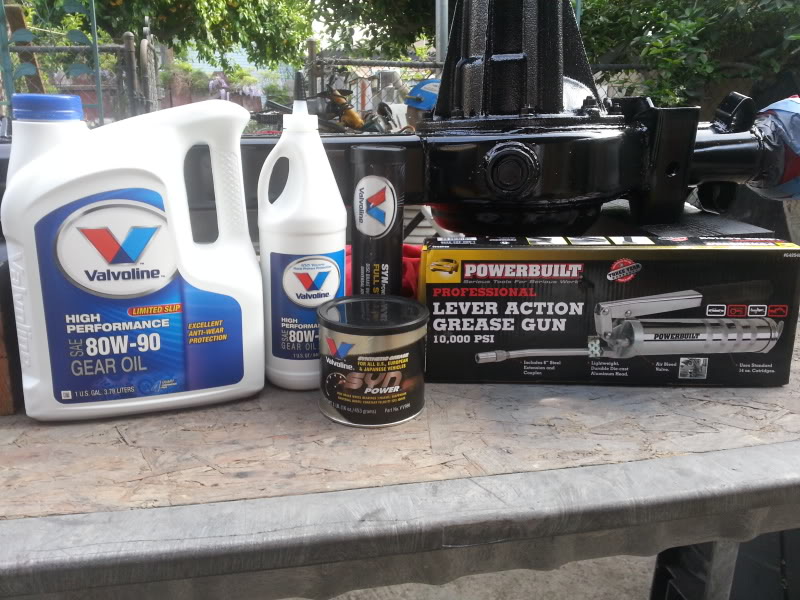
Here is what i ended up buying from PepBoys today.
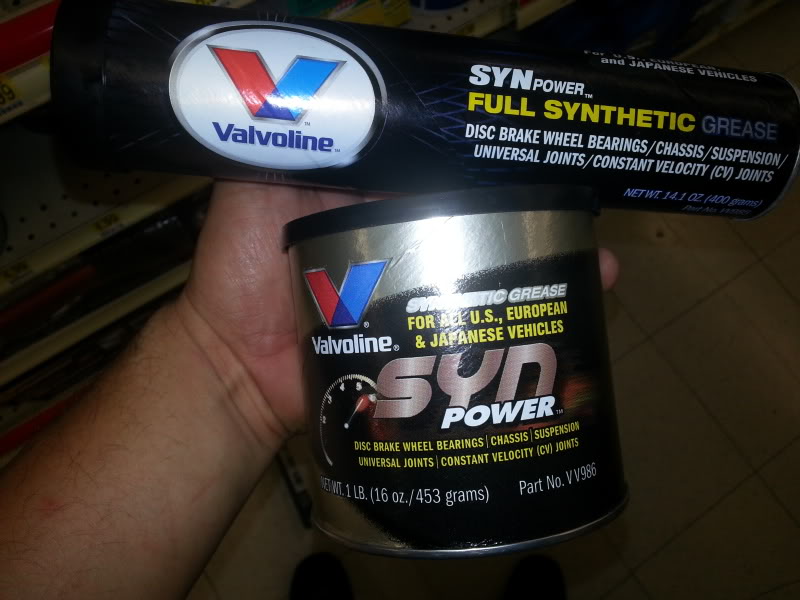
1gallon and 1 quart of 80w-90 Valvoline Gear Oil, 1 Tube and tub of Valvoline Syn Power Grease, and 1 grease gun for 14oz tubes. Also one thing not in the picture is the flexible hose for the grease gun.
And as promised here are the pictures i took of my Aisin Hubs.

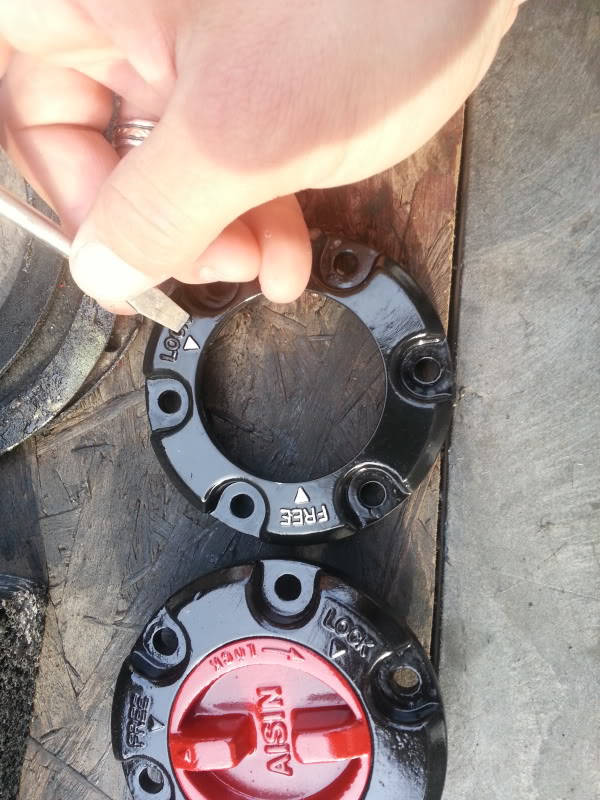
Nicely painted

------------------------------------------------------------------------------------
I called ToyotaMasters today. Their normal business hours are mon-fri 8am-5pm but their employee Erick was kind enough to do me the favor of taking in my 3rd member tomorrow morning at 10am since there's no way i can make it from Los Angeles Ca to Covina Ca in the heart of traffic hour. So I went ahead and took the 3rd member out and got my front Spartan locker and 4.88 ring&pinion ready to take over there.
I wanted to take both my 3rds to them all in one shot but it doesn't look like that will be possible. Dad wont let me park in the drive way lol. and i cant park it in the street due to the city street sweeping. So I'm just taking my front 3rd to the shop. Once my whole front axle is completed and ready for installation my neighbor is gonna take my truck into his backyard and then we'll be able to remove my rear 3rd while we work on the SAS/lift. I'm sure i'll have the rear 3rd ready before we are done with the whole front end. Plus my neighbor already told me he is ready whenever i am and he doesn't mind starting this week even though we don't have the rear ready.
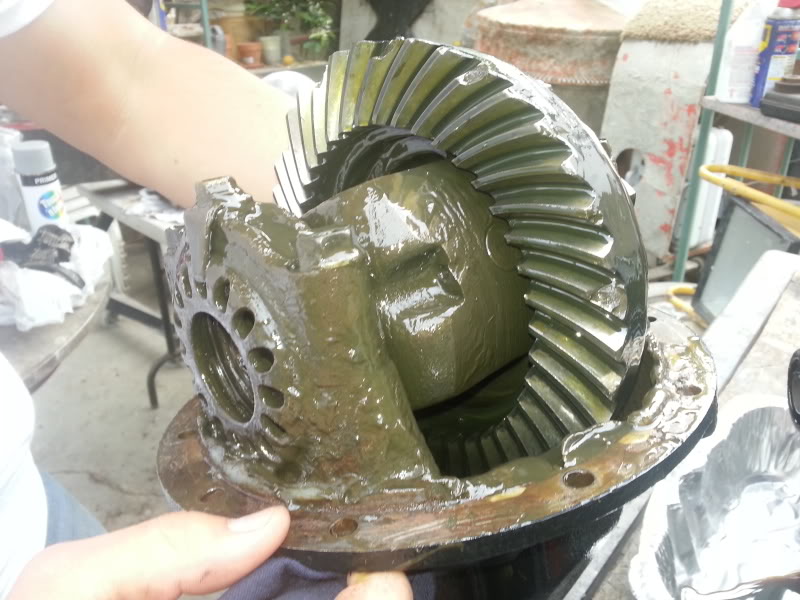
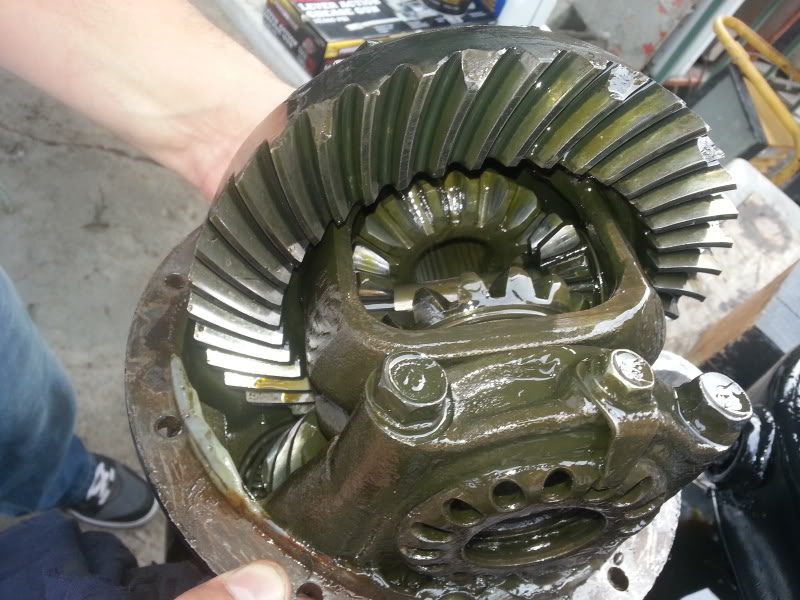
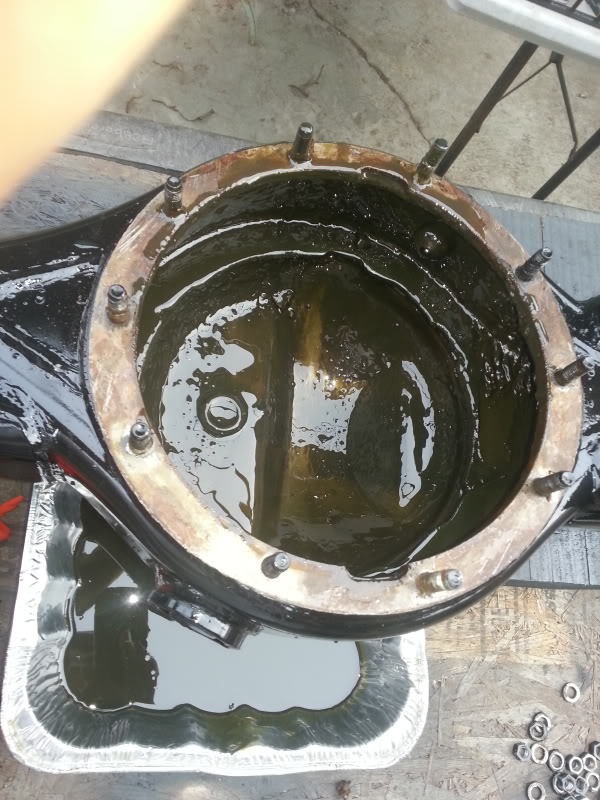
All i have to say is I AM SOOOOO DANG HAPPY THAT I BOUGHT 2 SETS OF 4.88 gears vs 1 rear set of 5.29's to match the ones already in the front axle. The reason i say this is because i found 8 broken teeth in the axle housing. and i know there is a 9th broken tooth somewhere inside the axle housing because i can hear it when i move the axle around lol. anyway here are the pictures i took.
Use a 12mm socket to take off the nuts
Interior view:
And last but not least, i found these 2 things when i removed the 3rd. the were just sitting inside the housing. One was stuck to the 3rd as i pulled it out and the other was just on the bottom of the housing.
Who can tell me what these 2 things are? and is it necessary to have because as you can see from the picture they're all bent out of shape. What are they used for? where do they go?
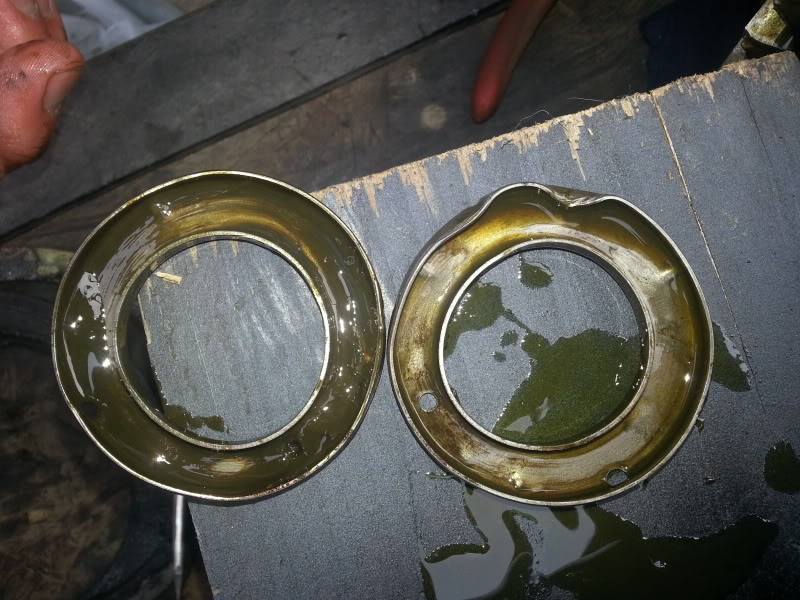
I'm going to try to find an exploded view of the axle and see if i can figure it out before you guys do. but if anyone knows please do tell. Thanks everybody
As for the 54mm socket. Thanks for offering Mark. and you're right it is better to have my own. But my socket says the estimated delivery should be tomorrow. So i can wait 1 more day. thats fine. Thanks for the offer though.
Here is what i ended up buying from PepBoys today.
1gallon and 1 quart of 80w-90 Valvoline Gear Oil, 1 Tube and tub of Valvoline Syn Power Grease, and 1 grease gun for 14oz tubes. Also one thing not in the picture is the flexible hose for the grease gun.
And as promised here are the pictures i took of my Aisin Hubs.
Nicely painted
------------------------------------------------------------------------------------
I called ToyotaMasters today. Their normal business hours are mon-fri 8am-5pm but their employee Erick was kind enough to do me the favor of taking in my 3rd member tomorrow morning at 10am since there's no way i can make it from Los Angeles Ca to Covina Ca in the heart of traffic hour. So I went ahead and took the 3rd member out and got my front Spartan locker and 4.88 ring&pinion ready to take over there.
I wanted to take both my 3rds to them all in one shot but it doesn't look like that will be possible. Dad wont let me park in the drive way lol. and i cant park it in the street due to the city street sweeping. So I'm just taking my front 3rd to the shop. Once my whole front axle is completed and ready for installation my neighbor is gonna take my truck into his backyard and then we'll be able to remove my rear 3rd while we work on the SAS/lift. I'm sure i'll have the rear 3rd ready before we are done with the whole front end. Plus my neighbor already told me he is ready whenever i am and he doesn't mind starting this week even though we don't have the rear ready.
All i have to say is I AM SOOOOO DANG HAPPY THAT I BOUGHT 2 SETS OF 4.88 gears vs 1 rear set of 5.29's to match the ones already in the front axle. The reason i say this is because i found 8 broken teeth in the axle housing. and i know there is a 9th broken tooth somewhere inside the axle housing because i can hear it when i move the axle around lol. anyway here are the pictures i took.
Use a 12mm socket to take off the nuts
Interior view:
And last but not least, i found these 2 things when i removed the 3rd. the were just sitting inside the housing. One was stuck to the 3rd as i pulled it out and the other was just on the bottom of the housing.
Who can tell me what these 2 things are? and is it necessary to have because as you can see from the picture they're all bent out of shape. What are they used for? where do they go?
I'm going to try to find an exploded view of the axle and see if i can figure it out before you guys do. but if anyone knows please do tell. Thanks everybody
Last edited by Redeth005; Mar 29, 2013 at 09:29 PM.
Mar 29, 2013 | 10:09 PM
#1185
and WTH? those look like the collars or something like that. ... like both in the inner part of the axle tubes came out? Just to the entry of the tubes from the diff housing? Not sure. My bet is ur gonna need em. Kit doesn't have em?
Last edited by ChefYota4x4; Mar 29, 2013 at 10:16 PM.
Mar 29, 2013 | 10:10 PM
#1186

"Oohhh nooo you forgot the rubber hose" "What oh it's in there somewhere WHEW!" 
Extra parts:
42311A SEAL, OIL (FOR REAR AXLE SHAFT)
But it doesn't make sense for me, and I haven't found a photo. I lost the parts site that gives pictures for stuff(sometimes).
Maybe these sans rubber?
Looks kinda like this one, but why would you have three
My foo has failed me. Someone else will know, or they'll have a part number on the other side maybe.
Eeeww:
Diff breather extensions, w/ filters!
Extra parts:
42311A SEAL, OIL (FOR REAR AXLE SHAFT)
But it doesn't make sense for me, and I haven't found a photo. I lost the parts site that gives pictures for stuff(sometimes).
Maybe these sans rubber?
Looks kinda like this one, but why would you have three
My
foo has failed me. Someone else will know, or they'll have a part number on the other side maybe.Eeeww:
Diff breather extensions, w/ filters!
Mar 29, 2013 | 10:21 PM
#1187
Hey CO,...
Yeah, the pinion seal on some models is all metal OD and inset with a dual lip seal. I got one handed to me by a buddy in parts by accident (I didnt need that/was ther e for the input shaft seal in the trans bearing retainer seal)..... Often, ppl use them to tap in new seals..... which might explain the carnage....but DOES NOT explain why its inside.....???
Yeah, the pinion seal on some models is all metal OD and inset with a dual lip seal. I got one handed to me by a buddy in parts by accident (I didnt need that/was ther e for the input shaft seal in the trans bearing retainer seal)..... Often, ppl use them to tap in new seals..... which might explain the carnage....but DOES NOT explain why its inside.....???
Mar 30, 2013 | 07:03 PM
#1188
Thread Starter
Registered User
Joined: Apr 2012
Posts: 2,817
Likes: 2
From: Los Angeles CA
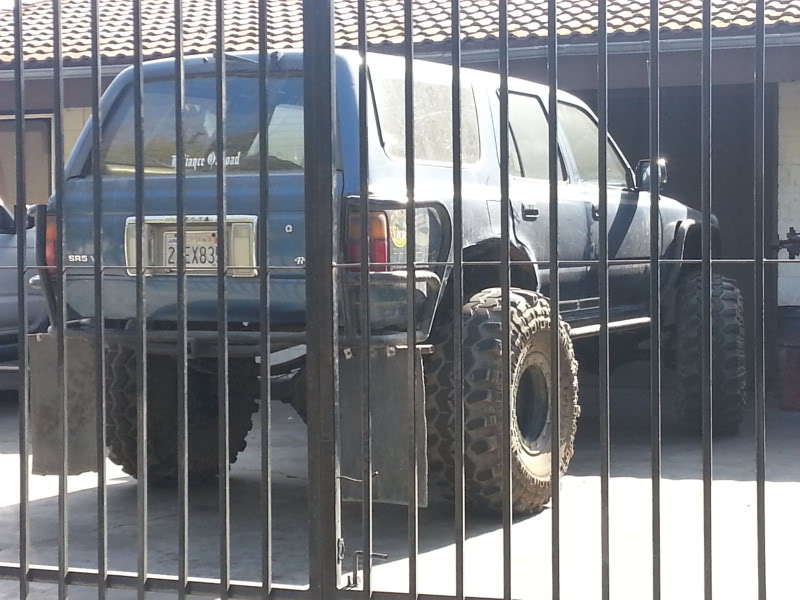
I met up with Erick from YotaMasters this morning. As I waited I spotted this rig from the other side of their fence.
It was a 2nd gen Dana 45 swap front and rear
I asked Erick about the 2 bent circle pieces that I found and he said that was totally normal. Also that the majority of axles people bring in have or have had the same problem before too. That it doesn't need to have them anyway. It's just a seal that works as a barrier to something but it doesn't work very well anyway. He said I can just toss them.
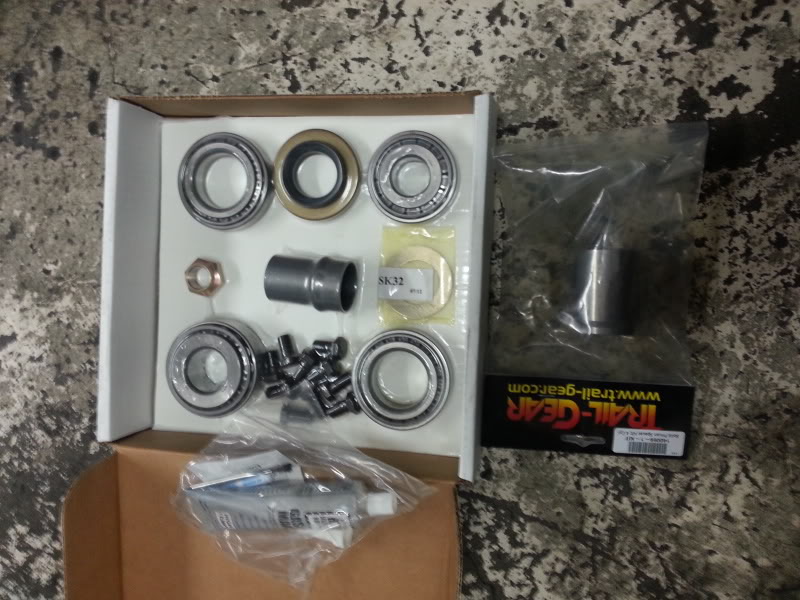
And this is the kit I was missing for ny gear install and the crushleeve replacement that I needed. He's providing it and im just gonna pay for that in the bill. All trailgear parts.
My 3rd member should be ready by monday or tuesday. We are gonna neet up this saturday for the pickup again. Hopefully I can take him my rear 3rd this Saturday when I go.
It was a 2nd gen Dana 45 swap front and rear
I asked Erick about the 2 bent circle pieces that I found and he said that was totally normal. Also that the majority of axles people bring in have or have had the same problem before too. That it doesn't need to have them anyway. It's just a seal that works as a barrier to something but it doesn't work very well anyway. He said I can just toss them.
And this is the kit I was missing for ny gear install and the crushleeve replacement that I needed. He's providing it and im just gonna pay for that in the bill. All trailgear parts.
My 3rd member should be ready by monday or tuesday. We are gonna neet up this saturday for the pickup again. Hopefully I can take him my rear 3rd this Saturday when I go.
Last edited by Redeth005; Mar 30, 2013 at 07:05 PM.
Mar 31, 2013 | 04:26 PM
#1191
Thread Starter
Registered User
Joined: Apr 2012
Posts: 2,817
Likes: 2
From: Los Angeles CA
Nah the tires were pretty worn out but they had massive tred on the walls still.
Teuf yes I am gomna use that grease on them
Teuf yes I am gomna use that grease on them
Mar 31, 2013 | 08:42 PM
#1192
Registered User
iTrader: (4)
Joined: May 2010
Posts: 720
Likes: 16
From: People's Republic of California
Nice work with all the refurbishing and paint work! That's a heck of a lot of work your doing.
Something to consider is if any of the old bearings and races are compatible and still somewhat good, you might want to clean a set up, pack them with some grease, get some cheap seals, and then seal them up in vacuum packaging for your trail gear box. I did that with one of my old sets...in case I ever take this truck on another baja excursion/expedition gain.

Something to consider is if any of the old bearings and races are compatible and still somewhat good, you might want to clean a set up, pack them with some grease, get some cheap seals, and then seal them up in vacuum packaging for your trail gear box. I did that with one of my old sets...in case I ever take this truck on another baja excursion/expedition gain.
Apr 1, 2013 | 08:25 AM
#1193
Thread Starter
Registered User
Joined: Apr 2012
Posts: 2,817
Likes: 2
From: Los Angeles CA
Nice work with all the refurbishing and paint work! That's a heck of a lot of work your doing.
Something to consider is if any of the old bearings and races are compatible and still somewhat good, you might want to clean a set up, pack them with some grease, get some cheap seals, and then seal them up in vacuum packaging for your trail gear box.
Something to consider is if any of the old bearings and races are compatible and still somewhat good, you might want to clean a set up, pack them with some grease, get some cheap seals, and then seal them up in vacuum packaging for your trail gear box.
------------------------------------------------------------------------------------
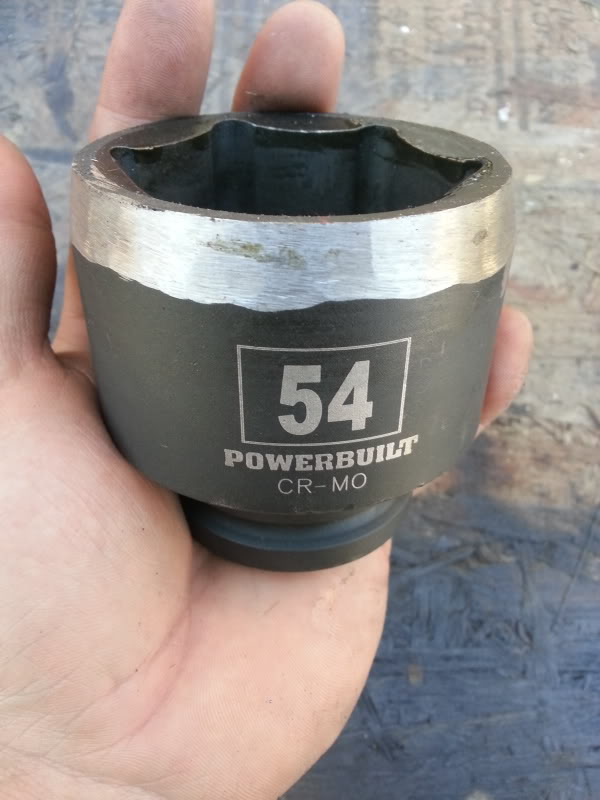
As for updates go. My girl and I really had our work cut out for us this past saturday it was one problem after another over and over again. I finally got my 54mm socket in the mail saturday afternoon. I was so happy when it arrived I felt like a kid getting a gift from santa claus. It was awesome. It looks like its super heavy duty. The walls are nice n thick; i doubt i'll ever break it. Then when I went to try to remove the 54mm nut I realized the walls are too damn thick to fit into the hub!
 Too big by about 2mm. It was frustrating. And I sure wasn't planning to send it back to wait another week. So I took my dads grinder to it and shaved down the tip of the socket and this is how it turned out. WORKS LIKE A CHARM NOW! sometimes ya just gotta improvise with what ya got.
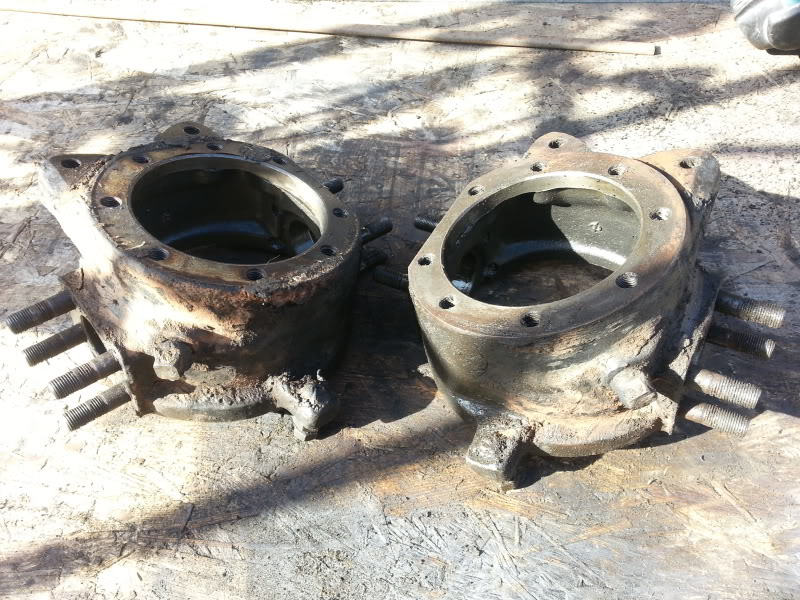
Only thing is that I think the last owner must had used an air gun to tighten the heck out of that nut because it just wouldn't budge the only way I was able to get it off was with my dads power socket drill. Like the ones they use at tire shops only ita electric. And even with using that we still had a hard time. And no it wasn't the star nut that was holding it in place either. I bent those arms out so I could remove it. Anyway once we got those off we took everything on the knuckles apart. And man do I have to say with all the crap that was on my axle holding everything together this I think was by far the hardest group of parts to take apart of the whole axle Everything from this point on was SIEZED TIGHT! Especially the wheel studs here:
Had 12 wheel studs to remove off both rotors and and there was no way in hell to take those off with only a hammer. Like Mark (ChefYota) suggested use some sort if a press if u have one available. I didn't so I had to use a vice. And even with that it was really hard to remove. I'm thinking of using some anti sieze or something else so i dont have such a difficult time removing them next time. The reason I am removing these is because I am installing the brand new V6 vented rotors that Allpro provided so I dont have any use for these 4cyl non vented ones. Anyway once these came off the next part I had to do was remove my trunion bearings and that there was really hard. I cut my knuckle up pretty bad. Well not too bad. It just looked worse at the time. Blood all over my black greasy hands lol. I'm ok though. Faby and I grinded down and sanded the old rotor dust shields. These wernt too bad. They didn't need a lot of work. Just had to remove the dirt that was cake'd on. Here she is in action again.
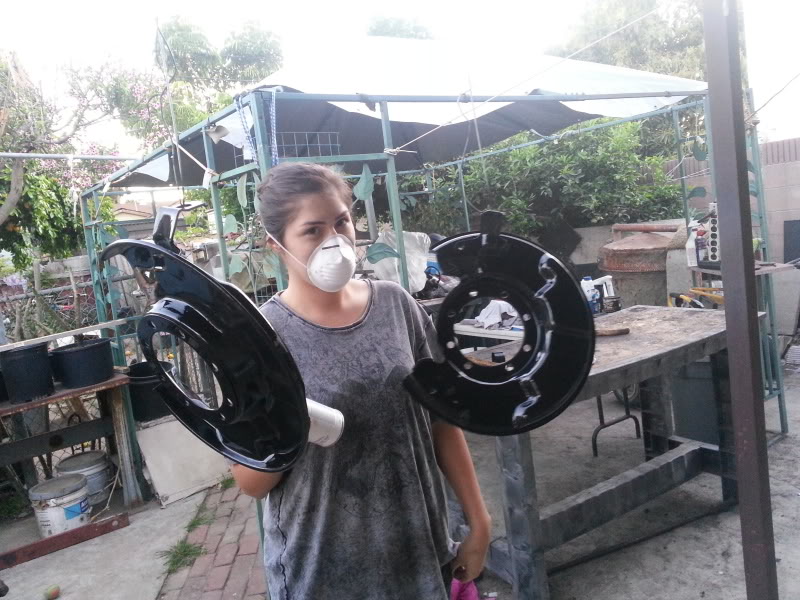
I'm really proud of her. Shes came a long way. She has turned into a fine assistant to have. As we grind stuff down she knows when to turn the parts slightly so I can continue grinding the nasties off. No need to even tell her anymore. And now I don't even have to watch over her when she paints. I'm confident that she will get everything nice and clean with no paint drops. Very proud to have a girl more then willing to get her hands dirty
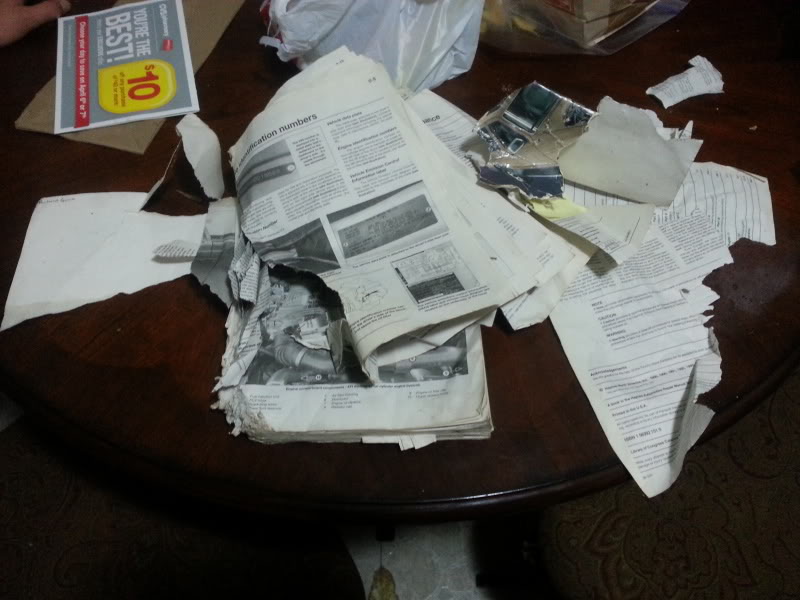
Something my little brother doesn't do too often. Haha! We cleaned out the knuckles but we haven't gotten to grinding them down and repainting them yet. Was just a wipe down of all the old grease on the inside of them. I wish I would have taken a bunch of pix of this process but unfortunately our hands were super greasy and I juat didn't wanna get my phone all dirty for pix. As for yesterday I took the day off from working on the axle and we went to my band mates house in the morning had a nice breakfast with 5 of us members/friends and headed back to their place for a long productive day of band practice. And then when i returned to my house i ran into some more bad news lol. My dog decided to get back at me for not running or playing with her yesterday her by tearing apart my Haynes manual. I guess that's what I get for being away and leaving my stuff out, cant blame her. Damn. Now I need to buy another book. I need it for this job. Thats another $20 I wasn't expecting to pay.

Last edited by Redeth005; Apr 1, 2013 at 09:39 AM.
Apr 1, 2013 | 02:51 PM
#1196
Registered User
Joined: Apr 2009
Posts: 5,592
Likes: 24
From: Dixon, Ca
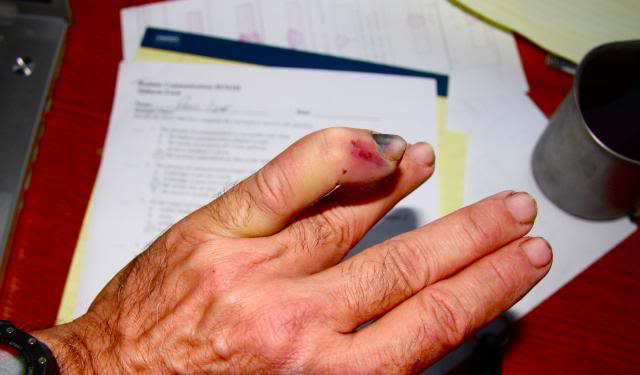
Good job Red. I picked up a hub at Inchworn when I got my thirds. One hub that was on my 83 axle was wrong. Well I was able to hammer (and a brass punch) the studs out but I bashed my little finger big time. The nail will be a gonner.
 Apr 1, 2013 | 07:52 PM
#1199
Thread Starter
Registered User
Joined: Apr 2012
Posts: 2,817
Likes: 2
From: Los Angeles CA
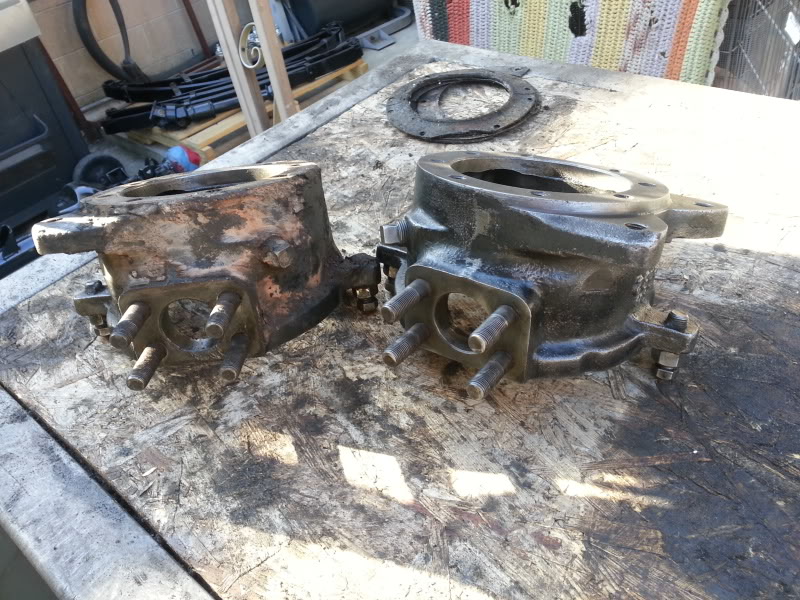
Hi guys, Got a nice update that im very happy to tell you about. I AM DONE WITH ALL THE SANDING AND GRINDING! about darn time because this cleaning up process has been such a pain. Anyway, i did get a good amount done today.
I got started and finished my knuckles and my hubs. Here are the pix.
Before:
As you can see most of the powder coating was still good(right). So it was just a quick clean up. (maybe about 10-15 min on each)
Primed 2ce:
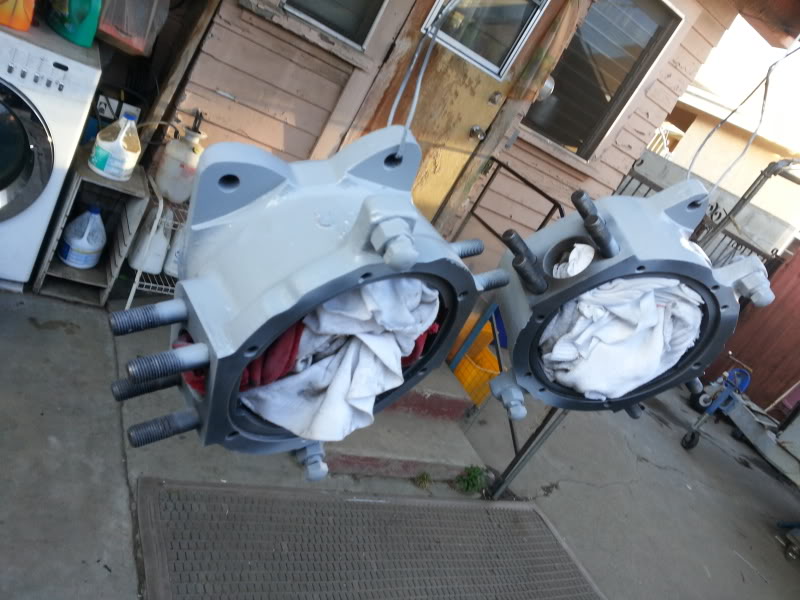
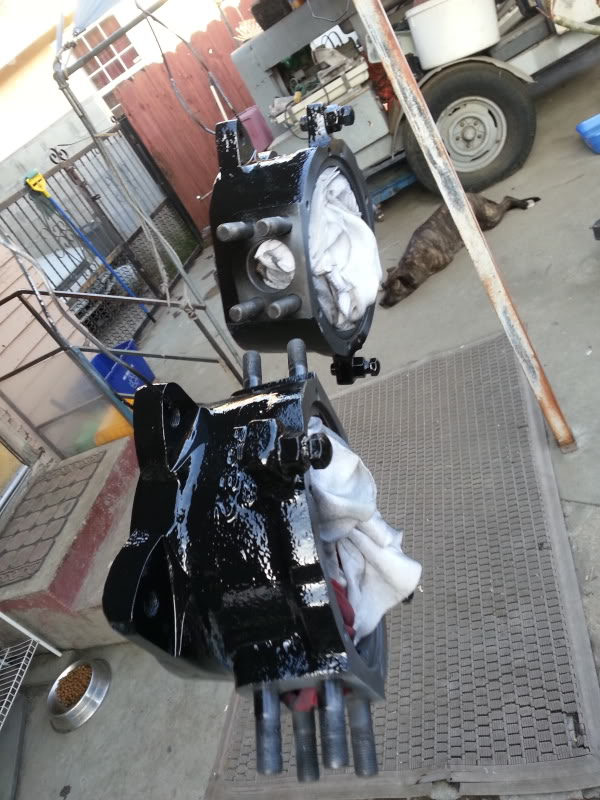
Painted:
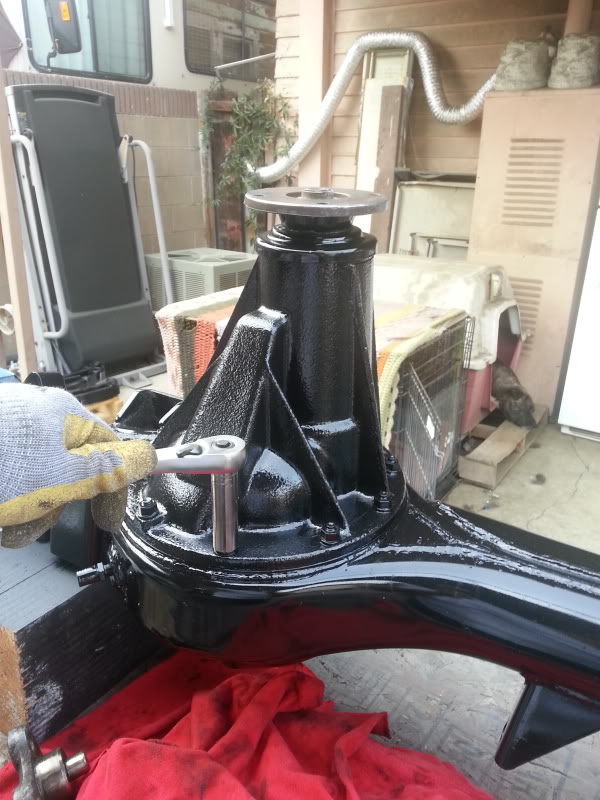
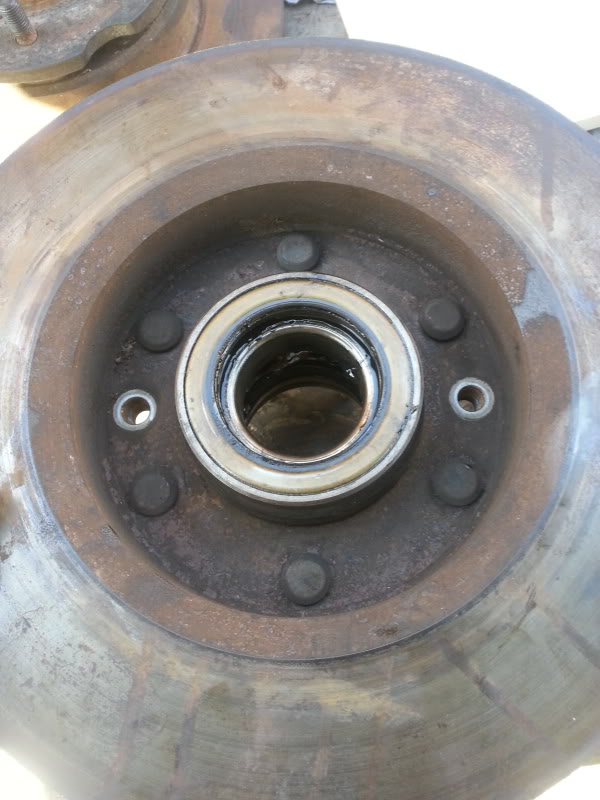
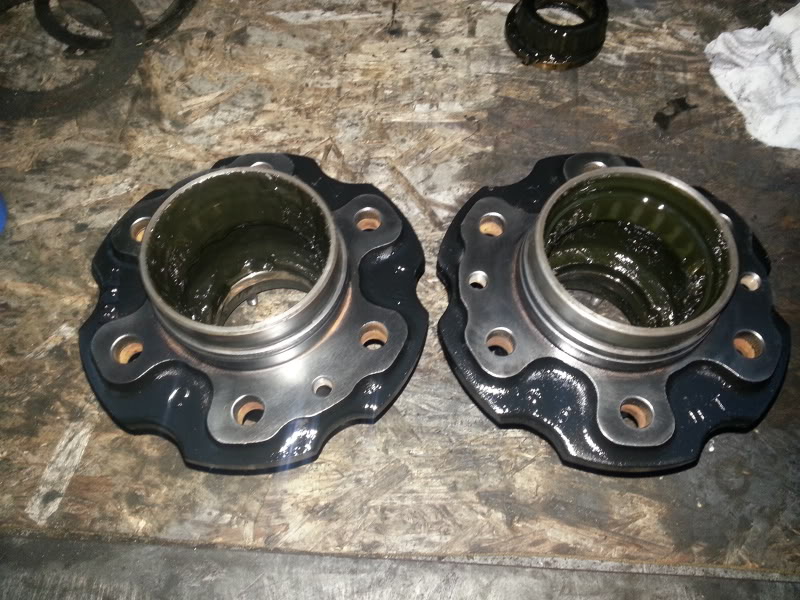
Cleaned up the Hub housing or whatever its called:
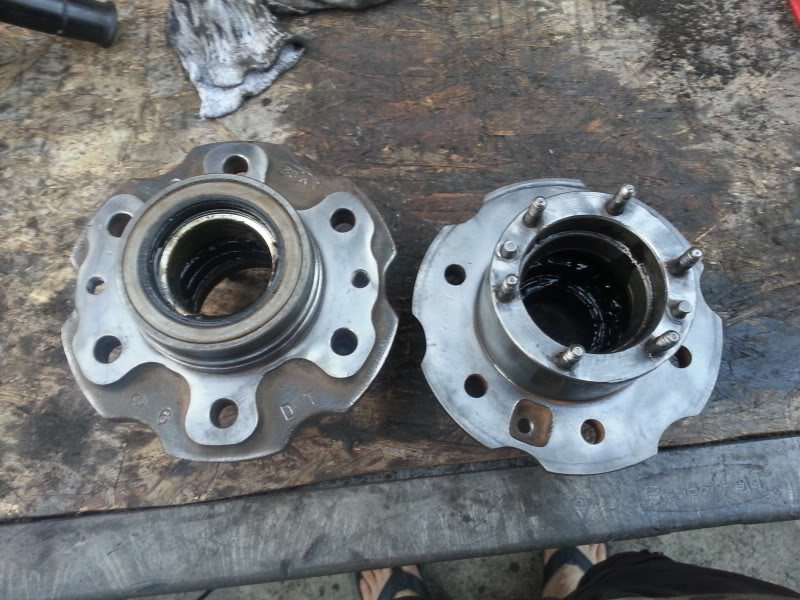
I Got them nice and purdy!
BTW in case you have the same problem i did in trying to remove this bearing. Here is a cool trick i learned off my neighbor

Get some pcv pipe and make sure it fits to the outer ring of the bearing and put a cap on it.
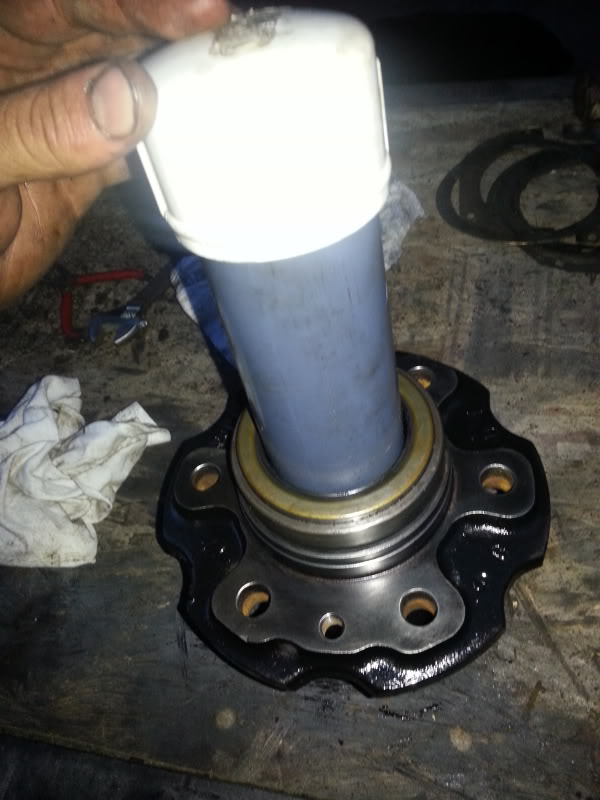
Flip the hub around and put the pipe inside so when you hit the bearing the force will knock it out of the hub.
Voila.... All done:
Tomorrow I begin cleaning out the grease and oily gunk from the inside of the parts.
and if i have time i want to grease everything up and have everything waiting for when i get the 3rd member back this weekend.
I got started and finished my knuckles and my hubs. Here are the pix.
Before:
As you can see most of the powder coating was still good(right). So it was just a quick clean up. (maybe about 10-15 min on each)
Primed 2ce:
Painted:
Cleaned up the Hub housing or whatever its called:
I Got them nice and purdy!
BTW in case you have the same problem i did in trying to remove this bearing. Here is a cool trick i learned off my neighbor
Get some pcv pipe and make sure it fits to the outer ring of the bearing and put a cap on it.
Flip the hub around and put the pipe inside so when you hit the bearing the force will knock it out of the hub.
Voila.... All done:
Tomorrow I begin cleaning out the grease and oily gunk from the inside of the parts.
and if i have time i want to grease everything up and have everything waiting for when i get the 3rd member back this weekend.
Apr 1, 2013 | 08:21 PM
#1200
Thread Starter
Registered User
Joined: Apr 2012
Posts: 2,817
Likes: 2
From: Los Angeles CA
Yep I've wanted to do it since i bought the truck. Seen my neighbors do a double Dana 45 swap and I've always wanted the same for myself only with Toyota axles.
Yea that was a big disappointment because i thought she was long over that stage in her life.
OMG!!!! Dude that thing looks bad! did you break it? wow.... totally topped mine. Mine just looked bad because of all the bright blood dripping on my black greasy hands but it only ended up being a little cut on the skin though. 


