
Redeth's 1989 4Runner Resurrection
 Mar 21, 2013 | 02:13 PM
#1144

Grab some spare hose to put on the battery hold down, you don't want that cable rubbing against the threads.
4g is rated for (conservativly) 60 and 135 Amp
What is the ratings and output terminal sizes on the block?
4g is rated for (conservativly) 60 and 135 Amp
What is the ratings and output terminal sizes on the block?
Mar 21, 2013 | 02:15 PM
#1145
Registered User


Joined: Mar 2012
Posts: 7,141
Likes: 687
4 AWG wire will easily handle 60amps. That's twelve 55-watt bulbs - LOL!
Check this out
Agree. In fact if you look at schematic, you'll see line for the winch right off the battery, even upstream of the fusible link.
Mar 21, 2013 | 02:24 PM
#1147
Thread Starter
Registered User
Joined: Apr 2012
Posts: 2,817
Likes: 2
From: Los Angeles CA
The mod is an extra fuse block. I had way too many things running off/branching off my positive terminal on the battery. it just looked really disorganized and just plain ol' messy. So by doing this rather then running a bunch of wires off the battery i run one into this fuse block, and then i have 6 available terminals. Each terminal with its own fuse to protect whatever you plan to run of of it. i think its a really cool mod to have.
Thanks William, i was also thinking the same thing. plus the winch leads are big i don't think it would even be able to attach into this box if i wanted it to.
-------------------------------------------------------------------------------
Got some REALLY REALLY GOOD NEWS!
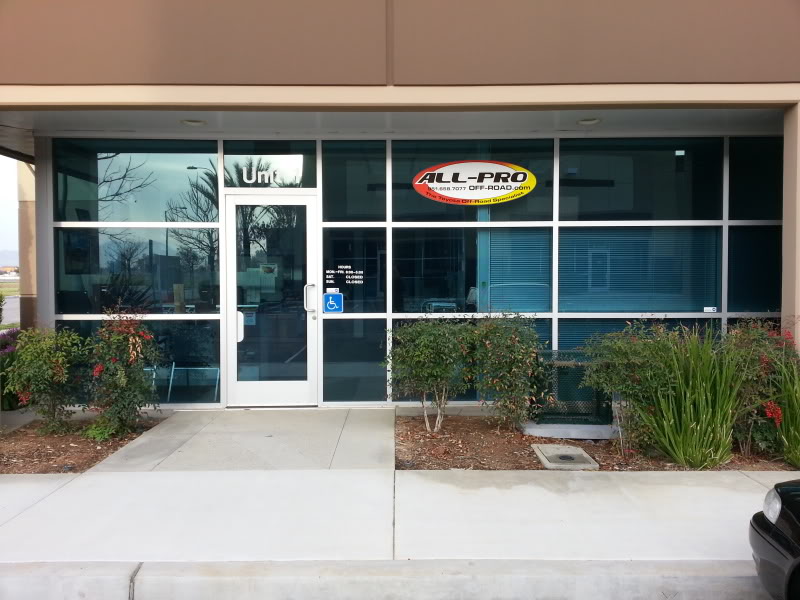
 AllProOffRoad Called me yesterday to let me know my order was ready for me to pick up.
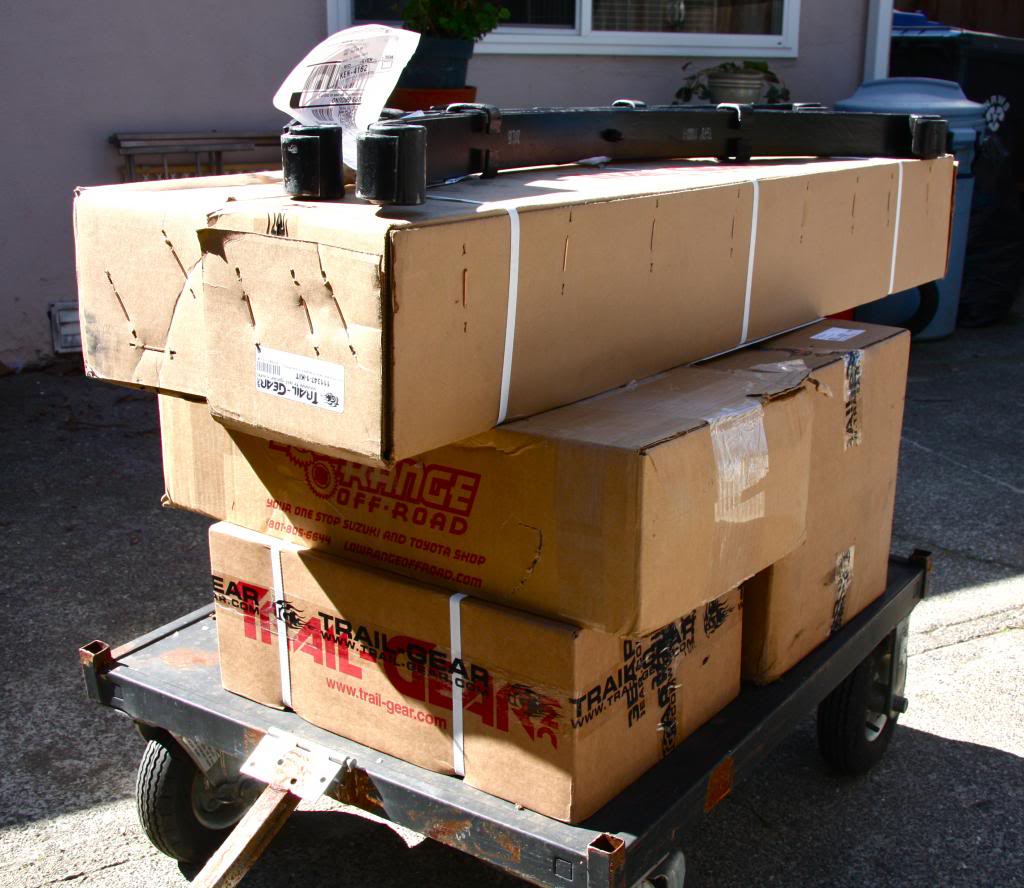
So rather then paying for 100-120 on S&H I just called in sick today for work(w/ sick pay ) and drove the 153mile round trip from Los Angles to Perris CA(1/3 tank of gas in my corolla) and picked everything up myself. Here we are outside waiting on the shop to open up.
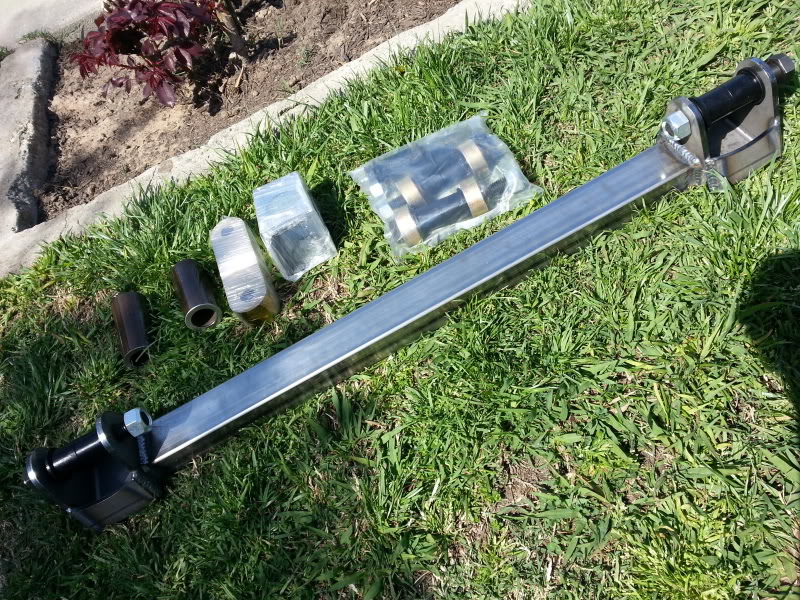
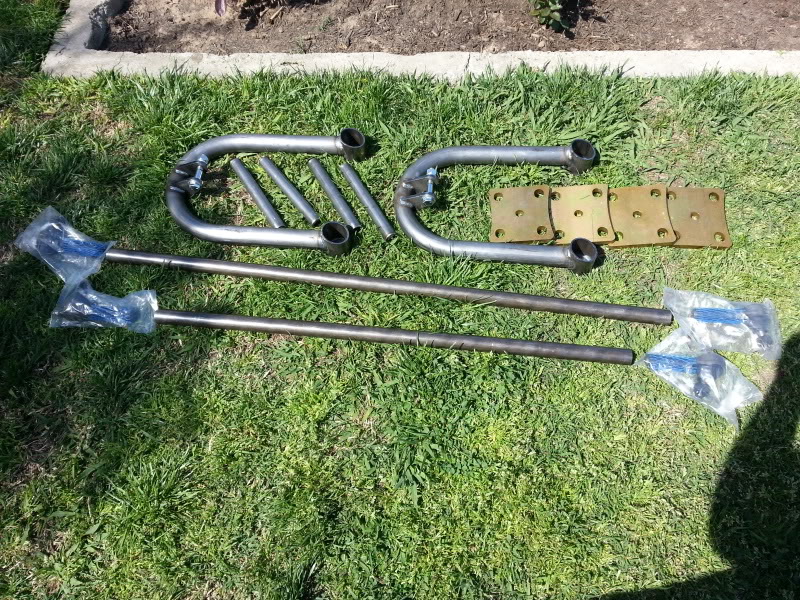
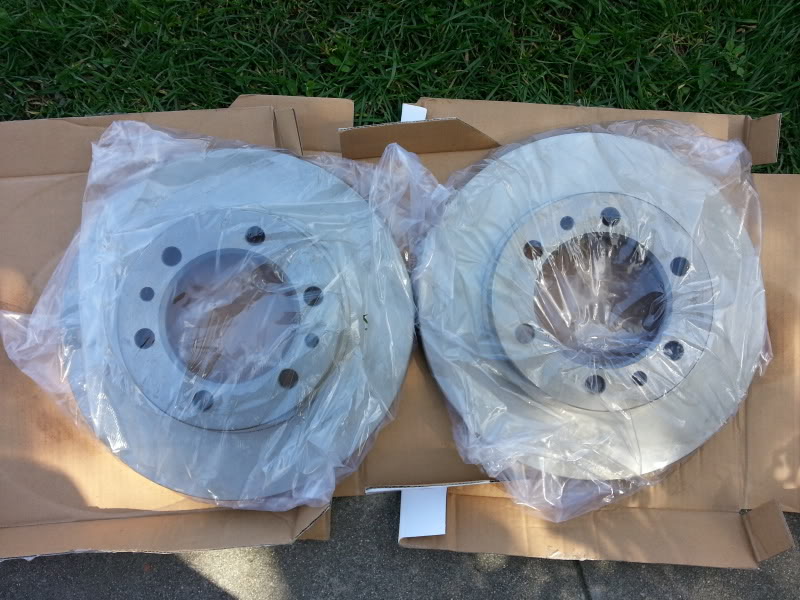
After driving back i opened everything up and laid it out on the front lawn. Here is what $1780 will buy you. Ouch... That was a huge dent in my wallet. Now that Ive spent my savings now i need to re-save $770 for the two 3rd members i need to have re-geared/locked.

Here are some close ups of what was included in my order.

And last but not least my Walker Evan Racing Shocks:
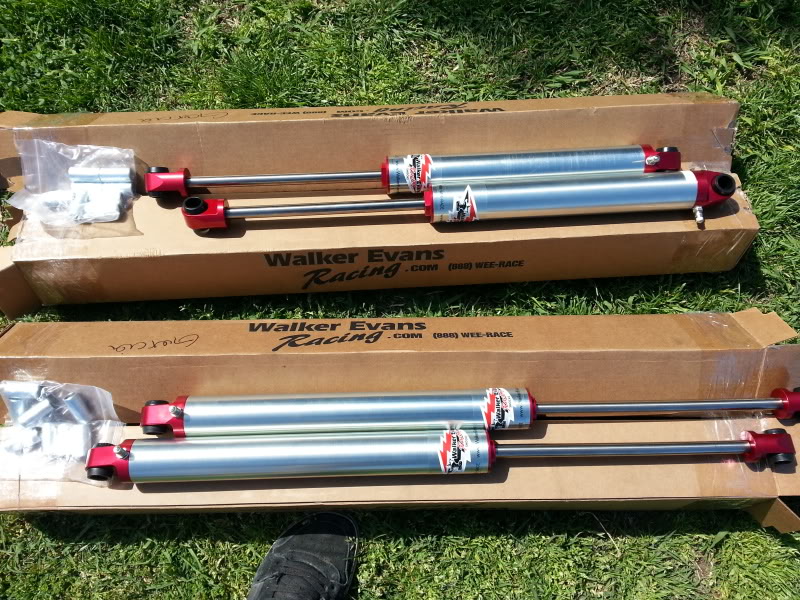
Top are 10" travel. Bottom are 12" travel. This is the size All-pro recommended for me to get for my 4" lift. originally i was asking to get 12" & 14" but they said that size would be too long. So i went with their suggestion since they do this kind of work all day long. They had some pretty sick rigs over there. wish i would have taken a picture of the 2011 Tacoma they were working on in the shop. it was an awesome sight. they had about 3 rigs being worked on. awesome!
If you guys wanna know exactly everything that was included by name let me know and i'll post up some pix of my invoices.
WOOOOOOOOO!!!!!!! Things are finally starting to get accomplished. im so happy for myself right now. And to top it off, my neighbor told me yesterday that he is ready for whenever i am ready. So pretty much as soon as i get my 3rd members done and rebuild that front axle then we are gonna start hacking off the IFS! HOW FUN! I CANT WAIT!
Thanks William, i was also thinking the same thing. plus the winch leads are big i don't think it would even be able to attach into this box if i wanted it to.
-------------------------------------------------------------------------------
Got some REALLY REALLY GOOD NEWS!
AllProOffRoad Called me yesterday to let me know my order was ready for me to pick up. So rather then paying for 100-120 on S&H I just called in sick today for work(w/ sick pay
) and drove the 153mile round trip from Los Angles to Perris CA(1/3 tank of gas in my corolla) and picked everything up myself. Here we are outside waiting on the shop to open up.After driving back i opened everything up and laid it out on the front lawn. Here is what $1780 will buy you. Ouch... That was a huge dent in my wallet. Now that Ive spent my savings now i need to re-save $770 for the two 3rd members i need to have re-geared/locked.
Here are some close ups of what was included in my order.
And last but not least my Walker Evan Racing Shocks:
Top are 10" travel. Bottom are 12" travel. This is the size All-pro recommended for me to get for my 4" lift. originally i was asking to get 12" & 14" but they said that size would be too long. So i went with their suggestion since they do this kind of work all day long. They had some pretty sick rigs over there. wish i would have taken a picture of the 2011 Tacoma they were working on in the shop. it was an awesome sight. they had about 3 rigs being worked on. awesome!
If you guys wanna know exactly everything that was included by name let me know and i'll post up some pix of my invoices.
WOOOOOOOOO!!!!!!! Things are finally starting to get accomplished. im so happy for myself right now. And to top it off, my neighbor told me yesterday that he is ready for whenever i am ready. So pretty much as soon as i get my 3rd members done and rebuild that front axle then we are gonna start hacking off the IFS! HOW FUN! I CANT WAIT!
 .
Mar 21, 2013 | 09:15 PM
.
Mar 21, 2013 | 09:15 PM
#1150
Thread Starter
Registered User
Joined: Apr 2012
Posts: 2,817
Likes: 2
From: Los Angeles CA
Didn't get too much axle grindage going on today. I mainly helped my older brother replace his 2003 Mitsubishi Eclipse GT 3.0 V6 valve cover gaskets. I have to say guys. I knew I hated newer cars due to complicatedness, too compact, and too many wires but JEEEEEZ! This engine tops my list on most annoying motors to work on. Too much stuff in a compact space. So little space and tiny spots and my hands are too big lol.
Best way I can explain it is everyone here already knows about the 3VZE engine on Toyotas. Now imagine that engine but witg more wires and clips and to top it off the motor is sideways! Urgh. Such a pain. I hate cars. My back hurts from being hunched over for so long lol.
Well, it's all the better though. So long as he sells this car and gets the 3rd gen 4runner that he wants sure ill help him fix anything he wants. I want more off-roading buddies in my group anyway. So lets fix that car and get your new car already lol
------------------------------------------
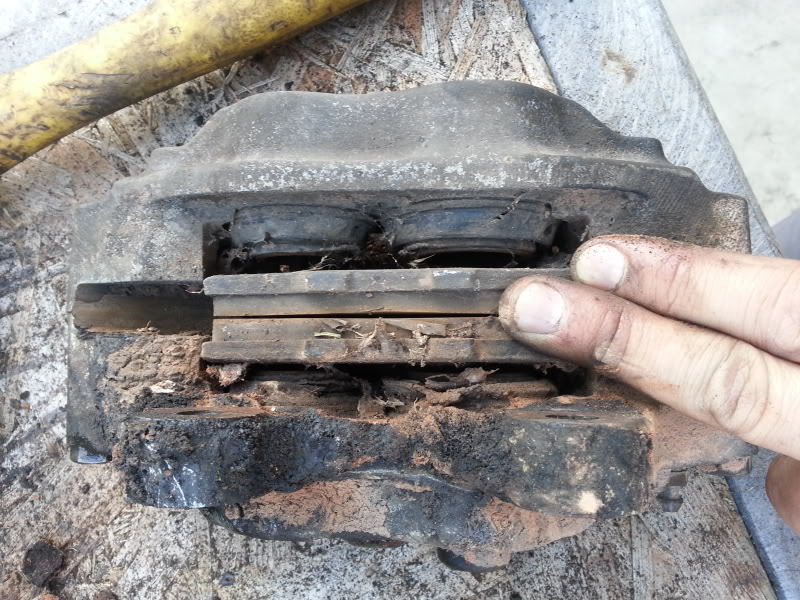
Alright guys so the highlight of my day right here. Picked up my girlfriend Faby and had her help out with the axle.
Check out what we found. Its so disgusting its scary!
Left side:

Right side:
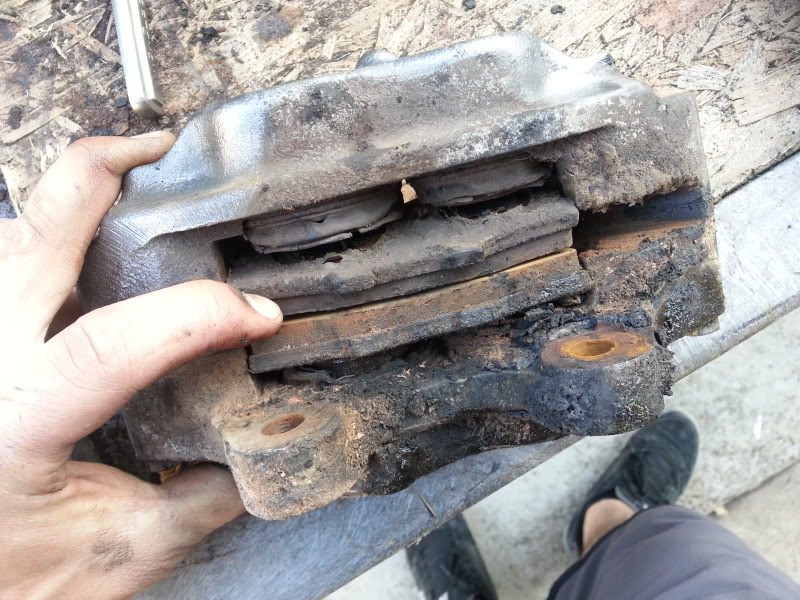
Definitely going to need to rebuild those calipers.
Its almost like everything was rock solid. I had to take a small pick to start chipping everything away then take the wire wheel to it. And it it wasn't rock hard it was really soaked in oil which turns that stuff into a something that feels like drumbrake bearing grease.
I'm glad my girlfriend loves to learn about cars n trucks. Especially when I do something to my truck lol. Mark's my witness. She is a girly girl but she ain't afraid to get down n' dirty when it cones to helping out! Gotta love that trait in a woman.
Ah screw it ill put up the pix anyway haha...
Here she is trying to earn her YotaTech badge. I told her she has to earn her stripes for your approval lol. She was more then happy to help out. Actually sbe was really anxious to help out hahaha

That's right girl! Attention to detail! Wooot
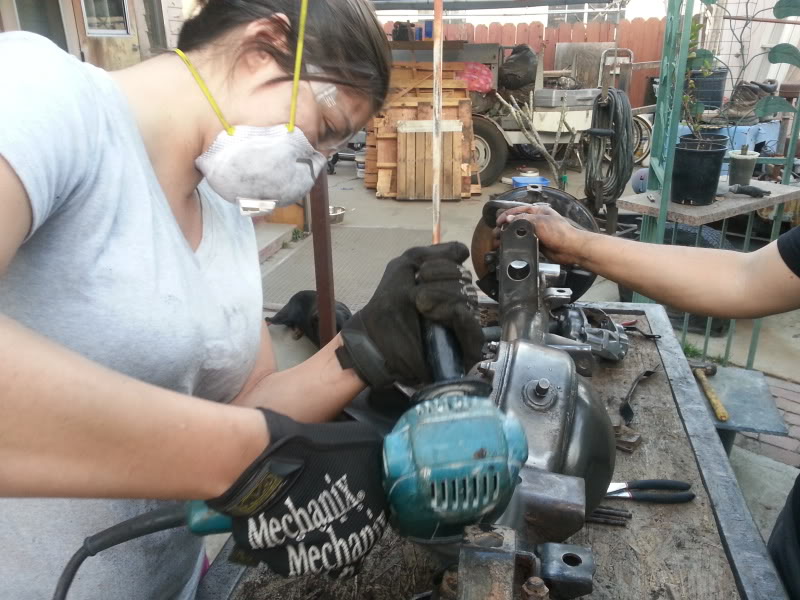
She wants to help me some more tomorrow amd during the weekend so I had to go out to harbor freight amd buy some more masks, protecive glasses and some more gloves. Here I hadn't gone to buy the stuff yet.

Good job Faby!

Haha nice n dirty. Just how I like'er. She had a blast today.

I showed her how to spray paint. She did really good for her first time. No paint drops what so ever. Left it just as good as the one I did. Followed by the black coat.
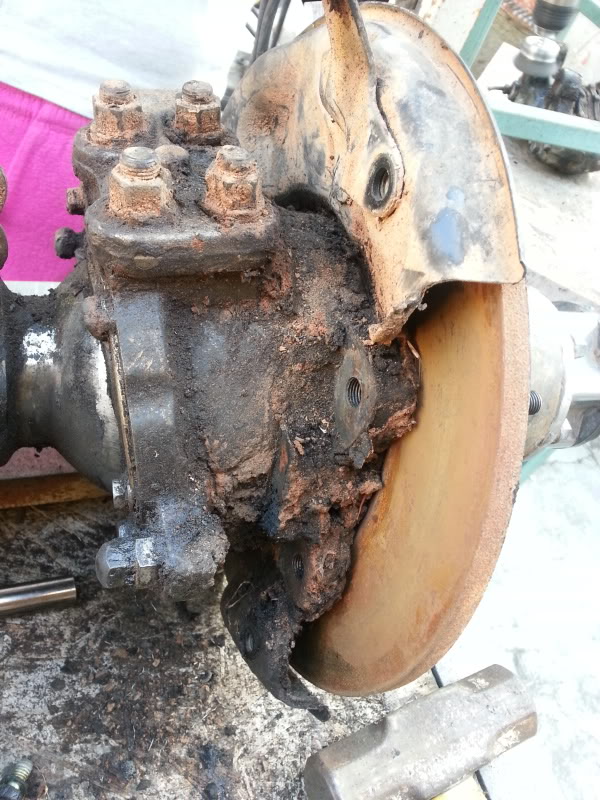
These are the brackets that hold the calipers in place which also go into the dust shield.

Best way I can explain it is everyone here already knows about the 3VZE engine on Toyotas. Now imagine that engine but witg more wires and clips and to top it off the motor is sideways! Urgh. Such a pain. I hate cars. My back hurts from being hunched over for so long lol.
Well, it's all the better though. So long as he sells this car and gets the 3rd gen 4runner that he wants sure ill help him fix anything he wants. I want more off-roading buddies in my group anyway. So lets fix that car and get your new car already lol
------------------------------------------
Alright guys so the highlight of my day right here. Picked up my girlfriend Faby and had her help out with the axle.
Check out what we found. Its so disgusting its scary!
Left side:
Right side:
Definitely going to need to rebuild those calipers.
Its almost like everything was rock solid. I had to take a small pick to start chipping everything away then take the wire wheel to it. And it it wasn't rock hard it was really soaked in oil which turns that stuff into a something that feels like drumbrake bearing grease.
I'm glad my girlfriend loves to learn about cars n trucks. Especially when I do something to my truck lol. Mark's my witness. She is a girly girl but she ain't afraid to get down n' dirty when it cones to helping out! Gotta love that trait in a woman.
Ah screw it ill put up the pix anyway haha...
Here she is trying to earn her YotaTech badge. I told her she has to earn her stripes for your approval lol. She was more then happy to help out. Actually sbe was really anxious to help out hahaha
That's right girl! Attention to detail! Wooot
She wants to help me some more tomorrow amd during the weekend so I had to go out to harbor freight amd buy some more masks, protecive glasses and some more gloves. Here I hadn't gone to buy the stuff yet.
Good job Faby!
Haha nice n dirty. Just how I like'er. She had a blast today.
I showed her how to spray paint. She did really good for her first time. No paint drops what so ever. Left it just as good as the one I did. Followed by the black coat.
These are the brackets that hold the calipers in place which also go into the dust shield.
Mar 21, 2013 | 09:42 PM
#1152
Dude, greeeeeat post!
I am so happy for ya! And brudda, that Faby is one gorgeous, helpful, CATCH OF A LIFETIME! Lol. .... nice work Yota-sister! Btw, earn her stripes? After freezing in my garage, sanding contacts, etc, etc, etc??? I think these, today, we're more like Yota LT Bars! Hahaha.....
Seriously , great news man!
I am so happy for ya! And brudda, that Faby is one gorgeous, helpful, CATCH OF A LIFETIME! Lol. .... nice work Yota-sister!
Btw, earn her stripes? After freezing in my garage, sanding contacts, etc, etc, etc??? I think these, today, we're more like Yota LT Bars! Hahaha.....Seriously , great news man!
Mar 21, 2013 | 10:29 PM
#1153
Registered User
Joined: Jul 2012
Posts: 2,365
Likes: 4
From: Idaho
you realize you could corner the market in awesome girlfriends just by cloning her right?
shes got my vote for her stripes
as for the mess around the calipers looks like they had a couple seals leaking an kinda added dirt to plug the leaks
shes got my vote for her stripes
as for the mess around the calipers looks like they had a couple seals leaking an kinda added dirt to plug the leaks
Mar 22, 2013 | 07:26 AM
#1155
Thread Starter
Registered User
Joined: Apr 2012
Posts: 2,817
Likes: 2
From: Los Angeles CA
Sorry for not replying to you guys sooner. As you can see I've been really busy trying to get stuff done but I promise I did not forget about you lol
Thanks a lot dude I totally forgot about that definitely something I need to do and I do have some extra hose for it. As for the output on each terminal I am really not sure because this fuse block never came with an informational manual. I just know you can use car fuses on each of those terminal outputs.
Mark is powering his sound system and his Dick Ceptic offroad lights off of it with no problem so long as it can do the same for me I'm cool. I don't mind running my future winch off the battery.
Ray thank you very much for your professional opinion. I look forward to powering all my goodies to this baby now 
Ray the rust was so bad that I had to grind down the threading on the bolts and nuts because the rust is just that bad. Lol
Heck yea!
That's right! Lol how could I forget that. She cleaned up the contacts on those power windiw buttons realky good. But that wasn't nearly as a dirty job as this was Lol. Look at the 2nd to last picture. She has grease and dirt smudges on her face haha! Not to mention all the dust from the grinding we did lol.
Haha dang William, u just gave me a mental picture. I like the cloning Idea but I think I will probably misuse that invention for my own personal kinky benefit hahaha  :rofl:
Yea its a smaller width when compared with my rear 4runner axle; I forget by how much. The axle is off a 1985 Toyota 4x4 Pickup truck which was supposedly built as a rock crawler with a 4" lift.
He obviously used it for mudding. No doubt about that. But ill confirm if the axle previously had a 4" lift or not soon. Once we see that the leaf springs match up to the spring perches on the axle with out leaving the axle at too much of an angle then I'll know for sure if it was really a 4" lift. If not then oh well I bought 4 more spring perches for the front and rear axles off the AllPro shop just in case I need to hack the old ones off and weld the new ones on.
As for the output on each terminal I am really not sure because this fuse block never came with an informational manual. I just know you can use car fuses on each of those terminal outputs. Mark is powering his sound system and his Dick Ceptic offroad lights off of it with no problem so long as it can do the same for me I'm cool. I don't mind running my future winch off the battery.
Nice!
4 AWG wire will easily handle 60amps. That's twelve 55-watt bulbs - LOL!
Check this out
Agree. In fact if you look at schematic,
you'll see line for the winch right off the battery, even upstream of the fusible link.
4 AWG wire will easily handle 60amps. That's twelve 55-watt bulbs - LOL!
Check this out
Agree. In fact if you look at schematic,
you'll see line for the winch right off the battery, even upstream of the fusible link.
Heck yea!
Dude, greeeeeat post!
I am so happy for ya! And brudda, that Faby is one gorgeous, helpful, CATCH OF A LIFETIME! Lol. .... nice work Yota-sister! Btw, earn her stripes? After freezing in my garage, sanding contacts, etc, etc, etc??? I think these, today, were more like Yota LT Bars! Hahaha.....
Seriously , great news man!
I am so happy for ya! And brudda, that Faby is one gorgeous, helpful, CATCH OF A LIFETIME! Lol. .... nice work Yota-sister!
Btw, earn her stripes? After freezing in my garage, sanding contacts, etc, etc, etc??? I think these, today, were more like Yota LT Bars! Hahaha.....Seriously , great news man!
:rofl: Yea its a smaller width when compared with my rear 4runner axle; I forget by how much. The axle is off a 1985 Toyota 4x4 Pickup truck which was supposedly built as a rock crawler with a 4" lift.
He obviously used it for mudding. No doubt about that. But ill confirm if the axle previously had a 4" lift or not soon. Once we see that the leaf springs match up to the spring perches on the axle with out leaving the axle at too much of an angle then I'll know for sure if it was really a 4" lift. If not then oh well I bought 4 more spring perches for the front and rear axles off the AllPro shop just in case I need to hack the old ones off and weld the new ones on.
Last edited by Redeth005; Mar 22, 2013 at 07:40 AM.
Mar 22, 2013 | 11:12 AM
#1157
Thread Starter
Registered User
Joined: Apr 2012
Posts: 2,817
Likes: 2
From: Los Angeles CA
Yea I only had mine at the time these pix were taken. So I let my girlfriend use the eye protection, gloves and mask that i usually use. After we were done here we made a trip to Harbor Freight and bought another set of of everything since she is gonna be helping me some more during the weekend.
Mar 22, 2013 | 12:06 PM
#1158
Hey buddy..... thats just the caliper rotting there? I must have misseen something, I thought it was the mounting portion of the axle or something.
Lots of unexpected work,..... wut a shock, right? Haha. Also: Dust mask when grinding metal, buddy, IMHO. ....
....
Keep that rust and crap outa the insides. Hehe
Lots of unexpected work,..... wut a shock, right? Haha. Also: Dust mask when grinding metal, buddy, IMHO.
.... Keep that rust and crap outa the insides. Hehe
Mar 22, 2013 | 05:45 PM
#1159
Thread Starter
Registered User
Joined: Apr 2012
Posts: 2,817
Likes: 2
From: Los Angeles CA
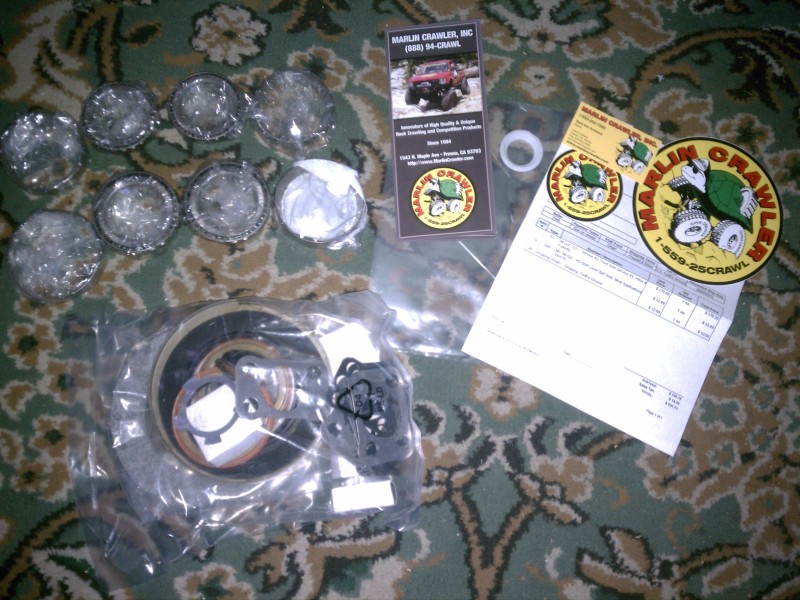
Just thought id finally post pix of the Ring & Pinion gears i bought off Trail-gear.com. Axle Rebuild kit and Spartan Lockers off Marlincrawler.com
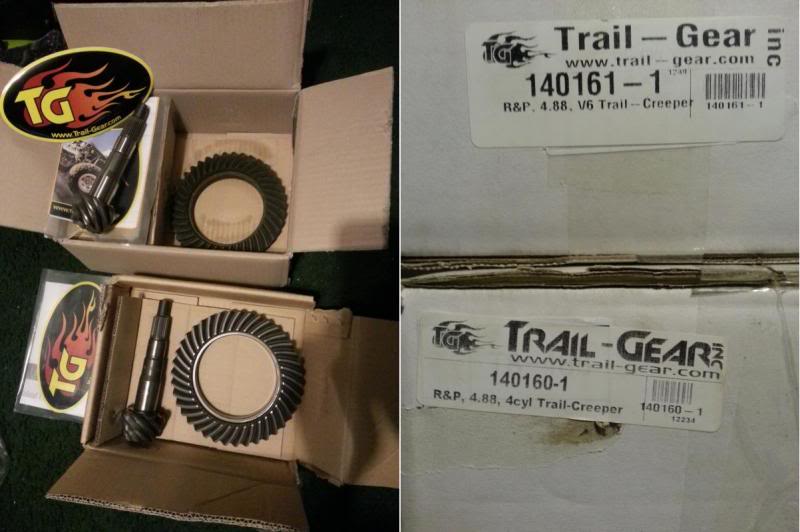

My question is for the above picture (the V6 spartan locker gears). where it says, "USE STOCK SIDE GEARS!!!" Does that mean i cant use my locker if i upgrade to 4.88's? I don't get it. Shouldn't these still work?
and last but not least the M.C. Axle Rebuild kit which i will be putting to good use very soon!
---------------------------------------------------------------------------------------------------------------------------------------------------------------------------
I think i should make a new thread dedicated this project. I'll still keep this build thread updated with the same exact stuff. But thinking of maybe making a thread. just cant decide if i should do it after im done or just keep uploading as i go along like i have been doing here for the past 2 weeks.
Last edited by Redeth005; Mar 22, 2013 at 05:50 PM.


