
Redeth's 1989 4Runner Resurrection
 Mar 22, 2013 | 07:15 PM
#1161
Registered User
Joined: Dec 2008
Posts: 2,391
Likes: 1
From: tecumseh nebraska
Yea it dosent matter what gear ratio you run, the side gears have nothing to do with that. But when i put the ez locker in my front end the side gears were replaced, so your having someone install them anyways right??? Hakuna mattata!!
Mar 25, 2013 | 10:37 PM
#1162
Registered User
Joined: Aug 2011
Posts: 1,507
Likes: 2
From: Fraser Valley, British Columbia
A guy at a job I worked on had metal get under a face shield and the safety glasses he had on somehow.
Had to go to an aboriginal community in Western Australia to get it drilled out by a doctor who stank of booze.

You just reminded me of that.
I agree, eye ppe is a must.
Mar 25, 2013 | 11:37 PM
#1163
Just getting caught up on your thread. You have been making some progress and the parts are starting to pile up. Atleast it better then having to wait to get the parts. Great to see her giving you a hand. That makes the build alot more enjoyable and helps her to understand what all is involved. Great job on what you are getting accomplished.
Mar 26, 2013 | 09:25 PM
#1164
Thread Starter
Registered User
Joined: Apr 2012
Posts: 2,817
Likes: 2
From: Los Angeles CA
Hi guys im back!
Sorry i missed your comment. I will really try to take a lot of pix.
Hey are you also doing a SAS??? that's a whole cart load of parts u got there lol.
Tell me about it mark! Lots of unexpected work. For example i havent done anything to the axle in 2 days and today i went outside only to see the axle with a hint of orange. i was like WTF!?! The dew from the night left a thin layer of rust on my axle lol. So im gonna have to regrind a few things.
As for what you call rot under the caliper area, nah dude it aint rot. its just a bunch of dirt and oil.
Thanks Teuf. I'm happy people are checking on the progress. i really look forward to what people have to say of the progress.
Thanks Dude! so this gear locker combo should work for me then.(crossing fingers)
Holy crap that story gave me a sweet mental picture lol Well if it'll help put your mind at ease,I already bought another set of gloves, eye protection, and dust masks. All ready to work on it some more 
OMG Terry, SERIOUSLY i dont have very much space here at home. Most of the space is occupied with a bunch of my dads junk and tools. So im trying my best to not take up so much space with my stuff. But the more parts i get the more i feel like a kid in a candy store lol and the closer we get to finally start working on my SAS the more i feel like a kid counting down the days to my birthday lol Talk about being super anxious lol. Even my neighbour is anxious lol. He was all like, "once the rain passes this coming weekend we can begin working on the install if you'd like." Even if it sits there for a bit. At least we will have the harder stuff done with already and once you get your 3rd members back we can just put them in quick and easy then you're good to go.
I get paid this thursday, so im looking forward to taking both my 3rd members to ToyotaMasters soon so we can finally hurry up and start this stuff.
Hey are you also doing a SAS??? that's a whole cart load of parts u got there lol.
Hey buddy..... thats just the caliper rotting there? I must have misseen something, I thought it was the mounting portion of the axle or something.
Lots of unexpected work,..... wut a shock, right? Haha. Also: Dust mask when grinding metal, buddy, IMHO. ....
....
Keep that rust and crap outa the insides. Hehe
Lots of unexpected work,..... wut a shock, right? Haha. Also: Dust mask when grinding metal, buddy, IMHO.
.... Keep that rust and crap outa the insides. Hehe
As for what you call rot under the caliper area, nah dude it aint rot. its just a bunch of dirt and oil.
Thanks Teuf. I'm happy people are checking on the progress. i really look forward to what people have to say of the progress.
A guy at a job I worked on had metal get under a face shield and the safety glasses he had on somehow.
Had to go to an aboriginal community in Western Australia to get it drilled out by a doctor who stank of booze.
You just reminded me of that.
I agree, eye ppe is a must.
Had to go to an aboriginal community in Western Australia to get it drilled out by a doctor who stank of booze.
You just reminded me of that.
I agree, eye ppe is a must.
Just getting caught up on your thread. You have been making some progress and the parts are starting to pile up. Atleast it better then having to wait to get the parts. Great to see her giving you a hand. That makes the build alot more enjoyable and helps her to understand what all is involved. Great job on what you are getting accomplished.
I get paid this thursday, so im looking forward to taking both my 3rd members to ToyotaMasters soon so we can finally hurry up and start this stuff.
Mar 26, 2013 | 09:35 PM
#1165

http://en.wikipedia.org/wiki/Camphor#Uses
They'll keep the rust off, it's an old machinist trick. You'll of course need to bag up the parts, then toss one of those in works better than silica packets and clears the sinuses too.
Mar 26, 2013 | 09:37 PM
#1166
Thread Starter
Registered User
Joined: Apr 2012
Posts: 2,817
Likes: 2
From: Los Angeles CA
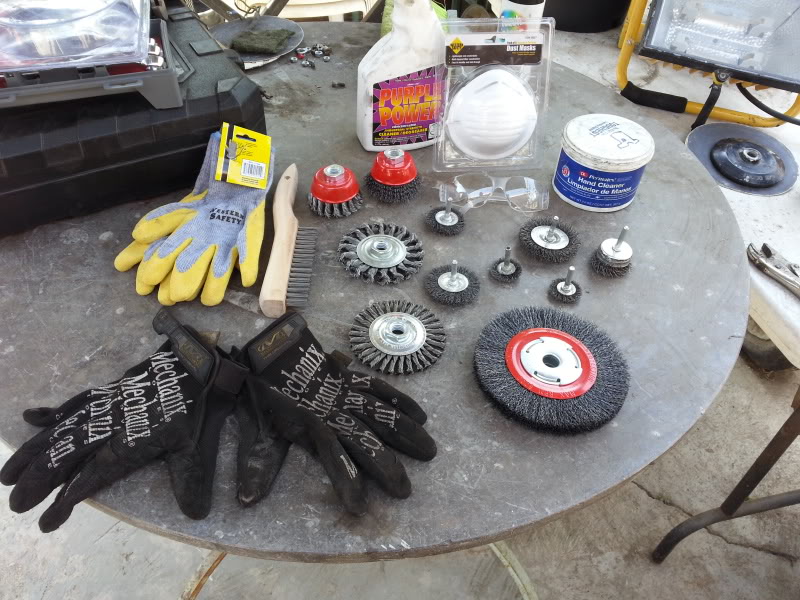
IF you guys are planning to pull of a job like this sometime in the near/distant future here is some of the stuff i recommend you guys buying. forgot to mention some primer and spray paint.
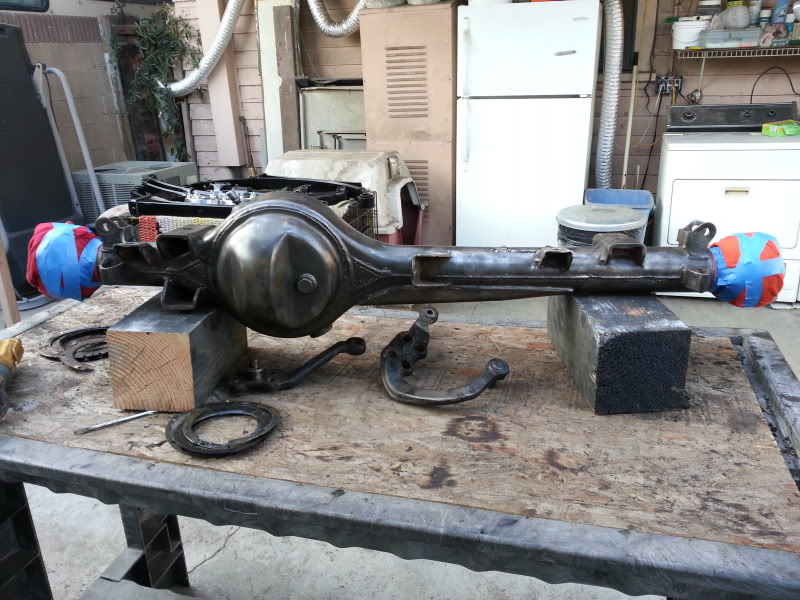
Had my dad help me this past weekend. Removed this unnecessary piece with a metal cutter wheel
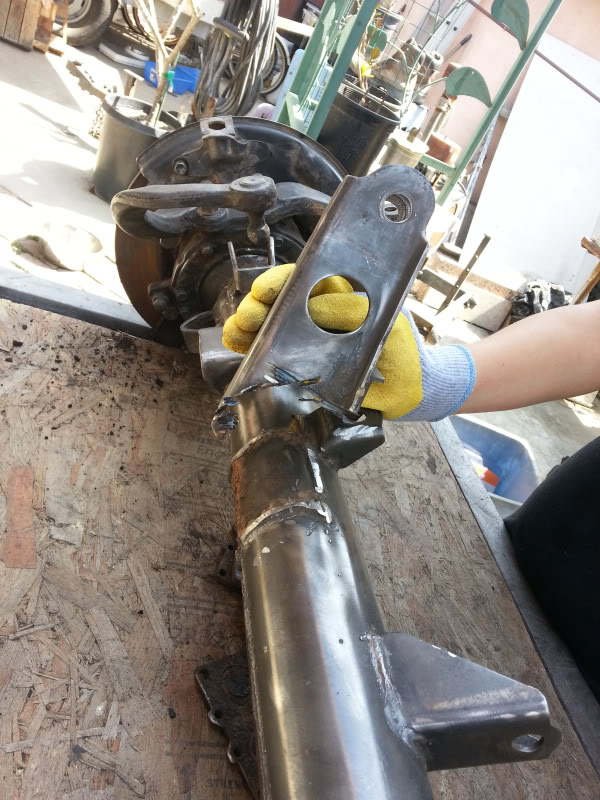
I still need to remove the 2 old spring perches and install the 2 new ones.
Also Today my neighbor and I removed my 2 Aisin Hubs, and front birfields I'm all set to remove the 3rd now! But... i ran out of daylight. Also i forgot to take pix of the process. So tomorrow i'll semi re install them, just to take some pix for all you guys. Hands were way too greasy to pull my beautiful Galaxy S3 out for pix lol.
Had my dad help me this past weekend. Removed this unnecessary piece with a metal cutter wheel
I still need to remove the 2 old spring perches and install the 2 new ones.
Also Today my neighbor and I removed my 2 Aisin Hubs, and front birfields I'm all set to remove the 3rd now! But... i ran out of daylight. Also i forgot to take pix of the process. So tomorrow i'll semi re install them, just to take some pix for all you guys. Hands were way too greasy to pull my beautiful Galaxy S3 out for pix lol.
Last edited by Redeth005; Mar 26, 2013 at 09:44 PM.
Mar 27, 2013 | 08:59 PM
#1170
Thread Starter
Registered User
Joined: Apr 2012
Posts: 2,817
Likes: 2
From: Los Angeles CA
Birfield Removal
------------------------------------------------------------------------------------
Starting up already. I wanted to clean up the axle, again, to take the new layer of rust off and give it a coat it with some primer to avoid it from rusting again.

 lets get to work now. So in order to remove the birfields we first need to take some of the other stuff off first.
Begin by removing your Aisin Hub dial with a 10mm socket.
Second, Remove the snap ring located on the spline. Then then remove the Aisin Hub housing thing-a-majig. These are 12mm nuts:
Third, remove the wipers. It takes 8 small 10mm bolts:
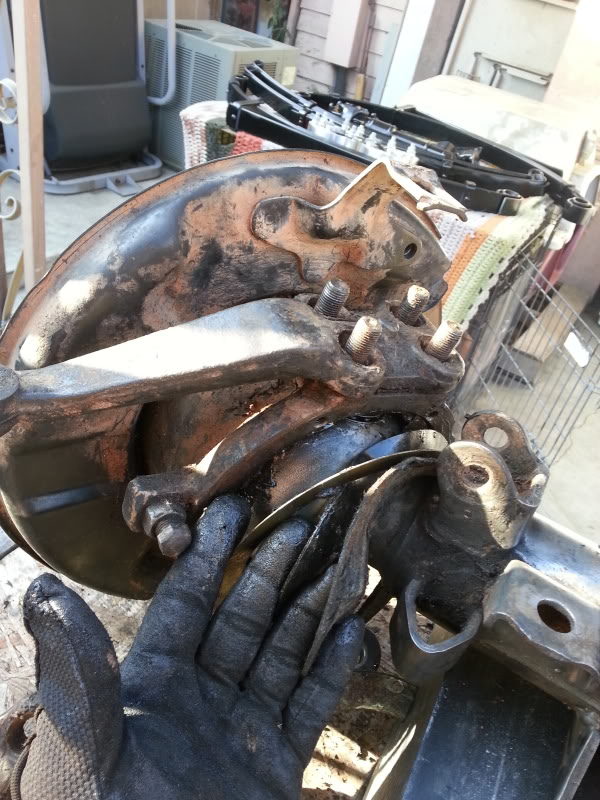
Then remove the steering arms: These take 4 cone washers, 4 washers and i believe its 4 14mm nuts. If you have a hard time removing the bolts take a hammer and lightly smack it from the bottom in an upward motion until it comes loose.
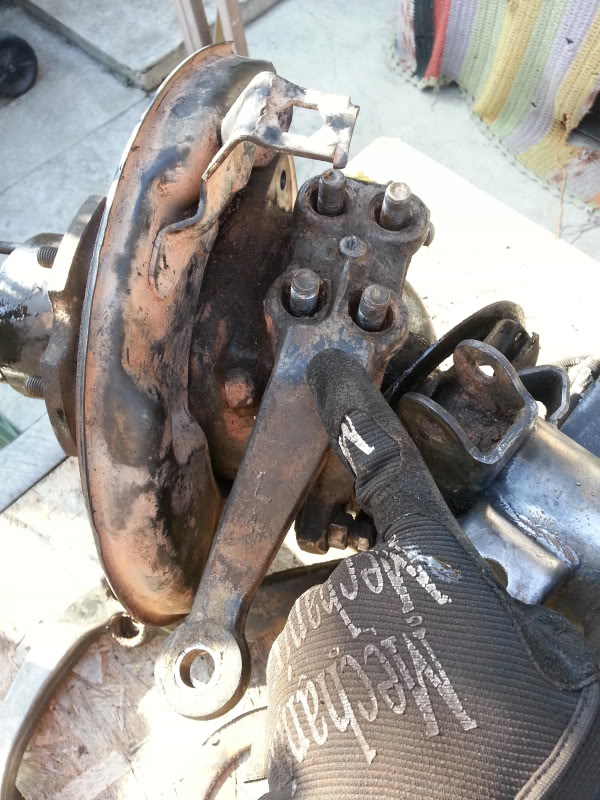
Once the the steering arms are off, hold the whole end(rotor/knuckle) up with your arm and press on the bearing from the hole where the steering arms were inside. BE CAREFUL! Make sure you are holding up that whole end. It is heavy and you dont want it to smash your finger when you press down on the bearing. (Note: watch my video so you know what i mean) once you get that off you're gonna wanna pull straight out and it will come out easily.
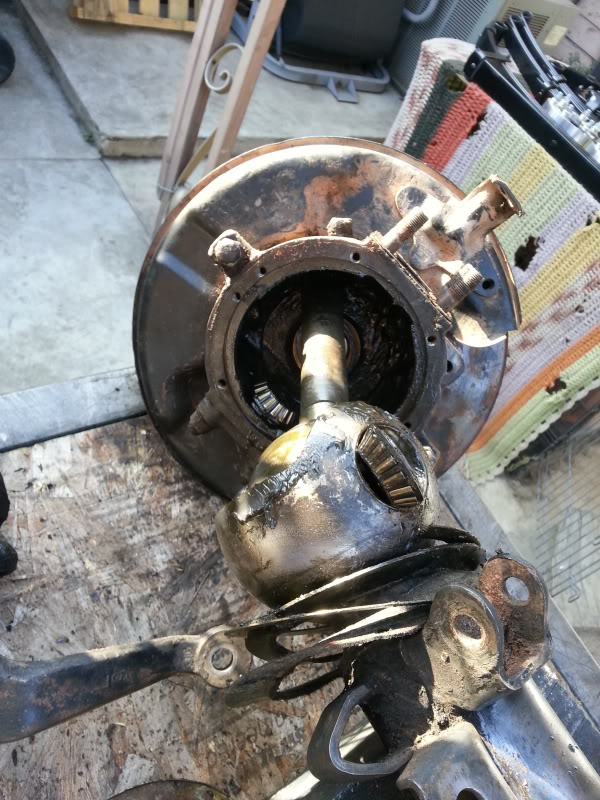
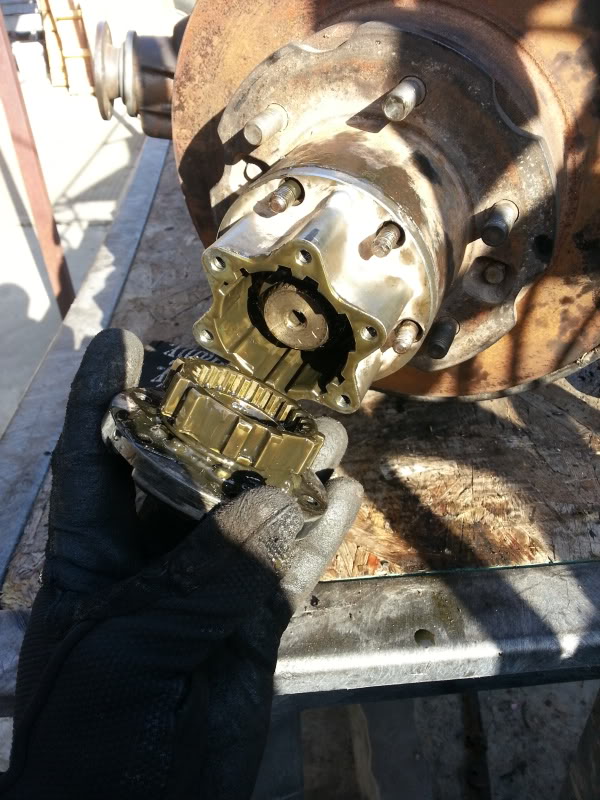
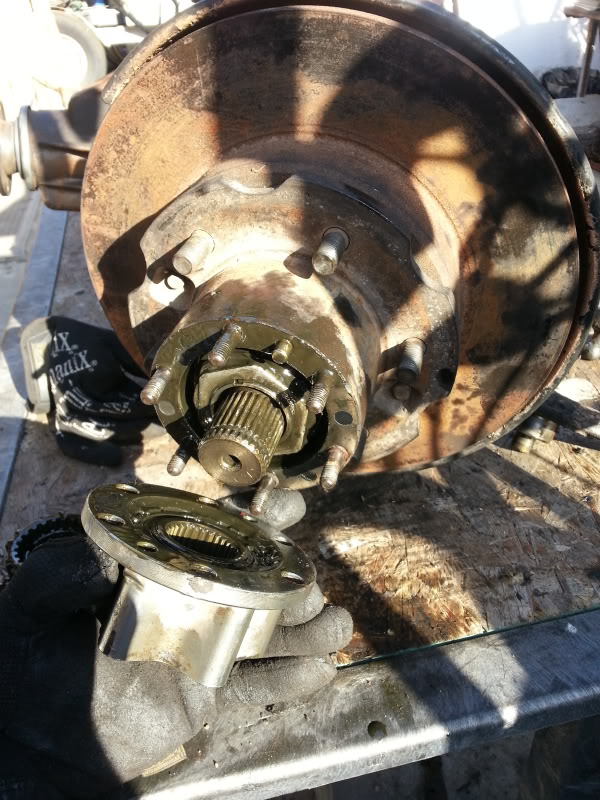
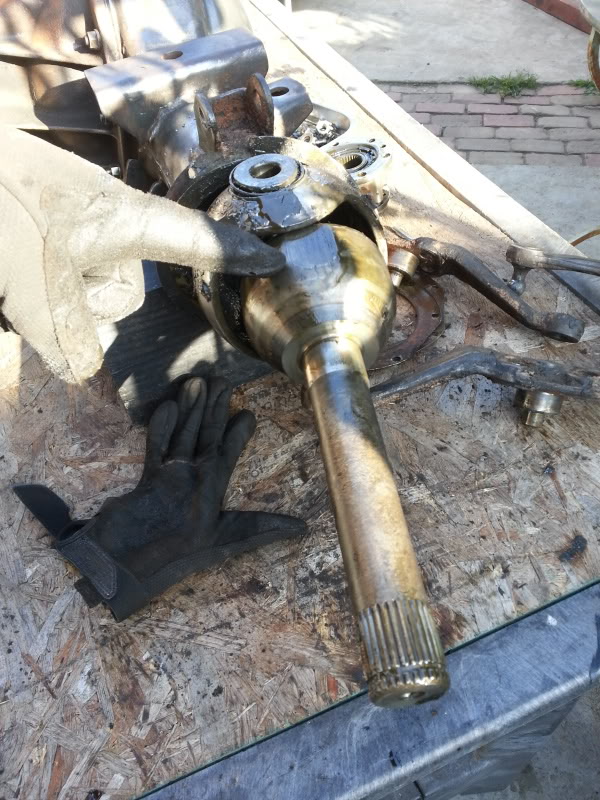
Once you have that whole side off your axle/birfield will look a little something like this. In order to remove the birfield grab on to the end and twist until the flat spot(where i'm pointing at in the pic) aligns with the little droop piece on that end. (Sorry i don't know the names to each piece exactly lol i hope my NEWBIE vocabulary is understandable to you guys. lol) (i also explain this in my YouTube video)
BTW dont forget the order of the wipers before you remove them. Here is a reference you can look back on:

NOTE: I know i know most people remove the 54mm nut and then take everything off the sides one piece at a time. But i didnt have a 54mm socket to take it off so that is why i did it this way. I actually ordered a 54mm Socket off eBay for just a little over $16 free S&H. Here is the link. http://www.ebay.com/itm/271179591565...84.m1497.l2649
I bought this because i live in Los Angeles CA and the vendor is located in Long Beach CA. So i figured i would probably get it within 2 days. Either way. it beats paying $25-50 for one somewhere else
Here is the YouTube Video i made on removing the parts:
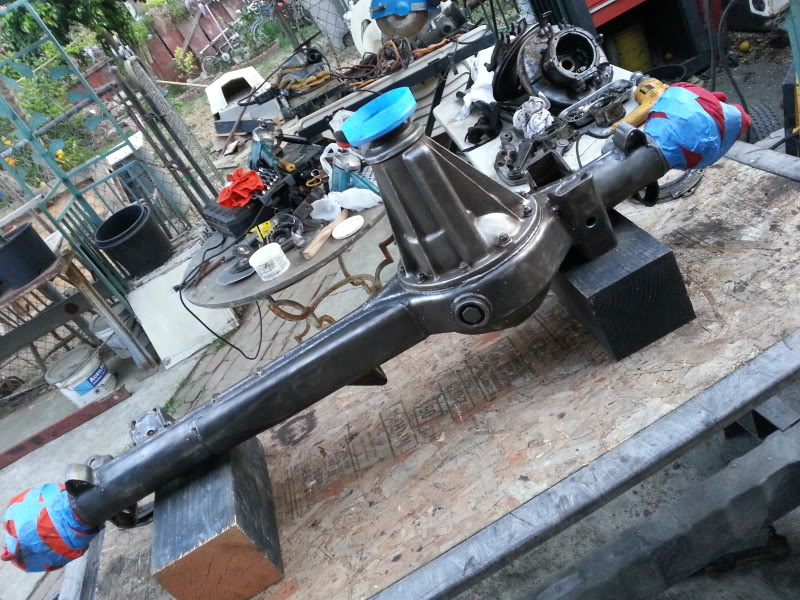
After that i wrapped up the ends with old shirts and began grinding off all the newly accumulated rust again. The rags is to prevent all the nasty stuff from getting into the axle.
Here are the pix of it already re-cleaned up and wiped down with a clean rag.
Bottom Side:
Top side:

Gave it a primer coat: (Bottom Side)
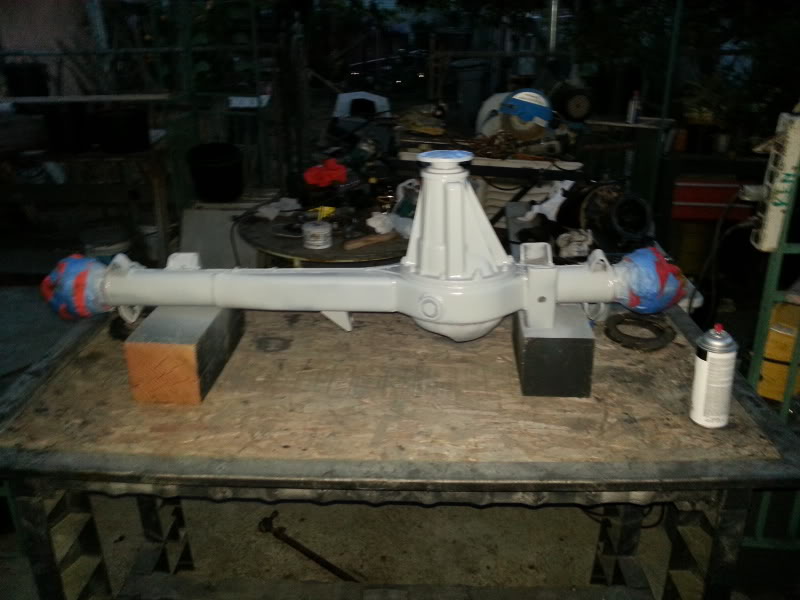
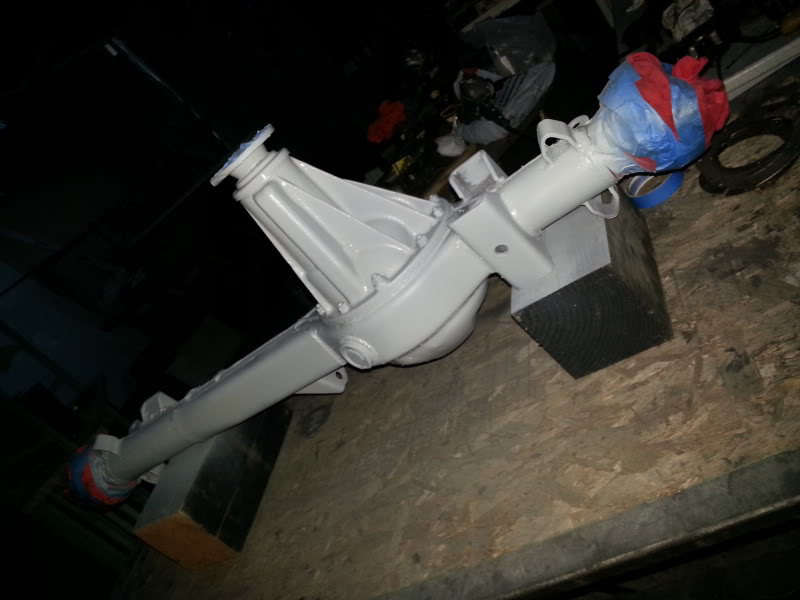
Top Side:
That's all i got for you guys. I know i still need to grind down a few pieces and re weld a few others. but the only reason i decided to prime the axle was because i don't want it to rust again with the night time dew. So i figured i can just go ahead and paint the axle and re prime/ paint the spots i need to grind off later. if that makes any sense.
Thanks for keeping up guys. I'll keep you all posted on any other things i do as i go.

Last edited by Redeth005; Mar 28, 2013 at 08:14 PM.
Mar 27, 2013 | 09:27 PM
#1171
Good to see the rust prevention. .. seems a lil redundant when ur doing it if ull be back at it again soon, but it's not, no way. Gotta try to stop it from forming and spreading... Nice work, nice journaling of ur each step, and don't sweat the wording. .. You can go back and edit, ya know ?
Mar 27, 2013 | 09:42 PM
#1172
Registered User
Joined: Jul 2012
Posts: 2,365
Likes: 4
From: Idaho
looks great! liked the vid!
with my electrowashing of rusty parts it blasted everything off the metal grease oil rust paint if i didnt prime soon as it was dry bam! powdery rust was forming within an hour
with my electrowashing of rusty parts it blasted everything off the metal grease oil rust paint if i didnt prime soon as it was dry bam! powdery rust was forming within an hour
Mar 28, 2013 | 07:55 PM
#1173
Thread Starter
Registered User
Joined: Apr 2012
Posts: 2,817
Likes: 2
From: Los Angeles CA
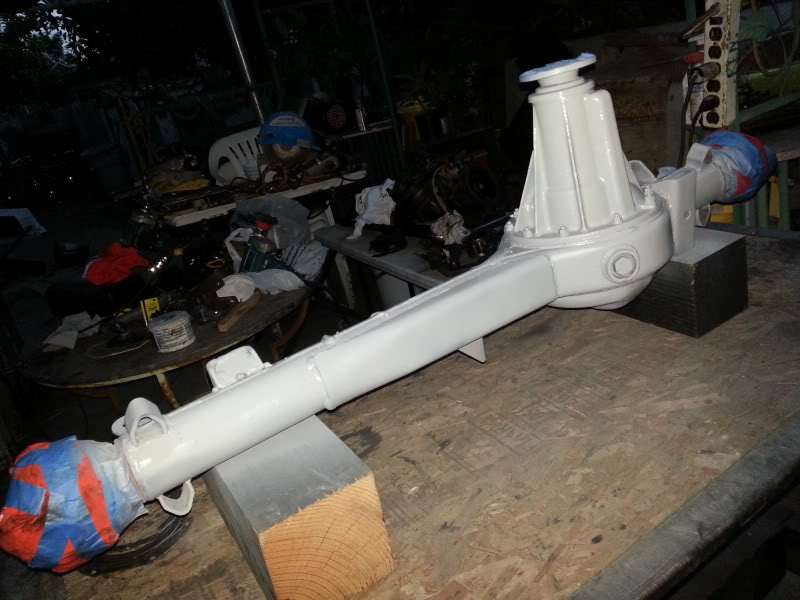
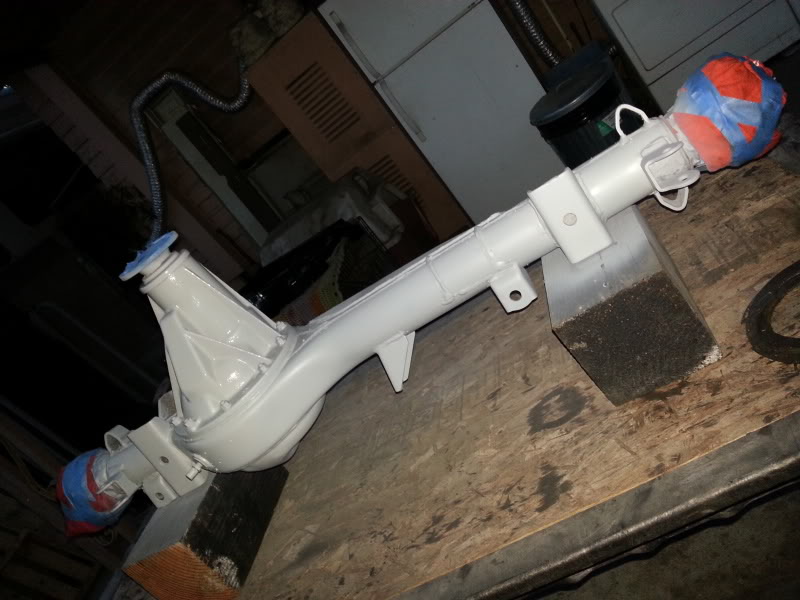
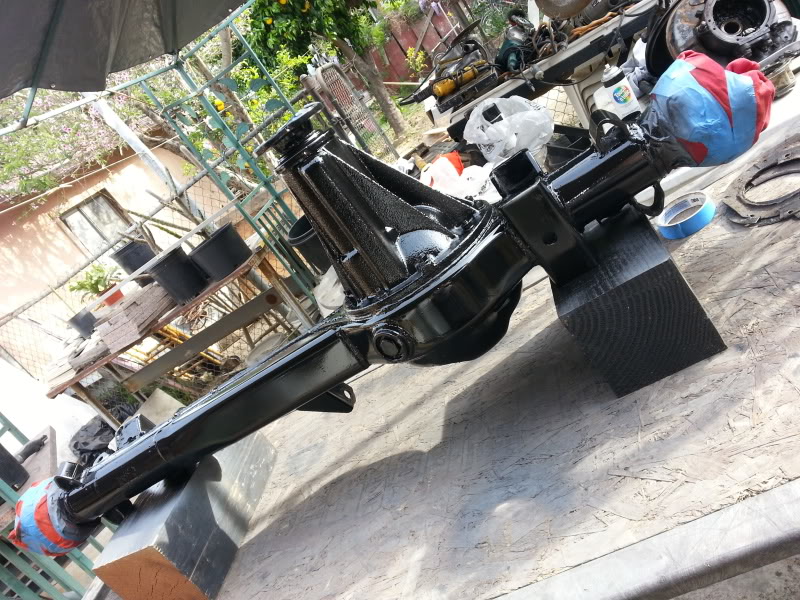
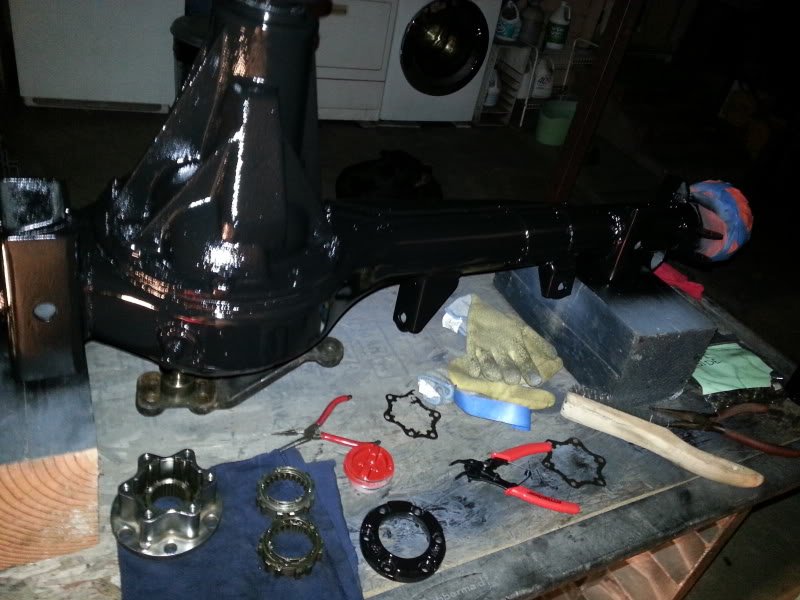
I gave my axle one more coat of primer when i got home from work. once it dried i painted the axle black. The paint is still wet in these 2 pix.

I figured i'd go ahead and start on the Aisin Hub paint. So i took them apart. BTW I HAD ALREADY TAKEN THESE AISIN HUBS OFF AND WIPED THEM DOWN prior to taking the pix so i could show you all the details of what to look for. Thats why they look so dry and clean. When you take your out they might look all black. and you're gonna have grease all over everything!
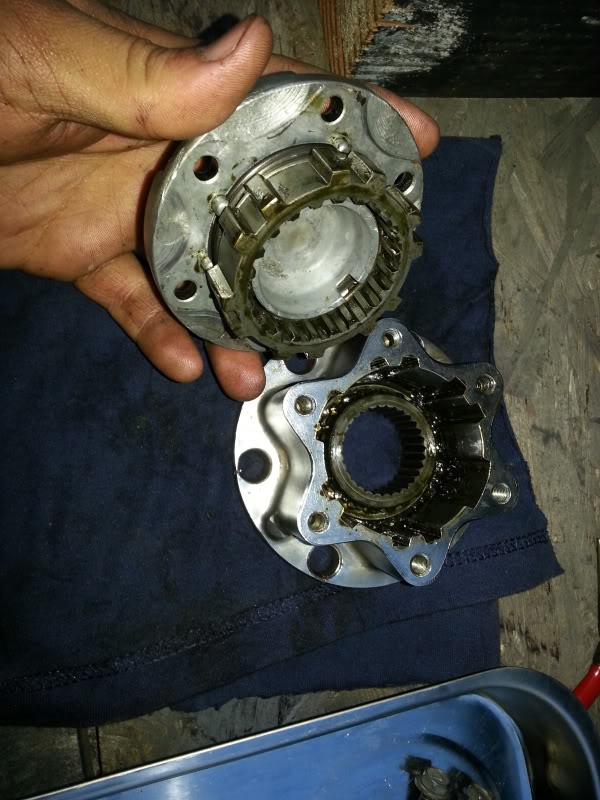
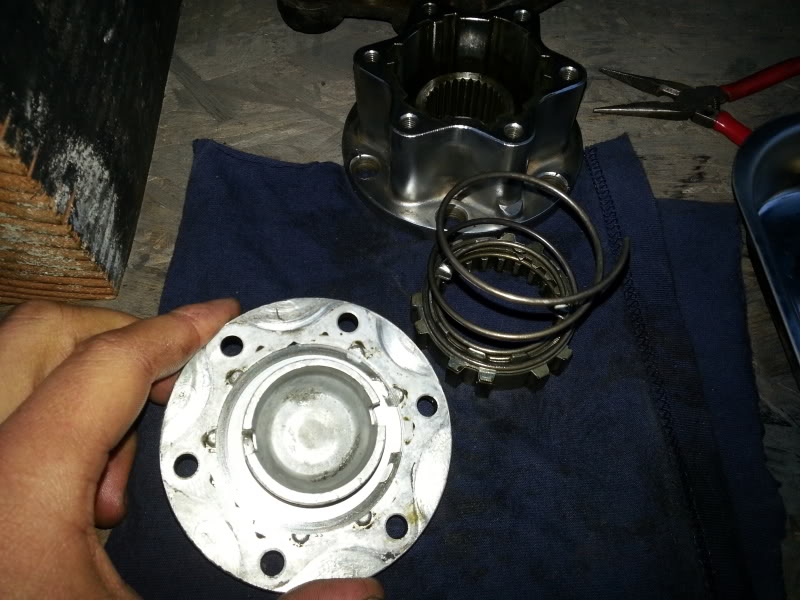
Remove the Snap Ring
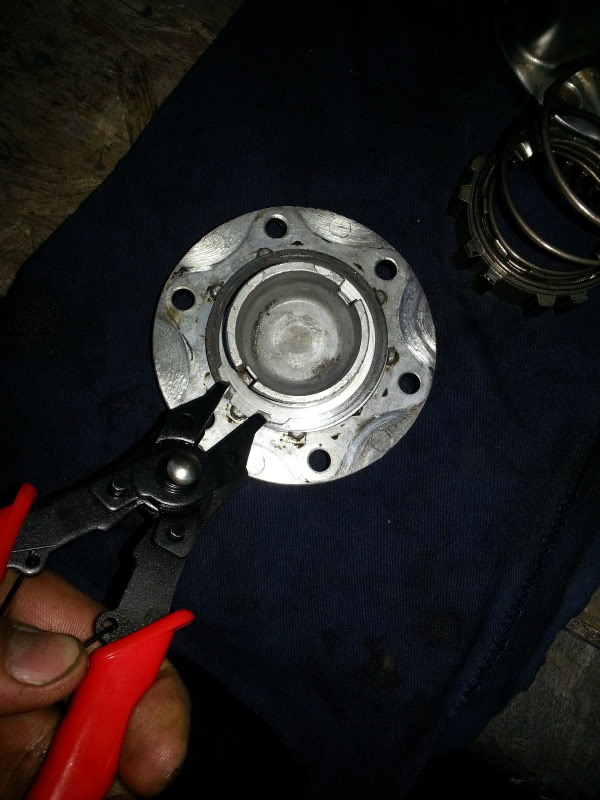
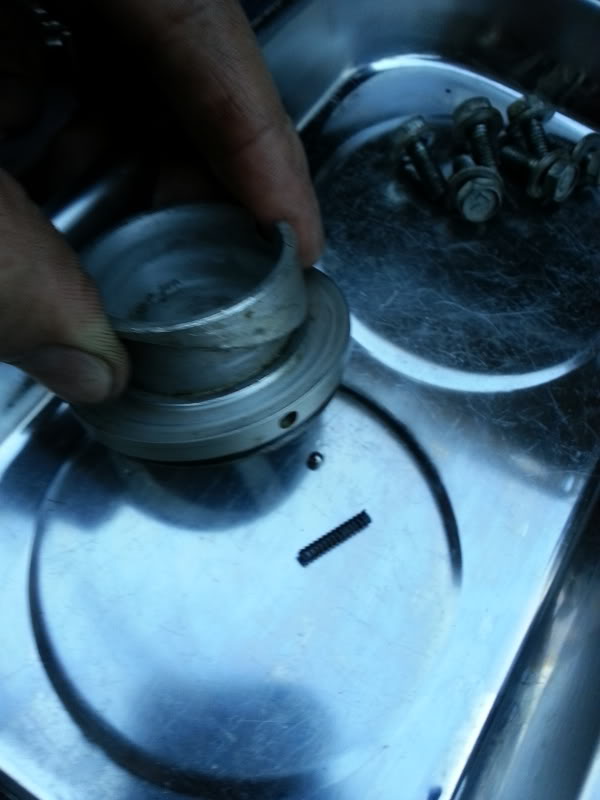
I did NOT loose the little ball & spring. Thanks to Chefyota and everybody else who gave me a warning about this. Twist the dial till you align the ball to that tiny groove then it'll come out easy. Make sure you don't loose that Ball & Spring!
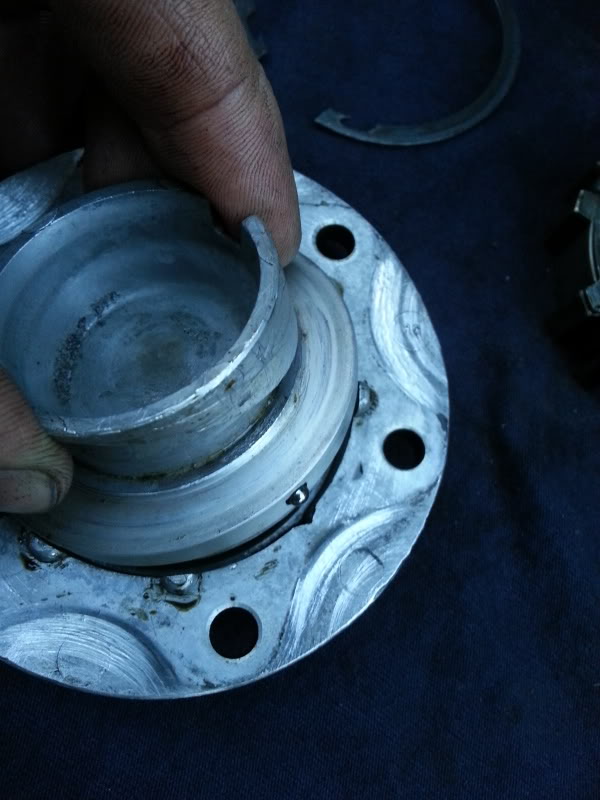
Here is what it looks like
Stopped for a dinner break. YUM!
Here is what i left off with. It looks glossy in person but i think this picture added a lot on to that glossiness. not to mention i used flash and the picture was taken during the night.
I dont have a picture available but i did knock out both Aisin hubs. I dont have the money to Powder Coat them. So i figured i would just use regular paint this time around and later on, after im done with the SAS, i will go out and get them powder coated. Here are the guys that Mark(Chefyota) recomended me going to when i do have them powdercoated. http://www.yelp.com/biz/powder-coating-maniac-torrance For now i just gave them a coat of primer, then used the axle paint on the outer circle and used my red caliper paint on the center dial. It'll have to do for now. I'll post up better non glossy pix tomorrow when the sun is back up.
I'll post some more pictures tomorrow. I need to go buy some high temp grease for the hubs/bearings/knuckles and some lube.
Anyone have any suggestions to brand? and what local stores i can get them at. I have AutoZone, Pepboys and O'Reilly local to me. I don't have a grease gun. Should i buy one? if so should i buy a big or small one? and Is that necessary to have to do this job?
I figured i'd go ahead and start on the Aisin Hub paint. So i took them apart. BTW I HAD ALREADY TAKEN THESE AISIN HUBS OFF AND WIPED THEM DOWN prior to taking the pix so i could show you all the details of what to look for. Thats why they look so dry and clean. When you take your out they might look all black. and you're gonna have grease all over everything!
Remove the Snap Ring
I did NOT loose the little ball & spring. Thanks to Chefyota and everybody else who gave me a warning about this. Twist the dial till you align the ball to that tiny groove then it'll come out easy. Make sure you don't loose that Ball & Spring!
Here is what it looks like
Stopped for a dinner break. YUM!
Here is what i left off with. It looks glossy in person but i think this picture added a lot on to that glossiness. not to mention i used flash and the picture was taken during the night.
I dont have a picture available but i did knock out both Aisin hubs. I dont have the money to Powder Coat them. So i figured i would just use regular paint this time around and later on, after im done with the SAS, i will go out and get them powder coated. Here are the guys that Mark(Chefyota) recomended me going to when i do have them powdercoated. http://www.yelp.com/biz/powder-coating-maniac-torrance For now i just gave them a coat of primer, then used the axle paint on the outer circle and used my red caliper paint on the center dial. It'll have to do for now. I'll post up better non glossy pix tomorrow when the sun is back up.
I'll post some more pictures tomorrow. I need to go buy some high temp grease for the hubs/bearings/knuckles and some lube.
Anyone have any suggestions to brand? and what local stores i can get them at. I have AutoZone, Pepboys and O'Reilly local to me. I don't have a grease gun. Should i buy one? if so should i buy a big or small one? and Is that necessary to have to do this job?
Last edited by Redeth005; Mar 28, 2013 at 08:27 PM.
Mar 28, 2013 | 08:20 PM
#1175
Registered User
Joined: Jul 2012
Posts: 2,365
Likes: 4
From: Idaho
theres a red severe duty water repelling grease ive been using for a long time but the label is kinda all goopey an unreadable... stuff is incredible for wheel bearings the hubs its great
for your ball joints tierods an Ujoints you'll need a grease gun they arent that expensive a manual one from HF is a great option grease in cartilages LOT better than the old hand load with a spoon ones
LOVE the paint job if you look at HF they have powder coating stuff for small parts you can do in an old oven ..or yours before cleaning so the cook of the house dont kill ya lol
seen several vids on it being done in a toaster oven for really small parts
Mar 29, 2013 | 02:15 AM
#1176
Big grease gun, with a flex nozzle. Most bang for your buck. One large (14oz) tube is the same price or less than a 3 pack of 3oz without the tube changing headache, and the flex hose gets you in just about anywhere.
Nice paint job I really didn't want to be the one to remind you most primer is porous and doesn't stop rusting  I have that problem where I knocked off the zinc in a few spots so it's a sore spot for me.
Still trying to find out what toyota used for wheel bearing grease myself. +210k and just a hint of black, gotta be good stuff and I want more!
Nice paint job
I really didn't want to be the one to remind you most primer is porous and doesn't stop rusting I have that problem where I knocked off the zinc in a few spots so it's a sore spot for me.Still trying to find out what toyota used for wheel bearing grease myself. +210k and just a hint of black, gotta be good stuff and I want more!
Mar 29, 2013 | 11:32 AM
#1178
CO, call my dealer parts guys and ask them to cgeck with the foreman.... They're pretty helpful there. They usually have a list of all the fipg's and lubes, like the cv restore kit with the 2 types of grease.... DCH TOYOTA of Torrance...
1 310-325-7500
I use extreme duty valvoline red, William, or SYN POWER by them. For guys who deal with freezing temps, the Lithium based seems to freeze up less than the SynPower. Think Mobil makes a highly chosen one as well.... Mobil1 maybe? I think Lucas has grease selections now at least at pepboys.... and do grab the extension hose and big gun.... worth every penny of 20 $ or so for a decent one.
Mar 29, 2013 | 12:49 PM
#1179
Registered User
Joined: Jul 2012
Posts: 2,365
Likes: 4
From: Idaho
I use extreme duty valvoline red, William, or SYN POWER by them. For guys who deal with freezing temps, the Lithium based seems to freeze up less than the SynPower. Think Mobil makes a highly chosen one as well.... Mobil1 maybe? I think Lucas has grease selections now at least at pepboys.... and do grab the extension hose and big gun.... worth every penny of 20 $ or so for a decent one.
Mar 29, 2013 | 01:15 PM
#1180
Yep, u saw my spindles and hubs after lots of use and 20k miles.... bright red and teeeeeeny bit of discolorarion, not even brown/let alone black....... Of course, I have to add an important factor: I was running new japan bearings and races since that point of repack/etc.


