
Redeth's 1989 4Runner Resurrection

 Mar 14, 2013 | 03:58 PM
#1122
Thread Starter
Registered User
Joined: Apr 2012
Posts: 2,817
Likes: 2
From: Los Angeles CA
Hah. I might have to sell it instead of holding it for my bro. Everyone is charging an arm and a leg for this 3rd member job. Gonna need to make some $$$ to be able to pay for the stuff. Lol
Mar 14, 2013 | 04:11 PM
#1123
Registered User
Joined: Dec 2008
Posts: 2,391
Likes: 1
From: tecumseh nebraska
Very nice tent!! As for the locker install, i could never afford paying that kind of labor. So.... your wanting to install lockers in front and rear, im assuming your ifs front end, or for the straight axle??? Either way as long as you dont remove the pinion gear you should be able to install them yourself fairly easy and if your bearings are ok, you shouldnt have to replace them. i installed my ez locker in my ifs frontend in about 3 hrs including removing the axle from my 4runner (with the engine out...) As far as the rear goes, once you remove the axles, take out the third, you should be able to install your rear on the bench. I took pics on my build thread for my front, still havent put one in the rear, but when i do i plan on doing it myself. I paid $130 for the front locker new, old stock. Its considered a lunchbox locker, not very strong compared to a arb but ok for what im using it for. So anyways if you plan on using your existing ring and pinion you should be able to do it yourself and youd only be out the cost of the lockers, some diff fluid, some gaskets, seals and your time. Not to mention educating yourself then you can be the guy charging mad cash for installs!!
Mar 14, 2013 | 06:48 PM
#1124
Thread Starter
Registered User
Joined: Apr 2012
Posts: 2,817
Likes: 2
From: Los Angeles CA
Also? GREAT DEAL, which is never a bad thing! lol. You scored, buddy!
ONLY other thing you have to research a lil...... RAIN! It can come out of nowhere, ...and I'm sure the tent has a plenty rain proof topper, and a lifted floor. But the seal around the body? TIGHT!!!!! Guys take rope-style bungies and put them together to make a tight seal, also using a strip of that Garage door foam/seal that you saw that I used on the top? (or something similar).... As long as the shute is waterproof material? YOU'RE SOLID! Just have to seal that up, or IT WILL leak in all over your stuff/feet/etc. lol. (if you sleep in the truck of course)
You have some REALLY nice gear, now, Richard, ....and you know how I feel, .."Why not be prepared and have what some consider 'too much' stuff? You know how often I've needed it?"... Even on our trip..... what, 3 different people ended up making comfy and useful use of my extra 'things', right?
Try R&H transmissions in Bakersfield. 661-834-7130. Talk to Nick. I know he dose a good job at a far more reasonable than $770 for both I can't see I costing anymore than $200 for the labor and I think that's a little high if you ask me. These third members are very similar to a ford 9" and any local race shop or good auto shop should be able to install the gears and locker for you and for quite a bit less than your first quote!!!
Nice! But whata glamper J/K - LOL! I just sleep here:
Richard,
Kidding aside, instead of dealing with bulky layers of comforters (and cotton is very in-effective in keeping you warm), may I suggest getting good backpacking sleeping bags? Synthetics are less expensive and keep insulating properties even when wet, but bulky. Down is lighter, compress to smaller size, but more expensive and lose insulating properties when wet. However, for use in SUV/SUV tent it would keep you warmer with less bulk. There are models that zip together for spooning .
.
Richard,
Kidding aside, instead of dealing with bulky layers of comforters (and cotton is very in-effective in keeping you warm), may I suggest getting good backpacking sleeping bags? Synthetics are less expensive and keep insulating properties even when wet, but bulky. Down is lighter, compress to smaller size, but more expensive and lose insulating properties when wet. However, for use in SUV/SUV tent it would keep you warmer with less bulk. There are models that zip together for spooning
.Very nice tent!! As for the locker install, i could never afford paying that kind of labor. So.... your wanting to install lockers in front and rear, im assuming your ifs front end, or for the straight axle??? Either way as long as you dont remove the pinion gear you should be able to install them yourself fairly easy and if your bearings are ok, you shouldnt have to replace them. i installed my ez locker in my ifs frontend in about 3 hrs including removing the axle from my 4runner (with the engine out...) As far as the rear goes, once you remove the axles, take out the third, you should be able to install your rear on the bench. I took pics on my build thread for my front, still havent put one in the rear, but when i do i plan on doing it myself. I paid $130 for the front locker new, old stock. Its considered a lunchbox locker, not very strong compared to a arb but ok for what im using it for. So anyways if you plan on using your existing ring and pinion you should be able to do it yourself and youd only be out the cost of the lockers, some diff fluid, some gaskets, seals and your time. Not to mention educating yourself then you can be the guy charging mad cash for installs!!
Mar 14, 2013 | 06:52 PM
#1125
Thread Starter
Registered User
Joined: Apr 2012
Posts: 2,817
Likes: 2
From: Los Angeles CA
Update! today i finished sanding down the 2 leaf springs we started on yesterday. These 2 are RANCHO leafs.
All sanded down:

Nicely primed; 2 coats:
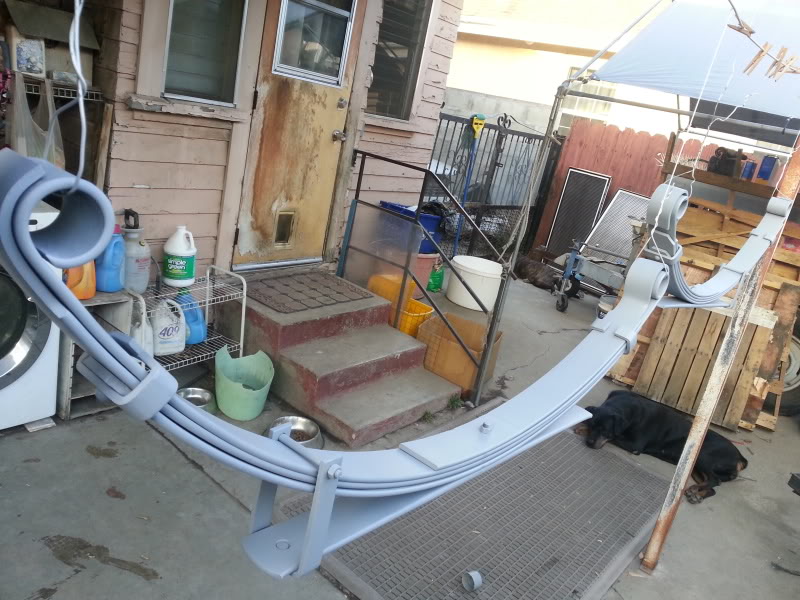
And finally painted:
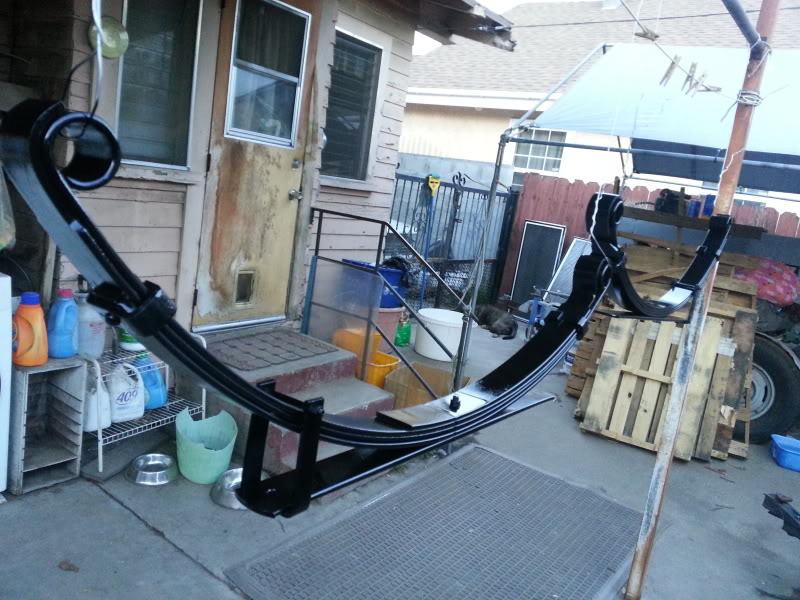
I think i did a good job on it. I hope it will be good in the end.
All sanded down:
Nicely primed; 2 coats:
And finally painted:
I think i did a good job on it. I hope it will be good in the end.
Mar 14, 2013 | 09:56 PM
#1127
Registered User


Joined: Mar 2012
Posts: 7,125
Likes: 681
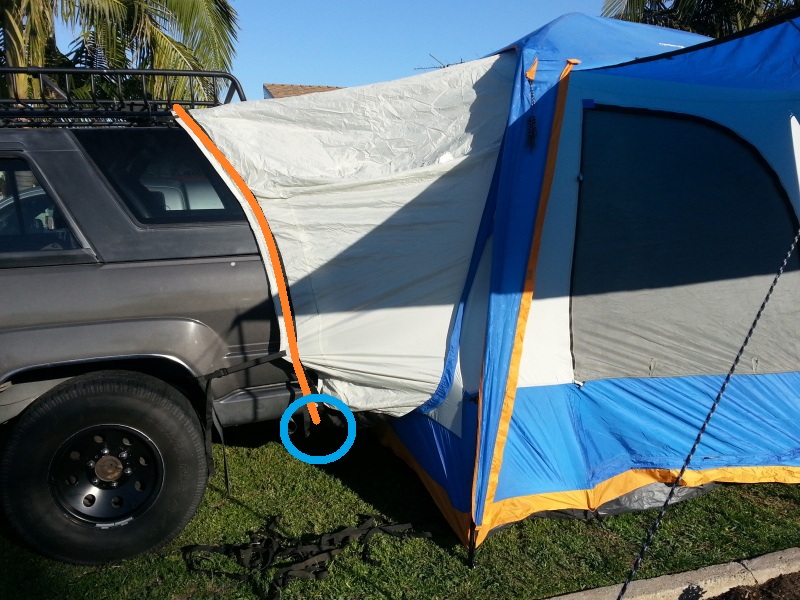
...That blue part on top of the tent is a Rain-fly...
...to waterproof the truck attachment part i was thinking possibly stretchy ropes.
... I'll look into that synthetic stuff you're talking about. We did have a ton of blankets this past trip and it did take up alot of space in the bed of the truck. thanks man. any particular ones?
...id rather have a professional do it ya get me?
Re: sleeping bag, you need to anticipate what you plan to do with it. Just load it in car for car camping? OK to get big rectangular bags. Backpack? Get slim fitting mummy with hood for maximum warmth with minimum bulk and weight. Down will further give you reduction in bulk and weight if you need it for very cold weather and you need to carry it.
Temp rating? About 20 degree F would work for most California trip. Because I take mine on winter trips on snow-covered mountains in CA, I chose a Zero-degree down bag. So far it has never failed me.
Re: Gears & lockers,,, Someday I'd like to get both, too. I don't have a garage to work in so I plan to just have the experts do it for me.
BTW, guys, Like I mentioned to Mark, Last Friday on my drive from SD to LA, another driver drove alongside me and held a piece of paper against his driver side window for me to see. It said, "Would You Sell the 4 Runner?" That felt good! Too bad, I did not have a camera ready- Pic would have been on Yotatech now.
Last edited by RAD4Runner; Mar 14, 2013 at 10:00 PM.
Mar 15, 2013 | 09:40 AM
#1129
Thread Starter
Registered User
Joined: Apr 2012
Posts: 2,817
Likes: 2
From: Los Angeles CA
Ray there are 2 layers on that sleeve that attach to the truck rear. The one that you see in the picture is obviously the exterior layer and then another one underneath that has that stretchy material you speak of. The stretchy material hugs the truck and the outer layer( which is about 1 foot longer just helps it a little more i'll try to make a video for you guys. i gotta open up the 2nd tent anyway so i still gotta assemble the tent to see if there are any rips of any kind.
William.Yea it was still glossy. I had just painted it. So in the picture they were still wet.
KornHuskerWizard I am curious to know too. More nervous to how much it'll come out to more then anything. but yea. This will definitely be an eye opener for all the people wanting to SAS such as yourself lol. So many charges and kits i didnt now were needed to do this...
 Ull get it!
Mar 17, 2013 | 11:28 AM
Ull get it!
Mar 17, 2013 | 11:28 AM
#1131
Thread Starter
Registered User
Joined: Apr 2012
Posts: 2,817
Likes: 2
From: Los Angeles CA
Good news everyone. I got my 4cyl 8" Spartan locker yesterday. I noticed it's different then the v6 locker. the 4cyl looks like it has more parts to install then the v6.
Now i will be able to start working on this front axle rebuild. Wanna at least take the front 3rd to go get the gears and locker installed. Once i have that completed or while i wait i can begin redoing all the seals gaskets, bearings and painting. pretty much everything else that comes with the Marlin Crawler Axle rebuild kit. I'm actually pretty anxious to finally start this. been looking forward to it for a long time!
------------------------------------------------------------------------------------------
For future reference:
http://forum.ih8mud.com/79-95-toyota...placement.html
https://www.yotatech.com/forums/f116...r-pics-177403/
Mar 18, 2013 | 10:25 AM
#1134
Registered User
Joined: Mar 2012
Posts: 7,125
Likes: 681
Guys,
Would like one installed, too but I think getting it done at the same time as my re-gear would save on labor cost, right?
Mar 18, 2013 | 11:37 AM
#1135
Hey Rad,......
If you have the gears done, u could then do the locker yourself and save quite a bit.
Just MHO.... LOCKER install is far less intimidating than the gear install.
If you have the gears done, u could then do the locker yourself and save quite a bit.
Just MHO.... LOCKER install is far less intimidating than the gear install.
Mar 18, 2013 | 11:38 AM
#1136
Thread Starter
Registered User
Joined: Apr 2012
Posts: 2,817
Likes: 2
From: Los Angeles CA
Thanks Will. Ill keep you all updated through the progress as best i can.
Yea I remember the price being cheaper a while back too. Maybe I should have bought them back then. lol
The locker install is supposed to be really straight forward and easy. Just take out spider gears and install the locker. Check out the videos on YouTube. All u would need is some more axle fluid. After u close it back up. Only reason I'm waiting is because I already have my gears sobid rather just install everything all at once. Plus I don't plan to go off road again till I get all this handled already. U should be cool with one locker till u decide to regear.
The locker install is supposed to be really straight forward and easy. Just take out spider gears and install the locker. Check out the videos on YouTube. All u would need is some more axle fluid. After u close it back up. Only reason I'm waiting is because I already have my gears sobid rather just install everything all at once. Plus I don't plan to go off road again till I get all this handled already. U should be cool with one locker till u decide to regear.
Mar 19, 2013 | 07:01 PM
#1137
Thread Starter
Registered User
Joined: Apr 2012
Posts: 2,817
Likes: 2
From: Los Angeles CA
Sorry guys not much of an update for today. I wasnt able to get much done but i did wanna show you what i did do and give some advice.
Today i spent about an hour just cleaning up the rust, mud/clay, and paint off this piece and some of the axle itself.
Before:
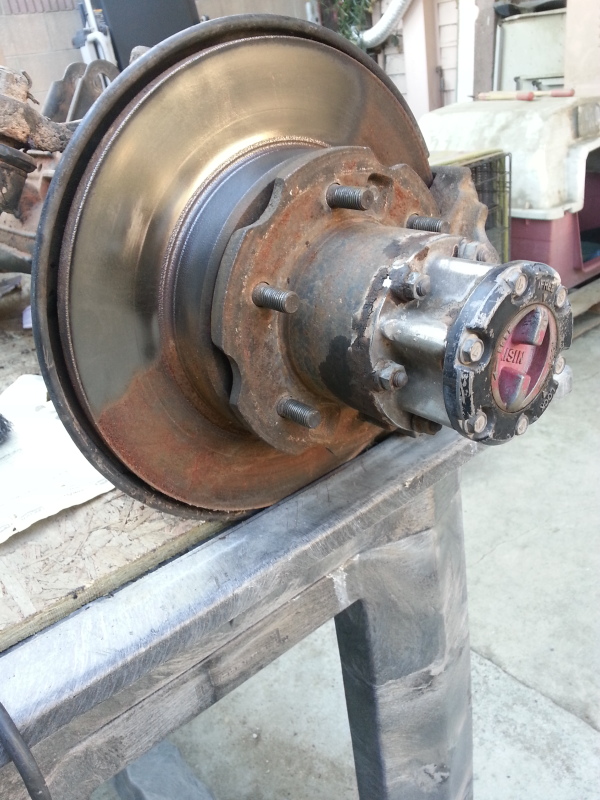
After:
It's obviously not gonna stay like this and i dont plan to paint it like this either. I plan to run the sander/grinder through a few more times once i remove all the parts so i can get into the nooks n' crannies.
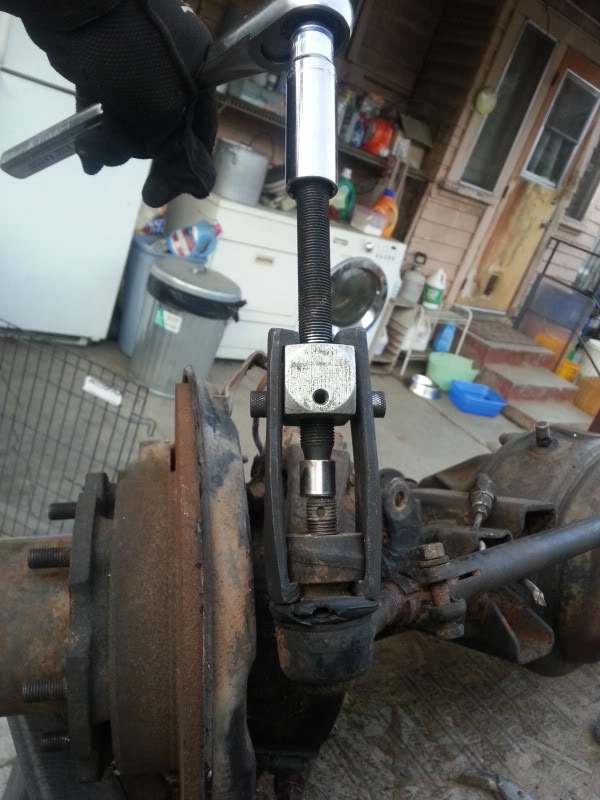
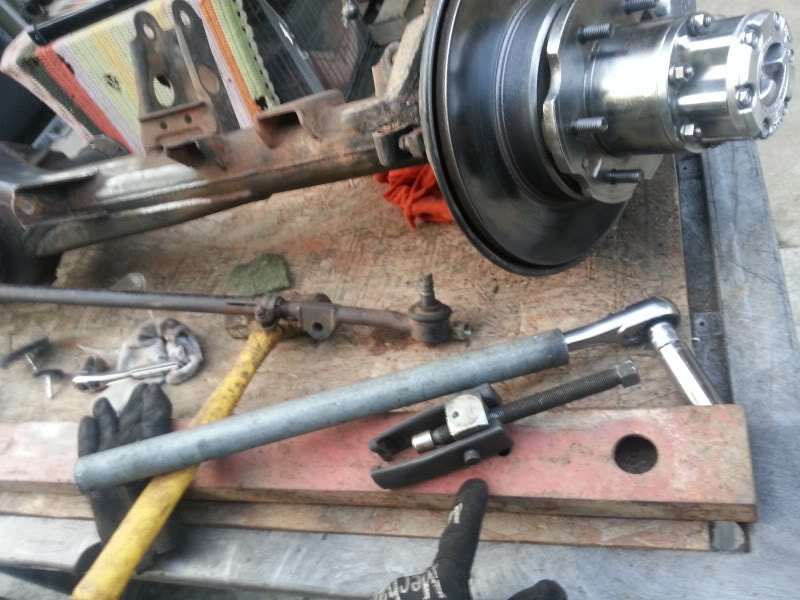
To anybody doing this job or planning to do this. MAKE SURE YOU HAVE THE RIGHT TOOLS! I cant imagine taking these stubborn tie rods off without a "Tie Rod Puller." It was definitely worth every penny out of the $10 i paid. Mark and Grego are my proof on this one. We all had a heck of a time trying to take off a tie rodwhich was attached to my donor steering box at the wilmington ca Pick Ur Part. Once i bought the tool we got it off in like 10 seconds. haha its a night and day difference! so do yourself a favor and buy it!
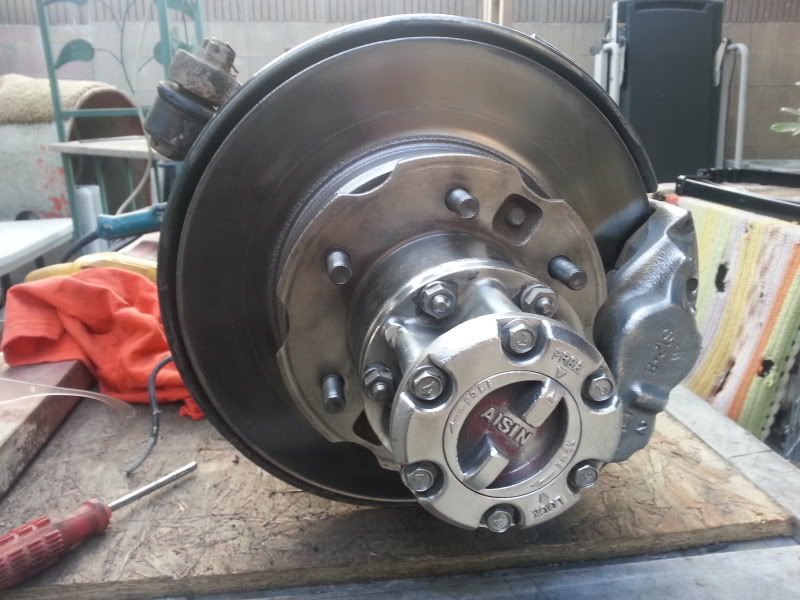
Its funny, you can definitely tell the difference on my wheel hub/brakes compared to that 1st picture. i was just looking at the pix and was like DAAYYYUMM!!!! big difference lol
It was so hard to remove i had to use my breaker bar pipe to get it loose. Sometimes rust can practically weld stuff together lol
Thats all i was able to get in for today. I only got about an hour and 1/2 work done today. Daylight doesn't last very long out here in SoCal this time of year. I figure while i try to raise enough money to cover the costs for this project i might as well try cleaning up the exterior of the axle as best as i can before i take it apart. Better to have it all prepared and ready for painting while i can. Make my job much easier later on when i remove each piece and clean them up 1 by 1 and paint them individually.
I'll try to get more stuff done tomorrow and hopefully share some more pix!
----------------------------------------------------------------------------------------------------------------------------------------------
....and for future reference
https://www.yotatech.com/forums/f115...ctures-180536/
Today i spent about an hour just cleaning up the rust, mud/clay, and paint off this piece and some of the axle itself.
Before:
After:
It's obviously not gonna stay like this and i dont plan to paint it like this either. I plan to run the sander/grinder through a few more times once i remove all the parts so i can get into the nooks n' crannies.
To anybody doing this job or planning to do this. MAKE SURE YOU HAVE THE RIGHT TOOLS! I cant imagine taking these stubborn tie rods off without a "Tie Rod Puller." It was definitely worth every penny out of the $10 i paid. Mark and Grego are my proof on this one. We all had a heck of a time trying to take off a tie rodwhich was attached to my donor steering box at the wilmington ca Pick Ur Part. Once i bought the tool we got it off in like 10 seconds. haha its a night and day difference! so do yourself a favor and buy it!
Its funny, you can definitely tell the difference on my wheel hub/brakes compared to that 1st picture. i was just looking at the pix and was like DAAYYYUMM!!!! big difference lol
It was so hard to remove i had to use my breaker bar pipe to get it loose. Sometimes rust can practically weld stuff together lol
Thats all i was able to get in for today. I only got about an hour and 1/2 work done today. Daylight doesn't last very long out here in SoCal this time of year. I figure while i try to raise enough money to cover the costs for this project i might as well try cleaning up the exterior of the axle as best as i can before i take it apart. Better to have it all prepared and ready for painting while i can. Make my job much easier later on when i remove each piece and clean them up 1 by 1 and paint them individually.
I'll try to get more stuff done tomorrow and hopefully share some more pix!
----------------------------------------------------------------------------------------------------------------------------------------------
....and for future reference
https://www.yotatech.com/forums/f115...ctures-180536/
Last edited by Redeth005; Mar 19, 2013 at 08:05 PM.
Mar 20, 2013 | 12:21 AM
#1139
Nice, keep at it, buddy! You'll get there quicker than you thought... Just chipping away every minute you can. You wanna be ready when it's time to cut and assemble.... So KEEP KILLIN IT!
YEP, that was a great buy, btw... Already loaned my third one out again and still haven't gotten that one back either... It's like they go around removing peoples pitmans and idlers and tie-rods, RANDOM STRANGERS, JUST FOR FUN! hahaha... I'ma get another that's a NO LOANER through my neighbor... who has a MAC account. He said 20$ through his buddy with his deal.. GOTTA have that in the arsenal!
YEP, that was a great buy, btw... Already loaned my third one out again and still haven't gotten that one back either... It's like they go around removing peoples pitmans and idlers and tie-rods, RANDOM STRANGERS, JUST FOR FUN! hahaha... I'ma get another that's a NO LOANER through my neighbor... who has a MAC account. He said 20$ through his buddy with his deal.. GOTTA have that in the arsenal!
Mar 21, 2013 | 01:41 PM
#1140
Thread Starter
Registered User
Joined: Apr 2012
Posts: 2,817
Likes: 2
From: Los Angeles CA
 thanks William. that was funny stuff..... oh... wait you're serious?!? lol jk I try to really get down to the metal so when i do paint it i wont have any nasty or visible paint bloches where i didnt take off the old paint ya know.
----------------------------------------------------------------------------------
Talking about getting stuff done; look what i did yesterday.
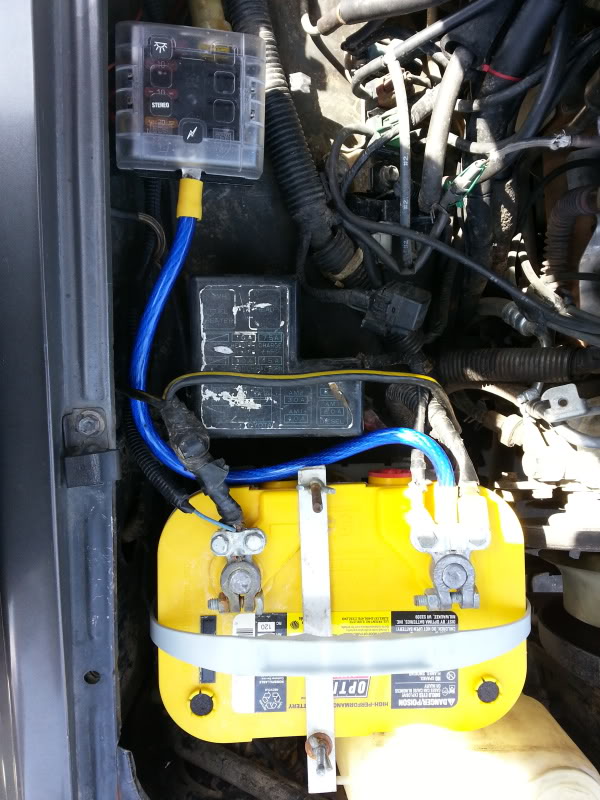
For the moment i am just using an Ultra high current 4 Gauge power distribution cable made by MONSTER. (It's really just a really thick amplifier power wire).
RAY, do you think that would be sufficient to power everything i would wanna run? it really is a really thick wire. I would like to run some off road lights(possibly 4 or 5), stereo system, and winch.


