
Redeth's 1989 4Runner Resurrection
 Nov 4, 2013 | 08:23 AM
#2221
Thread Starter
Registered User
Joined: Apr 2012
Posts: 2,817
Likes: 2
From: Los Angeles CA
I was gonna type out this weekend's update last night but I got home exhausted from band practice. Check in on my thread later on tonight guys. I have a huge update for you all with lots of pix, more fabbing up stuff, and some videos.
Nov 4, 2013 | 06:43 PM
#2222
Thread Starter
Registered User
Joined: Apr 2012
Posts: 2,817
Likes: 2
From: Los Angeles CA
Ladies and Gentlemen we are finished!
As you know my dad and I mounted the front bumper to the truck on friday night.
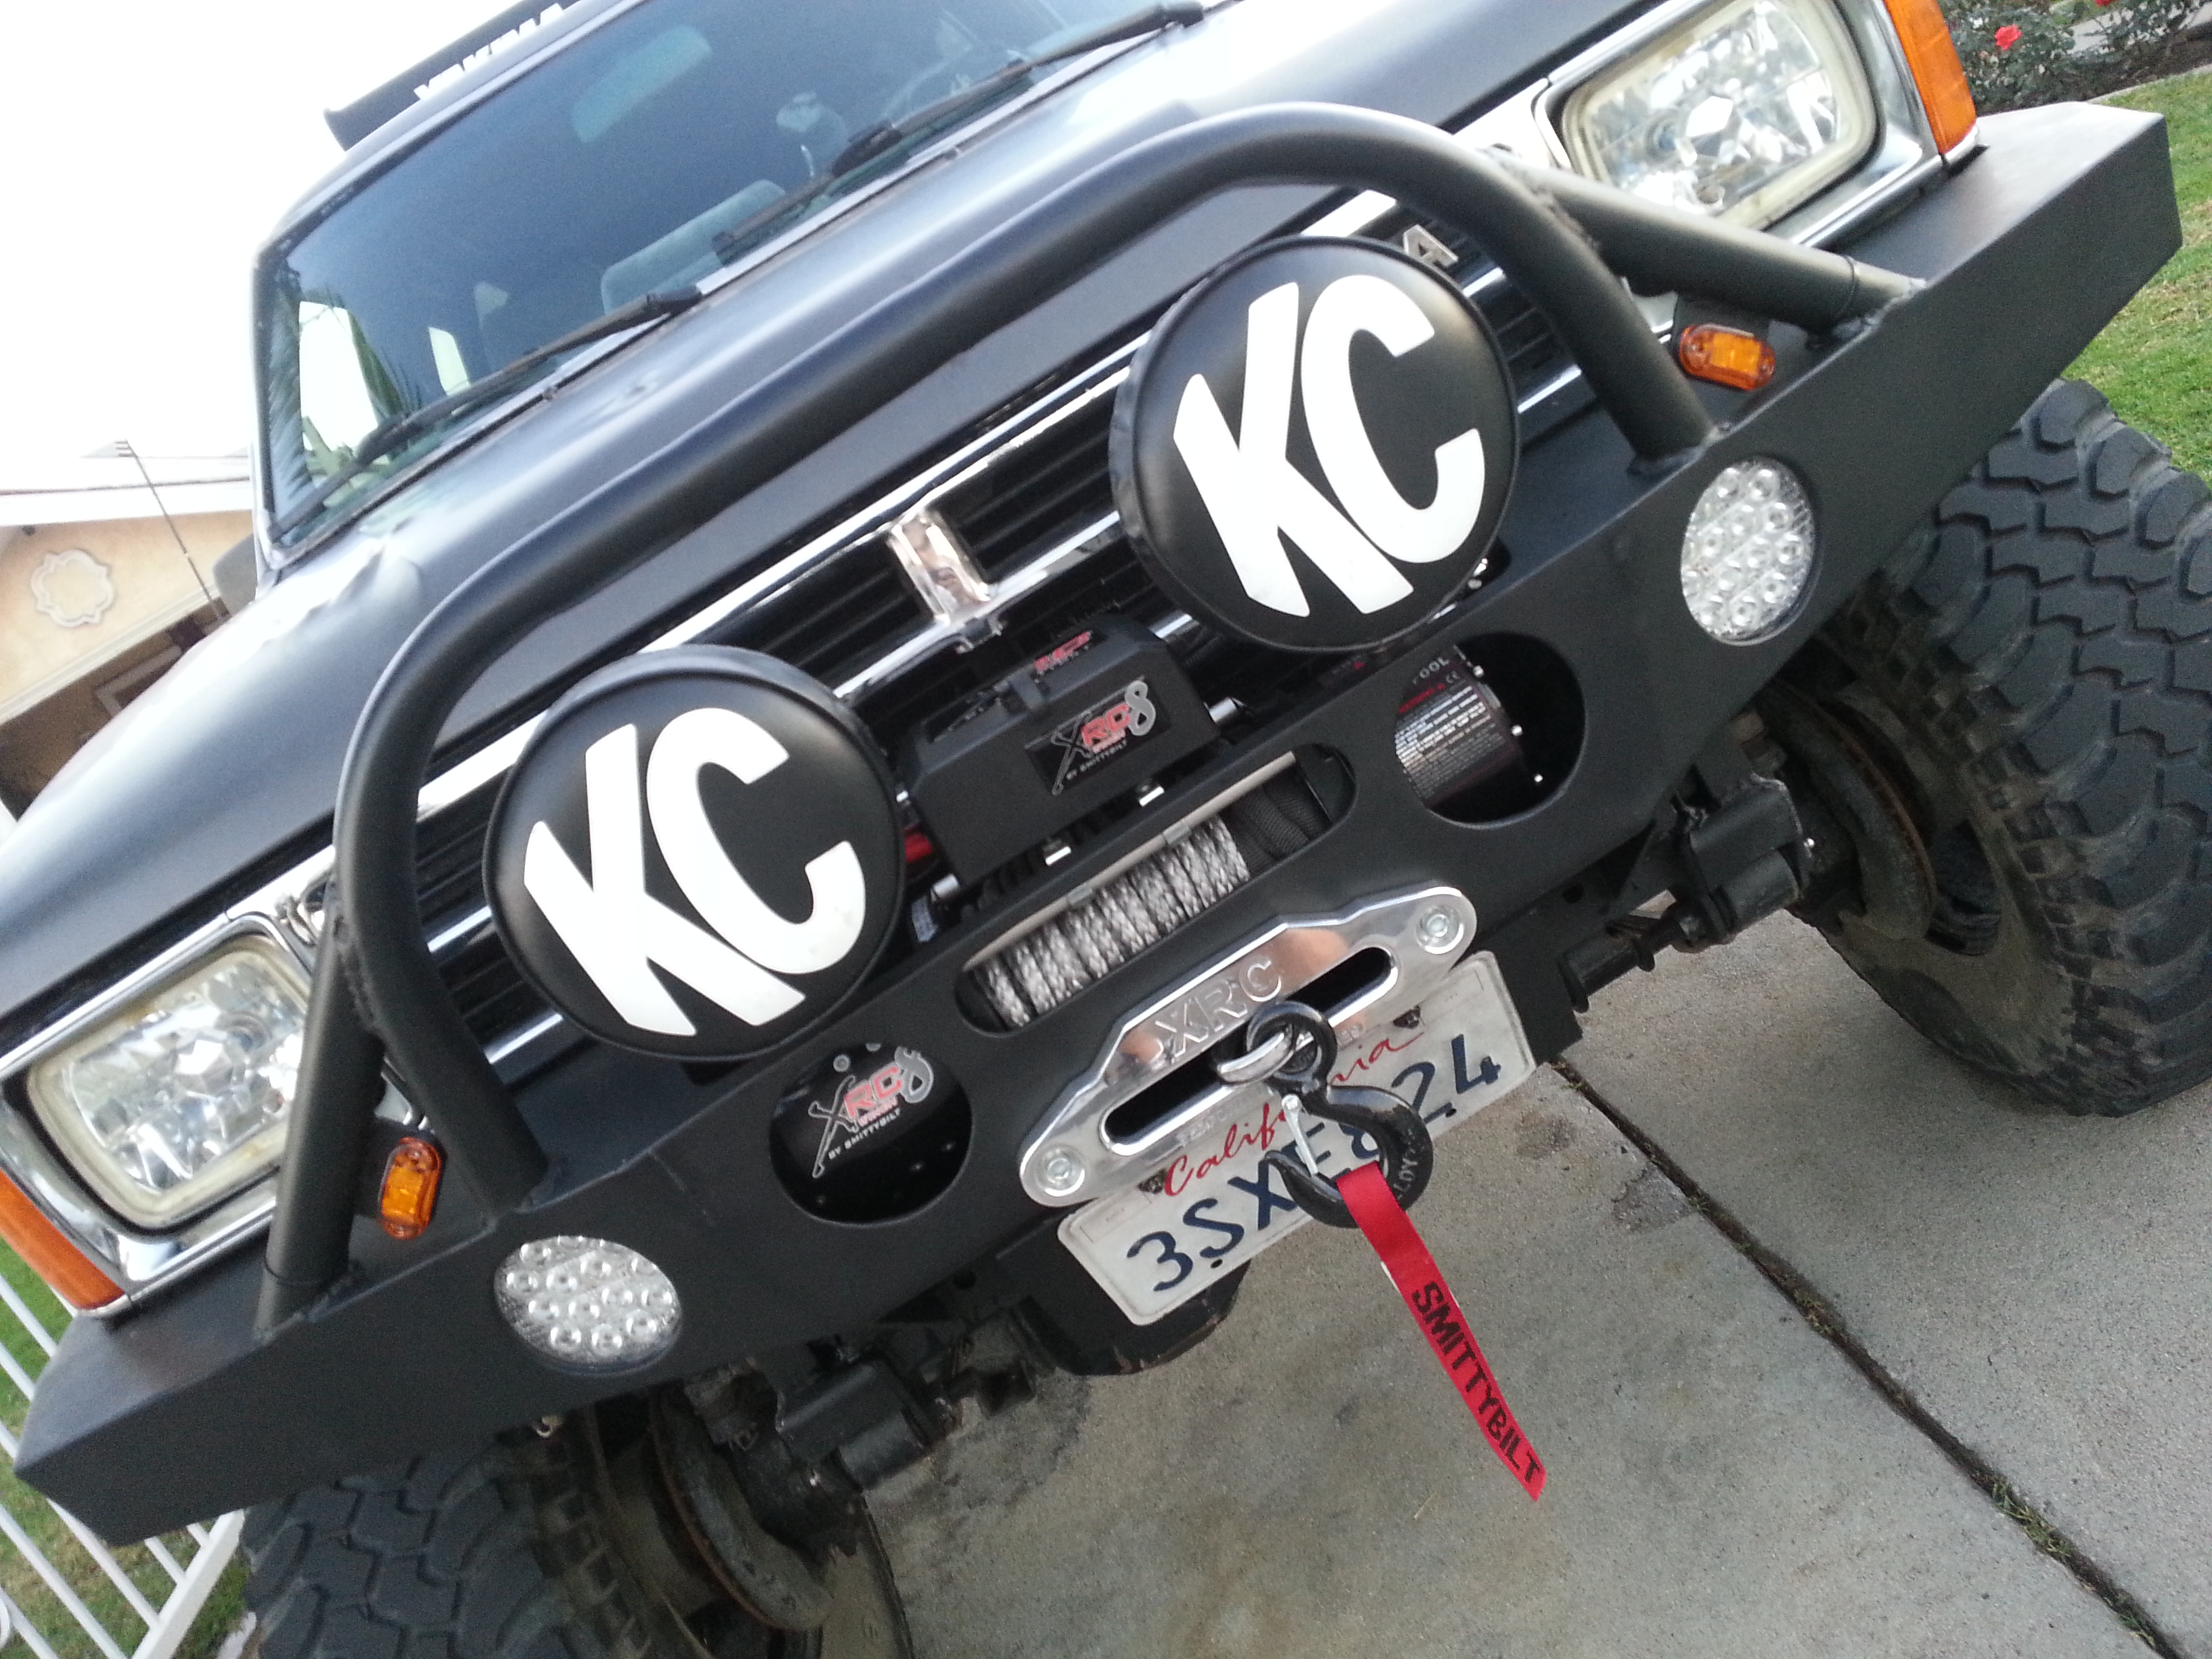
The following day I woke up nice n' early to begin installing the Smittybilt XRC8 Winch.
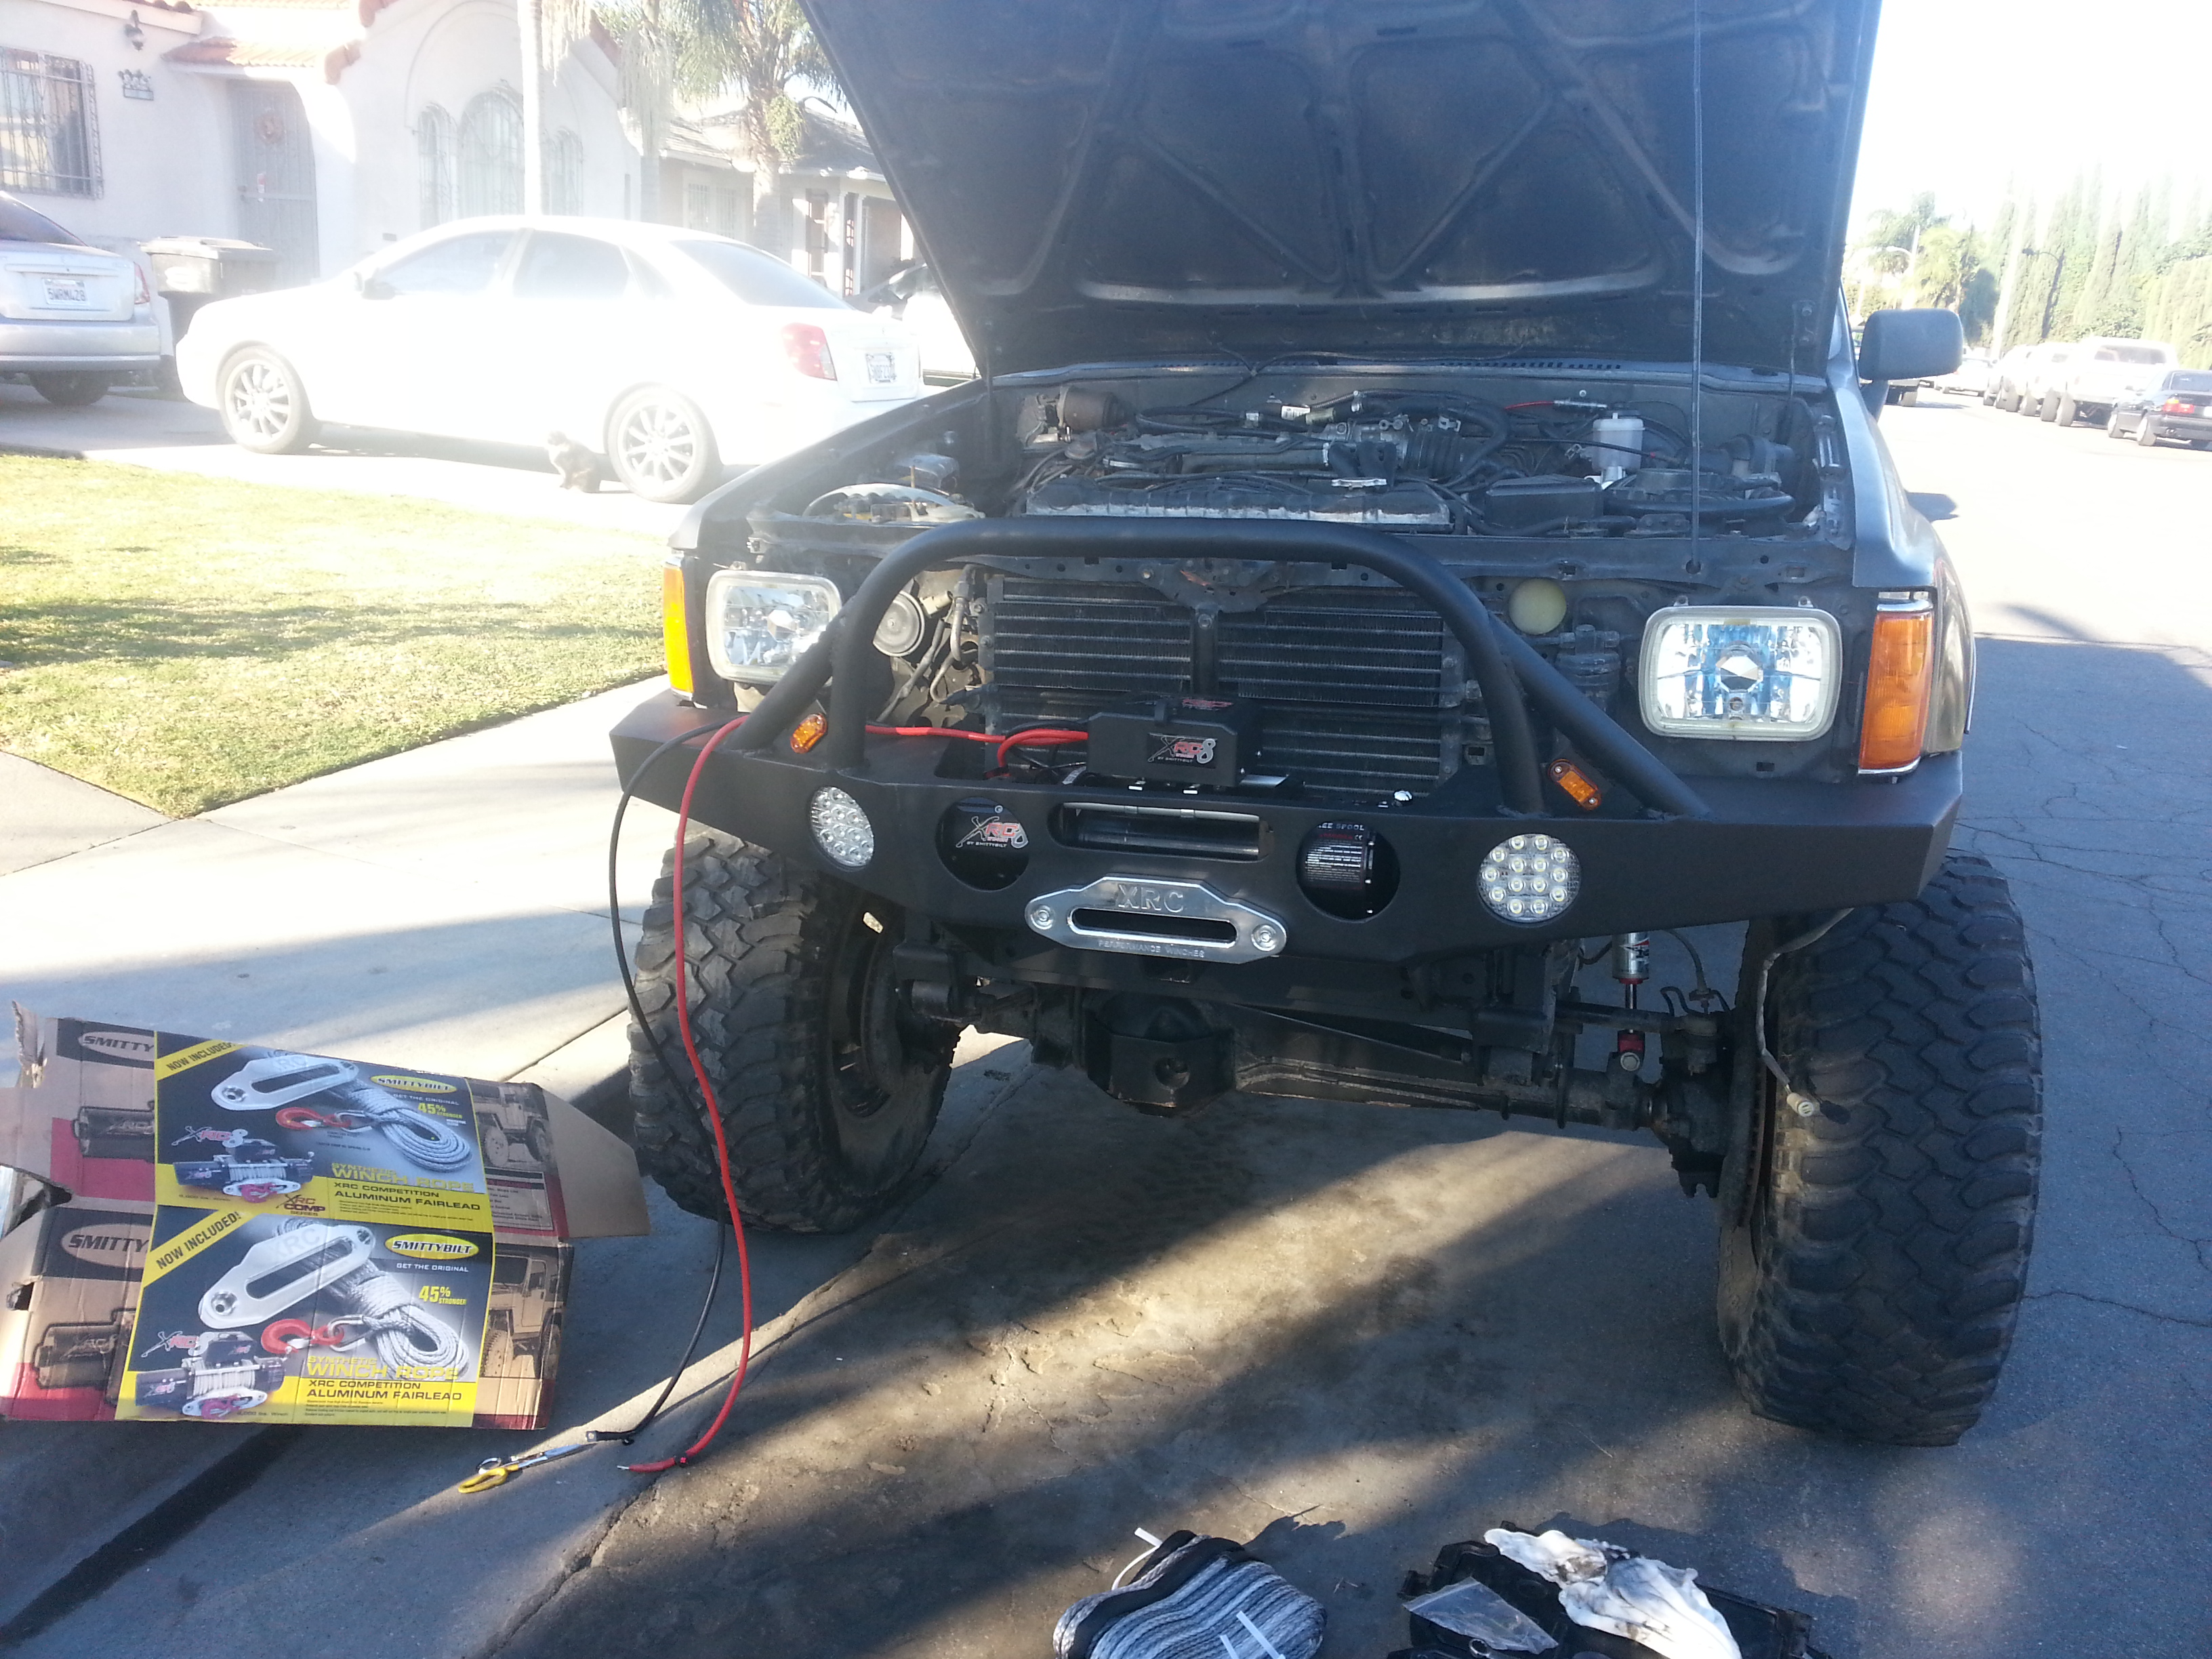
Got the synthetic rope started

Then I met up with Mark(Chefyota4x4) to get some help and learn how to install off-road lights properly. I'm very sorry everybody but i didn't take as many pictures as i should have taken. Barely took any at all.
Here we are still working on getting everything done. Soldering, heat shrinking covering up with the plastic flex, and wrapping with electrical tape.
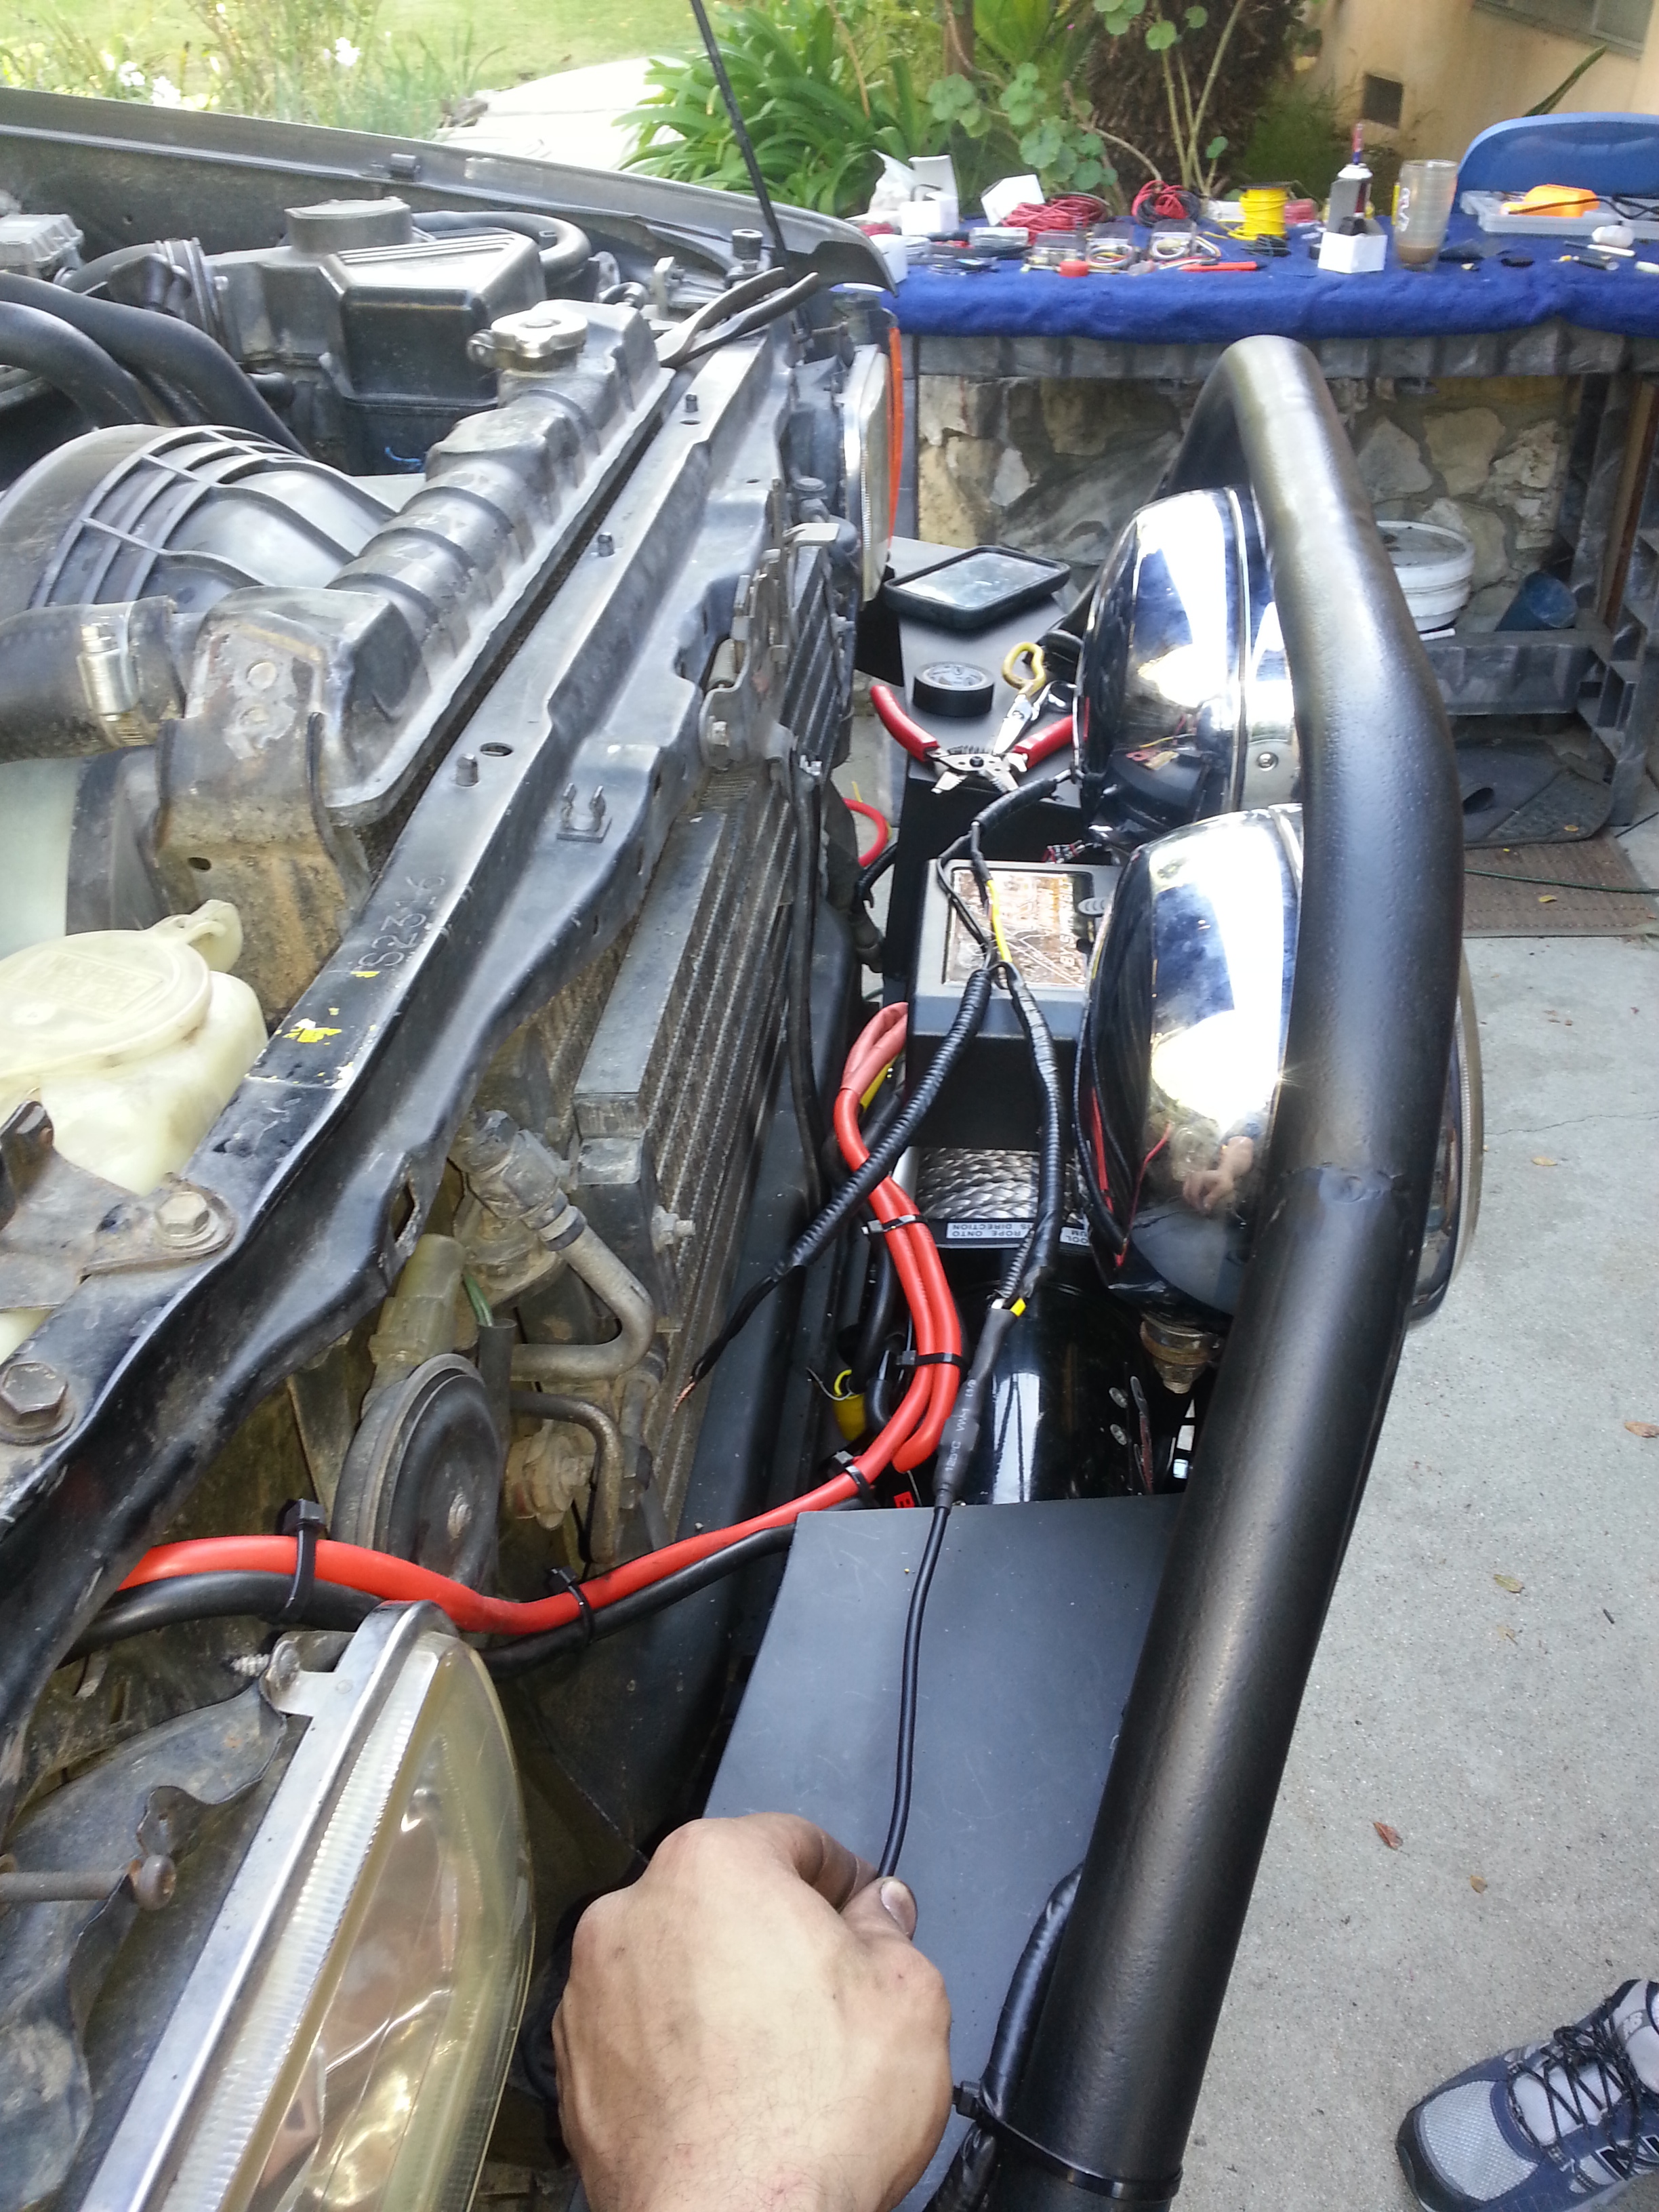
Joined up both driver side to the passenger side lights and brought the 2 wires into 1. We used male and female connectors then used heat shrink over it in case i ever had to remove the lights it wouldnt be much of a hassle.
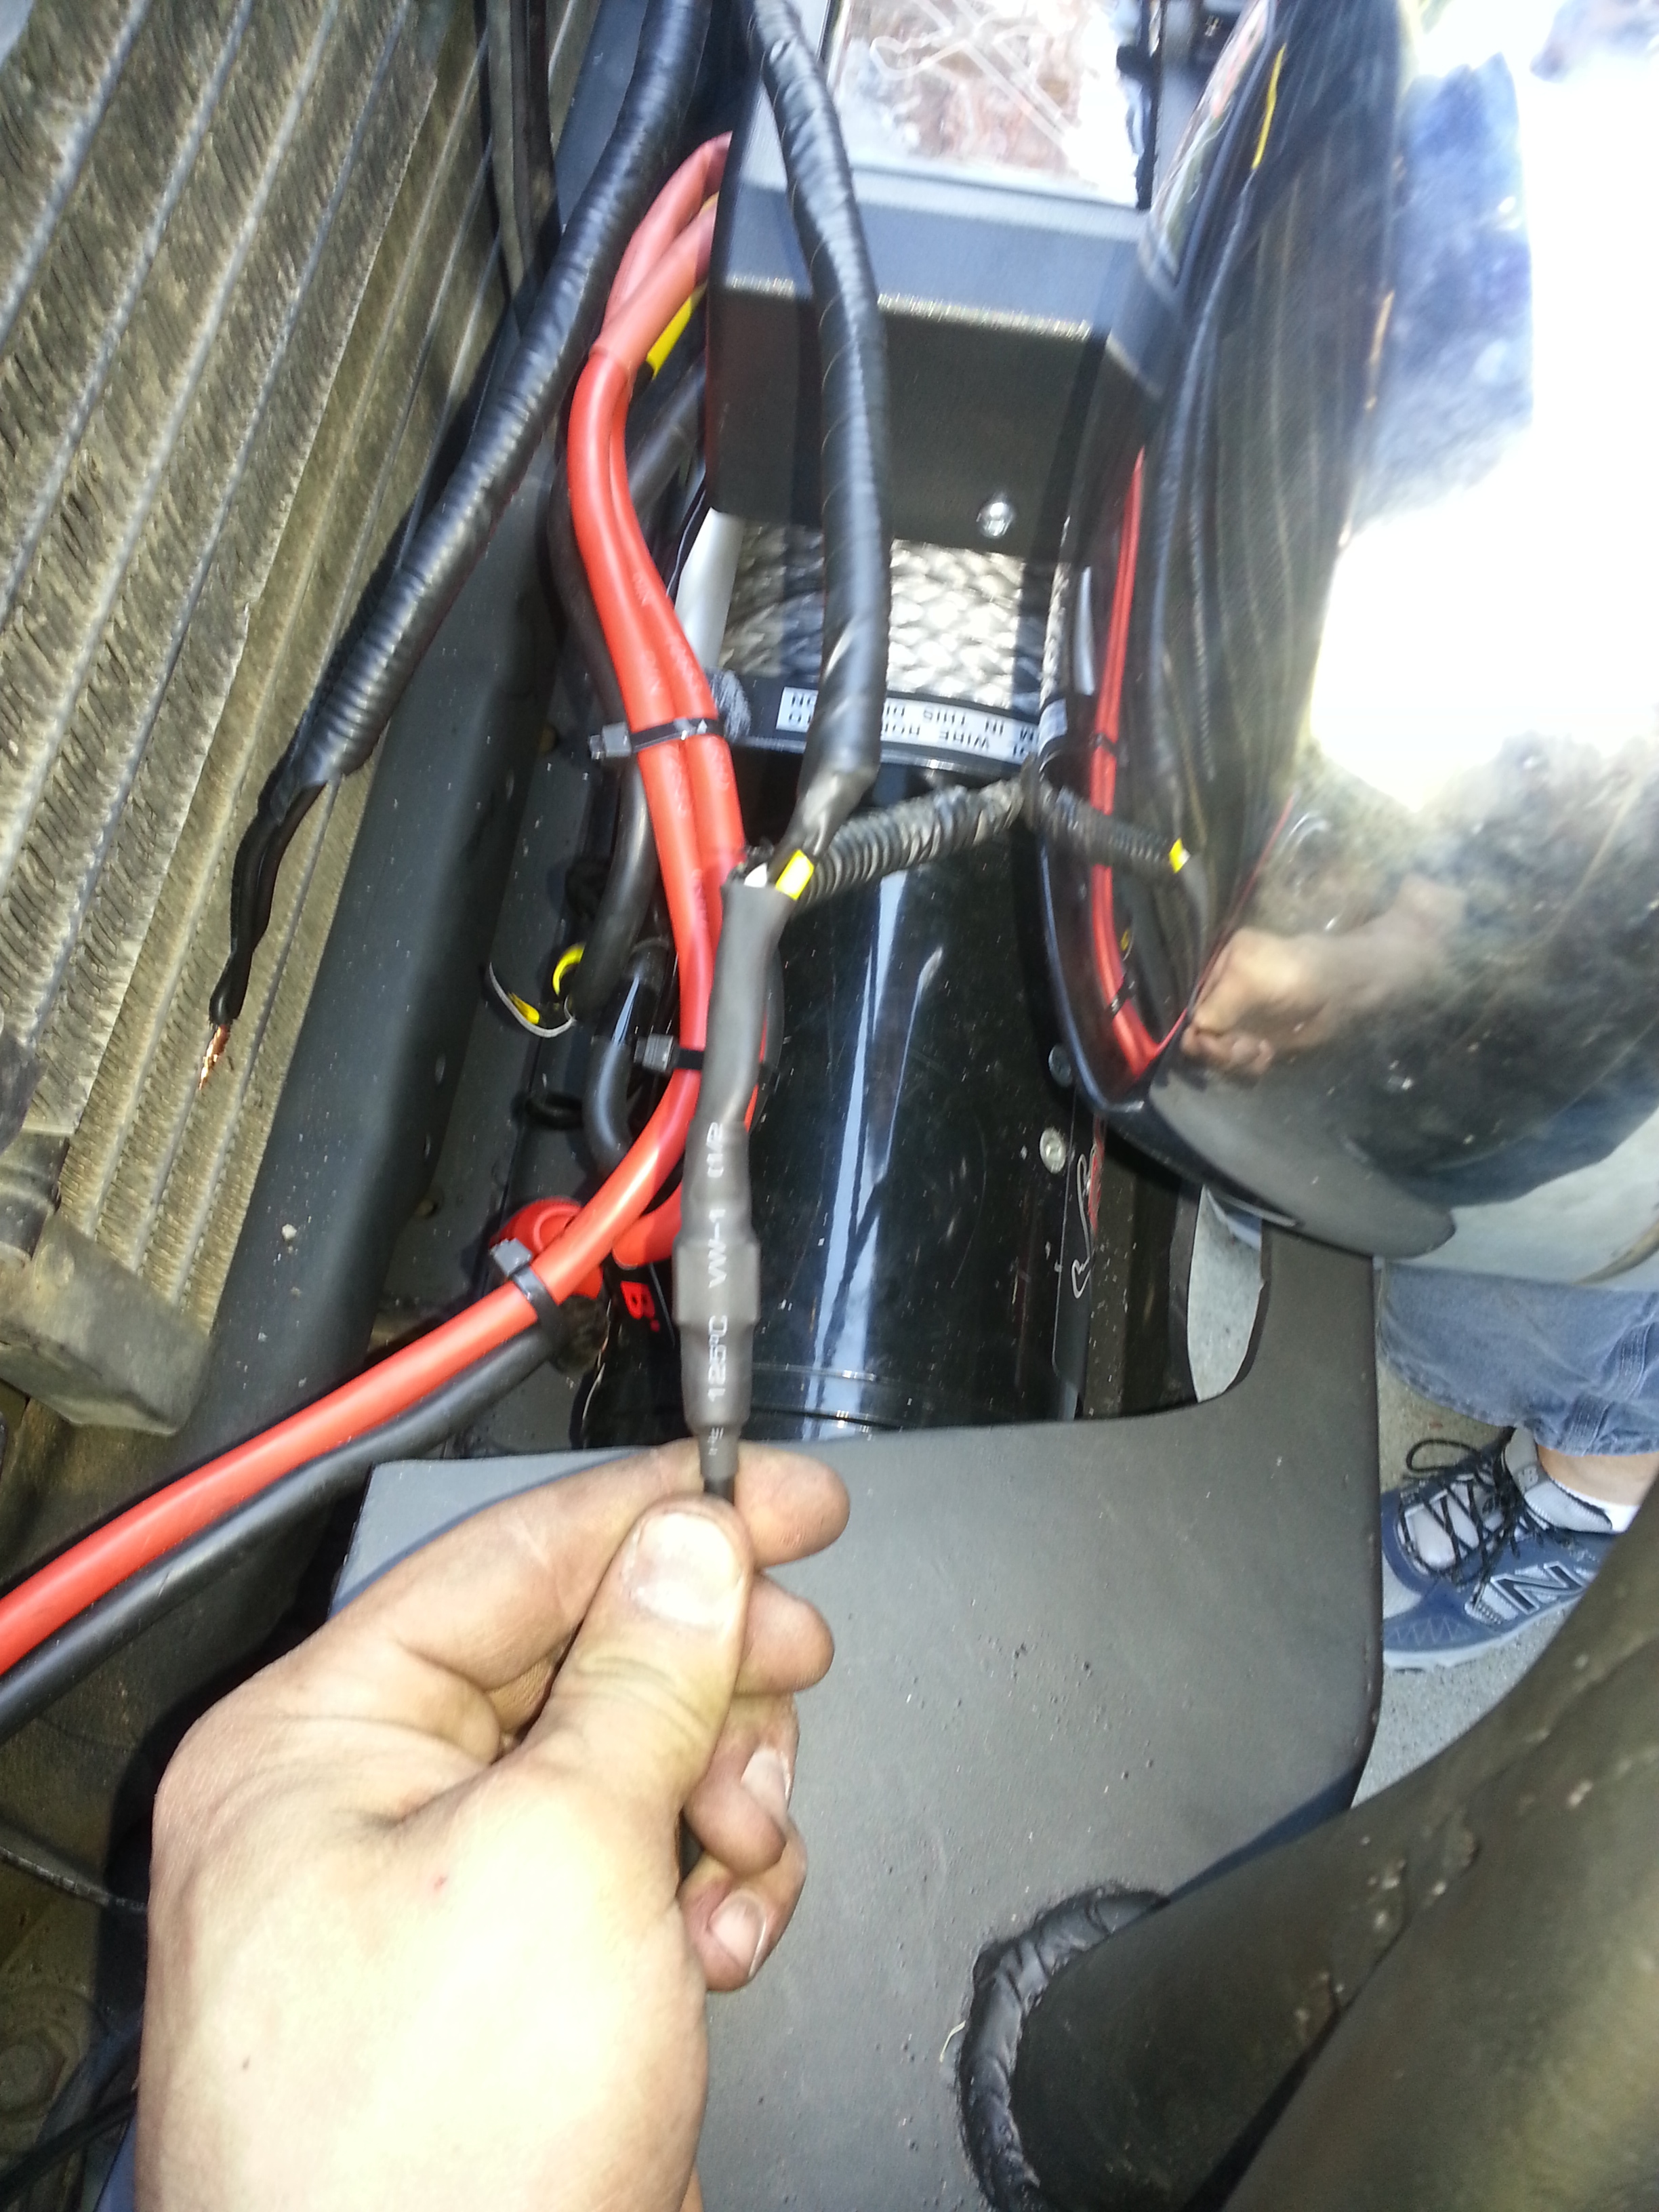
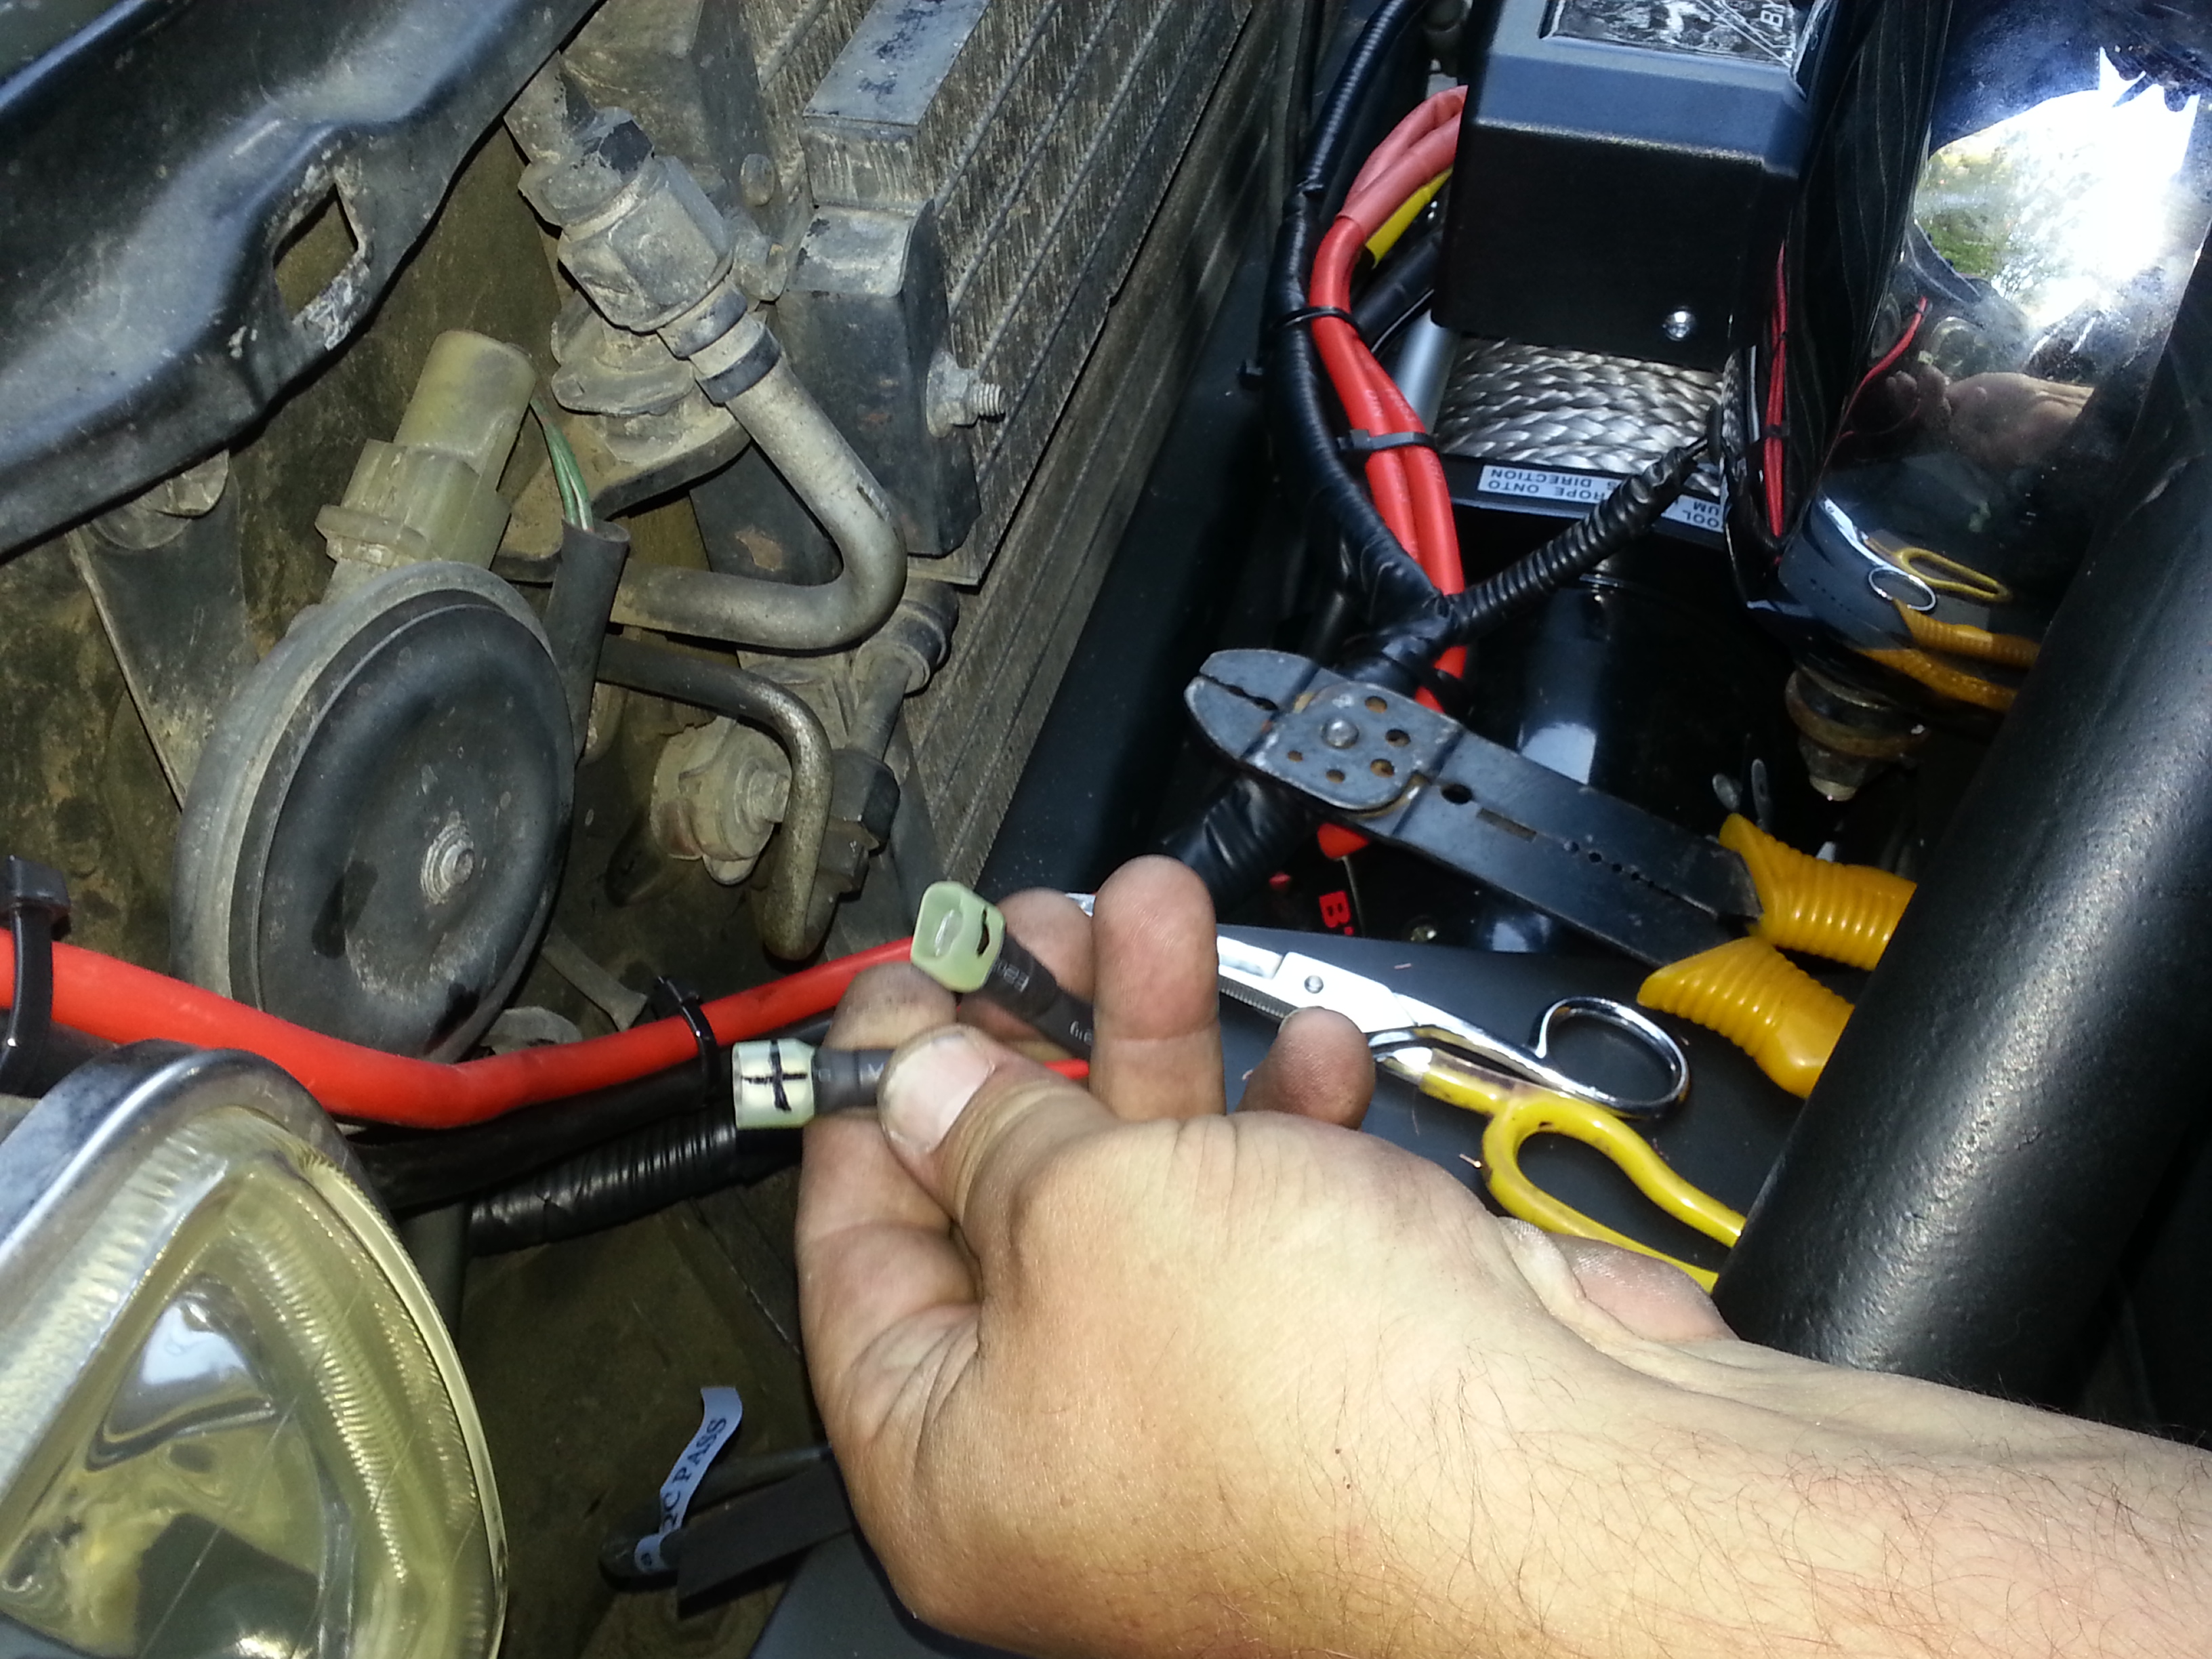
Wiring this stuff is a long process as it is if you want to do it clean and right. But we took a hell of a long time wiring up the Dick Cepek lights due to the wires on the Dick Cepek's being backwards. The white and black wires are switched around. Normally Black is ground! And really the polarity would just change if wired backwards, but the lights are also grounded to the bolt that they are mounted on. Meaning they are ground from the bumper and also to the wire. So every time we went to test out the wires we kept having sparks upon touching the wires together. after about 1hr or 1.5hrs we discovered that the white and black wires were wired wrong lol. For the life of us we just could not find out why we kept shorting out! it wasnt normal lol I guess it didnt help that Mark and i were both running very low on food and neither of us were able to think straight lol. After that we also ran into another problem with the relay wiring. We looked up the offroad light/switch/relay diagrams and the first 2 of 3 diagrams we were working off of were wrong. Apparently not everything on the internet is correct... imagine that lol Anyway after about another hour or so Mark found the wiring diagram he used to his truck's lights then we just used that diagram and BAM we were set! We began the day at 11:45 in the morning and we didnt finish till approx 12:30am. We had so many obstacles to overcome that we got sidetracked a lot. I'm just happy we were able to finish this that day.
Very grateful to Mark and all the help he has been along this project. i know absolutely nothing about wiring, relays and switches, and your experience and dedication to keep things looking clean and professional was definitely appreciated. Sorry we didnt finish in time for me to treat you n your mom to dinner but i will definitely make up for it by taking you two to Lucilles Smokehouse BBQ! yum...
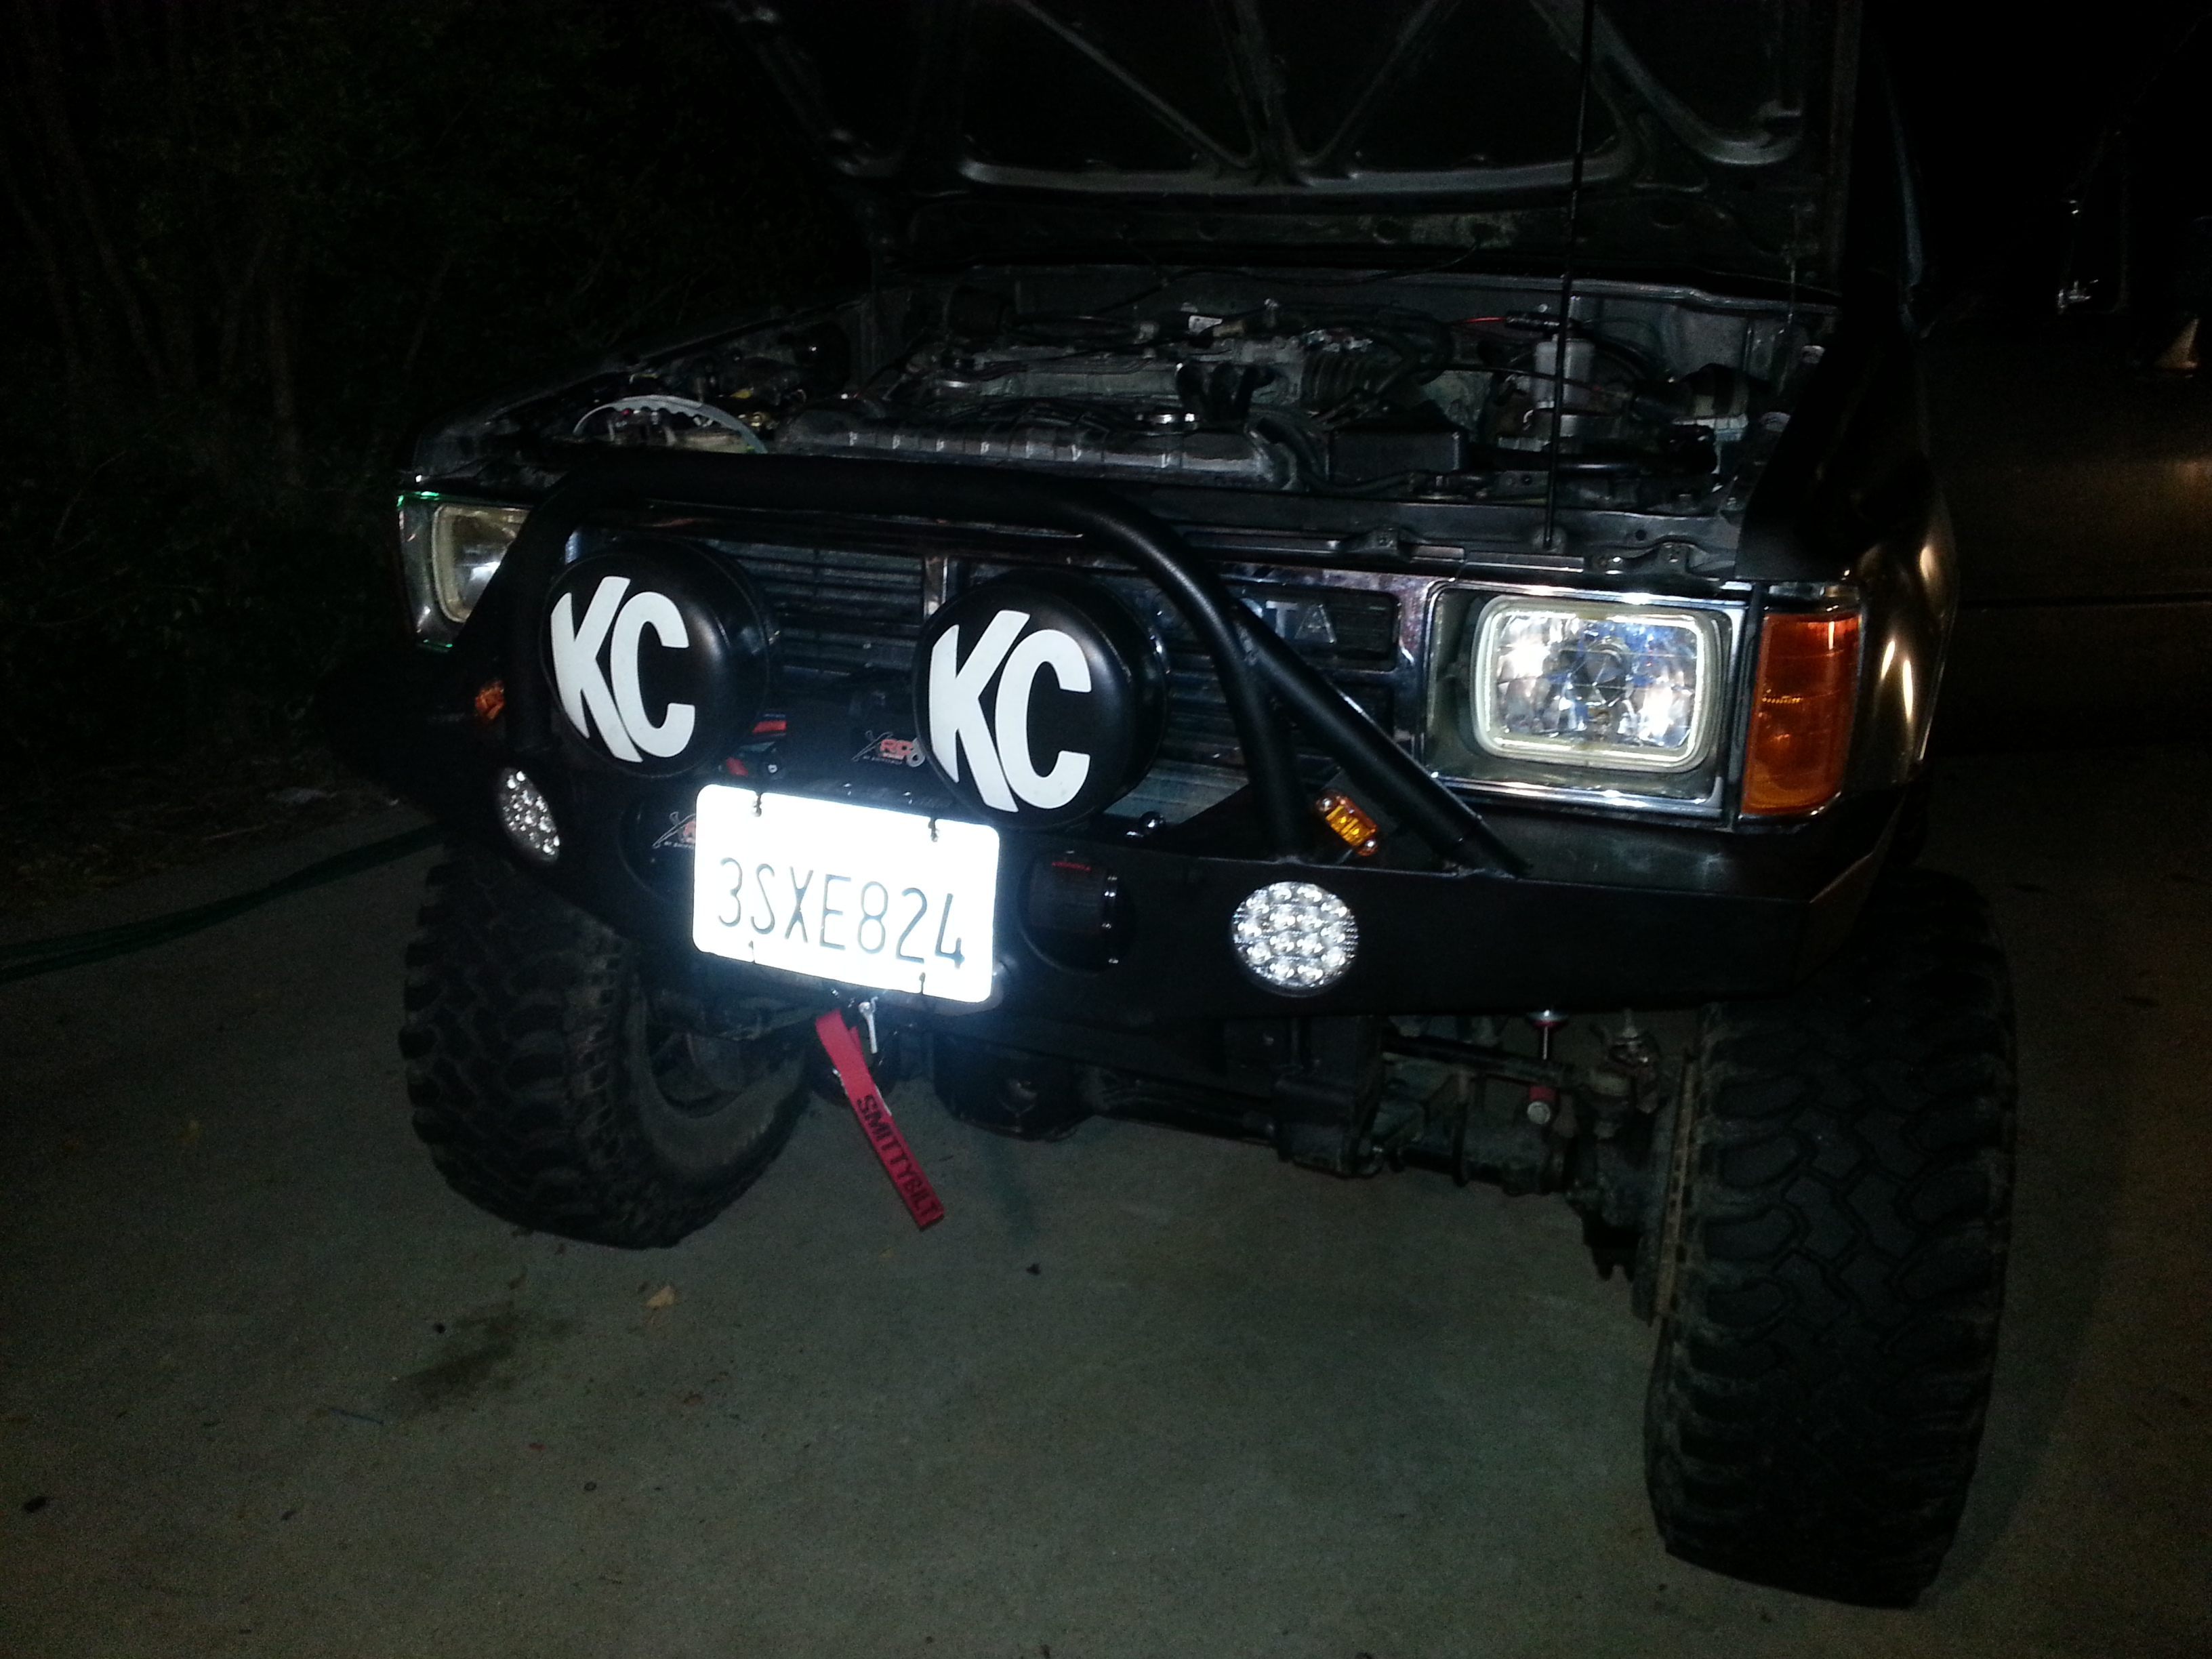
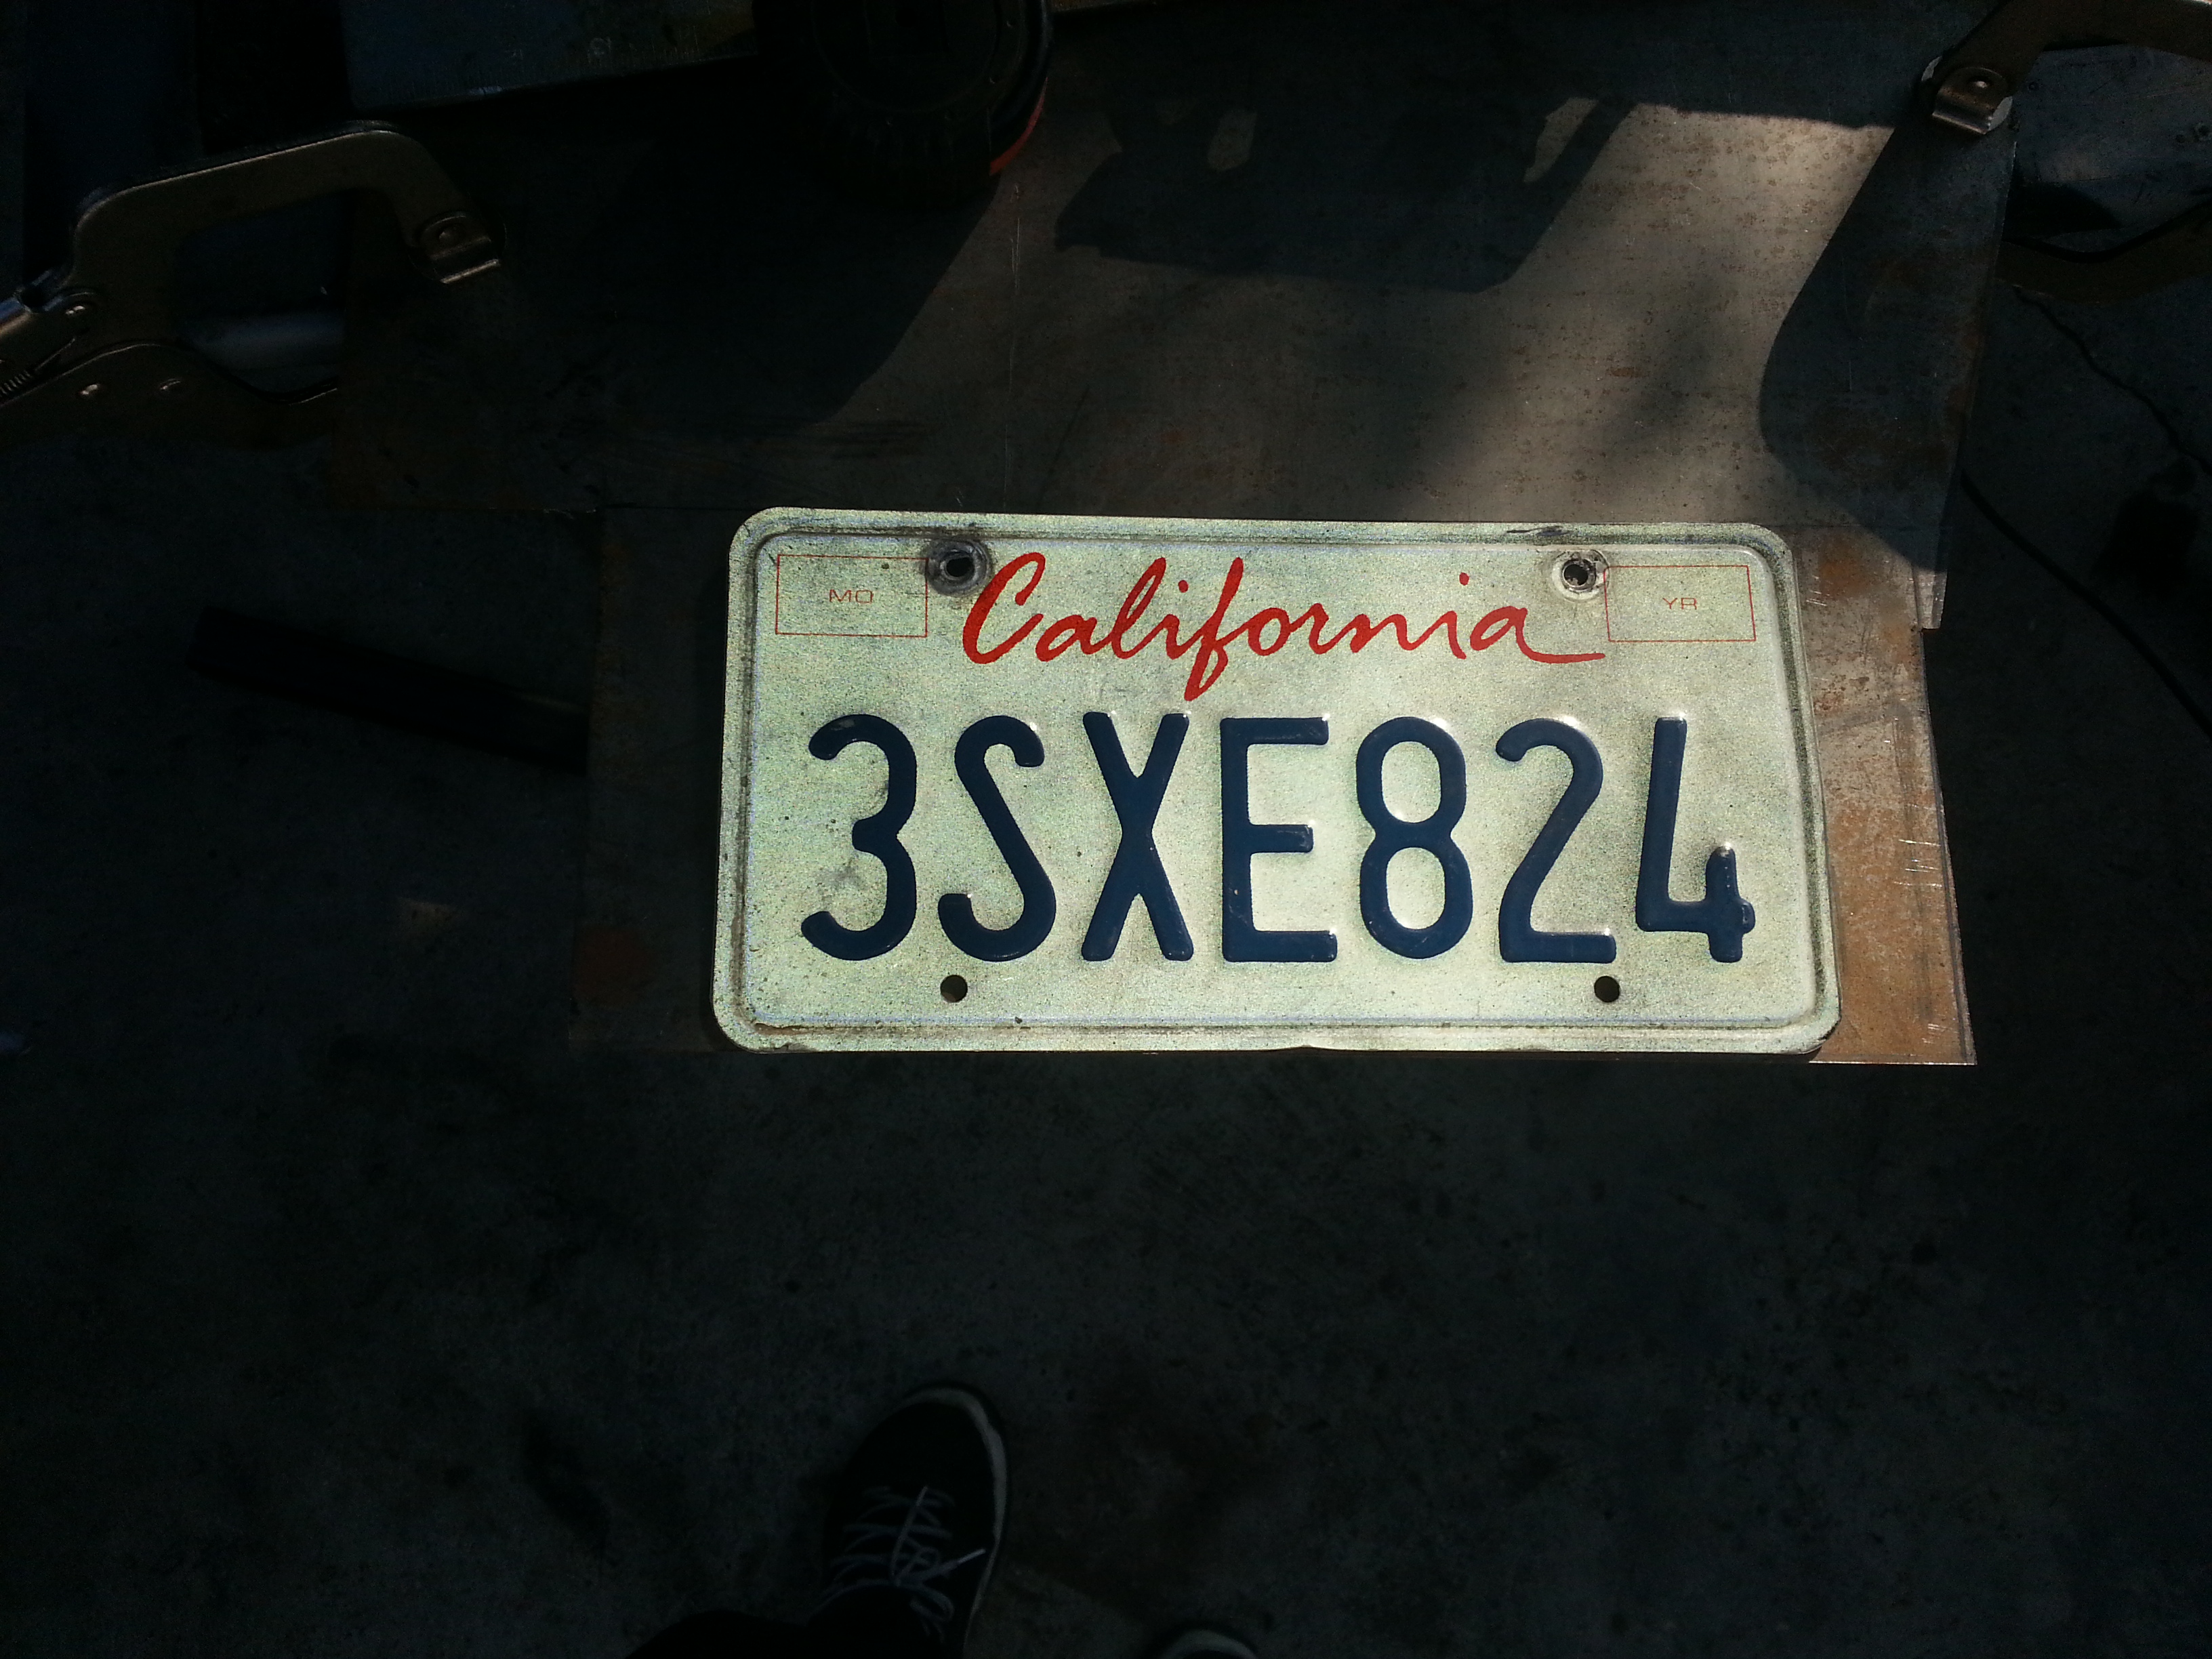
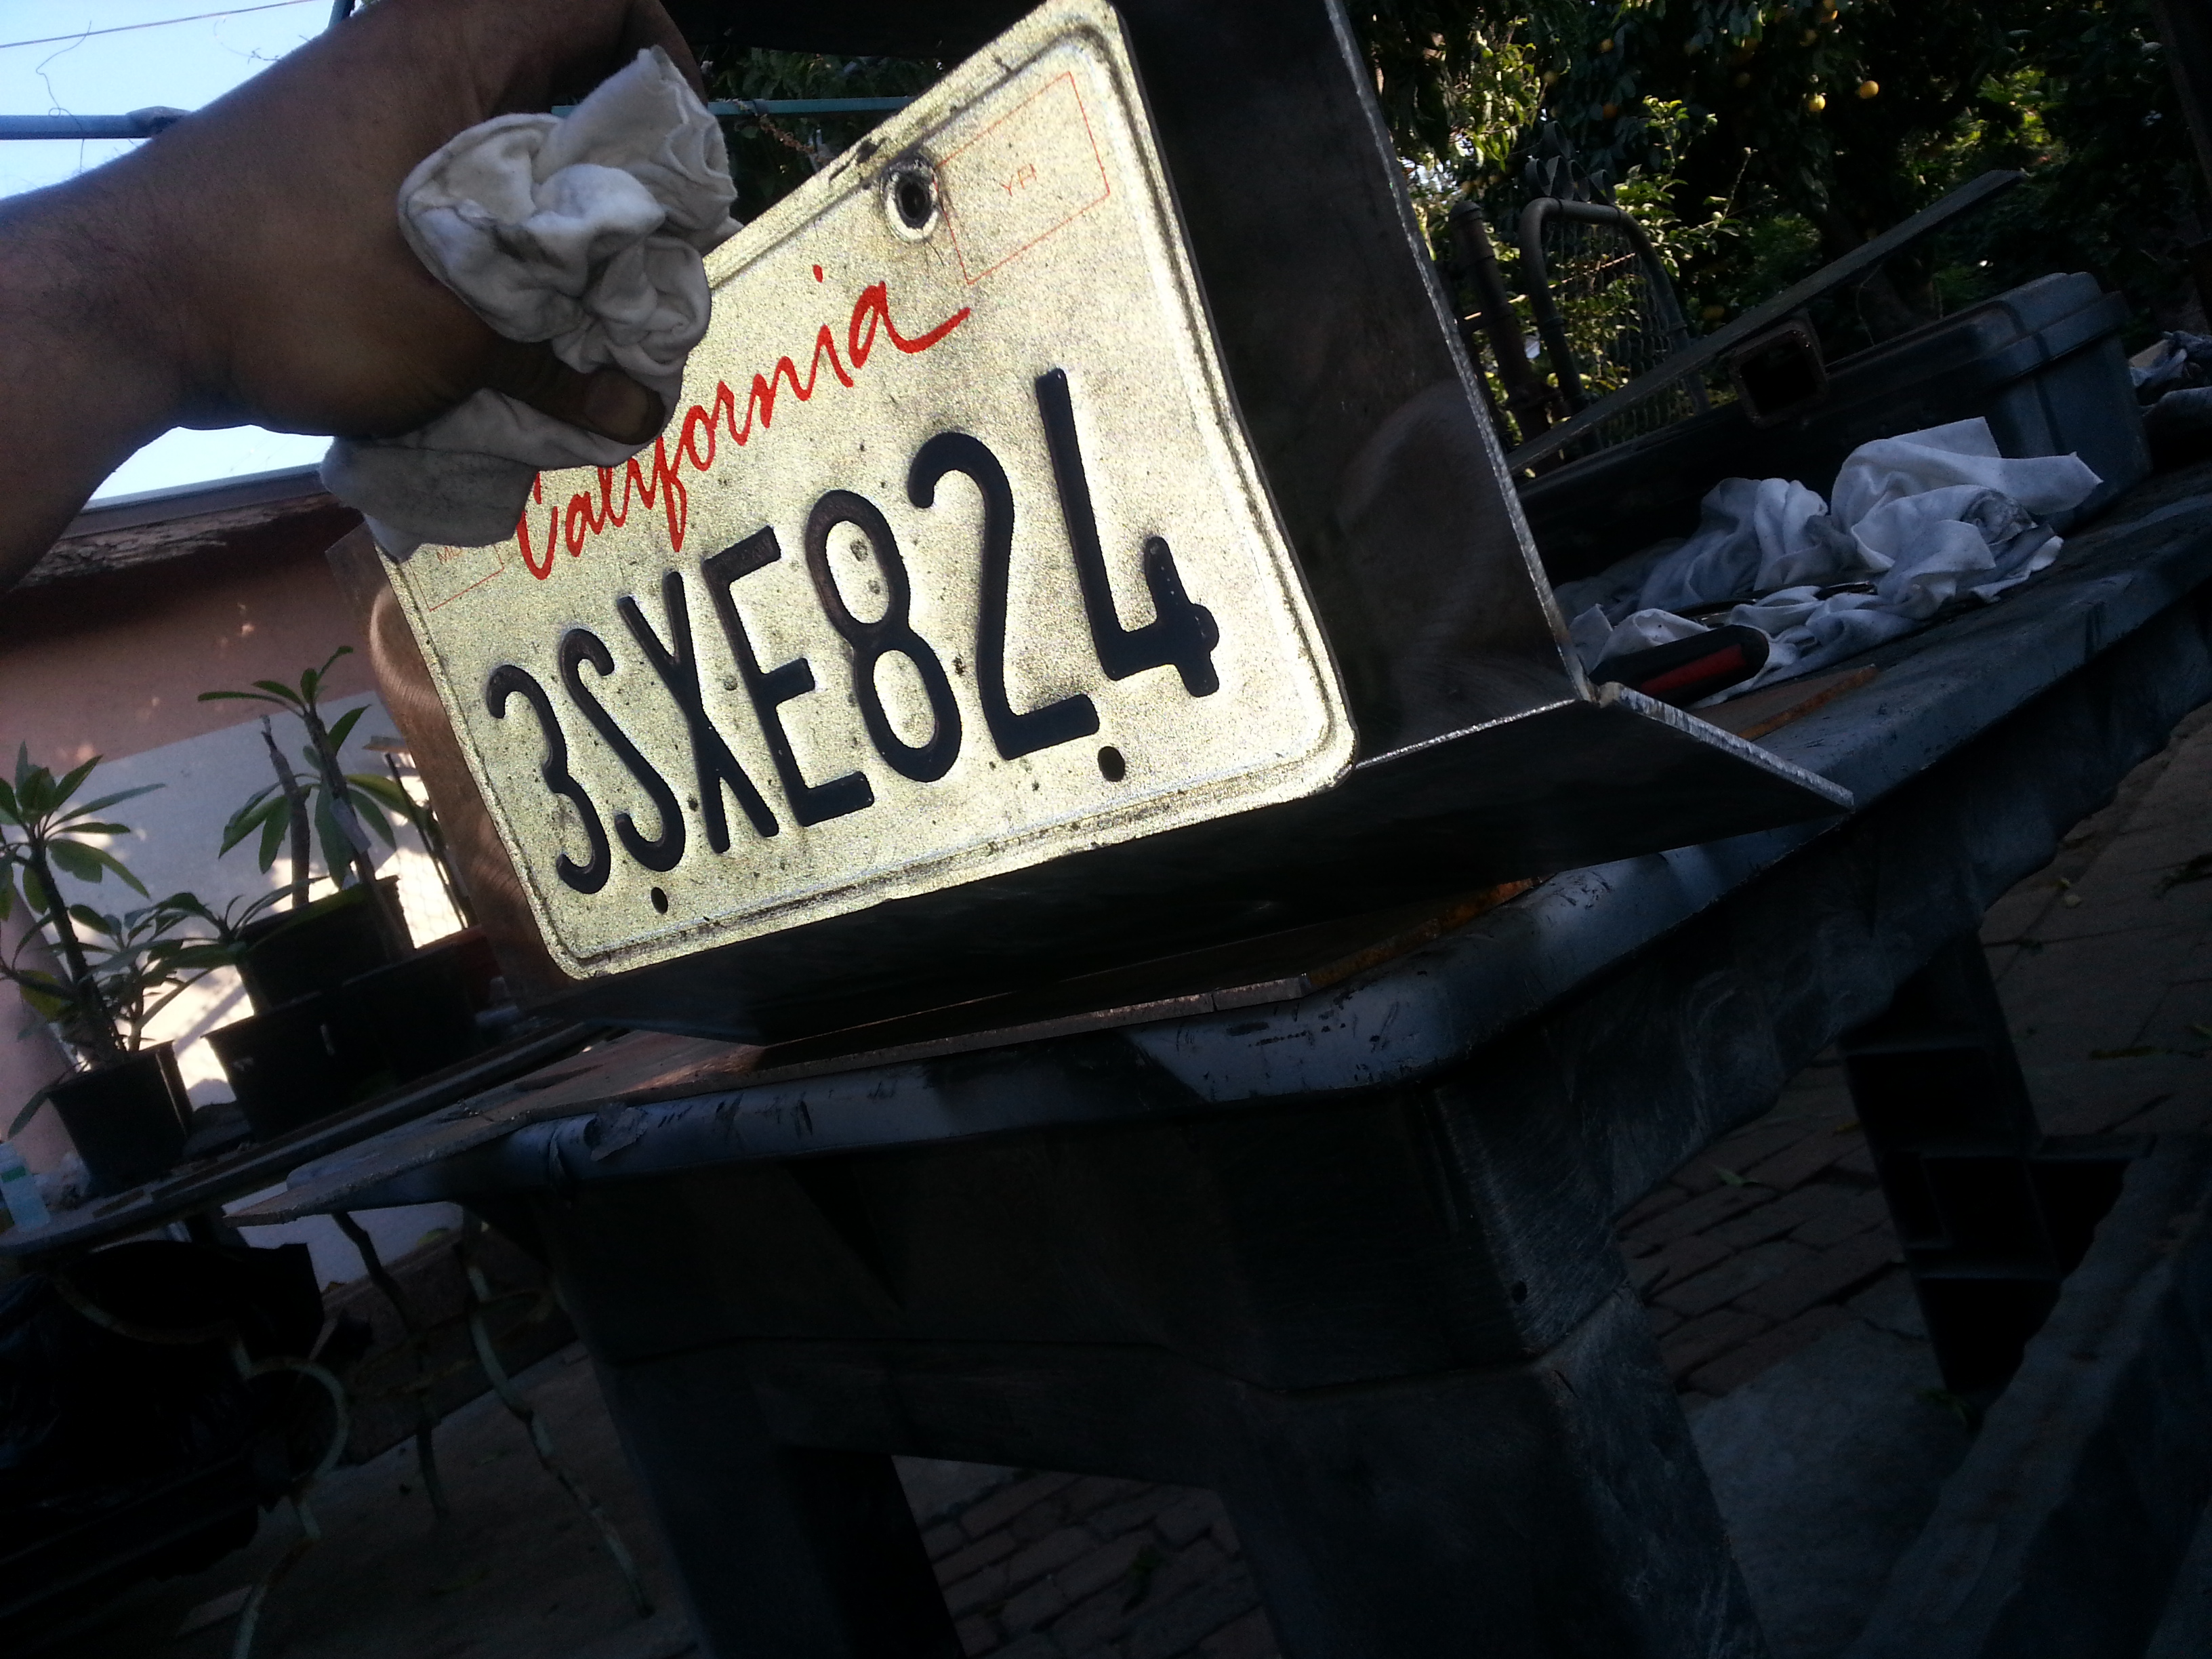
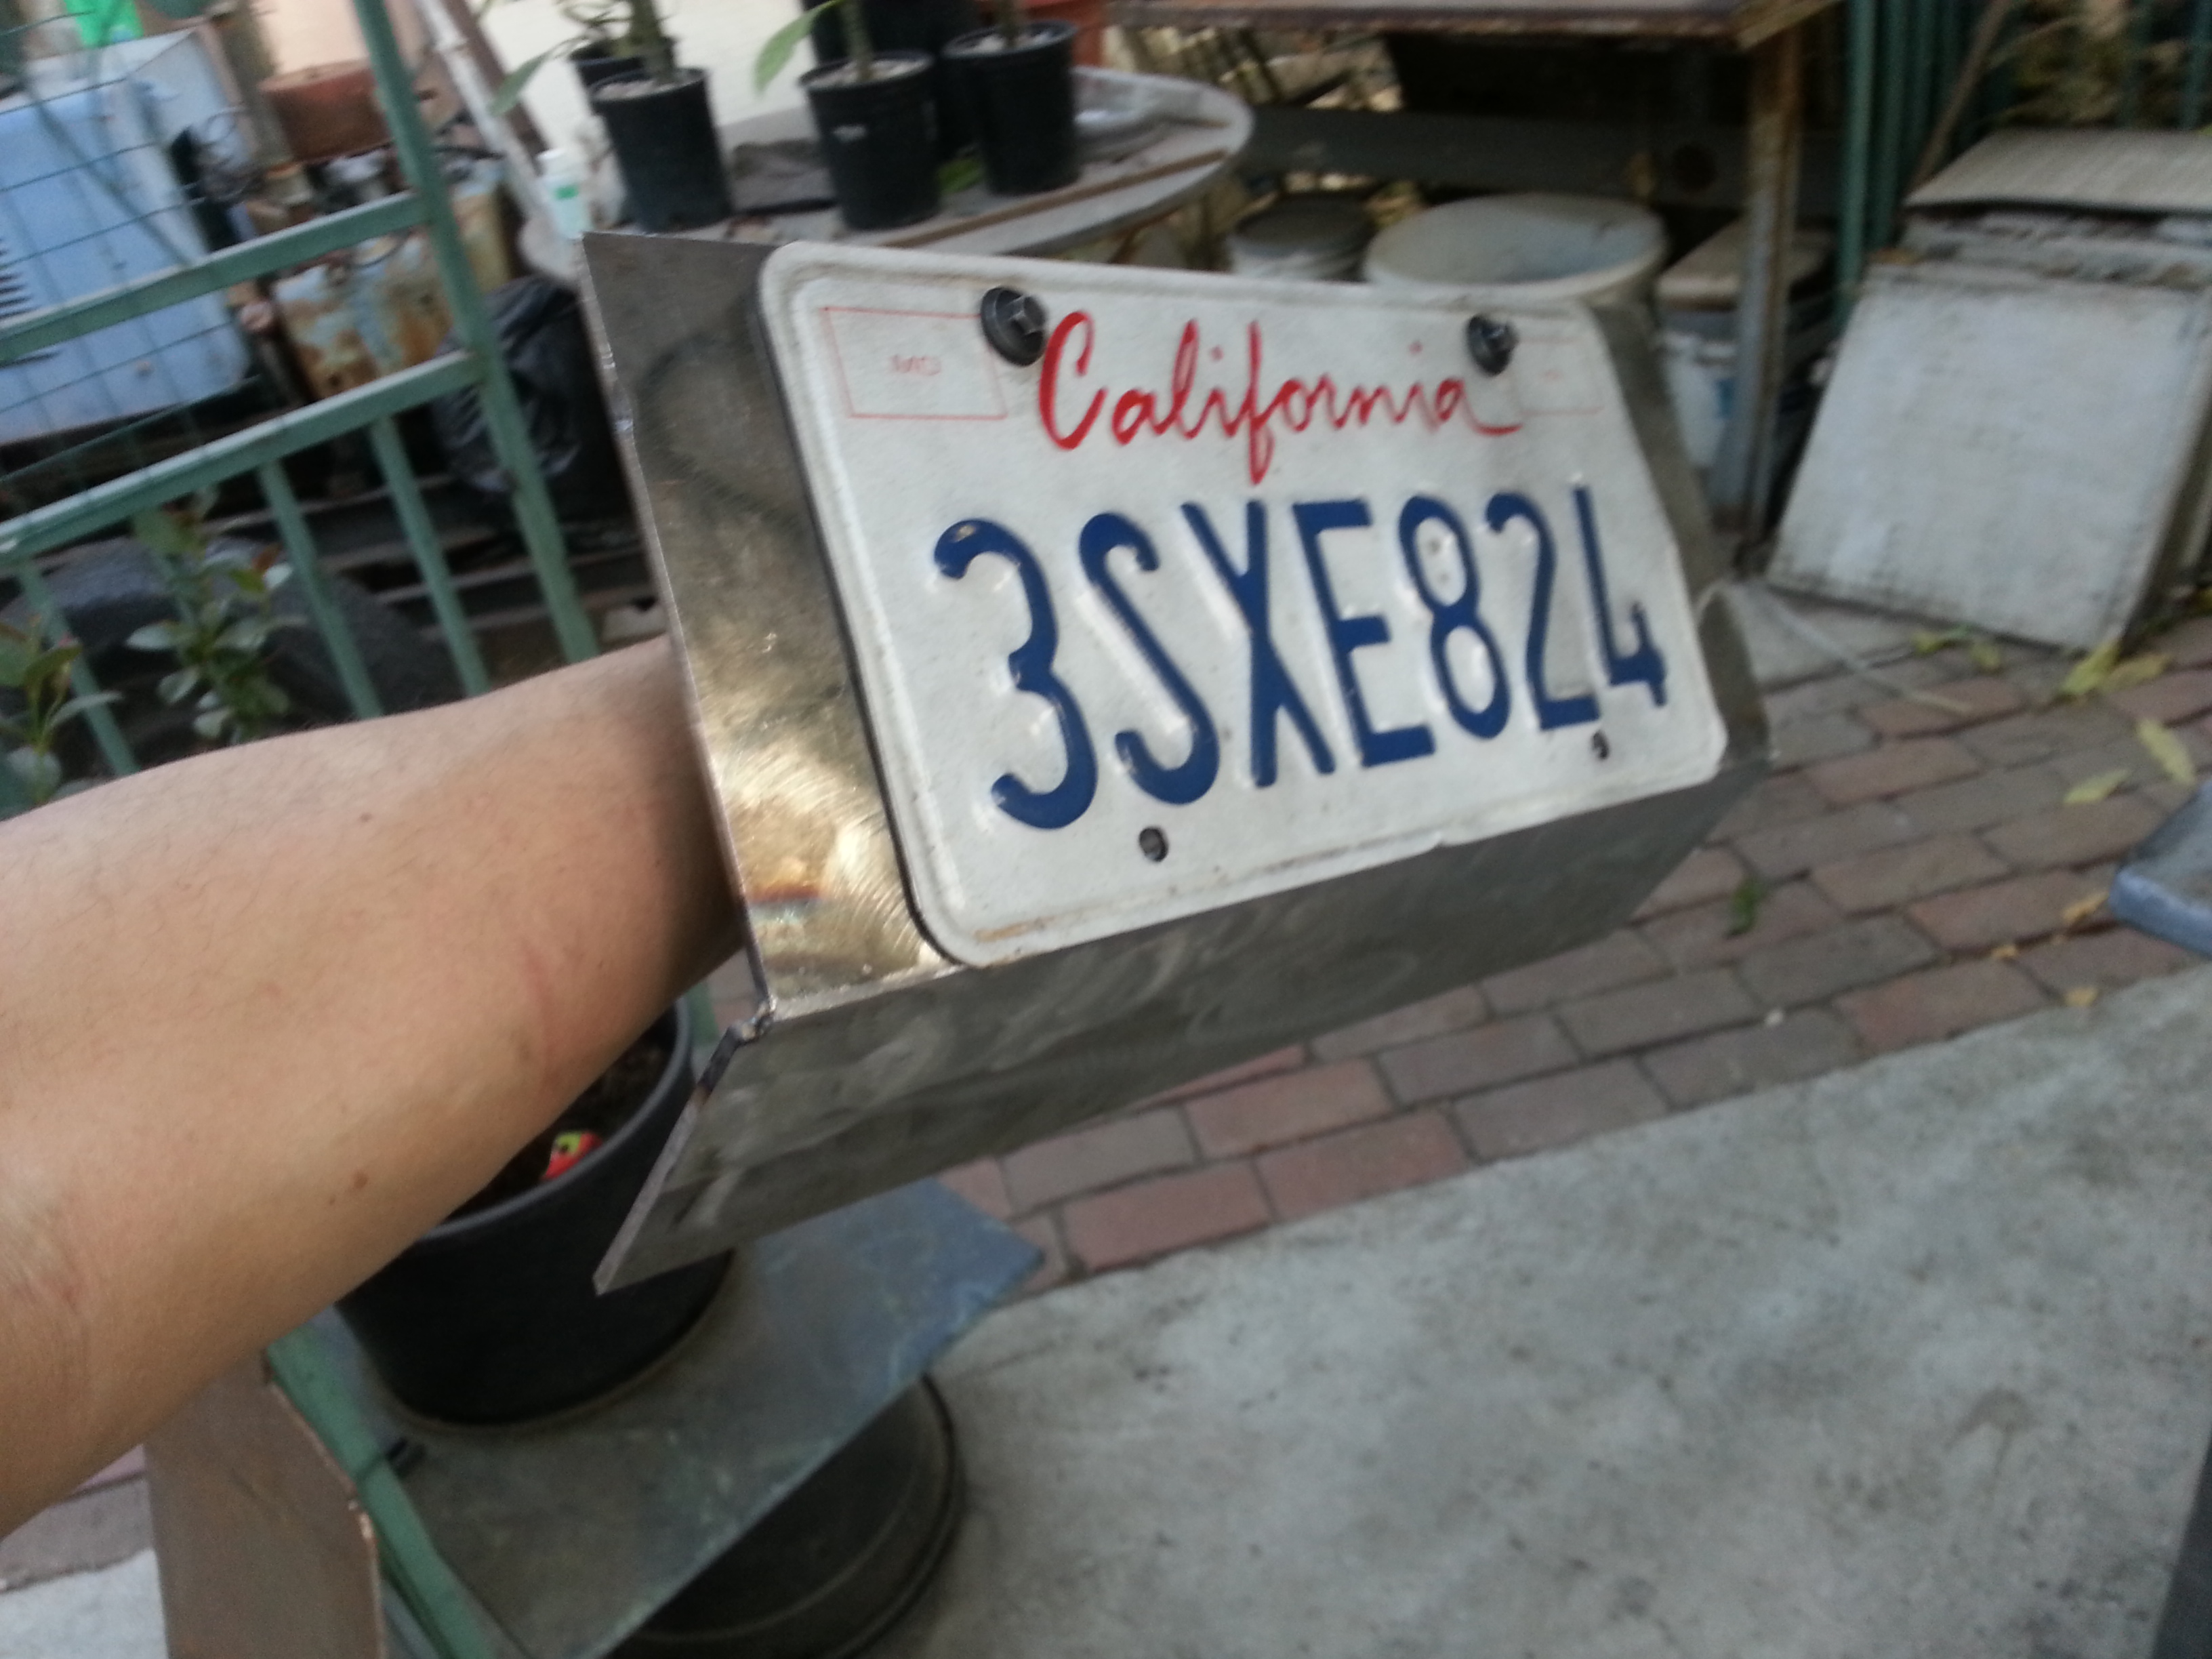
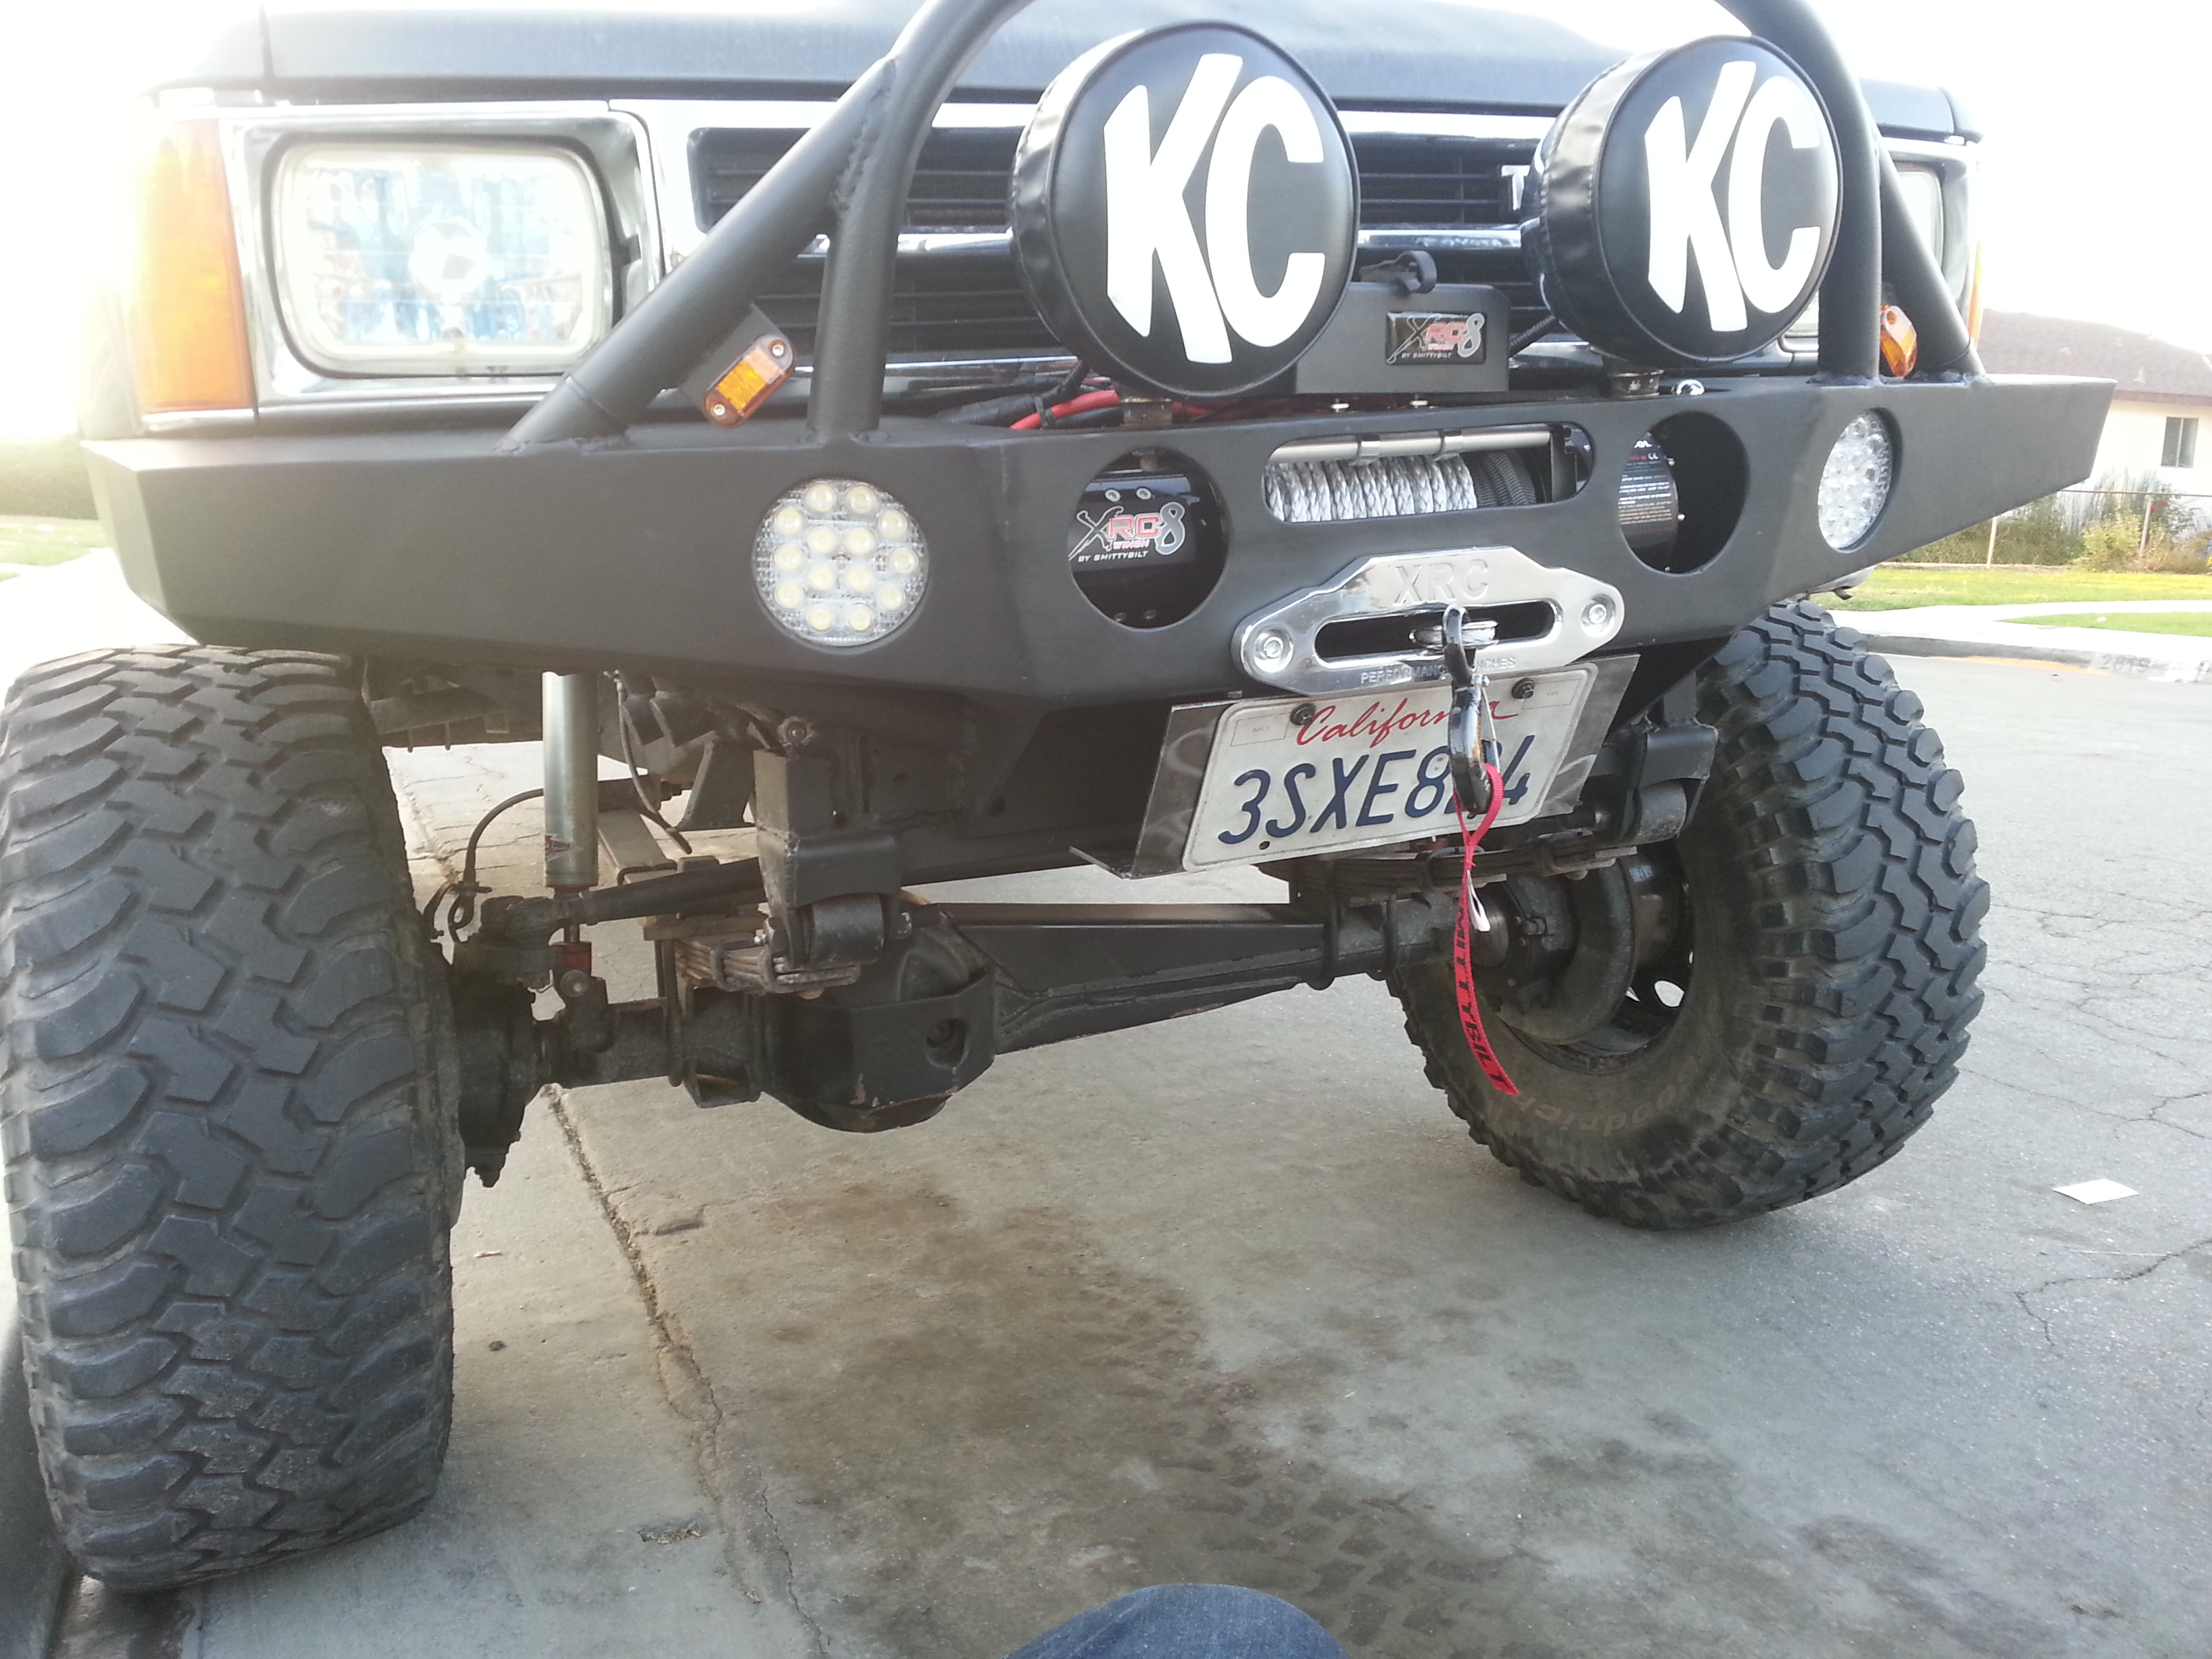
Here is a shot of when we had just finished. I had to mount my license plate to the front on top of the radiator bumper vents for the mean time.
--------------------------------------------------------------------------------
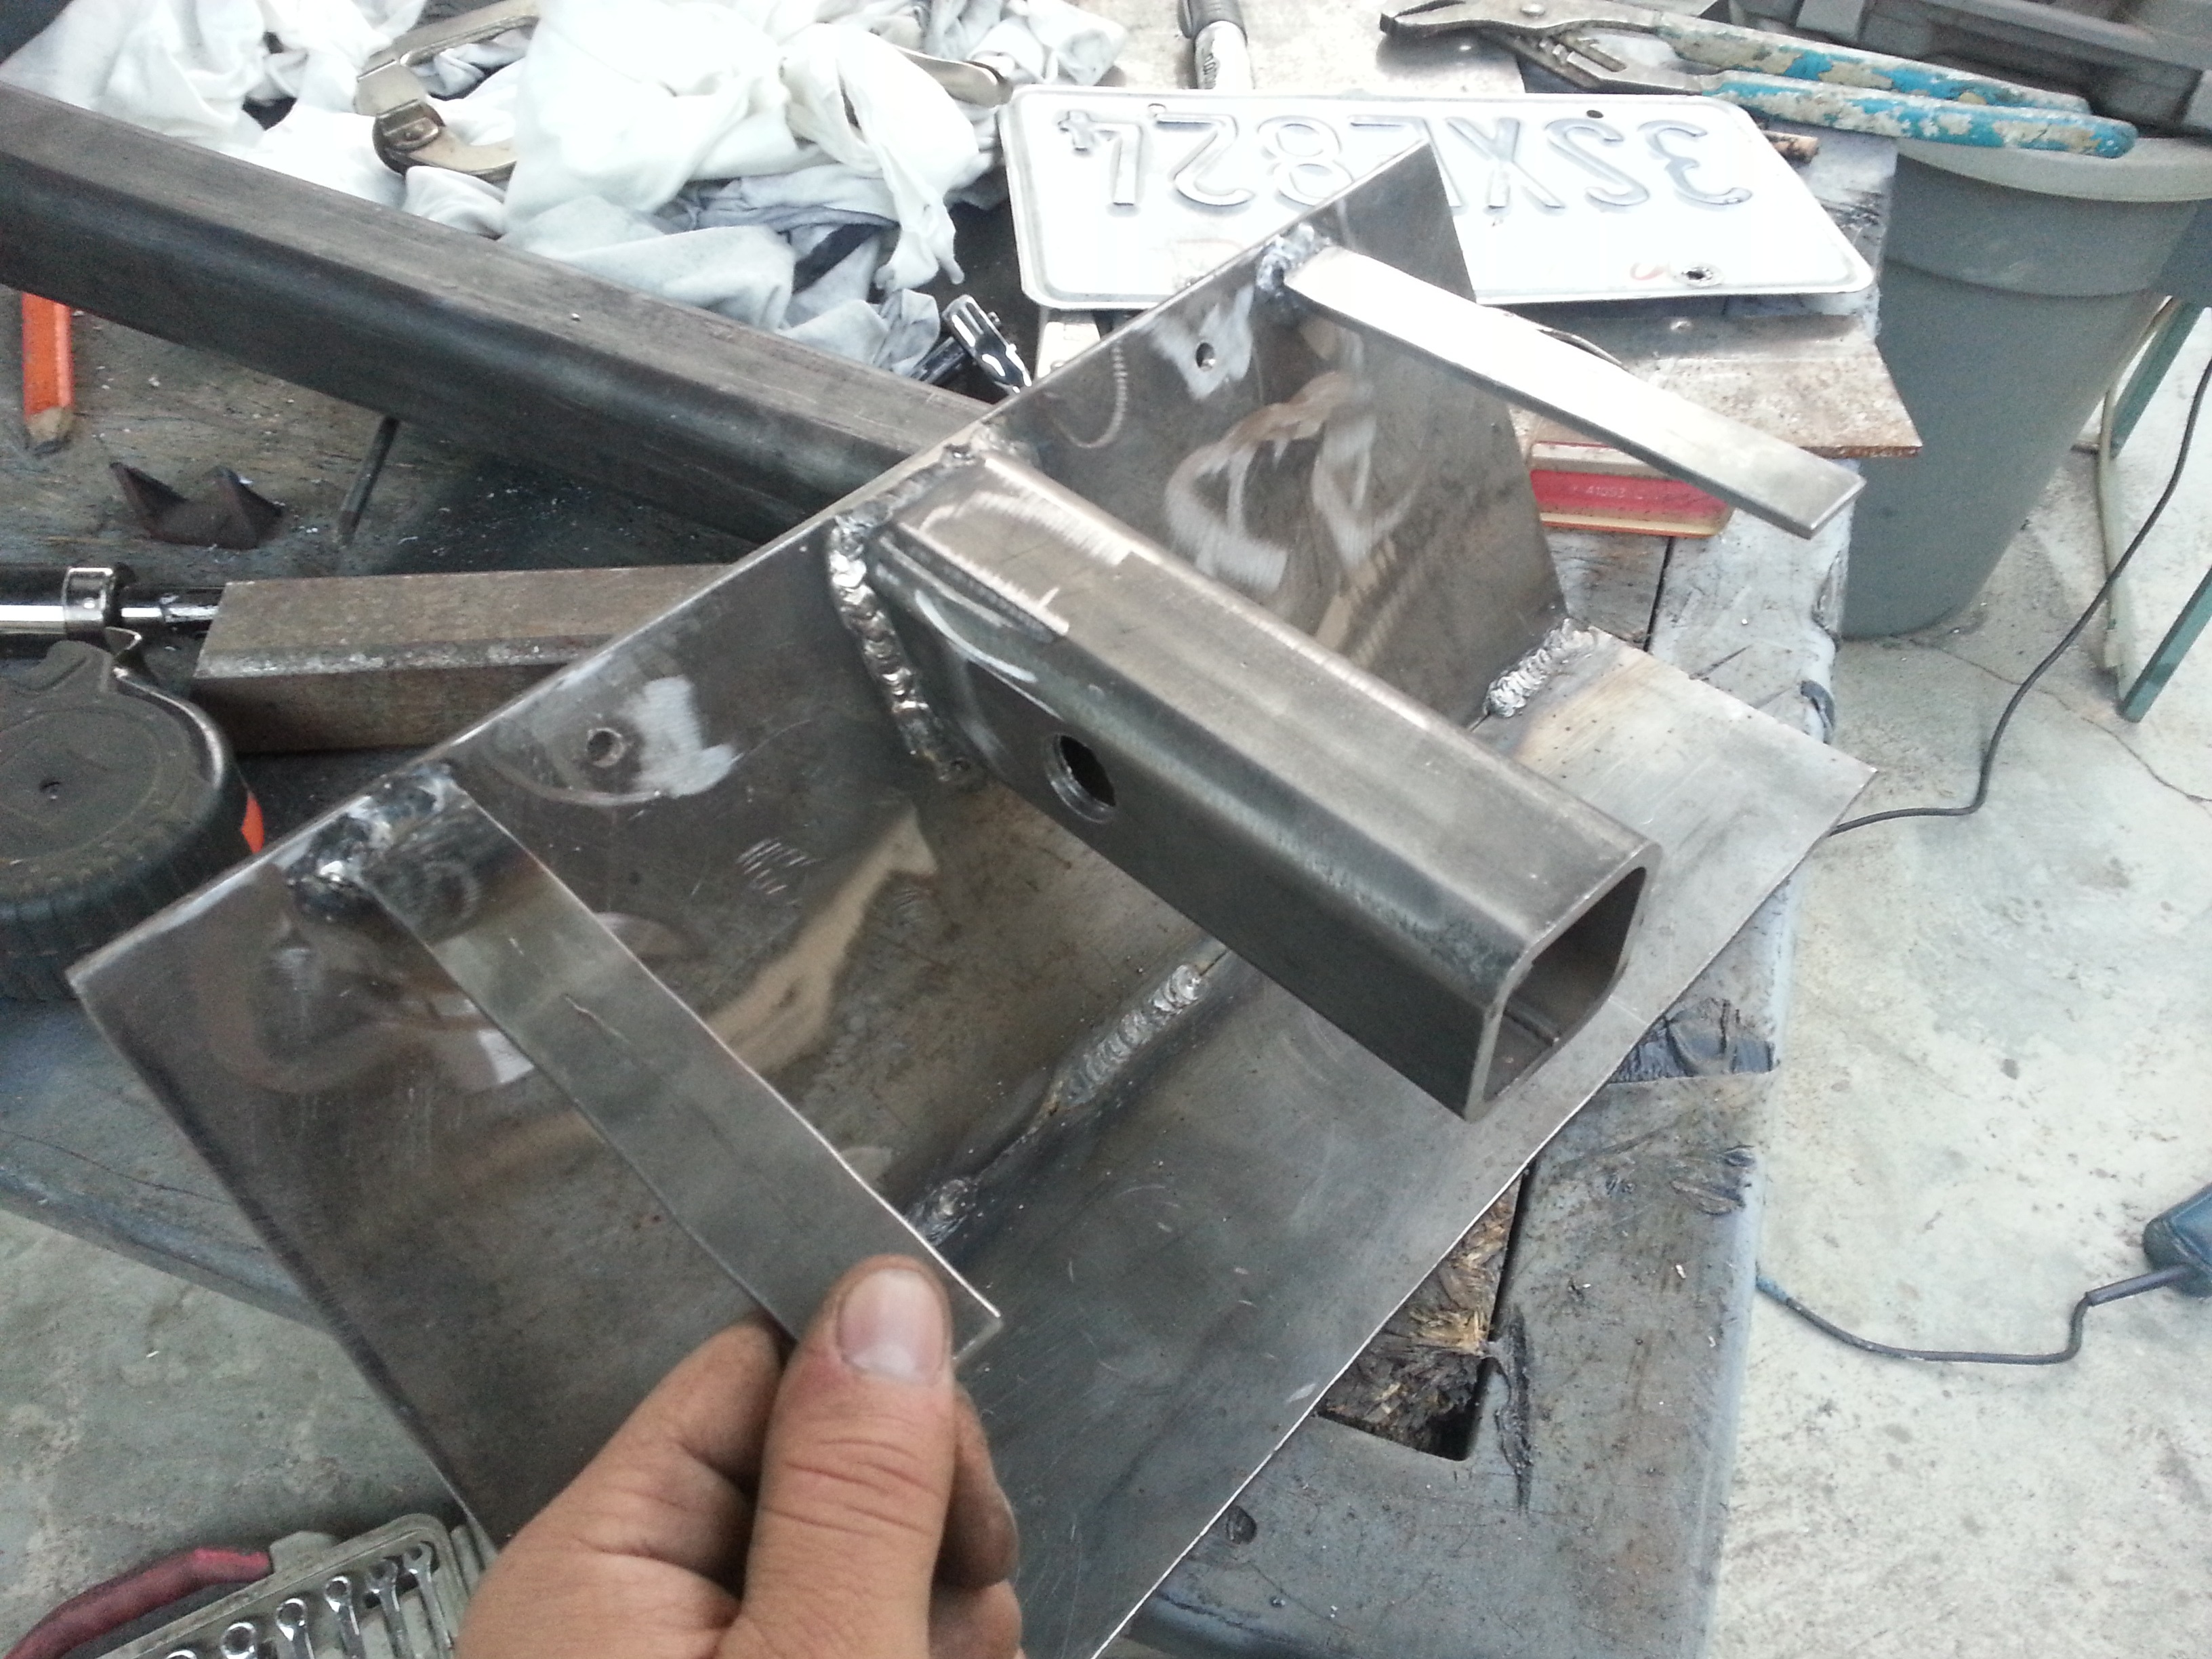
The following day(Sunday) i got to work on the License plate holder/winch bolt cover to restrict access to get to my bolts so people cant steal my winch when its parked on the street.
I drove down to the local steel shop and bought a 52" x 2" x 2" steel square tube.

I bought 2" because 2x2 is the correct size that will fit into the tow hitch and winch plate.
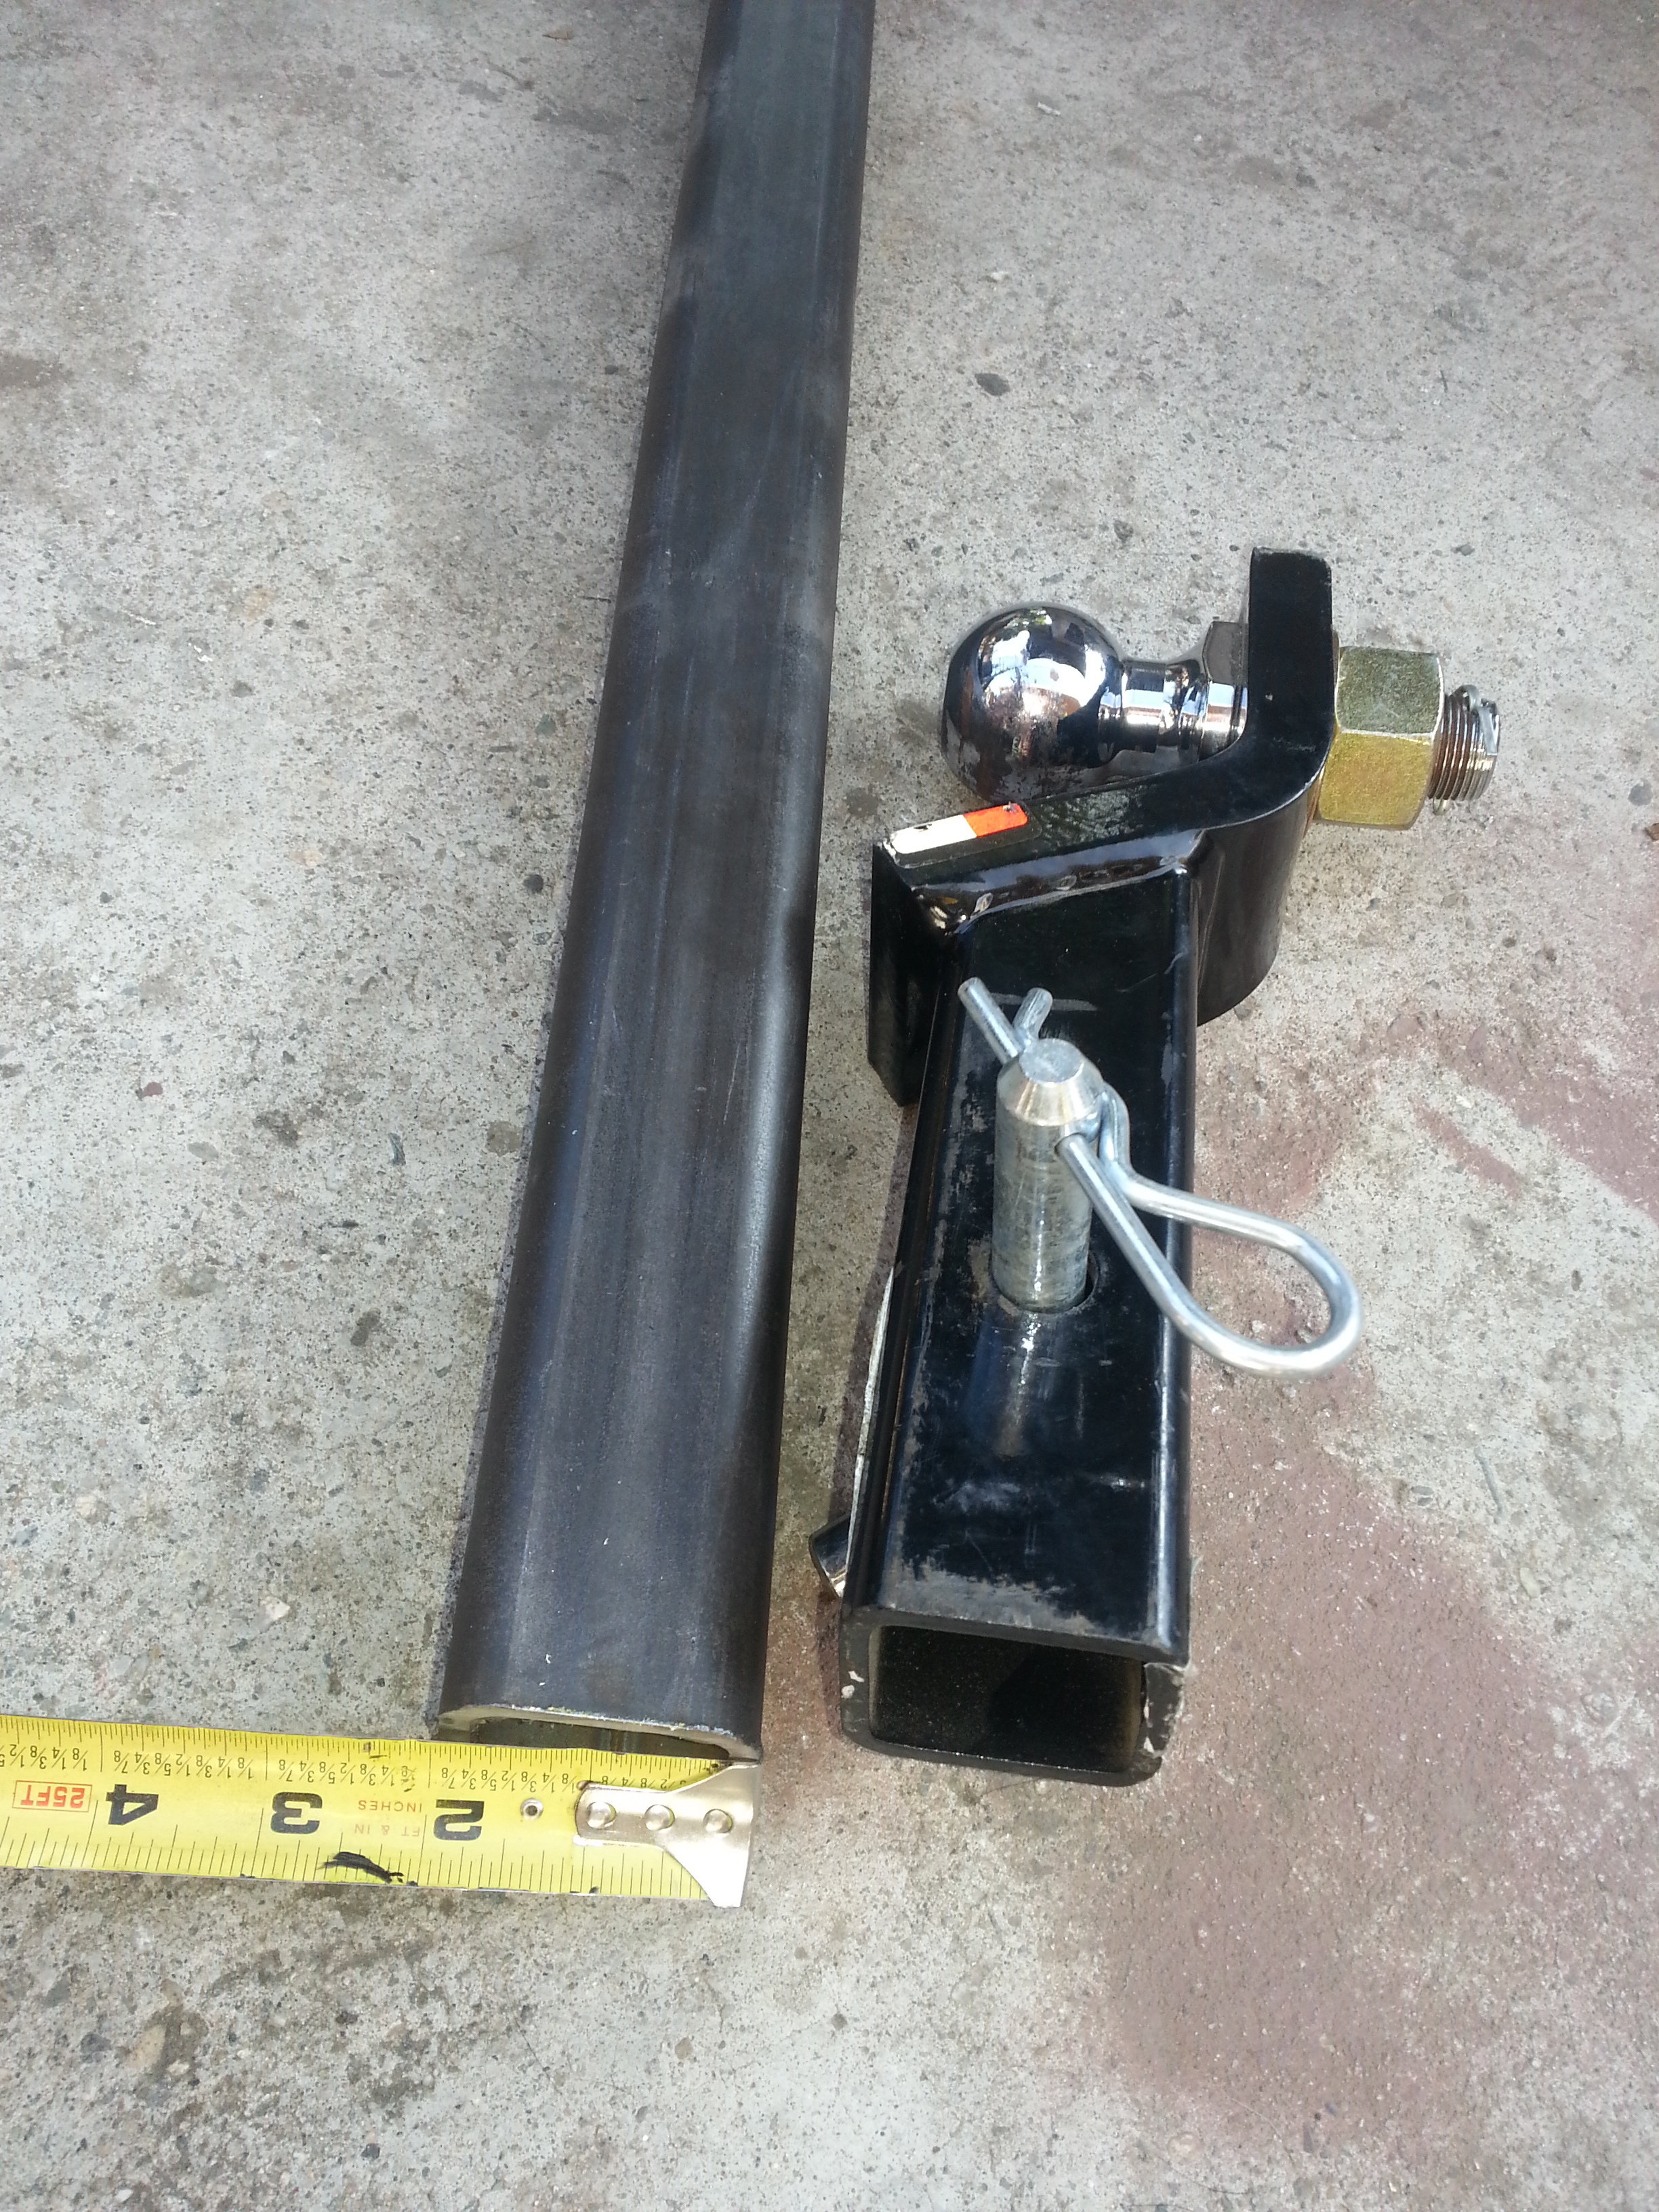
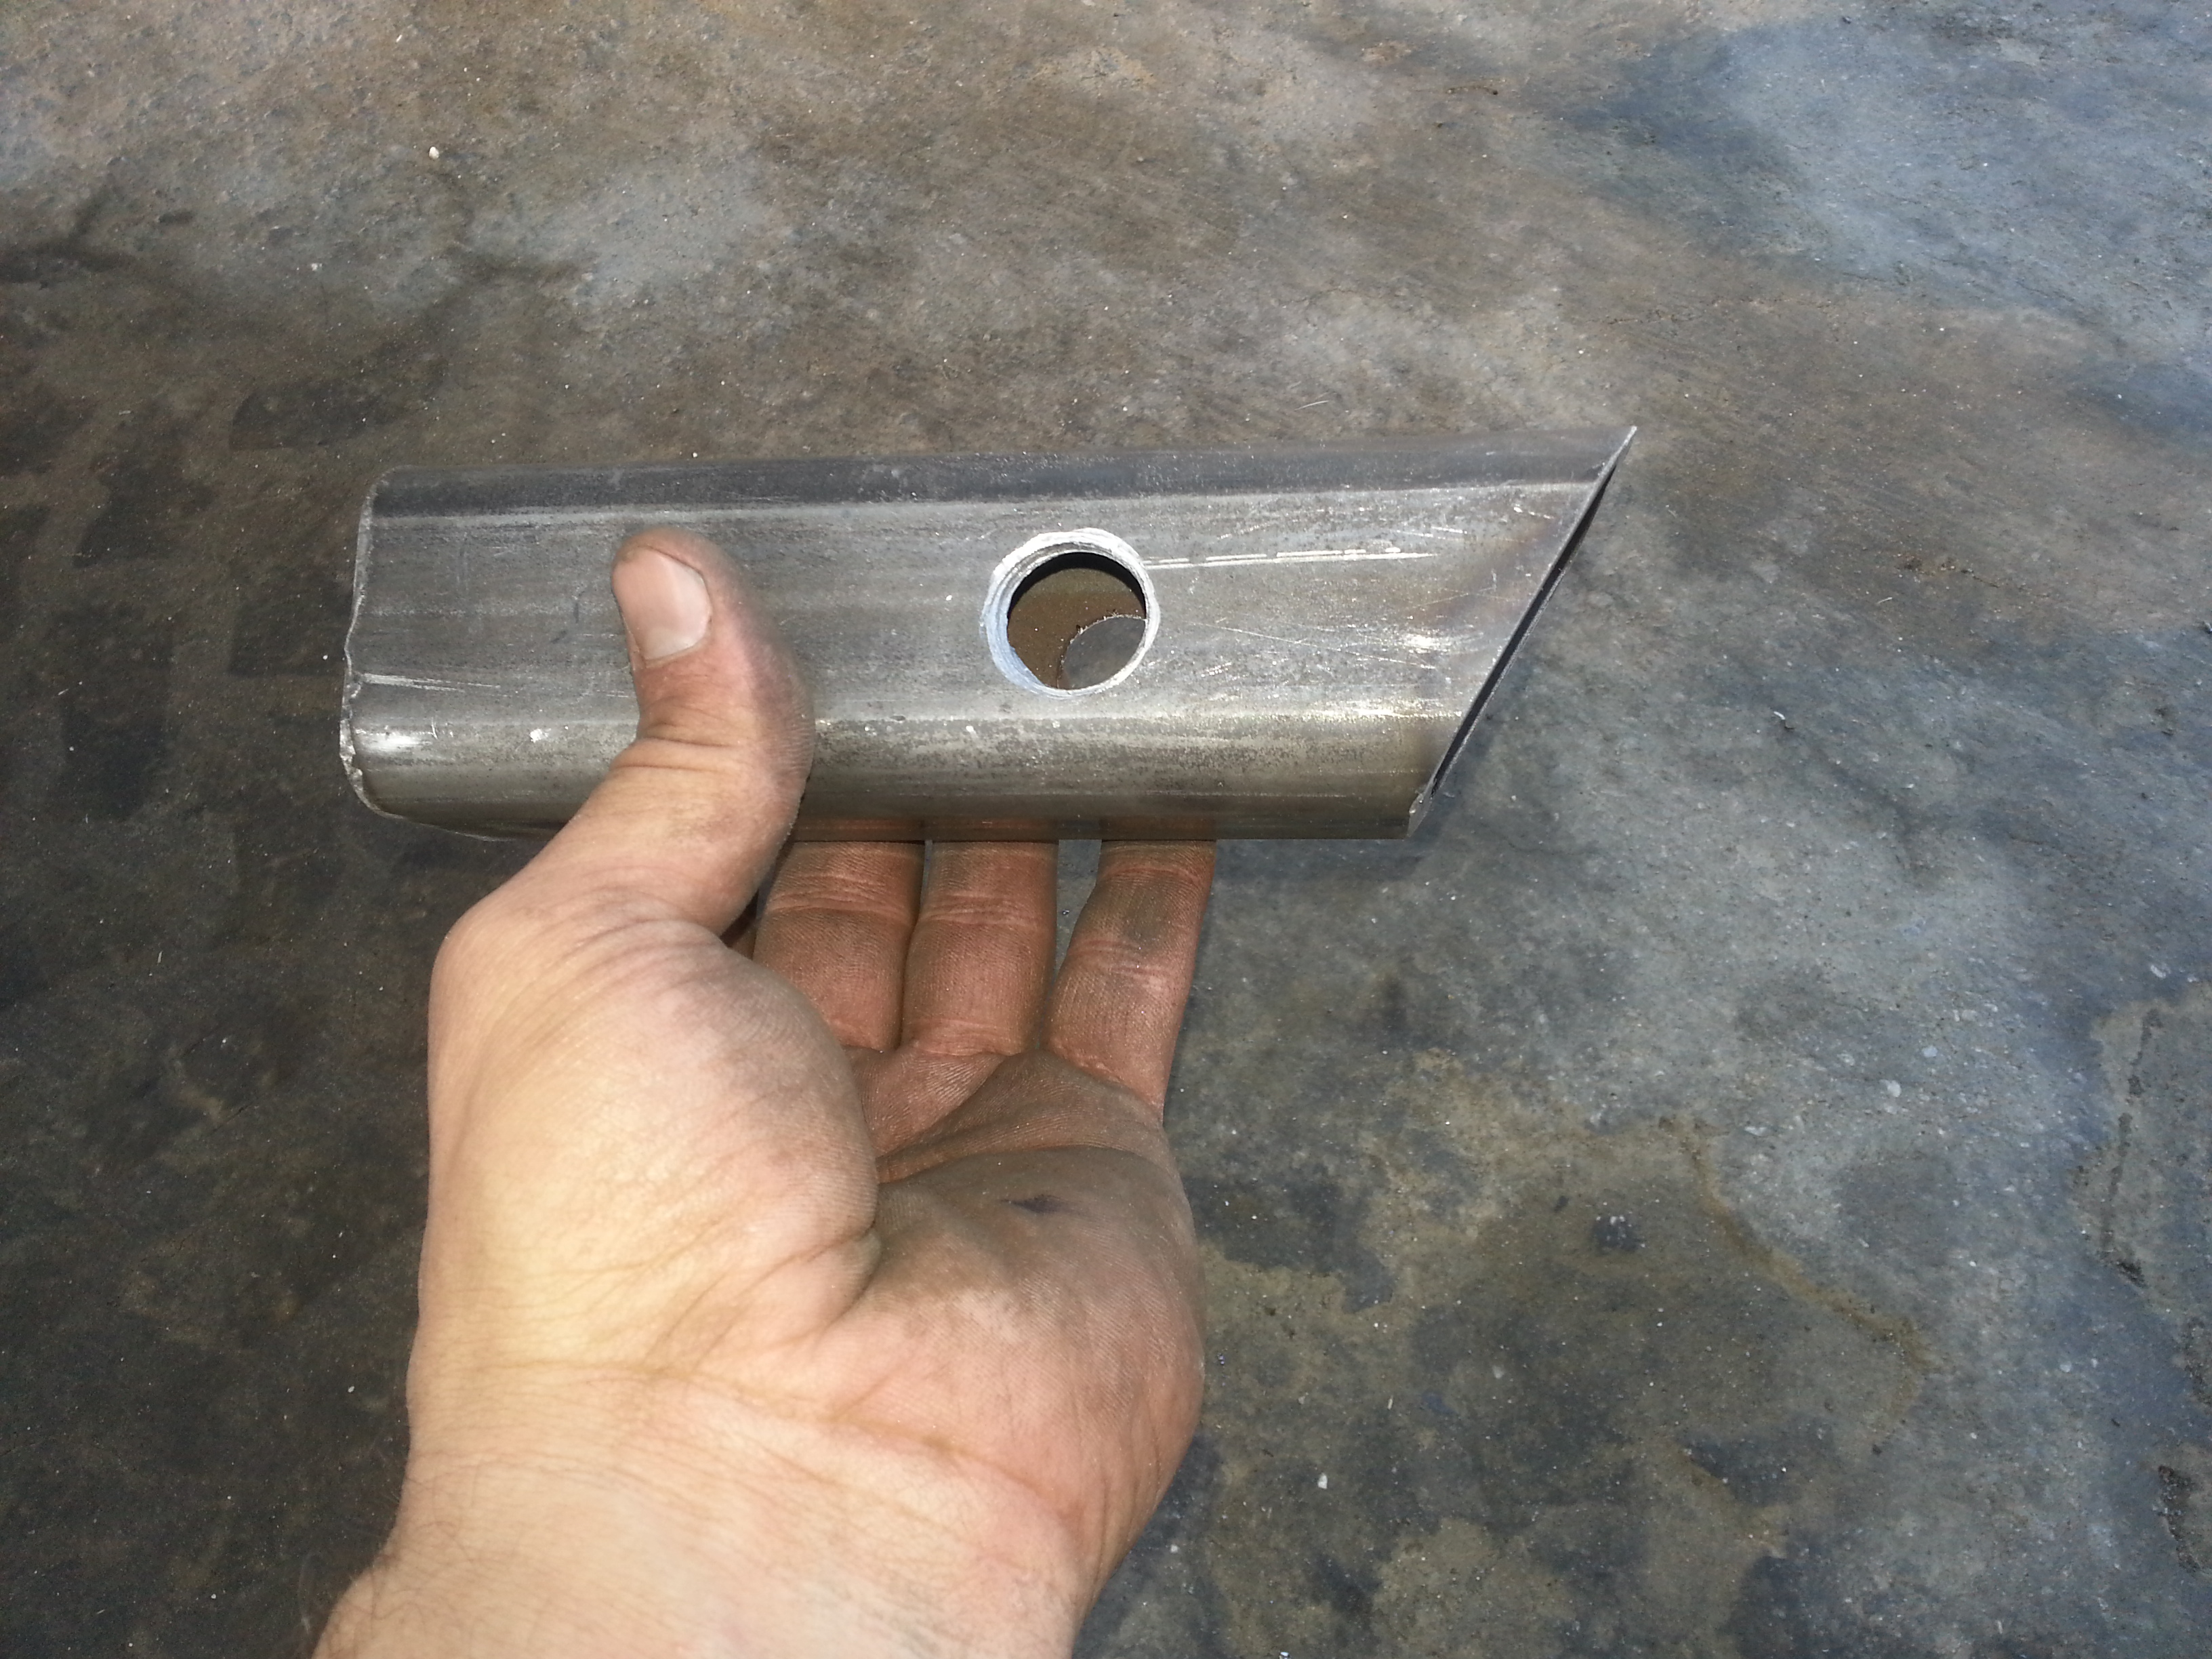
Cut the length to fit 1/4" out of the winch plate tow hitch hole.
I found that this Uhaul Towing hitch fit exactly where i wanted it when inserted upside down. Perfect! Just measured the top and bottom lengths and cut the angle to those measurements. 5&3/4" and 6&3/4"
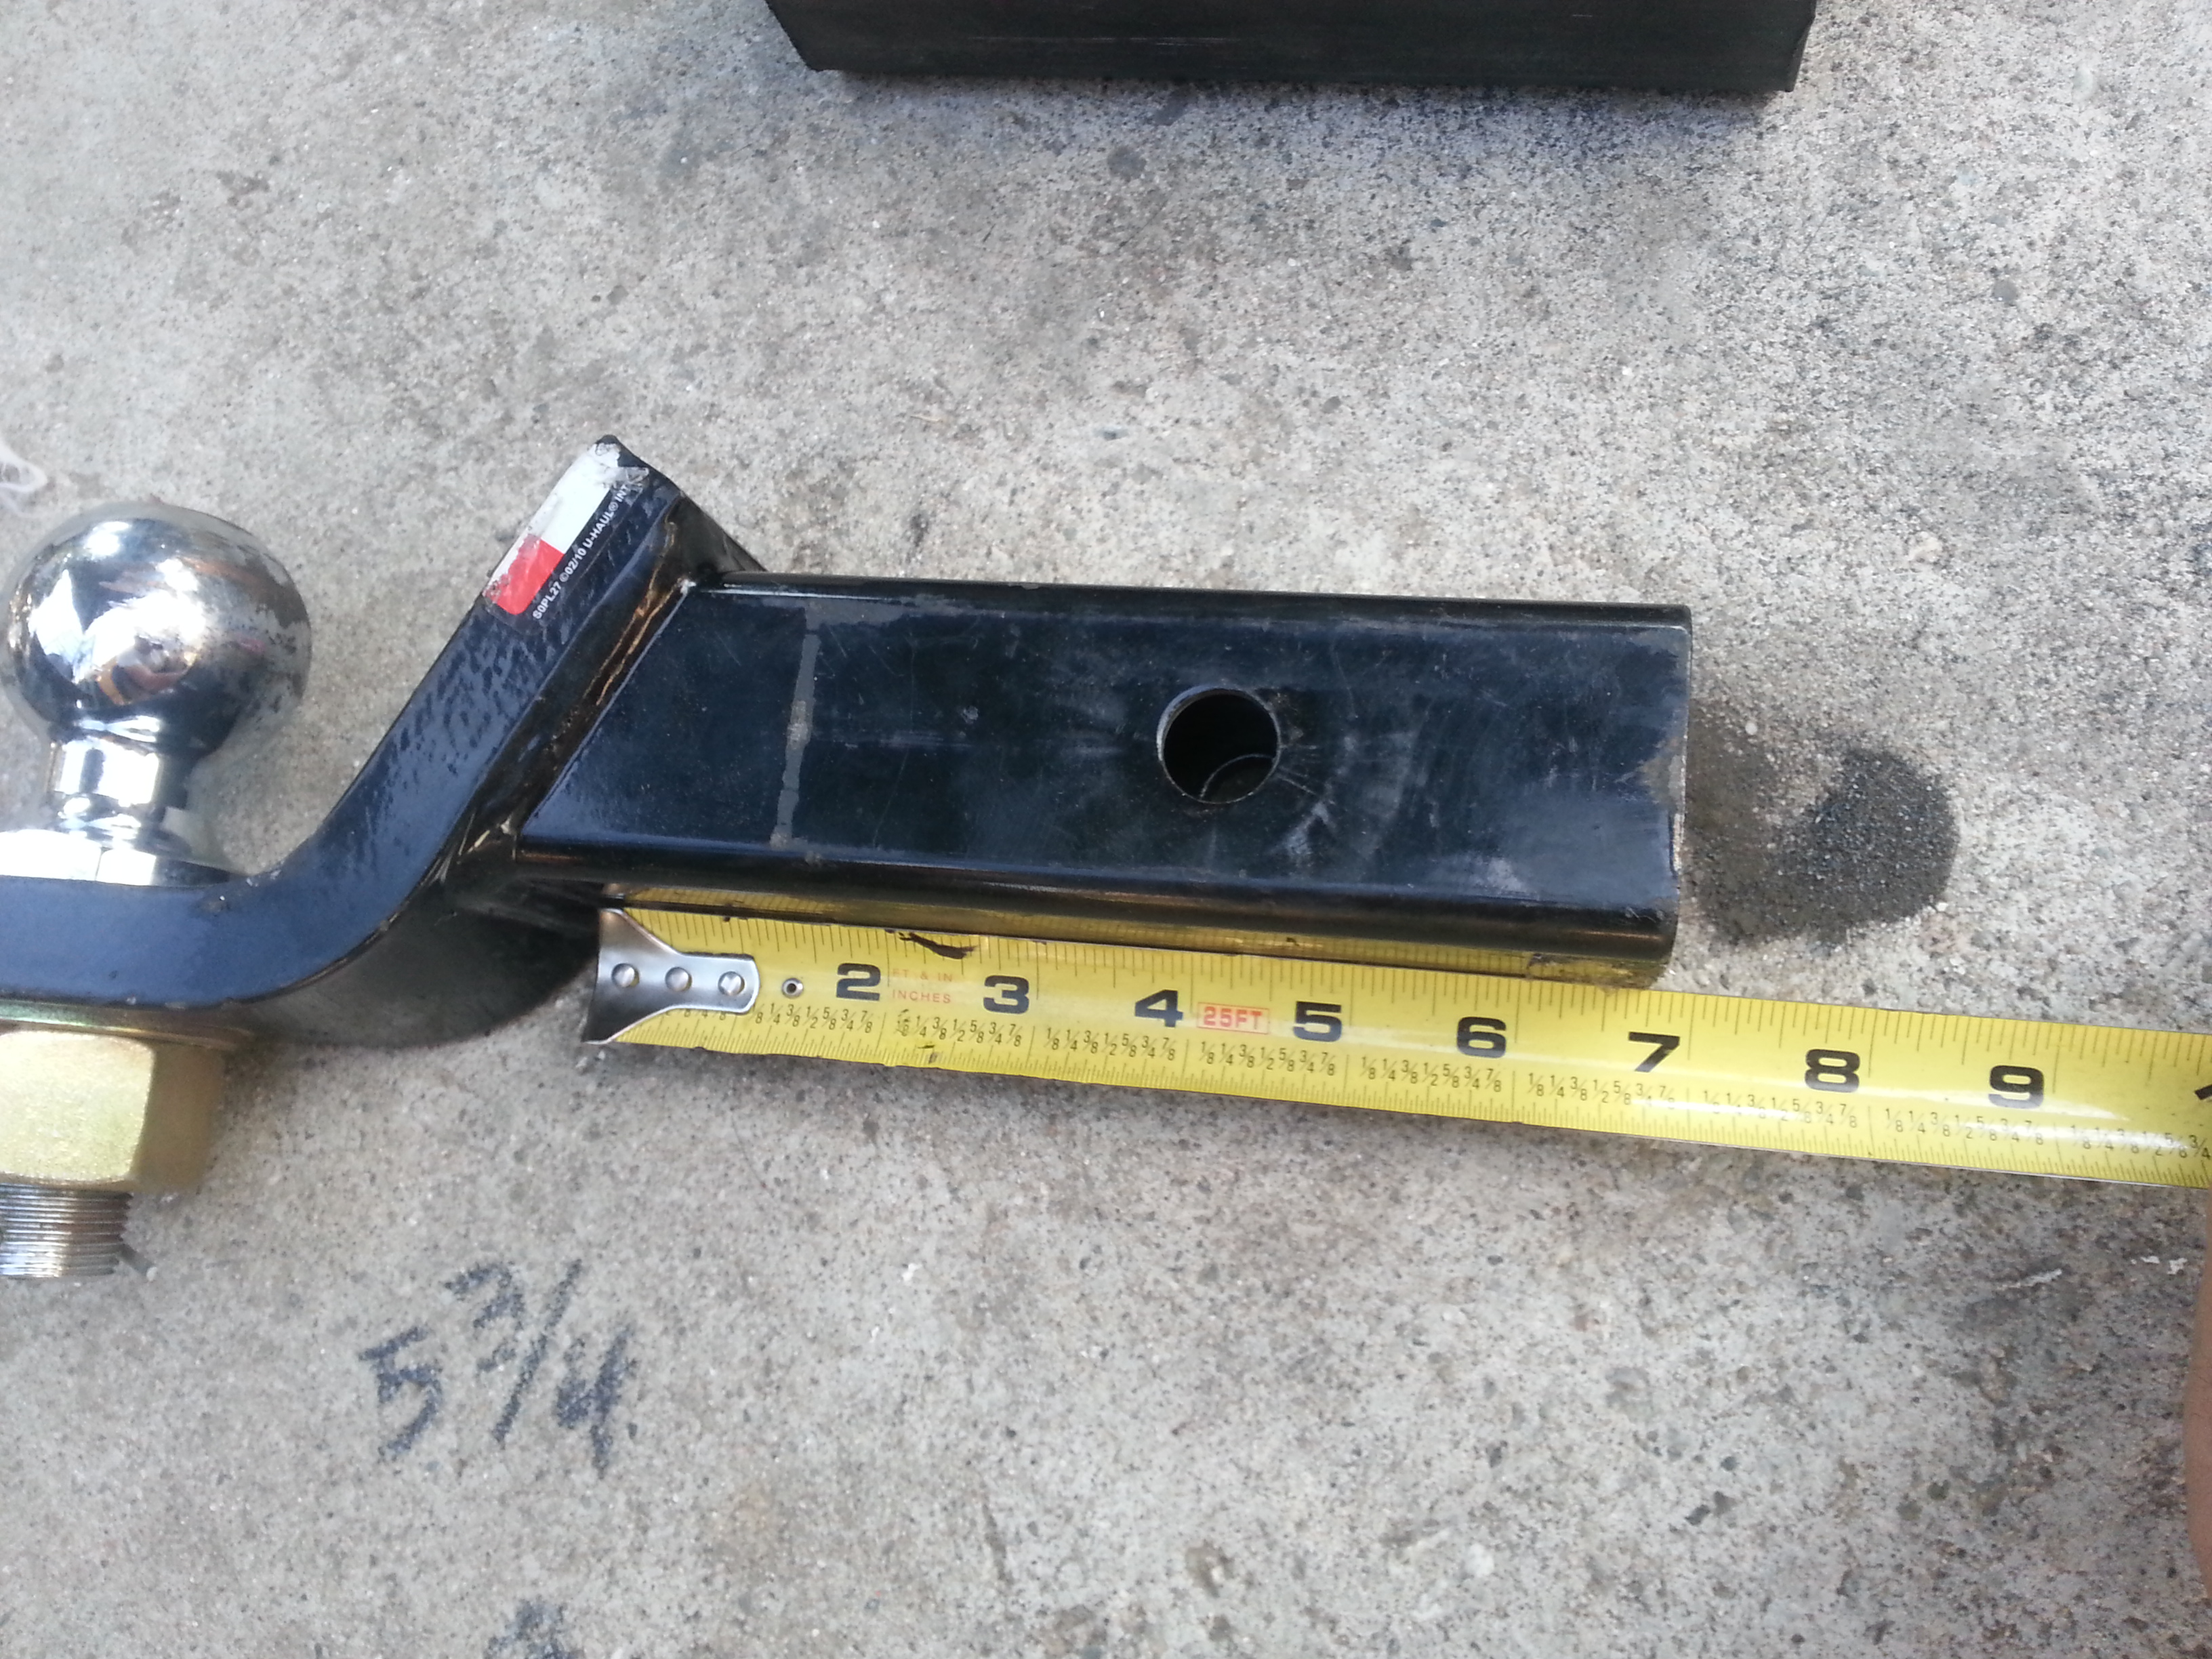
Cut the angle perfectly to match the same angle on the winch plate tow hitch tube.
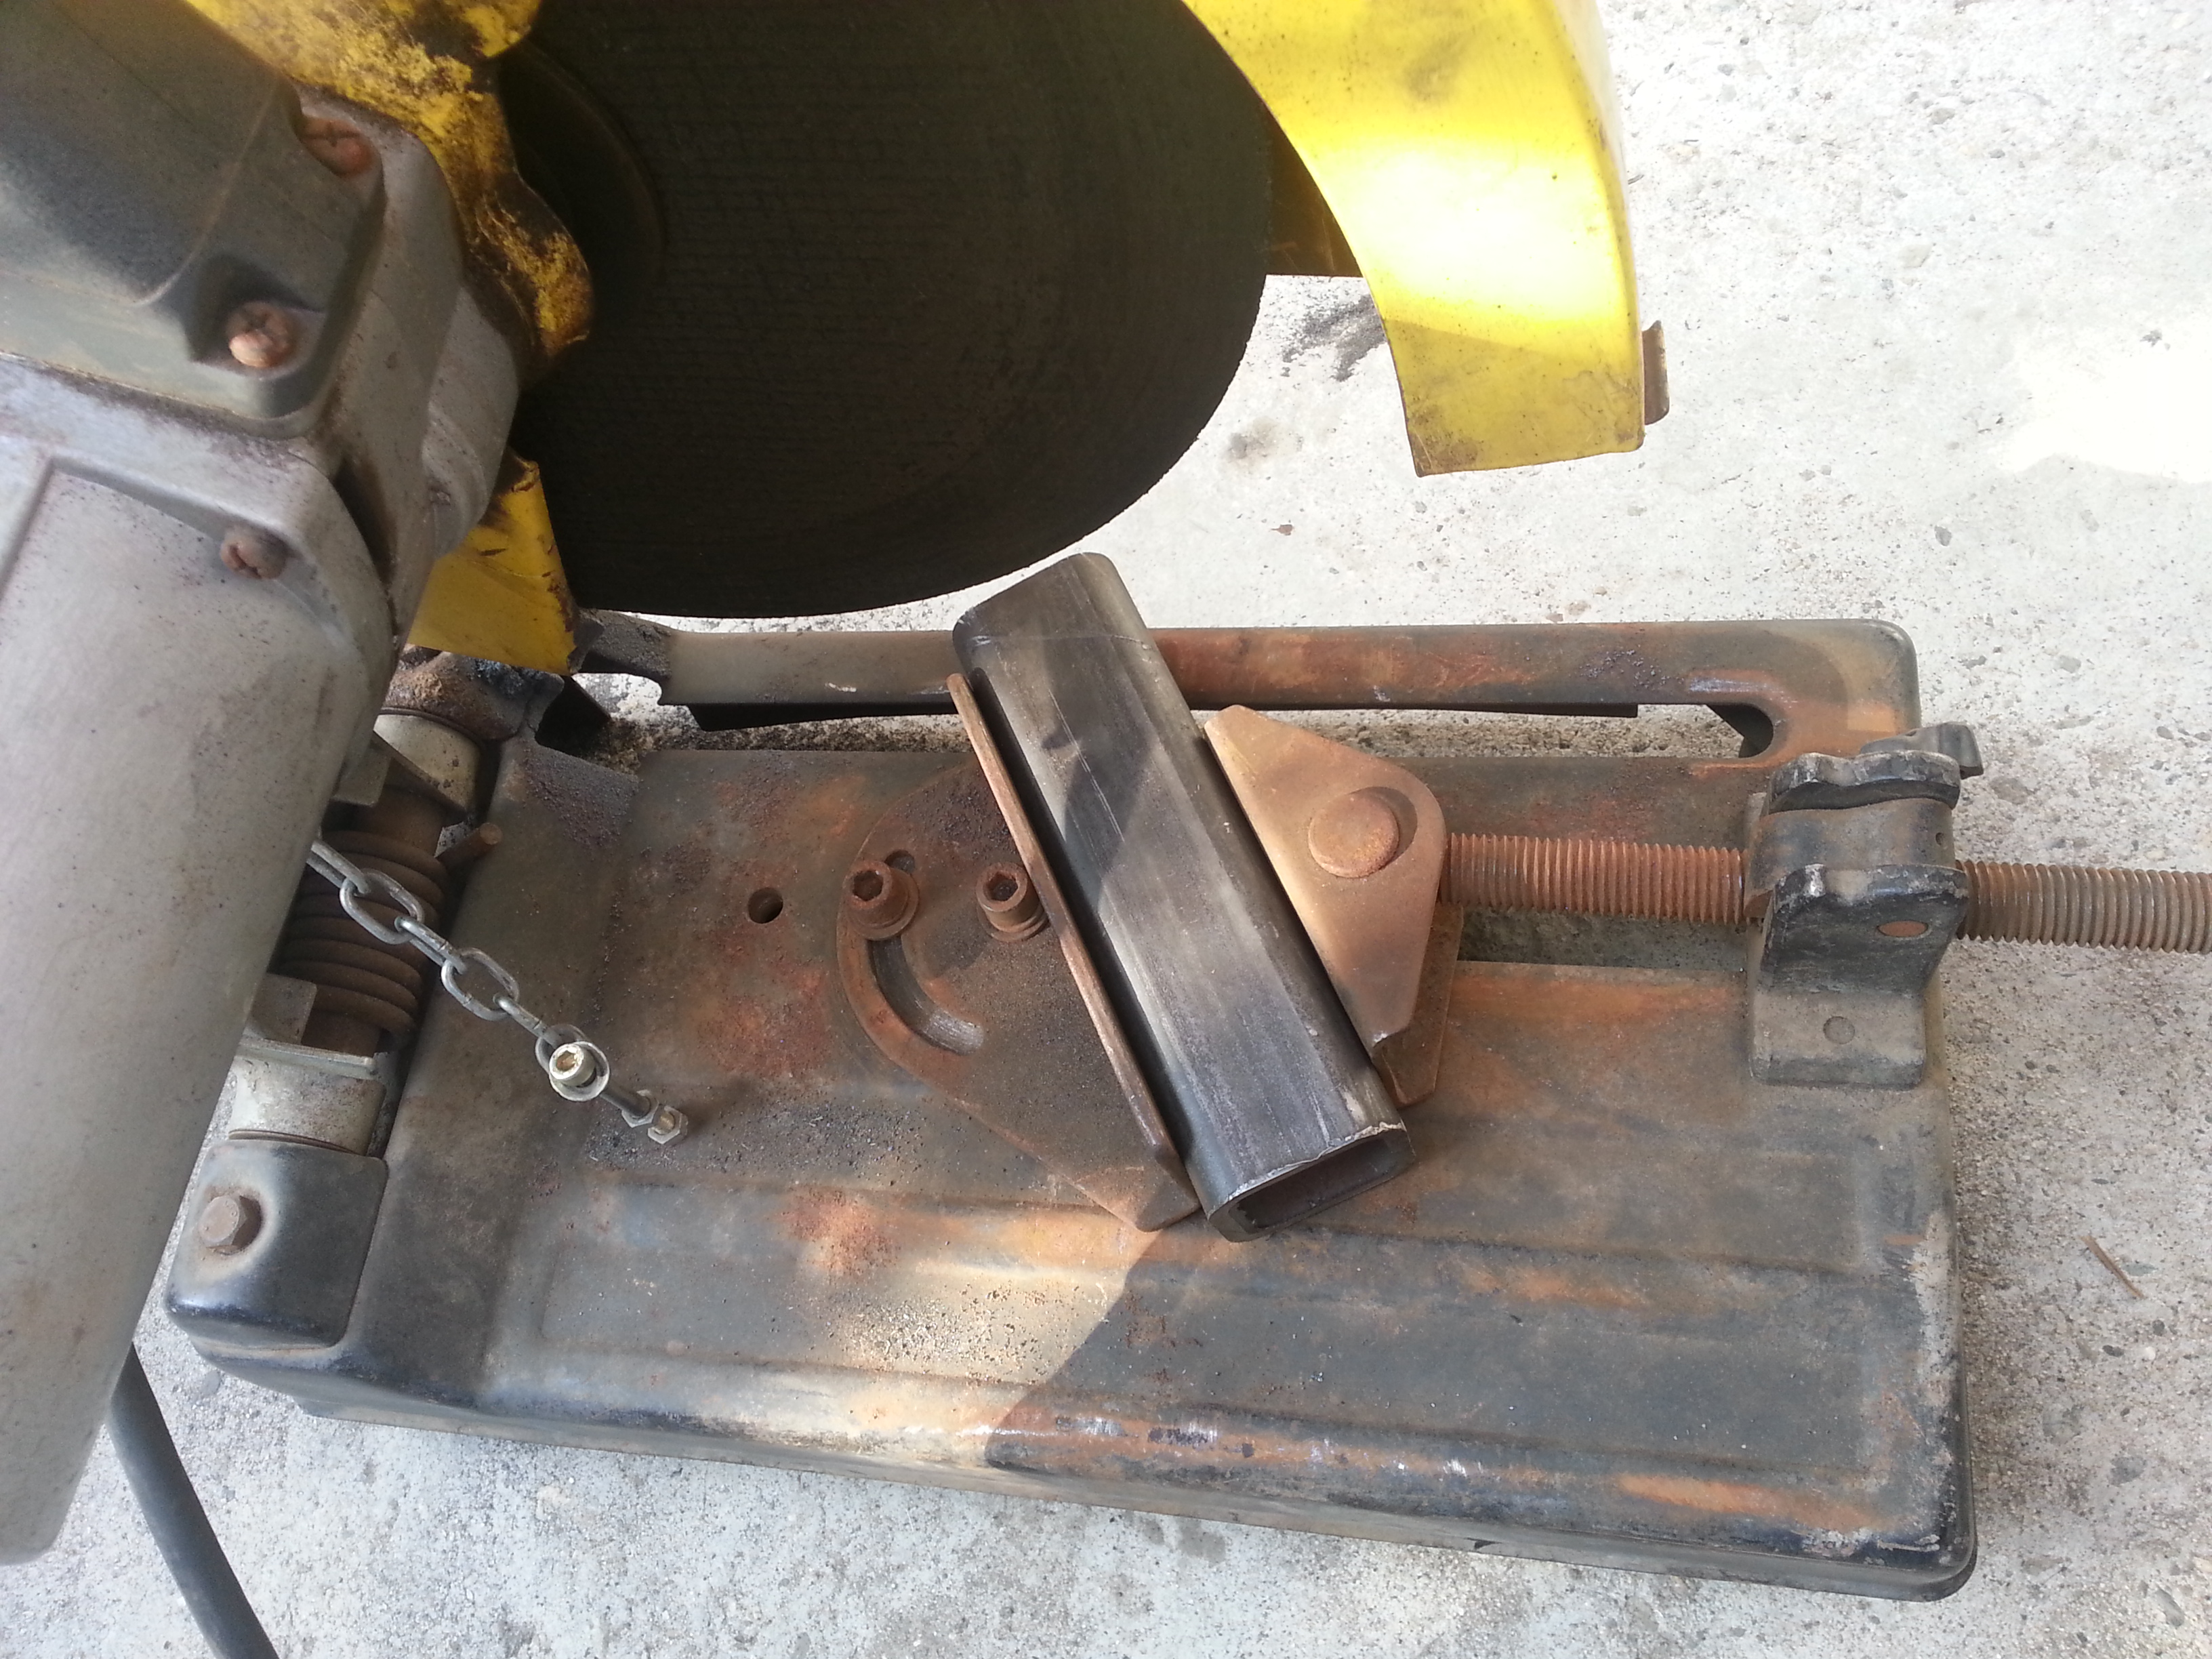
looks about right

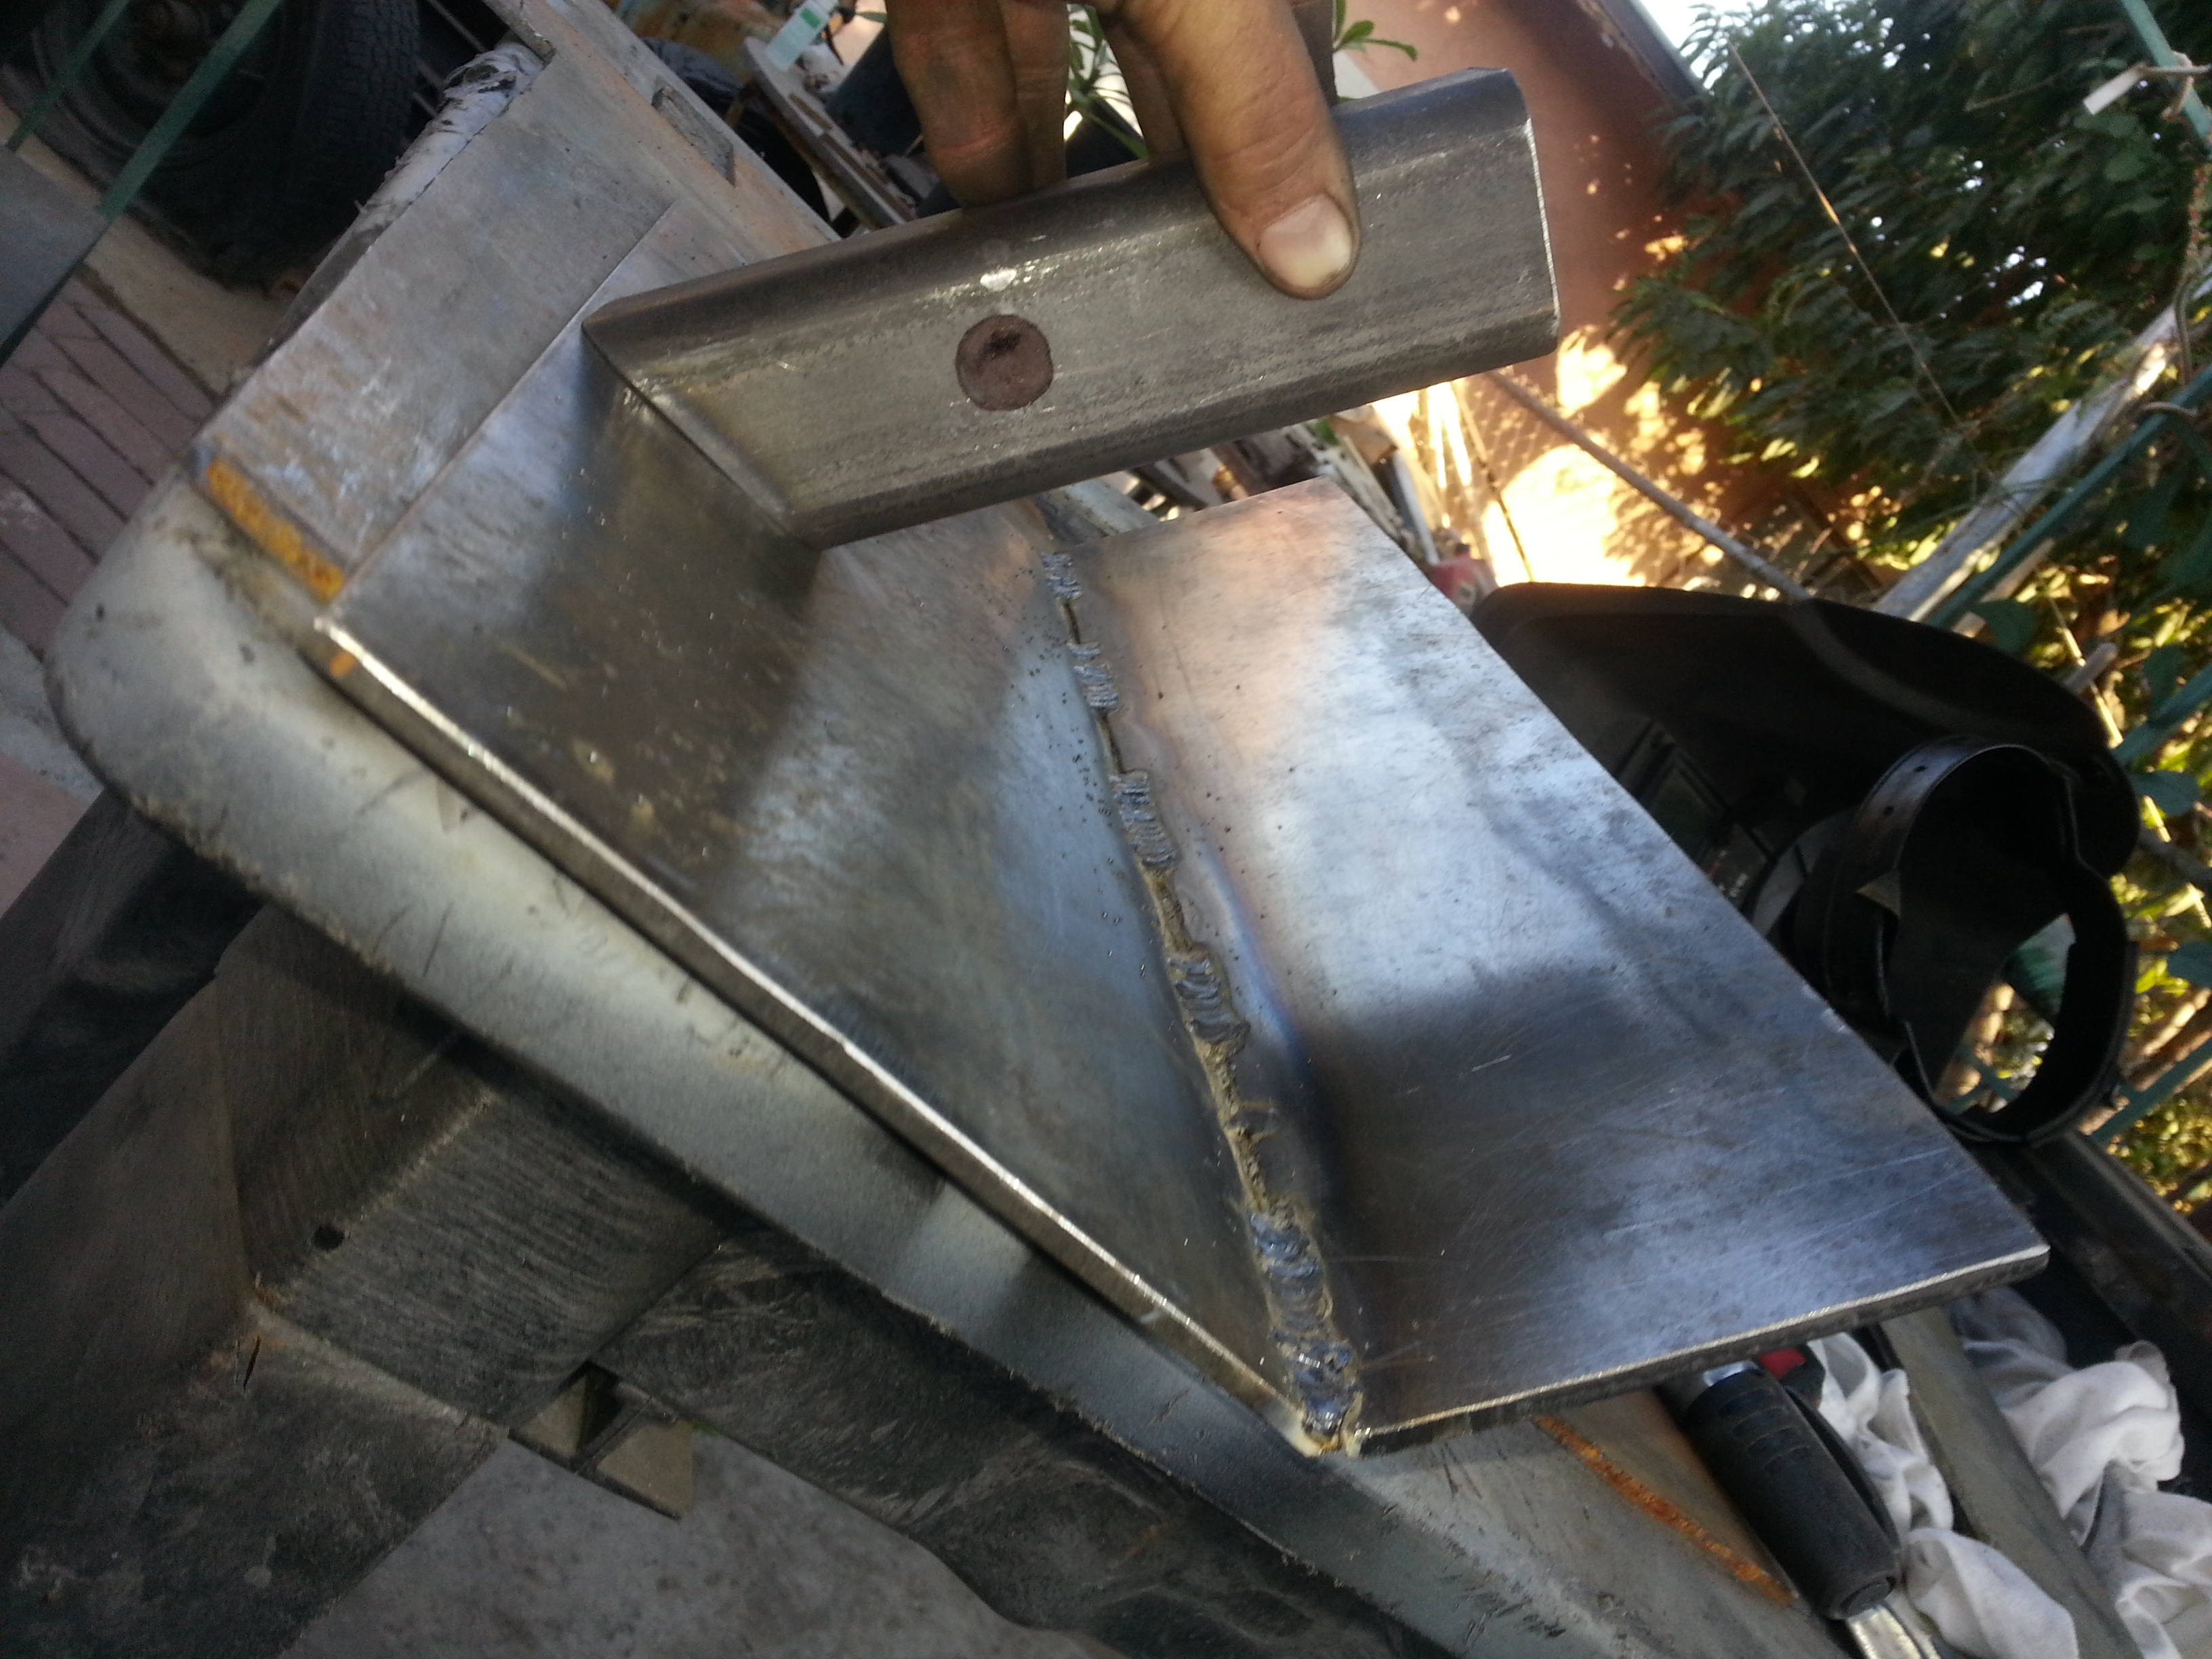
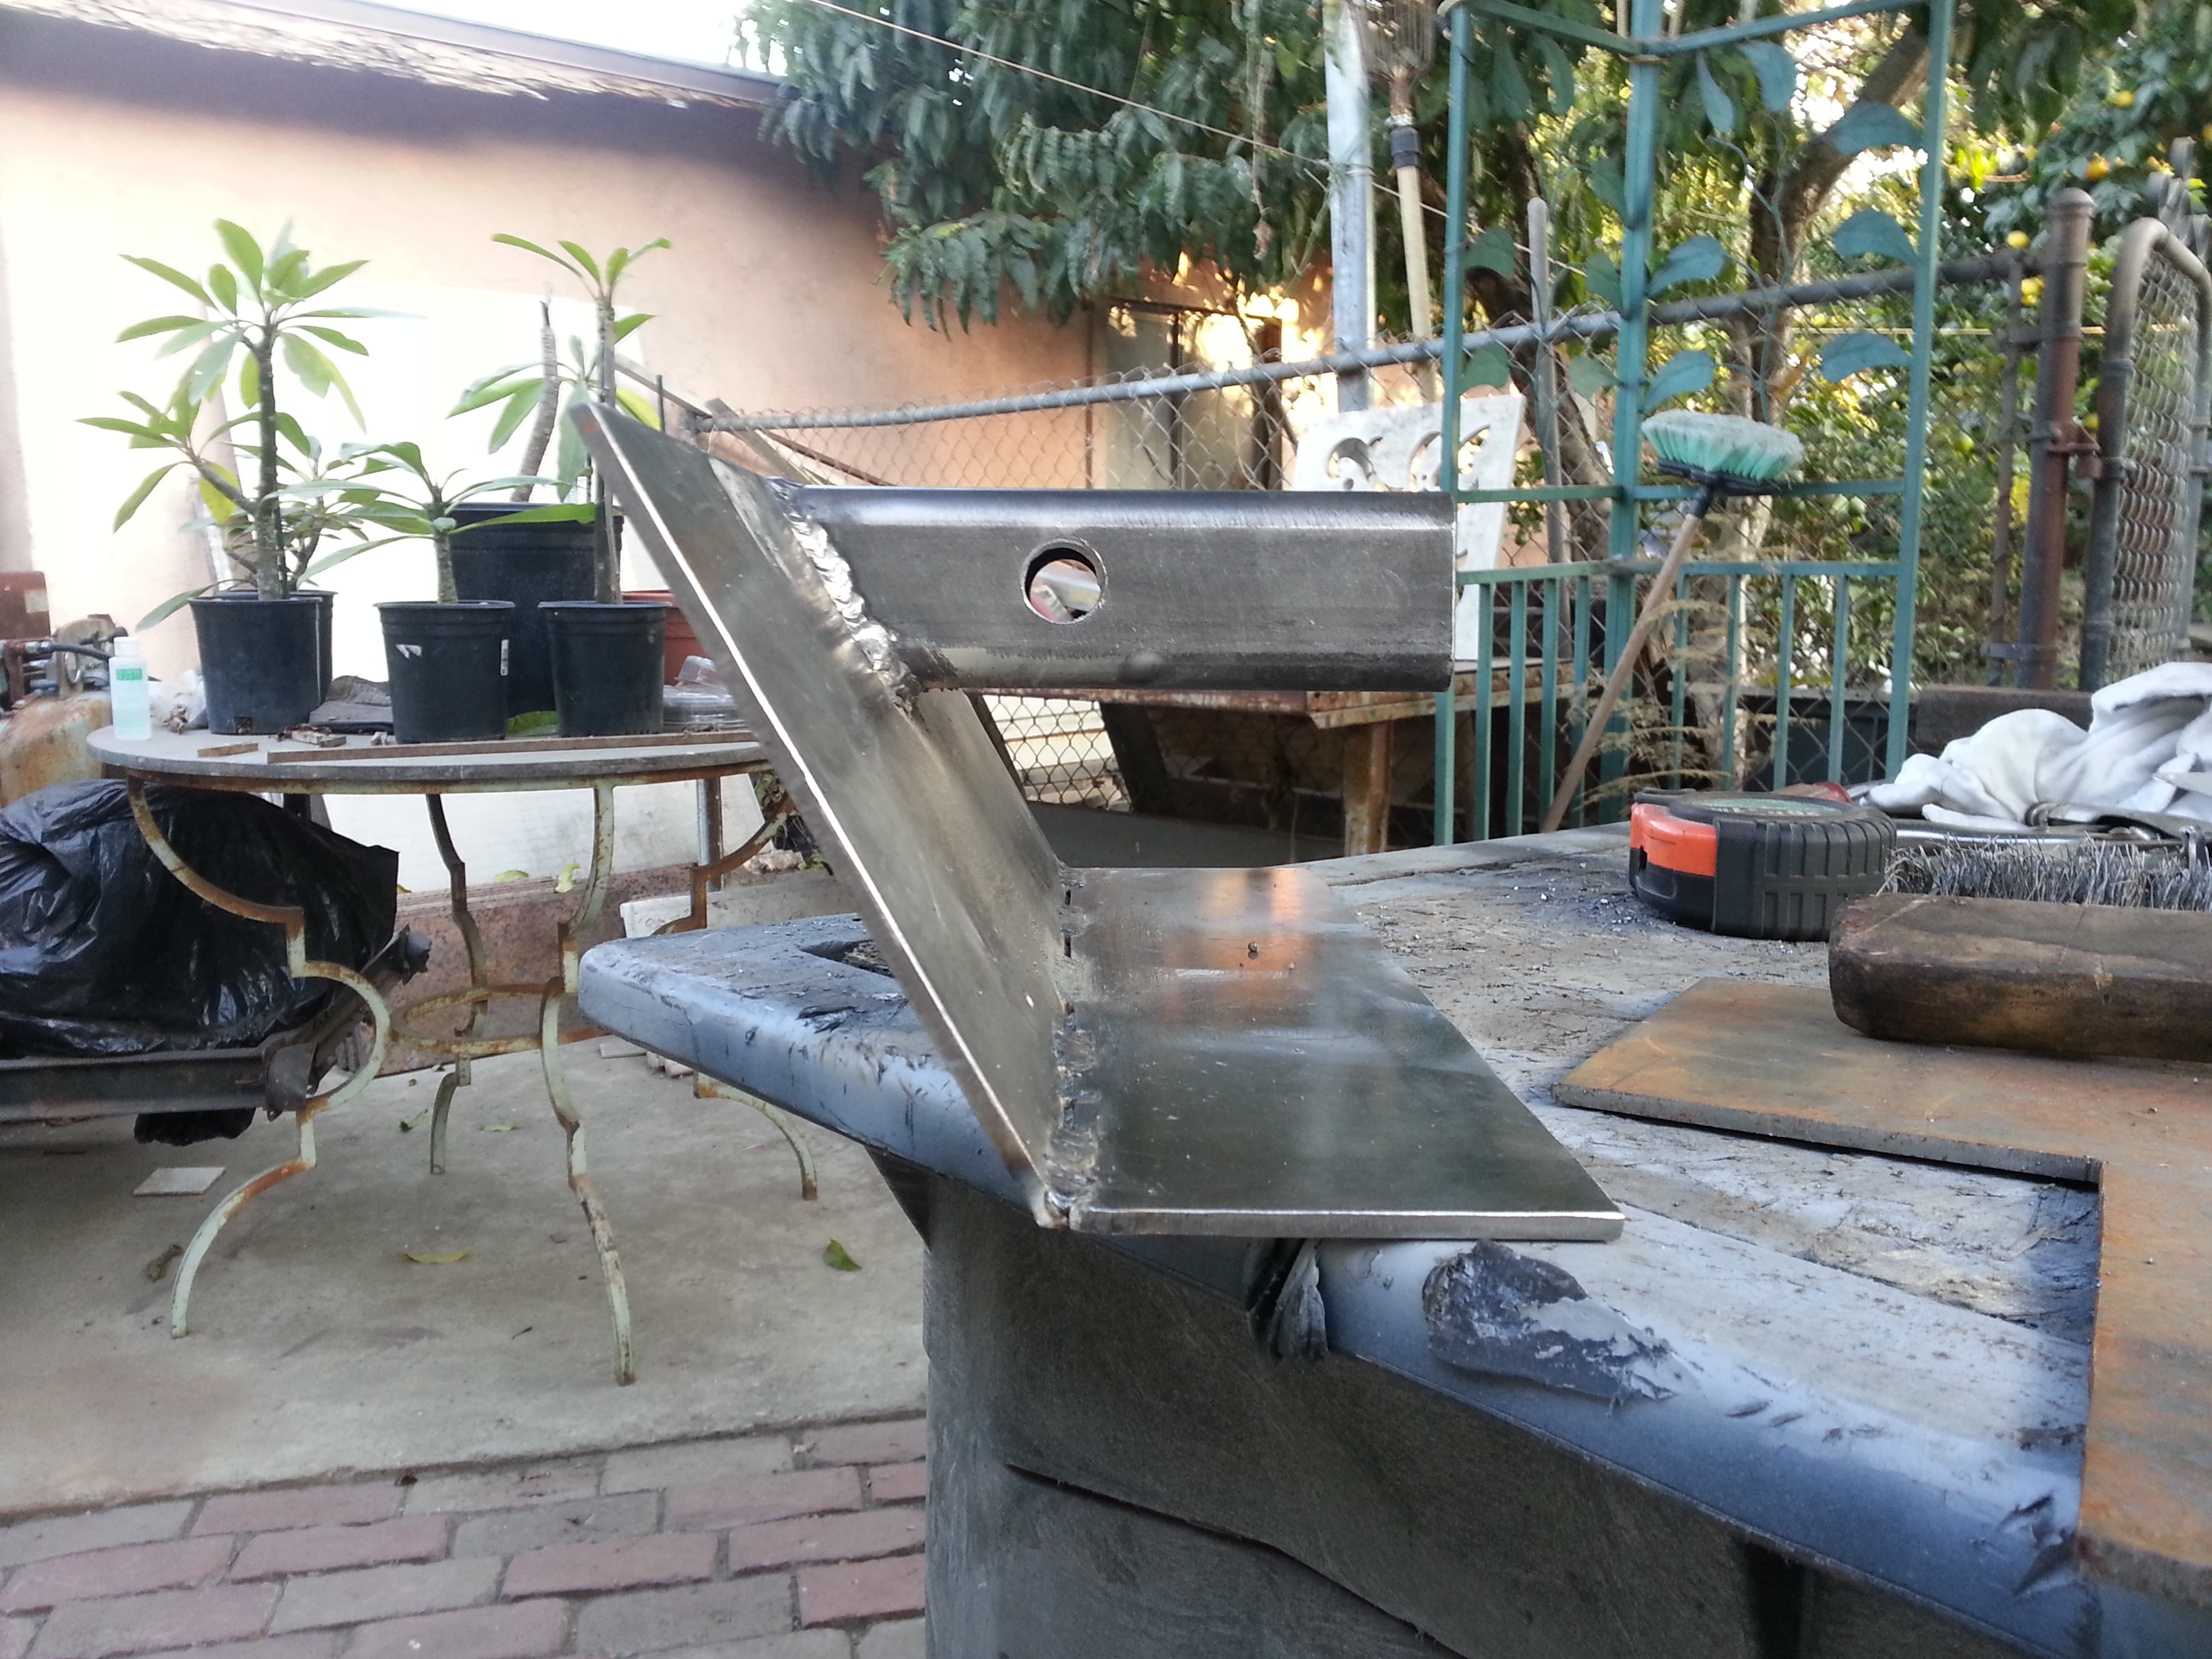
Cut the plate out that the license plate is gonna be mounted to. I left about 1&3/4" extra on each side of the bumper. You'll see why in a bit.
This is why i made it angled.
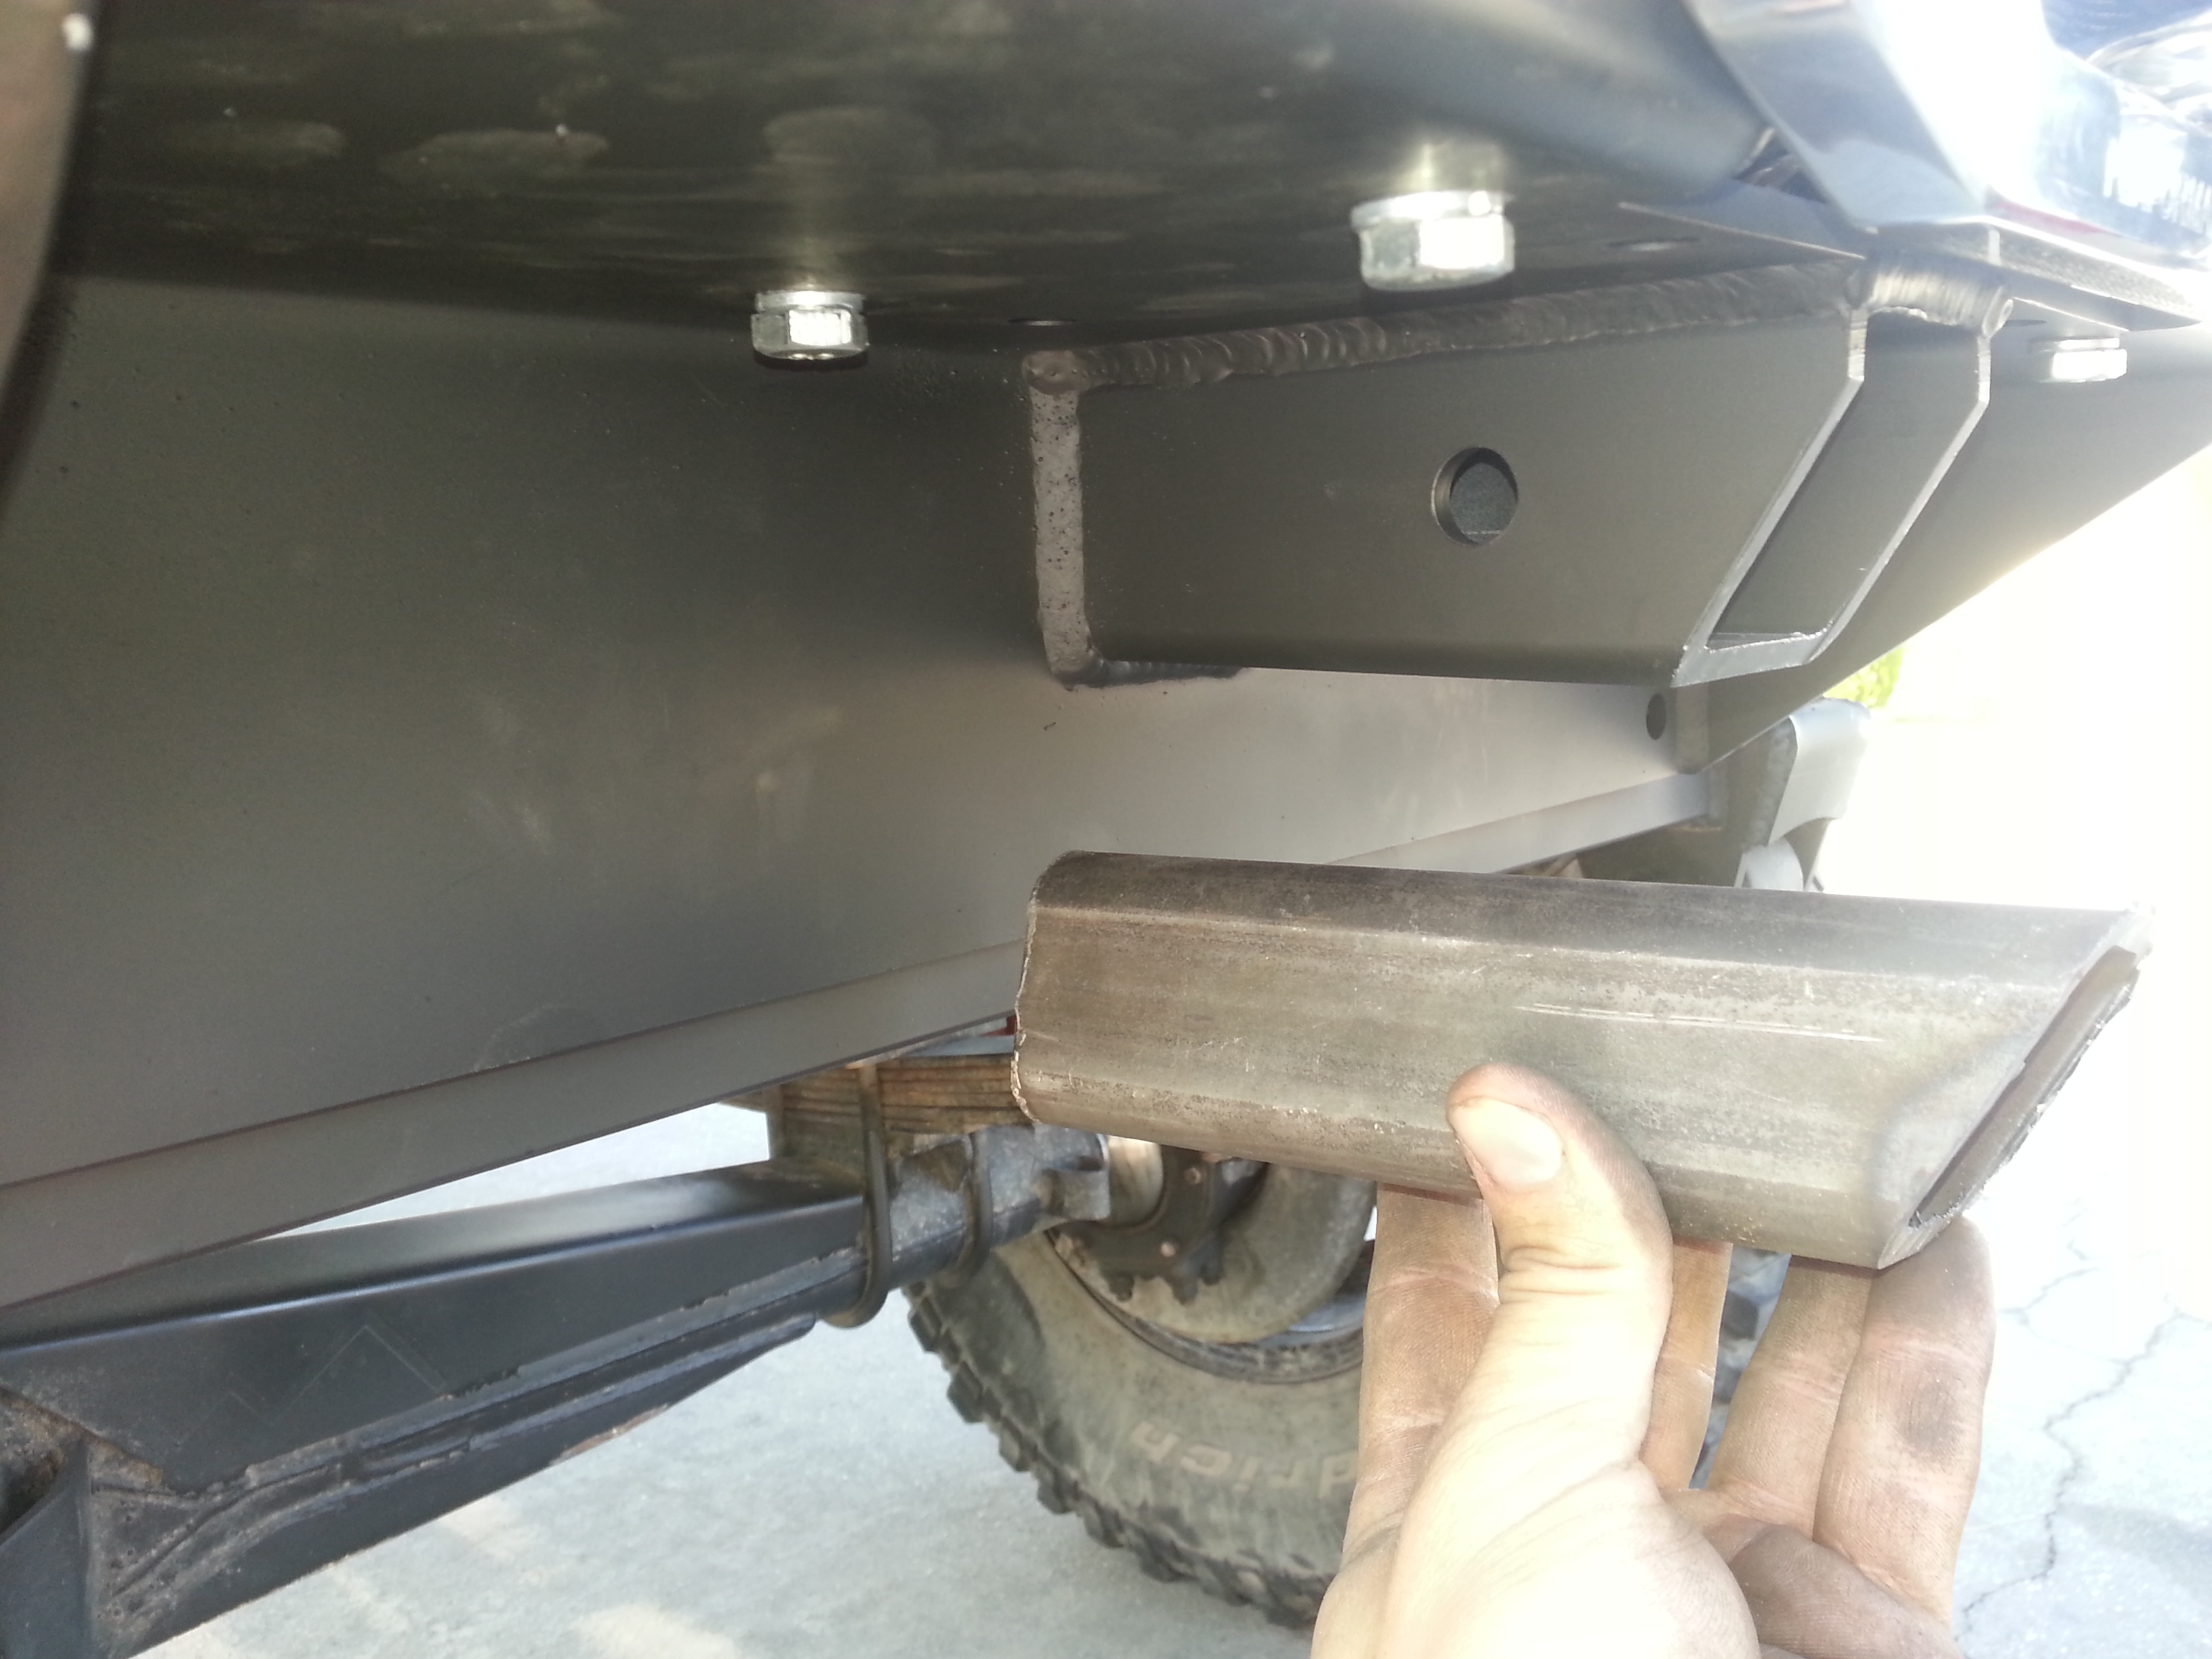
I like i said earlier, i left it sticking out about 1/4" just so i could weld the licence plate Plate onto the front and still have room for the welds so they dont restrict the tube from entering all the way.
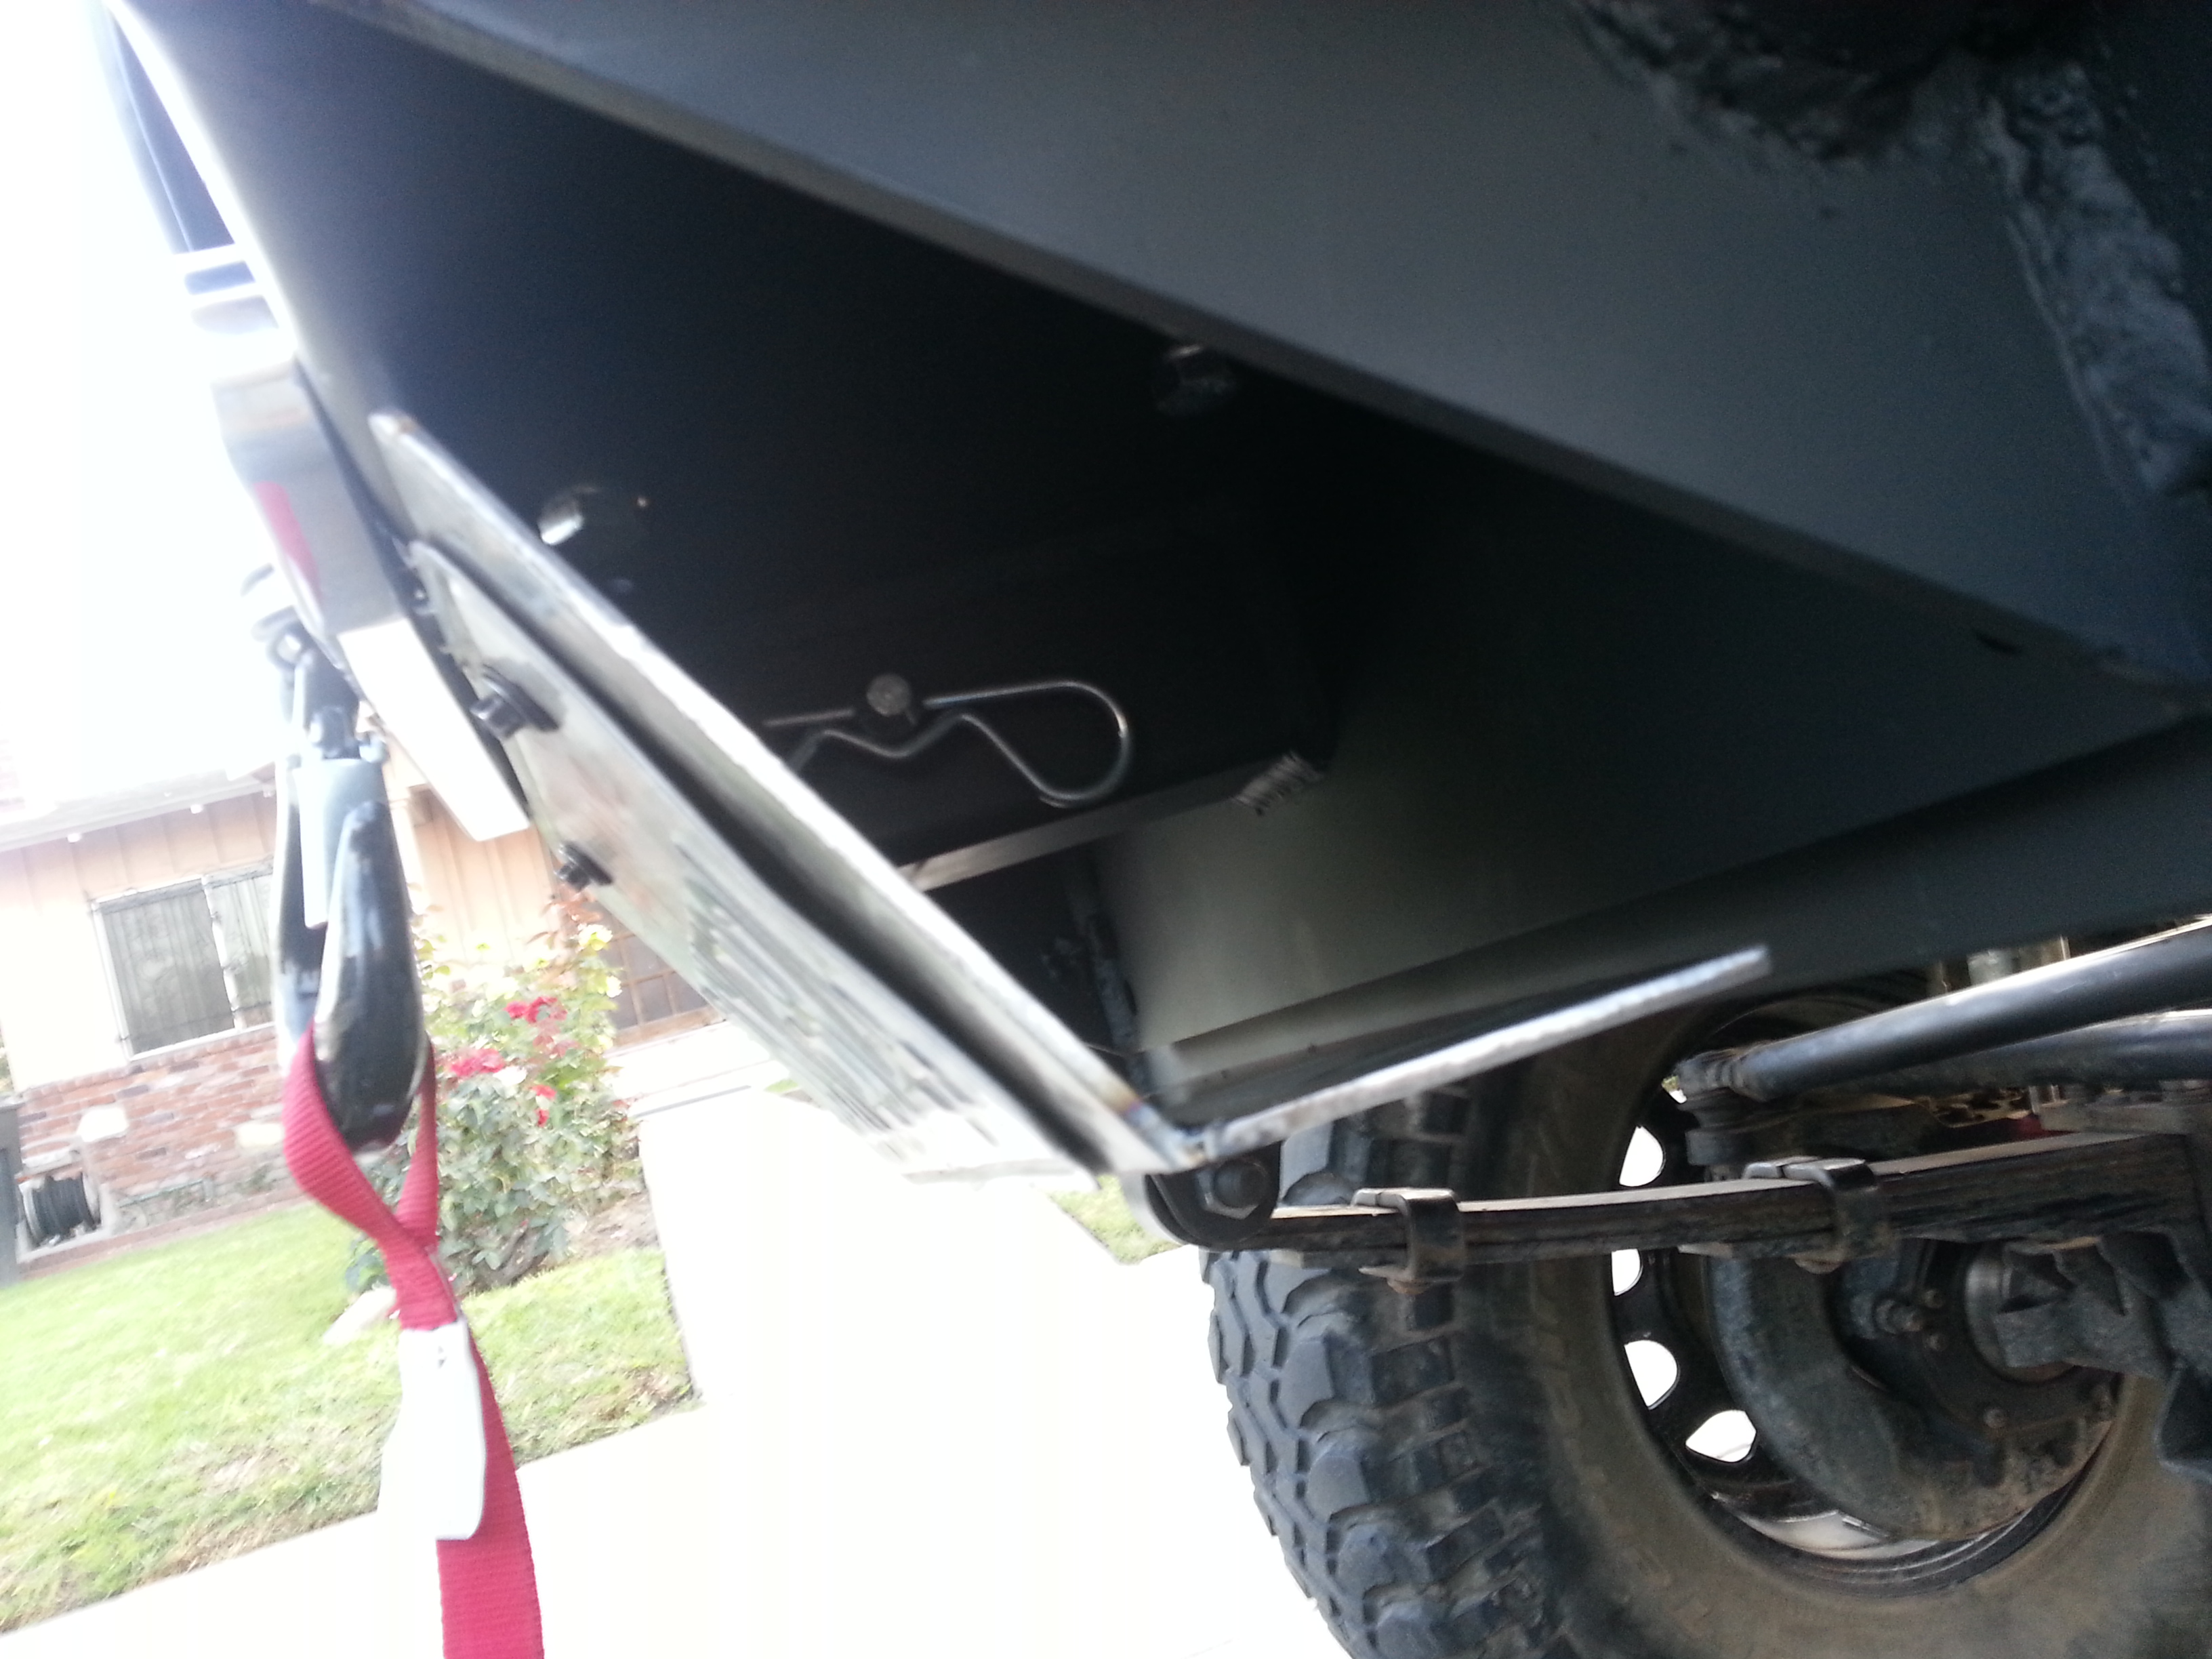
More or less where it will be sitting. I need enough room on both sides to be able to stick my hands on the sides because i will be using the locking hitch bolt behind there.

Also wanted to restrict the bottom side of the so people cant use an extension for their wrenches to get my winch bolts off. I left the welds in tact on the back side. No need to sand down because they wont be visible. plus it will make for a stronger joint.

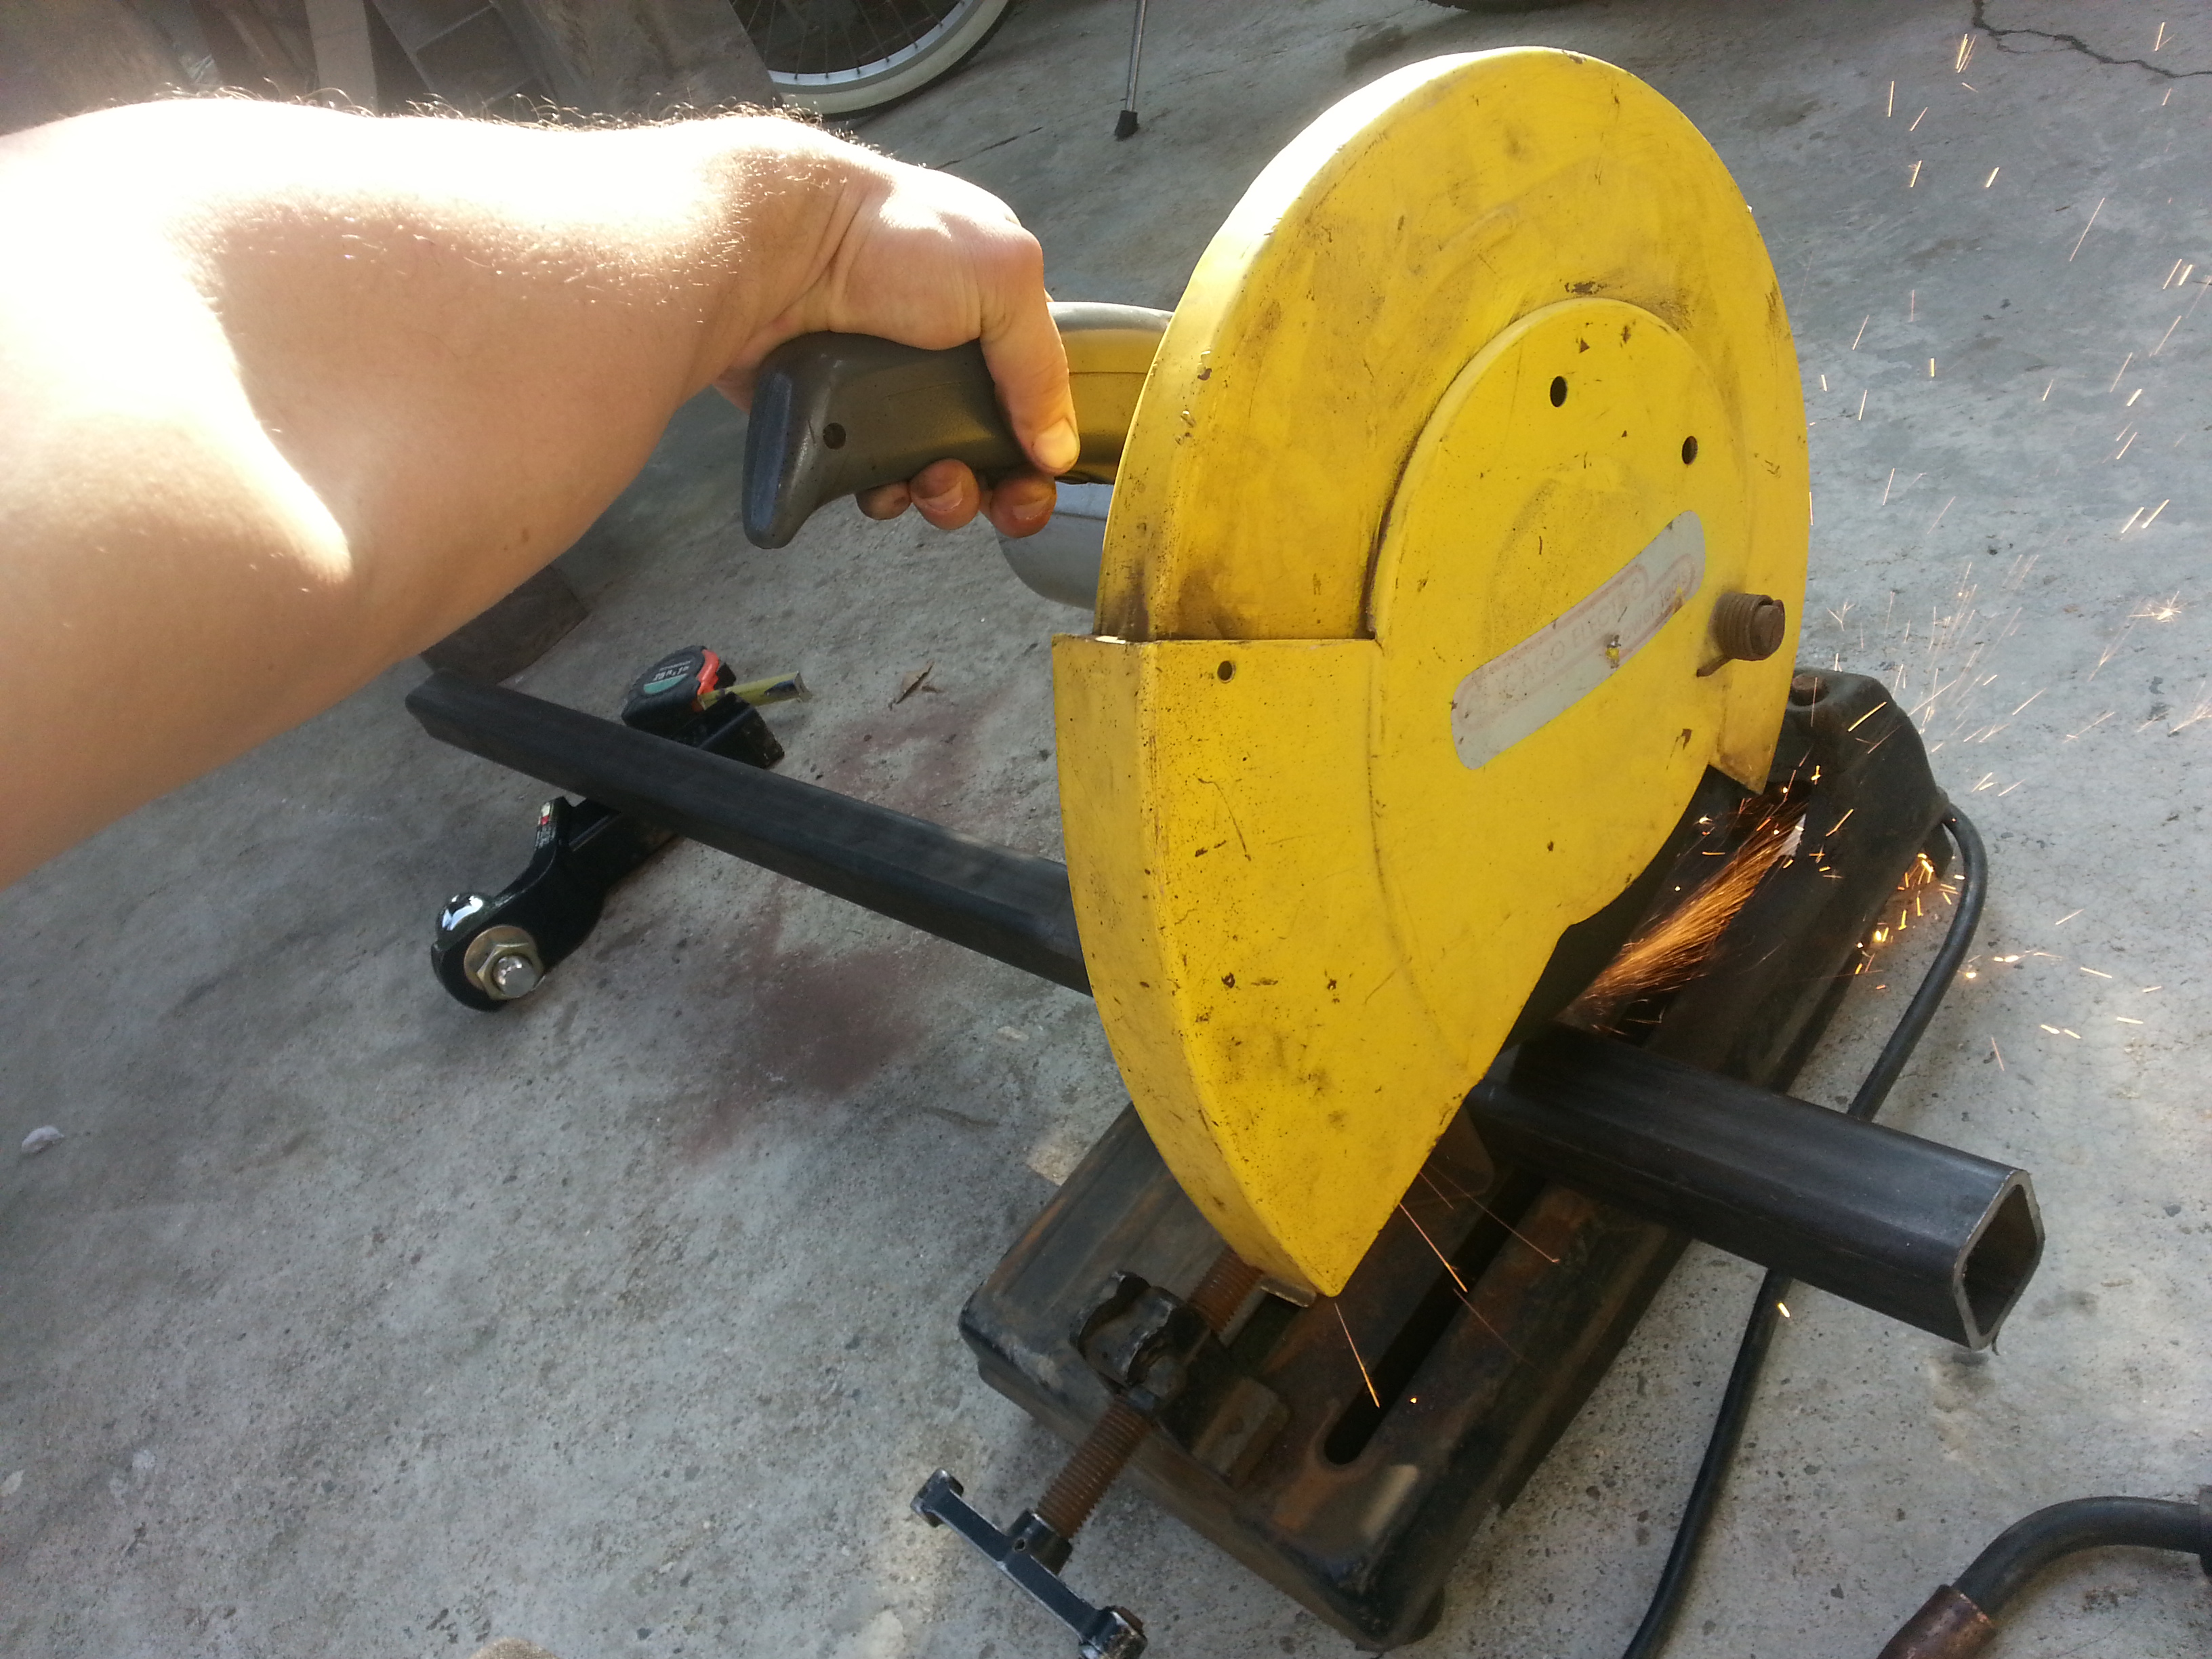
I did a full weld accross from left to right then ground down and sanded down to a clean angle.
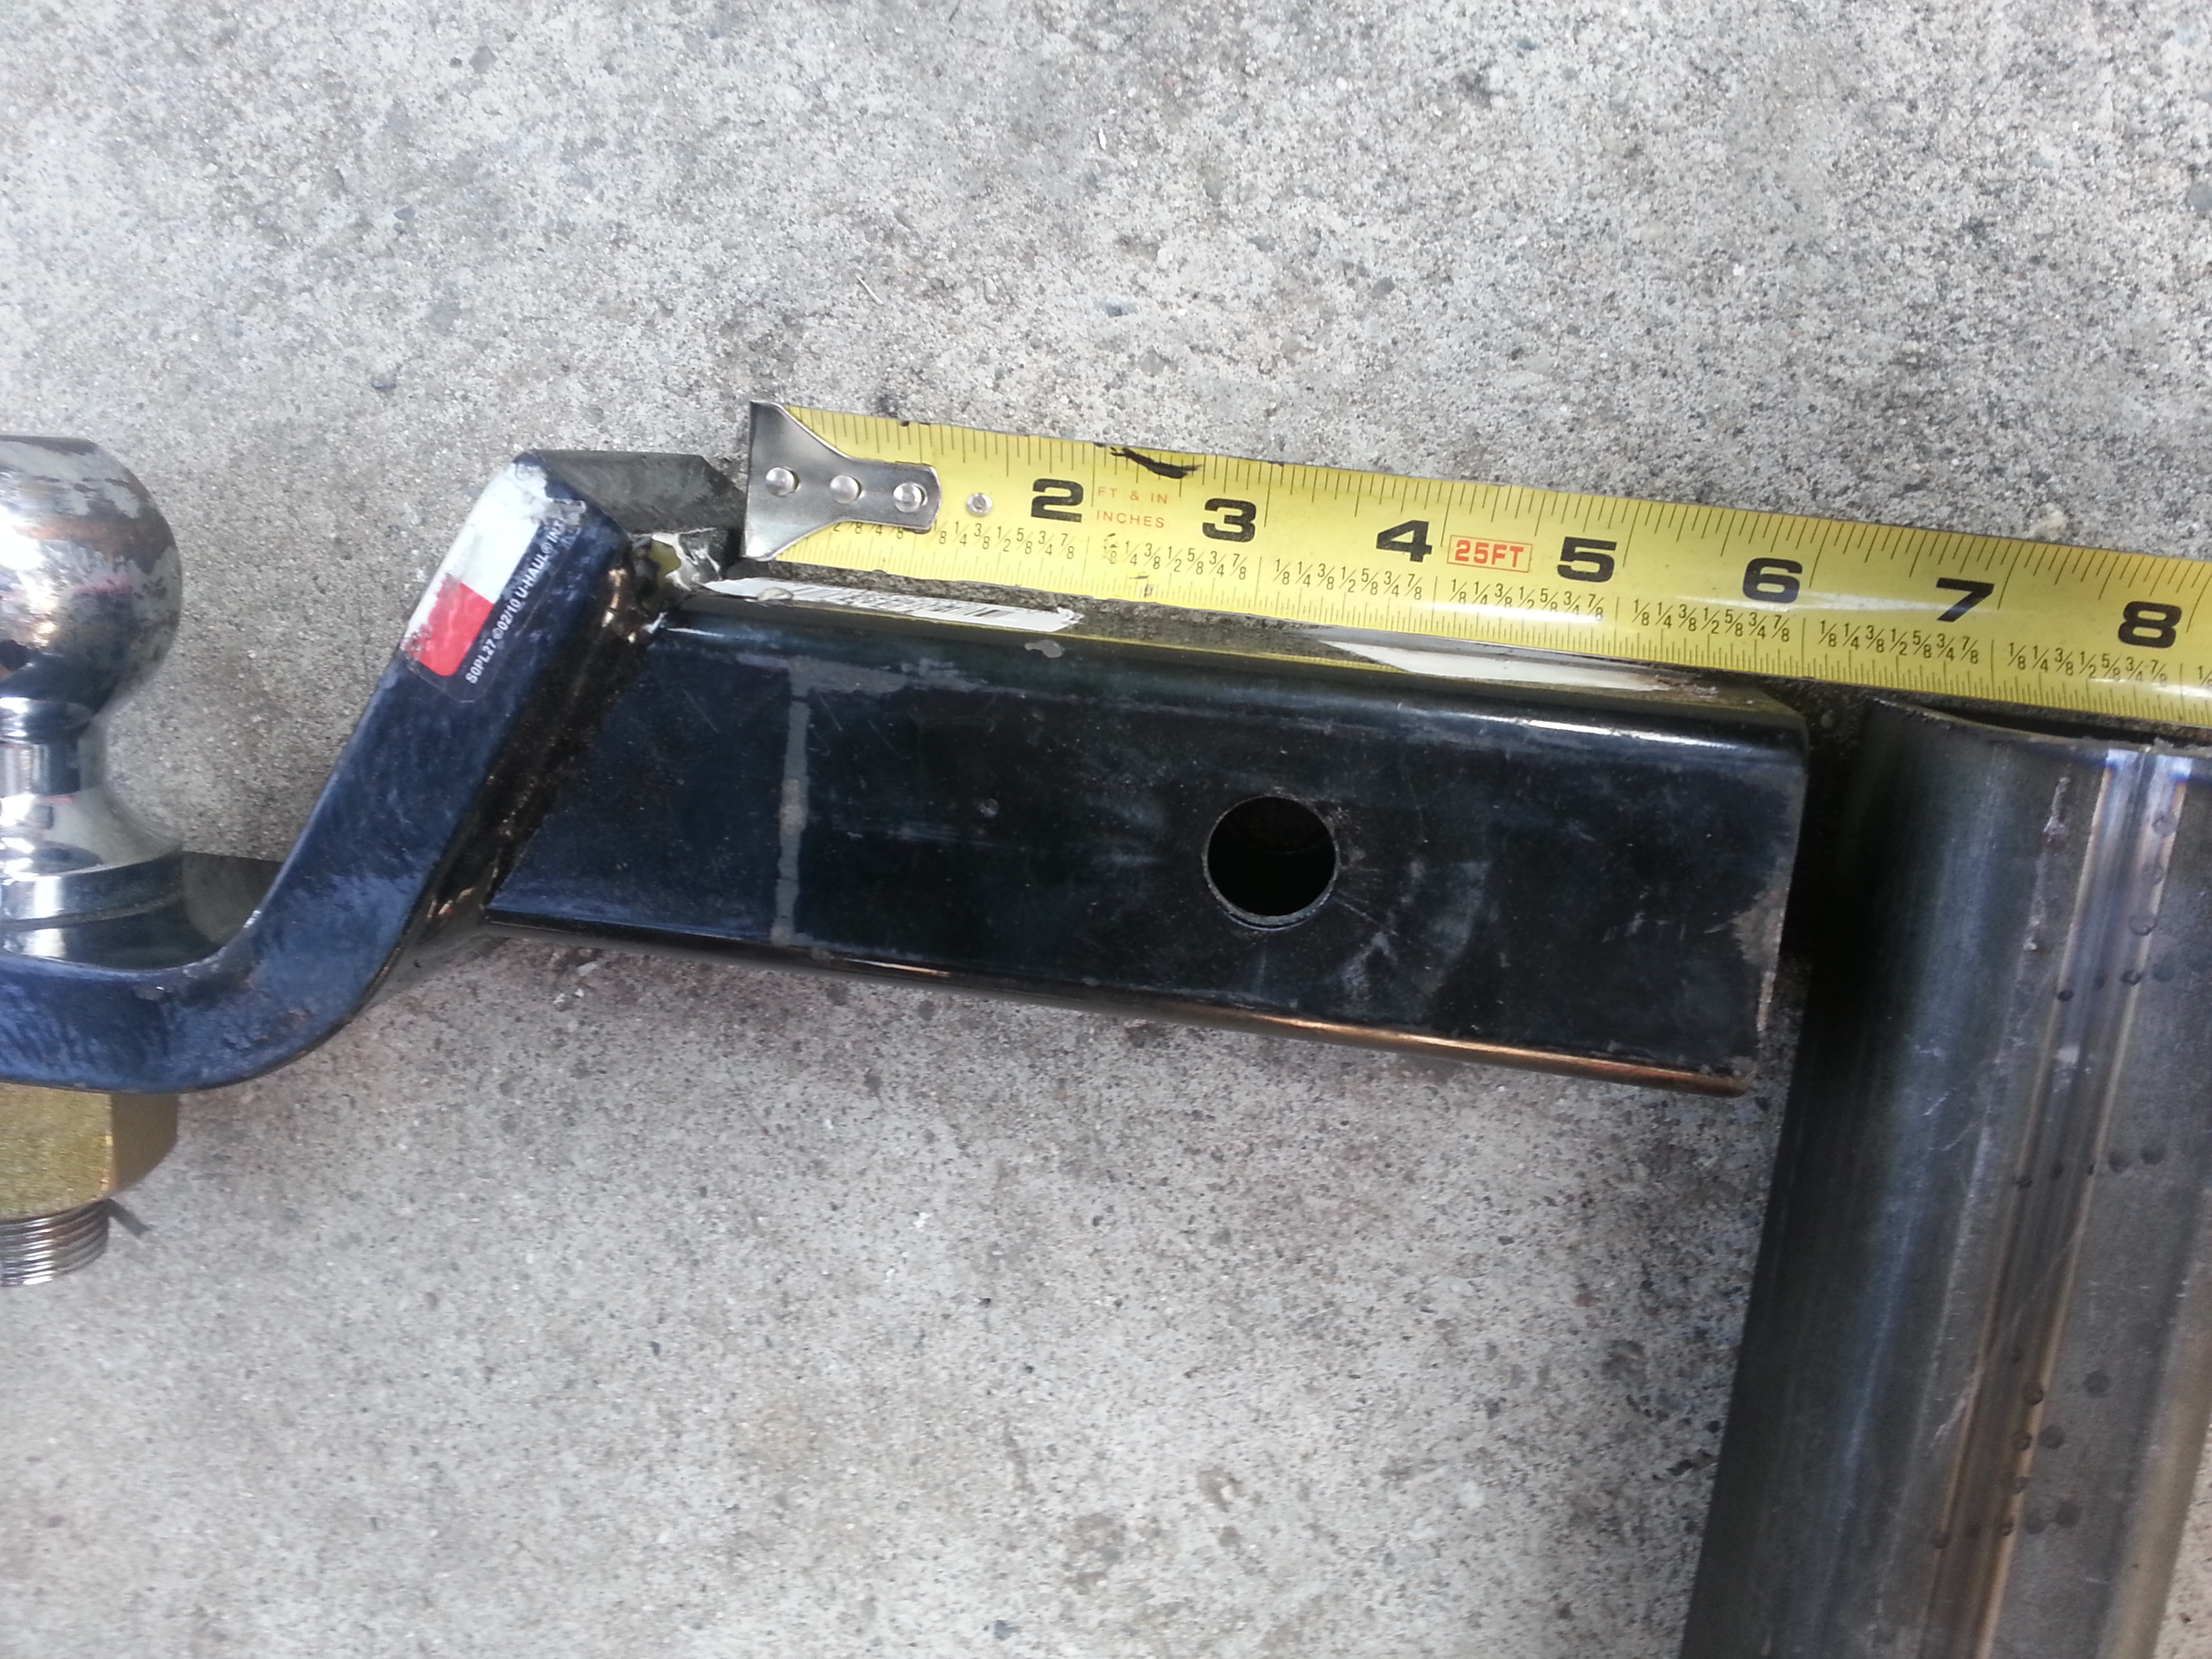
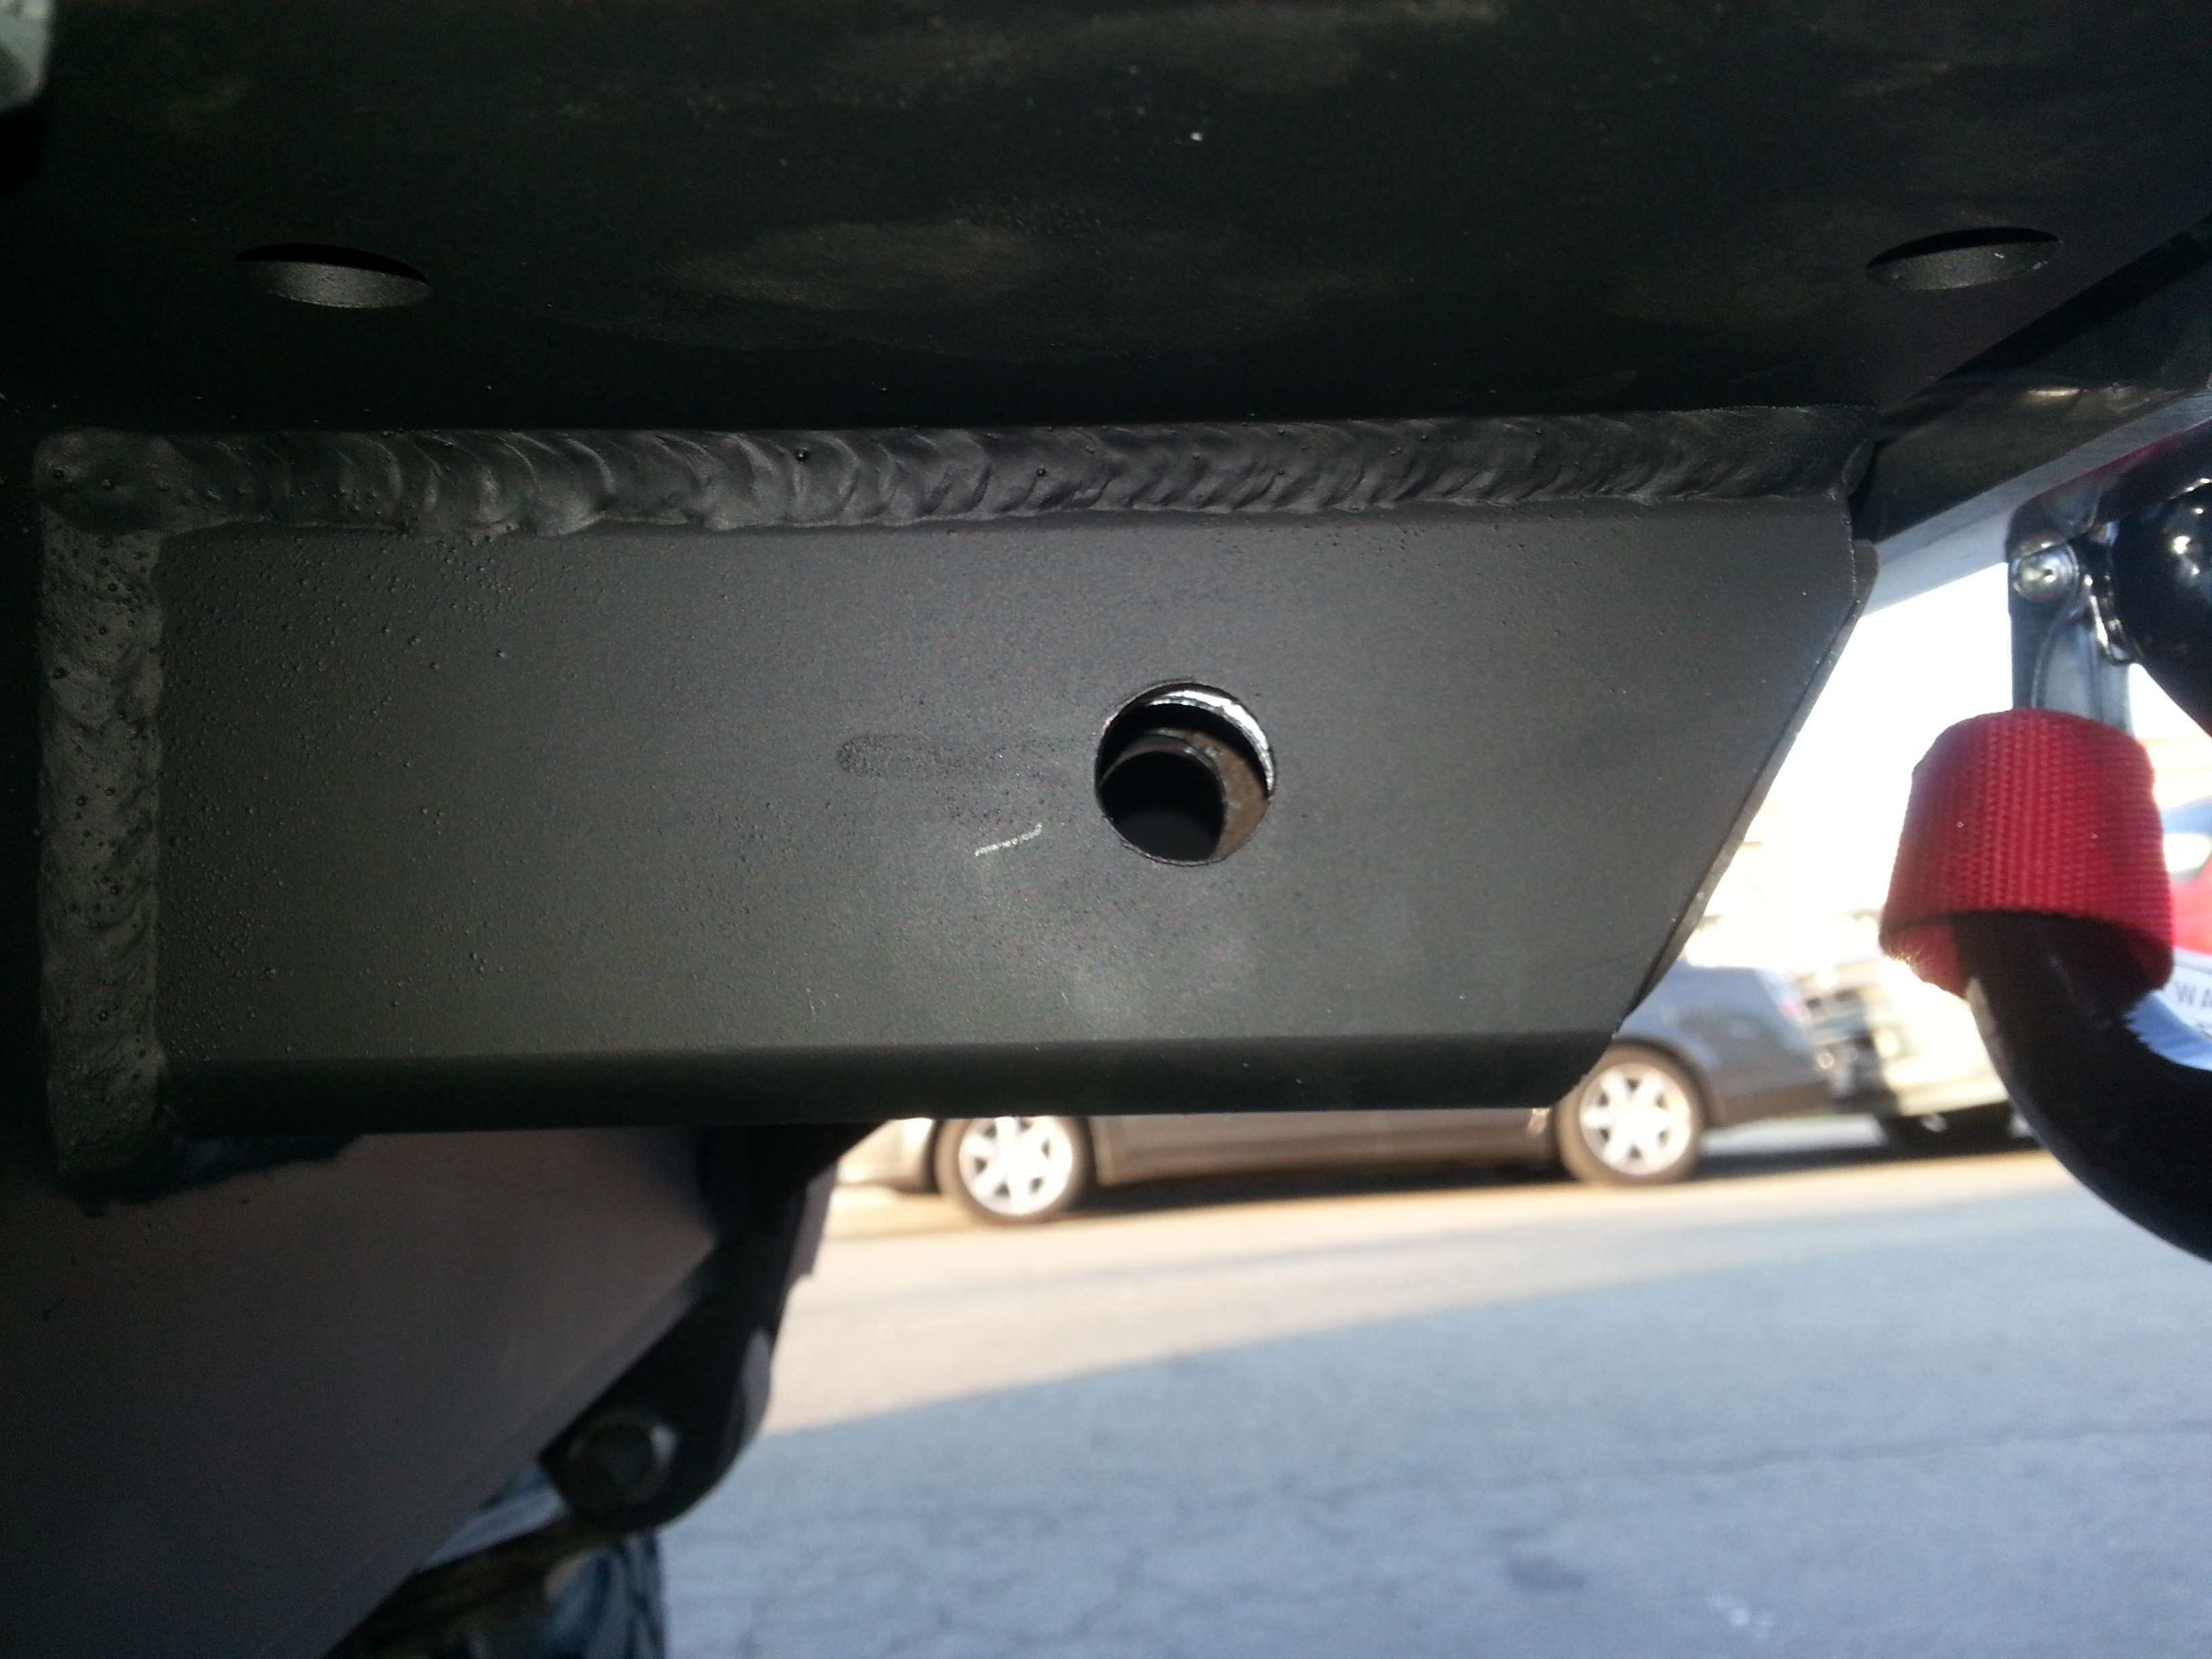
I marked where the bolt hole is going to be and i centered the hitch piece on the center of the back part of that plate.
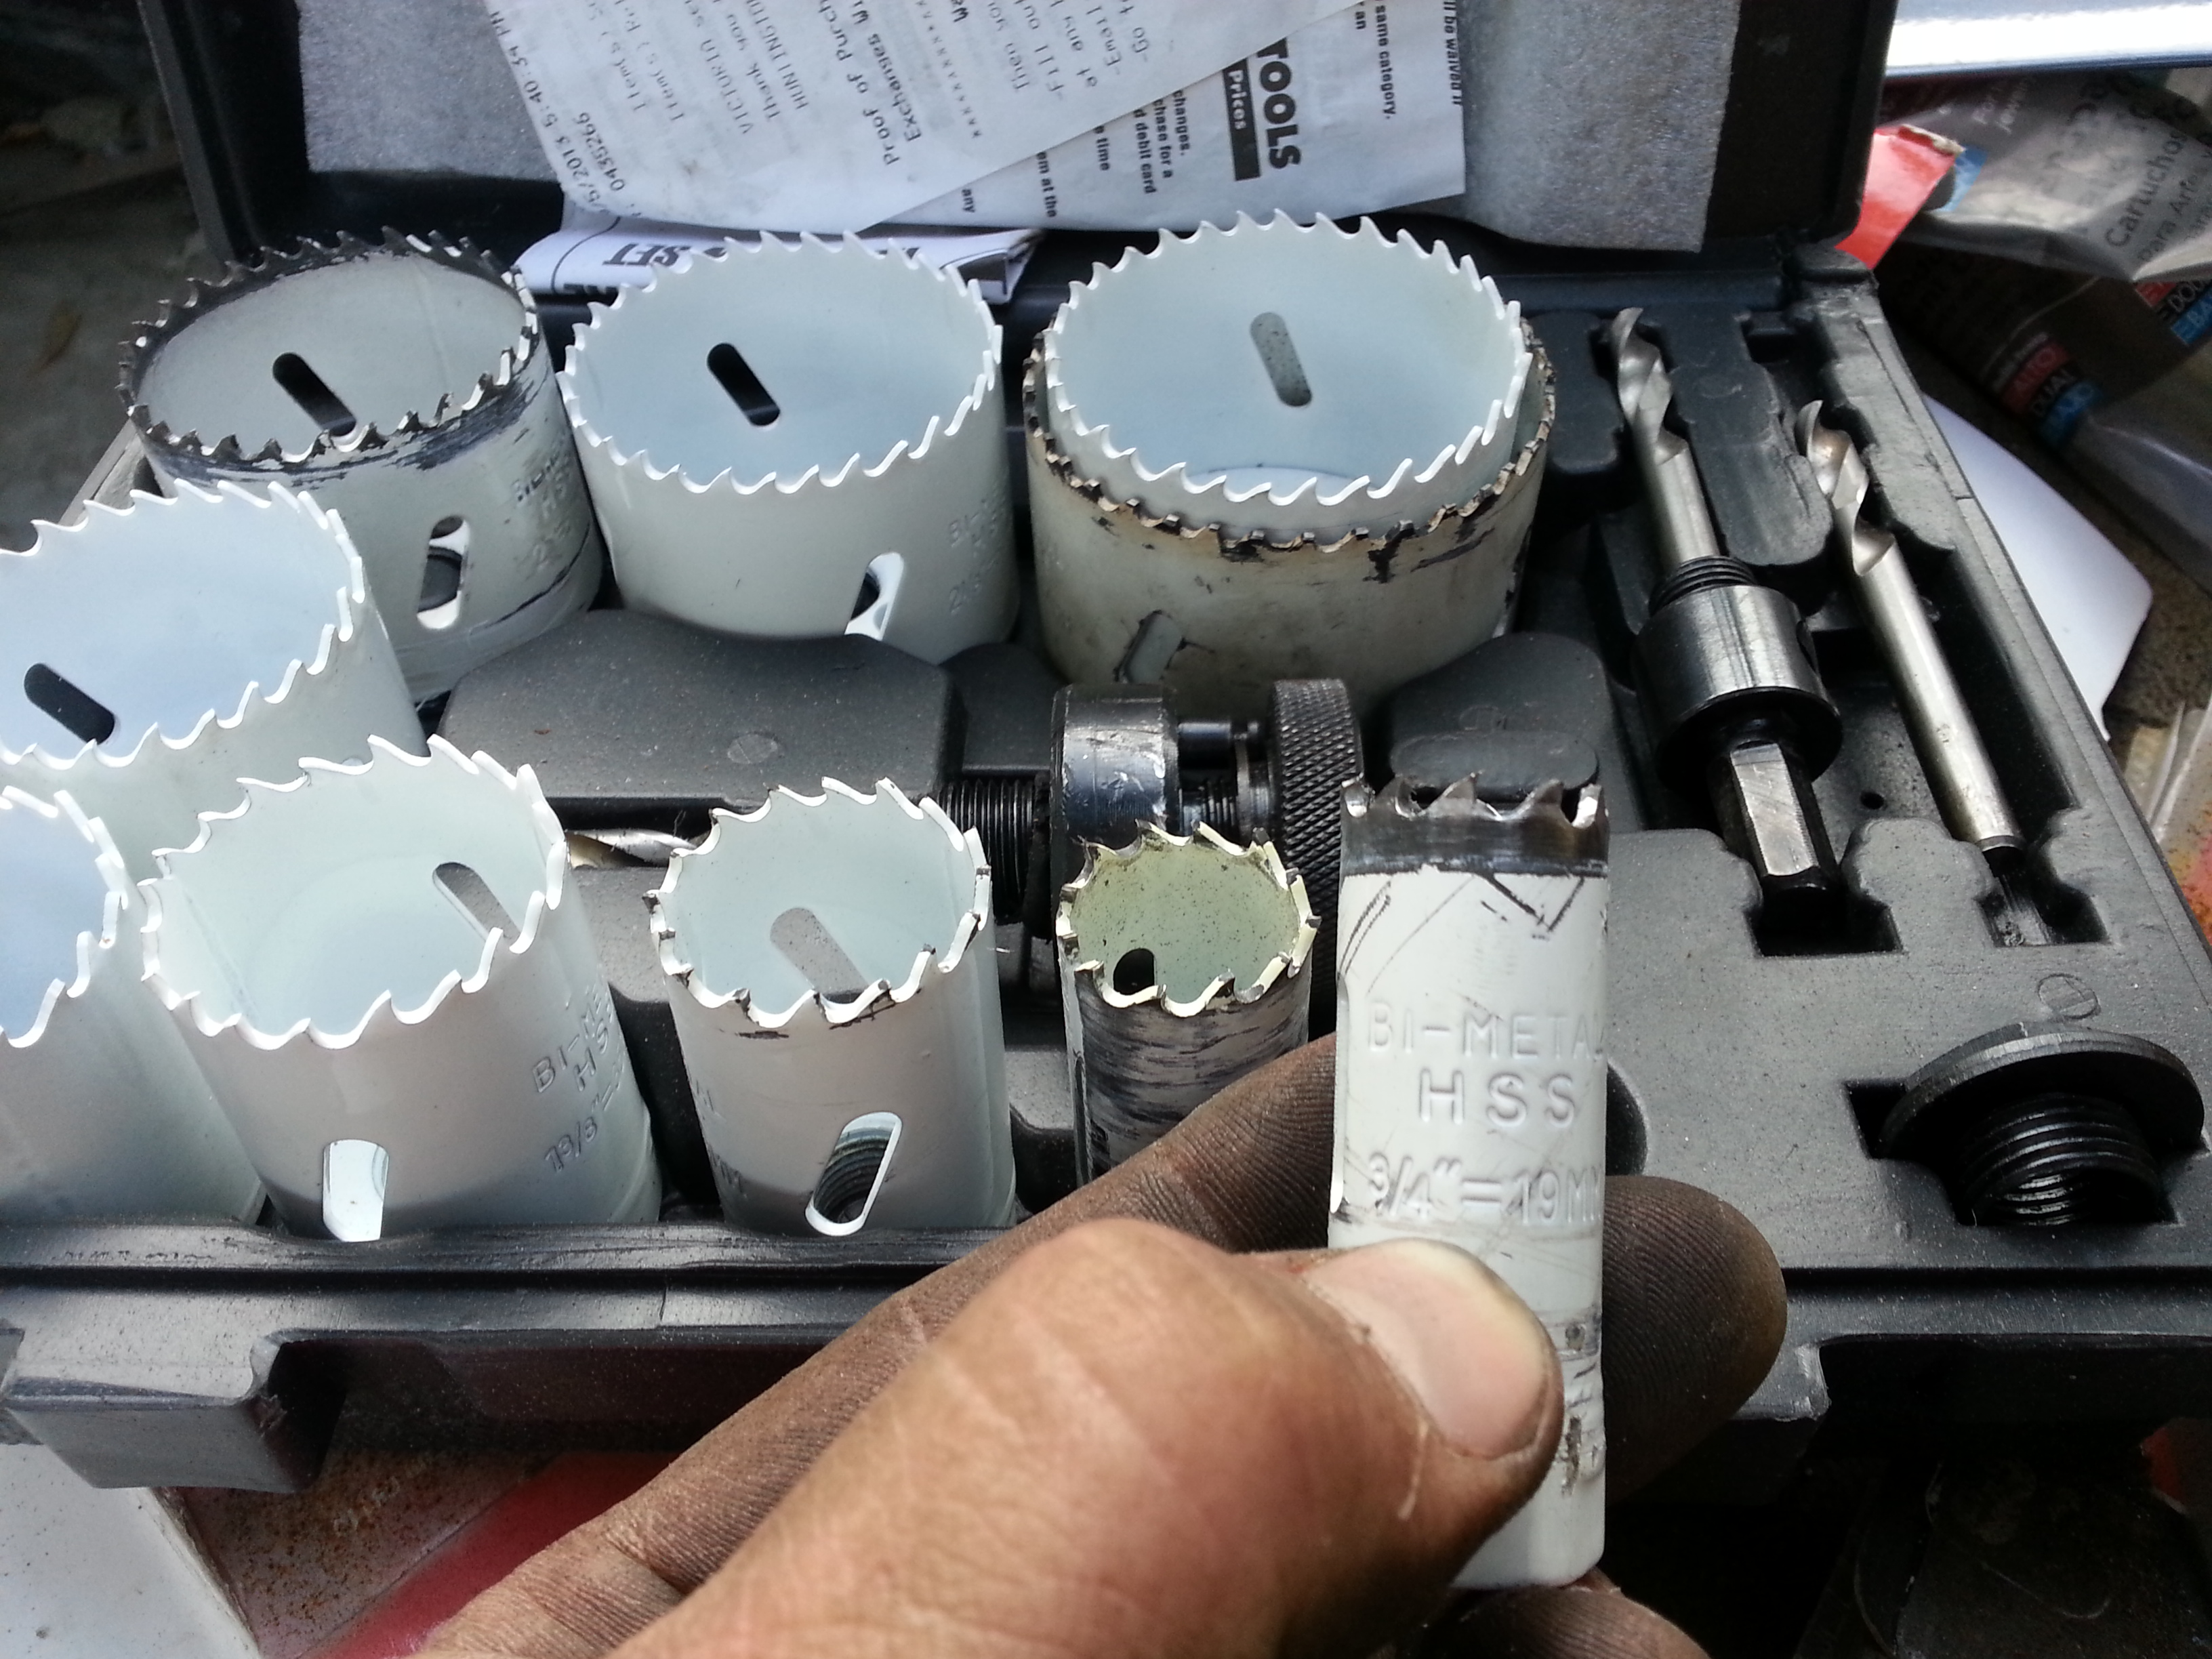
Drilled out the holes on the sides Using a 3/4" hole saw(Included in the Harbor Freight hole saw Saw kit).
Perfect fit. I wasnt supporting it in the picture but the bolt fits right through perfectly.
Bam! all welded up.
Nice. Came out clean.
BEEE-YODA-FUL! Btw sorry but this is the only picture i have at the moment of everything together. Either way you can still tell how clean it looks. It all came together very nicely.
Bolt and pin fit perfectly.
Bought a Reese hitch receiver bolt lock. Woot!
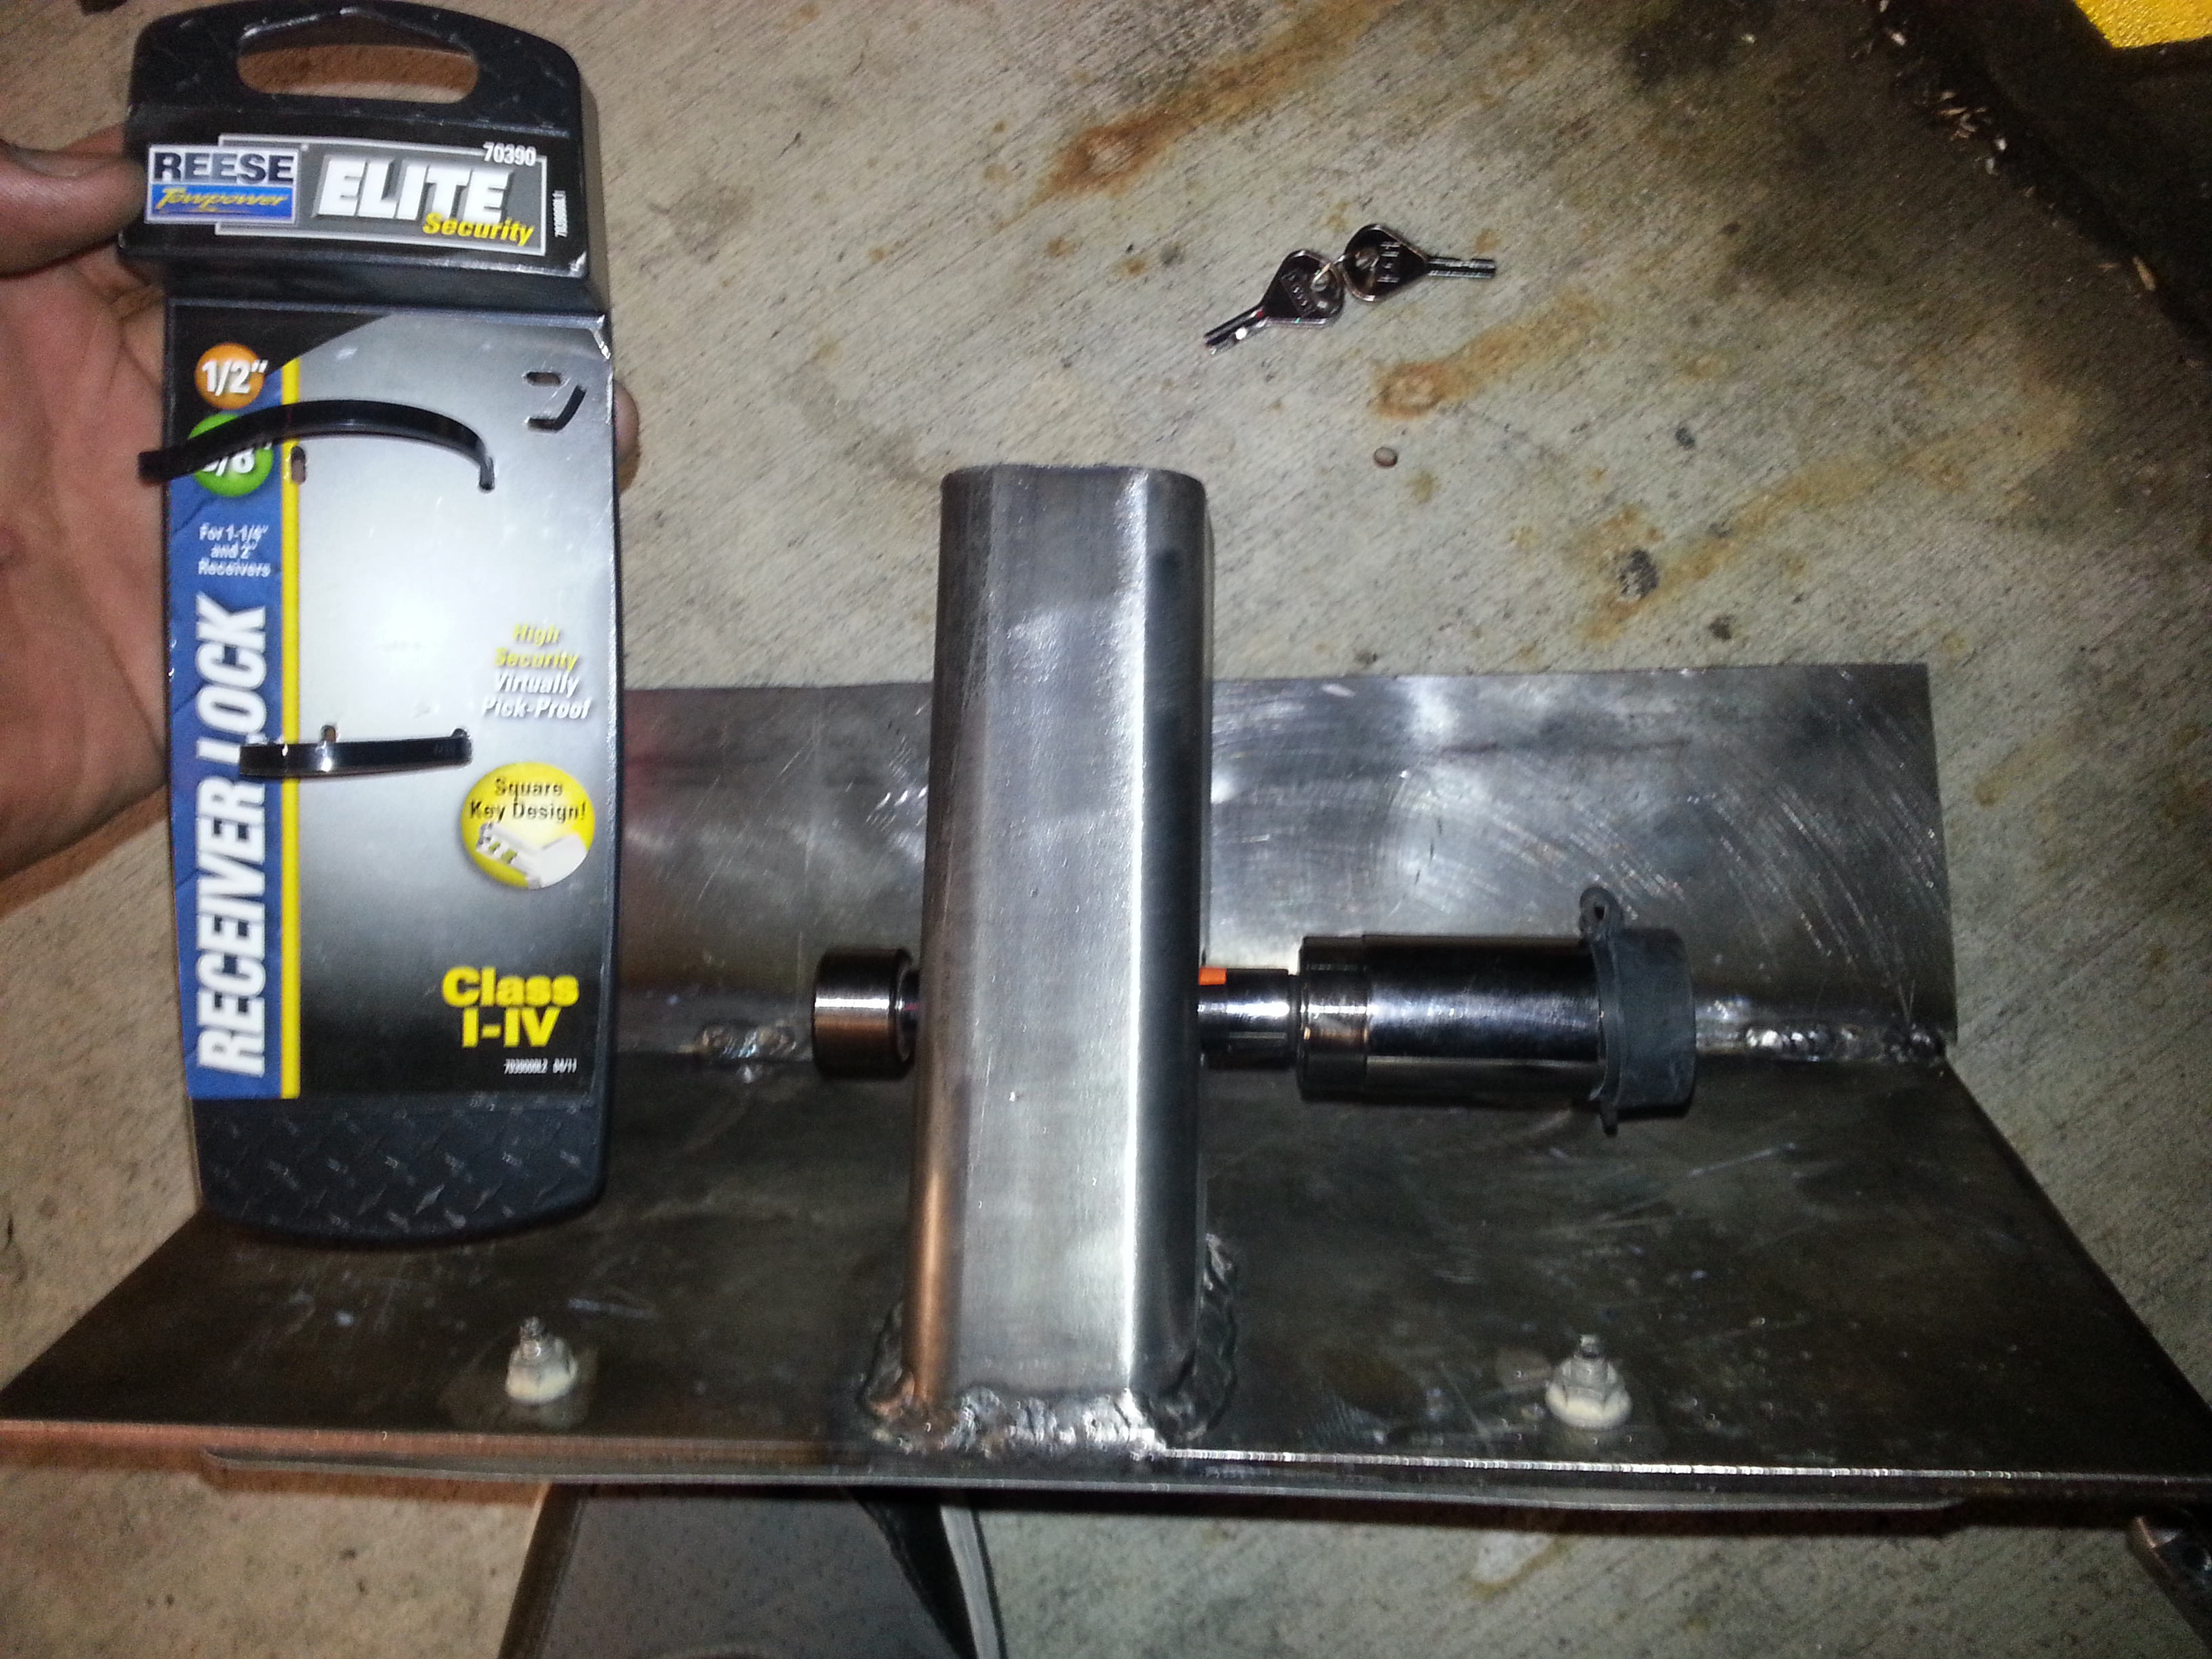
Good luck getting that off with the limited space you are provided with. lol
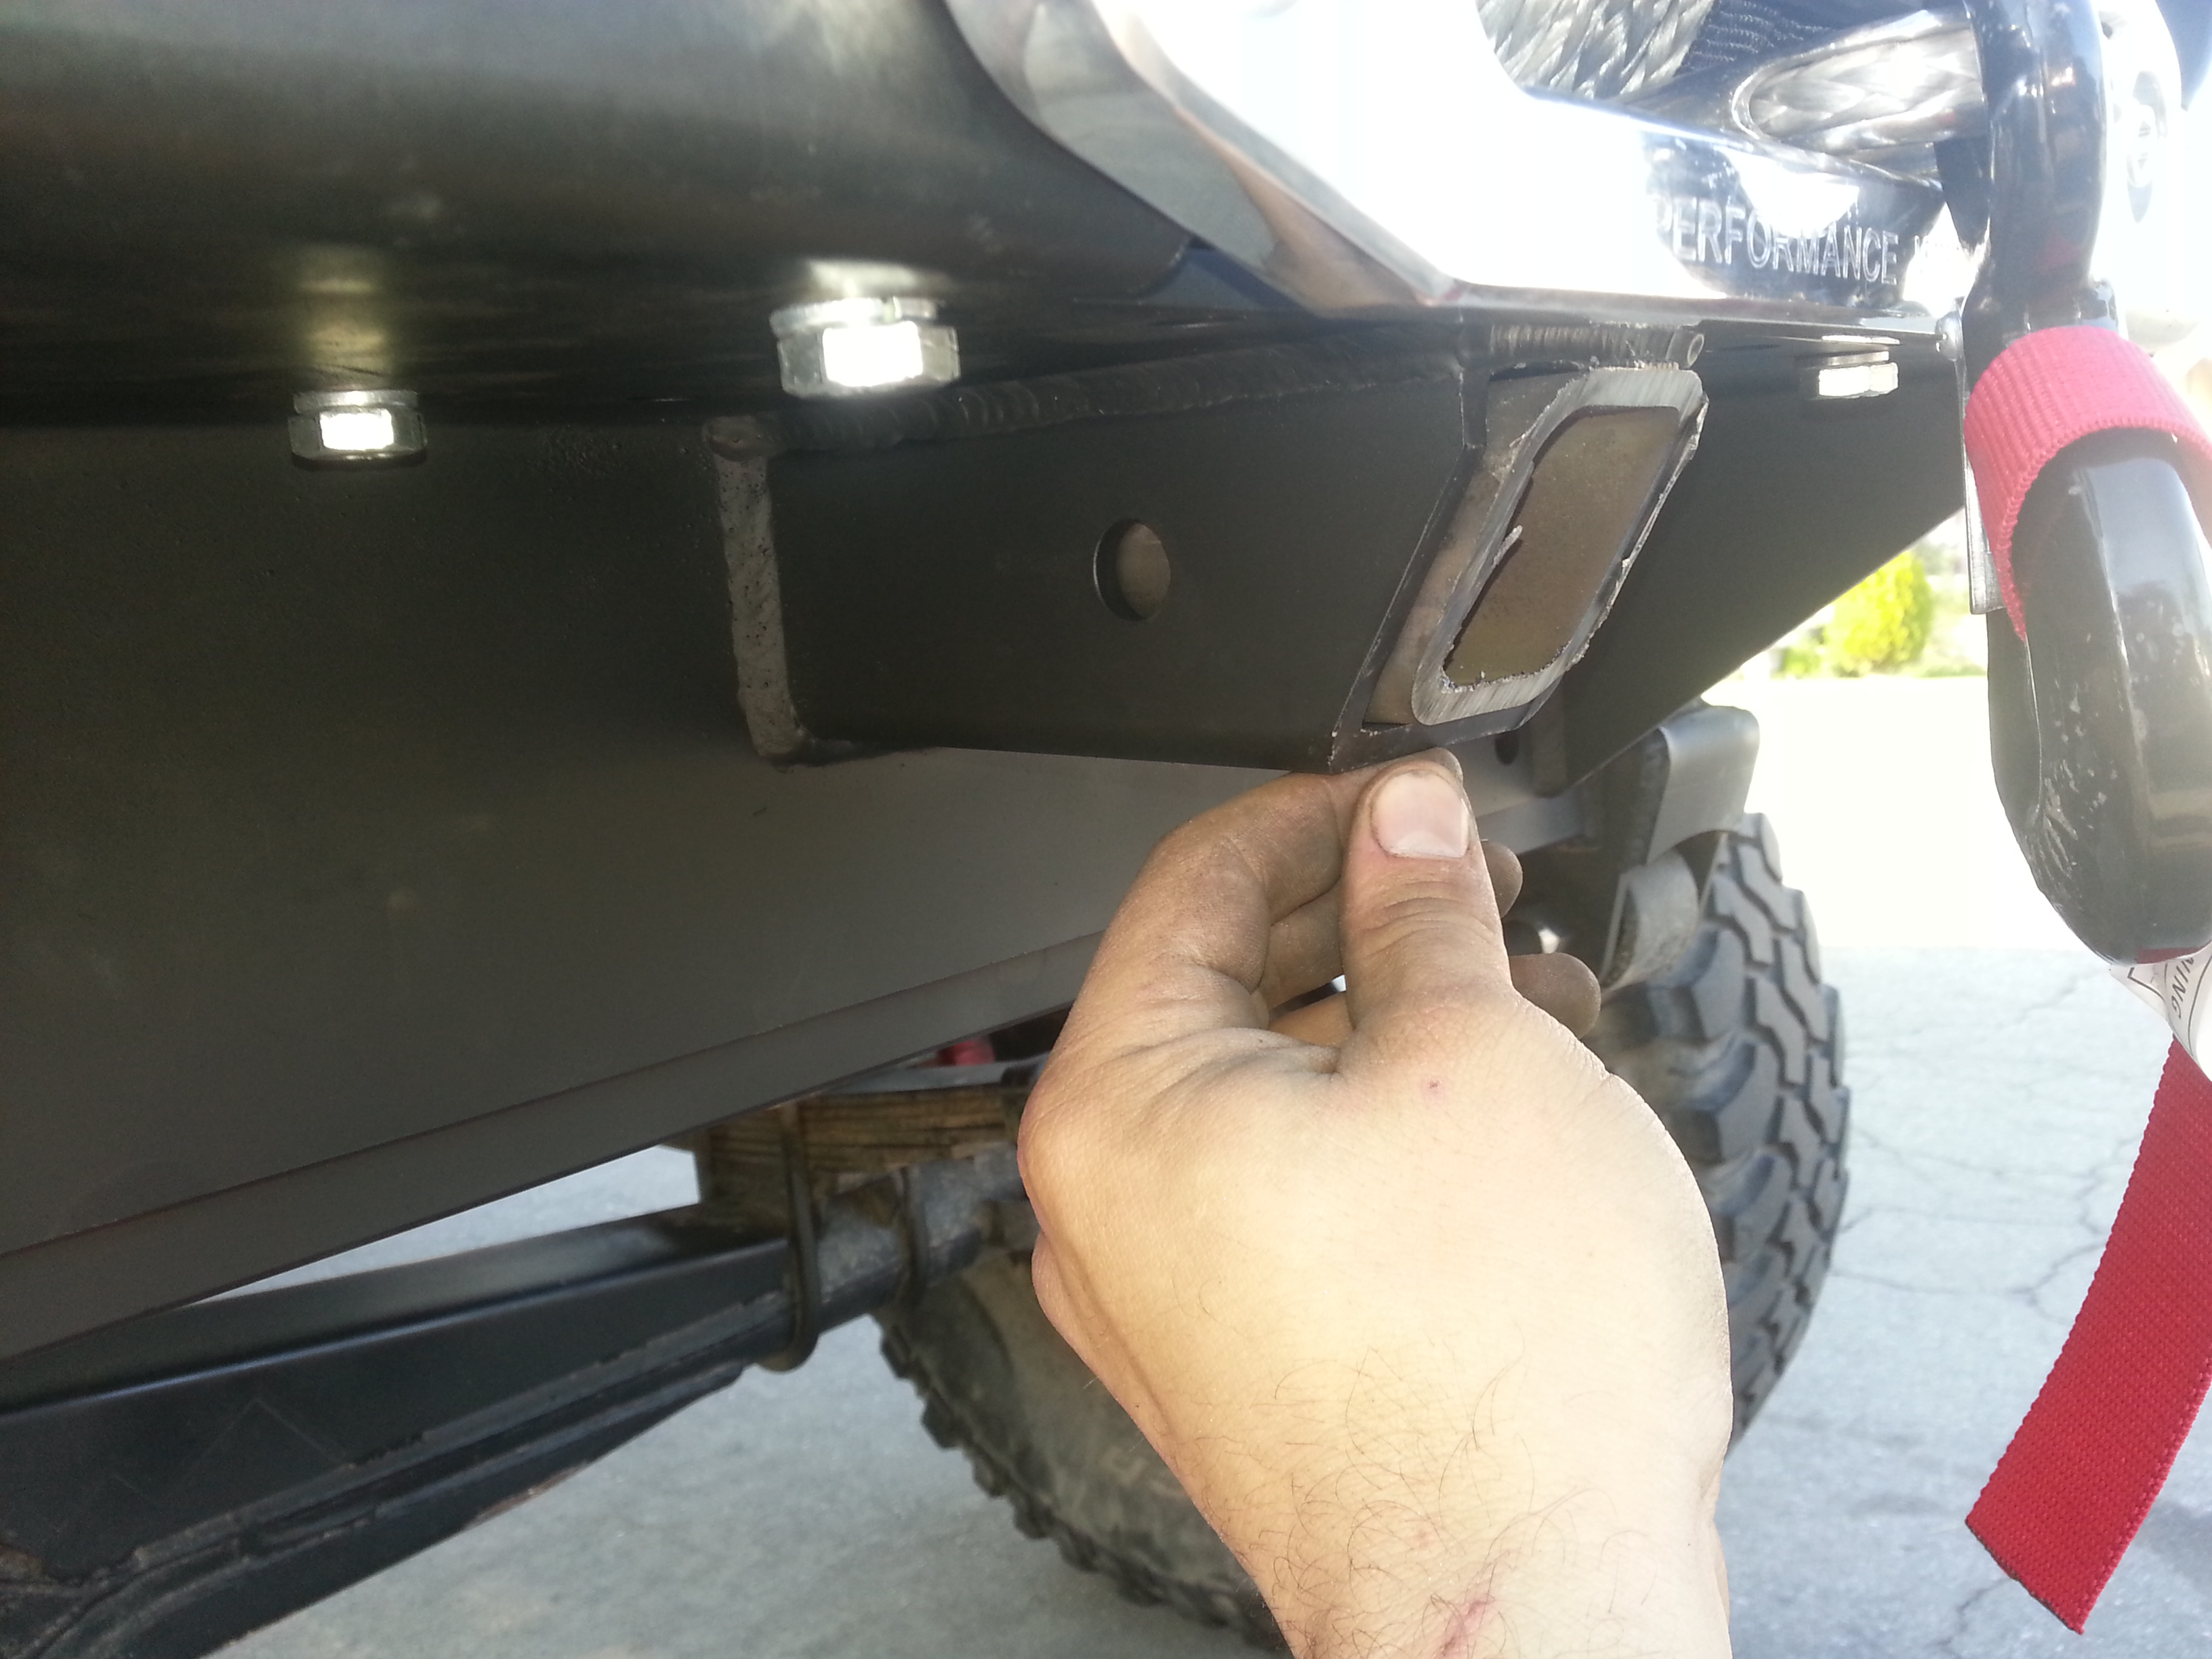
BTW on a side note; Notice the bolts still exposed there. I had to address this problem ASAP to avoid giving a-hole thieves easy access.
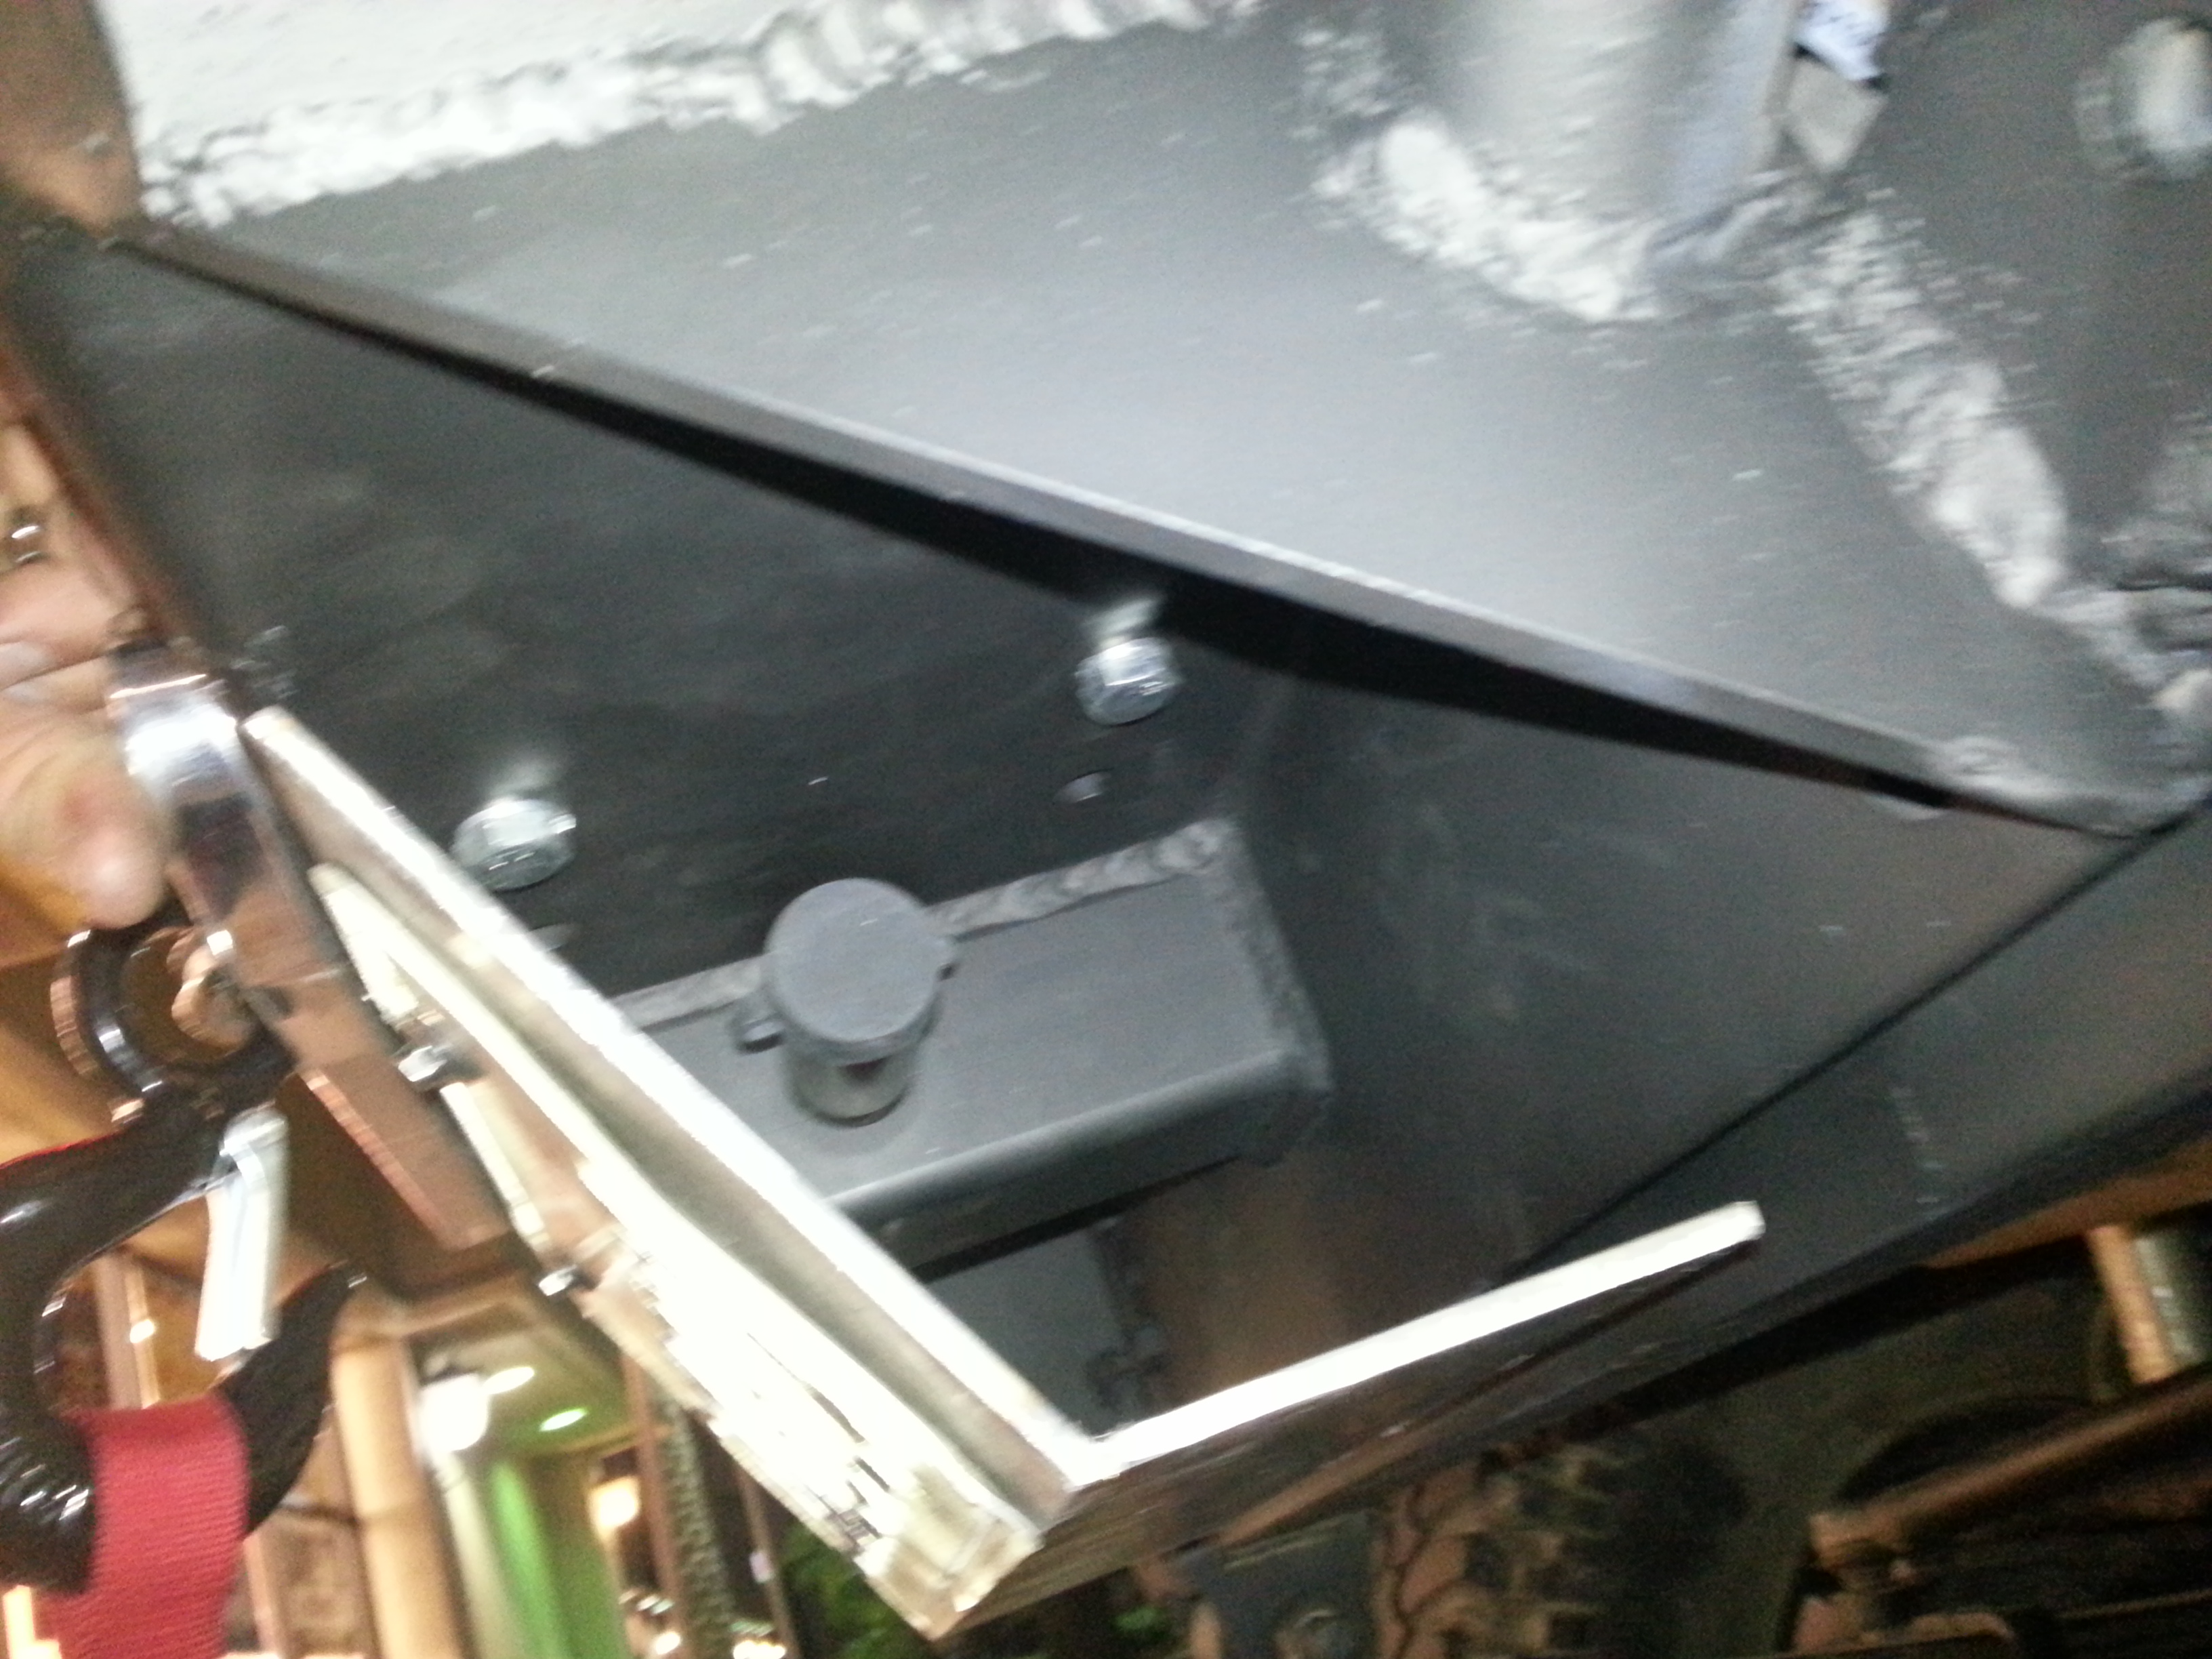
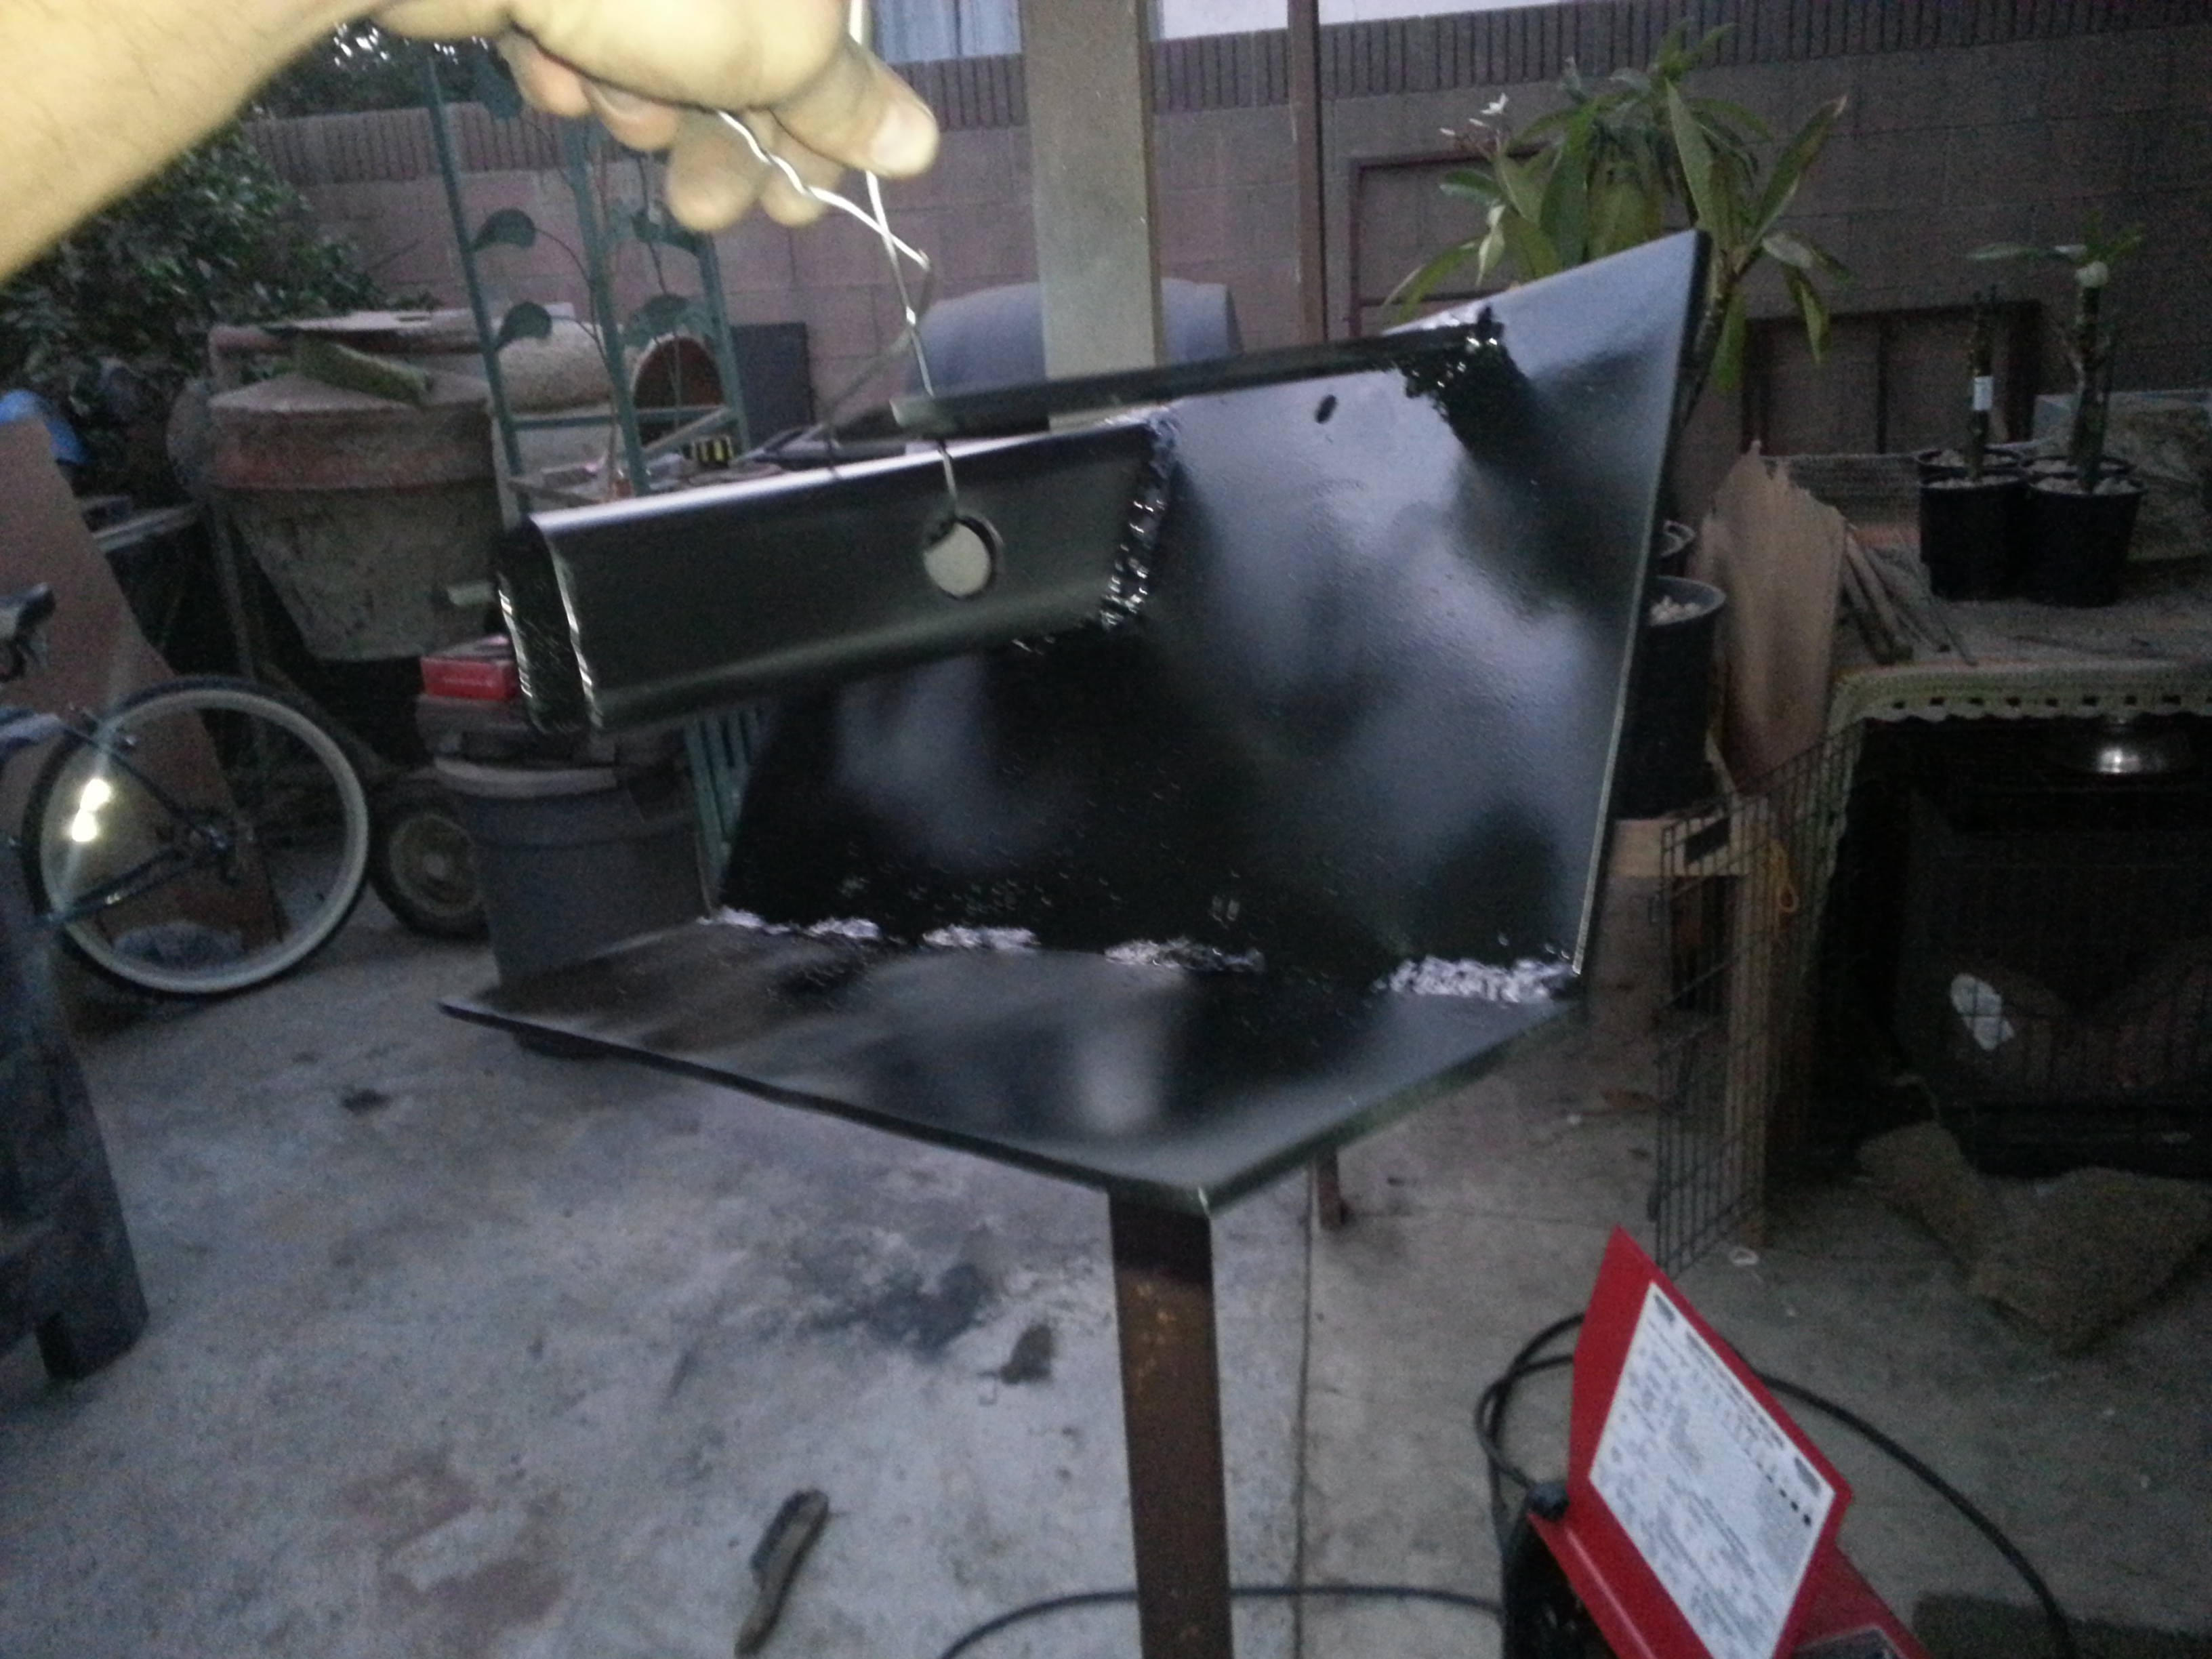
Here I added plates to the top side of that winch plate. These will cover the bolts completely.
As you can see here, there is no way to access those bolts now. and good luck getting a wrench in there jerks! lol That is 3/16" steel fully welded all the way around. It is very solid, That sucker ain't going anywhere!

Already Primed and painted matt black.
That is all guys. I've very happy with how this hitch license plate came out. It compliments the bumper very nicely. And best of all is that I can remove the License plate hitch when i go off-roading and slide in a hitch tube with a D-ring!!! Not only that but i will also be making another hitch receiver for towing the truck through the front end. Just in case i ever break down on the trail i will at least be able to get towed back home. When i get started on that hitch i will make sure to show the progress on this thread. So you guys can see what i come out with.
The following day I woke up nice n' early to begin installing the Smittybilt XRC8 Winch.

Got the synthetic rope started

Then I met up with Mark(Chefyota4x4) to get some help and learn how to install off-road lights properly. I'm very sorry everybody but i didn't take as many pictures as i should have taken. Barely took any at all.
Here we are still working on getting everything done. Soldering, heat shrinking covering up with the plastic flex, and wrapping with electrical tape.

Joined up both driver side to the passenger side lights and brought the 2 wires into 1. We used male and female connectors then used heat shrink over it in case i ever had to remove the lights it wouldnt be much of a hassle.


Wiring this stuff is a long process as it is if you want to do it clean and right. But we took a hell of a long time wiring up the Dick Cepek lights due to the wires on the Dick Cepek's being backwards. The white and black wires are switched around. Normally Black is ground! And really the polarity would just change if wired backwards, but the lights are also grounded to the bolt that they are mounted on. Meaning they are ground from the bumper and also to the wire. So every time we went to test out the wires we kept having sparks upon touching the wires together. after about 1hr or 1.5hrs we discovered that the white and black wires were wired wrong lol. For the life of us we just could not find out why we kept shorting out! it wasnt normal lol I guess it didnt help that Mark and i were both running very low on food and neither of us were able to think straight lol. After that we also ran into another problem with the relay wiring. We looked up the offroad light/switch/relay diagrams and the first 2 of 3 diagrams we were working off of were wrong. Apparently not everything on the internet is correct... imagine that lol Anyway after about another hour or so Mark found the wiring diagram he used to his truck's lights then we just used that diagram and BAM we were set! We began the day at 11:45 in the morning and we didnt finish till approx 12:30am. We had so many obstacles to overcome that we got sidetracked a lot. I'm just happy we were able to finish this that day.
Very grateful to Mark and all the help he has been along this project. i know absolutely nothing about wiring, relays and switches, and your experience and dedication to keep things looking clean and professional was definitely appreciated. Sorry we didnt finish in time for me to treat you n your mom to dinner but i will definitely make up for it by taking you two to Lucilles Smokehouse BBQ! yum...
Here is a shot of when we had just finished. I had to mount my license plate to the front on top of the radiator bumper vents for the mean time.

--------------------------------------------------------------------------------
The following day(Sunday) i got to work on the License plate holder/winch bolt cover to restrict access to get to my bolts so people cant steal my winch when its parked on the street.
I drove down to the local steel shop and bought a 52" x 2" x 2" steel square tube.

I bought 2" because 2x2 is the correct size that will fit into the tow hitch and winch plate.

Cut the length to fit 1/4" out of the winch plate tow hitch hole.

I found that this Uhaul Towing hitch fit exactly where i wanted it when inserted upside down. Perfect! Just measured the top and bottom lengths and cut the angle to those measurements. 5&3/4" and 6&3/4"


Cut the angle perfectly to match the same angle on the winch plate tow hitch tube.

looks about right

Cut the plate out that the license plate is gonna be mounted to. I left about 1&3/4" extra on each side of the bumper. You'll see why in a bit.

This is why i made it angled.

I like i said earlier, i left it sticking out about 1/4" just so i could weld the licence plate Plate onto the front and still have room for the welds so they dont restrict the tube from entering all the way.

More or less where it will be sitting. I need enough room on both sides to be able to stick my hands on the sides because i will be using the locking hitch bolt behind there.

Also wanted to restrict the bottom side of the so people cant use an extension for their wrenches to get my winch bolts off. I left the welds in tact on the back side. No need to sand down because they wont be visible. plus it will make for a stronger joint.

I did a full weld accross from left to right then ground down and sanded down to a clean angle.

I marked where the bolt hole is going to be and i centered the hitch piece on the center of the back part of that plate.

Drilled out the holes on the sides Using a 3/4" hole saw(Included in the Harbor Freight hole saw Saw kit).


Perfect fit. I wasnt supporting it in the picture but the bolt fits right through perfectly.

Bam! all welded up.

Nice. Came out clean.

BEEE-YODA-FUL! Btw sorry but this is the only picture i have at the moment of everything together. Either way you can still tell how clean it looks. It all came together very nicely.

Bolt and pin fit perfectly.

Bought a Reese hitch receiver bolt lock. Woot!

Good luck getting that off with the limited space you are provided with. lol
BTW on a side note; Notice the bolts still exposed there. I had to address this problem ASAP to avoid giving a-hole thieves easy access.

Here I added plates to the top side of that winch plate. These will cover the bolts completely.

As you can see here, there is no way to access those bolts now. and good luck getting a wrench in there jerks! lol That is 3/16" steel fully welded all the way around. It is very solid, That sucker ain't going anywhere!

Already Primed and painted matt black.

That is all guys. I've very happy with how this hitch license plate came out. It compliments the bumper very nicely. And best of all is that I can remove the License plate hitch when i go off-roading and slide in a hitch tube with a D-ring!!!
Not only that but i will also be making another hitch receiver for towing the truck through the front end. Just in case i ever break down on the trail i will at least be able to get towed back home. When i get started on that hitch i will make sure to show the progress on this thread. So you guys can see what i come out with.
Last edited by Redeth005; Nov 4, 2013 at 08:35 PM.
Nov 4, 2013 | 06:54 PM
#2223
Thread Starter
Registered User
Joined: Apr 2012
Posts: 2,817
Likes: 2
From: Los Angeles CA
Oh and for those of you curious about my offroad lights and how bright they are this is just a quick video i made yesterday night. I still need to adjust the 8" spot lights more centered and pick them up some more to get the light out further. but anyway please watch. Enjoy
Nov 4, 2013 | 07:39 PM
#2224
Thread Starter
Registered User
Joined: Apr 2012
Posts: 2,817
Likes: 2
From: Los Angeles CA
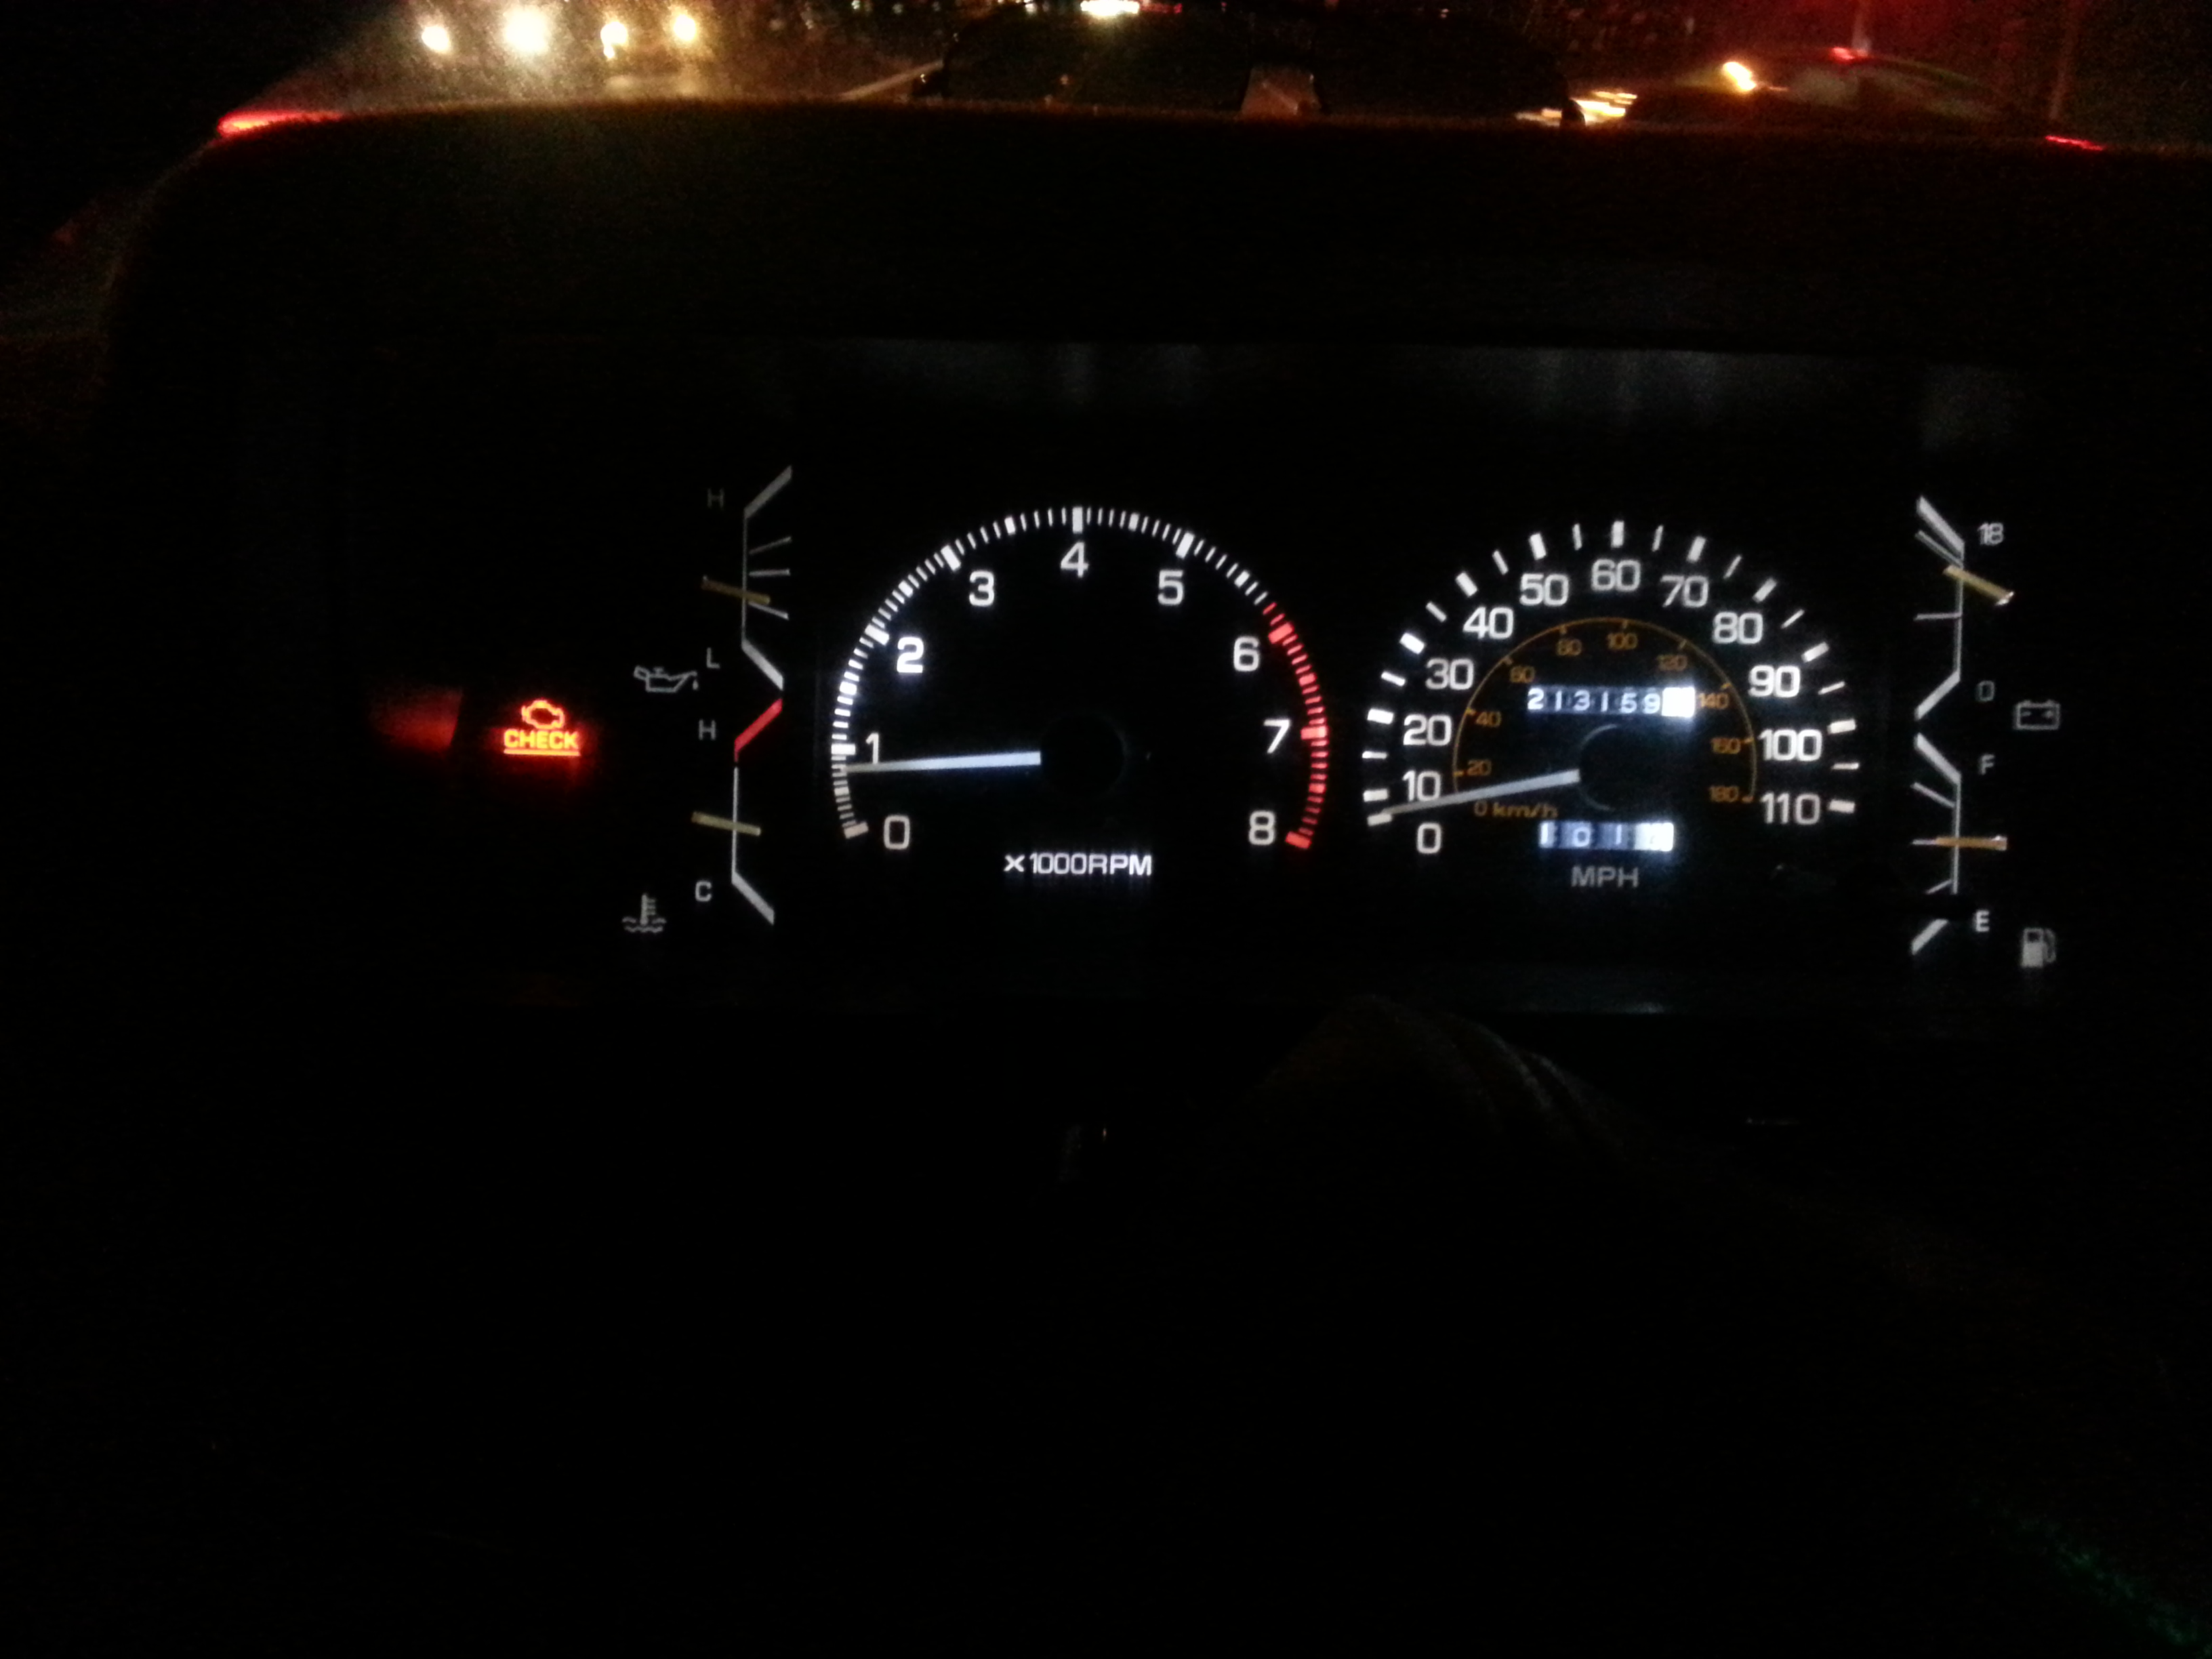
Btw, last night i ran into a lil problem... My check engine light turned on. I pulled over and turned the truck off. Then went on my way again and the light had turned off. then after about 1 mile or so the light came back on. I havent tested to see what code pops up. but im scared to see what it is. This engine only has 9000 miles on it! and the Vacuum switches are brand new right off the dealer. So im disapointed right about now. I gotta check to see what code pops up. I hope it isnt a big fix.
 Nov 4, 2013 | 08:10 PM
#2227
My pleasure, bud! By the way, it was also quite amazing that I just happen to have every single thing that we needed to do that install. I'm really happy there was no need to have to go to the store or anything... In a long time since I didn't have to run down for extra parts! Haha....
Sick!
Toyotech beat me to exactly what I was gonna say. 02 Sensor... It's common for that to cause a CEL that comes and goes. Mine would go away when hitting the freeway..... Then, when I would pull off the freeway and stop at a light for about a minute, it would come back on. Probably because they run the cleanest on the freeway at about 65 miles an hour.gotta figure out what is causing it, and if you already replaced your o2 sensor, don't be surprised if its the back 02 sensor(post CAT). The modern-day catalytic converter is not what it used to be. if the catalytic converter is bad that 2nd 02 sensor will definitely throw a code... That is if you even have a second one. Other codes that come and go are the EGR temperature sensor, amongst many others. Most common is the oxygen sensor though.
Nov 4, 2013 | 08:18 PM
#2228
Registered User
Joined: May 2010
Posts: 2,587
Likes: 7
From: Ofallon Missouri
Super cool man. I guess you have to be careful in CA not to mount something so its too easy to get to. Great teamwork. If I ever win the lottery...I'd open a toyota only shop and hire you all at outrageous saleries!!
Nov 4, 2013 | 09:37 PM
#2229
Registered User


Joined: Mar 2012
Posts: 7,141
Likes: 687
Nice job, Richard! I love the bright and even beam pattern of the LED lights!
Yes, highlux, we - Faby, Redeth, Grego, ChefYota & yours truly - are all ready to work for you

Last edited by RAD4Runner; Nov 4, 2013 at 09:56 PM.
Nov 4, 2013 | 09:53 PM
#2230
Don't forget Faby! Lol.... She wants her own custom Jump suit in pink leopard print, embroidered with "Will work for GOOD food!" Haha. ..
Last edited by ChefYota4x4; Nov 4, 2013 at 09:58 PM.
Nov 4, 2013 | 09:56 PM
#2231
Registered User
Joined: Mar 2012
Posts: 7,141
Likes: 687
Nov 4, 2013 | 10:00 PM
#2232
Nov 5, 2013 | 06:47 AM
#2233
Registered User
Joined: Jul 2012
Posts: 2,365
Likes: 4
From: Idaho
genius on the straps to cover the bolts an the locking hitch pin excellent! and A+ on having a hitch in the front bravo!
claps bravo rich bravo man someone needs to make a bumper kit like yours really excellent
love the LED floods i need to get some for bad weather up here
claps bravo rich bravo man someone needs to make a bumper kit like yours really excellent
love the LED floods i need to get some for bad weather up here
Last edited by Cyberhorn The Dragon; Nov 5, 2013 at 06:50 AM.
Nov 5, 2013 | 07:39 PM
#2234
Thread Starter
Registered User
Joined: Apr 2012
Posts: 2,817
Likes: 2
From: Los Angeles CA
Really? I gotta dig in my Haynes manual and check out how to work those pins with the paper clip and see how many blinks i count. Thank you for that man.
Mark Dunno how i forgot to mention that in the write up. YES you did have every single thing we needed to get the job done on the truck. I cant believe you had so much electrical stuff. WOW! Your garage is like a store haha Thank you so much Mark. I really did appreciate you taking time from your day to help me out man. I will check out to see if it is that o2 sensor once i check the pins to read the codes. Thank you
Well that is anywhere really. but i live about 30minute street drive from compton. And The city i live in is actually a city within a city, and mine is the nicer part. but everything around us from approx a 5-15 block radius out isn't too nice. So yea i would definitely like to take precaution. One can never be too safe at least when you are the one fabbing it up. Might as well make it while i was at it ya know.
Thanks guys. That made me laugh but its true, we had some fun that day. and that mexican food at Albertos is AWESOME. Seems like that is Faby's favorite place to eat whenever we go over to visit. lol As for the jump suit Faby mentiioned that she wanted a black jumpsuit with leopard trim. I dunno but i bet that would be a nice birthday present. I'm sure she would love that haha
Mr. Dragon Sir, Thank you very much for the compliments. Like i told Highlux Passing up that opportunity to just add it on while i was in the middle of fabbing it up was too good to pass up. Might as well be safe then sorry.
And just to let you know; kind of funny actually. I was actually dissapointed when i got the Trailgear winch plate instead of the Addicted off road one. But now that i think about it and have seen what i could do with that hitch receiver i absolutely love it. Because it is removeable there is so many things i can build to fit in there and i will use that for sure! i want to make or buy one of these D-ring hitch's for the front of the truck.
http://www.4wheelparts.com/Winches-W...FaY1QgoddgoA7w
I'm sure i can make it ad just buy the Dring i know i have seen some oversized ones at the bolt store. Another thing i would like to make to add into that hitch is a tow bar. it will slide in like the hitch does, have a bar accross from the left to right side in the front of the truck where i will then weld on one of these:
http://www.pepboys.com/product/detai...03/?quantity=1
And that tow bar will be a huge advantage to have handy. One never knows when the truck will break down on or off the trail. And why not save yourself an $80-120 uhual tow cart rental or even worse an expensive tow truck. This is much cheaper to have and there will always be somebody available to tow. So I am extreamely happy i got the trailgear winch plate in the end. It will definitely prove to be the best choice for any home made bumper fabricator. I definitely recommend it.
My pleasure, bud! By the way, it was also quite amazing that I just happen to have every single thing that we needed to do that install. I'm really happy there was no need to have to go to the store or anything... In a long time since I didn't have to run down for extra parts! Haha....
Sick!
Toyotech beat me to exactly what I was gonna say. 02 Sensor... It's common for that to cause a CEL that comes and goes. Mine would go away when hitting the freeway..... Then, when I would pull off the freeway and stop at a light for about a minute, it would come back on. Probably because they run the cleanest on the freeway at about 65 miles an hour.gotta figure out what is causing it, and if you already replaced your o2 sensor, don't be surprised if its the back 02 sensor(post CAT). The modern-day catalytic converter is not what it used to be. if the catalytic converter is bad that 2nd 02 sensor will definitely throw a code... That is if you even have a second one. Other codes that come and go are the EGR temperature sensor, amongst many others. Most common is the oxygen sensor though.
Sick!
Toyotech beat me to exactly what I was gonna say. 02 Sensor... It's common for that to cause a CEL that comes and goes. Mine would go away when hitting the freeway..... Then, when I would pull off the freeway and stop at a light for about a minute, it would come back on. Probably because they run the cleanest on the freeway at about 65 miles an hour.gotta figure out what is causing it, and if you already replaced your o2 sensor, don't be surprised if its the back 02 sensor(post CAT). The modern-day catalytic converter is not what it used to be. if the catalytic converter is bad that 2nd 02 sensor will definitely throw a code... That is if you even have a second one. Other codes that come and go are the EGR temperature sensor, amongst many others. Most common is the oxygen sensor though.
genius on the straps to cover the bolts an the locking hitch pin excellent! and A+ on having a hitch in the front bravo!
claps bravo rich bravo man someone needs to make a bumper kit like yours really excellent
love the LED floods i need to get some for bad weather up here
claps bravo rich bravo man someone needs to make a bumper kit like yours really excellent
love the LED floods i need to get some for bad weather up here
And just to let you know; kind of funny actually. I was actually dissapointed when i got the Trailgear winch plate instead of the Addicted off road one. But now that i think about it and have seen what i could do with that hitch receiver i absolutely love it. Because it is removeable there is so many things i can build to fit in there and i will use that for sure! i want to make or buy one of these D-ring hitch's for the front of the truck.
http://www.4wheelparts.com/Winches-W...FaY1QgoddgoA7w
I'm sure i can make it ad just buy the Dring i know i have seen some oversized ones at the bolt store. Another thing i would like to make to add into that hitch is a tow bar. it will slide in like the hitch does, have a bar accross from the left to right side in the front of the truck where i will then weld on one of these:
http://www.pepboys.com/product/detai...03/?quantity=1
And that tow bar will be a huge advantage to have handy. One never knows when the truck will break down on or off the trail. And why not save yourself an $80-120 uhual tow cart rental or even worse an expensive tow truck. This is much cheaper to have and there will always be somebody available to tow. So I am extreamely happy i got the trailgear winch plate in the end. It will definitely prove to be the best choice for any home made bumper fabricator. I definitely recommend it.
Nov 5, 2013 | 07:54 PM
#2235
First, NOoooo prob. 2. It's Alfredo's... 3. You just reminded me that those guys that I pulled out at Pismo kept my D-ring! Grrrr! Hahaha. Ima look around for it... Ticked about that! Lol
Nov 5, 2013 | 08:03 PM
#2236
Thread Starter
Registered User
Joined: Apr 2012
Posts: 2,817
Likes: 2
From: Los Angeles CA
Lol Mark You soo funny lol. I guess you must had been caught up in the moment that your little 22re 4runner was able to pull out a huge dodge truck from a dune. Trying to hold in your laughs and while making "superior toyota comments" in your head lol Jk i kid i kid.
Nov 5, 2013 | 08:04 PM
#2237
Thread Starter
Registered User
Joined: Apr 2012
Posts: 2,817
Likes: 2
From: Los Angeles CA
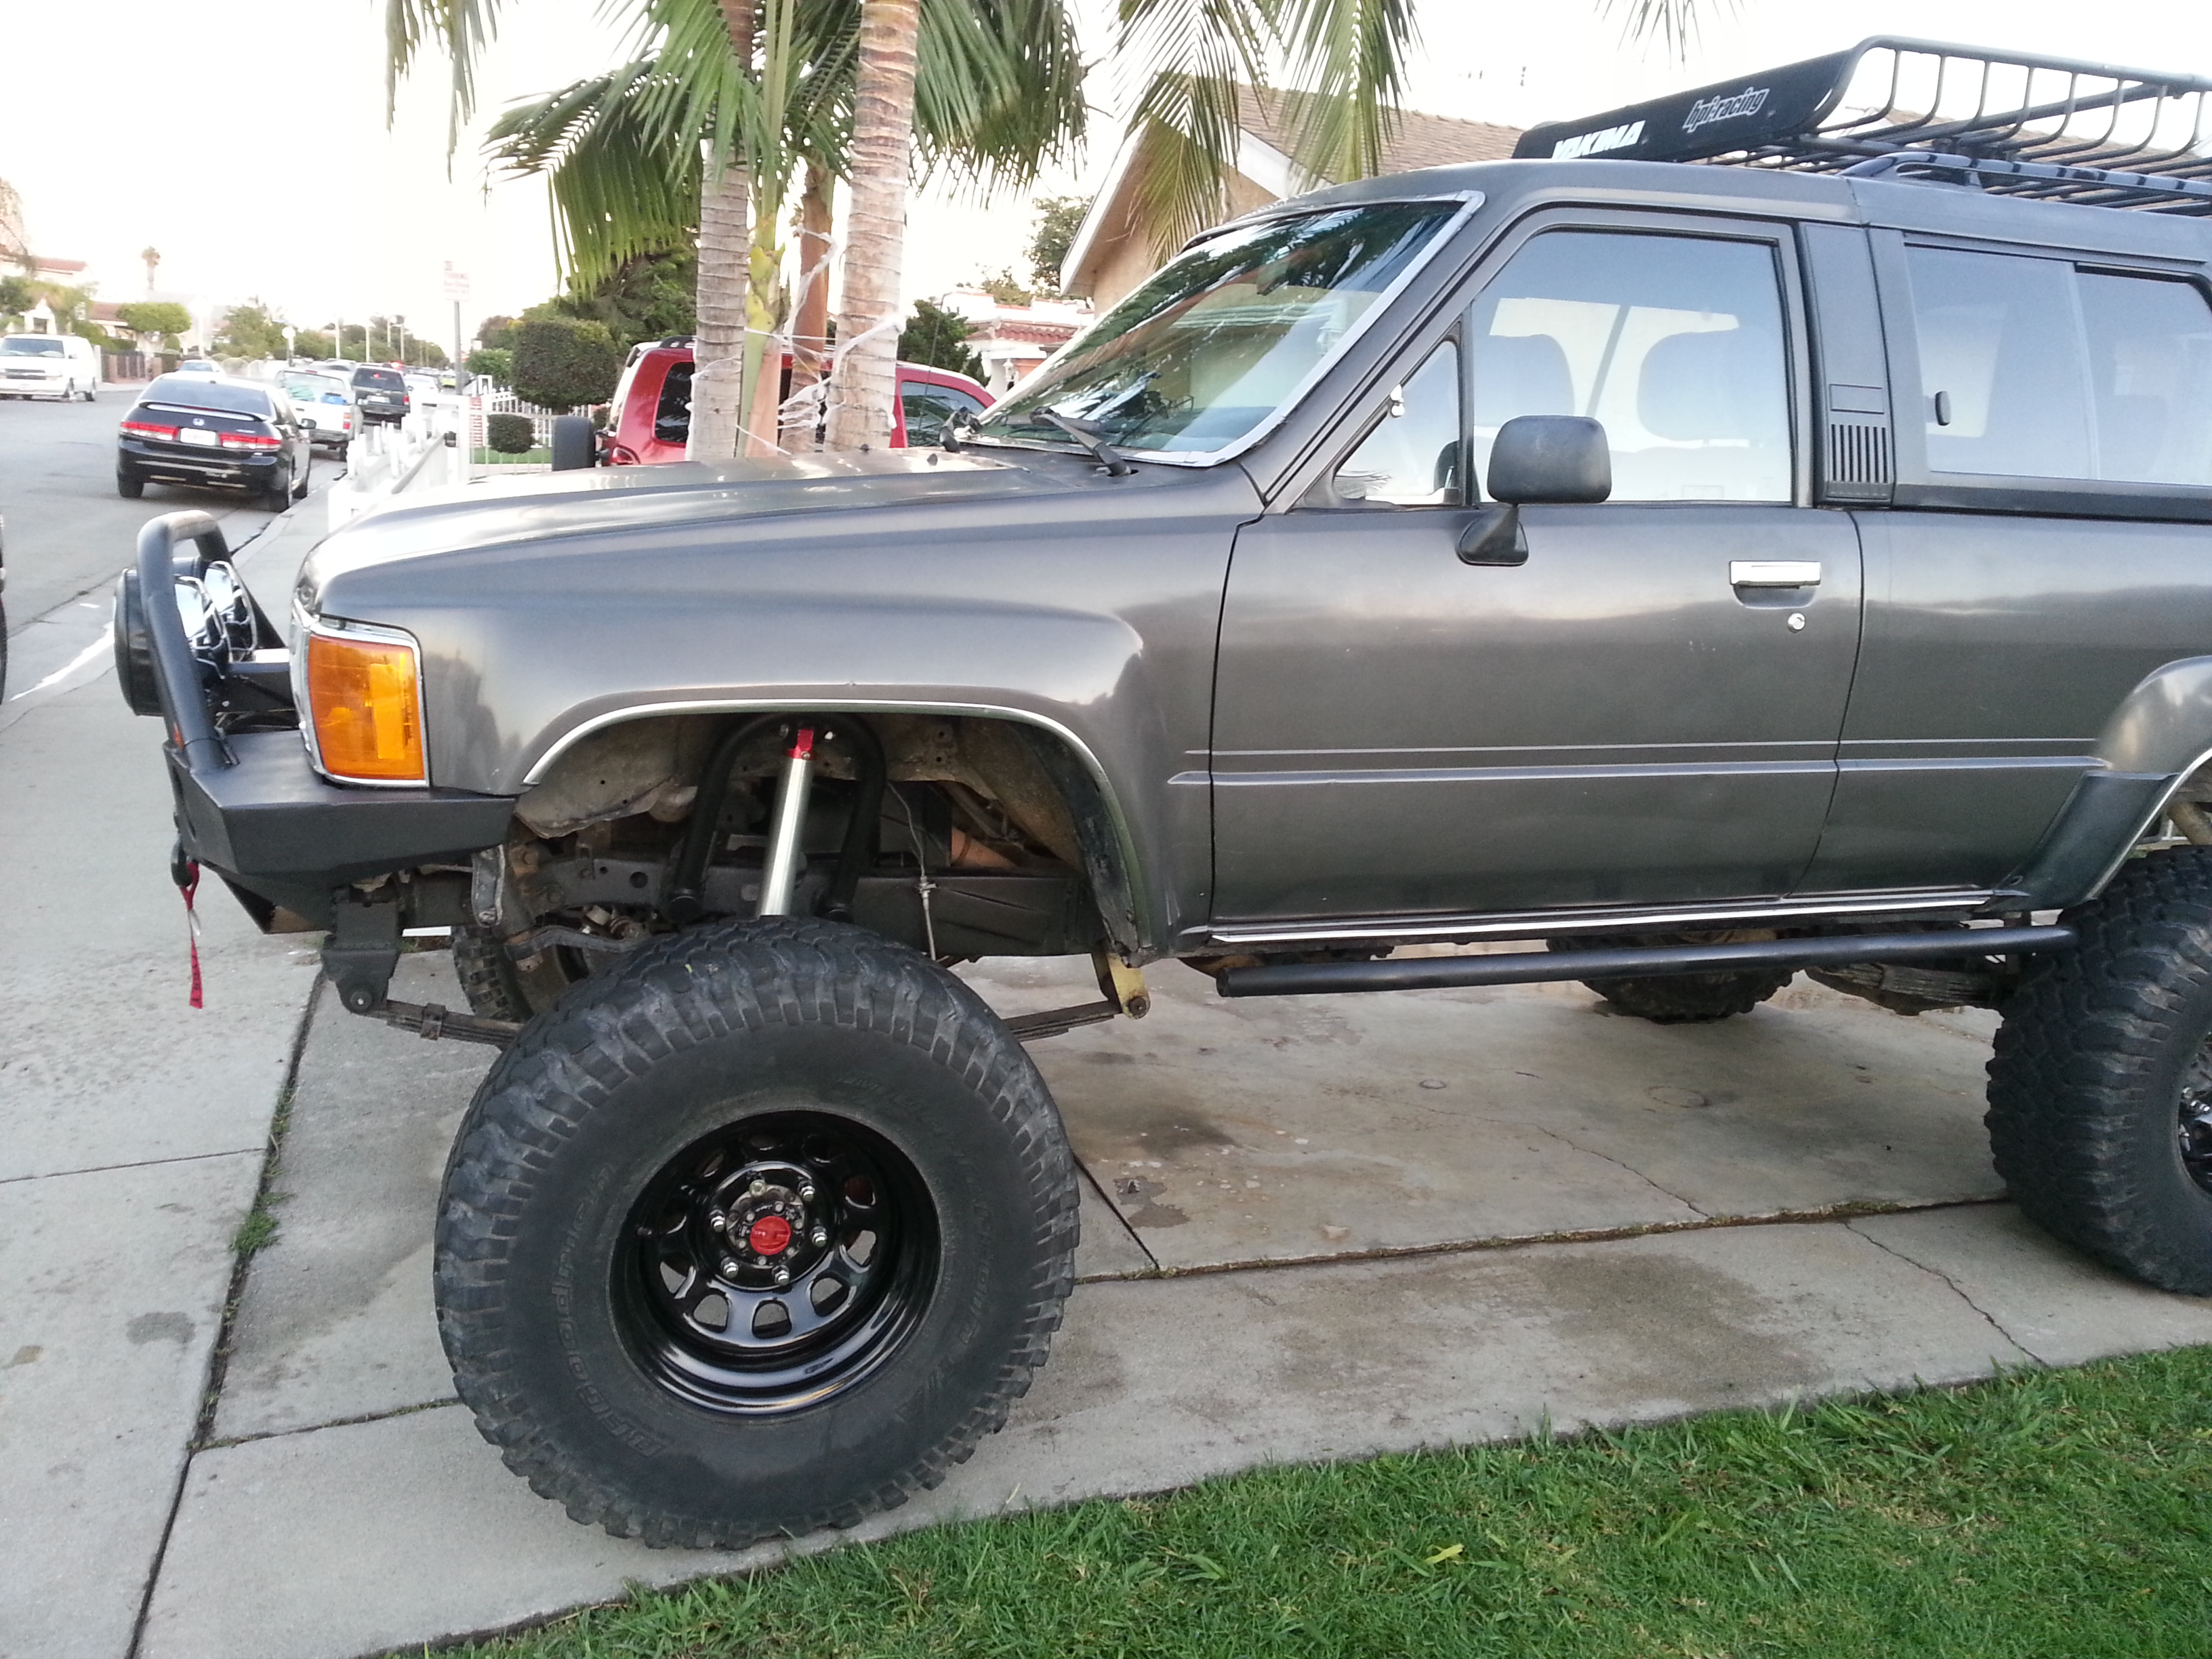
Alright guys I gave my truck a nice wash. And left her looking spectacular. Here are some updated pix of the front bumper from different angles. ENJOY! 


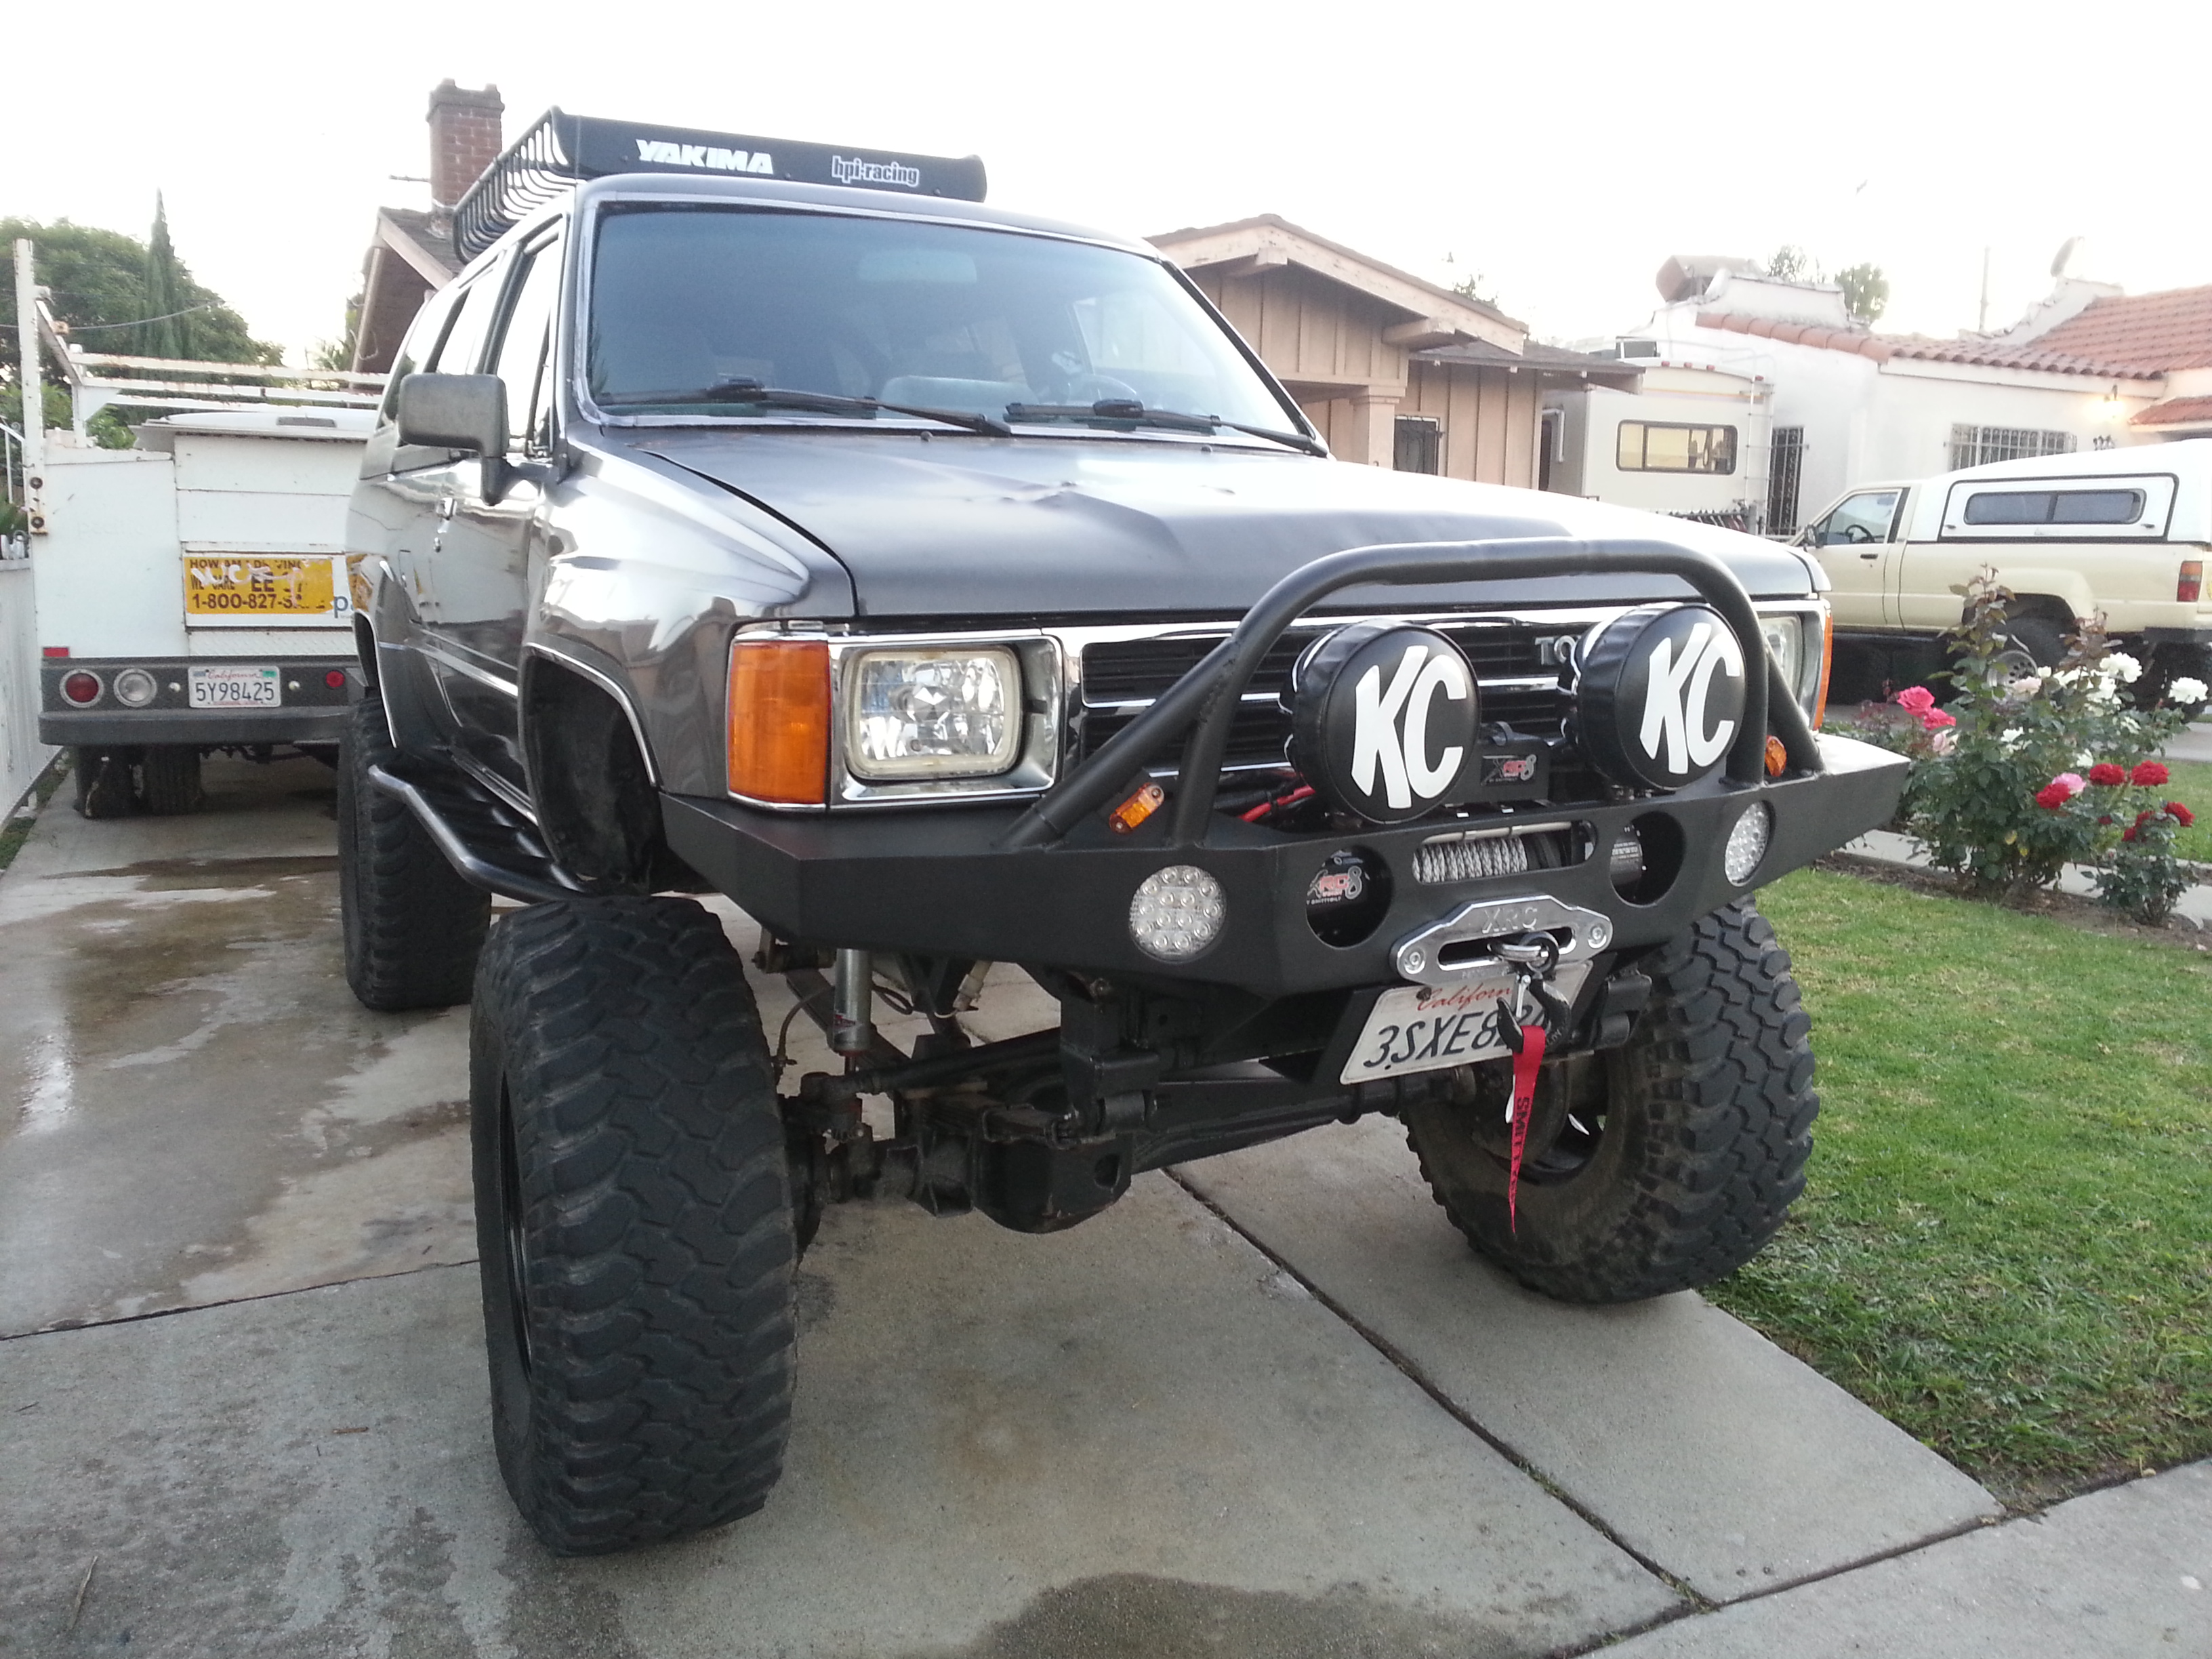
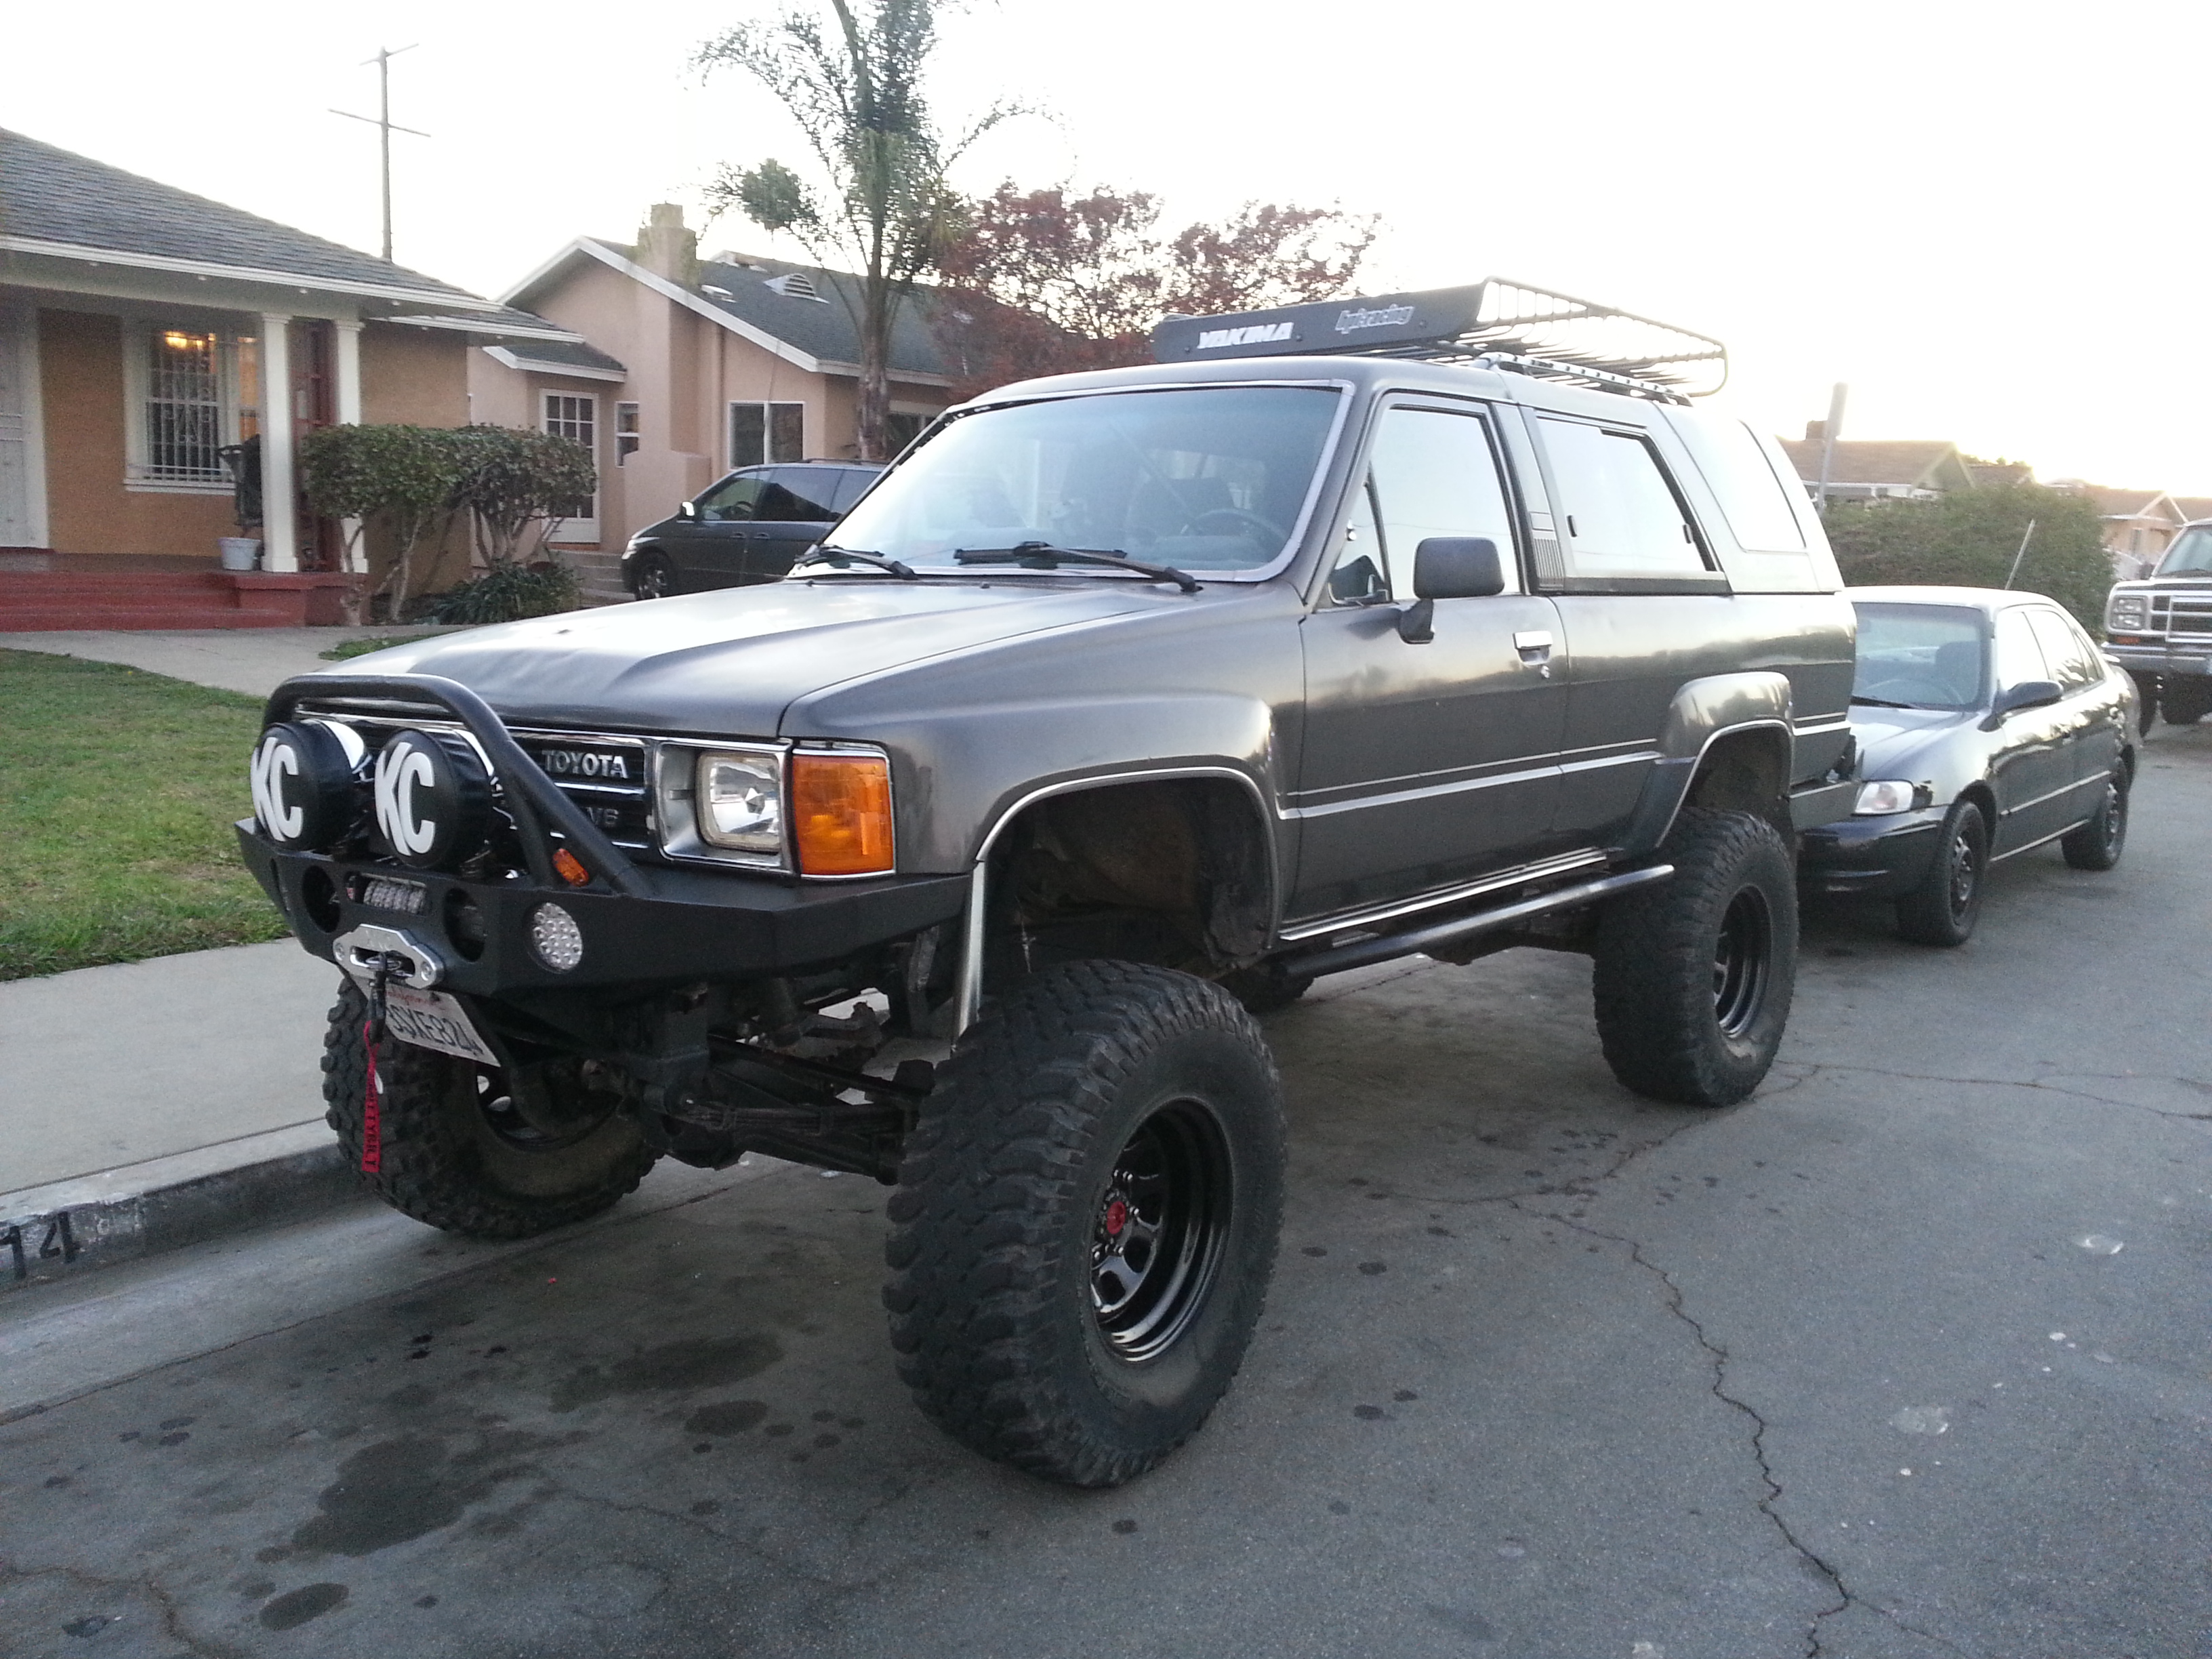
Driver side
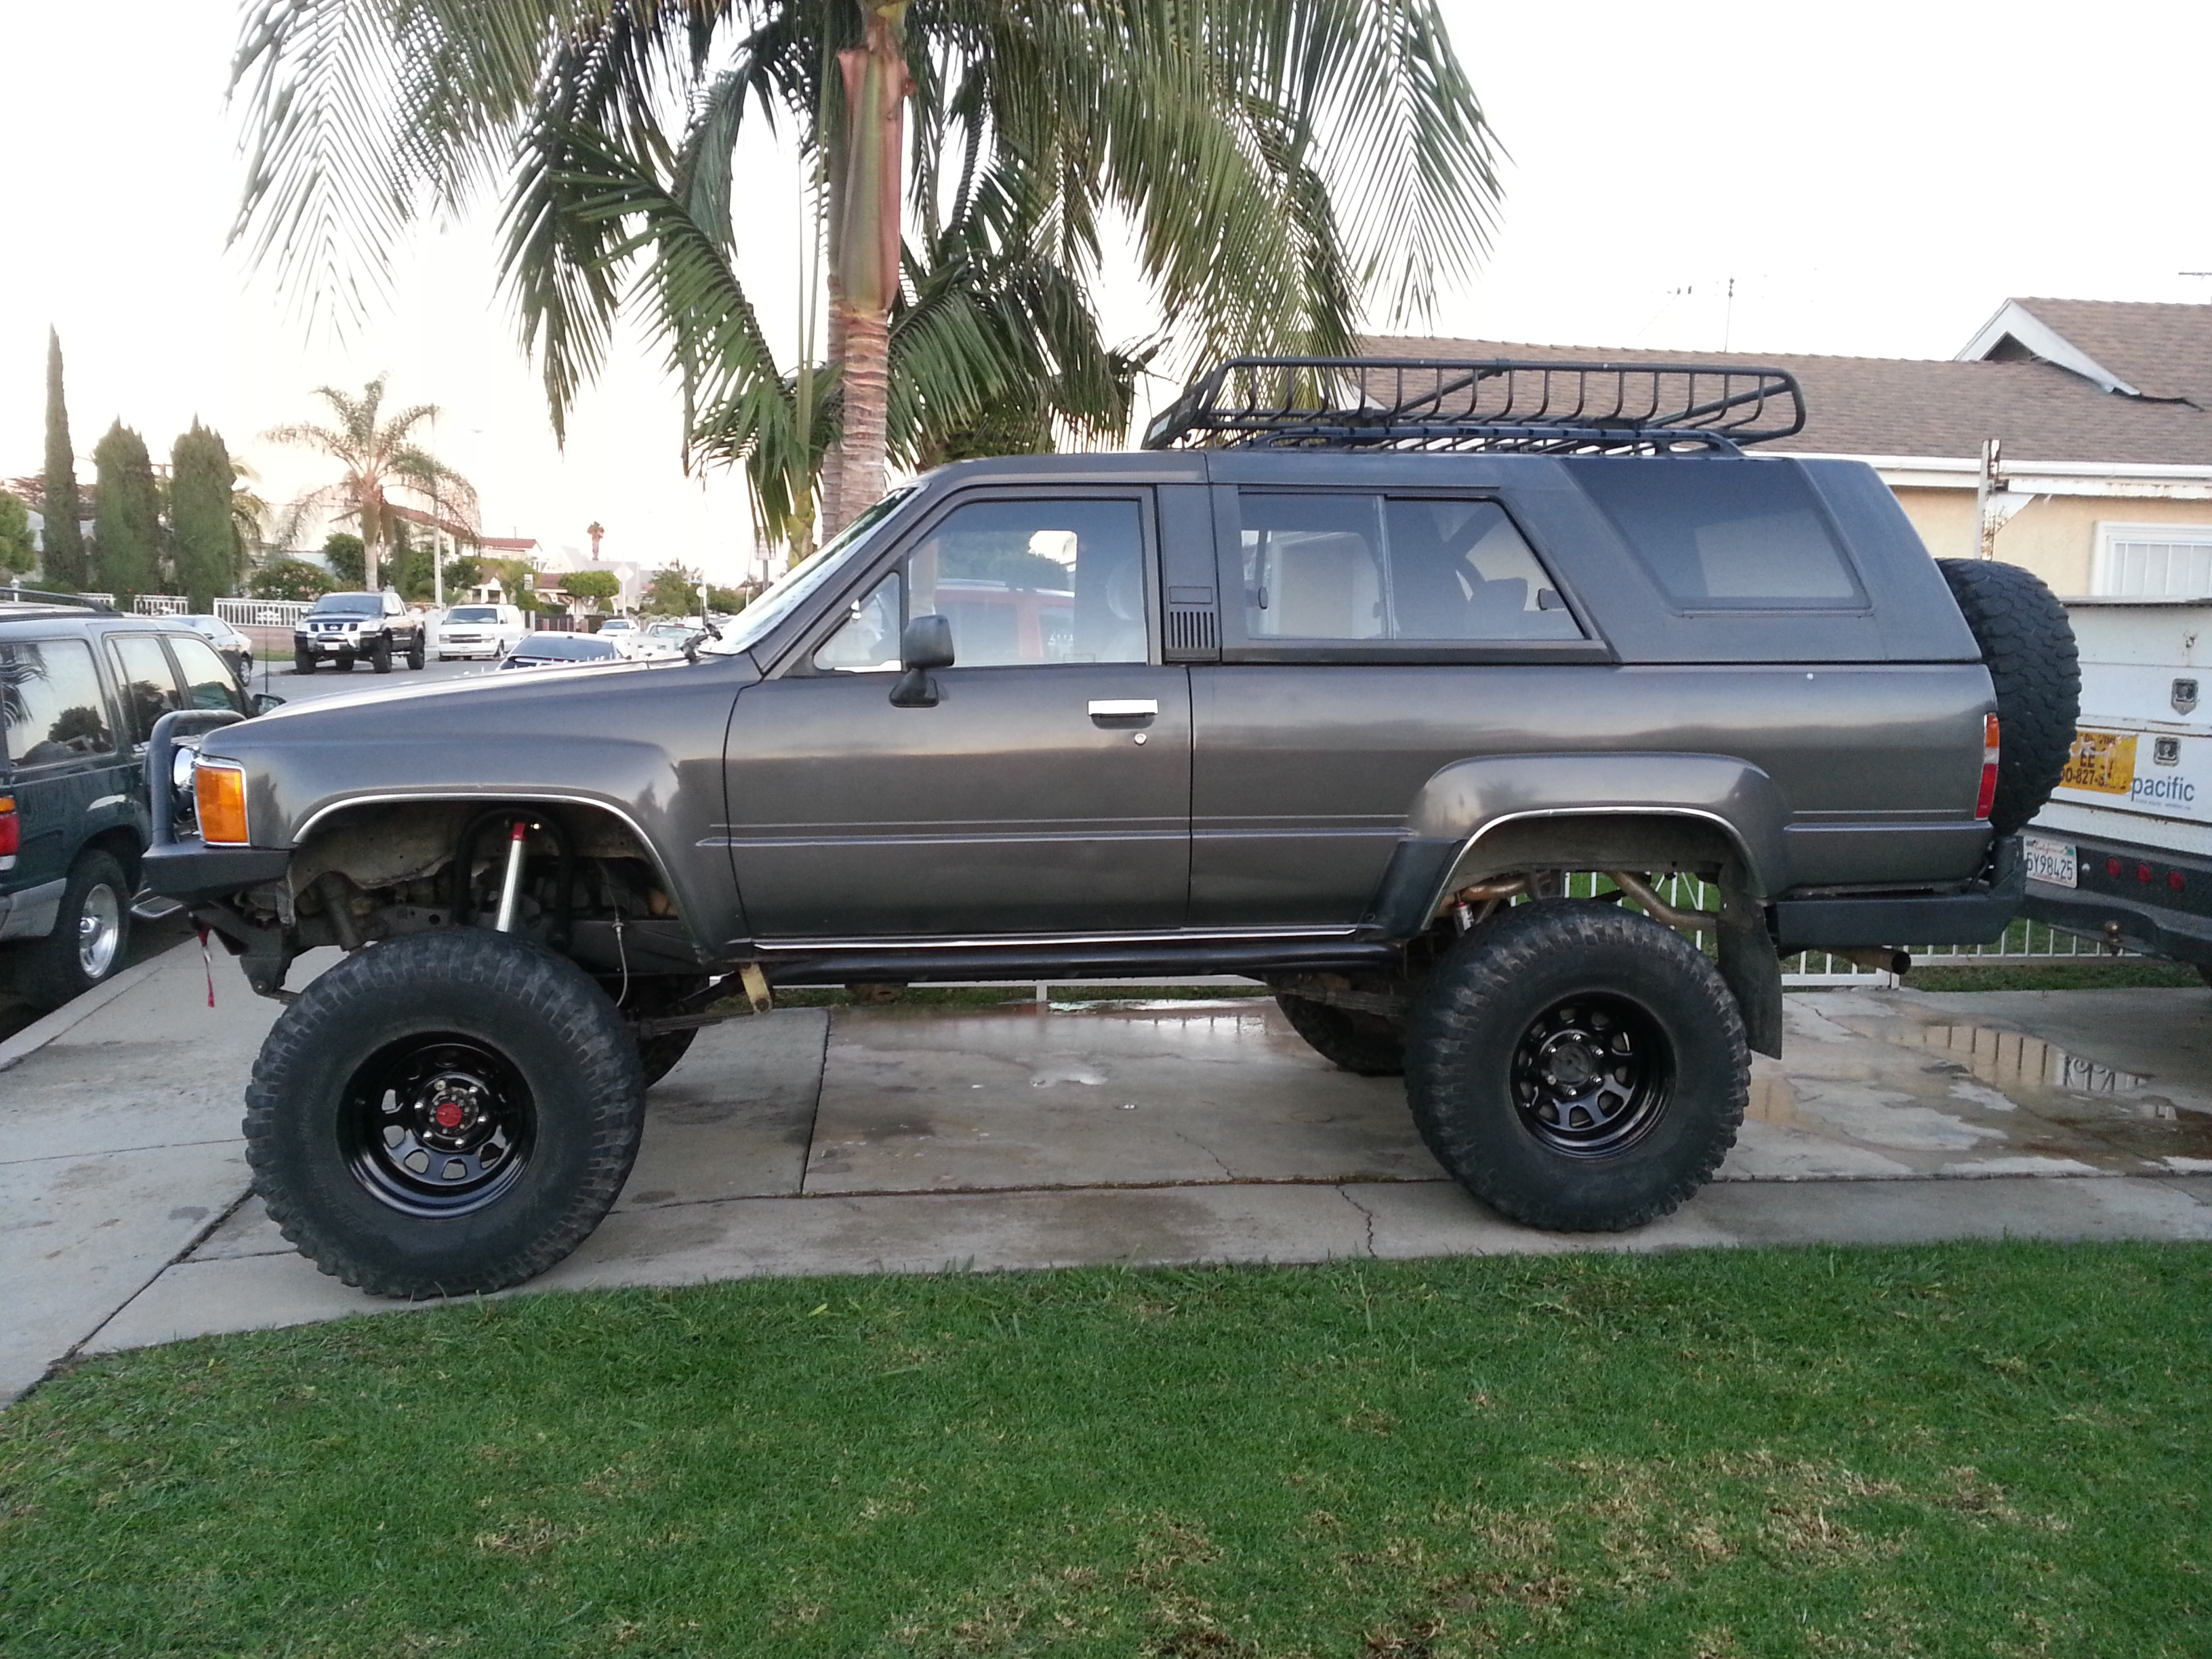
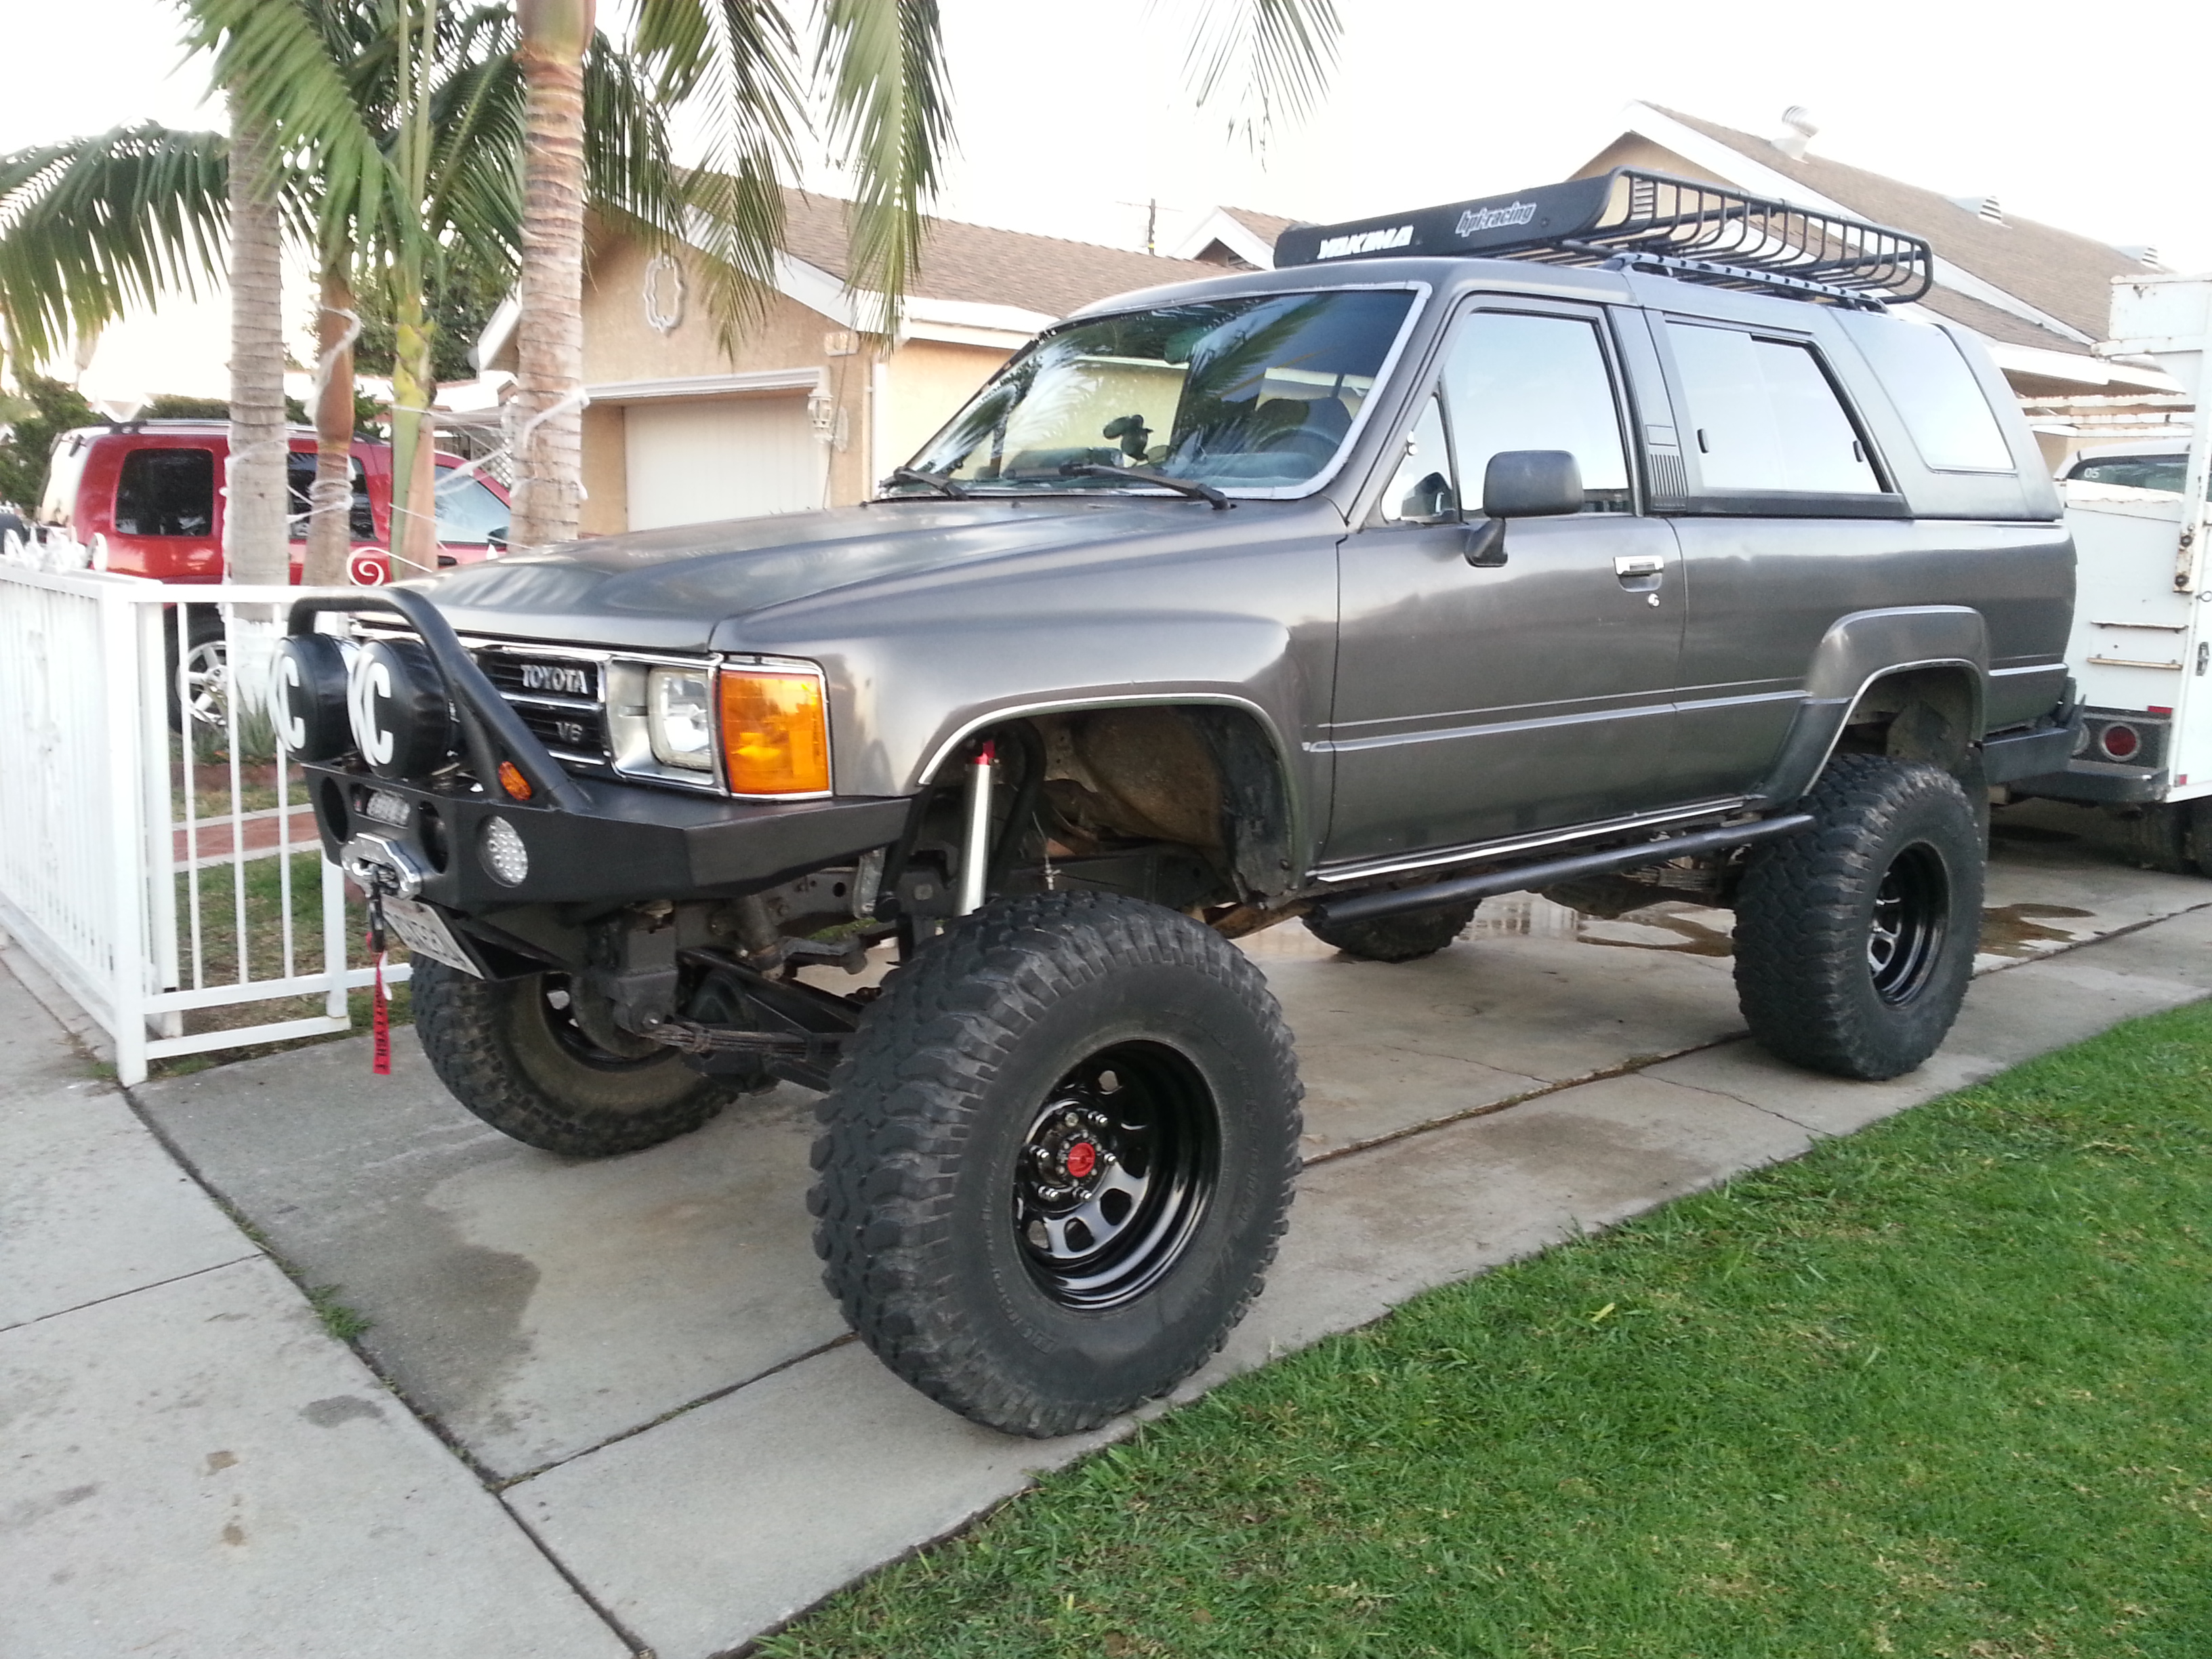

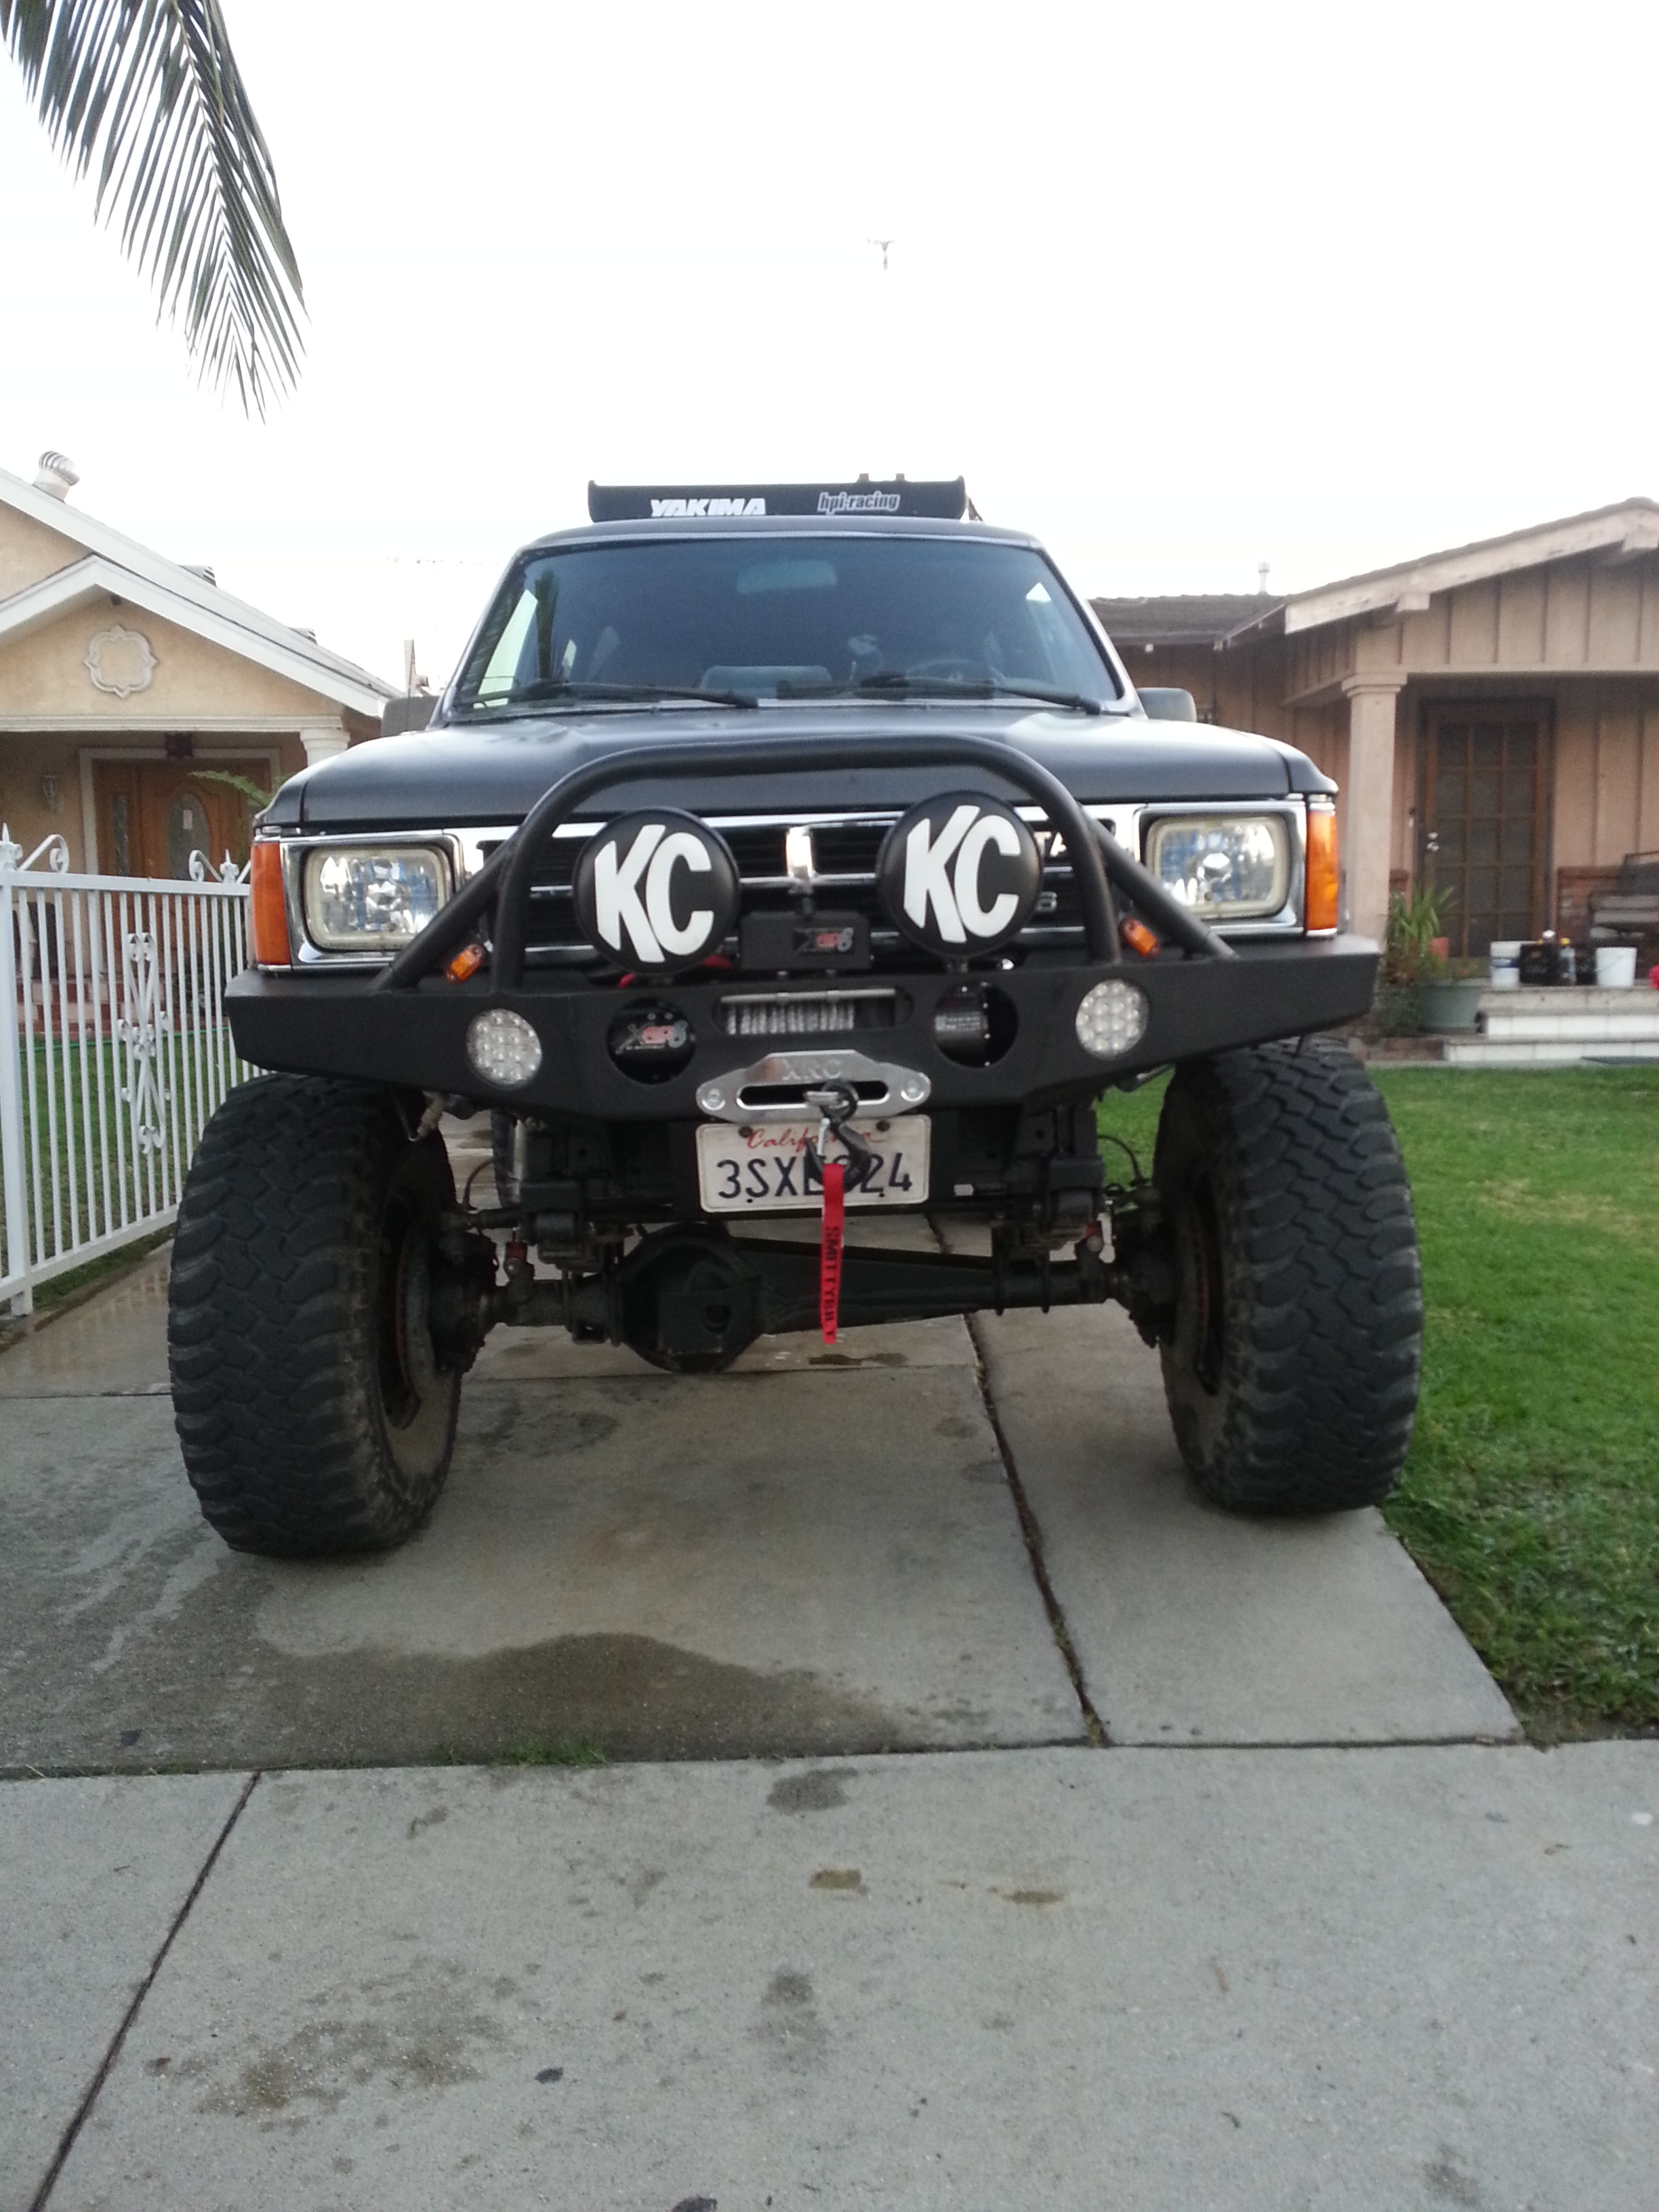
Front
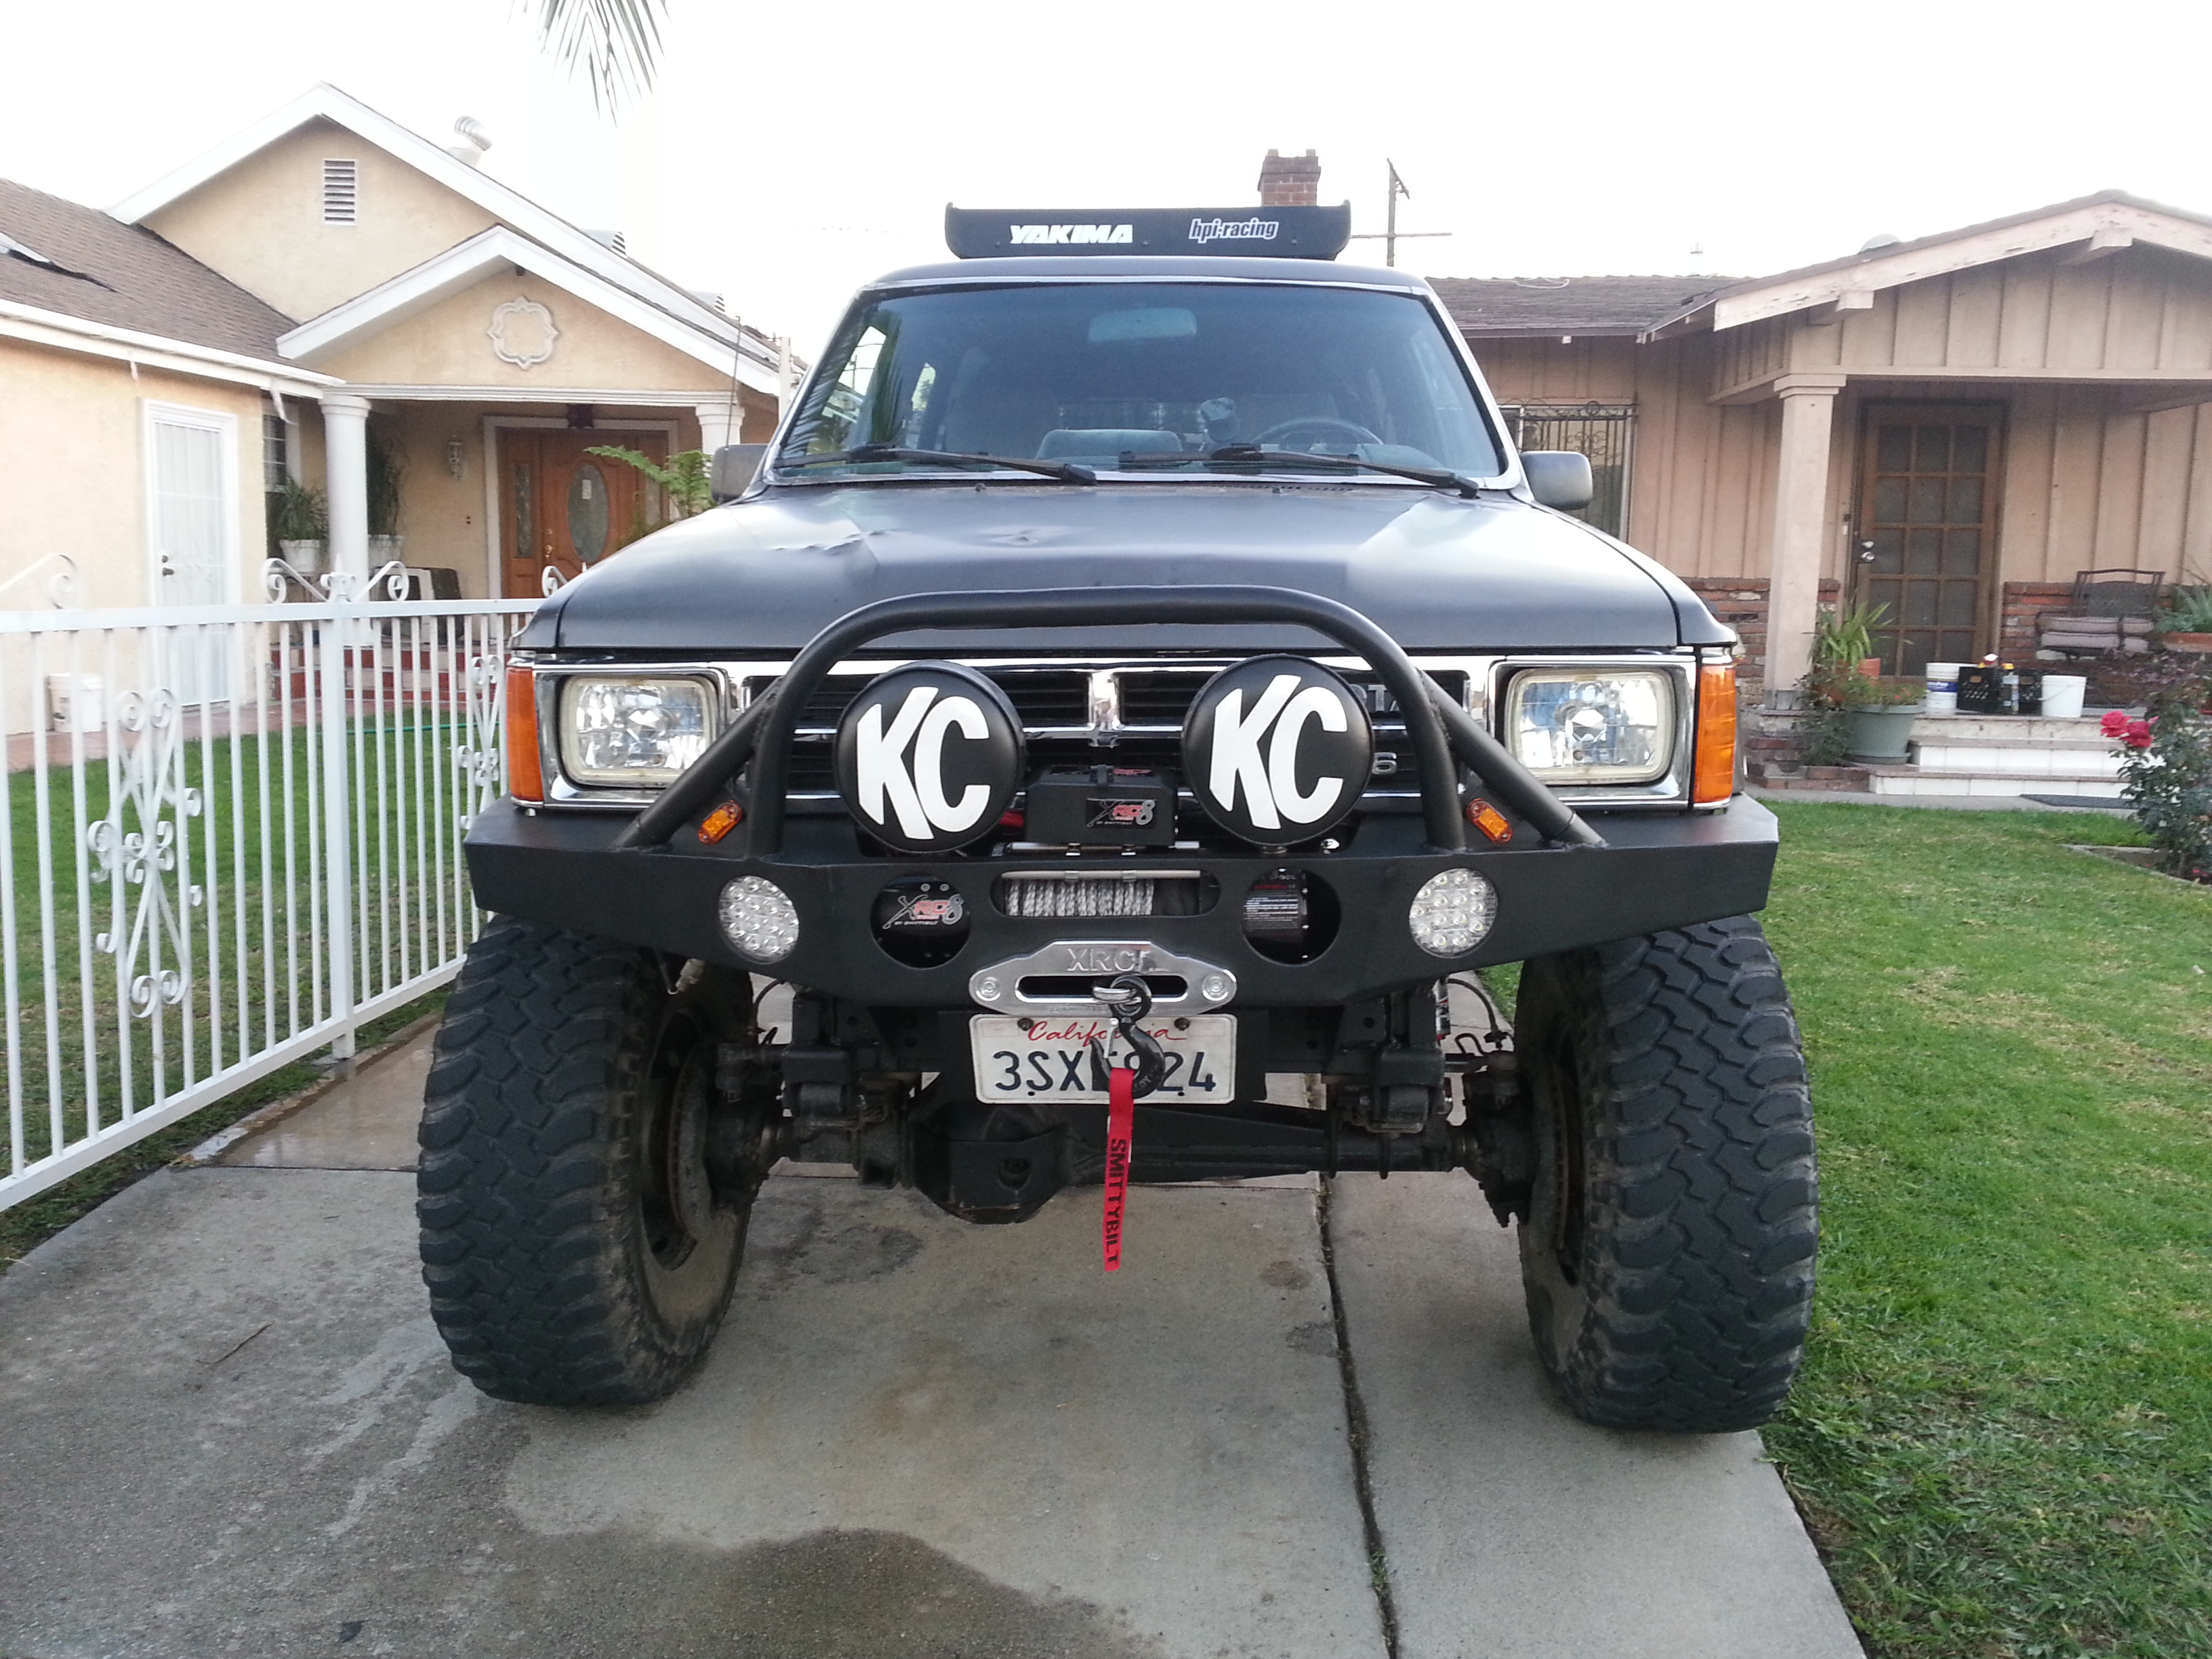
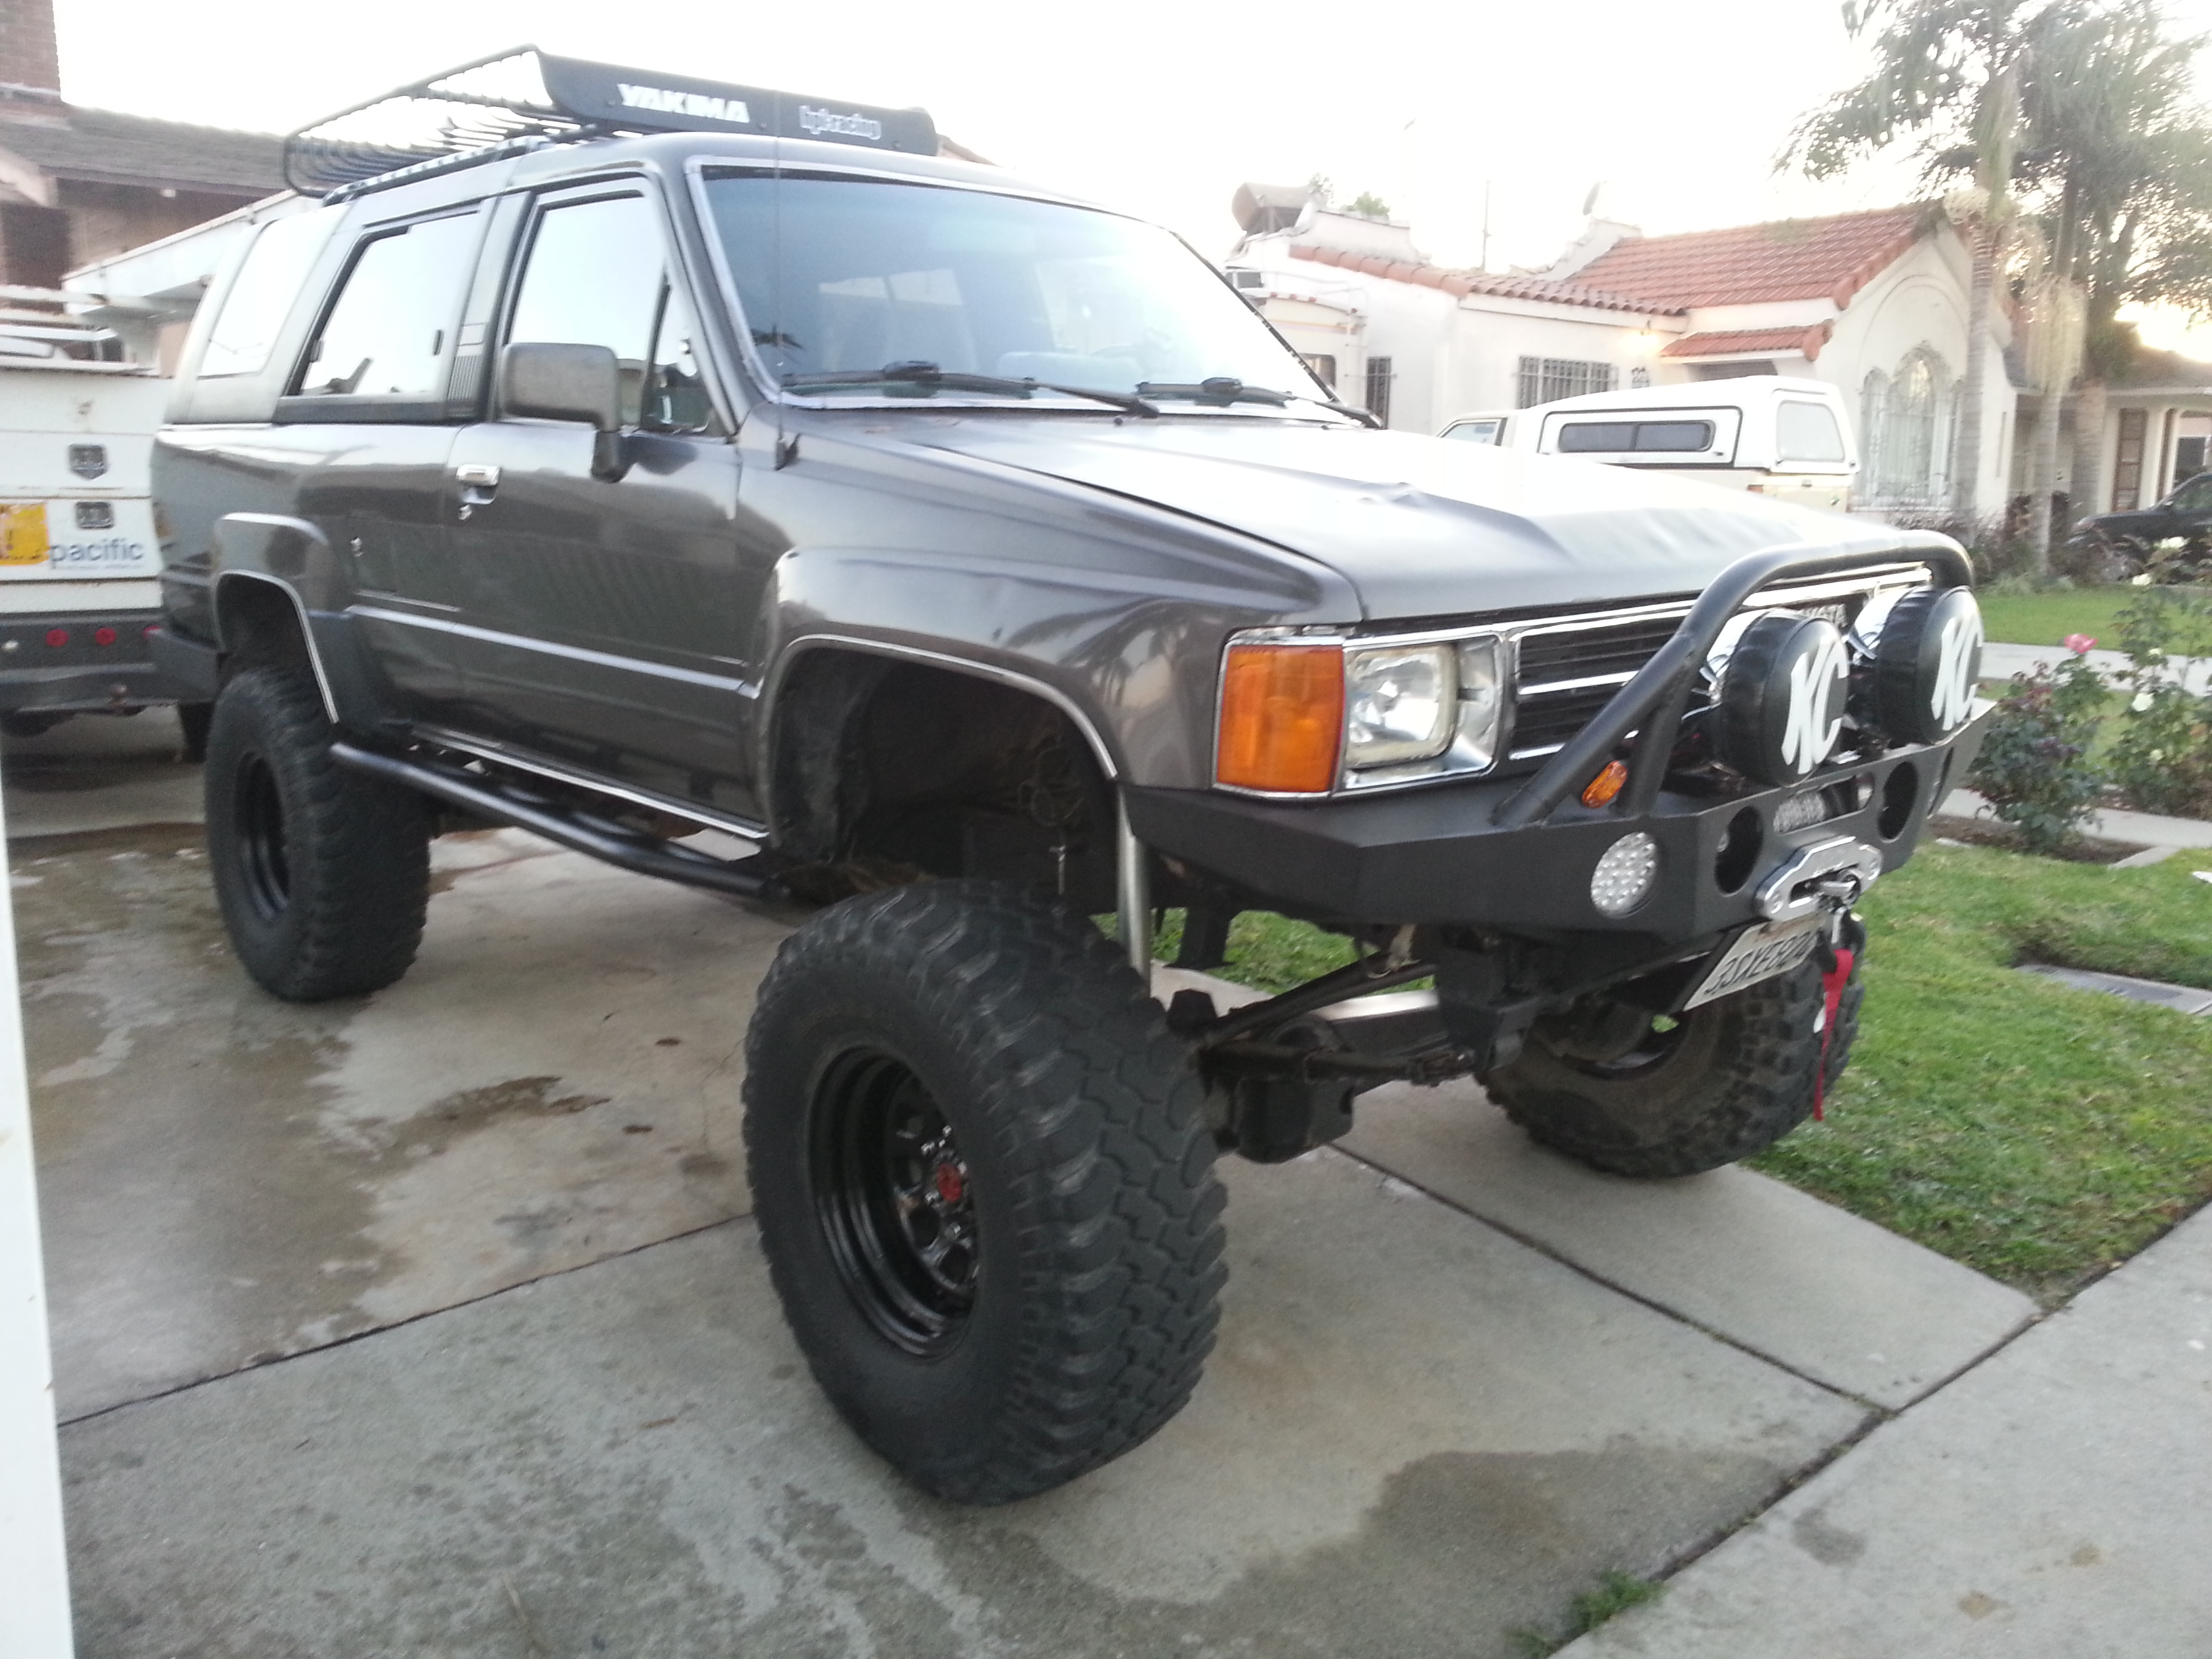
Possibly a new Avatar?

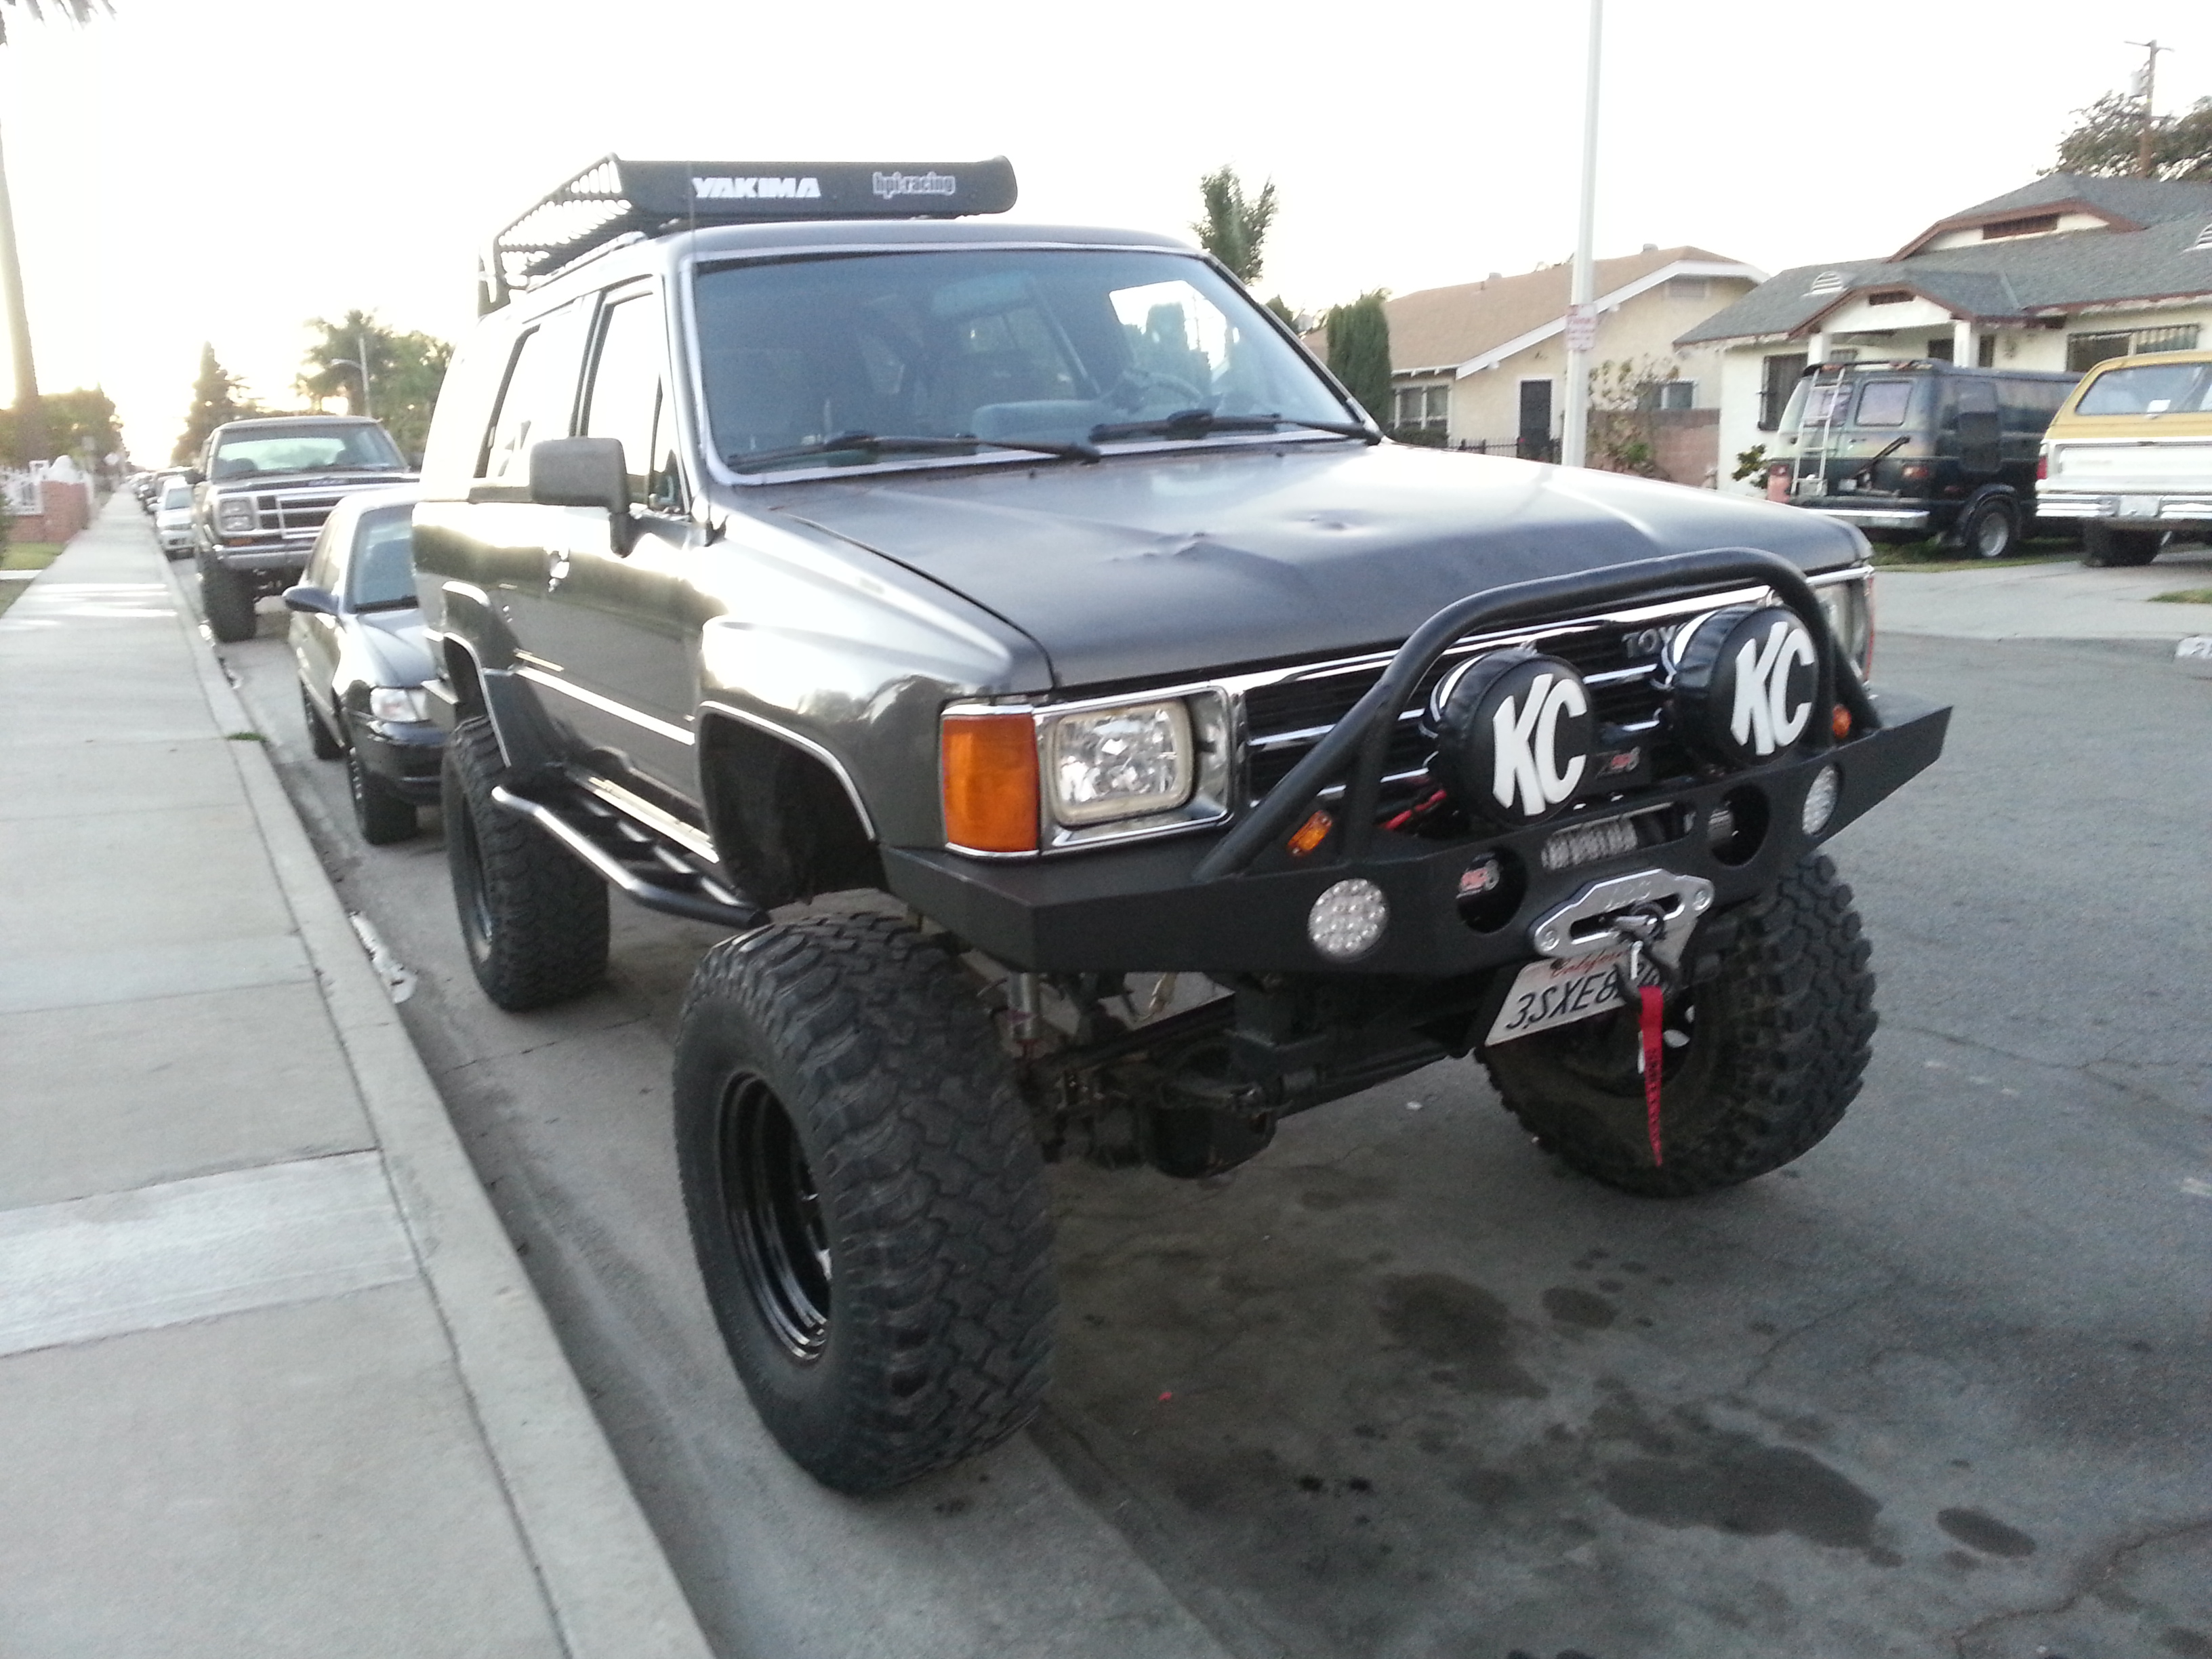
Passenger side: [btw that tan truck in the background belongs to one of my off-road buddies. He is my Next door neighbor. Doesnt get anymore local then that lol]
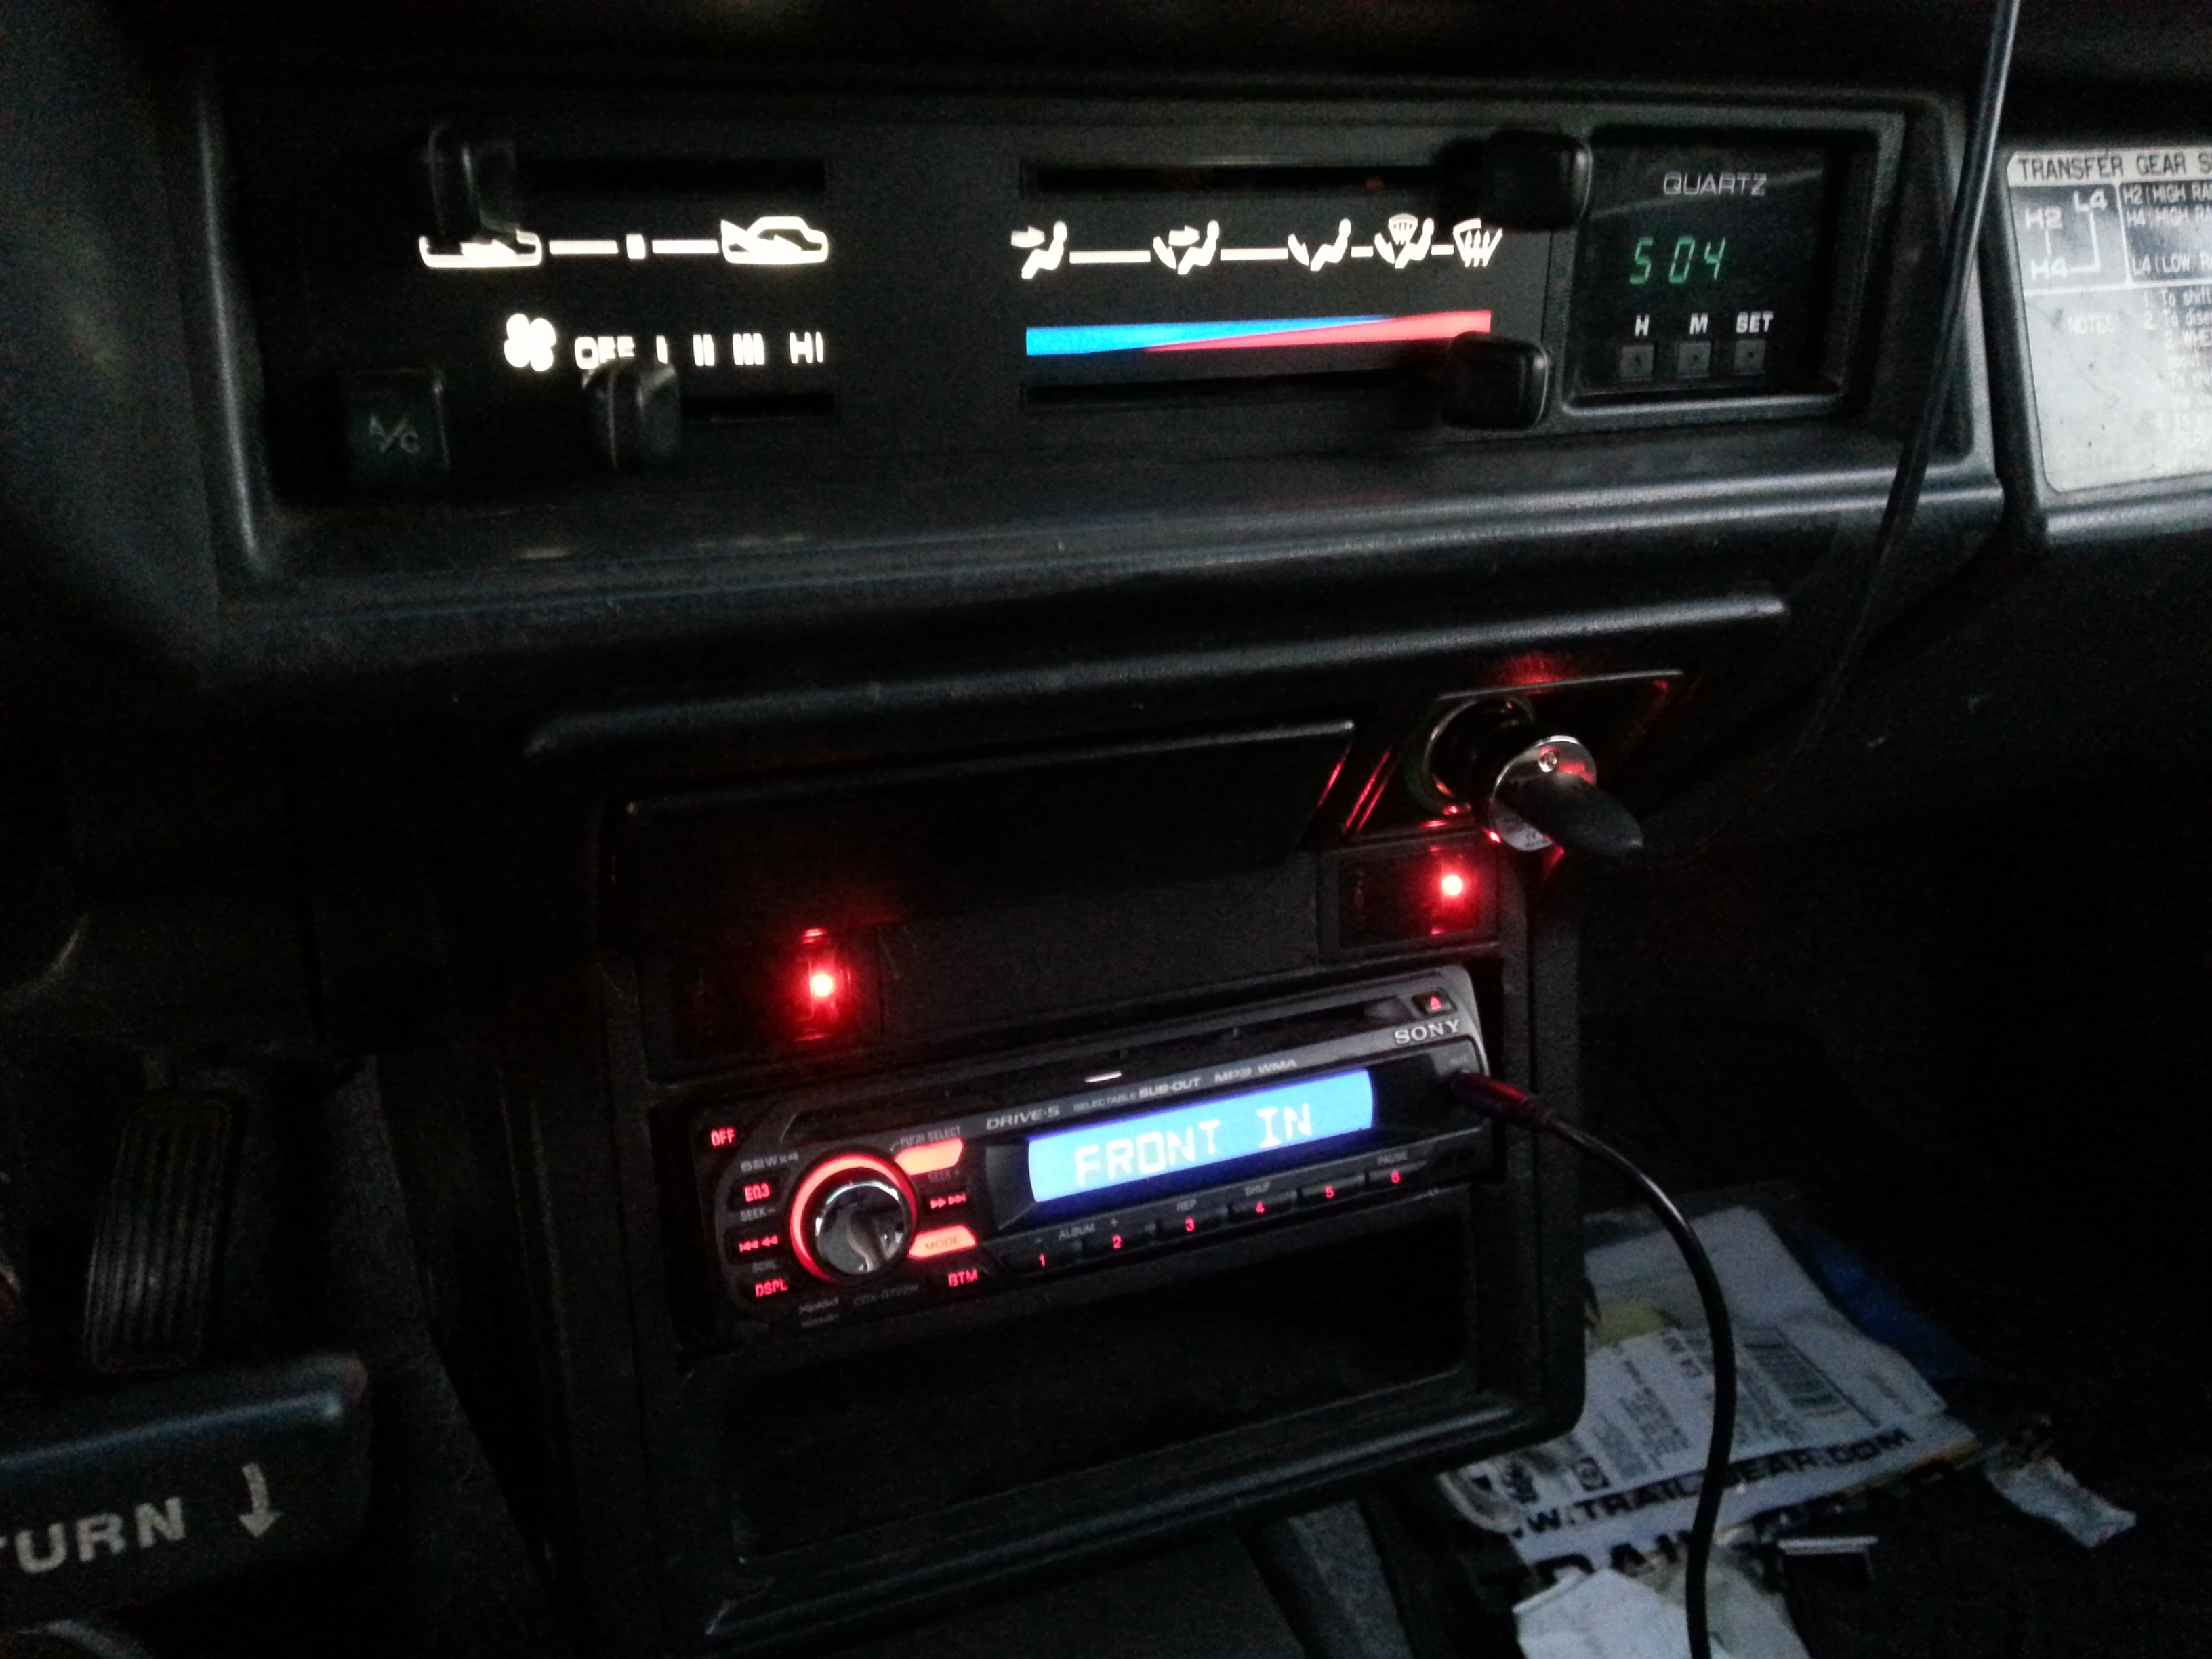
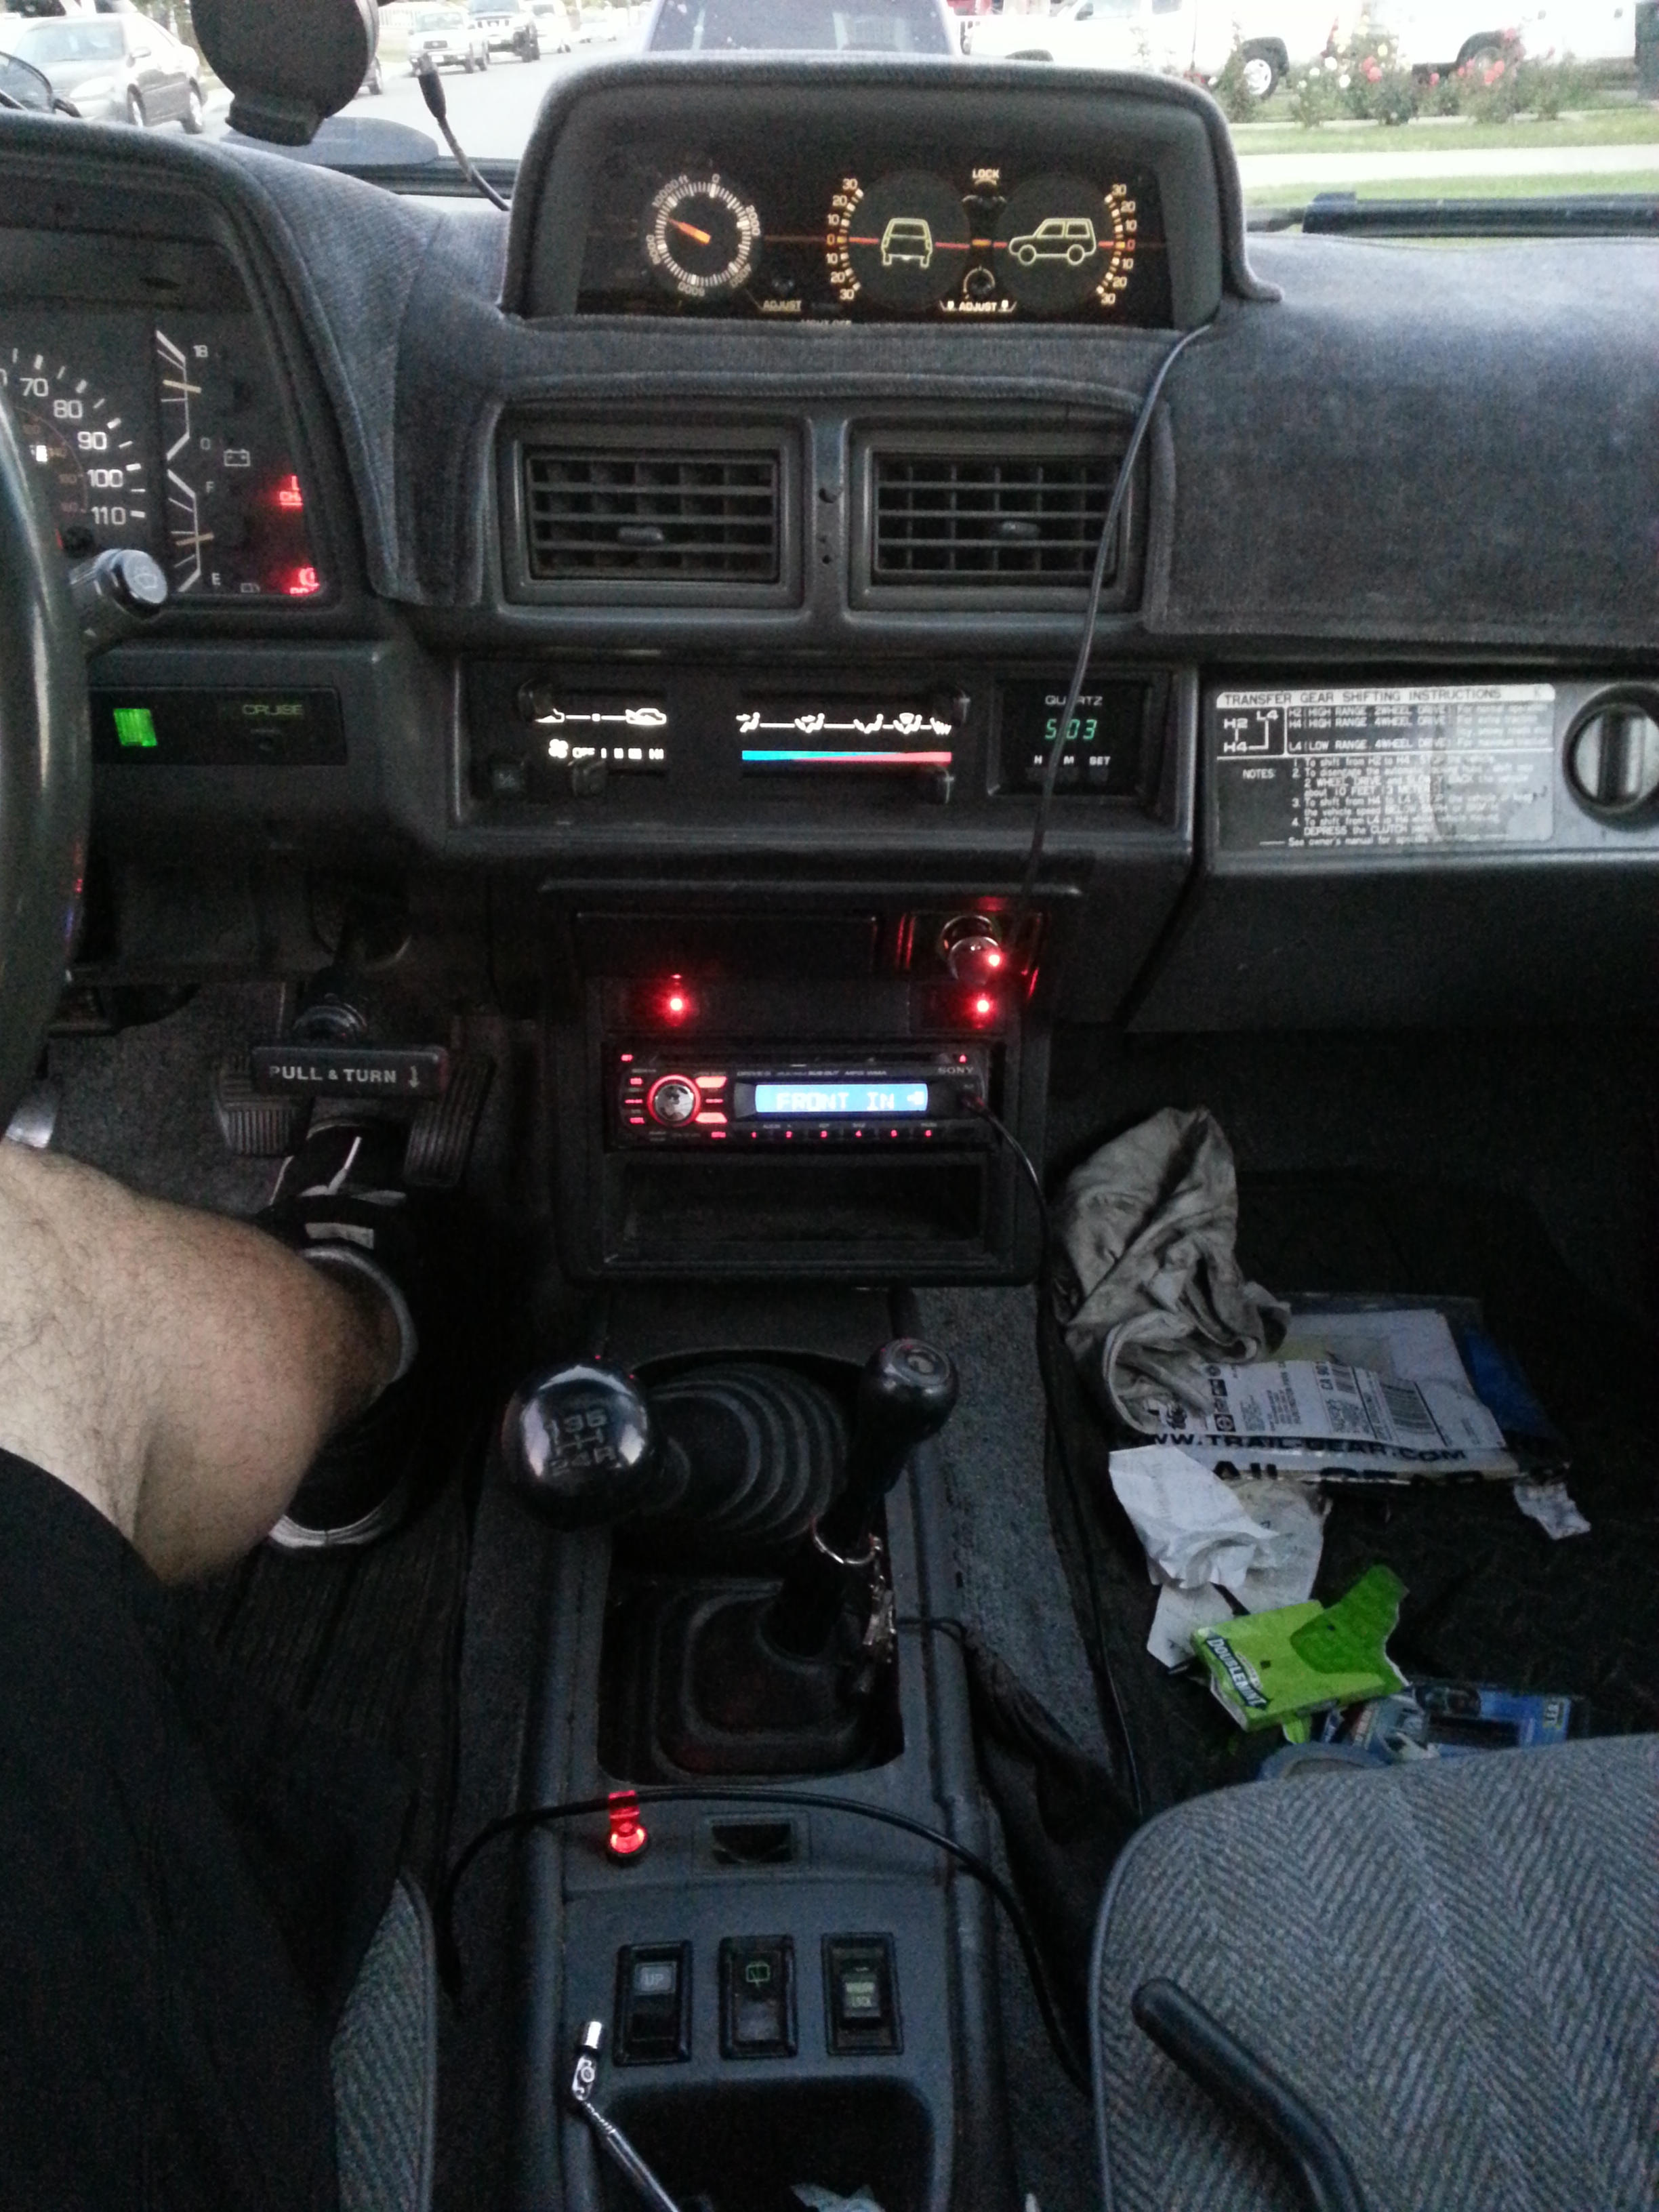
INTERIOR Shot: [you are looking at the touch activated LED buttons above the stereo] Left side activates the LED flood lights and the right one is for the 8" Dick Cepeks. They stay red when not in use. and turn blue when in use.
Don't mind the mess inside. i just cleaned out the back seats and threw everything in the front lol hadn't cleaned it out yet.
Parked her on the street so i could get some better(further away) pix.
-----------------------------------------------------------------------------
That's all folks. I really hope you all like the pix! I cant wait to take her offroad. Im anxious to try out these lights in the wilderness.
Driver side


Front

Possibly a new Avatar?


Passenger side: [btw that tan truck in the background belongs to one of my off-road buddies. He is my Next door neighbor. Doesnt get anymore local then that lol]


INTERIOR Shot: [you are looking at the touch activated LED buttons above the stereo] Left side activates the LED flood lights and the right one is for the 8" Dick Cepeks. They stay red when not in use. and turn blue when in use.

Don't mind the mess inside. i just cleaned out the back seats and threw everything in the front lol hadn't cleaned it out yet.

Parked her on the street so i could get some better(further away) pix.


-----------------------------------------------------------------------------
That's all folks. I really hope you all like the pix! I cant wait to take her offroad. Im anxious to try out these lights in the wilderness.


