
Redeth's 1989 4Runner Resurrection
 Oct 28, 2013 | 10:35 AM
#2201
Registered User


Joined: Mar 2012
Posts: 7,125
Likes: 681

Looking good, Richard!
I used same TG LED marker/turn lights. Very good- sturdy (polycarbonate body and fully-waterproof).
If I were to do it, I would re-use stock bumper turn signal mounted front-facing in plate bumper, then use TG on side of bumper, because right now, driver in our blind-spot do not see our turn signals.
Also, try using the LED alone and see if you have a problem with flasher going too fast. If you do, you would need a resistor to correct it. Rather that buying a resistor, be green and just re-use existing turn signal.
I just think rectangular lights (including existing bumper turn signals) just look meaner and purposeful.
Last edited by RAD4Runner; Oct 28, 2013 at 10:37 AM.
Oct 28, 2013 | 03:22 PM
#2203
Thread Starter
Registered User
Joined: Apr 2012
Posts: 2,817
Likes: 2
From: Los Angeles CA
Awesome! That is freaking sick! I personally like it better on the plate, but I see what you mean as far as sticking out their. However, it can't hurt for it to be seen a little closer to the corners / risen a little bit, as for safety. But just all in all I think it looks cleaner as far as uniformity, where you're holding it on the front portion of the plate. Maybe you could make a little recessed box for to sit in so its not sticking out. Just mounted on the stairs for now on the gusset, that way you can always add it later in the front if you like it better. Don't forget you need resistors or those blinkers will flash super fast.... All of em. Or mod your blinker relay.
Dude i didnt even take into consideration of the blinkers going too fast. Dang it. Where did you buy your resistors. and im assuming i need 2 right? one for each
im putting this as a suggestion as ya have round holes why not get a round hole type LED an mount it in the bumper flush where the second picture shows you holding the TG unit on the front
or maybe even an oval one? or just like the small TG unit?
im just curious
or maybe even an oval one? or just like the small TG unit?
im just curious
Your bumper turned out sick! Can't wait to see it all painted and mounted on your 4runner, you guys really did a fantastic job! I agree with Mark on the turn signals, think they look a little better on the plate, maybe sunk in like he mentioned so they don't stick out as far. I can't wait to replace my old Smittybuilt, after seeing your front and rear bumpers, I think I'm definitely leaning towards a plate style bumper rather than the tube style. once again nice job!
Ed. I'm happy i helped change your mind to plate. Those are definitely my favorites. I'm just happy the front and rear match. somewhat at least. lol Are you planning on making your own too?
Looking good, Richard!
I used same TG LED marker/turn lights. Very good- sturdy (polycarbonate body and fully-waterproof).
If I were to do it, I would re-use stock bumper turn signal mounted front-facing in plate bumper, then use TG on side of bumper, because right now, driver in our blind-spot do not see our turn signals.
Also, try using the LED alone and see if you have a problem with flasher going too fast. If you do, you would need a resistor to correct it. Rather that buying a resistor, be green and just re-use existing turn signal.
I just think rectangular lights (including existing bumper turn signals) just look meaner and purposeful.
Jason thanks man. I'm very anxious too. I was thinking that maybe i should have bought a highlift to mount to the front bumper as well. But i've seen way too many of those things get oxidized and left in bad condition. I will still buy one but i will just keep the jack mounted inside the truck when i do buy it.
Oct 28, 2013 | 07:17 PM
#2205
Registered User
Joined: Mar 2012
Posts: 7,125
Likes: 681
Dude i didnt even take into consideration of the blinkers going too fast. Dang it. Where did you buy your resistors. and im assuming i need 2 right?
... mine are both really faded and old! lol But i hear ya. I'll try out the LED's and let you know what i find out. hopefully i wont need one. I think the LED ones are more bright arent they?
... mine are both really faded and old! lol But i hear ya. I'll try out the LED's and let you know what i find out. hopefully i wont need one. I think the LED ones are more bright arent they?
During the day, I think the stock are more visible, because the size of the light matters more than the brightness, especially if you're going to recess the light flush with the tubing/gusset. A $9-$20 kit (fine sandpaper and polishing past) used with a drill can easily restore lens quality.
If you end up needing resistors, better re-use stock lights unless you really can't stand the looks of it.
Great job to you and you Dad.
Oct 30, 2013 | 09:20 PM
#2206
Thread Starter
Registered User
Joined: Apr 2012
Posts: 2,817
Likes: 2
From: Los Angeles CA
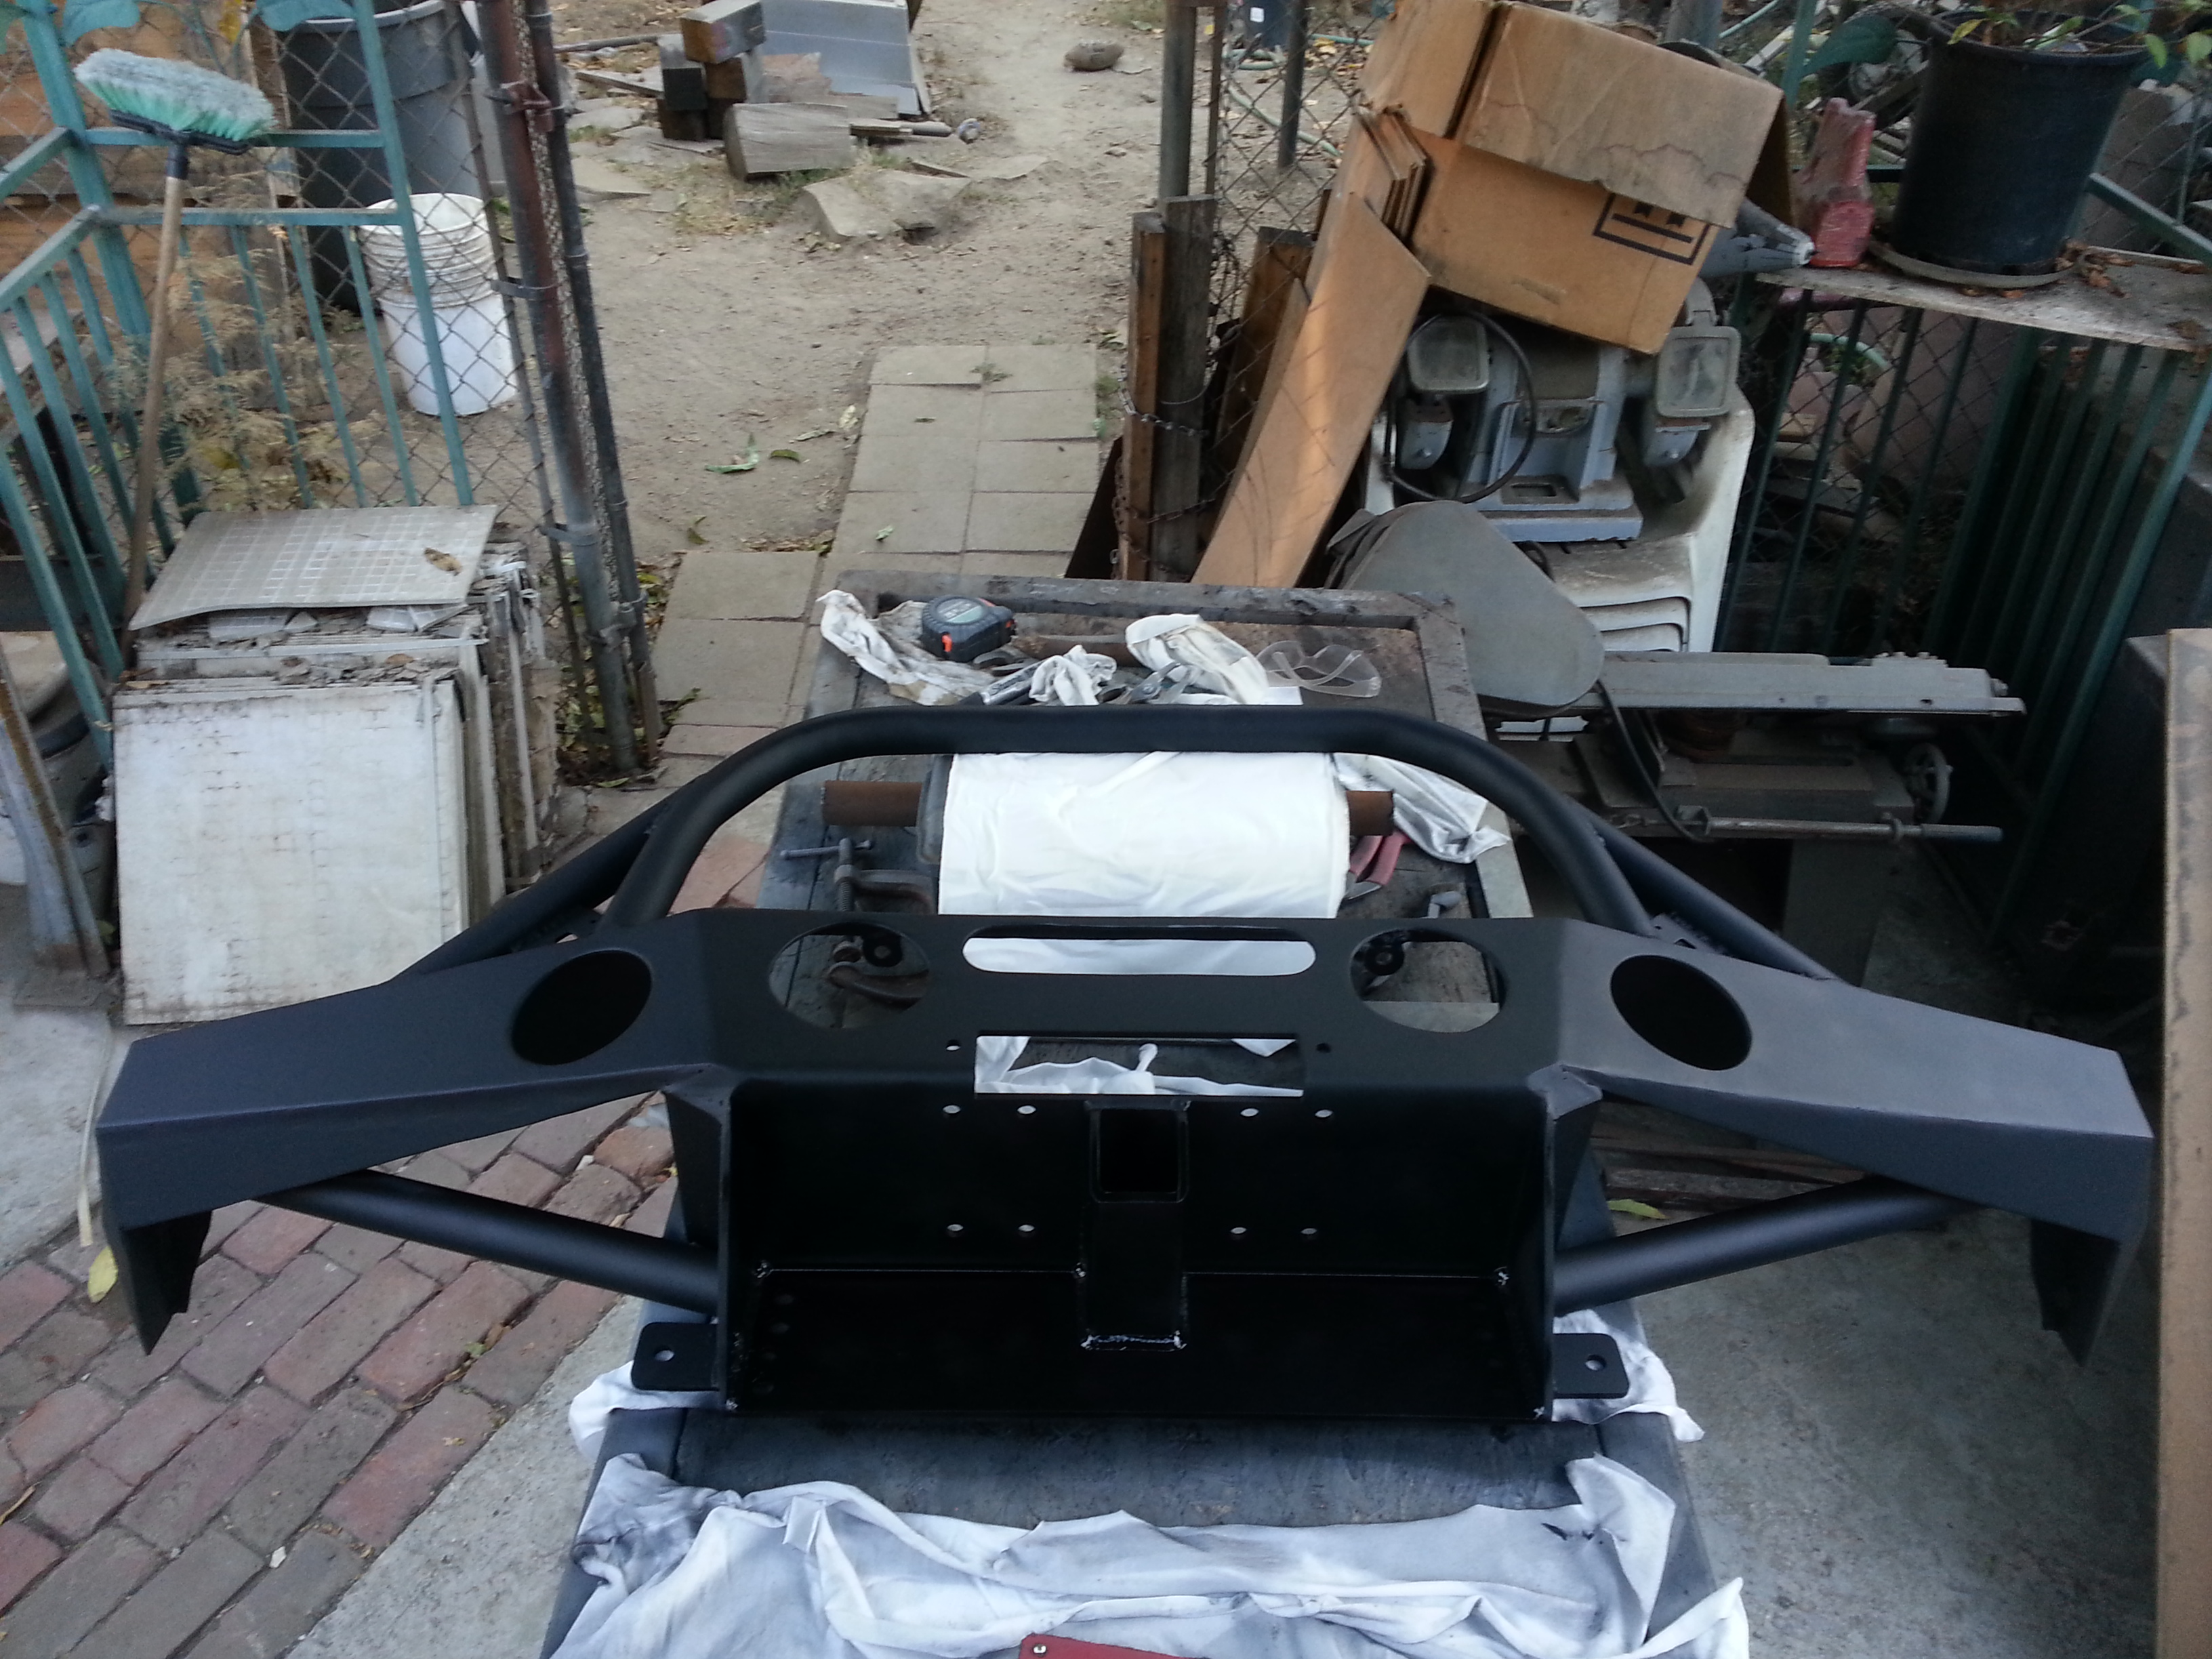
Got some more progress done today guys. enjoy 
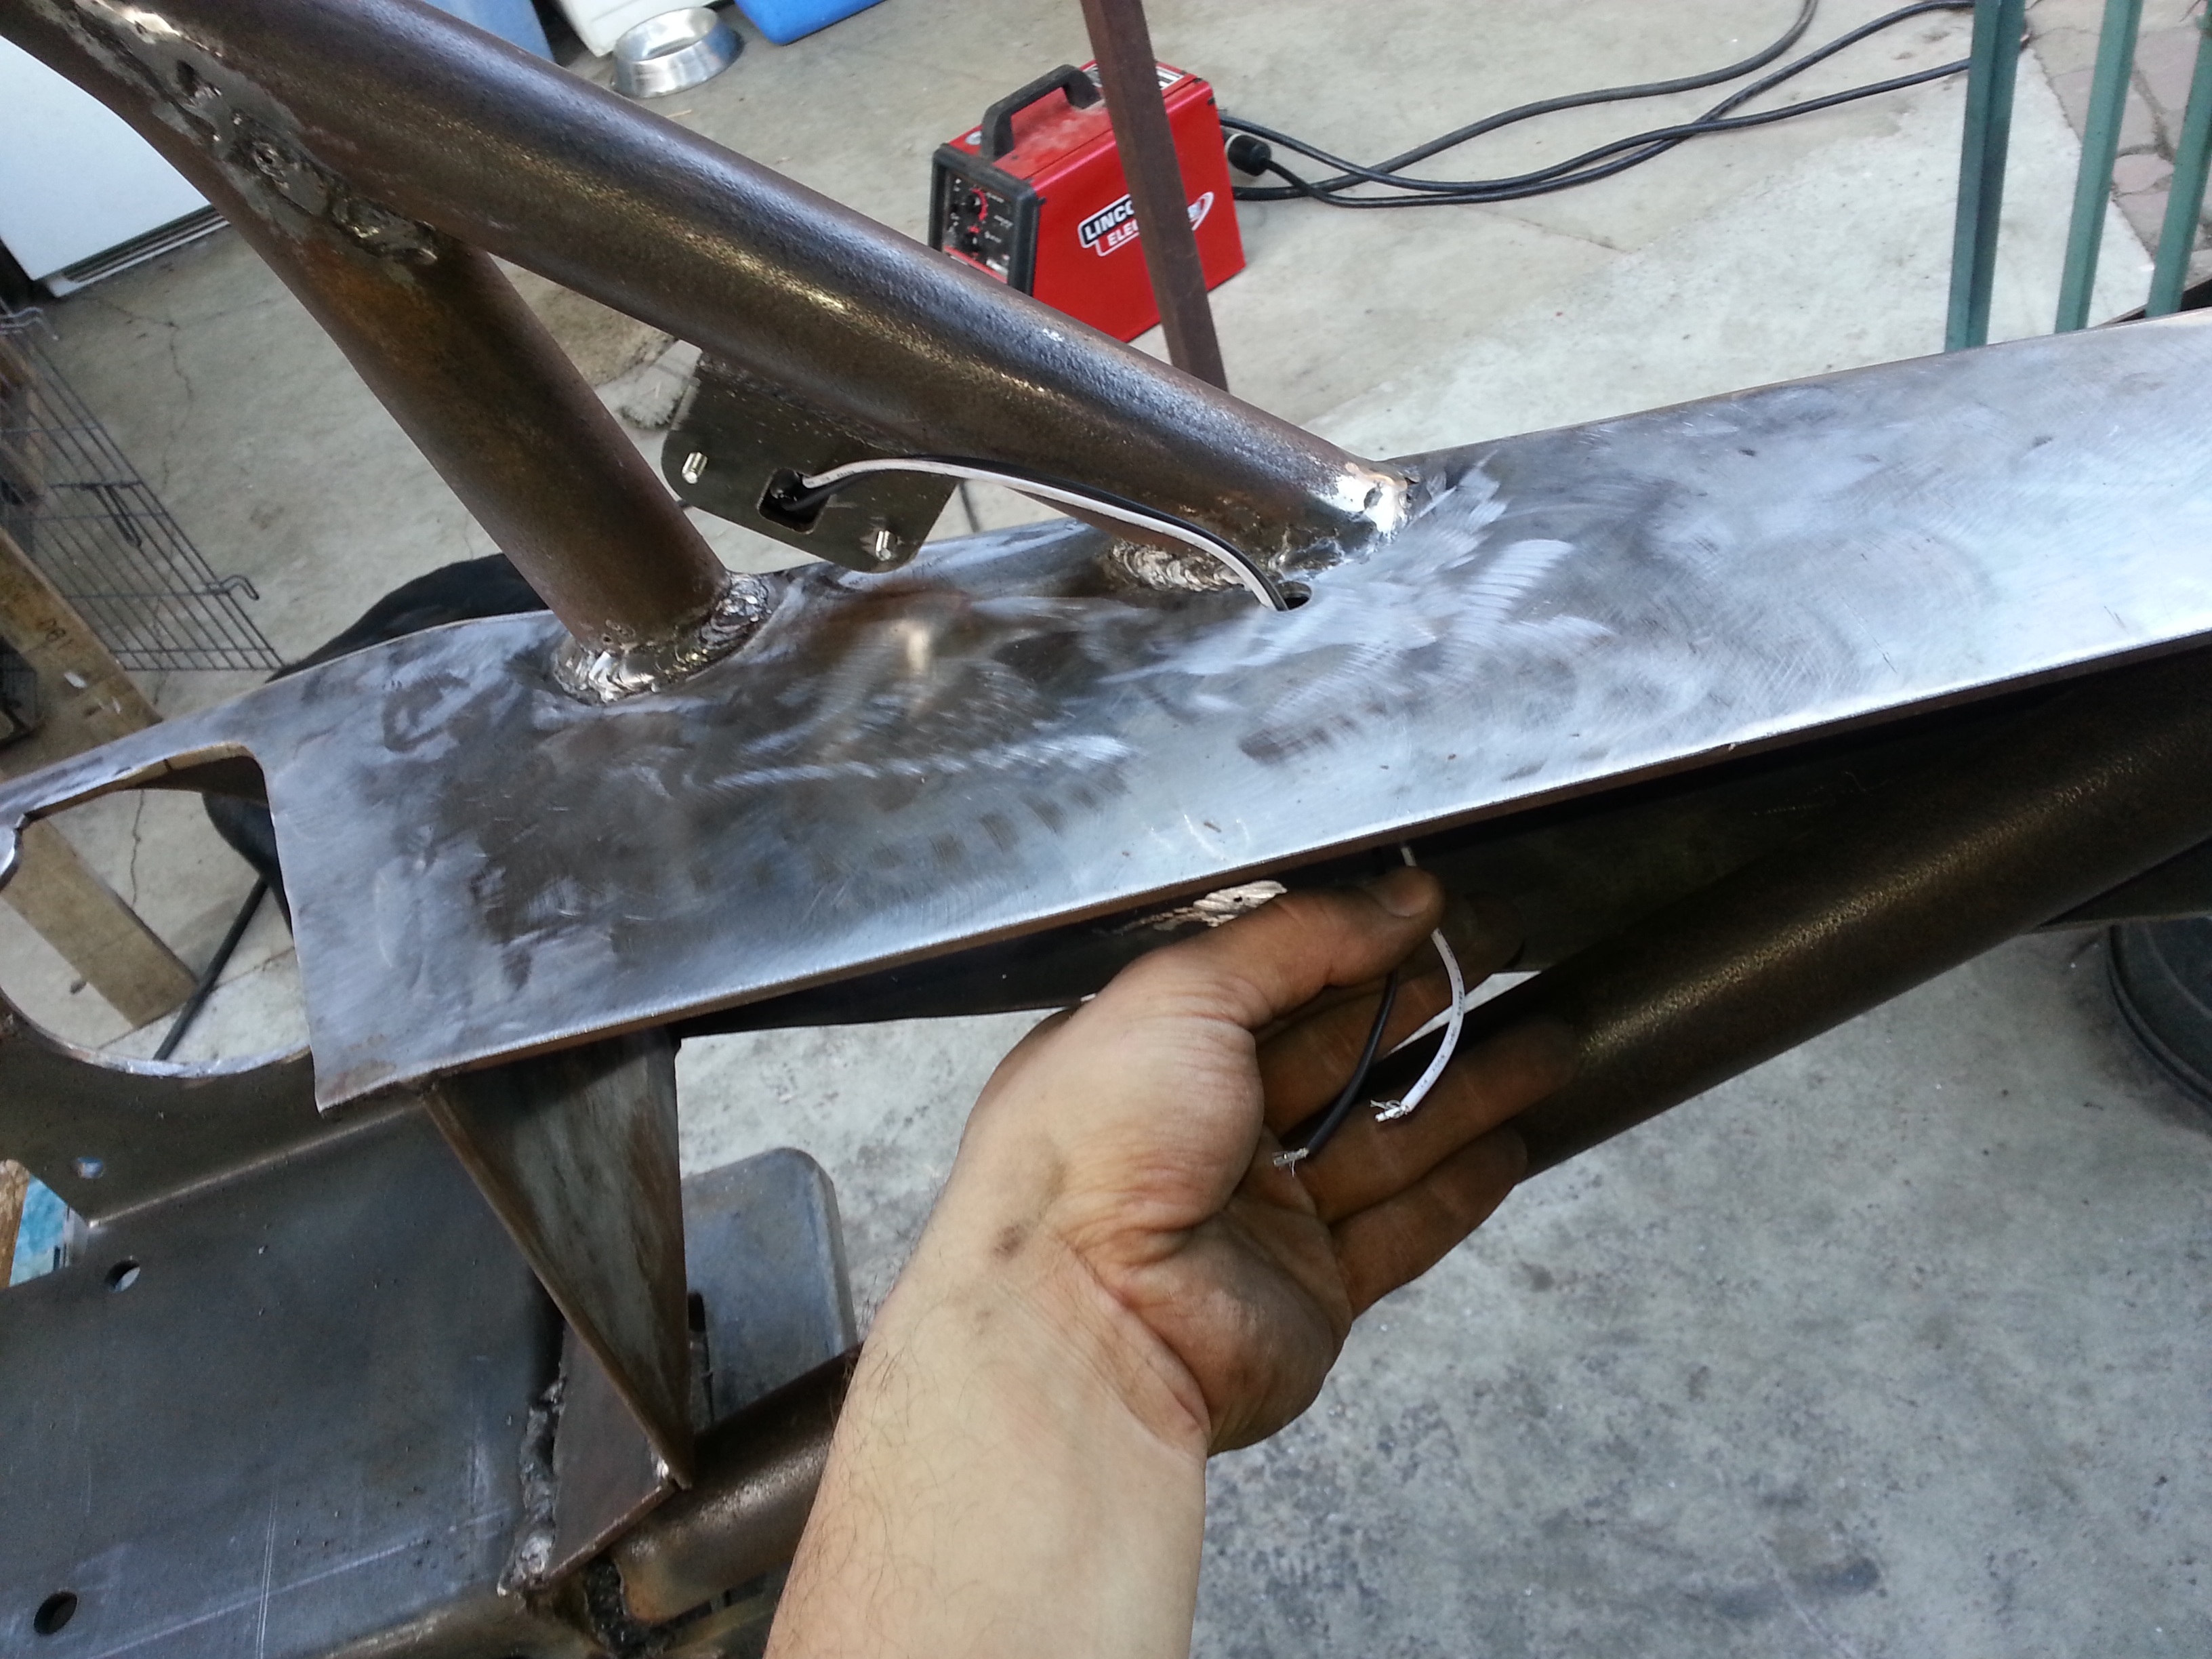
I cut the trail-gear light turn signal brackets in half to fit in the space where the gusset and grill guard are.
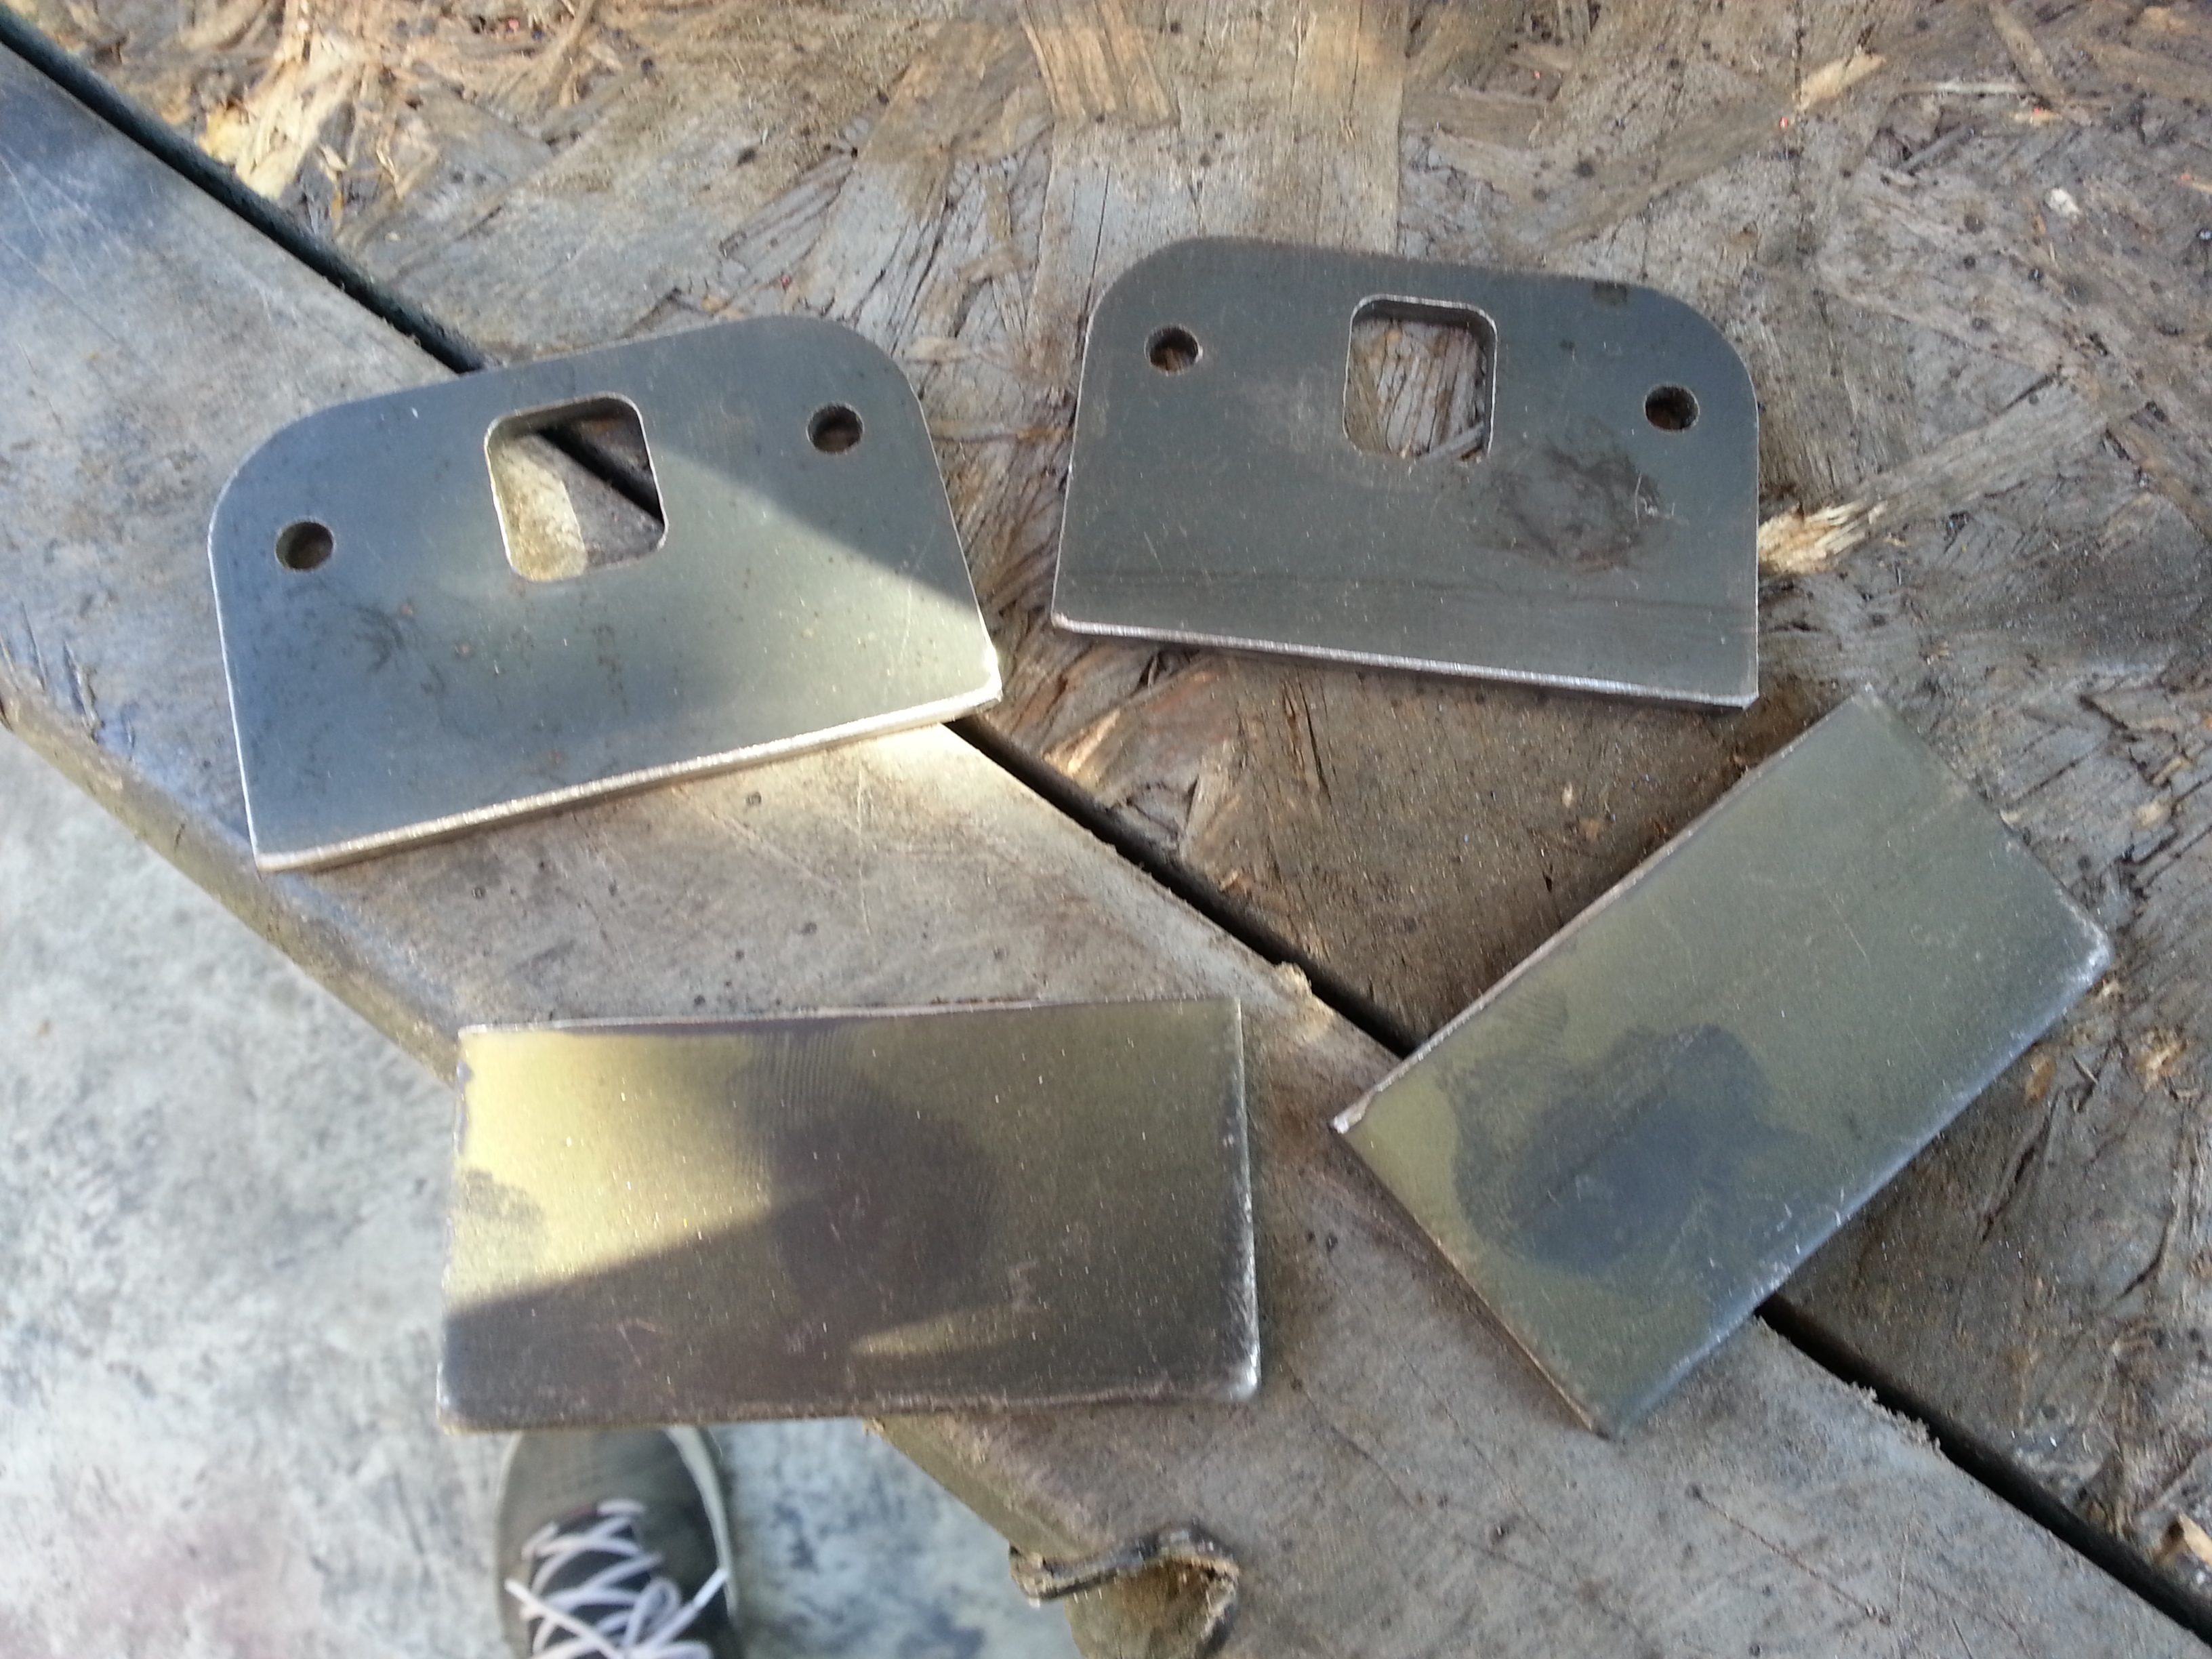
That's where i want'em
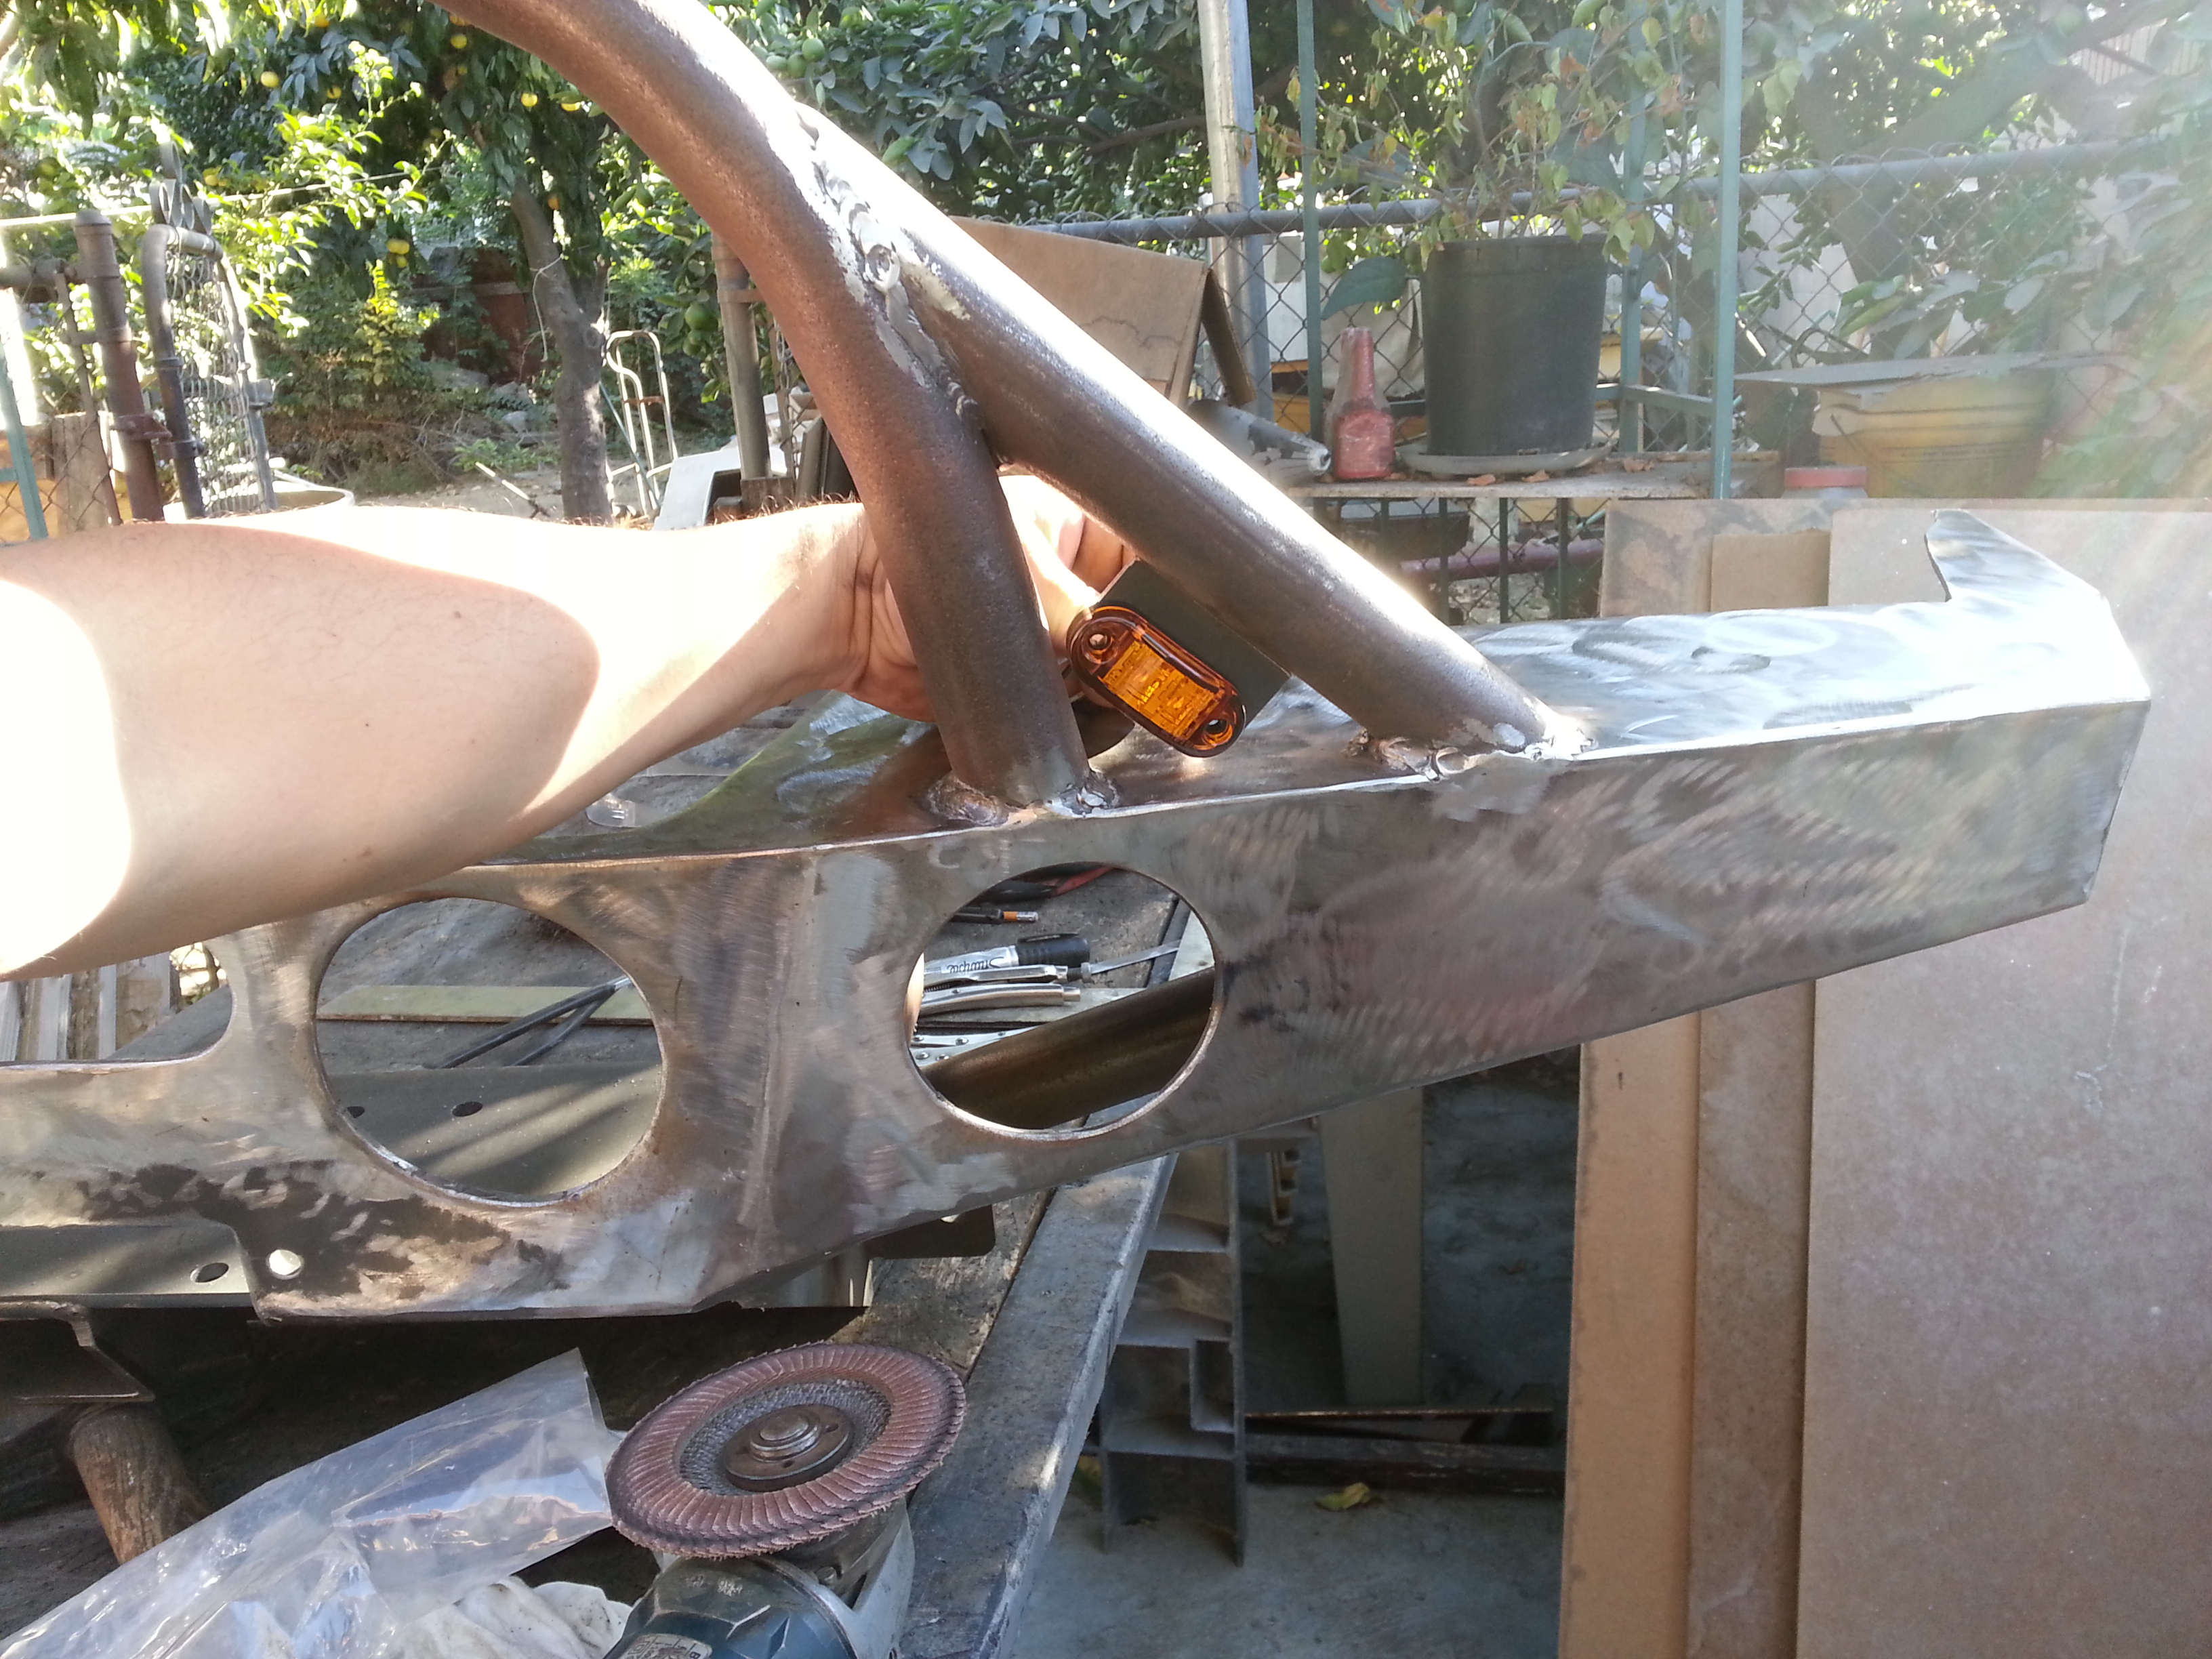
Just wanted to share a picture of my own welds. I think I've been getting much better over the past 2 projects. I have definitely had plenty of practice lol
Like it or not that's where they go now lol. No going back anymore because i welded it on both sides.
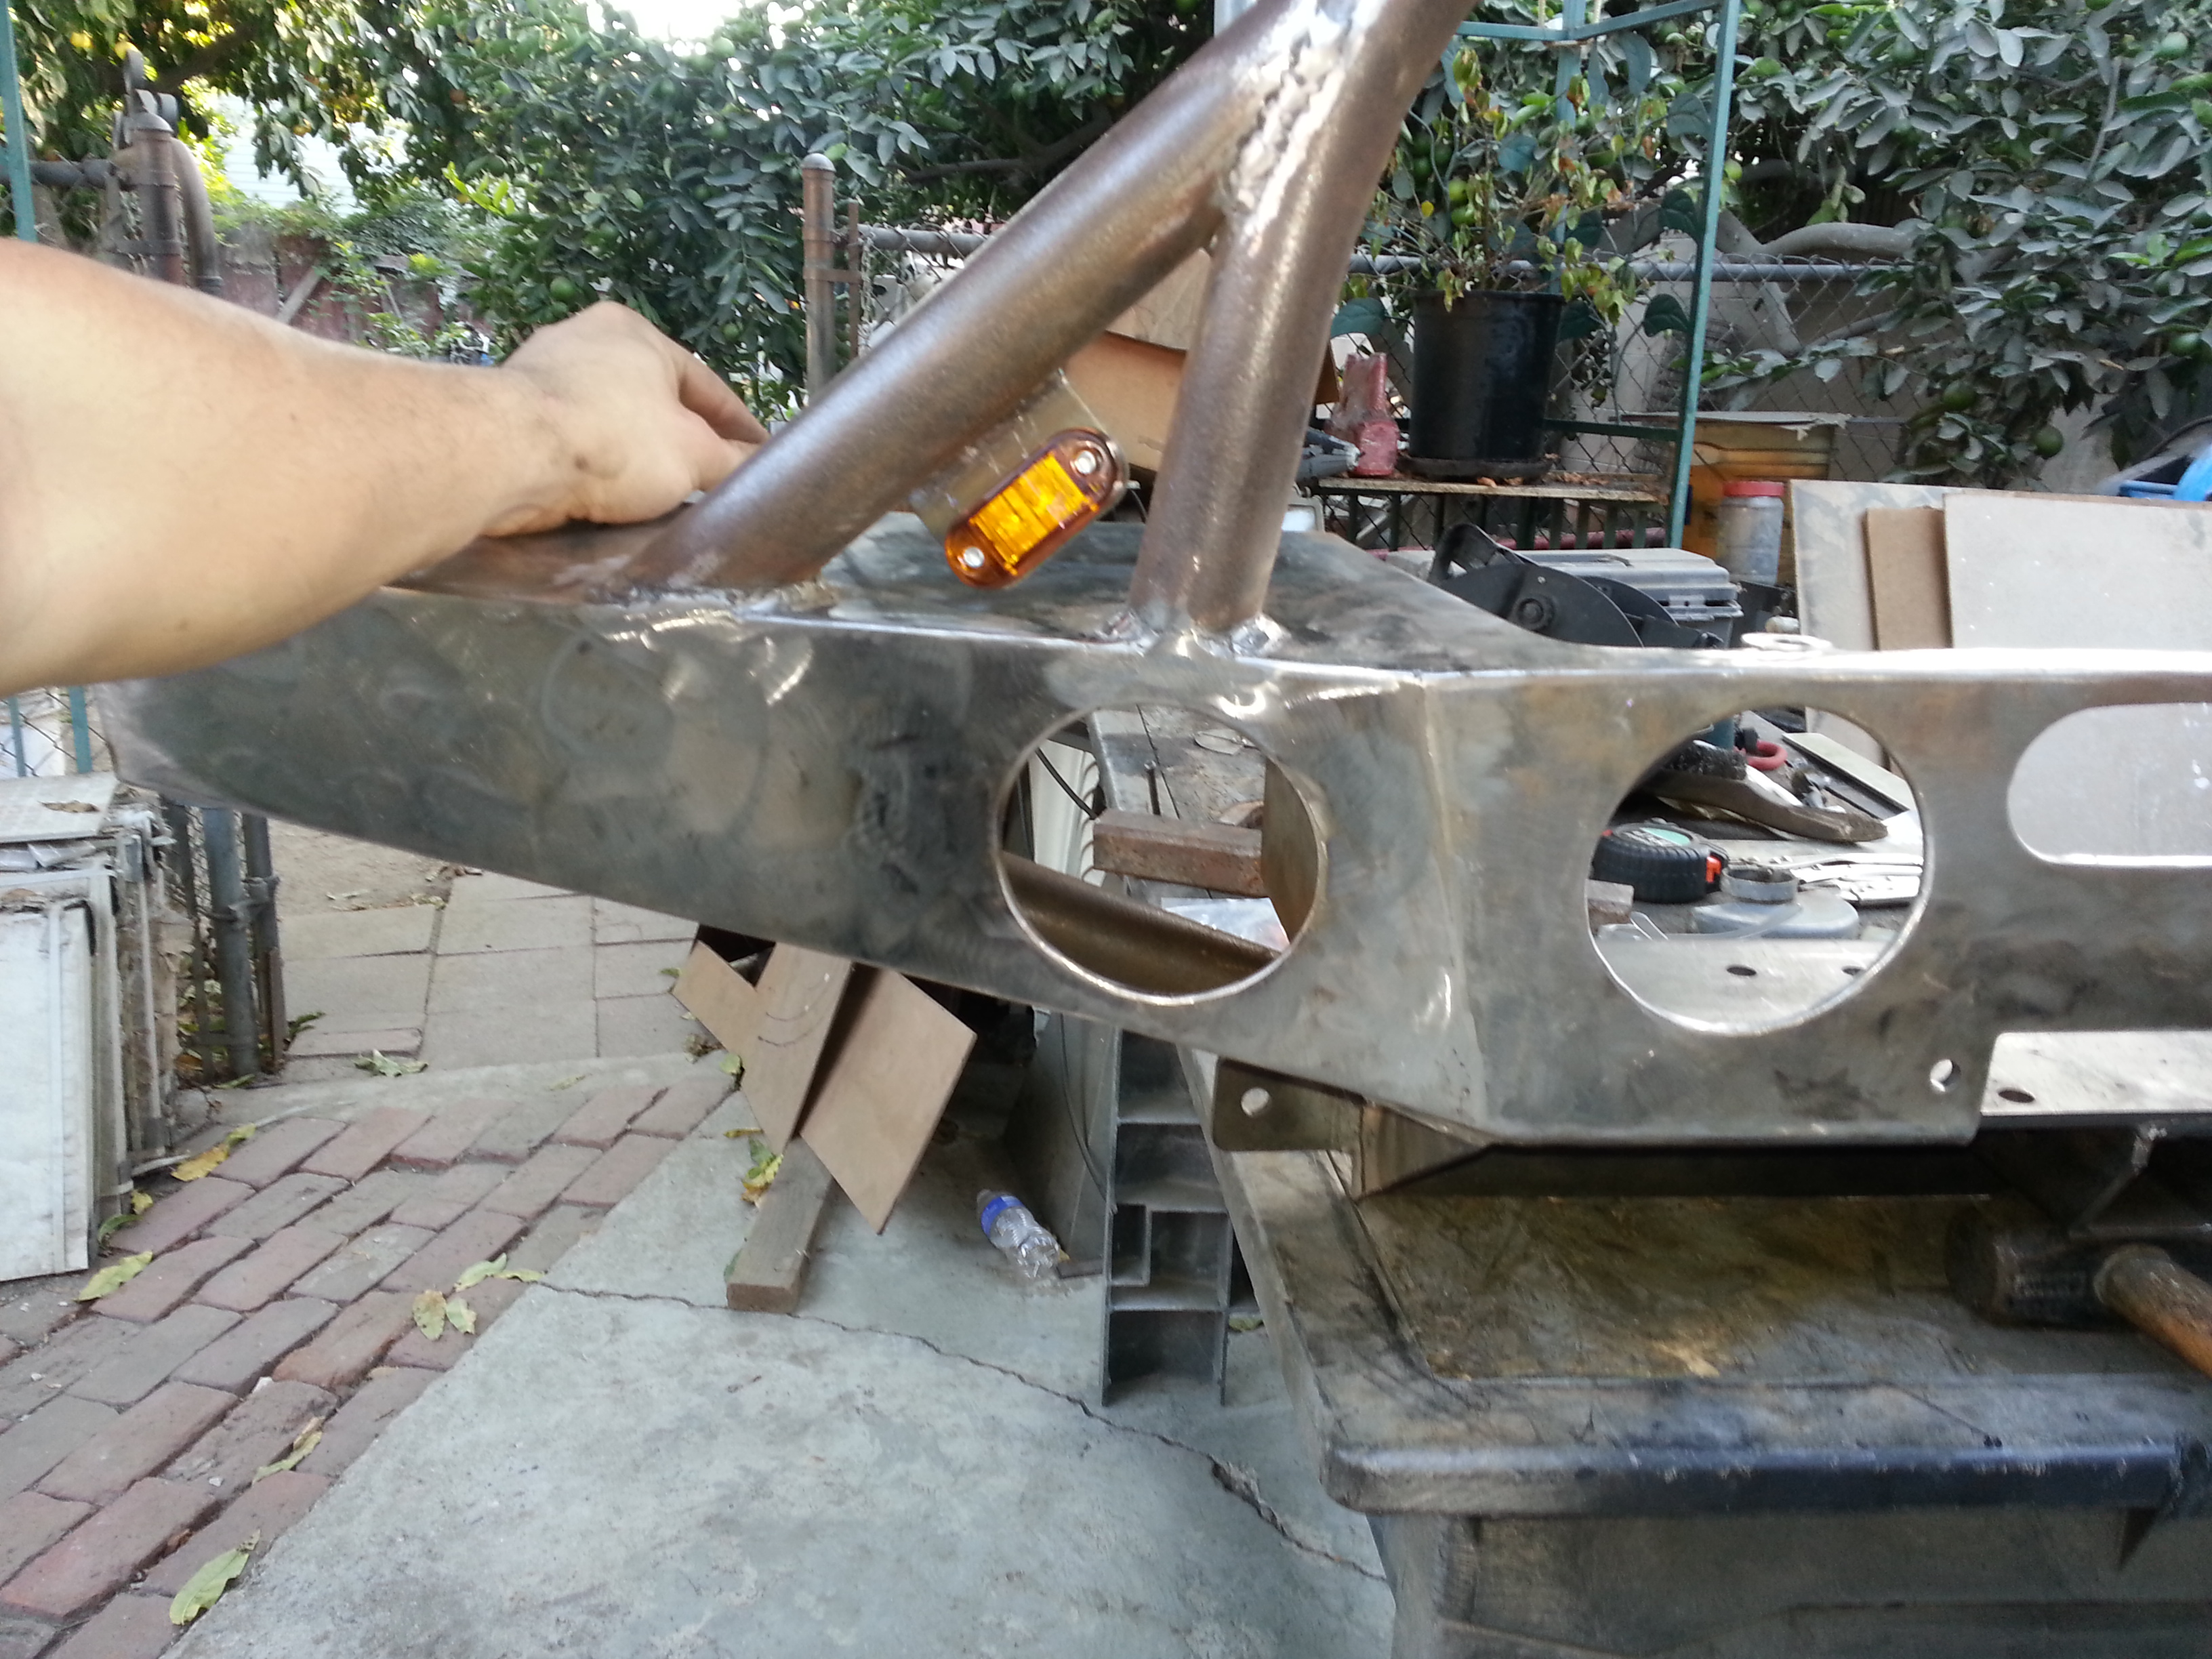
I will be wrapping the wire in some plastic flex stuff(not sure the exact name for it but its meant to shield your wires) will use heat shrink all the way up to the end of the wires then run the wires along the gusset strapped along the back side with black zip ties and down into the holes i made on the top side of the bumper.
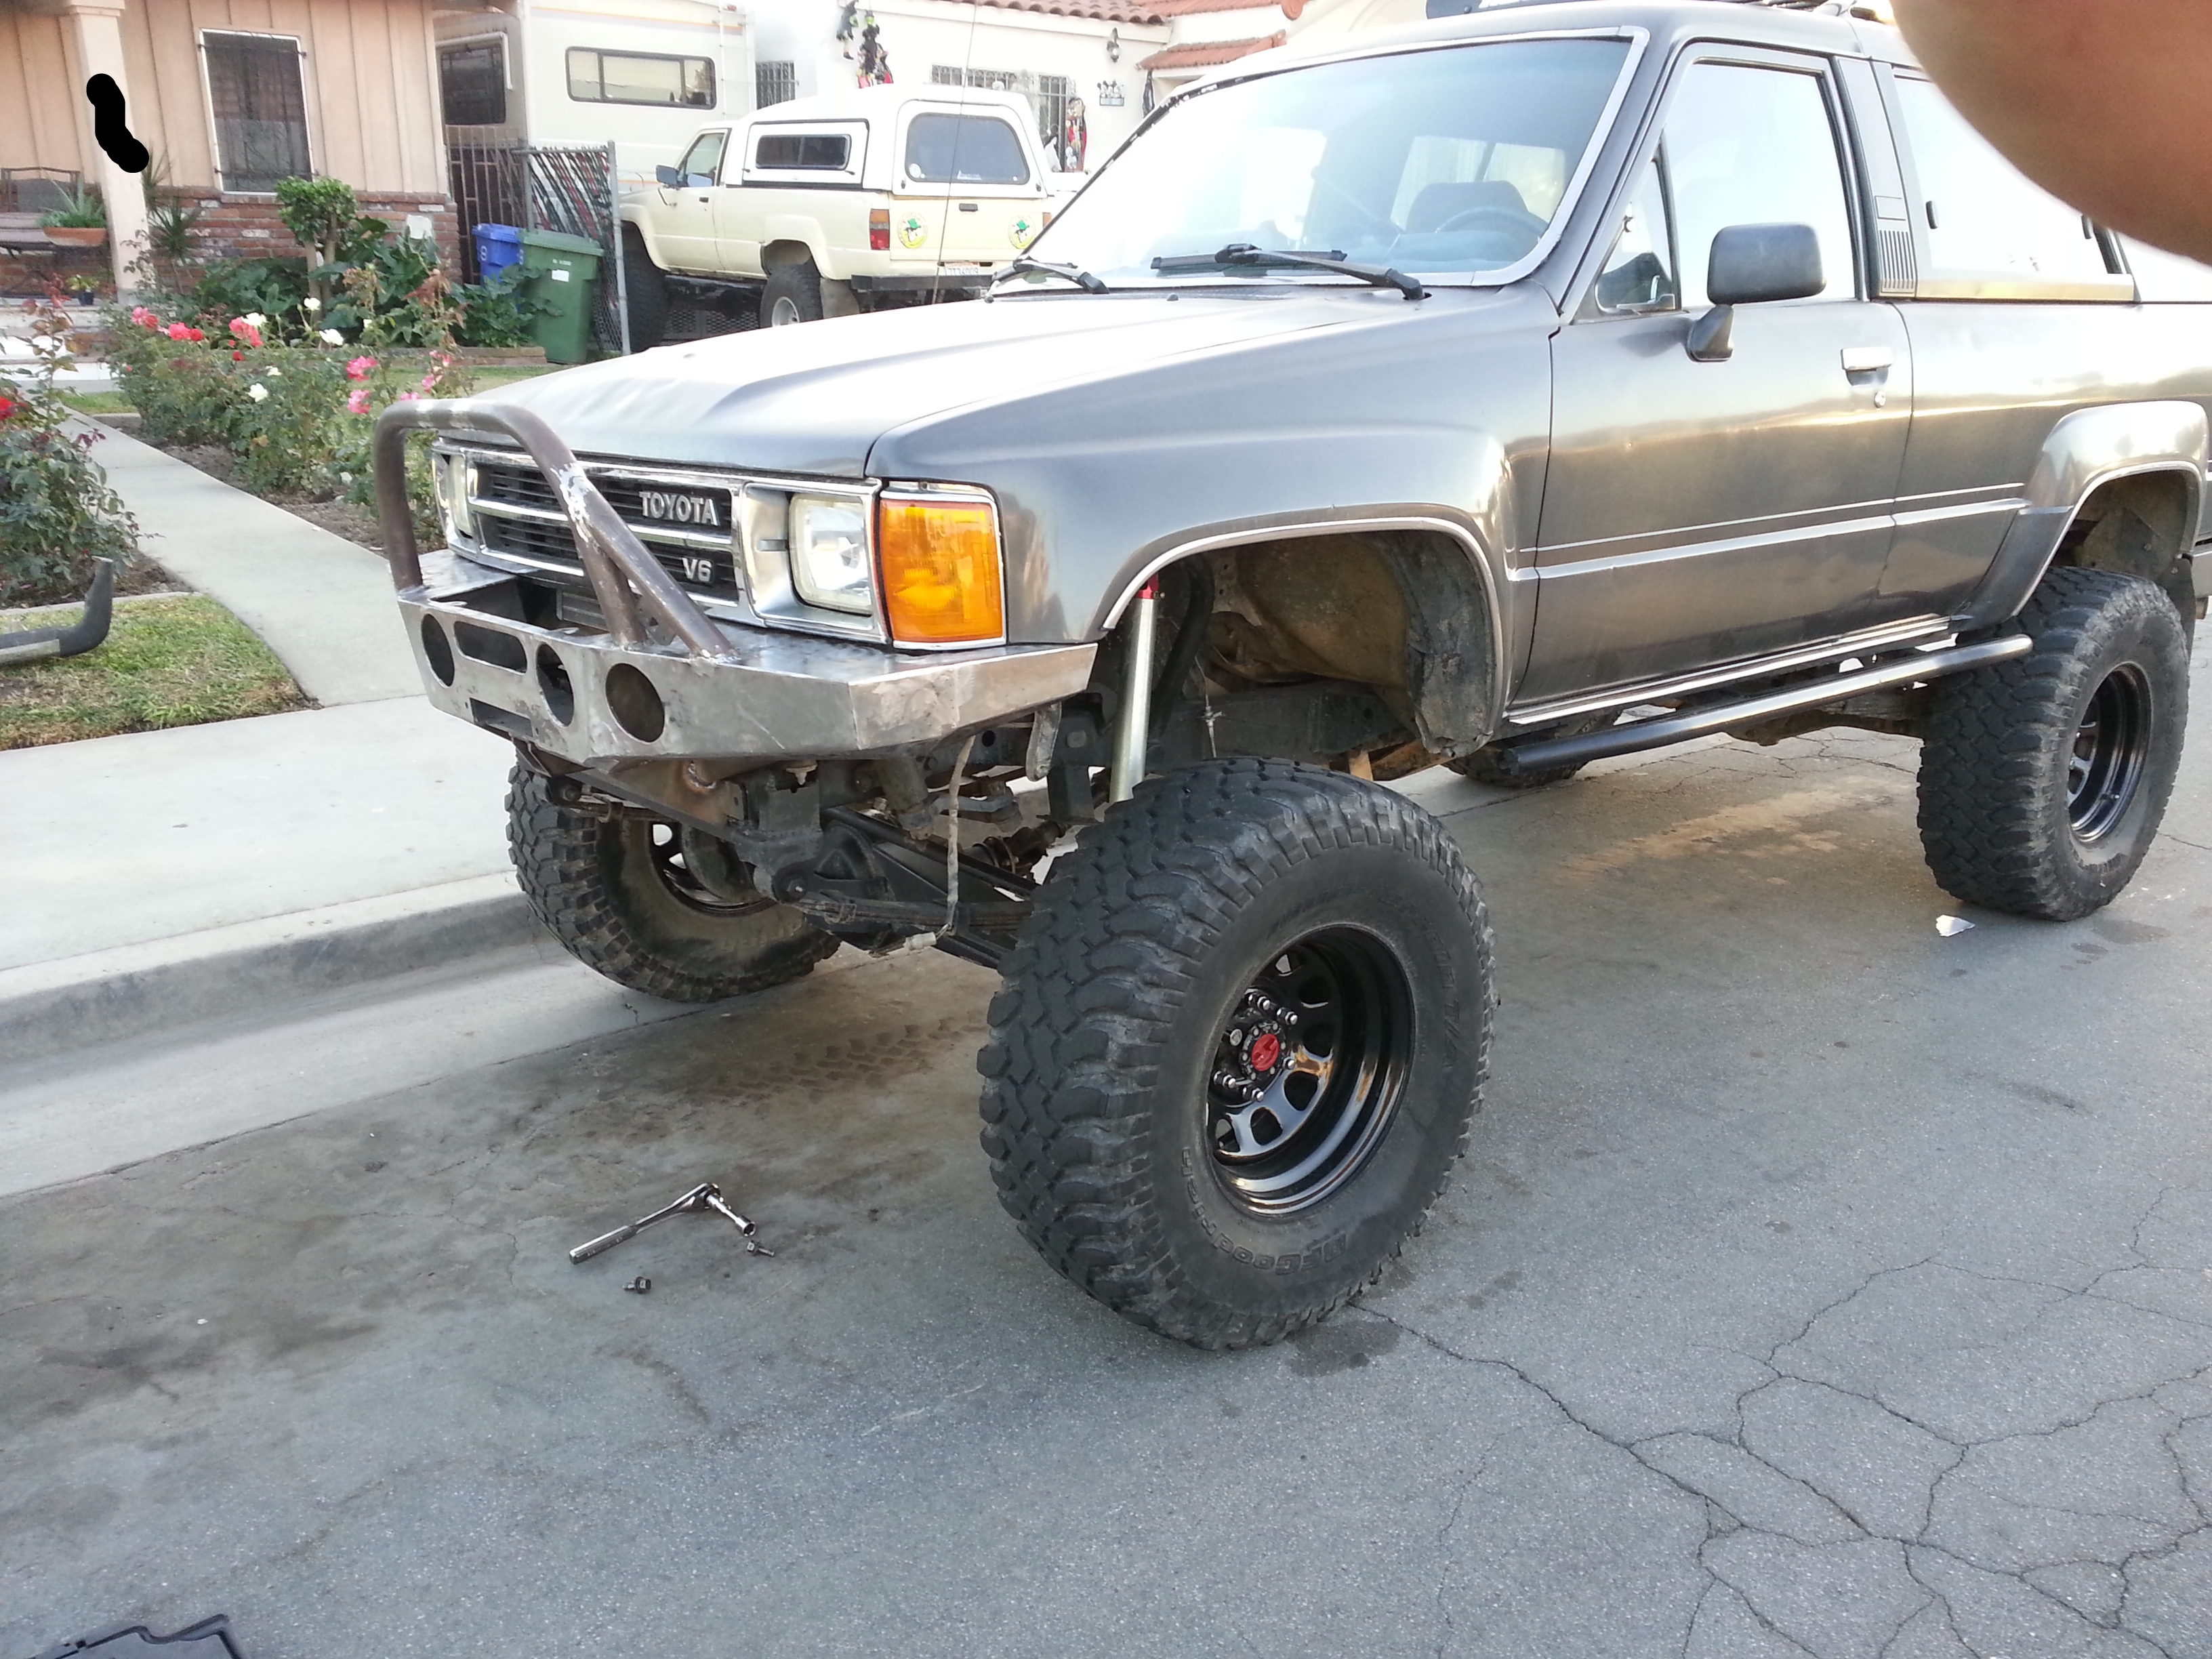
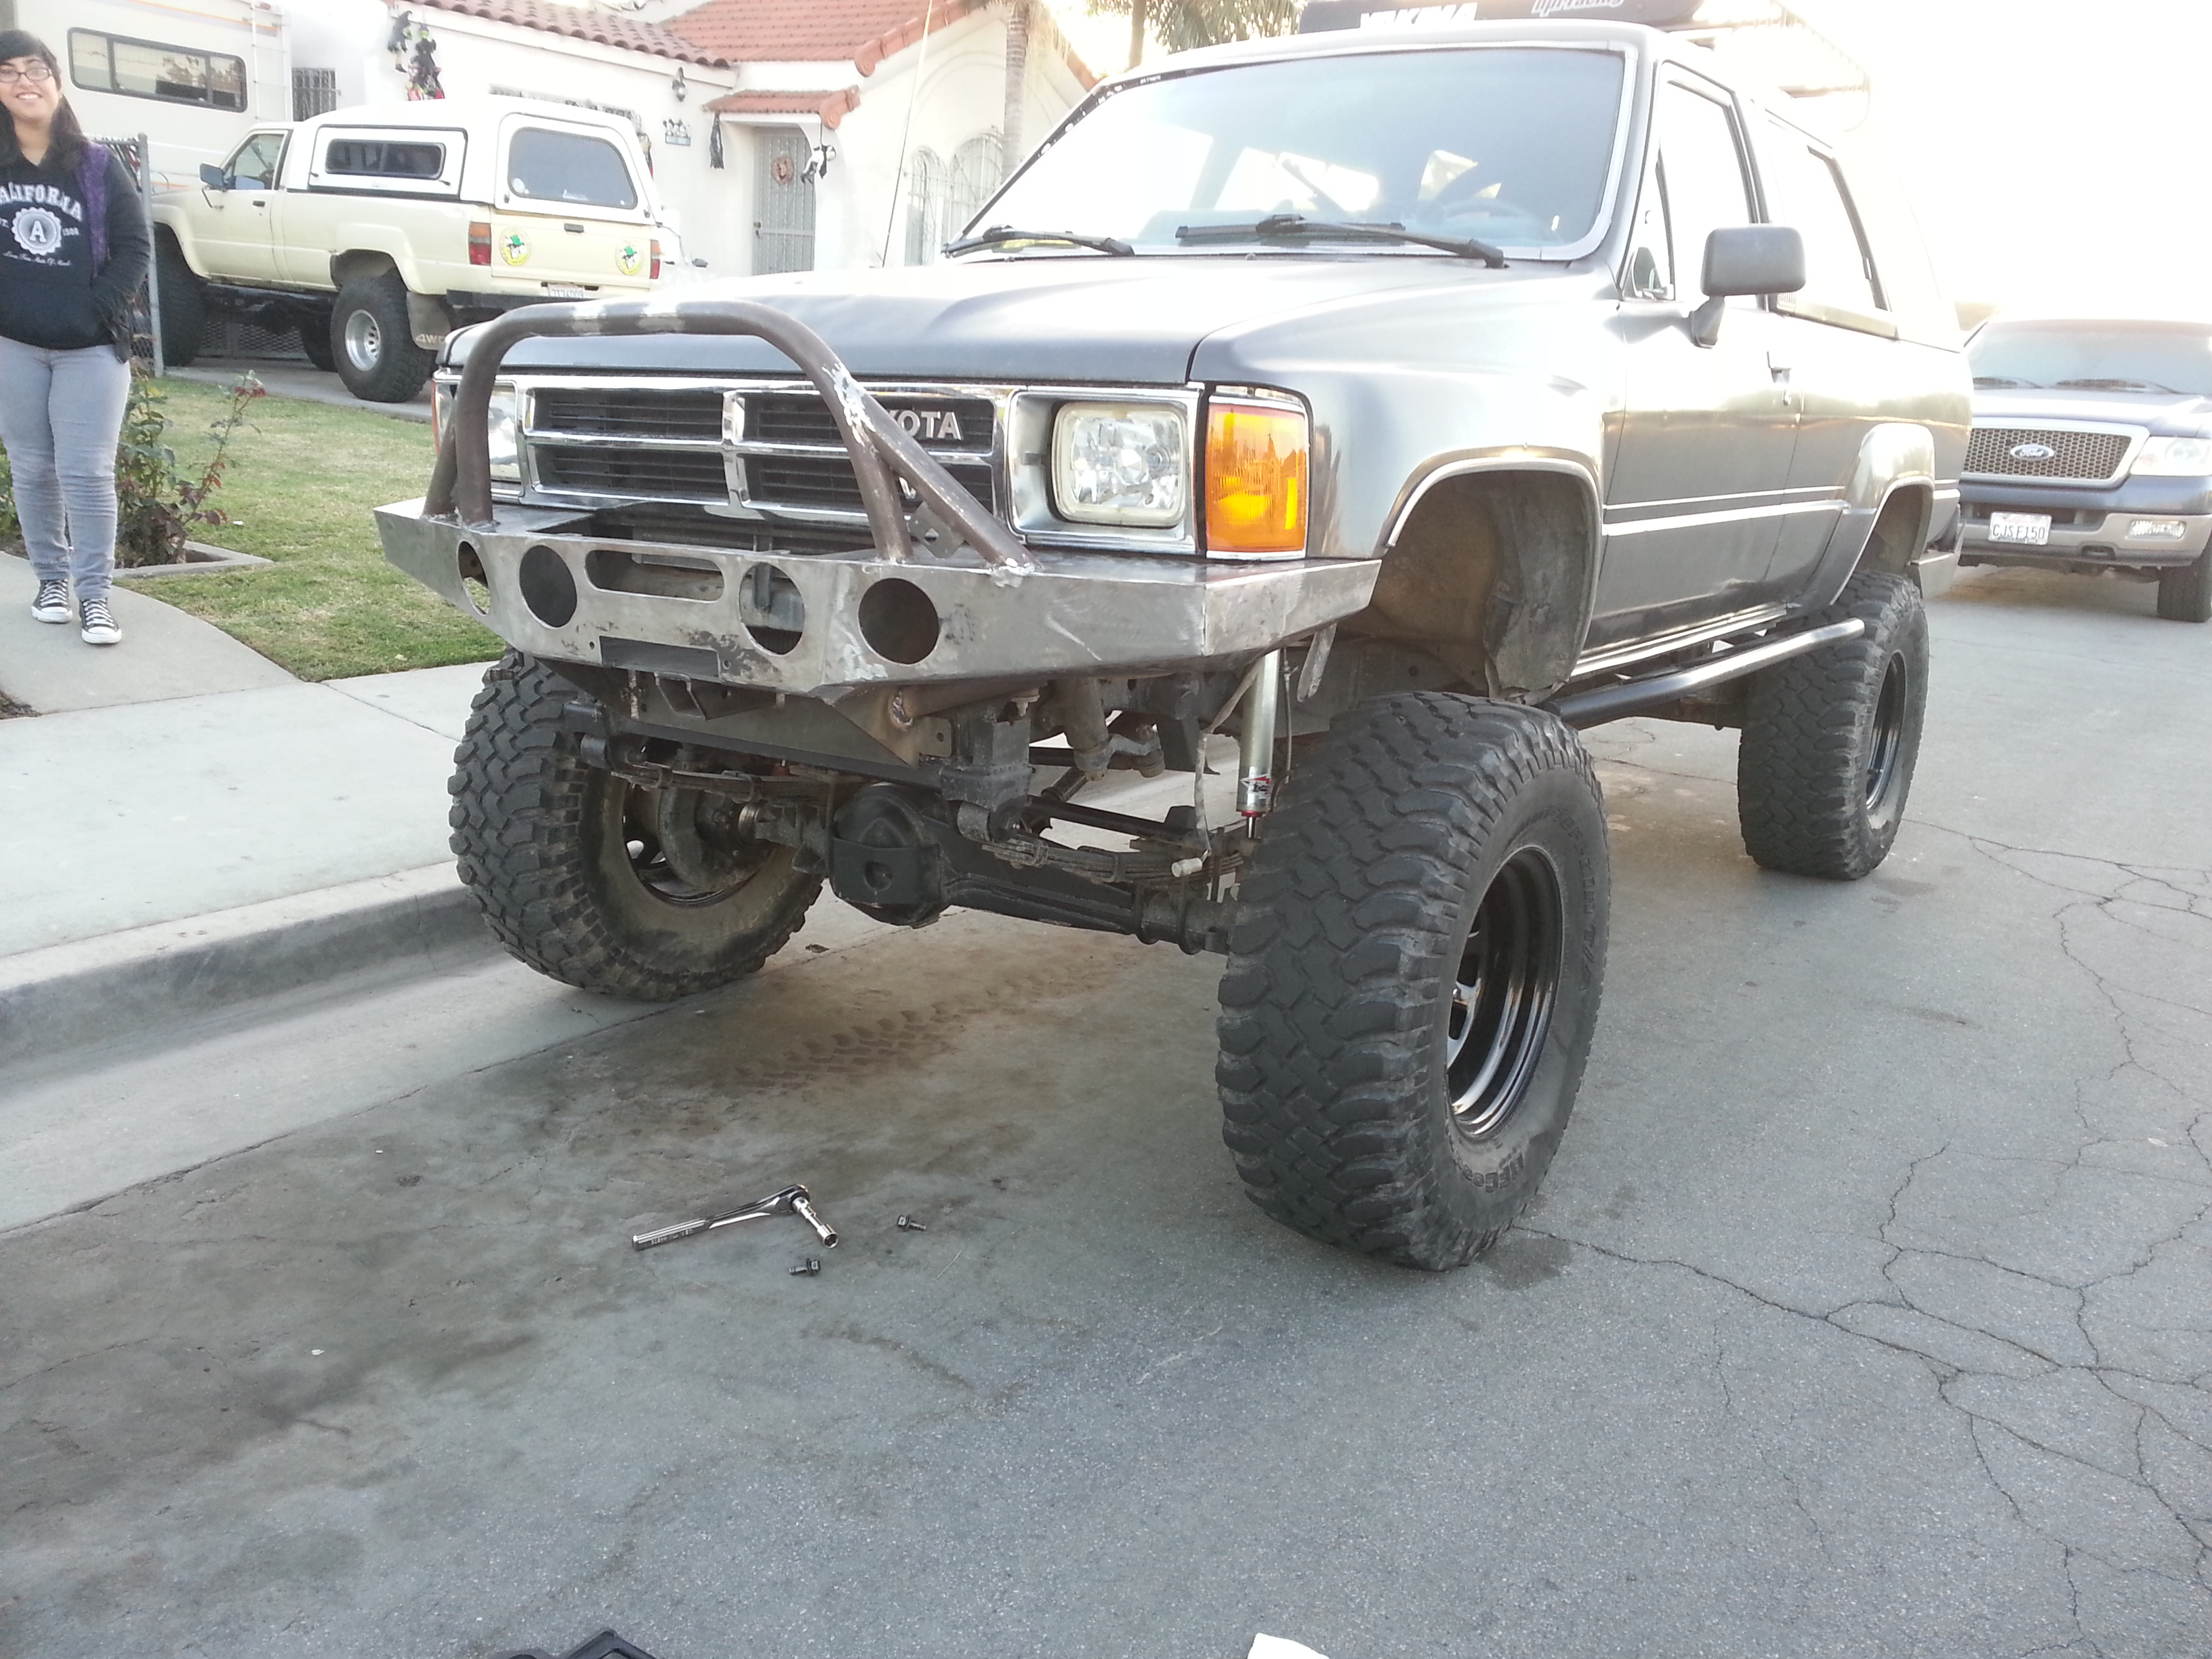
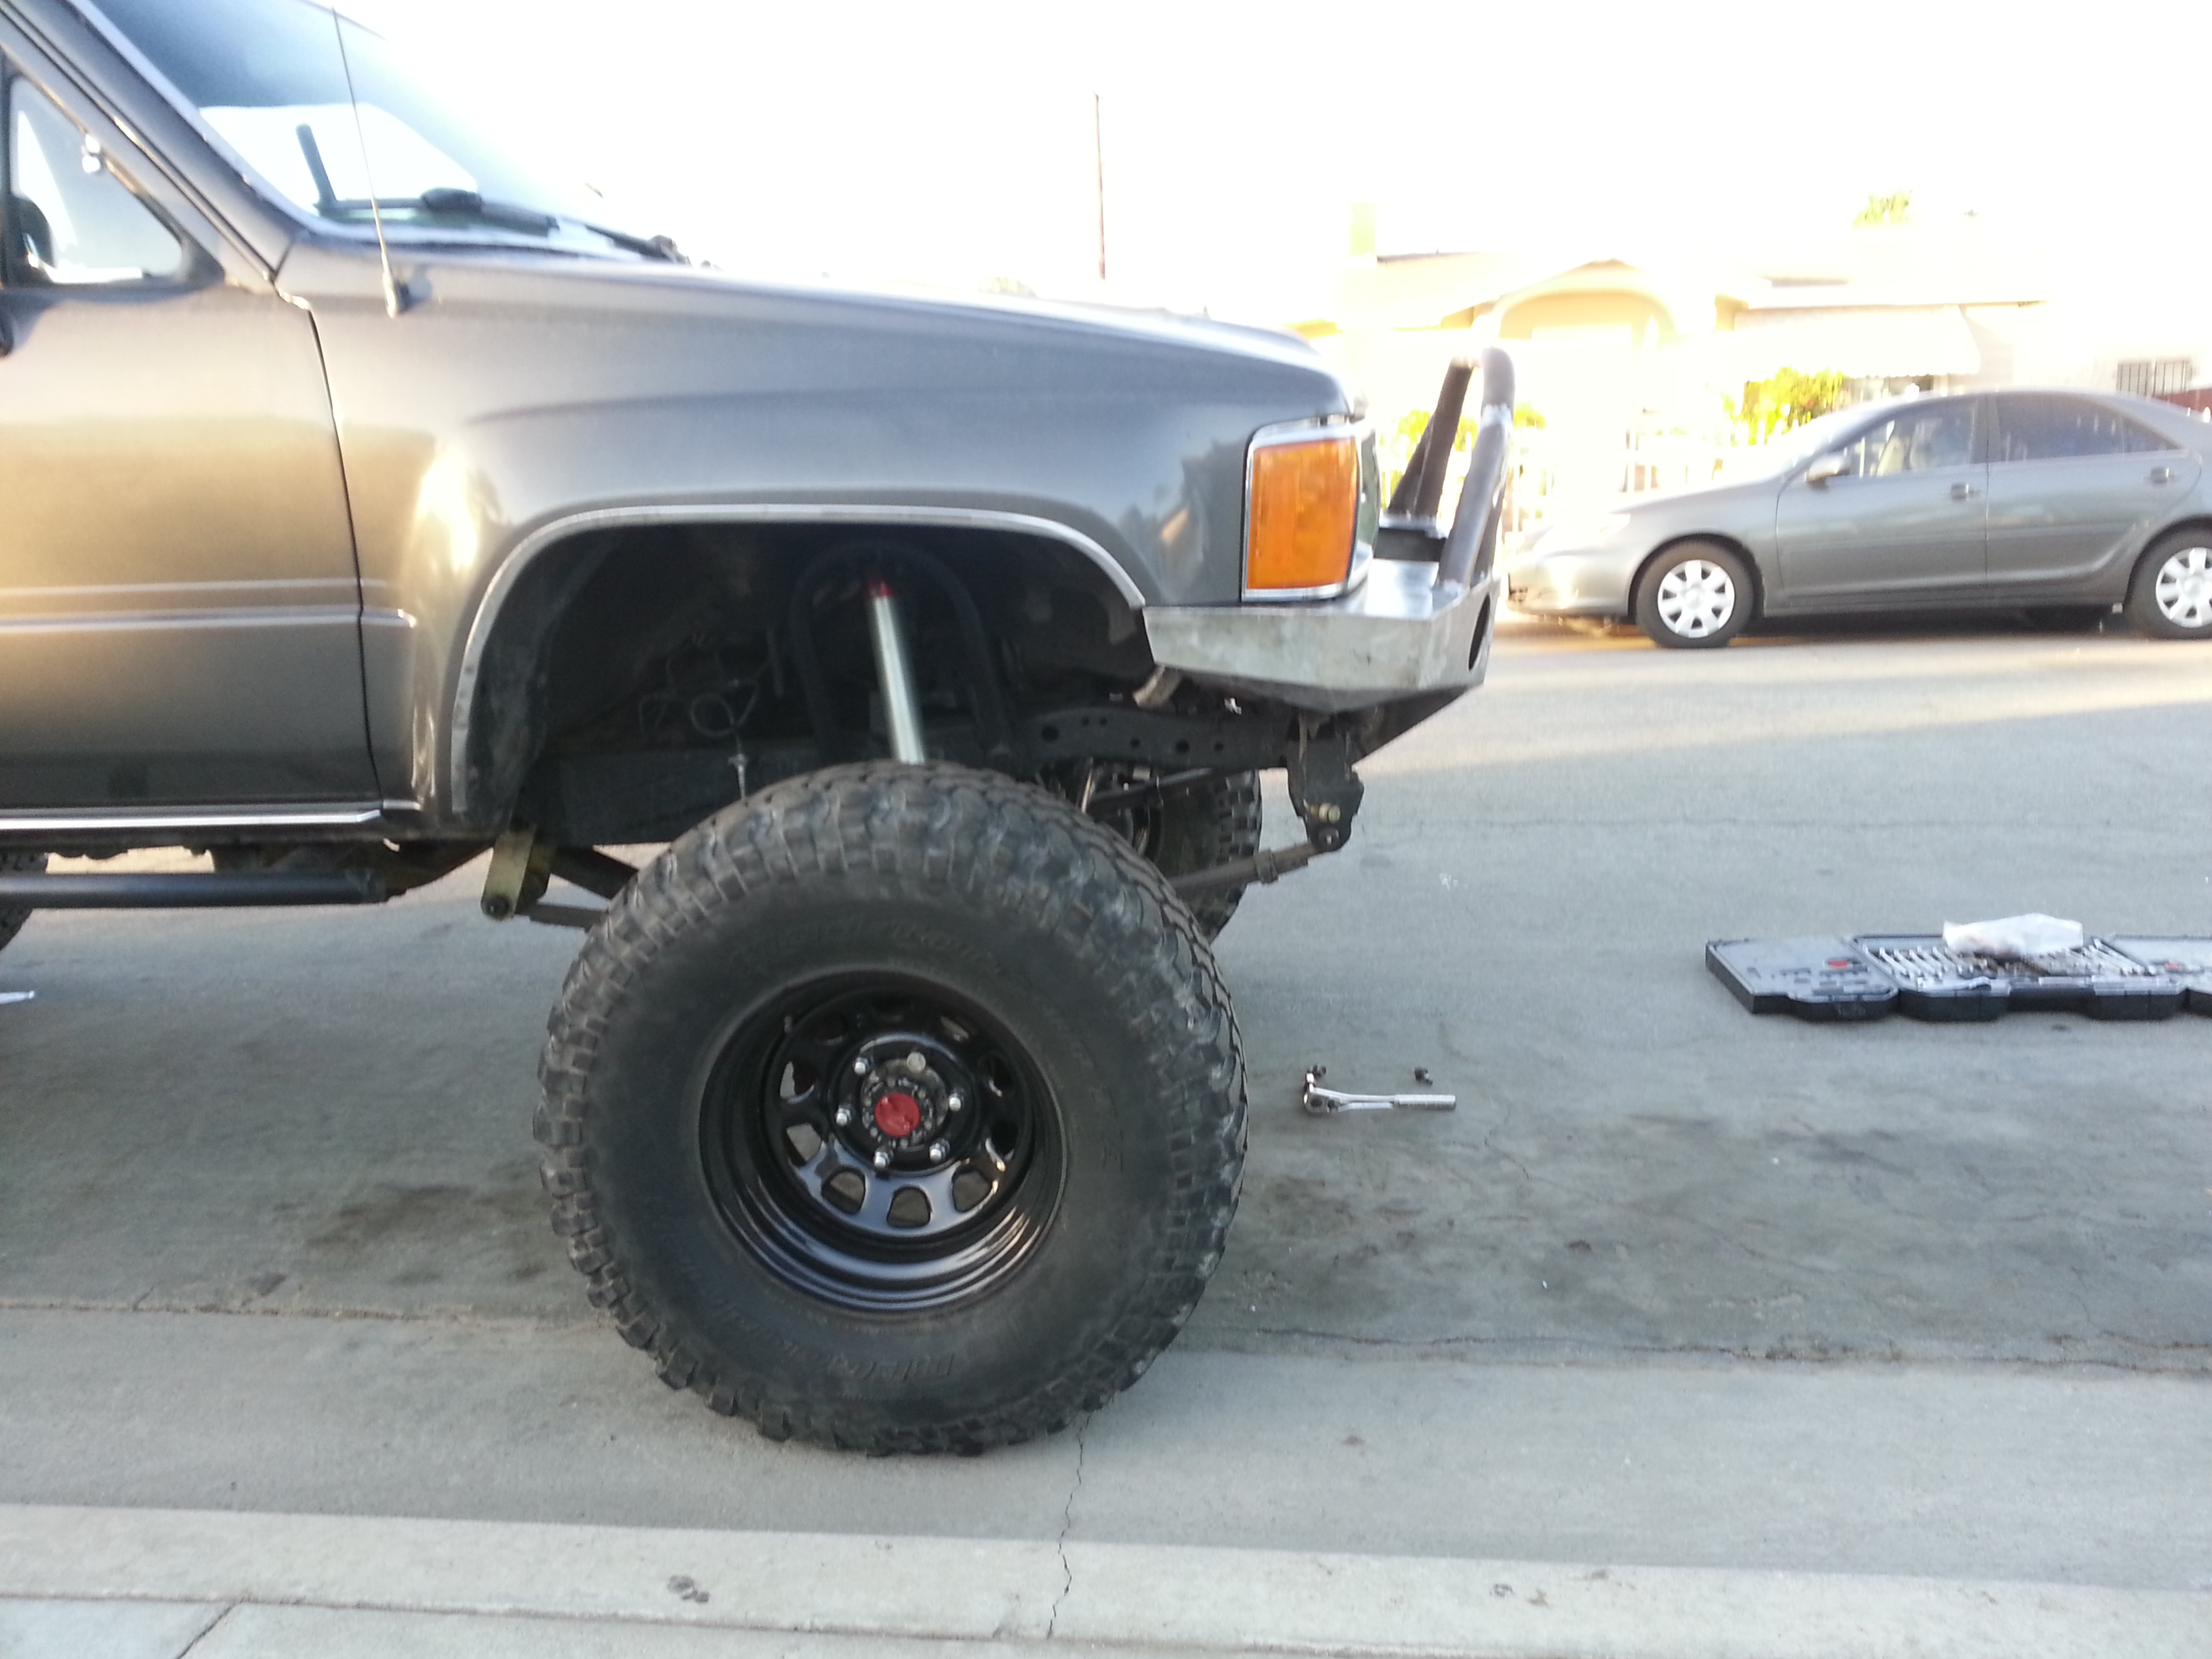
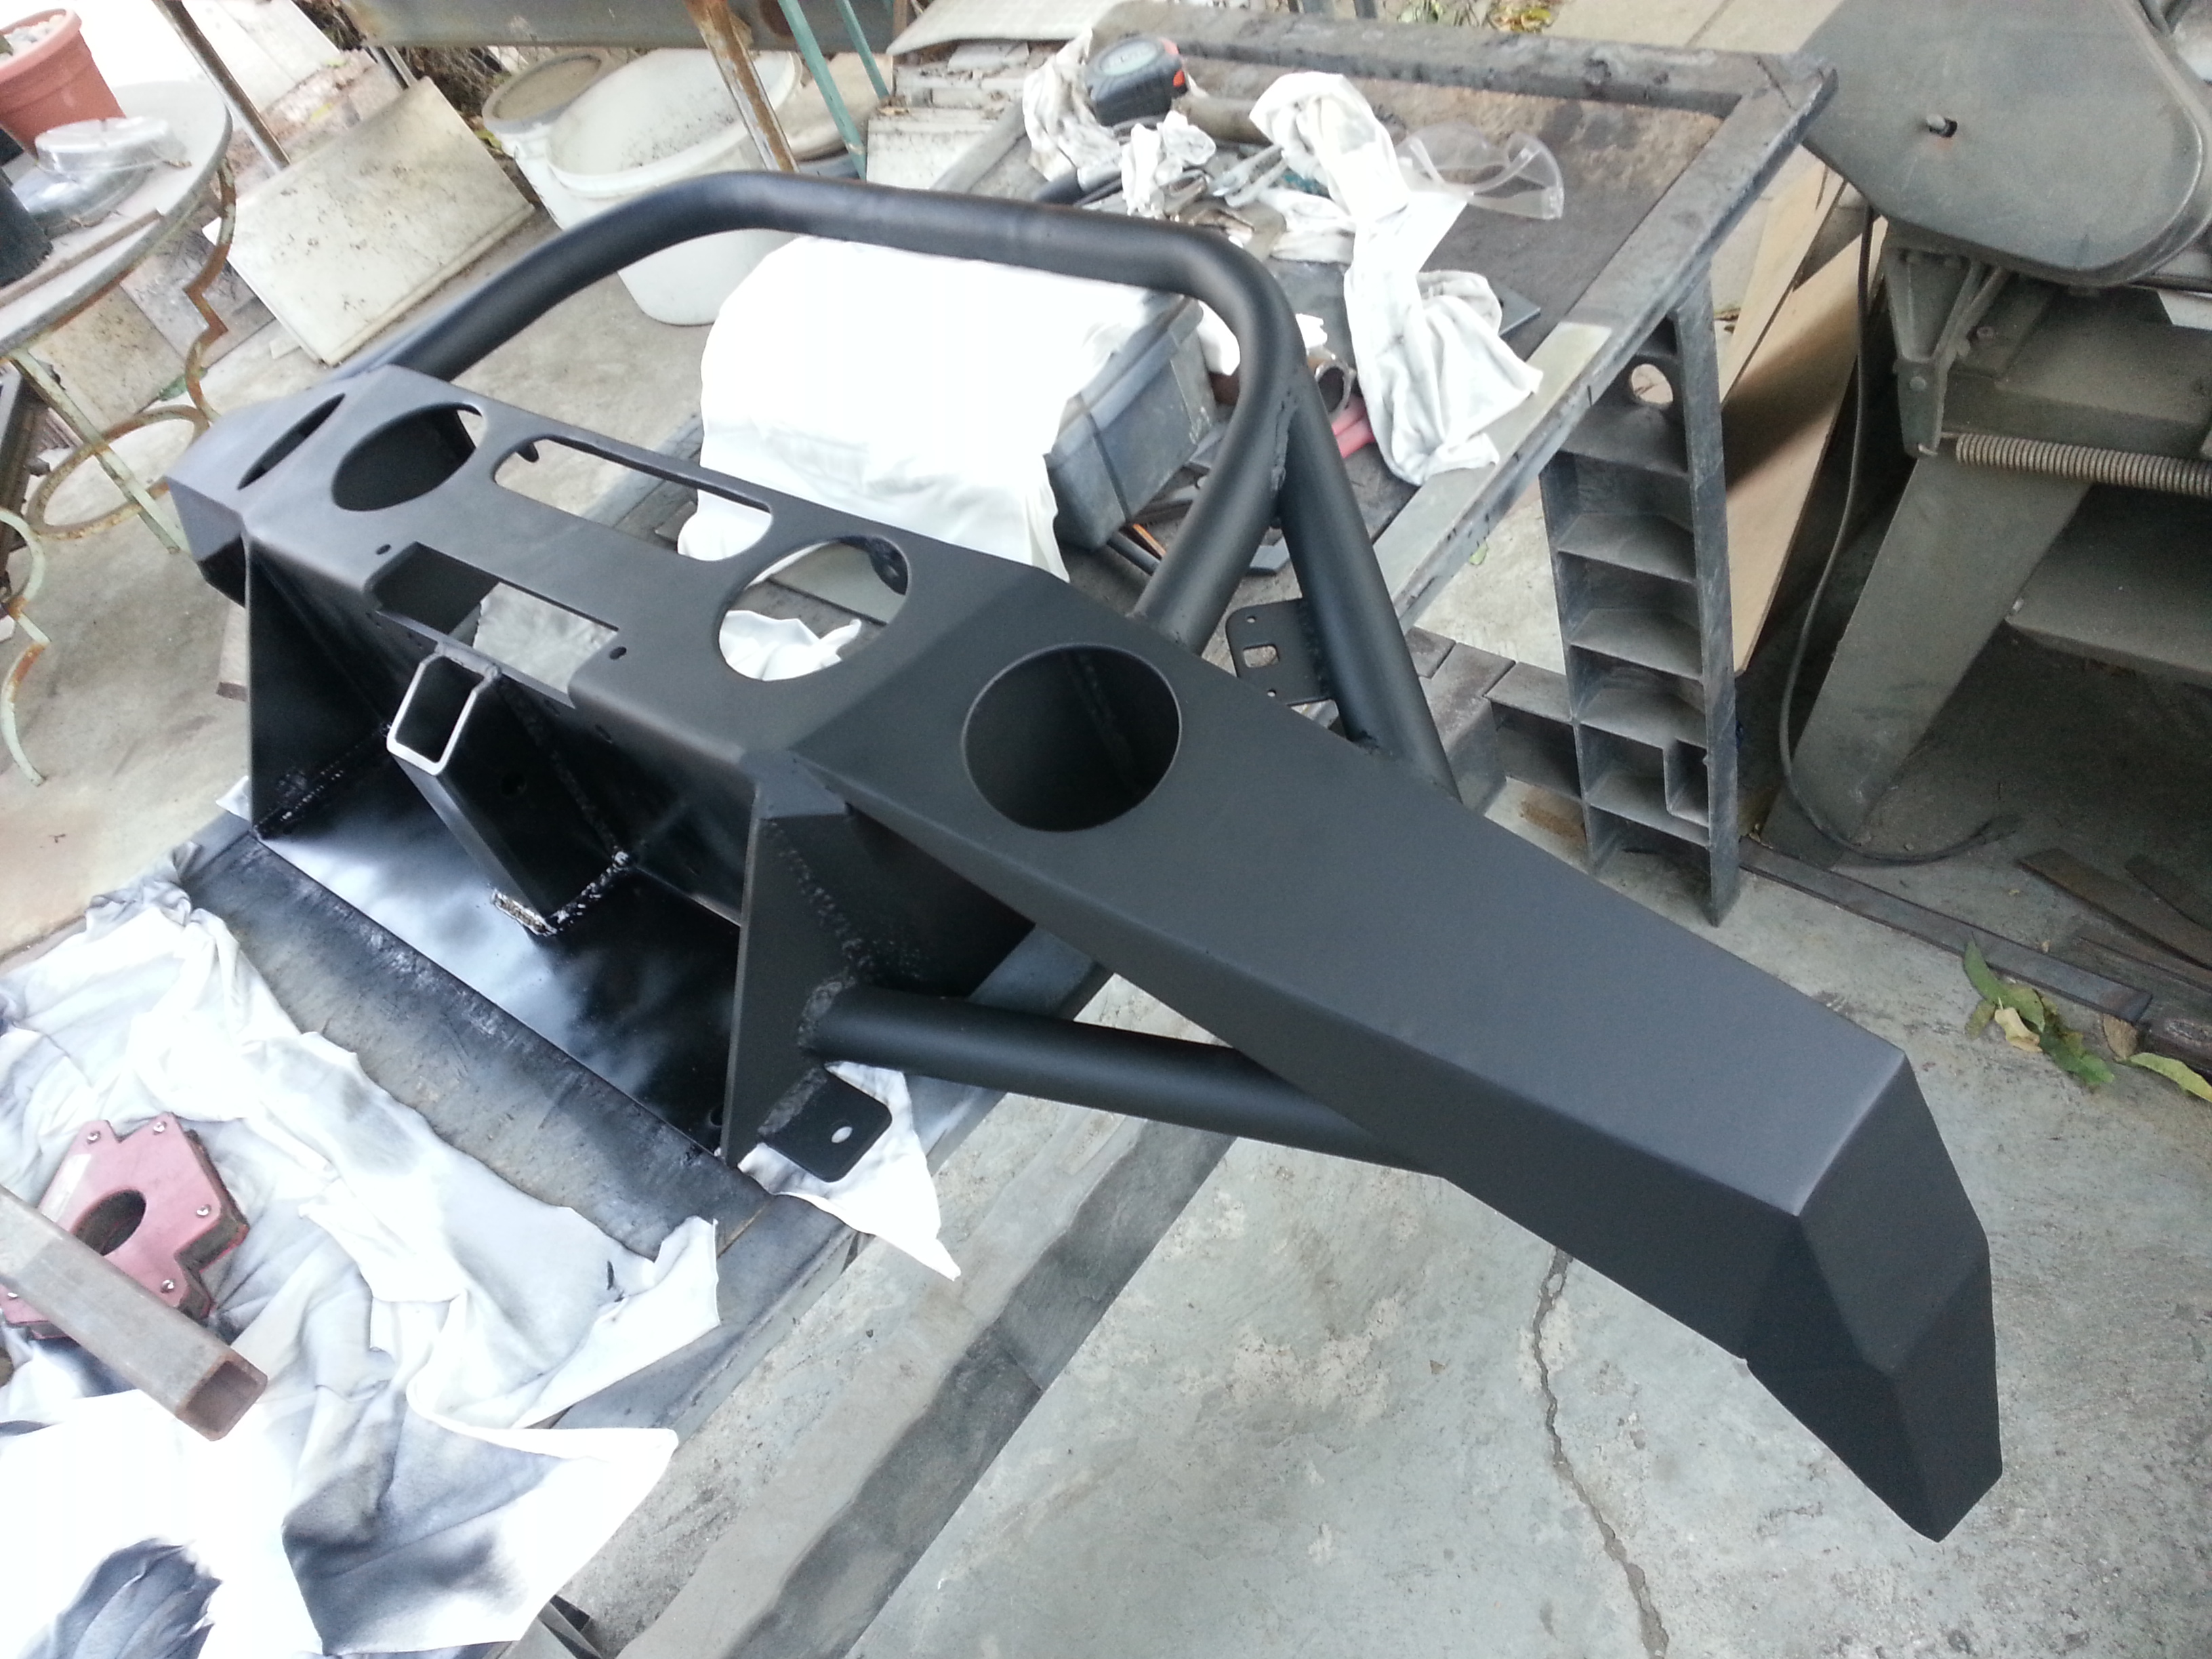
After i was done i gave the bumper one last clean up to take off surface rust and weld residue. Then i took the bumper out to the street where my truck was at to do the final fitting. Because once its painted i cant go back. Well i can but it'll really suck having to ruin the paint job.
Front:

Passenger side:


Driver side:
Close ups of the corners:
I seriously thought it was gonna be sticking out farther forward. I'm very satisfied where the bumper stayed at. Looks great
Also I'm definitely happy with how the corners came out. that was a hefty challenge to do somewhat even on both sides lol. But the part i like the best is how they go further up toward the fender. I saw that on my last trip to Big Bear i was having a big problem with my front tires rubbing on the bumper/ bumper brackets on the parts closest to both wheel wells while at full flex. This is definitely gonna help me out in that area.
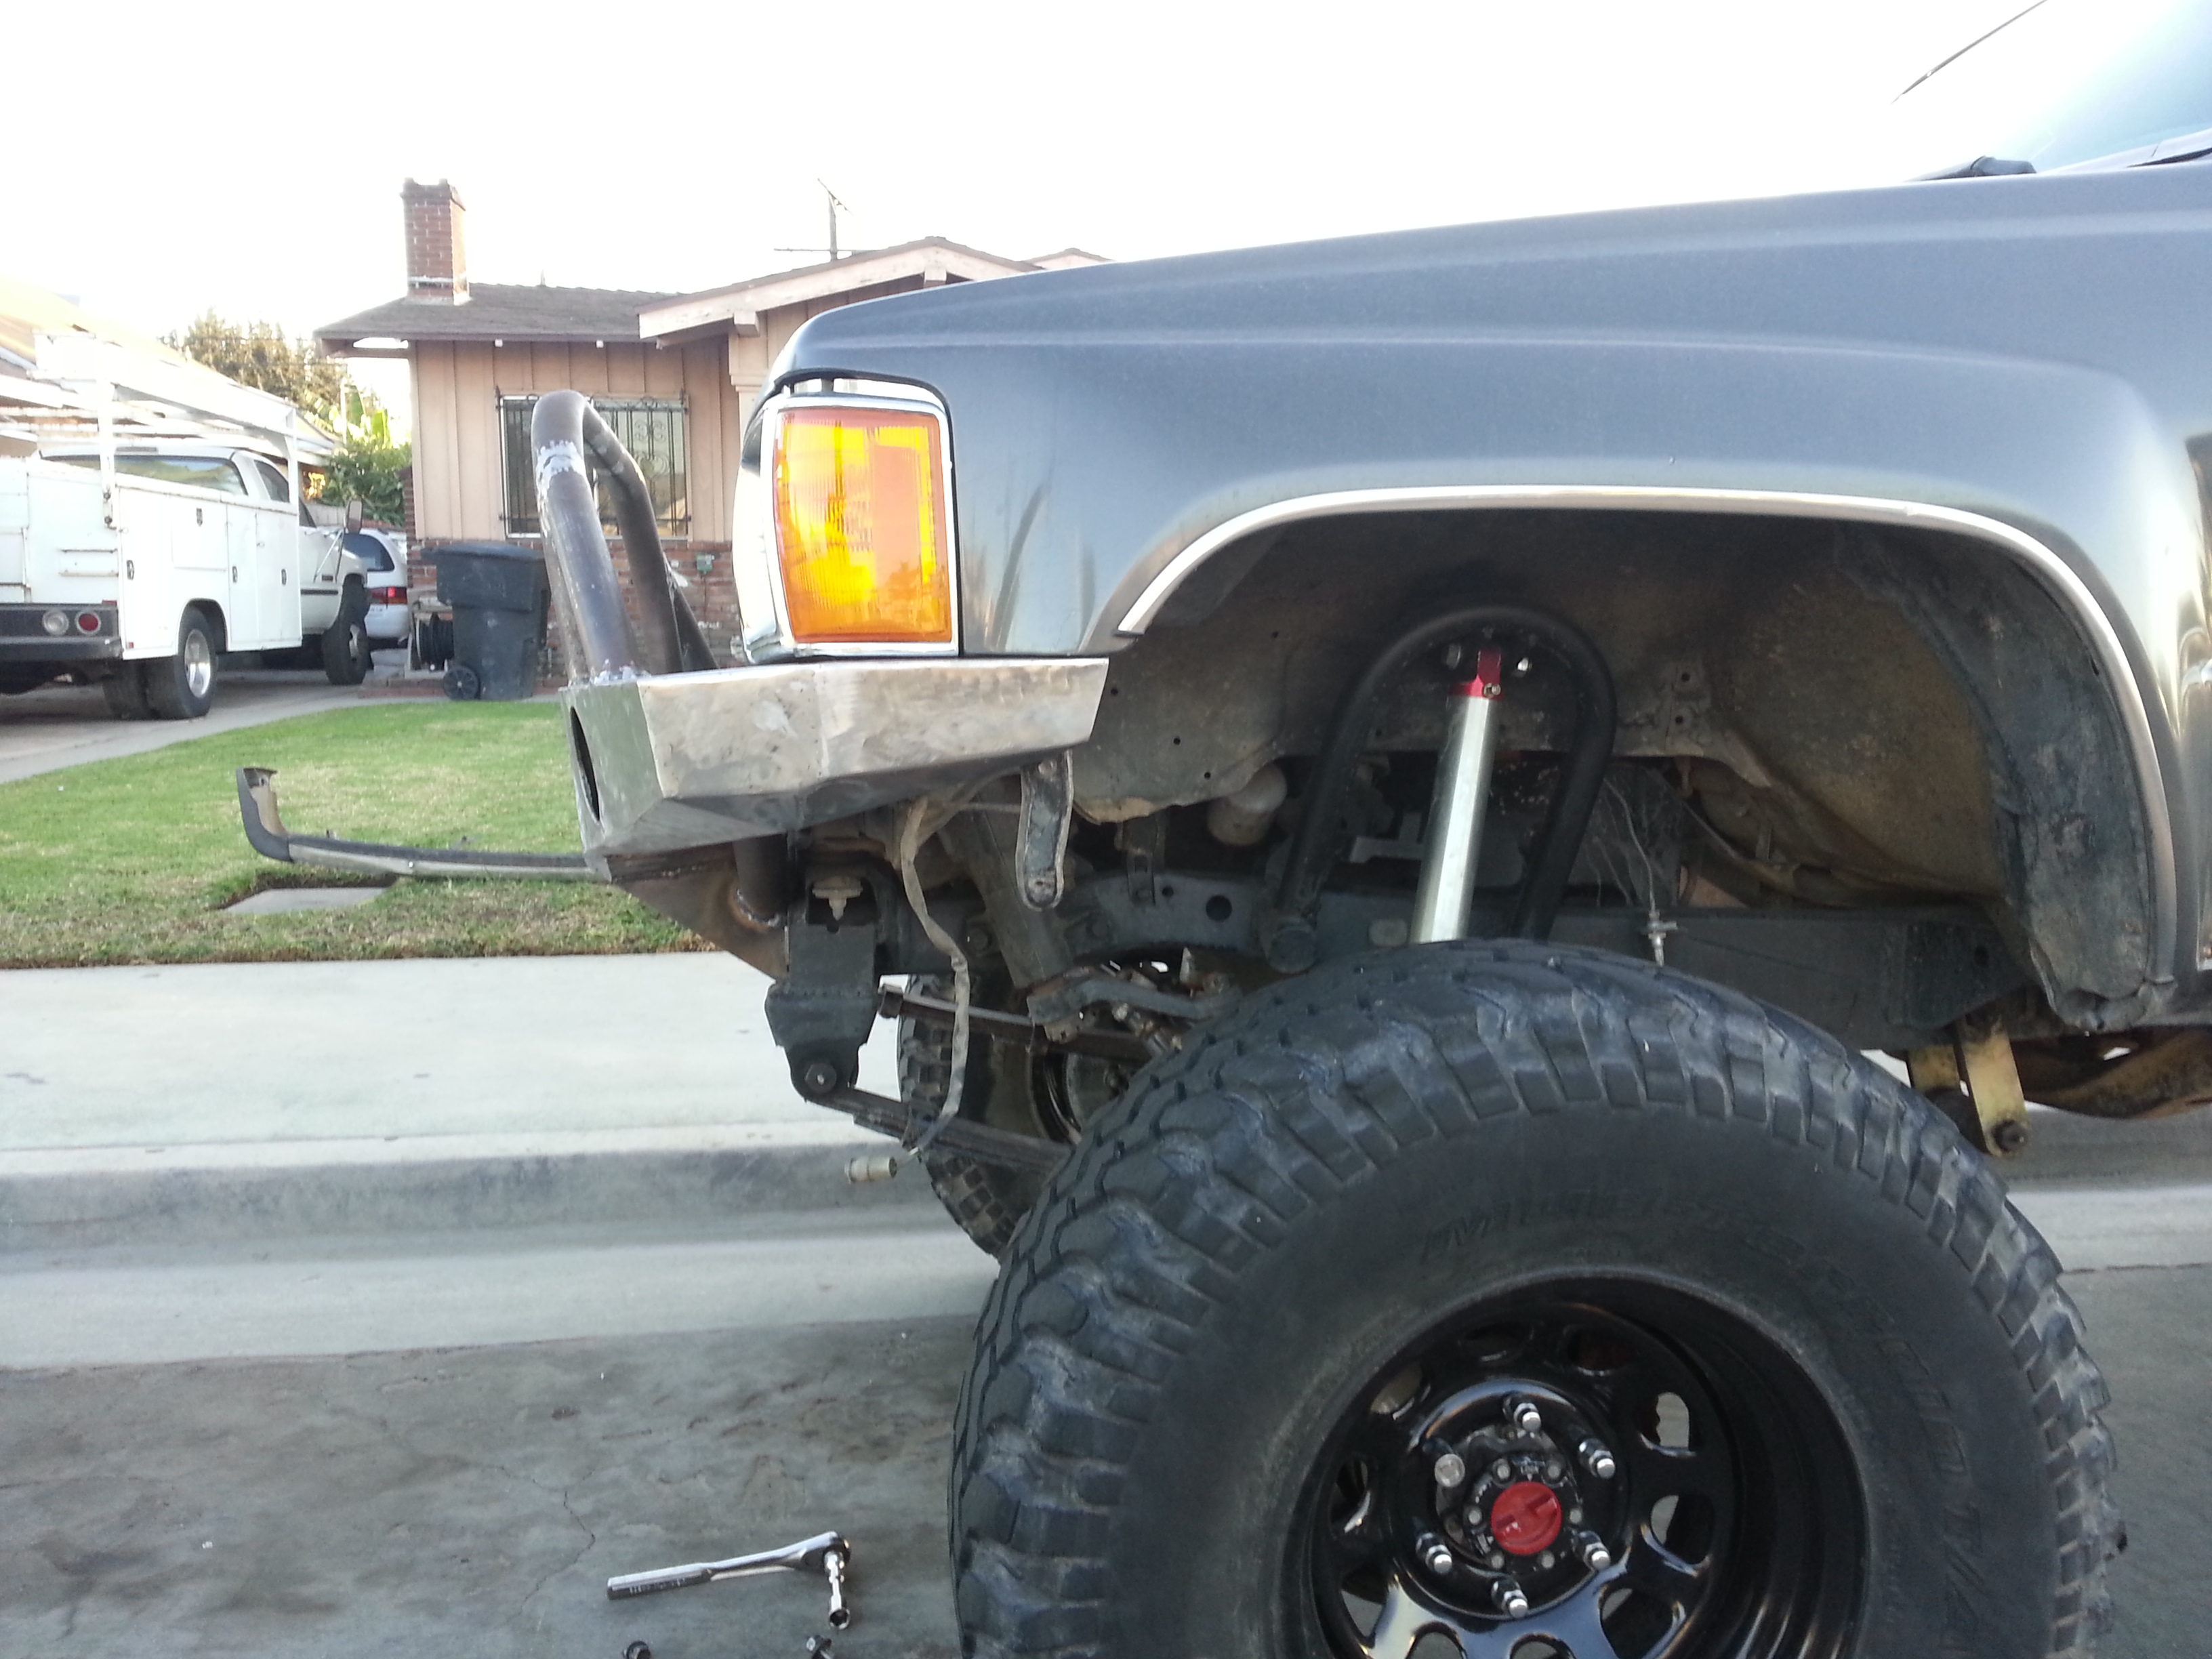
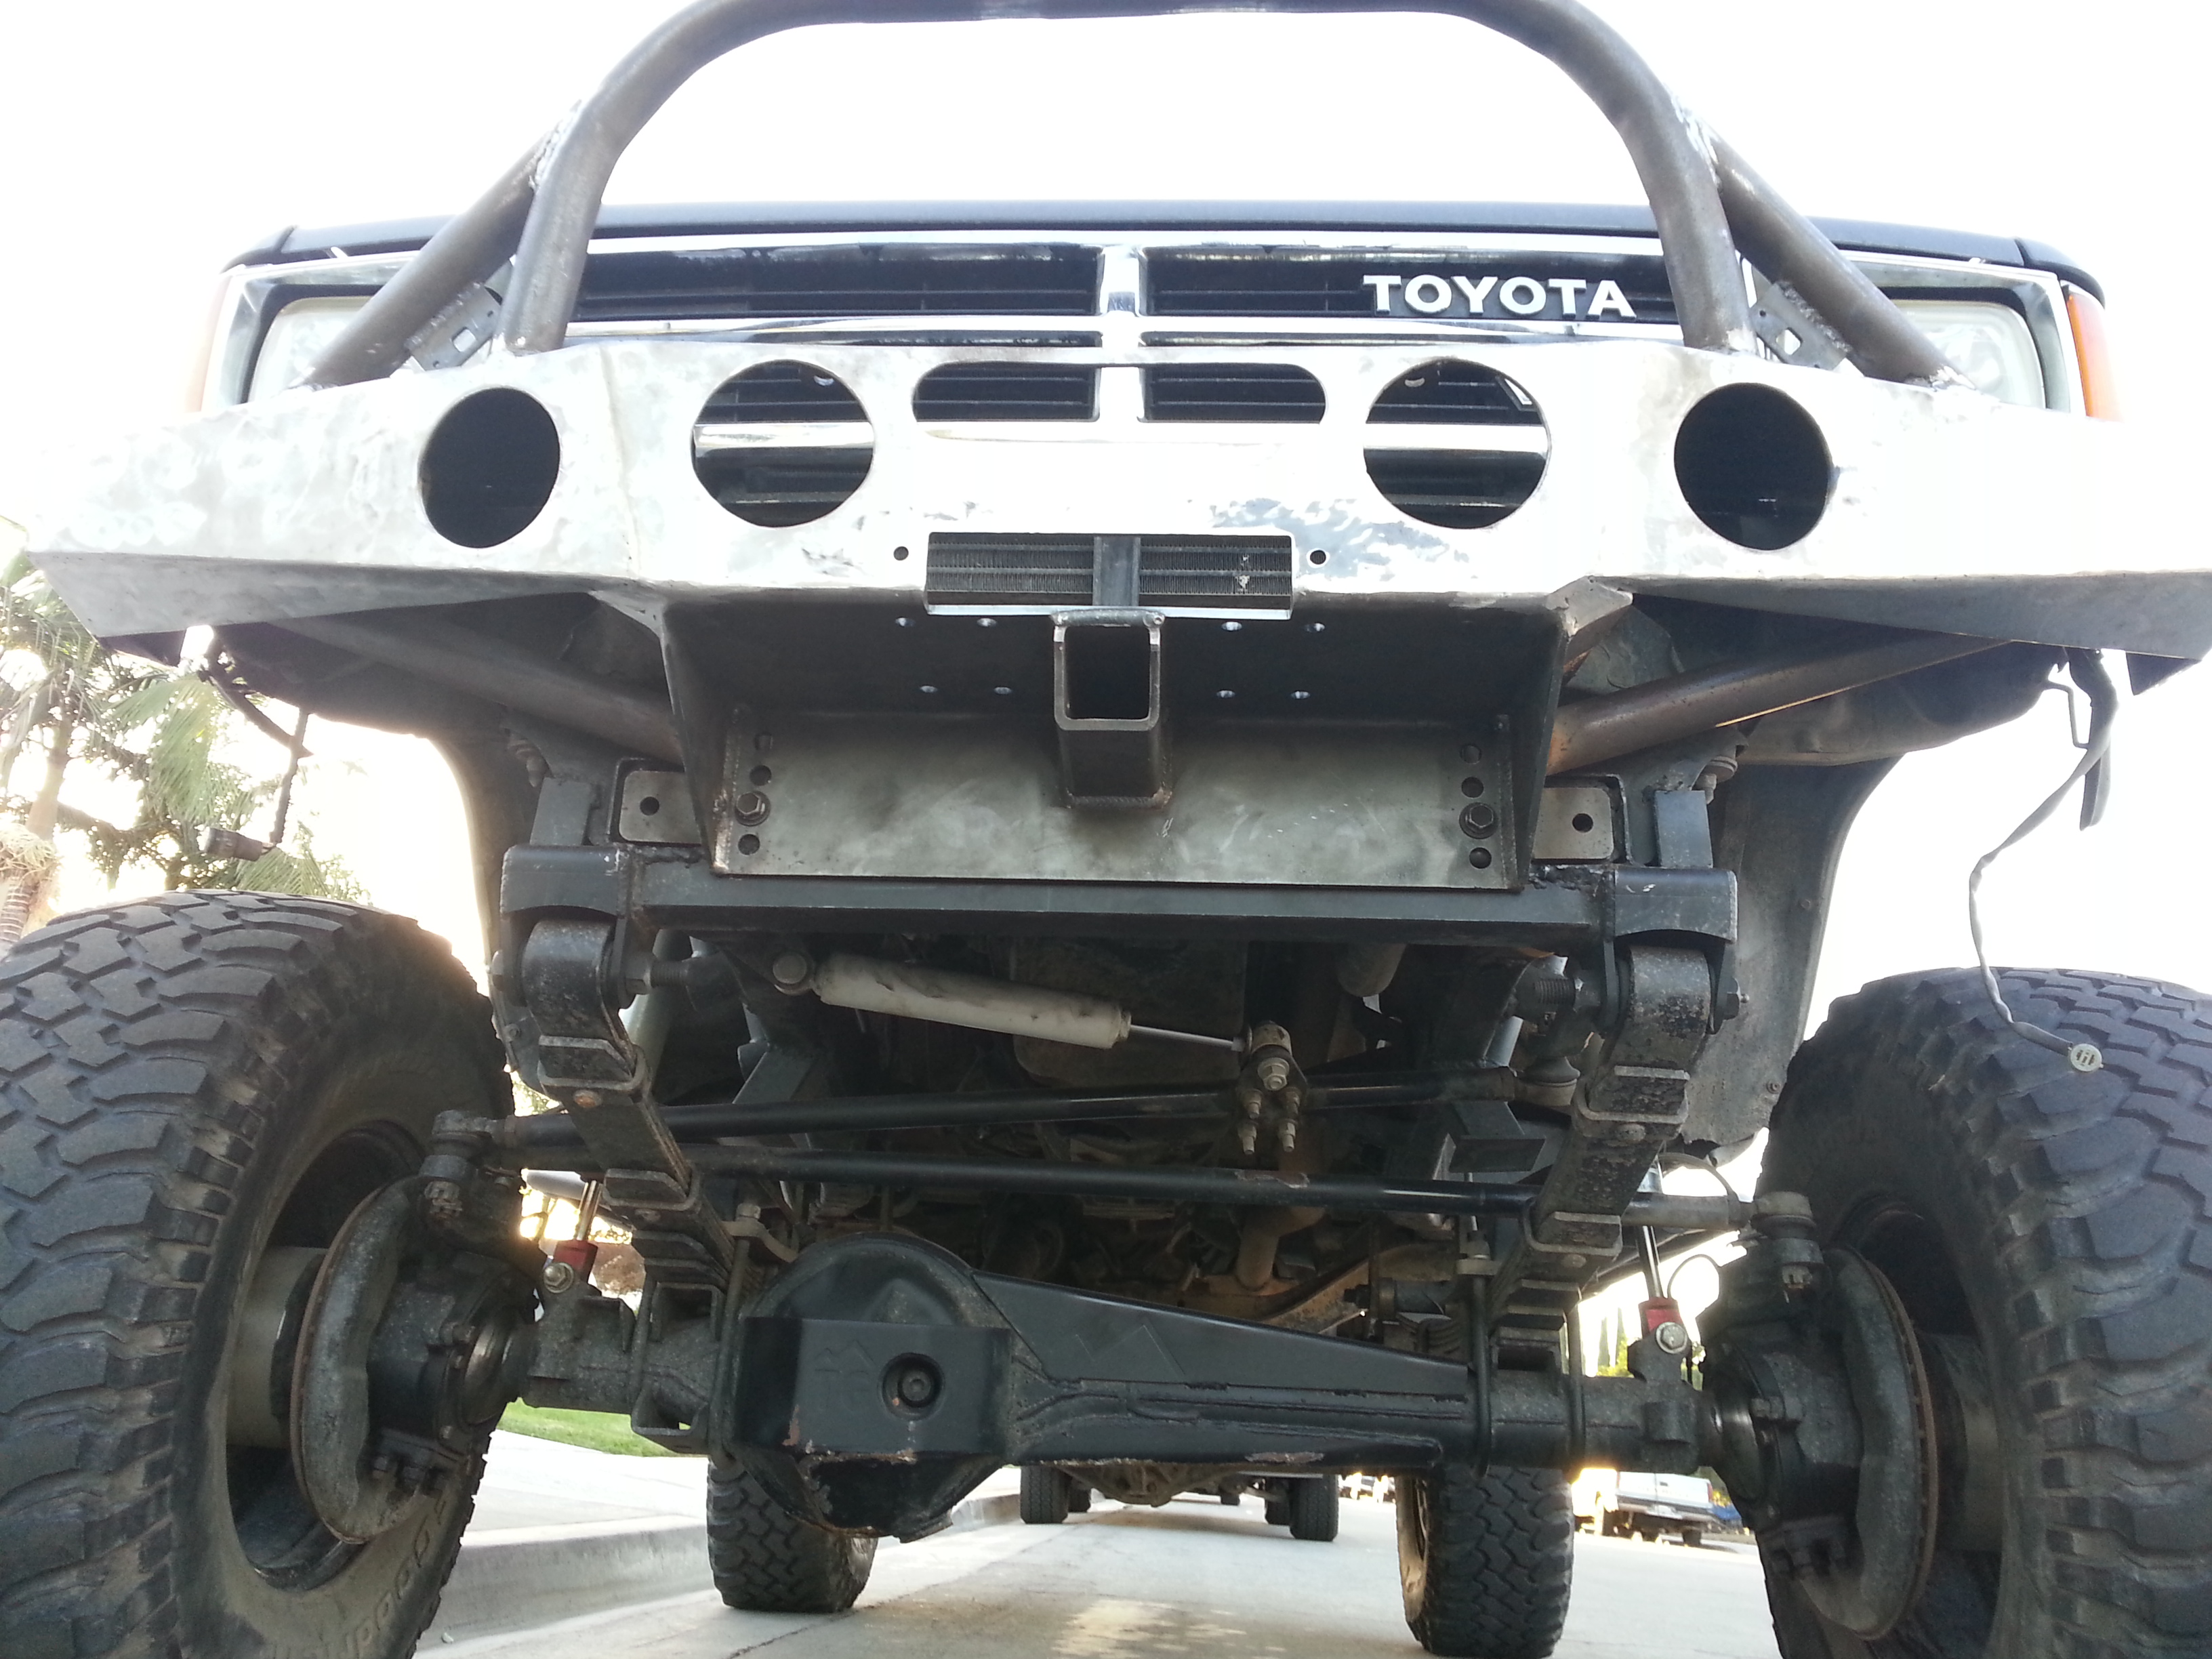
Bottom side:
Once i saw that everything was gonna come out fitting just right we unbolted it and took it to my shop table in the back yard. and then i had a surprise visit from my little helper Faby. Wish i would have taken a picture of her but oh well... next time. The sun was going down quick and i wanted to give the bumper a coat of primer all over.
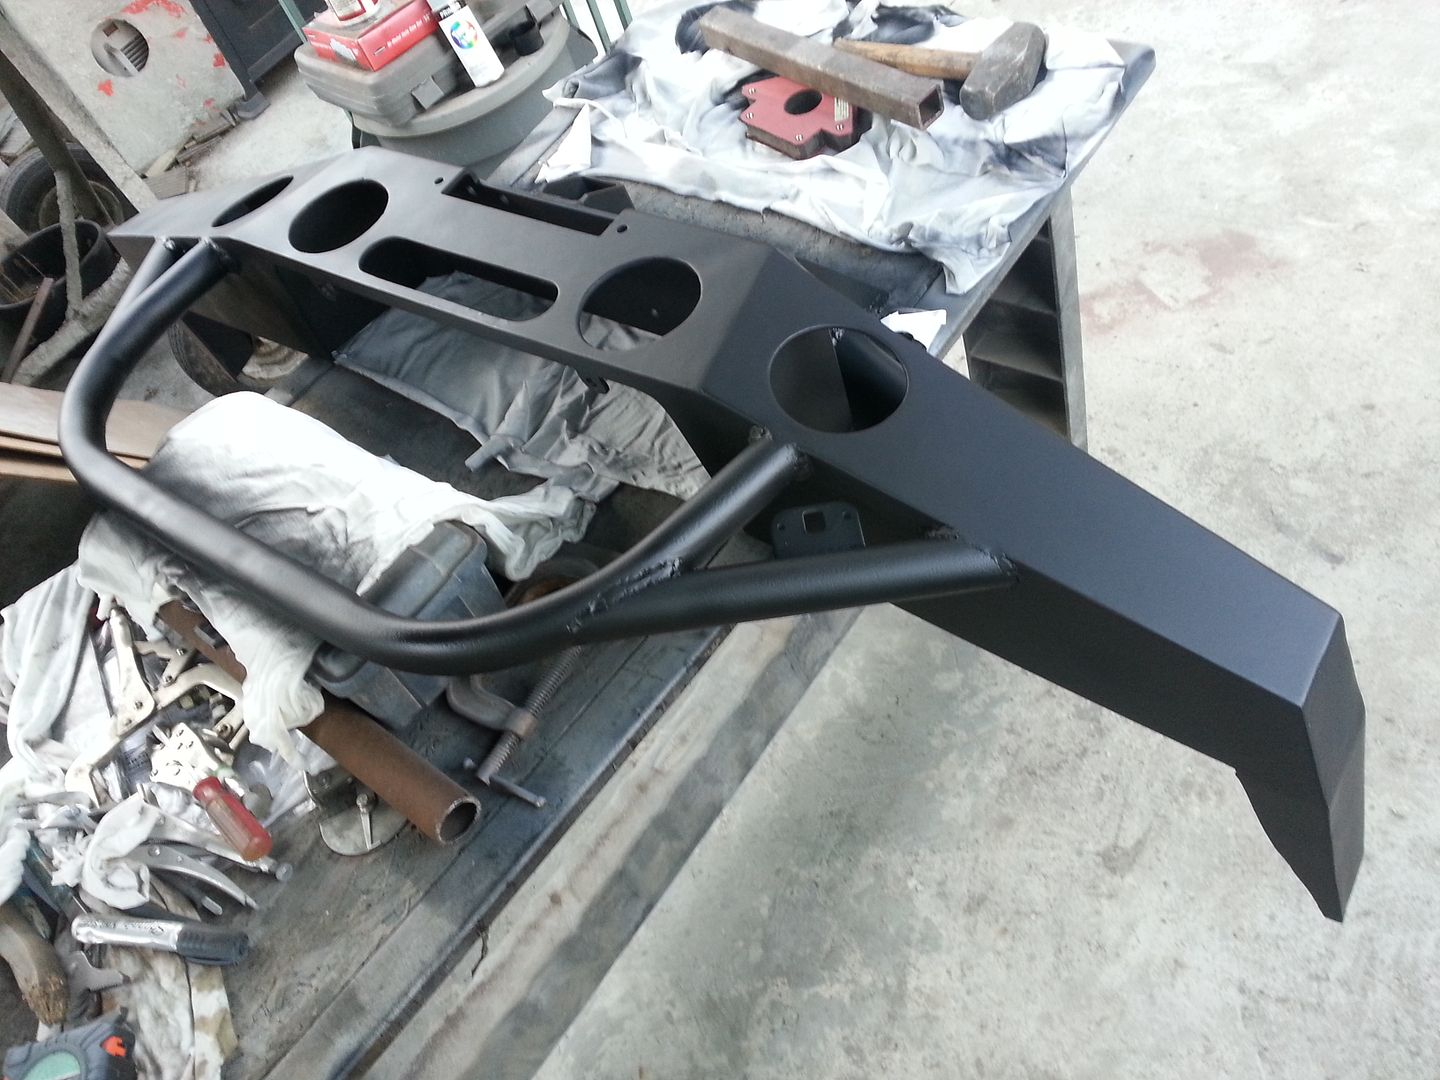
We managed to get both the back side and front side primed and here is what it looked like when we finished. We gave it about 2 coats using 2&1/3ish cans of primer
We went to go eat after to allow it to dry. Then when we got back we dropped by AutoZone to buy a couple of more cans of paint/primer. When we got back we laid the bumper on its back side and gave the whole front, bottom, and top a 3rd of primer. Used a full can. just for that.
Tomorrow i will give the back side a 3rd coat of primer using the other left over can. Then I'll paint the whole front matt black. I have 4 cans of Matt Black so i will give 2 heavy coats all around the bumper. Definitely wanna be generous with the paint. I don't want excuses of it getting scratched very easily just for any little pebble.
 Stay tuned guys. I'll keep you all updated when i get some more progress in
P.S.
*** I might actually be able to get the bumper on this weekend! YEAYAAA! *Crossing my fingers*
I cut the trail-gear light turn signal brackets in half to fit in the space where the gusset and grill guard are.

That's where i want'em

Just wanted to share a picture of my own welds. I think I've been getting much better over the past 2 projects. I have definitely had plenty of practice lol

Like it or not that's where they go now lol. No going back anymore because i welded it on both sides.

I will be wrapping the wire in some plastic flex stuff(not sure the exact name for it but its meant to shield your wires) will use heat shrink all the way up to the end of the wires then run the wires along the gusset strapped along the back side with black zip ties and down into the holes i made on the top side of the bumper.

After i was done i gave the bumper one last clean up to take off surface rust and weld residue. Then i took the bumper out to the street where my truck was at to do the final fitting. Because once its painted i cant go back. Well i can but it'll really suck having to ruin the paint job.
Front:

Passenger side:


Driver side:


Close ups of the corners:
I seriously thought it was gonna be sticking out farther forward. I'm very satisfied where the bumper stayed at. Looks great

Also I'm definitely happy with how the corners came out. that was a hefty challenge to do somewhat even on both sides lol. But the part i like the best is how they go further up toward the fender. I saw that on my last trip to Big Bear i was having a big problem with my front tires rubbing on the bumper/ bumper brackets on the parts closest to both wheel wells while at full flex. This is definitely gonna help me out in that area.

Bottom side:

Once i saw that everything was gonna come out fitting just right we unbolted it and took it to my shop table in the back yard. and then i had a surprise visit from my little helper Faby. Wish i would have taken a picture of her but oh well... next time. The sun was going down quick and i wanted to give the bumper a coat of primer all over.
We managed to get both the back side and front side primed and here is what it looked like when we finished. We gave it about 2 coats using 2&1/3ish cans of primer


We went to go eat after to allow it to dry. Then when we got back we dropped by AutoZone to buy a couple of more cans of paint/primer. When we got back we laid the bumper on its back side and gave the whole front, bottom, and top a 3rd of primer. Used a full can. just for that.
Tomorrow i will give the back side a 3rd coat of primer using the other left over can. Then I'll paint the whole front matt black. I have 4 cans of Matt Black so i will give 2 heavy coats all around the bumper. Definitely wanna be generous with the paint. I don't want excuses of it getting scratched very easily just for any little pebble.
Stay tuned guys. I'll keep you all updated when i get some more progress in P.S.
*** I might actually be able to get the bumper on this weekend! YEAYAAA! *Crossing my fingers*
 Oct 31, 2013 | 11:54 AM
#2211
Dang, that bumper looks so good on there! Awesome job, I think you've inspired me to build my own plate bumper, After I finish my offroad camping trailer project, lol. After seeing where you mounted your turn signal mounts, I think It will look really good, plus like you said they will be out of harms way! As a suggestion you could always add some LED lights to your factory driving/parking lights and turn them into functioning turn signals. That's what I did, so that people can see your turn signal from the side angle better, since mine were really small and mounted on the front bumper they weren't very visible from the side. Can't wait to see it painted!
Last edited by rustED; Oct 31, 2013 at 11:55 AM.
 Oct 31, 2013 | 06:07 PM
#2215
Thread Starter
Registered User
Joined: Apr 2012
Posts: 2,817
Likes: 2
From: Los Angeles CA
Replies
thank you Will.
Dang, that bumper looks so good on there! Awesome job, I think you've inspired me to build my own plate bumper, After I finish my offroad camping trailer project, lol. After seeing where you mounted your turn signal mounts, I think It will look really good, plus like you said they will be out of harms way! As a suggestion you could always add some LED lights to your factory driving/parking lights and turn them into functioning turn signals. That's what I did, so that people can see your turn signal from the side angle better, since mine were really small and mounted on the front bumper they weren't very visible from the side. Can't wait to see it painted!
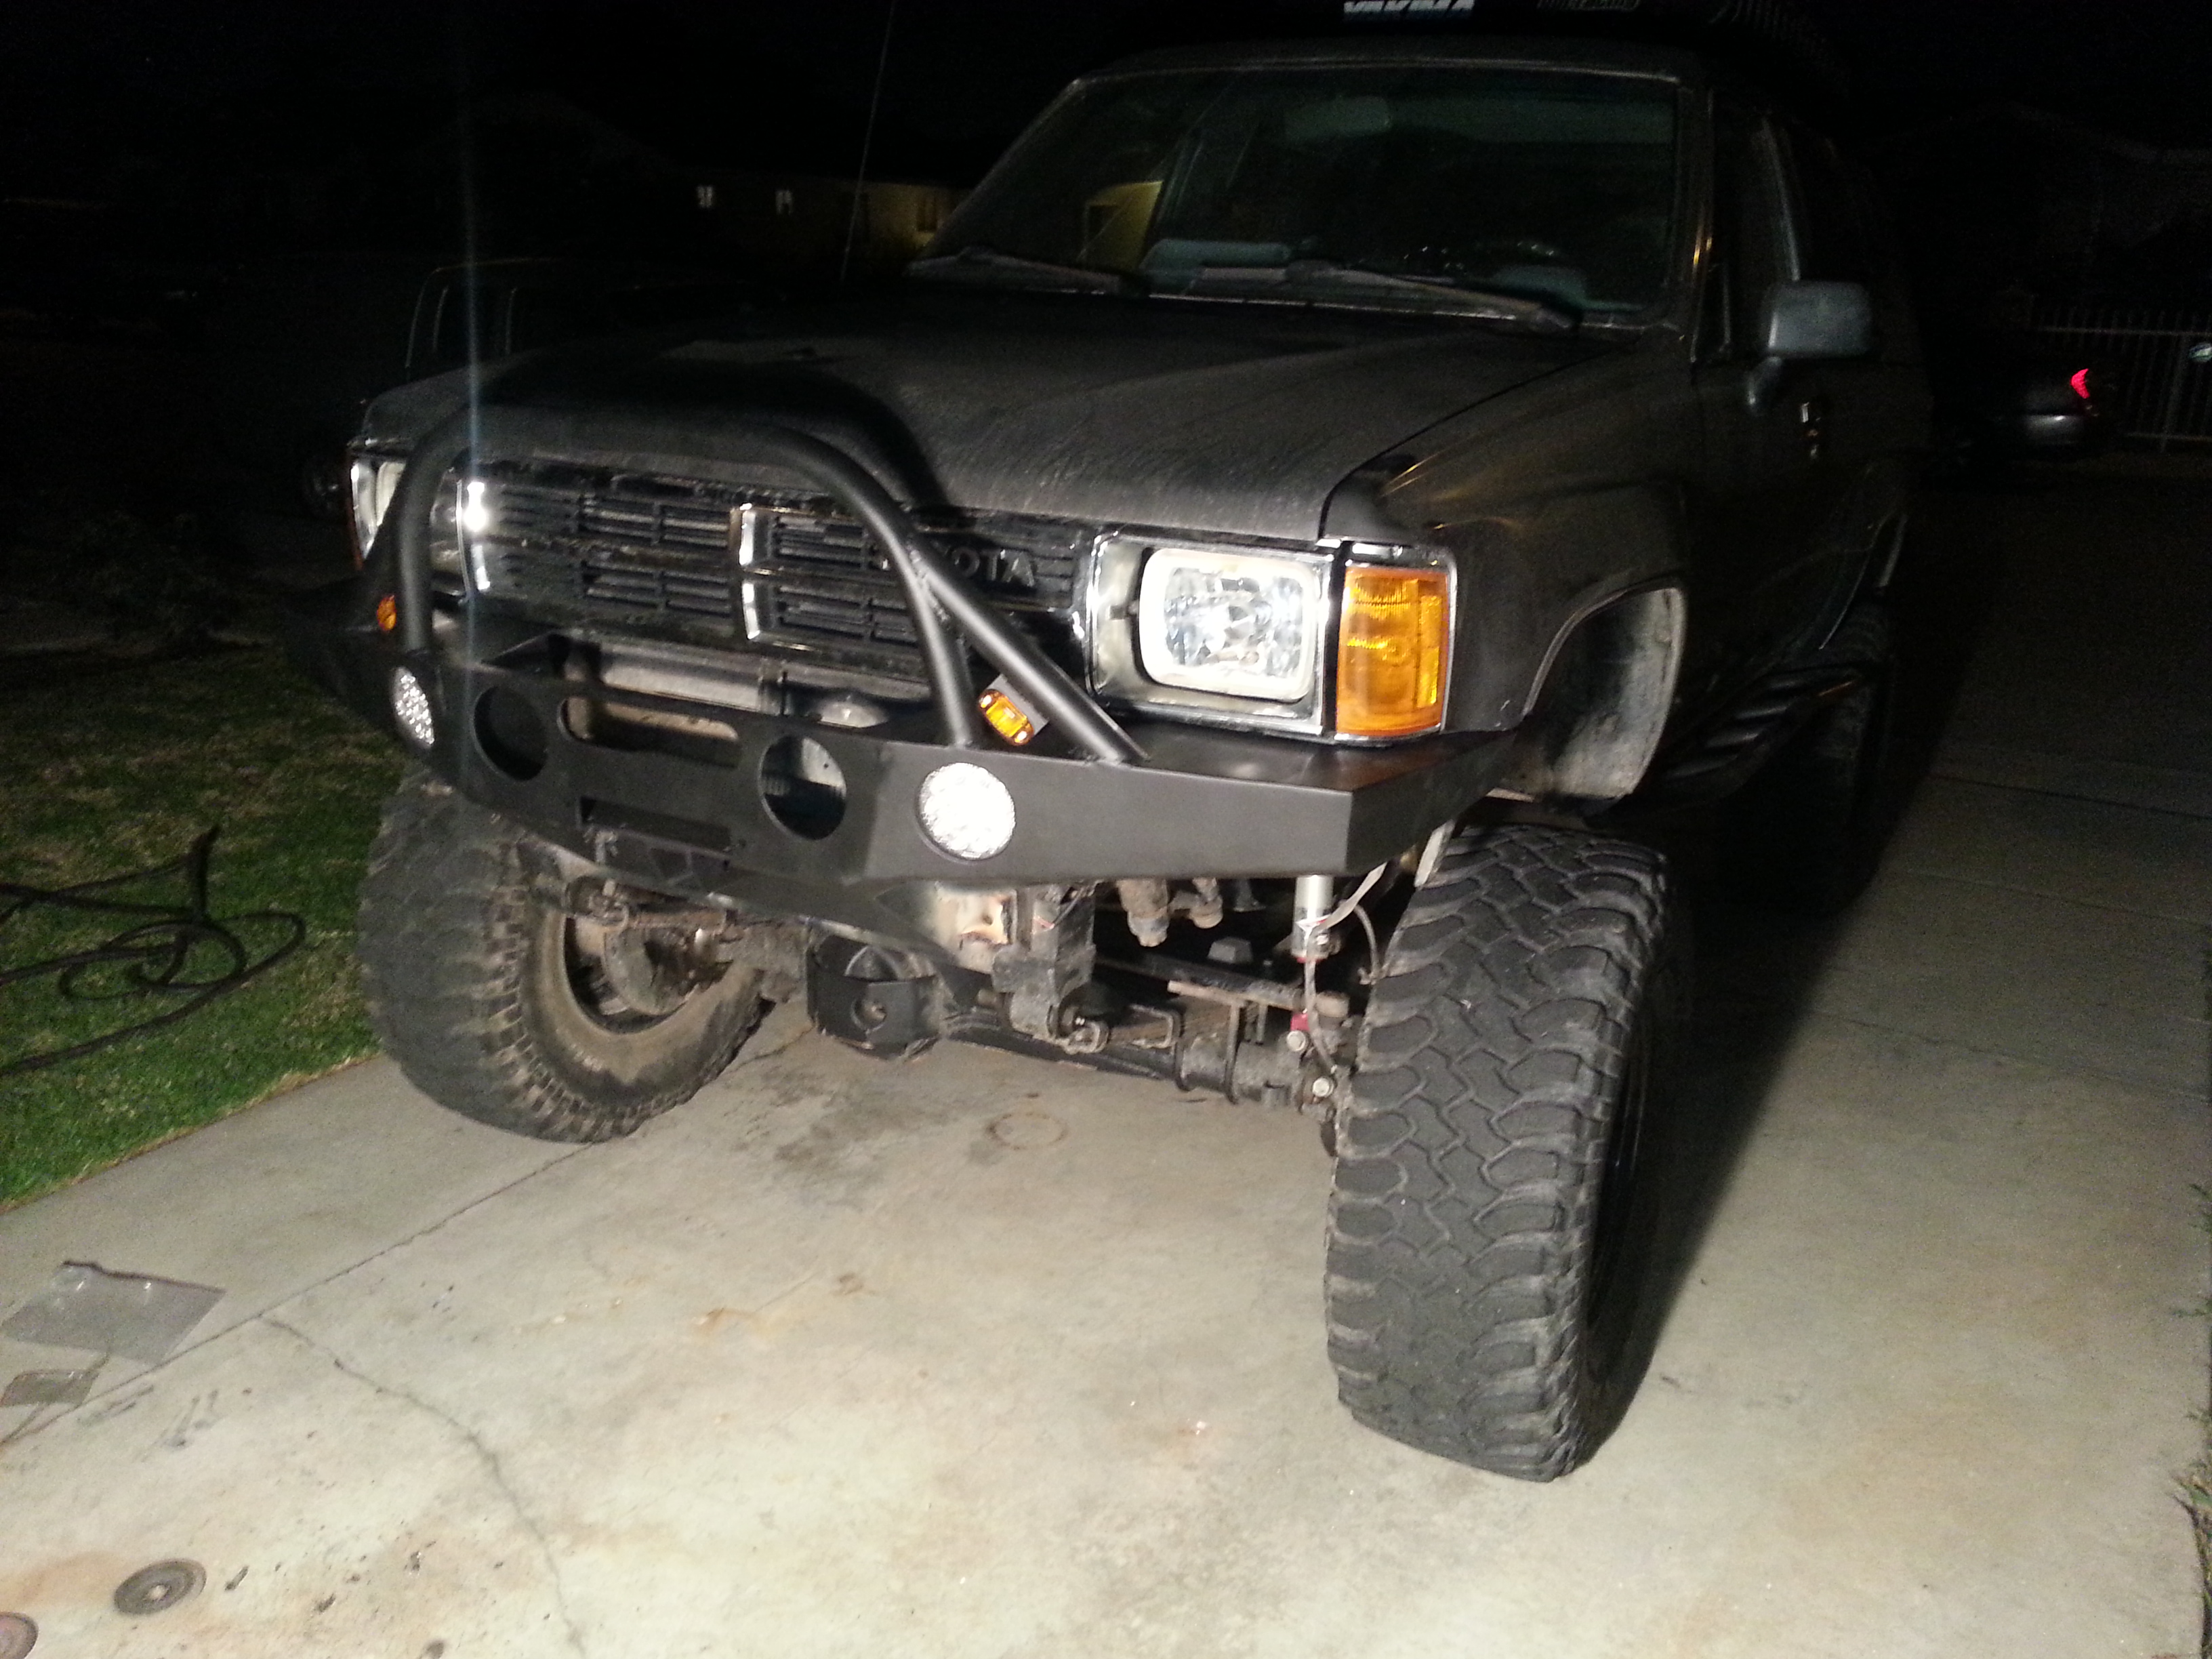
Here's what my bumper looks like with the lights and winch. just looking forward to seeing it with the black paint job.
As for the tan truck in the background. That is my next door neighbors awesome 1985 extended bed 4x4 pickup. 4.88 gears, detroit lockers front and rear, 5" AllPro lift, Marlin crawler transfer case, 35"/12.5"/15 BFG M/T's, and outlaw 2 rims.
Year he has a pretty sweet truck.


thanks dude. I was aiming from a mixture of CBI, 4x innovations, and relentless bumper styles. I think i pulled it off pretty nicely.
No I didnt. where can i get some at? I actually just intended to use some plastic wire flex stuff to wrap the wire. then use heat shrink down that hole over it.
Oct 31, 2013 | 06:14 PM
#2216
Thread Starter
Registered User
Joined: Apr 2012
Posts: 2,817
Likes: 2
From: Los Angeles CA
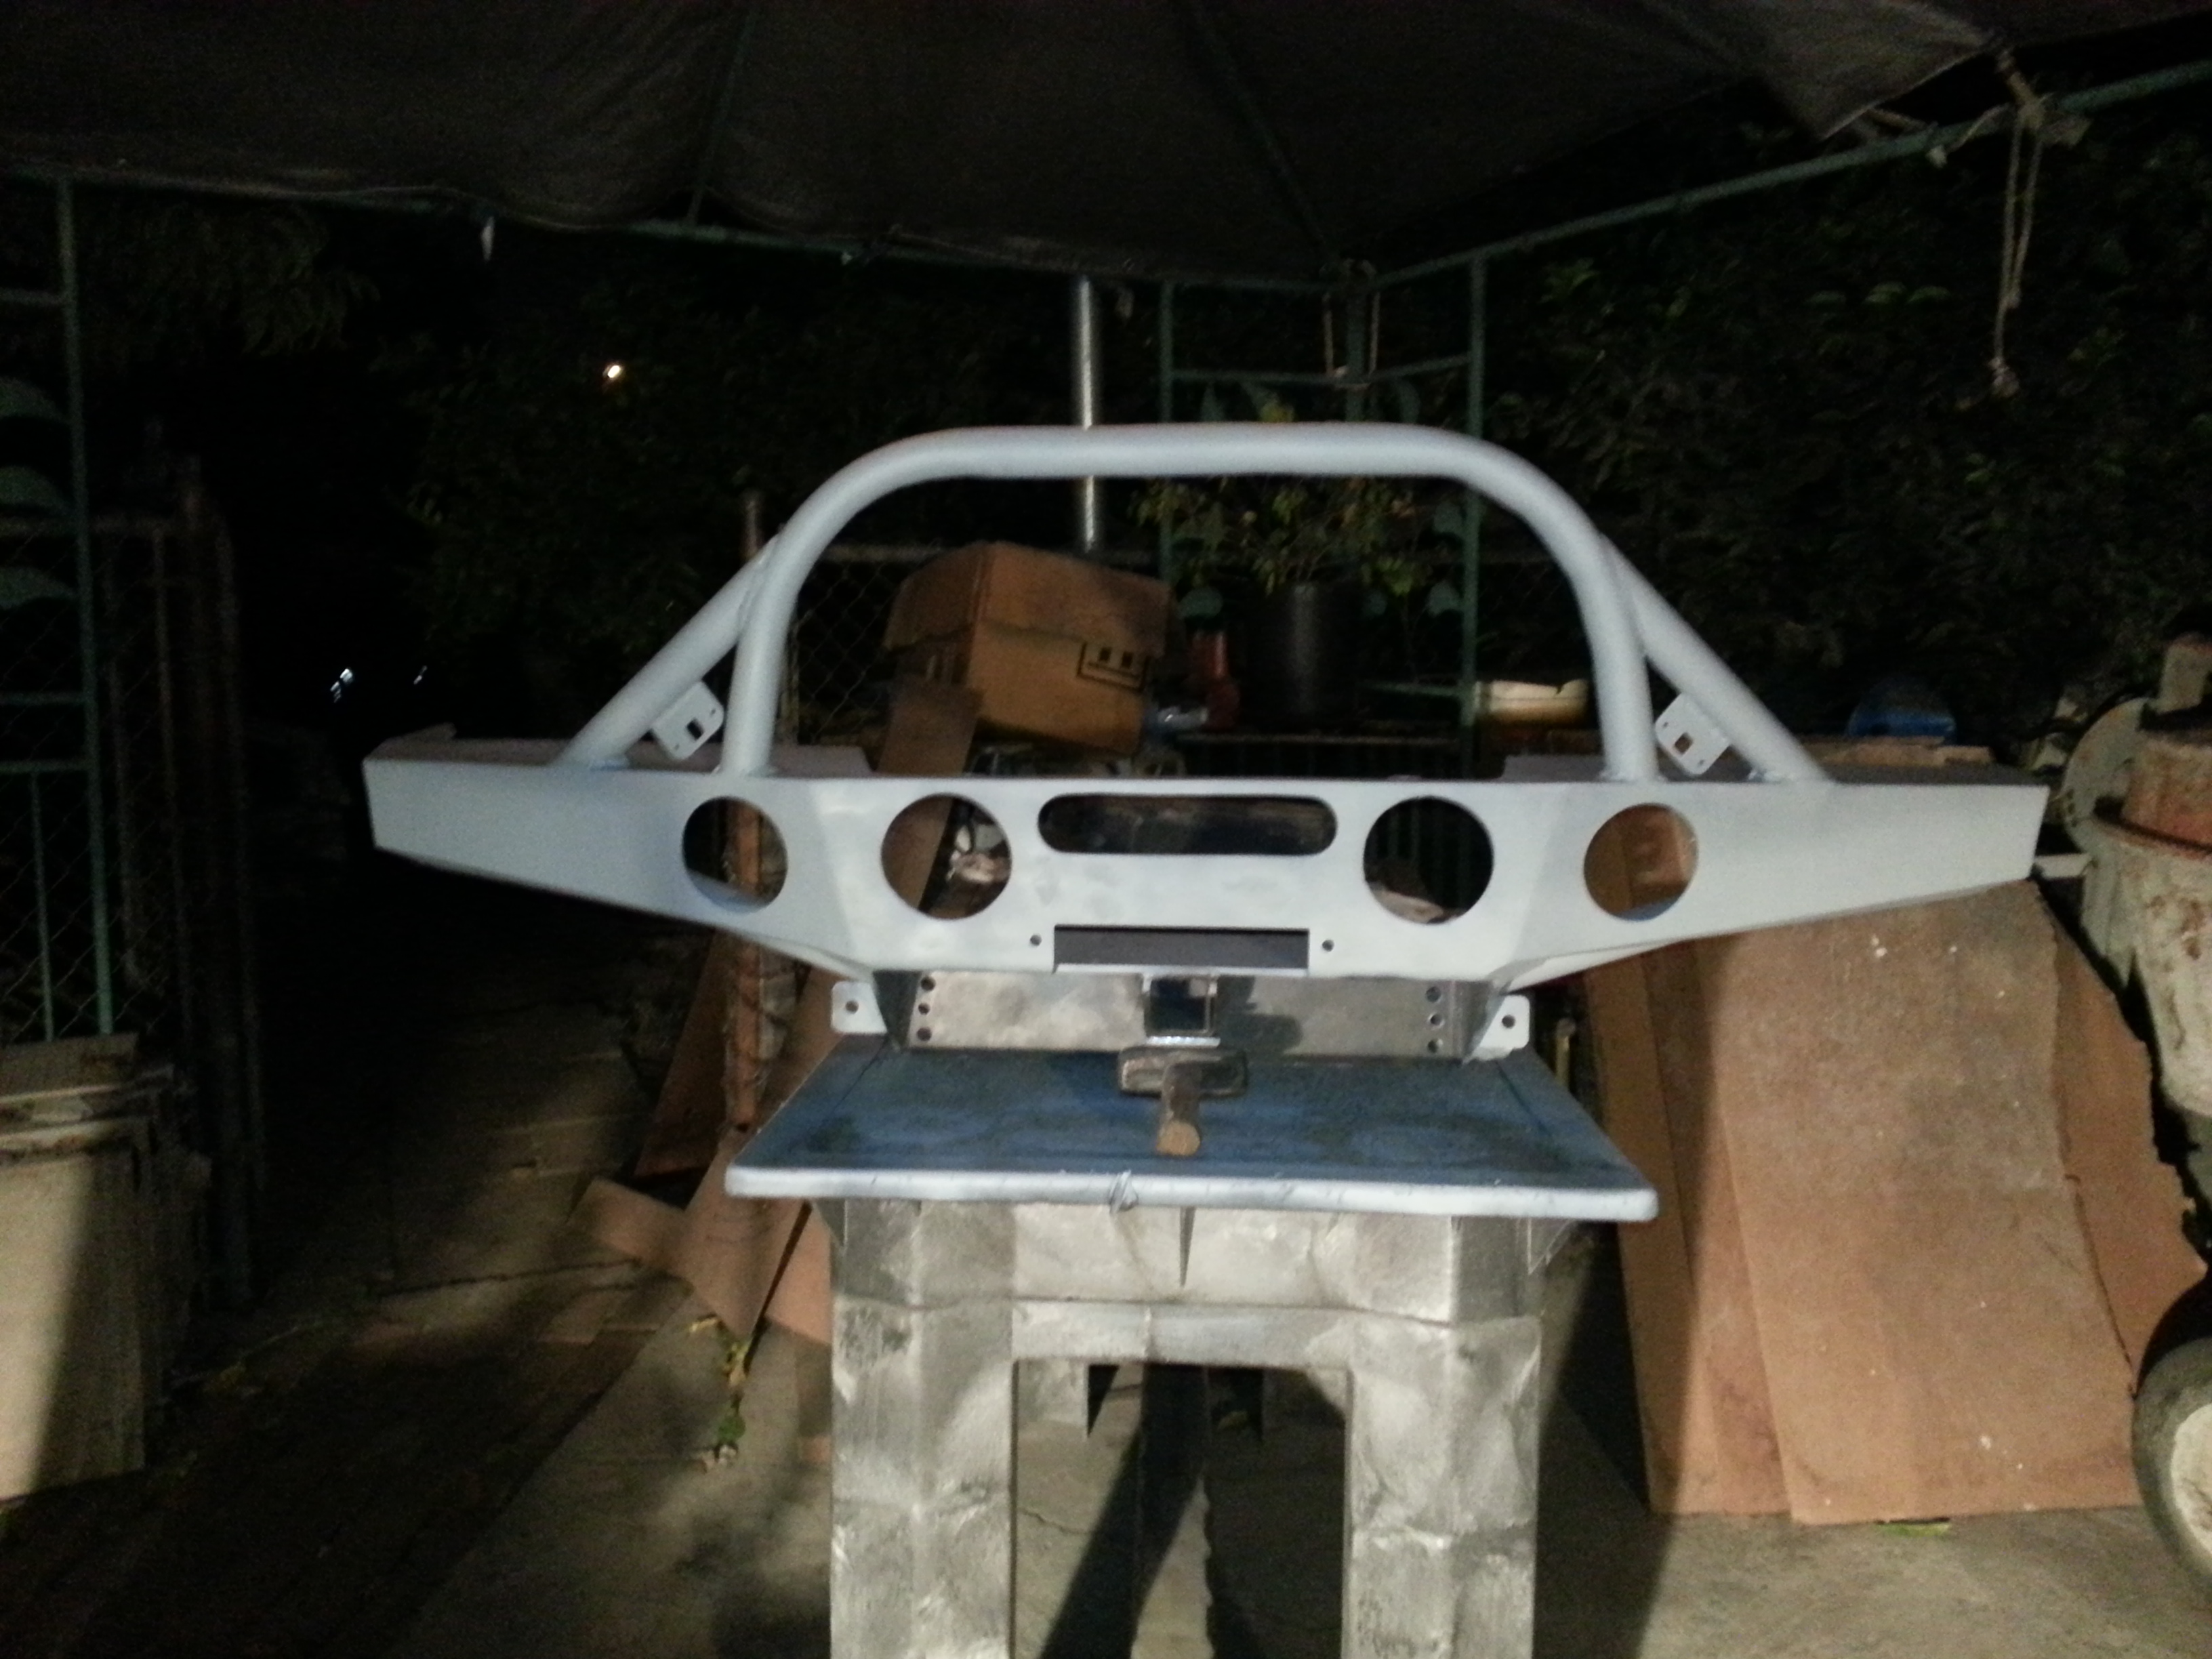
Alright guys i finally painted up the bumper! She is all finished and ready to be mounted. just need to allow it to dry.
Here she is guys!

I'll give ya'll some more progress shots either tomorrow or saturday depending on when we begin to mount it. Stay tuned everybody!
Here she is guys!


I'll give ya'll some more progress shots either tomorrow or saturday depending on when we begin to mount it. Stay tuned everybody!
Oct 31, 2013 | 06:24 PM
#2217
Contributing Member
Joined: Nov 2010
Posts: 5,125
Likes: 4
From: Columbia River Gorge, Oregon...east side
Ace, True Value, Home Depot, local auto parts place, etc have grommets in those pull out boxes in the nuts and bolts aisle.
Your plan to protect those wires should be fine too.
Your plan to protect those wires should be fine too.
Last edited by rworegon; Nov 2, 2013 at 04:55 AM.
Nov 1, 2013 | 07:37 PM
#2219
Thread Starter
Registered User
Joined: Apr 2012
Posts: 2,817
Likes: 2
From: Los Angeles CA
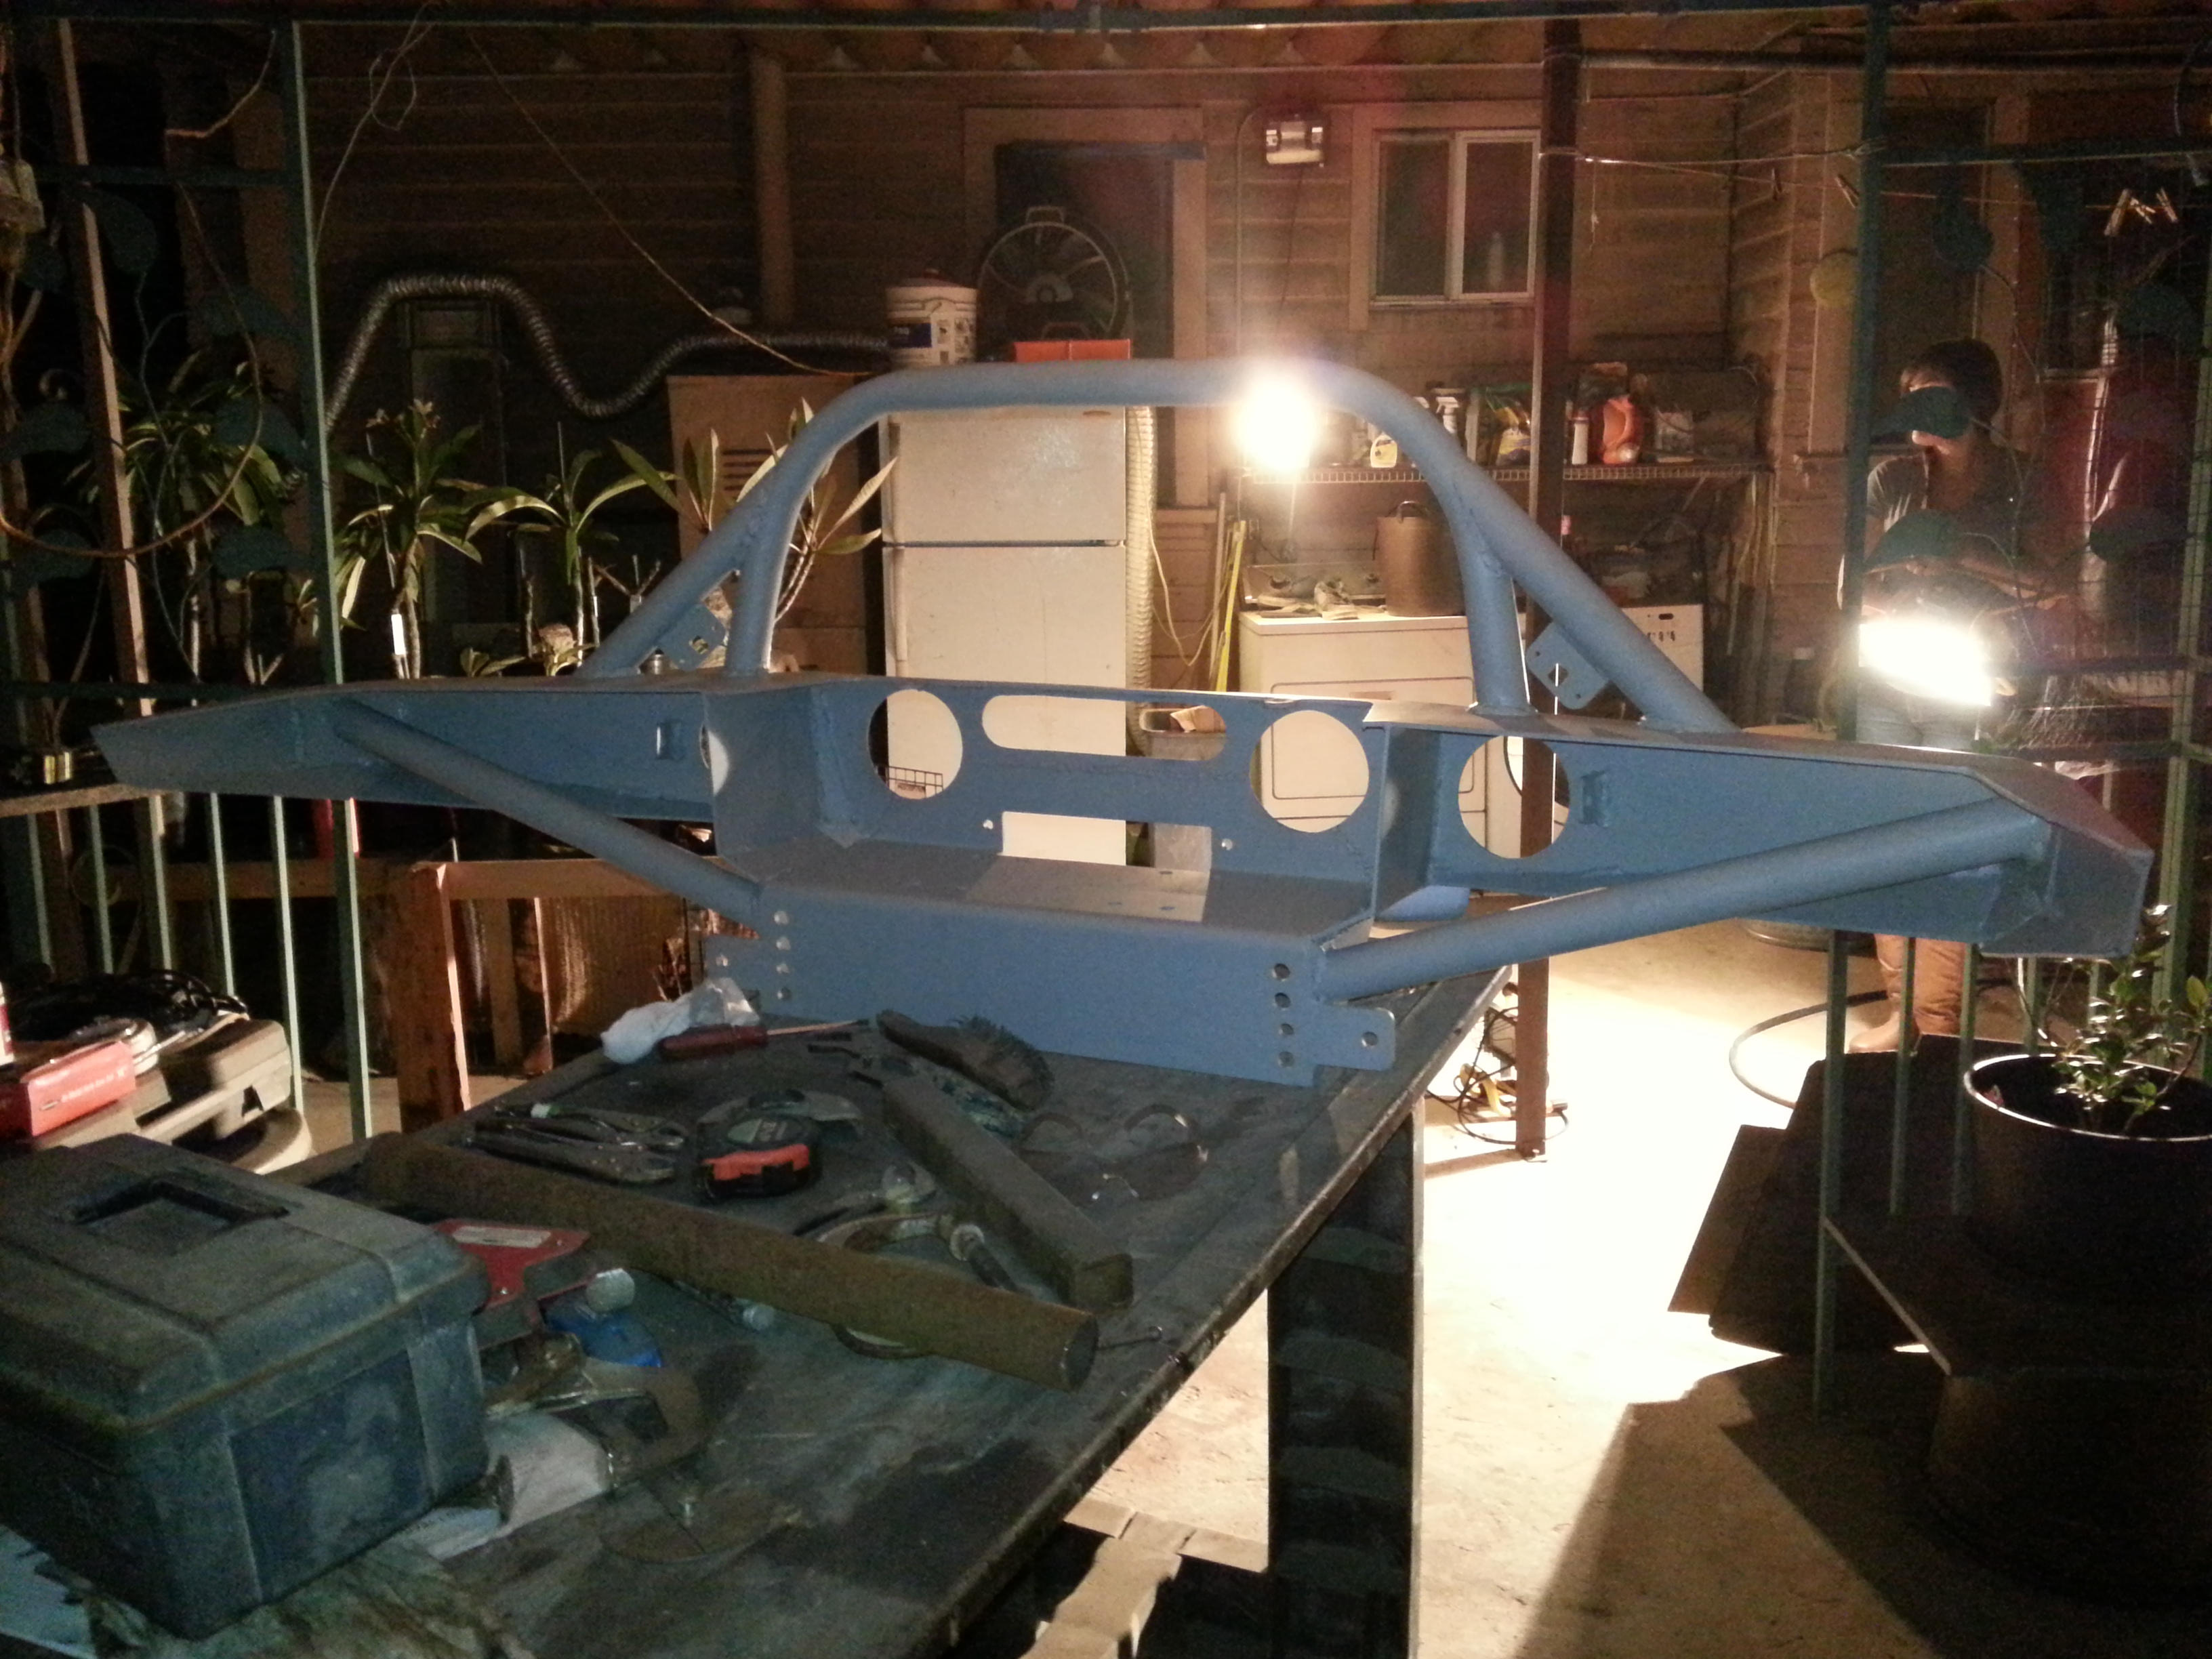
Anyone ask for a face lift?
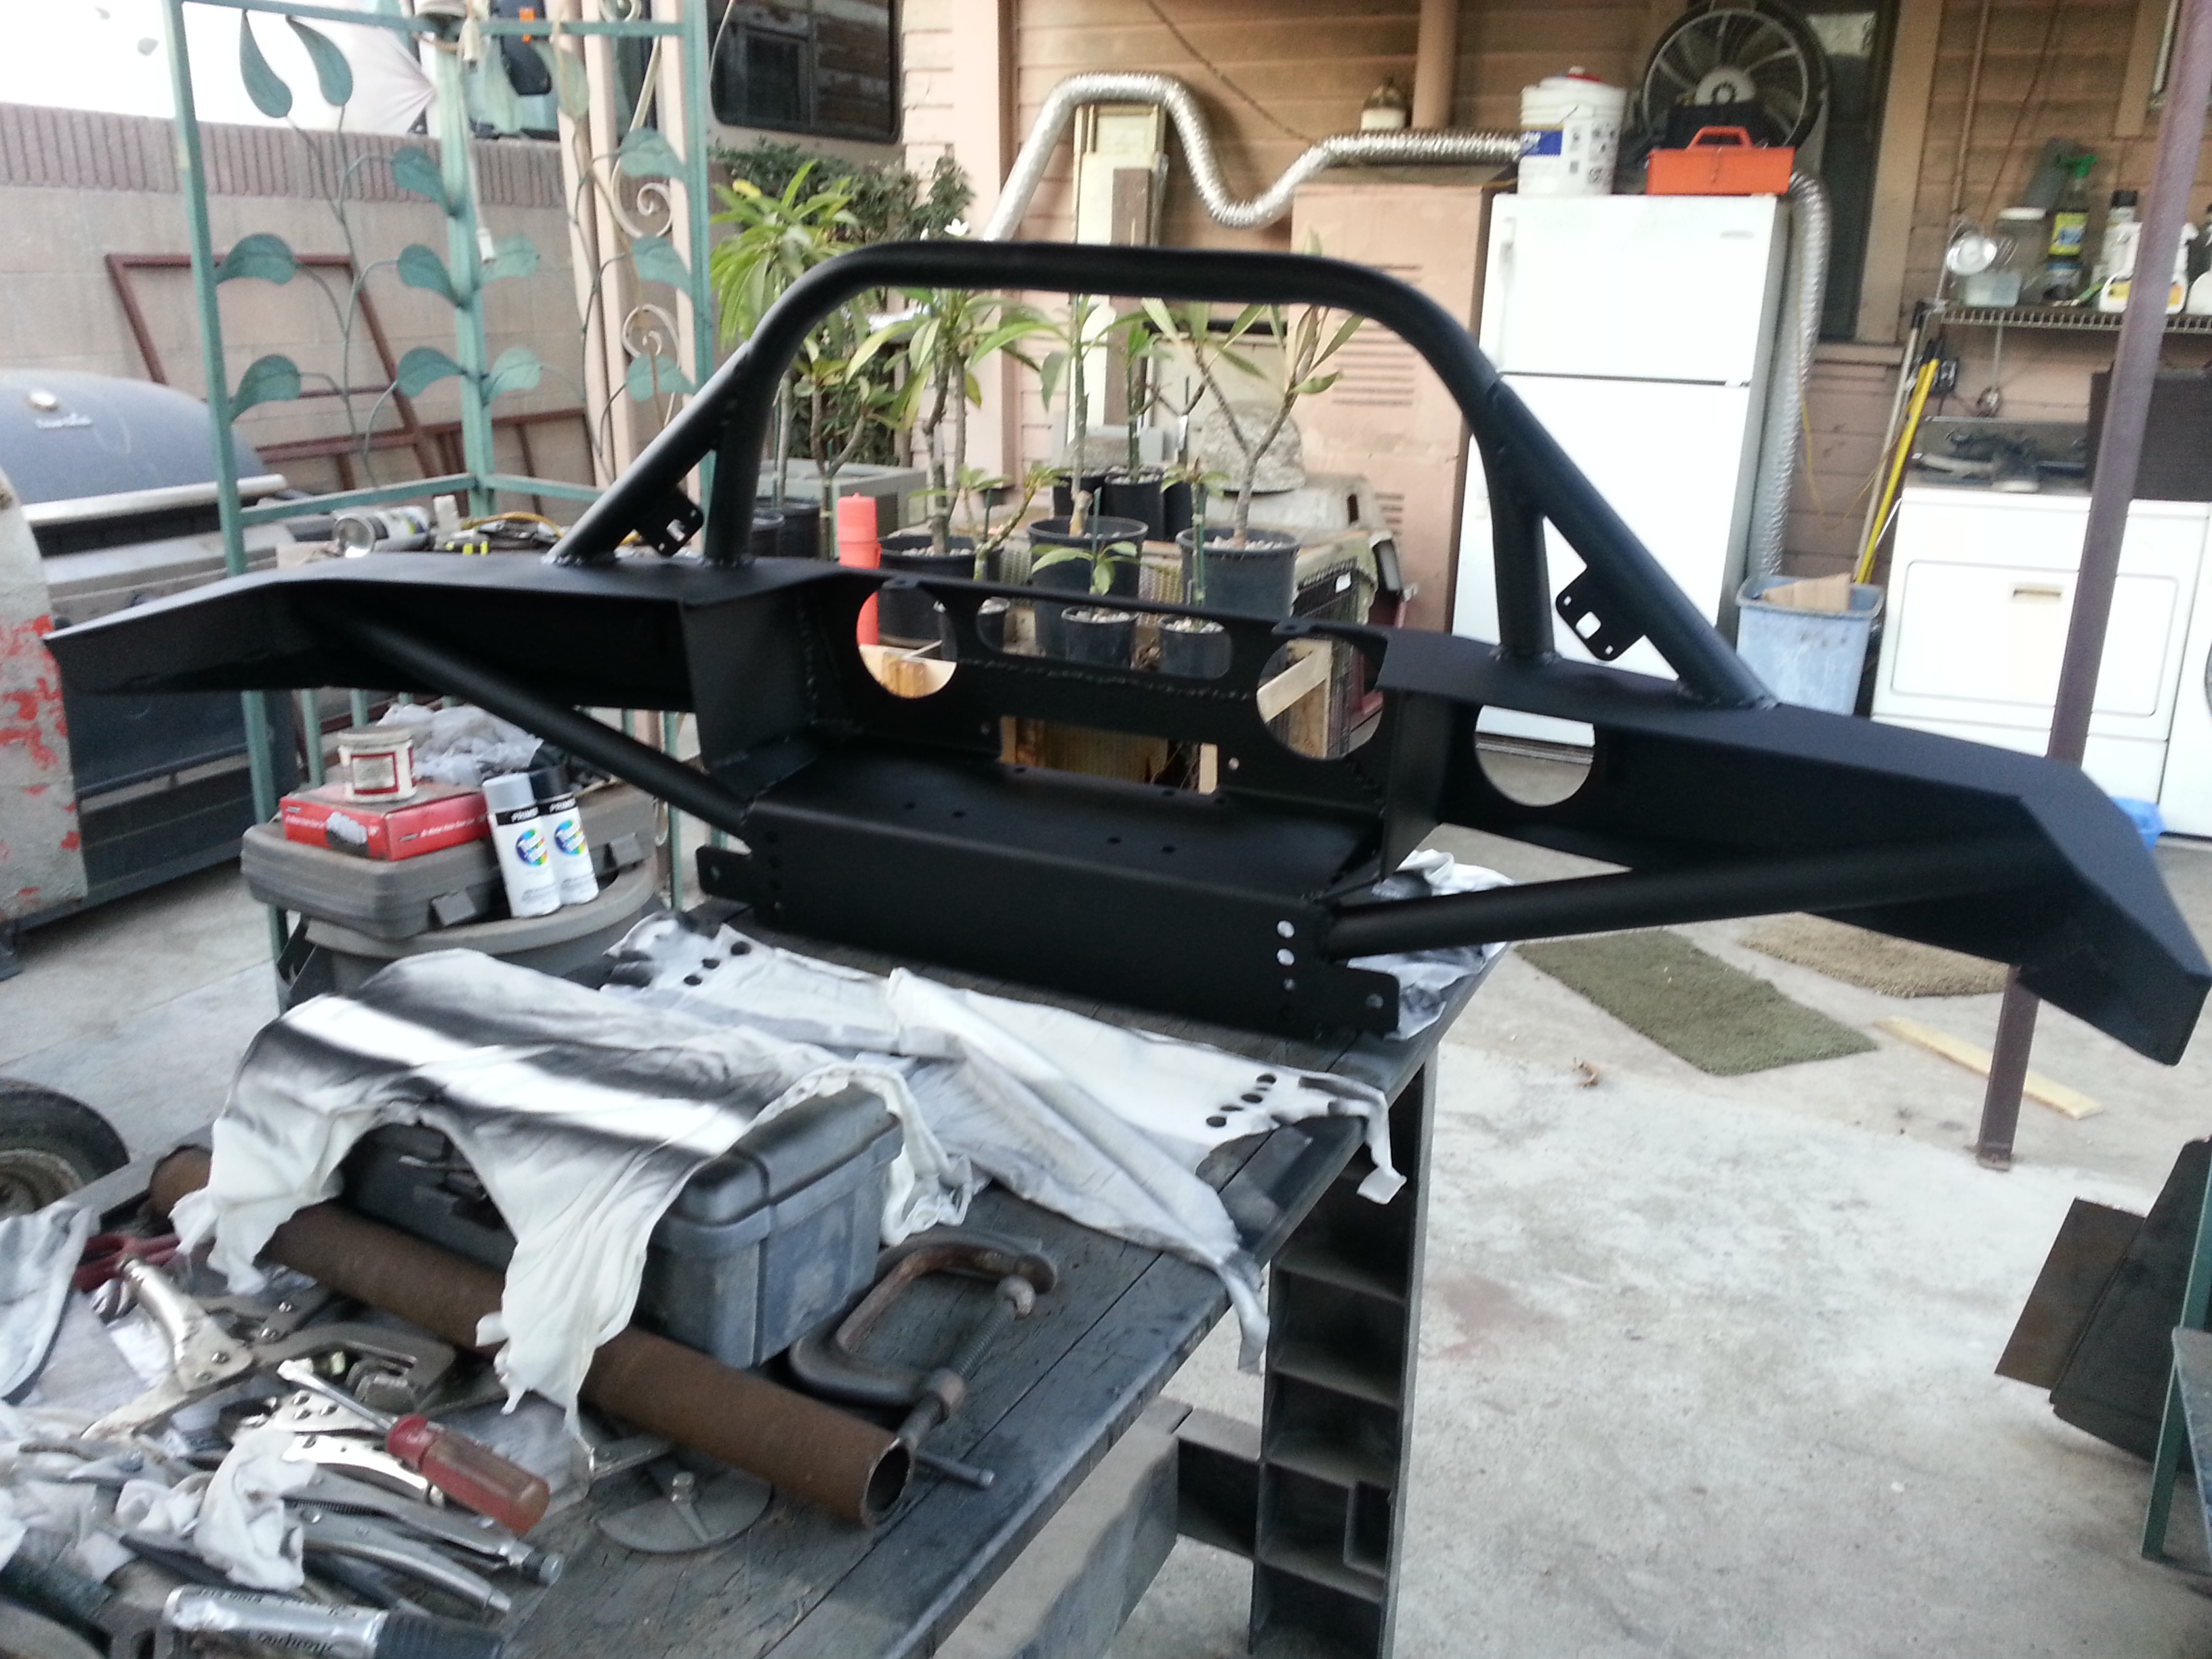
Only had about 1 hour before it got dark when i got home. But ive been known to be impatient so i started prepping the frame to weld on while my dad made his way home haha! Here we have my dad welding the frame reinforcement on to the truck.
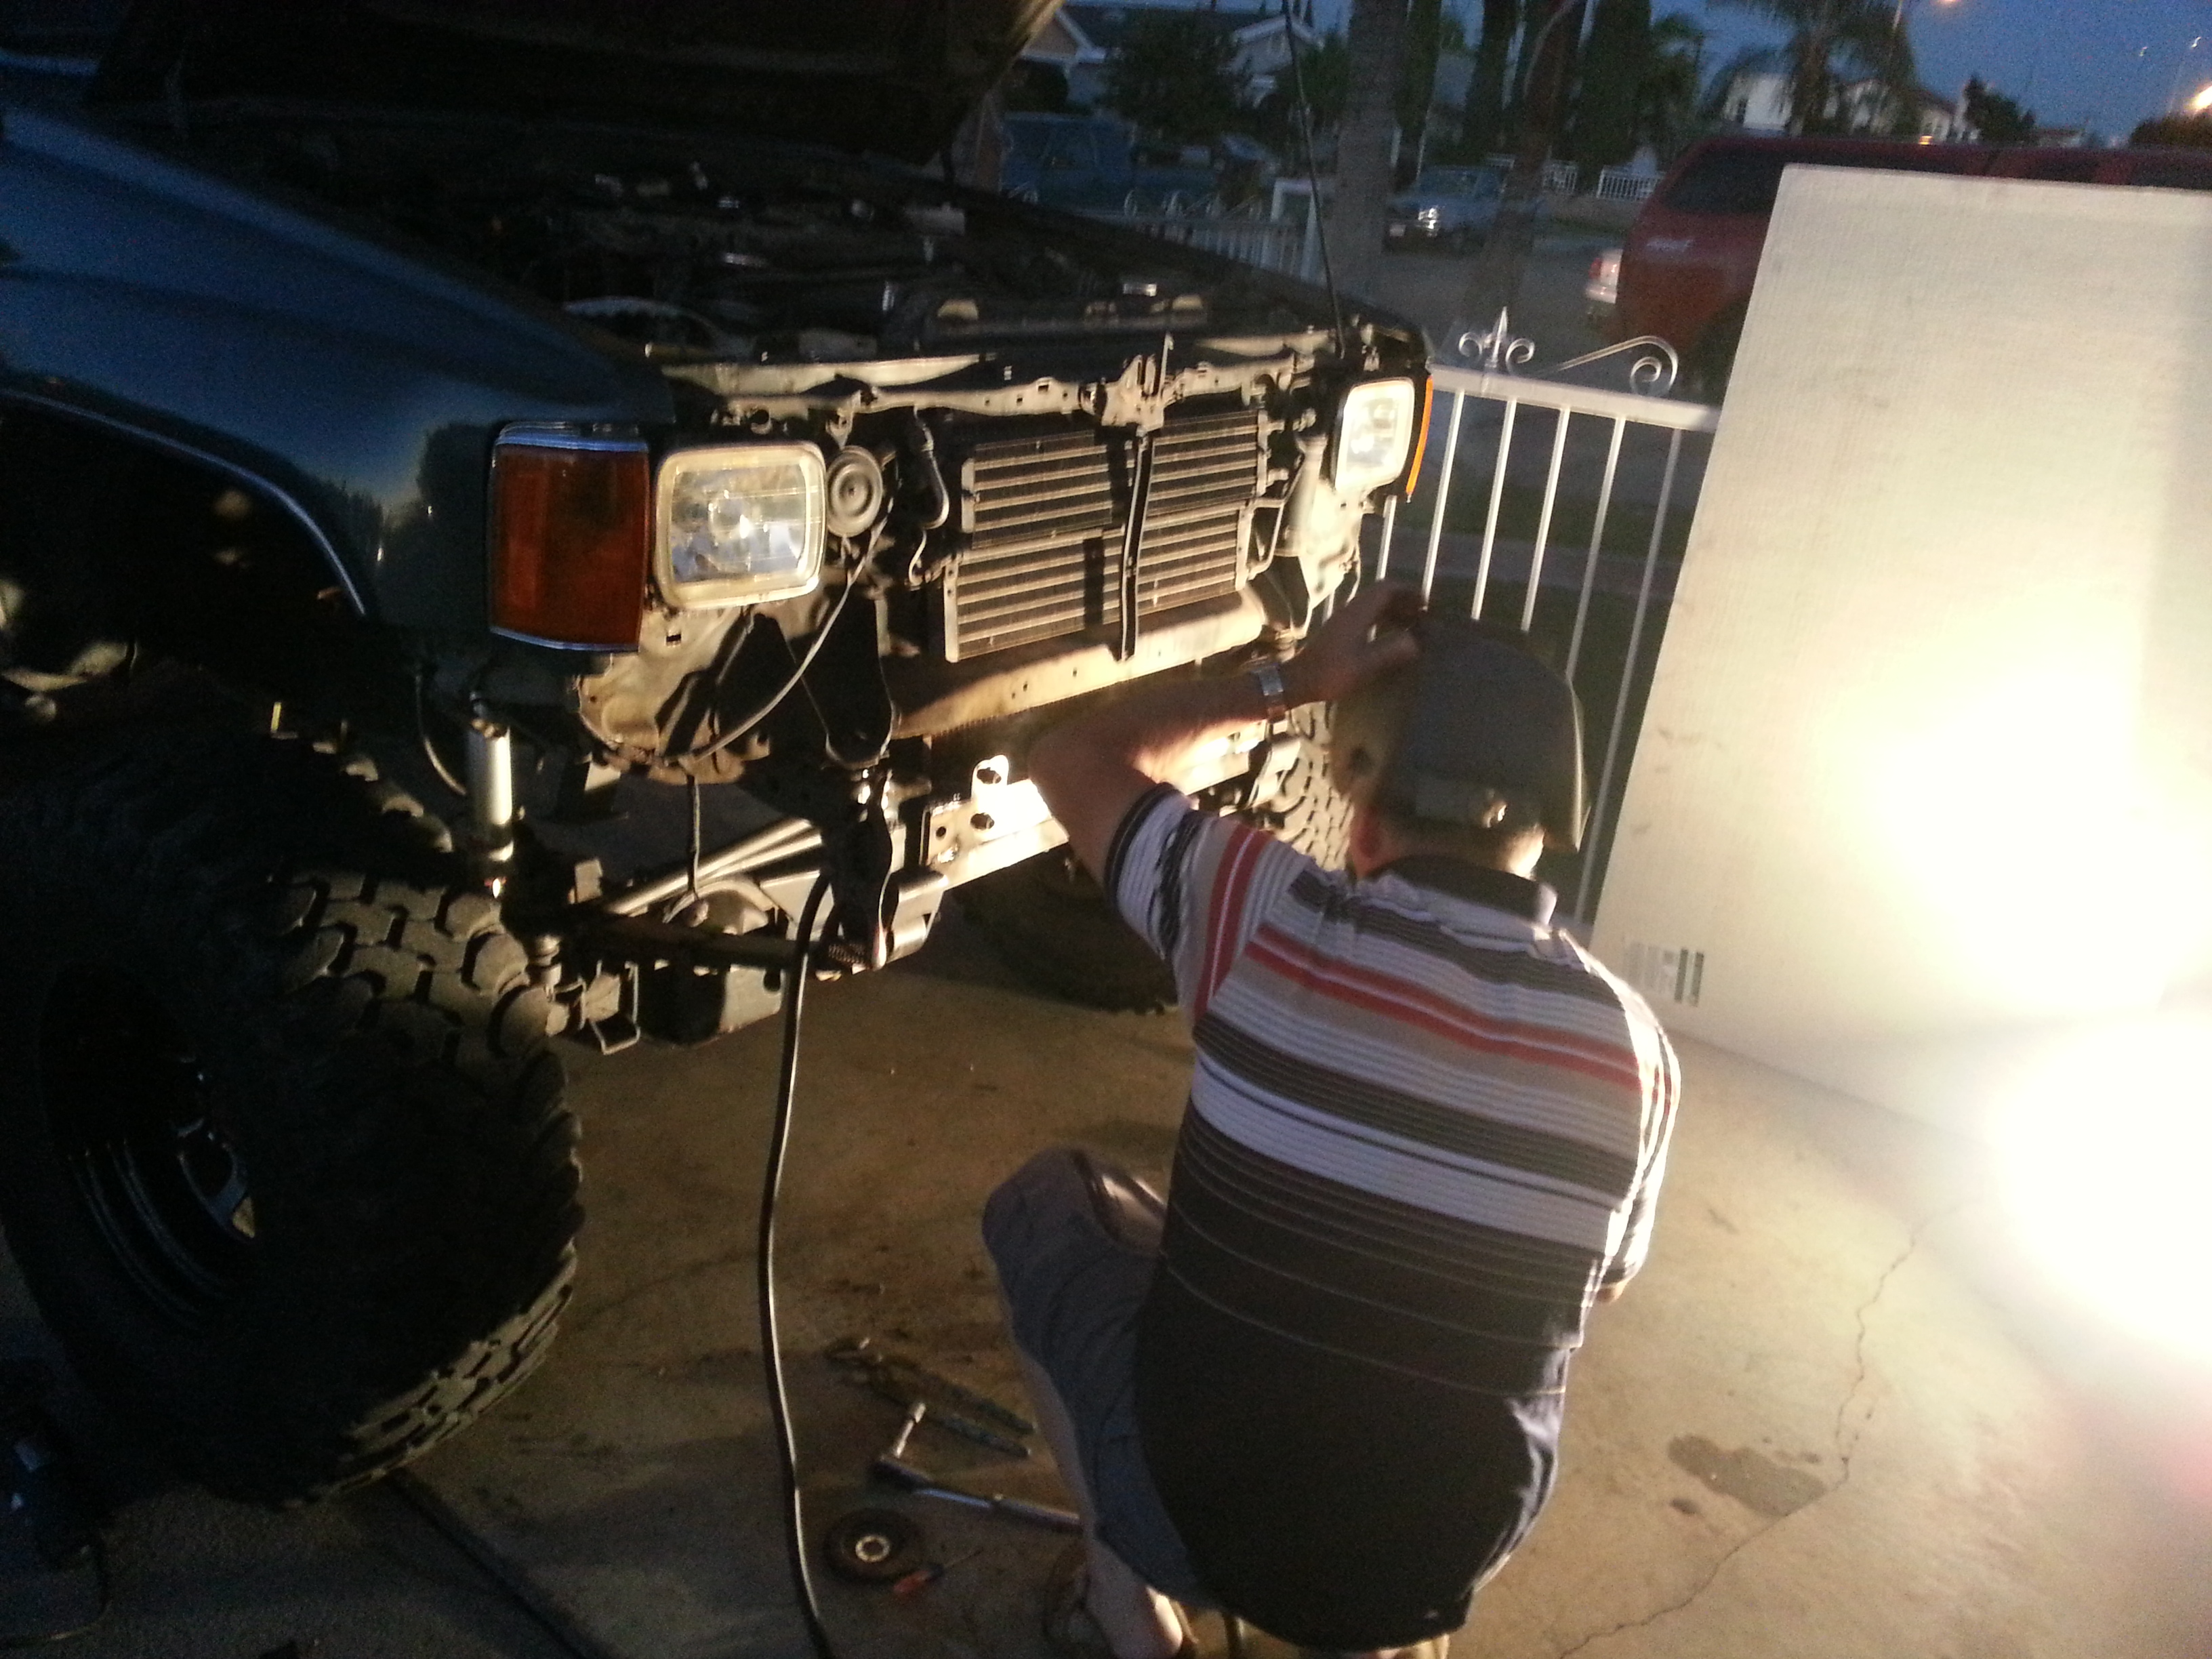
We were going to add on the bumper but found that the bolts were about 1/4 too short. And since it was too late in the day no shops would be open. So We improvised and cut off the washers on the bumper bolts. See the difference???

Once we did that we had enough threading to catch to be able to hold the bumper up. But then we found that only 3/4 of the bolts fit in the holes. My dad welded the one on the right side wrong. Oh well it was just meant to hold the bumper in place anyway. its okay because it is now welded i segments so i dont need the bolts anyway lol

Sorry guys this is as good as the pictures are gonna get right now. It was much too dark to take decent shots. I'll work on it some more tomorrow. I'll take better pix then.


After we finished amd cleaned up i Had to buy bread for my dad. He said jokingly that he thinks he deserved some bread for helping me throughout the the whole project. lol I thought it was funny the way he asked. But he's right he deserves it. So as he made his favorite home made brewed cinnamon coffee(Caf� de Olla) I went to get him his favorite sweet bread(pan dulce) from the local Mexican bakery. Yum. Ended the night with a sweet snack.

The one thing i absolutely love is the fact that i can remove the grill easily with no problems at all. I was actually worried that i would have to trim the bottom. but NOPE i didnt have to. And because i have access to remove the grill that means i can still access the AC stuff whenever im ready to fix that stuff. WOOT
Like i said. Sorry i couldnt get more pix but the night got the better of us. I'll give her a nice bath tomorrow install the winch. and possibly build the license plate skid plate/winch bolt cover thing to prevent people from stealing my precious $499 winch.
Later on i'll be possibly heading to Mark's(Chefyota4x4) house so we could properly install my offroad lights. Cant wait. I'm gonna wake up early tomorrow to get that skid plate finished so i could have more time over there because i have no clue how long wiring in the Relays, and switches/running the wires is gonna take. Hopefully he'll still have time for me.
Stay tuned for the next episode of Redeth005's Front Bumper Fab Project.
AWESOME UPGRADES TO BE MOUNTED!
Thanks for watching!
Only had about 1 hour before it got dark when i got home. But ive been known to be impatient so i started prepping the frame to weld on while my dad made his way home haha! Here we have my dad welding the frame reinforcement on to the truck.

We were going to add on the bumper but found that the bolts were about 1/4 too short. And since it was too late in the day no shops would be open. So We improvised and cut off the washers on the bumper bolts. See the difference???

Once we did that we had enough threading to catch to be able to hold the bumper up. But then we found that only 3/4 of the bolts fit in the holes. My dad welded the one on the right side wrong. Oh well it was just meant to hold the bumper in place anyway. its okay because it is now welded i segments so i dont need the bolts anyway lol

Sorry guys this is as good as the pictures are gonna get right now. It was much too dark to take decent shots. I'll work on it some more tomorrow. I'll take better pix then.


After we finished amd cleaned up i Had to buy bread for my dad. He said jokingly that he thinks he deserved some bread for helping me throughout the the whole project. lol I thought it was funny the way he asked. But he's right he deserves it. So as he made his favorite home made brewed cinnamon coffee(Caf� de Olla) I went to get him his favorite sweet bread(pan dulce) from the local Mexican bakery. Yum. Ended the night with a sweet snack.
The one thing i absolutely love is the fact that i can remove the grill easily with no problems at all. I was actually worried that i would have to trim the bottom. but NOPE i didnt have to. And because i have access to remove the grill that means i can still access the AC stuff whenever im ready to fix that stuff. WOOT
Like i said. Sorry i couldnt get more pix but the night got the better of us. I'll give her a nice bath tomorrow install the winch. and possibly build the license plate skid plate/winch bolt cover thing to prevent people from stealing my precious $499 winch.
Later on i'll be possibly heading to Mark's(Chefyota4x4) house so we could properly install my offroad lights. Cant wait. I'm gonna wake up early tomorrow to get that skid plate finished so i could have more time over there because i have no clue how long wiring in the Relays, and switches/running the wires is gonna take. Hopefully he'll still have time for me.
Stay tuned for the next episode of Redeth005's Front Bumper Fab Project.
AWESOME UPGRADES TO BE MOUNTED!
Thanks for watching!
Last edited by Redeth005; Nov 1, 2013 at 08:04 PM.


