
Rock Slide's 2002 Sport
 Jul 19, 2006 | 12:58 PM
#1
Thread Starter
Contributing Member
iTrader: (1)
Joined: May 2006
Posts: 2,262
Likes: 1
From: B'ham, AL
Rock Slide's 2002 Sport
Model: 2002 4Runner SE 4wd
Purchase Date: 4/20/2006
Mileage at Date of Purchase: 22K
Purchased From: Vanderstyne Toyota - Rochester, NY
Vehicle Build Date: January 2002
At Date of Purchase:


And then:
Mileage as of 07/2023: 250K
See below...
**CURRENT MODIFICATIONS**
Engine Mods:
Air Elbow Mod
Oil - Valvoline SynPower 5W-30 Synthetic
Oil Filter - Purolator PureOne PL10241
Amsoil Fluid in the Tranny, T-case & Diffs
Suspension Mods:
WabFab 1" Body Lift
Sonoran Steel 7.1 Lift Kit:
Front - 2.5" Lift:
-Tundra TRD 4WD Front Coils
-Toyota Heavy Duty Front Shocks
-Sonoran Front Diff Drop
-Bamachem Top Spacers
Rear - 3" Lift:
-OME 890 Coils
-FZJ-80 Land Cruiser Rear Shocks
-Adjustable Trac/PanHard Drop Bar
-Extended Bump Stops
Wheels & Tires:
265/75/16 Nitto Terra Graplers
16x8 TRD Ivan Stewart Wheels - Part# PTR20-34070
Brake Mods:
Front - Goodridge SS Braided Brake Lines
Rear - Sonoran Steel Extended SS Braided Brake Lines
Exterior Mods:
Stubb Sliders
TJM T-15 Front Bumper - Modified & Color Matched
OEM Black Pearl Emblems
OEM 2005 Tacoma TRD Decals
Extended Rear Diff Breather Mod
Interior Mods:
ScanGauge II
Sound Deadened Interior
WeatherTech Cargo Liner
WeatherTech Liners Front & Rear
Hilux Surf Overhead Field Monitor Console
Windows Tinted - Including Entire Front Windshield
Electrical Mods:
Fog Light Mod
Disabled DRLs
Disabled Keyless Entry Chirp
AndyMod 2.0 - (Disables VSC & TRAC only) Toyota switch # PT297-89013sw
Lighting Mods:
Interior:
Dome Light - 5K White LED 48-PCB
Map Lights - HID 6K White LED (Ba9s)
Glove Box - .5 watt White LED (74)
Cargo Light - 5K White LED 48-PCB
Exterior:
Headlights - HID Bi-Xenon Infiniti FX Projectors with Acura TSX Lenses, Hella Gen3 Ballasts & Philip H4 4300K Bulbs
Front Corner Lenses - Burtman Clear Corners
Fog Lights - 4" Round Eagle Eye 1863 Fogs
Turn Signals - Oval Clear lenses with orange LEDs (Tridon EP35 LED Flasher Unit installed behind dash for proper LED function)
Tail Lights - Burtman LED Tails
License Tag - WLED 6-LED (194)
Stereo Mods:
Head Unit: Pioneer AVH-1550NEX w/ Ipod and Camera control
Front Door Speakers & Tweeters: JBL GTO607C 6.5" 2-Way Component - 70W RMS
Rear Door Speakers: JBL GTO527 5.25" 2-Way Coaxial - 45W RMS
Write Ups:
1. Roll Bar & Sliders
2. Hilux Surf Field Monitor
3. 375wt Power Converter
4. Part 1 - 7.1 SS Lift Kit, TJM Bumper, Wilderness Rack & IPF Lights
5. Part 2 - Modified my TJM Bumper
6. Disable VSC/TRAC/ABS - AndyMod*
7. Disable VSC & TRAC Only - AndyMod 2.0. ABS Remains Active!
8. Rear Diff Breather Mod*
9. Fog Light Mod*
10. Rear Mud Flap Mod*
11. Disabled DRLs* - '00 4Runners: Cut Pin 2. '01-'02 4Runners: Cut Pin 12. Both are a Black/Yellow wire.
12. Disabled Keyless Entry Chirp*
13. Ashtray Mod
14. Six Speaker System Upgraded to JBLs
15. Ivan Stewart Wheels and Nitto Tires
16. Tundra Brake Upgrade
17. 1" Body Lift and Rear Fender Liners
18. Hella 4000s Converted to HID
19. Headlights Retrofitted with HID FX Projectors
20. WeatherTech vs Husky Liners
21. Pioneer 4100 HU & Camera Install
22. Combining Both Front & Rear Antennas Into One on Aftermarket HU
23. VSC Zero Point Calibration 01-02 4Runners
24. Hard Wired Garmin Nuvi 500 GPS
25. Used Oil Analysis Thread
26. Air Elbow Mod - write up coming soon...*
Having disabled the DRLs on my 4Runner, I've had several Tacoma owners ask me if disabling DRLs on a Tacoma is done in the same manner as disabling DRLs on a 4Runner; well, for you Tacoma owners, here's a write up I found showing you how to disable your DRLs:
** Disabling DRLs on a Tacoma
~~~~~~~~~~~~~~~~~~~~~~~~~~~~
Web Sites worth visiting:
Parts & Service:
WabFab Off Road
Sonoran Steel
ToyTec Lifts
4Wheel Online
4Crawler Off Road
4x4 Connection
Stubbs Welding
Retrofit Souce - HID Components
Burtman Industries
TRD Parts
McMaster-Carr
Summit Racing
Car Speaker Adapters - Speaker Plate Adapters
Expedition Exchange
Wheelers Offroad - SS Braided Brake Lines
Currie Enterprises - EZ Tire Deflator
Extreme Outback - Portable Air Compressor
Vehicle Light - LED DOT Turn Signals
Task LED - 1 watt Luxeon LED Dome Light Bulbs
Blackstone-Labs - Have your used oil analysized
WeatherTech Liners
Sure Seal Lighting
Auto Lumination
Super Bright LEDs
V-LEDs
Knowledge:
Wikipedia's History of the 4Runner
OEM Paint Colors & Codes
2002 4Runner Brochure PDF
4Runner Top Sites
Gear Ratio Guide
Tire Size Calculator
Tire Size Calculator 2
Toyota Maintenance
30K Mile Maintenance
Brake Replacement
Timing Belt Replacement
4x4 Wire
Undercoating Products
Hilux Surf.UK Forum
TLC Icon FJ 40s
The FJ Company
Fellow 4Runner Owners:
Jab's 4Runner
Bob's 4Runner
Speedy's 4Runner
Gadget's 4Runner
Darren's 4Runner This pg is no more...
**
Purchase Date: 4/20/2006
Mileage at Date of Purchase: 22K
Purchased From: Vanderstyne Toyota - Rochester, NY
Vehicle Build Date: January 2002
At Date of Purchase:
And then:
Mileage as of 07/2023: 250K
See below...
**CURRENT MODIFICATIONS**
Engine Mods:
Air Elbow Mod
Oil - Valvoline SynPower 5W-30 Synthetic
Oil Filter - Purolator PureOne PL10241
Amsoil Fluid in the Tranny, T-case & Diffs
Suspension Mods:
WabFab 1" Body Lift
Sonoran Steel 7.1 Lift Kit:
Front - 2.5" Lift:
-Tundra TRD 4WD Front Coils
-Toyota Heavy Duty Front Shocks
-Sonoran Front Diff Drop
-Bamachem Top Spacers
Rear - 3" Lift:
-OME 890 Coils
-FZJ-80 Land Cruiser Rear Shocks
-Adjustable Trac/PanHard Drop Bar
-Extended Bump Stops
Wheels & Tires:
265/75/16 Nitto Terra Graplers
16x8 TRD Ivan Stewart Wheels - Part# PTR20-34070
Brake Mods:
Front - Goodridge SS Braided Brake Lines
Rear - Sonoran Steel Extended SS Braided Brake Lines
Exterior Mods:
Stubb Sliders
TJM T-15 Front Bumper - Modified & Color Matched
OEM Black Pearl Emblems
OEM 2005 Tacoma TRD Decals
Extended Rear Diff Breather Mod
Interior Mods:
ScanGauge II
Sound Deadened Interior
WeatherTech Cargo Liner
WeatherTech Liners Front & Rear
Hilux Surf Overhead Field Monitor Console
Windows Tinted - Including Entire Front Windshield
Electrical Mods:
Fog Light Mod
Disabled DRLs
Disabled Keyless Entry Chirp
AndyMod 2.0 - (Disables VSC & TRAC only) Toyota switch # PT297-89013sw
Lighting Mods:
Interior:
Dome Light - 5K White LED 48-PCB
Map Lights - HID 6K White LED (Ba9s)
Glove Box - .5 watt White LED (74)
Cargo Light - 5K White LED 48-PCB
Exterior:
Headlights - HID Bi-Xenon Infiniti FX Projectors with Acura TSX Lenses, Hella Gen3 Ballasts & Philip H4 4300K Bulbs
Front Corner Lenses - Burtman Clear Corners
Fog Lights - 4" Round Eagle Eye 1863 Fogs
Turn Signals - Oval Clear lenses with orange LEDs (Tridon EP35 LED Flasher Unit installed behind dash for proper LED function)
Tail Lights - Burtman LED Tails
License Tag - WLED 6-LED (194)
Stereo Mods:
Head Unit: Pioneer AVH-1550NEX w/ Ipod and Camera control
Front Door Speakers & Tweeters: JBL GTO607C 6.5" 2-Way Component - 70W RMS
Rear Door Speakers: JBL GTO527 5.25" 2-Way Coaxial - 45W RMS
Write Ups:
1. Roll Bar & Sliders
2. Hilux Surf Field Monitor
3. 375wt Power Converter
4. Part 1 - 7.1 SS Lift Kit, TJM Bumper, Wilderness Rack & IPF Lights
5. Part 2 - Modified my TJM Bumper
6. Disable VSC/TRAC/ABS - AndyMod*
7. Disable VSC & TRAC Only - AndyMod 2.0. ABS Remains Active!
8. Rear Diff Breather Mod*
9. Fog Light Mod*
10. Rear Mud Flap Mod*
11. Disabled DRLs* - '00 4Runners: Cut Pin 2. '01-'02 4Runners: Cut Pin 12. Both are a Black/Yellow wire.
12. Disabled Keyless Entry Chirp*
13. Ashtray Mod
14. Six Speaker System Upgraded to JBLs
15. Ivan Stewart Wheels and Nitto Tires
16. Tundra Brake Upgrade
17. 1" Body Lift and Rear Fender Liners
18. Hella 4000s Converted to HID
19. Headlights Retrofitted with HID FX Projectors
20. WeatherTech vs Husky Liners
21. Pioneer 4100 HU & Camera Install
22. Combining Both Front & Rear Antennas Into One on Aftermarket HU
23. VSC Zero Point Calibration 01-02 4Runners
24. Hard Wired Garmin Nuvi 500 GPS
25. Used Oil Analysis Thread
26. Air Elbow Mod - write up coming soon...*
Having disabled the DRLs on my 4Runner, I've had several Tacoma owners ask me if disabling DRLs on a Tacoma is done in the same manner as disabling DRLs on a 4Runner; well, for you Tacoma owners, here's a write up I found showing you how to disable your DRLs:
** Disabling DRLs on a Tacoma
~~~~~~~~~~~~~~~~~~~~~~~~~~~~
Web Sites worth visiting:
Parts & Service:
WabFab Off Road
Sonoran Steel
ToyTec Lifts
4Wheel Online
4Crawler Off Road
4x4 Connection
Stubbs Welding
Retrofit Souce - HID Components
Burtman Industries
TRD Parts
McMaster-Carr
Summit Racing
Car Speaker Adapters - Speaker Plate Adapters
Expedition Exchange
Wheelers Offroad - SS Braided Brake Lines
Currie Enterprises - EZ Tire Deflator
Extreme Outback - Portable Air Compressor
Vehicle Light - LED DOT Turn Signals
Task LED - 1 watt Luxeon LED Dome Light Bulbs
Blackstone-Labs - Have your used oil analysized
WeatherTech Liners
Sure Seal Lighting
Auto Lumination
Super Bright LEDs
V-LEDs
Knowledge:
Wikipedia's History of the 4Runner
OEM Paint Colors & Codes
2002 4Runner Brochure PDF
4Runner Top Sites
Gear Ratio Guide
Tire Size Calculator
Tire Size Calculator 2
Toyota Maintenance
30K Mile Maintenance
Brake Replacement
Timing Belt Replacement
4x4 Wire
Undercoating Products
Hilux Surf.UK Forum
TLC Icon FJ 40s
The FJ Company
Fellow 4Runner Owners:
Jab's 4Runner
Bob's 4Runner
Speedy's 4Runner
Gadget's 4Runner
Darren's 4Runner This pg is no more...
**
Last edited by Rock Slide; Jul 3, 2023 at 05:25 PM. Reason: Color
Jul 20, 2006 | 05:07 AM
#2
Thread Starter
Contributing Member
iTrader: (1)
Joined: May 2006
Posts: 2,262
Likes: 1
From: B'ham, AL
OEM Black Pearl Emblem Package Installed:
(FYI, these emblems are no longer available as a Package from Toyota. You can still buy a few of these emblems individually, but not all of them.)


~~~~~~~~~~~~~~~~~~~~~~~~~~~~~~~~~~~~~~~~~~~~~~~~~~ ~~~~~~~~~~~~~~~~~~~~~~~~~~~~~~~~~~~~~~~~~~
**Edit 10-15-08:
Do NOT waste your money on the below pictured OEM rubber mats. Look what happened to mine here: Click Me.
OEM 4Runner All Season Floor Mats. Part No: PT908-89060-02:


**Edit 12-8-08:
Two months after my OEM mats failed, I purchased a set of WeatherTech Liners front & rear. Much Improved!!
See Post #14 of this build thread below for more info.
~~~~~~~~~~~~~~~~~~~~~~~~~~~~~~~~~~~~~~~~~~~~~~~~~~ ~~~~~~~~~~~~~~~~~~~~~~~~~~~~~~~~~~~~~~~~~~
Burtman Protective Door Sil Plates:
For more information on the products Jason Burtman offers, visit his site at Burtman Industries


~~~~~~~~~~~~~~~~~~~~~~~~~~~~~~~~~~~~~~~~~~~~~~~~~~ ~~~~~~~~~~~~~~~~~~~~~~~~~~~~~~~~~~~~~~~~~~
Windows tinted. The entire front windshield has been tinted to 35%. All remaining glass has been tinted to 20%:


~~~~~~~~~~~~~~~~~~~~~~~~~~~~~~~~~~~~~~~~~~~~~~~~~~ ~~~~~~~~~~~~~~~~~~~~~~~~~~~~~~~~~~~~~~~~~~
**Edit 8-20-08:
I have since completed an HID RETROFIT on my Headlights and therefore, no longer run these PIAAs (see Post #13 below for more information on my HID retrofit). In the 2yrs these PIAAs were installed, they worked great. IMO, they are a nice upgrade over stock H4 bulbs.
New PIAA H4 Intense White Headlight bulbs installed. This photo was taken while only the driver's side PIAA bulb was installed. These PIAA bulbs give off a much more whiter light than what the OEM bulbs produce. Notice the yellow cast to the passenger's side OEM bulb:

**
(FYI, these emblems are no longer available as a Package from Toyota. You can still buy a few of these emblems individually, but not all of them.)


~~~~~~~~~~~~~~~~~~~~~~~~~~~~~~~~~~~~~~~~~~~~~~~~~~ ~~~~~~~~~~~~~~~~~~~~~~~~~~~~~~~~~~~~~~~~~~
**Edit 10-15-08:
Do NOT waste your money on the below pictured OEM rubber mats. Look what happened to mine here: Click Me.
OEM 4Runner All Season Floor Mats. Part No: PT908-89060-02:


**Edit 12-8-08:
Two months after my OEM mats failed, I purchased a set of WeatherTech Liners front & rear. Much Improved!!
See Post #14 of this build thread below for more info.
~~~~~~~~~~~~~~~~~~~~~~~~~~~~~~~~~~~~~~~~~~~~~~~~~~ ~~~~~~~~~~~~~~~~~~~~~~~~~~~~~~~~~~~~~~~~~~
Burtman Protective Door Sil Plates:
For more information on the products Jason Burtman offers, visit his site at Burtman Industries


~~~~~~~~~~~~~~~~~~~~~~~~~~~~~~~~~~~~~~~~~~~~~~~~~~ ~~~~~~~~~~~~~~~~~~~~~~~~~~~~~~~~~~~~~~~~~~
Windows tinted. The entire front windshield has been tinted to 35%. All remaining glass has been tinted to 20%:


~~~~~~~~~~~~~~~~~~~~~~~~~~~~~~~~~~~~~~~~~~~~~~~~~~ ~~~~~~~~~~~~~~~~~~~~~~~~~~~~~~~~~~~~~~~~~~
**Edit 8-20-08:
I have since completed an HID RETROFIT on my Headlights and therefore, no longer run these PIAAs (see Post #13 below for more information on my HID retrofit). In the 2yrs these PIAAs were installed, they worked great. IMO, they are a nice upgrade over stock H4 bulbs.
New PIAA H4 Intense White Headlight bulbs installed. This photo was taken while only the driver's side PIAA bulb was installed. These PIAA bulbs give off a much more whiter light than what the OEM bulbs produce. Notice the yellow cast to the passenger's side OEM bulb:
**
Last edited by Rock Slide; Aug 15, 2017 at 05:28 PM.
Jul 21, 2006 | 06:28 AM
#3
Thread Starter
Contributing Member
iTrader: (1)
Joined: May 2006
Posts: 2,262
Likes: 1
From: B'ham, AL
Installed a set of Clear Corners from Jason Burtman:


~~~~~~~~~~~~~~~~~~~~~~~~~~~~~~~~~~~~~~~~~~~~~~~~~~ ~~~~~~~~~~~~~~~~~~~~~~~~~~~~~~~~~~~~~~~~~~
Installed a set of 2005 OEM Tacoma TRD Decals:


~~~~~~~~~~~~~~~~~~~~~~~~~~~~~~~~~~~~~~~~~~~~~~~~~~ ~~~~~~~~~~~~~~~~~~~~~~~~~~~~~~~~~~~~~~~~~~
I purchased a set of sliders from Richard Stubbs of Stubbs Welding. They are the Standard model angled at 15 degrees. I had them powdercoated a medium black at my local PC'ing facility - Baumann Coatings. Both companies do outstanding work in their own profession.


I also purchased a 1st Gen Roll Bar from John Grahm's Auto (a local salvage yard for Toyotas here in town) and also had Baumann Coatings powdercoat it a medium black.
Brian of WabFab Off-Road, modified it to fit and made the mounting plates for it:


Mounting plates underneath for added strength:

A big thanks goes to Waskillywabbit of WabFab Off-Road for his work welding the sliders on and modifying the Roll Bar to fit.
Also a big thanks to Richard for the outstanding work in creating these sliders and Baumann Coatings for their professional powdercoating.
For the full write-up on the Sliders and 1st Gen Roll Bar, click the following link: Click Me
**Update 08-23-12:
I've since removed the roll bar and sold it to a local member. Decided it was time for a change.
~~~~~~~~~~~~~~~~~~~~~~~~~~~~~~~~~~~~~~~~~~~~~~~~~~ ~~~~~~~~~~~~~~~~~~~~~~~~~~~~~~~~~~~~~~~~~~
After having mounted the Maglite to the roll bar, the batteries inside began to rattle while driving, thus causing an irritating noise. To aleviate this problem, I came up with a simple soultion:
I purchased a 4" by 8" piece of adhesive felt from Lowe's Home Improvment. I cut 3 small strips and applied one strip to each battery. Now, my maglite is the quietest thing in my 4Runner.
I've also done the L.E.D. bulb conversion to the maglite, which not only should save on battery drain, but provides an outstanding amount of light over the stock bulb:

**


~~~~~~~~~~~~~~~~~~~~~~~~~~~~~~~~~~~~~~~~~~~~~~~~~~ ~~~~~~~~~~~~~~~~~~~~~~~~~~~~~~~~~~~~~~~~~~
Installed a set of 2005 OEM Tacoma TRD Decals:


~~~~~~~~~~~~~~~~~~~~~~~~~~~~~~~~~~~~~~~~~~~~~~~~~~ ~~~~~~~~~~~~~~~~~~~~~~~~~~~~~~~~~~~~~~~~~~
I purchased a set of sliders from Richard Stubbs of Stubbs Welding. They are the Standard model angled at 15 degrees. I had them powdercoated a medium black at my local PC'ing facility - Baumann Coatings. Both companies do outstanding work in their own profession.


I also purchased a 1st Gen Roll Bar from John Grahm's Auto (a local salvage yard for Toyotas here in town) and also had Baumann Coatings powdercoat it a medium black.
Brian of WabFab Off-Road, modified it to fit and made the mounting plates for it:


Mounting plates underneath for added strength:

A big thanks goes to Waskillywabbit of WabFab Off-Road for his work
welding the sliders on and modifying the Roll Bar to fit. Also a big thanks to Richard for the outstanding work in creating these sliders and Baumann Coatings for their professional powdercoating.
For the full write-up on the Sliders and 1st Gen Roll Bar, click the following link: Click Me
**Update 08-23-12:
I've since removed the roll bar and sold it to a local member. Decided it was time for a change.
~~~~~~~~~~~~~~~~~~~~~~~~~~~~~~~~~~~~~~~~~~~~~~~~~~ ~~~~~~~~~~~~~~~~~~~~~~~~~~~~~~~~~~~~~~~~~~
After having mounted the Maglite to the roll bar, the batteries inside began to rattle while driving, thus causing an irritating noise. To aleviate this problem, I came up with a simple soultion:
I purchased a 4" by 8" piece of adhesive felt from Lowe's Home Improvment. I cut 3 small strips and applied one strip to each battery. Now, my maglite is the quietest thing in my 4Runner.
I've also done the L.E.D. bulb conversion to the maglite, which not only should save on battery drain, but provides an outstanding amount of light over the stock bulb:

**
Last edited by Rock Slide; Aug 15, 2017 at 05:34 PM.
Sep 6, 2006 | 06:17 PM
#4
Thread Starter
Contributing Member
iTrader: (1)
Joined: May 2006
Posts: 2,262
Likes: 1
From: B'ham, AL
I obtained a Field Monitor Console out of Hilux Surf from a friend of mine who resides in New Zealand. He originally pulled this unit out of Surf from Japan. This Field Monitor is a temperature gauge, barometer, compass, altimeter and relative altimeter all in one. Of course the coolest thing is the scrolling green lights that start up once the vehicle starts moving!
The toughest part was figuring out how to wire this unit up correctly, but with the help of both YT members, Midiwall and Soljah, it was a sinch. A lot of grafting, splicing, tapping and soldering wires was done to make this unit come to life.
Picture of the Barometer reading:

Picture of the Altimeter reading:

Night shot:

For the full Write up on the install of the Field Monitor Console, click on the link below:
Click Me
It's a great compliment to any 4Runner. If you're lucky enough to find one, I highly recommend purchasing it!
~~~~~~~~~~~~~~~~~~~~~~~~~~~~~~~~~~~~~~~~~~~~~~~~~~ ~~~~~~~~~~~~~~~~~~~~~~~~~~~~~~~~~~~~~~~~~~
Diff Breather Mod Parts List:
Here is the list of parts needed to complete the diff breather mod:
The two main parts from Toyota are:
1. 90404-51319 Union
2. 90930-03136 Plug, breather
Should be no more than $15.00.
The other parts you can pick up at a local parts store:
1. 3/8" fuel line hose...about 6 ft
2. 1/4" - 5/8" hose clamps (get a couple of them)
3. Zip ties
I ran the tube from the axle and up next to the gas tank filler neck. The breather valve exits next to the gas cap:

Hope this helps!
~~~~~~~~~~~~~~~~~~~~~~~~~~~~~~~~~~~~~~~~~~~~~~~~~~ ~~~~~~~~~~~~~~~~~~~~~~~~~~~~~~~~~~~~~~~~~~
Rear Mud Flap Mod:
I got tired of seeing those extra pieces of black rubber on each of my rear mud flaps hanging down low on the truck. So I used a utility knife and sliced them off.
BEFORE:


AFTER:

~~~~~~~~~~~~~~~~~~~~~~~~~~~~~~~~~~~~~~~~~~~~~~~~~~ ~~~~~~~~~~~~~~~~~~~~~~~~~~~~~~~~~~~~~~~~~~
I took an idea out of member J.A.'s book and purchased a 375wt Power Inverter:

I purchased an aux. power outlet for $5.00 and installed it under the passenger's seat. There was already a pre-drilled hole in the seat frame, so I mounted the outlet there using a bolt, lock washer and wing nut. I ran the wires under the carpet and under the middle console up to the dash. Because I never use the cigarette lighter outlet, I then tapped the power and ground wires into it.
Aux oulet under Passenger's seat:

Installed:

This Inverter has been a great investment. I've used it countless times to charge or operate all sorts of equipment.
For the Full Write-Up, click the link below:
Click Me
**
Last edited by Rock Slide; Aug 15, 2017 at 05:40 PM.
Jan 16, 2007 | 11:39 AM
#5
Thread Starter
Contributing Member
iTrader: (1)
Joined: May 2006
Posts: 2,262
Likes: 1
From: B'ham, AL
I read how Bob_98SR5 did some sound deadening on his 4Runner and thought I'd give it a try. I did not put forth as much work as he did, but it turned out great. I'd provide you a link to his web page, but it appears 4runners.org has since fallen off the internet...
It all started with a troublesome leak I had in the cabin of my 4Runner that I couldn't locate. Thanks to the advice of some members here, I found the leak and plugged it. Turns out, when I ran some additional wires through the firewall grommet, I accidentally pierced it. Every time it rained, water rolled off the hood, onto these wires and straight into my 4Runner causing the carpet insulation to mildew! I used some black silicone and sealed both sides of the grommet.
I removed the one-piece carpet and the thin factory padding that was glued to the carpet. Since I had half the truck torn apart, why not go ahead and lay down some sound deadening material and new padding.
My process in 3 steps:
Step 1 - Cab
Step 2 - Cargo & Hatch
Step 3 - Doors
For more information on the Sound Deadening material I used, visit: McCaster-Carr. Part Number: 9640T2 in the 6" roll. It has a very strong adhesive on one side and a reflective aluminum surface on the other. For the cab and cargo area, I used 4 and 1/2 rolls.
For the new padding, I picked up some 8lb carpet padding at my local Lowe's Home Improvment Store. They sell a 6ft wide by 9ft long piece for around $30.00. I lucked up and got the 9ft roll for $17.00 due to mispricing the item. I tried to find some for free, but no one was willing to let the 8lb stuff go!
Carpet padding is sold as 4lb, 6lb, 8lb and so on. When you need something above 10lb, the padding becomes heavier, stiffer and more expensive. It's also only offered as a rubber compound above 10lb I believe. 8lb is very firm, but molds very easy to many contours.
To secure the padding, I purchased 2 cans of 3M Adhesive Spray Glue #90 at Lowe's as well. This stuff's expensive, but well worth it.
I do not feel I need to further sound deaden my headliner, so for now I have only done Step 1 & 2 of my Three Step Process.
Step 1 - The Cab:
First was the cab. I removed all 4 seats, trim pieces and console pieces and then removed the one-piece carpet.
The sound deadening material is very easy to cut with a utility knife and molds to the floor contours very well. I applied it anywhere bare metal showed:


Next, I installed the padding everywhere I saw fit:


While the carpet was out, I went ahead and cleaned it. It was drying while I installed the padding:

Reinstalled all trim pieces and console pieces:


Put the seats back in and that's it! Step 1 is complete.
Step 2 - The Cargo Area & Hatch:
I removed the roll bar, trim pieces and rolled the carpet back. I installed the sound deadening material all over. I then installed a layer of the new carpet padding down over the sound deadening material. The OEM padding was still in good shape on the fender carpet pieces, so I just reused those 2 pieces. You'll also notice I stuffed extra unused padding pieces into the empty spaces in the fenders between the sheet metal and trim pieces.
This picture shows the new sound deadening material layed and carpet padding over it:

Rear Hatch:

I've since reassembled everything and now Step 2 is done.
To date, I have not done the doors. The cabin is much quieter than it was before. This project was time consuming, but very worth while.
**
Last edited by Rock Slide; Aug 15, 2017 at 05:47 PM.
Mar 30, 2007 | 10:43 AM
#6
Thread Starter
Contributing Member
iTrader: (1)
Joined: May 2006
Posts: 2,262
Likes: 1
From: B'ham, AL
Installed the Sonoran Steel 7.1 Lift Kit, TJM T-15 Bumper, Wilderness Rack & mulitple IPF & PIAA Aux Lights. With the addition of the TJM, my front dropped 0.5 inches.
If your front TJM Bumper Pads ever need replacing, the part number is: 076-P15-BUMP2. You must order them as a pair.
**Update 4-04-08:
I've since sold the Rack, 4 front rack mounted IPFs and 2 bumper mounted IPFs. (I kept the rear mounted PIAAs, just not sure where to install them yet.) The size of the Wilderness rack was a hinderence on narrow trails. Plus, most of the stuff I now haul, I can store in the cargo area instead. No need for a rack if I don't use it frequently. I purchased a pair of Hella 4000s (Cornering Beam) instead and converted them to 35wt HIDs, with 5000K bulbs.


For the Full Write-Up and mulitple pictures, click the link below
Click Me
~~~~~~~~~~~~~~~~~~~~~~~~~~~~~~~~~~~~~~~~~~~~~~~~~~ ~~~~~~~~~~~~~~~~~~~~~~~~~~~~~~~~~~~~~~~~~~
Couple shots on a nearby trail:


**
Last edited by Rock Slide; Aug 15, 2017 at 05:50 PM.
May 23, 2007 | 09:06 AM
#7
Thread Starter
Contributing Member
iTrader: (1)
Joined: May 2006
Posts: 2,262
Likes: 1
From: B'ham, AL
Upgraded my door speakers all the way around.
Installed the following:
Front Door Speakers: JBL GTO607C 6.5" 2-Way Component - 70W RMS
Rear Door Speakers: JBL GTO527 5.25" 2-Way Coaxial - 45W RMS
To mount the rear door speakers, I purchased a set of speaker adapter plates and speaker spacers from - Car Speaker Adapters
Front Door Speaker:

Tweeter:

Rear Door Speaker:
(You can see what it took to get that speaker to sit out far enough so the glass would not hit it when rolled down.)

Install was fairly easy. A big thanks to all the YT members who helped make this install go as straight forward as possible.
For the write-up, click in the link below:
Click Me
**
Last edited by Rock Slide; Aug 15, 2017 at 05:52 PM.
Trending Topics
Sep 30, 2007 | 02:53 PM
#8
Thread Starter
Contributing Member
iTrader: (1)
Joined: May 2006
Posts: 2,262
Likes: 1
From: B'ham, AL
Picked up a second OEM Cargo Liner for free from a friend a few months back. Since I already had one OEM Cargo Liner, I took this second one and cut it in such a way that it now acts as an extension to the first when the back seats are folded down. When not in use, it simply stores under the main liner:


~~~~~~~~~~~~~~~~~~~~~~~~~~~~~~~~~~~~~~~~~~~~~~~~~~ ~~~~~~~~~~~~~~~~~~~~~~~~~~~~~~~~~~~~~~~~~~
My wife's 2000 4Runner threw a Rod. But hey, one motor swap later and her 4Runner's running great! Check out the full story here:
Click Me
**


~~~~~~~~~~~~~~~~~~~~~~~~~~~~~~~~~~~~~~~~~~~~~~~~~~ ~~~~~~~~~~~~~~~~~~~~~~~~~~~~~~~~~~~~~~~~~~
My wife's 2000 4Runner threw a Rod. But hey, one motor swap later and her 4Runner's running great! Check out the full story here:
Click Me
**
Last edited by Rock Slide; Aug 15, 2017 at 05:53 PM.
Sep 30, 2007 | 02:58 PM
#9
Thread Starter
Contributing Member
iTrader: (1)
Joined: May 2006
Posts: 2,262
Likes: 1
From: B'ham, AL
Installed a set of 16x8 TRD Ivan Stewart wheels (Part # PTR20-34070) and paired them with a set of 265/75 Nitto Terra Grapplers:


A big thanks to member TACOZILLA for the great deal on the wheels and Discount Tire for the tires.
For more pictures and information on my install, click the link below:
Click Me
A couple shots out at the Cahaba River:


**


A big thanks to member TACOZILLA for the great deal on the wheels and Discount Tire for the tires.
For more pictures and information on my install, click the link below:
Click Me
A couple shots out at the Cahaba River:


**
Last edited by Rock Slide; Aug 15, 2017 at 05:55 PM.
Dec 27, 2007 | 12:45 PM
#10
Thread Starter
Contributing Member
iTrader: (1)
Joined: May 2006
Posts: 2,262
Likes: 1
From: B'ham, AL
Got around to upgrading my stock brakes to Tundra Rotors, Calipers and Pads. Even powder coated the new calipers High Gloss Red. Installed a set of Goodridge SS Braided Brake Lines too.


For the Full Write Up, click the link below:
Click Me
~~~~~~~~~~~~~~~~~~~~~~~~~~~~~~~~~~~~~~~~~~~~~~~~~~ ~~~~~~~~~~~~~~~~~~~~~~~~~~~~~~~~~~~~~~~~~~
I replaced my Mobil1 M1-209 oil filter with a Purolator PureOne. Part # PL10241. Although the M1-209 is a great filter, the PureOne not only claims better results over the M1, it also is half the cost of the M1. Check out this quote I found posted by YT member Speedy who did some research on the PureOne:
Here's the numbers I got directly from the engineers at Mobil1 and Purolator:
Purolator PureOne Efficiency:
30 micron 98%
20 Micron 96%
10 Micron 85%
Mobil1 Efficiency:
30 Micron 97%
20 Micron 85%
No rating for 10
You can judge for yourself how much better the Purolator is.
-Speedy
I've begun using Purolator filters now and haven't looked back since.
**
Last edited by Rock Slide; Aug 15, 2017 at 05:56 PM.
Mar 17, 2008 | 07:13 AM
#11
Thread Starter
Contributing Member
iTrader: (1)
Joined: May 2006
Posts: 2,262
Likes: 1
From: B'ham, AL
Rear Seat Cushion Wing Bolt Mod:
I purchased these Rear Seat Cushion Wing Bolts from www.sonoransteel.com. Wow, do they make removing and reinstalling the rear seat bottoms a breeze!
Bolt itself:

Bolts installed w/o Covers:

Painted Black:

More information on Steve's 'Rear Seat Cushion Wing Bolts' can be found here: Sonoran Steel
~~~~~~~~~~~~~~~~~~~~~~~~~~~~~~~~~~~~~~~~~~~~~~~~~~ ~~~~~~~~~~~~~~~~~~~~~~~~~~~~~~~~~~~~~~~~~~
Wab Fab Off Road 1" Body Lift installed
Wab Fab 1" UHMW Polyurethane Spacers & 4Crawler Steering Extension:

Before:


After:


Installed a set of OEM Rear Fender liners from an '89 Toyota pickup to hide the gap created by the BL:
Before:

After:

A big thanks to WabFab for the installation of this Body Lift .
.
For the full write up, including more pictures and detailed information of the install, click on the link below:
Click Me
~~~~~~~~~~~~~~~~~~~~~~~~~~~~~~~~~~~~~~~~~~~~~~~~~~ ~~~~~~~~~~~~~~~~~~~~~~~~~~~~~~~~~~~~~~~~~~
Installed a set of Eagle Eye LED Tail Lights from Burtman Industries:
*Please Note* - Neither of these pictures were taken with the brake pedal depressed. In the 1st shot, the photo was taken with the camera's flash ON. In the 2nd shot, the photo was taken without a flash and the camera was set to "Night" mode:


I'm also running a pair of LEDs for my Tag lights that I purchased from SuperBrightLeds.com. These LED lights really helped "clean up" the overall lighting on the rear of my 4Runner. I highly recommend them.
license plate(194 type)
Quantity: 2
Product: WLED 6-LED bulb $ 2.79 (each)
Color: White +$0.95
~~~~~~~~~~~~~~~~~~~~~~~~~~~~~~~~~~~~~~~~~~~~~~~~~~ ~~~~~~~~~~~~~~~~~~~~~~~~~~~~~~~~~~~~~~~~~~
Update 5-09-08:
Having sold the bumper mounted IPFs, it was time I got another pair of lights for the front. I went with the 8" round, Hella 4000s in the Cornering Beam pattern. Oh yeah, I also converted them to 35wt HIDs. (H1 bulbs in 4300K color temp.)


Quick video of them firing up:
Approx 40ft back:

On the trail with just my headlights on (photo taken thru the sunroof):

Same spot with just the Hellas on. The ridge in the background is 300+ feet away:

For more pictures of the install, check out the Write Up below:
Click Me
More info on this upgrade can also be found on the following links:
http://www.ttora.com/forum/showthread.php?t=82281
HID Kit purchased from Ebay:
Seller ID: hqz4321
**
I purchased these Rear Seat Cushion Wing Bolts from www.sonoransteel.com. Wow, do they make removing and reinstalling the rear seat bottoms a breeze!
Bolt itself:

Bolts installed w/o Covers:

Painted Black:

More information on Steve's 'Rear Seat Cushion Wing Bolts' can be found here: Sonoran Steel
~~~~~~~~~~~~~~~~~~~~~~~~~~~~~~~~~~~~~~~~~~~~~~~~~~ ~~~~~~~~~~~~~~~~~~~~~~~~~~~~~~~~~~~~~~~~~~
Wab Fab Off Road 1" Body Lift installed
Wab Fab 1" UHMW Polyurethane Spacers & 4Crawler Steering Extension:

Before:


After:


Installed a set of OEM Rear Fender liners from an '89 Toyota pickup to hide the gap created by the BL:
Before:

After:

A big thanks to WabFab for the installation of this Body Lift
.For the full write up, including more pictures and detailed information of the install, click on the link below:
Click Me
~~~~~~~~~~~~~~~~~~~~~~~~~~~~~~~~~~~~~~~~~~~~~~~~~~ ~~~~~~~~~~~~~~~~~~~~~~~~~~~~~~~~~~~~~~~~~~
Installed a set of Eagle Eye LED Tail Lights from Burtman Industries:
*Please Note* - Neither of these pictures were taken with the brake pedal depressed. In the 1st shot, the photo was taken with the camera's flash ON. In the 2nd shot, the photo was taken without a flash and the camera was set to "Night" mode:


I'm also running a pair of LEDs for my Tag lights that I purchased from SuperBrightLeds.com. These LED lights really helped "clean up" the overall lighting on the rear of my 4Runner. I highly recommend them.
license plate(194 type)
Quantity: 2
Product: WLED 6-LED bulb $ 2.79 (each)
Color: White +$0.95
~~~~~~~~~~~~~~~~~~~~~~~~~~~~~~~~~~~~~~~~~~~~~~~~~~ ~~~~~~~~~~~~~~~~~~~~~~~~~~~~~~~~~~~~~~~~~~
Update 5-09-08:
Having sold the bumper mounted IPFs, it was time I got another pair of lights for the front. I went with the 8" round, Hella 4000s in the Cornering Beam pattern. Oh yeah, I also converted them to 35wt HIDs
. (H1 bulbs in 4300K color temp.)


Quick video of them firing up:
Approx 40ft back:

On the trail with just my headlights on (photo taken thru the sunroof):

Same spot with just the Hellas on. The ridge in the background is 300+ feet away:

For more pictures of the install, check out the Write Up below:
Click Me
More info on this upgrade can also be found on the following links:
http://www.ttora.com/forum/showthread.php?t=82281
HID Kit purchased from Ebay:
Seller ID: hqz4321
**
Last edited by Rock Slide; Aug 15, 2017 at 06:07 PM.
May 19, 2008 | 05:46 AM
#12
Thread Starter
Contributing Member
iTrader: (1)
Joined: May 2006
Posts: 2,262
Likes: 1
From: B'ham, AL
5.20.08
Nothing special, just thought I would post this information . These measurements illustrate the gain in lift height I obtained after each modification was made. These measurements were taken from the ground to the center of the bottom lip of both front and rear driver side fenders.
STOCK RIDE HEIGHT
Front: 34.00 inches
Rear: 33.75 inches
7.1 LIFT KIT INSTALLED
Front: 36.50 inches
Rear: 37.00 inches
TJM T-15 INSTALLED
Front: 36.0 inches
Rear: No Change
1" BODY LIFT & 32" TIRES INSTALLED
Front: 37.00 inches
Rear: 38.50 inches
OVERALL GAIN OVER STOCK HEIGHT
Front: + 3.00 inches
Rear: + 4.75 inches

**
Nothing special, just thought I would post this information
. These measurements illustrate the gain in lift height I obtained after each modification was made. These measurements were taken from the ground to the center of the bottom lip of both front and rear driver side fenders.STOCK RIDE HEIGHT
Front: 34.00 inches
Rear: 33.75 inches
7.1 LIFT KIT INSTALLED
Front: 36.50 inches
Rear: 37.00 inches
TJM T-15 INSTALLED
Front: 36.0 inches
Rear: No Change
1" BODY LIFT & 32" TIRES INSTALLED
Front: 37.00 inches
Rear: 38.50 inches
OVERALL GAIN OVER STOCK HEIGHT
Front: + 3.00 inches
Rear: + 4.75 inches

**
Last edited by Rock Slide; Aug 15, 2017 at 06:08 PM.
Aug 18, 2008 | 08:06 AM
#13
Thread Starter
Contributing Member
iTrader: (1)
Joined: May 2006
Posts: 2,262
Likes: 1
From: B'ham, AL
Just finished a complete HID Retrofit to my stock headlights
Here's what I used:
Infiniti FX Bi-xenon Projectors
Acura TSX Lenses
Hella Gen 3 Ballasts
35W 4300K Philip D2S 85122+ Bulbs
H4 Plug-n-Play Wiring Kit - (ebay special)
Malibu Light Covers
Here are a few pictures of the finished product:


For more pictures of the install, check out the Write Up below:
Click Me

**
Here's what I used:
Infiniti FX Bi-xenon Projectors
Acura TSX Lenses
Hella Gen 3 Ballasts
35W 4300K Philip D2S 85122+ Bulbs
H4 Plug-n-Play Wiring Kit - (ebay special)
Malibu Light Covers
Here are a few pictures of the finished product:


For more pictures of the install, check out the Write Up below:
Click Me
**
Last edited by Rock Slide; Aug 15, 2017 at 06:09 PM.
Dec 14, 2008 | 12:23 PM
#14
Thread Starter
Contributing Member
iTrader: (1)
Joined: May 2006
Posts: 2,262
Likes: 1
From: B'ham, AL
It was time to upgrade my floor mats. My oem rubber "all season" mats failed after just 2yrs worth of use.
In the Beginning:

Two Years Later:


So, after a bit of research, the 2 best options available today, are either the WeatherTech or Husky Liners. To make my decision simple, I just ordered a set of both..
After a week of using both, the WeatherTech liners won the decision hands down. They have a much better fit and feel compared to that of the Huskys. The Huskys got returned.


For more photos of these mats installed and even a few comparison photos of the Huskys, click the below link. It's full of info on both these mats:
Click Me
**
In the Beginning:

Two Years Later:


So, after a bit of research, the 2 best options available today, are either the WeatherTech or Husky Liners. To make my decision simple, I just ordered a set of both.
. After a week of using both, the WeatherTech liners won the decision hands down
. They have a much better fit and feel compared to that of the Huskys. The Huskys got returned.


For more photos of these mats installed and even a few comparison photos of the Huskys, click the below link. It's full of info on both these mats:
Click Me
**
Last edited by Rock Slide; Aug 15, 2017 at 06:14 PM.
Oct 3, 2009 | 10:38 AM
#15
Thread Starter
Contributing Member
iTrader: (1)
Joined: May 2006
Posts: 2,262
Likes: 1
From: B'ham, AL
New Pioneer 4100DVD HU installed w/ a few cameras:
HU:


Camera Switch:

Baby Cam:

Backup Cam:

Full Write Up here:
Click Me
Having both a Pioneer HU and a Hilux Field Monitor installed created an issue as seen here: CLICK ME.
UPDATE 1/25/12: Solved the problem mentioned above! Refer to the link and you'll see...
**
HU:


Camera Switch:

Baby Cam:

Backup Cam:

Full Write Up here:
Click Me
Having both a Pioneer HU and a Hilux Field Monitor installed created an issue as seen here: CLICK ME.
UPDATE 1/25/12: Solved the problem mentioned above! Refer to the link and you'll see...
**
Last edited by Rock Slide; Aug 15, 2017 at 06:19 PM.
Jan 23, 2010 | 09:24 AM
#16
Thread Starter
Contributing Member
iTrader: (1)
Joined: May 2006
Posts: 2,262
Likes: 1
From: B'ham, AL
Modified and color matched my TJM. A big thanks to WabFab Off Road for all their hard work modifying my bumper . It was later professionally painted at a local body shop.
Run down of the mods:
-Raise the bumper 1" to accomodate the body lift
-Cut oval slots to mount new LED turn signals
-Cut holes for 4" round fog lights
-Bobbed the side wings
-Weld side wings to main bumper support (the side wings originally bolted to the front support.)
-Replace front bumper rubber pads with a set of custom low profile welded metal pads
Once the above mods were completed, I turned the bumper over to a local body shop. They in turn did all the pre/paint work. The entire back side of the bumper was rhino-lined black. As was the bottom front portion of the bumper to keep rocks from chipping it. Then the top half of the front was colored matched Thunder Cloud metallic.


LED Turn Signals:
Full Write Up on the Bumper Mod can be found here: Click Me
**
. It was later professionally painted at a local body shop.Run down of the mods:
-Raise the bumper 1" to accomodate the body lift
-Cut oval slots to mount new LED turn signals
-Cut holes for 4" round fog lights
-Bobbed the side wings
-Weld side wings to main bumper support (the side wings originally bolted to the front support.)
-Replace front bumper rubber pads with a set of custom low profile welded metal pads
Once the above mods were completed, I turned the bumper over to a local body shop. They in turn did all the pre/paint work. The entire back side of the bumper was rhino-lined black. As was the bottom front portion of the bumper to keep rocks from chipping it. Then the top half of the front was colored matched Thunder Cloud metallic.


LED Turn Signals:
Full Write Up on the Bumper Mod can be found here: Click Me
**
Last edited by Rock Slide; Aug 15, 2017 at 06:21 PM.
Sep 22, 2010 | 06:50 PM
#17
Thread Starter
Contributing Member
iTrader: (1)
Joined: May 2006
Posts: 2,262
Likes: 1
From: B'ham, AL
Finally posting photos of my gps that I hard wired + the Scangauge II installed:
GPS: Garmin Nuvi 500
Mount: Pro-Fit VSM
GPS Mounted:

Wiring Diagram. Disassembled the garmin car adapter plug to access the power/ground wires and ran new wiring:

Full Write Up can be found here: Click Me
-------------------------------------------------------------------------
Scangauge II mounted. Drilled a hole in the console to run the power cable to the OBDII Port. The SGII is held in place using a pair of velcro strips:

**
Last edited by Rock Slide; Aug 15, 2017 at 06:23 PM.
May 13, 2017 | 04:47 AM
#18
Thread Starter
Contributing Member
iTrader: (1)
Joined: May 2006
Posts: 2,262
Likes: 1
From: B'ham, AL
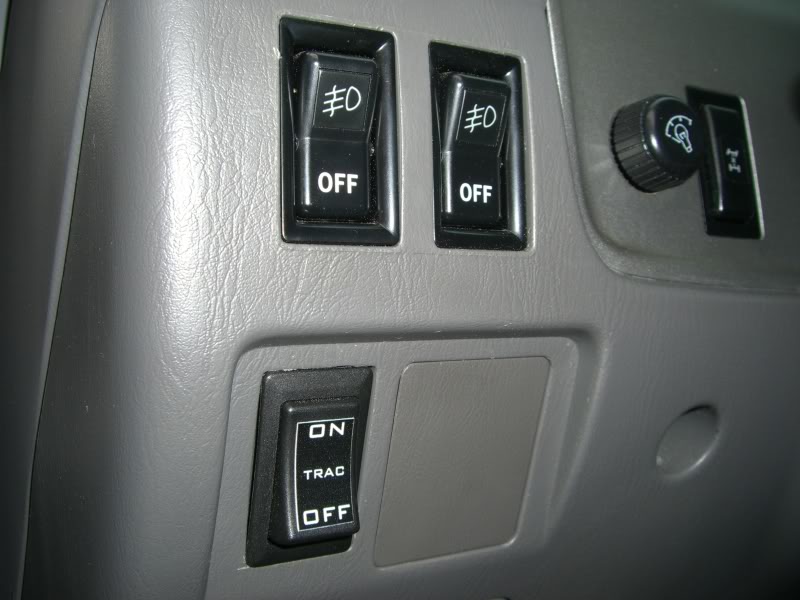
No new mods as of yet, just updating my Profile page to include info on the AndyMod-
The original AndyMod disabled VSC, TRAC & ABS: Click Me.
The follow-up, aptly named AndyMod 2.0, disables VSC & TRAC only! ABS remains active: Click Me.
AndyMod ON/OFF Decal installed:
**
The original AndyMod disabled VSC, TRAC & ABS: Click Me.
The follow-up, aptly named AndyMod 2.0, disables VSC & TRAC only! ABS remains active: Click Me.
AndyMod ON/OFF Decal installed:
**
Last edited by Rock Slide; Aug 15, 2017 at 06:24 PM.

Thread
Thread Starter
Forum
Replies
Last Post
jlehner
95.5-2004 Tacomas & 96-2002 4Runners (Build-Up Section)
30
Dec 12, 2013 09:50 AM
Ripcord_4Runner
95.5-2004 Tacomas & 96-2002 4Runners (Build-Up Section)
21
Apr 16, 2012 07:16 PM


