
rattlewagon's 1992 Pickup Build-Up Thread
 Jan 28, 2014 | 09:24 AM
#342
Thread Starter
Registered User


Joined: Oct 2009
Posts: 4,832
Likes: 332
From: Northfield, Vermont
Got my tanning booth set up
Got the frame finished and boxed on all sides and mounted the steering box.
Like a glove.

And the passenger side. I trimmed the smaller spacer on the other side for more up travel but didnt do this side because I didnt need to, but it looks pretty goofy being so tall. There is about 1/8th of an inch between the hemis at the closest point. Plenty of room!
Got the frame finished and boxed on all sides and mounted the steering box.
Like a glove.
And the passenger side. I trimmed the smaller spacer on the other side for more up travel but didnt do this side because I didnt need to, but it looks pretty goofy being so tall. There is about 1/8th of an inch between the hemis at the closest point. Plenty of room!
Jan 29, 2014 | 12:17 PM
#344
Thread Starter
Registered User
Joined: Oct 2009
Posts: 4,832
Likes: 332
From: Northfield, Vermont
Thanks Toytech and redwagon!
Im pretty lucky to have access to this shop, I would be doing it in a small 2 car garage without it, using just hand tools.
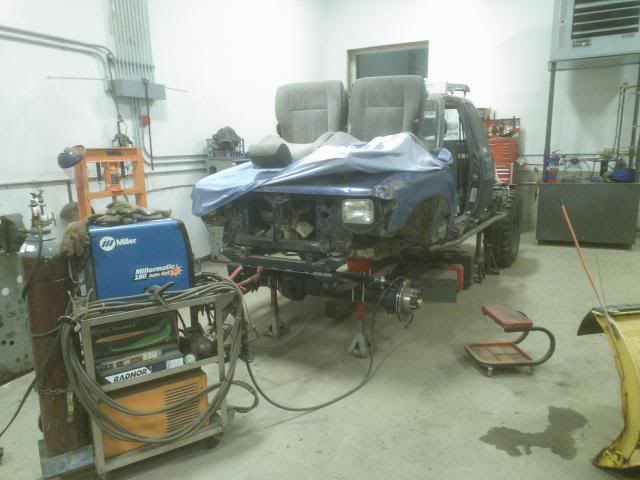
Group pic from Sat night, One sammy is getting the front end welded and the other is in.. well.. just because he wanted to tinker! Haha.

Im pretty lucky to have access to this shop, I would be doing it in a small 2 car garage without it, using just hand tools.
Group pic from Sat night, One sammy is getting the front end welded and the other is in.. well.. just because he wanted to tinker! Haha.
Last edited by rattlewagon; Jan 29, 2014 at 12:20 PM.
Feb 5, 2014 | 05:50 AM
#347
Thread Starter
Registered User
Joined: Oct 2009
Posts: 4,832
Likes: 332
From: Northfield, Vermont
Thanks Chef and julsruls!
Went down to change the oil in the Fiances A6 and got a little bit done.
The steering shaft needed to be about 1" longer due to the box being farther forward. So I cut a sleeve and Ill weld it up next time Im down there.

Went down to change the oil in the Fiances A6 and got a little bit done.
The steering shaft needed to be about 1" longer due to the box being farther forward. So I cut a sleeve and Ill weld it up next time Im down there.
Feb 17, 2014 | 03:44 PM
#348
Thread Starter
Registered User
Joined: Oct 2009
Posts: 4,832
Likes: 332
From: Northfield, Vermont
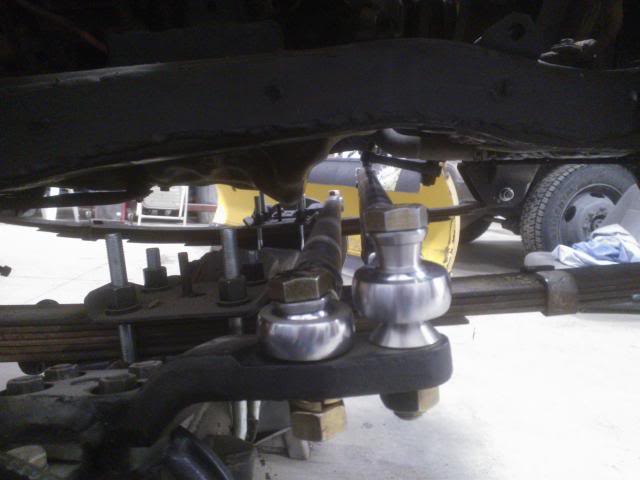
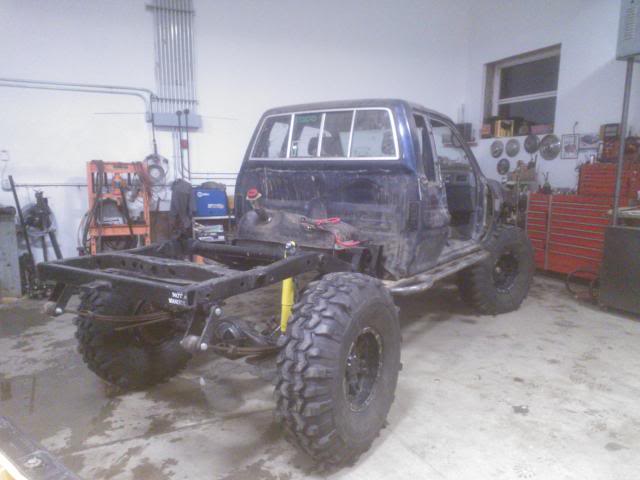
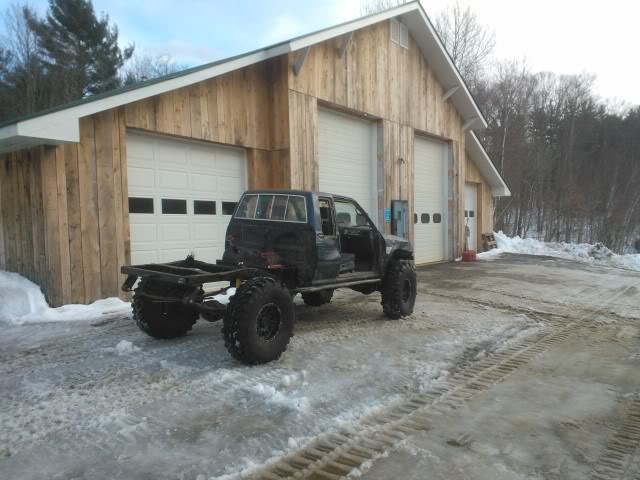
Sittin on all 4s.
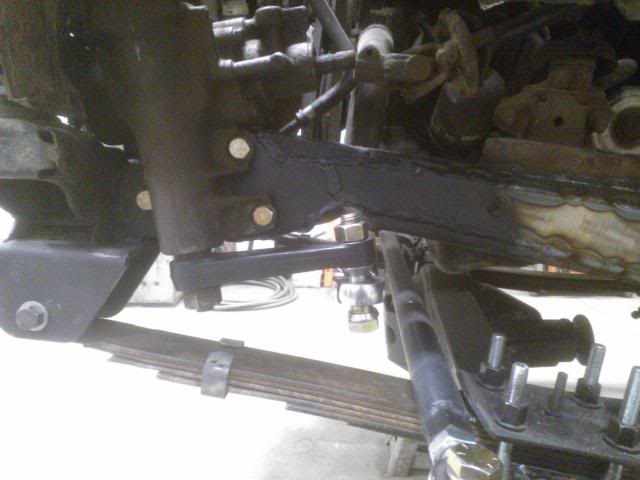
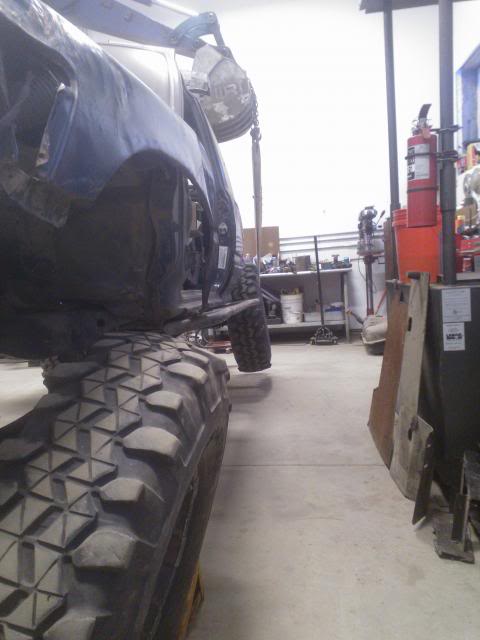
Tierod clearance

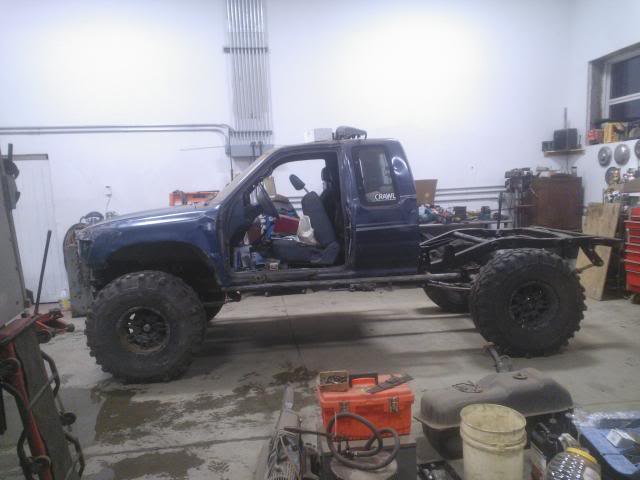
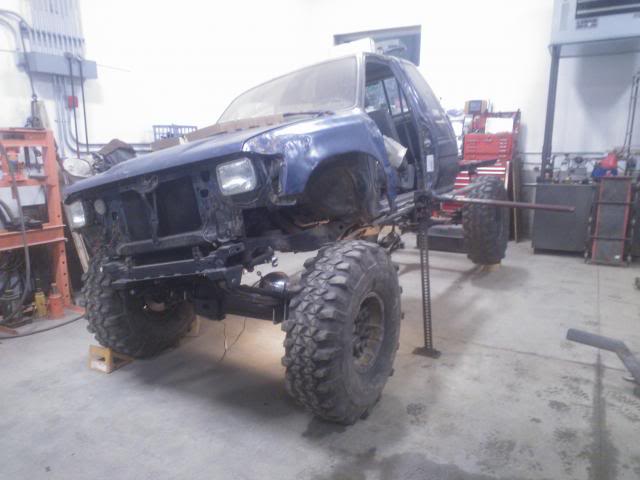
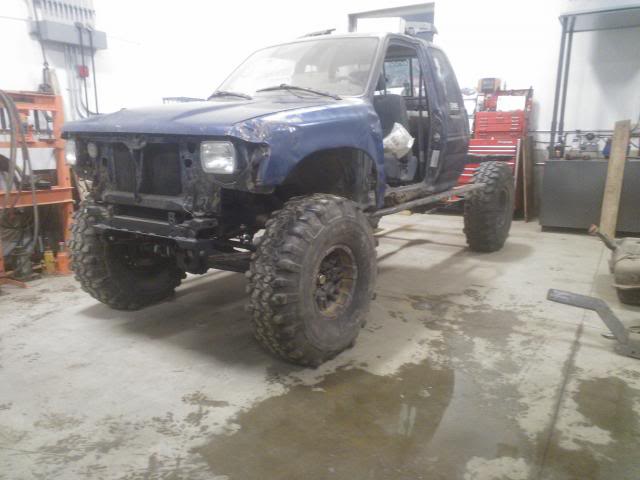
Flexed it out a little better with some help of the excavator


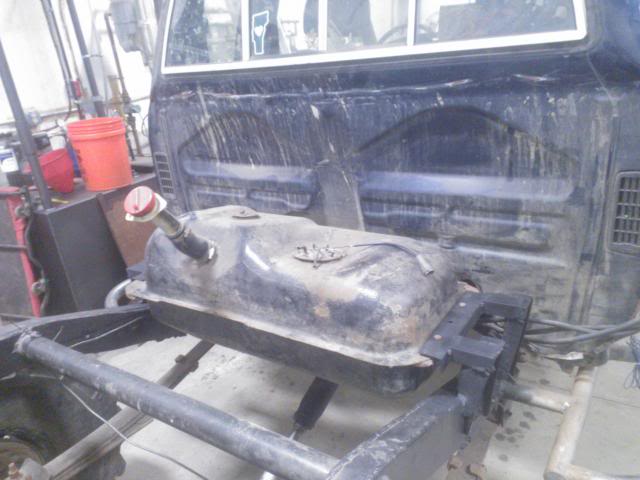
And got my tank mounted. And started running break lines.
Shocks and front drive shaft coming next.

Tierod clearance
Flexed it out a little better with some help of the excavator
And got my tank mounted. And started running break lines.
Shocks and front drive shaft coming next.
Last edited by rattlewagon; Feb 17, 2014 at 04:26 PM.
Feb 21, 2014 | 07:33 PM
#353
Thread Starter
Registered User
Joined: Oct 2009
Posts: 4,832
Likes: 332
From: Northfield, Vermont
Thanks guys! Action shots soon I promise.
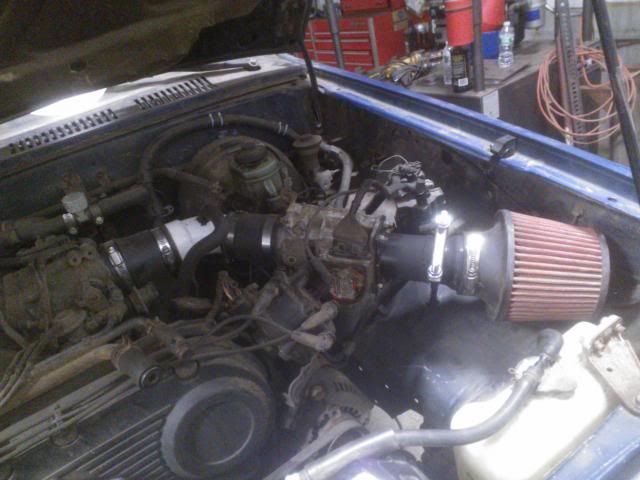
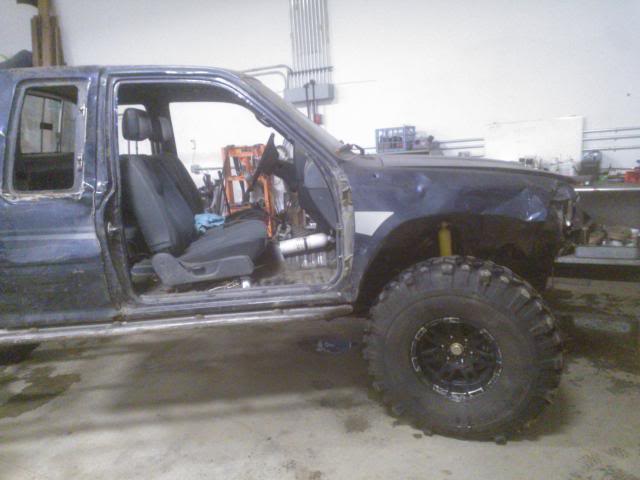
Intake is a little wonky, but it cleaned up the engine bay, which is what I was after.
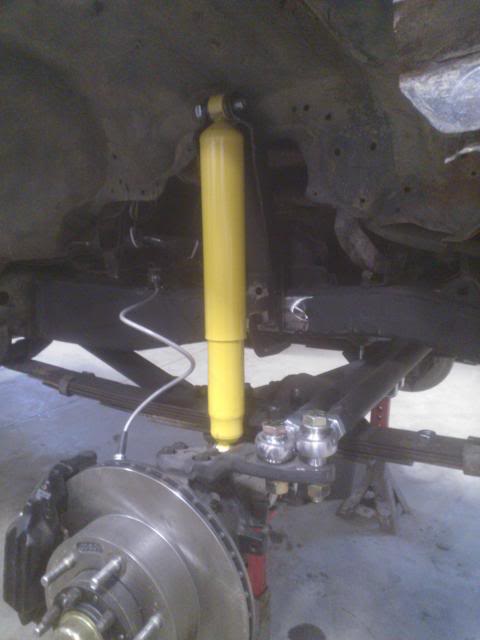
Front shock mock up. They are the 12" ford shocks with ford shock towers. Set for 3.5" up travel and 8.5" down. Should be plenty of travel.
Finished pic, Bumpstop is some small polypro (or something) on the spring plate, and bumps against the frame, just before the tie rod hits it.
Rear shock setup. Same Ford shocks and towers, but cut the towers down to fit.

Made a square shaft out of 2 single joint yokes. 8" droop and 4" stuff. Used 2.5" Receiver tubing (no inside seam) and some 2" .25 wall tube for the inside part. It required re drilling the mounting pattern on the t case output, but wasnt a big deal. . (more angle than clearance the CV joint) And took it for a drive!

I need to get a small piece of gas line tomorrow after work, but expect some action shots soon, and plans are now being drafted up for a bed/cage
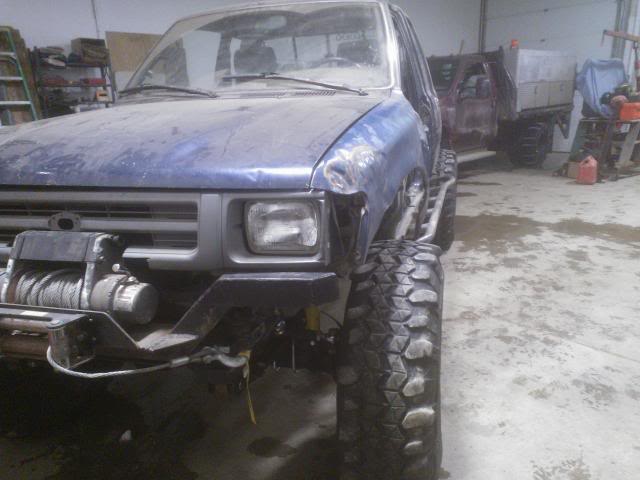
Looks like I got the RUFs and Chevies height to match quite nice.
Intake is a little wonky, but it cleaned up the engine bay, which is what I was after.
Front shock mock up. They are the 12" ford shocks with ford shock towers. Set for 3.5" up travel and 8.5" down. Should be plenty of travel.
Finished pic, Bumpstop is some small polypro (or something) on the spring plate, and bumps against the frame, just before the tie rod hits it.
Rear shock setup. Same Ford shocks and towers, but cut the towers down to fit.
Made a square shaft out of 2 single joint yokes. 8" droop and 4" stuff. Used 2.5" Receiver tubing (no inside seam) and some 2" .25 wall tube for the inside part. It required re drilling the mounting pattern on the t case output, but wasnt a big deal. . (more angle than clearance the CV joint) And took it for a drive!
I need to get a small piece of gas line tomorrow after work, but expect some action shots soon, and plans are now being drafted up for a bed/cage
Looks like I got the RUFs and Chevies height to match quite nice.
Last edited by rattlewagon; Mar 6, 2014 at 11:24 AM.
Feb 23, 2014 | 04:32 PM
#356
Thread Starter
Registered User
Joined: Oct 2009
Posts: 4,832
Likes: 332
From: Northfield, Vermont
Some out side pics! It will run for a few minuets, then dump fuel into the engine. Going to start by putting the wonky intake back to stockish and checking the AFM and TPS.
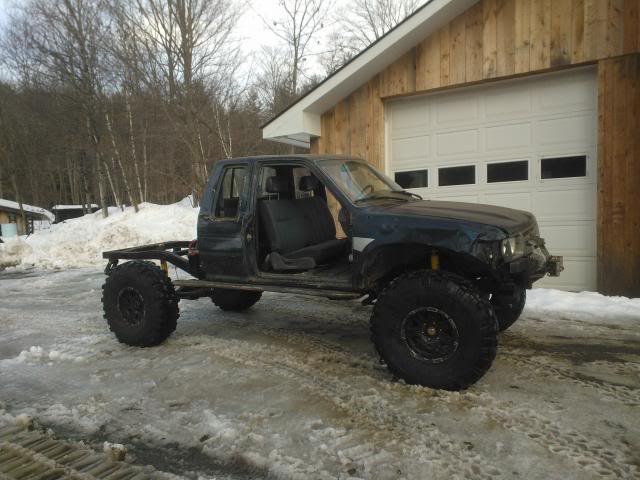
You can hear it start run bad right after the rpms come down. Had to shut the camera off to limp it back to the garage.
[youtube]HlKAieJ0Tfw[/youtube]
You can hear it start run bad right after the rpms come down. Had to shut the camera off to limp it back to the garage.
[youtube]HlKAieJ0Tfw[/youtube]
 Mar 3, 2014 | 03:29 PM
#358

Registered User
Joined: Dec 2005
Posts: 24
Likes: 0
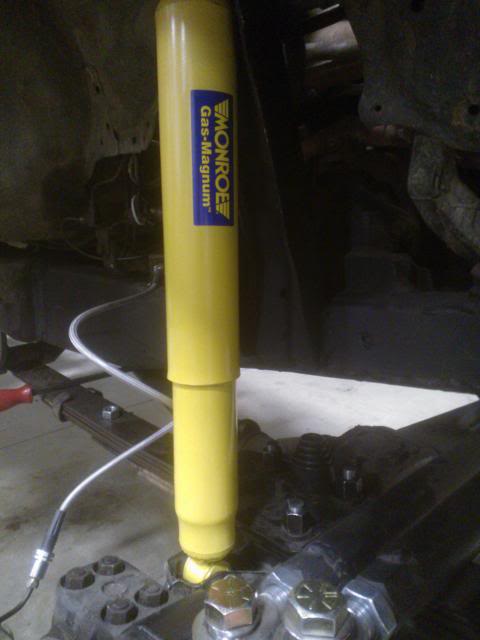
I am greatly saddened to see those yellow piece of junk Monroes on an otherwise spot on build.
Do yourself a favor and take them back before you get weld spatter or dirt on them and pick up some kYB Gas-A-Just's for not much more. Even if it's a $100 difference, it's worth it.
I can't explain in words the difference in stability and ride quality between low end low-pressure garbage twin tube shocks and better sealed, high-pressure mono-tube shocks.
Funny, I put the gas tank on my blue truck in pretty much the same place. Offset it just enough to fit a milk crate alongside it.
If you insist on using one of those dumb open element air filters (I've been guilty of it too), at least build a good splash guard around it, otherwise in deep water/mud the fan will literally force feed your motor liquids.
The beauty of the stock airbox is that the paper filter will ussually sop up enough water to stall the engine before it totally hydrolocks itself. And truth be told there it nothing to be gained by a bettter flowing filter as the MAF itself it the greatest restriction on airflow.
Make sure to put two small tubes going from the frame as far up those Ford shock towers as you can. Like the same 1" tubes that come with most conventional shock hoops. Otherwise the Ford towers will fatigue and crack just above wherever they are welded on the frame. Yeah, I know a factory Ford setup uses something like 3 rivets to hold them in place and they don't break often, but I'm convinced that's because riveted C-channel frame flexes more than a boxed, welded, Toyota frame. Frame no flex=shock tower flex
Is your receiver tube driveshaft loose at all? I've heard that the receiver stock is slightly oversized, and it seems like most 2" recievers are kinda loose fitting.
I ask because if so, you'll want to redo it. It will bind when under torque and not slip easily. This will kill diff pinion and transfer case output bearings.
I've made one with conventional 2x2" inside .25 wall 2.5x2.5 and had to grind a small groove up all the way up the male side to clear the weld on the inside of the 2.5.2.5. Installed a countersunk (needle fitting required) grease fitting on each side of the female, midway into the shaft overlap, and it was no-slop yet very easily slipping.
Tell me your going to be making some sort of solid bracket for the short piece of solid line coming out the the caliper? Ok, I'll stop now I'm just being OCD. I wish my woods truck was this far along.
Mar 3, 2014 | 04:23 PM
#359
Thread Starter
Registered User
Joined: Oct 2009
Posts: 4,832
Likes: 332
From: Northfield, Vermont
I am greatly saddened to see those yellow piece of junk Monroes on an otherwise spot on build.
I got them for practical nothing, so they are staying on for now..
If you insist on using one of those dumb open element air filters (I've been guilty of it too), at least build a good splash guard around it, otherwise in deep water/mud the fan will literally force feed your motor liquids.
Already been put back to the the stock box.
Make sure to put two small tubes going from the frame as far up those Ford shock towers as you can. Like the same 1" tubes that come with most conventional shock hoops. Otherwise the Ford towers will fatigue and crack just above wherever they are welded on the frame. Yeah, I know a factory Ford setup uses something like 3 rivets to hold them in place and they don't break often, but I'm convinced that's because riveted C-channel frame flexes more than a boxed, welded, Toyota frame. Frame no flex=shock tower flex
They will be braced in to the motor amount.. when I get time. Haha.
Is your receiver tube driveshaft loose at all? I've heard that the receiver stock is slightly oversized, and it seems like most 2" receivers are kinda loose fitting.
Its a bit loose, But I dont think it will slip all the way out enough to be wobbly.
Tell me your going to be making some sort of solid bracket for the short piece of solid line coming out the the caliper? Ok, I'll stop now I'm just being OCD. I wish my woods truck was this far along.
Wasnt go to..its only a 3" hardline, but now that your making me feel bad about it. haha.

Last edited by rattlewagon; Mar 5, 2014 at 06:44 AM.
Mar 5, 2014 | 06:47 AM
#360
Thread Starter
Registered User
Joined: Oct 2009
Posts: 4,832
Likes: 332
From: Northfield, Vermont
I think my poor running was a bad 02 sensor/mount. One of the studs broke off the exhaust so the 0s sensor would blow up out of the pipe when I reved it. Taking the pipe off to repair it left me with broken/stripped studs in the manifold, so that came off so I can get the broken bits out. 1 step forward 2 steps back.
The flowmaster is beat and getting replace with a punched out Harley sportster muffler. Should be interesting.
The flowmaster is beat and getting replace with a punched out Harley sportster muffler. Should be interesting.


