
KawaZX636's 1983 Toyota Pickup Restoration
 Dec 12, 2014 | 07:48 PM
#1061
Thread Starter
Super Moderator
iTrader: (3)
Joined: Jan 2012
Posts: 3,218
Likes: 26
From: Salisbury, MD
DECALS!! I forgot about the decals!! Pardon my excitement, but I just realized that the standard decals that I was planning on doing will cover up that pesky paint chip on the rear section of the bed!!! Of course I will still do the paint repair before the decals go over it, but at least I won't have to worry as much about it being perfect. The ones on the front corner of the bed aren't a big deal because since they are on a corner they will be easier to repair and hide.
This is the look I'm going for with the decals - just the standard three tone grey with the lightest grey on the tailgate lettering:

Wow, I feel much better about those paint chips now. Thanks for reminding me guys! Corey, drop me a price quote on those decals when you get a chance? Just need the front fenders, bed and tailgate decals; nothing on the hood - exactly like your Trekker. Thanks pal!
Dec 12, 2014 | 08:04 PM
#1062


no problem bud .. shoot me your parcel post addy again please cj@toyotafiberglass.com .. and i'll do a "shipped" quote for you
.
.
Dec 13, 2014 | 02:40 PM
#1063
Thread Starter
Super Moderator
iTrader: (3)
Joined: Jan 2012
Posts: 3,218
Likes: 26
From: Salisbury, MD
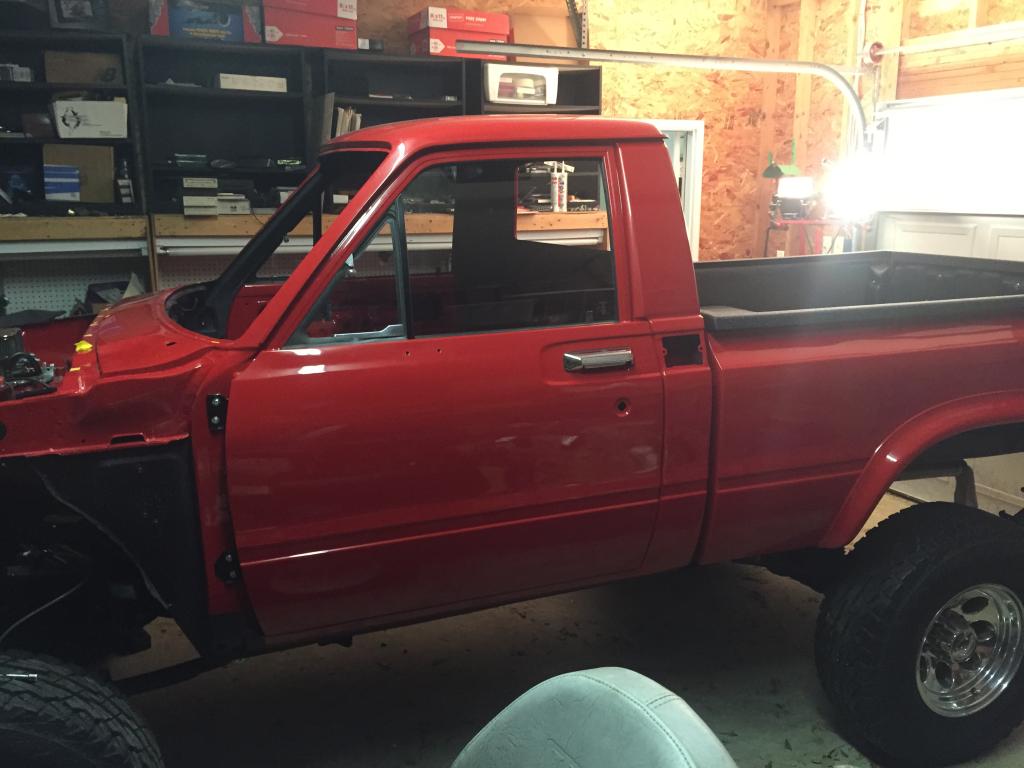
Exciting day today! I mount up my bed this afternoon. Everything went smoothly and I even managed to find my post-it note with my the correct shim height for each mount. Major turning point for me as it is starting to finally look like a truck again! Corey, I'm sure it excites you too - obviously I wouldn't be at this point today if it weren't for your products.
Here's the pics:
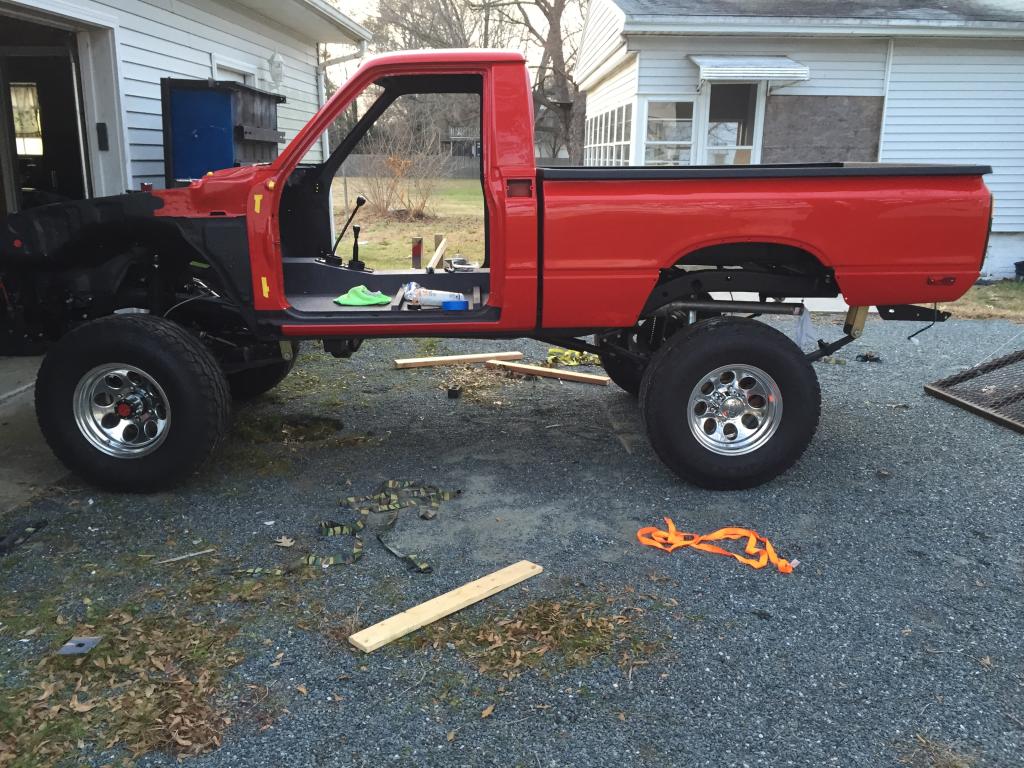

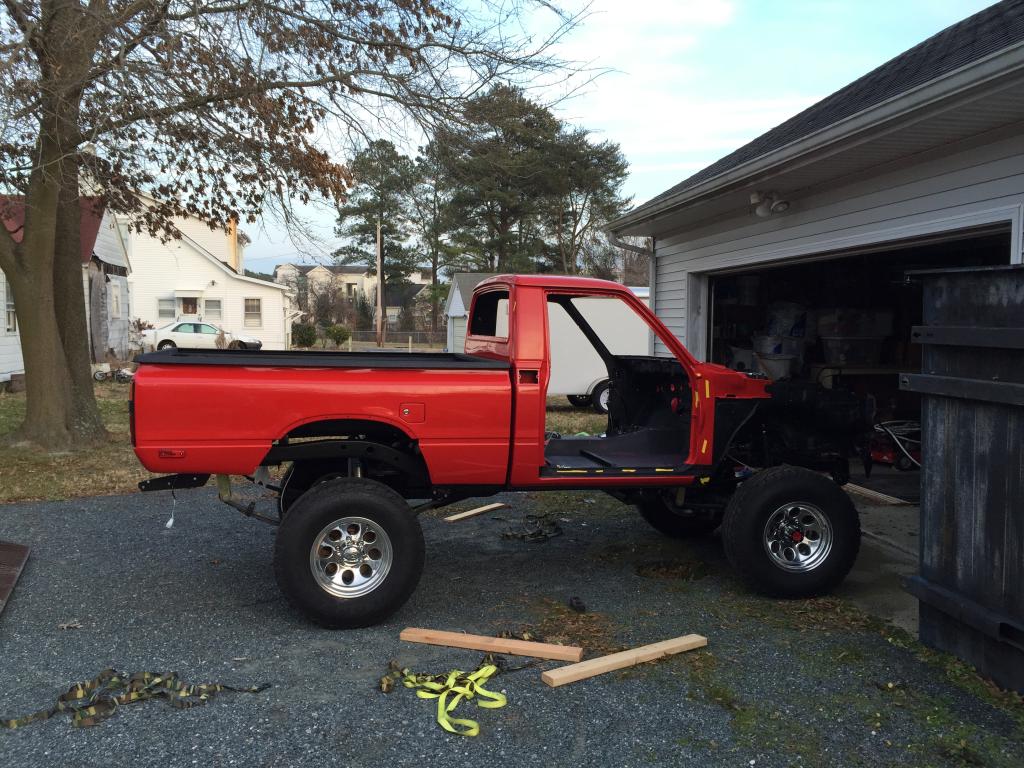
Here's the pics:


 Dec 14, 2014 | 07:49 AM
#1069
Registered User
Joined: Apr 2014
Posts: 126
Likes: 6
From: Kamloops, BC
I was thinking that your shackle angle was looking good. I think I have the same springs as you (Old Man Emu with a 2" lift) and I got greasable shackles that I think are stock length and they seem to be "pulled" too far forward and to me it looks like there wouldn't be much movement with them in that position! I don't want much lift so I'll have to try and figure out what to do to get a better shackle angle.
I don't want to thread jack but if someone has a quick answer I'd love to hear it.
I don't want to thread jack but if someone has a quick answer I'd love to hear it.
 Dec 14, 2014 | 09:40 AM
#1071
Thread Starter
Super Moderator
iTrader: (3)
Joined: Jan 2012
Posts: 3,218
Likes: 26
From: Salisbury, MD
Yeah, you could relocate the hangers, but I think the 89-95 springs would prevent having to do that. Amazingly, I jumped around in the bed yesterday and the springs weren't stiff at all - should be a nice ride. For now, I'm just going to hope that the suspension settles a bit.
Dec 15, 2014 | 05:36 PM
#1072
Registered User
Joined: Jan 2014
Posts: 83
Likes: 0
From: Alabama
Yeah, you could relocate the hangers, but I think the 89-95 springs would prevent having to do that. Amazingly, I jumped around in the bed yesterday and the springs weren't stiff at all - should be a nice ride. For now, I'm just going to hope that the suspension settles a bit.
You do have to move the rear shackle hangers when doing the 89-95 rear OME springs.. I had to move my hanger back 2.5" if I remember correctly. I have the regular load springs and they were extremely stiff for the first few months, but now that I've been hauling a bunch of firewood around for the winter they have softened up and are riding/flexing much better.
I definitely would recommend them for your application. You could actually pull a leaf on them and they would ride nice from the get-go. I had considered it myself, but I've found myself using the truck bed more lately and its not worth the payload for me.
I just know one thing.. your rear shackle angle is TERRIBLE and you WILL NOT be happy with the ride. As much money & time as you have already spent, I wouldn't sacrifice the ride quality with those springs. Your front isn't much better, but it should settle much quicker than your rear.
Dec 15, 2014 | 07:50 PM
#1073
Thread Starter
Super Moderator
iTrader: (3)
Joined: Jan 2012
Posts: 3,218
Likes: 26
From: Salisbury, MD
The shackle angle will get fixed, it's just a matter of when. It kind of sucks that the OME springs are supposed to be stock length but yet they don't fit appropriately. I'll still wait to see where it settles to after some riding around before I do anything. Hopefully it will settle to at least a vertical shackle angel so I don't have to mess with it. I think that is wishful thinking...
Dec 17, 2014 | 06:37 PM
#1074
Thread Starter
Super Moderator
iTrader: (3)
Joined: Jan 2012
Posts: 3,218
Likes: 26
From: Salisbury, MD
It looks like considerable progress will be made in the upcoming weeks. A few years ago, my cousin moved to Hawaii and was renting out his house back here. About a year or so ago the house went vacant and the electric has been off every since. I've been storing my chassis and some parts in his garage over the course of my build. Well, yesterday I finally broke down and called the electric company to turn the power on - it should be back on tomorrow. His garage is much bigger and more convenient to work in than mine and my Pops has a project that he's working on in his shop that I have been using so I'm picking up my operation and moving it to my cousin's garage. It's a little inconvenient having to shoot across town to work on my truck, but it beats having to work in tight spaces (plus the hardware store is about a 1/4 mile down the road from there).
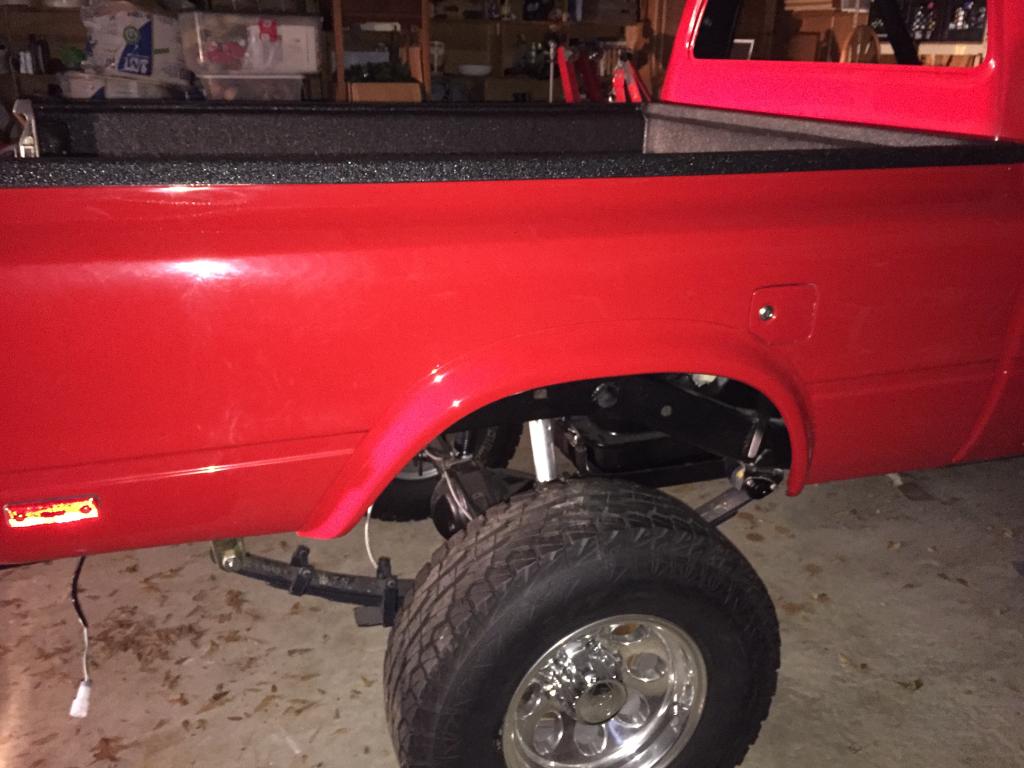
I spent last evening re-organizing my parts into Rubbermaid totes and labeling the contents in each so that I know exactly where everything is, what I need to clean/paint/powdercoat and to keep parts in a logical order according to assembly. I started hauling the parts over there tonight and hopefully I'll get the rest over there tomorrow (mostly just the body panels left for now). Among the parts I took over tonight were the fender flares. I didn't want them laying around to be potentially dinged so I installed them really quick while I was there using my Tundra headlights as a light source. I still need to wetsand, buff and polish them, but I figured it would be safer to do on the truck so that I don't flex them and risk cracking the paint.
I'm hoping to have all the painted body panels assembled (hopefully even more) by the end of the weekend; although, I have a sick son that has been keeping my wife and I busy this week so I may be a bit ambitious. Once he gets over his ailment, I have a feeling that things are really going to cruise now!
I just ordered a new 1" bore brake master cylinder to compliment my rear disk brake conversion and a new clutch master cylinder - both Aisin parts off of Amazon! I also ordered a pair of chrome door handles. I've got to start getting my parts list dwindled down so something silly doesn't holding me up.
I spent last evening re-organizing my parts into Rubbermaid totes and labeling the contents in each so that I know exactly where everything is, what I need to clean/paint/powdercoat and to keep parts in a logical order according to assembly. I started hauling the parts over there tonight and hopefully I'll get the rest over there tomorrow (mostly just the body panels left for now). Among the parts I took over tonight were the fender flares. I didn't want them laying around to be potentially dinged so I installed them really quick while I was there using my Tundra headlights as a light source. I still need to wetsand, buff and polish them, but I figured it would be safer to do on the truck so that I don't flex them and risk cracking the paint.


I'm hoping to have all the painted body panels assembled (hopefully even more) by the end of the weekend; although, I have a sick son that has been keeping my wife and I busy this week so I may be a bit ambitious. Once he gets over his ailment, I have a feeling that things are really going to cruise now!
I just ordered a new 1" bore brake master cylinder to compliment my rear disk brake conversion and a new clutch master cylinder - both Aisin parts off of Amazon! I also ordered a pair of chrome door handles. I've got to start getting my parts list dwindled down so something silly doesn't holding me up.
Last edited by kawazx636; Dec 17, 2014 at 06:39 PM.
 Dec 19, 2014 | 03:20 AM
#1076
Registered User
Joined: Jan 2012
Posts: 325
Likes: 2
From: Kansas City, Missouri
glass choices
Are you going to use the stock type rubber one piece bezel and stock glass on the front window? I bought the OEM rubber, but I looked into installation and it looks tough. They used a wire through the gap and moved it around the seam to get the out lip in place. Two people ganged up on it and it STILL looked hard!
And do you have a slider rear window?
And do you have a slider rear window?
Dec 19, 2014 | 05:20 PM
#1077
awesome Dave .. flares look great .
speaking of ... I hope to get my "bushwacker" replicas into production in 2015 looks like you might need a set of those ?
happy holiday bud .. all the best to you and yours
.
speaking of ... I hope to get my "bushwacker" replicas into production in 2015 looks like you might need a set of those ?
happy holiday bud .. all the best to you and yours
.
Dec 23, 2014 | 07:52 AM
#1078
Thread Starter
Super Moderator
iTrader: (3)
Joined: Jan 2012
Posts: 3,218
Likes: 26
From: Salisbury, MD
Are you going to use the stock type rubber one piece bezel and stock glass on the front window? I bought the OEM rubber, but I looked into installation and it looks tough. They used a wire through the gap and moved it around the seam to get the out lip in place. Two people ganged up on it and it STILL looked hard!
And do you have a slider rear window?
And do you have a slider rear window?
And yes, I do have a rear slider. It installs the same way as the windshield.
Dec 23, 2014 | 08:11 AM
#1079
Registered User
Joined: Jan 2012
Posts: 325
Likes: 2
From: Kansas City, Missouri
Useful suggestion on the bezel seating. Thanks.
Sorry your son broke the glass. It must have given him a real scare! My son was about 3 years old and decided to pull the ring on my compressor tank. He JUMPED a foot in the air when it let loose! Poor kid. He wasn't the same for hours...I just couldn't stop him before he got to it. Reminds me of myself, even worse, myself when I was a kid
Sorry your son broke the glass. It must have given him a real scare! My son was about 3 years old and decided to pull the ring on my compressor tank. He JUMPED a foot in the air when it let loose! Poor kid. He wasn't the same for hours...I just couldn't stop him before he got to it. Reminds me of myself, even worse, myself when I was a kid
Last edited by 83pingpong; Dec 23, 2014 at 08:12 AM.
Dec 23, 2014 | 10:01 PM
#1080
Thread Starter
Super Moderator
iTrader: (3)
Joined: Jan 2012
Posts: 3,218
Likes: 26
From: Salisbury, MD
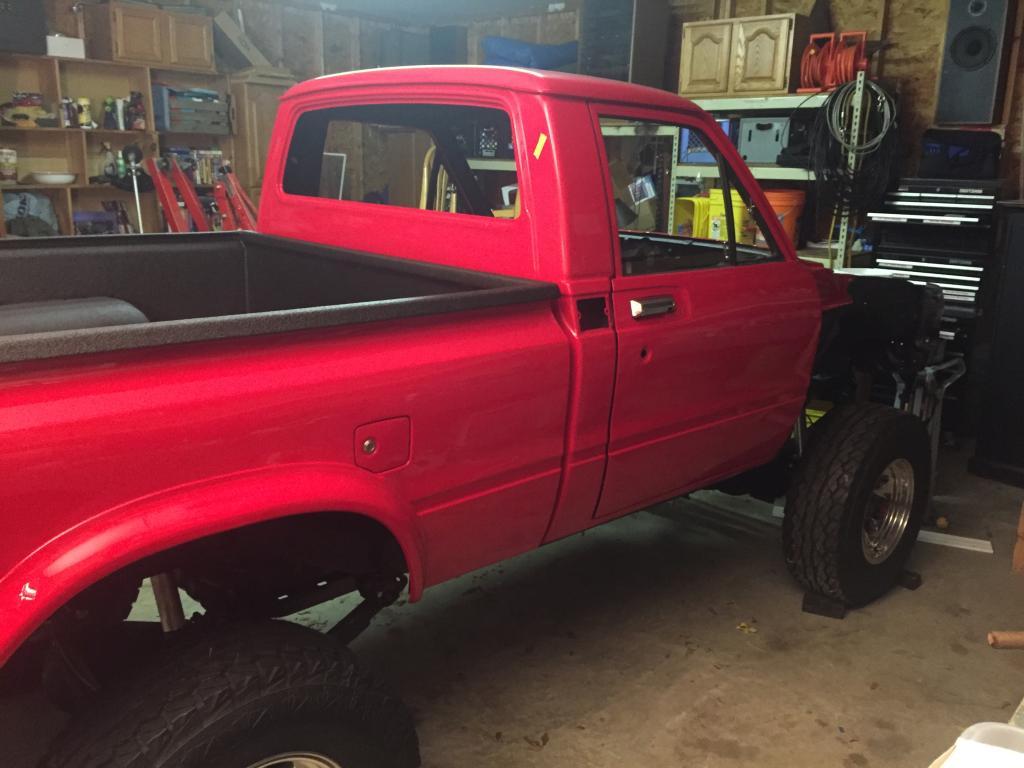
Finished mounting the doors tonight. They are fully functional except for the lock cylinders and weather seal. I still have some minor alignment adjustments to make, but that'll happen once I get the fenders mounted up.
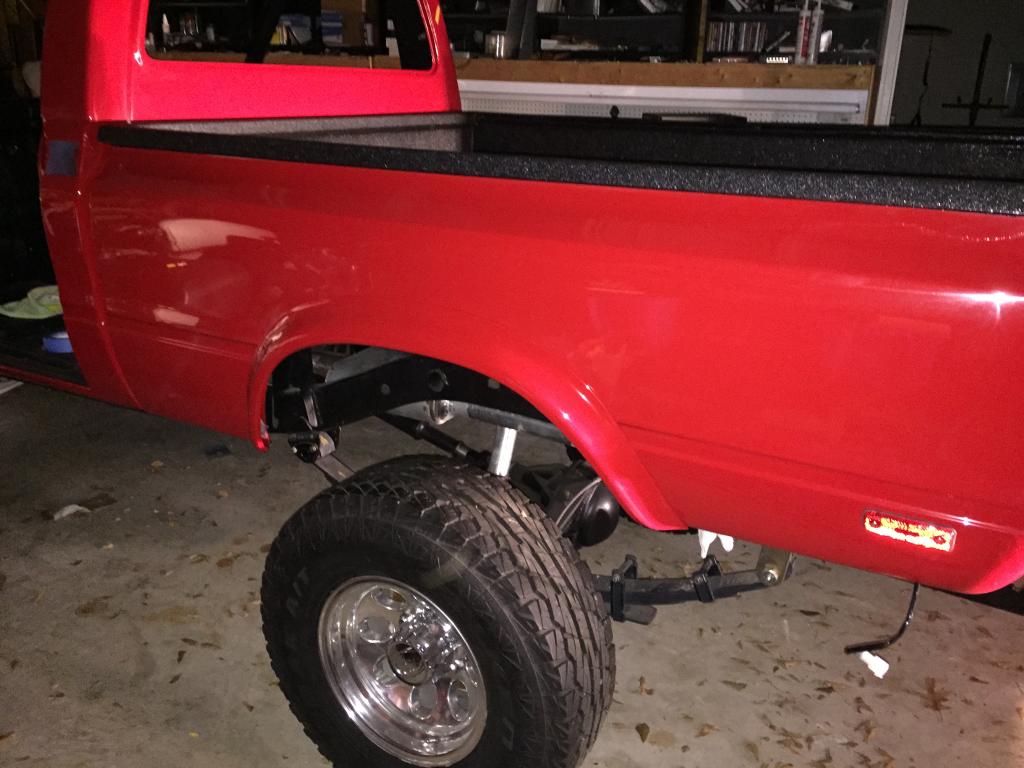
Right now I am kind of at a stand still. I seem to have lost one of the plugs that goes in the holes towards the front of the rockers behind the lower fender mount. Very crucial part in keeping water from getting inside the rockers and they have to go in before the fenders go on. Does anybody have a couple they could spare? I checked with the dealership, but they were no help with any cross reference from another model and the parts stores around town don't have anything that will fit. It's the plug that goes into the hole at the top of the picture below:
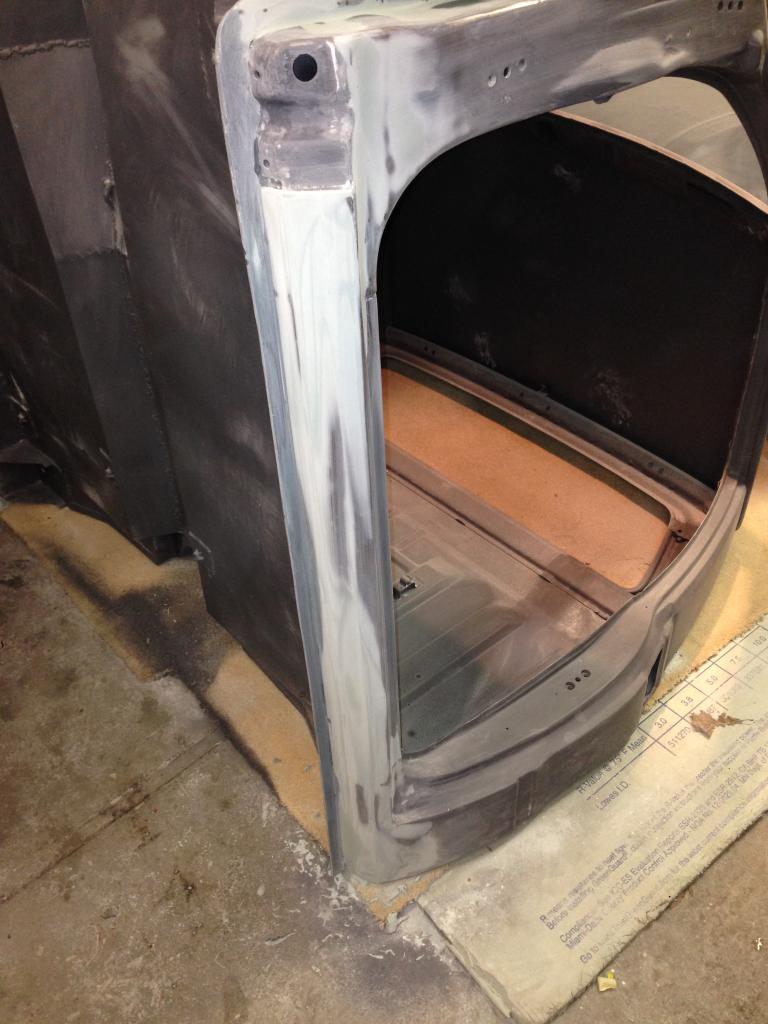


Right now I am kind of at a stand still. I seem to have lost one of the plugs that goes in the holes towards the front of the rockers behind the lower fender mount. Very crucial part in keeping water from getting inside the rockers and they have to go in before the fenders go on. Does anybody have a couple they could spare? I checked with the dealership, but they were no help with any cross reference from another model and the parts stores around town don't have anything that will fit. It's the plug that goes into the hole at the top of the picture below:


