
KawaZX636's 1983 Toyota Pickup Restoration
 Nov 6, 2013 | 07:25 PM
#361
Thread Starter
Super Moderator
iTrader: (3)
Joined: Jan 2012
Posts: 3,218
Likes: 26
From: Salisbury, MD
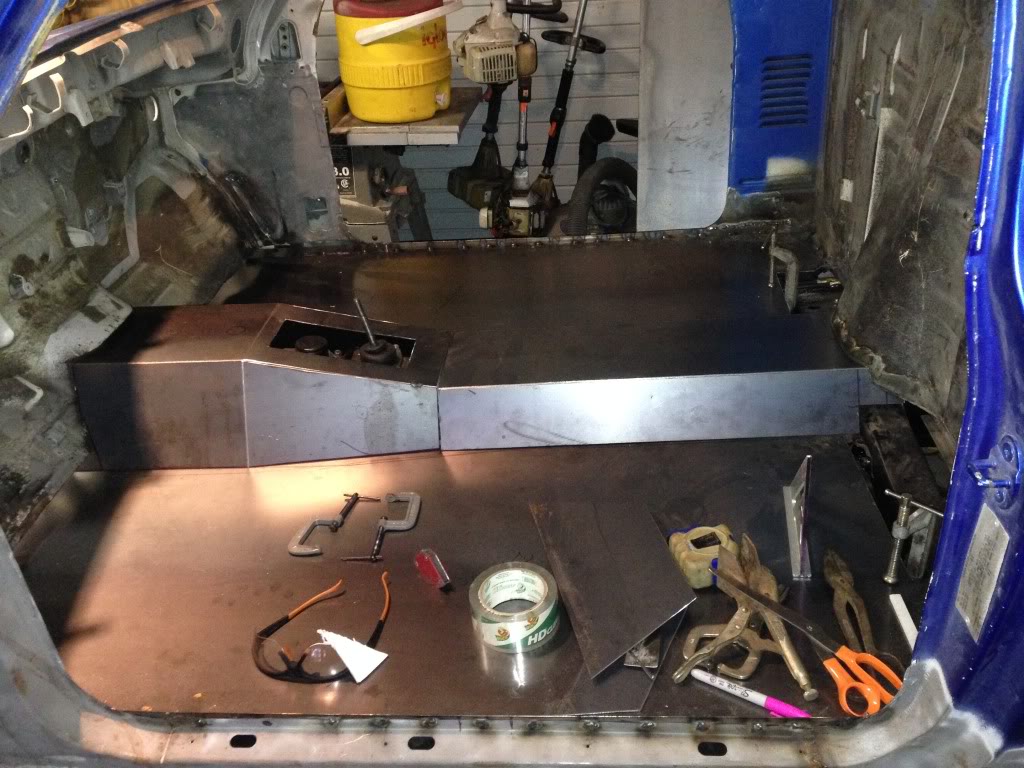
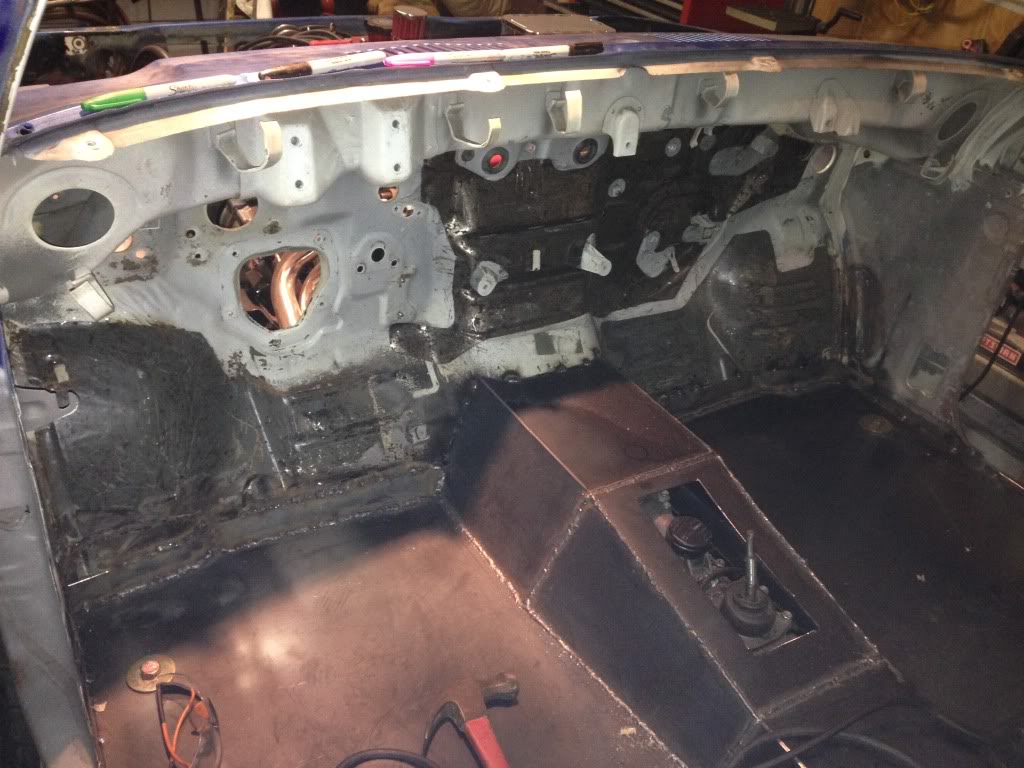
I believe somebody said "we want floors" a few days ago... Well, here they are! I used my handy dandy template that I made last night to cut out some 14ga sheet steel (sorry, got excited about installing the floors that I forgot to take some pics of the cut out steel). Plopped those bad boys in the cab and everything lined up perfectly! I left some extra towards the tunnel that I will cut even with the tunnel from underneath after I tack in the tunnel. Got the driver and passenger sides tacked in and leveled. It was scary how easily and quickly I got them in tonight. Here's the pics:
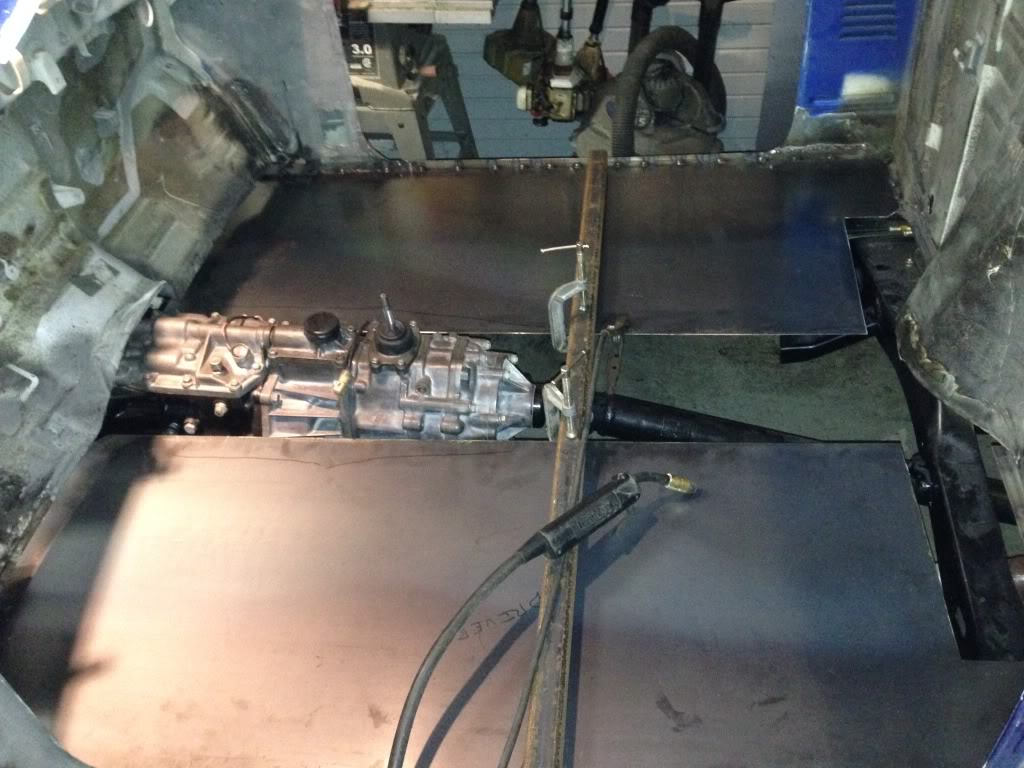
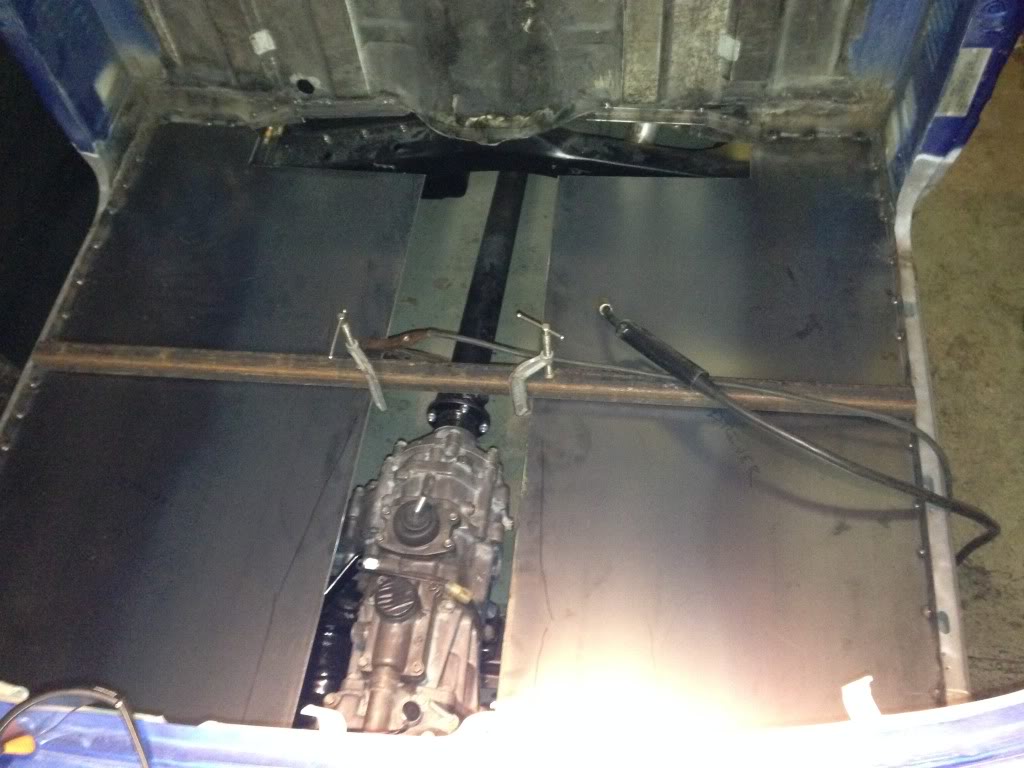
The 1.5" steel tube going across the middle is just clamped there for support to keep everyhting level for right now. Eventually I will use a cleaner piece of steel to cut even with the tunnel for mounting the front of the seat rails. It will also help add rigidity to the floor pan.
Also laid in my tunnel mock up. The geometry seems to fit fine, but I forgot to take the heater core over to my Pop's house tonight so I still need to check the clearance for that before I continue.
Hopefully tomorrow night I can get the tunnel built and ready to be tacked in. I want to get it completely welded together and ground down prior to tacking it in so that I don't have to do that work while it's in the cab.


The 1.5" steel tube going across the middle is just clamped there for support to keep everyhting level for right now. Eventually I will use a cleaner piece of steel to cut even with the tunnel for mounting the front of the seat rails. It will also help add rigidity to the floor pan.
Also laid in my tunnel mock up. The geometry seems to fit fine, but I forgot to take the heater core over to my Pop's house tonight so I still need to check the clearance for that before I continue.


Hopefully tomorrow night I can get the tunnel built and ready to be tacked in. I want to get it completely welded together and ground down prior to tacking it in so that I don't have to do that work while it's in the cab.
Nov 7, 2013 | 03:11 AM
#363

Registered User
Joined: Oct 2013
Posts: 28
Likes: 0
That's some fantastic work!! Actually I also just finished reading your entire built so far ... well done. I had to do a lot of the same with my build so reading this .... especially all the axle rebuild, and paint stuff .... hours and hours of fun. Well done sir!!
 Nov 7, 2013 | 12:47 PM
#365
Thread Starter
Super Moderator
iTrader: (3)
Joined: Jan 2012
Posts: 3,218
Likes: 26
From: Salisbury, MD
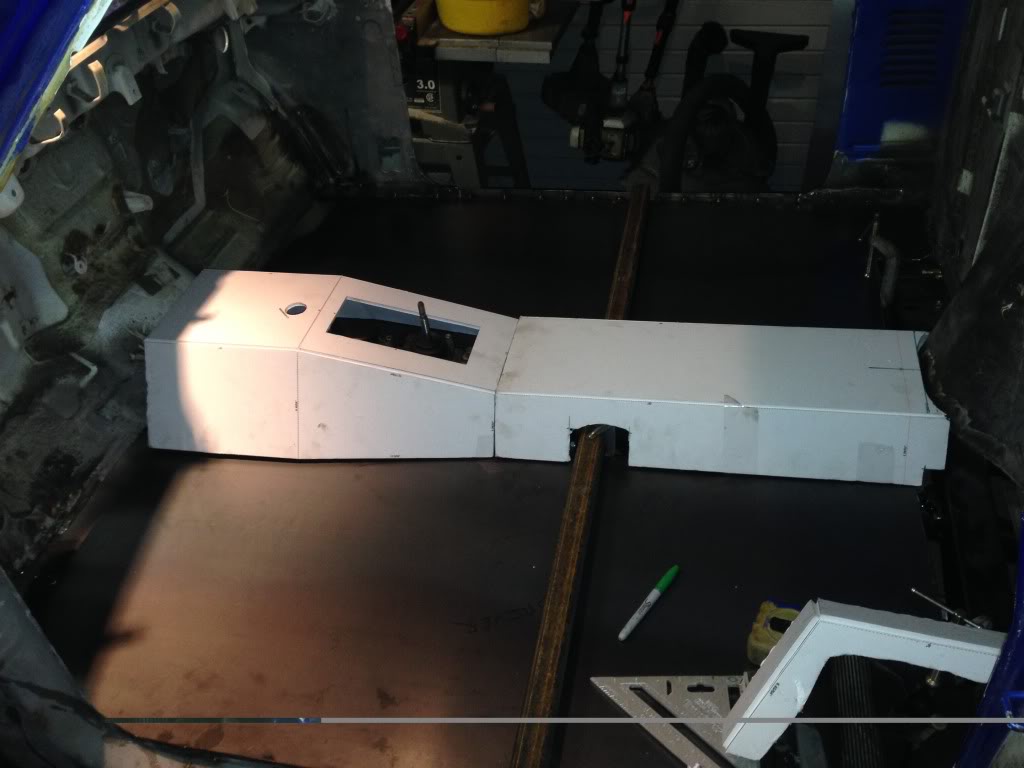
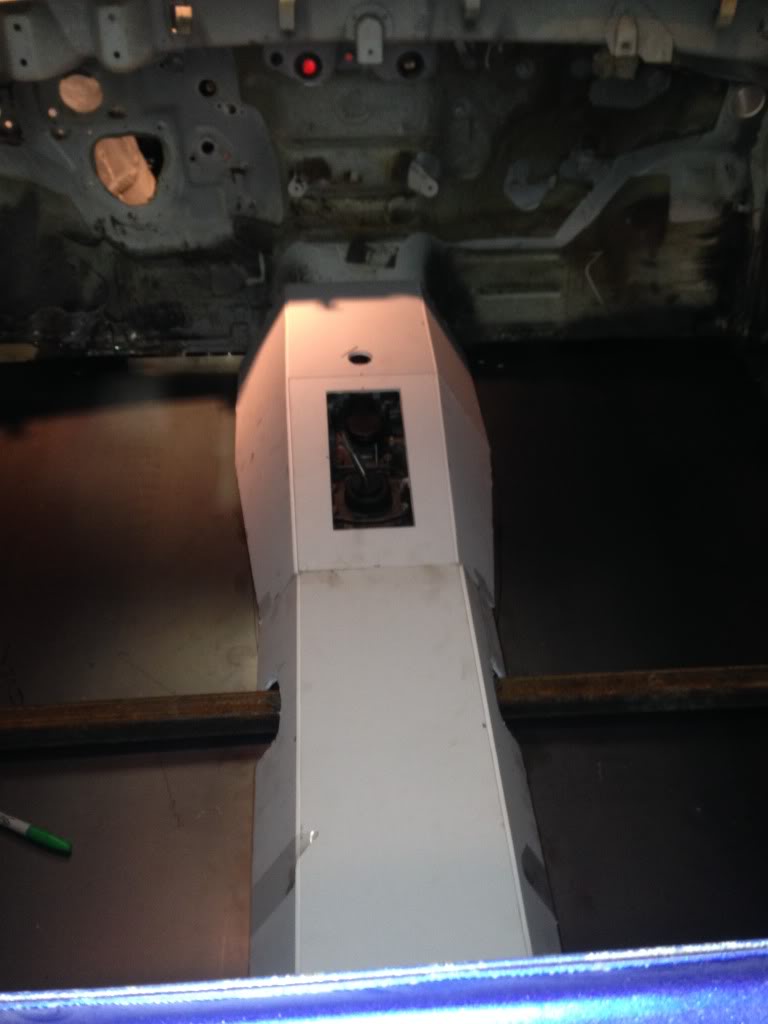
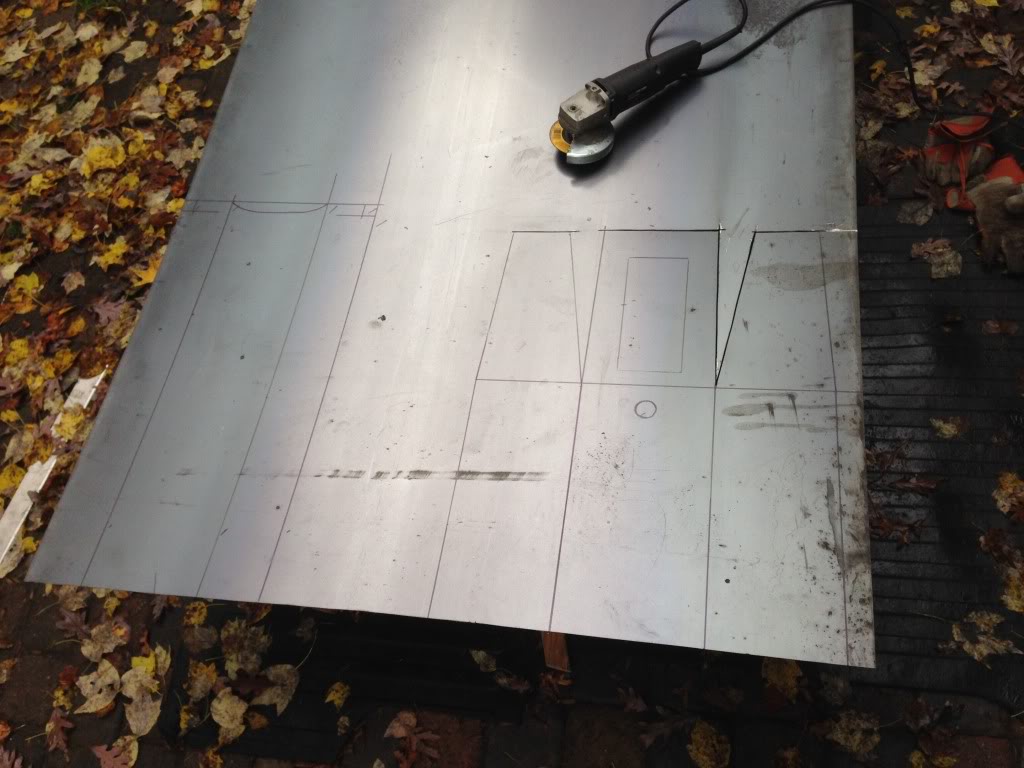
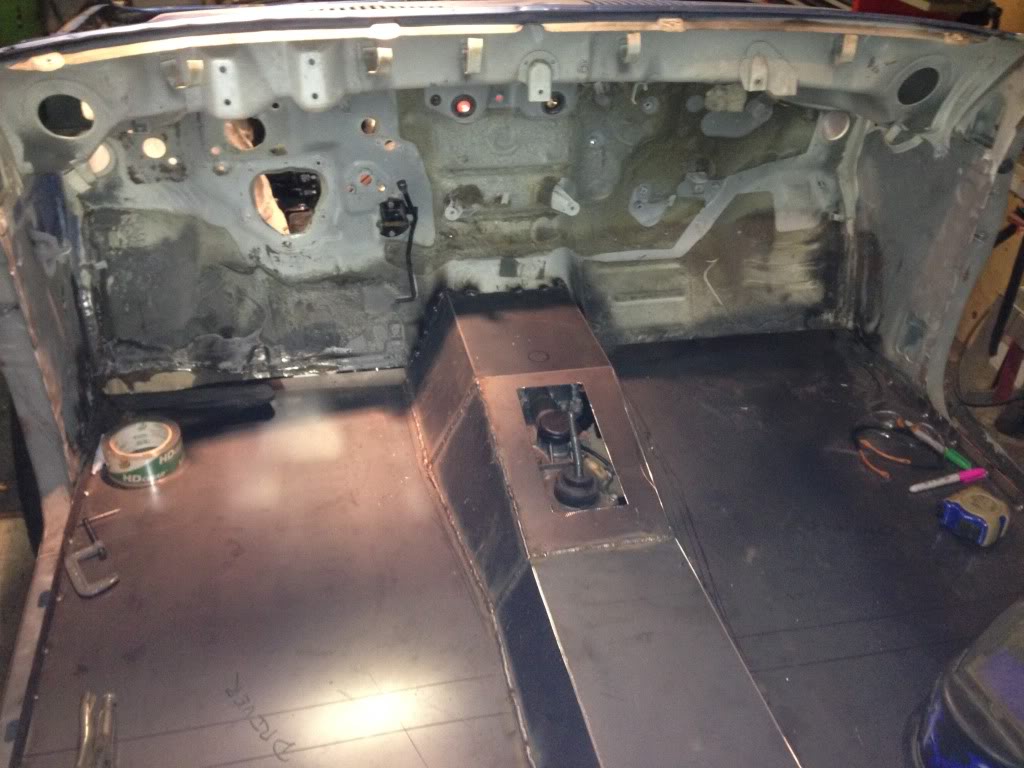
Took the afternoon off work to work on the truck. Pretty much got the tunnel done short of welding it together.
Template drawn out on 14ga steel:
Cut and bent into shape:
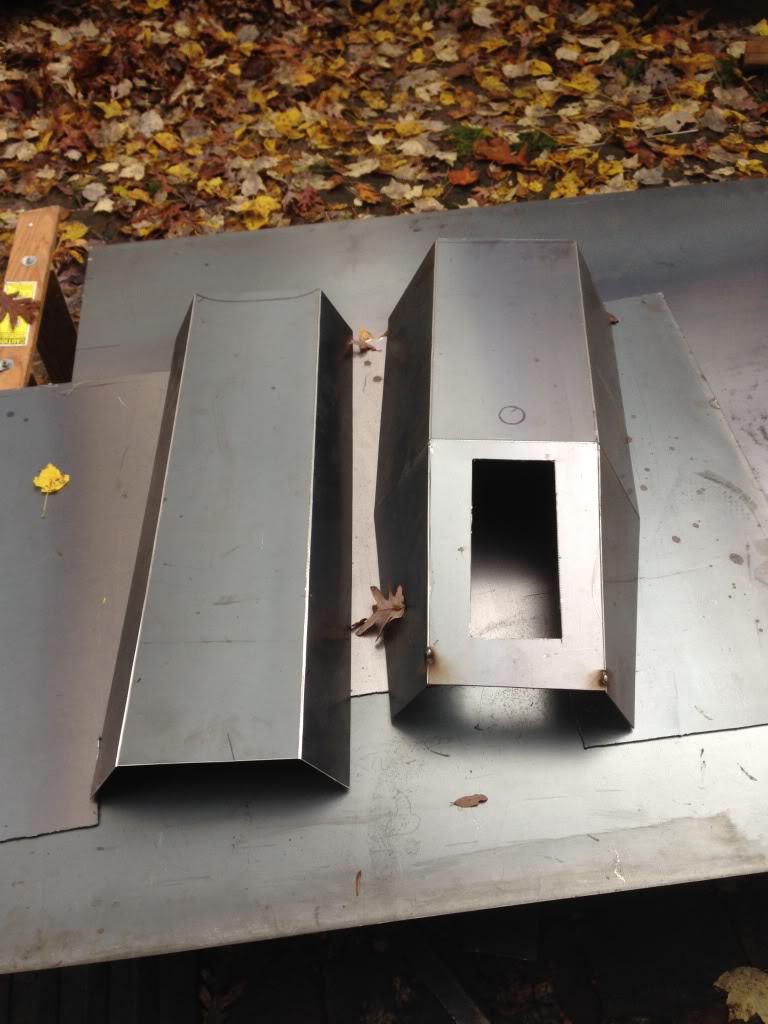
Had to trim out the firewall so that I can just slide the tunnel into place and weld it to the firewall (also did the same to the rear). Later I'll be able to trim the little bit of overhang from the outside of the cab:
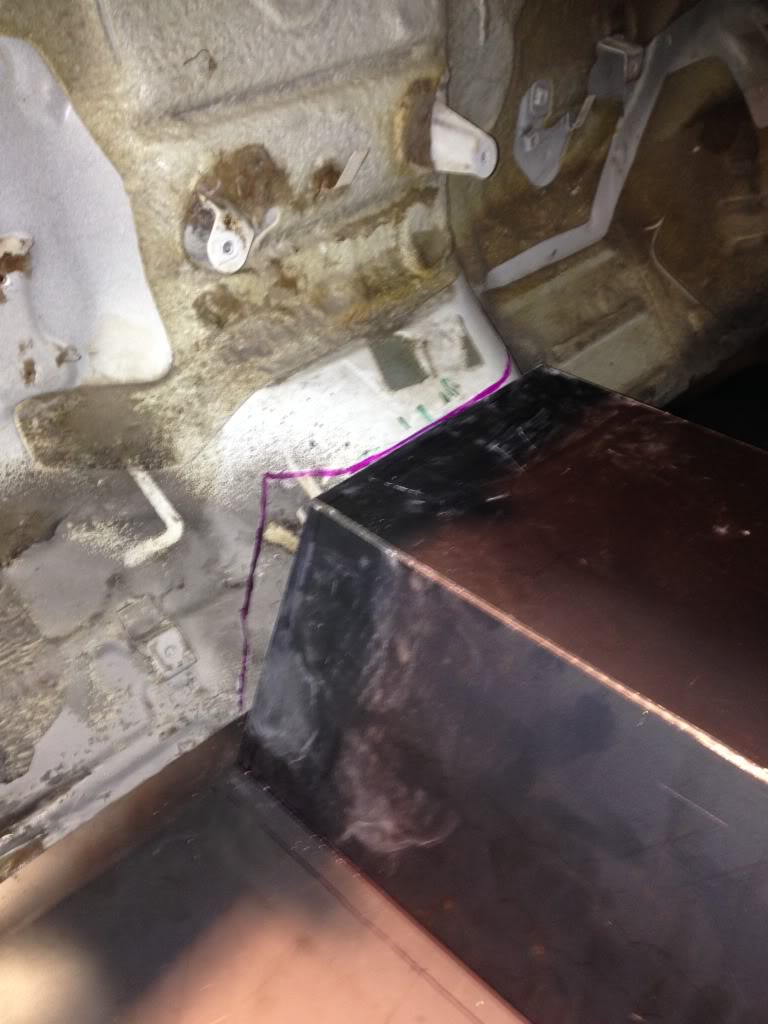
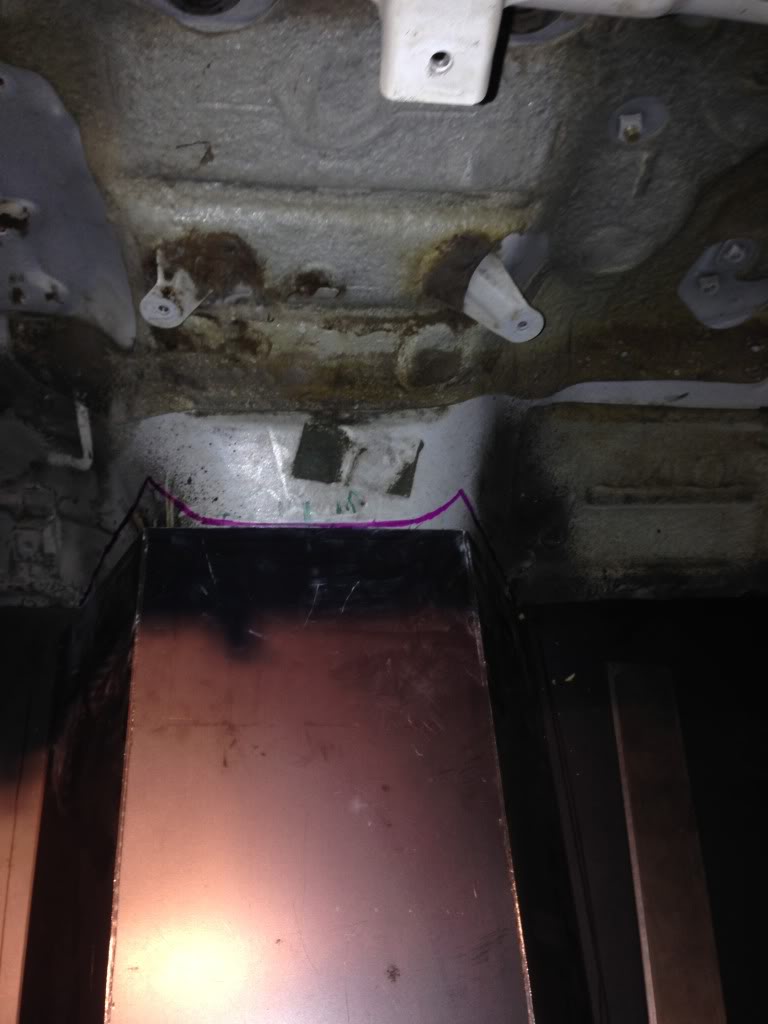
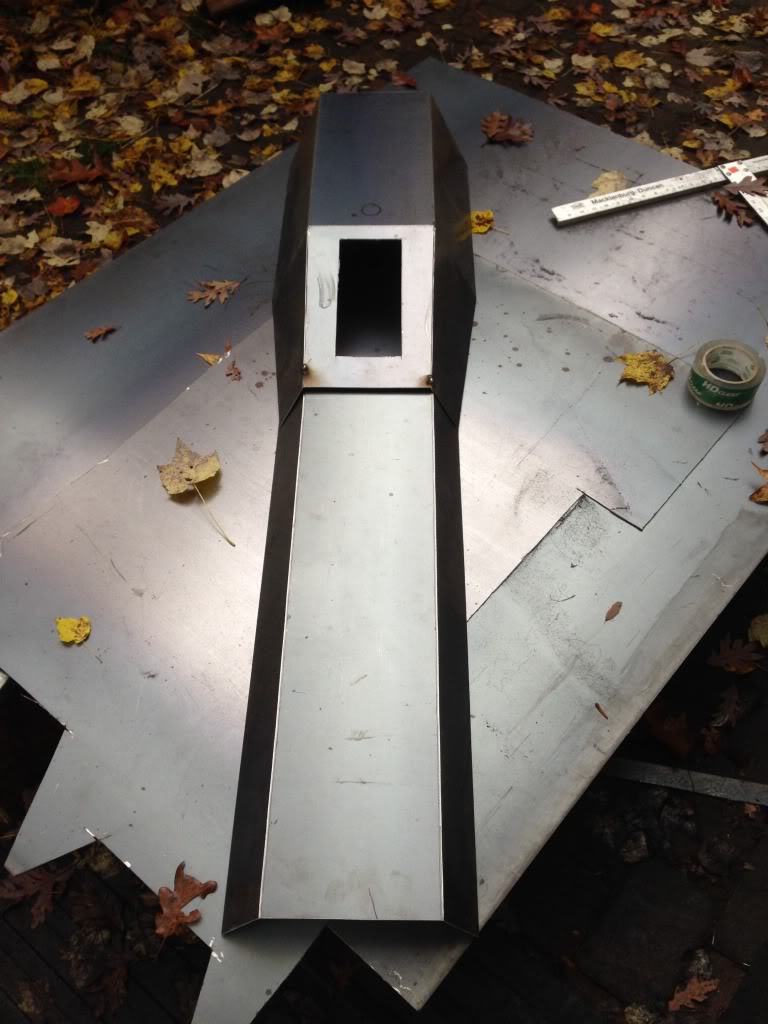
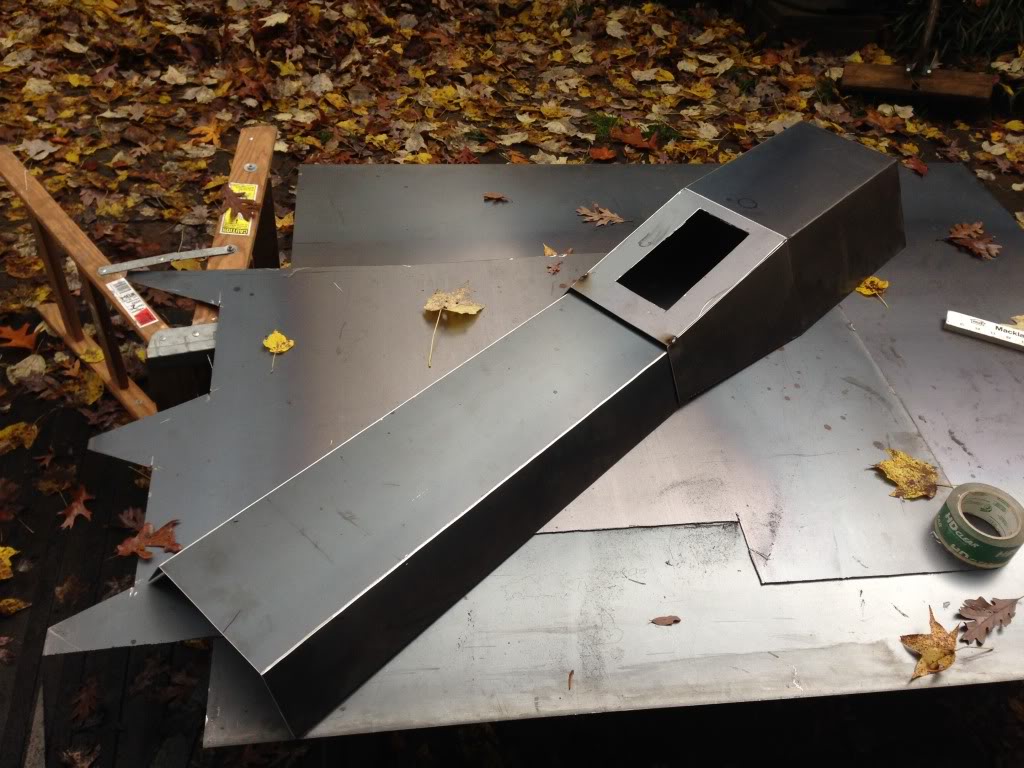
Trimmed out and it slid right in perfectly:
And the final look before burning it all in:
The heater core fit in perfectly with about a 1/4" to spare. I may be able to get back over there tonight to level up the floor so everything is tight around the cutouts in the firewall and rear cab wall. From there I should be able to tack it in and work on the seat rail crossmember.
Template drawn out on 14ga steel:

Cut and bent into shape:


Had to trim out the firewall so that I can just slide the tunnel into place and weld it to the firewall (also did the same to the rear). Later I'll be able to trim the little bit of overhang from the outside of the cab:


Trimmed out and it slid right in perfectly:


And the final look before burning it all in:

The heater core fit in perfectly with about a 1/4" to spare. I may be able to get back over there tonight to level up the floor so everything is tight around the cutouts in the firewall and rear cab wall. From there I should be able to tack it in and work on the seat rail crossmember.
Last edited by kawazx636; Nov 7, 2013 at 05:55 PM.
Nov 7, 2013 | 06:16 PM
#366
Thread Starter
Super Moderator
iTrader: (3)
Joined: Jan 2012
Posts: 3,218
Likes: 26
From: Salisbury, MD
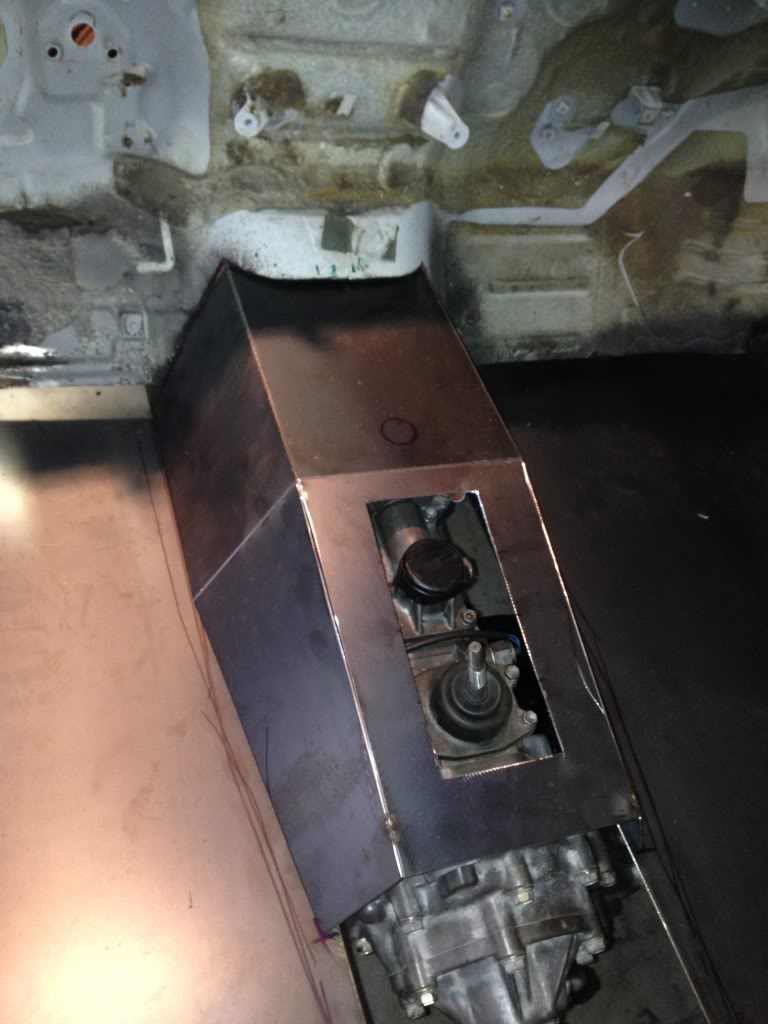
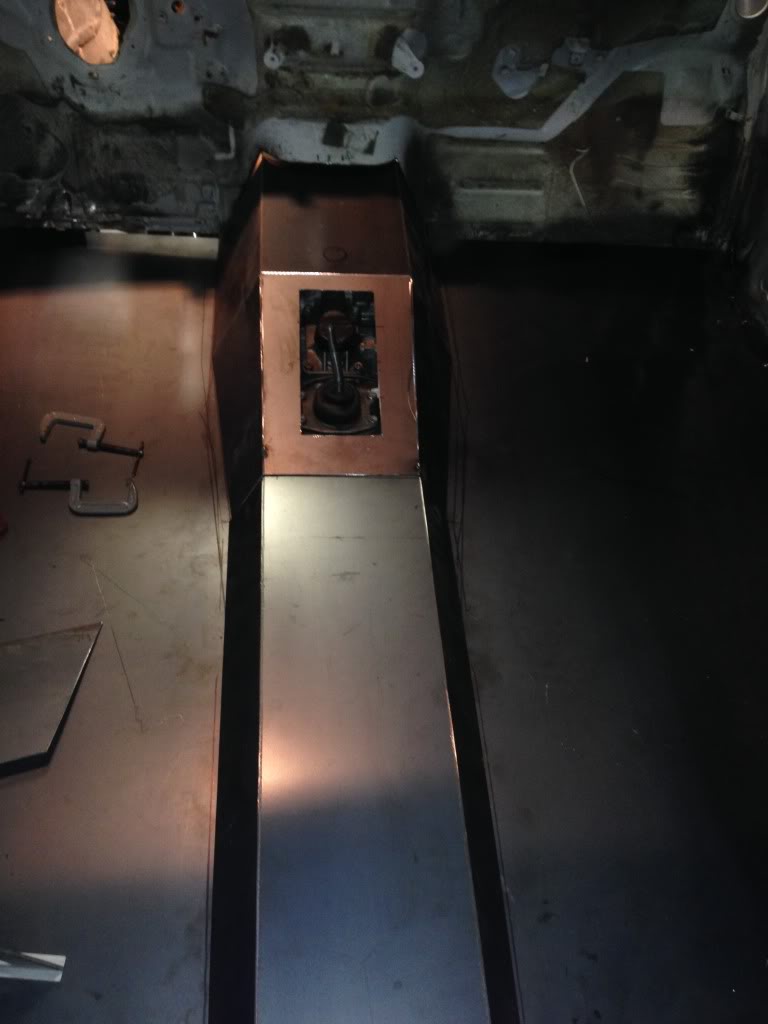
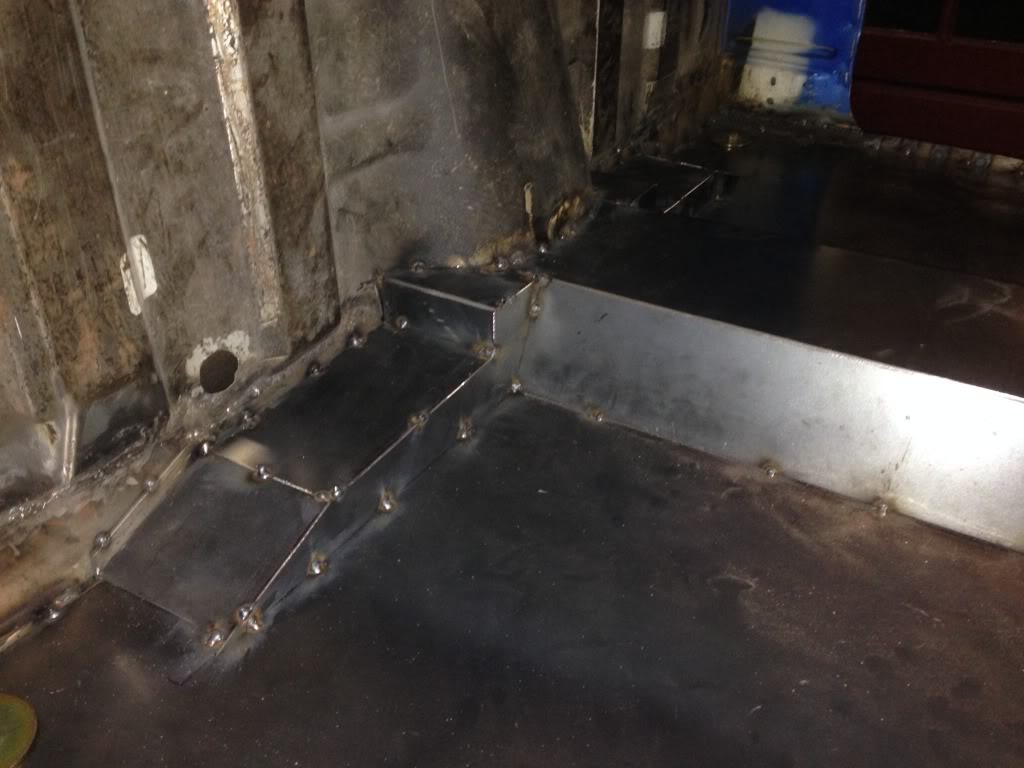
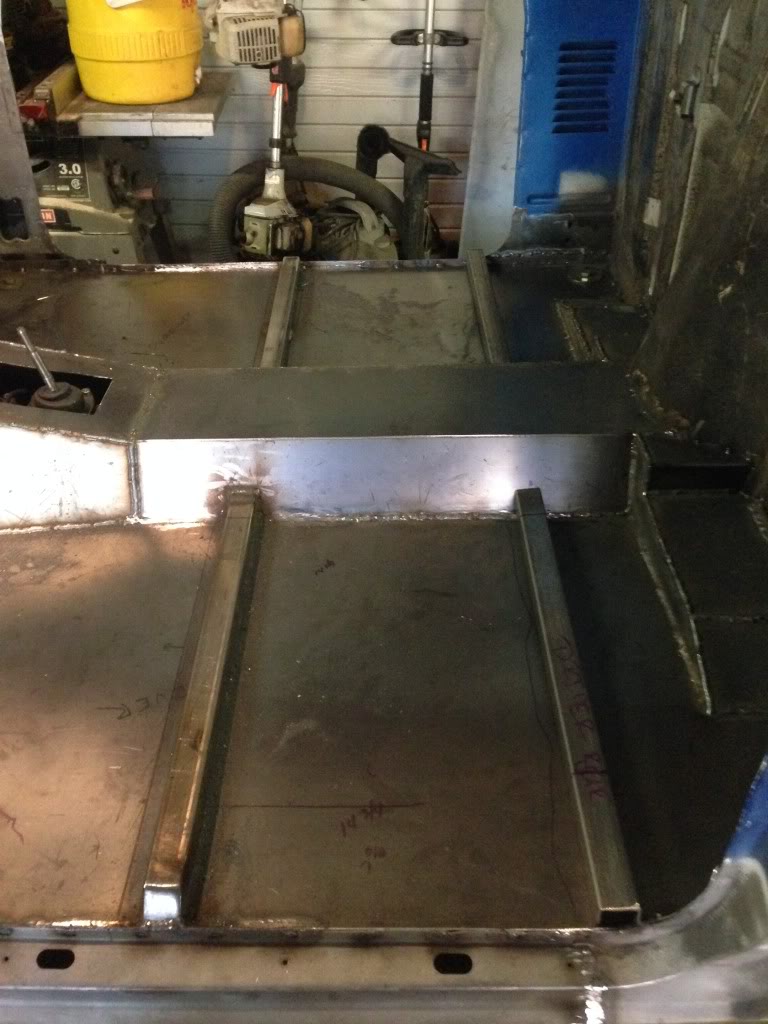
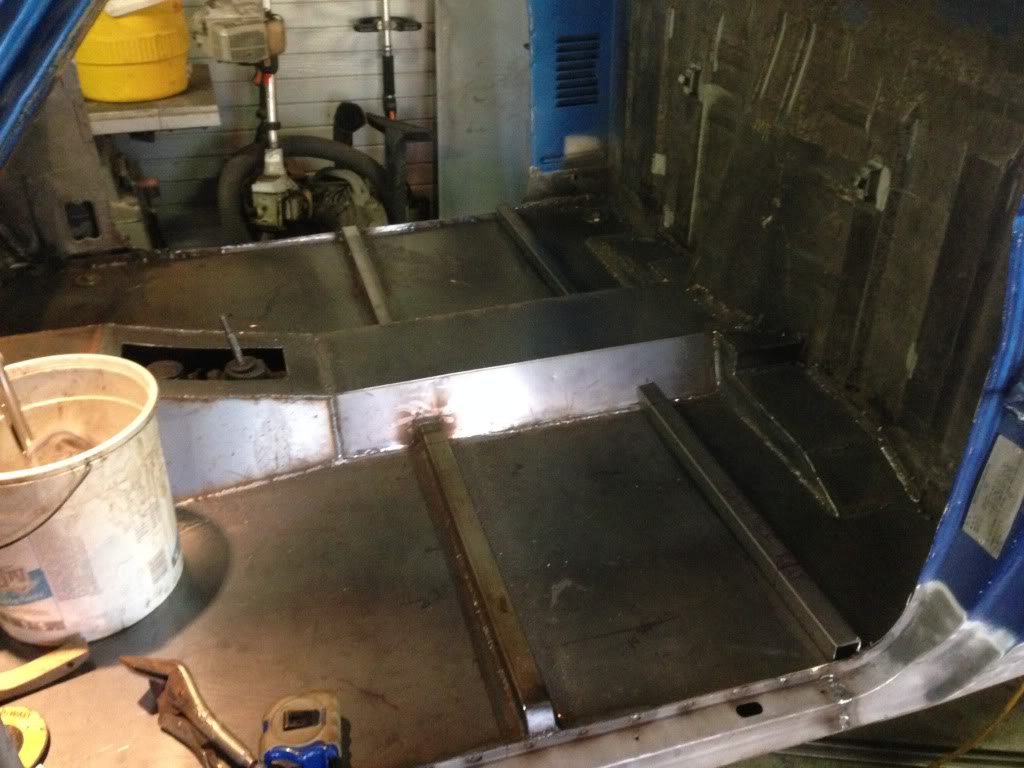
Got a little bit done tonight before the Redskins game started. Tacked the tunnel down to the floor pans, firewall and rear wall. Then started laying some beads down the the tunnel until the game kicked off.

I'm really surprised with how sturdy the floor pan is already and I don't even have the rear or the front welded in yet at all or the seat mount crossmembers in. I was originally thinking that I might have to add extra reinforcements from underneath, but I think it's going to be ok - the geometry of the tunnel really stiffens everything up well. I should be able to get alot of the welding done on all the new metal tomorrow night, but I'll have to wait until I get everything sandblasted before I can weld everything into the perimeter to the original cab walls - the metal is just too dirty with old paint, grease, sound deadener and seam sealer so if I were to try to weld it in I would have a lot of contaminants in my welds. I'll tack it in good for now though.


I'm really surprised with how sturdy the floor pan is already and I don't even have the rear or the front welded in yet at all or the seat mount crossmembers in. I was originally thinking that I might have to add extra reinforcements from underneath, but I think it's going to be ok - the geometry of the tunnel really stiffens everything up well. I should be able to get alot of the welding done on all the new metal tomorrow night, but I'll have to wait until I get everything sandblasted before I can weld everything into the perimeter to the original cab walls - the metal is just too dirty with old paint, grease, sound deadener and seam sealer so if I were to try to weld it in I would have a lot of contaminants in my welds. I'll tack it in good for now though.
Last edited by kawazx636; Nov 7, 2013 at 06:18 PM.
Nov 8, 2013 | 08:37 PM
#367
Thread Starter
Super Moderator
iTrader: (3)
Joined: Jan 2012
Posts: 3,218
Likes: 26
From: Salisbury, MD
I fabricated the rear section of the cab tonight to box out the middle frame crossmember that arches up into the cab. Same deal, 14ga steel, but this ended up being a little more cut and fit, cut and fit, cut and fit. The peices actually sit on a angle steel "ledge" that I welded onto the rear of the cab when it was off of the frame. I then tied it into the floor pan and tunnel. Got it all tacked up and ready for final welding.
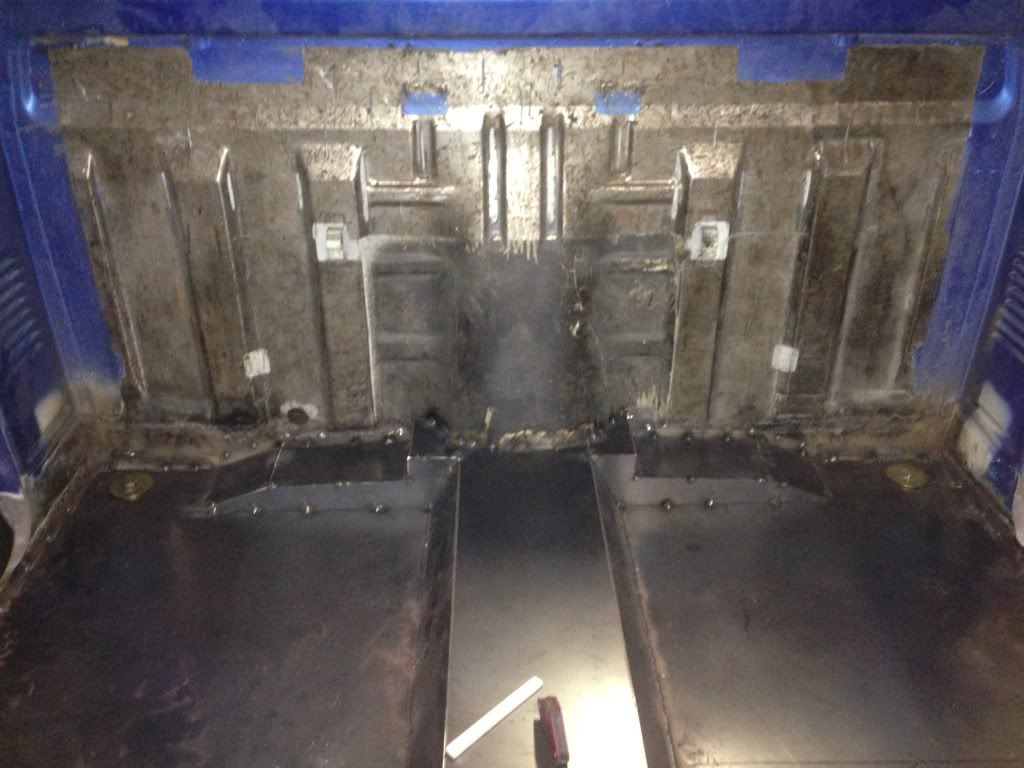
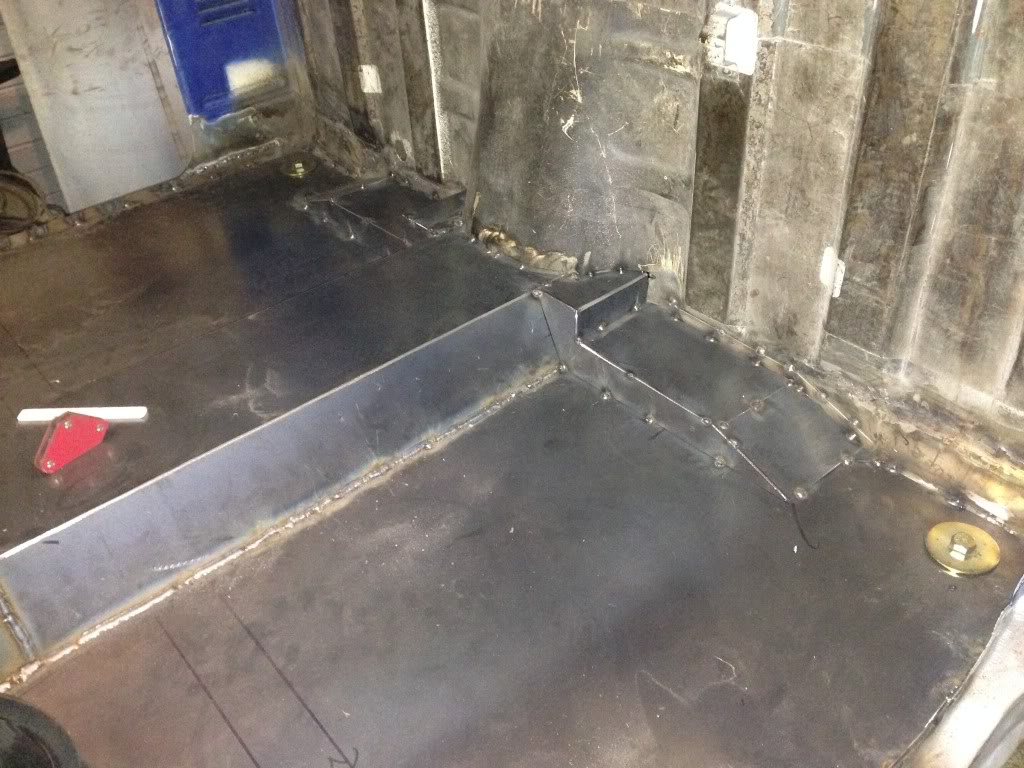
Now all I have left to do to the floorpan is to fit the seat rail crossmembers and cut and fit a piece of steel to fill the gap between the bottom portion of the firewall and the floorpan. Shouldn't be too difficult and then it'll come off to get sand blaster before I lay the final welds.
Am I moving to fast, Can you guys keep up? Need me slow down a bit??
Nov 9, 2013 | 05:14 AM
#370
I fabricated the rear section of the cab tonight to box out the middle frame crossmember that arches up into the cab. Same deal, 14ga steel, but this ended up being a little more cut and fit, cut and fit, cut and fit. The peices actually sit on a angle steel "ledge" that I welded onto the rear of the cab when it was off of the frame. I then tied it into the floor pan and tunnel. Got it all tacked up and ready for final welding.

Am I moving to fast, Can you guys keep up? Need me slow down a bit??
Am I moving to fast, Can you guys keep up? Need me slow down a bit??
Nov 9, 2013 | 04:54 PM
#372
Nov 9, 2013 | 06:15 PM
#373
Thread Starter
Super Moderator
iTrader: (3)
Joined: Jan 2012
Posts: 3,218
Likes: 26
From: Salisbury, MD
Thanks guys!
If you want to come over and polish it for me, go right ahead! But I'm just going to seal it and spray it with bed liner (I hate carpet!). Besides, I'm somewhat of a perfectionist (In case you haven't noticed) so it would take forever! LOL I polished the wheels, frame and subframe on my Kawasaki ZX-6R and my ZX-10R to a perfect mirror finish (all the way to a 5000 grit wetsand where most typical polish jobs go to 3000 grit). I made guys with all chromed out bikes look like crap - It was literally brighter than chrome!
The steps are there for a couple reasons. First, I had to clear the middle crossmember on the frame. If you look at the back of your factory floorpan, you'll see that it slopes upward to the rear of the cab to clear that crossmember. Second, it actually helps add some rigidity to the floor and rear cab wall. If I had to do it again, I would have made just one even slope up to the top of the tunnel, but I was trying to retain the as much of the original rear wall as possible. It shouldn't interfere with the seat rails, but we'll find out on Monday when I test fit the seats - Fingers crossed!
Thanks! It really wasn't that much work. I've only spent 2 evenings and a long afternoon to complete the floorpan and tunnel to where they are now - maybe about 15 hours of work total.
Tomorrow is my wife and my anniversary so I'm taking the day off from my truck to spend the day with her. I'm off work on Monday, but My friend and I have a tradition of taking all of our military friends out to lunch on Veteran's Day every year so I'll probably get back at it late afternoon on Monday.
 Nov 11, 2013 | 08:11 PM
#376
Thread Starter
Super Moderator
iTrader: (3)
Joined: Jan 2012
Posts: 3,218
Likes: 26
From: Salisbury, MD
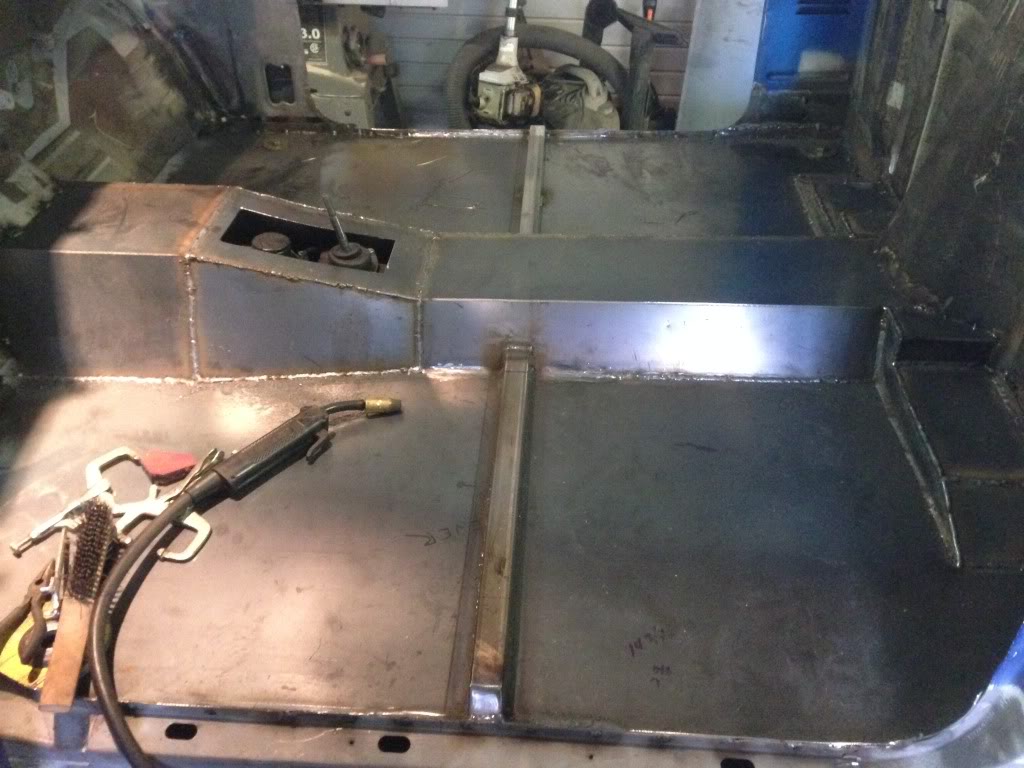
After we took my military friends out to lunch and some beers for Veteran's Day, I got back in the shop to work on my truck. Fabricated the seat rail crossmembers today. Went pretty smooth.
Cut up the front crossmembers using 1 1/4" thin wall tube steel and drilled them out for the mounting bolts:
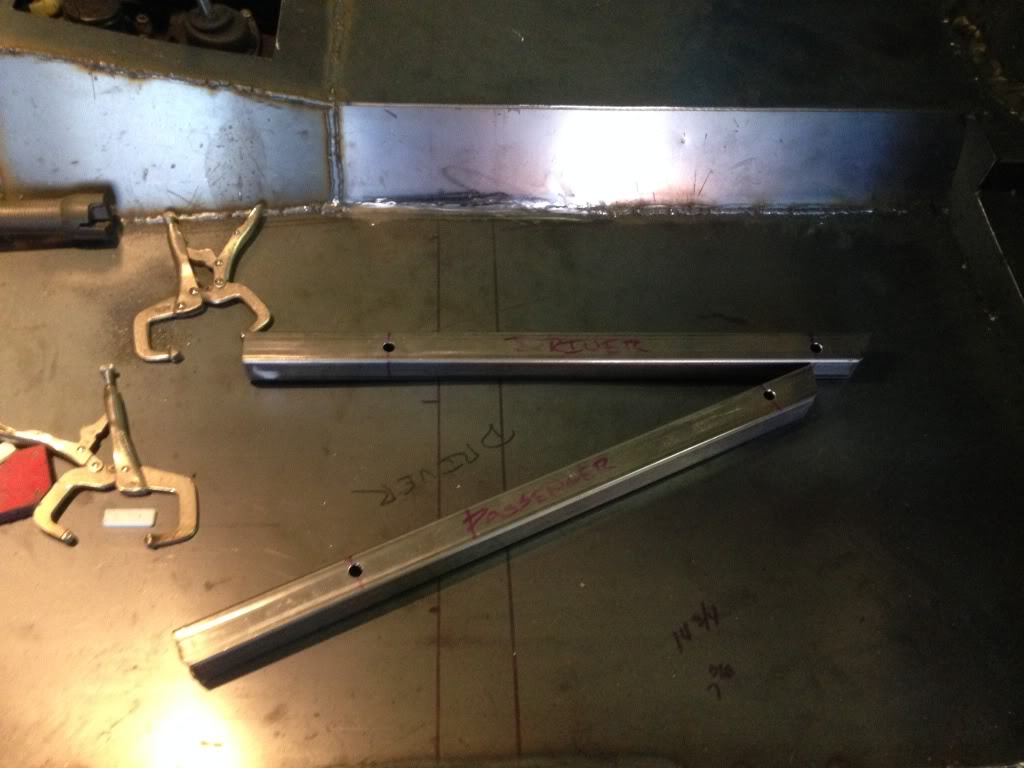
Little test fit:
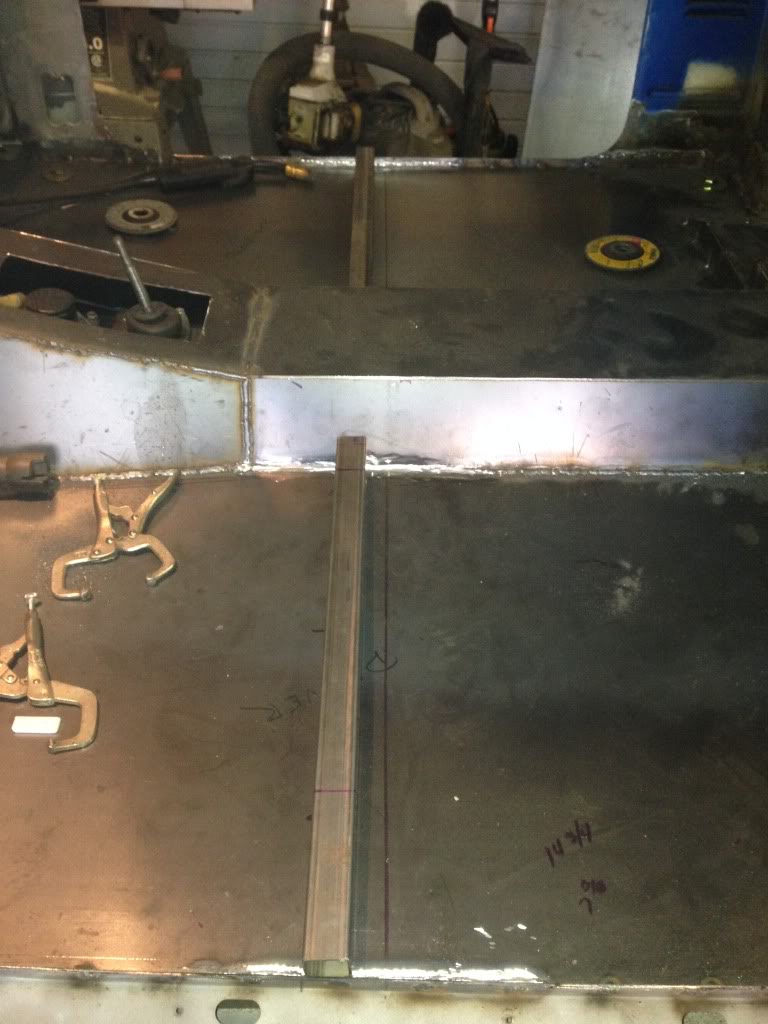
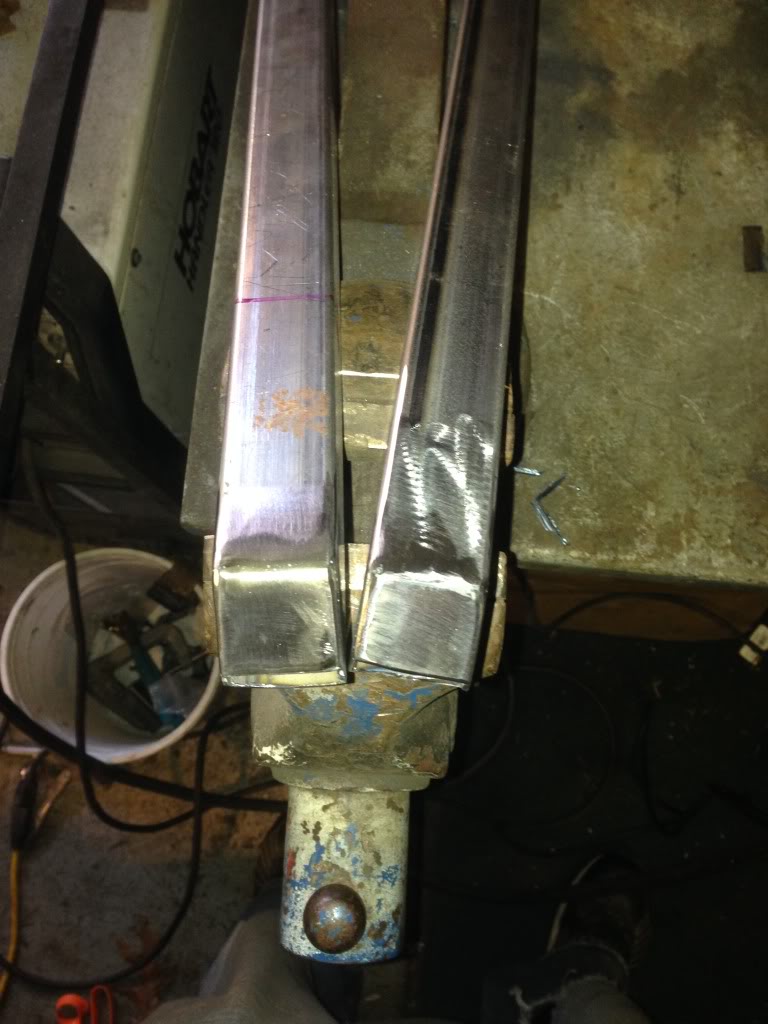
I had to cut a 45* angle on the end that butts up to the door sill so that the door will clear the crossmember. I welded a piece of 14ga steel to the end to make it look clean when mounted and to prevent water and junk from getting inside of the tube steel:
Tacked those biznatches in:
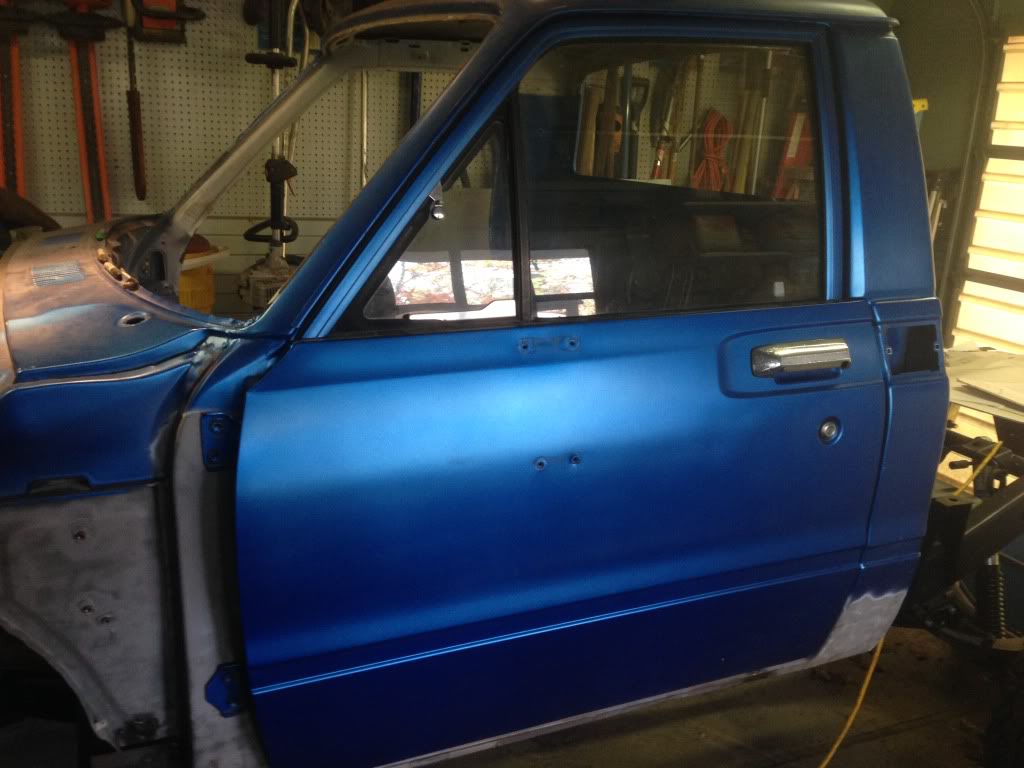
Holy cow is that a door?! I mounted the door really quick to make sure I didn't have any clearance issues:
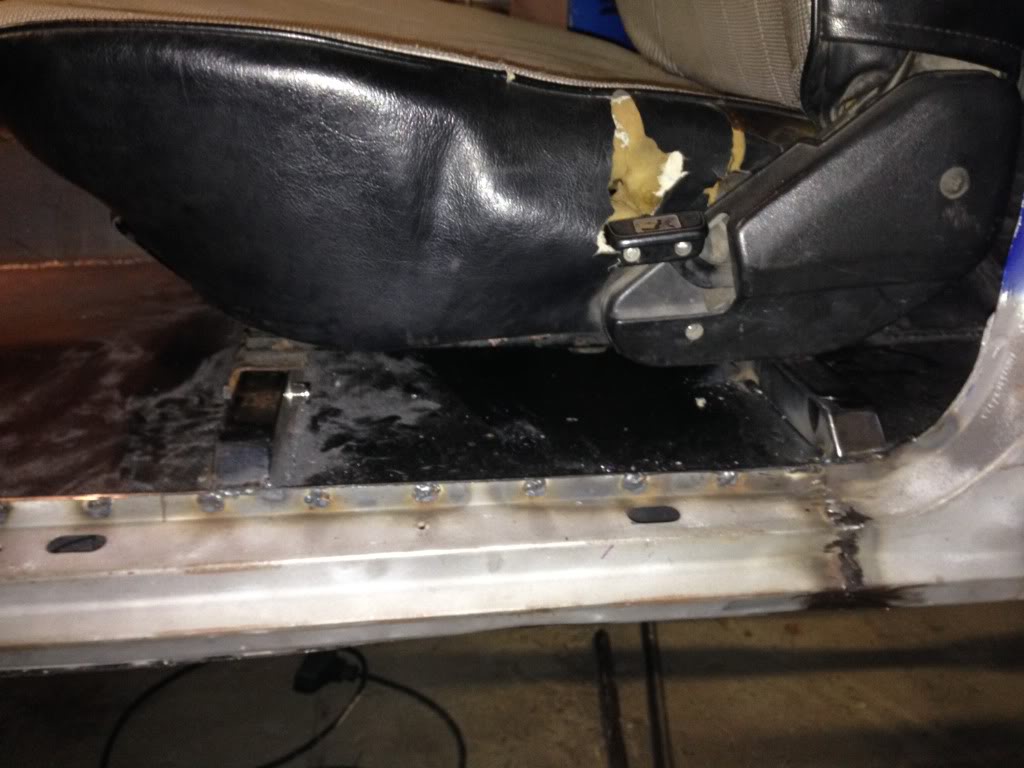
Did the same crossmember mock up and fab for the rear. The factory seat rails sit on a high spot in the floorpan towards the rear of the cab, but since I now have a flat floorpan I had to create that high spot to make the seat rails sit level. Thus the rear mount like the front:
Tacked it all in and test fit the seats:
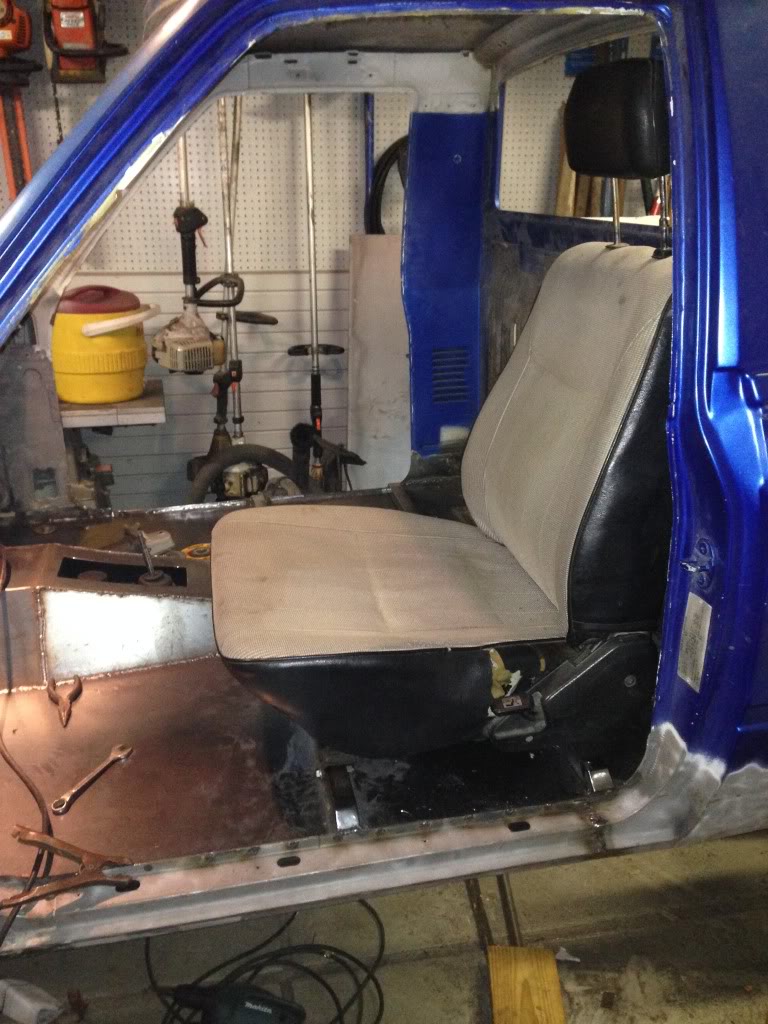
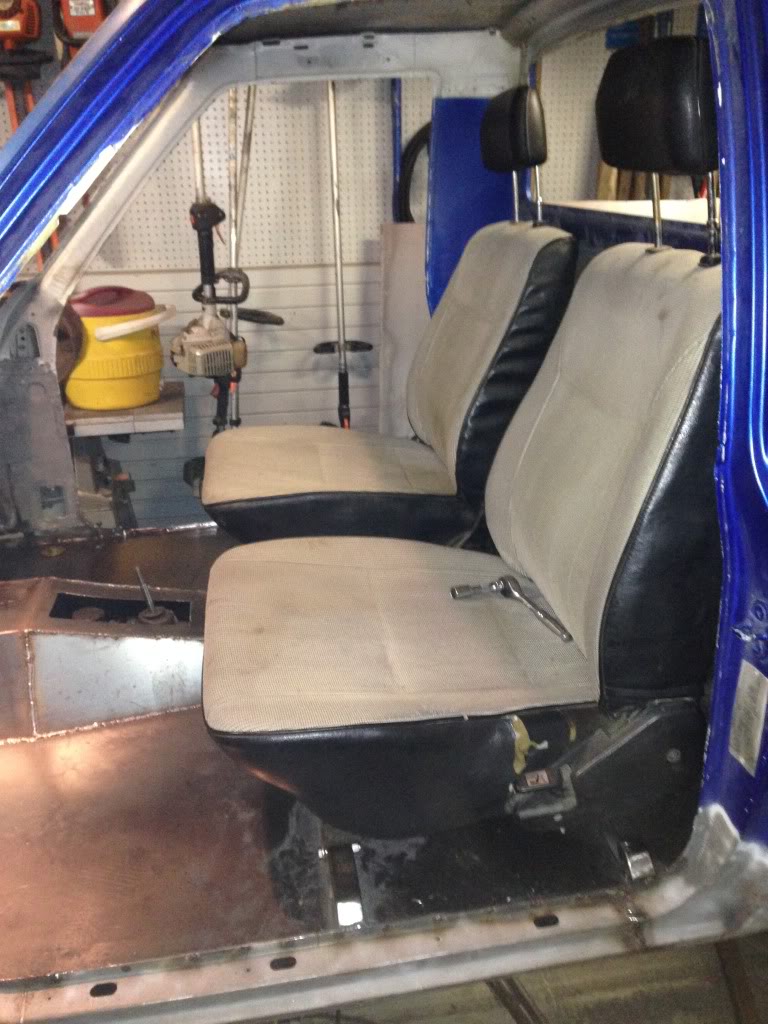
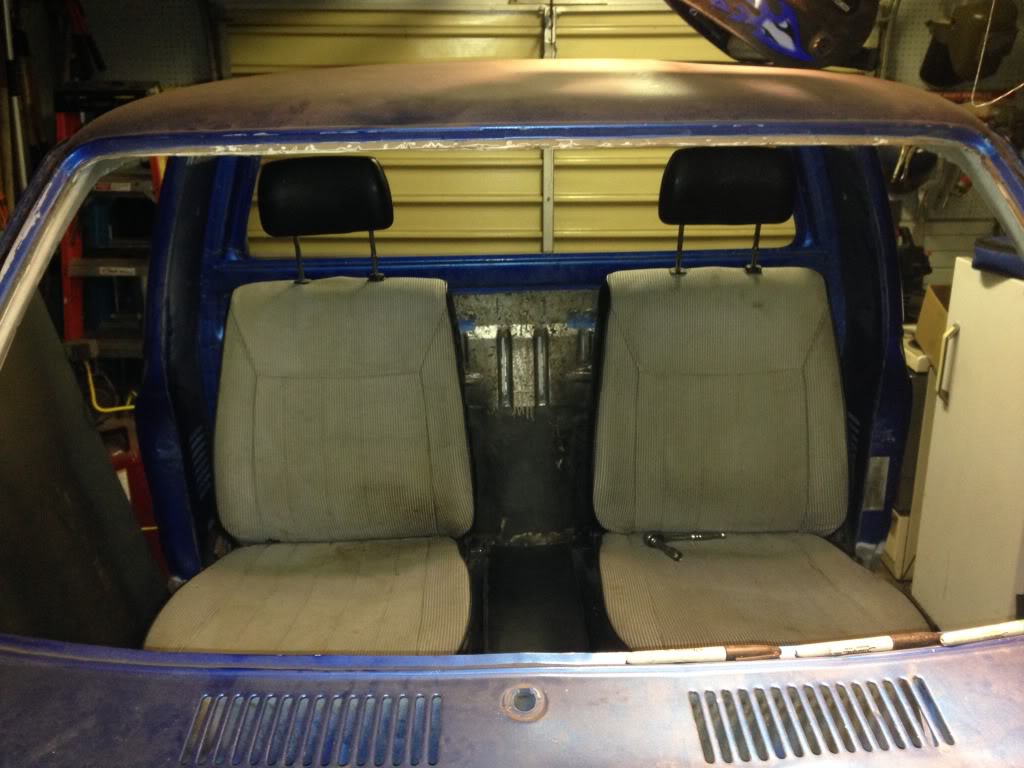
Now I know what you all are thinking, "is he really going to put those ugly ass stock seats in there?!" No, no, I'm just mocking everything up so that I can move forward with the build. The beauty of the stock Toyota seats is that the rails are super easy to remove from the stock seat frames so I can mount them to the new seats.
Now it's on to addressing that gap between my floorpan and firewall...
Cut up the front crossmembers using 1 1/4" thin wall tube steel and drilled them out for the mounting bolts:

Little test fit:

I had to cut a 45* angle on the end that butts up to the door sill so that the door will clear the crossmember. I welded a piece of 14ga steel to the end to make it look clean when mounted and to prevent water and junk from getting inside of the tube steel:

Tacked those biznatches in:

Holy cow is that a door?! I mounted the door really quick to make sure I didn't have any clearance issues:

Did the same crossmember mock up and fab for the rear. The factory seat rails sit on a high spot in the floorpan towards the rear of the cab, but since I now have a flat floorpan I had to create that high spot to make the seat rails sit level. Thus the rear mount like the front:


Tacked it all in and test fit the seats:


Now I know what you all are thinking, "is he really going to put those ugly ass stock seats in there?!" No, no, I'm just mocking everything up so that I can move forward with the build. The beauty of the stock Toyota seats is that the rails are super easy to remove from the stock seat frames so I can mount them to the new seats.
Now it's on to addressing that gap between my floorpan and firewall...


 Nov 12, 2013 | 05:28 PM
#378
Registered User
Joined: Sep 2008
Posts: 522
Likes: 0
Originally Posted by dropzone View Post
When are you gonna be done??
You work as fast as my kid cleans her room
...says the guy that's been working on his truck for the past 6 years! LOL Nice one Rob!
Are any of us "EVER DONE" working on, building or modifying our trucks????
When are you gonna be done??
You work as fast as my kid cleans her room
...says the guy that's been working on his truck for the past 6 years! LOL Nice one Rob!
Are any of us "EVER DONE" working on, building or modifying our trucks????
Last edited by gmack192; Nov 12, 2013 at 05:29 PM.
Nov 12, 2013 | 08:36 PM
#379
Thread Starter
Super Moderator
iTrader: (3)
Joined: Jan 2012
Posts: 3,218
Likes: 26
From: Salisbury, MD
Gmack, one day I will be done! LOL Hopefully it will be reliable and hearty enough that I shouldn't ever need to work on it again.
Unfortunately, I finally had to remove the sound deadener on the firewall. Talk about a PITA! But it had to be done so I could weld to the firewall without it burning off fumes or catching fire.

I had about a 1" gap between the floor pan and the firewall on both side from where the previous owner FUBAR'ed the area with sharty welds and bondo while attempting to repair some rust holes in the floorpans so I had to cut out a little bit more that I would have liked to; thus the 1" gap. No biggie though. I cut a piece of 14ga steel to fit the gap. Unfortunately I ran out of argon so my welding looks like crap! I'm actually rather embarassed by it LOL. I still have boat load of welding to do throughout the cab, so I'll just have to add this to the list.
Next on the list to to address the kick panels on both sides. I had a little bit of cancer to cut out about 1" above the floorpan so I need to cut and fit a patch for that area as well. After that I should be able to yank the cab off the frame, media blast and do the final welding.
Unfortunately, I finally had to remove the sound deadener on the firewall. Talk about a PITA! But it had to be done so I could weld to the firewall without it burning off fumes or catching fire.

I had about a 1" gap between the floor pan and the firewall on both side from where the previous owner FUBAR'ed the area with sharty welds and bondo while attempting to repair some rust holes in the floorpans so I had to cut out a little bit more that I would have liked to; thus the 1" gap. No biggie though. I cut a piece of 14ga steel to fit the gap. Unfortunately I ran out of argon so my welding looks like crap! I'm actually rather embarassed by it LOL. I still have boat load of welding to do throughout the cab, so I'll just have to add this to the list.

Next on the list to to address the kick panels on both sides. I had a little bit of cancer to cut out about 1" above the floorpan so I need to cut and fit a patch for that area as well. After that I should be able to yank the cab off the frame, media blast and do the final welding.


