
KawaZX636's 1983 Toyota Pickup Restoration
 Nov 19, 2013 | 12:18 PM
#401
Registered User
Joined: Aug 2011
Posts: 592
Likes: 0
From: Canon City, Colorado
Nice deer, Out here in Colorado its almost like the dam liberals dont want us to kill deer, just let people keep hitting them with cars. This was the first year I havent drawn a tag since I started hunting.
On another note. Did you build a frame for your center console or just bend the steel? What gauge steel? Im thinking of tackling the idea for my truck. Just not sure if to make a small frame and weld the steel on or bend it and form it.
On another note. Did you build a frame for your center console or just bend the steel? What gauge steel? Im thinking of tackling the idea for my truck. Just not sure if to make a small frame and weld the steel on or bend it and form it.
Nov 19, 2013 | 07:12 PM
#402
Thread Starter
Super Moderator
iTrader: (3)
Joined: Jan 2012
Posts: 3,218
Likes: 26
From: Salisbury, MD
Yeah, the effin' liberals here in Maryland just passed some of the strictest gun laws in America. They just passed a law that requires a handgun qualification license with training to buy any kind of regulated firearms, mandatory fingerprinting, banned the sale of magazines greater than 10 rounds, requires the registration of any currently owned firearms (even though they were registered when they were purchased or transferred - I think it is $50 per gun so it's just another money maker for the state) and banned the sale and manufacturing of assault rifles which in turn is pushing LWRC (a local higher end assault rifle manufacturer) and Beretta out of the state. We do have concealed carry permits, but it is impossible to get one and open carry is a no go. Maryland is also not a reciprical state in regards to carry. I truly don't mind the extra effort required to buy a gun, but it is rather annoying that I put in an application to buy a Kimber 1911 back in June and the State Police is so backed up that my background check has yet to be returned so I'm still waiting. Regardless, criminals don't buy guns legally so all these new regulations don't really solve any problems. It's a good thing that my gun collection has pretty much everything I need for now and I reload my own ammo so when they try to regulate that I'll be ahead of the game! Dang dsal, you had to get me all worked up on liberals didn't you?! LOL
You have to "draw a tag?" Does Colorado have a deer tag lottery?? That would piss me off! I am lucky though to be able to hunt on a crop damage permit. I typically don't shoot a lot of bucks (this year has been good to me) but I do shoot a lot of doe to stock the freezer and to cut the sausage when we slaughter hogs - In fact, I typically don't hunt during deer season because of all the other hunters surrounding the land that I hunt that stress the deer during the open season. I primarily hunt in Delaware, but the natural resources department really understands the importance of deer management.
Back to Toyotas (I could talk about guns and hunting all day!), I built my console out of 14ga sheet steel. I just bent it up and welded the seems. Then I welded some 1/2" thin wall steel square tube around the top to give it some structure and, more or less, a lip to the top of the console (that's the "frame" you see). I didn't want to have the thin sheet metal meeting up with the lid of the console if you know what I mean. I also cut the rear of the console to match up to the contour of the hump in the rear of cab - I'll find some sort of windless trim or rubber trim to line the rear edges where it meets the cab so that it fits snug without scratching the coating on the rear cab wall. The console itself, as you see it a couple posts back, only took about 2 hours to make. I just have to finish up the welds, grind them flat and it'll be ready to go. I have a template to cut out the sheet metal if you want it - you'll just have to slightly modify it to fit properly.
Nov 20, 2013 | 12:13 PM
#403
Registered User
Joined: Aug 2011
Posts: 592
Likes: 0
From: Canon City, Colorado
We have to put in for out tags in begining of April, If we dont draw our 1st pick, we get a "preference point" which means we should get the tag the next year but some areas take 5+ points to get a tag. Because of all the out of staters that come here to hunt monster Muleys and Big Elk, locals get screwed. I understand its a buisness but dam.
that would be great if you could send me the template. Ill pm you my emails. thanks
that would be great if you could send me the template. Ill pm you my emails. thanks
Nov 21, 2013 | 05:44 AM
#404
Registered User
Joined: May 2010
Posts: 159
Likes: 0
From: Durango, Colorado
Hey Dsal, I lived in Durango for 10 years, and never missed on getting my 1st preference. We had access to San Juan National Forest and the Weminuche Wilderness area, which has some pristine hunting country.
Sometimes, I left my 1st choice blank to gain a preference point and still received my first pick with it listed as my second choice. The hunting might not be as good as in your neck of the woods, but it's still pretty good. There were never enough local hunters to take up all the tags, so the out of stater's and locals had plenty to pick.
I hear you about some areas taking up a lot of points. I never saved up points to hunt in those areas.
I live in PA now and miss 1st Rifle of elk season. Nothing better than being camped out in the high country the night before and listening to the bulls' bugles.
Didn't mean to threadjack.
I do love this build thread!
Last edited by Rusto; Nov 21, 2013 at 05:47 AM.
Nov 22, 2013 | 08:41 AM
#405
Thread Starter
Super Moderator
iTrader: (3)
Joined: Jan 2012
Posts: 3,218
Likes: 26
From: Salisbury, MD
Haven't got much work done on the truck lately. This cold weather has kinda of got me in a lull plus I needed a little bit of a break from the late nights. My next major step will be to remove the cab again and so I can sand blast all the areas that I need to finish welding and get some clean welds laid. Barring any unforeseen circumstances (Like that battery tray that looks like it may have had some globs of bondo slapped on it), I should be able to do a final media blast of the whole cab and lay down some epoxy sealer and start the body filler.
In other news. I was trying to figure out how I was going to wire my gauge pod. With little room in the actual pod that I made, I wanted to make sure that I could get everything to fit in it before I finished it up. Made this wiring diagram:
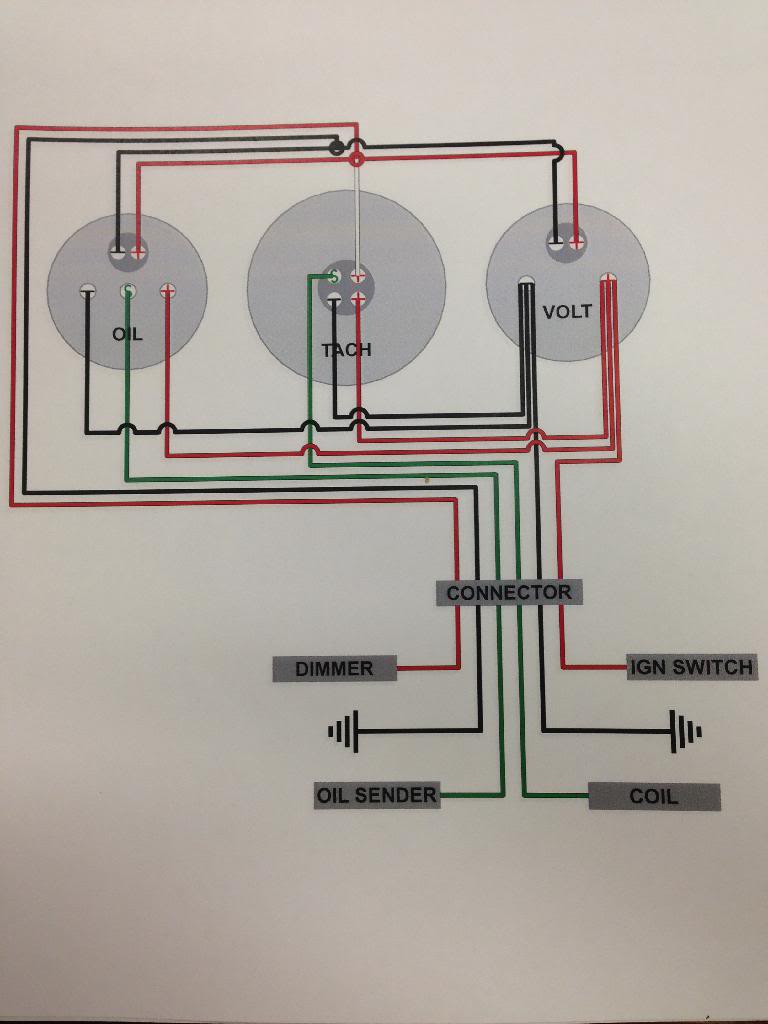
Basically, I'm running the illumination together and off to the dimmer - I'm going to with all the positives together to the dimmer switch and the grounds together to an existing ground point (The tach illumination ground is shared with the tach ground, so I'll run that with the other grounds). I'm running the positive and ground from the oil pressure gauge and the tach to the posts on the volt meter to reduce the amount of wires and connectors (plus this will allow me to easily disconnect the gauges without actually having to cut any wires). The ignition switched positive will then run directly to the volt meter which will feed the tach and oil pressure gauge (same with the ground). The oil pressure sender wire to the oil pressure sender and the tach sender wire to the empty diagnostic plug on the igniter. What I'm hoping to do is find an 8-pin connector (only need 6, but I want a couple extras just in case I add something to the area later) to wire everything into so that I can easily disconnect everything if I need to remove the gauge pod for some reason. Should be fairly simple and clean - nothing grinds my gears more than a bird's nest of wiring!
I'm no electronics specialist, so please chime in if I'm about to do something wrong (like wiring everything together) or if you have a better idea.
Last edited by kawazx636; Nov 22, 2013 at 08:45 AM.
Nov 22, 2013 | 09:29 AM
#406
Registered User
Joined: May 2009
Posts: 684
Likes: 1
From: Downingtown, PA
If you are using the stock Toyota Dimmer (Rheostat) you have to wire your Ground wire of the Gauge lights to the Dimmer not the Gauge Light Positive wire otherwise you will smoke your Dimmer and / or other lights that are wired into the Dimmer. Do not wire the Tach Ground to the Voltmeter, wire it to an Isolated Ground. If you need help wiring call me (610) 223-2397 as I wire all of my friends Street Rods and Customs.
Last edited by suncomb1; Nov 22, 2013 at 09:37 AM.
Nov 22, 2013 | 09:47 AM
#407
Thread Starter
Super Moderator
iTrader: (3)
Joined: Jan 2012
Posts: 3,218
Likes: 26
From: Salisbury, MD
See, I knew somebody would know more than me! Ok Don, so couple of questions for you:
1 - Since the light ground goes to the rheostat. Can I just wire all of my positives together to a ignition switched source?
2 - What is the reason behind isolating the ground to the tach? (Not doubting you, just trying to get some knowledge)
3 - If the tach is wired to an isolated ground and the rheostat controls the (-), I assume that the tach would not be dimmable?
4 - Can I wire the positive for the lights to the volt meter or should I run those separate?
Thanks for your help!
Last edited by kawazx636; Nov 22, 2013 at 10:21 AM.
Nov 22, 2013 | 10:20 AM
#408
Thread Starter
Super Moderator
iTrader: (3)
Joined: Jan 2012
Posts: 3,218
Likes: 26
From: Salisbury, MD
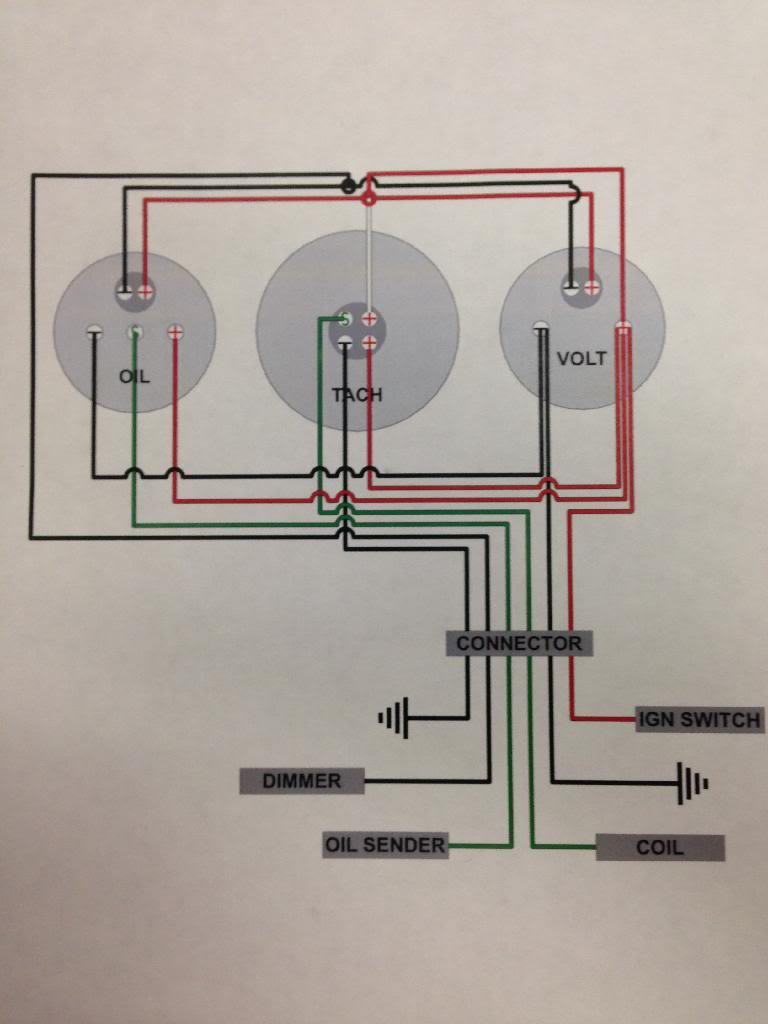
How about this Don:
Oil Pressure Light (+) --> Volt Meter (+)
Oil Pressure Light (-) --> Connector --> Rheostat
Oil Pressure (+) --> Volt Meter (+)
Oil Pressure (-) --> Volt Meter (-)
Oil Pressure (S) --> Sending Unit
Tach Light (+) --> Volt Meter (+)
Tach (+) --> Volt Meter (+)
Tach (-) --> Connector --> Isolated Ground
Tach (S) --> Connector --> Igniter Diagnostic Plug
Volt Meter Light (+) --> Volt Meter (+)
Volt Meter Light (-) --> Connector --> Rheostat
Volt Meter (+) --> Connector --> Ignition Switch
Volt Meter (-) --> Connector --> Ground
Here's an updated diagram if you can't follow that:
 Nov 22, 2013 | 10:54 AM
#409
Registered User
Joined: May 2009
Posts: 684
Likes: 1
From: Downingtown, PA
I assume your truck is not an SR5 so off of your Heater Contol Panel Light you will see a GREEN wire; use that as the 12V positive feed to all of your Gauge lights. You will also see a Red / Black or a White / Black wire on the Heater Control Panel Light; use that as the Negative (ground) feed to all of your Gauge lights. If you use the power from the Voltmeter, your Gauge lights will be on when you ever you run your truck.
Isolated Ground for Tach. If you hook up the Tach without an isolated ground you will get electrical interference and / or a false reading. You have Ignition (12V) Hot feed (Voltmeter), Tach Ground (Isolate), Sender to Ignition Module, Gauge Light + to Heater Control Light and Gauge Light - to the Heater Contol Light. By wiring this way your gauge lights will Dim like stock, Lighting will come on with your factory light switch and your Tach will function without problems. Power from the Voltmeter to the Oil Pressure Gauge and to the Tach is okay. The Oil Pressure Gauge Light and the Voltmeter Gauge Light should be wired the same as the Tach Light.
Isolated Ground for Tach. If you hook up the Tach without an isolated ground you will get electrical interference and / or a false reading. You have Ignition (12V) Hot feed (Voltmeter), Tach Ground (Isolate), Sender to Ignition Module, Gauge Light + to Heater Control Light and Gauge Light - to the Heater Contol Light. By wiring this way your gauge lights will Dim like stock, Lighting will come on with your factory light switch and your Tach will function without problems. Power from the Voltmeter to the Oil Pressure Gauge and to the Tach is okay. The Oil Pressure Gauge Light and the Voltmeter Gauge Light should be wired the same as the Tach Light.
Last edited by suncomb1; Nov 22, 2013 at 11:12 AM.
Nov 22, 2013 | 11:17 AM
#411
Thread Starter
Super Moderator
iTrader: (3)
Joined: Jan 2012
Posts: 3,218
Likes: 26
From: Salisbury, MD
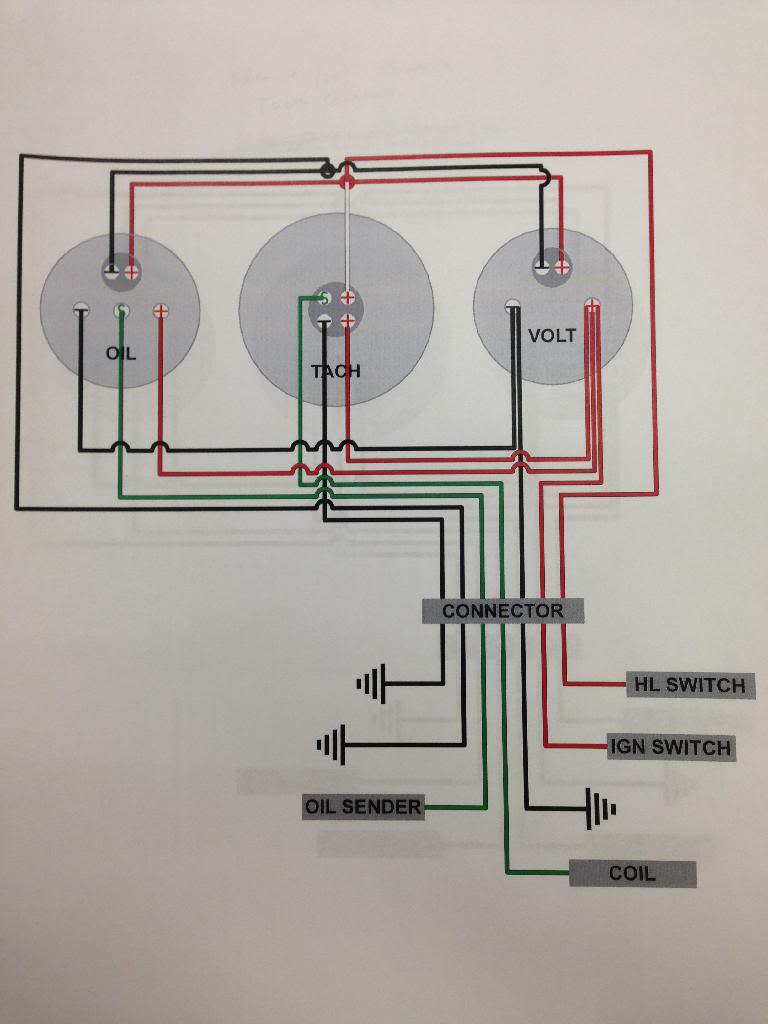
Thanks Don! Since the rheostat controls the ground side of the instrument panel circuit I learned that this particular model of Tachometer can not be wired that way. I really don't care if my gauges dim or not since I alway keep them as bright as they go in all my other vehicles. So I'll just wire all three to the headlamp switch. How does this sound?:
LIGHTS:
Oil Pressure Light (+), Tach Light (+) & Volt Meter Light (+) --> Connector --> Headlamp switch.
Oil Pressure Light (-) & Volt Meter Light (-) --> Connector --> Ground
(Tach light shares a ground with the tach operation)
GAUGES:
Oil Pressure (+) --> Volt Meter (+)
Oil Pressure (-) --> Volt Meter (-)
Oil Pressure (S) --> Sending Unit
Tach (+) --> Volt Meter (+)
Tach (-) --> Connector --> Isolated Ground
Tach (S) --> Connector --> Igniter Diagnostic Plug
Volt Meter (+) --> Connector --> Ignition Switch
Volt Meter (-) --> Connector --> Ground
I'll look for those wires you are talking about, but the previous owner hacked into that area of the wiring harness a few times and it took me forever to figure it all out. I ended up removing a lot of wires that he had spliced into and hacked all to hell. So chances are I probably removed those wires, but it's not a big deal to run them back to the switch.
Updated Diagram:
 Nov 24, 2013 | 11:59 AM
#413

Registered User
Joined: Nov 2013
Posts: 83
Likes: 0
Hey Kawazx636, I've been following your whole build. I'm very impressed with the work you've done on your truck.
I am contemplating replacing the frame on my truck or patching it. If I go the frame route, is there any advice/tips you'd have for removing anything on the truck? Problems you encountered? I'd appreciate the the help very much. Thanks!
I am contemplating replacing the frame on my truck or patching it. If I go the frame route, is there any advice/tips you'd have for removing anything on the truck? Problems you encountered? I'd appreciate the the help very much. Thanks!
Nov 24, 2013 | 12:34 PM
#414

I'll let kawa answer you, but since I've been doing the same (with not as many new parts and attention to detail though haha), I would say keep all your parts and bolts in zip lock bags and identify them, will make things much easier when re-assembling. I thought I lost 4 cone washers so I said to myself ''meh i'll just buy new ones'', but at 10$ each cone washer I turned my garage upside down to find them!
Nov 24, 2013 | 03:58 PM
#415
Thread Starter
Super Moderator
iTrader: (3)
Joined: Jan 2012
Posts: 3,218
Likes: 26
From: Salisbury, MD
Hey Kawazx636, I've been following your whole build. I'm very impressed with the work you've done on your truck.
I am contemplating replacing the frame on my truck or patching it. If I go the frame route, is there any advice/tips you'd have for removing anything on the truck? Problems you encountered? I'd appreciate the the help very much. Thanks!
I am contemplating replacing the frame on my truck or patching it. If I go the frame route, is there any advice/tips you'd have for removing anything on the truck? Problems you encountered? I'd appreciate the the help very much. Thanks!
Nov 25, 2013 | 10:32 AM
#418
Registered User
Joined: Jan 2012
Posts: 53
Likes: 0
What kind of shape is the bed in, Can it be unbolted and shipped? If you could PM me a few pics and a price. I may be able to get the fenders for it. Does the bed look home made or like it could be the wolverine one? Thanks
Nov 26, 2013 | 08:12 PM
#420
Thread Starter
Super Moderator
iTrader: (3)
Joined: Jan 2012
Posts: 3,218
Likes: 26
From: Salisbury, MD
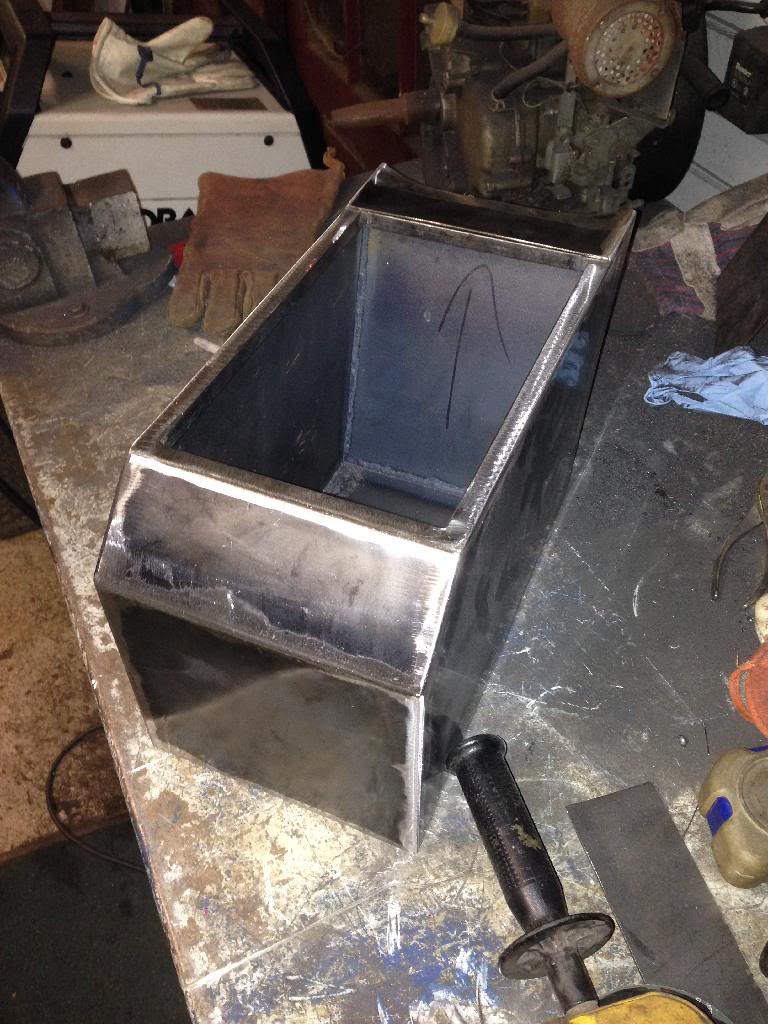
Finished up the box of the console. Welded up the seams and ground the welds flat. Turned out pretty alright in my opinion.
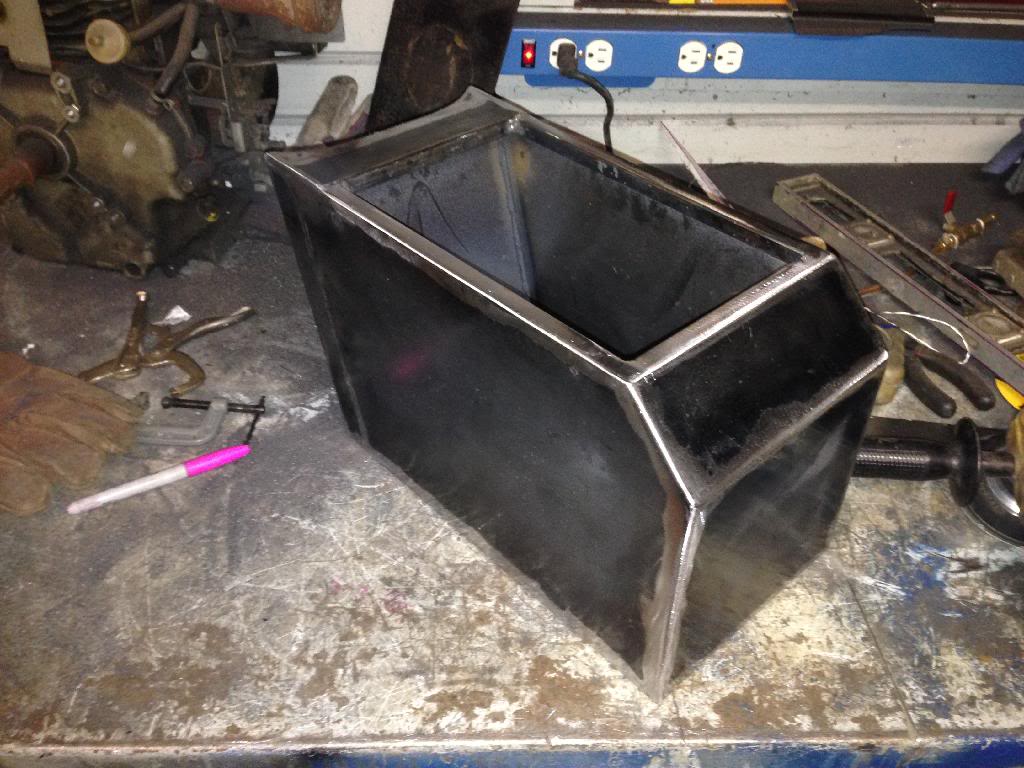
And the test fit... guess what! It fit! I drilled 4 holes through the bottom of the console and into the tunnel so it can easily be bolted in. I will weld on some nuts on the underside of the tunnel.
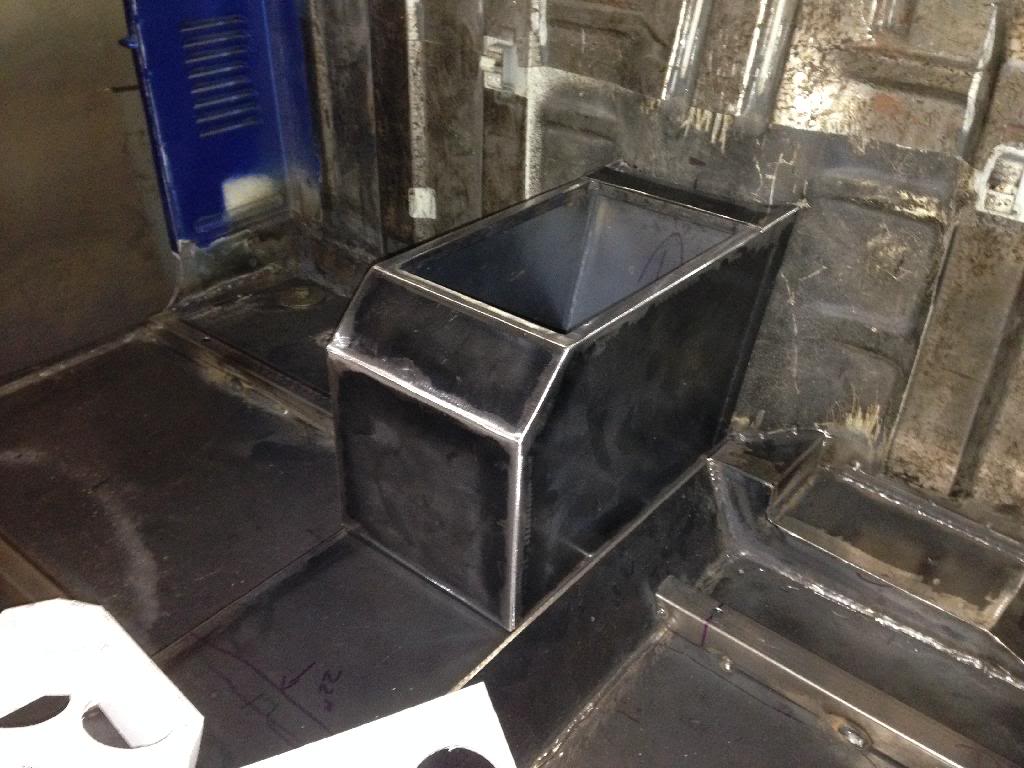
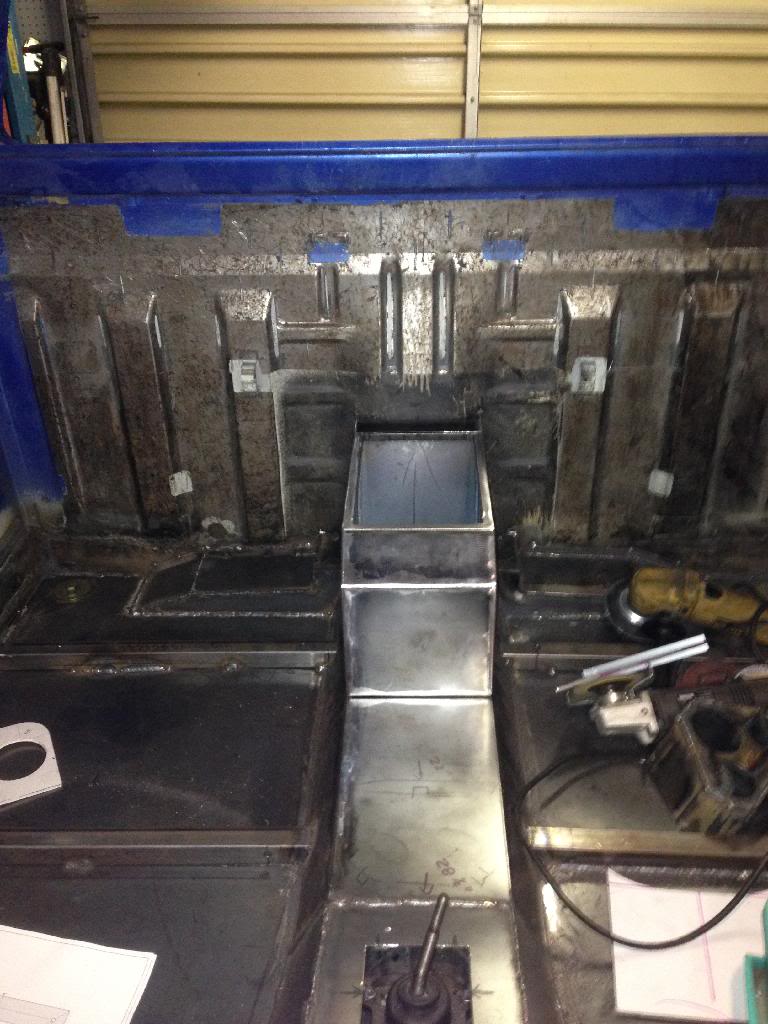
Looks like it belongs in there. All I have to do is get some 1/4 steel to make the cup holders and weld them on. The way that I have designed them, I want them to be thick enough that they aren't flimsy and so that they are unlikely to get clothing and such snagged on them. I'm debating on whether I want to make a steel lid for it or some kind of upholstered lid. I'm leaning towards steel because I want to put a lock on it and essentially have a Tuffy box.
Hopefully tomorrow night I can get the gauge pod, cup holders and console lid wrapped up so I can powdercoat them when I get a chance and scratch them off the to do list. And while the crazies are shopping on black friday, I will hopefully be popping the cab off the frame. It's getting closer and close to shooting some primer!
Last edited by kawazx636; Nov 26, 2013 at 08:15 PM.


