
KawaZX636's 1983 Toyota Pickup Restoration
 Aug 14, 2013 | 12:21 PM
#201
Thread Starter
Super Moderator
iTrader: (3)
Joined: Jan 2012
Posts: 3,218
Likes: 26
From: Salisbury, MD
The bleeders are on the top side of the caliper so no air bubbles for me there.
I wasn't feeling well this morning so I stayed home from work today. Around about noon I finally decided to get out of bed and putzed around the house for a bit until I got bored... Of course when I get bored, I go out to the garage...
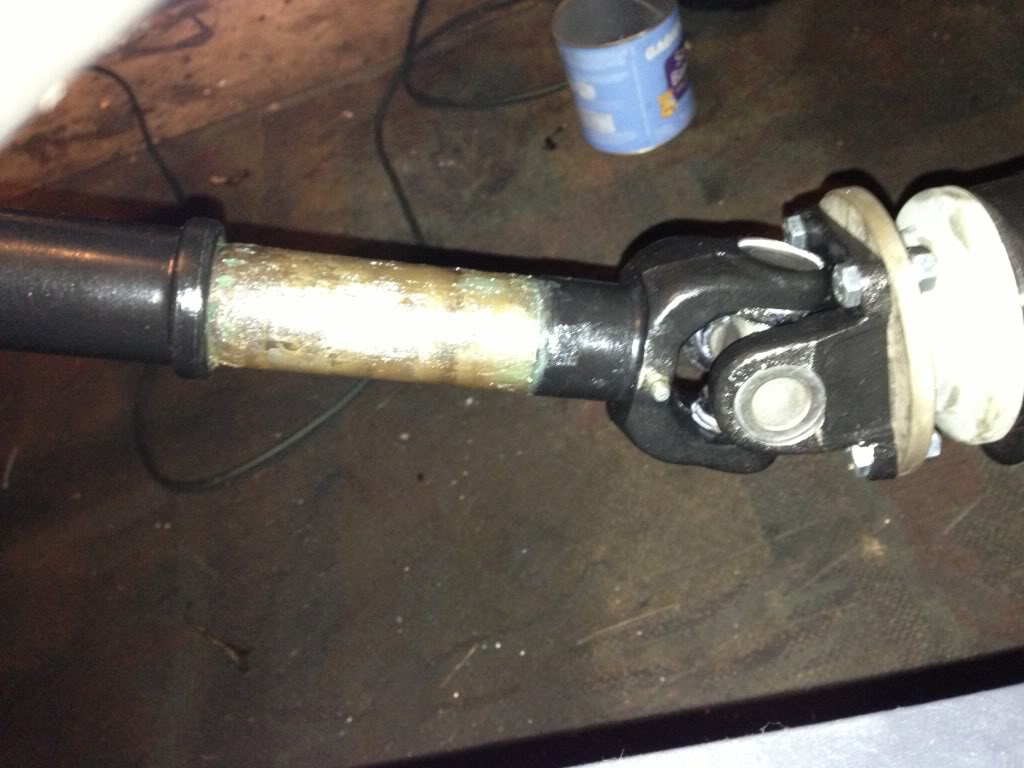
I masked off and sandblasted all of my driveshaft parts - all with a massive headache and a clogged nose that feels like I have a pair of vice grips clamped on it.
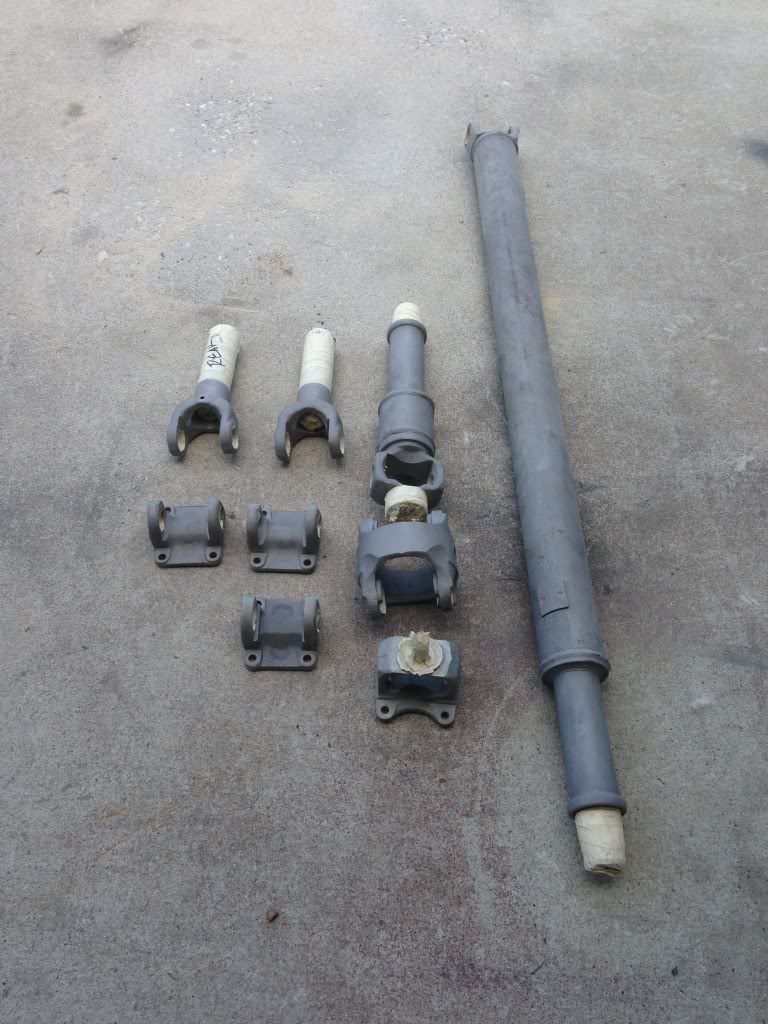
That's dedication! Not sure if I'll get it all powdercoated/POR-15'ed tonight, but I'm feeling froggy!
I wasn't feeling well this morning so I stayed home from work today. Around about noon I finally decided to get out of bed and putzed around the house for a bit until I got bored... Of course when I get bored, I go out to the garage...
I masked off and sandblasted all of my driveshaft parts - all with a massive headache and a clogged nose that feels like I have a pair of vice grips clamped on it.

That's dedication! Not sure if I'll get it all powdercoated/POR-15'ed tonight, but I'm feeling froggy!
Aug 15, 2013 | 07:31 PM
#203
Thread Starter
Super Moderator
iTrader: (3)
Joined: Jan 2012
Posts: 3,218
Likes: 26
From: Salisbury, MD
I have a tendancy to wear flip flops around the garage when I'm not doing anything too hazardous, but tonight it caught up to me. I had part of my front driveshaft (Probably around 10 lbs) in the vice when it slipped out and fell to the floor smashing my toe. Chances are I could use some stitches and I probably shattered a couple bones. Of course I hollered a few choice words and my wife came running out. She shook he head and said, "I don't think flip flops are OSHA approved footwear" and then went back in the house...
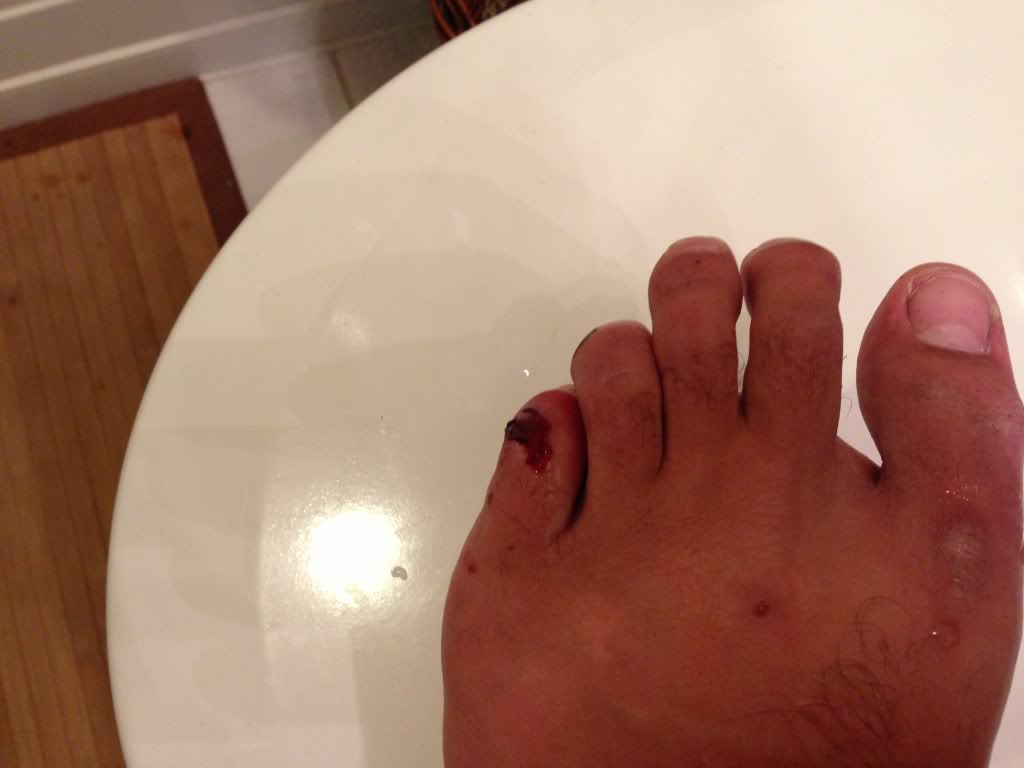
Upon bandaging up my toe, I managed to finish painting my driveshaft parts tonight. I decided not to powdercoat them so that I could easily touch up the paint in the event that I chip or scratch it when I'm pressing the the u-joints back in. I did 2 coats of POR-15 rust preventative paint and 2 coats of POR-15 Chassis Coat. All brushed on, but it appears to be laying down fairly flat. I may go back and knock down the shaft with some 320 grit and do a light spray once I have everything reassembled if it doesn't lay as flat as I would like. Nonetheless, I should have everything reassembled tomorrow night just in time for the weekend so I can trailer the chassis over to storage.
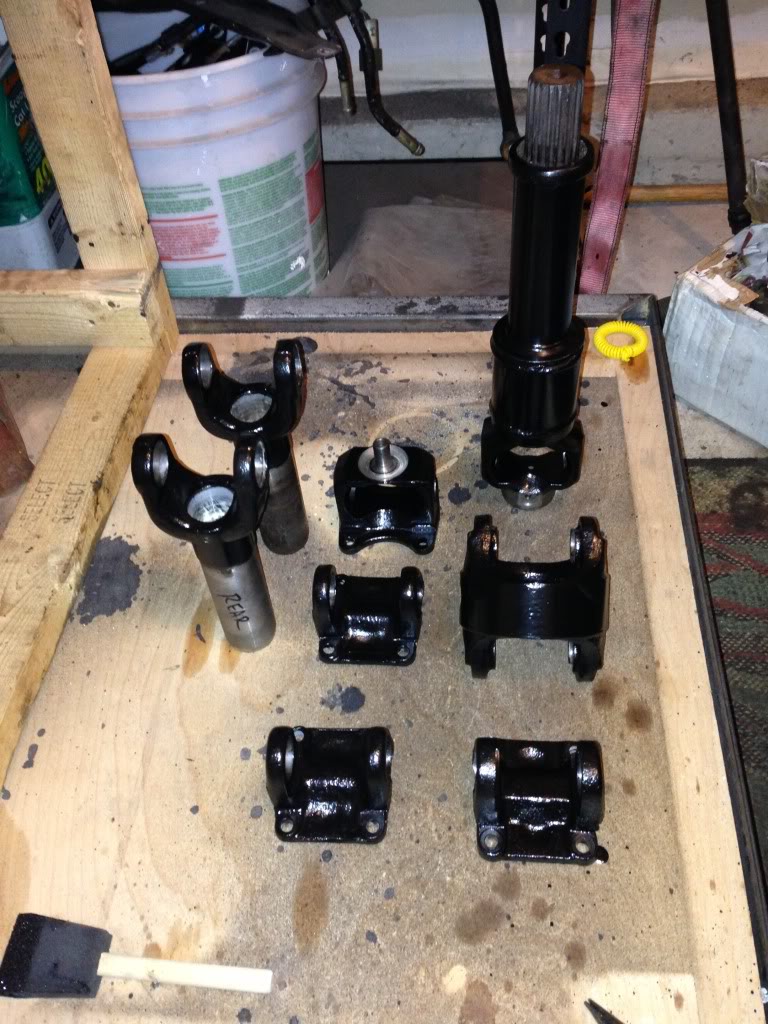

Upon bandaging up my toe, I managed to finish painting my driveshaft parts tonight. I decided not to powdercoat them so that I could easily touch up the paint in the event that I chip or scratch it when I'm pressing the the u-joints back in. I did 2 coats of POR-15 rust preventative paint and 2 coats of POR-15 Chassis Coat. All brushed on, but it appears to be laying down fairly flat. I may go back and knock down the shaft with some 320 grit and do a light spray once I have everything reassembled if it doesn't lay as flat as I would like. Nonetheless, I should have everything reassembled tomorrow night just in time for the weekend so I can trailer the chassis over to storage.


 Aug 16, 2013 | 08:57 PM
#206
Thread Starter
Super Moderator
iTrader: (3)
Joined: Jan 2012
Posts: 3,218
Likes: 26
From: Salisbury, MD
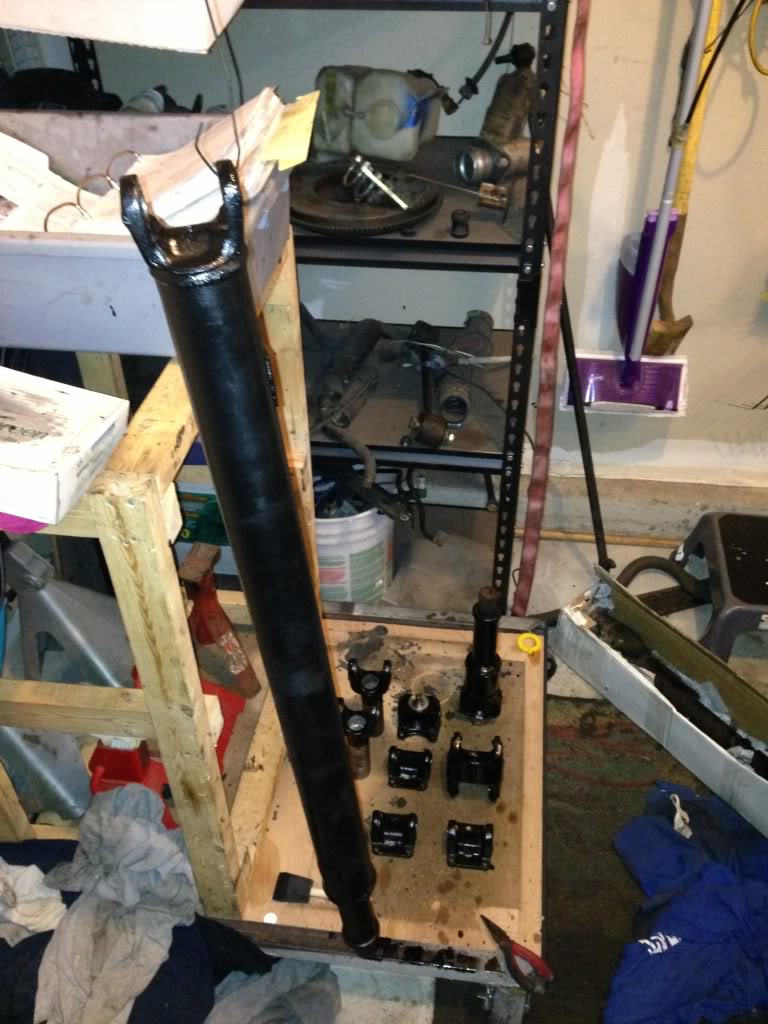
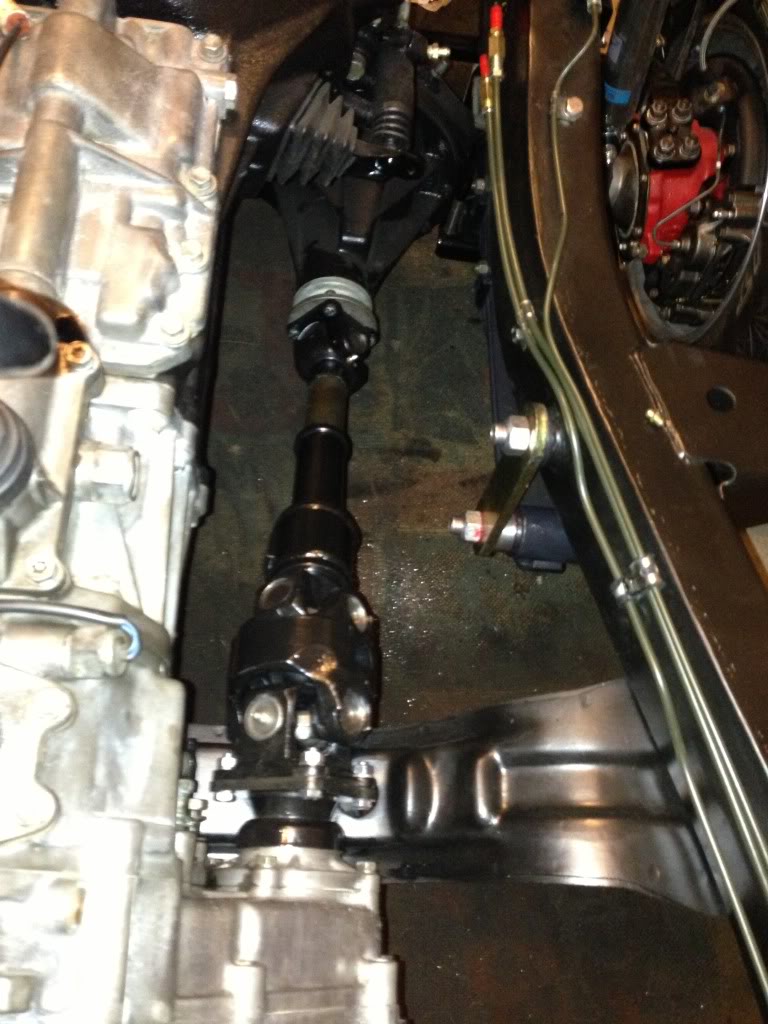
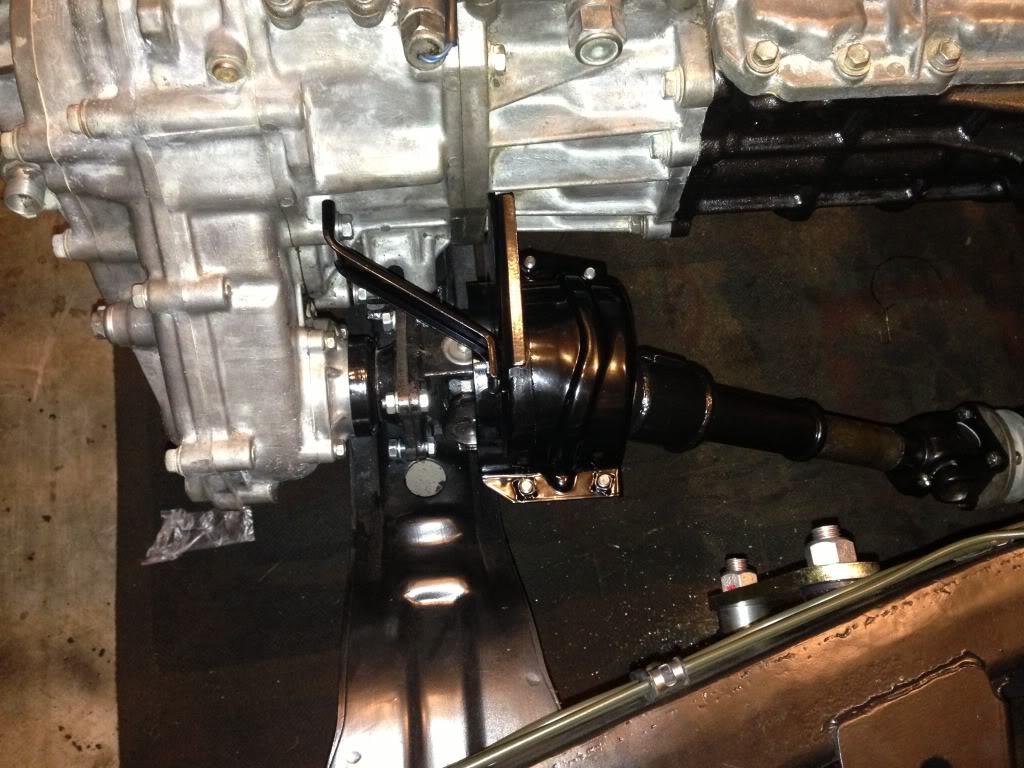
Well, Dad, I went out to the garage tonight donning a nice pair of flip flops again (I tend to not learn my lessons too well) to assemble my driveshafts. Everything went smooth as butter with minimal swearing. Rear was a snap but the front took a little finesse. I replaced the self centering bearing in the double cardan joint. I determined that it is easier to press the u-joints to the outter yokes first. Then I was able to slide the u-joints into the H-yoke and press the caps in. When dealing with the self centering bearing, I did the center joint first, then the end joint. Pretty much the only problem I had was that the needle bearings in the centering bearing kept sliding down on me so I couldn't get it to seat in all the way. Waaaaaay easier to reassmble than it was to disassemble! Installed some new grease zerks and I was good to go.
Ta da:

When I installed the front, I had the t-case in 2Hi and the hubs unlock so I could spin it to make sure there was no binding. Well, there was binding!!! I had a flashlight shining in there to see where it was binding up and I couldn't find anything! So I took it off only to find that the H-Yoke was binding up on the grease zerk that I put in the self centering bearing cup. Easy fix-pumped it full of grease and put a tiny 6mmx1.0 bolt in it. Bolted it up with some shiney new grade 10.8 hardware:
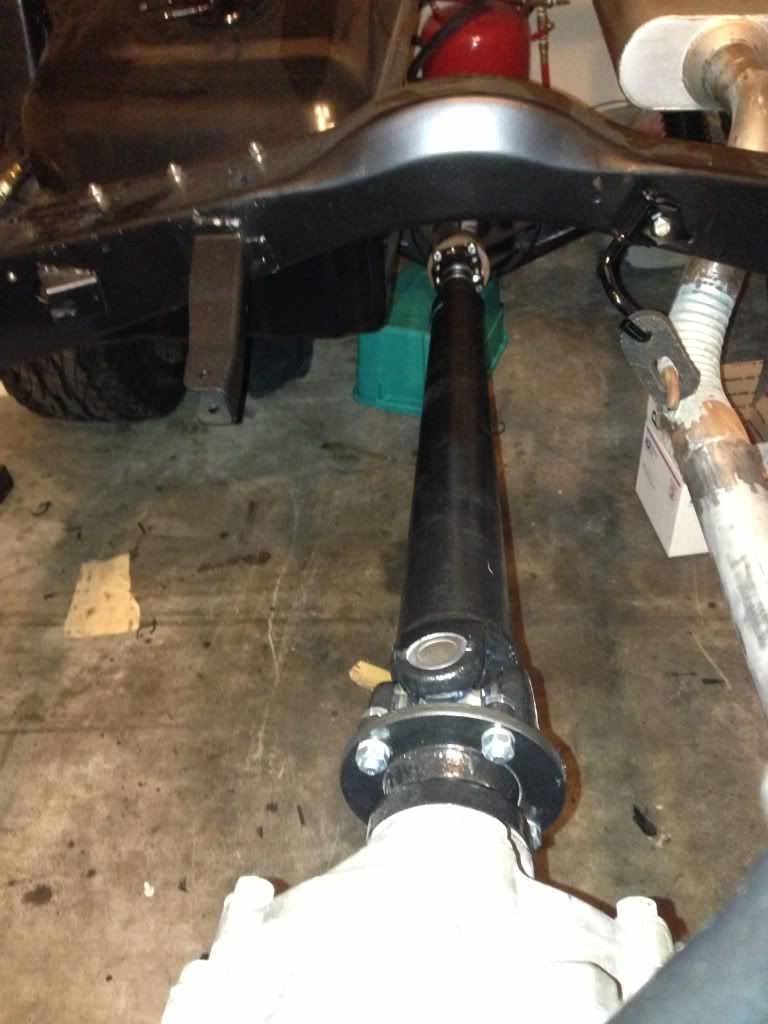
Rear was a piece of cake:
Bolted up the CV shield (Yes, it's powdercoated):
Now for observations. The front drive shaft is way too short. I'm not quite too sure how I want to handle this. I could go with a pinion spacer, but I still don't think it would be enough. I'd hate to have longer shaft made so I'm open for suggestions.

I'll probably do a little cleaning to get all the grime and dust that I've got on the chassis over the past couple months and haul it off to storage tomorrow or sunday.
Ta da:

When I installed the front, I had the t-case in 2Hi and the hubs unlock so I could spin it to make sure there was no binding. Well, there was binding!!! I had a flashlight shining in there to see where it was binding up and I couldn't find anything! So I took it off only to find that the H-Yoke was binding up on the grease zerk that I put in the self centering bearing cup. Easy fix-pumped it full of grease and put a tiny 6mmx1.0 bolt in it. Bolted it up with some shiney new grade 10.8 hardware:

Rear was a piece of cake:

Bolted up the CV shield (Yes, it's powdercoated):

Now for observations. The front drive shaft is way too short. I'm not quite too sure how I want to handle this. I could go with a pinion spacer, but I still don't think it would be enough. I'd hate to have longer shaft made so I'm open for suggestions.


I'll probably do a little cleaning to get all the grime and dust that I've got on the chassis over the past couple months and haul it off to storage tomorrow or sunday.
Aug 17, 2013 | 12:19 PM
#207
Get a front drive shaft from a IFS 4wd yota, there a inch or so longer. You will need to drill the flange to fit or buy on from marlin crawler.
Or this
http://www.marlincrawler.com/axle/dr...-spline-flange
or this
http://www.marlincrawler.com/axle/dr...nt-drive-shaft
but the first one cheaper.
Or this
http://www.marlincrawler.com/axle/dr...-spline-flange
or this
http://www.marlincrawler.com/axle/dr...nt-drive-shaft
but the first one cheaper.
Aug 17, 2013 | 07:17 PM
#208
Thread Starter
Super Moderator
iTrader: (3)
Joined: Jan 2012
Posts: 3,218
Likes: 26
From: Salisbury, MD
Thanks Josh, I'll have to look into that option.
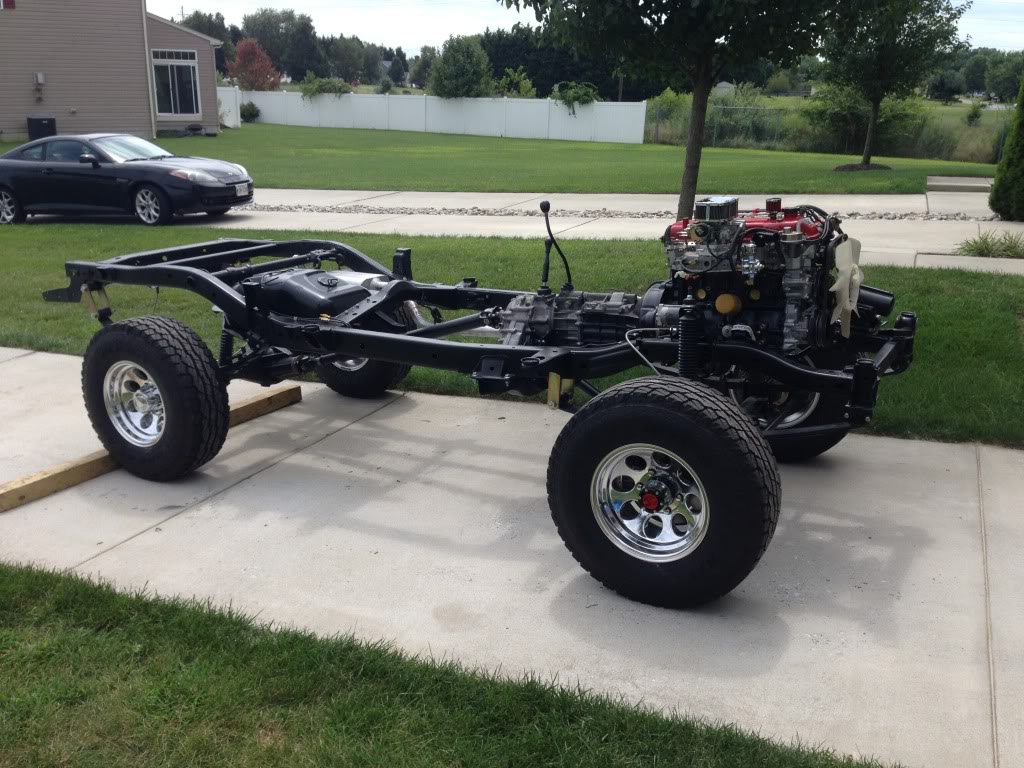
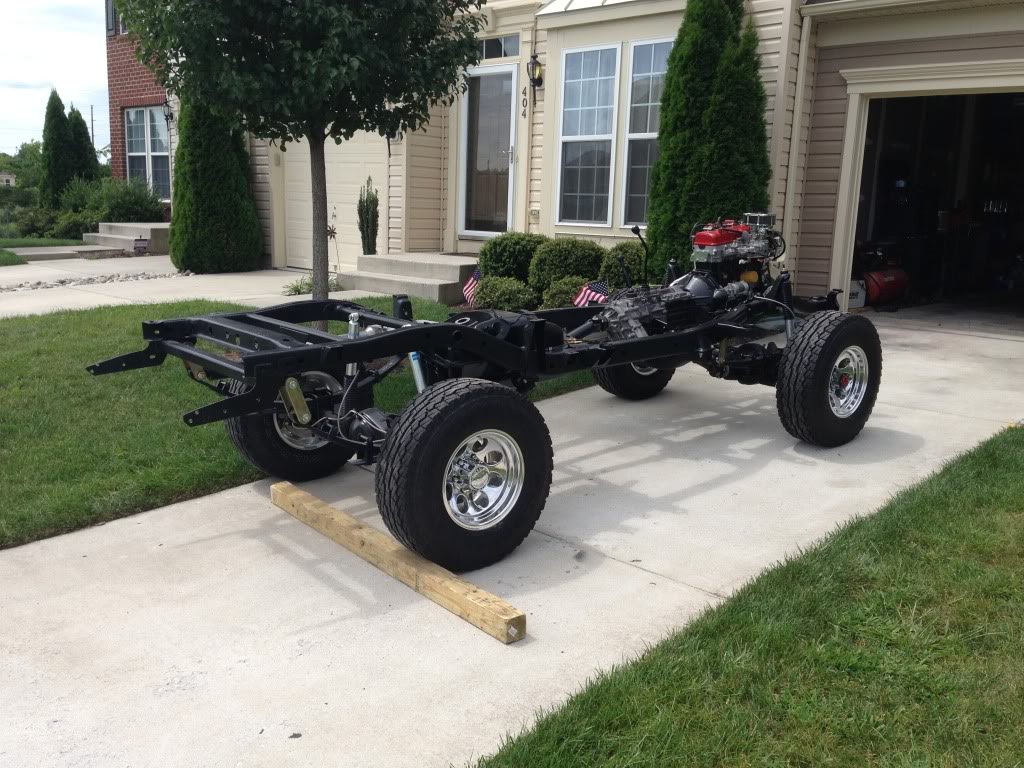
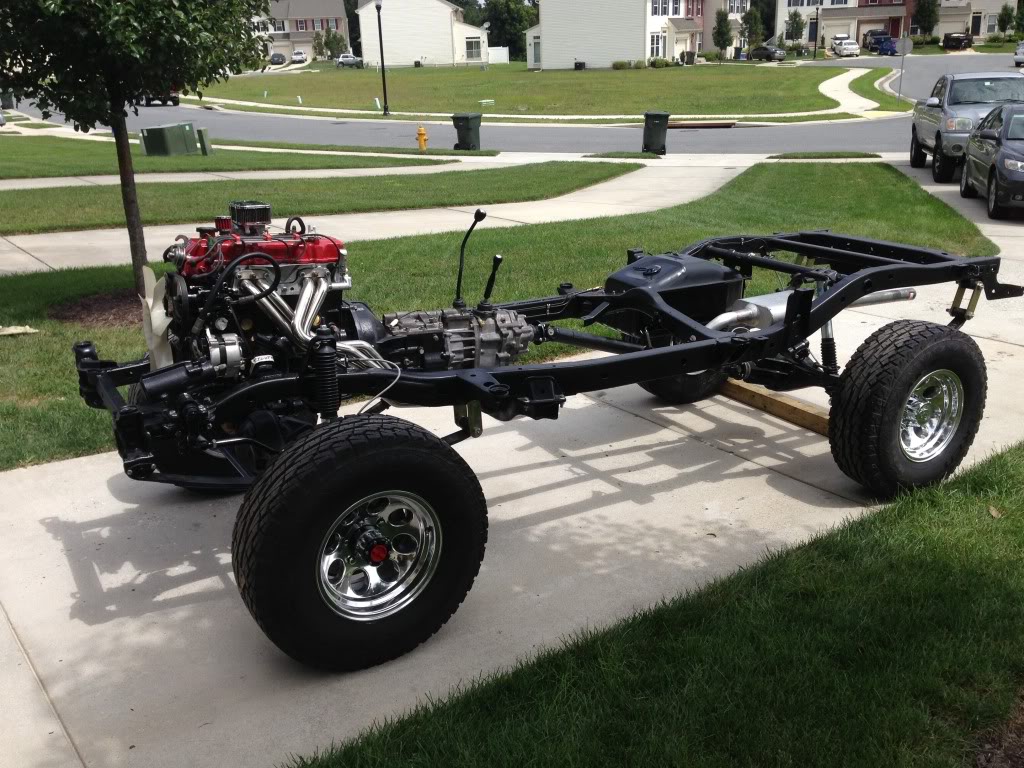
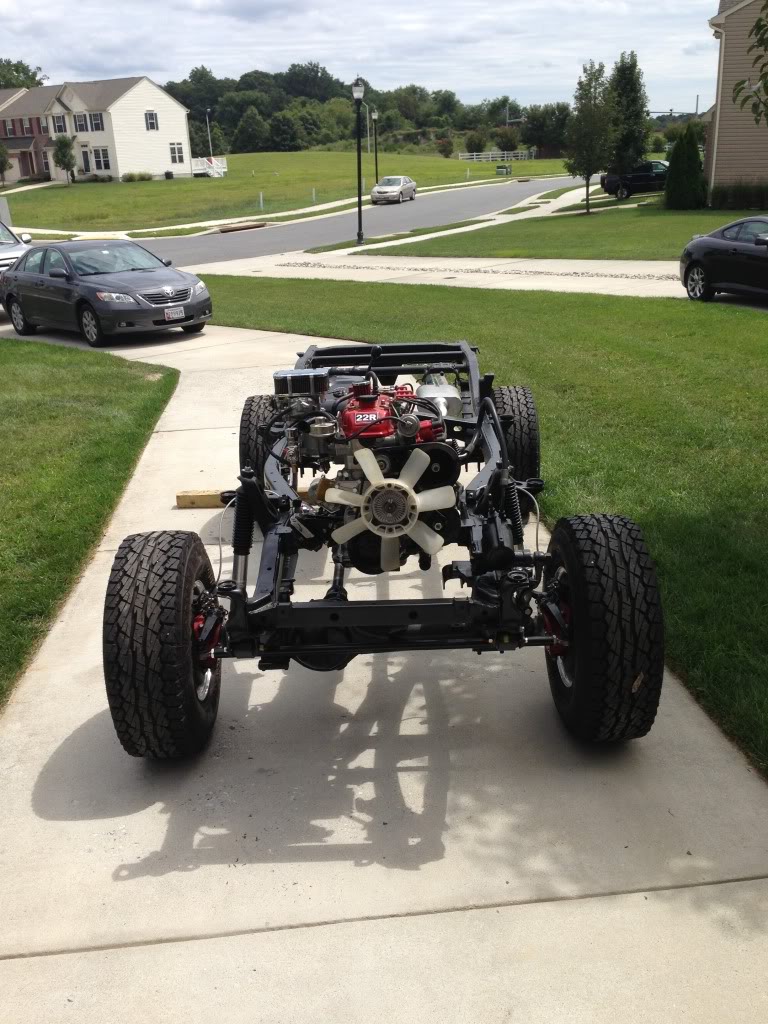
The chassis didn't move far today, just a few feet down the driveway so I could tidy up the garage a bit - I Decided to take my son out on the boat instead of putting it in storage to start the bodywork. But I did get some sunny day pictures of the completed chassis today!
Here it is in all it's glory:
My son wanted to go for a ride too:
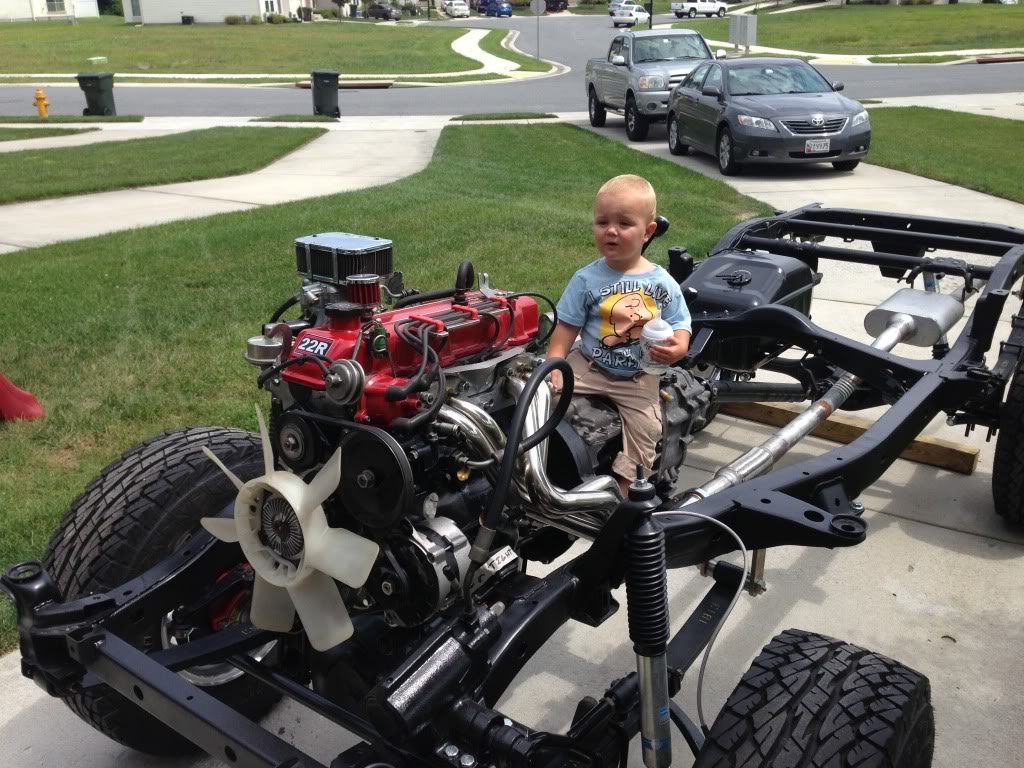
At least my boy enjoyed the day out on the boat... and swatted a bunch of flies too

The chassis didn't move far today, just a few feet down the driveway so I could tidy up the garage a bit - I Decided to take my son out on the boat instead of putting it in storage to start the bodywork. But I did get some sunny day pictures of the completed chassis today!
Here it is in all it's glory:


My son wanted to go for a ride too:

At least my boy enjoyed the day out on the boat... and swatted a bunch of flies too

 Aug 18, 2013 | 05:56 PM
#213
Aug 18, 2013 | 06:07 PM
#214
Registered User
Joined: Sep 2008
Posts: 522
Likes: 0
looks like the ones that lce has http://www.lceperformance.com/billet...-p/1085007.htm
Last edited by gmack192; Aug 18, 2013 at 06:14 PM.
Aug 19, 2013 | 12:30 PM
#215
Thread Starter
Super Moderator
iTrader: (3)
Joined: Jan 2012
Posts: 3,218
Likes: 26
From: Salisbury, MD
Lons is right, LCE and I love the way it cleans up the engine - it's the perfect touch. Hopefully the color has returned to your face! I also plan on getting all braid stainless steel vacuum, fuel, coolant, PCV, heater, brake booster and steering hoses once I get closer to completion. I didn't want to get everything now because the lengths/routing may change once I have the body on.
Thanks for the complements guys, this forum really helps me stay motivated to finish this project when it seems like there is no end in sight. I just reeeeeeeally hope that the body work isn't as extensive as the chassis work has been.
Thanks for the complements guys, this forum really helps me stay motivated to finish this project when it seems like there is no end in sight. I just reeeeeeeally hope that the body work isn't as extensive as the chassis work has been.
Aug 19, 2013 | 05:02 PM
#217
Thread Starter
Super Moderator
iTrader: (3)
Joined: Jan 2012
Posts: 3,218
Likes: 26
From: Salisbury, MD
LCE is a pretty well run company. My only complaint about them is that their shipping prices are high and it sometimes takes a while to get parts. But they truly do care about their customers and are incredibly knowledgeable about Toyotas.
Aug 19, 2013 | 05:20 PM
#219
I agree on the shipping costs, they are higher than most places. My only complaint from ordering my carb kit was that the every time I logged on and checked my order it still said processing. Even the day it showed up on my door. Makes kinda hard to estimate when your order will be in lol.


