
KawaZX636's 1983 Toyota Pickup Restoration
 Apr 9, 2015 | 09:58 PM
#1202
Thread Starter
Super Moderator
iTrader: (3)
Joined: Jan 2012
Posts: 3,218
Likes: 26
From: Salisbury, MD
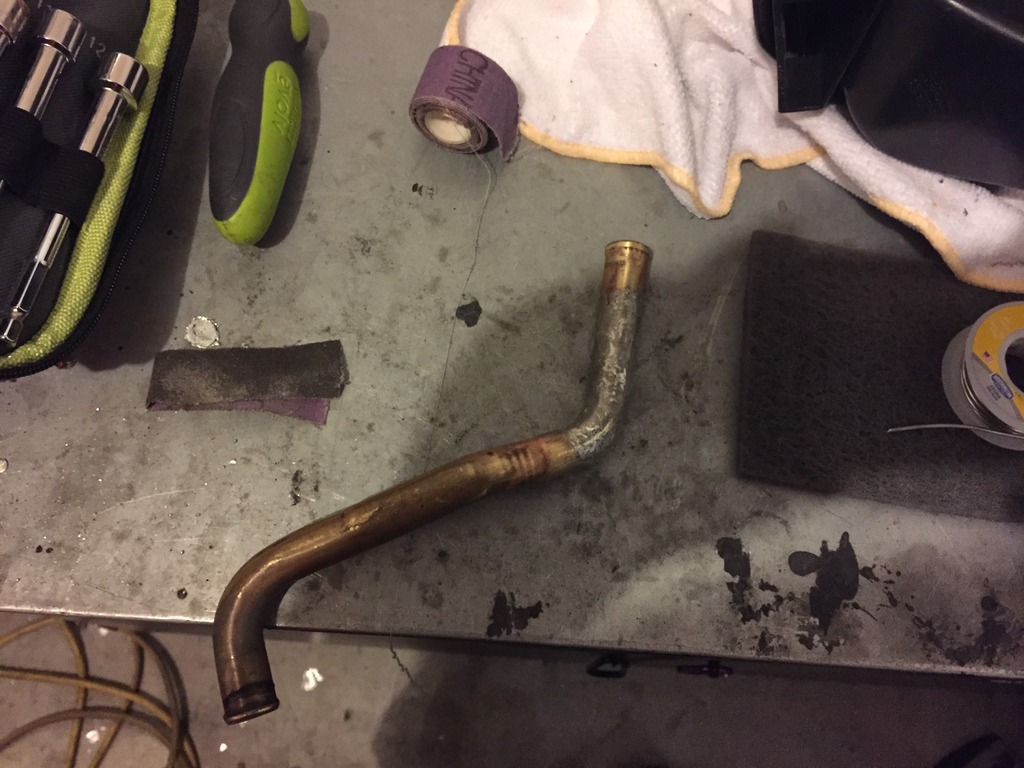
I managed to fix me heater core leak. I ended up removing the heater core to inspect the issue - I barely had enough room to remove it without completely removing the dash. Turns out there was a hairline crack in the driver side brass pipe. So I grabbed some flux and solder and brazed over the crack really well. I tested it for leaks in the kitchen sink (the wife didn't exactly approve of that). After I reinstalled everything I gave it a test... Voila! No more leak!!!
Tonight I went over the truck with a tiny brush and am eye dropper to fix any flaws or chips in the paint - namely those created by Line-X. This weekend I'll go ahead and finish wetsanding and polishing the paint. It seens like I'm almost done, but I still have a bunch of final touches to add and several parts to find.
Here are a few of the parts that I am desparately needing:
-Front fender liners (without damaged tabs)
-Ashtray
-Storage pocket that goes above the radio
-Rear mudflaps
-Grille emblem
-Windshield wiper caps
-Courtesy light switches that go in the door jambs
-Rearview mirror
Can anybody help me out with these?
Apr 11, 2015 | 10:31 PM
#1203
Registered User
Joined: Jun 2011
Posts: 57
Likes: 0
From: Brew city,Wisconsin
Hey there, was going thru some old boxes of Toy parts. Was hoping I had another ashtray and cubby. I did not find any but still have some stuff to go thru. I did pull the door triggers off an '83 landcruiser. They look the same as my '87. They just screw in to a nut on inside of kick panels with 1 wire on it.
Apr 11, 2015 | 10:47 PM
#1205
Registered User
Joined: Jun 2011
Posts: 57
Likes: 0
From: Brew city,Wisconsin
Apr 17, 2015 | 09:12 AM
#1207
Thread Starter
Super Moderator
iTrader: (3)
Joined: Jan 2012
Posts: 3,218
Likes: 26
From: Salisbury, MD
With our second son due at any moment, I haven't been focusing much on my truck lately. Mostly getting my son moved into his new room and just spending a lot of time with him lately. I'm a huge O's fan (so much so that I named my son Camden after the stadium...) so I took him to the game on Wednesday night. He had a blast! Made it through the last pitch and passed out on the 2.5 hour car ride home.


Of course they won - beat the Yankees 5-7!
I've put a couple hundred miles on the truck so far and just filled it up for the second time earlier this week. I got 18.26mpg on my first tank which isn't bad considering that included a lot of the break in and initial start up procedures. I bet I get at least 21mpg on my next fill-up! The truck is running GREAT! Pulls 5th gear all the way to 75mph (about 85mph after considering the tire size increase), but I should be able to get more once I make some tweaks to my gas pedal. I currently don't have enough travel in my gas pedal to fully open the secondary on my carb but I should be able to make a couple slight bends in the pedal assemble to get it to where I need to be. I'm also thinking about going to an electric fuel pump - My "Toyota tick" was bothering me so I put a stethoscope on my engine the other night. Come to find out, my mechanical fuel pump is causing the majority of the chatter under the hood. That should be solved easily with an electric fuel pump. Just another case of me being ridiculously particular again...
Last weekend my wife allowed me to work on my truck all day Saturday because I really needed to get my paint squared away before the baby came and then I would have no time at all! A couple nights before I touched up any small chips or imperfections (basically the chips that Line-X thought that I needed to have) with an eyedropper and small paint brush. Everything got wetsanded up to 2,500 grit to remove any orange peel and flatten the surface down. The paint was pretty good to begin with but I'm no professional painter so I had some areas where my lack of abilities showed through. Put it this way, I painted this thing is a garage with no ventilation system using heaters to keep the temperature up and the humidity down and I have talked to guys who restore the finest cars in the area and they couldn't believe it! Nothing major had to really be fixed but the beauty of single stage paint is that you can lay it on nice and heavy and fix any insufficiencies with wetsanding and buffing - very forgiving painting technique and allows the most novice DIY painters to create a good product. Some say that base coat/clear coat is the way to go; however, I personally find that the problem with clear coats is that they magnify any flaws in your base coat and prep so it can tend to make paint look even worse. A lot of professionals will disagree, but they are professionals and don't necessarily have the mentality or the lack of skill of a novice. Since the whole truck has already been painted I think that later on down the road I may wetsand everything down and get a professional to shoot one more coat of color and clear it. It isn't necessary, but I wouldn't mind having the extra protection of clear coat. Since I would be doing the same color wouldn't have to "jamb" it - I would just need to remove all the trim, lights, mirrors and glass, mask it off and have it sprayed. Would be a quick weekend job. But I'm highly satisfied and proud of the way it looks now so that would can certainly wait.
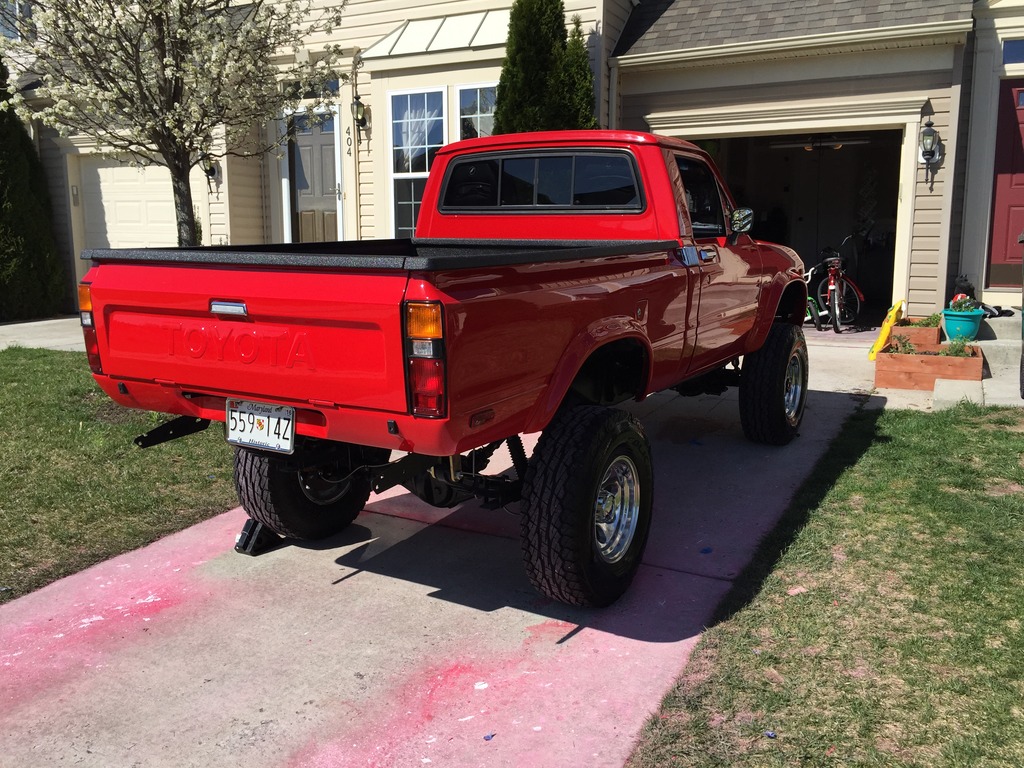
Anyway, things get worse before they get better. Here's the truck after wetsanding the hood, front fenders and doors (bed was done a while back):
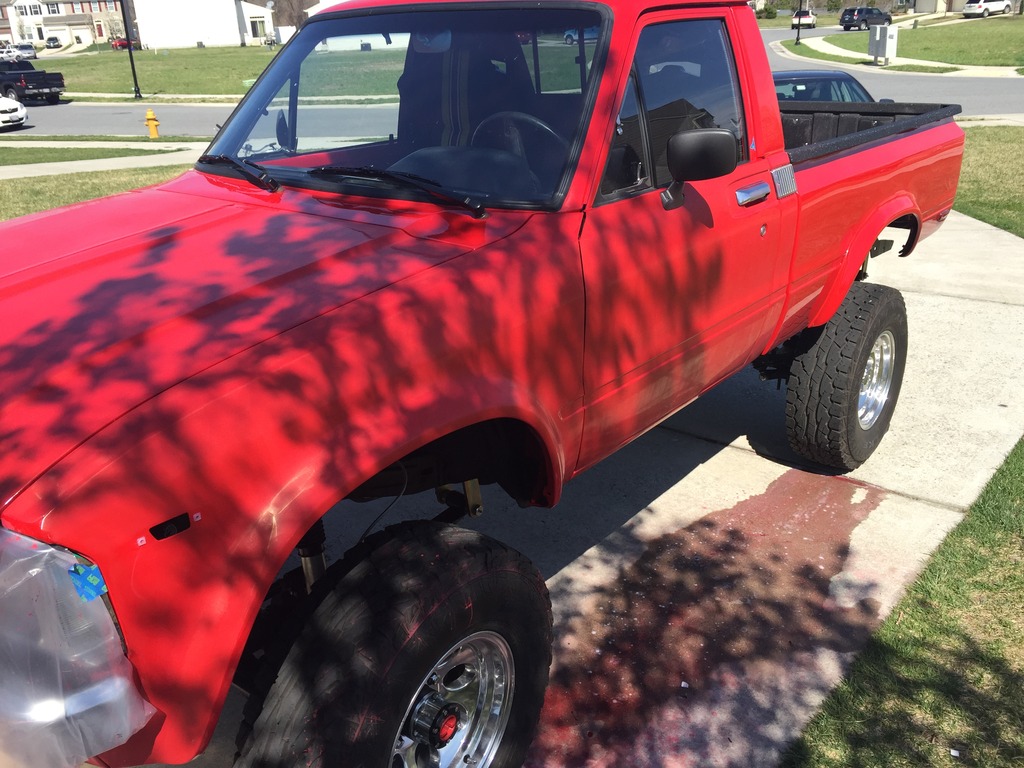
Then some buffing and polishing (the door looks to be a different shade of red, which freaked me out when I looked at the picture, but I think it was just because the door was cracked). I use Norton's Liquid Ice 3-in-1 compound and pads with a Makita rotaty buffer at 1,500 RPM. The stuff is AWESOME and takes the guesswork out of figuring out which compound to use for what situation. Compounding is an absolute mess, but the results are outstanding:
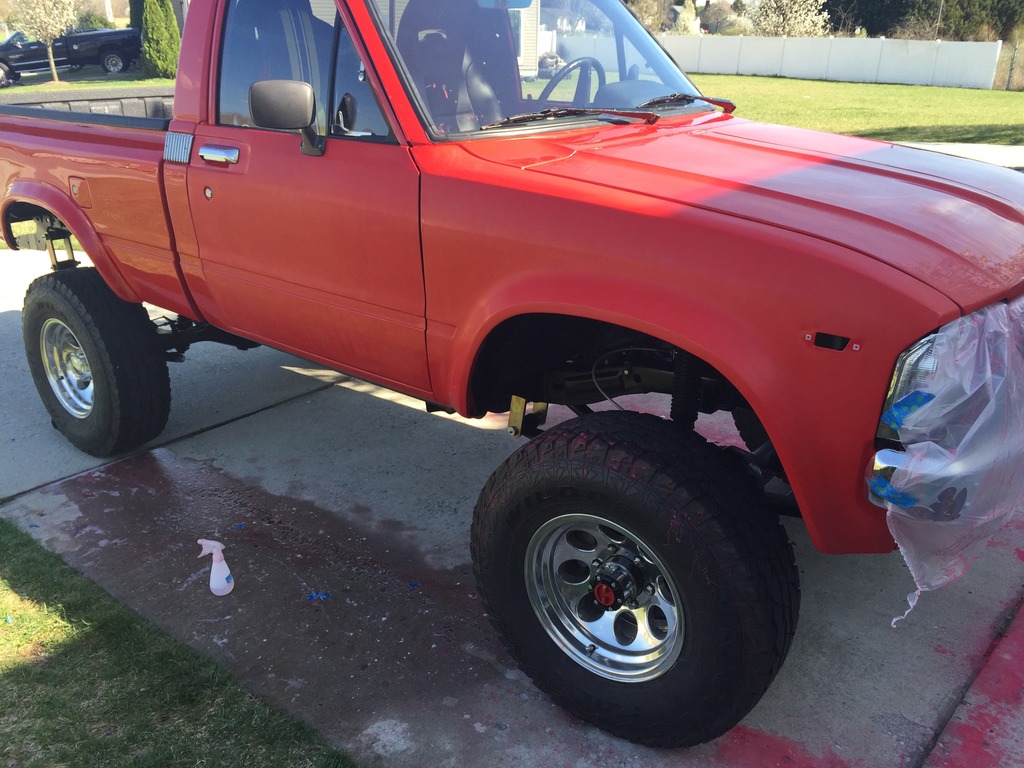
Then I waxed it up real good and now it shines like it should!
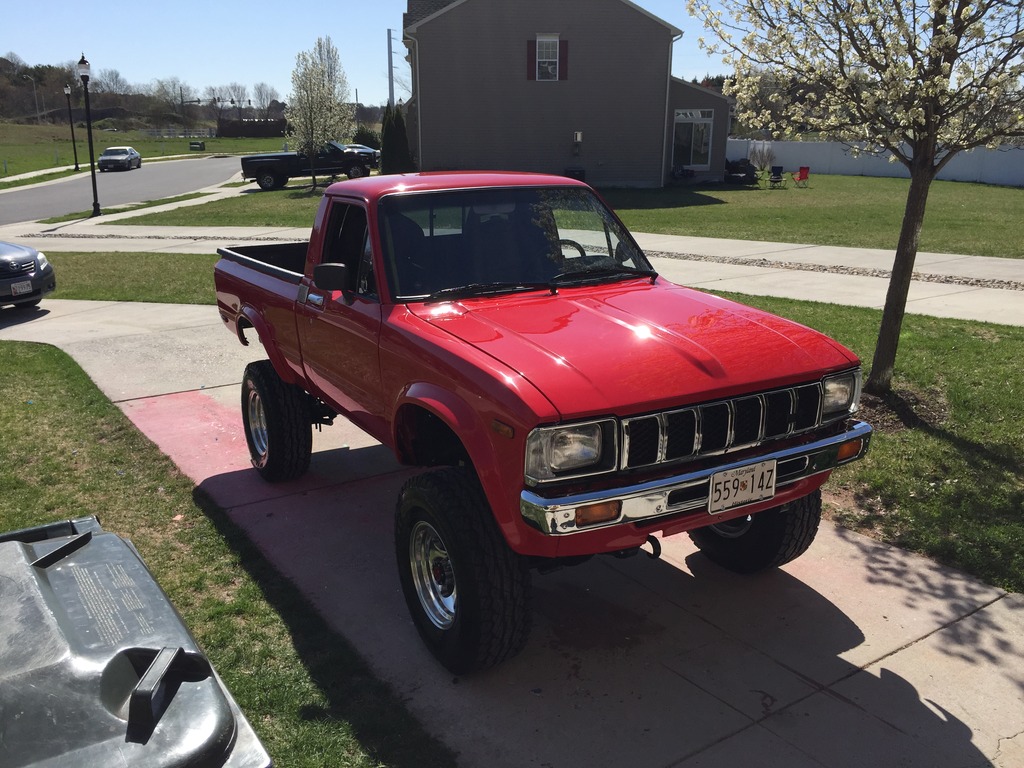
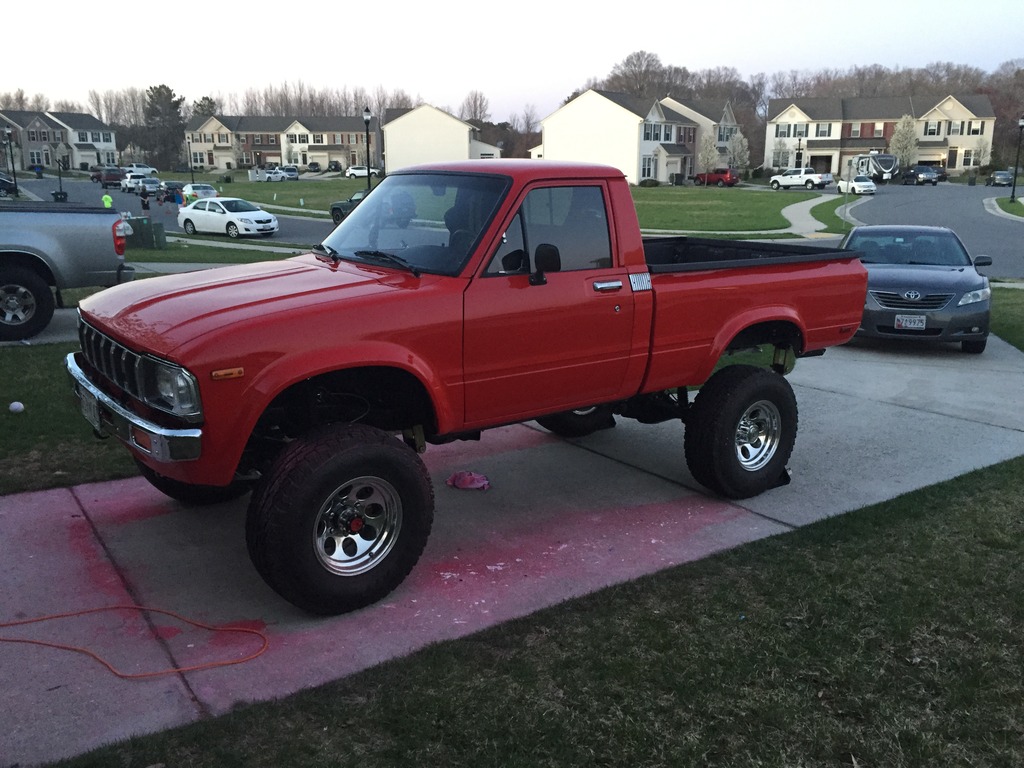
Went parking lot pimpin' that the local Walmart:
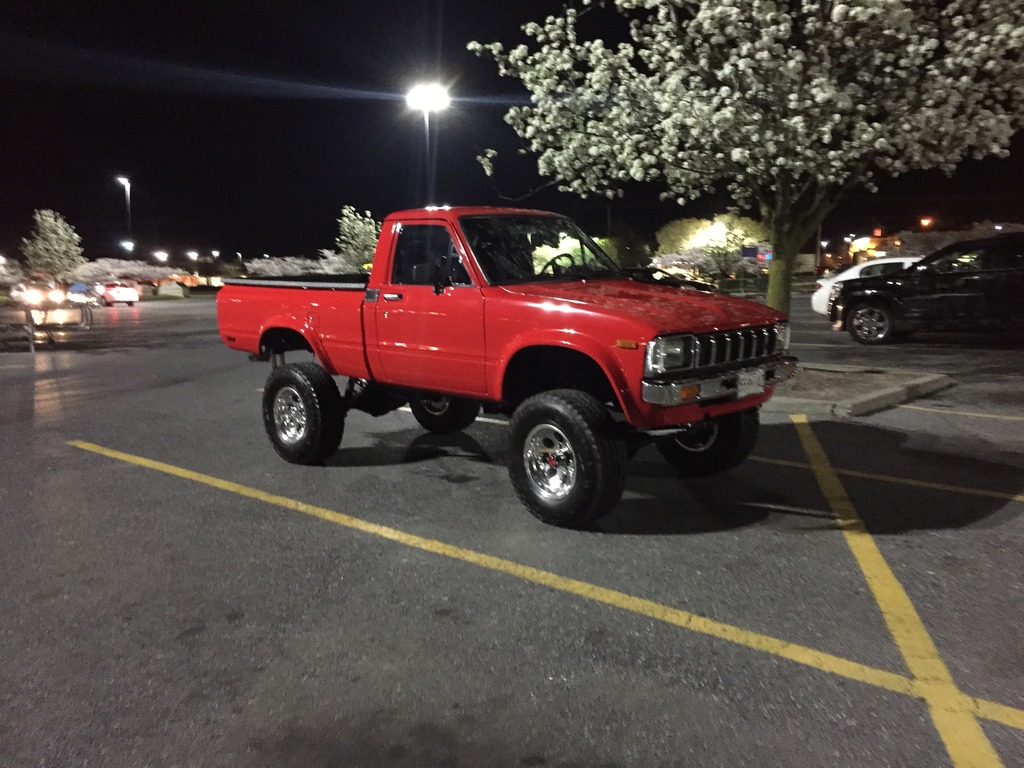
And drove it to work for the first time this week!

And those nice chips that Line-X felt that I needed are almost invisible!
The next day a local used truck dealership was have their annual car show so I rolled up there with my Pops (he has a '55 Chevy pickup with a custom extended cab) and son. They didn't have an import class, but everybody LOVED my truck despite the fact that the vast majority of the guys there were American muscle heads. These trucks are something you don't see everyday and a vehicle that most wouldn't even think about dumping time and money into so folks tend to flock to it. It feels really good though when people come up to you and are impressed with the work I've done - especially when those people have $75,000+ hot rods!
I also go hooked up with a RetroSound Zuma radio from a friend of mine that lives up in PA. It's got a similar look as the original Toyota radio with with knobs, but has a digital display, station presets, amp signal, amp outputs, USB input and a 3.5mm aux input. He sold the vehicle that it was supposed to go in so he gave it to me. Should be sitting in my mailbox right now! I took some measurements of the stock holes in the dash and ordered a trim kit from RetroSound that I THINK will fit my dash without modifications to the bezel. It's kit #215 (For black) and #115 (For chrome) and they are designed to fit the 1968-72 Pontiac GTO, Tempest and LeMans. It may be tight, but hopefully it'll work for me. It's killing me not having music while I drive!!! I'll let you all know how it goes.
I also ordered some Rivnuts to put in the door holes where the door panels snapped in. My plan is to use some M6 allen cap bolts to attach the door panels and M4 allen cap bolts to install my door speakers. For now, I think I am just going to wrap some MDF in vinyl to use as door panels. Eventually I would like to make some nice custom fiberglass panels with some contour and custom speaker mounts then wrap them in vinyl, but I simply don't have the time to do that right now.
Still a bunch of little things to do, but I'm enjoying the truck so far!
(Sorry for the short novel here....)


Of course they won - beat the Yankees 5-7!
I've put a couple hundred miles on the truck so far and just filled it up for the second time earlier this week. I got 18.26mpg on my first tank which isn't bad considering that included a lot of the break in and initial start up procedures. I bet I get at least 21mpg on my next fill-up! The truck is running GREAT! Pulls 5th gear all the way to 75mph (about 85mph after considering the tire size increase), but I should be able to get more once I make some tweaks to my gas pedal. I currently don't have enough travel in my gas pedal to fully open the secondary on my carb but I should be able to make a couple slight bends in the pedal assemble to get it to where I need to be. I'm also thinking about going to an electric fuel pump - My "Toyota tick" was bothering me so I put a stethoscope on my engine the other night. Come to find out, my mechanical fuel pump is causing the majority of the chatter under the hood. That should be solved easily with an electric fuel pump. Just another case of me being ridiculously particular again...
Last weekend my wife allowed me to work on my truck all day Saturday because I really needed to get my paint squared away before the baby came and then I would have no time at all! A couple nights before I touched up any small chips or imperfections (basically the chips that Line-X thought that I needed to have) with an eyedropper and small paint brush. Everything got wetsanded up to 2,500 grit to remove any orange peel and flatten the surface down. The paint was pretty good to begin with but I'm no professional painter so I had some areas where my lack of abilities showed through. Put it this way, I painted this thing is a garage with no ventilation system using heaters to keep the temperature up and the humidity down and I have talked to guys who restore the finest cars in the area and they couldn't believe it! Nothing major had to really be fixed but the beauty of single stage paint is that you can lay it on nice and heavy and fix any insufficiencies with wetsanding and buffing - very forgiving painting technique and allows the most novice DIY painters to create a good product. Some say that base coat/clear coat is the way to go; however, I personally find that the problem with clear coats is that they magnify any flaws in your base coat and prep so it can tend to make paint look even worse. A lot of professionals will disagree, but they are professionals and don't necessarily have the mentality or the lack of skill of a novice. Since the whole truck has already been painted I think that later on down the road I may wetsand everything down and get a professional to shoot one more coat of color and clear it. It isn't necessary, but I wouldn't mind having the extra protection of clear coat. Since I would be doing the same color wouldn't have to "jamb" it - I would just need to remove all the trim, lights, mirrors and glass, mask it off and have it sprayed. Would be a quick weekend job. But I'm highly satisfied and proud of the way it looks now so that would can certainly wait.
Anyway, things get worse before they get better. Here's the truck after wetsanding the hood, front fenders and doors (bed was done a while back):


Then some buffing and polishing (the door looks to be a different shade of red, which freaked me out when I looked at the picture, but I think it was just because the door was cracked). I use Norton's Liquid Ice 3-in-1 compound and pads with a Makita rotaty buffer at 1,500 RPM. The stuff is AWESOME and takes the guesswork out of figuring out which compound to use for what situation. Compounding is an absolute mess, but the results are outstanding:

Then I waxed it up real good and now it shines like it should!


Went parking lot pimpin' that the local Walmart:

And drove it to work for the first time this week!

And those nice chips that Line-X felt that I needed are almost invisible!
The next day a local used truck dealership was have their annual car show so I rolled up there with my Pops (he has a '55 Chevy pickup with a custom extended cab) and son. They didn't have an import class, but everybody LOVED my truck despite the fact that the vast majority of the guys there were American muscle heads. These trucks are something you don't see everyday and a vehicle that most wouldn't even think about dumping time and money into so folks tend to flock to it. It feels really good though when people come up to you and are impressed with the work I've done - especially when those people have $75,000+ hot rods!
I also go hooked up with a RetroSound Zuma radio from a friend of mine that lives up in PA. It's got a similar look as the original Toyota radio with with knobs, but has a digital display, station presets, amp signal, amp outputs, USB input and a 3.5mm aux input. He sold the vehicle that it was supposed to go in so he gave it to me. Should be sitting in my mailbox right now! I took some measurements of the stock holes in the dash and ordered a trim kit from RetroSound that I THINK will fit my dash without modifications to the bezel. It's kit #215 (For black) and #115 (For chrome) and they are designed to fit the 1968-72 Pontiac GTO, Tempest and LeMans. It may be tight, but hopefully it'll work for me. It's killing me not having music while I drive!!! I'll let you all know how it goes.
I also ordered some Rivnuts to put in the door holes where the door panels snapped in. My plan is to use some M6 allen cap bolts to attach the door panels and M4 allen cap bolts to install my door speakers. For now, I think I am just going to wrap some MDF in vinyl to use as door panels. Eventually I would like to make some nice custom fiberglass panels with some contour and custom speaker mounts then wrap them in vinyl, but I simply don't have the time to do that right now.
Still a bunch of little things to do, but I'm enjoying the truck so far!
(Sorry for the short novel here....)


 Apr 19, 2015 | 12:56 AM
#1210

Registered User
Joined: Mar 2013
Posts: 1,060
Likes: 48
Awesome!! Now all you need is a toyota grill emblem and a rear bumper! Also here is a cool link on some door panel mods by another yotatech member. Not sure if you have seen it already but here it is
https://www.yotatech.com/forums/f116...panels-256546/
https://www.yotatech.com/forums/f116...panels-256546/
Apr 20, 2015 | 07:32 PM
#1211
Thread Starter
Super Moderator
iTrader: (3)
Joined: Jan 2012
Posts: 3,218
Likes: 26
From: Salisbury, MD
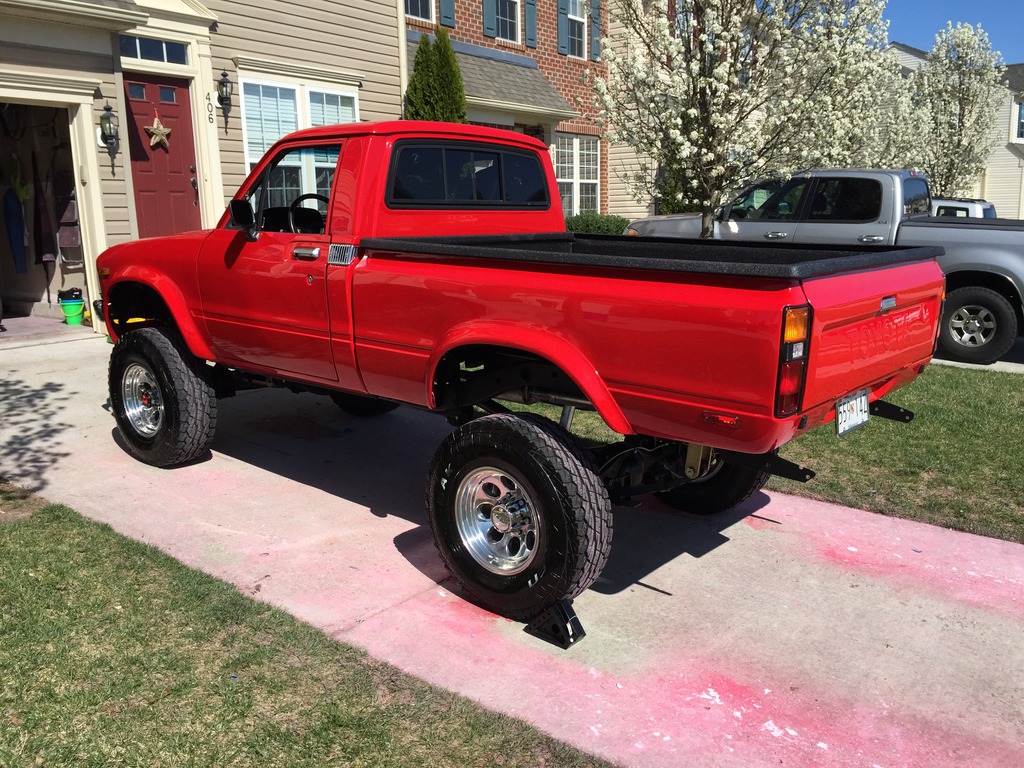
The rear shackle angle is slowly getting better. I haven't flexed the springs out much yet but I'll get to it soon. Currently, They are just shy of vertical, which I can deal with, but I think the springs still have some more settling to do. The ride is really good so it doesn't seem like much of an issue as of yet. Time will tell, but if I do anything it won't be anytime soon.
Apr 20, 2015 | 07:34 PM
#1212
Thread Starter
Super Moderator
iTrader: (3)
Joined: Jan 2012
Posts: 3,218
Likes: 26
From: Salisbury, MD
Are they every really "done?" LoL! My wife is already yelling at me because I keep eyeballing FJ45's and looking for another project. But I'm going to enjoy this one for a while before I move on.
Apr 20, 2015 | 07:43 PM
#1213
Thread Starter
Super Moderator
iTrader: (3)
Joined: Jan 2012
Posts: 3,218
Likes: 26
From: Salisbury, MD
Awesome!! Now all you need is a toyota grill emblem and a rear bumper! Also here is a cool link on some door panel mods by another yotatech member. Not sure if you have seen it already but here it is
https://www.yotatech.com/forums/f116...panels-256546/
https://www.yotatech.com/forums/f116...panels-256546/
As for the door panels, the previous owner hacked up the speaker holes so when I went back to trim them straight they had to be trimmed enough that standard 6.5" speakers barely don't fit. For now, I'm going to get some MDF to make door panels that my speakers will mount to then wrap it in vinyl. I got some rivnuts today so that I can bolt the panels on instead of using clips. Less chance of rattles and things popping loose that way. I'll hopefully be figuring that out shortly.
Apr 20, 2015 | 07:45 PM
#1214
Thread Starter
Super Moderator
iTrader: (3)
Joined: Jan 2012
Posts: 3,218
Likes: 26
From: Salisbury, MD
Almost forgot, big thanks to ToyBoy_Twink! I snagged some courtesy light switches off of him and got them installed tonight - now I can open the door and actually see what I am doing at night!!
Apr 20, 2015 | 07:50 PM
#1215
It is great seeing this thing out on the road. I would love to see the work up close..
Apr 22, 2015 | 06:20 AM
#1217
Thread Starter
Super Moderator
iTrader: (3)
Joined: Jan 2012
Posts: 3,218
Likes: 26
From: Salisbury, MD
By up close, do you mean like this?


Or are you asking to arrange a play date? One of my ultimate ambitions is to take a trip across the country and I would really like to visit the Pac NW, but I must first figure out how to make time for something like that!
Apr 22, 2015 | 06:46 AM
#1218
Thread Starter
Super Moderator
iTrader: (3)
Joined: Jan 2012
Posts: 3,218
Likes: 26
From: Salisbury, MD
I got my radio wired up and installed last night. I had to run a new +12v constant to the main power block that I installed off the battery, a new ground to the bus bar (I perfer to have my accessories labeled and grounded to one central solid ground location in lieu of random bolts on the body) and new speaker wire to the doors. I tapped into the original radio wire for the ACC on signal. I really wish I had done most of this back when I ran my harness because it would have been a whole hell of a lot easier to tuck and secure the wires up under the dash! Anybody ever notice how tiny these trucks are?? LOL
I scored a free RetroSound Zuma radio off of a friend (normally around $200 from a place like Jegs or Crutchfield) and got a bezel adapter from Retrosound (#215 for 68-72 Pontiac GTO, Tempest and LeMans). I had to do some measuring and research to find the best fitting bezel for my truck. The RetroSound radios are great! Factory classic look with all the modern amenities: adjustable mounting shafts, 2 3.5mm aux inputs, 2 RCA pre-outs for amps, Amp remote lead, USB input, 30 AM/FM pre-sets, green/white digital illumination... It has everything I ever need and then some!
Installation was easy but a little tedious to get it mounted exactly the way I wanted. I ended up pulling the dash bezel and mounting it outside of the truck and then put it back in as one unit. It would be impossible to get it mounted properly without removing the bezel. Best part about it... NO CUTTING OF THE DASH!!! Hey hackers, leave that dash alone! (sung to the tune of Pink Floyd). Operation takes a little getting used to since there is a boat load of features wrapped into such a simple design, but I'll get it figured out. Since I shaved the antenna hole on my fender, I need to grab a hidden antenna so I can get reception and I still need to make some door panels to mount my speakers - right now they are sitting in a box on the floor.
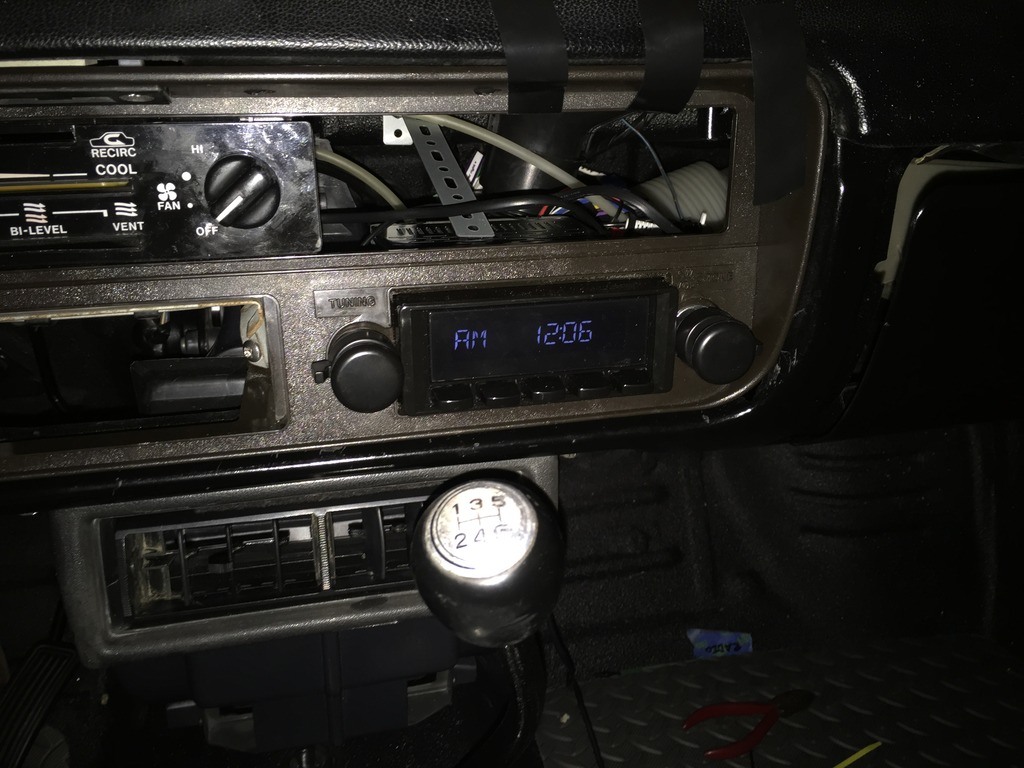
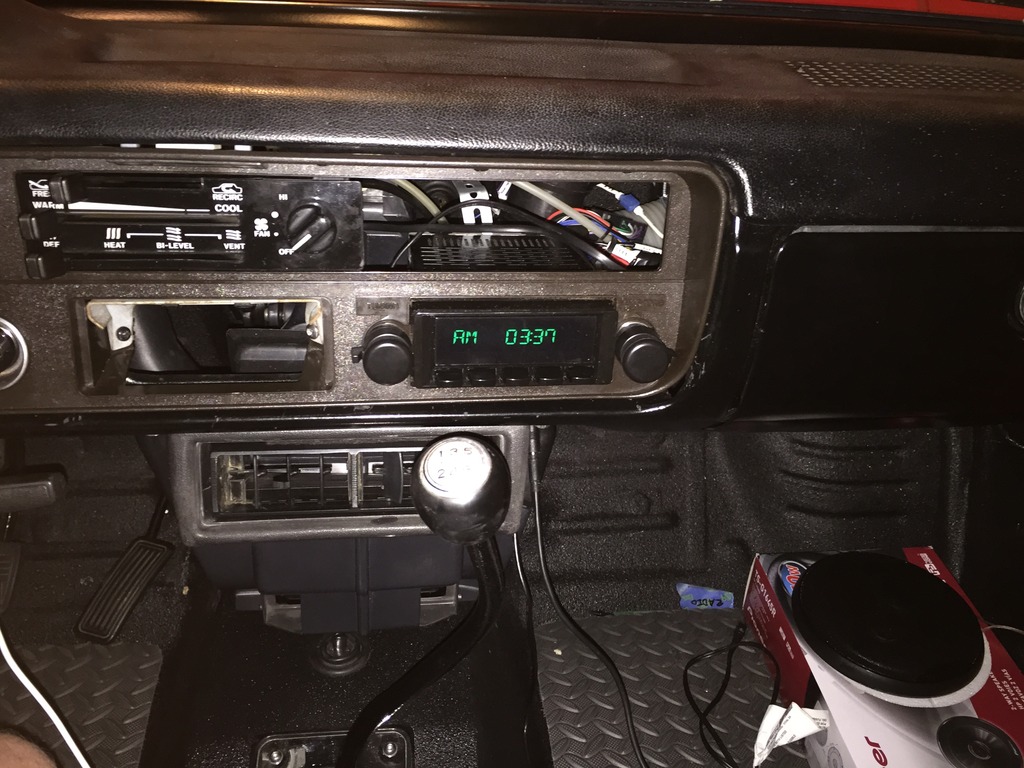
And yes, the clock is correct in the second picture... I ended up wrapping up this install around 4am this morning! Now if only I could do something about that stupid brown bezel!! Anybody have a good black one that they are willing to trade? Mine is brand new NOS that was installed for the first time in my truck about a month ago.


