
KawaZX636's 1983 Toyota Pickup Restoration
 May 12, 2015 | 07:32 PM
#1241

Registered User
Joined: May 2015
Posts: 1
Likes: 0
From: Saltillo, Mexico
I�ve spent the last 2 days at work reading this thread hahahaha, I�m in the middle of rebuilding my 83 Toyota pickup also but certainly not at that degree of detail, I fell in love with toyota�s 1st gen pickups a couple of years ago by looking at some pictures on the internet not knowing how awesome they really are, I was lucky enough to find one in good shape here in Mexico there were only 2 in the country advertised at that moment and this one was 700 miles away from where I live so I had to take a plane and go for it since it was probably going to be my only chance to get one. Everybody from my girlfriend to my family and friends think I�m crazy for spending time and money on an old truck when I could use it on a new �reliable� car, I will never probably finish working on it improving and changing things but I always tell them that my truck will bury all of us before she dies, So you can imagine why I have spent the last two days neglecting my job and reading your thread I couldn�t stop reading amazed to find out that I�m not alone and that there are even crazier guys than me just north of the border.
After I finished reading I had to become a member, I will certainly keep coming back.
Thanks for sharing and for the inspiration job, enjoy your truck & keep making memories with her and you family.


After I finished reading I had to become a member, I will certainly keep coming back.
Thanks for sharing and for the inspiration job, enjoy your truck & keep making memories with her and you family.
May 15, 2015 | 08:40 PM
#1242
Thread Starter
Super Moderator
iTrader: (3)
Joined: Jan 2012
Posts: 3,218
Likes: 26
From: Salisbury, MD
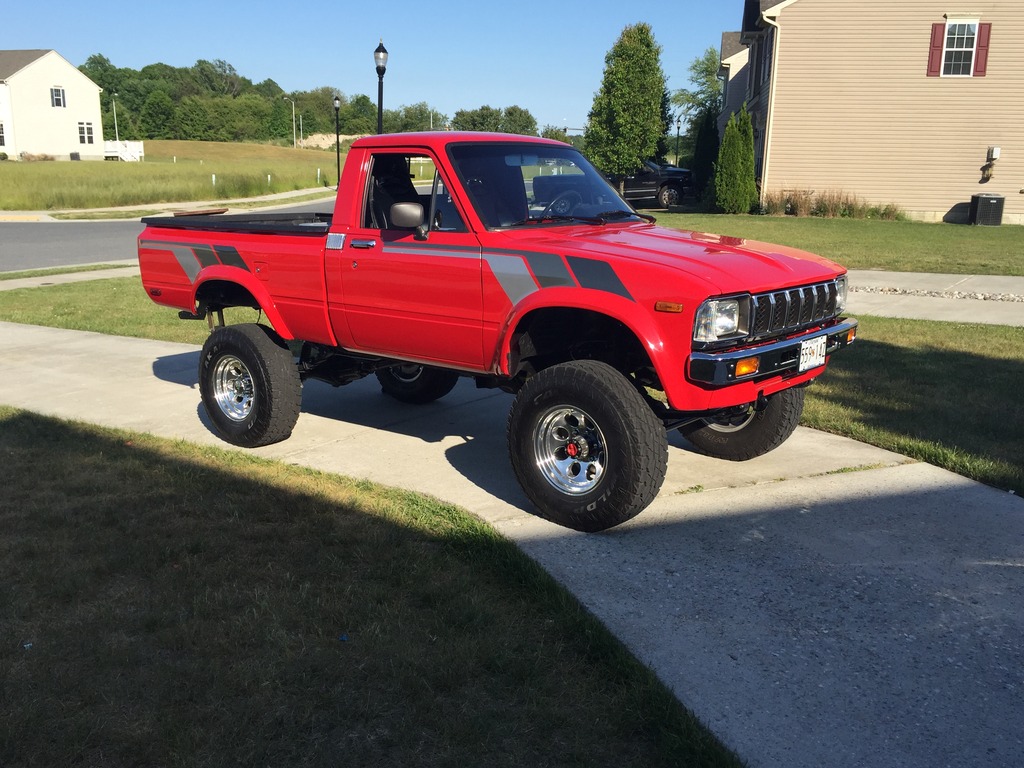
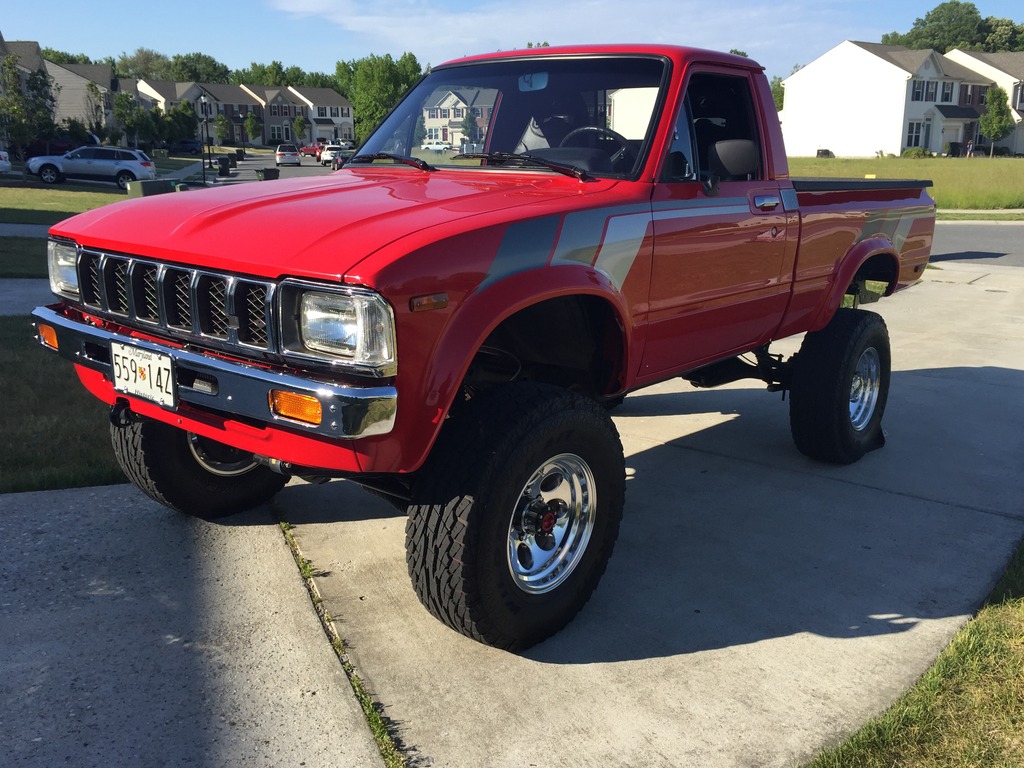
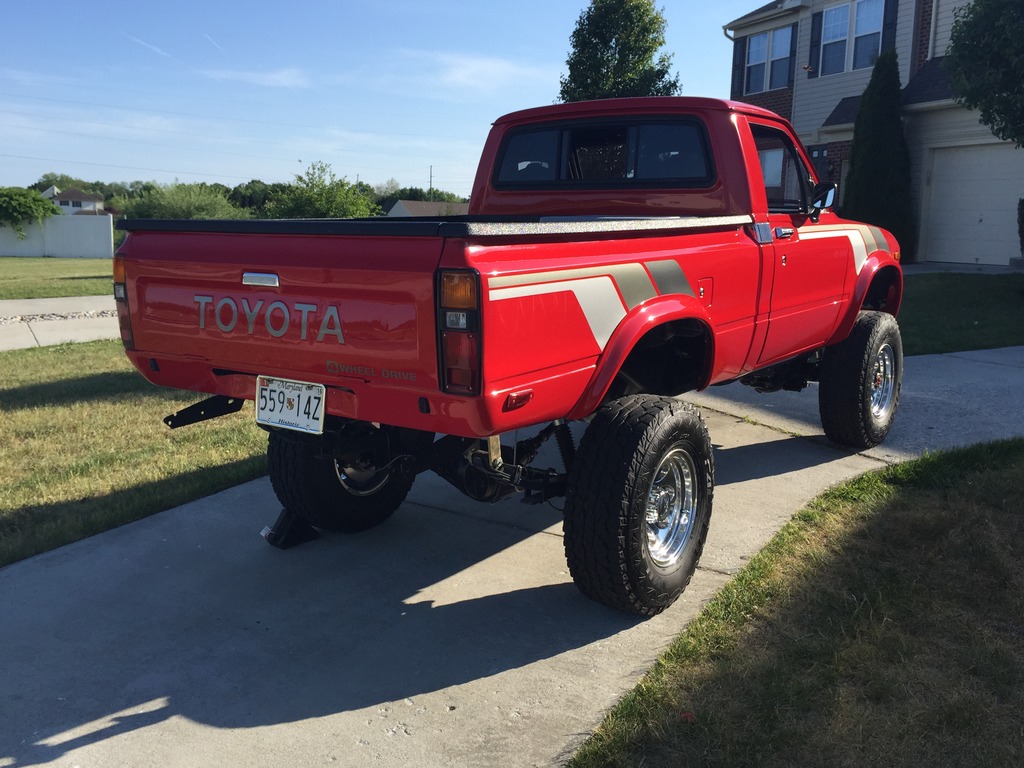
I got my stripe decals in the mail from Corey yesterday so naturally I rushed over to my Pop's garage to get them laid out on the truck. I was a little on the fence as to whether or not to stripe it, but I'm glad I did. It gives it a true original look and it breaks up the brightness of the red really well.
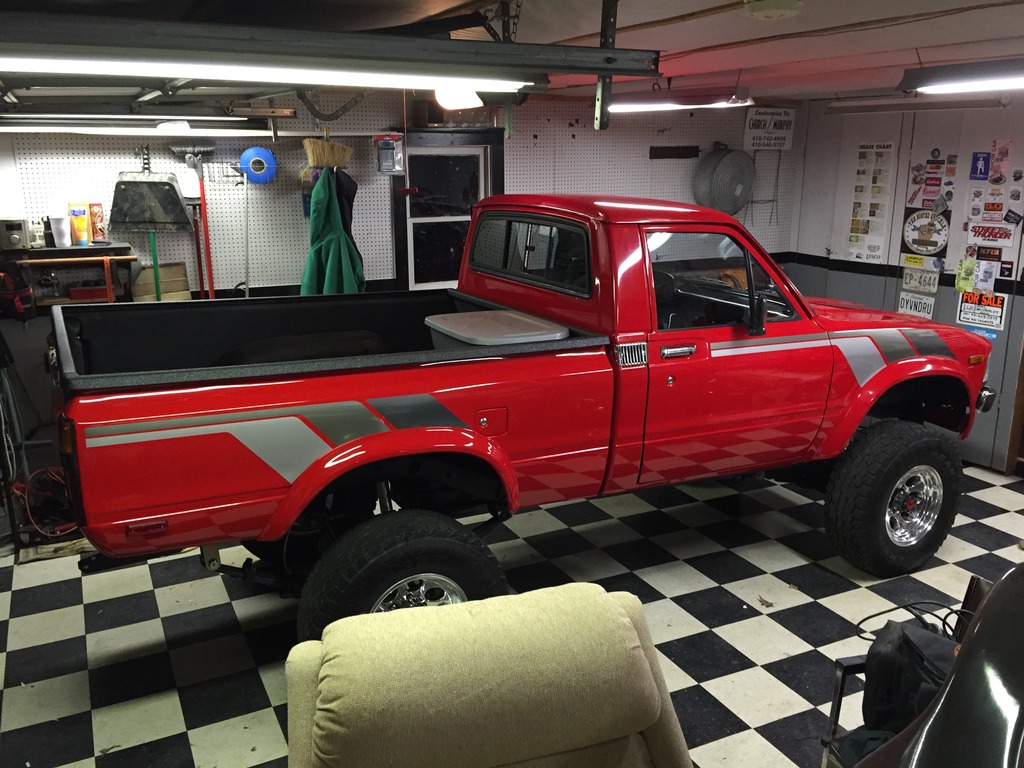
After a quick detailing, it really pops in the sun:
Tailgate letter looks a lot better now too:
I have just a few bubbles that I need to puncture and work out but I just haven't had the time to do it in the day light and I didn't have a needle at my pop's garage last night.
My son and I are heading down to the beach for the Ocean City Cruisin Car show tomorrow. It's a pretty big event and I will likely be the only Toyota Pickup among thousands of American Muscle and exotics, but I'm sure I'll get some looks. There is something about these trucks that people simply like. I have yet to take a drive without getting a thumbs up or at least breaking necks as I drive by. The best is the kids - kids LOVE these trucks for some reason too - It's pretty neat. Also, in a couple weeks there is an off-road show and obsticle course put on by a local 4x4 club. It'll be primarily jeeps so I'll definitely stand out there! Plus I may just get a little mud on the tires for the first time (assuming that I get the inside of my rockers spray with internal frame coating first)

After a quick detailing, it really pops in the sun:


Tailgate letter looks a lot better now too:

I have just a few bubbles that I need to puncture and work out but I just haven't had the time to do it in the day light and I didn't have a needle at my pop's garage last night.
My son and I are heading down to the beach for the Ocean City Cruisin Car show tomorrow. It's a pretty big event and I will likely be the only Toyota Pickup among thousands of American Muscle and exotics, but I'm sure I'll get some looks. There is something about these trucks that people simply like. I have yet to take a drive without getting a thumbs up or at least breaking necks as I drive by. The best is the kids - kids LOVE these trucks for some reason too - It's pretty neat. Also, in a couple weeks there is an off-road show and obsticle course put on by a local 4x4 club. It'll be primarily jeeps so I'll definitely stand out there! Plus I may just get a little mud on the tires for the first time (assuming that I get the inside of my rockers spray with internal frame coating first)
May 15, 2015 | 09:07 PM
#1243
Thread Starter
Super Moderator
iTrader: (3)
Joined: Jan 2012
Posts: 3,218
Likes: 26
From: Salisbury, MD
Oh, forgot to mention, I also performed my 500 mile oil change last night too. Earlier this week, I finally "felt" my rings seat in. I'm used to the power slowly increasing as the rings settle in, but on this engine It was almost like a flip of a switch! I had very little metal dust "shimmer" in my oil and the oil hardly looked used at all. Looks likes the engine is running pretty healthy right now - didn't really have any doubts that it would ;o) I'll do the valves in the next week or so.


 May 16, 2015 | 05:59 PM
#1245
Registered User
Joined: Jun 2011
Posts: 57
Likes: 0
From: Brew city,Wisconsin
Hi Dave, Slacker pretty much summed it up, WOW. Truck looks awesome and I love the stripes on it. Btw my name is Chris and thanks for the mention in your previous post. I didn't do much but I am glad I could help you out even in a little way. I will use your threads for knowledge and inspiration if and when I can get to woking on my '83. I haven't forgotten about the parts you need. I just haven't found the time to get up by the guy, if he'll even let me come and pull the parts now. I will get ahold of you if I can get some stuff. Hope all is good with the new guy and your getting some seep. Take care, CB.
May 26, 2015 | 07:07 AM
#1247
Thread Starter
Super Moderator
iTrader: (3)
Joined: Jan 2012
Posts: 3,218
Likes: 26
From: Salisbury, MD
Thanks guys! I really appreciate the compliments! Like I said, I was a little on the fence about the stripes, but I'm really glad that Corey force fed them to me! They grow on me more and more every time I look at the truck and my friends seem to like it more with them too. They really do make the truck pop a little more.
I haven't driven my truck in over a week now since I have a couple issues that I need to address. I have a slight leak at the transfer case output flanges. I knew about the leaks prior to building the truck and I meant to replace the seals when I was building the chassis, but I simply kept neglecting to do so. I have the seals already so it is just a matter of installing them. I have also developed a leak at the rear pinion seal. I ordered the Marlin Crawl EcoSeals last week to replace the front and rear seals. I would HIGHLY recommend the MC EcoSeals over any aftermarket or factory seals. I used them on my front and rear axles and I was really impressed with the design and quality of the seals. They are definitely worth the extra cost. I also have noticed a little extra slop in my shifter (particularly in 3rd and 4th gear) so I also ordered a Marlin Crawler shifter seat to replace the old worn out seat. That should tighten everything up in the shifting. My tranny, transfer case and diffs were in really good shape so I didn't need to rebuild them, but go figure that the 4 things that I didn't rebuild on the truck are the ONLY things that I am having issues with right now! LOL
I also decided that it is time to get a parking brake... Last weekend I was meeting my friend at his house before going down to the OC Crusin Car Show. My truck was parked in his driveway and naturally he wanted to take it out for a spin. When he went to turn it over he didn't realize that I had left it in gear so it took him for a quick short ride... Fortunately for me and his garage door (as well as his general well-being because I would have beat the crap out of him), I have a very good habit of leaving my truck in the gear opposite of what the truck could run into if started in gear - In this case his garage was in front of my truck so I left it in reverse. I was going to wait to get a t-case brake since I don't have a lot of disposable income right now, but this is coming out of necessity. Plus it would be nice not to have to chock up my wheels when I park in my garage and driveway which sit on a slight slope.
Sooooo, I ordered a Sky Off Road Design transfer case brake last week as well. The new seals, new pinion nuts and t-case brake should all be in later on this week so I should be able to get everything installed in time for the Jeep/Truck off road event next weekend. I'll let you all know how the install goes.
May 26, 2015 | 06:21 PM
#1248
Thanks guys! I really appreciate the compliments! Like I said, I was a little on the fence about the stripes, but I'm really glad that Corey force fed them to me! They grow on me more and more every time I look at the truck and my friends seem to like it more with them too. They really do make the truck pop a little more.
.
May 27, 2015 | 06:50 AM
#1249
Thread Starter
Super Moderator
iTrader: (3)
Joined: Jan 2012
Posts: 3,218
Likes: 26
From: Salisbury, MD
Yeah, you evil man!!! I was perfectly happy with my all red truck then you had to go off and make me stripe it and now I'm all kinds of pissed off... Ok, maybe not... I'm glad I striped it - It does look a lot better now! LOL I'll get up with you next week to square up.
May 27, 2015 | 07:19 AM
#1250
Thread Starter
Super Moderator
iTrader: (3)
Joined: Jan 2012
Posts: 3,218
Likes: 26
From: Salisbury, MD
Last night I started taking everything apart so I had everything ready to go when my seals and t-case brake come in later this week. I removed the driveshafts and stake nuts and pulled the flanges and seals on both t-case outputs and the rear diff. All the seals were totally shot as suspected. The baby was sleeping so I couldn't whack too much on the stake nut on the front diff so I didn't get that one pulled yet. I also think that the front stake nut may be seized onto the pinion shaft too because it wouldn't budge at all. It didn't look corroded or anything, but it did appear rather dry so you never know - I'll get it figured out tonight before the boys go to bed.
So like usual with these trucks, things like this don't come without a bit of bad news... As I was pulling the pinion flange on the rear diff I noticed that the stake nut was staked twice (by at least a half turn tighter) and there was a little play in the pinion - that's not a good sign... So I finished removing the flange and seal and discovered that at least the outer bearing and race were toast! There was a groove worn in the race and the bearings were pitted up pretty bad. Soooo, what was supposed to be an easy seal replacement is going to lead to removing the rear axle shafts and diff for a rebuild. Got to love those idiot PO's and their incredible ability to screw something up more by trying to "fix" it - evidently, he had no clue how pre-load works in these diffs. Hopefully the local parts stores have some decent pinion bearings in stock and I REALLY hope that the pinion and gear ring aren't jacked up because if they are then the truck is going to be parked for a while until I can better afford to replace them. The bright side would be that if they do need to be replaced I can switch over to 4.88's and go with some 33" tires later on down the road.
The never ending saga continues...
Last edited by kawazx636; May 27, 2015 at 07:23 AM.
May 28, 2015 | 05:09 AM
#1251
Thread Starter
Super Moderator
iTrader: (3)
Joined: Jan 2012
Posts: 3,218
Likes: 26
From: Salisbury, MD
The front differential pinion flange was indeed seized on, but after a short soak in WD-40 and a few shots with the impact gun I managed to get it off. I was able to source a decent bearing kit from Advanced Auto Parts that comes with Koyo bearings. It comes with the pinion and carrier bearings but no shims. In theory, I shouldn't have to re-shim it, but knowing my luck that will not be the case... The kit should be in on Friday so meanwhile I finished removing all the old parts, cleaned them up and powdercoated them:
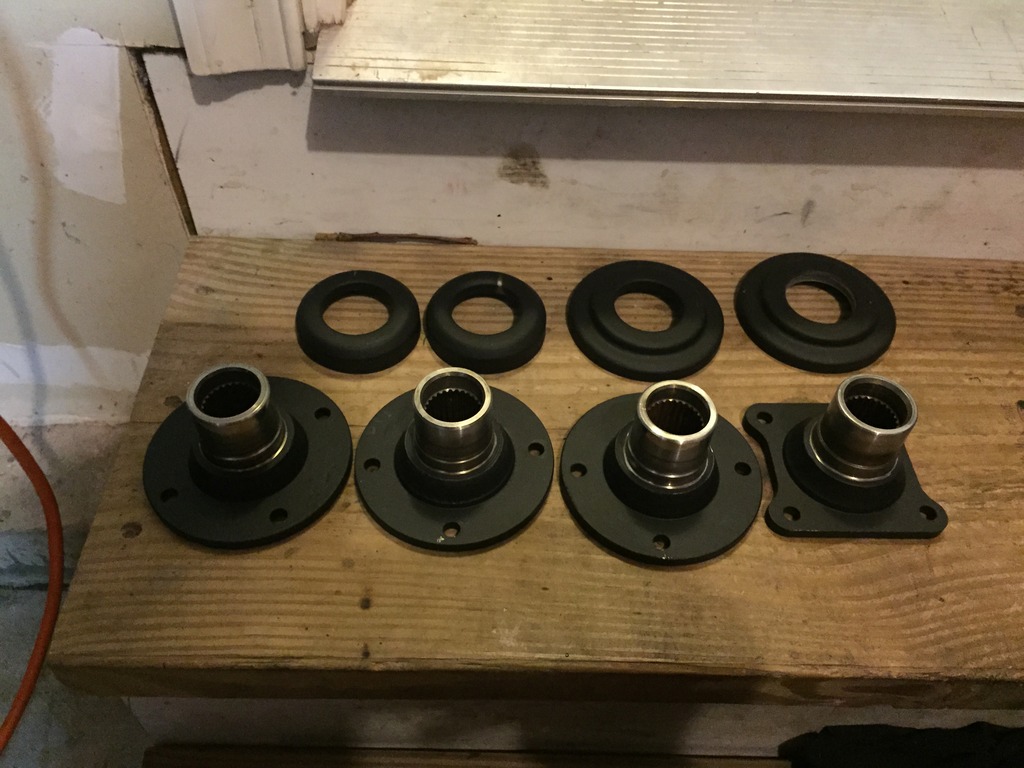
I really dig the satin black powder that I have. I've only used it once - on my front brake dust shields, but the finish is really nice and it seems to go on more even and thinner than gloss powders. Tonight I want to get pinion flange, t-case output flange and driveshaft on the front end reassembled. Then it is just waiting on parts to get the rear end done.

I really dig the satin black powder that I have. I've only used it once - on my front brake dust shields, but the finish is really nice and it seems to go on more even and thinner than gloss powders. Tonight I want to get pinion flange, t-case output flange and driveshaft on the front end reassembled. Then it is just waiting on parts to get the rear end done.
May 28, 2015 | 05:37 AM
#1252
The stripes do make the truck pop and look great. I like seeing them on there and know that was probably one of the easiest things you did on it but still I do admire the work and detail you put into it before the stripes, that was alot of work. Wont be long and your kid will wanting to be driving it. It will be here before you know it.
May 28, 2015 | 04:46 PM
#1253
Yeah, you evil man!!! I was perfectly happy with my all red truck then you had to go off and make me stripe it and now I'm all kinds of pissed off... Ok, maybe not... I'm glad I striped it - It does look a lot better now! LOL I'll get up with you next week to square up.
love the powder , I have had the same results with the satin colors
.
May 29, 2015 | 04:42 AM
#1254
Thread Starter
Super Moderator
iTrader: (3)
Joined: Jan 2012
Posts: 3,218
Likes: 26
From: Salisbury, MD
Last night I got the seals and flanges installed in the front diff and front t-case output. It was took late to go banging on it so I still need to stake the nuts and install the driveshaft but that will be quick and easy. As least then I'll have a front wheel drive truck! Here is a shot of the Marlin Crawler EcoSeals if you haven't seen them before. They are beefier than stock and have more articulation in the rubber for a better seal.
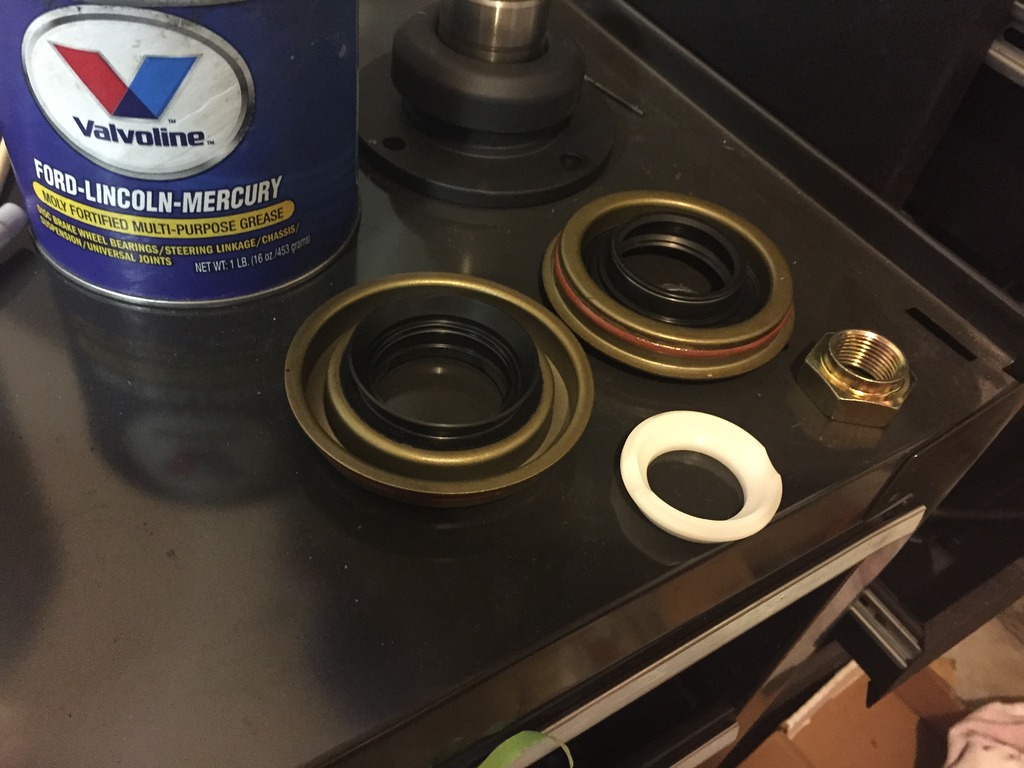
Then I installed the new Marlin Crawler shifter seat. WOW! What a difference that made!! All the excessive slop was removed and the shifter is much tighter now. I have a second gen pickup shifter handle that I eventually would like to use to modify my shifter like I did my t-case shifter to make it shorter and look like the same style as the t-case shifter. That'll likely be a quick winter project. Below you can see the difference between the old shifter seal and the new one - I'd say I was slightly overdue for a replacement...

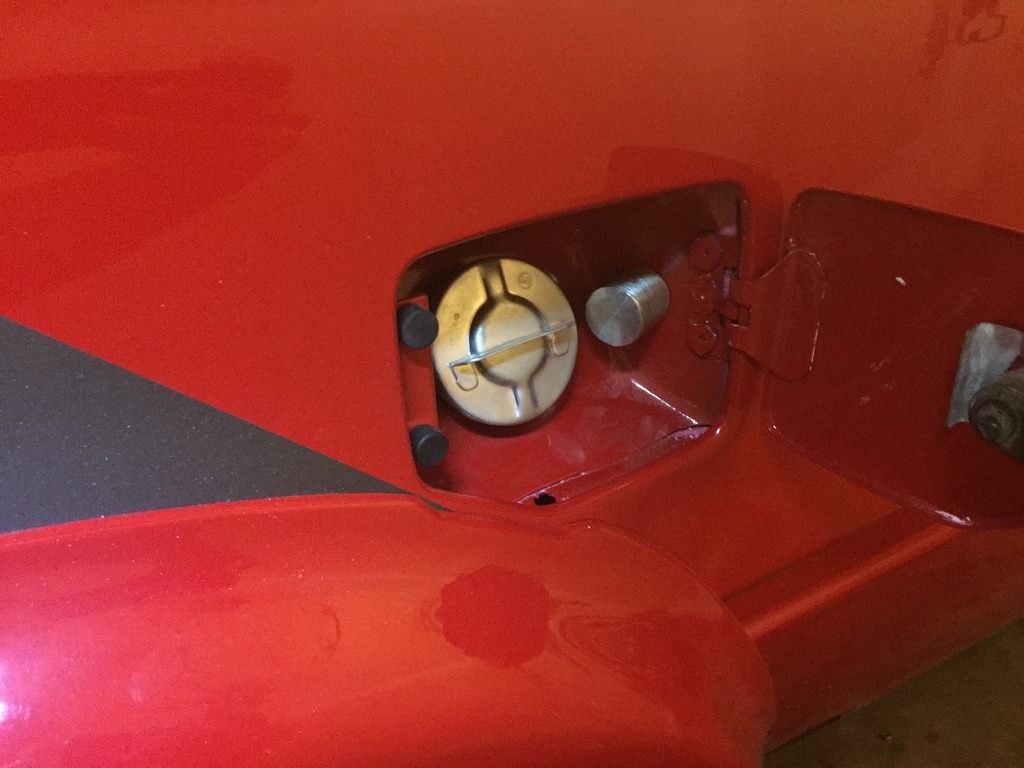
I also ran my fuel vent last night. Since my engine is desmogged, I don't have the charcoal canisters to vent the pressure out of my gas tank. The gas cap will release the vacuum build up caused by the fuel pump pulling fuel but there was no mechanism to release the pressure build up cause by heat and vaporized fuel. Everytime I would remove the fuel cap I would get a long large hiss of pressure coming out of the tank - it was really bad and quite frankly scary! I had a boat gas tank vent lying around so I decided to use that for my vent.
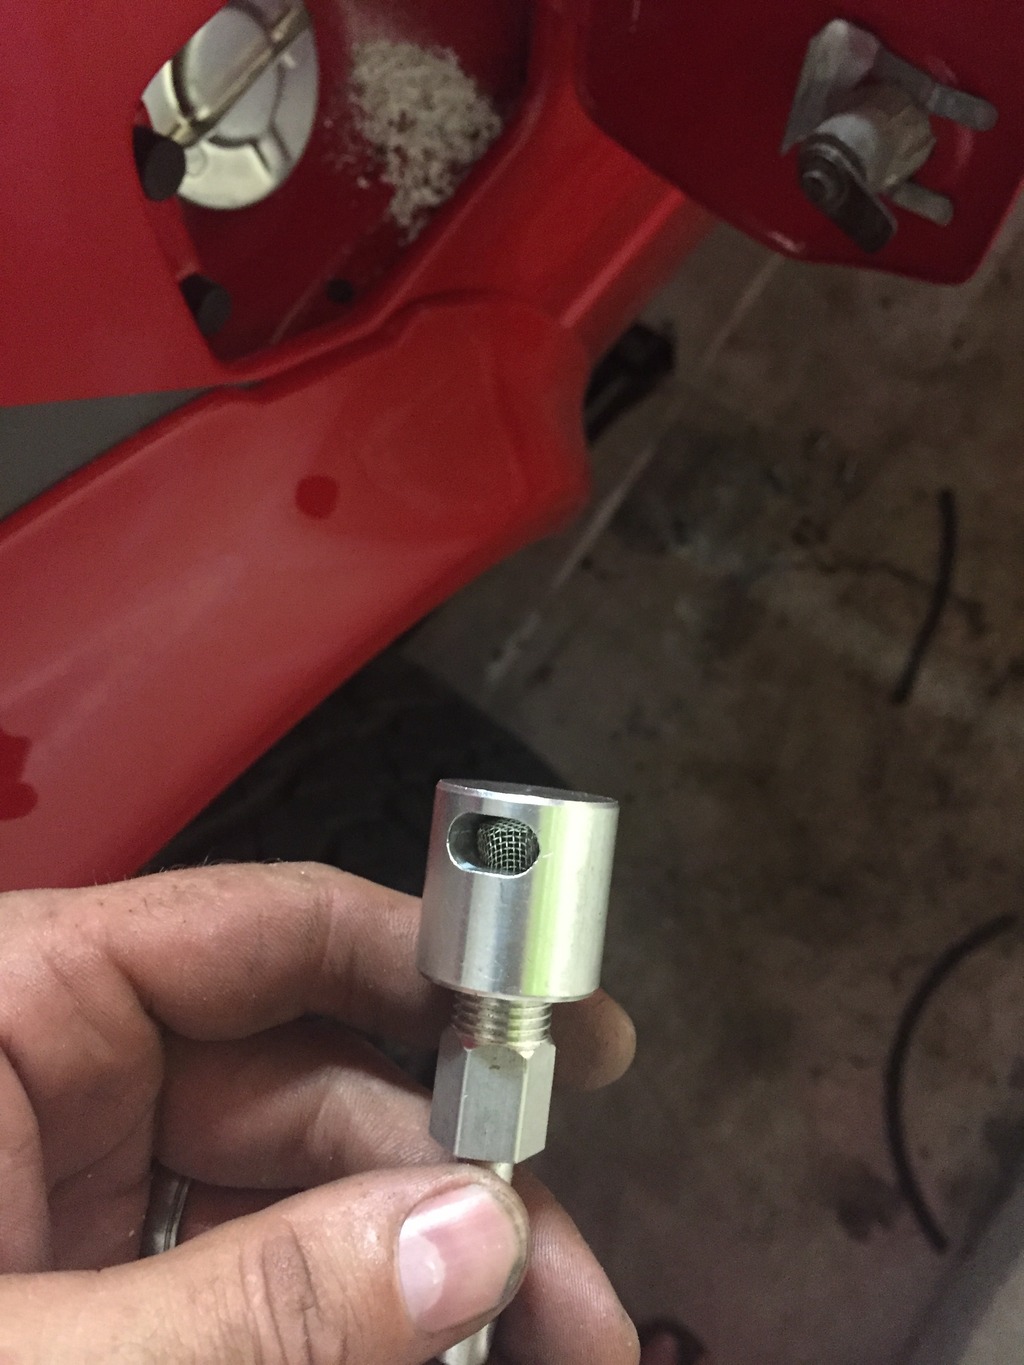
Obviously I wanted it hidden and it you typically want it mounting as high or higher than the fuel filler so I drilled a 1/2" hole in the fuel pocket to mount it.
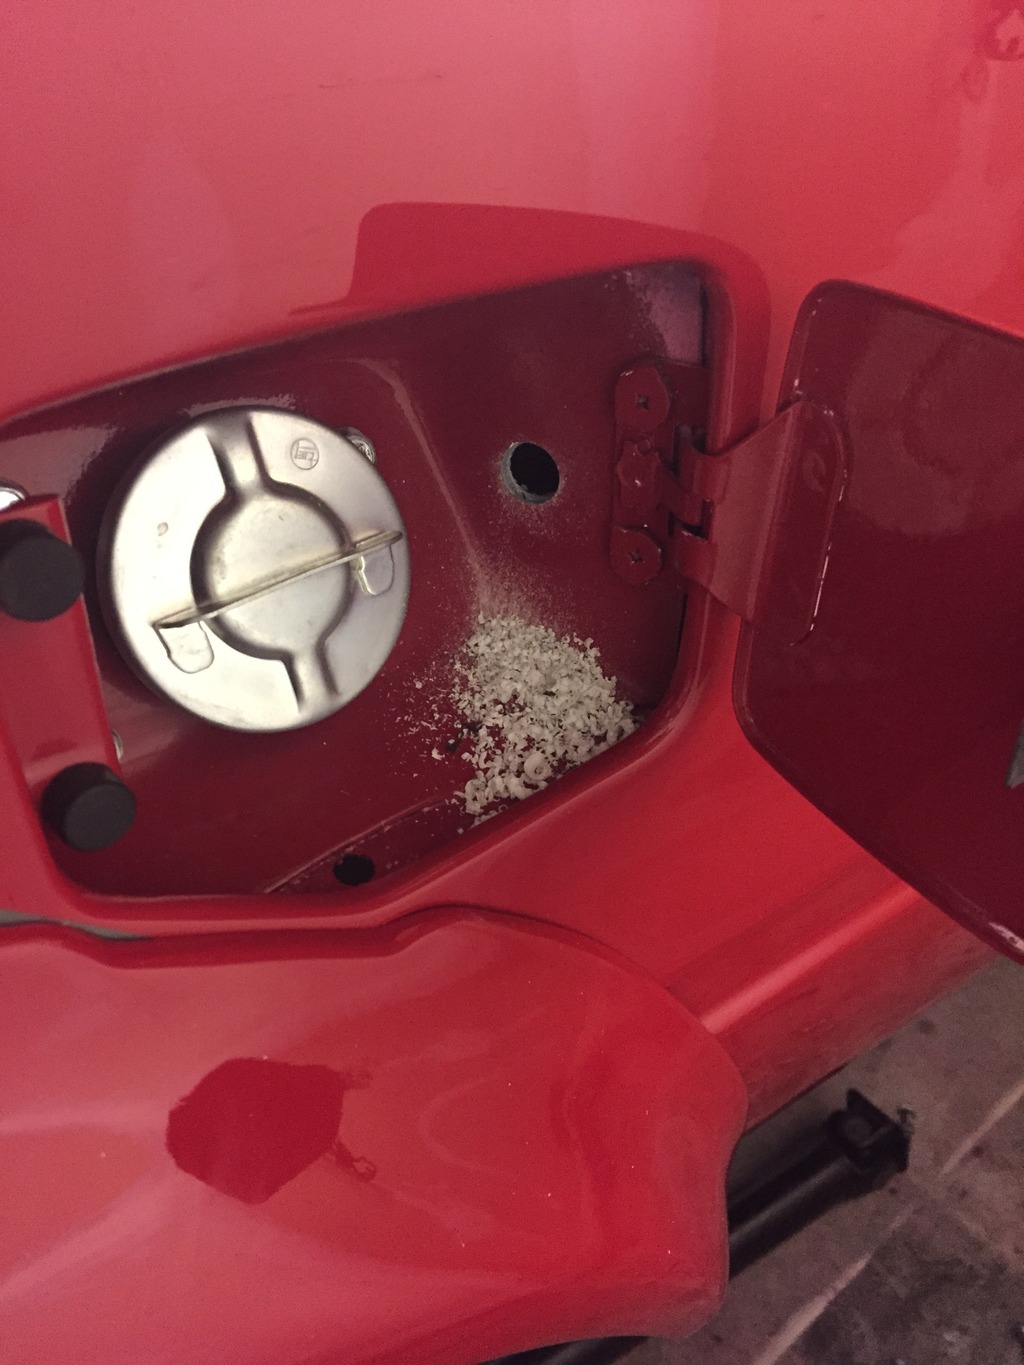
Installed it with the vent opening facing downward to prevent the possibility of water or debris getting into the fuel tank and ran a section of 1/4" fuel hose from the barb fitting on the back side of the vent to the factory vent line on the tank that would normally go to the charcoal canister. I had to bend the vent line on the tank so that it pointed towards the filler neck to make installation easier and cleaner. Turned out just as expected with plenty of clearance around the filler cap so it isn't in the way when refueling.
Now the race is on to get my truck put back together before the show tomorrow! My t-case brake is on the UPS truck for delivery today and my diff bearings should be in at Advance Auto Parts this afternoon. I want to powdercoat the t-case brake brackets before I install them so I likely won't get that done tomorrow, but at least I can rebuild the rear diff and install the brake rotor on the t-case output flange tonight so I have a roller for tomorrow. Then I can finish installing the t-case brake brackets and caliper after powdercoating.

Then I installed the new Marlin Crawler shifter seat. WOW! What a difference that made!! All the excessive slop was removed and the shifter is much tighter now. I have a second gen pickup shifter handle that I eventually would like to use to modify my shifter like I did my t-case shifter to make it shorter and look like the same style as the t-case shifter. That'll likely be a quick winter project. Below you can see the difference between the old shifter seal and the new one - I'd say I was slightly overdue for a replacement...

I also ran my fuel vent last night. Since my engine is desmogged, I don't have the charcoal canisters to vent the pressure out of my gas tank. The gas cap will release the vacuum build up caused by the fuel pump pulling fuel but there was no mechanism to release the pressure build up cause by heat and vaporized fuel. Everytime I would remove the fuel cap I would get a long large hiss of pressure coming out of the tank - it was really bad and quite frankly scary! I had a boat gas tank vent lying around so I decided to use that for my vent.

Obviously I wanted it hidden and it you typically want it mounting as high or higher than the fuel filler so I drilled a 1/2" hole in the fuel pocket to mount it.

Installed it with the vent opening facing downward to prevent the possibility of water or debris getting into the fuel tank and ran a section of 1/4" fuel hose from the barb fitting on the back side of the vent to the factory vent line on the tank that would normally go to the charcoal canister. I had to bend the vent line on the tank so that it pointed towards the filler neck to make installation easier and cleaner. Turned out just as expected with plenty of clearance around the filler cap so it isn't in the way when refueling.

Now the race is on to get my truck put back together before the show tomorrow! My t-case brake is on the UPS truck for delivery today and my diff bearings should be in at Advance Auto Parts this afternoon. I want to powdercoat the t-case brake brackets before I install them so I likely won't get that done tomorrow, but at least I can rebuild the rear diff and install the brake rotor on the t-case output flange tonight so I have a roller for tomorrow. Then I can finish installing the t-case brake brackets and caliper after powdercoating.
Last edited by kawazx636; May 29, 2015 at 05:22 AM.
Jun 1, 2015 | 06:12 AM
#1257
Thread Starter
Super Moderator
iTrader: (3)
Joined: Jan 2012
Posts: 3,218
Likes: 26
From: Salisbury, MD
Fun was certainly had! It was hella hot out, but hanging out down by the mud course was nice and cool! Details on the event to follow shortly...
I got my new differential bearings in Friday afternoon. Great deal on the kit - $89 (after a coupon code) from Advance Auto Parts for Koyo carrier and pinion bearings. The kit also came with a pinion nut, pinion seal and crush sleeve but I already had those so I didn't need them. So Friday night turned into a reeeeeally long night. The pinion and carrier bearings were seized on pretty good so it took a good while to get them off. My bearing puller and bearing separator just wasn't doing the job at first so I threw the pinion and carrier assembly in the freezer for a couple hours and then they came right off with the bearing separator. After getting everything apart it was evident that the differential had been apart before since there were FOUR different brands of bearings in there - one was Koyo, one was Timken and two other mystery brands. Seems like a previous owner decided to only replace the bearing that failed one at a time instead of doing all of them at once. It doesn't make sense to me to do a quarter of the job when you have something that far apart, but that comes as no surprise since nothing the previous owners did has made much sense thus far. It was definitely in need of a rebuild after looking at the condition of the bearings and races. Here is a shot of the pinion bearing and race (the only ones I managed to remove without completely destroying):


Everything went back together with no problems. Backlashed perfectly within spec at 0.006"

After seeing the condition of the bearings, I was amazed that the gears weren't completely destroyed, but they were still good. I tried a couple different shim combinations, but since the gears were used and likely had some abnormal wear from the shot bearings I couldn't get the gear pattern completely perfect so I went with the best pattern I could achieve:

Like I said, not perfect, but it will do fine for my use.
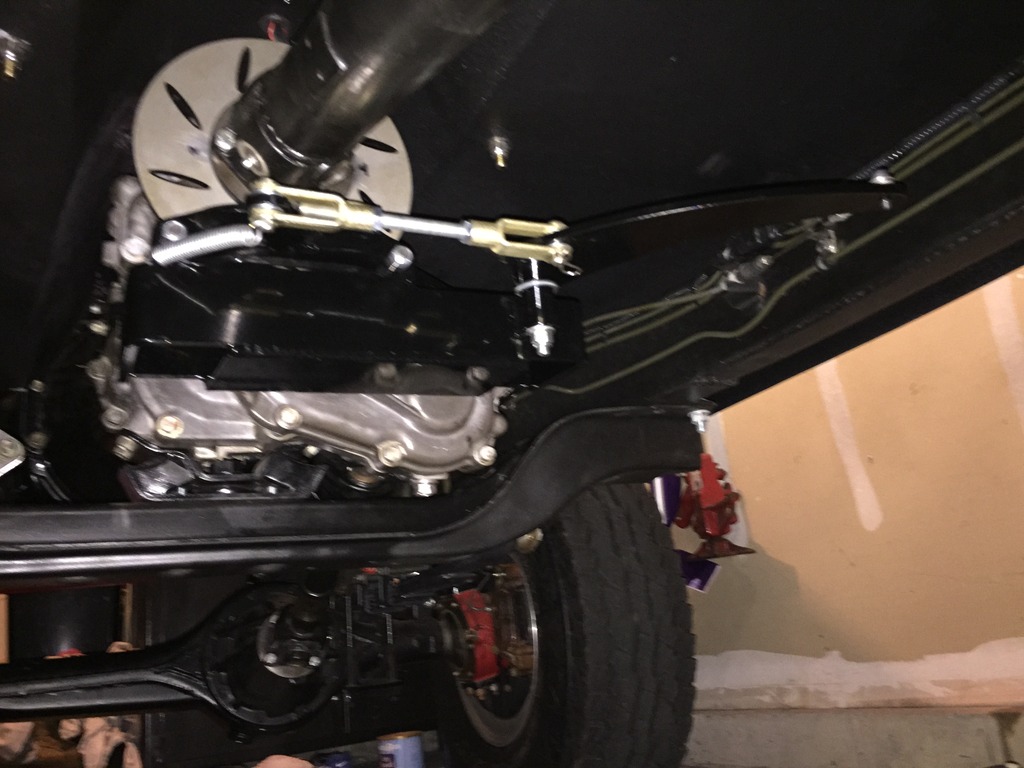
The SORD t-case brake came in on Friday as well so after I got done rebuilding the rear diff, I went ahead and drilled out the rotor for my transfer case brake. For some ungodly reason, Sky Offroad doesn't pre-drill the rotor with the 64mm x 56mm bolt pattern with 8mm bolts for the pre-84 flanges. Instead they tell you to go with the later flanges or a triple drilled flange. Seems like a ploy to get you to buy more of their products... Sorry, but I have all new u-joints in my drive shafts that I don't feel like destroying to remove and I don't want to buy new drive shaft and t-case companion flanges! There was plenty of room on the rotor, So I drilled and tapped my bolt pattern into the rotor before I left my pop's shop. It was about 4:00am when I left my pop's shop and I was beyond tired so I decided to bolt everything back on the truck in the morning.
I woke up at 7:30am to get everything back together on the truck. Installed the rear diff, the axle shafts, the rear disc brake calipers and wheels. Bolted on the t-case brake rotor and rear driveshaft. I didn't have time to install the rest of the t-case brake, but at least I was back up and running! Everything ran smooth except for the dust shield on the rear t-case output that was rubbing the t-case housing and making an awful noise! Apparently I had tweaked it when I was removing it from the flange so I just took a small screw driver and bent it back a little so it wouldn't rub.
Then it was off to the show...LATE! I arrived at the show about 15 minutes too late to enter the show and shine! I WAS PISSED! I was even more pissed when I talked to the judges after they handed out trophies and they said that I would have come in 2nd place for sure. Second behind an absolutely beautiful Jeep Willys pickup (Midnight blue in the center of the first picture below) which I would have proudly taken since I was the lone Toyota amongst a ton of Jeeps! It would have been a real slap in the face to all the Jeepers out there LOL! Anyhow, my son and I thoroughly enjoyed the event. Here are shots from the event:


This guy completely snapped his passenger side front axle housing...silly Jeep...

Hopefully this week I'll get the t-case brake bracket powdercoated and installed so I don't have to worry about any eminent repairs or concerns for a while.
Jun 4, 2015 | 07:19 AM
#1258
Thread Starter
Super Moderator
iTrader: (3)
Joined: Jan 2012
Posts: 3,218
Likes: 26
From: Salisbury, MD
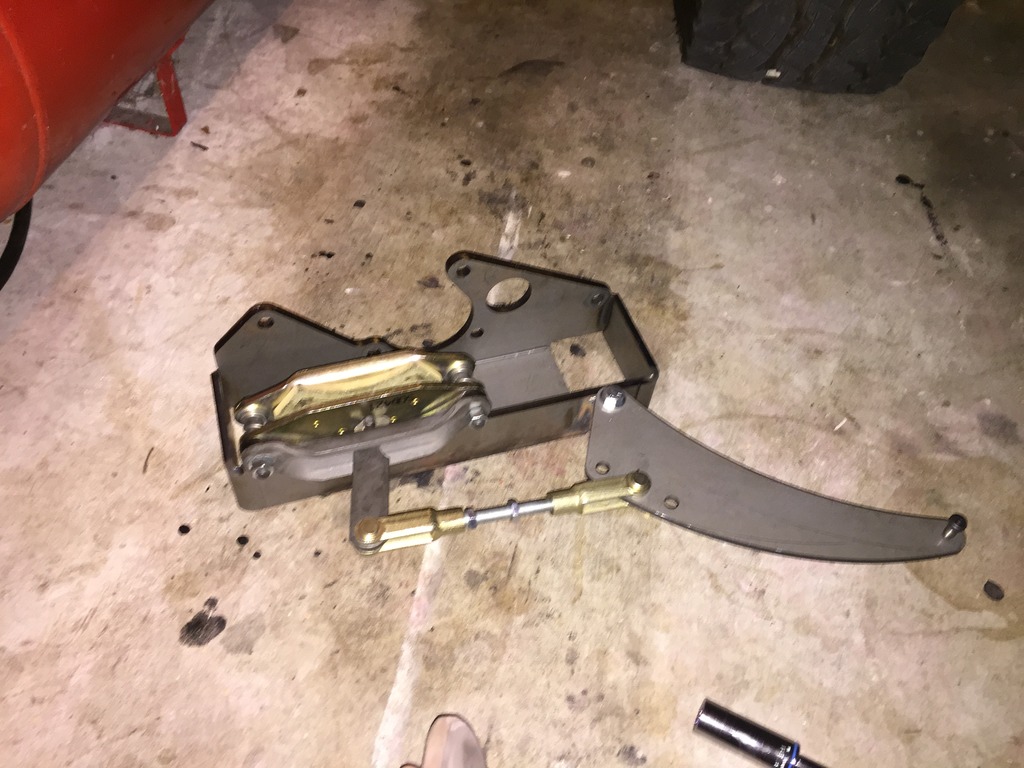
The other night I assembled and did a quick mock up of the T-Case brake that I got from Sky Off-Road. Everything bolted up easily to the transfer case so pulled it off to powdercoat all the brackets so I don't have a big mass of rusted metal hanging from my transfer case.
Before powder:
Have I mentioned before how much I love powdercoating??? Since it was thicker metal, I "hot coated" (heating the metal to 450* before applying powder) and laid the powder on a little thicker than usual for more durability. After powder:
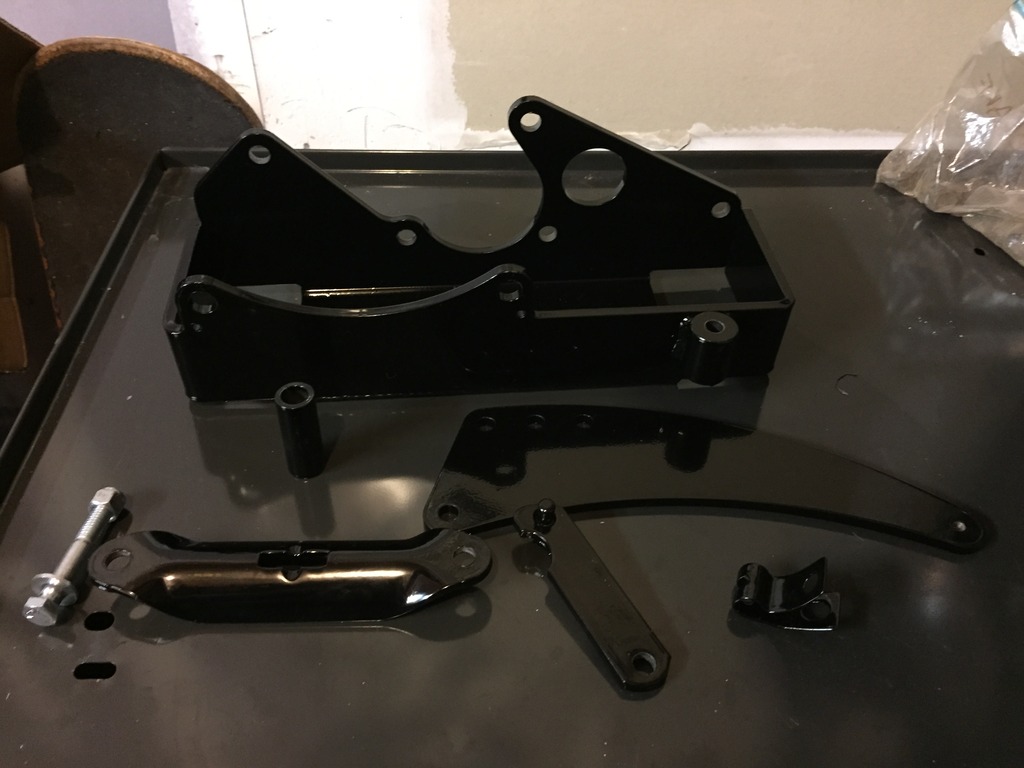
My biggest complaint with Sky's t-case brake is their lack of instructions. It is a pretty simple design, but in assembling everything, I discovered that there are washers that need to be strategically placed to properly space the caliper on the rotor. This would be nice to know PRIOR to laying on my back under the truck with a 10lb piece of steel hanging above my head... It would also be nice to have a general idea of how to go about properly adjusting the cam and linkage for optimal position, pull and function since I heard that tends to involve a little trial and error.
Anyway, I got the damn thing installed last night with minor issues - mostly involving hardware that I needed to acquire. These fit 79-83 trucks, but are directly designed to use on 84+ trucks - the major differences being their lack of consideration in drilling a 64mm x 56mm bolt pattern as I mentioned before and the parking brake cable connection. On Sky's website they recommend using a cable crimp to loop around the post on the cam for pre84 trucks. Good idea... in theory... until that loop hops off the post and your truck rolls away. So I used a cable loop thimble and three cable crimps to make a loop and properly secure said loop from slipping. I also used a couple washers on either side of the loop to keep it from sliding off the post bolt on the cam and to help prevent chaffing and binding. I also used some nylon washers on either side the cam where it pivots on the main bracket so that I can tighten the bracket more without having to worry about binding. This should also eliminate potential rattles. Other than those upgrades, all went well.
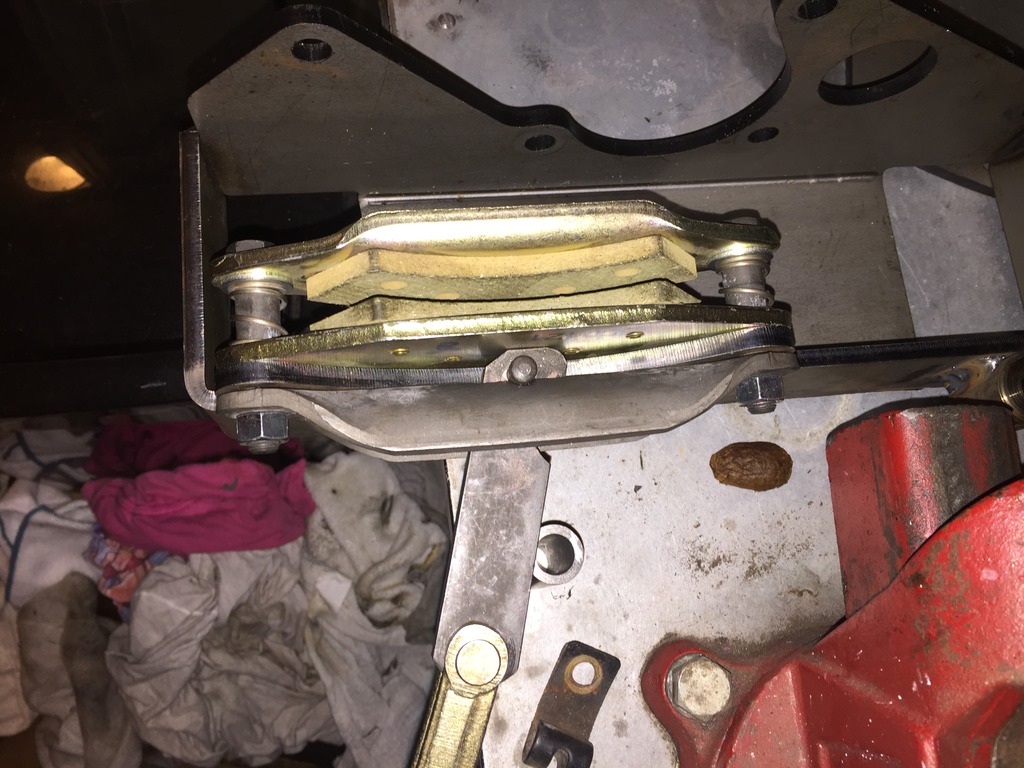
Here are the final installed pics:
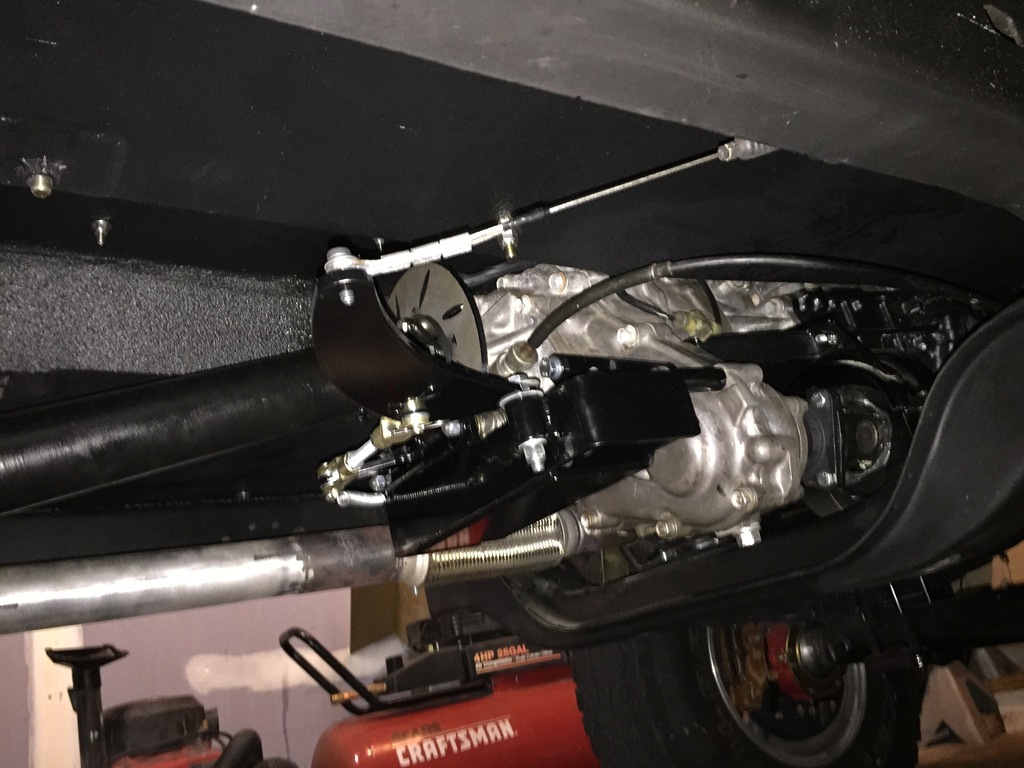
It seems as though the caliper completely releases with no drag on the rotor and it seems to hold the truck in place when engaged, but I have yet to road test it. The pull on the e-brake handle is about 75% of the original pull of the stock e-brake so assuming that it functions properly I would say that this is a success. It's supposed to rain ALLLLLL week so I might not get around to test driving until Sunday or Monday.
Before powder:


Have I mentioned before how much I love powdercoating??? Since it was thicker metal, I "hot coated" (heating the metal to 450* before applying powder) and laid the powder on a little thicker than usual for more durability. After powder:

My biggest complaint with Sky's t-case brake is their lack of instructions. It is a pretty simple design, but in assembling everything, I discovered that there are washers that need to be strategically placed to properly space the caliper on the rotor. This would be nice to know PRIOR to laying on my back under the truck with a 10lb piece of steel hanging above my head... It would also be nice to have a general idea of how to go about properly adjusting the cam and linkage for optimal position, pull and function since I heard that tends to involve a little trial and error.
Anyway, I got the damn thing installed last night with minor issues - mostly involving hardware that I needed to acquire. These fit 79-83 trucks, but are directly designed to use on 84+ trucks - the major differences being their lack of consideration in drilling a 64mm x 56mm bolt pattern as I mentioned before and the parking brake cable connection. On Sky's website they recommend using a cable crimp to loop around the post on the cam for pre84 trucks. Good idea... in theory... until that loop hops off the post and your truck rolls away. So I used a cable loop thimble and three cable crimps to make a loop and properly secure said loop from slipping. I also used a couple washers on either side of the loop to keep it from sliding off the post bolt on the cam and to help prevent chaffing and binding. I also used some nylon washers on either side the cam where it pivots on the main bracket so that I can tighten the bracket more without having to worry about binding. This should also eliminate potential rattles. Other than those upgrades, all went well.
Here are the final installed pics:


It seems as though the caliper completely releases with no drag on the rotor and it seems to hold the truck in place when engaged, but I have yet to road test it. The pull on the e-brake handle is about 75% of the original pull of the stock e-brake so assuming that it functions properly I would say that this is a success. It's supposed to rain ALLLLLL week so I might not get around to test driving until Sunday or Monday.
Jun 4, 2015 | 05:29 PM
#1259
Dave
ratz ... sorry you were a little late for the show .. but no worries , there will be more shows !!
nice .. "off the shelf piece " .. I'm not a huge fan of that set up .. but I guess it's what's available , so go with it .
however , I did notice the RAIN remark mostly ... do you not drive this in the rain ? ... huh !! I can , and probably will quote some remarks you made to me on my Trekker build .. you knew it was coming !!

.
ratz ... sorry you were a little late for the show .. but no worries , there will be more shows !!
nice .. "off the shelf piece " .. I'm not a huge fan of that set up .. but I guess it's what's available , so go with it .
however , I did notice the RAIN remark mostly ... do you not drive this in the rain ? ... huh !! I can , and probably will quote some remarks you made to me on my Trekker build .. you knew it was coming !!
.
Jun 6, 2015 | 08:14 PM
#1260
Thread Starter
Super Moderator
iTrader: (3)
Joined: Jan 2012
Posts: 3,218
Likes: 26
From: Salisbury, MD
Caught the tater! It will eventually get driven in the rain... When I get stuck out on the road in it! LOL I guess I'm just not ready for it to get dirty yet, but mainly it is because I NEVER want to have to do rust repairs again after all I have been through and no rain = no rust! I suppose I deserve the wrath that you are about to bestow upon me...


