
KawaZX636's 1983 Toyota Pickup Restoration
 Nov 13, 2013 | 08:06 AM
#381
Thread Starter
Super Moderator
iTrader: (3)
Joined: Jan 2012
Posts: 3,218
Likes: 26
From: Salisbury, MD
I had some down time at work waiting for some data to process so I began making a design for my center console, cup holders and gauge pod. While I still had the seats in the truck last night, I sat in it to see what a comfortable height would be for my console. I like to be able to rest my elbow on the console without having to slouch off to the center of the truck so I determined that about 9-10" off the top of the tunnel would be a good height for the console. So made the design of the box of the console to be 9" to allow for a 1" padded lid to be hinged from the rear of the console. Also designed a simple, yet aesthetically pleasing cup holder. The gauge pod will contain a 2 5/8" Tach, a 2" volt meter and a 2" oil pressure gauge. I still have to check for fitment and clearance around the heater core and ensure that there is enough back spacing for the gauges to properly fit in the holes. but hopefully this design will work. Ideally, most people like their tach up near the cluster for easier heads up viewing, but I'm basically using it in event that I need to do some diagnostics or quick tuning adjustments in the future. I don't really need it for everyday driving, I just need to know about what the idle is and if there are certain RPM ranges that my engine may be having problems with. Plus it looks clean and I hate seeing tachs slapped to the side of a steering column or mounted on top of the dash. (And before anybody says it, I don't want to do a cluster swap).
The gauge pod and console will be fabricated using steel, but I'm still contemplating on
whether or not I want to bolt in the console or weld it in. I'm leaning more towards welding it in because there shouldn't ever be a need to remove it. The gauge pod will most likely be a bolt on since I may need to easily remove it if I ever have problems with the gauges.
Here are the drawings, what do you guys think?


 Nov 13, 2013 | 12:21 PM
#386
Thread Starter
Super Moderator
iTrader: (3)
Joined: Jan 2012
Posts: 3,218
Likes: 26
From: Salisbury, MD
Just used a 1" putty knife. It was old and dry so it chipped away rather easily once I got under it, but the angles and position of the firewall made it rather awkward to work with.
Last edited by kawazx636; Nov 14, 2013 at 05:47 AM.
Nov 14, 2013 | 06:34 AM
#387
Thread Starter
Super Moderator
iTrader: (3)
Joined: Jan 2012
Posts: 3,218
Likes: 26
From: Salisbury, MD
I need some feedback guys!
It's back to the drawing board. My original gauge pod design wasn't even going to come close to fitting between the heater core and the shifter. In fact, I recall barely tapping the factory gauge pod with the shifter when in 3rd gear. So that was a tight fit as well and with the additional backspacing needed for the tach there is no way I'm going to be able to make something to fit in that location.
So last night, I sat in my truck with the gauges in hand trying to find suitable locations. Like I said earlier, I hate seeing a tach mounted to the steering column or pillar and I don't mind not having a heads up view of the these gauges. So I came up with two options.
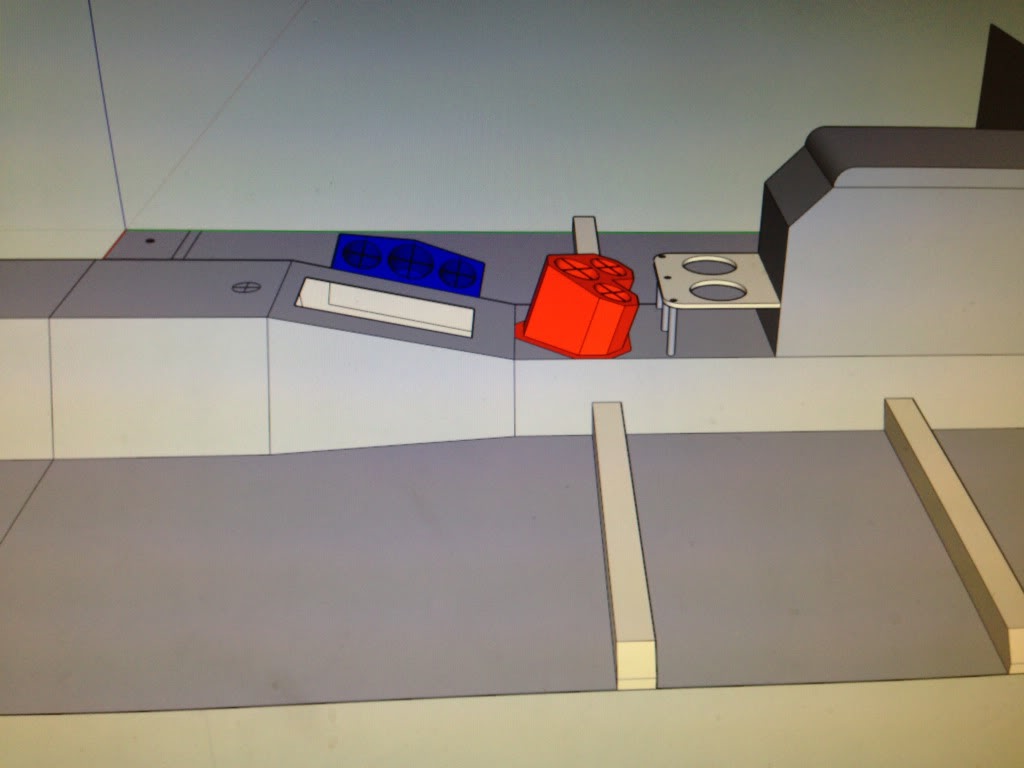
#1 (Red option): About 6.5" wide, 6" long and sits a about 4" above the top of the tunnel in front of the tunnel. The faces are angled about 18* towards the driver with the Tach in the front hole and the volt meter and oil pressure gauge in the rear holes. There will be a base plate that will allow me to bolt the pod to the top of the tunnel for easy access to wiring if I need it. This option also requires me to move the center console back about 7" - not a big deal, but I would lose a little bit of storage (not that there was storage there at all to begin with! LOL)
#2 (Blue option): About 8" long, 3.5" wide and 3" deep and will protruded about 4.5" into the passenger leg room. The face is angled about 12* to the rear and 26* to the driverside with the Tach mounted in the middle hole and the volt meter and oil pressure gauges mounted in the two outer holes. This design will also have a base plate for bolt on application to allow for easy removal and access to wiring.
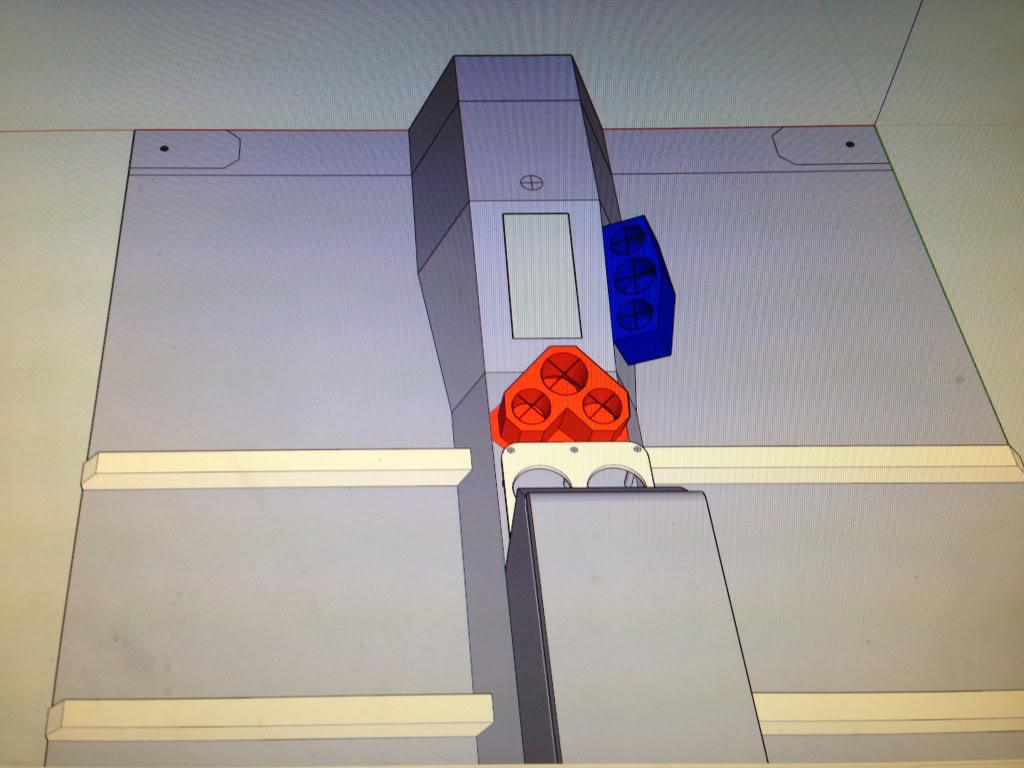
Which design do you folks like better? Any input or suggestions? Thanks!
It's back to the drawing board. My original gauge pod design wasn't even going to come close to fitting between the heater core and the shifter. In fact, I recall barely tapping the factory gauge pod with the shifter when in 3rd gear. So that was a tight fit as well and with the additional backspacing needed for the tach there is no way I'm going to be able to make something to fit in that location.
So last night, I sat in my truck with the gauges in hand trying to find suitable locations. Like I said earlier, I hate seeing a tach mounted to the steering column or pillar and I don't mind not having a heads up view of the these gauges. So I came up with two options.
#1 (Red option): About 6.5" wide, 6" long and sits a about 4" above the top of the tunnel in front of the tunnel. The faces are angled about 18* towards the driver with the Tach in the front hole and the volt meter and oil pressure gauge in the rear holes. There will be a base plate that will allow me to bolt the pod to the top of the tunnel for easy access to wiring if I need it. This option also requires me to move the center console back about 7" - not a big deal, but I would lose a little bit of storage (not that there was storage there at all to begin with! LOL)
#2 (Blue option): About 8" long, 3.5" wide and 3" deep and will protruded about 4.5" into the passenger leg room. The face is angled about 12* to the rear and 26* to the driverside with the Tach mounted in the middle hole and the volt meter and oil pressure gauges mounted in the two outer holes. This design will also have a base plate for bolt on application to allow for easy removal and access to wiring.


Which design do you folks like better? Any input or suggestions? Thanks!
Last edited by kawazx636; Nov 14, 2013 at 06:37 AM.
Nov 14, 2013 | 01:12 PM
#389
I would go with #1 pod. I think #2 looks like an add-on and not pleasing to look at. and you really don't have a lot of room in the leg area to start with. Would hate to be wheelin and bashing me knees against that box.
Have you thought of going with digital gauges? Seems there are a lot of formats to pick from, that still might fit under the center duct. With your fab skills, something custom built around or incorporating the vent down to your tunnel, seems doable. Look at some of the newer trucks for design ideas
Have you thought of going with digital gauges? Seems there are a lot of formats to pick from, that still might fit under the center duct. With your fab skills, something custom built around or incorporating the vent down to your tunnel, seems doable. Look at some of the newer trucks for design ideas
Nov 14, 2013 | 04:03 PM
#391

I've loved everything you have done with the truck so far, and I mean everything, but the guage position is really not my cup of tea, because I've always loved to have all my guages between eyesight, but that's just personal preference. However if I had to chose between the two, I would choses number 1.
Nov 14, 2013 | 07:30 PM
#392
Thread Starter
Super Moderator
iTrader: (3)
Joined: Jan 2012
Posts: 3,218
Likes: 26
From: Salisbury, MD
Thanks for the input guys! Looks like I'm going to go with option 1 (red).
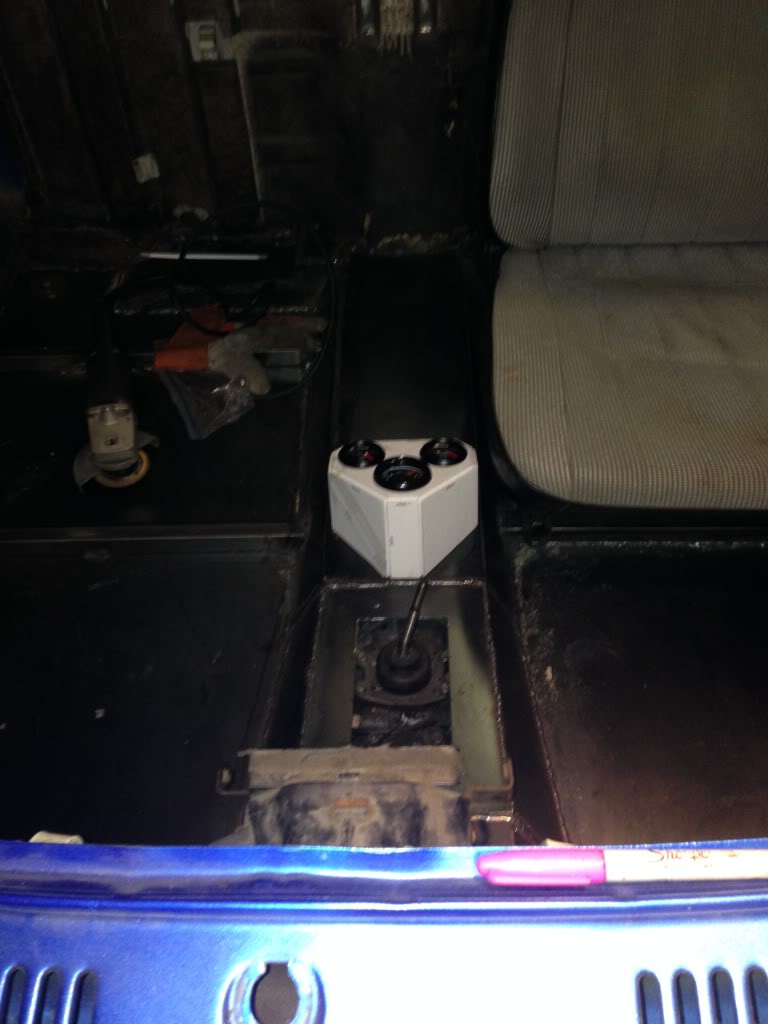
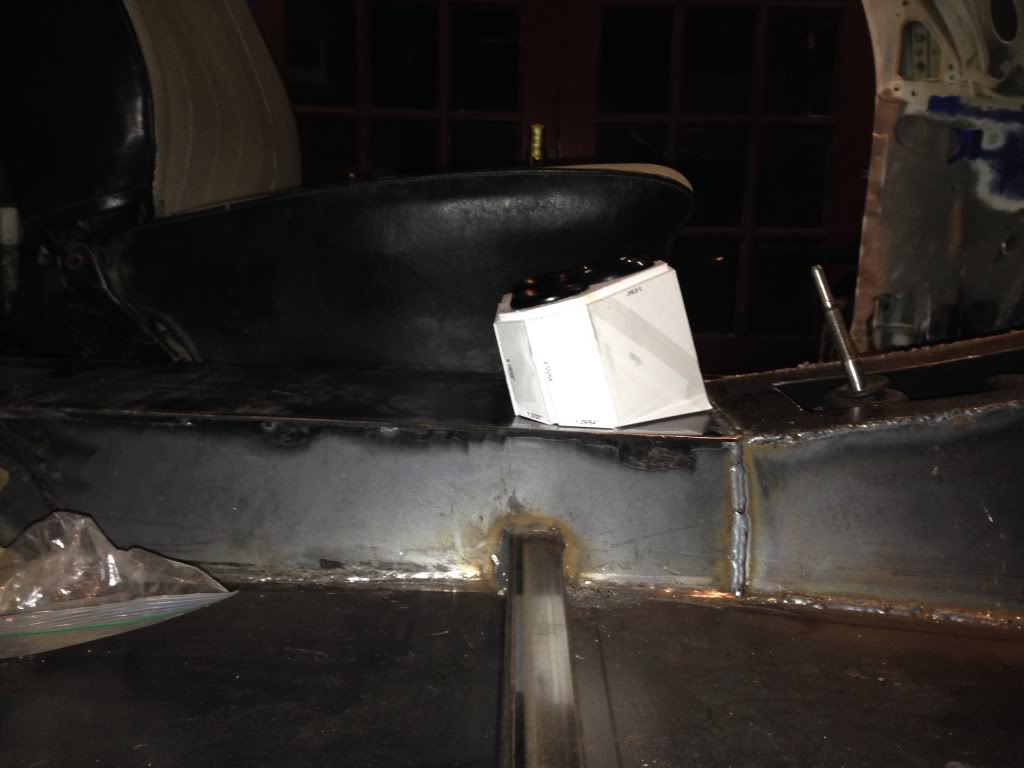
Like always, I'm pretty tedious about mock up so I printed out the template and slapped it on some foamcore:
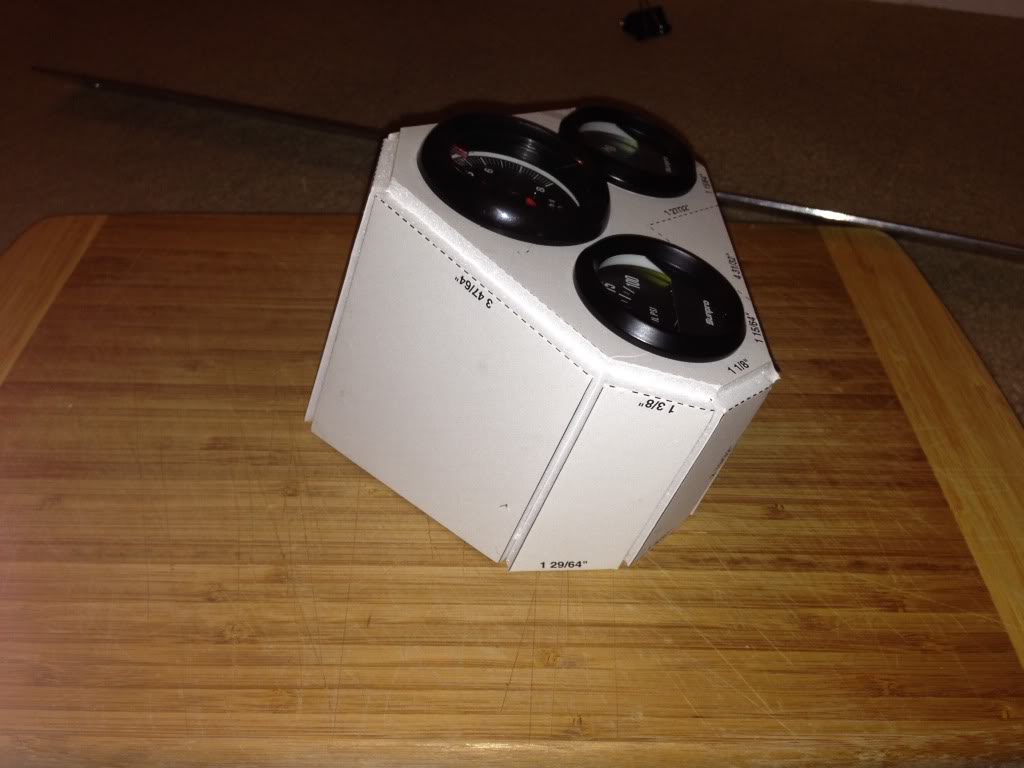

Headed over to the shop for a visual to make sure the angle of the gauges was adequately aimed towards the driver. Here's a shot from eye level looking down at the gauges:
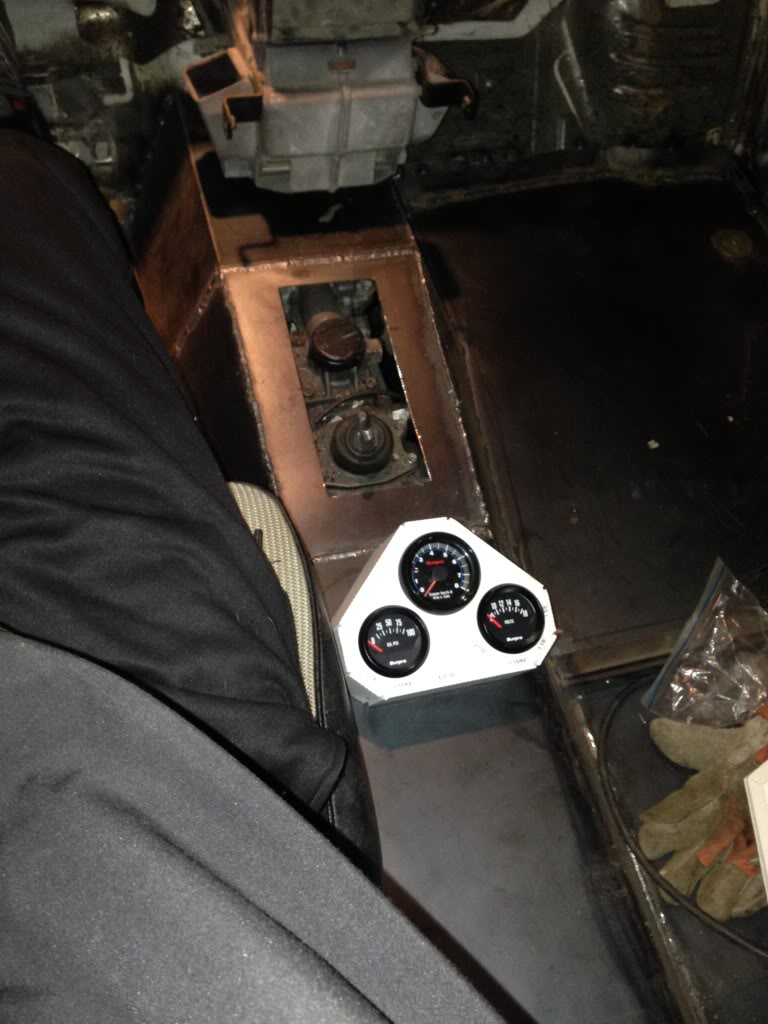
I like how it isn't obtrusive or bulky in this location:
Ideally I would to get a 6 pin connector to wire it into the truck - two pins for the light positive and grounds wire (I'll wire the 3 bulbs together prior to the connector) going to the dimmer, two pins for the positive and ground wires going to switch power (Again, I'll wire them all together prior to the connector), one wire to the oil pressure sender and one wire to the coil. But that will all come later when I install the wiring harness.
I took some extra measurements tonight as well so I can get a final mock up design for my console. Unfortunately, I have to frame up some walls and completely remove and replace the floor joints and substrate at my brother's store front building downtown in order to get some subcontractors in there in a couple weeks so I'm going to be a little thin on time with my truck. Kind of a bummer, but it helps pay the bills - particularly the bills that involve parts!
Like always, I'm pretty tedious about mock up so I printed out the template and slapped it on some foamcore:


Headed over to the shop for a visual to make sure the angle of the gauges was adequately aimed towards the driver. Here's a shot from eye level looking down at the gauges:

I like how it isn't obtrusive or bulky in this location:


Ideally I would to get a 6 pin connector to wire it into the truck - two pins for the light positive and grounds wire (I'll wire the 3 bulbs together prior to the connector) going to the dimmer, two pins for the positive and ground wires going to switch power (Again, I'll wire them all together prior to the connector), one wire to the oil pressure sender and one wire to the coil. But that will all come later when I install the wiring harness.
I took some extra measurements tonight as well so I can get a final mock up design for my console. Unfortunately, I have to frame up some walls and completely remove and replace the floor joints and substrate at my brother's store front building downtown in order to get some subcontractors in there in a couple weeks so I'm going to be a little thin on time with my truck. Kind of a bummer, but it helps pay the bills - particularly the bills that involve parts!
Last edited by kawazx636; Nov 14, 2013 at 07:32 PM.
Nov 15, 2013 | 01:30 AM
#393
Registered User
Joined: May 2009
Posts: 684
Likes: 1
From: Downingtown, PA
I like the option you chose but one suggestion. Increase your gauge pod angle slighly because of glare from the rear window. When I did mine originaly, I would get glare on sunny days and had trouble reading the gauges. After I installed the higher angled gauge pod on my console I did not have any glare problem. You might want to test your gauges / pod for glare. Really nice job you are doing on your truck, keep up the great work.
Nov 15, 2013 | 12:37 PM
#394
Thread Starter
Super Moderator
iTrader: (3)
Joined: Jan 2012
Posts: 3,218
Likes: 26
From: Salisbury, MD
Thanks Don!
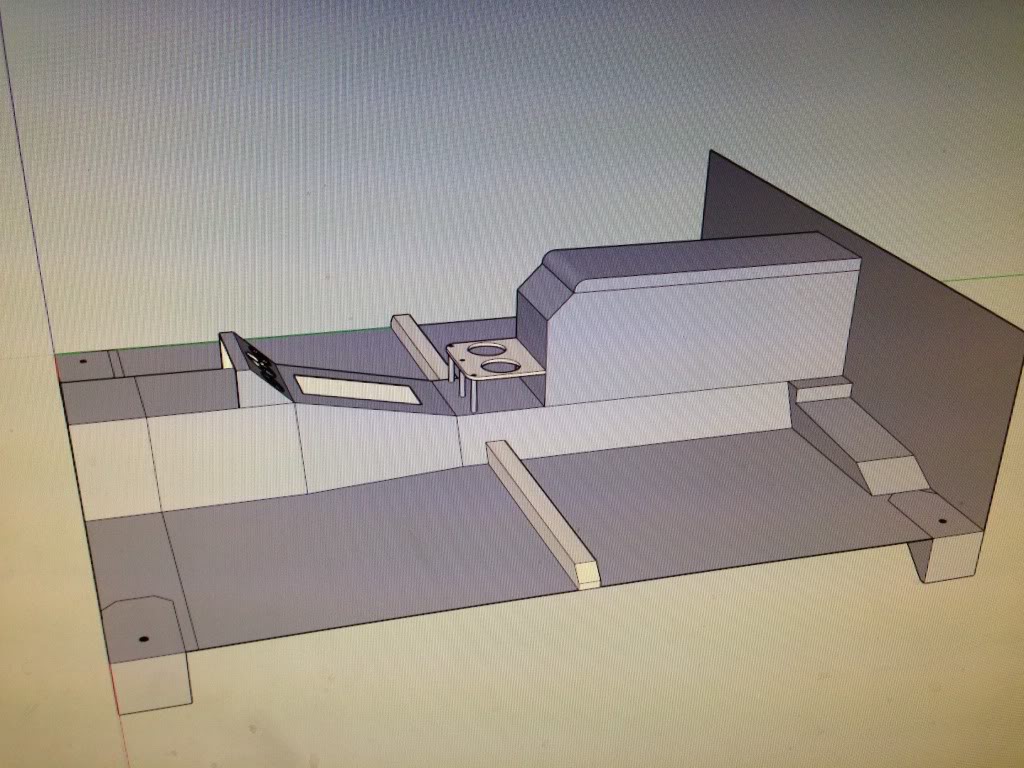
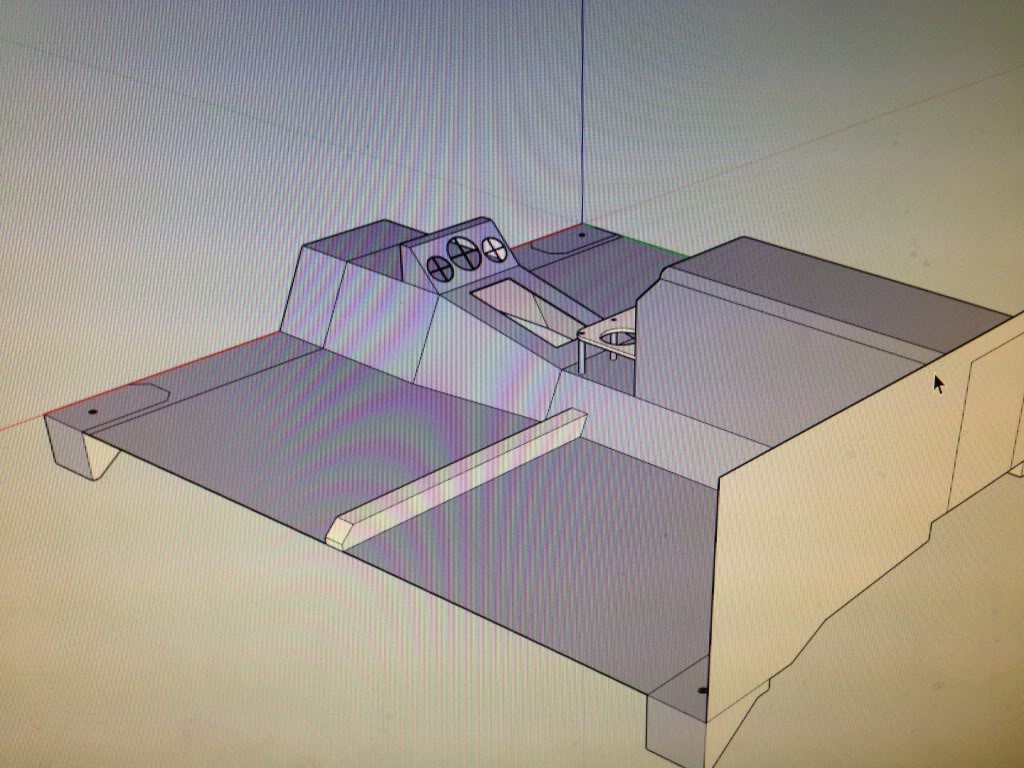
So I drew the final plan today, or at least I hope it is the final plan! I double checked to ensure that everything is drawn exactly to scale (except for the hump in the rear wall - I'll handle that during fabrication) so there shouldn't be any more fitment surprises. Here's what it should all look like once done:
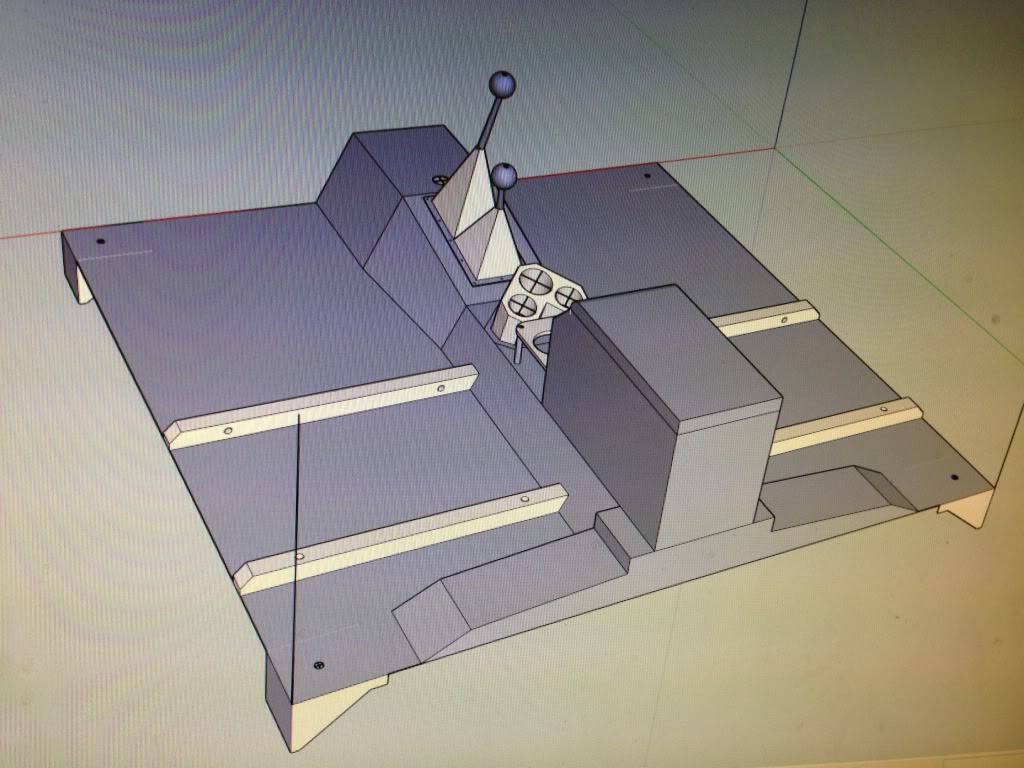

I printed out the templates for the console, cup holders and shift boot plate. Now I just need to find some time between my family and my brother's construction to work on the truck...
Nov 15, 2013 | 01:31 PM
#395
I love the fact you're working your own homebrew Tuffy console into this build, and that it's tucked back against the rear firewall out of the way. This'll be a great interior when finished.
Nov 16, 2013 | 12:04 PM
#396
Thread Starter
Super Moderator
iTrader: (3)
Joined: Jan 2012
Posts: 3,218
Likes: 26
From: Salisbury, MD
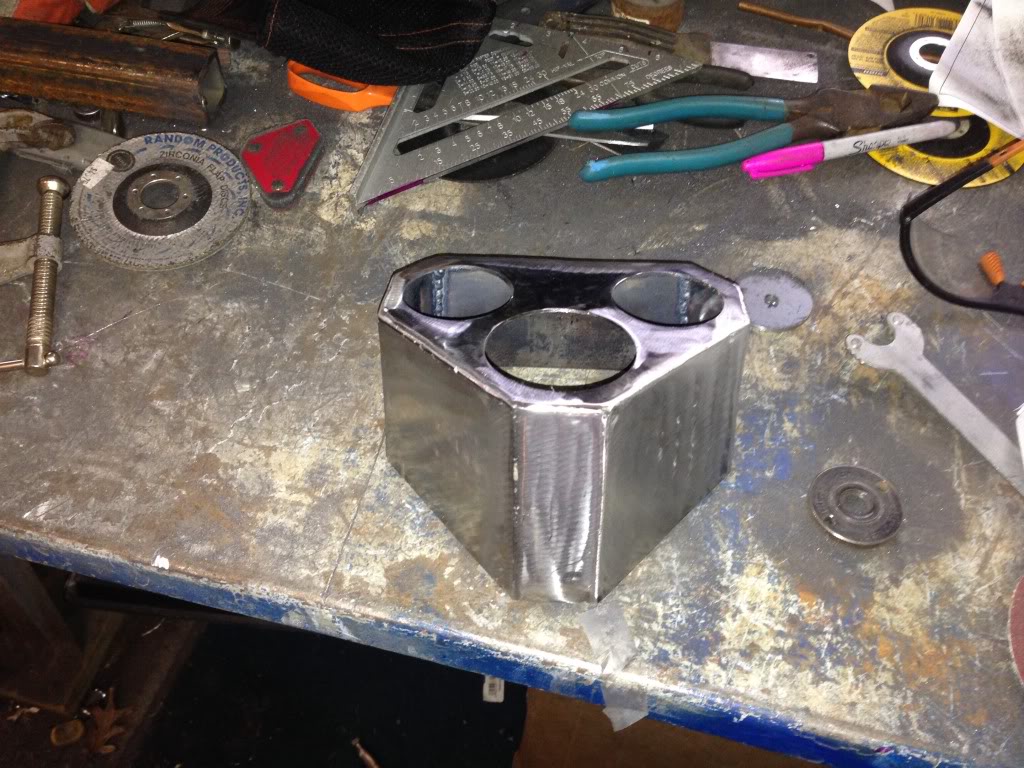
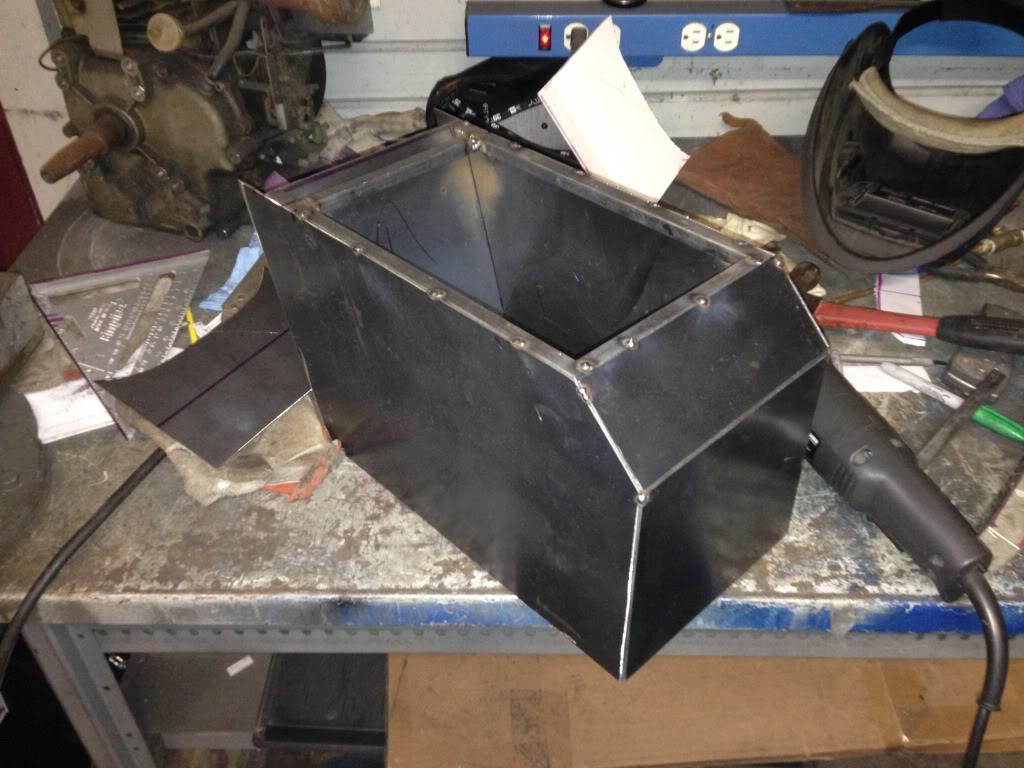
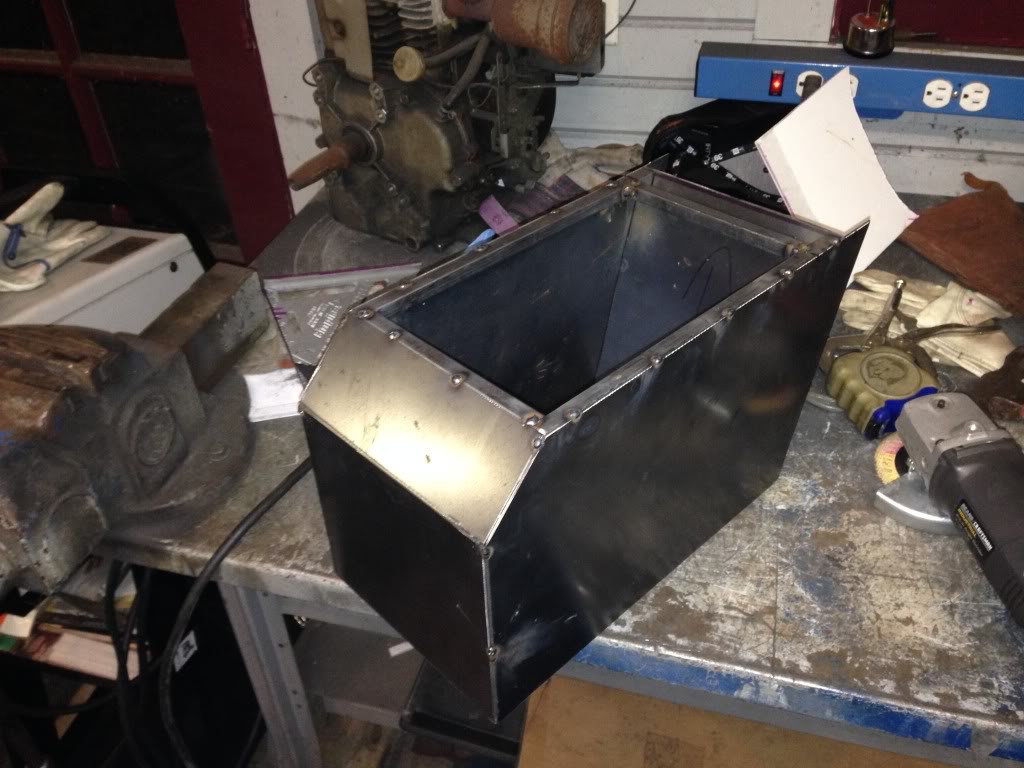
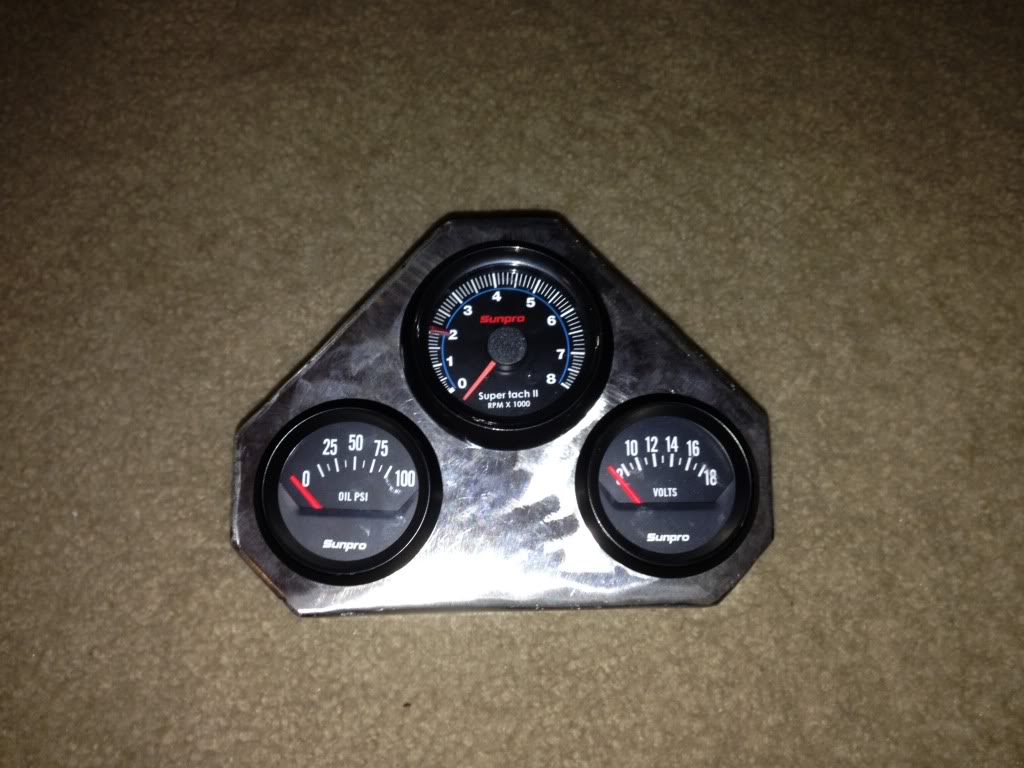
I got the gauge pod worked up today. I'm fairly impressed with home it turned out.
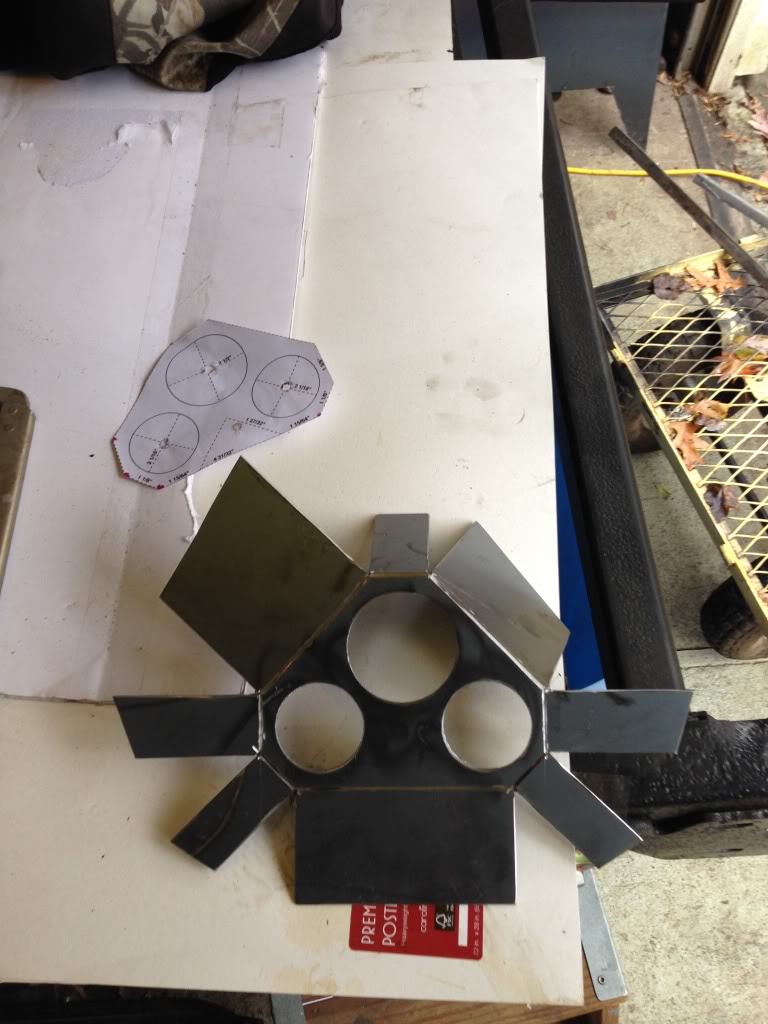
Cut out some 14ga steel and scored it for the bends. Used a 2.5" hole saw to make the tach hole and a 2" hole saw to make the volt and oil pressure guage holes. I couldn't find a 2 1/16" hole saw so I'm going to have to trim the 2" holes slightly bigger with a dremel to fit the gauges - no biggie
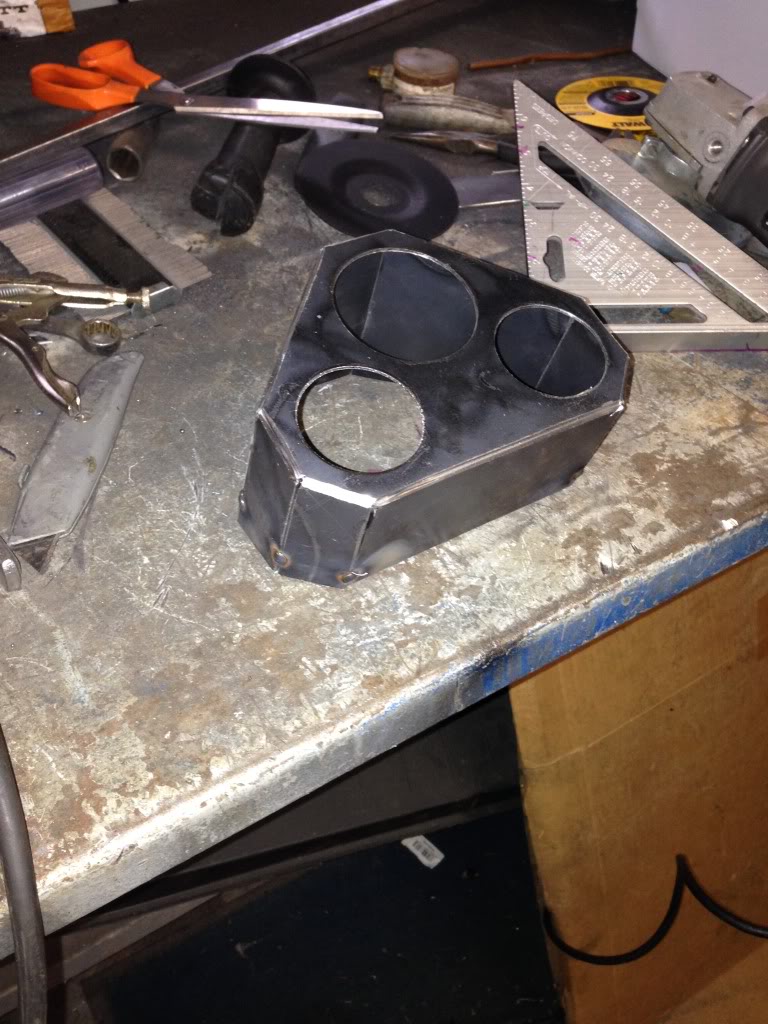
Bent it up and tacked it together:
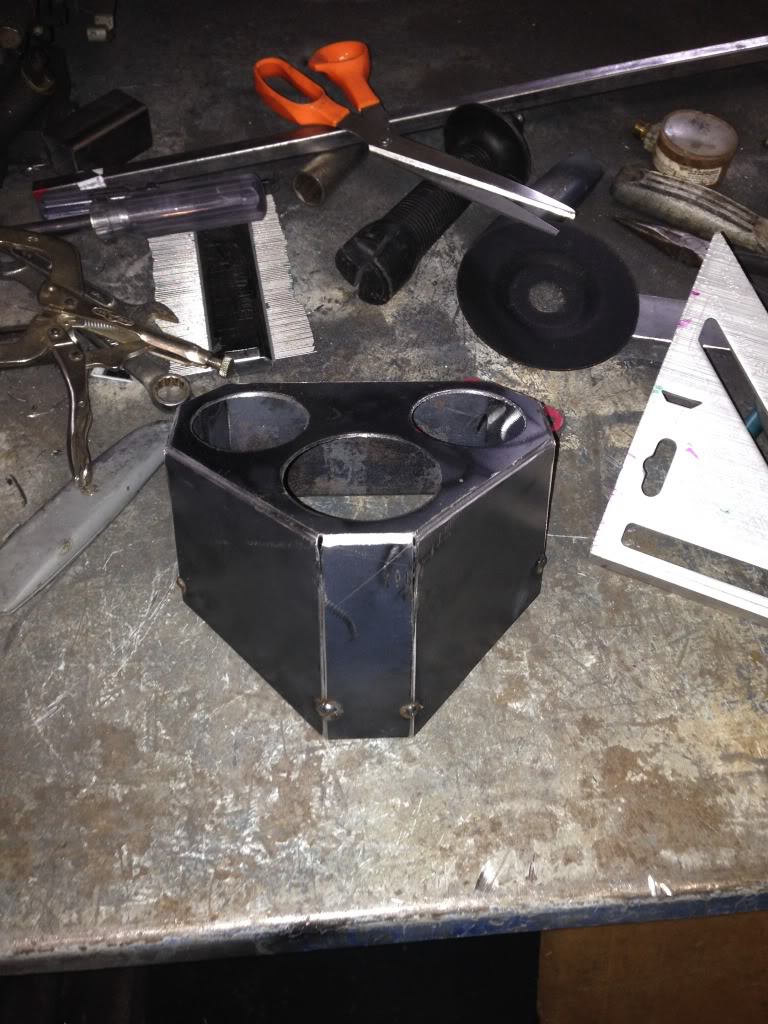
Then finished the welding and ground the welds flat:
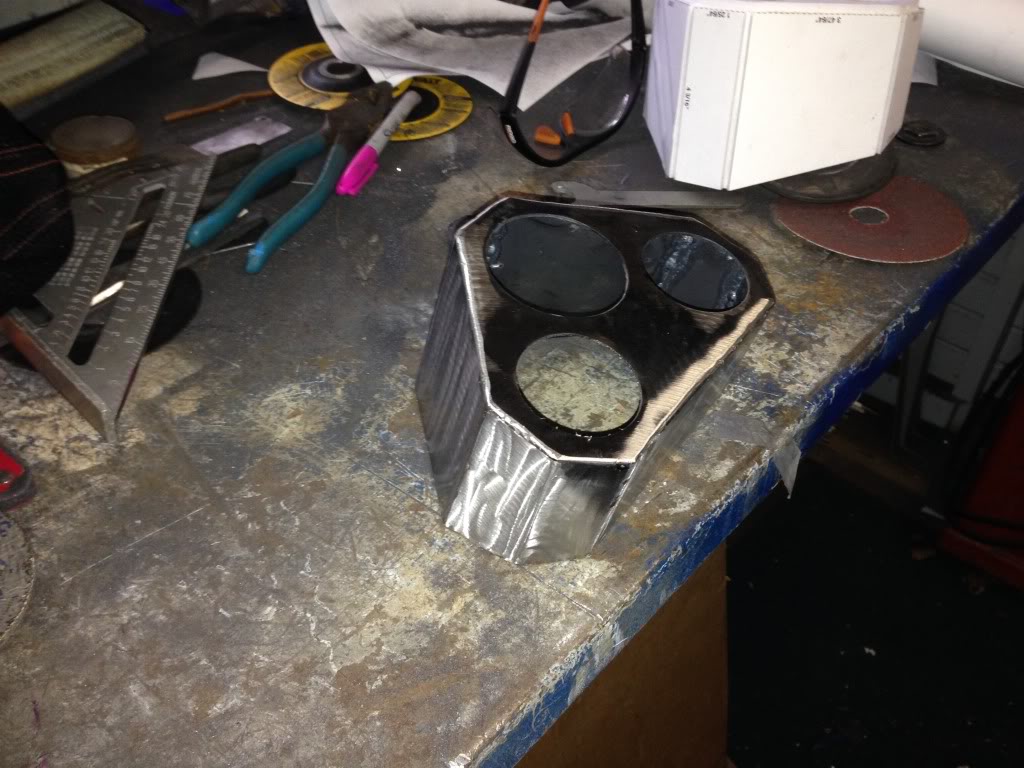
I have a few places that I need to go back to touch up because the anticorrosion coating on the sheet steel kept giving me bubbles in my welds so I have a few little craters that i want to get rid of. Since I plan on powdercoating it, it doesn't have to be perfect but I need to make sure that i don't have anything too noticeable.
Cut out some 14ga steel and scored it for the bends. Used a 2.5" hole saw to make the tach hole and a 2" hole saw to make the volt and oil pressure guage holes. I couldn't find a 2 1/16" hole saw so I'm going to have to trim the 2" holes slightly bigger with a dremel to fit the gauges - no biggie
Bent it up and tacked it together:
Then finished the welding and ground the welds flat:
I have a few places that I need to go back to touch up because the anticorrosion coating on the sheet steel kept giving me bubbles in my welds so I have a few little craters that i want to get rid of. Since I plan on powdercoating it, it doesn't have to be perfect but I need to make sure that i don't have anything too noticeable.
Last edited by kawazx636; Nov 16, 2013 at 12:06 PM.
Nov 16, 2013 | 08:53 PM
#397
Thread Starter
Super Moderator
iTrader: (3)
Joined: Jan 2012
Posts: 3,218
Likes: 26
From: Salisbury, MD
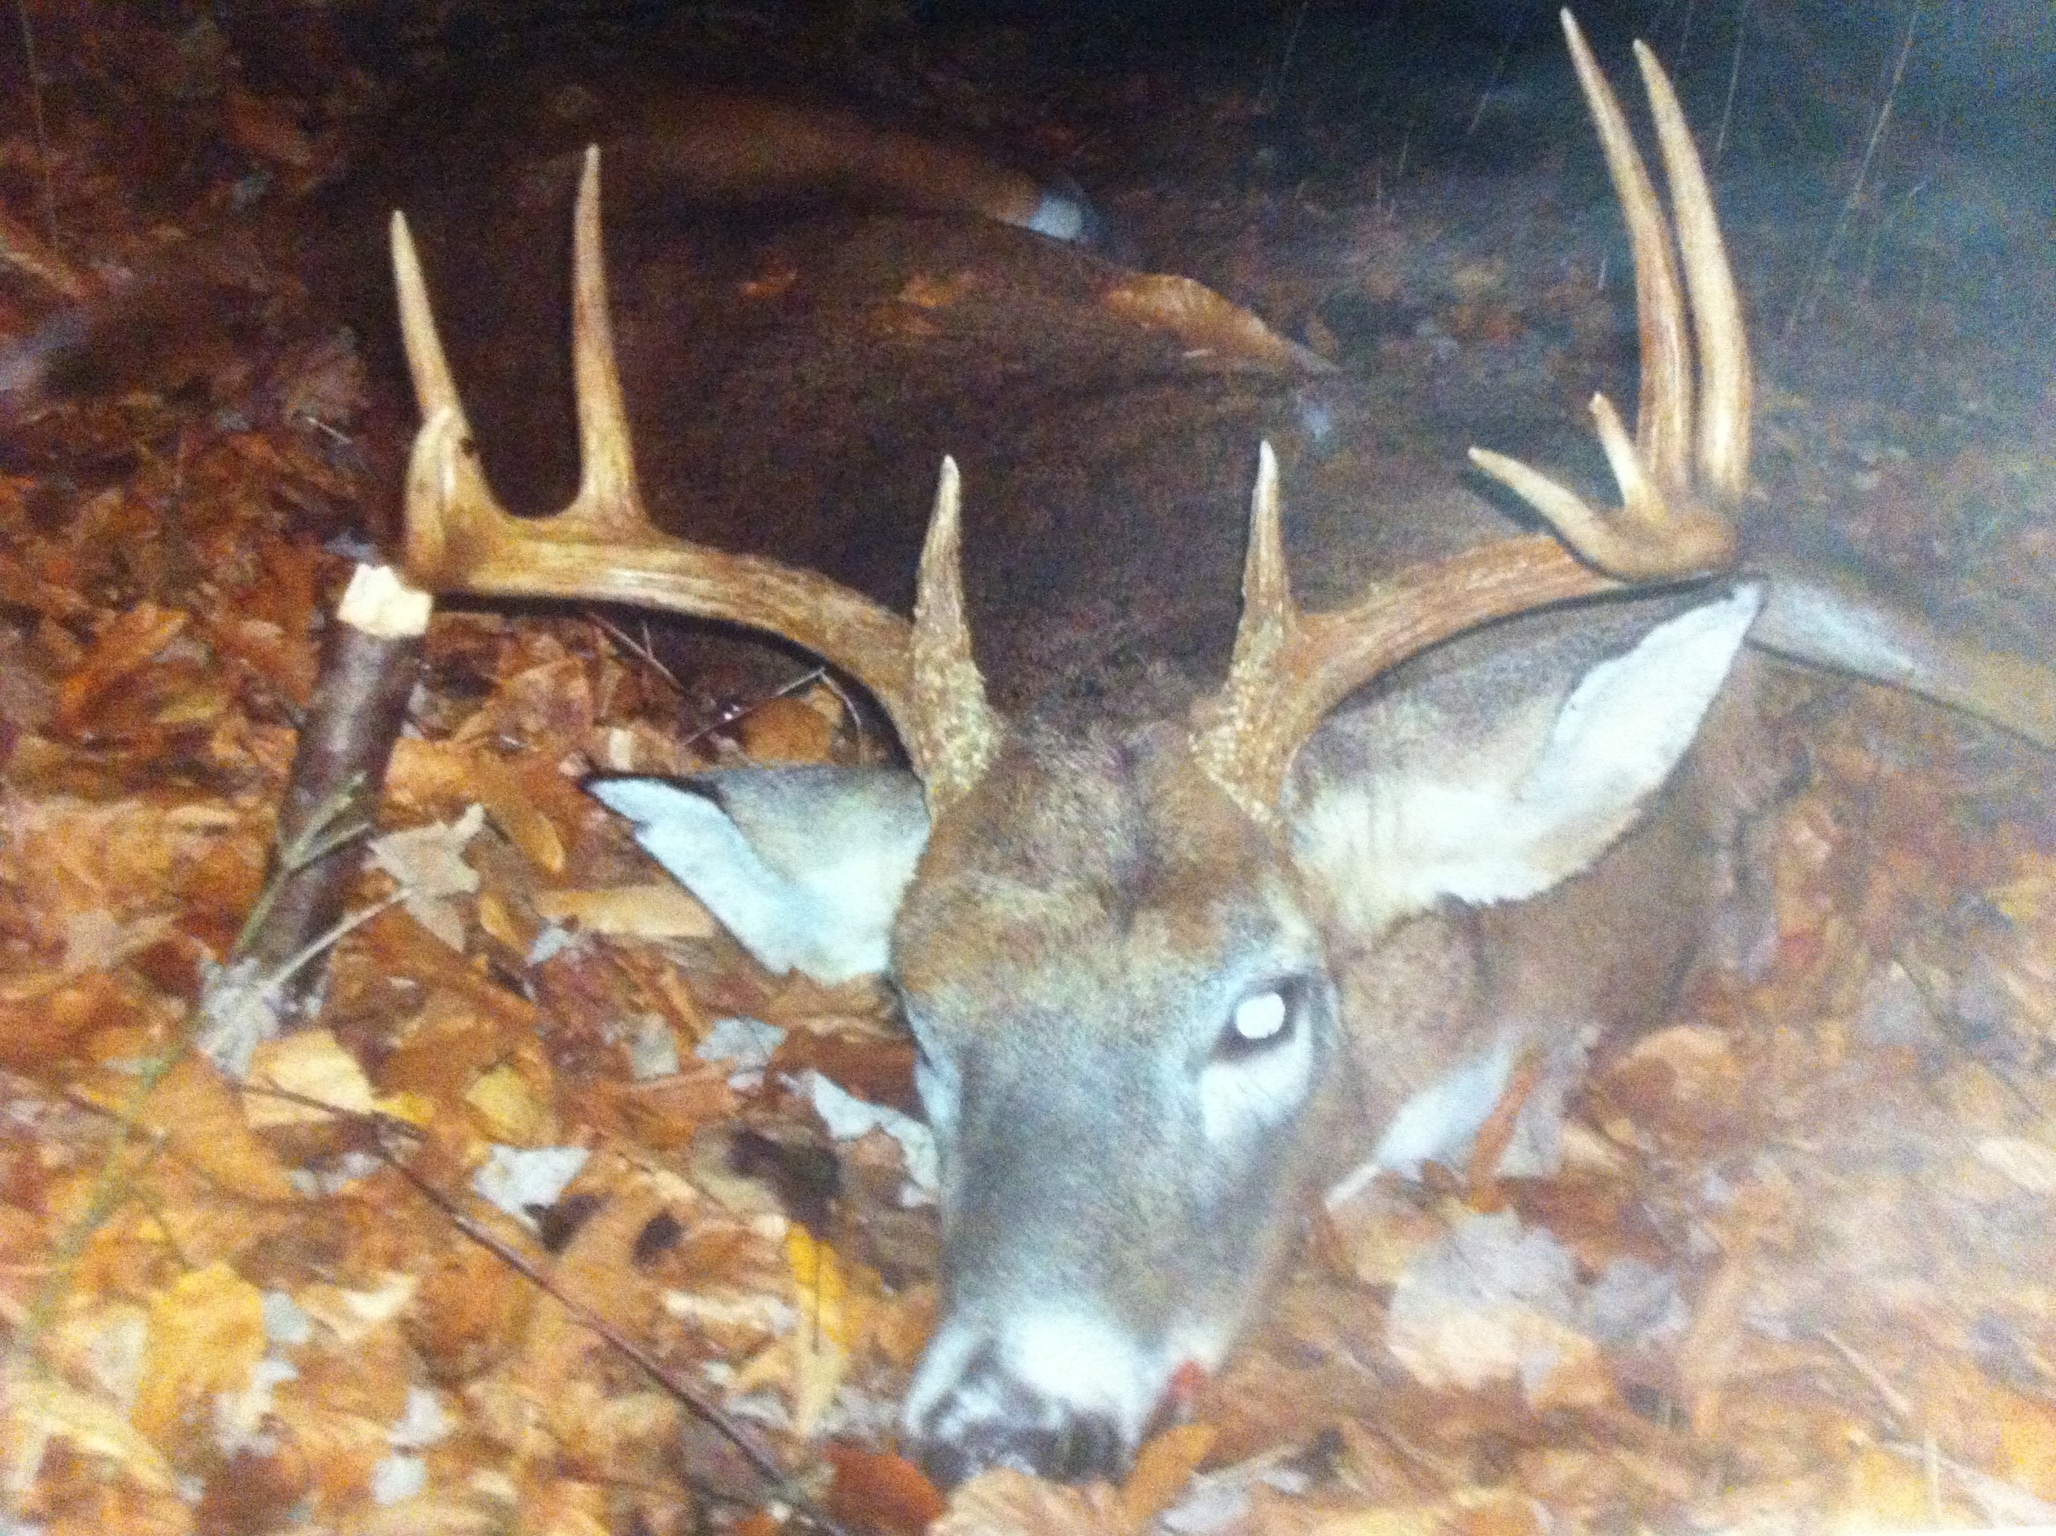
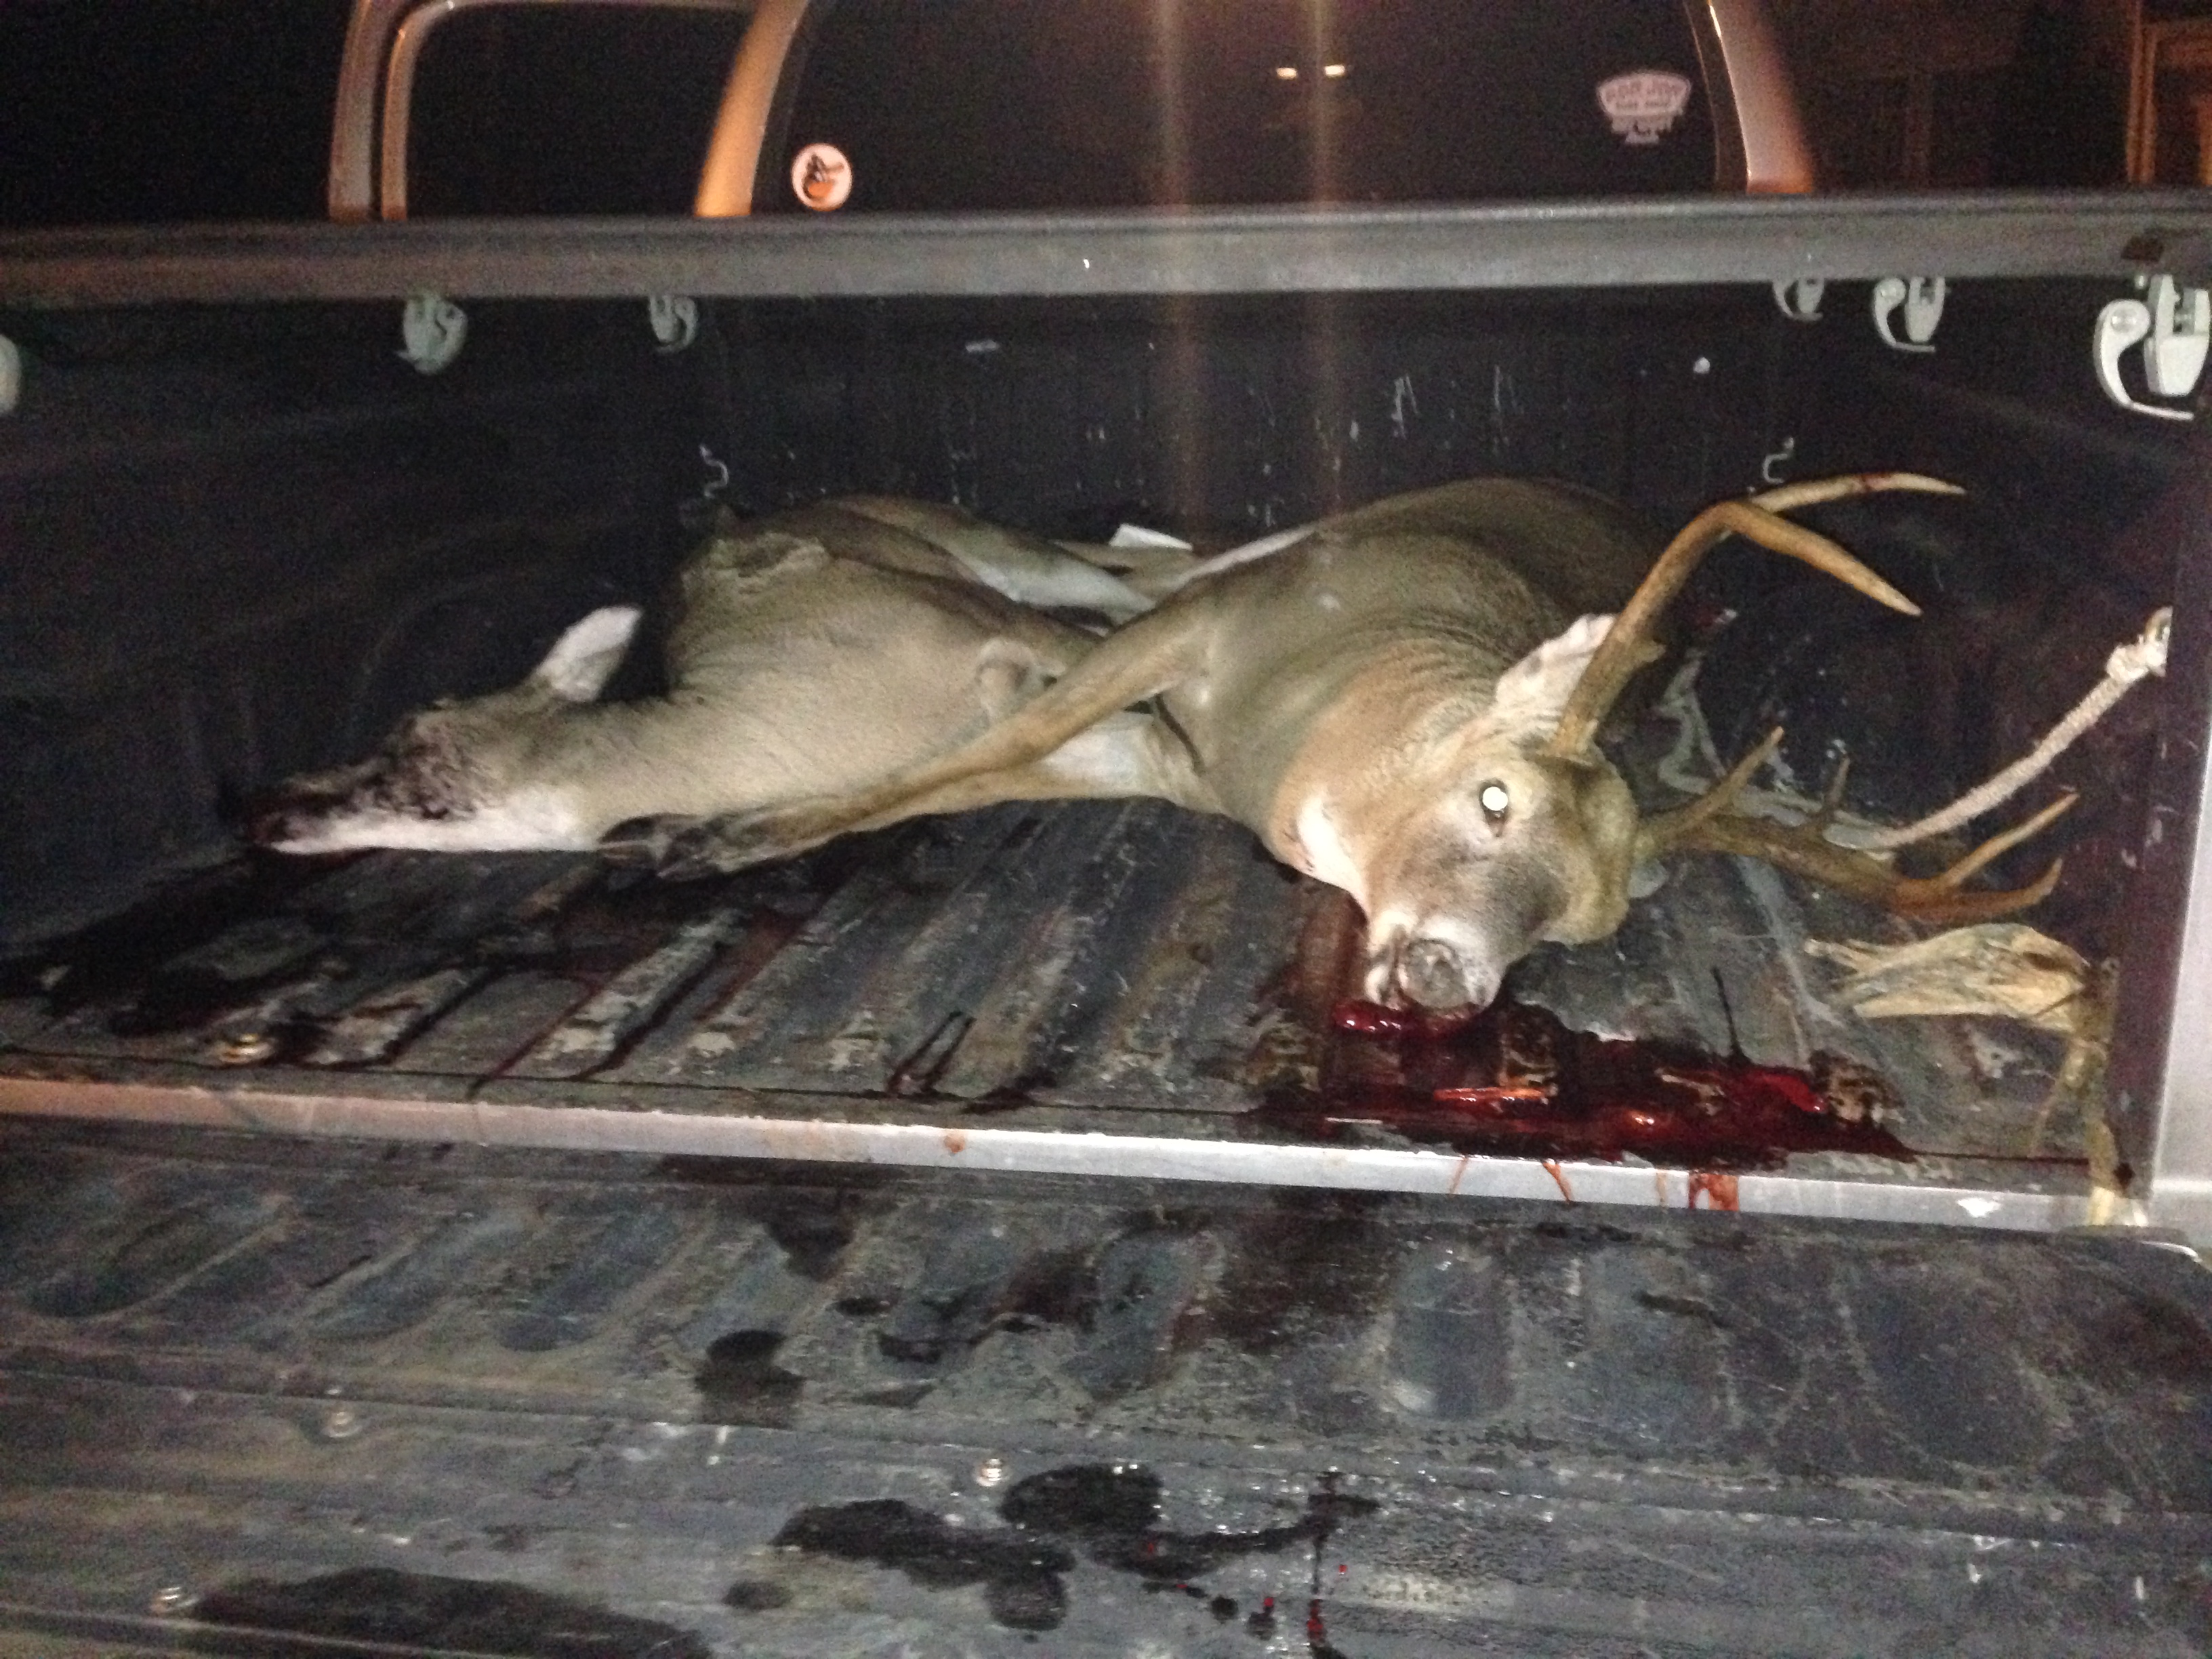
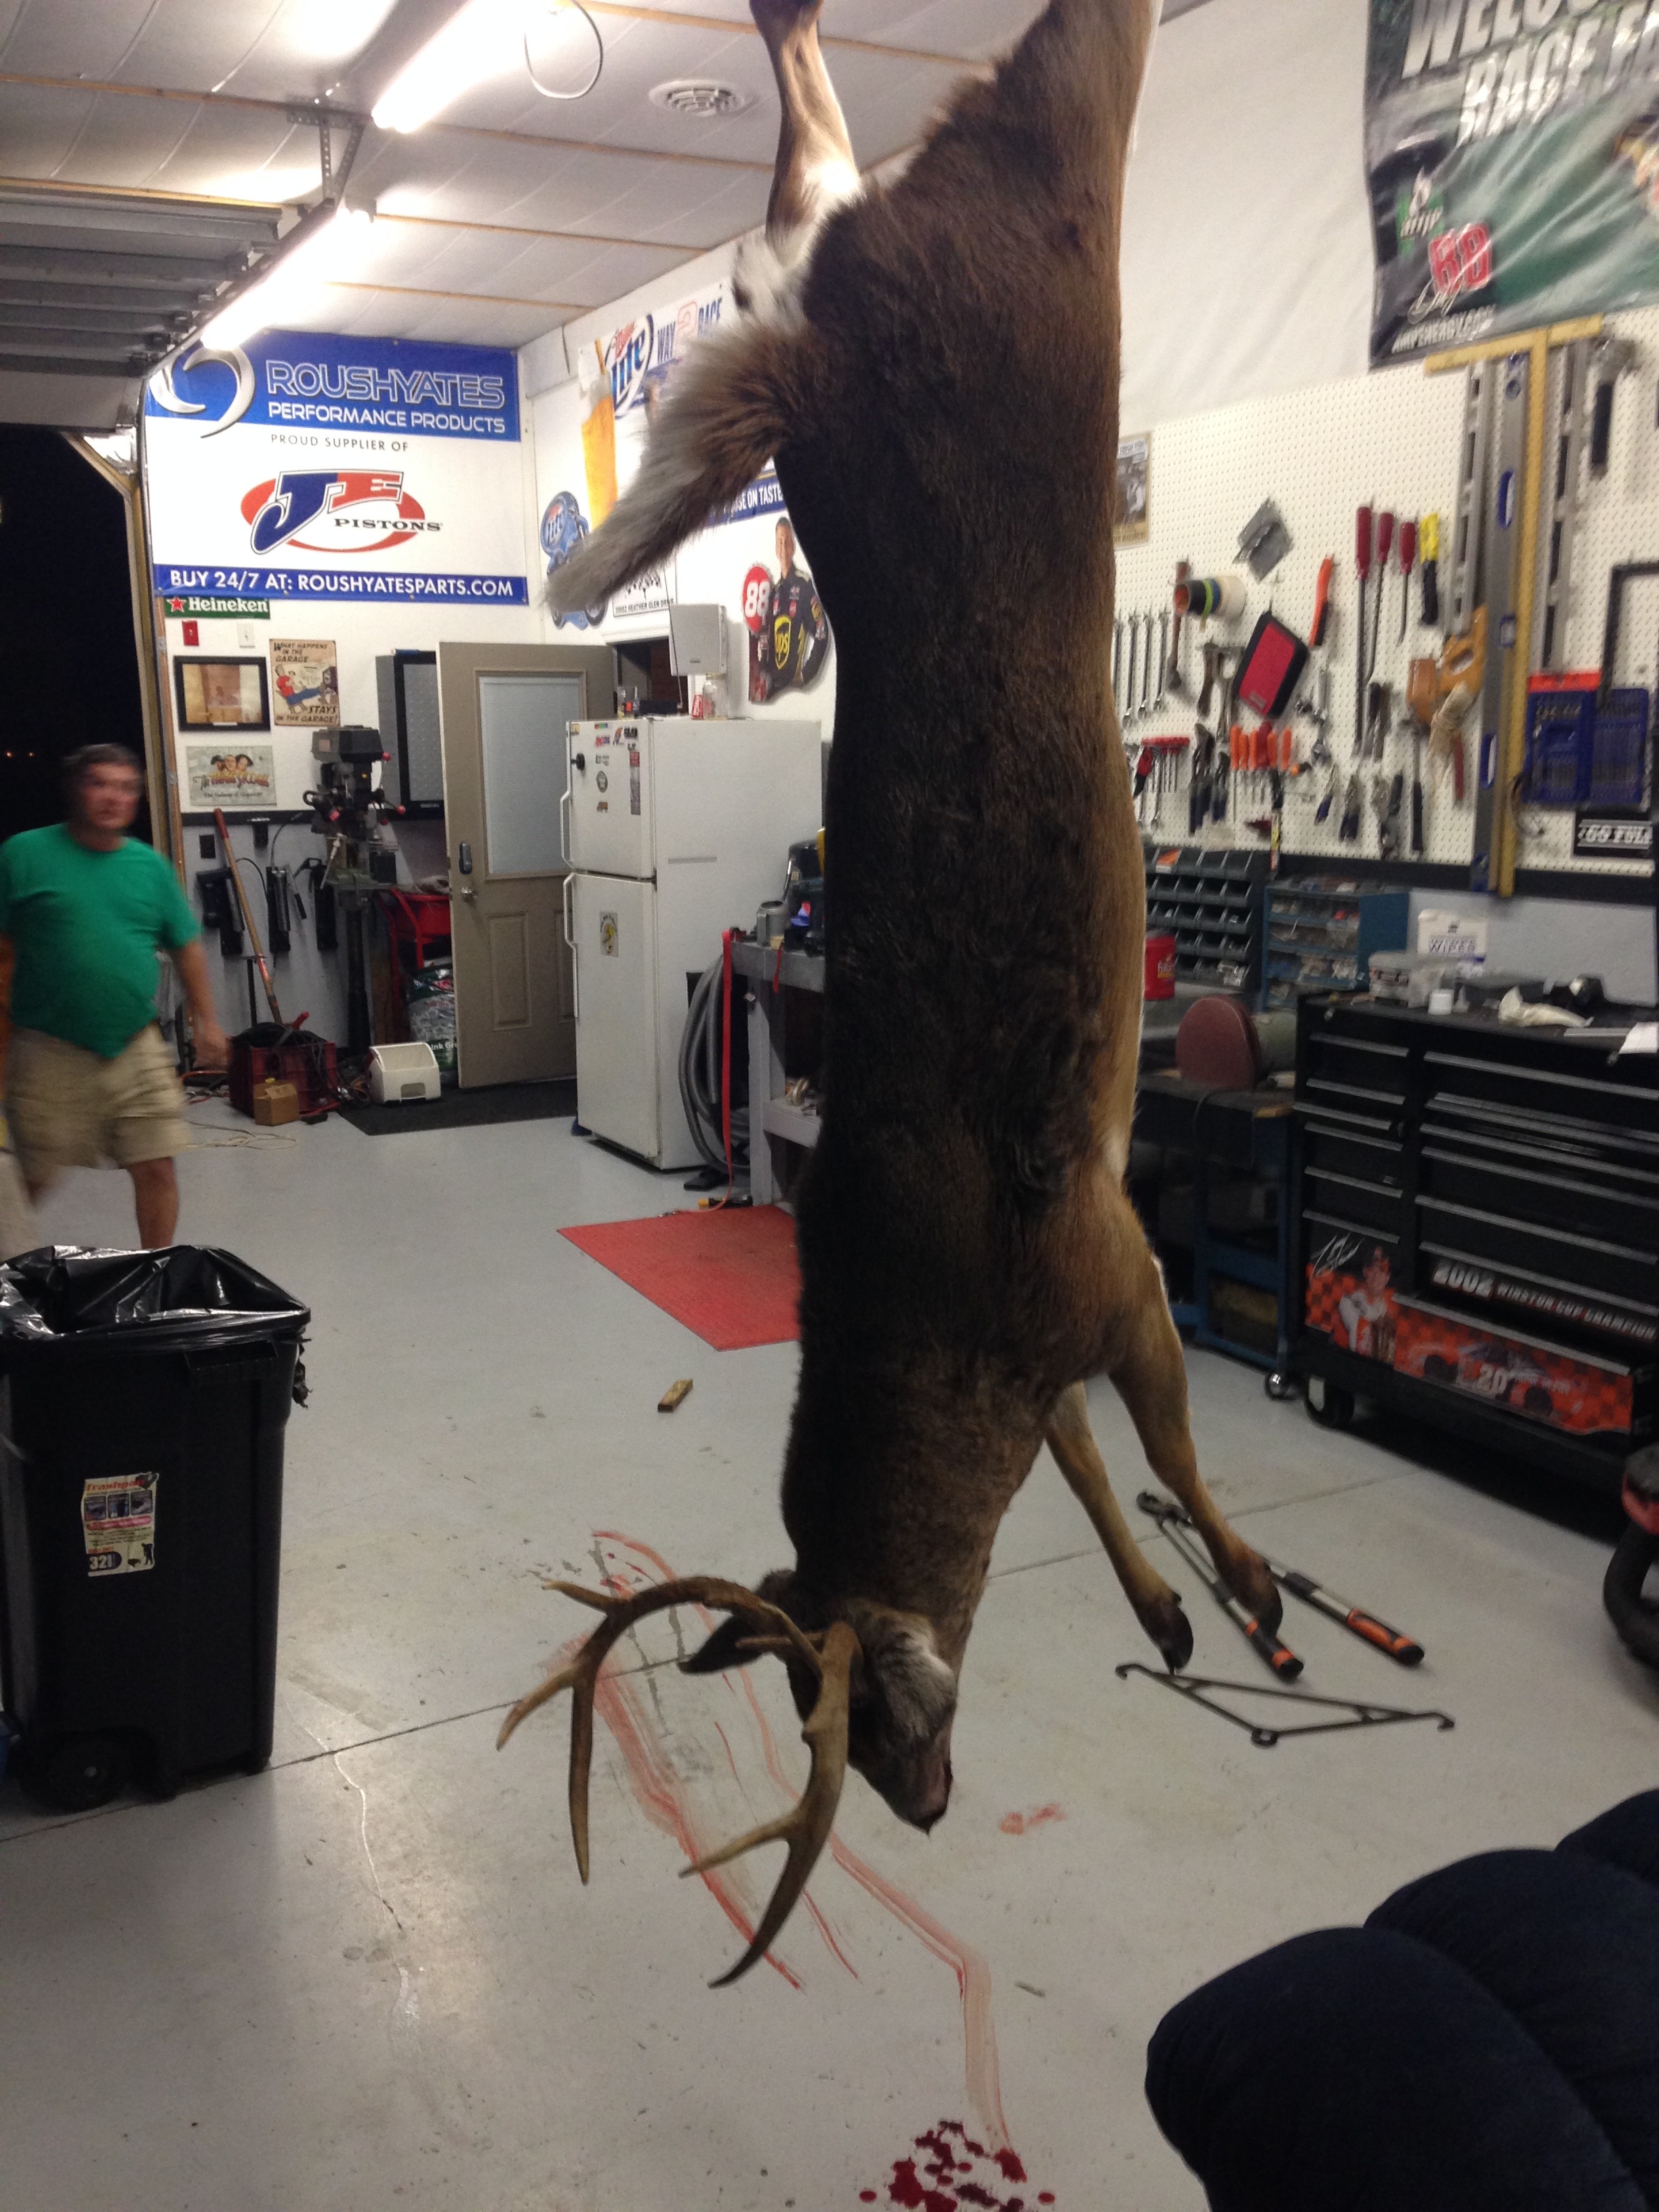
Today was a mildly productive day. First I got a good amount of the demo done at my brother's building. Then I got the gauge pod done. Then I went hunting and shot this 10 point buck:
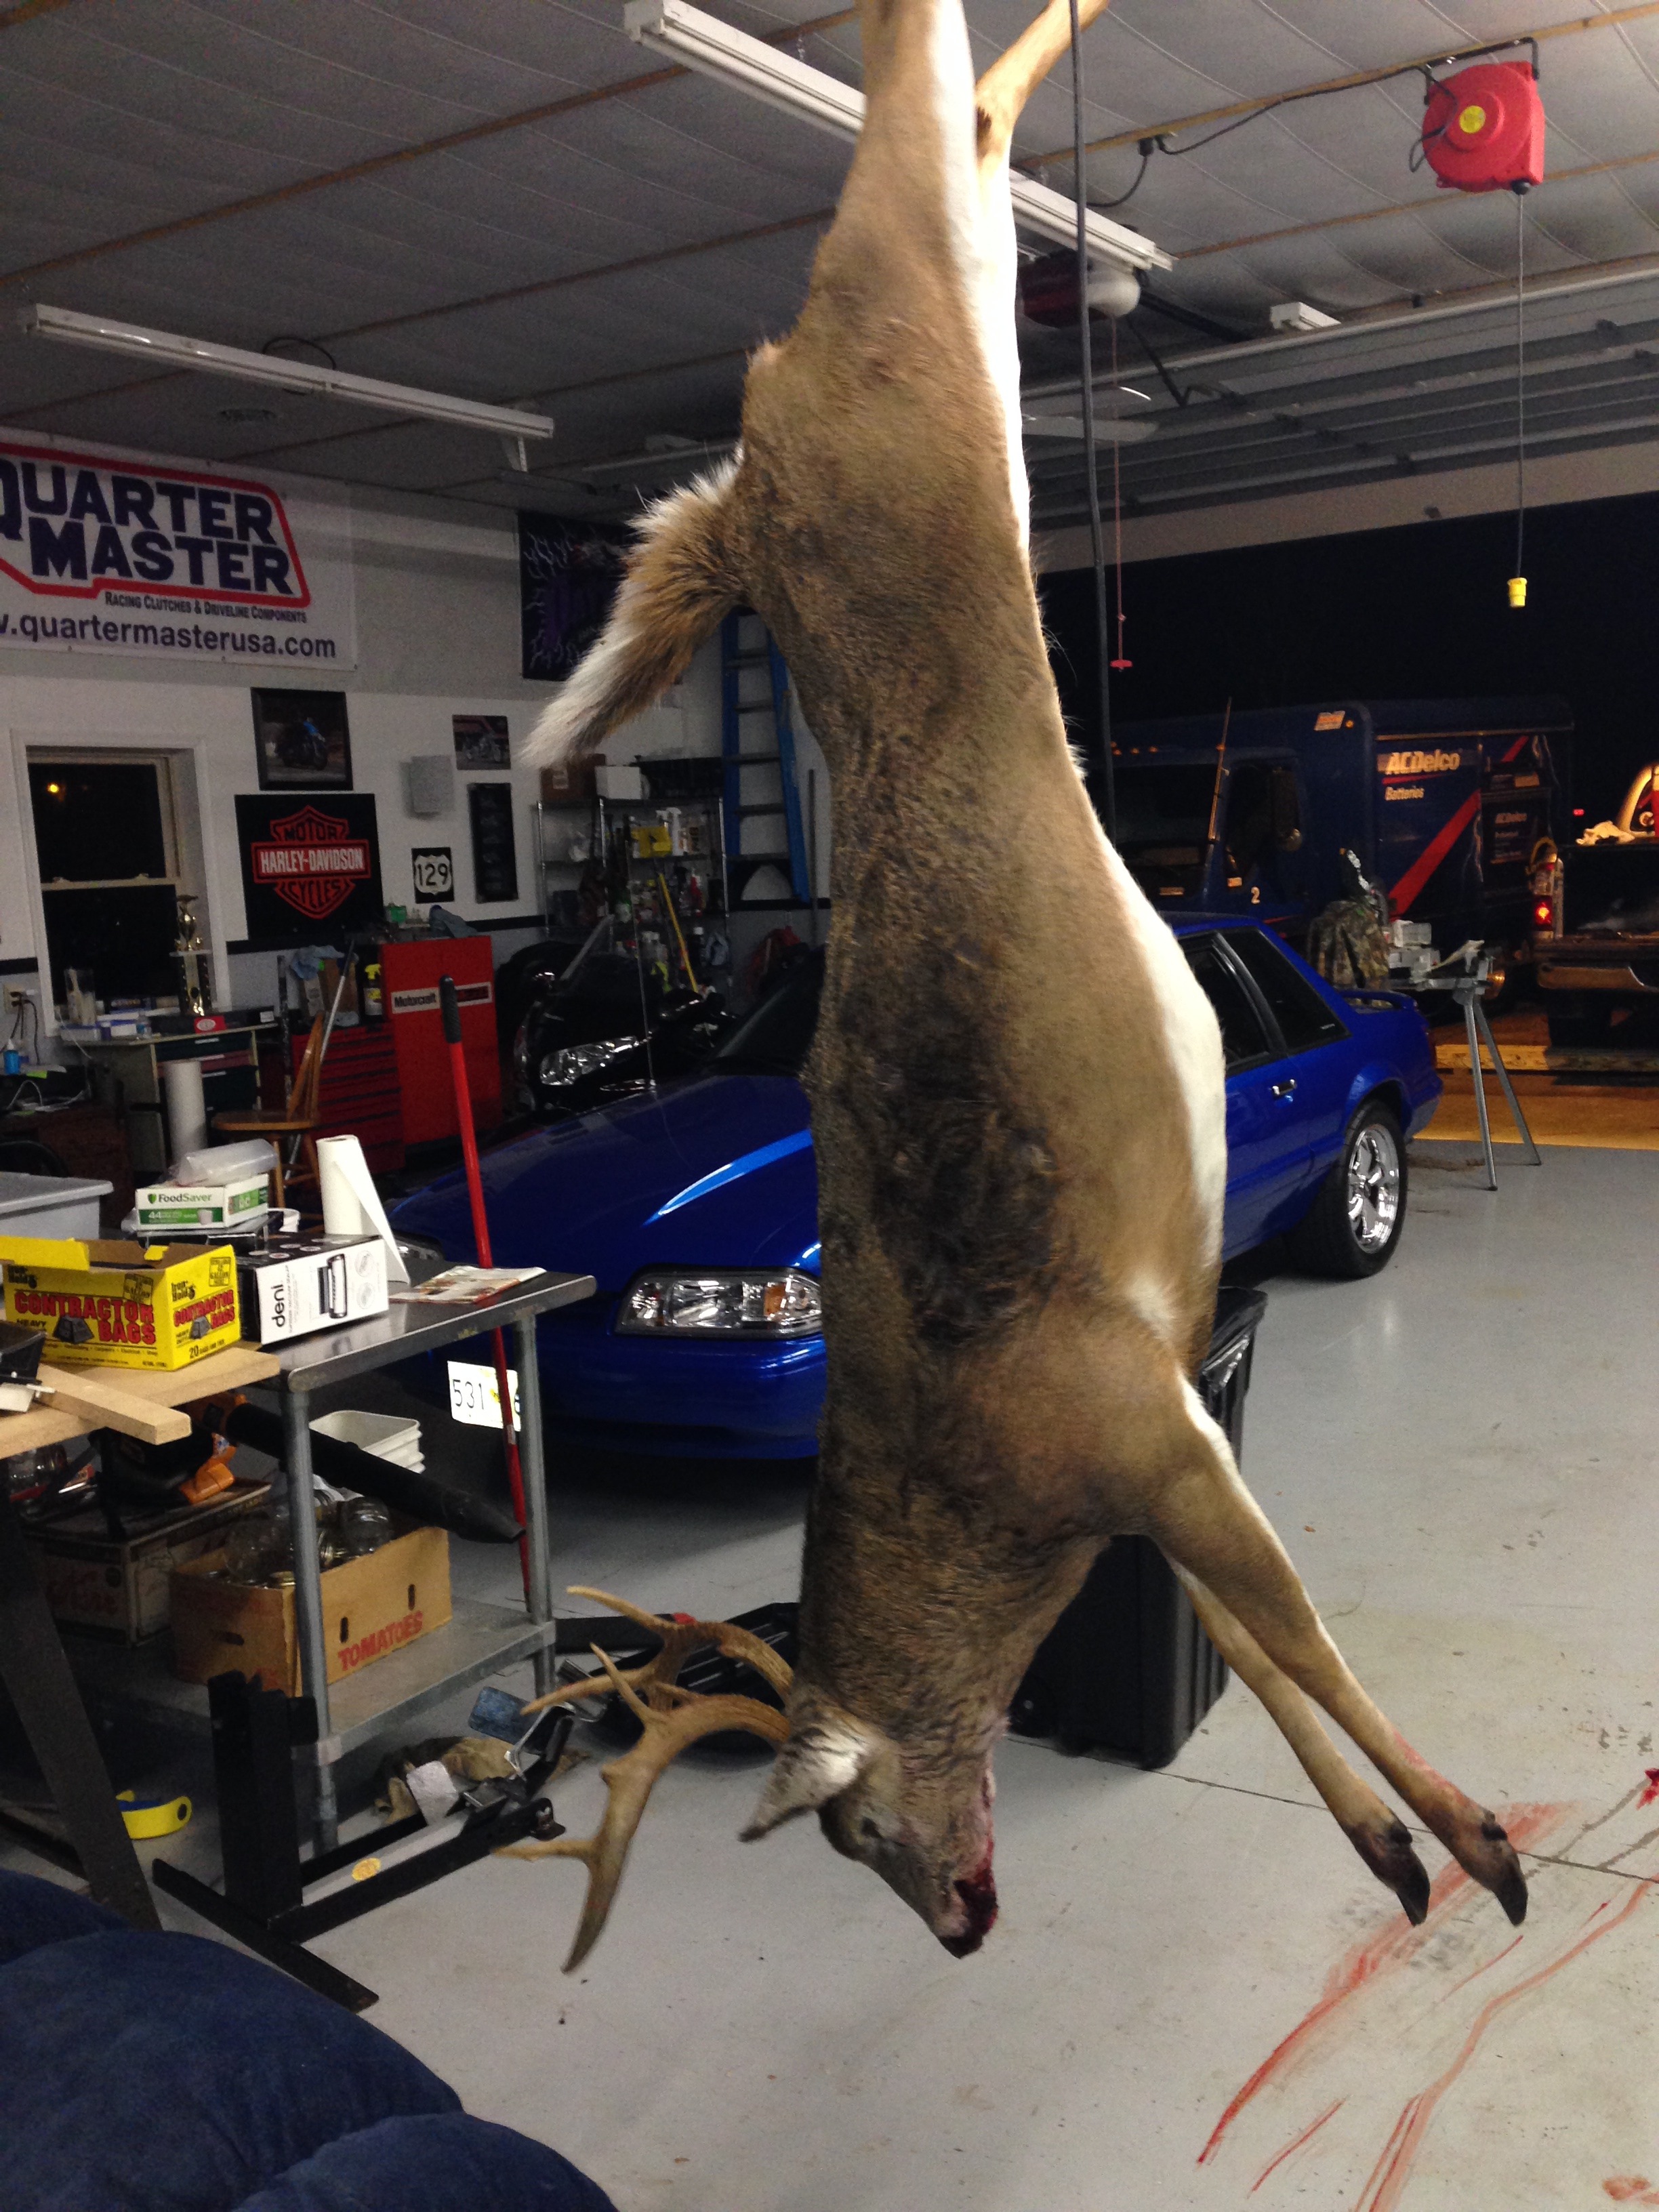
and I also shot this fat doe (engine hoists aren't just good for engines!):
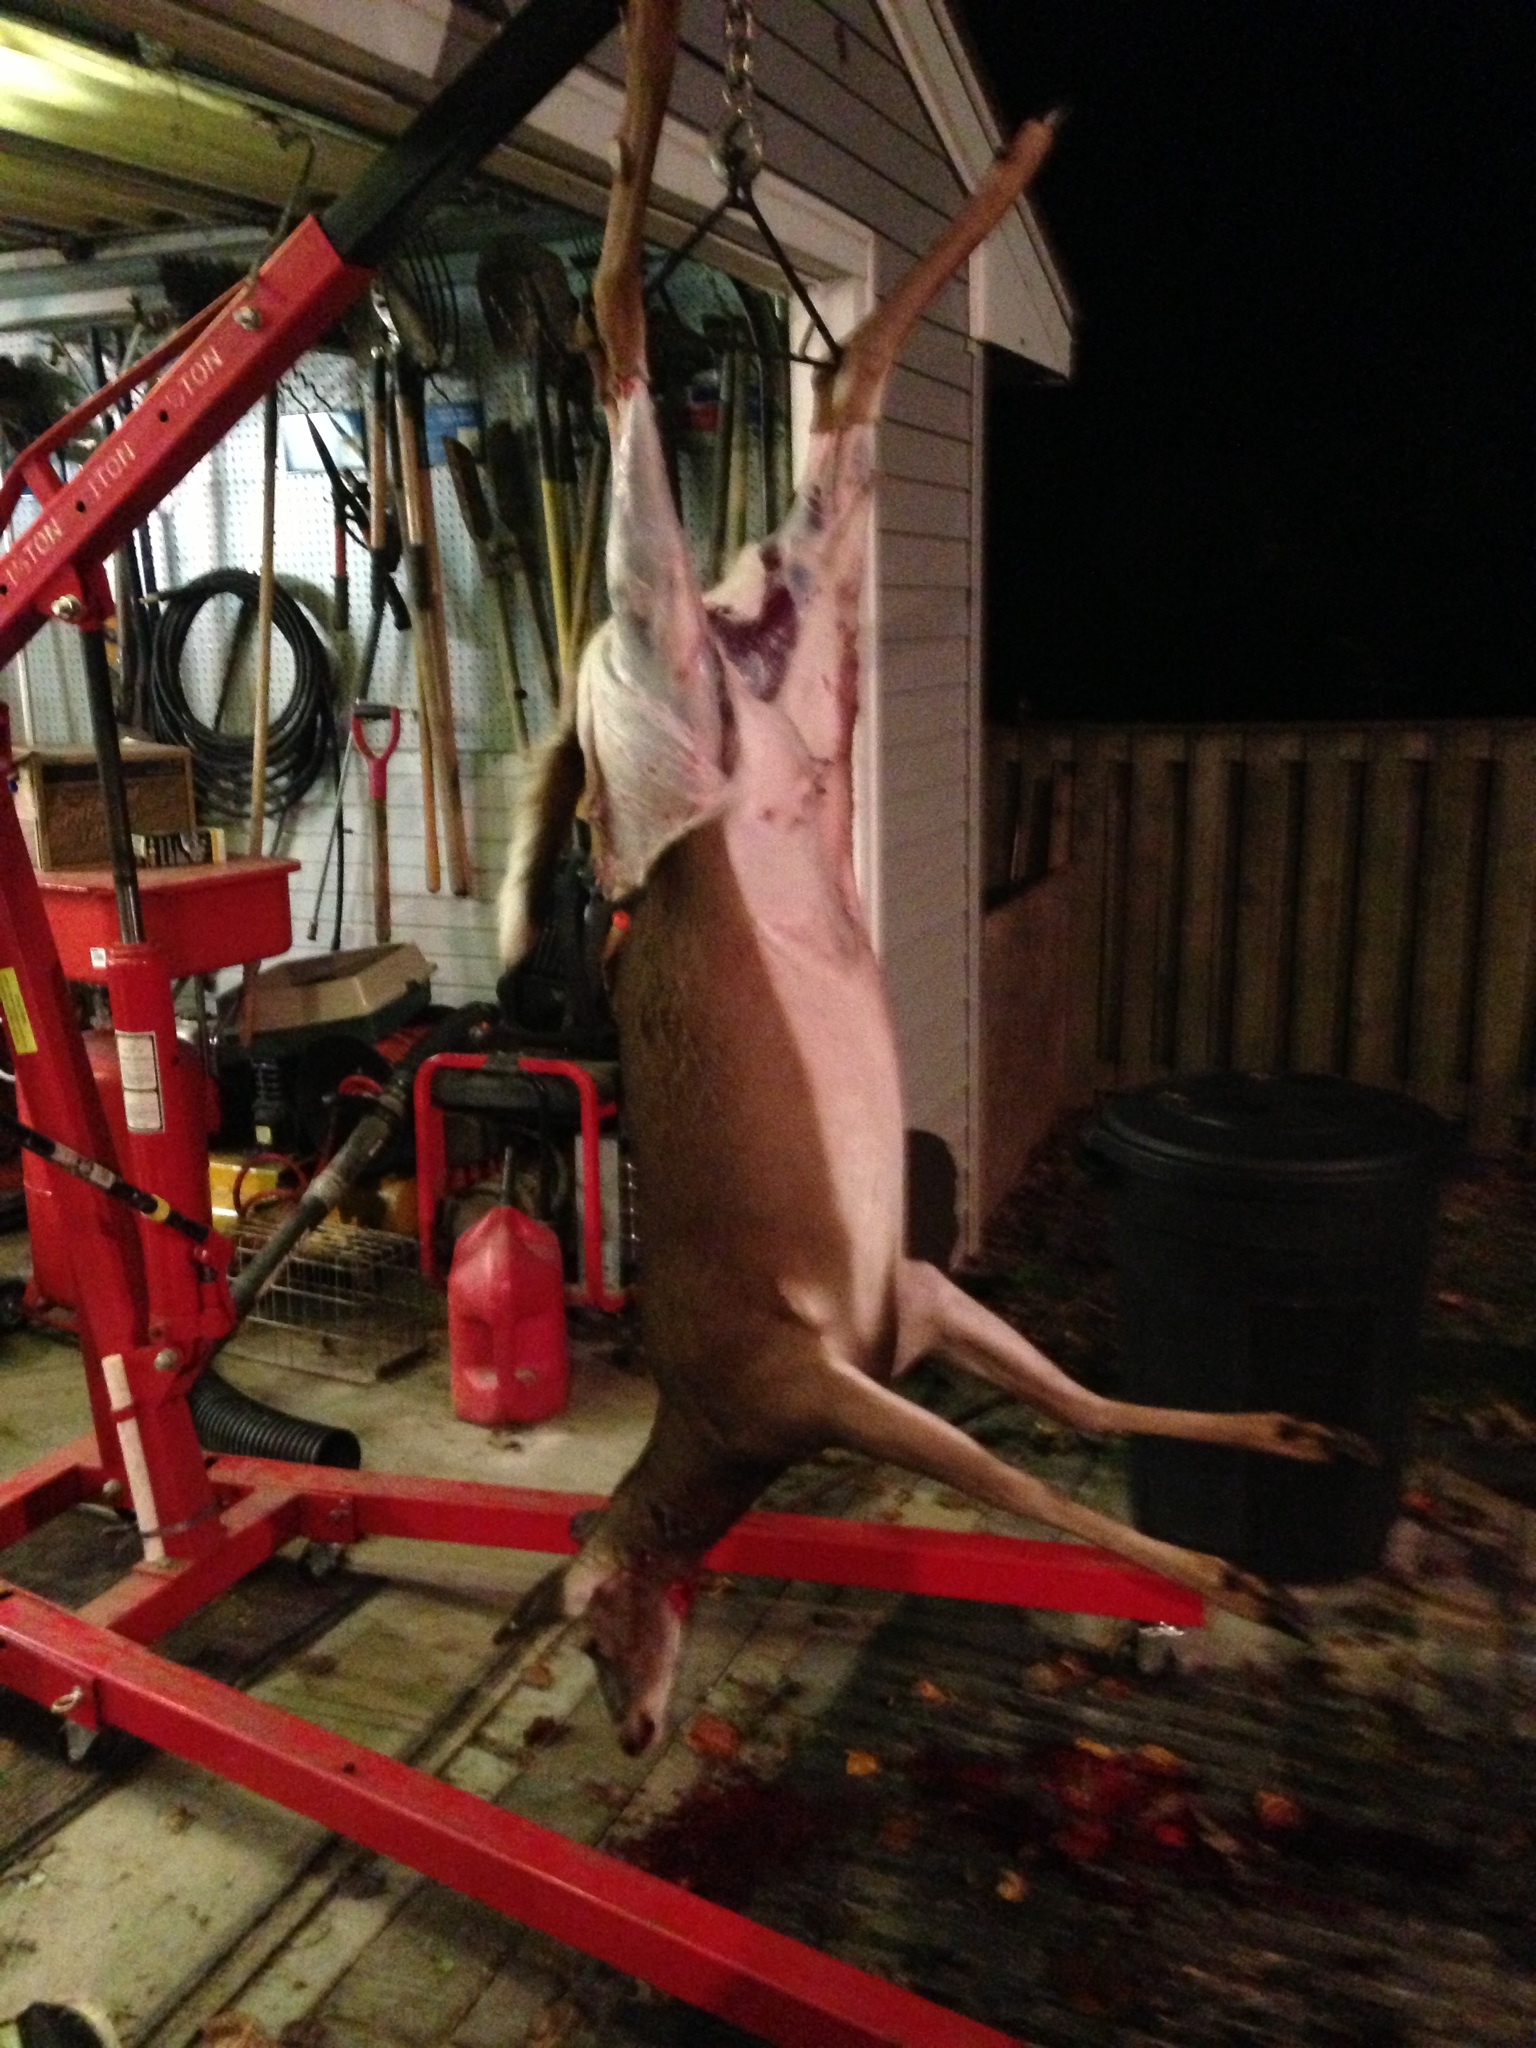
I hacked the buck and took it to the taxidermist to get mounted and I'll donate the meat to the local food bank tomorrow. The doe will make for a whole bunch of jerky that I've been craving lately.
So what to I do after shooting two deer??? Work on my truck of course! I got the console cut up and tacked together. Turned out pretty good so far:
And test fit it in the cab. I still need to trim and tack on the top rear piece, but I want to look into my hinge options first.


Just got to fab up the cup holders, lay the final welds and figure out what I want to do for a lid - not sure if I want to go upholstered or steal. I'm going to bolt-on the console so I checked to see if it will fit in the oven so I can powdercoat it; it did so I'm thinking that I may just powdercoat it along with the gauge pod.
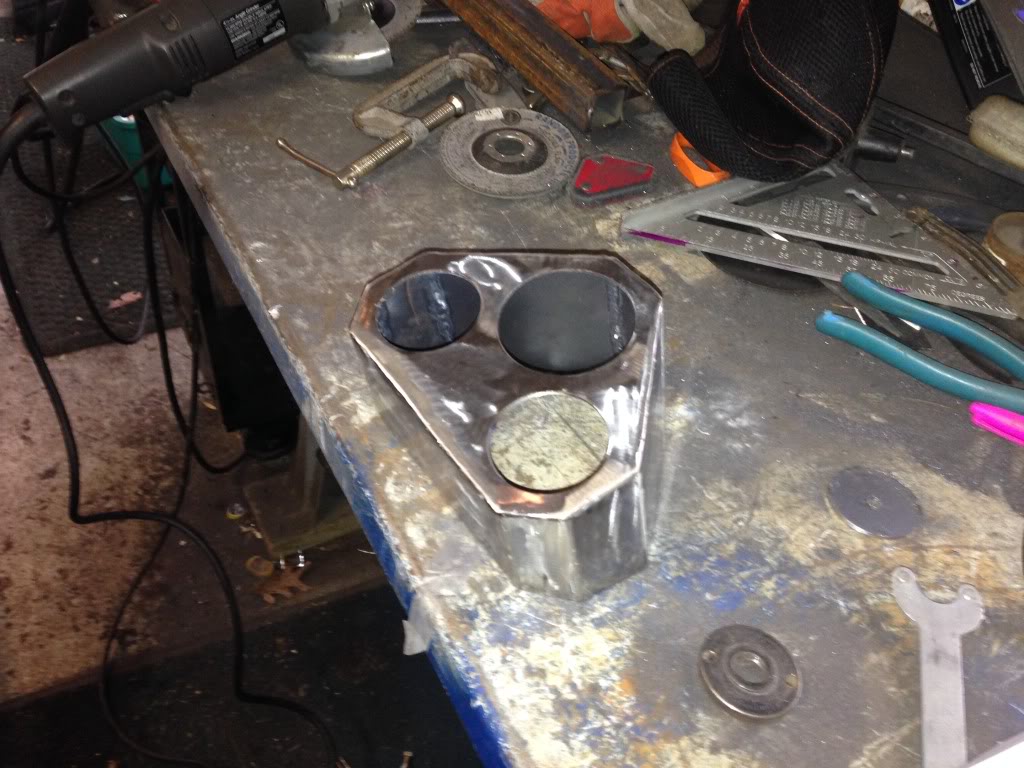
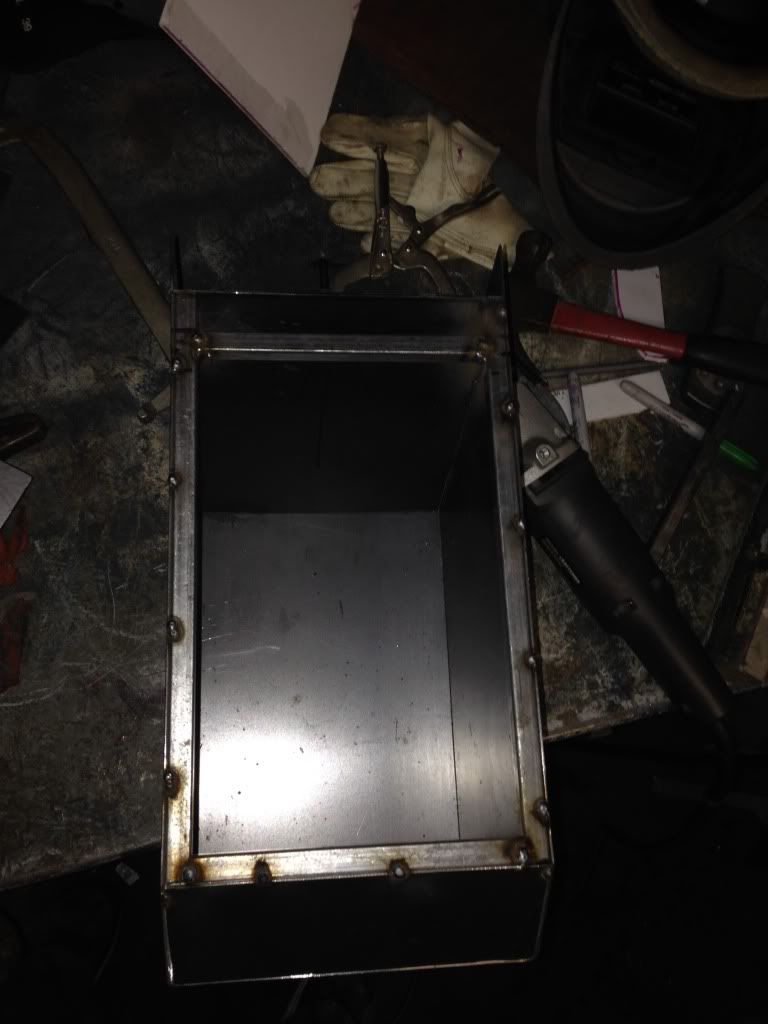
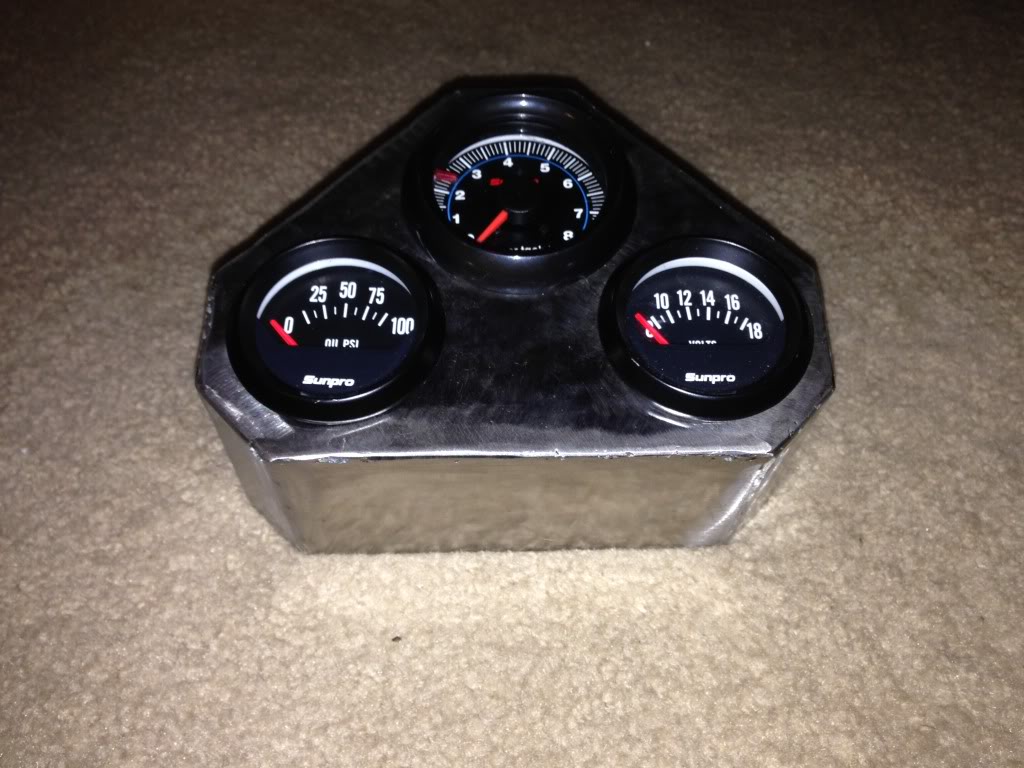
Also broke out the dremel and reemed out the holes in the gauge pod for the volt meter and oil pressure gauge (still need to clean up the welds):
How's that for a productive day?!

and I also shot this fat doe (engine hoists aren't just good for engines!):

I hacked the buck and took it to the taxidermist to get mounted and I'll donate the meat to the local food bank tomorrow. The doe will make for a whole bunch of jerky that I've been craving lately.
So what to I do after shooting two deer??? Work on my truck of course! I got the console cut up and tacked together. Turned out pretty good so far:


And test fit it in the cab. I still need to trim and tack on the top rear piece, but I want to look into my hinge options first.


Just got to fab up the cup holders, lay the final welds and figure out what I want to do for a lid - not sure if I want to go upholstered or steal. I'm going to bolt-on the console so I checked to see if it will fit in the oven so I can powdercoat it; it did so I'm thinking that I may just powdercoat it along with the gauge pod.
Also broke out the dremel and reemed out the holes in the gauge pod for the volt meter and oil pressure gauge (still need to clean up the welds):


How's that for a productive day?!
Last edited by kawazx636; Nov 16, 2013 at 08:57 PM.
Nov 17, 2013 | 07:14 PM
#398
Thread Starter
Super Moderator
iTrader: (3)
Joined: Jan 2012
Posts: 3,218
Likes: 26
From: Salisbury, MD
No work on the truck, but I did shoot a couple more deer! Got another 10 point buck (full 8 point with two numbs) and his girlfriend. Here's the kicker... One shot two kills with a 12ga slug gun! I shot the buck clean through the neck and followed through to hit the doe in the lung - completely unintentional, but I'll take it. It is certainly a hunter's dream until I had to clean them both!
Deer should fear me!


Deer should fear me!
 Nov 18, 2013 | 12:44 PM
#400
Thread Starter
Super Moderator
iTrader: (3)
Joined: Jan 2012
Posts: 3,218
Likes: 26
From: Salisbury, MD
Shooting them is the easy part... I can teach you how to cut up a deer tonight. Got 4 of them to do and always looking for help in that area! LOL
One more good sized doe and the freezer should be well stocked for the year with enough lean meat to add into my sausage to lean it up when we slaughter hogs in February. Fortunately for me I am able to shoot doe from August 15th through April 15th on my friend's family farm under their deer crop damage permit. But I can only shoot bucks in season.


