
Another 88 rebuild/questions thread (in Hawaii)
 Apr 4, 2010 | 04:21 PM
#241
YotaTech Milestone-Two Millionth Post
Joined: Jan 2009
Posts: 12,009
Likes: 122
From: Northeast Pennsylvania
the only thing i can think of is some grease and a long / thick screwdriver to put in the holes and work them into place...other than that i'm gonna play it as i go along.
Apr 4, 2010 | 06:17 PM
#244

Registered User
Joined: Jan 2009
Posts: 175
Likes: 0
post some pict's, and we'll try and walk you through it as best we can. Snap a front, back, side to side, so folks on here can chime in on where the prob. is. Generally you want to keep every thing loose and in place before you tighten every thing up(cross mem. mnts, diff mnts, etc...).
Apr 4, 2010 | 08:48 PM
#246
Registered User
iTrader: (2)
Joined: Dec 2009
Posts: 2,159
Likes: 7
From: Pleasanton, CA - SF Bay Area
Roger, I haven't done the diff drop (I had a 4" IFS lift installed so I have the room for my oil pan), but if you're trying to cram something into a tight space, and line up some bolt holes on BOTH items, here's a tip I learned:
Use 2x4s or a large rubber mallet (or both) to wedge the one piece in between the other and adjust as close as possible to get some of the holes starting to line up.
Once you have some "daylight" in between at least one pair of matched holes, get a punch and a hammer - get the narrow end of the punch into the hole and start gently tapping...the 2 holes will slowly line up (the further the punch goes into the hole, the wider the punch amount inside the holes, and the more the 2 holes will line up.
I used this when doing control arm bushings on my Datsun - was a very tight fit, especially with new poly bushings - this worked great.
Hope this helps!
Apr 5, 2010 | 01:33 AM
#247
YotaTech Milestone-Two Millionth Post
Joined: Jan 2009
Posts: 12,009
Likes: 122
From: Northeast Pennsylvania
Apr 5, 2010 | 01:33 AM
#248
Thread Starter
Registered User
Joined: Jul 2005
Posts: 195
Likes: 0
From: Currently Hilo Hawaii, Saipan 670 Is Home
I'm gonna try it out either tomorrow afternoon or wednesday. I need to figure out what is giving me the code 51 and 52. Maybe the knock sensor I got is for the wrong year? I also have to figure out my vaccum line problem, and lastly get a down pipe bolt (my truck sounds like a diesel)Dad is coming this weekend so the gas is on.
Apr 5, 2010 | 04:07 PM
#249
Registered User
Joined: Jan 2009
Posts: 175
Likes: 0
rog, support your diff. with your jack, LOOSEN the remaining two bolts that hold up your diff.(one will be located near your pinnion, the other is located on the drivers side, just under your motor mount.). The two bolts are either 15 or 17mm(might even be 19mm, can't rem.), and go up through the bushing (vertically, same kind of looking bush as on the diff cover). With your jack, move your diff. away enough to put the cross member on. Insert the four nuts and bolts to your cross, and just finger tighten to hold it in place. Use your jack to maneuver your diff. back into the cross member mount, insert bolt. Tighten cross member nuts and bolts to spec. torque and then tighten diff mount bolts (3 of them, 2-vert.,1-horiz.) to spec. torque.
Apr 5, 2010 | 04:23 PM
#251
YotaTech Milestone-Two Millionth Post
Joined: Jan 2009
Posts: 12,009
Likes: 122
From: Northeast Pennsylvania
Apr 6, 2010 | 09:04 AM
#253
Registered User
Joined: Jan 2009
Posts: 175
Likes: 0
92, forgive me for not reading your thread. You have, like 71-72 pages, dude, I just don't have that kind of time! I did manage to read pg. 1 and the last pg., looks like you did alright. Are you still in the process of putting it together? How far along are u and what(if any) problems ru encountering??
Apr 6, 2010 | 09:18 AM
#254
Registered User
Joined: Jan 2009
Posts: 6,086
Likes: 17
From: Just North of Pittsburgh
Come on Stepside don't be a girl sit down with beer and a box of tissues and give it a read. You'll laugh you'll cry you'll wonder WTH was he thinking and WTH are they telling him to do.
Apr 6, 2010 | 09:18 AM
#255
Registered User
Joined: Jan 2009
Posts: 175
Likes: 0
Rog., I just try to help where I can. I try not to give too much help as that can lead to potential danger. If you give some one advice and they don't follow it to a "T" (and chances are they don't!!), they will hunt you down and blame you for more damage to their rig! It's also hard to diagnose problems with out physically hearing, seeing, touching the rig. I get a lot of phone calls at my shops from potential cust. asking why their veh. is making a weird sound, then they go into making weird noises over the phone......
 Apr 6, 2010 | 10:53 AM
#259
Thread Starter
Registered User
Joined: Jul 2005
Posts: 195
Likes: 0
From: Currently Hilo Hawaii, Saipan 670 Is Home
here are the pre pictures of the vacuum lines I'm having a hard time getting connected

- I'm looking for the lines that go to the Red and Blue VSVs
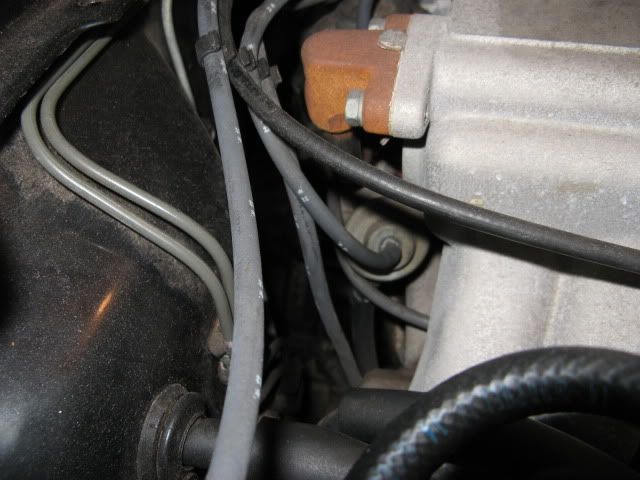
- There are a couple on this side that I'm confused with. I plugged one vacuum line which was bigger than the rest (thicker tube, larger diameter) into what I thought was right but it has a lot of extra line to it. Make me think that it's the wrong place to plug it. I'll get more detailed photos after class today.
- I'm looking for the lines that go to the Red and Blue VSVs
- There are a couple on this side that I'm confused with. I plugged one vacuum line which was bigger than the rest (thicker tube, larger diameter) into what I thought was right but it has a lot of extra line to it. Make me think that it's the wrong place to plug it. I'll get more detailed photos after class today.


