
Another 88 rebuild/questions thread (in Hawaii)
 Feb 27, 2010 | 09:21 PM
#1
Thread Starter
Registered User
Joined: Jul 2005
Posts: 195
Likes: 0
From: Currently Hilo Hawaii, Saipan 670 Is Home
Another 88 rebuild/questions thread (in Hawaii)
Disclaimer: Noob writing a ton of stuff. Read at own discretion
Hello everyone, My name is Roger. I am a proud owner of a 88 4wd SR5 Hilux that is in pristine condition with 212XXX miles on the clock. I bought the truck here in Hilo though it originally was from Oahu. I am the second owner, the first owner was an engineer and did all the maintenance at the prescribed intervals. Right now I am still in school (university of hawaii @ Hilo) and I'm tight on time and money. I have an 92 hilux back in Saipan that I worked on in High School and think I'm a bit capable.
The list of questions:
1. The timing chain is slapping like no other. Over time I have gathered A timing cover and timing set from engnbldr and a toyota headgasket from discounttoyotaparts or cheapttoyota parts whichever one is from Texas haha.
--> Labor is super expensive out here and the cheapest quote I've recieved to do the job is 900 dollars without parts. Is chainging the timing chain and headgasket doable in a week? (spring break) Is there anything I need specific to this job And is it difficult to drop the oil pan? What would be the easiest means without buying a whole lot of tools?
I understand that I might as well rebuild the engine since I have that many miles on it but it's just not that feasible at this moment for I have no help, little money and no connections out here. Will this be ok till I can gather more money and resources?
2. My LSPV is leaking and looks like it doesn't work. What would be the best thing to do about it? Replace or manual proportioning swap?
3. My parents are very concerned about safety thus they are giving me a little money to fix up the brakes. I have standard 4cyl ifs brakes. Should I just upgrade the master cylinder with the 1" bore piece or should I supplement that with the bigger v6 brakes? Marlin has a special for v6 calipers and rotors for 200 bucks.
4. The clutch on this bad boy is slipping and is probably due soon. Is this an fairly easy job to preform in a car port or should I get someone to do this?
5. LAST question for now. My rear leafs are sagging. Is the zuk mod easier to preform than add-a-leafs? I gotta do this in my car port and don't have money for a sawzall to cut the upper bump stops but would a hack saw and a whole lot of elbow grease suffice? (what kind of man has no tools?!)
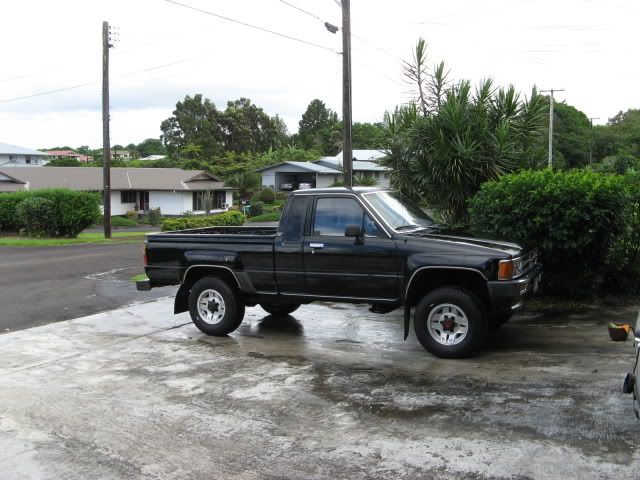
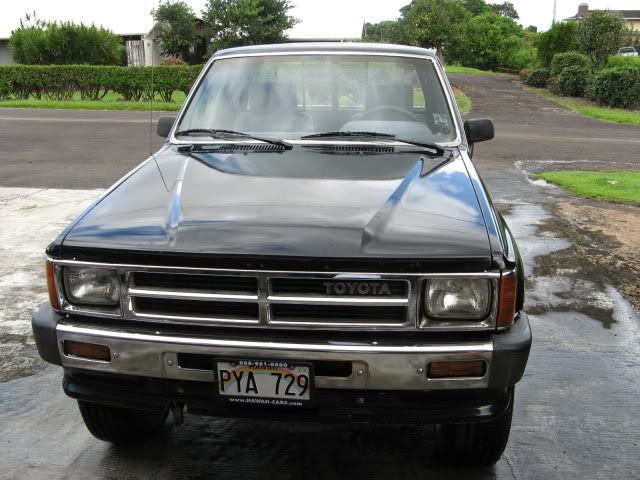
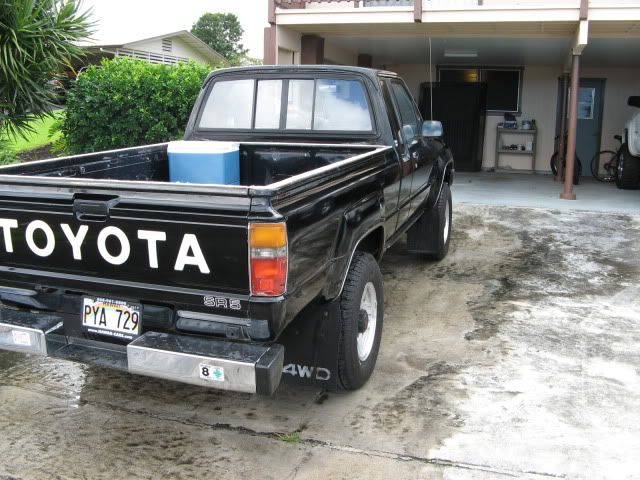
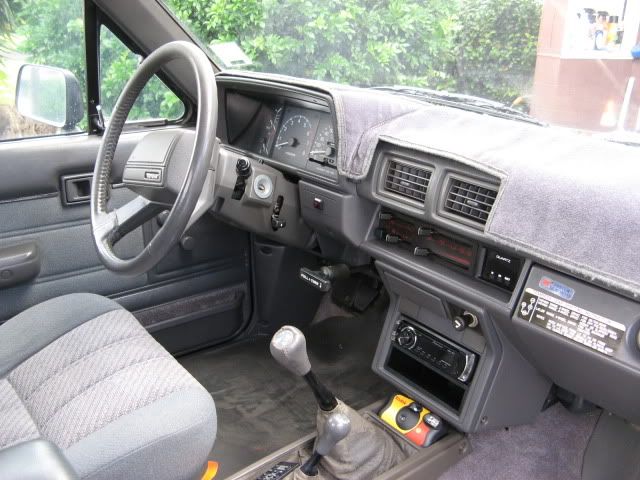
Sorry for so much reading, I really appreciate the help. Here are some pictures of my truck:
Hello everyone, My name is Roger. I am a proud owner of a 88 4wd SR5 Hilux that is in pristine condition with 212XXX miles on the clock. I bought the truck here in Hilo though it originally was from Oahu. I am the second owner, the first owner was an engineer and did all the maintenance at the prescribed intervals. Right now I am still in school (university of hawaii @ Hilo) and I'm tight on time and money. I have an 92 hilux back in Saipan that I worked on in High School and think I'm a bit capable.
The list of questions:
1. The timing chain is slapping like no other. Over time I have gathered A timing cover and timing set from engnbldr and a toyota headgasket from discounttoyotaparts or cheapttoyota parts whichever one is from Texas haha.
--> Labor is super expensive out here and the cheapest quote I've recieved to do the job is 900 dollars without parts. Is chainging the timing chain and headgasket doable in a week? (spring break) Is there anything I need specific to this job And is it difficult to drop the oil pan? What would be the easiest means without buying a whole lot of tools?
I understand that I might as well rebuild the engine since I have that many miles on it but it's just not that feasible at this moment for I have no help, little money and no connections out here. Will this be ok till I can gather more money and resources?
2. My LSPV is leaking and looks like it doesn't work. What would be the best thing to do about it? Replace or manual proportioning swap?
3. My parents are very concerned about safety thus they are giving me a little money to fix up the brakes. I have standard 4cyl ifs brakes. Should I just upgrade the master cylinder with the 1" bore piece or should I supplement that with the bigger v6 brakes? Marlin has a special for v6 calipers and rotors for 200 bucks.
4. The clutch on this bad boy is slipping and is probably due soon. Is this an fairly easy job to preform in a car port or should I get someone to do this?
5. LAST question for now. My rear leafs are sagging. Is the zuk mod easier to preform than add-a-leafs? I gotta do this in my car port and don't have money for a sawzall to cut the upper bump stops but would a hack saw and a whole lot of elbow grease suffice? (what kind of man has no tools?!)
Sorry for so much reading, I really appreciate the help. Here are some pictures of my truck:
Feb 27, 2010 | 10:59 PM
#2
Registered User
Joined: Oct 2006
Posts: 4,166
Likes: 11
From: GrangeVille, Idaho
Thats a clean truck. You should be able to do the timming chain and head gasket in a weekend, if you have the time and the tools to do it. If the timming chain is as noisey as you say it is, them you need to replace it as soon as possible before it wears through the timming cover and causes more problems. Replacing the clutch isn`t hard to do if you have a transmission jack or floor jack to lift the transmission. I can`t really help with the brakes, I always let a qualified mechanic do the work. I would get it running and stopping good before you worry about the rear springs.
Feb 28, 2010 | 04:45 AM
#3

Registered User
Joined: Oct 2005
Posts: 578
Likes: 2
From: New Brunswick, Canada
Nice looking truck! If you are not doing any changes to the truck right now, then forget about the V6 brake upgrade, money is tight, Right? The stock brakes are fine. If your rotors are not scored and your calipers are in good shape then you will only have to replace the pads and it's always easier if you replace the spring/pin kit. On the rear if the drums and brake cylinders are in good shape then a set of rear shoes are not that expensive and a new spring kit is a must. The arms for your emergency brake are probably seized (cast aluminum & steel)so be prepared to dis-assemble the parts (heat helps-propane torch!) and lubricate them to get them to move freely. Take pictures or draw diagrams of the set up (Spring orientation) before you dis-assemble anything, you'll thank yourself later. As far as the LSPV valve, try to find one that is leak free from your local junk yard or Craigs list, etc. unless you have a double flaring tool and have worked with making brake lines before, I'd stay away from a manual proportioning valve. Brake work is not rocket science, but if you have to turn down rotors (requires disassemble of the front hubs) or turn down drums then a reputable brake shop may be your cheapest route.
Last edited by Hadmatt54; Feb 28, 2010 at 04:48 AM.
Feb 28, 2010 | 10:09 AM
#4
Registered User
iTrader: (2)
Joined: Dec 2009
Posts: 2,159
Likes: 7
From: Pleasanton, CA - SF Bay Area
You can do the timing chain job in a day. Make sure you have a good torque wrench, breaker bar, and overall good set of tools. You'll likely want some way to clean the parts as they come off, since they are likely to be caked in gook....I just did this job and it was messy (brake cleaner, carb cleaner, etc + a bucket and lots of rags).
Never done a head before, but you can do timing chain/cover without removing the head.
Oil pan you can do easily if you alreayd have a 4 inhc IFS lift, but if not, I think you need to drop the front diff to get it off (not sure on this one).
+1 on the brakes - stick with what you have to keep under budget.
I am about to do the ZUK mod in a couple weeks, but i have a cut off tool already (i'm doing the weldless version). A good cut off tool is worth it ($60-80) - came in really handy when I did my exhaust.
Good luck!
Feb 28, 2010 | 01:22 PM
#5
Thread Starter
Registered User
Joined: Jul 2005
Posts: 195
Likes: 0
From: Currently Hilo Hawaii, Saipan 670 Is Home
Hey guys thanks for the responses. I'm going to have about 4-500 dollars to work with for this project. I figure I might aswell change the headgasket since it overheated this one time. I was driving on saddle road for about an hour then decided to drive up mauna kea. Didn't give the clutch fan time to catch up and saw the gauge creep. I shut off right away and let it cool down. It runs fine now but I feel it's a ticking bomb if I don't do it.
With the head off is there any special procedures I should know of? like what grit sand paper should i use to get the old HG off? is there anything I should spray on the HG? when my cousin and I rebuilt my 92 he sprayed something on the HG.
Brakes are non budget since my parents are concerned. I think my rotors are fine. would the bigger bore master be a bad idea for my 4cly brakes?
Feb 28, 2010 | 05:33 PM
#7

Registered User
Joined: Dec 2009
Posts: 55
Likes: 0
From: Haiku, Hawaii
I just did my timing chain and cover. You can do that without taking everything apart. You might wanna skip the headgasket because you're gonne have a lot more stuff to do and take apart.
Check your spark plugs -- if your oil and water mixed, it is not necessarily the HG. if they are all clean...then do the HG. IF they still have a lot of carbon build up and what not, skip the HG. You can do a compression test too if you rreally wanna be certain.
For the cover and timing chain....don't even take off the EFI. remove as little as possible.
your talkin' just unbolting radiator, belts, etc. and making some minor movements of the alt/power steering and AC compressor.
make sure you do the timing chain right TDC all the way and to get that crankshaft bolt off, if you don't have the SST tool...you can use your starter and a breaker bar against the frame...not too dicey but you gotta just tap the starter and it will break the bolt loose.
the timing guides on these are so they break easy and grind holes intothe water pump -- that causes the water to mix with the oil.
If you read alot and look at some pictures, it will be a quick one day affair. maybe over the weekend.
make sure you have a new oil seal and the gaskets for the cover and water pump. get the right kinds of gasket SEALERS and gasket forming RTV silicone products.
also, you're gonna wanna use cardboard and make a real life replica of the cover and just stick the bolts in so you know which ones go where...if you stretched out at all, you can put washers in to make up the difference so they are snug on the cover, etc.
good luck -- if i could do mine over again knowing what i know now...it would have been so much more painless and job well done. I'm dealing with timing issues right now and it's a pain in the a$$. i could be rambling and mudding right now @ JAWS if i didn't have to deal with this -- so plan it out right and take your time.
shoots-
Trending Topics
Feb 28, 2010 | 07:41 PM
#8

Registered User


Joined: Aug 2007
Posts: 356
Likes: 56
From: Fresno
I did my '89 at 153,000 miles. The chain had worn grooves more than 1/8'' deep into the driver's side of the timing case casting. Job took me about 24 hr. working slowly and carefully. I know what I'm doing; just don't work on cars much anymore.
You can find links to a factory service manual on this site. You can also search and get lots of tips and others experience. I did NOT disturb the head or drop the pan. I won't argue the point either way. Its 10,000 miles later now and it runs great, no leaks, and no issues with the engine.
Several sites with info; here's one:
http://www.4crawler.com/4x4/CheapTri...ingChain.shtml
here's another:
http://www.4x4wire.com/toyota/maintenance/timingchain/
I used both of these, plus the factory manual mainly for illustrations.
I had no problems with the big screw holding the vibration damper to the crank. Put it in 4th gear, set the brake and chocked the wheels and one good pull on a 1/2 flexhandle and it was loose. I marked the distributor and mounting surface with a couple of prick punch marks so I could reinstall it in same timing. Works good; didn't even feel the need to hook up a timing light.
Bought some parts from rockauto.com, some form enginebuilder, and some from the stealer. Used Permatex ultra gray RTV gassket maker. Worst parts were getting the valve cover off (the rubber grommets were hard as a rock just like extra nuts, one of the AC compressor brackets fasteners, and scraping gaskets/cleaning parts. Just take your time and don't get carried away with a BFH if you have trouble getting something loose or back togethre. Mark/record everything carefully and take pictures as you go. The experts here will set you straight if you have trouble. Good luck>
Last edited by JJ'89; Feb 28, 2010 at 07:43 PM.
Feb 28, 2010 | 07:47 PM
#9
Registered User
Joined: Aug 2007
Posts: 356
Likes: 56
From: Fresno
I did my '89 at 153,000 miles. The chain had worn grooves more than 1/8'' deep into the driver's side of the timing case casting. Job took me about 24 hr. working slowly and carefully. I know what I'm doing; just don't work on cars much anymore.
You can find links to a factory service manual on this site. You can also search and get lots of tips and others experience. I did NOT disturb the head or drop the pan. I won't argue the point either way. Its 10,000 miles later now and it runs great, no leaks, and no issues with the engine.
Several sites with info; here's one:
http://www.4crawler.com/4x4/CheapTri...ingChain.shtml
here's another:
http://www.4x4wire.com/toyota/maintenance/timingchain/
I used both of these, plus the factory manual mainly for illustrations.
I had no problems with the big screw holding the vibration damper to the crank. Put it in 4th gear, set the brake and chocked the wheels and one good pull on a 1/2 flexhandle and it was loose. I marked the distributor and mounting surface with a couple of prick punch marks so I could reinstall it in same timing. Works good; didn't even feel the need to hook up a timing light.
Bought some parts from rockauto.com, some form enginebuilder, and some from the stealer. Used Permatex ultra gray RTV gassket maker. Worst parts were getting the valve cover off (the rubber grommets were hard as a rock just like extra nuts, one of the AC compressor brackets, and scraping gaskets/cleaning parts. Just take your time and don't get carried away with a BFH if you have trouble getting something loose or back togethre. Mark/record everything carefully and take pictures as you go. The experts here will set you straight if you have trouble. Good luck>
Feb 28, 2010 | 08:36 PM
#10
Registered User
Joined: Aug 2007
Posts: 356
Likes: 56
From: Fresno
Hey guys thanks for the responses. I'm going to have about 4-500 dollars to work with for this project. I figure I might aswell change the headgasket since it overheated this one time. I was driving on saddle road for about an hour then decided to drive up mauna kea. Didn't give the clutch fan time to catch up and saw the gauge creep. I shut off right away and let it cool down. It runs fine now but I feel it's a ticking bomb if I don't do it.
With the head off is there any special procedures I should know of? like what grit **sand paper **should i use to get the old HG off? is there anything I should spray on the HG? when my cousin and I rebuilt my 92 he sprayed something on the HG.
Brakes are non budget since my parents are concerned. I think my rotors are fine. would the bigger bore master be a bad idea for my 4cly brakes?
Go down to the public library and get a an automotive textbook and read up on some of this stuff. Its not rocket science, but there's a right way and lots of wrong ways. Good luck.
Feb 28, 2010 | 11:47 PM
#12
Registered User
Joined: Dec 2009
Posts: 55
Likes: 0
From: Haiku, Hawaii
download the FSM too
....way better and more detailed. good to have both.
take the oil pan IF your plastic guides broke...you could run it because there is a metal mesh screen...but it's a good idea. Pain though...i've got a 3" body lift and 3" suspension lift and it's still a pain...might wanna skip it if you can
Mar 1, 2010 | 10:25 AM
#15

I like this FSM best as you don't have to scroll through all of the pages to get where you want to be. It's for a '93 but it worked fine for 99.9% of my '86 stuff.
http://personal.utulsa.edu/~nathan-buchanan/93fsm/
It took me a long time to do just the headgasket but I was being very slow and very deliberate and cleaning lots of other stuff in the engine bay as I went. I was also not under any kind of deadline pressure to get it done so it was easy to take a few days off here and there when I felt like it. I would think a week is reasonable to get done.
Mar 1, 2010 | 10:30 AM
#16
Also this thread has a bunch of useful links throughout
https://www.yotatech.com/forums/f116...e-help-178123/
https://www.yotatech.com/forums/f116...e-help-178123/
Mar 1, 2010 | 05:11 PM
#17
Thread Starter
Registered User
Joined: Jul 2005
Posts: 195
Likes: 0
From: Currently Hilo Hawaii, Saipan 670 Is Home
Ok so here's what I have:
oem toyota headgasket
engnbldr timing kit
engnbldr timing cover
toyota red anti freeze and I'll get oil as well
Tools:
basic craftsman socket set with only 1/4 and 3/8 drive
assorted small hand tools.
small jackstands
would it be wise to just order the full gasket set from engnbldr?
What else would I need to complete this job (tools and parts) Feel free to bash me if anything I just gotta lay it all out so when the time comes I have everything and won't have to walk to the parts stores.
Mar 1, 2010 | 09:49 PM
#18
Yes, you want all your gaskets in order ahead of time. You might want to call Ted and see if he would send out the extra items to make your timing kit a full front end kit like this:
http://cgi.ebay.com/ebaymotors/TOYOT...item5ad794ba36
then you would have everything you need except the HG stuff. (but you already have that) You could also ask him about new head bolts. They are required on 6 cyl engines but just a good idea and peace of mind on the 22re. (not necessarily required) They are not that expensive and make life alot easier.
A good set of basic hand tools should cover most of it but as mentioned elsewhere you really need to have a good torque wrench. A breaker bar and the tool to pull the crank pulley (should be able to rent). A compressor would be nice but not a must, more for blowing/cleaning things off with air than for tools. Oh, and the tap to chase the headbolt threads. I'll have to go look up what size that is.
Mar 1, 2010 | 09:53 PM
#19
Mar 1, 2010 | 11:56 PM
#20
Thread Starter
Registered User
Joined: Jul 2005
Posts: 195
Likes: 0
From: Currently Hilo Hawaii, Saipan 670 Is Home
Hey Blknblu thanks alot for all the help. I'm gonna give Ted a call tomorrow or Weds. I think I'll get my torque wrench from sears. Should I get a 3/8 or 1/2 drive?


