
habanero's 1996 4Runner Build-Up Thread
 Jan 23, 2022 | 09:53 AM
#4282
Thread Starter
Contributing Member


Joined: Sep 2005
Posts: 8,247
Likes: 497
From: mo
and
thanks, your thread is one of my favorites too!
Jan 23, 2022 | 10:05 PM
#4283
Registered User
Joined: Jun 2011
Posts: 21
Likes: 9
I've got a new project brewing. You'll see it soon

 Feb 18, 2022 | 09:37 AM
#4285
Thread Starter
Contributing Member
Joined: Sep 2005
Posts: 8,247
Likes: 497
From: mo
Some of the Toyota Parts Group dealerships have 10% off and free shipping this weekend.
I know for sure Serra Toyota and Bommarito Toyota,
Not McGeorge or LaGrange though.
I've had good interactions with all 4 of these
I know for sure Serra Toyota and Bommarito Toyota,
Not McGeorge or LaGrange though.
I've had good interactions with all 4 of these
Feb 26, 2022 | 04:02 PM
#4286
Thread Starter
Contributing Member
Joined: Sep 2005
Posts: 8,247
Likes: 497
From: mo
There were 2 silver 3rd gens at Speedway salvage today with the j-shift transfer case my husband has been looking for for his transfer case project. Wrecks killed both of them. He picked the nicer one and crawled under while I worked up top. He was fortunate it was on one of the few gravelly drier spots and not the mud bog surrounding us.
There was also a black 3rd gen at Riverside salvage, 2wd 3vzfe though. Lower ball joint fail at 300,000ish miles killed that one.
There was also a black 3rd gen at Riverside salvage, 2wd 3vzfe though. Lower ball joint fail at 300,000ish miles killed that one.
Feb 27, 2022 | 03:01 PM
#4287
Thread Starter
Contributing Member
Joined: Sep 2005
Posts: 8,247
Likes: 497
From: mo
Another junkyard run to the same truck we pulled the transfer case out of.
I grabbed the parking brake lever that I should've gotten yesterday
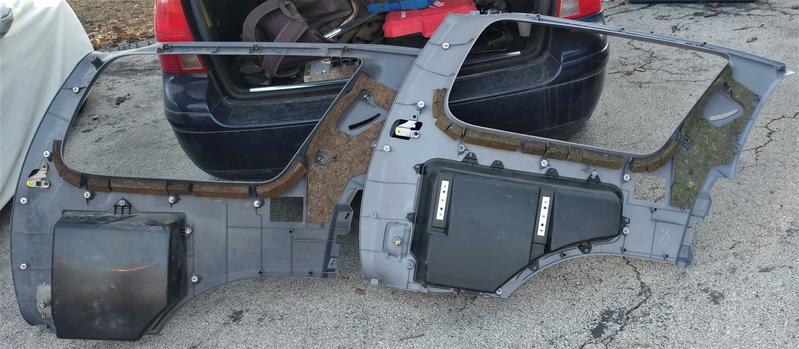
Also the entire rear heat assembly including the lines (they don't rust on the newer 3rd gens), ductwork, the tees, grommets, everything. A project!
My husband also talked me into getting the rear cargo area panels because of the bigger cubby. It's not often we see the blue-grey interiors around here. I believe that one will require some cutting to fit.
After that a long walk and some beer and pretzel bread sticks w/beer cheese on the Bike Stop cafe patio...it's been an awesome day.
I grabbed the parking brake lever that I should've gotten yesterday
Also the entire rear heat assembly including the lines (they don't rust on the newer 3rd gens), ductwork, the tees, grommets, everything. A project!
My husband also talked me into getting the rear cargo area panels because of the bigger cubby. It's not often we see the blue-grey interiors around here. I believe that one will require some cutting to fit.
After that a long walk and some beer and pretzel bread sticks w/beer cheese on the Bike Stop cafe patio...it's been an awesome day.
Feb 28, 2022 | 07:36 AM
#4288

Registered User

Joined: Feb 2010
Posts: 748
Likes: 135
From: St. Louis MO
Now that I have two donor transfer cases, I can completely bench assemble the NWF Eco-crawler doubler kit. And in the spring, have the '99 apart for a shorter amount of time.
I like that the NWF kit uses much, MUCH easier to find VF transfer case internals for the second reduction gearset, but unfortunately, you have to take BOTH transfer cases almost completely apart. The new middle case obviously comes way apart because you're just using the planetary gearset. But the rear case also has to come about as far apart as possible because the NWF kit replaces the input shaft. It would have been even nicer if they could have managed to make the rear transfer case a simple bolt-on to the adapter case in the middle. I'm sure there's a good reason they did it this way.
Still waiting on their triple-stick shifter kit. And I need to get some driveshafts in the works, measured the new adapter case at 6.5 inches long. Roughly 2 inches shorter than the Marlin Taco-box kit.
 Mar 1, 2022 | 04:40 PM
#4291
Thread Starter
Contributing Member
Joined: Sep 2005
Posts: 8,247
Likes: 497
From: mo
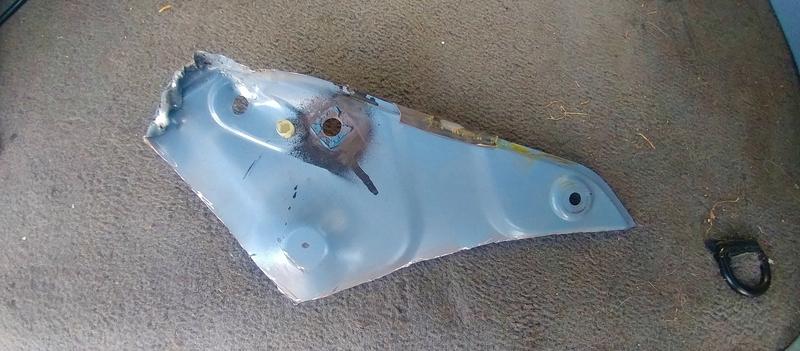
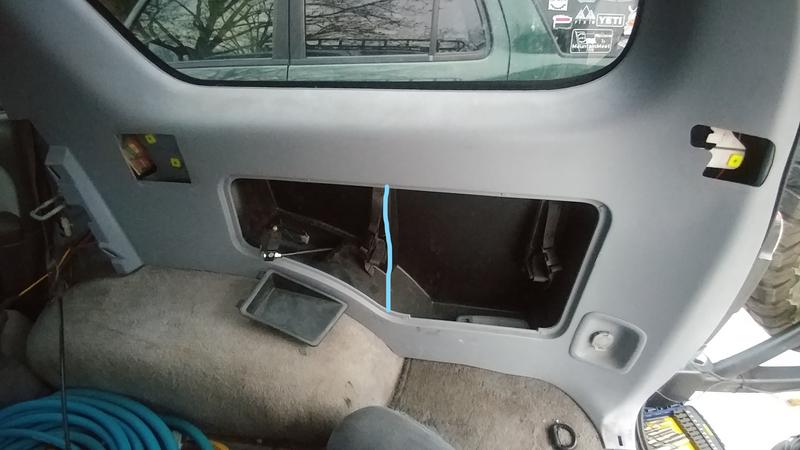
96 4Runner 32x,xxx miles
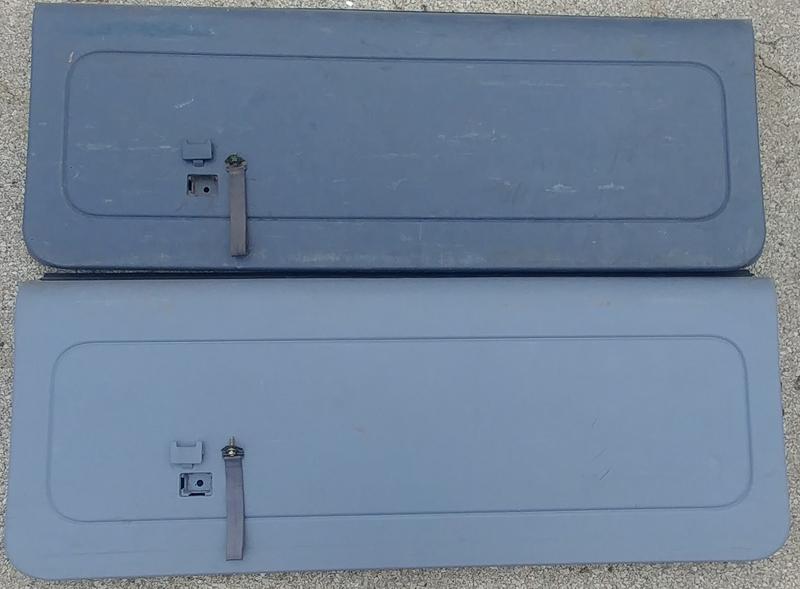
Here's the right side cargo panels, old vs new. There's gonna have to be a little cutting and I'll have to move the ARB solenoid from where I put it, but that's not a big deal.
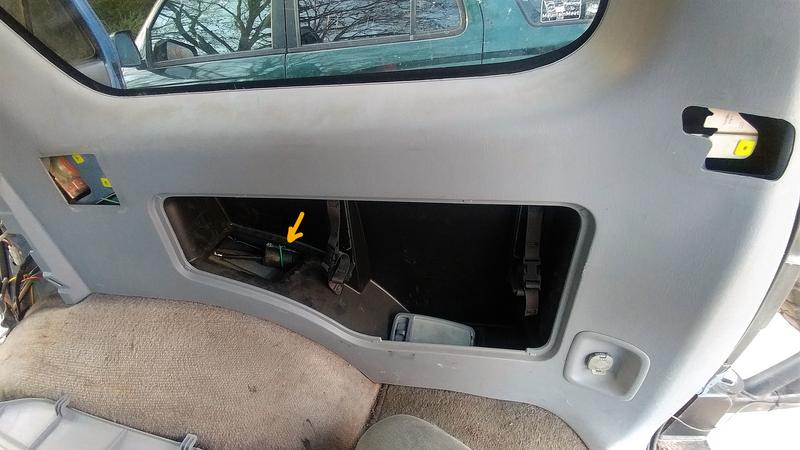
And here's the rear heat thingy...
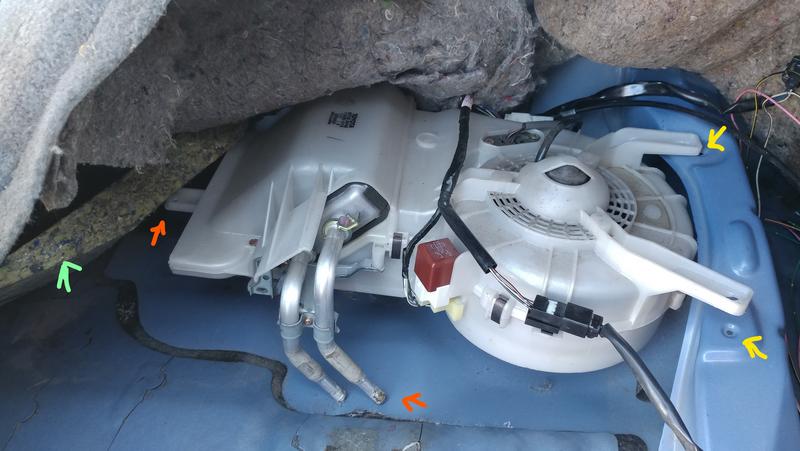
The yellow arrows show holes that are already there
The orange arrows are where modifying will need to occur
The green arrow points to a wedge thing that fills in under the carpet where a truck with rear heat would have ductwork. I think that's gonna come out.
Here's the right side cargo panels, old vs new. There's gonna have to be a little cutting and I'll have to move the ARB solenoid from where I put it, but that's not a big deal.
And here's the rear heat thingy...
The yellow arrows show holes that are already there
The orange arrows are where modifying will need to occur
The green arrow points to a wedge thing that fills in under the carpet where a truck with rear heat would have ductwork. I think that's gonna come out.
Last edited by habanero; Mar 1, 2022 at 04:42 PM.
Mar 2, 2022 | 04:52 PM
#4293
Thread Starter
Contributing Member
Joined: Sep 2005
Posts: 8,247
Likes: 497
From: mo
I didn't have rear heat and if this works out I will. Then I'll have another thing to maintain.
Mar 2, 2022 | 05:15 PM
#4294
Thread Starter
Contributing Member
Joined: Sep 2005
Posts: 8,247
Likes: 497
From: mo
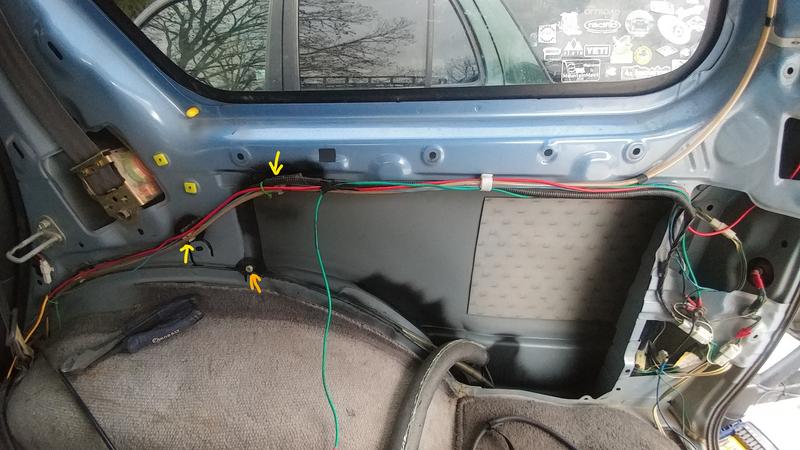
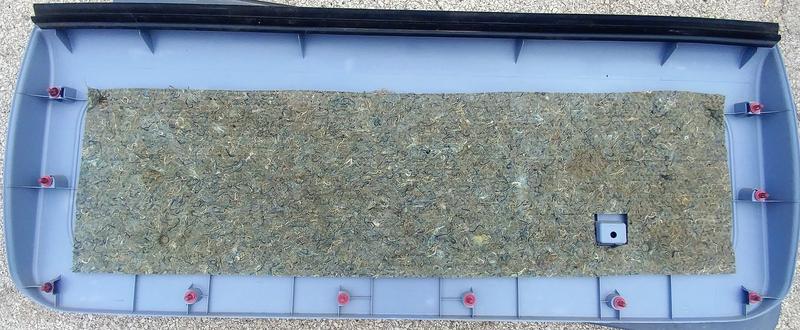
96 4Runner 32x,xxx I really need to check the mileage.
The phone camera did weird things to the colors. Anywho...
Yellow arrow is where the Arb solenoid was. You can see the dremeling has begun.

I made the vertical cut, then worried the weld apart- it was all that was holding that portion to the top section.
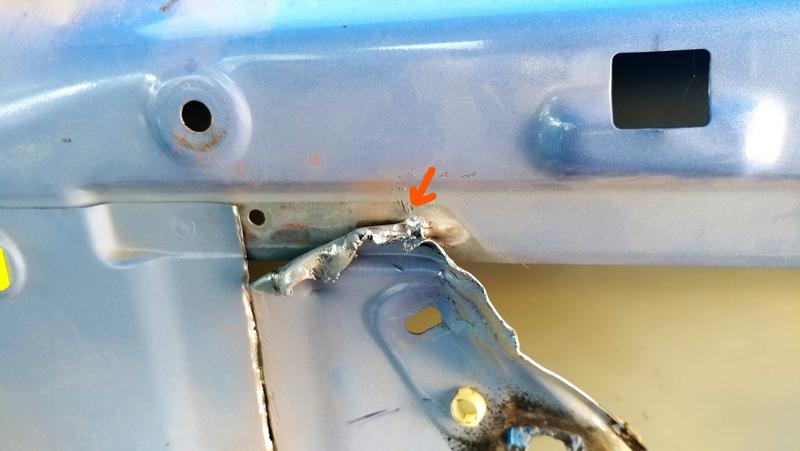
Next I ran the dremel along the bottom, following the line of the wheel well and starting where the original cubby hole ended. The top and side was already separated, so a few wiggles and out it came.
There's a little part that pops out, below that you can see where my arb line (orange arrow) is. I had to pop that part out to get the panel out of the donor truck...
The strap closest to the front of the truck is about where the smaller cubby ends.
Pardon the disaster, the panel is just sitting in place for a fitting. I still have to deal with the arb and other wiring and I need to clean up and paint the cut parts.
The phone camera did weird things to the colors. Anywho...
Yellow arrow is where the Arb solenoid was. You can see the dremeling has begun.
I made the vertical cut, then worried the weld apart- it was all that was holding that portion to the top section.
Next I ran the dremel along the bottom, following the line of the wheel well and starting where the original cubby hole ended. The top and side was already separated, so a few wiggles and out it came.
There's a little part that pops out, below that you can see where my arb line (orange arrow) is. I had to pop that part out to get the panel out of the donor truck...
The strap closest to the front of the truck is about where the smaller cubby ends.
Pardon the disaster, the panel is just sitting in place for a fitting. I still have to deal with the arb and other wiring and I need to clean up and paint the cut parts.
Last edited by habanero; Mar 2, 2022 at 05:20 PM.
Mar 4, 2022 | 06:14 PM
#4295
Thread Starter
Contributing Member
Joined: Sep 2005
Posts: 8,247
Likes: 497
From: mo
96 4Runner 32...I forgot to look...
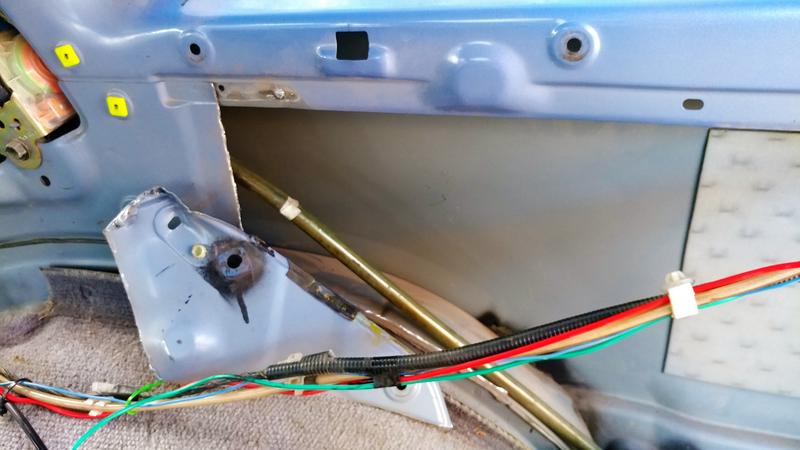
New holes made for a couple of the wire keepers and for the sunroof drain. They aren't pretty, but it's working. Hit all the bare metal with paint (black, like anyone 'cept you all will know) and cleaned up a couple of rusty spots and also smacked some black on them.
Yellow arrows, wire holders. One is just a little above the old hole and one is replacing a now non-existent hole. The new positioning re-routes the wiring away from the new cubby hole.
Orange, sunroof drain holder. The business end is on the back-side and keeps the sunroof drain hose near the wheel well and out of the way of the cubby.
The carpet at the wheel well is quite a bit darker and a bluer grey where the panel protected it from the sun.
Still working on where to go with that pesky but useful arb solenoid.
The area to the left of the blue line is what is being gained compared to the old cubby. Not a huge amount, but more than there was. The bigger door might make for easier access, that part will be nice, I think.
Annnd lastly. The part number for the door knobs for the moon mist color is 64348-35020-B1 . These are pretty crumbly, whether junkyard or new, they're going to need replacing.
Last edited by habanero; Mar 4, 2022 at 06:45 PM.
Mar 5, 2022 | 06:27 PM
#4296
Thread Starter
Contributing Member
Joined: Sep 2005
Posts: 8,247
Likes: 497
From: mo
96 4Runner 320,698 miles
Today the tailgate got a new panel. Top is the old one.
Easy enough, gently pry off the bolt head cover for the strap. !0mm to remove the bolt. Gently pry the panel up. Pic below shows what you're dealing with. Once the panel is free it needs to come up and over the lip of the hatch at the window.
Hang new panel over the top ledge at the window, pop the panel into place. I use a fairly gentle tap with the side of my fist. Once secure use the bolt to secure the strap, cover Pop plastic bolt cover into place.
TaDa!
My truck has a two-tone interior- the upper sections in the seating area is the lighter color, the lower sections and the cargo area are the blue-grey. The new panel is lighter and will match the upper trim instead of the lower.
I need to buy some arb 6mm air line to move the solenoid...
 Mar 6, 2022 | 05:34 PM
#4298
Registered User
Joined: Jun 2011
Posts: 21
Likes: 9
Nice progress
Looking forward to see what you do with all that new cargo space aka 1 cu ft. I'm leaning towards my ARB there, too
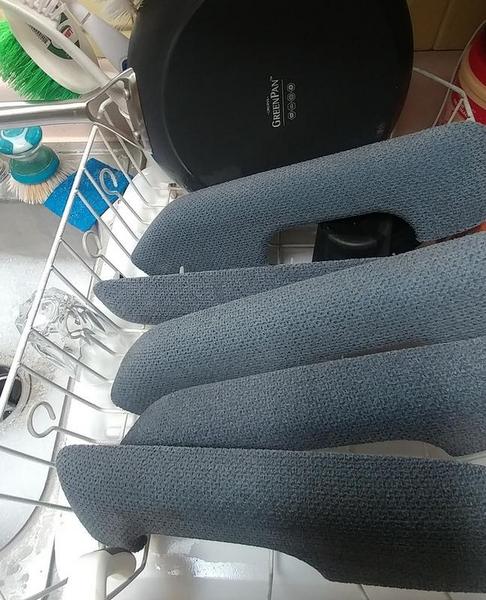
I had all my interior door panels off today replacing the door checks with rebuilds from JZiggy on T4R.org. I used the opportunity to clean and vacuum the insides and outsides of the plastic panels, the doors, detailed the switches and levers, cleanes the fabric door pulls (like yours in the drying rack) and measured all the speakers for future replacement
THe new, rebuilt door checks are awesome. I actually have to wrestle the doors open and shut now.

Looking forward to see what you do with all that new cargo space aka 1 cu ft. I'm leaning towards my ARB there, too
I had all my interior door panels off today replacing the door checks with rebuilds from JZiggy on T4R.org. I used the opportunity to clean and vacuum the insides and outsides of the plastic panels, the doors, detailed the switches and levers, cleanes the fabric door pulls (like yours in the drying rack) and measured all the speakers for future replacement
THe new, rebuilt door checks are awesome. I actually have to wrestle the doors open and shut now.
Mar 7, 2022 | 02:46 PM
#4299
Thread Starter
Contributing Member
Joined: Sep 2005
Posts: 8,247
Likes: 497
From: mo
Nice progress
Looking forward to see what you do with all that new cargo space aka 1 cu ft. I'm leaning towards my ARB there, too
I had all my interior door panels off today replacing the door checks with rebuilds from JZiggy on T4R.org. I used the opportunity to clean and vacuum the insides and outsides of the plastic panels, the doors, detailed the switches and levers, cleanes the fabric door pulls (like yours in the drying rack) and measured all the speakers for future replacement
The new, rebuilt door checks are awesome. I actually have to wrestle the doors open and shut now.
My husband put his twin arb compressor in his 99's cubby. I have a Viair on the opposite side behind the cargo panel. My arb part is the little actuator solenoid for the front locker...approximately 2.5"x2.5".Or maybe that's what you've got too?
I think (and he'll likely weigh in) his biggest problem with his set-up was the air hose busting until he added some braided steel line to distance the hose from the heat.
And wow! You were very busy with your new and very awesome find!
Mar 8, 2022 | 08:01 AM
#4300
Registered User
Joined: Feb 2010
Posts: 748
Likes: 135
From: St. Louis MO
Yeah, I bolted an air line quick disconnect directly to the Arb dual, and made a hole in the cubby cover that it pokes out of. And then drilled some more holes for ventilation since the pump gets pretty hot while in use.
And the first time I really used it to air up all 4 tires, my poly coily hose got hot at that quick disconnect from the normal compressor heat and popped on the 4th tire. As she mentioned, I got a short-ish (1.5 ft?) section of stainless braided line with quick disconnects on both ends to space the more heat sensitive poly hose away from the hot compressor. Which has worked well for a couple of years since. I try not to stress it though, by letting the compressor build up the full 150 psi in the air hose after I've been using it a bunch. As I'm filling tires, when I get one tire full I'll pop the hose off the tire and keep the lever down, dumping air, while I move to the next tire. And on the last tire, I do the same thing, keep dumping the air until I reach inside and turn the compressor off. So I avoid the combination of a hot compressor/hot hose, and 150 psi all coming together.
And the first time I really used it to air up all 4 tires, my poly coily hose got hot at that quick disconnect from the normal compressor heat and popped on the 4th tire. As she mentioned, I got a short-ish (1.5 ft?) section of stainless braided line with quick disconnects on both ends to space the more heat sensitive poly hose away from the hot compressor. Which has worked well for a couple of years since. I try not to stress it though, by letting the compressor build up the full 150 psi in the air hose after I've been using it a bunch. As I'm filling tires, when I get one tire full I'll pop the hose off the tire and keep the lever down, dumping air, while I move to the next tire. And on the last tire, I do the same thing, keep dumping the air until I reach inside and turn the compressor off. So I avoid the combination of a hot compressor/hot hose, and 150 psi all coming together.


