
habanero's 1996 4Runner Build-Up Thread
 Feb 22, 2021 | 12:36 PM
#4081
Thread Starter
Contributing Member


Joined: Sep 2005
Posts: 8,247
Likes: 497
From: mo
Today marks a month since I ordered the transmission. Crossing fingers that Marlin gets it done in the given 4-6 week time frame!
Feb 27, 2021 | 12:49 PM
#4082
Thread Starter
Contributing Member
Joined: Sep 2005
Posts: 8,247
Likes: 497
From: mo
96 4Runner 316, 094 (because speedo/odo wasn't working for a bit)
Cleaned all the junk out and reorganized, so really not much. Still waiting on the tranny, it's the end of week 5. Things are starting to warm up and I'm getting psyched up to get it done. There's some other stuff, like sound deadening and some wiring, that requires the removal of the shifter surround and stuff. I'm waiting and doing it all at the same time.
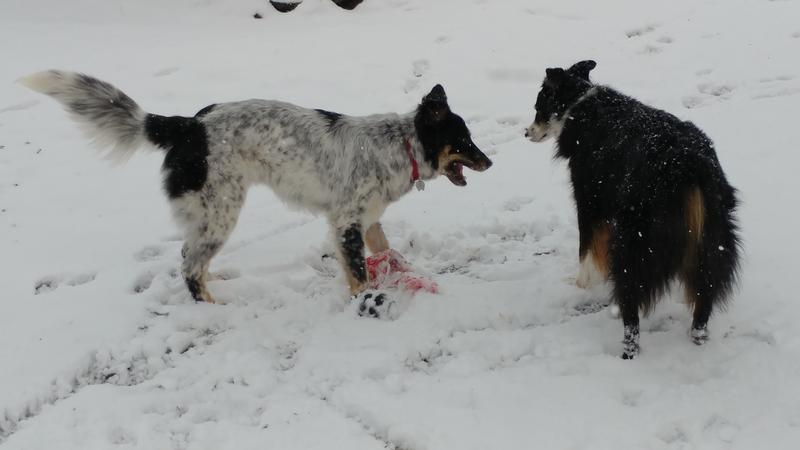
Also been measuring and trying to figure out how to fit 2 dogs crates in the back. Unfortunately both dogs need large crates which are generally 36x24x30 high. Figuring out options, coming up with ideas.
Today my husband began to set up dual batteries in the green truck. His set-up is different than mine, it's looking good so far. I'll let him do the pic posting if he feels like it.
Cleaned all the junk out and reorganized, so really not much. Still waiting on the tranny, it's the end of week 5. Things are starting to warm up and I'm getting psyched up to get it done. There's some other stuff, like sound deadening and some wiring, that requires the removal of the shifter surround and stuff. I'm waiting and doing it all at the same time.
Also been measuring and trying to figure out how to fit 2 dogs crates in the back. Unfortunately both dogs need large crates which are generally 36x24x30 high. Figuring out options, coming up with ideas.
Today my husband began to set up dual batteries in the green truck. His set-up is different than mine, it's looking good so far. I'll let him do the pic posting if he feels like it.
Feb 28, 2021 | 04:40 PM
#4083

Registered User

Joined: Feb 2010
Posts: 748
Likes: 135
From: St. Louis MO
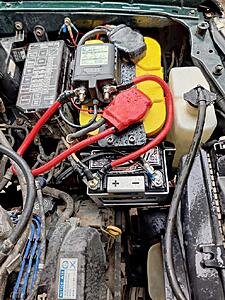
Both AGM's, but a little/big battery pair. I've run little tiny batteries in a couple of my other cars (turbo LS swapped Volvo 240 wagon, and an old rat-rod Volvo PV544) - and in both cases - never had an issue - everything acts like normal, even though the battery is 1/4 the normal size and weight. And after playing around with it, I figured I could hang a tiny battery off the side of the larger battery, and not move stuff around much in the engine bay.
So out came the 8 year old slowly failing old AGM battery (it was having some issues this winter). In went a new Optima yellow-top and a Braille 14115 battery. I looked until I found an Optima holder that had 'ends' on it instead of 'sides' - that gave me something to weld a bit of bracketry to attach the Braille holder. Then a Blue Sea ACR switch - I tried various spots before deciding to just mount it to the top plate on the Optima holder - between the two terminals. All the 'Toyota' start/car stuff gets attached to the tiny little Braille battery (11.5 lbs). And all the winch/air compressor/lights (that's it for now)/house stuff is attached to the yellow-top (44 lbs). (I isolate the winch/house loads with a solenoid as well, have to turn on the house power for all that stuff to work.) Then whipped up a couple of short positive leads to attach the two batteries to the ACR. Then some light wiring to the ACR's remote switch inside - and a little carving on a switch blank to fit it into the dash. And done.
The view under the hood - Yellowtop in the normal spot and position and orientation, the Braille hanging off the end of it. Not in the way of the engine, alternator, radiator shroud, or coolant expansion/overflow bottle:
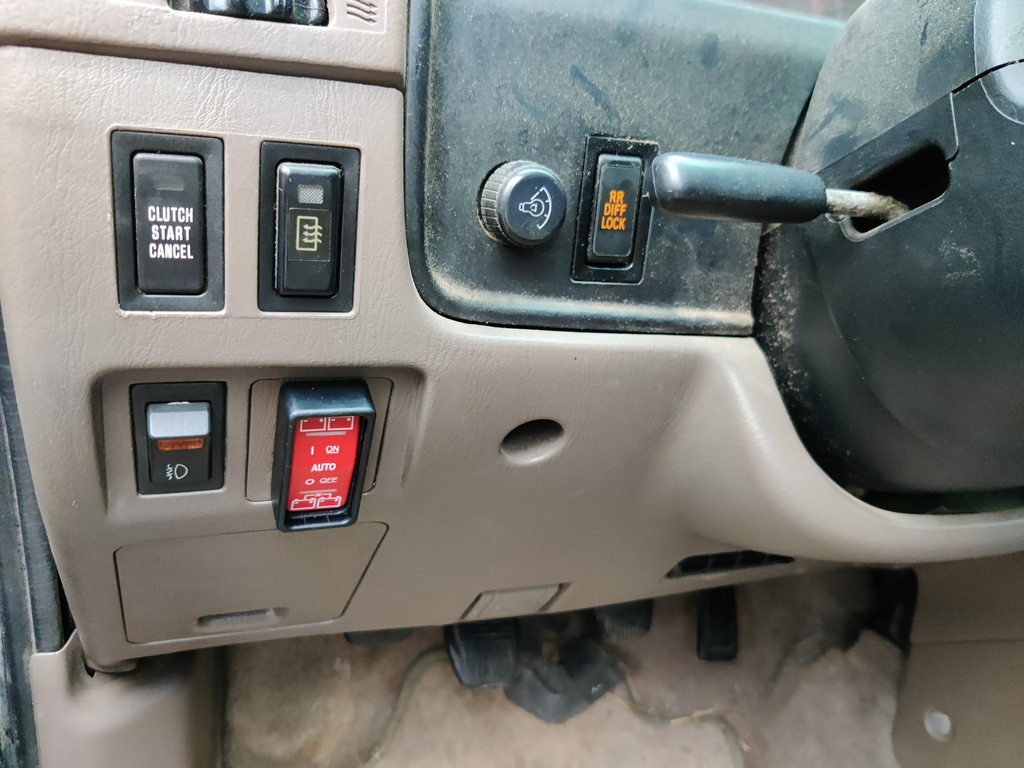
And the ACR remote switch inside:

Now it's just a matter of seeing how the two batteries play together, with the ACR as the referee. They're both AGM's, so hopefully similar voltage profiles as they charge/discharge, and the ACR can handle the difference in capacities.
So out came the 8 year old slowly failing old AGM battery (it was having some issues this winter). In went a new Optima yellow-top and a Braille 14115 battery. I looked until I found an Optima holder that had 'ends' on it instead of 'sides' - that gave me something to weld a bit of bracketry to attach the Braille holder. Then a Blue Sea ACR switch - I tried various spots before deciding to just mount it to the top plate on the Optima holder - between the two terminals. All the 'Toyota' start/car stuff gets attached to the tiny little Braille battery (11.5 lbs). And all the winch/air compressor/lights (that's it for now)/house stuff is attached to the yellow-top (44 lbs). (I isolate the winch/house loads with a solenoid as well, have to turn on the house power for all that stuff to work.) Then whipped up a couple of short positive leads to attach the two batteries to the ACR. Then some light wiring to the ACR's remote switch inside - and a little carving on a switch blank to fit it into the dash. And done.
The view under the hood - Yellowtop in the normal spot and position and orientation, the Braille hanging off the end of it. Not in the way of the engine, alternator, radiator shroud, or coolant expansion/overflow bottle:

And the ACR remote switch inside:
Now it's just a matter of seeing how the two batteries play together, with the ACR as the referee. They're both AGM's, so hopefully similar voltage profiles as they charge/discharge, and the ACR can handle the difference in capacities.
Feb 28, 2021 | 05:47 PM
#4084
96 4Runner 316, 094 (because speedo/odo wasn't working for a bit)
Cleaned all the junk out and reorganized, so really not much. Still waiting on the tranny, it's the end of week 5. Things are starting to warm up and I'm getting psyched up to get it done. There's some other stuff, like sound deadening and some wiring, that requires the removal of the shifter surround and stuff. I'm waiting and doing it all at the same time.
Also been measuring and trying to figure out how to fit 2 dogs crates in the back. Unfortunately both dogs need large crates which are generally 36x24x30 high. Figuring out options, coming up with ideas.

Today my husband began to set up dual batteries in the green truck. His set-up is different than mine, it's looking good so far. I'll let him do the pic posting if he feels like it.
Cleaned all the junk out and reorganized, so really not much. Still waiting on the tranny, it's the end of week 5. Things are starting to warm up and I'm getting psyched up to get it done. There's some other stuff, like sound deadening and some wiring, that requires the removal of the shifter surround and stuff. I'm waiting and doing it all at the same time.
Also been measuring and trying to figure out how to fit 2 dogs crates in the back. Unfortunately both dogs need large crates which are generally 36x24x30 high. Figuring out options, coming up with ideas.
Today my husband began to set up dual batteries in the green truck. His set-up is different than mine, it's looking good so far. I'll let him do the pic posting if he feels like it.
Both AGM's, but a little/big battery pair. I've run little tiny batteries in a couple of my other cars (turbo LS swapped Volvo 240 wagon, and an old rat-rod Volvo PV544) - and in both cases - never had an issue - everything acts like normal, even though the battery is 1/4 the normal size and weight. And after playing around with it, I figured I could hang a tiny battery off the side of the larger battery, and not move stuff around much in the engine bay.
So out came the 8 year old slowly failing old AGM battery (it was having some issues this winter). In went a new Optima yellow-top and a Braille 14115 battery. I looked until I found an Optima holder that had 'ends' on it instead of 'sides' - that gave me something to weld a bit of bracketry to attach the Braille holder. Then a Blue Sea ACR switch - I tried various spots before deciding to just mount it to the top plate on the Optima holder - between the two terminals. All the 'Toyota' start/car stuff gets attached to the tiny little Braille battery (11.5 lbs). And all the winch/air compressor/lights (that's it for now)/house stuff is attached to the yellow-top (44 lbs). (I isolate the winch/house loads with a solenoid as well, have to turn on the house power for all that stuff to work.) Then whipped up a couple of short positive leads to attach the two batteries to the ACR. Then some light wiring to the ACR's remote switch inside - and a little carving on a switch blank to fit it into the dash. And done.
The view under the hood - Yellowtop in the normal spot and position and orientation, the Braille hanging off the end of it. Not in the way of the engine, alternator, radiator shroud, or coolant expansion/overflow bottle:

And the ACR remote switch inside:

Now it's just a matter of seeing how the two batteries play together, with the ACR as the referee. They're both AGM's, so hopefully similar voltage profiles as they charge/discharge, and the ACR can handle the difference in capacities.
So out came the 8 year old slowly failing old AGM battery (it was having some issues this winter). In went a new Optima yellow-top and a Braille 14115 battery. I looked until I found an Optima holder that had 'ends' on it instead of 'sides' - that gave me something to weld a bit of bracketry to attach the Braille holder. Then a Blue Sea ACR switch - I tried various spots before deciding to just mount it to the top plate on the Optima holder - between the two terminals. All the 'Toyota' start/car stuff gets attached to the tiny little Braille battery (11.5 lbs). And all the winch/air compressor/lights (that's it for now)/house stuff is attached to the yellow-top (44 lbs). (I isolate the winch/house loads with a solenoid as well, have to turn on the house power for all that stuff to work.) Then whipped up a couple of short positive leads to attach the two batteries to the ACR. Then some light wiring to the ACR's remote switch inside - and a little carving on a switch blank to fit it into the dash. And done.
The view under the hood - Yellowtop in the normal spot and position and orientation, the Braille hanging off the end of it. Not in the way of the engine, alternator, radiator shroud, or coolant expansion/overflow bottle:
And the ACR remote switch inside:
Now it's just a matter of seeing how the two batteries play together, with the ACR as the referee. They're both AGM's, so hopefully similar voltage profiles as they charge/discharge, and the ACR can handle the difference in capacities.
emailing this battery post to myself for future reference
Last edited by dropzone; Feb 28, 2021 at 05:53 PM.
Mar 1, 2021 | 12:26 PM
#4085
Thread Starter
Contributing Member
Joined: Sep 2005
Posts: 8,247
Likes: 497
From: mo

It is a little close, but not bad close. One of us can get a measurement when or if you want it.
Mar 1, 2021 | 12:55 PM
#4086
They have some different sizes, having the side and end entry is nice
Mar 1, 2021 | 05:07 PM
#4087
Thread Starter
Contributing Member
Joined: Sep 2005
Posts: 8,247
Likes: 497
From: mo
We have this crate currently, it breaks down easily for travel. She usually doesn't travel in the crate but rides in the back seat but I want to be able to have the space available in the back so that we could have two crates set up in the back.
https://www.amazon.com/dp/B000QFT1R2...v_ov_lig_dp_it
They have some different sizes, having the side and end entry is nice
https://www.amazon.com/dp/B000QFT1R2...v_ov_lig_dp_it
They have some different sizes, having the side and end entry is nice
One of the dogs gets motion sick and still chews some and the other travels much better in a crate. It's possible to put that one in a seat belt and the other in the pet porter if I can't find a better solution.
So far it's narrow crates or carriers that will still accommodate 50-70# dogs, a pet barrier- with some sort of barrier so I can unroll the rear window for air- with something waterproof for the floor in case of barfies.
I will look at the possibility of making a platform for one of the crates to get the room I need, but then it might be too high for the crate to fit once you clear the wheel well.
I'm glad you replied, just thinking about what you said while I'm typing this, the crate for one/seatbelt for the other seems like the current best bet.

 Mar 2, 2021 | 05:19 PM
#4090
Thread Starter
Contributing Member
Joined: Sep 2005
Posts: 8,247
Likes: 497
From: mo
96 4Runner 316,xxx miles
I've got some pics for you...
but I wish I didn't.
Pulled in the driveway from work today and heard that tell-tale noise:
Bad bearing in the fan pulley bracket.
Not terribly difficult to remove except I hate the power steering pump adjuster quite a lot.
I removed the ps and alt belts, the ps adjuster bracket, 3 studs (they came out instead of the nuts coming off), the fan clutch w/fan, and the 6 bolts that hold the upper timing cover on.
I did not remove the timing cover, just needed to loosen it to get the fan bracket out from under it. The pulleys are held on by the fan clutch nuts and the bracket comes right out.
The old thing sure is keeping me busy of late. It's an original part so no real complaint.
Looking for a fan pulley bracket now. I'm not seeing one available through Toyota, but there does appear to be an Aisin version.
Last edited by habanero; Mar 2, 2021 at 05:24 PM.
Mar 3, 2021 | 07:26 AM
#4091
Registered User

Joined: Aug 2016
Posts: 115
Likes: 13
From: Tennessee
96 4Runner 316,xxx miles
I've got some pics for you...
but I wish I didn't.
Pulled in the driveway from work today and heard that tell-tale noise:
Bad bearing in the fan pulley bracket.
Not terribly difficult to remove except I hate the power steering pump adjuster quite a lot.
I removed the ps and alt belts, the ps adjuster bracket, 3 studs (they came out instead of the nuts coming off), the fan clutch w/fan, and the 6 bolts that hold the upper timing cover on.
I did not remove the timing cover, just needed to loosen it to get the fan bracket out from under it. The pulleys are held on by the fan clutch nuts and the bracket comes right out.
The old thing sure is keeping me busy of late. It's an original part so no real complaint.
Looking for a fan pulley bracket now. I'm not seeing one available through Toyota, but there does appear to be an Aisin version.
I've got some pics for you...
but I wish I didn't.
Pulled in the driveway from work today and heard that tell-tale noise:
Bad bearing in the fan pulley bracket.
Not terribly difficult to remove except I hate the power steering pump adjuster quite a lot.
I removed the ps and alt belts, the ps adjuster bracket, 3 studs (they came out instead of the nuts coming off), the fan clutch w/fan, and the 6 bolts that hold the upper timing cover on.
I did not remove the timing cover, just needed to loosen it to get the fan bracket out from under it. The pulleys are held on by the fan clutch nuts and the bracket comes right out.
The old thing sure is keeping me busy of late. It's an original part so no real complaint.
Looking for a fan pulley bracket now. I'm not seeing one available through Toyota, but there does appear to be an Aisin version.
I just had to replace mine last week! I found out it has been making noise for the last 115k miles LOL Discovered it when I did my timing belt & water pump during the snowstorm a couple weeks ago.
My engine has never been this quiet.
I got the Aisin one off Rockauto.
Mar 3, 2021 | 10:47 AM
#4092
Registered User
Joined: Feb 2010
Posts: 748
Likes: 135
From: St. Louis MO
I'd say it's about 3/4 of an inch clearance down to the top of the alternator. The engine doesn't seem to wiggle around all that much, and I replaced that side's motor mount this past summer. And generally, if you do get some movement out of the drivetrain it's not directly upward.
Last edited by Jomoka; Mar 5, 2021 at 07:57 AM.
Mar 3, 2021 | 01:49 PM
#4093
I've got one of those and I've got a large size pet porter, both are too wide to fit 2 between the wheel wells. There's this one https://www.amazon.com/Midwest-Plast...upplies&sr=1-1, but I think it's too wide too, and possibly too long. I'll have to do some measuring.
One of the dogs gets motion sick and still chews some and the other travels much better in a crate. It's possible to put that one in a seat belt and the other in the pet porter if I can't find a better solution.
So far it's narrow crates or carriers that will still accommodate 50-70# dogs, a pet barrier- with some sort of barrier so I can unroll the rear window for air- with something waterproof for the floor in case of barfies.
.
Mar 3, 2021 | 05:12 PM
#4094
Thread Starter
Contributing Member
Joined: Sep 2005
Posts: 8,247
Likes: 497
From: mo
Mar 5, 2021 | 11:06 AM
#4095
Registered User
Joined: Jan 2010
Posts: 953
Likes: 21
From: Imperial County CA
I know it's not like having 2 crates, but I built a PVC frame (painted black) and used a wire closet shelf to barricade the back off to keep the dogs separate. I don't have it in now, but it's in the back of this picture. I can take more pics if it helps anyone
Mar 5, 2021 | 12:22 PM
#4096
Thread Starter
Contributing Member
Joined: Sep 2005
Posts: 8,247
Likes: 497
From: mo
I know it's not like having 2 crates, but I built a PVC frame (painted black) and used a wire closet shelf to barricade the back off to keep the dogs separate. I don't have it in now, but it's in the back of this picture. I can take more pics if it helps anyone
https://flic.kr/p/2kHiKbv
https://flic.kr/p/2kHiKbv
So far I think I'm going to try the 8 year old in the seat with a harness and the 1 year old in the crate I already have. I may do some measuring and make a platform like dropzone has if I do a second crate because the new one gets carsick. I'm hoping she'll grow out of it...

they usually do.
Mar 5, 2021 | 01:07 PM
#4097
Thread Starter
Contributing Member
Joined: Sep 2005
Posts: 8,247
Likes: 497
From: mo
96 4Runner 316,106 miles
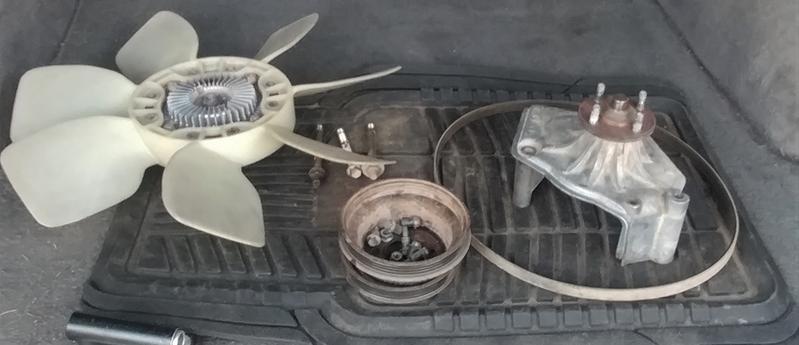
I replaced the pulley bracket yesterday and all is good again. It's not a difficult job. I bought the Aisin FBT004 off Amazon. Wasn't impressed with the casting. It looks a little rough and painted, unlike the oe version. Came in a box that said Aisin all over it and Aisin is rubberstamped on the bracket itself. The bearing does say it's an NSK from Japan. I don't really think there was much in the way of options that didn't include the pulleys and fan clutch so there you go.
No coolant draining needed (saw someone said to do it in another thread. If I can get that fan out and the upper timing cover enough out of the way with the dual box and the relocated coolant overflow then you can too and if you don't have all that junk it'll be even easier for you. I did not need to take off the upper radiator hose to get the job done.
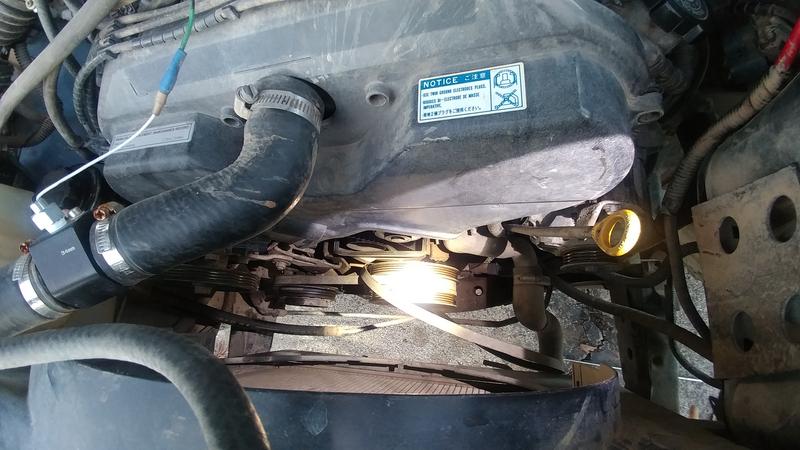
Anyway, this is putting it back on.
There are 2 studs w/nuts and a bolt holding the fan bracket on. The bolt goes in the upper center. (yellow poorly drawn arrows) The stud on the power steering side also holds a bracket for the power steering. A tab (orange sad arrow) in the p/s bracket goes in a hole there.
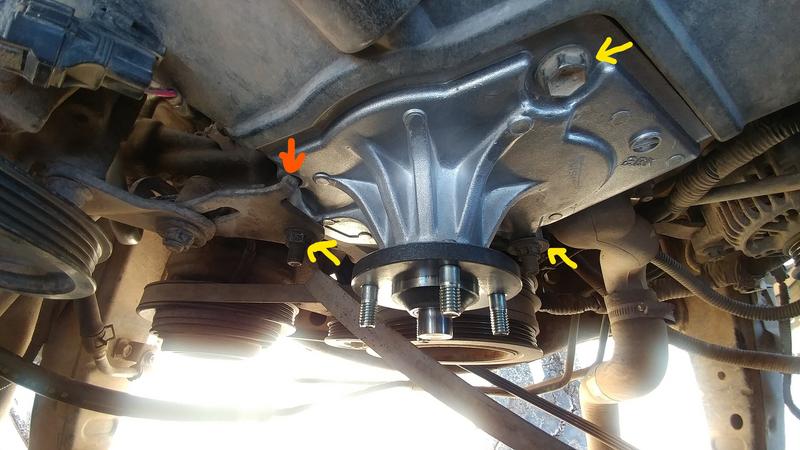
The fan bracket fits between the timing covers and the lip on the upper cover fits a little over the pulley bracket. It took a little finessing to get it in the right spot, but not much. This picture vaguely shows that. 6 special shank bolts for the upper timing cover.
I put the power steering and alternator belts on the bracket because they'll need to be in that area
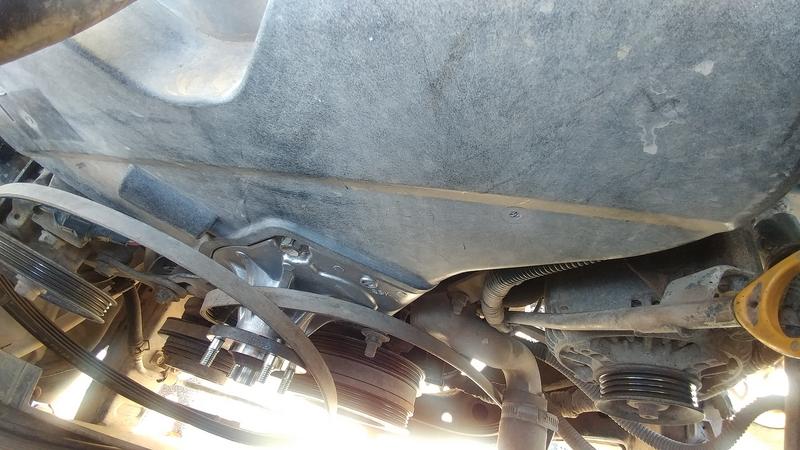
A picture of the two pulleys sitting together like they will when I bolt them on. If you do it right they will line up with the inner and outer crank pulleys.

Next I carefully put the fan w/fan clutch in and set it on the fan shroud while I added the pulleys. It's just resting there.
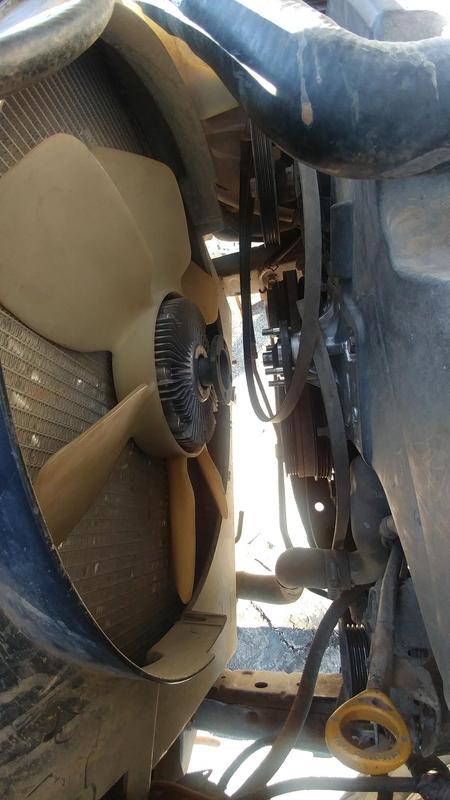
and on goes the deeper width pulley,
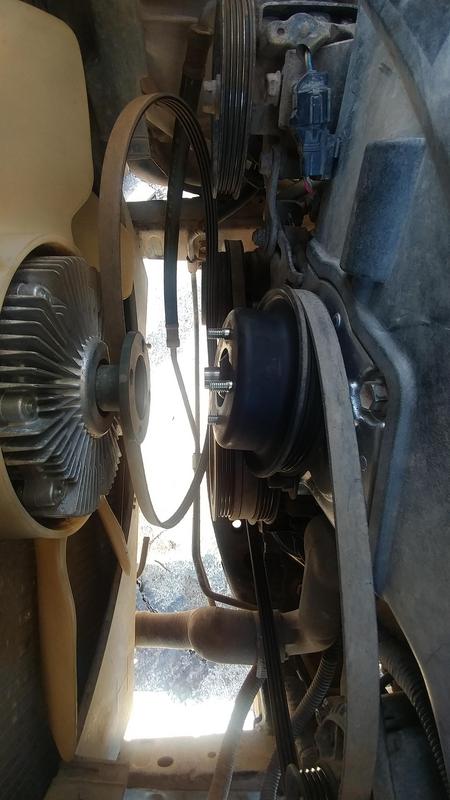
and then the shallower one. If it's right they will line up with the crank pulleys as mentioned a few seconds ago.

And then the fan/fan clutch goes on with the 4 small nuts. Once that's all done I put the alternator belt on and tensioned it not too tight and not too loose, then did the same with the power steering belt.
I double checked my bolts and nuts and the belts, then started it up. The engine is quiet again.
And that was that.
I replaced the pulley bracket yesterday and all is good again. It's not a difficult job. I bought the Aisin FBT004 off Amazon. Wasn't impressed with the casting. It looks a little rough and painted, unlike the oe version. Came in a box that said Aisin all over it and Aisin is rubberstamped on the bracket itself. The bearing does say it's an NSK from Japan. I don't really think there was much in the way of options that didn't include the pulleys and fan clutch so there you go.
No coolant draining needed (saw someone said to do it in another thread. If I can get that fan out and the upper timing cover enough out of the way with the dual box and the relocated coolant overflow then you can too and if you don't have all that junk it'll be even easier for you. I did not need to take off the upper radiator hose to get the job done.
Anyway, this is putting it back on.
There are 2 studs w/nuts and a bolt holding the fan bracket on. The bolt goes in the upper center. (yellow poorly drawn arrows) The stud on the power steering side also holds a bracket for the power steering. A tab (orange sad arrow) in the p/s bracket goes in a hole there.
The fan bracket fits between the timing covers and the lip on the upper cover fits a little over the pulley bracket. It took a little finessing to get it in the right spot, but not much. This picture vaguely shows that. 6 special shank bolts for the upper timing cover.
I put the power steering and alternator belts on the bracket because they'll need to be in that area
A picture of the two pulleys sitting together like they will when I bolt them on. If you do it right they will line up with the inner and outer crank pulleys.
Next I carefully put the fan w/fan clutch in and set it on the fan shroud while I added the pulleys. It's just resting there.
and on goes the deeper width pulley,
and then the shallower one. If it's right they will line up with the crank pulleys as mentioned a few seconds ago.
And then the fan/fan clutch goes on with the 4 small nuts. Once that's all done I put the alternator belt on and tensioned it not too tight and not too loose, then did the same with the power steering belt.
I double checked my bolts and nuts and the belts, then started it up. The engine is quiet again.
And that was that.
Mar 6, 2021 | 07:29 AM
#4098
That's pretty cool and I have all of those things laying around....would be less expensive than buying a barrier if I go that route.
So far I think I'm going to try the 8 year old in the seat with a harness and the 1 year old in the crate I already have. I may do some measuring and make a platform like dropzone has if I do a second crate because the new one gets carsick. I'm hoping she'll grow out of it...
they usually do.
So far I think I'm going to try the 8 year old in the seat with a harness and the 1 year old in the crate I already have. I may do some measuring and make a platform like dropzone has if I do a second crate because the new one gets carsick. I'm hoping she'll grow out of it...
they usually do.
 Mar 6, 2021 | 12:49 PM
#4099
Thread Starter
Contributing Member
Joined: Sep 2005
Posts: 8,247
Likes: 497
From: mo
We took a few days off and went to the coast, Kenai did pretty good this time, no getting car sick. She is almost two. It has taken her a little bit to get used to it, if the weather is decent we try to have the rear windows down for some fresh air, seems to help. We still keeps some clean up supplies in the car just in case.
Ah, the struggles of having a younger dog that gets car-sick, hoping they grow out of it. An old friend used to give hers a ginger cookie or two. In the years it took to mostly recover from a nasty concussion I would get motion sick bad if I wasn't driving. Remembering her trick I tried it on myself and it really helped. I may give it a try with Lou after making sure ginger is okay for dogs if she keeps getting sick.
Mar 6, 2021 | 01:16 PM
#4100
Thread Starter
Contributing Member
Joined: Sep 2005
Posts: 8,247
Likes: 497
From: mo
Sounds like that bracket was the easiest part of your adventure.


