
habanero's 1996 4Runner Build-Up Thread
 Aug 14, 2017 | 05:55 PM
#3281


mine were cracked just like yours
Aug 14, 2017 | 06:39 PM
#3282
Thread Starter
Contributing Member


Joined: Sep 2005
Posts: 8,247
Likes: 497
From: mo
All the rubber on this thing is getting old! Not as old as the Trekker, but old enough. Front upper control arm bushings, front dif bracket bushings, intake hose....that's all the 21 year old rubber that's left that I can think of. The rear lower control arms are out of an '01.
I looked very briefly into solid mounts but didn't think it was what I wanted for the Blue truck....
what are the advantages to them vs oem?
Edit: Now you've got me curious so I looked up the mount number I was given- it does say 2.4 and 2.7 and lists a different number for the 3.4, 12361-62110
The local dealership looked it up by the vin and he hasn't let me down yet....guess I'll edit my post on the part number and give them a call tomorrow. Weird....
Last edited by habanero; Aug 14, 2017 at 06:51 PM.
Aug 15, 2017 | 04:21 AM
#3283
Thread Starter
Contributing Member
Joined: Sep 2005
Posts: 8,247
Likes: 497
From: mo
Yep. Wrong. Part.
By the vin, too. Ah well. Back up a few squares and start again. Hey, at least I know how to do this!

Thanks, Dropzone. Your observation scritchin' my curiosity....
annoying, the part fits the cap (multi-application) and the bracket and looks great other than seeming a little too flexy in there. They look a little different but a lot of the parts I get these days have been superseded at least once.
By the vin, too. Ah well. Back up a few squares and start again. Hey, at least I know how to do this!
Thanks, Dropzone. Your observation scritchin' my curiosity....
annoying, the part fits the cap (multi-application) and the bracket and looks great other than seeming a little too flexy in there. They look a little different but a lot of the parts I get these days have been superseded at least once.
Last edited by habanero; Aug 15, 2017 at 04:26 AM.
Aug 15, 2017 | 09:22 AM
#3284
Downside is that they transfer a lot of vibration as in all of it and is louder. For the Trekker it wasn't a big deal because it was beat and loud anyway, 6 months out of the year it was half doors and no top.
I would not recommend them on a dual purpose - trail & DD truck.
Aug 15, 2017 | 11:30 AM
#3285
Thread Starter
Contributing Member
Joined: Sep 2005
Posts: 8,247
Likes: 497
From: mo
For me the advantage was the solid mount was stronger, for heavy wheeling a lot of people would actually weld a piece of chain to the left side mount to prevent the engine from torquing into the radiator if the mount broke, i needed new mounts and the missus ordered the T-G bombproof mounts for a B-day gift.
Downside is that they transfer a lot of vibration as in all of it and is louder. For the Trekker it wasn't a big deal because it was beat and loud anyway, 6 months out of the year it was half doors and no top.
I would not recommend them on a dual purpose - trail & DD truck.
Downside is that they transfer a lot of vibration as in all of it and is louder. For the Trekker it wasn't a big deal because it was beat and loud anyway, 6 months out of the year it was half doors and no top.
I would not recommend them on a dual purpose - trail & DD truck.
Did a junkyard run today, got a few bits and pieces but nothing exciting. Actually got to a 4Runner before too many other people did, which was nice.
Aug 17, 2017 | 06:05 PM
#3286
Thread Starter
Contributing Member
Joined: Sep 2005
Posts: 8,247
Likes: 497
From: mo
96 4Runner
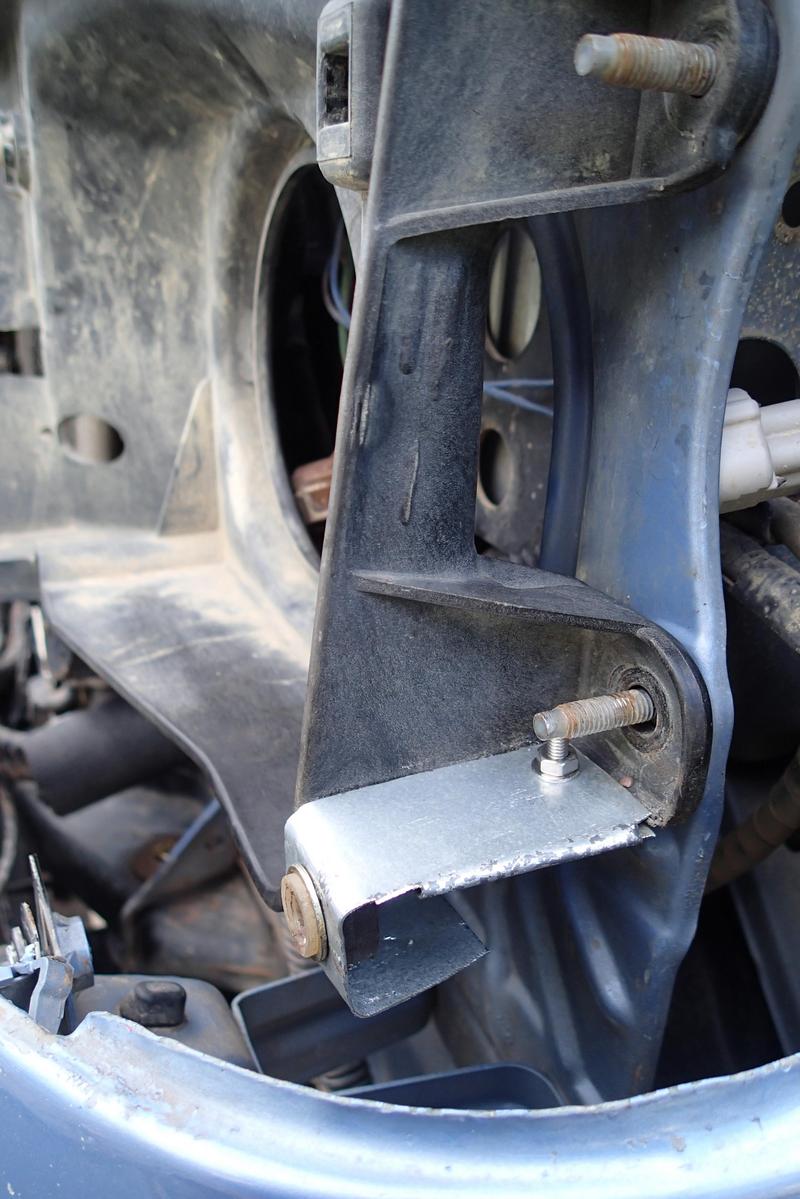
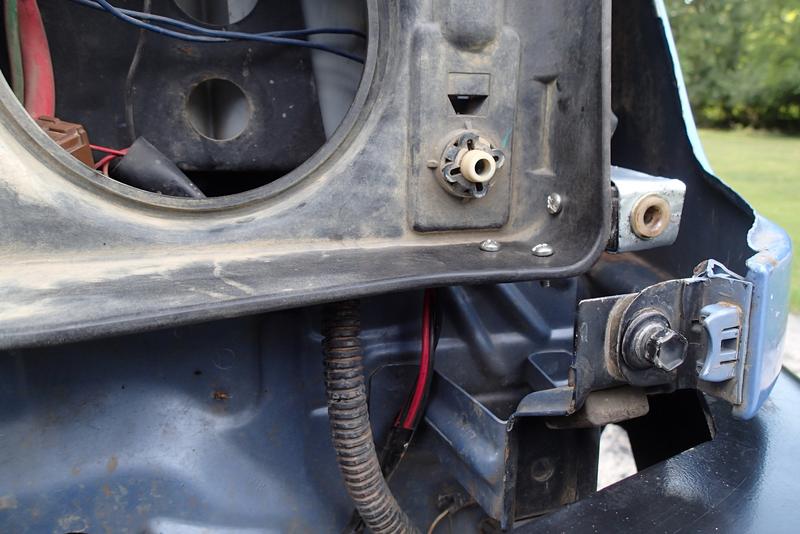
Still fixing stuff. The marker light is held on by a screw at the top and a pin on the bottom The receptacle for the pin is attached to the headlight mount.
Mine is broken off.
Since I replaced the 96's headlights with those from a 99 and still have the 96's old headlights I took the mount off the 99 headlight to replace it with the 96's.
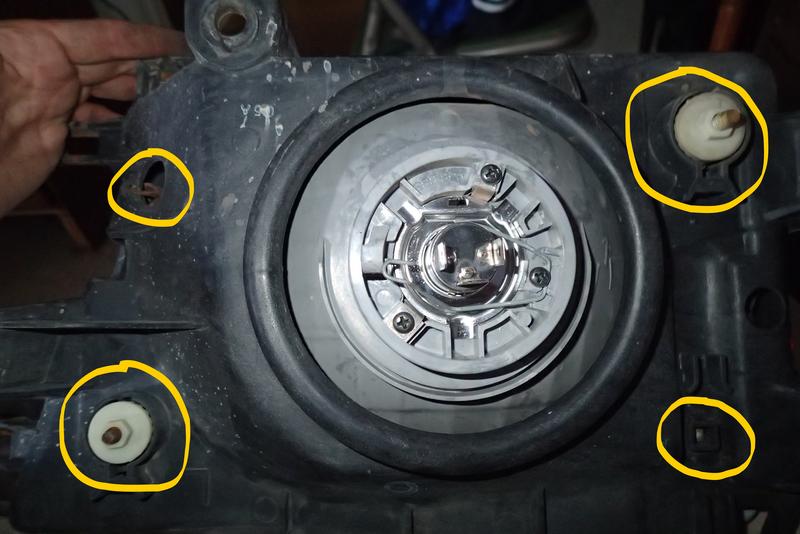
Circled:
Upper left- spring
Upper right- adjuster screw (make note of where this is screwed into, I used the dirt!)
Lower left- adjuster screw (unscrew the adjuster screws evenly, they mount into plastic, use a lube if needed)
Lower right- clips into the mount, must be unclipped to remove the mount from the headlight
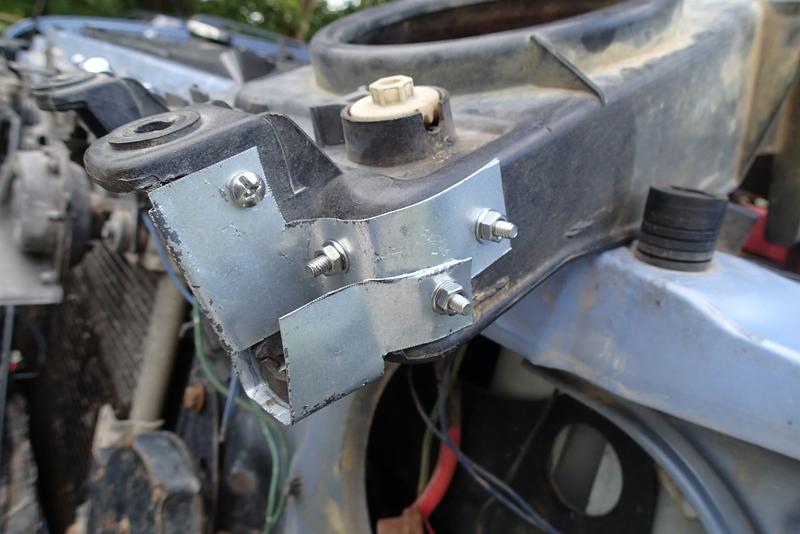
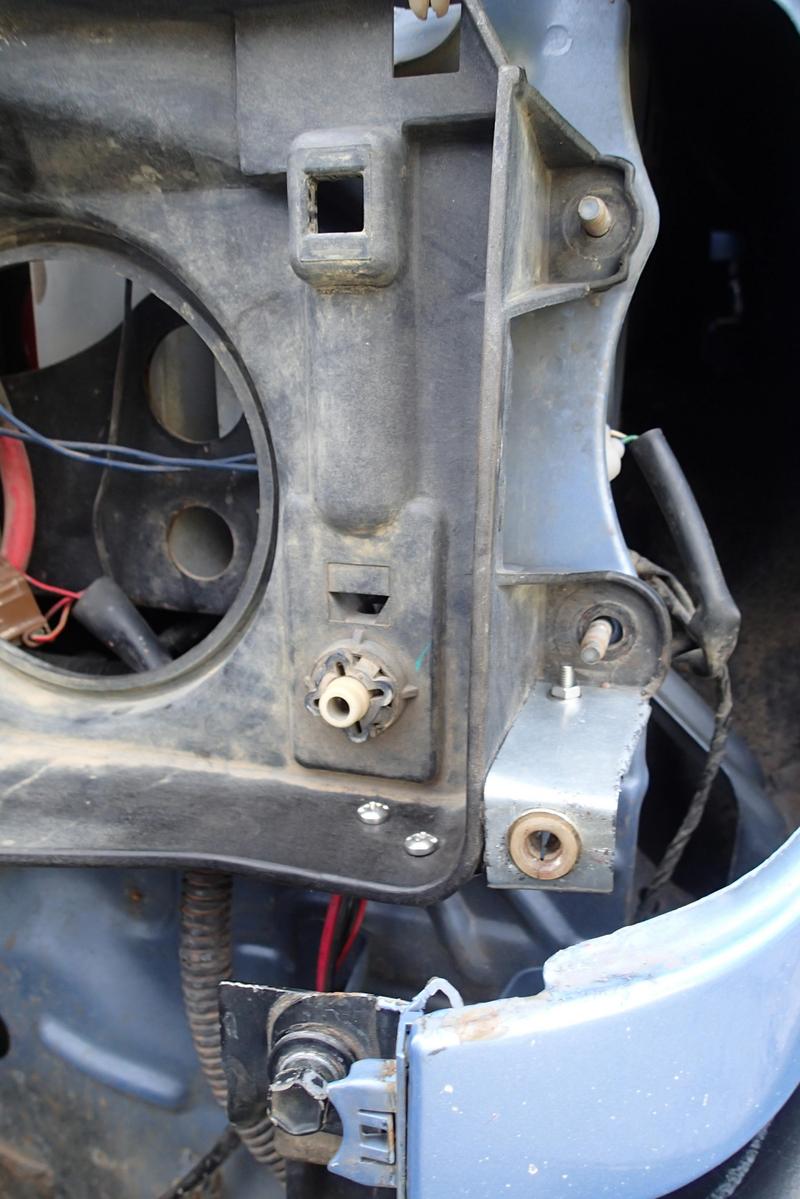
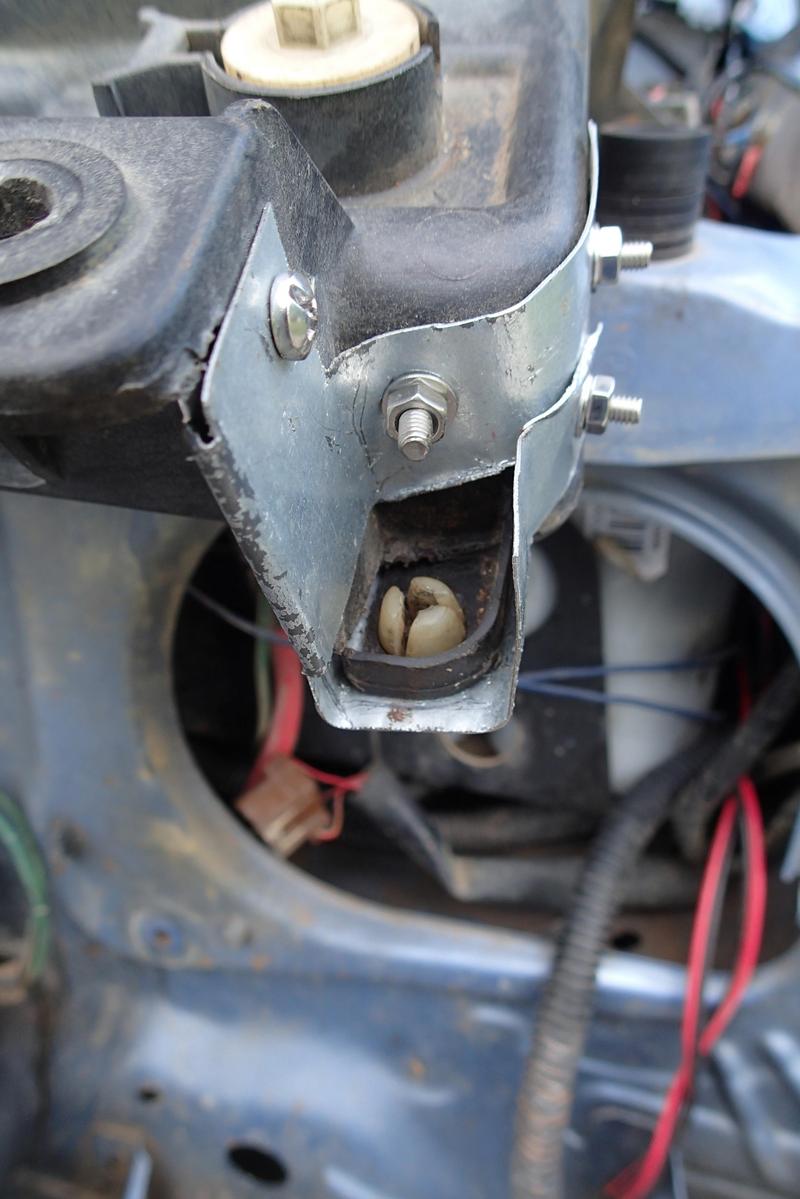
The 96's mount has a missing piece and the pin receptacle ear is cracked in two places.
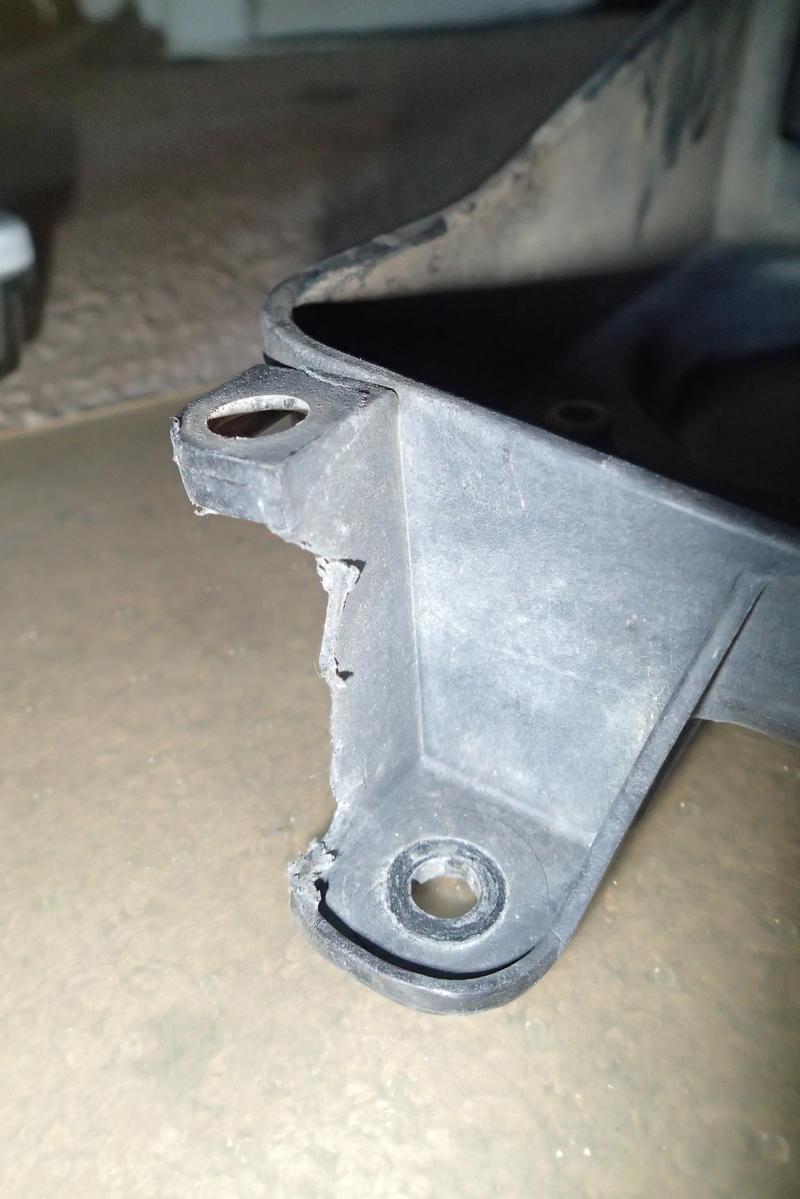
Had a scrap of sheet metal so I made a new one using the metal, 4 screws/washers/nuts, the broken ear, the bit of plastic the pin fits into and a washer because I don't have a bit between 3/8 and 1/2....7/16 would prolly fit best.
Don't laugh too hard:
Still fixing stuff. The marker light is held on by a screw at the top and a pin on the bottom The receptacle for the pin is attached to the headlight mount.
Mine is broken off.
Since I replaced the 96's headlights with those from a 99 and still have the 96's old headlights I took the mount off the 99 headlight to replace it with the 96's.
Circled:
Upper left- spring
Upper right- adjuster screw (make note of where this is screwed into, I used the dirt!)
Lower left- adjuster screw (unscrew the adjuster screws evenly, they mount into plastic, use a lube if needed)
Lower right- clips into the mount, must be unclipped to remove the mount from the headlight
The 96's mount has a missing piece and the pin receptacle ear is cracked in two places.
Had a scrap of sheet metal so I made a new one using the metal, 4 screws/washers/nuts, the broken ear, the bit of plastic the pin fits into and a washer because I don't have a bit between 3/8 and 1/2....7/16 would prolly fit best.
Don't laugh too hard:
 Aug 17, 2017 | 06:31 PM
#3288
Thread Starter
Contributing Member
Joined: Sep 2005
Posts: 8,247
Likes: 497
From: mo
96 4Runner
Replaced the alternator with a newer junkyard nippondenso...'00 or '01. Sounds a bit quieter than my old one and is a little bigger 80amp. The donor truck was a front end hit so I'm assuming it was running and working at the time of impact. Don't know how many miles because digital dash but I'm betting a lot less than 295,xxx.
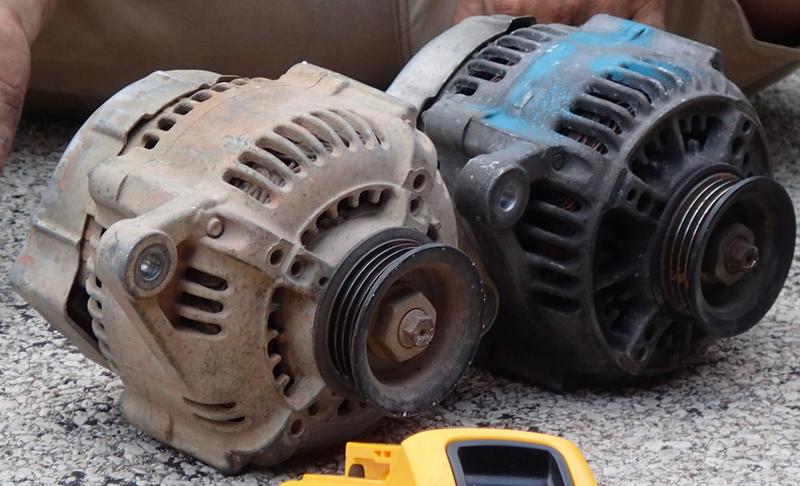
Wasn't really planning on it as the old one is still working, was a crime of opportunity. Only without the crime.
Also picked up an entire roof rack off the same truck so I have something to work with since nearly my entire rack is messed up, pieces either broken or distorted.
It also had a sunroof spoiler so I nabbed that too.
Replaced the alternator with a newer junkyard nippondenso...'00 or '01. Sounds a bit quieter than my old one and is a little bigger 80amp. The donor truck was a front end hit so I'm assuming it was running and working at the time of impact. Don't know how many miles because digital dash but I'm betting a lot less than 295,xxx.
Wasn't really planning on it as the old one is still working, was a crime of opportunity. Only without the crime.
Also picked up an entire roof rack off the same truck so I have something to work with since nearly my entire rack is messed up, pieces either broken or distorted.
It also had a sunroof spoiler so I nabbed that too.
Aug 18, 2017 | 06:03 PM
#3289
Thread Starter
Contributing Member
Joined: Sep 2005
Posts: 8,247
Likes: 497
From: mo
Got the v6 mounts in and all is well in the world. Edited my motor mounts report to reflect that.
Owe you big time, dropzone, your simple observation repaired a problem before it became one.
This go-round I took both mounts out to take back to Toyota. Started both at the top 17mm nut first, fairly loose but so the pin was in the hole. Next I wrestled the motor til the two bolts per side lined up. What a pain!
Aug 20, 2017 | 12:51 PM
#3290
Thread Starter
Contributing Member
Joined: Sep 2005
Posts: 8,247
Likes: 497
From: mo
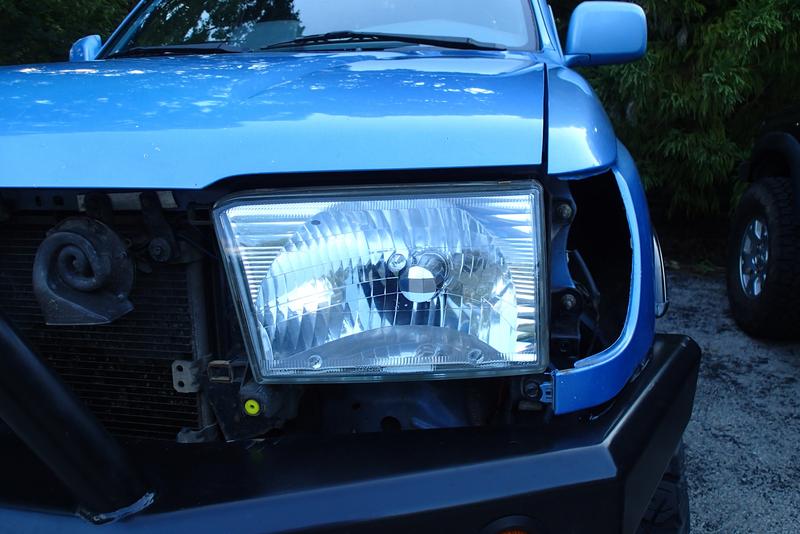
Left front fender is in a sorta reasonable shape again, headlight and marker/turn reinstalled, grille reinstalled. New roof rack painted and on, gonna work on the KC light bar in a bit. Still have not come up with a decision on how to secure said rack beyond the oe clips.
Also, now that the poly body mounts and engine mounts are in it isn't happy about shifting into reverse. Will have to look at the tunnel, may have to reconfigure it enough for reverse. It goes in, but the tunnel is a tiny bit in the way as best as I can tell.
Also, now that the poly body mounts and engine mounts are in it isn't happy about shifting into reverse. Will have to look at the tunnel, may have to reconfigure it enough for reverse. It goes in, but the tunnel is a tiny bit in the way as best as I can tell.
Aug 20, 2017 | 03:31 PM
#3291
Got the v6 mounts in and all is well in the world. Edited my motor mounts report to reflect that.
Owe you big time, dropzone, your simple observation repaired a problem before it became one.
This go-round I took both mounts out to take back to Toyota. Started both at the top 17mm nut first, fairly loose but so the pin was in the hole. Next I wrestled the motor til the two bolts per side lined up. What a pain!
Owe you big time, dropzone, your simple observation repaired a problem before it became one.
This go-round I took both mounts out to take back to Toyota. Started both at the top 17mm nut first, fairly loose but so the pin was in the hole. Next I wrestled the motor til the two bolts per side lined up. What a pain!

The headlight retrofit mounts you made look great. I wish I would have thought about something like that before I tossed a set for the 94
Aug 20, 2017 | 04:36 PM
#3292
Thread Starter
Contributing Member
Joined: Sep 2005
Posts: 8,247
Likes: 497
From: mo
Actually.....I never checked what the dealership wants for one of those...
Drove it! Road vibration? Yes! Does it matter? Nope, it's definitely there but not horrible. Probably doesn't help I've been driving the VW wagon around all week. Apples and oranges.
Aug 21, 2017 | 10:48 AM
#3293
Thread Starter
Contributing Member
Joined: Sep 2005
Posts: 8,247
Likes: 497
From: mo
Well, that was weird. Didn't see any stars, just a planet.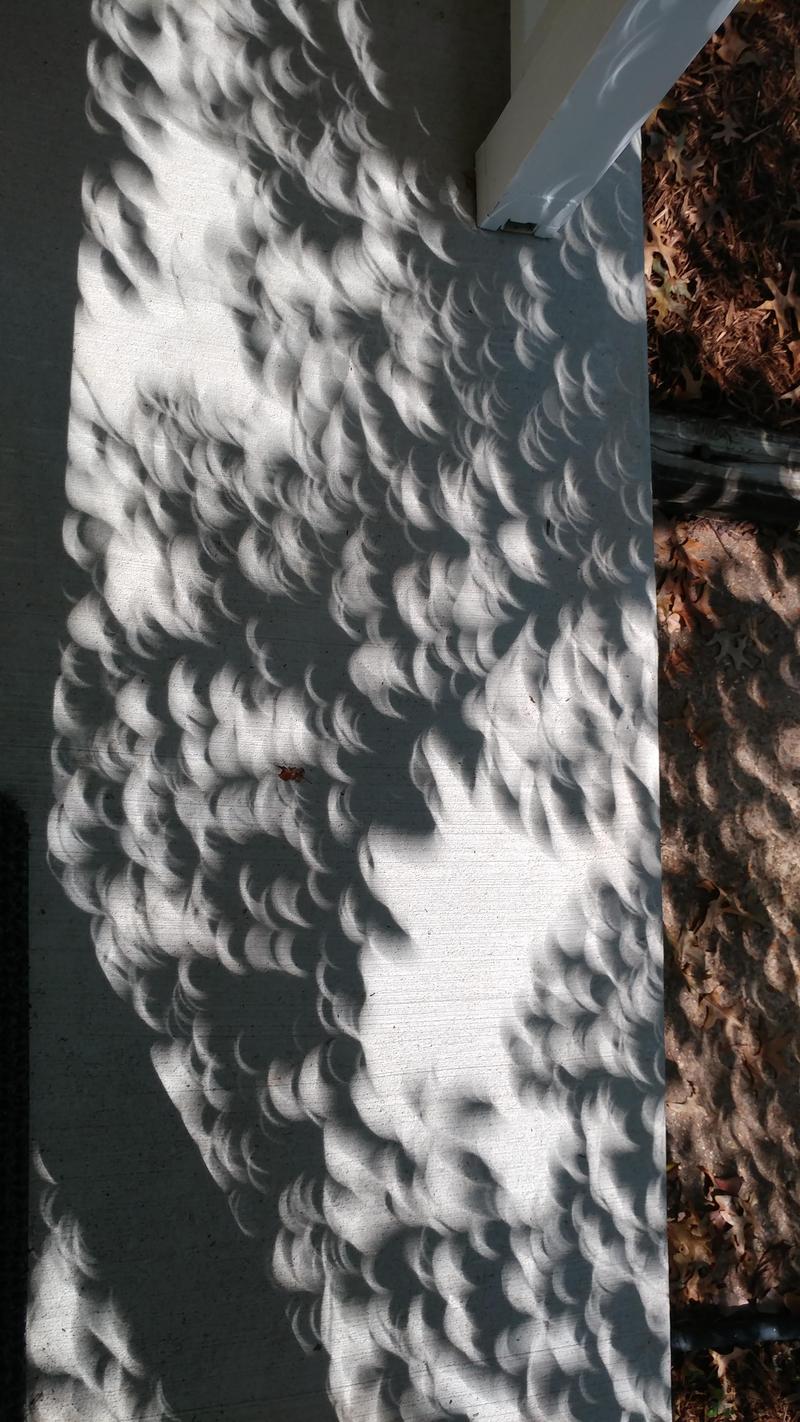
We were in the path of totality for the eclipse today. It was pretty cool and eerie out, didn't get as dark as I thought it would though the cicadas thought it was evening for a little bit. It was weird how the spotty tree shade showed lots and lots of eclipses on the ground.
In the truck world I got the skid plates bolted back on and installed my new version of light bar 2.0. Roof basket is back up and the lights and electric up top done and plugged together. Time for the interior things!
Last edited by habanero; Aug 21, 2017 at 05:56 PM.


 Aug 22, 2017 | 05:01 PM
#3296
Registered User

Joined: Aug 2016
Posts: 115
Likes: 13
From: Tennessee

 Aug 28, 2017 | 01:37 PM
#3298
Thread Starter
Contributing Member
Joined: Sep 2005
Posts: 8,247
Likes: 497
From: mo
Poor ol' Blue, 295,638 miles, 96 4Runner
Searching for a couple of small leaks. One is at the front right corner of the roof rack where the little 'vase' is and I'm now waiting for the silicone to dry. Still looking for the other one.
Since the headliner and trim is out I decided to extend the roof rack drains. I am trying to combat rust here in the salt belt and the front drain hoses empty into the sill, which has tiny drains in the pinch weld for the water to drain out of. Water. Too small for any debris to pass through which can clog them and also hold moisture- and no easy way to hose the salt out. Currently I have one hole in each sill from rust.
I used 1/2" ID tubing- very slightly too big though it did clamp in place without leaking in my 'downpour' test. I went ahead and stuck some silicone on the sunroof drain nipples as insurance against leakage.
Doing this was a huge pain....it would make more sense to use a hose barb, pull the end of the current tube out from the access near the floor on either side, cut short enough to fit the barb and add tubing to extend outside the body.
But since when do I do anything that makes sense?
Oooh, hold on....thunderstorm! BRB!
Aug 28, 2017 | 02:03 PM
#3299
Thread Starter
Contributing Member
Joined: Sep 2005
Posts: 8,247
Likes: 497
From: mo
96 4Runner 295,638 miles
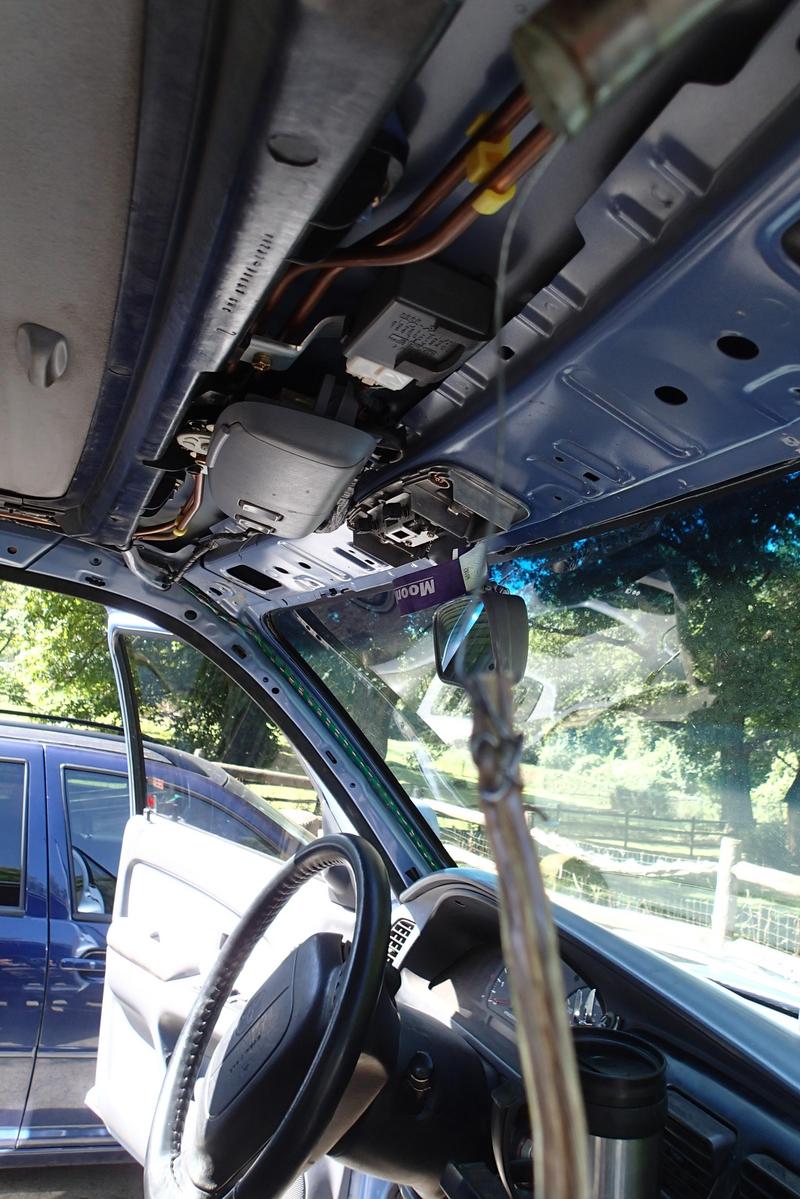
Front sunroof drain extension the hard way. The original drain tubes have a coating of dirt 'n' junk inside, I'm going to be crazy and replace them entirely rather than the much easier cutting the bottom and extending them.
I am sure there are a variety of ways to do this, but as usual I am going to use mostly what I have on hand. I did buy 1/2" ID tubing that came in a 20' roll. I didn't use more than 6 or so feet per side, and that was too much but I'd rather trim than end up short.
On the 3rd gen the right rear drain exits the body below the cargo storage box. The left rear drain empties into the plastic air vent. Those are good, not gonna mess with them.
I have the headliner off for curiosity purposes. If you do the cut and extend down low version you would not have to bother any of this stuff.
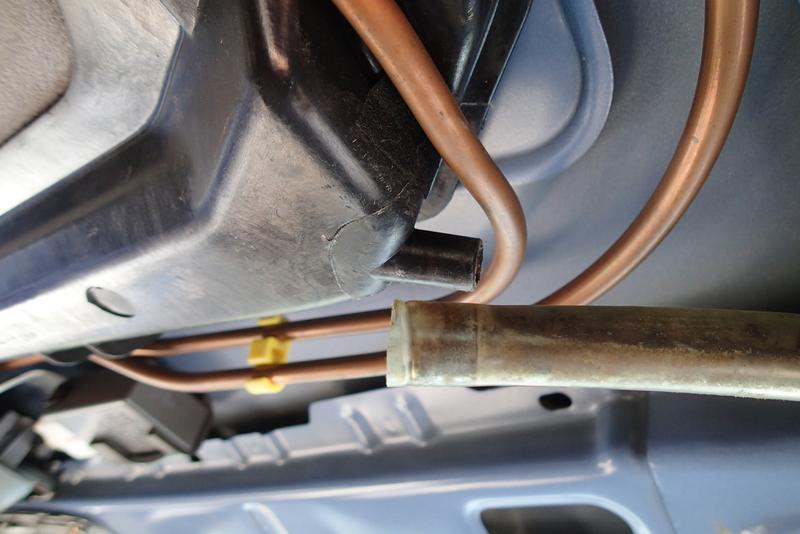
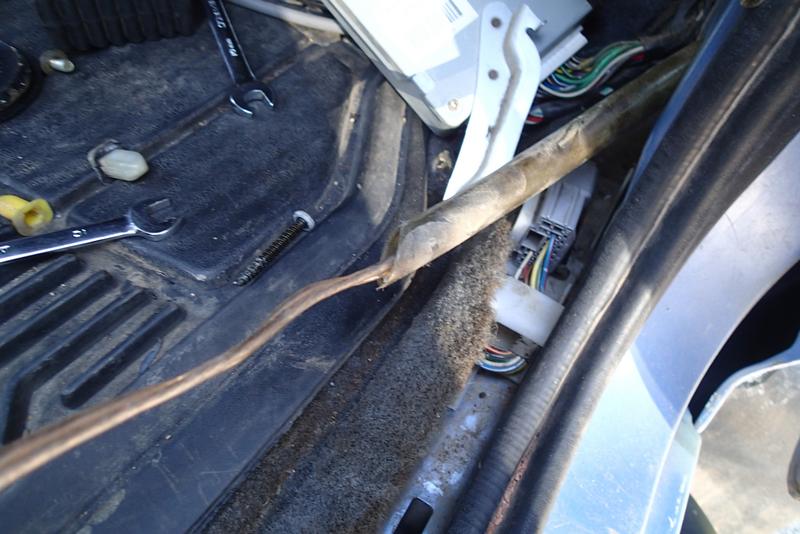
Right front sunroof drain:
Small clamp holds it on, remove clamp and pull hose off nipple
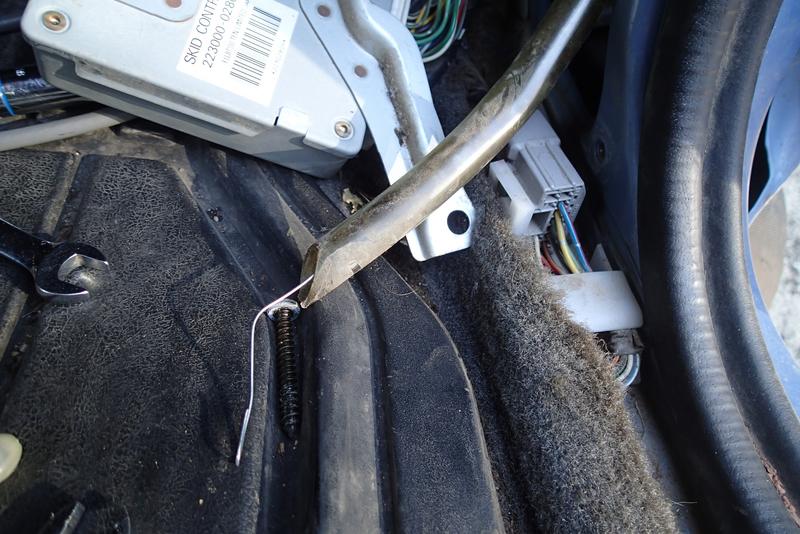
This is your abs computer, behind the right front kick panel. Two 10mm bolts hold it on.
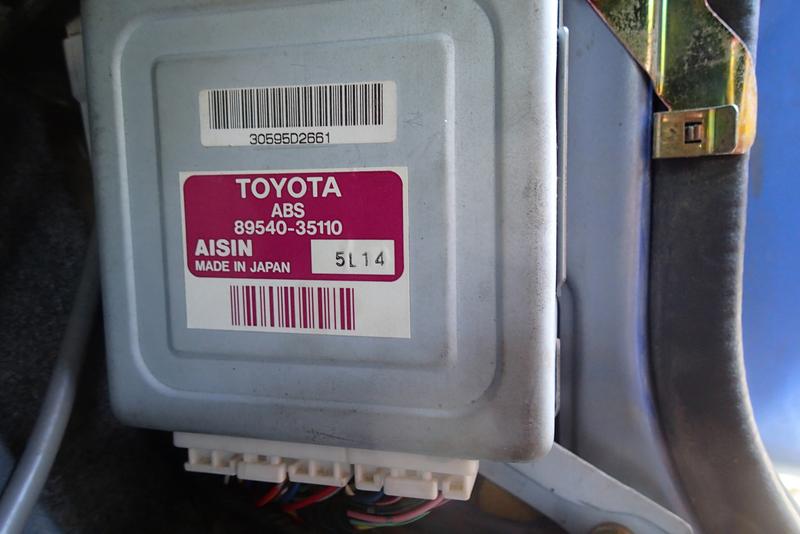
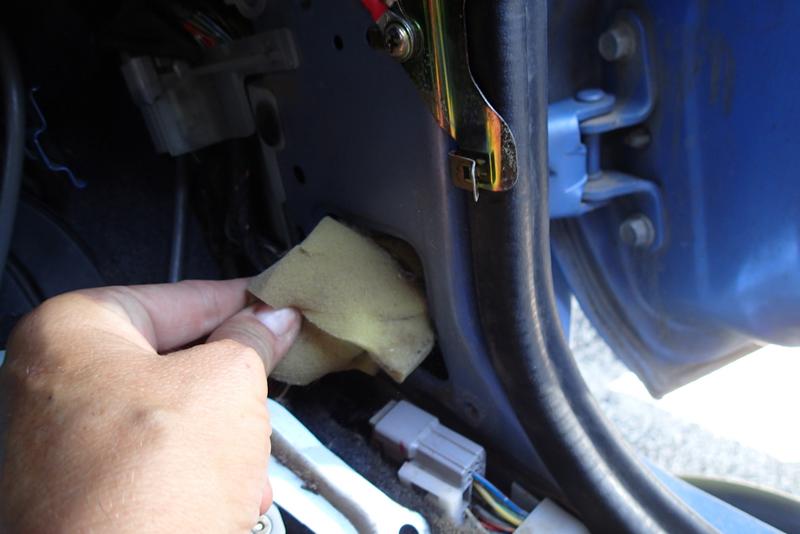
Undo them and lay it over out of the way
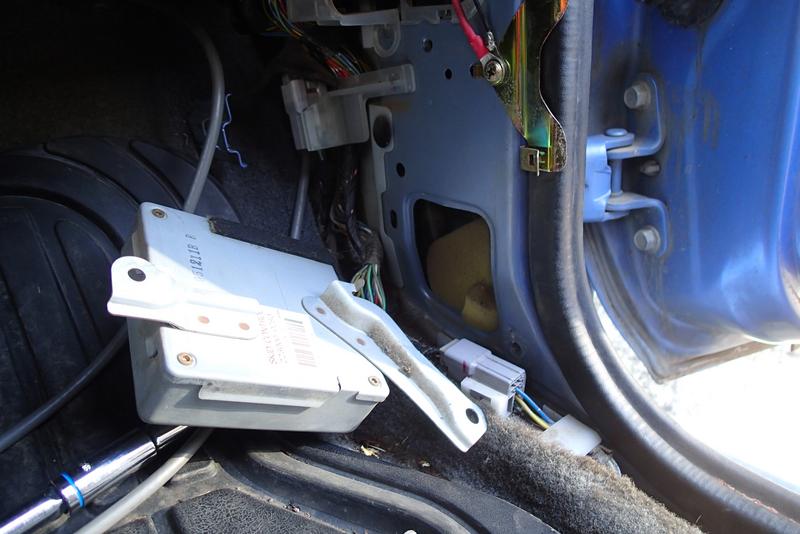
And pull the stuffing out of the cavity
Front sunroof drain extension the hard way. The original drain tubes have a coating of dirt 'n' junk inside, I'm going to be crazy and replace them entirely rather than the much easier cutting the bottom and extending them.
I am sure there are a variety of ways to do this, but as usual I am going to use mostly what I have on hand. I did buy 1/2" ID tubing that came in a 20' roll. I didn't use more than 6 or so feet per side, and that was too much but I'd rather trim than end up short.
On the 3rd gen the right rear drain exits the body below the cargo storage box. The left rear drain empties into the plastic air vent. Those are good, not gonna mess with them.
I have the headliner off for curiosity purposes. If you do the cut and extend down low version you would not have to bother any of this stuff.
Right front sunroof drain:
Small clamp holds it on, remove clamp and pull hose off nipple
This is your abs computer, behind the right front kick panel. Two 10mm bolts hold it on.
Undo them and lay it over out of the way
And pull the stuffing out of the cavity
Aug 28, 2017 | 02:49 PM
#3300
Thread Starter
Contributing Member
Joined: Sep 2005
Posts: 8,247
Likes: 497
From: mo
So here is the drain hose in the cavity above. If you look you'll see it goes down into a hole that is entrance to the sill. That's where it stops.
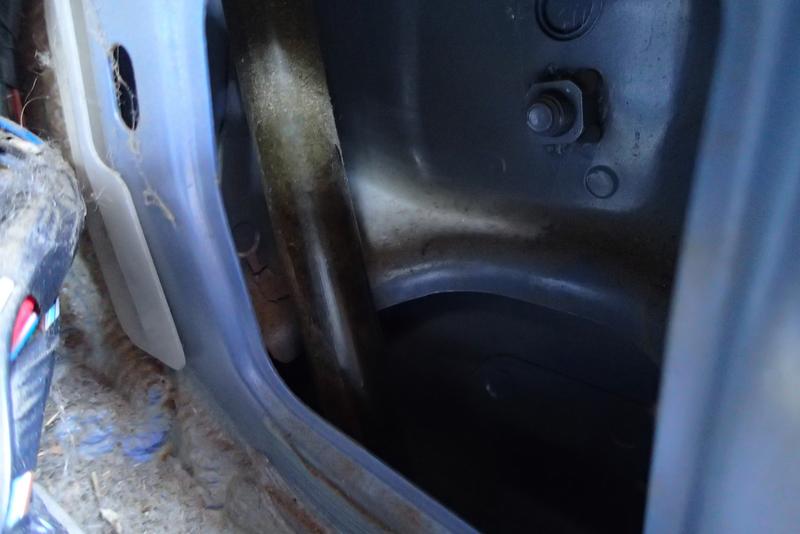
Pull the end of the hose out, but leave the rest of the hose where it's at. You can see I ran a wire from the top entrance of the hose all the way through to the end.
My wire is a guide for a heavier duty version that is too bendy to be pushed through the drain tube on its own. I attached the heavier vinyl coated wire to it and carefully pulled the heavier wire through the drain hose, leaving plenty of length on either side
Now I am ready to remove the old drain tube. Making sure the heavier wire can't be pulled out with it, I pulled the old drain tube up from the top and out of the truck's inner framework. This leaves only the heavier wire behind to act as a guide for the new drain hose.


