
habanero's 1996 4Runner Build-Up Thread
 Aug 8, 2017 | 05:17 PM
#3261
Thread Starter
Contributing Member


Joined: Sep 2005
Posts: 8,247
Likes: 497
From: mo
Ugh. Got the new fan shroud in and the fan is hitting the lower piece of the shroud. It's removable so I took that piece out for now, but gotta figure out why things aren't lining up as they should.
The fan started hitting the original lower piece when I put the truck in 4lo to go up Imogene....that was maybe an hour after the hit that knocked the roof off the truck when I was coming down Black Bear. Was in 4lo on BB, went to 2wd through town and back to 4lo when I hit dirt again. No symptoms between the big hit and the 2nd time I went into 4lo. I do have a 1" body lift that's been there for years and years.
Motor mount(s)?
Also, that removable lower piece of the fan shroud allows for the shroud to be removed/ installed without removing the fan. It's clipped to the main shroud in 4 places.
Aug 11, 2017 | 04:17 AM
#3262
Thread Starter
Contributing Member
Joined: Sep 2005
Posts: 8,247
Likes: 497
From: mo
I was doing a search and came across a thread heavily populated by Molly and TC. 
Warm thoughts to Lysmachia and Tippy II and to TC as well.
96 4Runner 295,589
Body mounts are in, they didn't change the height at all, thank goodness. I'm looking for stiffer, not taller.
The hardest part of body mounts are getting the old ones off. An impact got the old nylocs nuts off pretty easy. Had to cut one of the bolts because the oe body mount sleeve was merged with the bolt, making it too big to slide out.
So I broke everything loose, leaving one side that way with nuts and removing the other nuts completely.
Using the 4Runner's jack and a piece of wood to spread the weight stresses, I lifted the loose side just enough to exchange the mounts.
Got them changed out and started the nuts on them, leaving them loose. Lowered the body, went to the other side, pulled the nuts, lifted that side and changed out the mounts. Got that all done, lowered the body, tightened all the mounts.
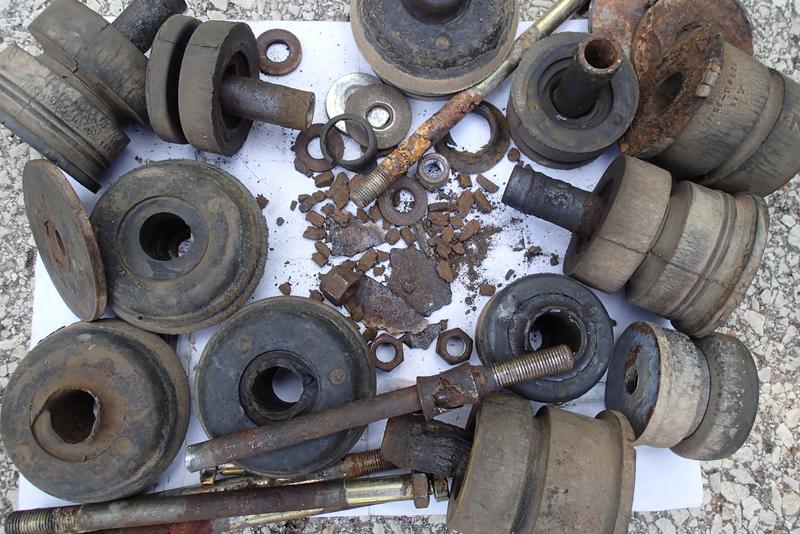
Again, the hardest part was getting the old hardware off. The shards in the middle of the pic was the mount under the driver's floorpan by the kick panel. I didn't do that, it was like that when I pulled it.
To find the tops of the body mount bolts locate the mount, remove the carpet inside the truck enough to locate the round plastic plug in the floor above the mount, use something to pry it out and there it is underneath.
On the 96 there are a total of 8 mounts. Later models got 10, another set that hangs loose-looking below the b-pillar. Don't worry about that, it's supposed to be loose. If you have one of the years with 8 mounts and want the missing ones Roger Brown has them. They're not in my already seriously stretched budget so I skipped them for now.
I'd already replaced the rear body mounts with a kit from Sonoran Steel to stop the body from flexing into the 4xInnovations bumper (which worked superbly) so bought the remaining 6 I needed from Roger Brown because he makes a nice kit that also includes properly sized spacers and washers to equal the oe height. Toyota no longer offers the oe mounts as best as I can tell. I wanted poly for this application anyway, just throwing that out there.
Still haven't decided on exhaust. Still have to figure out why the engine dropped down about an inch-ish. Still have to re-shape the left front fender.....
Well, there's lots to do.
Warm thoughts to Lysmachia and Tippy II and to TC as well.
96 4Runner 295,589
Body mounts are in, they didn't change the height at all, thank goodness. I'm looking for stiffer, not taller.
The hardest part of body mounts are getting the old ones off. An impact got the old nylocs nuts off pretty easy. Had to cut one of the bolts because the oe body mount sleeve was merged with the bolt, making it too big to slide out.
So I broke everything loose, leaving one side that way with nuts and removing the other nuts completely.
Using the 4Runner's jack and a piece of wood to spread the weight stresses, I lifted the loose side just enough to exchange the mounts.
Got them changed out and started the nuts on them, leaving them loose. Lowered the body, went to the other side, pulled the nuts, lifted that side and changed out the mounts. Got that all done, lowered the body, tightened all the mounts.
Again, the hardest part was getting the old hardware off. The shards in the middle of the pic was the mount under the driver's floorpan by the kick panel. I didn't do that, it was like that when I pulled it.
To find the tops of the body mount bolts locate the mount, remove the carpet inside the truck enough to locate the round plastic plug in the floor above the mount, use something to pry it out and there it is underneath.
On the 96 there are a total of 8 mounts. Later models got 10, another set that hangs loose-looking below the b-pillar. Don't worry about that, it's supposed to be loose. If you have one of the years with 8 mounts and want the missing ones Roger Brown has them. They're not in my already seriously stretched budget so I skipped them for now.
I'd already replaced the rear body mounts with a kit from Sonoran Steel to stop the body from flexing into the 4xInnovations bumper (which worked superbly) so bought the remaining 6 I needed from Roger Brown because he makes a nice kit that also includes properly sized spacers and washers to equal the oe height. Toyota no longer offers the oe mounts as best as I can tell. I wanted poly for this application anyway, just throwing that out there.
Still haven't decided on exhaust. Still have to figure out why the engine dropped down about an inch-ish. Still have to re-shape the left front fender.....
Well, there's lots to do.
Last edited by habanero; Aug 11, 2017 at 04:33 AM.
 Aug 12, 2017 | 06:53 AM
#3265
Thread Starter
Contributing Member
Joined: Sep 2005
Posts: 8,247
Likes: 497
From: mo
Thanks! I wasn't sure what size to make them.
Letting the hubby weld on my truck this morning!
The left motor mount was coming apart and even shorter than the right. I'll do a small write-up when I get a chance but basically ugh, but only because no room to do what needs to be done. Otherwise not too bad.
I hear him grinding....
*breathing into paper bag*
It's gonna be fine! It's gonna be fine!
Aug 12, 2017 | 11:19 AM
#3266
so what was leaking on the RR wheel? wheel cylinder or axle seal?
sucks about the rack, luckily not in traffic. could have been much worse.
the rack itself failed or come loose, slide forward and broke through the end caps?
I am gonna have to look at how the 2nd gen rack rails are mounted. On my 26" (or so) extension i used 4 nutserts on each side. I am eliminating the factory cross bars and going with 1" box tubing for crossbars attached directly to the
new bumpers look awesome, rear ones looked to have earned their keep
looks like it could be time for a winch now that you have a place to stuff one
 Aug 12, 2017 | 02:23 PM
#3268
Thread Starter
Contributing Member
Joined: Sep 2005
Posts: 8,247
Likes: 497
From: mo
so what was leaking on the RR wheel? wheel cylinder or axle seal?
sucks about the rack, luckily not in traffic. could have been much worse.
the rack itself failed or come loose, slide forward and broke through the end caps?
I am gonna have to look at how the 2nd gen rack rails are mounted. On my 26" (or so) extension i used 4 nutserts on each side. I am eliminating the factory cross bars and going with 1" box tubing for crossbars attached directly to the
new bumpers look awesome, rear ones looked to have earned their keep
looks like it could be time for a winch now that you have a place to stuff one
sucks about the rack, luckily not in traffic. could have been much worse.
the rack itself failed or come loose, slide forward and broke through the end caps?
I am gonna have to look at how the 2nd gen rack rails are mounted. On my 26" (or so) extension i used 4 nutserts on each side. I am eliminating the factory cross bars and going with 1" box tubing for crossbars attached directly to the
new bumpers look awesome, rear ones looked to have earned their keep
looks like it could be time for a winch now that you have a place to stuff one
I really like the way your rack extension turned out.
Agree about my rack! Luckily it happened where the wait for other people was moving the rack and trucks out of the way. The only victim was a small part of the roof and my hood. All the bolts but one were tight tight. I'm not sure if all the legs slid down- at least 2 of the 3 did by the scars in the rail or if the end one popped out or what. We have some unistrut....or maybe something like what you're saying.....or extending the rail bolts upwards so nothing can slide past them....
wracking the ol' brain on that one!
Bumpers are doing their job.

The hubby just did a big job for me involving the 99's old crush bar ends and my frame rails. It came out great. Pics later.
I do have a winch in a carrier so we can use it on either end of either truck. We may go ahead and move it to my front bumper though I am worried about St. Louis' salty winters. Maybe in the spring, not sure yet.
 good thing I wasn't drinking coffee!
Aug 12, 2017 | 06:08 PM
good thing I wasn't drinking coffee!
Aug 12, 2017 | 06:08 PM
#3269
Thread Starter
Contributing Member
Joined: Sep 2005
Posts: 8,247
Likes: 497
From: mo
96 4Runner 295,589 miles
All the credit for this one goes to my husband and a huge chunk of the work, too. I Vanna White-ed as best as a middle-aged brown-eyed brunette with grease smudges can and that's about all I was good for.
We both replaced our front bumpers with 4xInnovations versions.
From the 96 I removed the bumper and my homemade bumper lifts to accommodate the 1" body lift. My new bumper was held on by a total of 11 bolts.
From the 99 my husband removed the fat-lip with its brackets and also a separate crush thingy. His new bumper is held on by a total of 15 bolts.
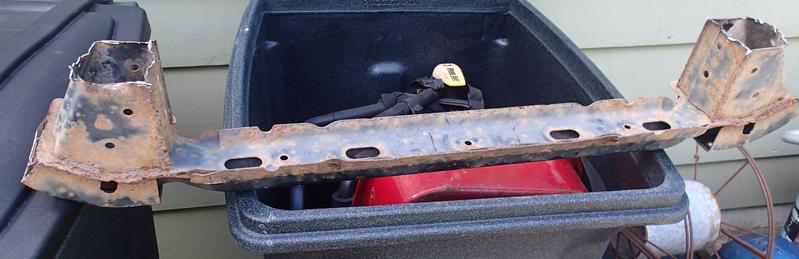
He got the bright idea to cut the ends of the crush bar off to weld onto the end of my frame, giving me an extra 4 bolts to hold my bumper on over a larger surface area.
Crush bar minus ends
After trimming the caps off the ends of my frame rails- for those unfamiliar the 96's caps are the same size as the ends of the frame rails and have a single small bolt hole in the approximate center.
The plates were bolted to the bumper and the bumper installed onto the truck. The plates were then marked and the bumper removed, plates unbolted and welded onto the prepared frame ends.
And the bumper bolted back on. He did a great job and everything fit together great so now the 96's bumper is noticeably more stable in its attachment. It was a terrific idea and didn't even cost us anything but time and some extra bolts.
Also if it falls off or catches fire then he's getting the credit for that, too!
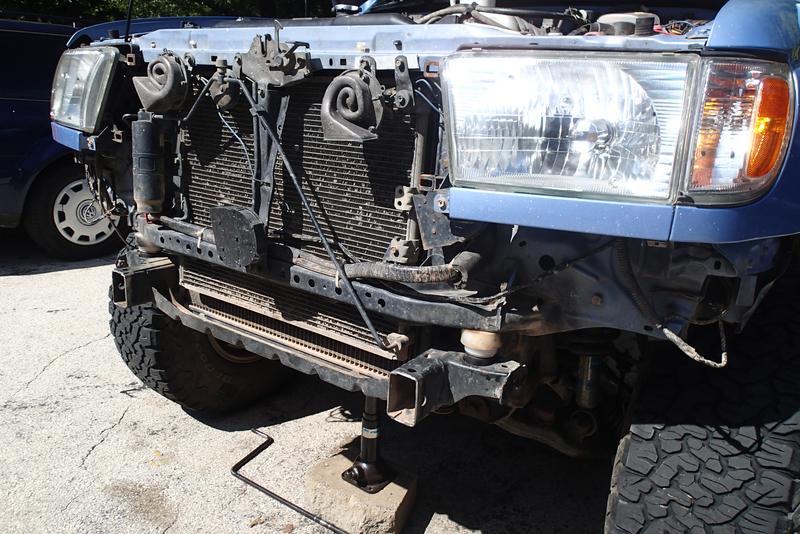
Don't pay any attention to the jack, it's holding the engine up.
All the credit for this one goes to my husband and a huge chunk of the work, too. I Vanna White-ed as best as a middle-aged brown-eyed brunette with grease smudges can and that's about all I was good for.
We both replaced our front bumpers with 4xInnovations versions.
From the 96 I removed the bumper and my homemade bumper lifts to accommodate the 1" body lift. My new bumper was held on by a total of 11 bolts.
From the 99 my husband removed the fat-lip with its brackets and also a separate crush thingy. His new bumper is held on by a total of 15 bolts.
He got the bright idea to cut the ends of the crush bar off to weld onto the end of my frame, giving me an extra 4 bolts to hold my bumper on over a larger surface area.
Crush bar minus ends
After trimming the caps off the ends of my frame rails- for those unfamiliar the 96's caps are the same size as the ends of the frame rails and have a single small bolt hole in the approximate center.
The plates were bolted to the bumper and the bumper installed onto the truck. The plates were then marked and the bumper removed, plates unbolted and welded onto the prepared frame ends.
And the bumper bolted back on. He did a great job and everything fit together great so now the 96's bumper is noticeably more stable in its attachment. It was a terrific idea and didn't even cost us anything but time and some extra bolts.
Also if it falls off or catches fire then he's getting the credit for that, too!
Don't pay any attention to the jack, it's holding the engine up.
Last edited by habanero; Aug 12, 2017 at 06:12 PM.
Aug 13, 2017 | 04:49 AM
#3270
Just catching up on your thread. There not to much you are not worried about taking a part one these 3rd gens. Interior can be some of the most complicated pieces with out breaking. Your pictures are a great size.
Aug 13, 2017 | 07:40 AM
#3271
Thread Starter
Contributing Member
Joined: Sep 2005
Posts: 8,247
Likes: 497
From: mo
I actually have some broken parts from pulling the trim, luckily mostly the retainers. I should invest in one of those retainer tools, as much as things get torn apart. I try to be careful but these things are old and many of them are very brittle. If anyone cares to know....
Cargo area retainers- with a metal 3-prong collar, total of 18:
67771-89110
Panel retainers- all plastic, no metal for the lower trim panels up front and the upper cargo area trim, total of 16:
67771-42010
Headliner retainers- largish round buttons, total of 6:
90467-09110 (BO for grey)
I didn't need that many, just recording how many there are.
I'm also noticing that 3rd gen parts are becoming a little more rare from Toyota. The local dealership almost always has to order what I want these days. Having one of the motor mounts back-ordered (it's in Florida) is a clue to me.
Thanks for the note on the pics- imgur doesn't auto resize as far as I know and I didn't want to make people crazy with super-size pics.
Last edited by habanero; Aug 13, 2017 at 07:42 AM.
 Aug 13, 2017 | 02:24 PM
#3274
Thread Starter
Contributing Member
Joined: Sep 2005
Posts: 8,247
Likes: 497
From: mo
Spent some time today trying to get the left fender straight enough to fit the marker light somewhat more properly. It's pretty good now but I'm gonna have to make a junkyard run- the hole that the post on the marker light goes into is missing and is broken on my old headlight bracket, where it's located. Since the marker light itself is broken (one corner, still usable) it'd be nice if I could find a newer one of those, too.
Aug 14, 2017 | 04:48 PM
#3275
Thread Starter
Contributing Member
Joined: Sep 2005
Posts: 8,247
Likes: 497
From: mo
96 4Runner 295,589 miles
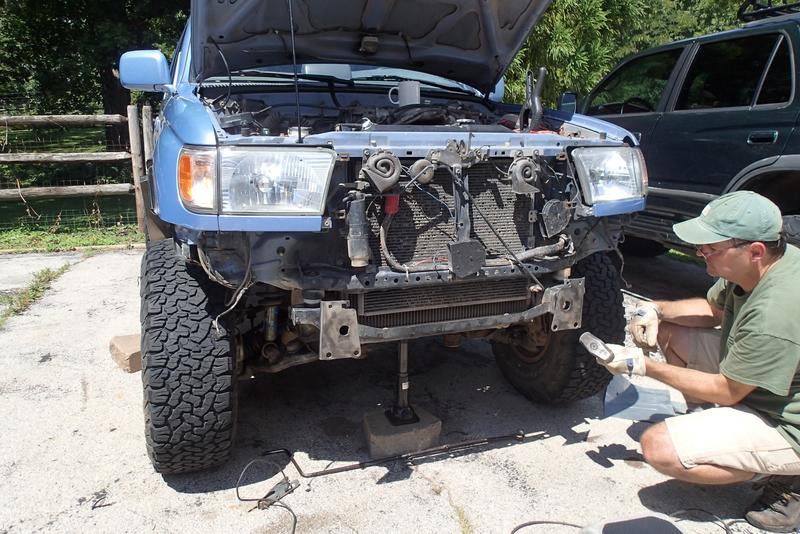
Replaced the motor mounts. Symptom- fan ate lower fan shroud. Nothing that could affect engine placement looked out of.....place and the motor mounts are 21 years old so I went for it.
For the record, the engine didn't do anything out of the ordinary when revved. Moved a little as expected.
There are three bolts for each motor mount, a 17mm and two 14mm. There is also a 14mm bolt on the block that holds the wire loom on the right and a small 10mm bolt on top of the left (driver) motor mount that also holds the wiring loom. Both of those need to be removed. I did the right side first, then the left after loosely bolting the right together with the new mount.
Very important. I am not a mechanic, don't even play one of t.v. There may be a better way to do this. I don't know what that way is. This is the first time I've replaced motor mounts on anything.
You need two mounts. For my V6 it's these:
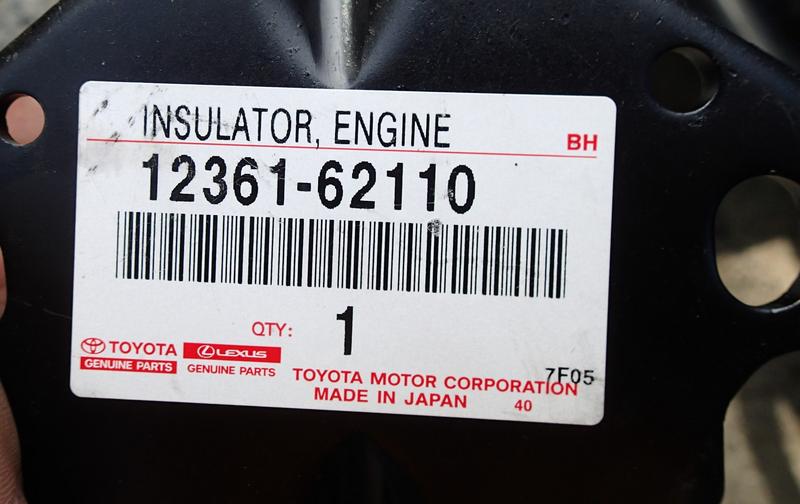
4 cylinder are different. If your mount doesn't look like what came out of your truck it's wrong, not superseded. Even if the parts guy that's never given you a wrong part before goes by the vin and it doesn't look the same it's wrong. Yes, I found this out the wrong way. This is my first motor mount job. Ever.
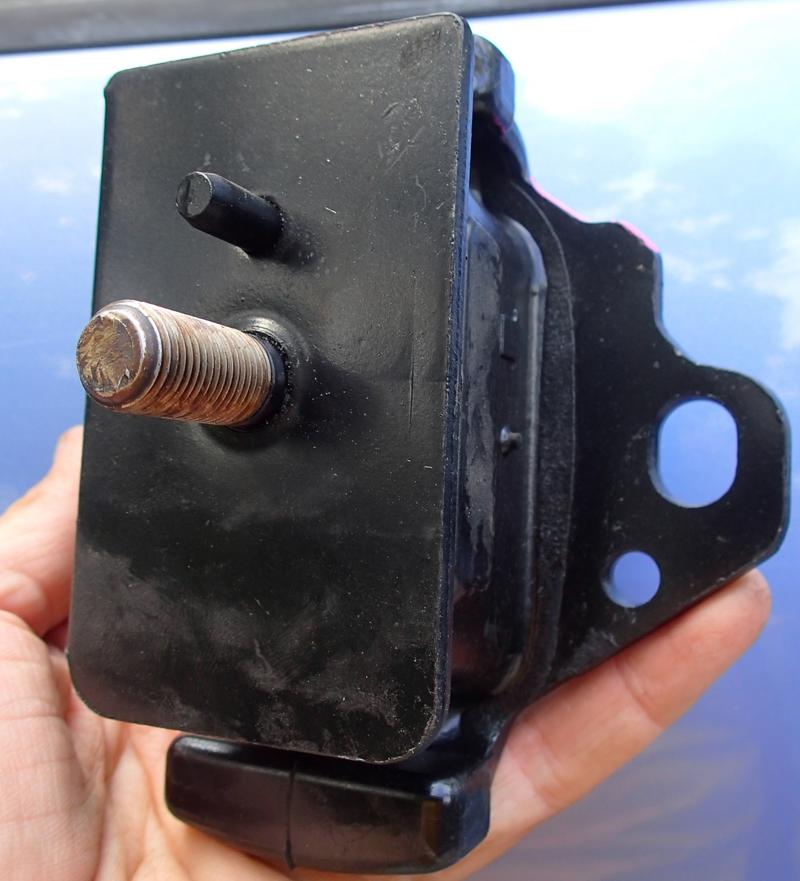
The metal cap is reusable. It only fits on one way. When you install it the little metal bracket at one end faces upwards.
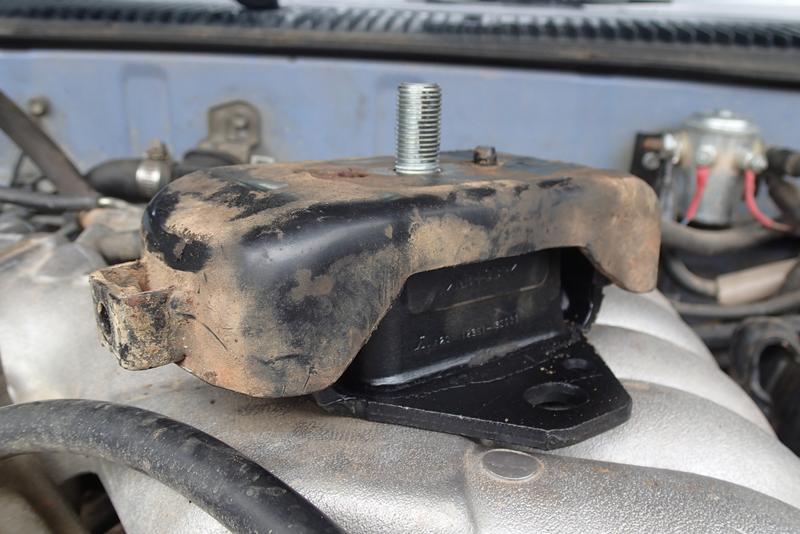
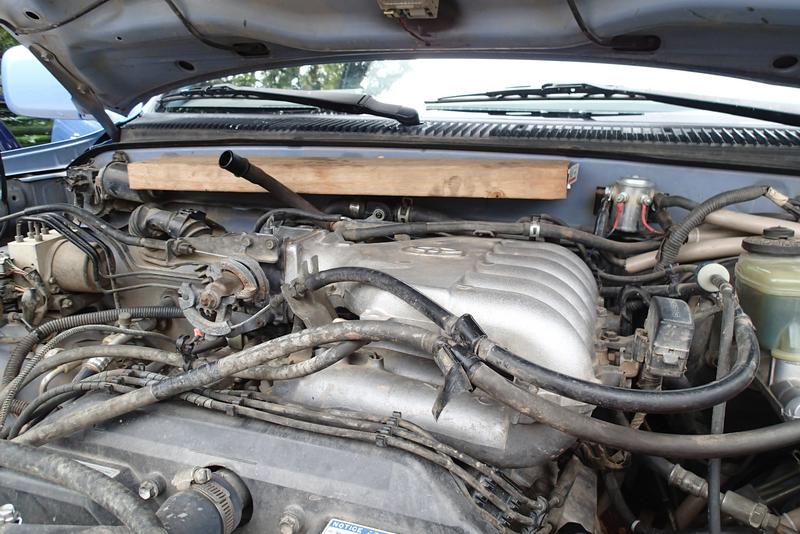
First off I took the air box and intake hose out. Easy to do and gives me a little more room.
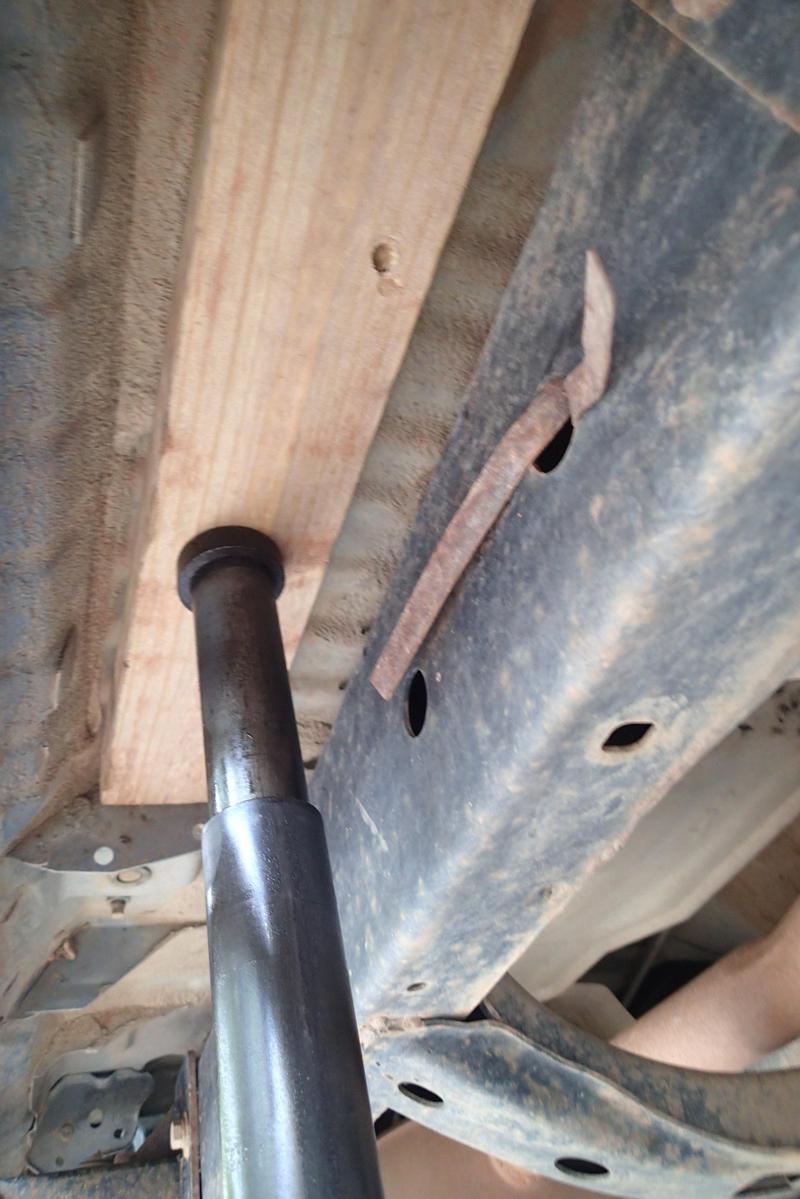
Next I jacked up the engine enough that it was supported by the block of wood on top of the jack. The block of wood is to spread the weight. Don't just use a jack on the oil pan by itself.
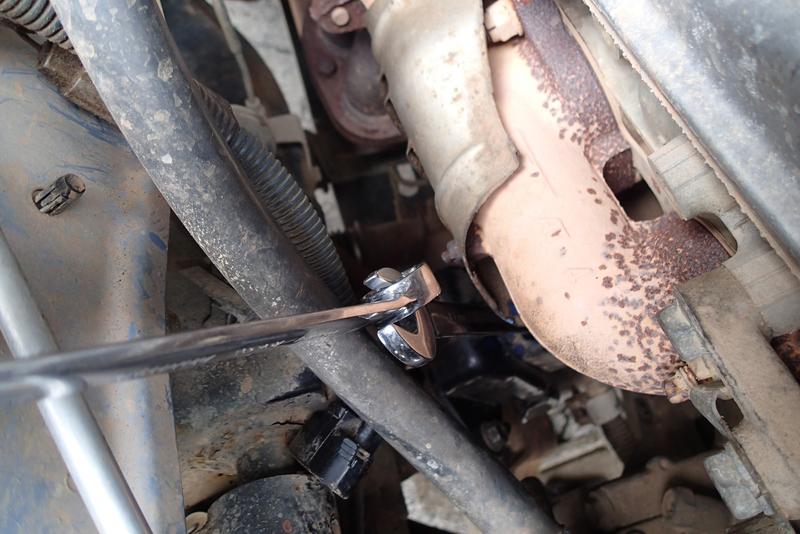
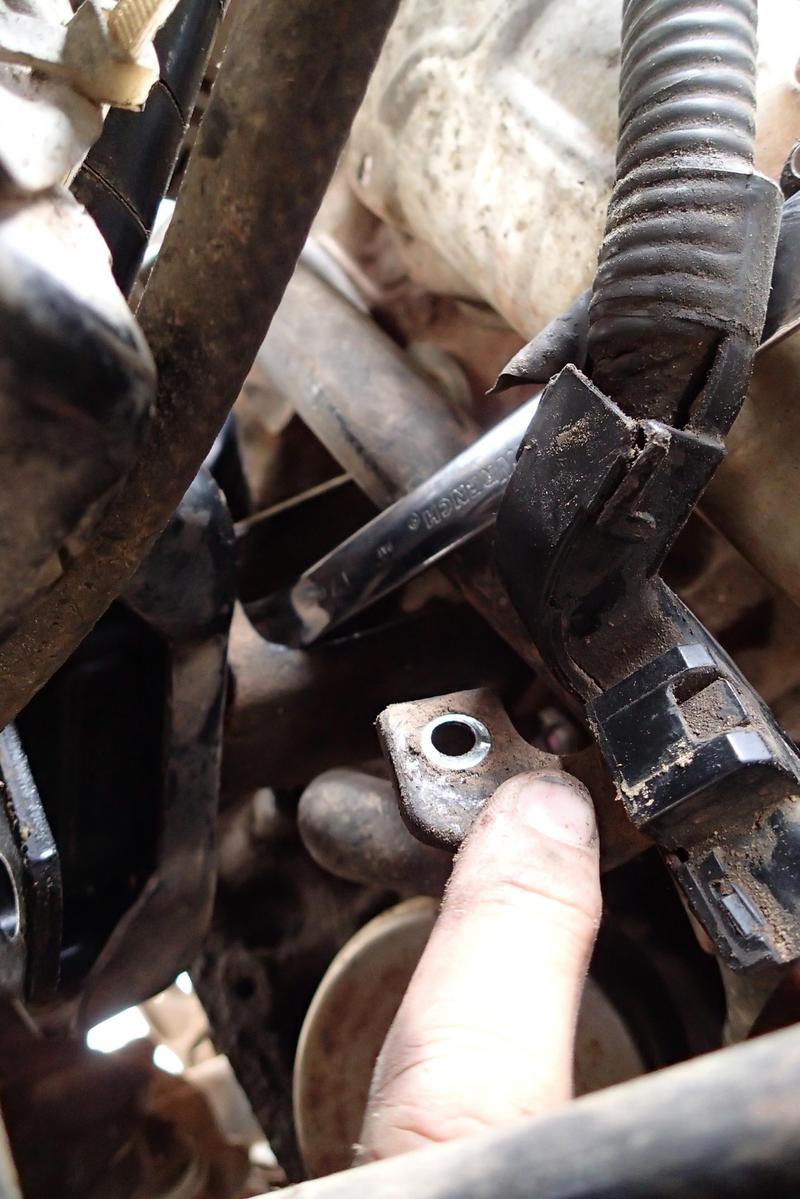
On the right side I removed the bolt that holds the wiring harness to move it out of my way/ give it some slack. Then I broke loose the two smaller bolts on the frame side, then the bigger bolt on the engine side. The little guys were easy (nothing tacked in, need a wrench on both sides) but the 17mm is between two ears. The only thing in my tool box that would fit is a wrench, and only one side. Thank goodness it was the ratcheting side!

In the above pic just below the mount you can see the wiring harness that gets unbolted.
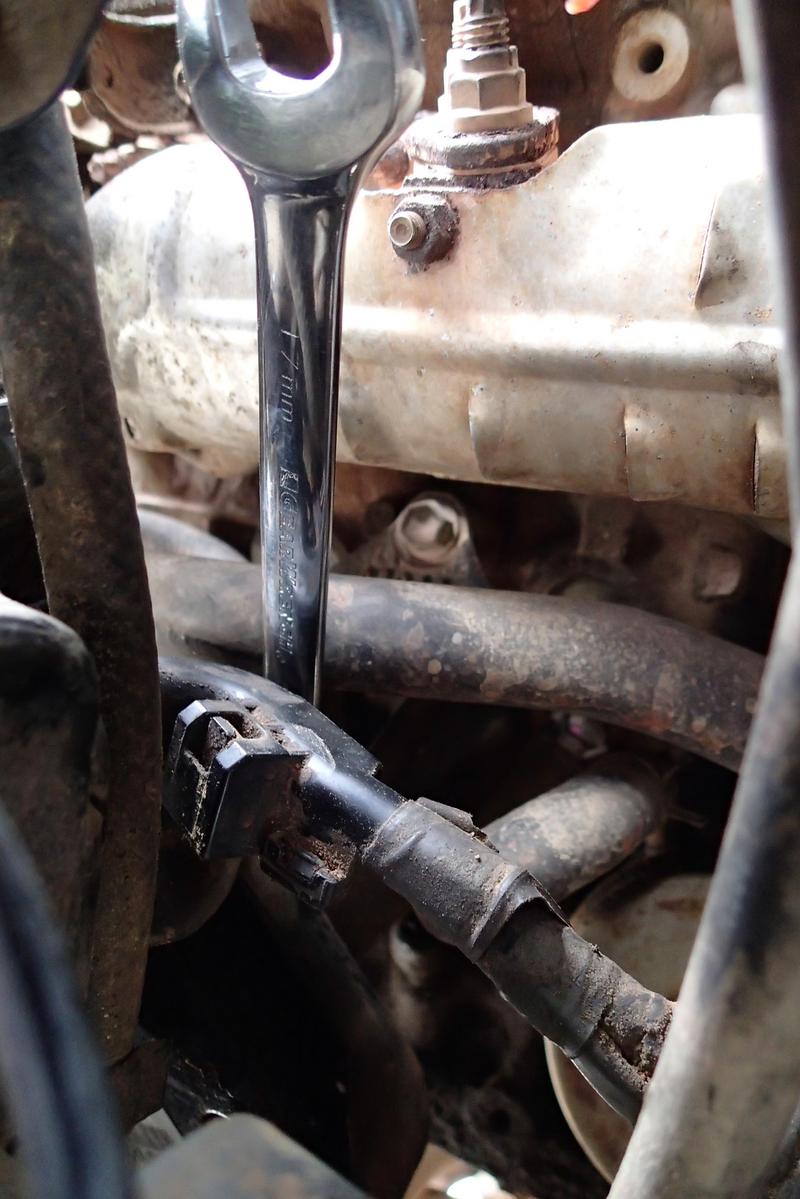
This image shows the cheater way I was able to break the 17mm loose with my girly arms. It was actually taken when I was giving it that last oomph tighten, your wrench would be on the other prong to loosen.
Replaced the motor mounts. Symptom- fan ate lower fan shroud. Nothing that could affect engine placement looked out of.....place and the motor mounts are 21 years old so I went for it.
For the record, the engine didn't do anything out of the ordinary when revved. Moved a little as expected.
There are three bolts for each motor mount, a 17mm and two 14mm. There is also a 14mm bolt on the block that holds the wire loom on the right and a small 10mm bolt on top of the left (driver) motor mount that also holds the wiring loom. Both of those need to be removed. I did the right side first, then the left after loosely bolting the right together with the new mount.
Very important. I am not a mechanic, don't even play one of t.v. There may be a better way to do this. I don't know what that way is. This is the first time I've replaced motor mounts on anything.
You need two mounts. For my V6 it's these:
4 cylinder are different. If your mount doesn't look like what came out of your truck it's wrong, not superseded. Even if the parts guy that's never given you a wrong part before goes by the vin and it doesn't look the same it's wrong. Yes, I found this out the wrong way. This is my first motor mount job. Ever.
The metal cap is reusable. It only fits on one way. When you install it the little metal bracket at one end faces upwards.
First off I took the air box and intake hose out. Easy to do and gives me a little more room.
Next I jacked up the engine enough that it was supported by the block of wood on top of the jack. The block of wood is to spread the weight. Don't just use a jack on the oil pan by itself.
On the right side I removed the bolt that holds the wiring harness to move it out of my way/ give it some slack. Then I broke loose the two smaller bolts on the frame side, then the bigger bolt on the engine side. The little guys were easy (nothing tacked in, need a wrench on both sides) but the 17mm is between two ears. The only thing in my tool box that would fit is a wrench, and only one side. Thank goodness it was the ratcheting side!
In the above pic just below the mount you can see the wiring harness that gets unbolted.
This image shows the cheater way I was able to break the 17mm loose with my girly arms. It was actually taken when I was giving it that last oomph tighten, your wrench would be on the other prong to loosen.
Last edited by habanero; Aug 18, 2017 at 05:53 PM.
Aug 14, 2017 | 04:55 PM
#3276
Thread Starter
Contributing Member
Joined: Sep 2005
Posts: 8,247
Likes: 497
From: mo
I used the jack to lift the engine enough to get the mount out. Be aware of things attached to the engine- that you don't stretch anything beyond its limit. Power steering return line and wiring loom come to mind...
And bolted the new one in loosely.
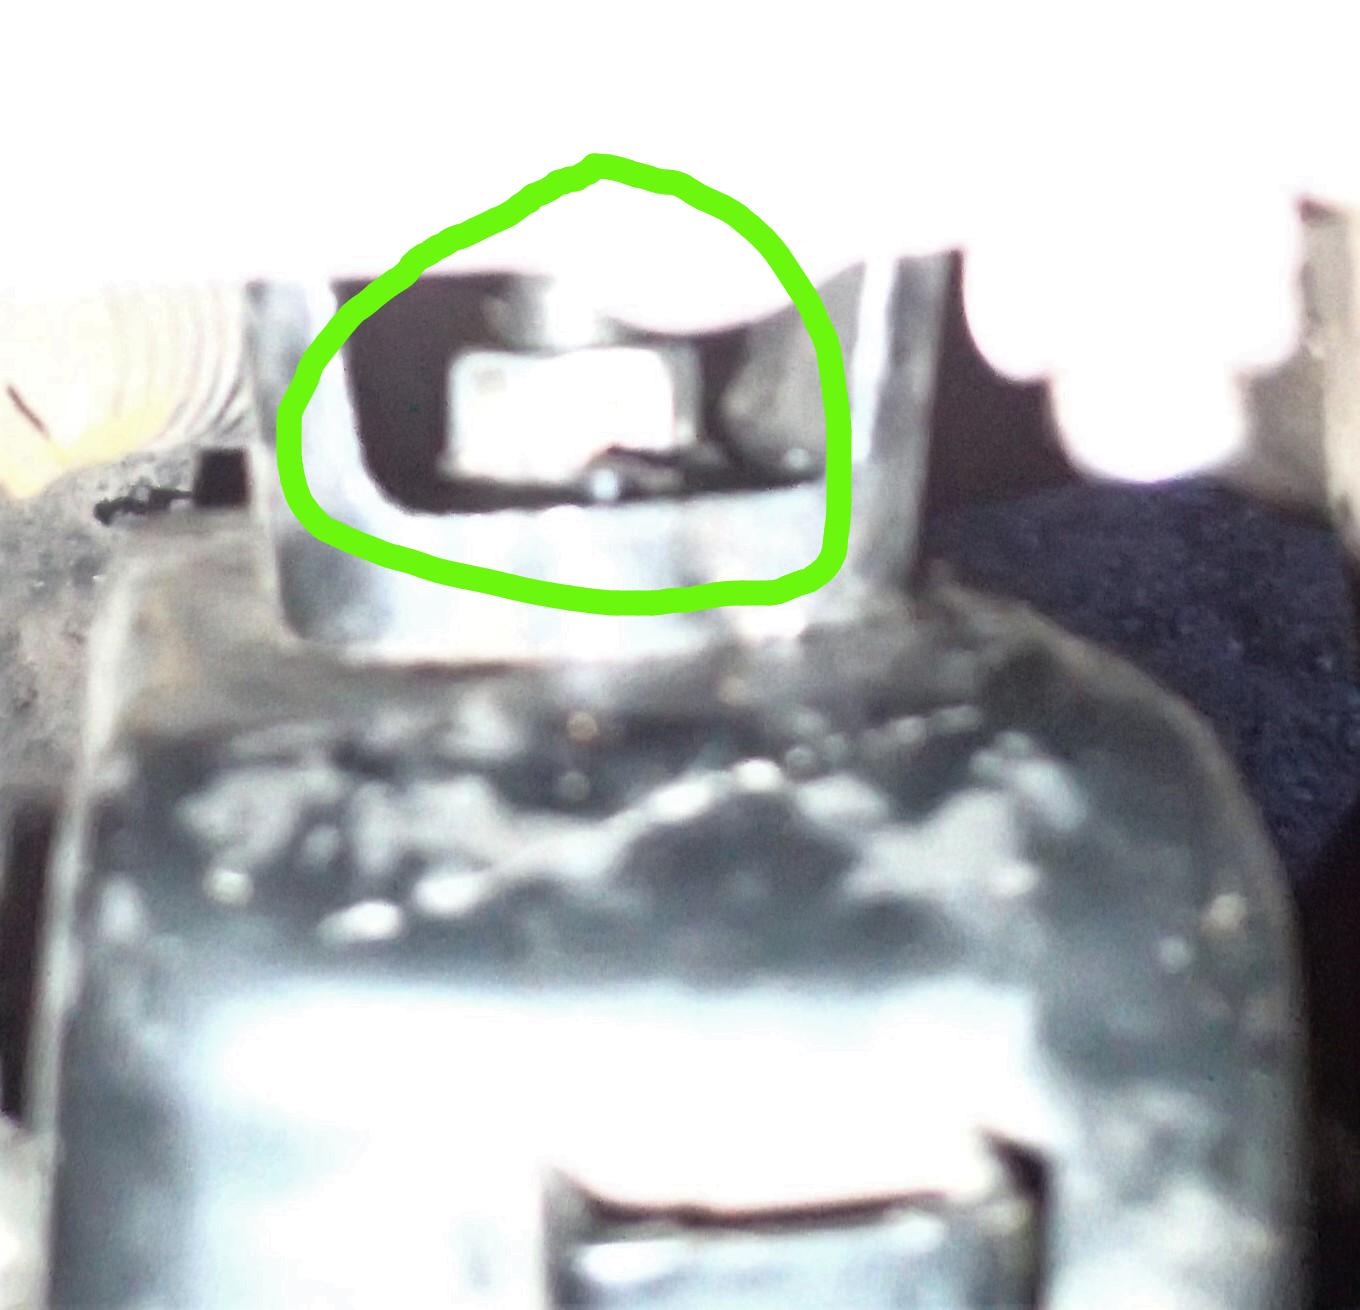
NOTE: The pin that pokes through the cap fits into a hole in the engine side mount. Here is a cruddy pic of the pin just in front of the 17mm nut
Then I lowered the engine a bit and got started on the left side.
And bolted the new one in loosely.
NOTE: The pin that pokes through the cap fits into a hole in the engine side mount. Here is a cruddy pic of the pin just in front of the 17mm nut
Then I lowered the engine a bit and got started on the left side.
Last edited by habanero; Aug 18, 2017 at 05:52 PM.
Aug 14, 2017 | 05:07 PM
#3277
Thread Starter
Contributing Member
Joined: Sep 2005
Posts: 8,247
Likes: 497
From: mo
The left side has more stuff on it, especially mine with the winch wiring and dual batteries. Still, it's the same deal. Unbolt the wiring harness from the top of the motor mount.
I broke the 14mm loose first, then got to work on the 17mm. To get a better angle I did lift the motor some. There is a coolant hose likely in the way if you have an oil cooler, I just slid the wrench under it. With the 1" body lift the best access for the left mount is through the side. I did not remove the tire to do this. You'll have to figure out your truck for your ownself.
I broke the 14mm loose first, then got to work on the 17mm. To get a better angle I did lift the motor some. There is a coolant hose likely in the way if you have an oil cooler, I just slid the wrench under it. With the 1" body lift the best access for the left mount is through the side. I did not remove the tire to do this. You'll have to figure out your truck for your ownself.
Aug 14, 2017 | 05:18 PM
#3278
Thread Starter
Contributing Member
Joined: Sep 2005
Posts: 8,247
Likes: 497
From: mo
And lifted the engine enough to get the mount out.
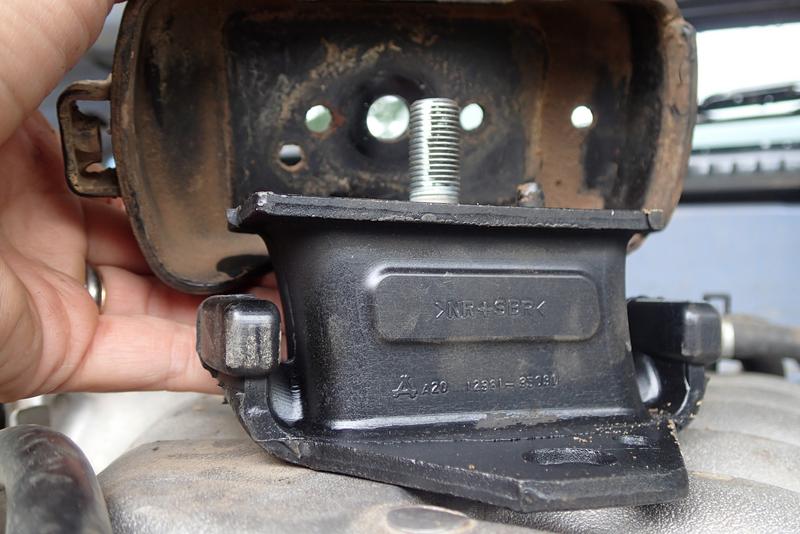
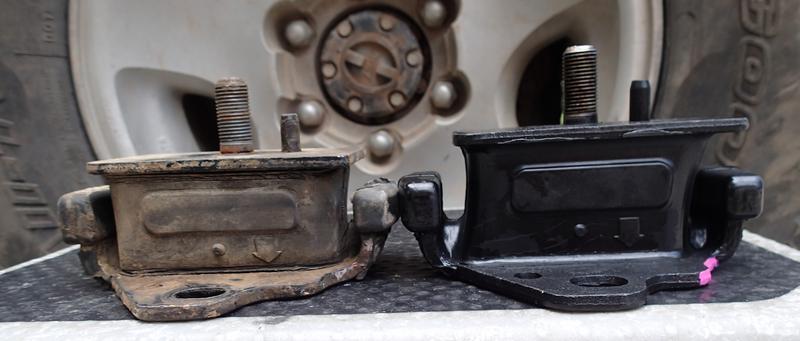
The left was definitely the worst of the 2. Both are compressed maybe a quarter inch or so, but the rubber was separating from the plate on the left one.
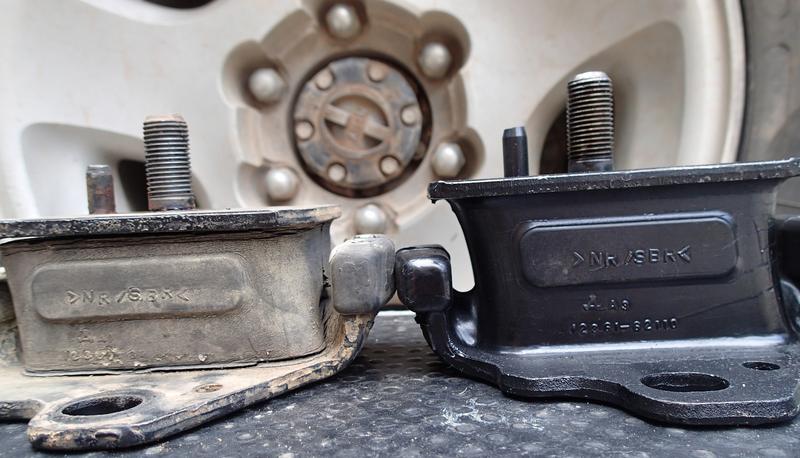
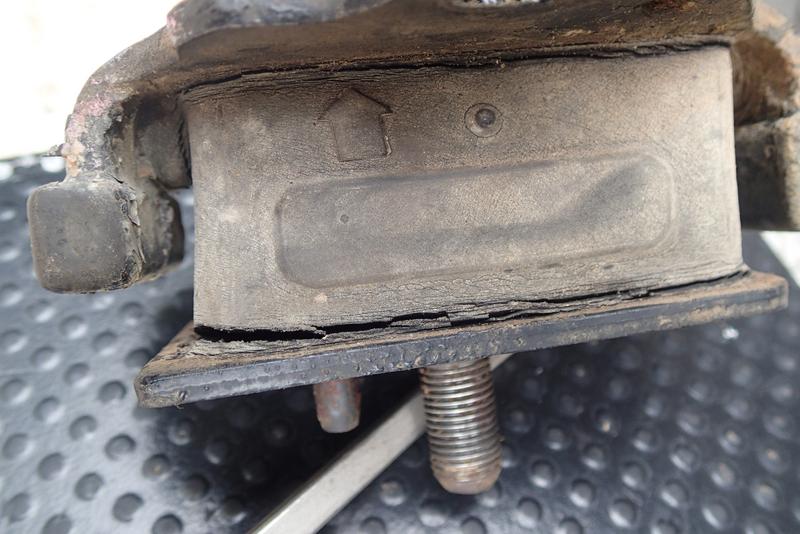
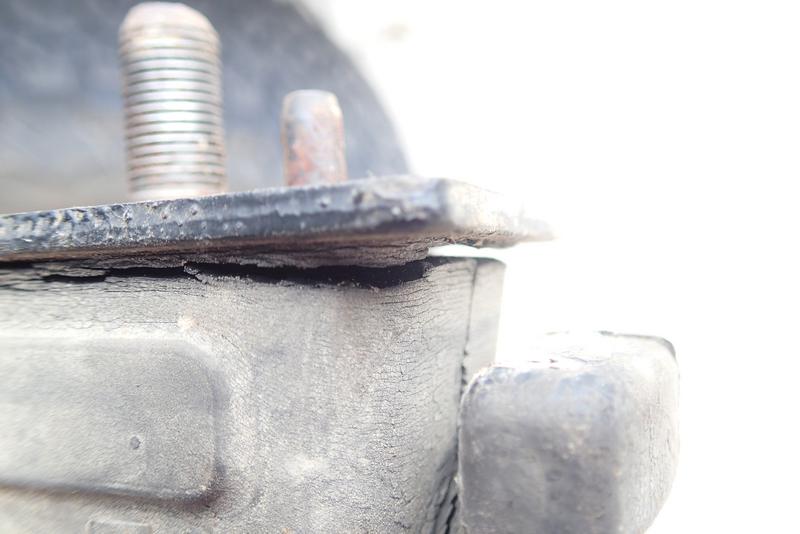
The left was definitely the worst of the 2. Both are compressed maybe a quarter inch or so, but the rubber was separating from the plate on the left one.
Last edited by habanero; Aug 18, 2017 at 05:54 PM.
Aug 14, 2017 | 05:29 PM
#3279
Thread Starter
Contributing Member
Joined: Sep 2005
Posts: 8,247
Likes: 497
From: mo
When I put the left motor mount in I loosely bolted the 17mm first, then lowed the engine enough to line up the 14mm bolts. That wasn't all that easy and there's no great place to pry the engine into place. A lot of up and down and some sideways. I did have to move the engine a little forward and couldn't find a good pry spot. Finally I settled on placing a board on the firewall and a prybar between that and the upper intake. Then I pried very gently while the kid helped with directions and got a 14mm bolt started.
More finessing to get the other 14mm started...ugh. Once I got them all well started I lowed the engine and tightened everything, using a little loc-tite for some insurance. Got the 2 wiring harness bolts back in and put the airbox back in, made sure it was all good, then VROOM!!
The fan is clearing the shroud just fine. The 1" body lift does give me less fan to shroud clearance than if it had no body lift so I might not have noticed the failing mount until it had separated. That metal cap keeps things together in case of failure except for upwards but it also obscures the mount.
Last edited by habanero; Aug 18, 2017 at 05:56 PM.
Aug 14, 2017 | 05:45 PM
#3280
Thread Starter
Contributing Member
Joined: Sep 2005
Posts: 8,247
Likes: 497
From: mo
I went out Saturday morning to remove the left motor mount and there was a honey bee on my fender. I didn't have any pollen on its legs where they store it and he seemed listless. Then I accidentally touched him and he fell onto the ground. I was really worried about stepping on him, especially as I was barefoot as usual, so I tried to get him to go away. He was still really listless so I got a little honey out for him. Which he licked for nearly 10 minutes and then flew away.

(how I fed a bee so I could work on my truck and not get stung)
(how I fed a bee so I could work on my truck and not get stung)


