
habanero's 1996 4Runner Build-Up Thread
 Aug 28, 2017 | 03:19 PM
#3301
Thread Starter
Contributing Member


Joined: Sep 2005
Posts: 8,247
Likes: 497
From: mo
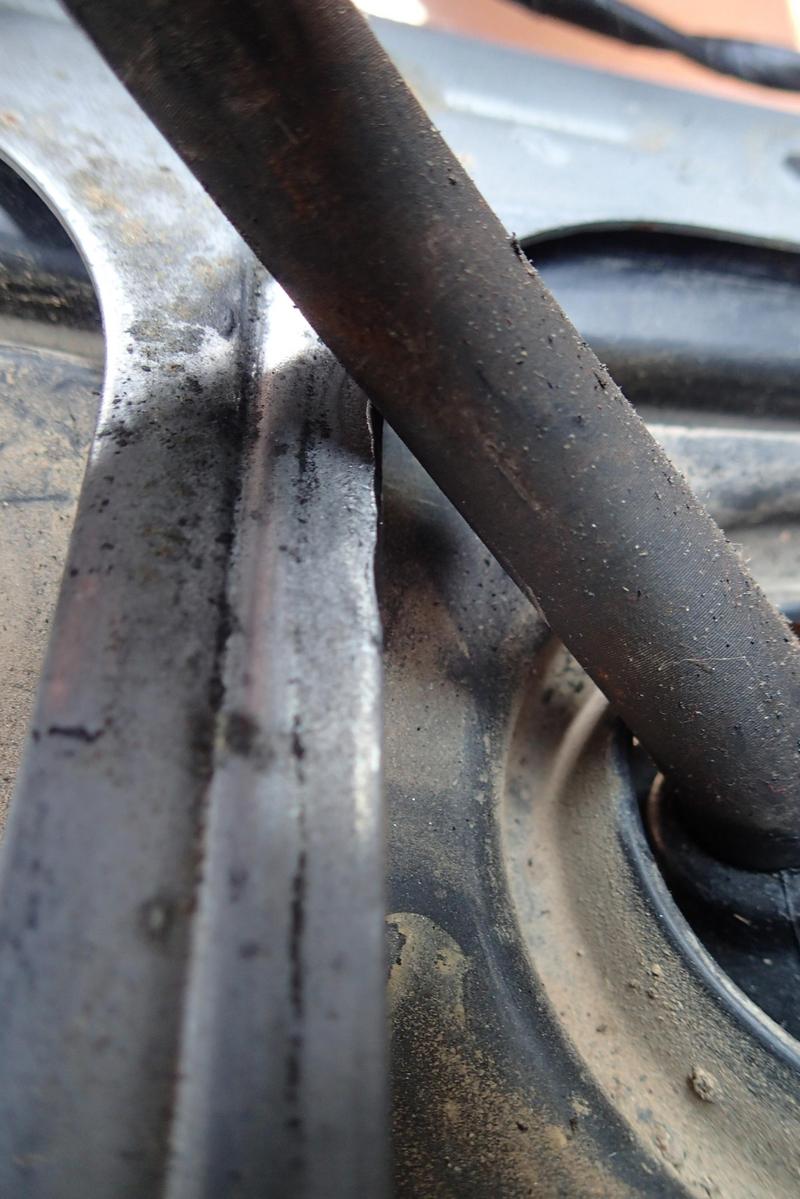
Before I mess with the new drain hose I need to finish running the heavier wire to where I want the hose to go. This is the only spot that accesses the sill:
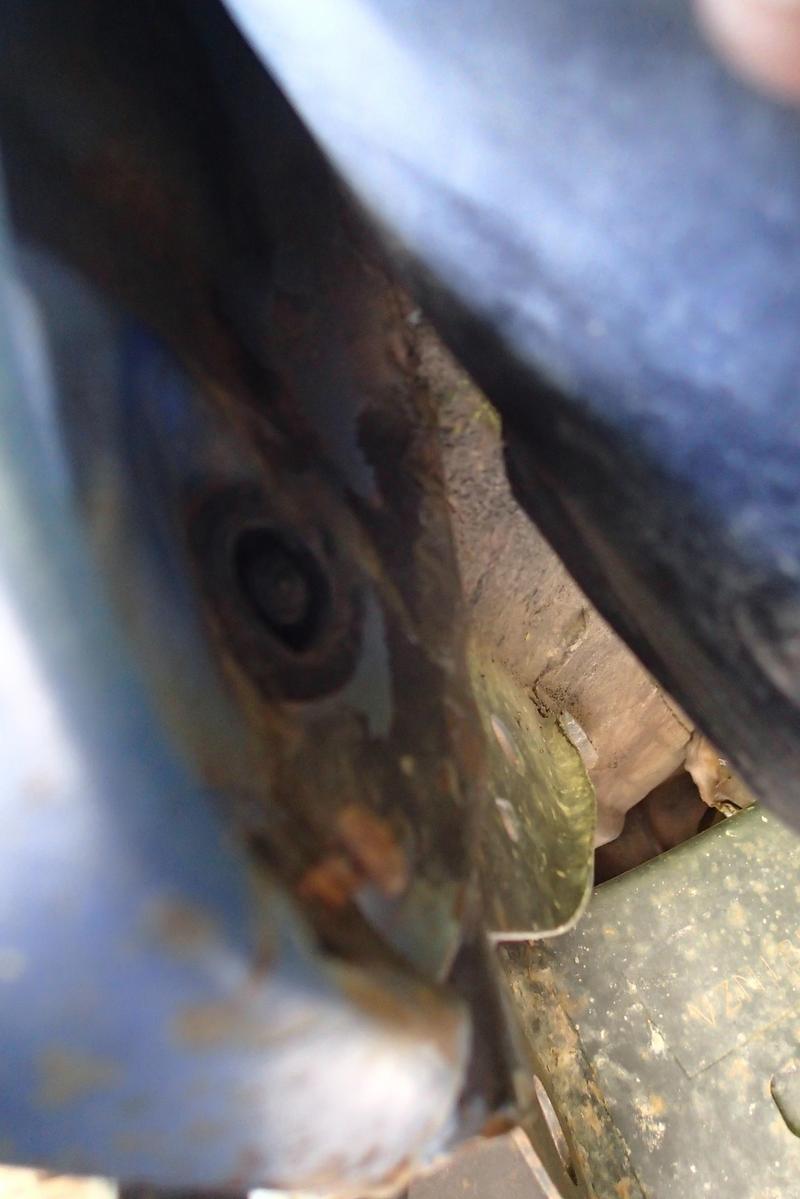
It is at the front, you can see mine is pretty mangled looking. That's because it's where the pinch weld that often gets pounded down is in order to fit bigger front tires. So you'll find it at the front just behind the front tire. The plug comes out.
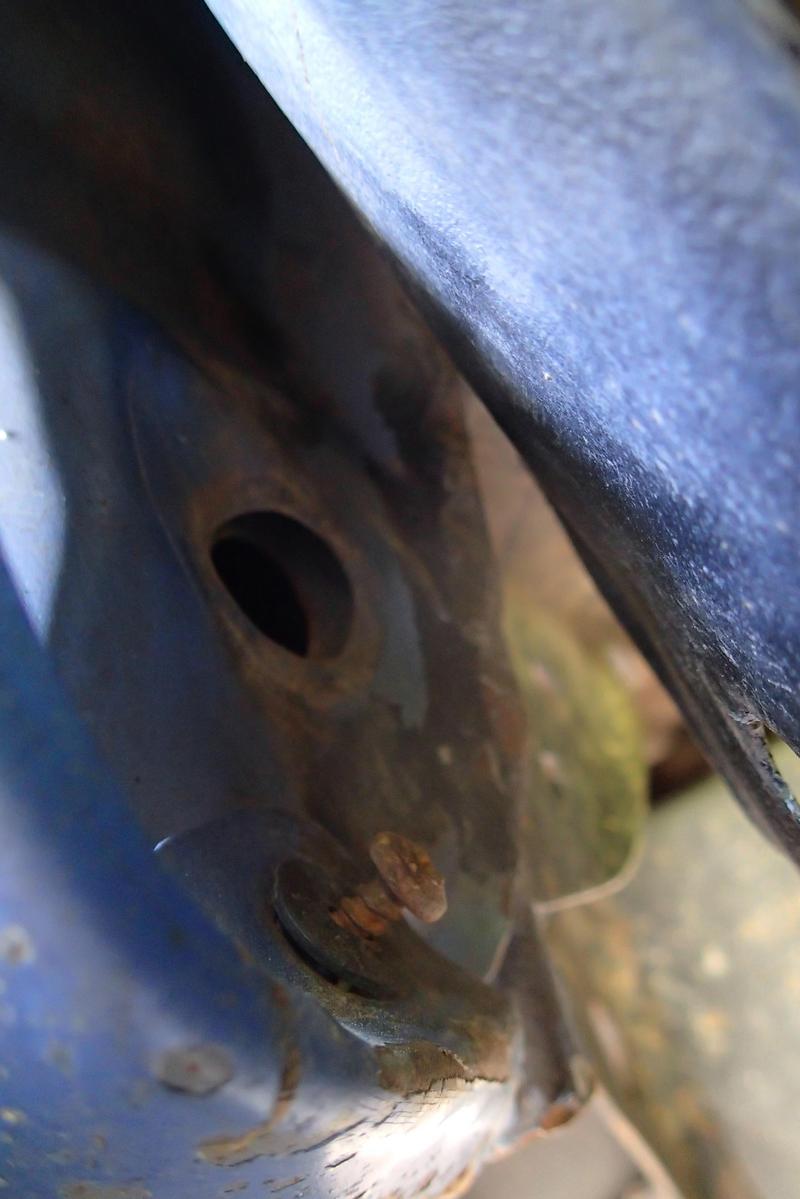
And some careful aiming should get your heavier wire though the hole.
To install the new drain hose I attach the wire to the top end of the heavier wire, then run the wire through the new drain hose
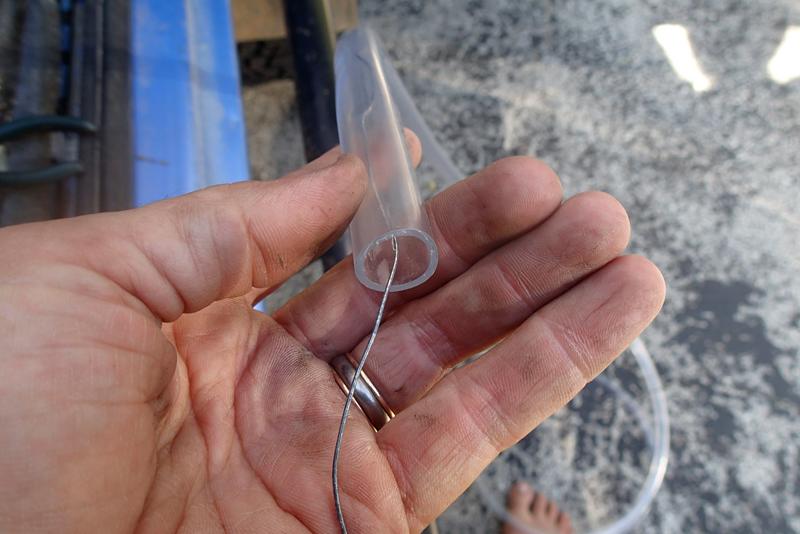
Which will guide the new drain hose over the heavier wire and give you something to pull and keep the heavier wire straight enough to slide the new drain hose into place. This isn't particularly easy, it took a few times of backing up several inches and retrying, sometimes while maneuvering the hose via the various ports in the a-pillar.
It may take a little work to get the tube though the last hole, patience, Grasshopper.
Once you're golden pull your guide wire out. Now you get to be like me and figure out the rest of the story....
I've bent the hole that the new drain hose aims more downwards and have shortened it after making sure there's enough hose it won't pull back into the hole. The top was easy, put clamp on hose, slide onto nipple (used a little silicone since hose was a tiny bit too big) and reclamp.
I still need to figure out exactly what I'm going to do with the end of the drain hose. So while it's driveable I don't consider it finished.
I may place a pin through it so it can't go back into the hole, then cutting it short enough not to interfere with the tire. I may have to trim the fender liner a bit.
I may insert a spring to keep it from kinking where it exits the hole and pointing it downwards more, again possibly trimming the fender liner.
Another option that I'm NOT planning on is removing the fender so I can drill a drain hose-sized hole just behind it for a front side exit.
And a last option that I don't really want to do is to drill a hole in the sill so the hose can exit along the side of the truck out of the way of the tire.
I'll have to get back to y'all on what happens there. If you decide to do this look at the options and decide your own best course of option for yourself. There is only the one exit hole at the front, drilling would have to be on the outside of the pinch weld at the bottom of the sill if you only want to go through one lay of metal.
The left side is more difficult than the right because of the wires behind the kick panel on that side, it's still do-able.
It is at the front, you can see mine is pretty mangled looking. That's because it's where the pinch weld that often gets pounded down is in order to fit bigger front tires. So you'll find it at the front just behind the front tire. The plug comes out.
And some careful aiming should get your heavier wire though the hole.
To install the new drain hose I attach the wire to the top end of the heavier wire, then run the wire through the new drain hose
Which will guide the new drain hose over the heavier wire and give you something to pull and keep the heavier wire straight enough to slide the new drain hose into place. This isn't particularly easy, it took a few times of backing up several inches and retrying, sometimes while maneuvering the hose via the various ports in the a-pillar.
It may take a little work to get the tube though the last hole, patience, Grasshopper.
Once you're golden pull your guide wire out. Now you get to be like me and figure out the rest of the story....
I've bent the hole that the new drain hose aims more downwards and have shortened it after making sure there's enough hose it won't pull back into the hole. The top was easy, put clamp on hose, slide onto nipple (used a little silicone since hose was a tiny bit too big) and reclamp.
I still need to figure out exactly what I'm going to do with the end of the drain hose. So while it's driveable I don't consider it finished.
I may place a pin through it so it can't go back into the hole, then cutting it short enough not to interfere with the tire. I may have to trim the fender liner a bit.
I may insert a spring to keep it from kinking where it exits the hole and pointing it downwards more, again possibly trimming the fender liner.
Another option that I'm NOT planning on is removing the fender so I can drill a drain hose-sized hole just behind it for a front side exit.
And a last option that I don't really want to do is to drill a hole in the sill so the hose can exit along the side of the truck out of the way of the tire.
I'll have to get back to y'all on what happens there. If you decide to do this look at the options and decide your own best course of option for yourself. There is only the one exit hole at the front, drilling would have to be on the outside of the pinch weld at the bottom of the sill if you only want to go through one lay of metal.
The left side is more difficult than the right because of the wires behind the kick panel on that side, it's still do-able.
Last edited by habanero; Aug 28, 2017 at 03:22 PM.
Aug 28, 2017 | 05:26 PM
#3302
Hab, consider wrapping thin wire around the drain hose. Coil it around enough and it will allow you to bend it into any shape you want and should keep it's shape for a good long while.
Aug 28, 2017 | 06:18 PM
#3303
Thread Starter
Contributing Member
Joined: Sep 2005
Posts: 8,247
Likes: 497
From: mo
Thanks for the idea, space-junk!
 Sep 3, 2017 | 02:09 PM
#3304
Thread Starter
Contributing Member
Joined: Sep 2005
Posts: 8,247
Likes: 497
From: mo
So busy.
Finally installed a dash cam,
got the sunroof leak fixed (it seems),
made a drainage where the water pours onto my wiring and into the cabin to divert said water,
scraped off the rust near that spot where the water sits under the carpet and hit it with converter,
cut out a bit of the shifter template thingy so the truck won't pop out of second and fourth like it has been since the motor mount replace,
found a spot for the through-panel connector for the start battery aux fuse block,
am replacing some of the older relays (aux reverse light, horn and something I can't remember what it is off-hand),
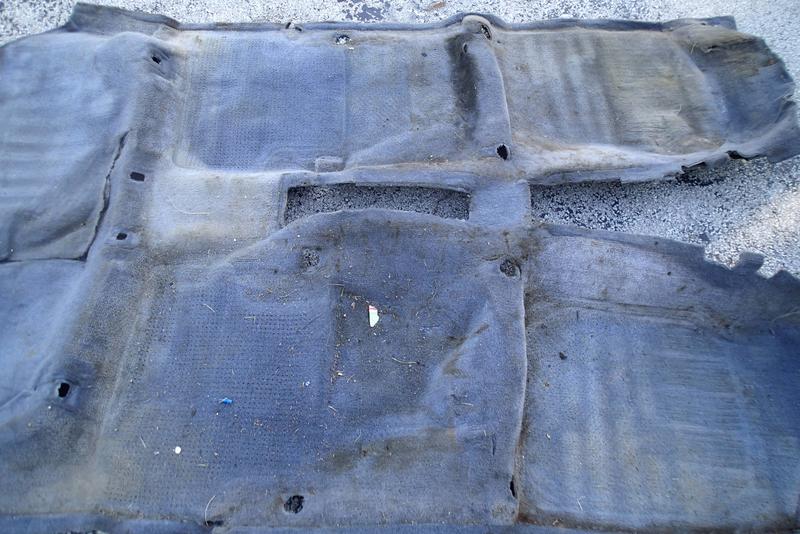
took the carpet and seats out,
cleaned carpet.
You know, stuff.
Pics later.
Finally installed a dash cam,
got the sunroof leak fixed (it seems),
made a drainage where the water pours onto my wiring and into the cabin to divert said water,
scraped off the rust near that spot where the water sits under the carpet and hit it with converter,
cut out a bit of the shifter template thingy so the truck won't pop out of second and fourth like it has been since the motor mount replace,
found a spot for the through-panel connector for the start battery aux fuse block,
am replacing some of the older relays (aux reverse light, horn and something I can't remember what it is off-hand),
took the carpet and seats out,
cleaned carpet.
You know, stuff.
Pics later.
Sep 3, 2017 | 03:00 PM
#3305


and you will like the dash cam. It is amazing what they catch that you don't notice
What kind did you get?
Last edited by dropzone; Sep 3, 2017 at 03:02 PM.
Sep 3, 2017 | 06:23 PM
#3306
Thread Starter
Contributing Member
Joined: Sep 2005
Posts: 8,247
Likes: 497
From: mo

(nope, you're remembering right, I don't have a snorkel)
I went with an Anker Roav It does have a battery instead of the more desirable capacitor but it is rated from -20 to 160 degrees Fahrenheit so am hoping it can handle the temps. I've had good luck with Anker, have a battery pack usb cords and a usb charger. And I found a promo code that made the cost $66. It has 3 image quality choices, is motion activated if you get hit while parked, it also auto starts and loop records. Time will tell.
There were so many dash cams to pick from, was considering the Rexing V1 before I came across the Roav.
I also bought a 64gb high endurance mini sd card to go with.
Sep 7, 2017 | 05:41 PM
#3307
Thread Starter
Contributing Member
Joined: Sep 2005
Posts: 8,247
Likes: 497
From: mo
Poor old 96 neglected 4Runner.
Carpet back in, driver's seat in-ish. It got dark.
It was kinda dirty...
Wiring to start battery aux fuse block which sits under the right rear seat routed through the hole where the missing body mount would be if it were a newer truck
using a Blue Seas through-panel connector and some silicone.
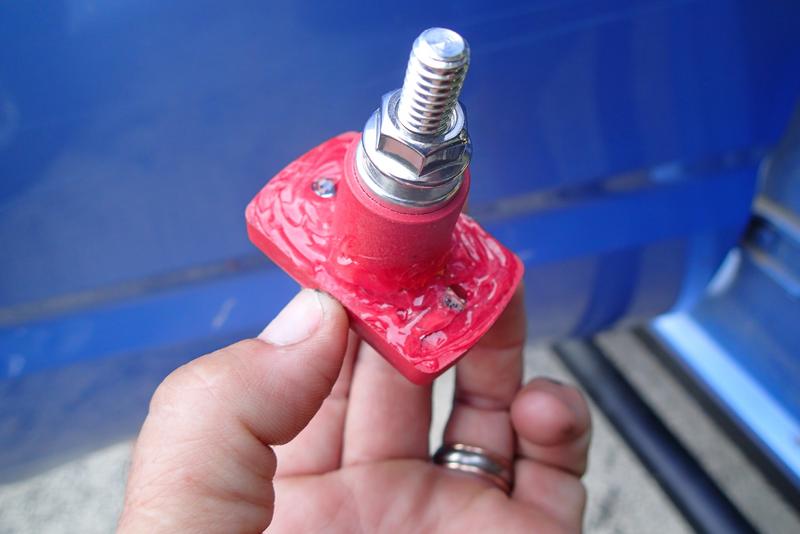
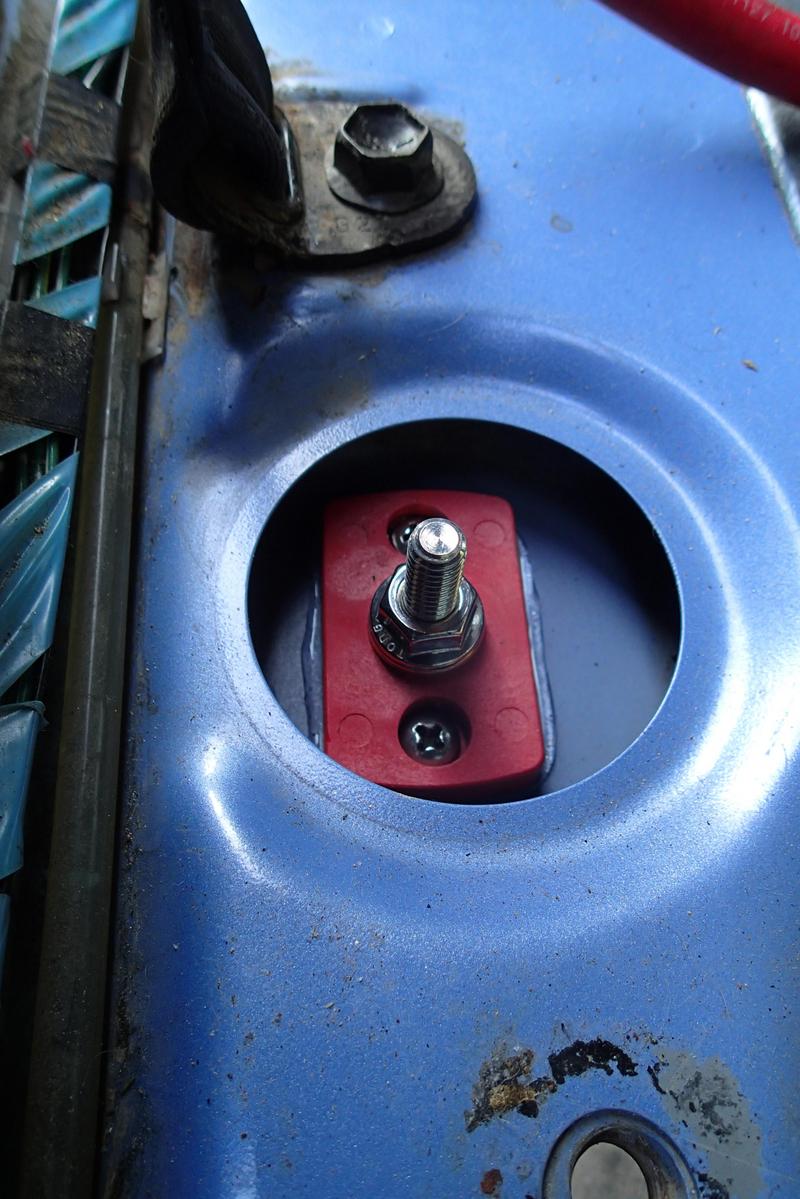

It is out of the way of feet, between the front seat belt floor mount and the rear foot of the front seat.
Carpet back in, driver's seat in-ish. It got dark.
It was kinda dirty...
Wiring to start battery aux fuse block which sits under the right rear seat routed through the hole where the missing body mount would be if it were a newer truck
using a Blue Seas through-panel connector and some silicone.
It is out of the way of feet, between the front seat belt floor mount and the rear foot of the front seat.
Last edited by habanero; Sep 7, 2017 at 05:42 PM.
Sep 7, 2017 | 05:50 PM
#3308
Thread Starter
Contributing Member
Joined: Sep 2005
Posts: 8,247
Likes: 497
From: mo
Wiring to roof lights repaired and reconnected.
It didn't help we had to learn almost all the countries in the world in a week. Okay, the kid did, but Morocco, Algeria, Tunisia, Egypt, Western Sahara, Mauritania, Mali, Niger, Chad.....there's 56 countries in Africa alone....ugh. It seems I'm doing more helping with schoolwork than anything else.
I still have to finish going over the wiring and put seats in and also the trim panels. I really miss driving the little blue truck.
Sunroof drain doing its job
Sunroof NOT doing its job
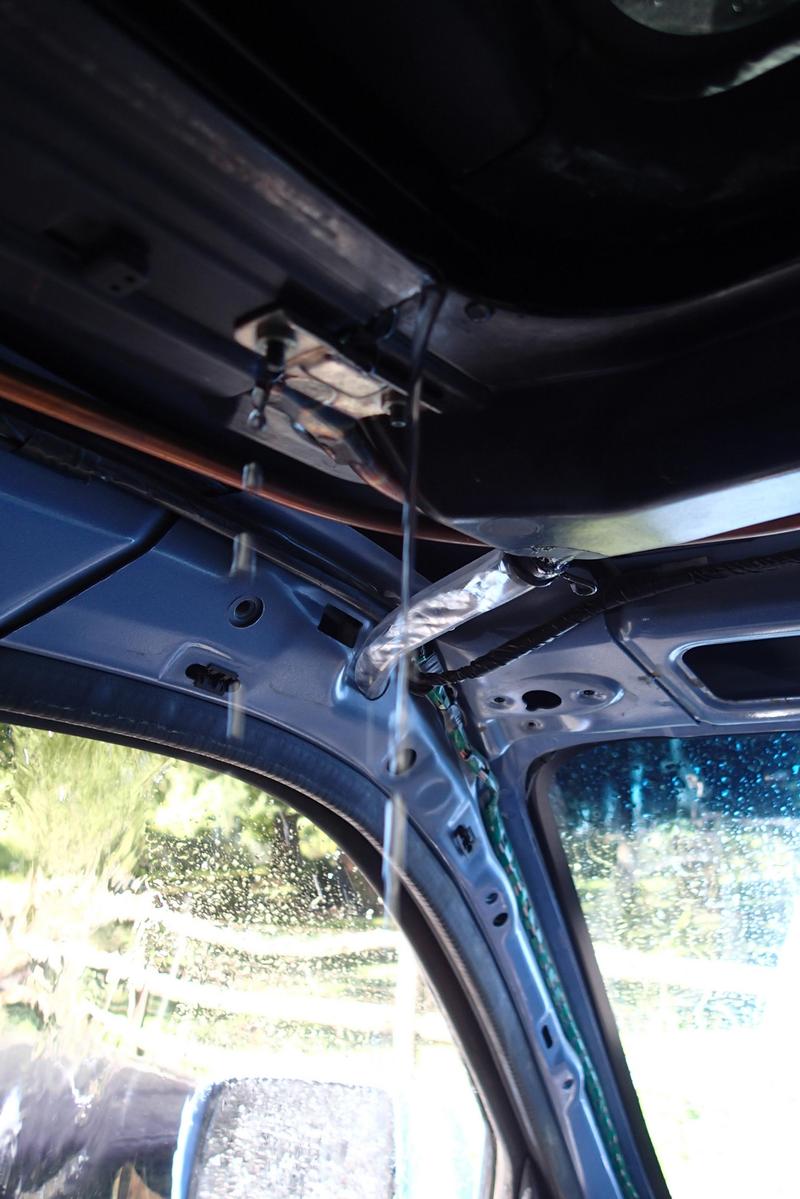
I never saw a leak other than a little water at the corner and am mystified as to where the water was going. I really don't think it could have been this much water or it would have been going somewhere obvious. Right?
After the motor mounts were replaced the stick shift was hitting the metal plate that holds the rubber gasket. It'd go into 2nd and 4th with some difficulty, but would pop out at the slightest provocation.
So I trimmed the problem area
It didn't help we had to learn almost all the countries in the world in a week. Okay, the kid did, but Morocco, Algeria, Tunisia, Egypt, Western Sahara, Mauritania, Mali, Niger, Chad.....there's 56 countries in Africa alone....ugh. It seems I'm doing more helping with schoolwork than anything else.
I still have to finish going over the wiring and put seats in and also the trim panels. I really miss driving the little blue truck.
Sunroof drain doing its job
Sunroof NOT doing its job
I never saw a leak other than a little water at the corner and am mystified as to where the water was going. I really don't think it could have been this much water or it would have been going somewhere obvious. Right?
After the motor mounts were replaced the stick shift was hitting the metal plate that holds the rubber gasket. It'd go into 2nd and 4th with some difficulty, but would pop out at the slightest provocation.
So I trimmed the problem area
Sep 7, 2017 | 06:05 PM
#3309
Thread Starter
Contributing Member
Joined: Sep 2005
Posts: 8,247
Likes: 497
From: mo
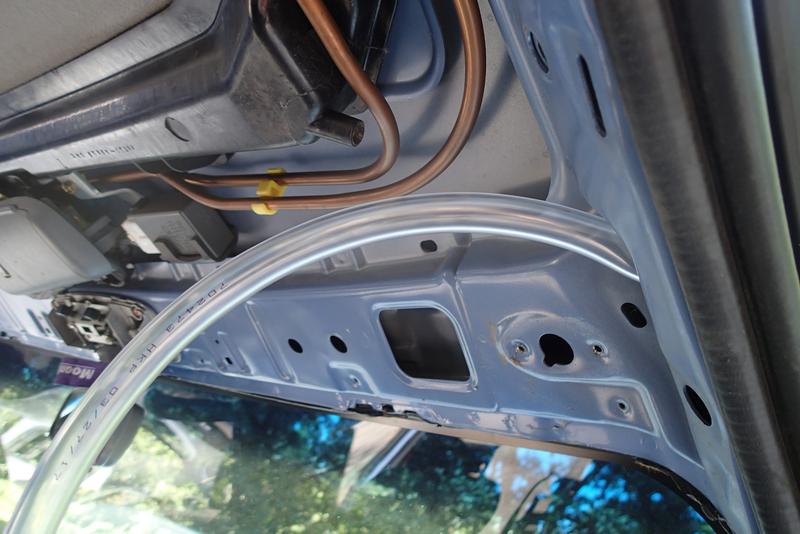
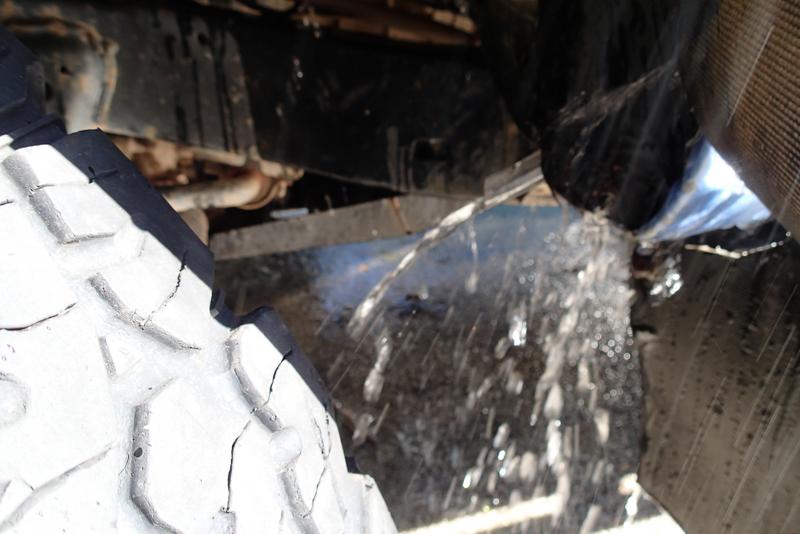
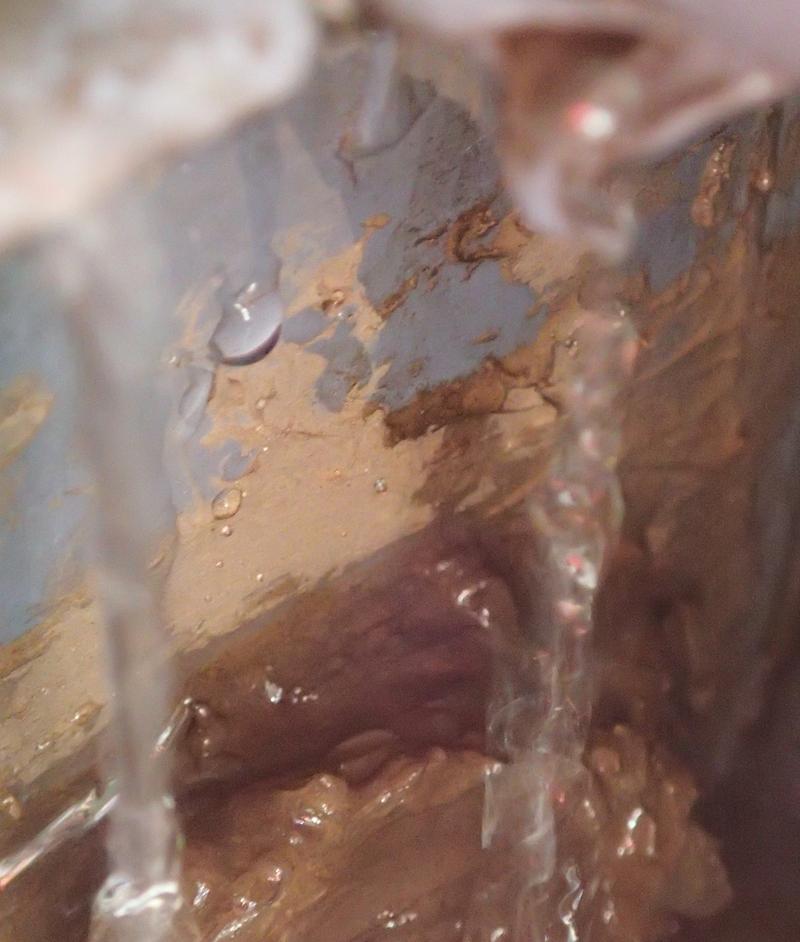
And I addressed the issue of water coming into the truck via the main wires the come in just below the master cylinder on the firewall. This is actually a somewhat common problem.
The blob below the water is a combination of the gasket and silicone I'd originally tried to help plug the leak. That didn't work. You can see the water just cascades right onto the wiring there, which runs into the truck.
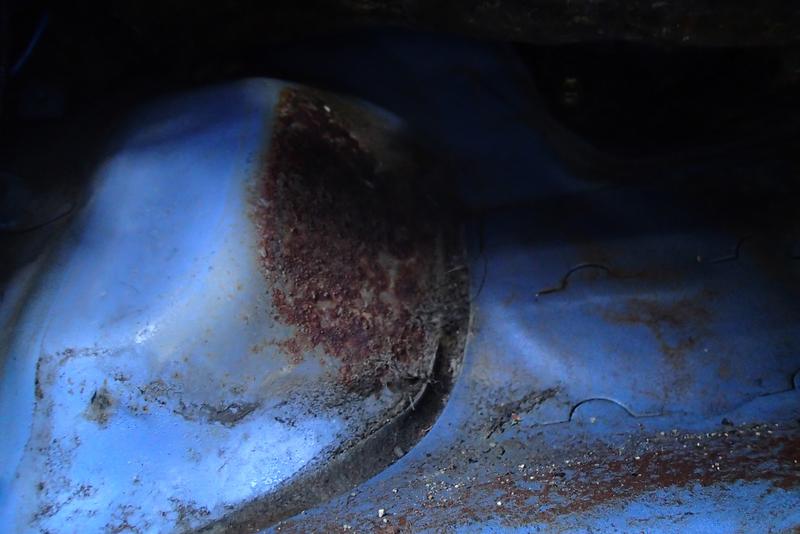
Which makes the carpet all wet and disgusting and smelly. Oddly no mold. Thankfully no mold! When I pulled the carpet I did find bubbly surface rust in one big patch pretty much under the clutch pedal.
So I built a drain using some of the left-over tubing. It's really hard to get a picture of something that's clear. Basically it's an open gutter at the top that becomes an enclosed tube that directs much of the water away from the wiring. Lots of silicone. A bolt and a zip-tire. Lots of silicone. I may have to figure a way to secure it better, if the silicone won't hold. Step 1 is to see if it will do the job.
Wow, that picture bites. Well, it looks better in person.
The blob below the water is a combination of the gasket and silicone I'd originally tried to help plug the leak. That didn't work. You can see the water just cascades right onto the wiring there, which runs into the truck.
Which makes the carpet all wet and disgusting and smelly. Oddly no mold. Thankfully no mold! When I pulled the carpet I did find bubbly surface rust in one big patch pretty much under the clutch pedal.
So I built a drain using some of the left-over tubing. It's really hard to get a picture of something that's clear. Basically it's an open gutter at the top that becomes an enclosed tube that directs much of the water away from the wiring. Lots of silicone. A bolt and a zip-tire. Lots of silicone. I may have to figure a way to secure it better, if the silicone won't hold. Step 1 is to see if it will do the job.
Wow, that picture bites. Well, it looks better in person.
Sep 8, 2017 | 04:57 AM
#3310
Registered User

Joined: Aug 2016
Posts: 115
Likes: 13
From: Tennessee
That blue sea connector is cool! I didn't know they made those.
I must have missed it... what was the pint of the new sunroof drain line?
Lastly, I'm pretty sure my sunroof leaks where you built the little gutter. Mine has calcium deposits there around the edges and I've just been ignoring them lol
I must have missed it... what was the pint of the new sunroof drain line?
Lastly, I'm pretty sure my sunroof leaks where you built the little gutter. Mine has calcium deposits there around the edges and I've just been ignoring them lol
Sep 8, 2017 | 06:24 AM
#3311
Thread Starter
Contributing Member
Joined: Sep 2005
Posts: 8,247
Likes: 497
From: mo
That blue sea connector is cool! I didn't know they made those.
It's called a through panel connector...that one is Blue Sea #2202
and the boot is Blue Sea #4010 It is a 2 pack.
I must have missed it... what was the point of the new sunroof drain line?
To extend the lines beyond the sills where they normally drain into. I've already got one rust hole in each sill and the 99 is in even worse shape. Being in the salt belt is disadvantageous, and silt from the drains also collect and trap moisture down in there too.
Those lines are accessible at the kick panels and can be extended from there but I already had the headliner and trim out so decided to go ahead and replace the whole line.
Lastly, I'm pretty sure my sunroof leaks where you built the little gutter. Mine has calcium deposits there around the edges and I've just been ignoring them lol
My pic is horrible but that's at the driver's upper rear corner where firewall and fender meet.
The water runs down the windshield over the cowl and down into that corner, then at that point and along the fender where it rains down off the firewall and onto my wiring. The wiring goes downward into the firewall so gravity takes it from there.
I had to watch it with my rain gear, first simulated by the hose, then some convenient downpours to see exactly what goes on. My neighbor thinks I'm nuts.
Last edited by habanero; Sep 8, 2017 at 06:26 AM.
Sep 8, 2017 | 12:15 PM
#3313
Thread Starter
Contributing Member
Joined: Sep 2005
Posts: 8,247
Likes: 497
From: mo
Hahaha fierohink....as new as that is it's not even entirely relevant any more!
Remember the U.S.S.R? Czechoslovakia? East Germany? Vietnam having a north and south? Both Yemens?
So many new countries from the ashes of the old. Even if I could remember what I'd learned back then I'd totally fail if I took today's test.
Remember the U.S.S.R? Czechoslovakia? East Germany? Vietnam having a north and south? Both Yemens?
So many new countries from the ashes of the old. Even if I could remember what I'd learned back then I'd totally fail if I took today's test.
Sep 8, 2017 | 06:03 PM
#3314
i like that connector, very cool
that is a ton of water coming through, no good. Makes me kind of glad I don't have a sunroof. The one in the trekker had been siliconed shut by a previous owner. Tried to make it work...yep re-sealed it..it was nice to have to see how close i was going under some logs and stuff though.
Curious how you will like the dash cam. I have a Garmin in the 4runner, want to put one in our other cars. The one you found is priced about right
Sep 8, 2017 | 06:56 PM
#3315
Thread Starter
Contributing Member
Joined: Sep 2005
Posts: 8,247
Likes: 497
From: mo
i like that connector, very cool
that is a ton of water coming through, no good. Makes me kind of glad I don't have a sunroof. The one in the trekker had been siliconed shut by a previous owner. Tried to make it work...yep re-sealed it..it was nice to have to see how close i was going under some logs and stuff though.
Curious how you will like the dash cam. I have a Garmin in the 4runner, want to put one in our other cars. The one you found is priced about right
that is a ton of water coming through, no good. Makes me kind of glad I don't have a sunroof. The one in the trekker had been siliconed shut by a previous owner. Tried to make it work...yep re-sealed it..it was nice to have to see how close i was going under some logs and stuff though.
Curious how you will like the dash cam. I have a Garmin in the 4runner, want to put one in our other cars. The one you found is priced about right
I'm curious too! I'll have to post some videos when I get something together. So far I haven't formed an opinion, but I only went for a couple of short drives today. It is evident I really should get a rear camera too, if anyone has any suggestions....cheap, durable, waterproof, great picture, wide angle. You know, everything.
You know, Woot! had a couple of Garmins for under $100 a day or two ago. Amazon reviews were just okay though, for those particular models.
Sep 8, 2017 | 07:10 PM
#3316
i have a Garmin DashCam 35, it is nice with the red light camera and warning if you get too close
I would like the dashcam 55 since it is voice activated.
http://www.trustedreviews.com/review...in-dash-cam-55
but $200 is a bit much
Garmin's editing software sorta sucks too
I would like the dashcam 55 since it is voice activated.
http://www.trustedreviews.com/review...in-dash-cam-55
but $200 is a bit much
Garmin's editing software sorta sucks too
Sep 10, 2017 | 05:51 PM
#3317
Thread Starter
Contributing Member
Joined: Sep 2005
Posts: 8,247
Likes: 497
From: mo
Nice dropzone. The reviews I've seen on both of them have been favorable but agree the price is high. Would have to be one heck of a quality pic for that!
Got nearly all the interior back in the 96, carpet and seats and most of the panels. Cleaned up more of the interior wiring too. Glad to be able to drive it again!
The 99 got some work from the husband. Switch for the Arb OBA, front right diff tube seal, installed the year-old junkyard radiator and the shiny junkyard rear coolant lines.
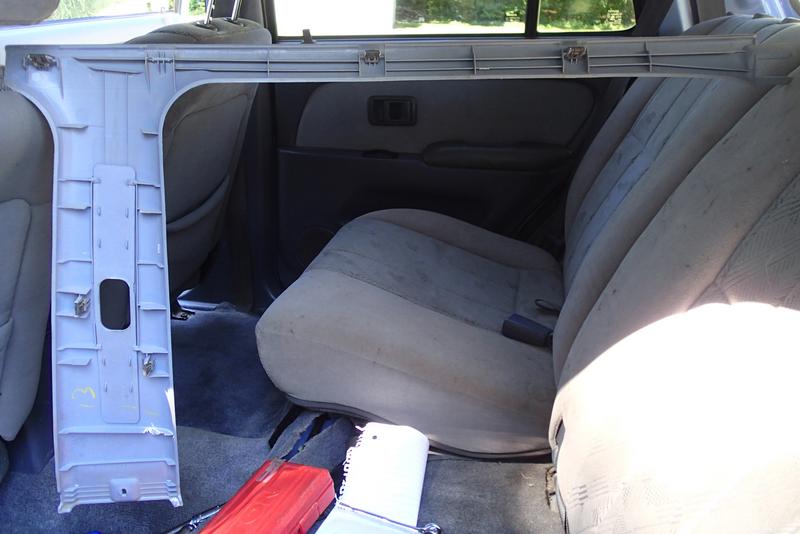
Here's one the the forward interior trim panels, the one over the b-pillar and rear door:
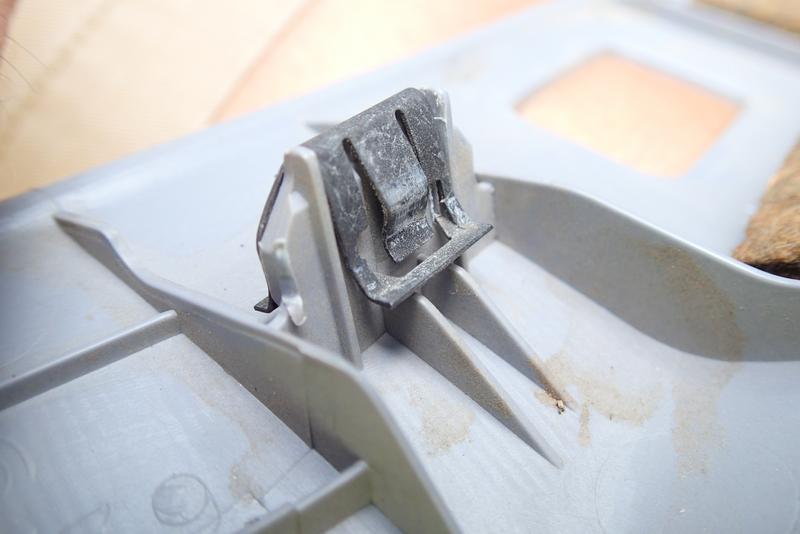
The two top forward panels, the ones that cover the A and B pillars, have these horrible little clips. I don't have whatever special tool it takes to get them out but was able to pull them with minimal damage. This is what you're working with, if you want to get them out:
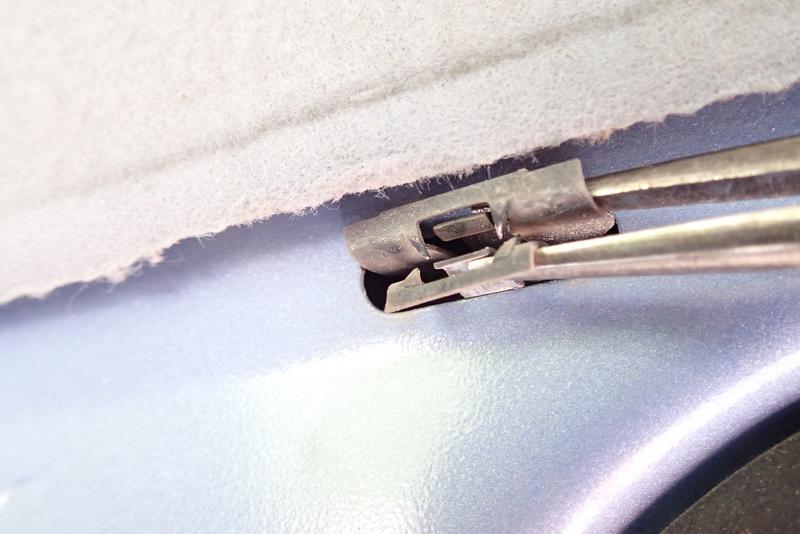
They're probably supposed to come out with the panel, but if they don't a little needle nose works great:
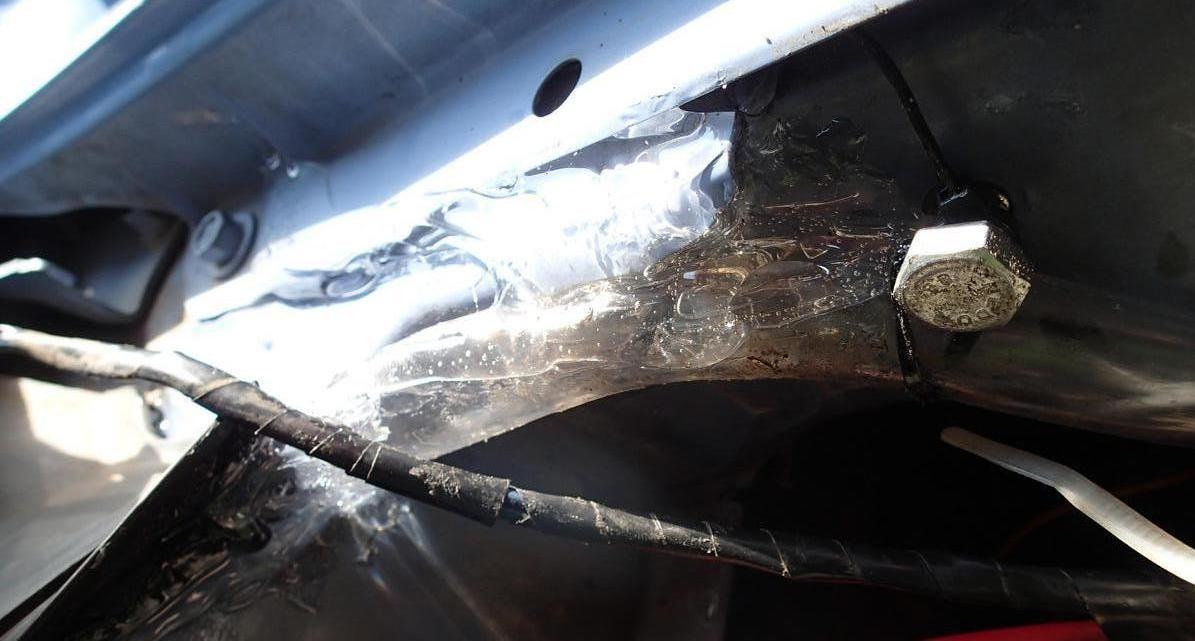
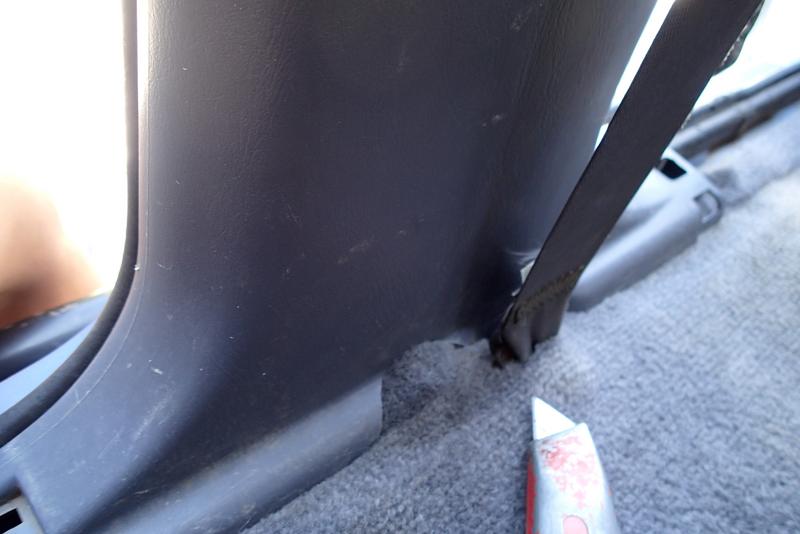
Did a bit of trimming on the right B-pillar so there wouldn't be anything pressing on the through-panel connector wiring:
And lastly this is a very common occurrence with the 3rd gen's front seat bolts:
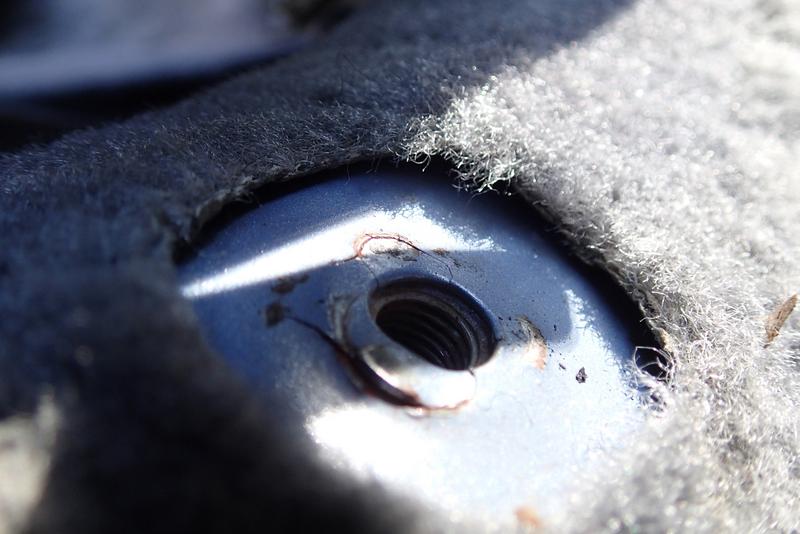
It will eventually crack completely and the seat bolt will no longer be held in place. Pictured is the right front corner for the passenger seat. There are 3 other bolts holding the seat to the floor so I will continue to monitor this until it needs action.
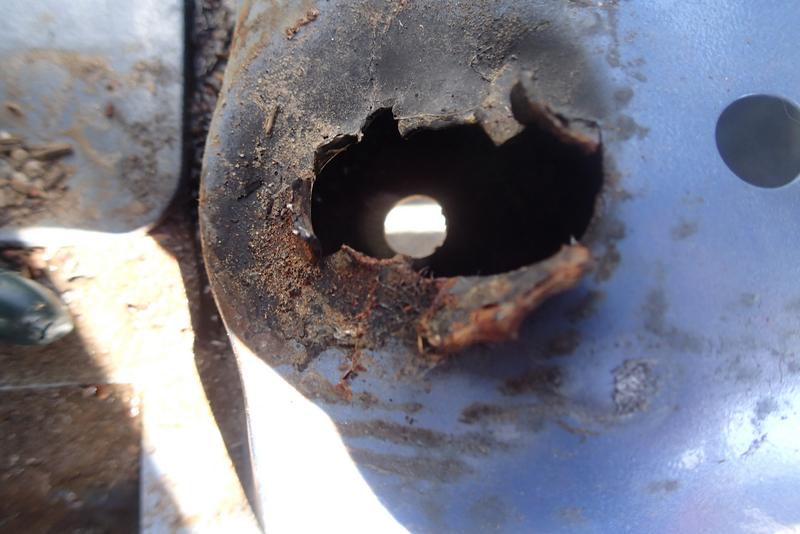
The left front nut for the left front seat cracked free many years ago. I repaired it with a bolt through the floor.
Could have cleaned that up a bit, eh?
Got nearly all the interior back in the 96, carpet and seats and most of the panels. Cleaned up more of the interior wiring too. Glad to be able to drive it again!
The 99 got some work from the husband. Switch for the Arb OBA, front right diff tube seal, installed the year-old junkyard radiator and the shiny junkyard rear coolant lines.
Here's one the the forward interior trim panels, the one over the b-pillar and rear door:
The two top forward panels, the ones that cover the A and B pillars, have these horrible little clips. I don't have whatever special tool it takes to get them out but was able to pull them with minimal damage. This is what you're working with, if you want to get them out:
They're probably supposed to come out with the panel, but if they don't a little needle nose works great:
Did a bit of trimming on the right B-pillar so there wouldn't be anything pressing on the through-panel connector wiring:
And lastly this is a very common occurrence with the 3rd gen's front seat bolts:
It will eventually crack completely and the seat bolt will no longer be held in place. Pictured is the right front corner for the passenger seat. There are 3 other bolts holding the seat to the floor so I will continue to monitor this until it needs action.
The left front nut for the left front seat cracked free many years ago. I repaired it with a bolt through the floor.
Could have cleaned that up a bit, eh?
Sep 11, 2017 | 06:30 AM
#3319
Thread Starter
Contributing Member
Joined: Sep 2005
Posts: 8,247
Likes: 497
From: mo
Exactly! 
As we both know: Have a 3rd gen? Check front seat mounts.
You can get the entire mount separate and weld it in, iirc. I did use a large diameter washer of a thickness that won't bow like the thinner fender washers can.
Or maybe not....EB isn't showing a price for the right side, only the left.
57452-35040 left
57451-35030 right showing as discontinued
Have also seen people cut out the broken spot and weld in something new.
Somebody reported cracked spot welds on the cross member too. Fun and games.
Last edited by habanero; Sep 11, 2017 at 06:46 AM.
Sep 12, 2017 | 05:06 AM
#3320
Thread Starter
Contributing Member
Joined: Sep 2005
Posts: 8,247
Likes: 497
From: mo
Looking at videos from the Roav. Pretty clear though you have to be fairly close to see license plates.
One thing I've learned is that all my mental notes are out loud!
Will have to record without sound before I post, unless you want to hear me blah blah blah not much that makes sense blah blah blah.
Other than that, trying to figure out how to fit my circuit breakers along with the house fuse block and relays about where the block and relays are now.


