habanero's 1996 4Runner Build-Up Thread
 Jan 20, 2019 | 02:51 PM
#3781
Thread Starter
Contributing Member


Joined: Sep 2005
Posts: 8,247
Likes: 497
From: mo
Sitting around on my behind looking at parts I need to order and it's snowing again. Went out for a short while and blew some bubbles for the housebound neighbor who wanted to know where his snowman is but it's not snowman snow so he's just going to have to live with bubbles. 
Not much going on here- it's supposed to be a SUPER BLOOD WOLF MOON or something like that- tonight- beginning about 8:40 pm for central time, totality about 10:40 til about 11:40 pm. If you like that sort of thing may your skies be clear and you not be too tired. Lucky you, west coast, with a pre-bedtime viewing. I'm hoping for clear skies, but it's not looking good for us.
Guess it's about done and it's only about an inch, time to go shovel stuff. Have a good warm evening.
Jan 20, 2019 | 08:56 PM
#3782
Registered User

Joined: Jun 2013
Posts: 3,112
Likes: 582
From: Portland, Oregon, USA
We lucked out timing wise on the moon, but our sky is pretty cloudy.
We could see the moon slowly disappearing behind the clouds with a very faint redish-orange glow.
Still pretty cool!
We could see the moon slowly disappearing behind the clouds with a very faint redish-orange glow.
Still pretty cool!
Jan 21, 2019 | 05:23 AM
#3783
Thread Starter
Contributing Member
Joined: Sep 2005
Posts: 8,247
Likes: 497
From: mo
Off work today, still need to order parts, make breakfast, do laundry, do a little stinky shopping. It isn't going to be a doing truck stuff day today because BRRRRR!
Jan 24, 2019 | 07:09 AM
#3784
Thread Starter
Contributing Member
Joined: Sep 2005
Posts: 8,247
Likes: 497
From: mo
96 4Runner 304,681 miles
It's freezing brrrr cold out which is why this morning I noticed the rear defrost is working iffily. As in just barely and not the whole time as best as I can tell. Once it warms up I'll take a gander at the wiring between the hatch and truck for starters, crossing fingers it's that simple.
On the plus side the side mirrors- same circuit- defrost beautifully.
EDIT:
Went out this afternoon to see what's up. All I learned is that it's too cold outside for both fingers and supple wires. Will have to wait for it to get warmer.
Last edited by habanero; Jan 24, 2019 at 02:05 PM.
Jan 27, 2019 | 07:41 AM
#3785
Thread Starter
Contributing Member
Joined: Sep 2005
Posts: 8,247
Likes: 497
From: mo
96 4Runner 304,702 miles
Well, it's not the wires at the hatch, all 4 repairs including the defrost wire are holding fine and there are no new breaks. Tested for continuity between each wire at the 2 connectors from where it connects to the body harness and the 2 connectors that are within the hatch itself- all those are good.
I've reconnected the body harness to hatch harness wiring and am currently inside trying to warm up my frozen meat logs and turn them back into fingers.
I know the defrost is getting power of some kind because some defrosting is happening, next up is the defroster itself.
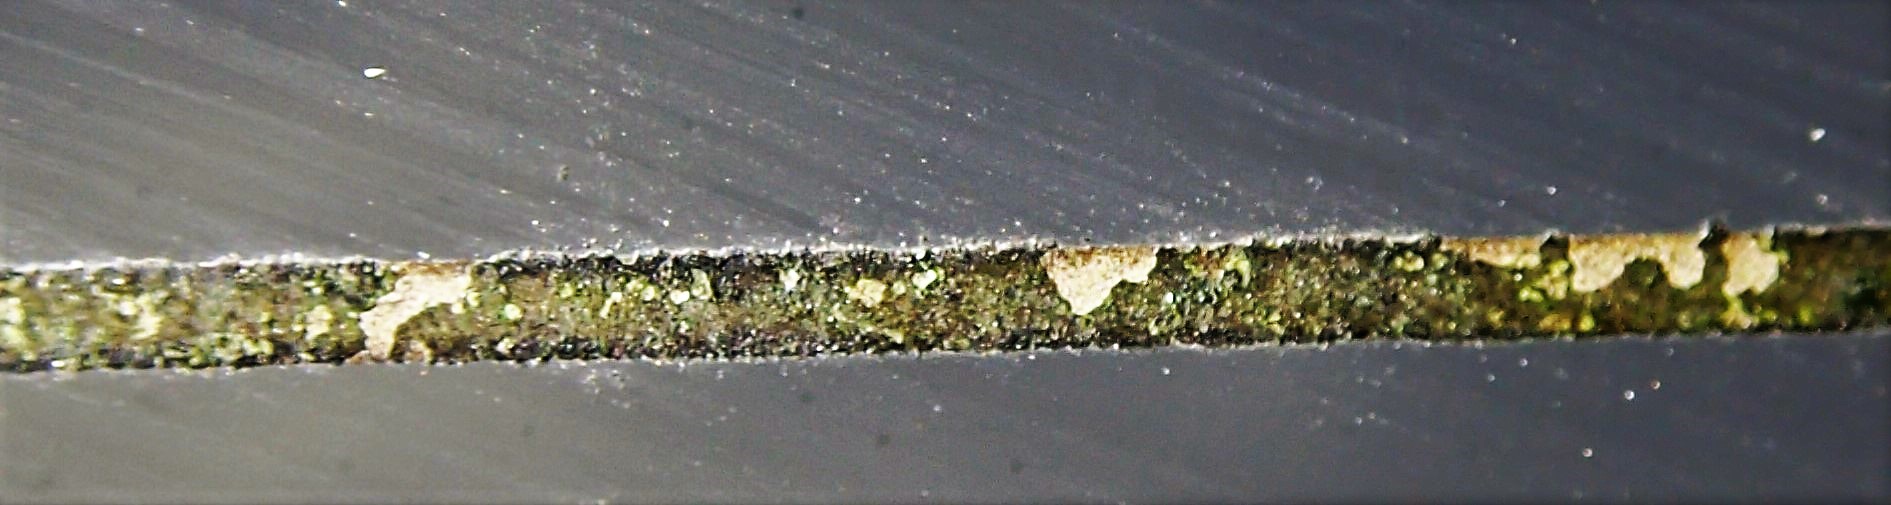
I'm having a heck of a time checking those tiny lines so I grabbed the temp gun. By the time the mirrors were around 100 degrees the rear defrost was 34-37 degrees, depending on where I aimed. Starting temp was 31 degrees. I ran a flashlight over it to see if I could find any breaks, there are several areas like
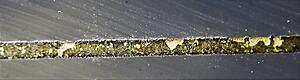
Flaking off and greenish in places. I'm still going to try to get some good reads at some point, my fingers are so cold right now.
Well, it's not the wires at the hatch, all 4 repairs including the defrost wire are holding fine and there are no new breaks. Tested for continuity between each wire at the 2 connectors from where it connects to the body harness and the 2 connectors that are within the hatch itself- all those are good.
I've reconnected the body harness to hatch harness wiring and am currently inside trying to warm up my frozen meat logs and turn them back into fingers.
I know the defrost is getting power of some kind because some defrosting is happening, next up is the defroster itself.
I'm having a heck of a time checking those tiny lines so I grabbed the temp gun. By the time the mirrors were around 100 degrees the rear defrost was 34-37 degrees, depending on where I aimed. Starting temp was 31 degrees. I ran a flashlight over it to see if I could find any breaks, there are several areas like
Flaking off and greenish in places. I'm still going to try to get some good reads at some point, my fingers are so cold right now.
Last edited by habanero; Jan 27, 2019 at 02:05 PM.
Feb 3, 2019 | 04:12 PM
#3786
Thread Starter
Contributing Member
Joined: Sep 2005
Posts: 8,247
Likes: 497
From: mo
96 4Runner 304,725 miles
Oil change- looked like oil without anything milky in it and no weird not-oil smells.
PCV- had one out of a spare valve cover that works (rattles/moves), which is better than the one that was in there that was sticking. Have a fresh new one coming along with a new hose to replace the one that is splitting and hard as a rock.
Replaced the dirt-spattered filters for VSV2 and VSV4 for ADD (4wd part) with a set from the junkyard that was clean- for no particular reason.
Feb 4, 2019 | 12:30 PM
#3787
Thread Starter
Contributing Member
Joined: Sep 2005
Posts: 8,247
Likes: 497
From: mo
96 4Runner 304,729 miles
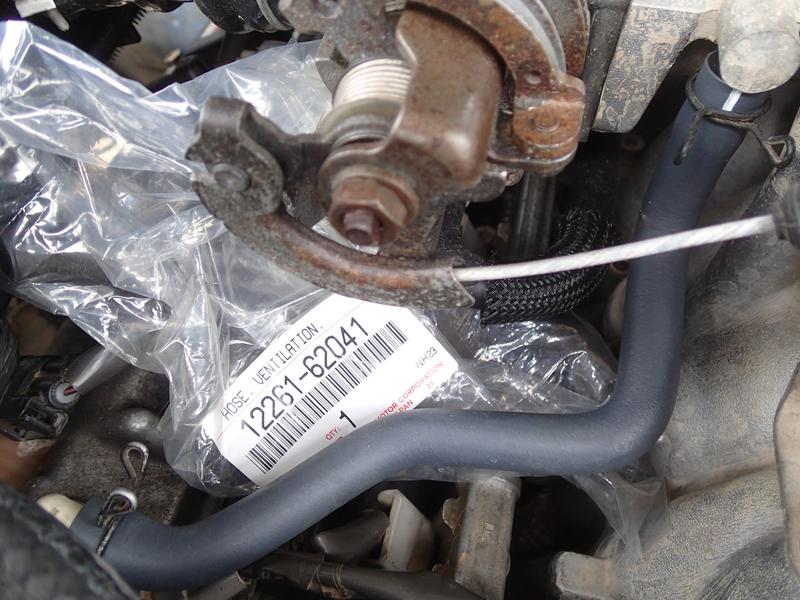
PCV hose came today- the original one is very hard and splitting-
And the hood bumpers that go on the fenders 53384-35010 Insulator Bumper. There are 2, one on each fender
Might be a little tired and hard after 23 years
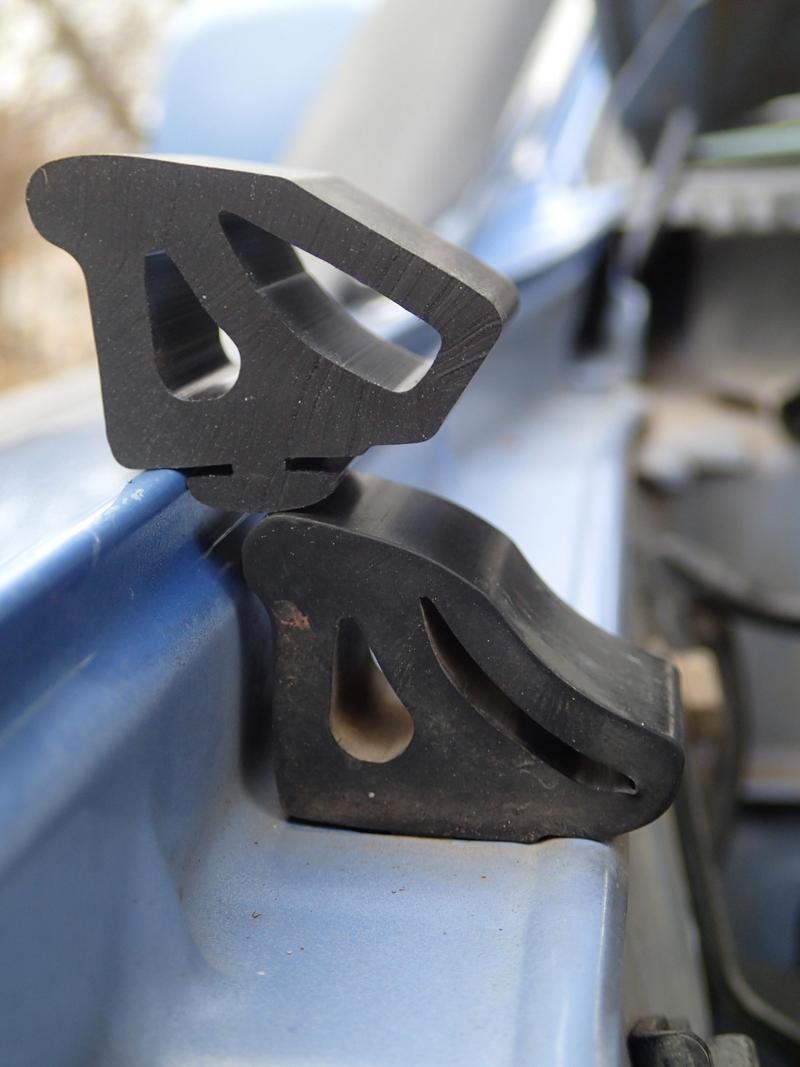
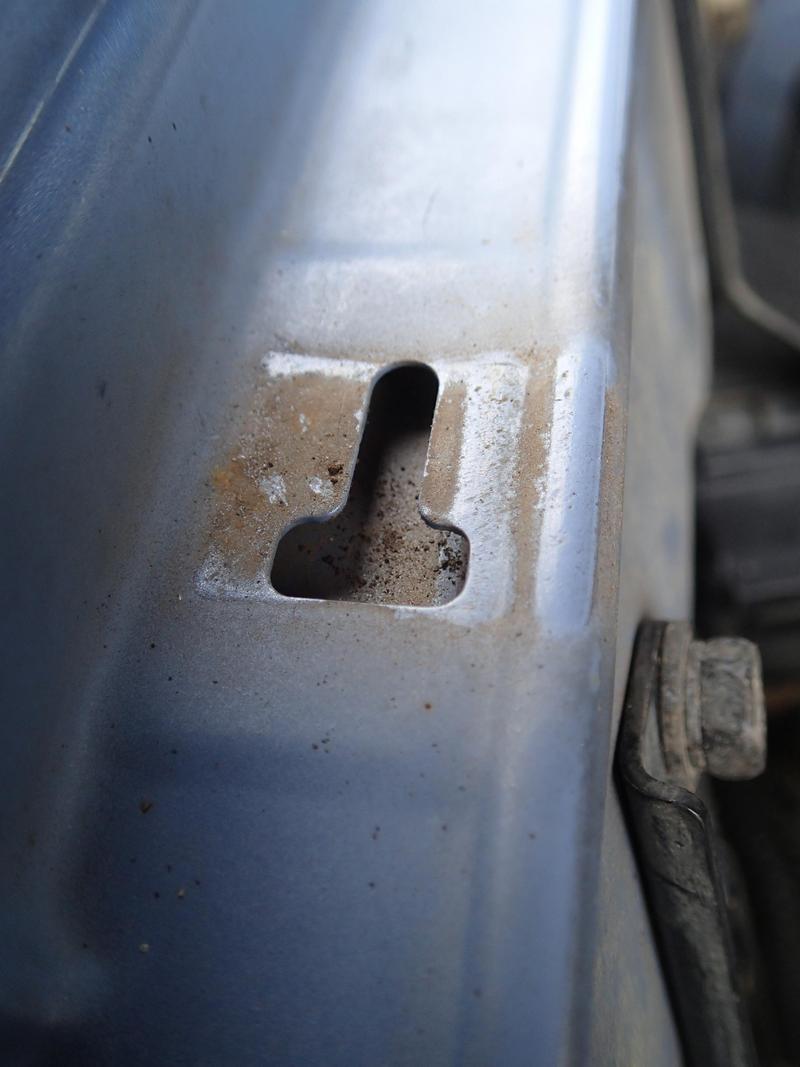
It fits in this t-shaped hole
And pulls up, forward and out

To put the new one in I used a pic to get the wings started down into the forwardmost section of the 'T', then pushed down and back. It was not difficult.
Ta da!
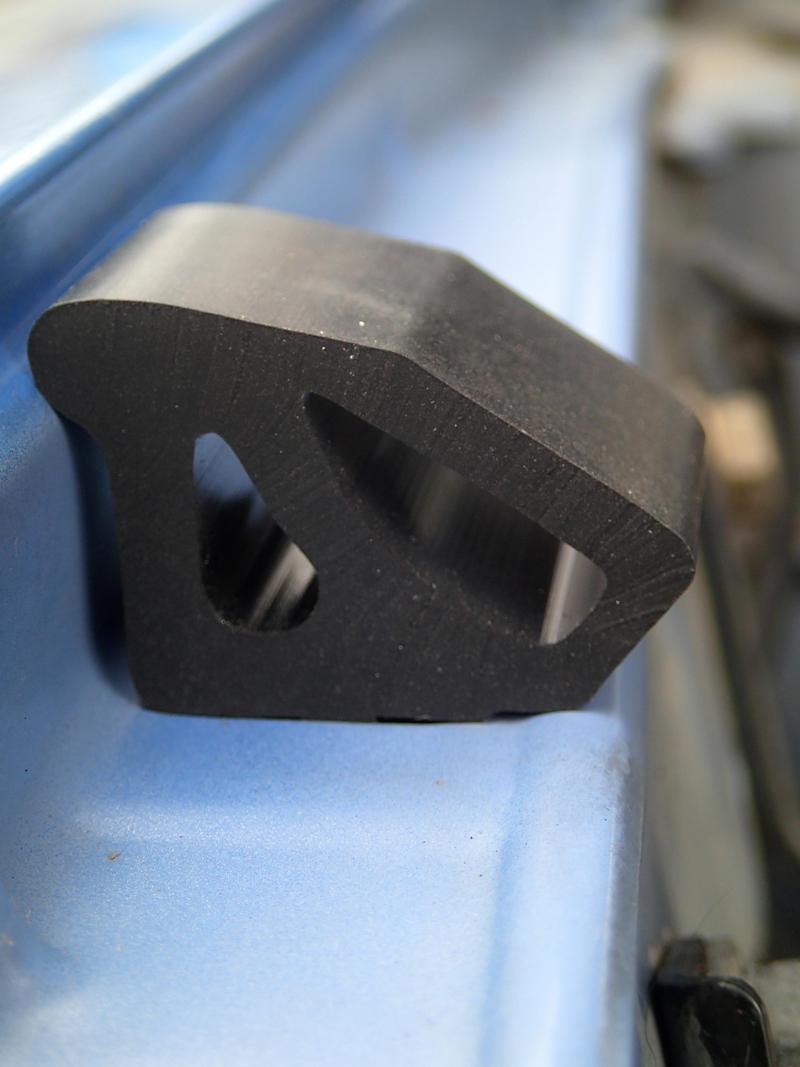
I expect that they won't retain their shape, but they won't be hard little rocks, either.
PCV hose came today- the original one is very hard and splitting-
And the hood bumpers that go on the fenders 53384-35010 Insulator Bumper. There are 2, one on each fender
Might be a little tired and hard after 23 years
It fits in this t-shaped hole
And pulls up, forward and out
To put the new one in I used a pic to get the wings started down into the forwardmost section of the 'T', then pushed down and back. It was not difficult.
Ta da!
I expect that they won't retain their shape, but they won't be hard little rocks, either.
Last edited by habanero; Feb 4, 2019 at 12:32 PM.
Feb 4, 2019 | 02:13 PM
#3788
Registered User
Joined: Jun 2013
Posts: 3,112
Likes: 582
From: Portland, Oregon, USA
Nice, new OEM goodness! 
The bumpers should hold their shape for a little while, while conforming to the shape of the hood over time. But now they will be hood bumpers instead of rock hard hood stops!

The bumpers should hold their shape for a little while, while conforming to the shape of the hood over time. But now they will be hood bumpers instead of rock hard hood stops!
Feb 4, 2019 | 02:39 PM
#3789
Thread Starter
Contributing Member
Joined: Sep 2005
Posts: 8,247
Likes: 497
From: mo
There was also a clutch hose and some bell crank boots in the box. B'lasted the hose fittings on the truck and didn't do anything with the boots yet. It's dropped 20 degrees in the past couple hours and the wind has picked up so that's as far as I'm getting with it today.
Let's just say I have to...um...make dinner- which is not going to be the barbecue I'd originally planned.
 Feb 12, 2019 | 01:57 PM
#3790
Thread Starter
Contributing Member
Joined: Sep 2005
Posts: 8,247
Likes: 497
From: mo
PARTS!
Sonoran Steel heavy duty rear lower control arms- I went with poly, these are also available with Toyota oe bushings-
pictured with my '96's old captive bushing arm:
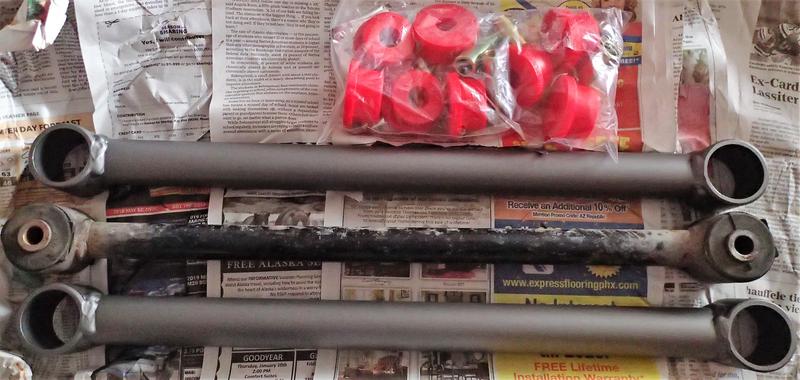
hoping to find time to install today or tomorrow
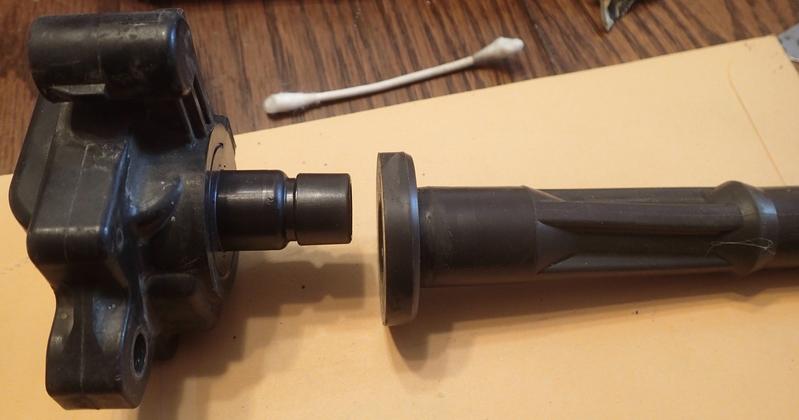
Sonoran Steel heavy duty rear lower control arms- I went with poly, these are also available with Toyota oe bushings-
pictured with my '96's old captive bushing arm:
hoping to find time to install today or tomorrow
Feb 12, 2019 | 05:31 PM
#3791
Registered User

Joined: Aug 2016
Posts: 115
Likes: 13
From: Tennessee
Feb 13, 2019 | 03:19 PM
#3793
Thread Starter
Contributing Member
Joined: Sep 2005
Posts: 8,247
Likes: 497
From: mo
96 4Runner 304,828 miles
Replaced the worn out rear lower control arm bushings with whole new Sonoran Steel arms (pictured a few posts above).
Grease and install the bushings into the new arms, add each bolt sleeve after the bushings are in.
Not hard, take out ONE old RLCA, loosely bolt in side by axle, put the frame side in, use a jack to lift the axle until the hole lines up and the bolt goes in, once in put the axle back on the ground and tighten the nuts. Do the other side.
I like to use anti-seize on the bolt sleeves/middle of bolt to keep them from melding here in the salt belt.
DON'T do them at the same time, leave one installed to help keep the axle pretty much in place as you do the other.
Last edited by habanero; Feb 13, 2019 at 03:21 PM.
Mar 4, 2019 | 12:22 PM
#3794
Thread Starter
Contributing Member
Joined: Sep 2005
Posts: 8,247
Likes: 497
From: mo
I'm pretty sure I'm at 750' above sea level in the midwest and it's March, but then I look out and see 3" of snow on the ground and we woke up to 2 degrees (feels like -24!) and that's not right so maybe it's not March?
I am so confused....
The Sonoran Steel rear lower control arms solved my obnoxious rear shuddering situation.
The new pcv valve and hose appears to have solved my really really bad gas mileage though I don't go through a tank that fast so it may take another month to confirm. So far I've gone through about a 1/2 tank where pre-new-pcv & hose I was near empty.
Waiting for warmer weather and less white stuff to do the clutch hose and bell crank boots. Ugh. I'm also looking for the source(s) of some thumps and bumps noises. You know, the usual.
It is March, right??
Mar 6, 2019 | 02:32 PM
#3795
Thread Starter
Contributing Member
Joined: Sep 2005
Posts: 8,247
Likes: 497
From: mo
96 4Runner, 305,048 miles
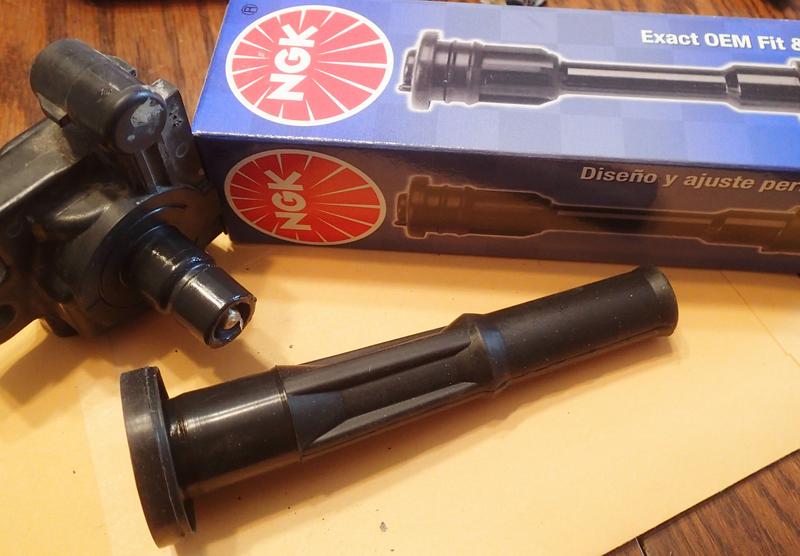
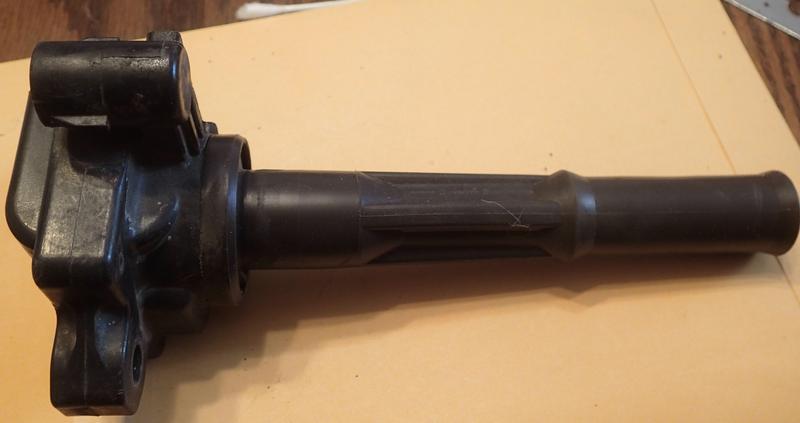
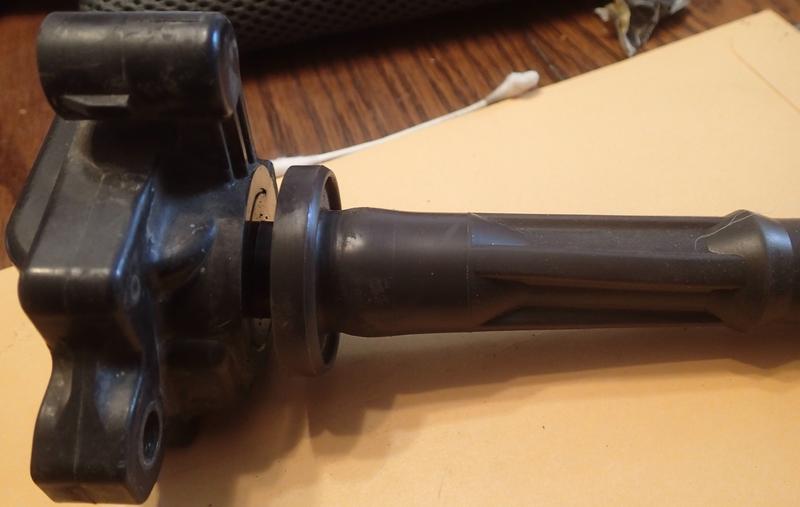
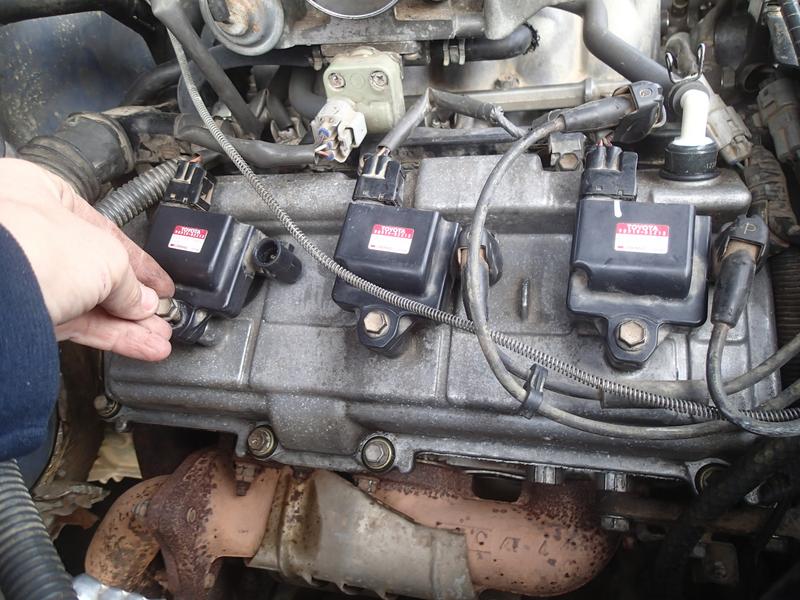
Changed out the oe coil boots with NGK boots. Now that I've done it, I probably could have just cleaned off the coil's contacts- if you're gonna do this it would be worth checking that possibility out.
It's pretty easy, take intake hose off, unplug the 3 coils, unbolt the coils from the valve cover (10 mm), remove coil, remove spark plug wire (use small flat screwdriver to pull up on the bottom of the tab to release the wire from the coil), remove old boot by twisting free while pulling, use a light bit of dielectric grease, push new boot on.
Be careful with the bolts that secure the coil to the valve cover- use a very light torque.
NGK (58931) CPB-T003 Ignition Coil on Plug Boot 58931
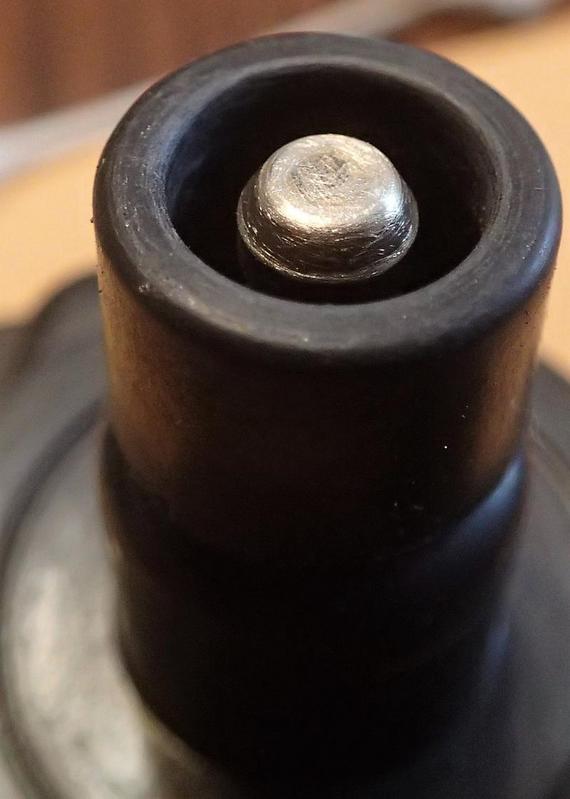
A pic of the guts of the old boot-
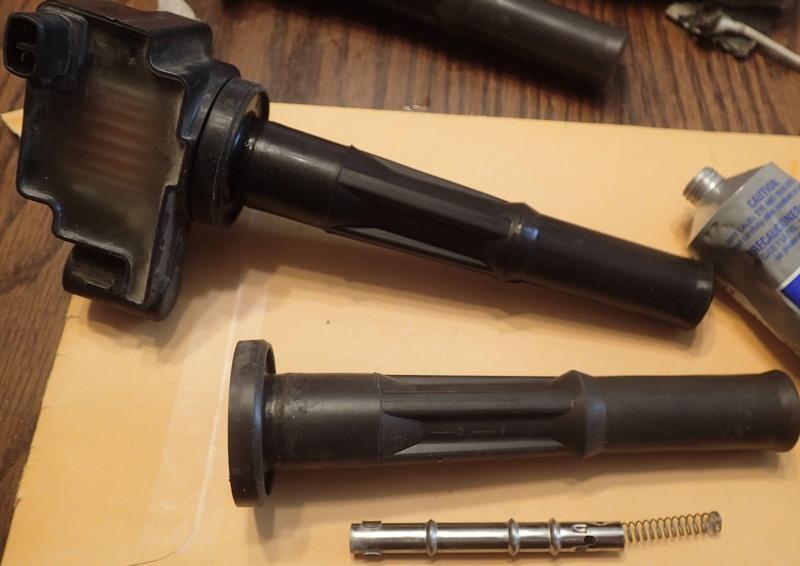
Starts out like this:
Twist and pull- it was pretty tenacious-
And it will come off-
#1 cleaned up pretty easy, #3 had weird bumpy deposits, and #5 had the most stuff on it.
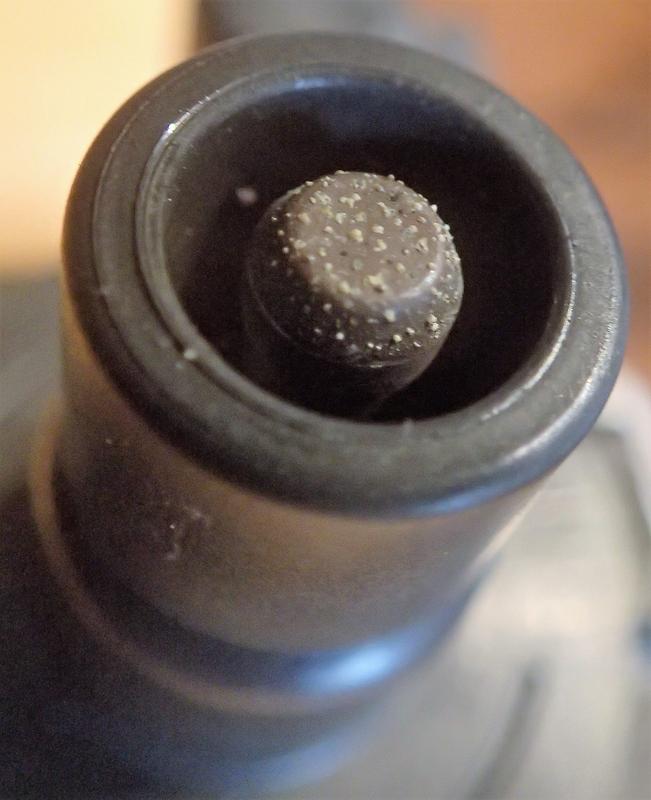
A little sandpaper did will for #1 and #3, #5 took some scraping too.
Hand start these little bolts and take care with tightening it
Changed out the oe coil boots with NGK boots. Now that I've done it, I probably could have just cleaned off the coil's contacts- if you're gonna do this it would be worth checking that possibility out.
It's pretty easy, take intake hose off, unplug the 3 coils, unbolt the coils from the valve cover (10 mm), remove coil, remove spark plug wire (use small flat screwdriver to pull up on the bottom of the tab to release the wire from the coil), remove old boot by twisting free while pulling, use a light bit of dielectric grease, push new boot on.
Be careful with the bolts that secure the coil to the valve cover- use a very light torque.
NGK (58931) CPB-T003 Ignition Coil on Plug Boot 58931
A pic of the guts of the old boot-
Starts out like this:
Twist and pull- it was pretty tenacious-
And it will come off-
#1 cleaned up pretty easy, #3 had weird bumpy deposits, and #5 had the most stuff on it.
A little sandpaper did will for #1 and #3, #5 took some scraping too.
Hand start these little bolts and take care with tightening it
Mar 8, 2019 | 06:05 PM
#3796
Thread Starter
Contributing Member
Joined: Sep 2005
Posts: 8,247
Likes: 497
From: mo
96 4Runner
Nothing exciting, just a Kenwood stereo receiver with bluetooth and a remote mic so I can play my pandora without an aux cord and so I can google up directions hands free- my phone can't hear me over all the noises in its center bezel cradle.
It looks pretty much the same as the old one (kid will get that one for his car if he wants it), just had to cut and solder the new connector on- and that was pretty much color coded so easy enough.
Mar 10, 2019 | 06:59 PM
#3797
Thread Starter
Contributing Member
Joined: Sep 2005
Posts: 8,247
Likes: 497
From: mo
96 4Runner 305,056 miles
Replaced the original clutch hose. Noticed it felt flakey went I was looking for a dropped exhaust manifold bolt while buttoning up the head gasket job.
It's had a good run, but it's done...
90931-01073
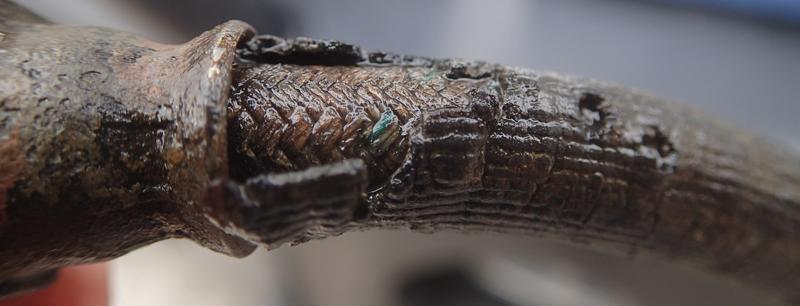
It was pretty easy to replace, the hardest part was removing the square keepers that hold the line to the brackets. There is a 17mm spot to hold the hose still when unscrewing the hard line. Start with the one closest to you and the frame.
Have something (I use a vacuum cap) to cap off the steel line when you remove the hose.
It's the two shiniest parts in the pic, and you can see the keeper that sits on the hard line side of the bracket
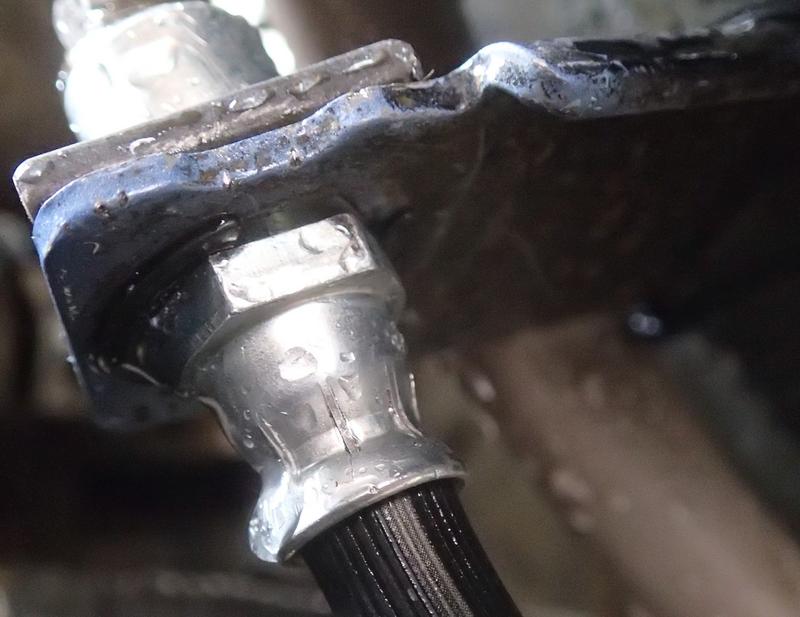
I was able to gravity bleed the line.
I also replaced the original bell crank boots after finding them full of mud a month or so ago. New ones are much more secure on the bell cranks.
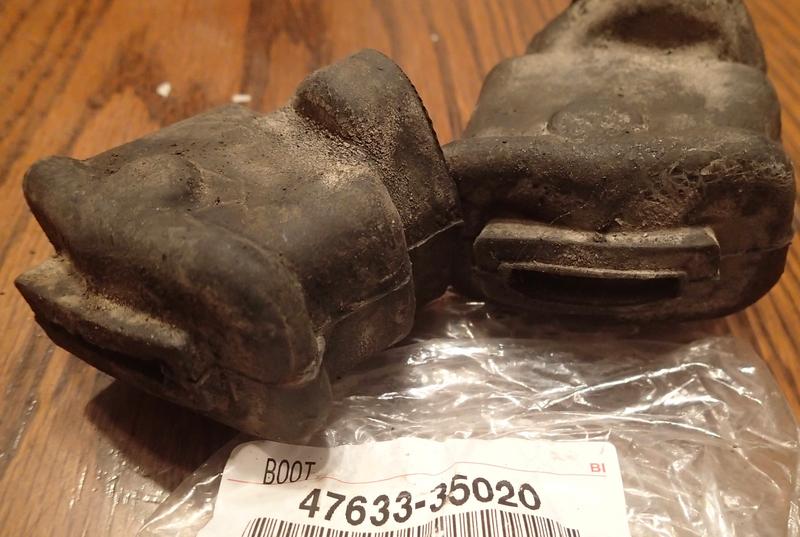
46733-35020
Replaced the original clutch hose. Noticed it felt flakey went I was looking for a dropped exhaust manifold bolt while buttoning up the head gasket job.
It's had a good run, but it's done...
90931-01073
It was pretty easy to replace, the hardest part was removing the square keepers that hold the line to the brackets. There is a 17mm spot to hold the hose still when unscrewing the hard line. Start with the one closest to you and the frame.
Have something (I use a vacuum cap) to cap off the steel line when you remove the hose.
It's the two shiniest parts in the pic, and you can see the keeper that sits on the hard line side of the bracket
I was able to gravity bleed the line.
I also replaced the original bell crank boots after finding them full of mud a month or so ago. New ones are much more secure on the bell cranks.
46733-35020
Mar 11, 2019 | 12:45 PM
#3799
Thread Starter
Contributing Member
Joined: Sep 2005
Posts: 8,247
Likes: 497
From: mo
I had just started losing a small amount of fluid and the hose had a little wetness at that end, I think you're right.
Mar 18, 2019 | 06:42 AM
#3800
Thread Starter
Contributing Member
Joined: Sep 2005
Posts: 8,247
Likes: 497
From: mo
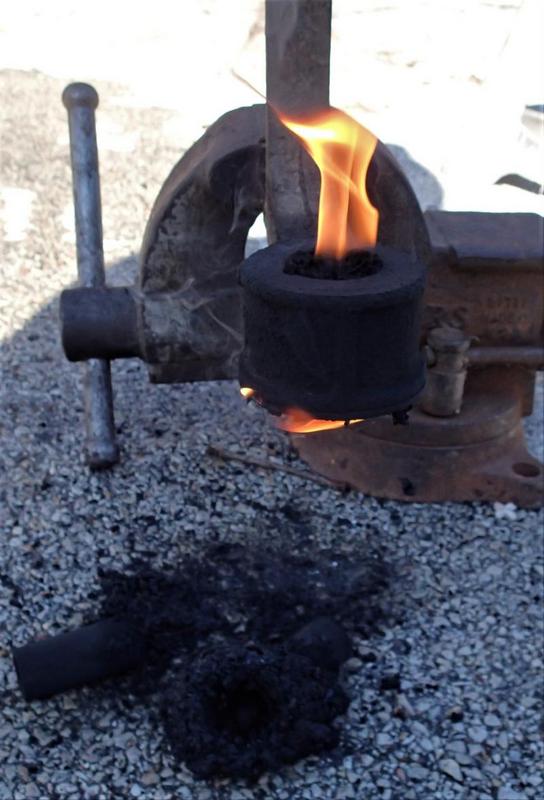
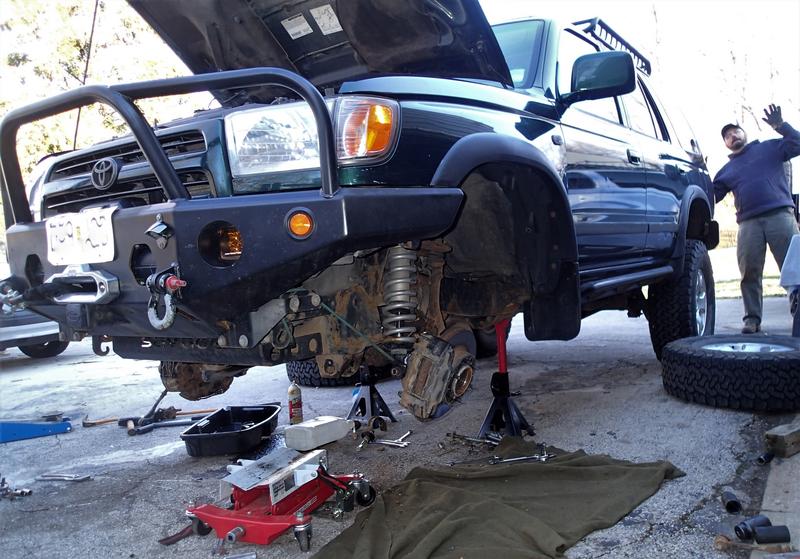
NOT MY TRUCK FOR ONCE!!!
The '99 got some love and care this weekend, new-to-it front diff, new lower ball joints, left control arm, sway bar link bushings, front diff mount bushings, rear wiper blade, both outer tie rod ends, rebooted a cv....
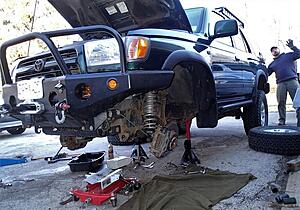
The hubby heated the outside of the brackets until the bushings caught fire and after awhile they pooped out on their own

The '99 got some love and care this weekend, new-to-it front diff, new lower ball joints, left control arm, sway bar link bushings, front diff mount bushings, rear wiper blade, both outer tie rod ends, rebooted a cv....
The hubby heated the outside of the brackets until the bushings caught fire and after awhile they pooped out on their own