
Redeth's 1989 4Runner Resurrection
 Jul 10, 2013 | 09:52 AM
#1821
Thread Starter
Registered User
Joined: Apr 2012
Posts: 2,817
Likes: 2
From: Los Angeles CA
Jul 10, 2013 | 09:51 PM
#1823
Thread Starter
Registered User
Joined: Apr 2012
Posts: 2,817
Likes: 2
From: Los Angeles CA
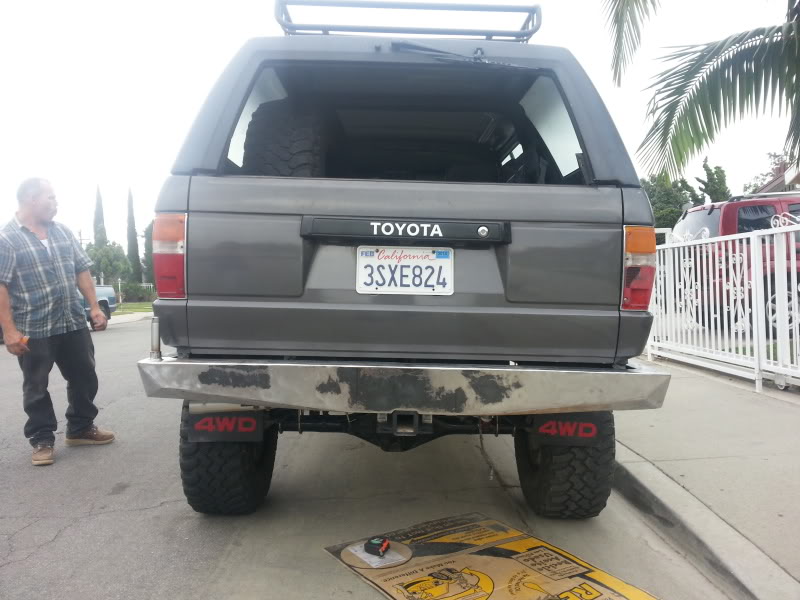
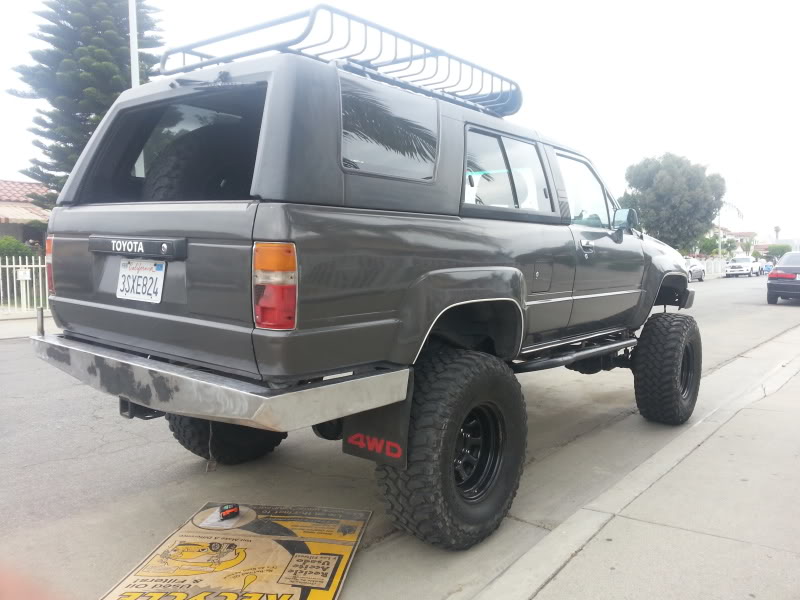
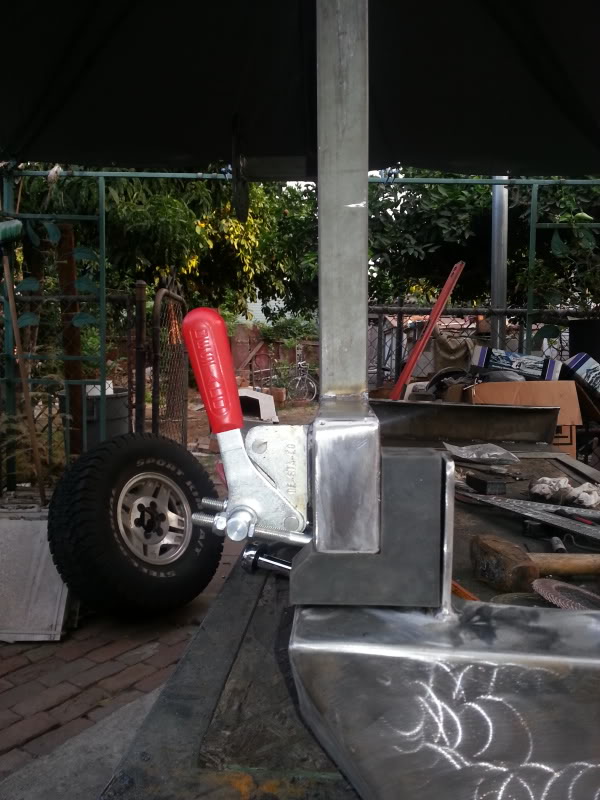
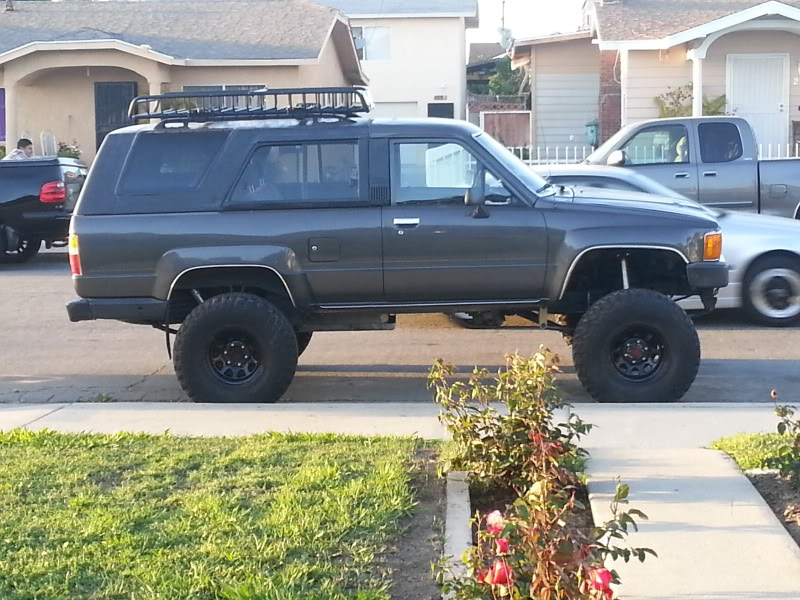
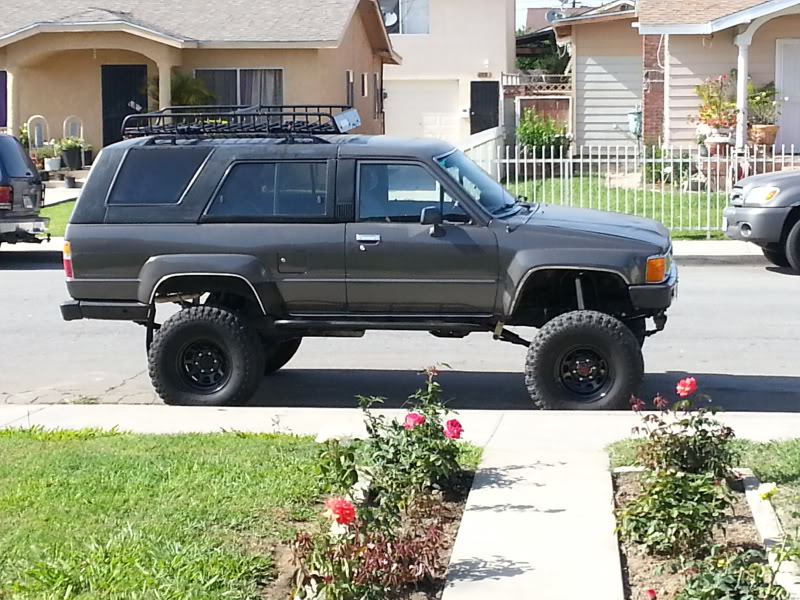
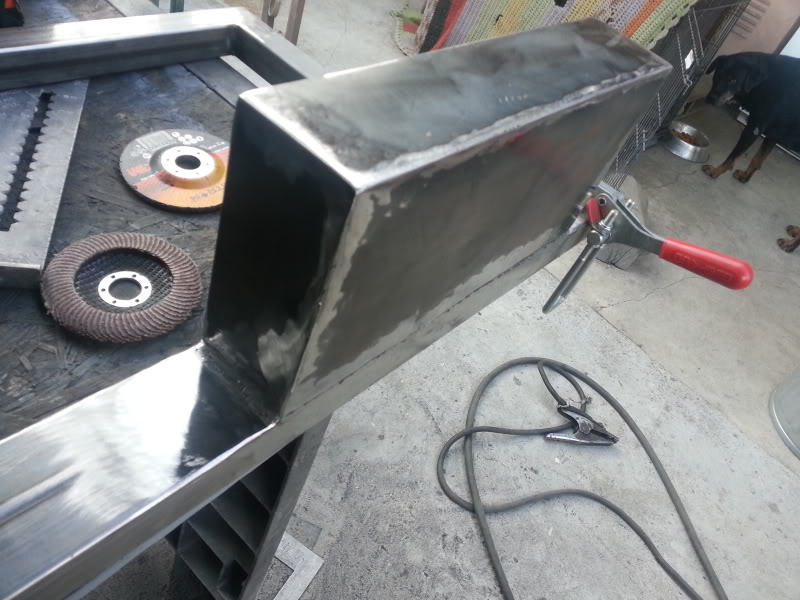
Alright guys you wanted pix of the bumper nicely sanded and on the truck so you got it! 
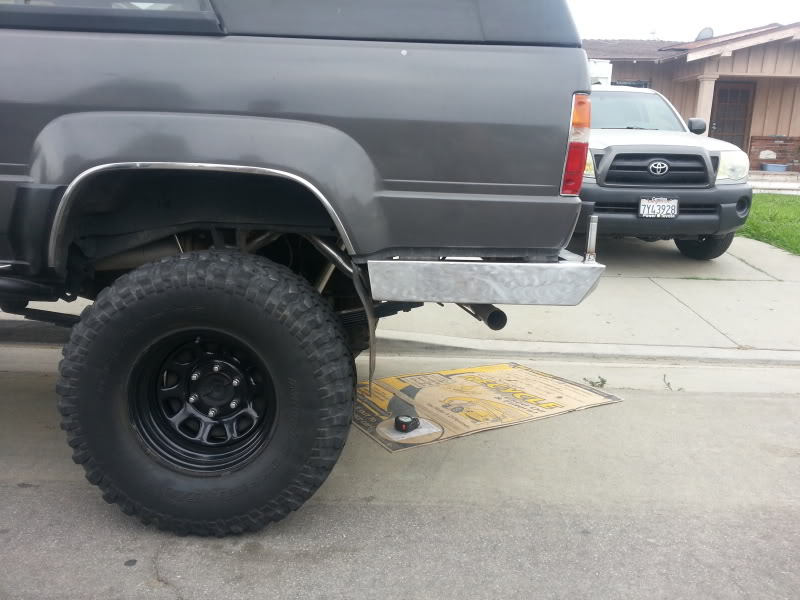

Close up on that wheel well area. This is the only thing that didnt come out picture perfect. but whatever im still happy with it. i'll just move the mud flap slightly back to fill that gap some.

-----------------------------------------------------------------------------------------
Today i went back to the BOBCO METAL company and bought some more scrap metal pieces for my tire swing. I got a bunch of 2"x2" square tubing and one long rectangular 2"x4" both @ 1/8" thickness for the tire swing metal material. And i also bought 2"x2" sqare tube with 1/4" thick steel to weld/mount the bumper to my hitch crossbar right behind the face of the bumper and the sides of the bumper onto the frame. and some 1/16" sheet steel to fab up a Jerry Can holder. I bought all this scrap metal for about $25-28. Sorry i didnt take any pix of the metal i bought laid out on the floor.
We had to cut 2 pieces @ 4&1/4" for the face of the bumper to hitch crossbar
2 more pieces @ 12" from the side wall of the bumper onto the frame. One end at 70* and the other end at 120* None of these tubes are welded on just yet. We had to work quickly because for some odd reason we had rain/on and off sprinkles all day today. So we had to work fast to get as much done before we had some more showers again.
We cut the long tire swing crossbar at 59&3/4" to make even with the outer wall of the spindle. both sides will be 0.5" away from the end of the actual bumper. (hope this all makes sense)

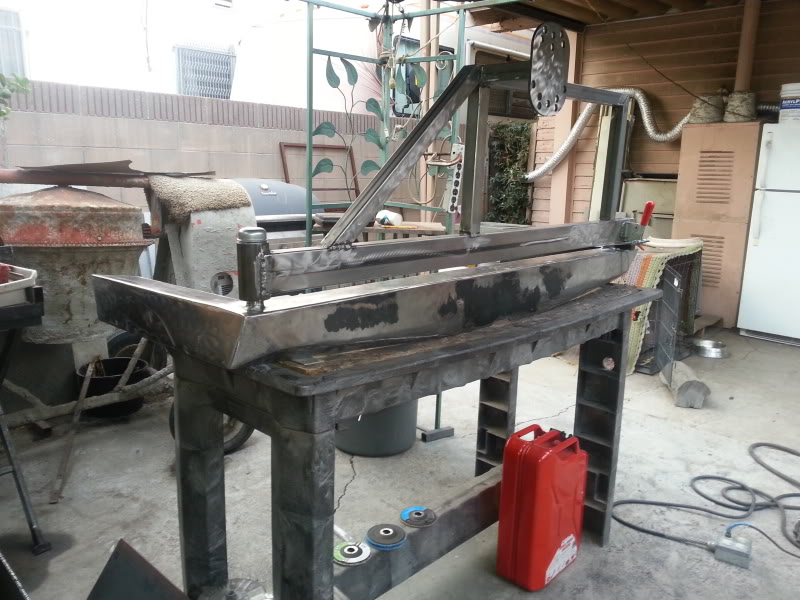
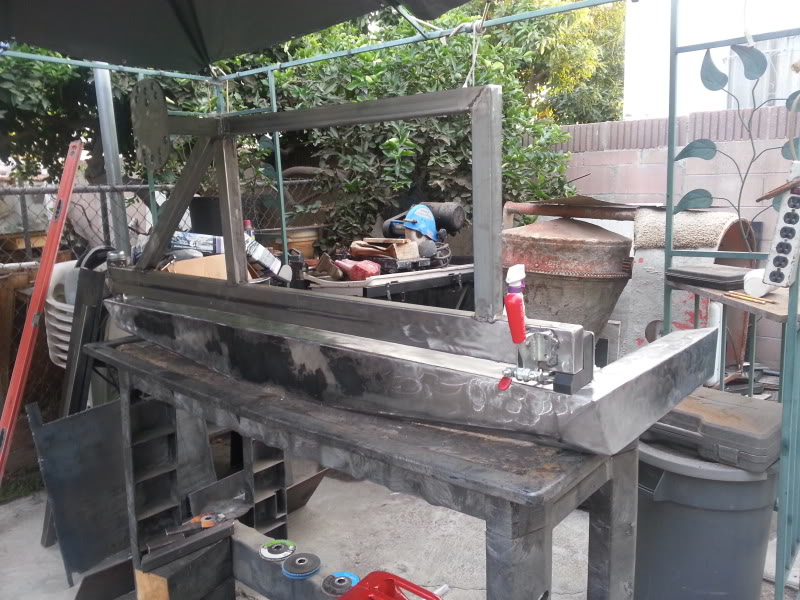
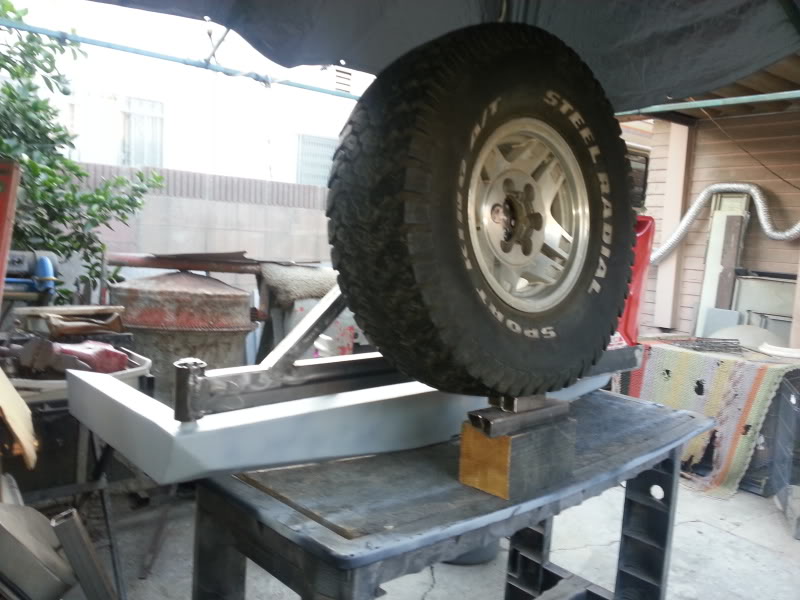
There is the Spindle temporarily installed to get an idea of where to mount that rectangular tube. Also had to cut the left end in a 1/4 of a circle to fit the spindle wall exactly.
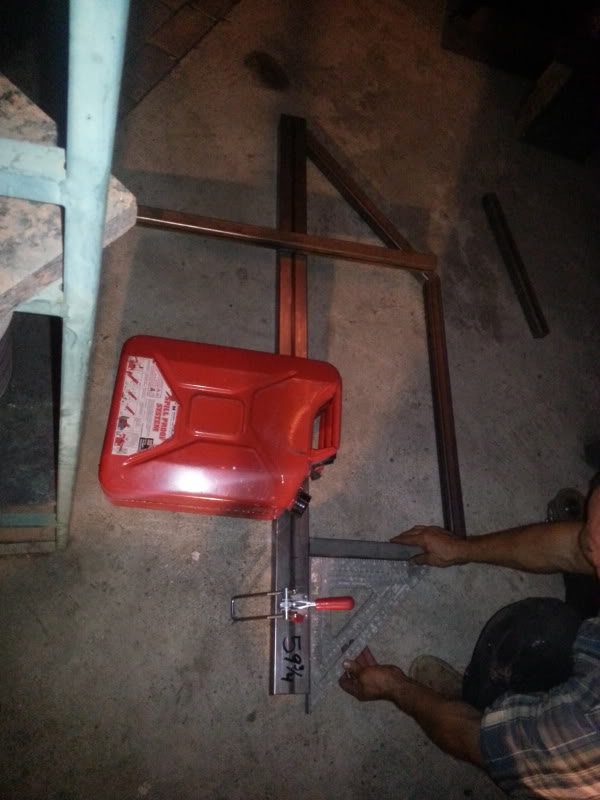
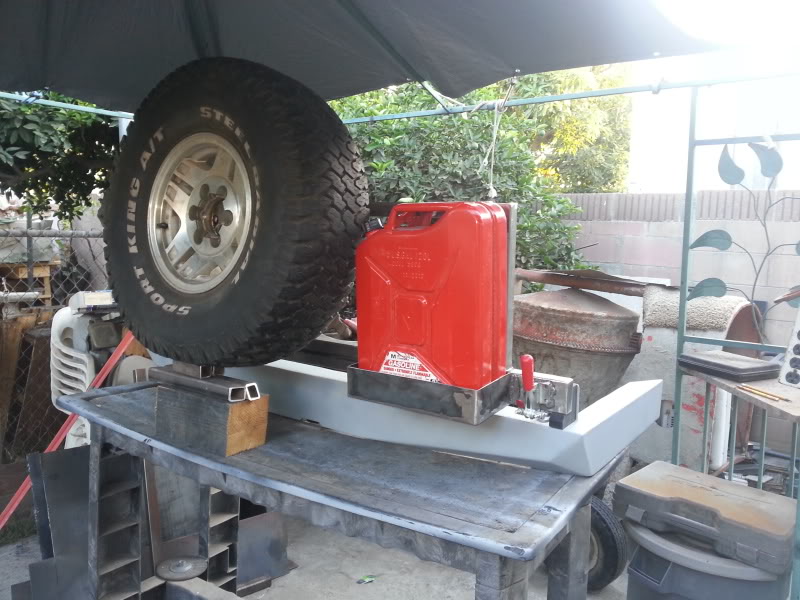
Dad using the 90* angle to make sure everything is cut correctly so we dont run into any problems while welding tomorrow. BTW im not planning to use this Harbor Freight Jerry can. I just had it out to get a rough idea of the amount of space its going to be taking up.
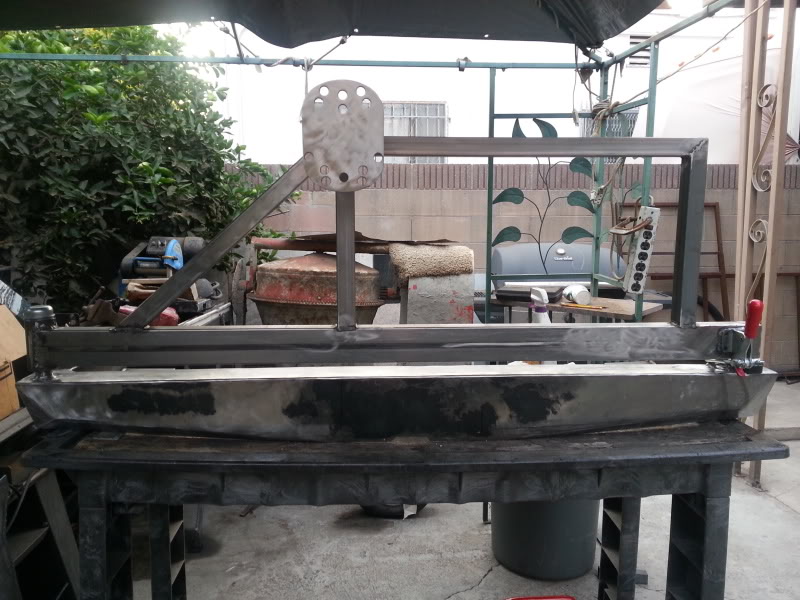
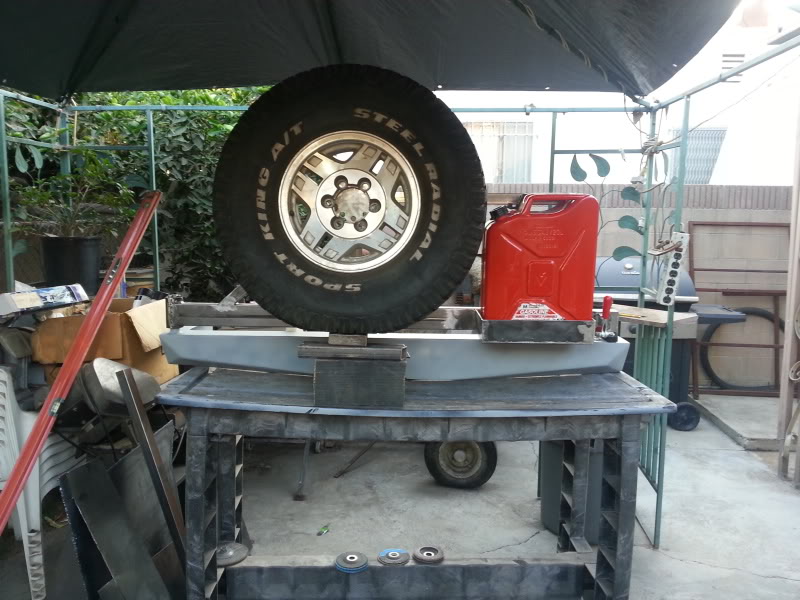
Here is what my tire swing is going to look like. Only think we're missing now is the tire plate and studs to hold the tire in place. also to fab up a jerry can holder off of some 1/16" sheet metal that i bought today.
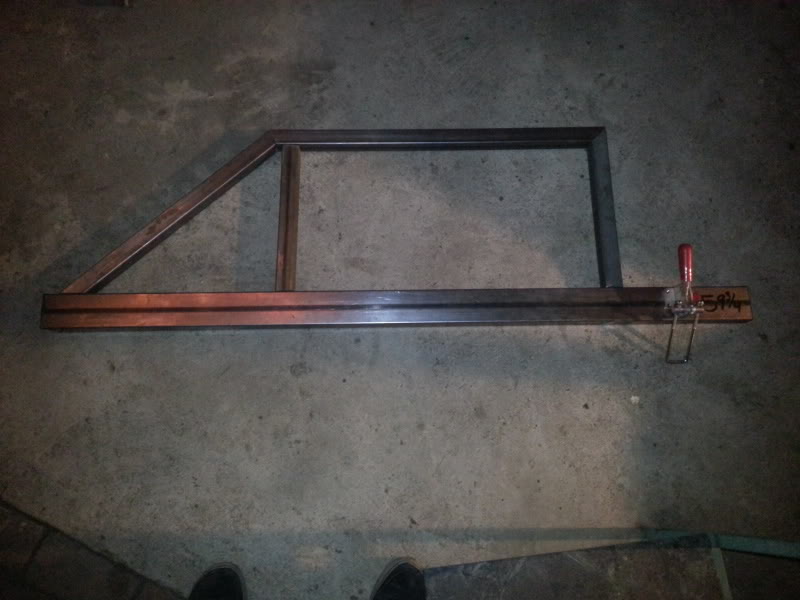
the tire is going to mounted on the spindle side(left) near that top corner. The Jerry can will be mounted on the right and the right side of the jerry can will align flush with that right vertical tube. so you wont even see that tube at all from the back view.
I also bought 3 cans of primer and 3 cans of matt black today. I didn't get around to painting because as i said before we were working quickly to finish all our cuts with the metal saw. Sometimes working with a little dizzle. I'm going to hold off on all painting for the time being just until we finish that tire swing then grind down. Once we finish i and gonna prime and paint the whole project leaving the 1/4" steel tubing for last. just so we can have the bumper nicely painted so i dont struggle later on on trying to paint the bumper while its on the truck.


Close up on that wheel well area. This is the only thing that didnt come out picture perfect. but whatever im still happy with it. i'll just move the mud flap slightly back to fill that gap some.

-----------------------------------------------------------------------------------------
Today i went back to the BOBCO METAL company and bought some more scrap metal pieces for my tire swing. I got a bunch of 2"x2" square tubing and one long rectangular 2"x4" both @ 1/8" thickness for the tire swing metal material. And i also bought 2"x2" sqare tube with 1/4" thick steel to weld/mount the bumper to my hitch crossbar right behind the face of the bumper and the sides of the bumper onto the frame. and some 1/16" sheet steel to fab up a Jerry Can holder. I bought all this scrap metal for about $25-28. Sorry i didnt take any pix of the metal i bought laid out on the floor.
We had to cut 2 pieces @ 4&1/4" for the face of the bumper to hitch crossbar
2 more pieces @ 12" from the side wall of the bumper onto the frame. One end at 70* and the other end at 120* None of these tubes are welded on just yet. We had to work quickly because for some odd reason we had rain/on and off sprinkles all day today. So we had to work fast to get as much done before we had some more showers again.
We cut the long tire swing crossbar at 59&3/4" to make even with the outer wall of the spindle. both sides will be 0.5" away from the end of the actual bumper. (hope this all makes sense)

There is the Spindle temporarily installed to get an idea of where to mount that rectangular tube. Also had to cut the left end in a 1/4 of a circle to fit the spindle wall exactly.

Dad using the 90* angle to make sure everything is cut correctly so we dont run into any problems while welding tomorrow. BTW im not planning to use this Harbor Freight Jerry can. I just had it out to get a rough idea of the amount of space its going to be taking up.

Here is what my tire swing is going to look like. Only think we're missing now is the tire plate and studs to hold the tire in place. also to fab up a jerry can holder off of some 1/16" sheet metal that i bought today.

the tire is going to mounted on the spindle side(left) near that top corner. The Jerry can will be mounted on the right and the right side of the jerry can will align flush with that right vertical tube. so you wont even see that tube at all from the back view.
I also bought 3 cans of primer and 3 cans of matt black today. I didn't get around to painting because as i said before we were working quickly to finish all our cuts with the metal saw. Sometimes working with a little dizzle. I'm going to hold off on all painting for the time being just until we finish that tire swing then grind down. Once we finish i and gonna prime and paint the whole project leaving the 1/4" steel tubing for last. just so we can have the bumper nicely painted so i dont struggle later on on trying to paint the bumper while its on the truck.
Last edited by Redeth005; Jul 10, 2013 at 10:10 PM.
Jul 10, 2013 | 10:02 PM
#1824
BADDDD ARSSSSSSE! Realllly like that swing out design... Simple/strong and practical!
Nice work, again..... Say hi to Mr. G in the place to be, for me, eh?.... Momma G as well! Lol
Nice work, again..... Say hi to Mr. G in the place to be, for me, eh?
.... Momma G as well! Lol
Jul 10, 2013 | 10:13 PM
#1825
Thread Starter
Registered User
Joined: Apr 2012
Posts: 2,817
Likes: 2
From: Los Angeles CA
Sure thing Mark. I like the design too. Was considering leaving space for a Hi-Lift in between the Tire and Jerry can but it's just too much darn weight back there already. So i'm just gonna do what you did and use a bike lock to attack the Hi-Lift to the roll cage.
-------------------------------------------------------------------
BTW guys i'd like to make one thing very clear, i didnt do a single thing today other then assist my dad. I'm not the best with trig/geometry and this is where my dad excels. So i wanted to leave it in the hands of the professional. All i did was carry stuff from one spot to another, hold the tubes as he cut, and got the tools he needed/asked for. This was all him here. He just asked "what do you want? and how do you want it." and he made it happen.
Jul 10, 2013 | 11:08 PM
#1826
Registered User
Joined: Jul 2012
Posts: 2,365
Likes: 4
From: Idaho
dads are great that way no worries richard no worries
the carrier looks great once all welded an primered are you going to cap the open ends? just to protect the insides from rusting an ruining the hard work you could though after done welding soak the insides with undercoating that'd seal the steel an water would run right out
the carrier looks great once all welded an primered are you going to cap the open ends? just to protect the insides from rusting an ruining the hard work you could though after done welding soak the insides with undercoating that'd seal the steel an water would run right out
Jul 10, 2013 | 11:26 PM
#1828
What a great gift to have a pops like that. .. Not only good at it, but anxious to do it with ya! I'm grateful for mine as well...
I always enjoyed math... But when it came to my pops? He was manager of all quality assurance of TRW: Space ships, etc... I suddenly felt like I was learning two plus two when I was around him! Lol. We'd be working on a motor or something and he would come home one day with a piston that he designed over a couple lunch breaks! Hahaha... He actually enjoyed that stuff at TRW quite a bit( they designed fine car parts for many years )..... Probably not as much as building Apollo's, but he definitely loved the car stuff! Now? Like many at 80, he loves the remote control and TV all day... Very sad, but I mention it because I hope you can enjoy this stuff for quite a while and as often as you can with him.... And then, when you get into the medical field and he cuts himself or something you can fix him! Full circle, bubba! Lol
I'm sure there'll be plenty more like this... But what a great memory, and it's something you can look at every day... Very cool!
Jul 12, 2013 | 05:56 AM
#1829
Thread Starter
Registered User
Joined: Apr 2012
Posts: 2,817
Likes: 2
From: Los Angeles CA
Some of what we did yesterday. We welded the tire swing together, and I eventually sanded down the welds to smooth them out (not in the pictures.)
Eventually we messed up with the way the latch is properly supposed to mount so I had to look up a tire swing thread here on yotatech to see how it is supposed to be done. Once we found out we had to grind off the welds and smooth out the surface of the humper again then re position and weld again. Here are some shots of how the tire latch mounts just in case you guys ever make your own bumper.

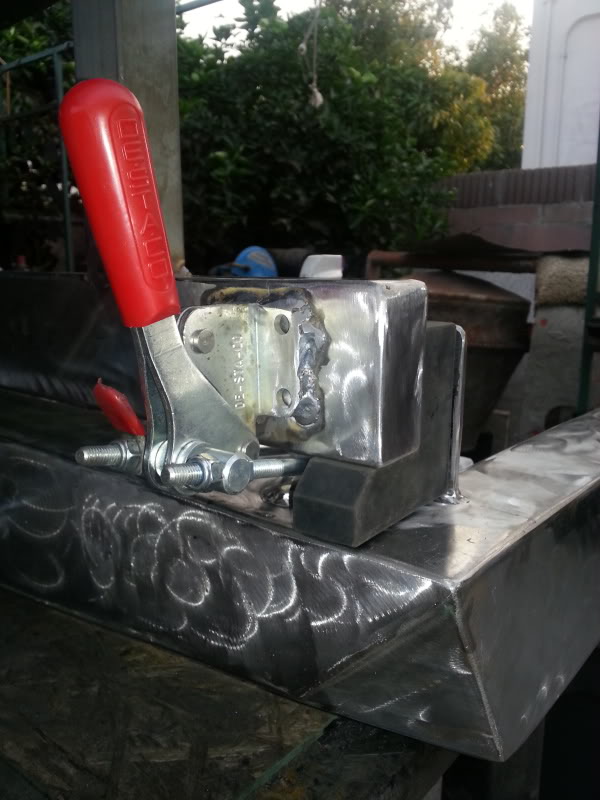
Had to weld a small plate to the back side of the rubber stop because the holes for which to mount the rubber is on the back side not the bottom.
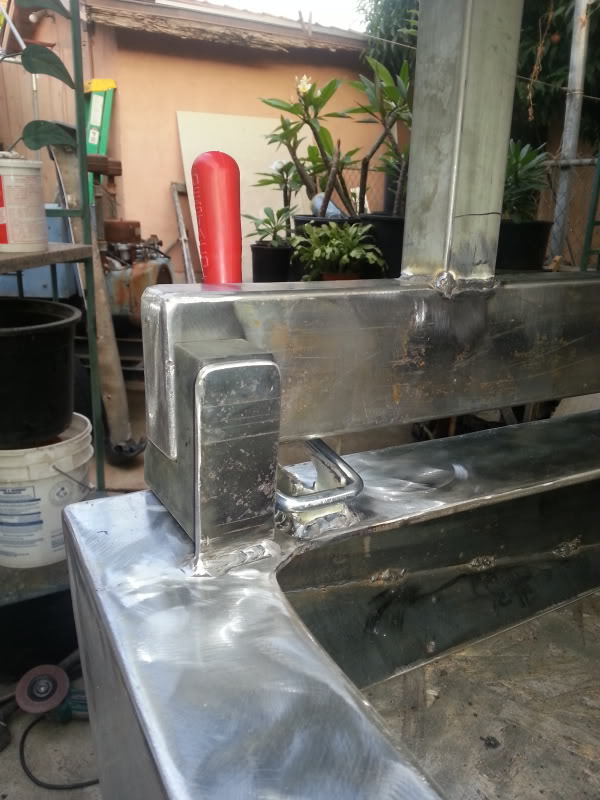
Top view

After getting those pix I sanded down the welds to a smpoth surface and primered the bumper. Didn't get to do the tire swing. I dodnt want to do it yet because we still need to fab up the gas can holder. So as of right now the bumper is the only thing that is painted.
Eventually we messed up with the way the latch is properly supposed to mount so I had to look up a tire swing thread here on yotatech to see how it is supposed to be done. Once we found out we had to grind off the welds and smooth out the surface of the humper again then re position and weld again. Here are some shots of how the tire latch mounts just in case you guys ever make your own bumper.
Had to weld a small plate to the back side of the rubber stop because the holes for which to mount the rubber is on the back side not the bottom.
Top view
After getting those pix I sanded down the welds to a smpoth surface and primered the bumper. Didn't get to do the tire swing. I dodnt want to do it yet because we still need to fab up the gas can holder. So as of right now the bumper is the only thing that is painted.
Jul 12, 2013 | 07:02 AM
#1831
Thread Starter
Registered User
Joined: Apr 2012
Posts: 2,817
Likes: 2
From: Los Angeles CA
already the bumper looks epic
i need to get some of those for my frame HF huh? have to check the prices im still amazed at how good my frame is versus the rust everywhere else
if weight is/becomes a problem you could pop holes in it where ya can to lighten it such as the rear face thats where companies lighten with decorative lettering or logos
dads are great that way no worries richard no worries
the carrier looks great once all welded an primered are you going to cap the open ends? just to protect the insides from rusting an ruining the hard work you could though after done welding soak the insides with undercoating that'd seal the steel an water would run right out
the carrier looks great once all welded an primered are you going to cap the open ends? just to protect the insides from rusting an ruining the hard work you could though after done welding soak the insides with undercoating that'd seal the steel an water would run right out
What a great gift to have a pops like that. .. Not only good at it, but anxious to do it with ya! I'm grateful for mine as well...
I always enjoyed math... But when it came to my pops? He was manager of all quality assurance of TRW: Space ships, etc... I suddenly felt like I was learning two plus two when I was around him! Lol. We'd be working on a motor or something and he would come home one day with a piston that he designed over a couple lunch breaks! Hahaha... He actually enjoyed that stuff at TRW quite a bit( they designed fine car parts for many years )..... Probably not as much as building Apollo's, but he definitely loved the car stuff! Now? Like many at 80, he loves the remote control and TV all day... Very sad, but I mention it because I hope you can enjoy this stuff for quite a while and as often as you can with him.... And then, when you get into the medical field and he cuts himself or something you can fix him! Full circle, bubba! Lol
I'm sure there'll be plenty more like this... But what a great memory, and it's something you can look at every day... Very cool!
I always enjoyed math... But when it came to my pops? He was manager of all quality assurance of TRW: Space ships, etc... I suddenly felt like I was learning two plus two when I was around him! Lol. We'd be working on a motor or something and he would come home one day with a piston that he designed over a couple lunch breaks! Hahaha... He actually enjoyed that stuff at TRW quite a bit( they designed fine car parts for many years )..... Probably not as much as building Apollo's, but he definitely loved the car stuff! Now? Like many at 80, he loves the remote control and TV all day... Very sad, but I mention it because I hope you can enjoy this stuff for quite a while and as often as you can with him.... And then, when you get into the medical field and he cuts himself or something you can fix him! Full circle, bubba! Lol
I'm sure there'll be plenty more like this... But what a great memory, and it's something you can look at every day... Very cool!
------------------------------------------
Thanks Terry. I think we might have it mounted by this coming up week.
Last edited by Redeth005; Jul 12, 2013 at 07:04 AM.
Jul 12, 2013 | 07:09 AM
#1832
Registered User
iTrader: (2)
Joined: Dec 2009
Posts: 2,159
Likes: 7
From: Pleasanton, CA - SF Bay Area
Looking fantastic - thanks for all the photos for us dreamers 
Are you going to put a gusset under the 90* angle where your actual wheel mount plate is, just for extra support?
I really like how you handled the angles on the bumper - not sure what you call that - the way it's like a 3D trapezoid lol
Are you going to put a gusset under the 90* angle where your actual wheel mount plate is, just for extra support?
I really like how you handled the angles on the bumper - not sure what you call that - the way it's like a 3D trapezoid lol
Jul 12, 2013 | 01:39 PM
#1835
Thread Starter
Registered User
Joined: Apr 2012
Posts: 2,817
Likes: 2
From: Los Angeles CA
Looking fantastic - thanks for all the photos for us dreamers
Are you going to put a gusset under the 90* angle where your actual wheel mount plate is, just for extra support?
I really like how you handled the angles on the bumper - not sure what you call that - the way it's like a 3D trapezoid lol
Are you going to put a gusset under the 90* angle where your actual wheel mount plate is, just for extra support?
I really like how you handled the angles on the bumper - not sure what you call that - the way it's like a 3D trapezoid lol
He had a point but it seems like it'd be a pain to have to worry about getting something like that built and then worry about shipping suh a heavy shipment you know. I like the idea. But I dont think its for me. Plus that would require my dad to do sone more work and I kbow he won't want to do it.
I bought this one in Harbor freight for something like $25ish. I do know that 4WheelParts.com sells this same exact one for over $40 lol so I got a good deal I guess.
Last edited by Redeth005; Jul 12, 2013 at 01:55 PM.
Jul 13, 2013 | 07:35 PM
#1838
Registered User
Joined: Apr 2009
Posts: 5,592
Likes: 24
From: Dixon, Ca
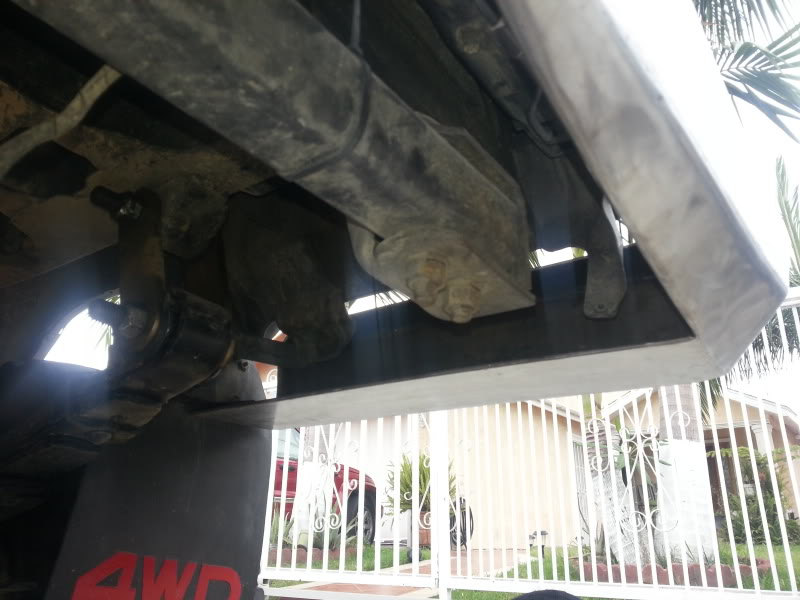
I am assuming the angle there is because the spring is unloaded? Was the front hanger flush with the frame? Did you set the front hanger back any? I tacked my sas up and had neg angle like that, unloaded. I will set the spring in tomorrow and let it settle. i don't want to recut my shackle holes any more forward, well if I have to I will.

 Jul 13, 2013 | 08:03 PM
#1839
Thread Starter
Registered User
Joined: Apr 2012
Posts: 2,817
Likes: 2
From: Los Angeles CA
I know right. This is a heck of alot of work to do to make one of these. I have so many burns all over my fingers and arms. Lots of tiny pencil tip sized scabs all over my forarms due to shards of grinder/metal pieces flying off as we work. Today i literally sanded off my left pointer finger fingertip. OUUUUCH that one hurt bad. didnt begin to burn till about 10 minutes after it happened. but what im trying to say is it definitely aint worth making a few more just to sell lol
Tell ya one thing though. All this pain and suffering making this bumper definitely has me appreciating it a lot more!
Thanks dude. I'm gonna upload about 9 more pix on my progress over the past 2 days after these replies.
We welded my front spring hanger flush with the front frame crossmember there( i think thats what its called.) This is the only close up i have uploaded of the hanger. Hope it helps.
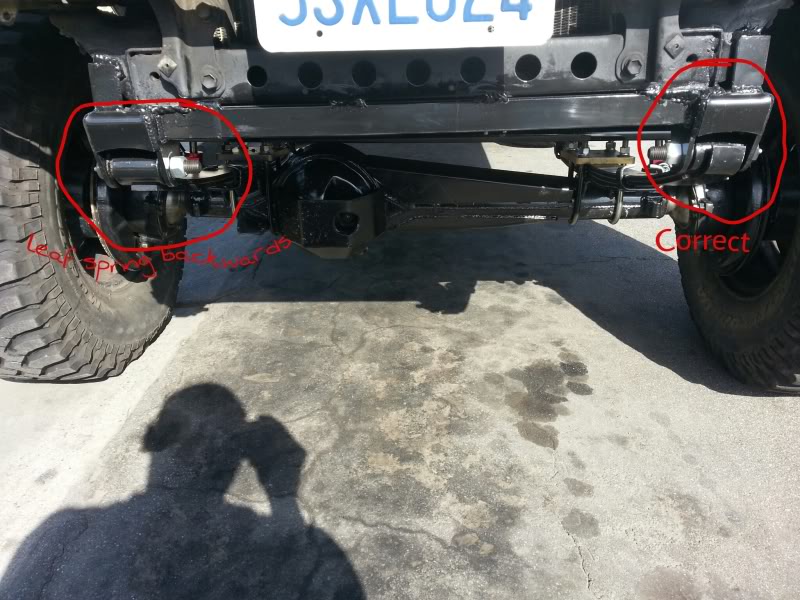
Here is are my shackles.
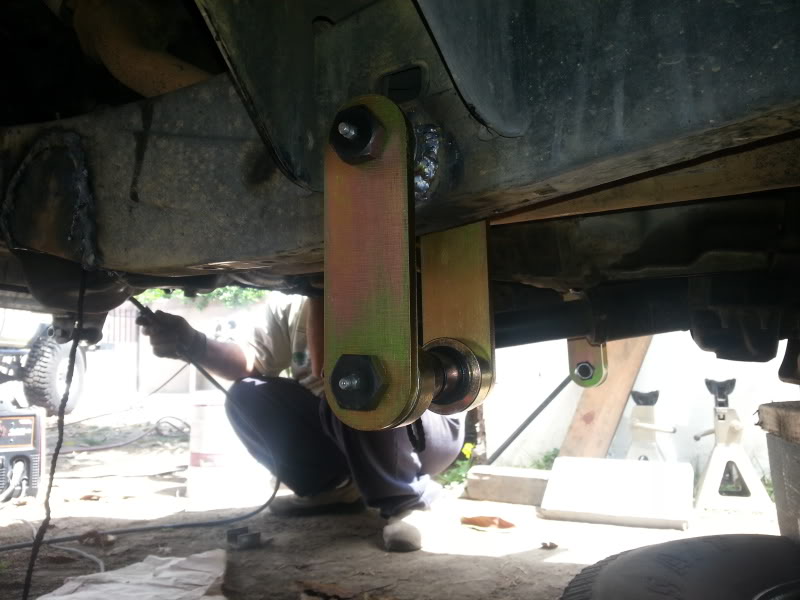
This is the angle i had when i had my 3" springs (Rancho). As you can see the angle isnt goo good. it was completely vertical
This is the angle i have now. after the 4" new allpro springs. The Shackle angle is much better now. See the difference???
Tell ya one thing though. All this pain and suffering making this bumper definitely has me appreciating it a lot more!
Thanks dude. I'm gonna upload about 9 more pix on my progress over the past 2 days after these replies.
I am assuming the angle there is because the spring is unloaded? Was the front hanger flush with the frame? Did you set the front hanger back any? I tacked my sas up and had neg angle like that, unloaded. I will set the spring in tomorrow and let it settle. i don't want to recut my shackle holes any more forward, well if I have to I will.

Here is are my shackles.

This is the angle i had when i had my 3" springs (Rancho). As you can see the angle isnt goo good. it was completely vertical

This is the angle i have now. after the 4" new allpro springs. The Shackle angle is much better now. See the difference???

Last edited by Redeth005; Jul 13, 2013 at 08:07 PM.
Jul 13, 2013 | 09:18 PM
#1840
Thread Starter
Registered User
Joined: Apr 2012
Posts: 2,817
Likes: 2
From: Los Angeles CA
This update will be for yesterday and today. Yesterday my dad wasnt feeling ok to weld. back was hurting after work. So he took me outside after i had prepared the work area for us and he gave me his spare mask so i could watch him again (like i had been doing for the past week), and he showed me how welding should be done. After he did 1-2 welds he let me take over. Leaving me with the welding gear, and told me to make sure everything was at the right angles and double check everything after tack welds before i go through with a full weld. Anyway. He went inside the house and left me to fab up the gas can holder. I gotta say He makes welding look like a piece of cake lol.
Here is a picture of my first welds. (dad's welds are at the far right of the top; he only did about 3 inches worth). You can see where i took over lol looks sloppy and lots of balls. hahaha
  But I did get much better with practice.
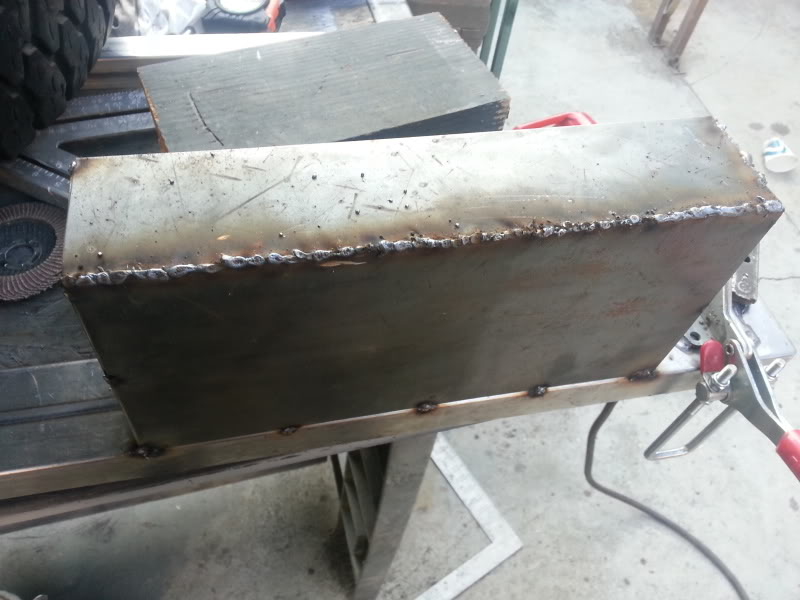
After welds were grinded and sanded down to 120grit. Wooo looks nice.
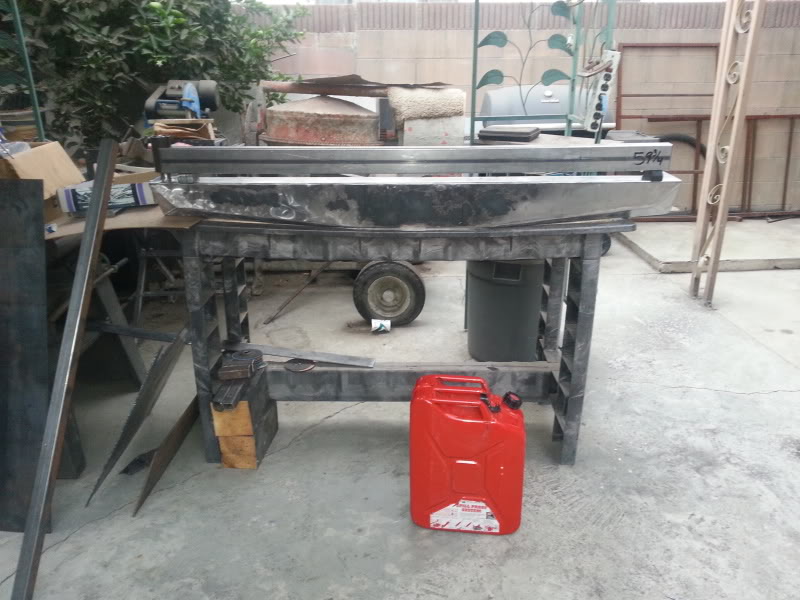
I was only able to get that done. I had to clean up early because i had a hot date with Faby. Gotta tell ya that new 'Grown Ups 2' movie was hilarious! So this is how i left the tire swing.
--------------------------------------------------------------------------------
Today I got much busier. Lots accomplished. I started off the day fitting that rubber tire swing stop right and bolting it down with some nice steel bolts, nuts, and lock washers. That alone took me forever because i had tons of mismatched combinations. i finally gave up and asked my neighbor ruben if he had 2 spares that he could let me have. and thankfully he did. YAY. lol
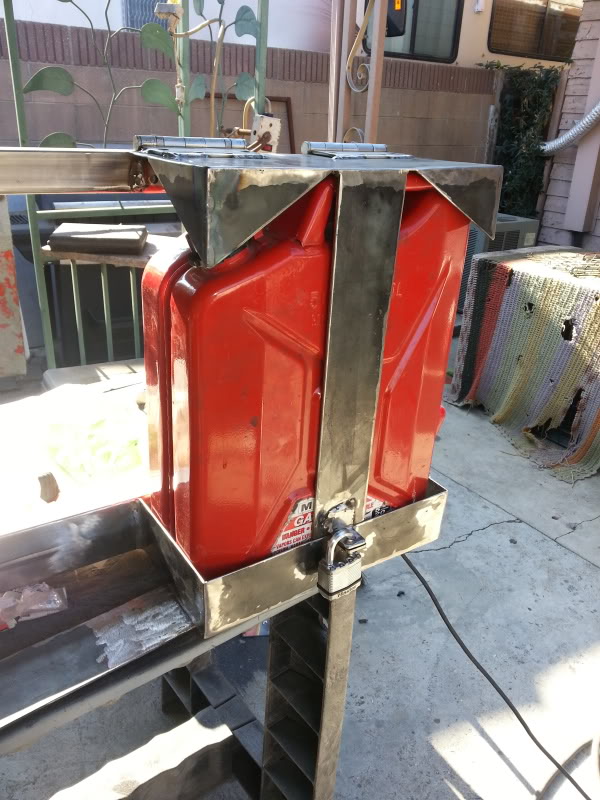
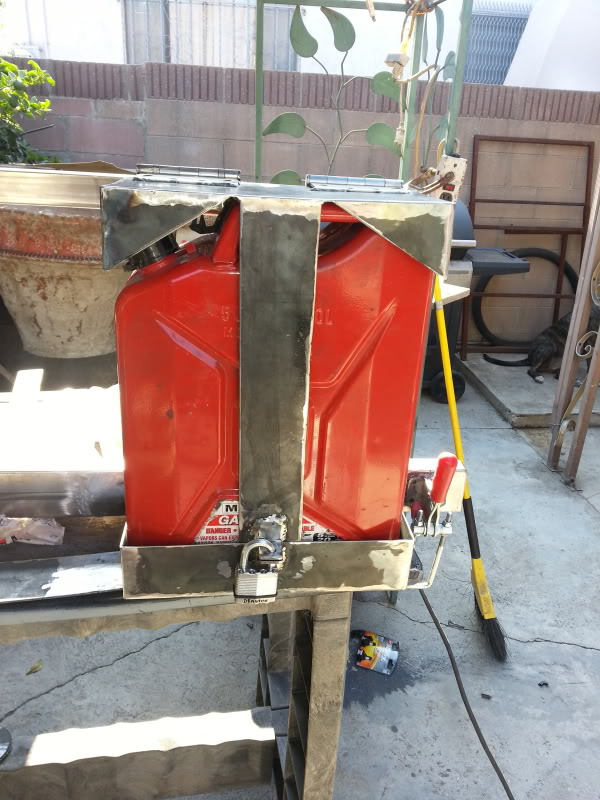
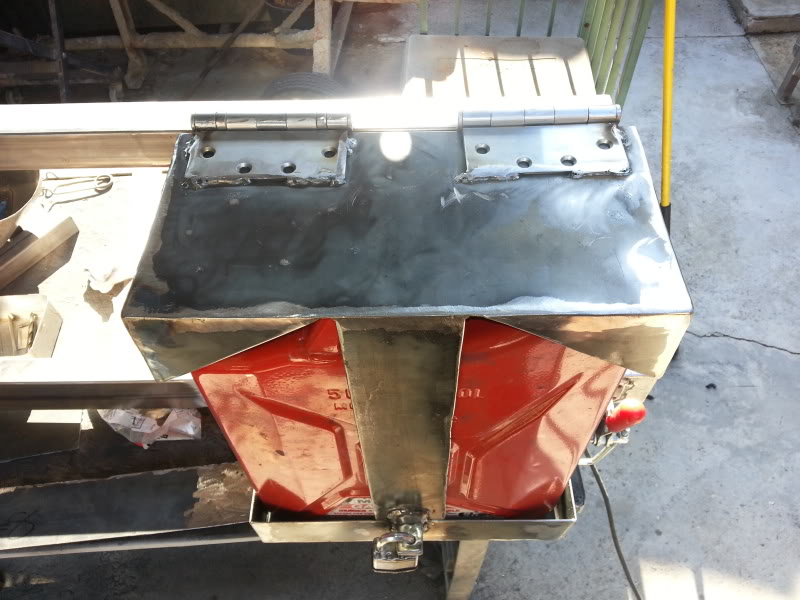
After that simple task i was back to fabbing up the rest of the gas can holder. Well actually the gas can holder was finished. i just wanted something to keep it from getting stolen. so i wanted to somehow make a lock to stop crooks from steeling my jerry can. after the top plate was finished i thought to myself.... "These guys can still steal my gas with a plate keeping it in place. There is still access to the lid of the jerry can. I have to keep them away from taking my gas." So i cut up some triangles and angled them around the corners to better keep the jerry can in place. but most of all. Keep people from opening my jerry can lid and sucking my gas out with a water hose. After i had all my cuts made i had to drop by Home Depot to buy 2 thick door hinges, and 2 MasterLock locks. came out to about $30 or so.
Once i came back home i spent about an hour welding all my pieces together and another 1-2 hours sanding everything down. Here is my 'protected' jerry can. This swinging bracket/ lock is really solid. unless someone is desperate enough to remove the pin's from my hinges i dont think anybody will be getting to my jerry can lol

--------------------------------------------------
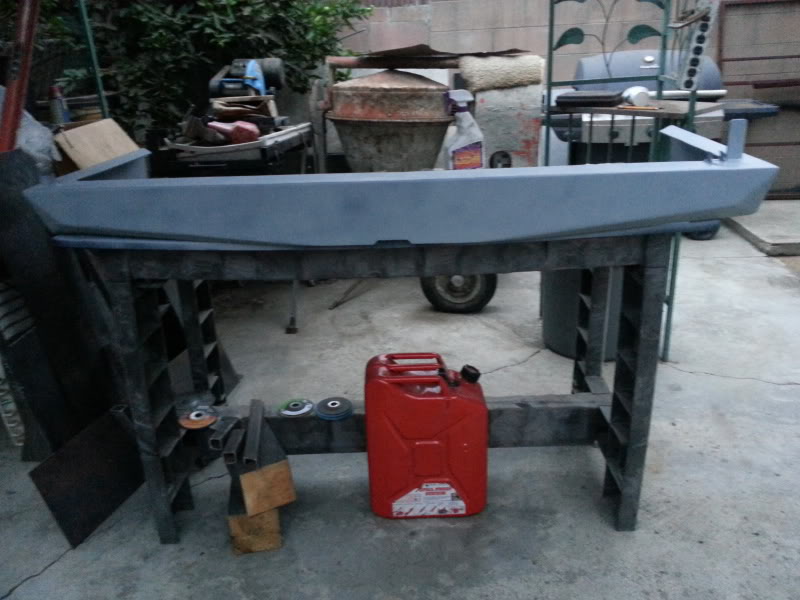
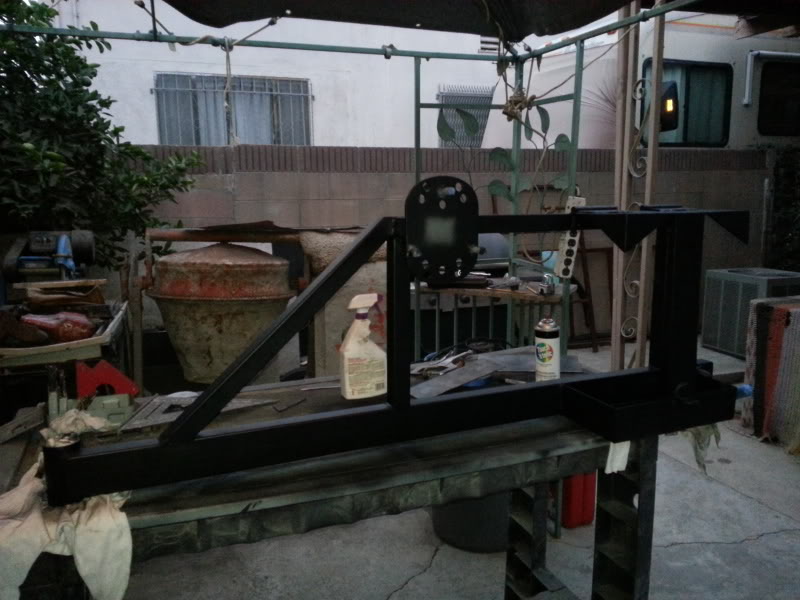
While i was doing all of this i was painting the bumper matt black. Also made a triangle shaped gusset to assist with the weight of the tire.
Picked up some wheel studs from AutoZone and found they didnt fit into the holes right. but i didnt wanna return them so i just sanded them down toward where they lock in place. then just gave it a couple of small welds to keep them in place. Then i sprayed the bumper with primer.

And just cleaned up the patio and came in the house about 2 hours ago. This is how i left the tire swing.
I'm really hoping that We get to install the bumper tomorrow. It'd be really nice to have a bumper on the truck again lol. The only thing i am stuck on at the moment is where to mount my license plate. I had originally thought of having it mounted in the center of the tire but i cant figure out how exactly to mount it. If i mount it in the center of the tire then i am gonna want to use my 2nd MasterLock to lock the license plate(which will be mounted on to a 2/16" plate) blocking the wheel nuts. The master lock will be mounted behind the license plate locking in 2 tabs one on the tube that will come out of the middle of the tire and the other which will be on the tube that is behind the license plate. I'll probable have one tube slide into a bigger tube and have 2 tabs meet in the middle somewhere(with 2 holes drilled) so i can lock the 2 pieces together. This will not only keep my license plate from falling out, but also keep people from steeling the tire.
...and the 2nd choice would be to mount the license plate to the jerry can holder. Simply by using bolts, lock washers, and nuts. Seems like a very simple choice. I like the 1st example much better though because it is more of a security piece to keep people from steeling the spare tire. I can still mount the license plate to the jerry can bracket and just use locking wheel nuts with the special tip. but like i said. the first choice seems like more of a multi use thing. because it provides that security to the tire. aside from bing a license plate holder. ya know?
Where ever i decide to mount this i am gonna have to run wires to it to have a small light to keep my license plate lit. I'm pretty sure its the law to have license plates lit. Anyway my question to you was gonna be where can i run my new lights through? Where are the the 2 wires that power the license plate lights on the tailgate? Becuase if there is already wires running to those from the bottom of the truck somewhere then i would rather just re use those wires vs running a whole new set and also running a new light switch in to the truck to turn on and off.
If any of you guys have any knowledge for this talegate light please let me know. Because i will be mounting this bumper/tires swing sometime this week. and i'd really like to have time to make all these wires look organized. Thanks guys.
Here is a picture of my first welds.
(dad's welds are at the far right of the top; he only did about 3 inches worth). You can see where i took over lol looks sloppy and lots of balls. hahaha But I did get much better with practice.
After welds were grinded and sanded down to 120grit. Wooo looks nice.

I was only able to get that done. I had to clean up early because i had a hot date with Faby. Gotta tell ya that new 'Grown Ups 2' movie was hilarious! So this is how i left the tire swing.


--------------------------------------------------------------------------------
Today I got much busier. Lots accomplished. I started off the day fitting that rubber tire swing stop right and bolting it down with some nice steel bolts, nuts, and lock washers. That alone took me forever because i had tons of mismatched combinations. i finally gave up and asked my neighbor ruben if he had 2 spares that he could let me have. and thankfully he did. YAY. lol
After that simple task i was back to fabbing up the rest of the gas can holder. Well actually the gas can holder was finished. i just wanted something to keep it from getting stolen. so i wanted to somehow make a lock to stop crooks from steeling my jerry can. after the top plate was finished i thought to myself.... "These guys can still steal my gas with a plate keeping it in place. There is still access to the lid of the jerry can. I have to keep them away from taking my gas." So i cut up some triangles and angled them around the corners to better keep the jerry can in place. but most of all. Keep people from opening my jerry can lid and sucking my gas out with a water hose. After i had all my cuts made i had to drop by Home Depot to buy 2 thick door hinges, and 2 MasterLock locks. came out to about $30 or so.
Once i came back home i spent about an hour welding all my pieces together and another 1-2 hours sanding everything down. Here is my 'protected' jerry can. This swinging bracket/ lock is really solid. unless someone is desperate enough to remove the pin's from my hinges i dont think anybody will be getting to my jerry can lol


--------------------------------------------------
While i was doing all of this i was painting the bumper matt black. Also made a triangle shaped gusset to assist with the weight of the tire.
Picked up some wheel studs from AutoZone and found they didnt fit into the holes right. but i didnt wanna return them so i just sanded them down toward where they lock in place. then just gave it a couple of small welds to keep them in place. Then i sprayed the bumper with primer.

And just cleaned up the patio and came in the house about 2 hours ago. This is how i left the tire swing.

I'm really hoping that We get to install the bumper tomorrow. It'd be really nice to have a bumper on the truck again lol. The only thing i am stuck on at the moment is where to mount my license plate. I had originally thought of having it mounted in the center of the tire but i cant figure out how exactly to mount it. If i mount it in the center of the tire then i am gonna want to use my 2nd MasterLock to lock the license plate(which will be mounted on to a 2/16" plate) blocking the wheel nuts. The master lock will be mounted behind the license plate locking in 2 tabs one on the tube that will come out of the middle of the tire and the other which will be on the tube that is behind the license plate. I'll probable have one tube slide into a bigger tube and have 2 tabs meet in the middle somewhere(with 2 holes drilled) so i can lock the 2 pieces together. This will not only keep my license plate from falling out, but also keep people from steeling the tire.
...and the 2nd choice would be to mount the license plate to the jerry can holder. Simply by using bolts, lock washers, and nuts. Seems like a very simple choice. I like the 1st example much better though because it is more of a security piece to keep people from steeling the spare tire. I can still mount the license plate to the jerry can bracket and just use locking wheel nuts with the special tip. but like i said. the first choice seems like more of a multi use thing. because it provides that security to the tire. aside from bing a license plate holder. ya know?
Where ever i decide to mount this i am gonna have to run wires to it to have a small light to keep my license plate lit. I'm pretty sure its the law to have license plates lit. Anyway my question to you was gonna be where can i run my new lights through? Where are the the 2 wires that power the license plate lights on the tailgate? Becuase if there is already wires running to those from the bottom of the truck somewhere then i would rather just re use those wires vs running a whole new set and also running a new light switch in to the truck to turn on and off.
If any of you guys have any knowledge for this talegate light please let me know. Because i will be mounting this bumper/tires swing sometime this week. and i'd really like to have time to make all these wires look organized. Thanks guys.
Last edited by Redeth005; Jul 13, 2013 at 09:39 PM.


