
Redeth's 1989 4Runner Resurrection
 Jul 5, 2013 | 09:24 AM
#1781
Thread Starter
Registered User
Joined: Apr 2012
Posts: 2,817
Likes: 2
From: Los Angeles CA
Thanks guys. He was using an acetylene torch. I seen his face after we got the cuts made. You can tell he's having fun helping me make this bad boy. Lol he gets all goofy like a kid does when they know they're going to a candy store or toys r us hahaha. I'd like to have the bumper all clean and ready. So we can get some some tac welds and more or less get the right shape and angle degrees right.
That would be a fun job to have right? I think it would. There are tons of metal workers out here in southern CA though. Amd lots of fab shops. So many work independently because there's so much competition. It wouldn't be worth it out here. Maybe out in a state where youre the only one or only have 2 other fab shops in the state. Thatd seem to have more of a ground to be a more successful business I think.
That would be a fun job to have right? I think it would. There are tons of metal workers out here in southern CA though. Amd lots of fab shops. So many work independently because there's so much competition. It wouldn't be worth it out here. Maybe out in a state where youre the only one or only have 2 other fab shops in the state. Thatd seem to have more of a ground to be a more successful business I think.
Jul 5, 2013 | 09:36 AM
#1782
Registered User
Joined: Aug 2011
Posts: 1,507
Likes: 2
From: Fraser Valley, British Columbia
That would be a fun job to have right? I think it would. There are tons of metal workers out here in southern CA though. Amd lots of fab shops. So many work independently because there's so much competition. It wouldn't be worth it out here. Maybe out in a state where youre the only one or only have 2 other fab shops in the state. Thatd seem to have more of a ground to be a more successful business I think.
You will always have business if you are one of the best at what you do. Go get a spot in a great shop then when you know your business start talking partnership or branch out on your own. At the very least being good will get you top dollar as long as you have the guts to ask for it.
Don't take no for the final answer while you chase things either. I got a job at an Amsterdam coffee shop by going there every day asking for a job five or six weeks every day.
You only live once. Do what makes you happy and do it the best you can. Also know when to outsource stuff you are not best at.
If I have my own business I sure won't be the bookkeeper. The wife is the numbers one in this partnership.
Last edited by Red Wagon; Jul 5, 2013 at 09:38 AM.
Jul 5, 2013 | 10:47 AM
#1783
Thread Starter
Registered User
Joined: Apr 2012
Posts: 2,817
Likes: 2
From: Los Angeles CA
That is true. Being an off-road part fabricator would be an awesome career to pursue. I see some of the work these "Iron workers" do here in the building and I'm amazed. Its cool to build something from the ground up. I think so at least.
Jul 5, 2013 | 12:45 PM
#1784
Fab/Medical....both tough but rewarding careers.... Just make the right decision now, before you get highly invested into one or the other, only to realize later you took the wrong turn at the fork, ya know?
Can't wait to see you slap this thing on. ..... very excited for ya, and super stoked you're getting to do this with popz!...
Still waiting to find out if I'll need the ride or not. THANX for saying u will!
Can't wait to see you slap this thing on. ..... very excited for ya, and super stoked you're getting to do this with popz!...
Still waiting to find out if I'll need the ride or not. THANX for saying u will!
Jul 5, 2013 | 12:48 PM
#1785
One other thing... It's getting incredibly difficult for fabricators and shops in general due to all the regulations that continue to come down like an avalanche on California businesses, via C.A.R.B., E.P.A., etc.... Make sure you talk to a bunch of them if you decide you might want to take this route.

 Jul 5, 2013 | 08:16 PM
#1788
Thread Starter
Registered User
Joined: Apr 2012
Posts: 2,817
Likes: 2
From: Los Angeles CA
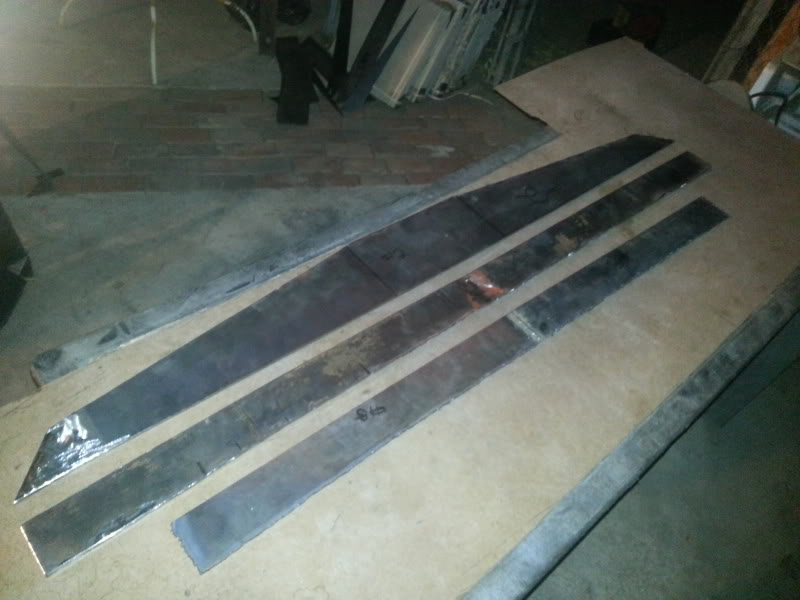
A bit of what I did today. I ran out of daylight so I had to stop before I could begin the last one on the right. Apparently the welds somehow warped my pieces so the straight edges all had some what of a belly in the middle. So I had to put a straight edge to it and re cut and grind to make it straight again. It was actually a lot of work getting that damn thing straightened out again lol I think they came out pretty good.
Last edited by Redeth005; Jul 5, 2013 at 08:18 PM.
Jul 5, 2013 | 09:48 PM
#1790
Thread Starter
Registered User
Joined: Apr 2012
Posts: 2,817
Likes: 2
From: Los Angeles CA
Dang... I just went through the whole SAS part of my thread. I'm amazed at how much stuff we have gotten done in the past 3 months. the 2nd half of my build thread is only the stuff i have done in the past 3 months. Axle cleanup/rebuild, SAS/lift, driveshaft fitting Shock size problems, more lift with new leaf springs, trouble shooting lift, retrofitting new springs and adding springs, and now making a bumper/ tire carrier. wow. These past 3 months have been the busiest i have ever had in the 2 years ive owned this truck. its amazing the things you learn by doing stuff hands on and just experimenting with stuff sometimes. this hands on experience has been priceless. wow... It feels good to know i was able to transform this truck the way i have(with the help of friends and family of course  )
)
)
Jul 5, 2013 | 11:44 PM
#1791
Registered User
Joined: Aug 2011
Posts: 1,507
Likes: 2
From: Fraser Valley, British Columbia
Jul 7, 2013 | 08:10 PM
#1792
Thread Starter
Registered User
Joined: Apr 2012
Posts: 2,817
Likes: 2
From: Los Angeles CA
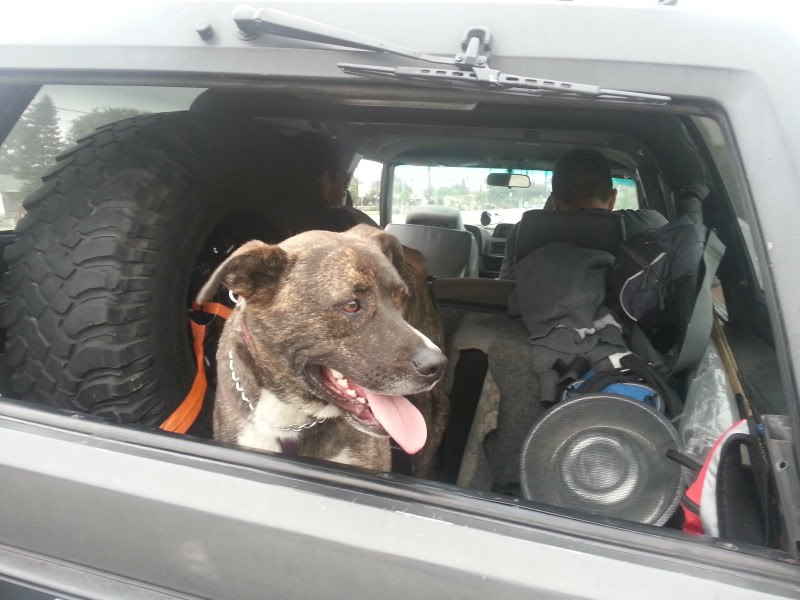
Had a pretty busy weekend. Yesterday a few friends, younger brother, and I went to do the Azusa 'Bridge to nowhere' 10mile hike. I totally forgot this was the 4th of july weekend. and talk about packed! There were so many freekin cars. Parking lot was full and there were tons more cars parked going waaaaaaay down the street about 1/4 mile. Mostly people camping out. BUT ON THE BRIGHT SIDE I TOOK MY TRUCK. I'm happy i took the 4runner instead of the corolla. Because i found one spot near the parking lot area where no other car could fit. it is a gutter that goes from the street part and drains into a that deep gutter and off a cliff lol. And my Rock Crawler truck is probably the only vehicle that could pull off that parallel parking with its nice flex haha. I really wish i would have taken a picture because my rear end was 'semi-flexing' but my friends were freaking out hahaha! anyway here are the pix.
My little girl, behaving well in the back of my truck

All packed loaded up and ready go hike.
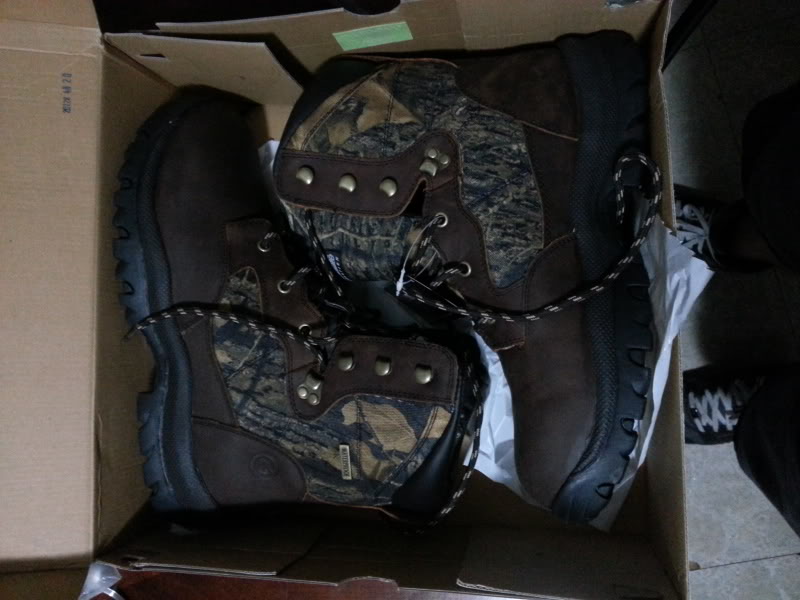
My favorite boots grew a mouth about 3 miles in this made for a very unpleasant remainder of the round trip. After 2 long years these boots finally kicked the bucket... DAMNIT THESE WERE $125 WHEN I BOUGHT THEM! But they were definitely the best investment i've ever made for hiking; with the exception of the Camelbak water backpack. I have used these boots over 60 times i would assume with all the hikes i did over the 2 years and the few off road trips ive gone on. i always have to have that Ankle support on any hike with my weak ankles.

Sophie watching her Papa jump off the big ol rocks into the river down below.
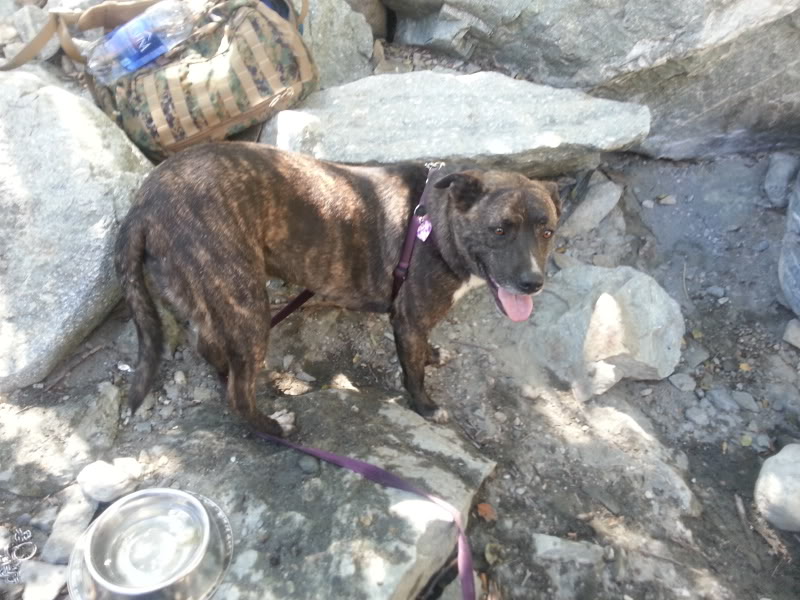
i was seriously thought Sophie was gonna pass out on us on the way back. i was freeking out. Sophie was panting so hard and we had ran out of water already. I carried her 3 times on the way back to the truck. She is fine right now i kept her fur wet and i gave her a nice fresh bath when we got home. Having her get heat stroke and dehydrated is the last thing i would want to happen to her on a fun day like that.
After i got home i went to Big5 Sporting Goods to buy some new hiking boots. I use them much too often to not have a new set. And i found the same brand only with a cammo deer hunting kind of look to them these were on sale for $45. Woot. talk about a smoking deal.
----------------------------------------------------------------------------------------------------------------------------------------------------------------------------------------------------------
STAY TUNED. I have a big update for my rear bumper coming up in a few minutes.
My little girl, behaving well in the back of my truck

All packed loaded up and ready go hike.

My favorite boots grew a mouth about 3 miles in
this made for a very unpleasant remainder of the round trip. After 2 long years these boots finally kicked the bucket... DAMNIT THESE WERE $125 WHEN I BOUGHT THEM! But they were definitely the best investment i've ever made for hiking; with the exception of the Camelbak water backpack. I have used these boots over 60 times i would assume with all the hikes i did over the 2 years and the few off road trips ive gone on. i always have to have that Ankle support on any hike with my weak ankles.
Sophie watching her Papa jump off the big ol rocks into the river down below.

i was seriously thought Sophie was gonna pass out on us on the way back. i was freeking out. Sophie was panting so hard and we had ran out of water already. I carried her 3 times on the way back to the truck. She is fine right now i kept her fur wet and i gave her a nice fresh bath when we got home. Having her get heat stroke and dehydrated is the last thing i would want to happen to her on a fun day like that.
After i got home i went to Big5 Sporting Goods to buy some new hiking boots. I use them much too often to not have a new set. And i found the same brand only with a cammo deer hunting kind of look to them these were on sale for $45. Woot. talk about a smoking deal.

----------------------------------------------------------------------------------------------------------------------------------------------------------------------------------------------------------
STAY TUNED. I have a big update for my rear bumper coming up in a few minutes.
Last edited by Redeth005; Jul 7, 2013 at 08:15 PM.
Jul 7, 2013 | 08:28 PM
#1793
Registered User
Joined: Jul 2012
Posts: 2,365
Likes: 4
From: Idaho
dont pitch the old boots bub SHOE GOO apply liberally to the boot an then tape it shut leave overnight an will be good to go for those more muddy icky things ya wouldnt want to put your new boots through
Jul 7, 2013 | 08:47 PM
#1794
Thread Starter
Registered User
Joined: Apr 2012
Posts: 2,817
Likes: 2
From: Los Angeles CA
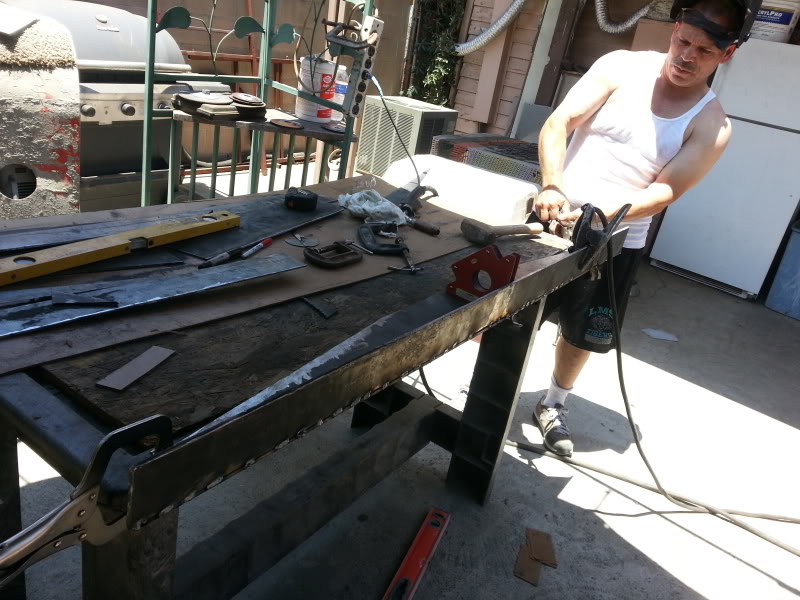
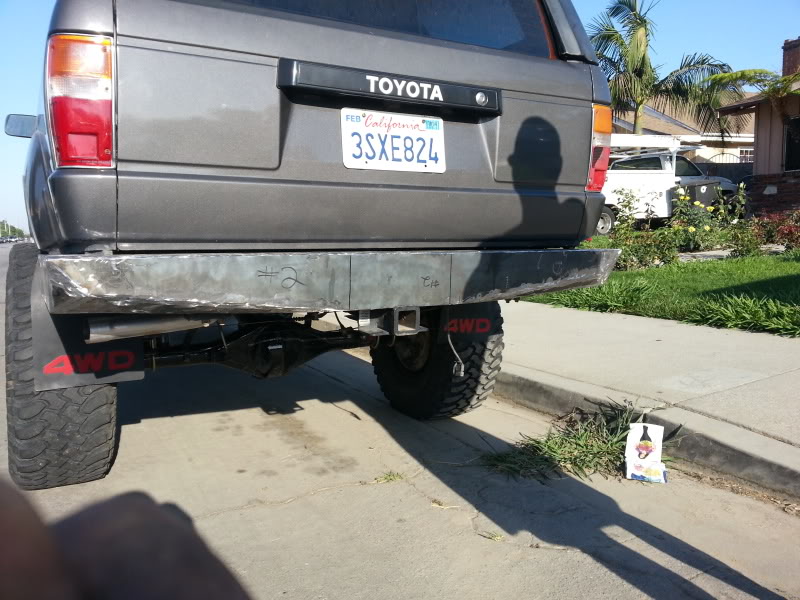
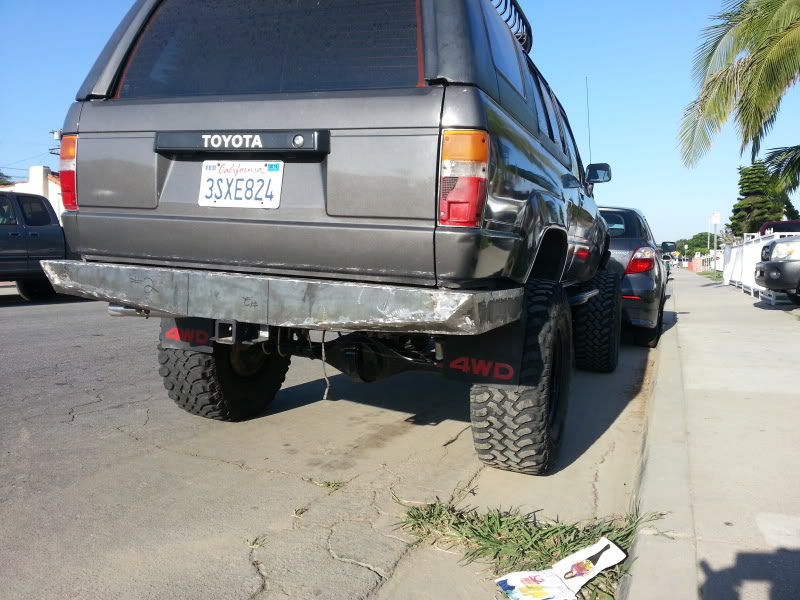
I started off my day at about 11am and just finished at about 8pm. We had a a very long but productive day. I finished grinding down the last piece (which i didnt end up needing after all lol) after that was done my dad and i brought out the big 220 Lincoln welder and started putting this heavy duty bumper of mine together.
first 2 parts. definitely need to make sure its all level and aligned correctly of not the whole bumper will be off when we try mounting it.
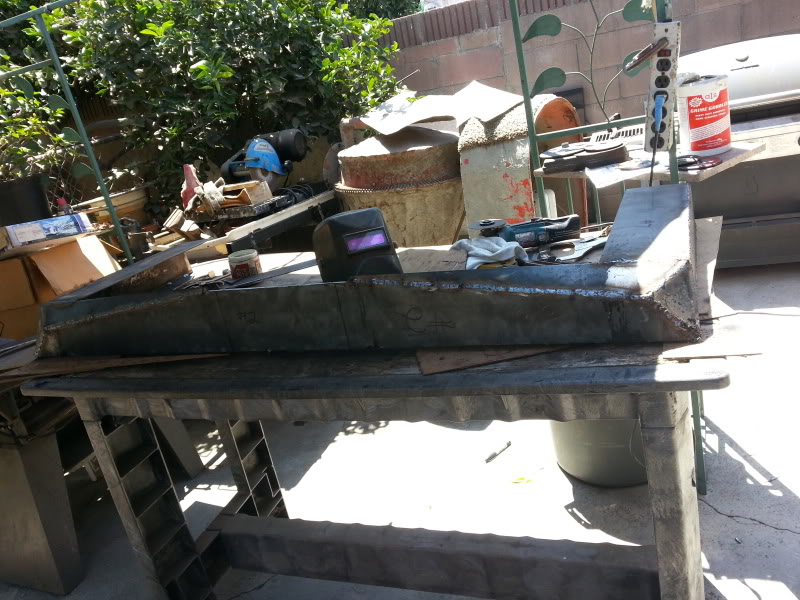
Got the corner and side protection pieces welded on already too.

Bottom side up: That's one beefy looking bumper! It was a pretty windy day out here where i live so the air was interfering with my dad's welds causing unwanted air bubbles in certain areas. you can see them in these 2 pix

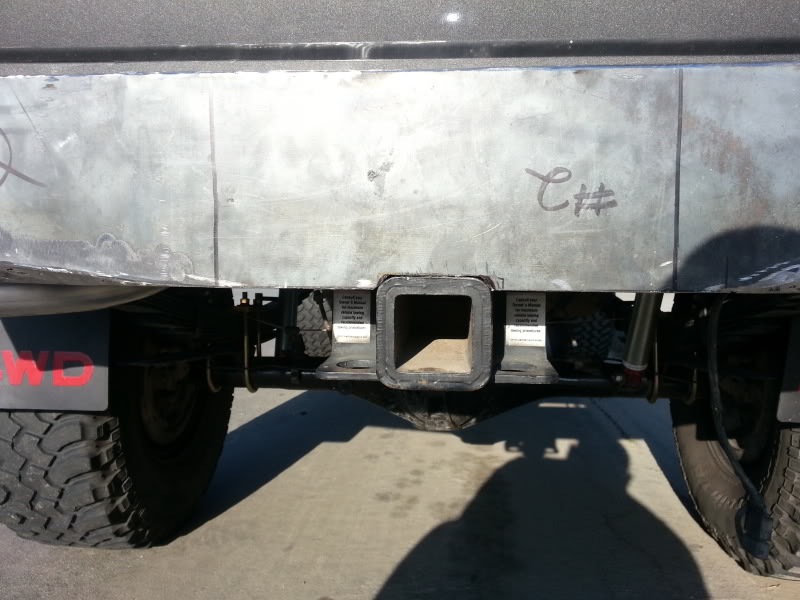
Once the whole bumper was welded together i grinded the welds down to a nice smooth surface. and as you can see there were a lot of air pockets....
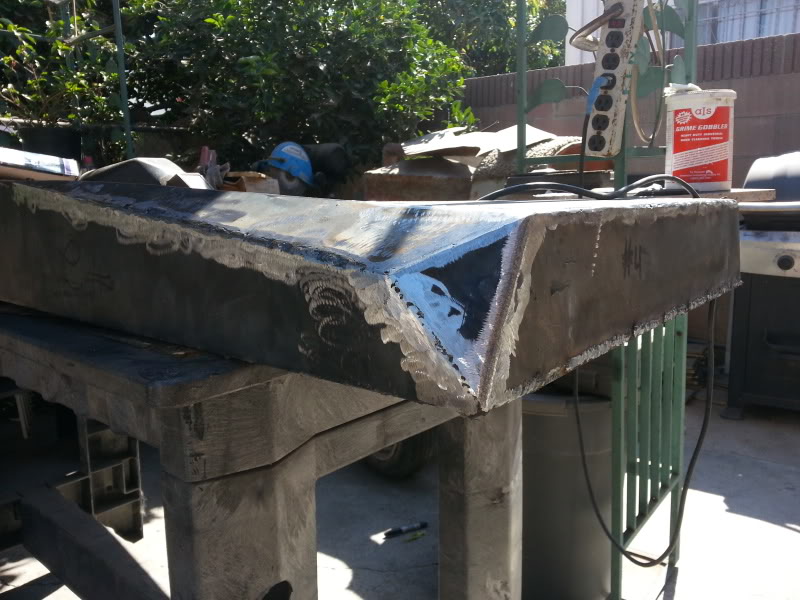
...and due to those air pockets i had my dad go over those pockets again to fill those holes. Here we go much better right?!?
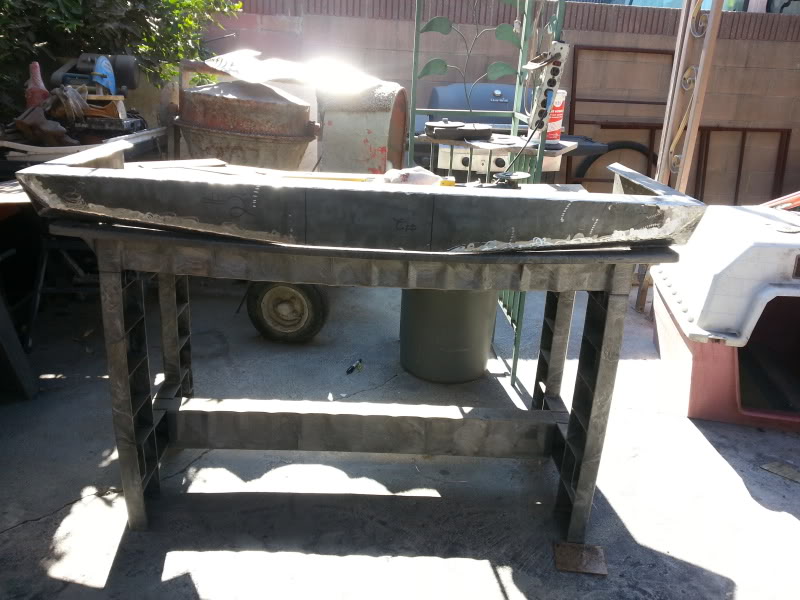
Here are some quick shots i took before doing some more changes it. It's still more or less gonna look like this here
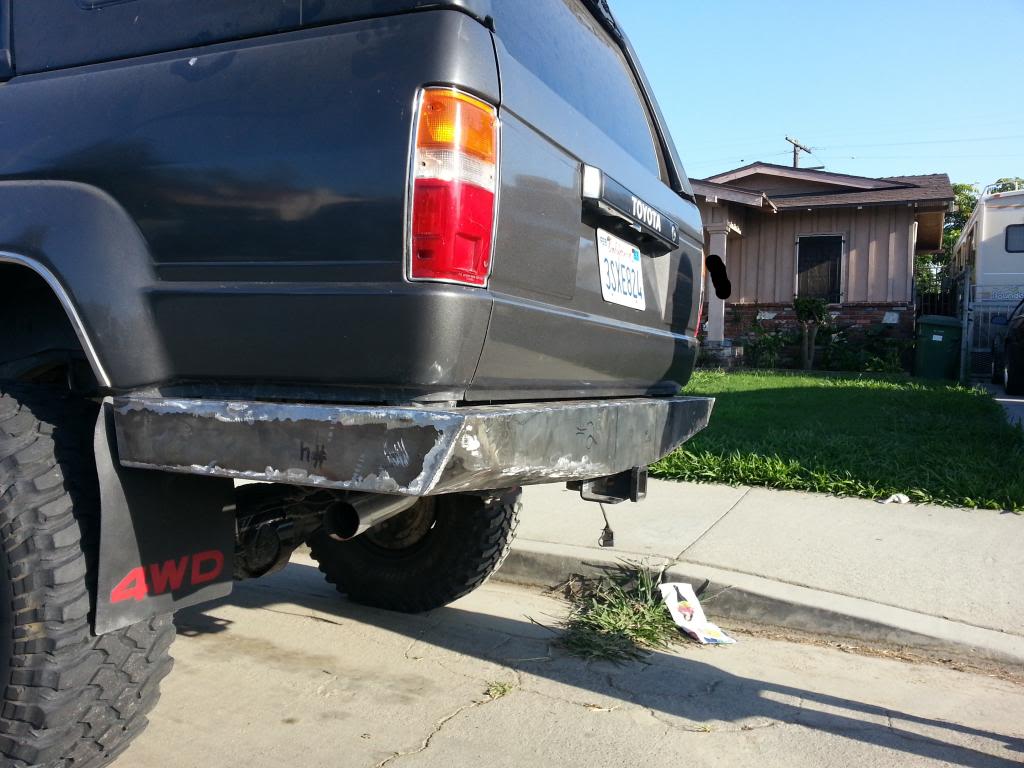

The bumper sat a bit too high and too far in under the tailgate. I had to fix this problem or else my tire swing/spindle would not work at all cuz it'd be hitting the tailgate. So i pulled the bumper out all the way to the top of the hitch. So the hitch entry is gonna sit flush with the bumper. but because it would be sitting slightly higher i had to remove 1/4" to accomodate that hitch space. either way it still looks good.
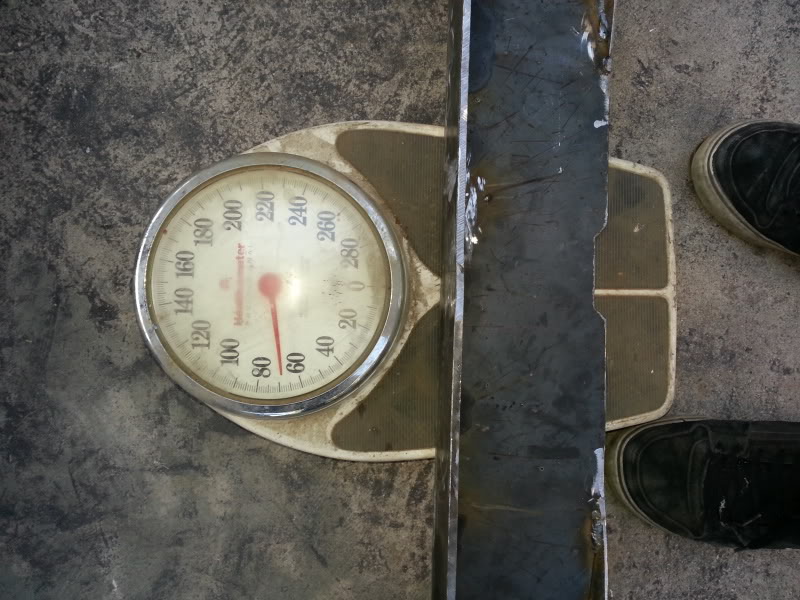
As of right now the the bumper sits at approximately 68lb. I think it'll be about 90lb once its all done with the extra metal for the tire carrier swing away, spare tire, and possibly 1 Jerry Can or Water can spot. Still thinking about getting a secondary gas tank. But it seems like too much work to go through for someone who isnt usually low on gas. Not to mention all the extra weight im going to have aside from tire carrier/bumper and whatever cargo i carry on my roof rack. So Yea i think my choice will more then likely be to just have 1 Jerry can spot, or maybe 2 spots one for gas and one for water. and i'll just mount the license plate onto the Jerry can holder.
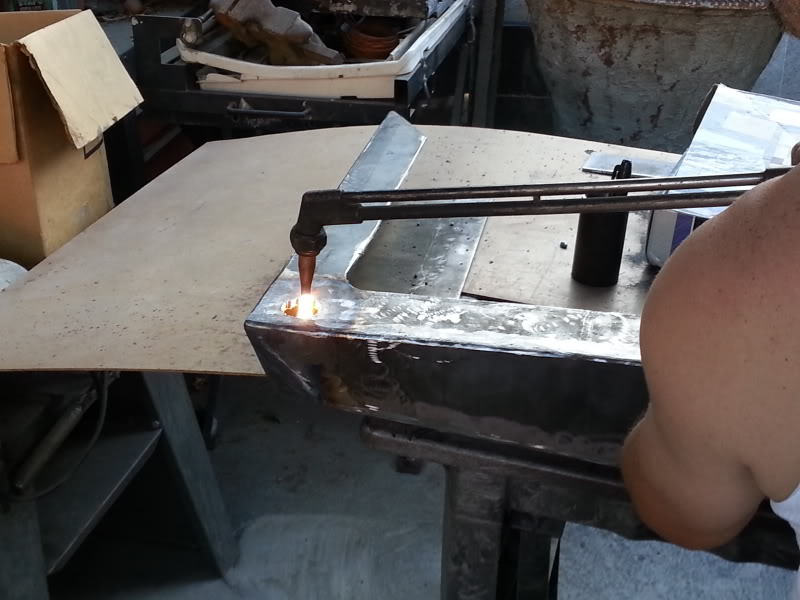
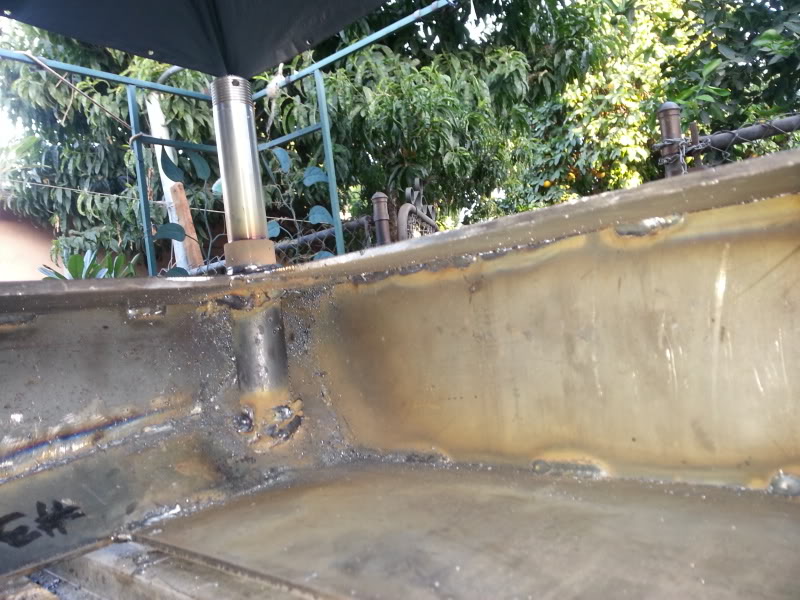
Time to mount the spindle. Here is my dad at work again working that torch.
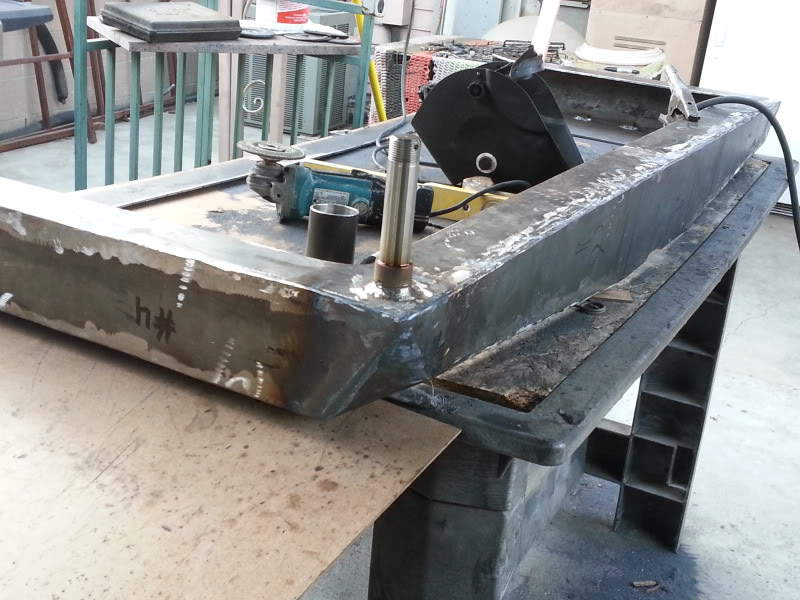
Spindle all mounted, at exactly 90* angles all the way around.
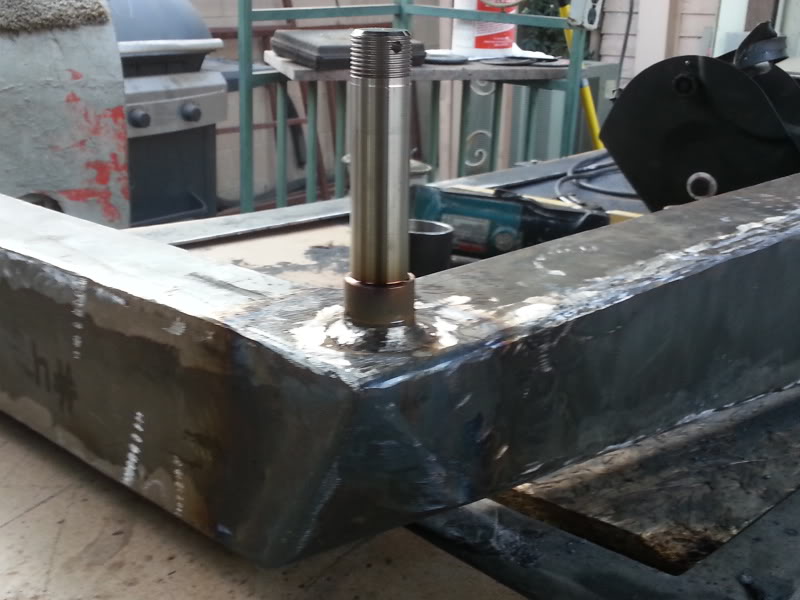
Spindle was welded in 3 places. on topside of the bumper, on the underside of that top plate, and on the very bottom of the bumper. I dont think this thing will be coming loose any time soon.
------------------------------------------------------------------------------------------------------------------------------------------------------------------------------------------------------------
EDIT:
All that is left is to buy some sand paper and sand thing thing to a shiney smooth surface all over. I was thinking of using bondo to fill whatever gaps the bumper had but then Mark reminded me about JB WELD and i figured i would rather use that instead because that will prevent that nasty chaulky break whenever i do hit something on the trail, or when somebody totals their car in a rear end accident lol But now that JB weld might not even be necessary anymore because my dad went over his welds that 2nd time and filled up the holes. Everything seems to be fine now. all it would need is a nice sand all over and then a couple of coats of primer and a couple of coats of the same Matt Black that i used on my sliders. I was hoping to get this thing powder coated but i really dont have that kind of money. I still need to buy 2 good Jerry Cans, box steel for the tire swing, threaded studs to mount the spare tire, and also a hy-lift. that alone is gonna be costly. So im just going to go with Matt Black.
Oh yea and i still need to build a design for the tire swing and figure out how i'm going to want these jerry cans mounted.
Just in case you're wondering why i left the hitch in the stock location I thought it over and over and concluded that if we heat up the hitch brackets to cut them to move them up 2 inches It is definitely gonna compromise the strength of the brackets. Even with extra plate reinforcements. I figure this hitch is already rated for towing and I don't know how much it'll be compromised if I were to cut and heat up with a torch. So I'm gonna keep the hitch where it is now and just weld the bottom of the bumper to the hitch and then mount the sides to the frame and hitch brackets etc.... it still looks good anyway so I don't mind.
------------------------------------------------------------------------------------------------------------------------------------------------------------------------------------------------------------
Alright guys thats all i got. I hope this was a good enough update to fuel your Yotatech addiction for the day lol I mean 9hours of work..... i hope it was enough.
first 2 parts. definitely need to make sure its all level and aligned correctly of not the whole bumper will be off when we try mounting it.

Got the corner and side protection pieces welded on already too.

Bottom side up: That's one beefy looking bumper! It was a pretty windy day out here where i live so the air was interfering with my dad's welds causing unwanted air bubbles in certain areas. you can see them in these 2 pix


Once the whole bumper was welded together i grinded the welds down to a nice smooth surface. and as you can see there were a lot of air pockets....

...and due to those air pockets i had my dad go over those pockets again to fill those holes. Here we go much better right?!?

Here are some quick shots i took before doing some more changes it. It's still more or less gonna look like this here


The bumper sat a bit too high and too far in under the tailgate. I had to fix this problem or else my tire swing/spindle would not work at all cuz it'd be hitting the tailgate. So i pulled the bumper out all the way to the top of the hitch. So the hitch entry is gonna sit flush with the bumper. but because it would be sitting slightly higher i had to remove 1/4" to accomodate that hitch space. either way it still looks good.

As of right now the the bumper sits at approximately 68lb. I think it'll be about 90lb once its all done with the extra metal for the tire carrier swing away, spare tire, and possibly 1 Jerry Can or Water can spot. Still thinking about getting a secondary gas tank. But it seems like too much work to go through for someone who isnt usually low on gas. Not to mention all the extra weight im going to have aside from tire carrier/bumper and whatever cargo i carry on my roof rack. So Yea i think my choice will more then likely be to just have 1 Jerry can spot, or maybe 2 spots one for gas and one for water. and i'll just mount the license plate onto the Jerry can holder.

Time to mount the spindle. Here is my dad at work again working that torch.

Spindle all mounted, at exactly 90* angles all the way around.


Spindle was welded in 3 places. on topside of the bumper, on the underside of that top plate, and on the very bottom of the bumper. I dont think this thing will be coming loose any time soon.

------------------------------------------------------------------------------------------------------------------------------------------------------------------------------------------------------------
EDIT:
All that is left is to buy some sand paper and sand thing thing to a shiney smooth surface all over. I was thinking of using bondo to fill whatever gaps the bumper had but then Mark reminded me about JB WELD and i figured i would rather use that instead because that will prevent that nasty chaulky break whenever i do hit something on the trail, or when somebody totals their car in a rear end accident lol But now that JB weld might not even be necessary anymore because my dad went over his welds that 2nd time and filled up the holes. Everything seems to be fine now. all it would need is a nice sand all over and then a couple of coats of primer and a couple of coats of the same Matt Black that i used on my sliders. I was hoping to get this thing powder coated but i really dont have that kind of money. I still need to buy 2 good Jerry Cans, box steel for the tire swing, threaded studs to mount the spare tire, and also a hy-lift. that alone is gonna be costly. So im just going to go with Matt Black.
Oh yea and i still need to build a design for the tire swing and figure out how i'm going to want these jerry cans mounted.
Just in case you're wondering why i left the hitch in the stock location I thought it over and over and concluded that if we heat up the hitch brackets to cut them to move them up 2 inches It is definitely gonna compromise the strength of the brackets. Even with extra plate reinforcements. I figure this hitch is already rated for towing and I don't know how much it'll be compromised if I were to cut and heat up with a torch. So I'm gonna keep the hitch where it is now and just weld the bottom of the bumper to the hitch and then mount the sides to the frame and hitch brackets etc.... it still looks good anyway so I don't mind.
------------------------------------------------------------------------------------------------------------------------------------------------------------------------------------------------------------
Alright guys thats all i got. I hope this was a good enough update to fuel your Yotatech addiction for the day lol I mean 9hours of work..... i hope it was enough.
Last edited by Redeth005; Jul 8, 2013 at 08:04 AM.
 Jul 7, 2013 | 08:59 PM
#1796
BADASS! Really looking it bubba! Congrats, amd tell pops "NICE WORK, MR.G!" for me, k? Lol.
Great work at designing it bud! I know pops helped making sure everything was mic'd and angled right and all that...And you really came up with a nice design with all the wood pieces and it really does look great man! Damn that thing looks like it's in there solid, you are right... The spindle I mean. Holy car killer! Hahahahaha.
I forgot to mention that when you are completely ready and get that thing smooth if you want the number to those guys they will give you a killer deal on powder coating that if you want to go that route. They do a really good job and it will be like half the price of anywhere else.
Last edited by ChefYota4x4; Jul 7, 2013 at 09:02 PM.
Jul 7, 2013 | 09:58 PM
#1797
Registered User
Joined: Jul 2012
Posts: 2,365
Likes: 4
From: Idaho
lookin extremely awesome!
hylift jack HF good price affordable
buy lug studs at auto parts store press them into a plate for the spare get a couple extra lug nuts you can drill one of them for a padlock OR make a bolt to go through the hylift the plate and the spare then a padlock all swings together
just ideas here
hylift jack HF good price affordable
buy lug studs at auto parts store press them into a plate for the spare get a couple extra lug nuts you can drill one of them for a padlock OR make a bolt to go through the hylift the plate and the spare then a padlock all swings together
just ideas here
Jul 8, 2013 | 08:54 AM
#1800
Thread Starter
Registered User
Joined: Apr 2012
Posts: 2,817
Likes: 2
From: Los Angeles CA
 . Like i said they lasted me 2 years of pretty heavy hiking.
 ...you really came up with a nice design with all the wood pieces and it really does look great man! Damn that thing looks like it's in there solid, you are right... The spindle I mean. Holy car killer! Hahahahaha.
I forgot to mention that when you are completely ready and get that thing smooth if you want the number to those guys they will give you a killer deal on powder coating that if you want to go that route. They do a really good job and it will be like half the price of anywhere else.
I forgot to mention that when you are completely ready and get that thing smooth if you want the number to those guys they will give you a killer deal on powder coating that if you want to go that route. They do a really good job and it will be like half the price of anywhere else.
Mark didn't that power coating cost you like $100ish only for doing the aisin hubs? I can't imagin what the price would be for something much much bigger.
lookin extremely awesome!
hylift jack HF good price affordable
buy lug studs at auto parts store press them into a plate for the spare get a couple extra lug nuts you can drill one of them for a padlock OR make a bolt to go through the hylift the plate and the spare then a padlock all swings together
just ideas here
hylift jack HF good price affordable
buy lug studs at auto parts store press them into a plate for the spare get a couple extra lug nuts you can drill one of them for a padlock OR make a bolt to go through the hylift the plate and the spare then a padlock all swings together
just ideas here
I was thinking of mounting the hylift either through the bottom tube of the tire swing or mount it diagonally in between the tire and gas can.
Thank you Phil. Can't wait for it to be finished. The truck looks funny without her rear end.
hi Terry. Thank you. I think its already been rewarding. Lol. I've saved hundreds of dollars by doing this myself already. And the best part is I got to spend some time with my dad. I think I had the hardest part of cutting and grinding all the parts lol. But I couldn't hace done it without his set of skills. Happy I got a dad that knows how to do all these things cuz if it weren't for him I'd probably be spending $600-1200 on a bumper already made. I've only spend $225 so far. Lol that's a huge difference!
Last edited by Redeth005; Jul 8, 2013 at 09:16 AM.


