
Redeth's 1989 4Runner Resurrection
 Jul 13, 2013 | 09:43 PM
#1841
Registered User
Joined: Jul 2012
Posts: 2,365
Likes: 4
From: Idaho
all you need is a tap off the trailer harness connector or where you'd connect to it when you turn on your running lights (the small 194/T10 bulb in the drivers taillight) thats all the licence plate lights are just extra running lights
bumper looks excellent and i like the design of the jerry can protector! awesome thinking!!
inside it you might want to pop a couple drain holes so water dont sit in it i know calif dont get much of it but...
bumper looks excellent and i like the design of the jerry can protector! awesome thinking!!
inside it you might want to pop a couple drain holes so water dont sit in it i know calif dont get much of it but...
Last edited by Cyberhorn The Dragon; Jul 13, 2013 at 09:45 PM.
Jul 13, 2013 | 09:56 PM
#1842
Thread Starter
Registered User
Joined: Apr 2012
Posts: 2,817
Likes: 2
From: Los Angeles CA
Would you happen to have a picture of which wires those would be? Btw thanks for the suggestion i totally forgot about a drain hole. Thanks man
I'm probably gonna have to go to Pepboys or O'reily auto parts tomorrow and look for some license plate lights. It'd be nice to just get a 12" LED strip. that'd definitely provide enough light. We'll see what i find in the store.
I'm probably gonna have to go to Pepboys or O'reily auto parts tomorrow and look for some license plate lights. It'd be nice to just get a 12" LED strip. that'd definitely provide enough light. We'll see what i find in the store.
Jul 13, 2013 | 10:29 PM
#1843
Registered User
Joined: Jul 2012
Posts: 2,365
Likes: 4
From: Idaho
Would you happen to have a picture of which wires those would be? Btw thanks for the suggestion i totally forgot about a drain hole. Thanks man
I'm probably gonna have to go to Pepboys or O'reily auto parts tomorrow and look for some license plate lights. It'd be nice to just get a 12" LED strip. that'd definitely provide enough light. We'll see what i find in the store.
I'm probably gonna have to go to Pepboys or O'reily auto parts tomorrow and look for some license plate lights. It'd be nice to just get a 12" LED strip. that'd definitely provide enough light. We'll see what i find in the store.
i looked at my PDF for my 88 an looks like the wire is green/blue which jives with that i remember when i was in there fixing that rear corner
wouldn't be hard for ya pull the drivers side tail light an inside look at the connectors the small bulb and the run light on the 1157 should be on the same line the other will be the ground (white/black) (test light time) tap off the live wire run it down through the drain hole or make one just under the taillight run that up to your license plate light
or you could get real adventurous and find the license plate light wire in the loom going right there on the drivers side of the tail gate an tap into that one
ya might need a ground depending on how well the pivot conducts but that can only be seen once youve got things hooked up
Last edited by Cyberhorn The Dragon; Jul 13, 2013 at 10:43 PM.
Jul 14, 2013 | 12:13 AM
#1844
Holy crapoli, Richard! That is so badarse!!!! Very original and LOVE the can carrier! WOW, ......just freaking digging this thing!
Hey, have u looked at superbrightleds.com for a lic.plate lite kit? They have em, pretty sure!
By the way, I was looking at that and I just realized that you could totally find a place on your swing out or something for some backup lights... even if they're just some Harbor Freight 4 inch for now, trust me you will love having something and as long as you have the tabs there you can put whatever you want later when you upgrade?
Jul 14, 2013 | 07:53 AM
#1845
Registered User
Joined: Feb 2013
Posts: 121
Likes: 0
From: Central CA
Looks awesome and learning to fab and weld from someone that knows their stuff. Can't beat that dude. Satisfaction of answering, "I built it" when folks ask which one it is too. Doing great work man!
 Jul 14, 2013 | 02:18 PM
#1847
Thread Starter
Registered User
Joined: Apr 2012
Posts: 2,817
Likes: 2
From: Los Angeles CA
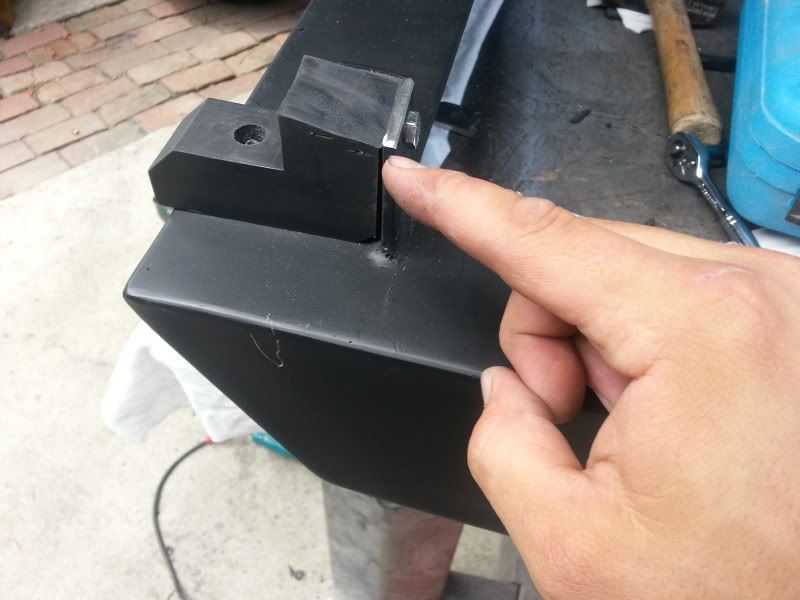
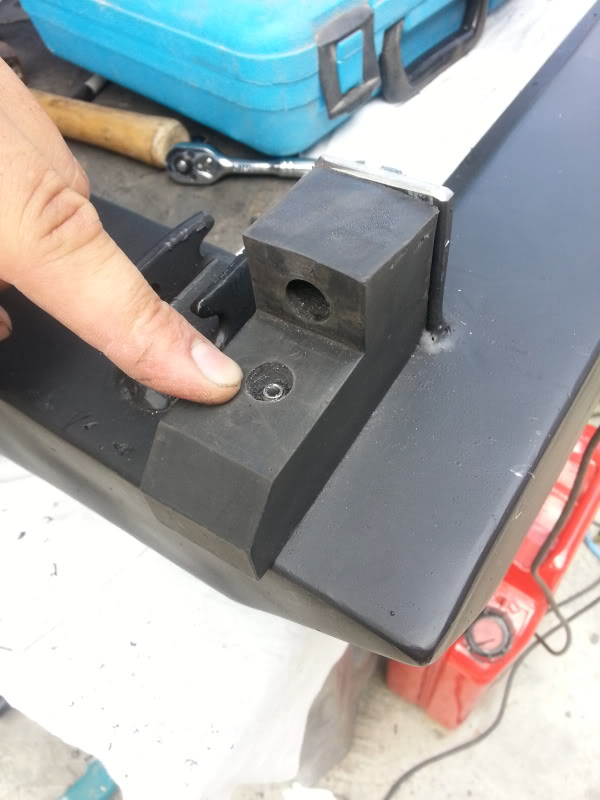
We tried mounting the bumper before my dad had to leave for the day but we ran into conplications. The tire swing rubber stop sat too tall. So I had to cut the top off and make a new hole on the bottom side so it wouldn't just be 1 nut and bolt holding it down. This is how it turned out.
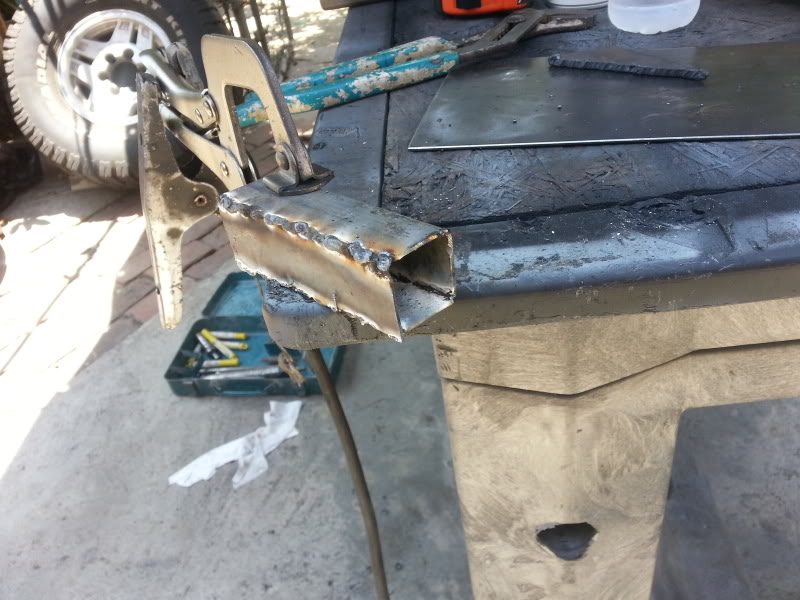
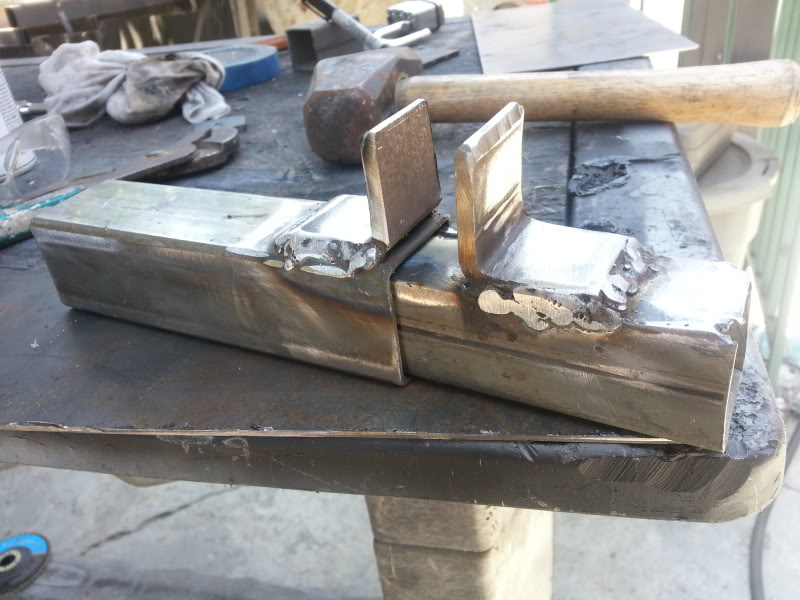
I decided to go with the license plate in the middle of the tire route. So I had to fab up a smaller tube to fit into the bigger tube. And make 2 tabs so they can lock together behind the license plate.

I decided to go with the license plate in the middle of the tire route. So I had to fab up a smaller tube to fit into the bigger tube. And make 2 tabs so they can lock together behind the license plate.
Jul 15, 2013 | 07:33 AM
#1850
Thread Starter
Registered User
Joined: Apr 2012
Posts: 2,817
Likes: 2
From: Los Angeles CA
wouldn't be hard for ya pull the drivers side tail light an inside look at the connectors the small bulb and the run light on the 1157 should be on the same line the other will be the ground (white/black) (test light time) tap off the live wire run it down through the drain hole or make one just under the taillight run that up to your license plate light
or you could get real adventurous and find the license plate light wire in the loom going right there on the drivers side of the tail gate an tap into that one
ya might need a ground depending on how well the pivot conducts but that can only be seen once youve got things hooked up
or you could get real adventurous and find the license plate light wire in the loom going right there on the drivers side of the tail gate an tap into that one
ya might need a ground depending on how well the pivot conducts but that can only be seen once youve got things hooked up
I'm happy though I'm learning how to weld finally. This is a pretty sweet and helpful skill to know

Meee toooooooo!
I just took a look at those Super bright LED ones last night. I did like some of the designs they had. i'm thinking of ordering 2 of them and while im at it order a few more dash board lights so i can put white lights into my inclinometer too.
Last edited by Redeth005; Jul 15, 2013 at 07:49 AM.
Jul 15, 2013 | 09:49 AM
#1853
Thread Starter
Registered User
Joined: Apr 2012
Posts: 2,817
Likes: 2
From: Los Angeles CA
The locking mechanism that i want to be completely confident and sure about is the one for my license plate tire blocker. I see way too many adds on craigslist of people selling only one rim and one full tred off road tire. and i dont wanna be one of those guys that gets jacked. So having that plate with a lock behind it blocking anybodys way to my wheel nuts should definitely be enough. and even if they do manage to get the nuts off i seriously doubt they'll be able to get the tire out due to the plate stopping it.
As for mounting the bumper goes I plan to weld around the square hitch piece. Then two 4&1/4" tubes from the bumper to the face of the hitch. And have 2 slanted tubes from the sides of the bumper to the frame. Those will be about 12"-12&3/4". Ill take a bunch of pictures for you all when the mounting process is finished.
Last edited by Redeth005; Jul 15, 2013 at 09:57 AM.
Jul 15, 2013 | 11:02 AM
#1854
Great updates and work, Richard! it's looking great and I think it's about time if you just make me one of those jerry can holders... no just go ahead and do it it's okay... I insist! it's no problem! hahaha...
hey buddy, I'm sure you're busy today but just letting you know that Johnny's coming over... thought you might want to have a Pow Wow for a minute and check out his 3.4 swap and maybe pick up the switch and a couple of avo's? I figure you're working till 4 or so? anyway, I'm heading over to do lunch for the peeps and then I'll be back at my pad around 1. just send me a message or call... I'm going to text you in a few. I only mention his engine swap because anything can happen, to you or me or anyone... that's why I've been looking into mine for quite a while. not necessarily that motor but for you if you ever did go there it would probably be the most logical, and you could supercharge it like Brian/ swimmer boy is doing right now...
Anyway, just wanted to say that I'm really stoked for you and you're doing a great job man! Finally I have someone within a reasonable distance that will do my welding! lol.....
PS: Say hi to Mr and Mrs G for me!.... and ... sorry your dad's battling the back drama. I know that well for the last 20 years and it really sucks!
Jul 16, 2013 | 09:51 AM
#1855
Thread Starter
Registered User
Joined: Apr 2012
Posts: 2,817
Likes: 2
From: Los Angeles CA
Just bought my LED light strip from SuperBrightLEDs.com
Cant wait for it to come. They were selling a few with cosmetic blemish(glue on the end of the light) for 1/2 price. Woot i scored on that. Here's the links to the LED strip and the 2 mounting clips that i bought.
LED strip:
http://www.superbrightleds.com/morei...-blemish/1411/
Just seen this link has better pix of it in action
http://www.superbrightleds.com/morei...r-fixture/680/
Clips
http://www.superbrightleds.com/morei...ed-product/94/
and while there i went ahead and bought myself 5 more 194 dashboard wedge lights. im gonna use 2 for the inclinometer to finally match the resh of the dash lights and the other 3 will be used as spares.
http://www.superbrightleds.com/morei...edge-base/199/
All this came out to $34.77 with s&h included. Not too bad. Always better to buy from this site when you buy multiple items vs just a couple of bulbs because the s&h can cost a lot at times.
Last edited by Redeth005; Jul 16, 2013 at 09:58 AM.
Jul 16, 2013 | 09:58 AM
#1856
Cool, they are great customer device as well. .... Good biz!
Great seeing u guys, bubba, hope to get out there soon with the SAS'sy twins(paternal, not identical, hahaha)....
EBay about the glove box light?
Great seeing u guys, bubba, hope to get out there soon with the SAS'sy twins(paternal, not identical, hahaha)....
EBay about the glove box light?
Jul 16, 2013 | 10:20 AM
#1857
Thread Starter
Registered User
Joined: Apr 2012
Posts: 2,817
Likes: 2
From: Los Angeles CA
Nah. I only ordered this stuff because I needed to have that light for the license plate so I put it on the credit card. But I still don't have the money to spend on extras that I don't need to absolutely have right now.
I'm gonna have to make some sort of a light mount or plate so I mount the light facing downward toward the license plate. But since I'm probably gonna be using a nut and bolt or self tapping screw into the steel to hold it the mounting tabs in place I'm probably gonna have to somehow weld together a housing for this light. Either that or bend some of the thinner steel. I'm not sure just yet. I can't really make it till I have it in front of me. Or else ill just be wasting steel. Ya get me.
It was nice to see you and Jonnyboy yesterday. I had fun. Thanks again for dinner Mark. It was delicious. I'm definitely gonna have a great lunch at work today.
Jul 16, 2013 | 10:34 AM
#1858
Ebay? Wth? Hahaha..... YEP, talk to text blooper again..... I meant cant u use one of you SUPERBRIGHTLEDS.COM bulbs for the glive box light? Ashtray?
My pleasure, Richard. .... Hope to see ya again soon! Maybe we can make a road trip eventually and head up Johnny's way!
My pleasure, Richard. .... Hope to see ya again soon! Maybe we can make a road trip eventually and head up Johnny's way!
Jul 16, 2013 | 10:47 AM
#1859
Thread Starter
Registered User
Joined: Apr 2012
Posts: 2,817
Likes: 2
From: Los Angeles CA
Lol Why don't you reread everything your google voice thing types out before you post. Damn phone gets words wrong 20-30% of the time. I usually try to check it all.
My truck doesn't have a light for the ash tray.
I just thought about something. I should have bought the lights for the door panels, map light, the overhead light and that engine bay light while I was at it woukd have been cheaper to get it all together in one order. Oh well. Ill wait till next time I gotta buy something from them.
Last edited by Redeth005; Jul 16, 2013 at 10:48 AM.
Jul 16, 2013 | 10:58 AM
#1860
I'm about to grab all of the running and reverse and brake lights.... Probably leave my dash and all that alone as those are not on all the time and I can just open my tailgate and have plenty of light, so I don't have to worry about dimming those up front to save on power, etc...
I think I will get all the rest of my off road lights on including the rock lights and then decide on what type of engine bay light... I still like that one but as you've seen in my engine bay I am much more restricted on room( that's pretty crazy considering how much more room I have everywhere else right? you got that extra room in the back there... that's a really cool mod man I'm glad we got on those and I think it is probably one of the best options >>>). I'm sure I can figure something out and if I do I would like to get that one tower bulb that I'm pretty sure you are planning on getting. just make sure you measure the height of the bulb after its installed so from the base of the lights or the top of the bayonet fitting. As I remember it was going to be a very tight fit to get it to fit under that shell.
You don't have an ashtray light? I thought they all had one... learn something new everyday. What about the glove box? I have a standard bulb in there and it's pretty darn bright... not that it would be that much extra to do, so I might just do it.
I should probably work on my mud flaps and other legal issues first.... ...... Maybe I can get you to fab me up something?
I was bummed when I realized after you left that you didn't come down with us and grab some avocados. I'm pretty sure you heard us talking about it though, so you must have been tired! lol
I think I will get all the rest of my off road lights on including the rock lights and then decide on what type of engine bay light... I still like that one but as you've seen in my engine bay I am much more restricted on room( that's pretty crazy considering how much more room I have everywhere else right? you got that extra room in the back there... that's a really cool mod man I'm glad we got on those and I think it is probably one of the best options >>>). I'm sure I can figure something out and if I do I would like to get that one tower bulb that I'm pretty sure you are planning on getting. just make sure you measure the height of the bulb after its installed so from the base of the lights or the top of the bayonet fitting. As I remember it was going to be a very tight fit to get it to fit under that shell.
You don't have an ashtray light? I thought they all had one... learn something new everyday. What about the glove box? I have a standard bulb in there and it's pretty darn bright... not that it would be that much extra to do, so I might just do it.
I should probably work on my mud flaps and other legal issues first....
...... Maybe I can get you to fab me up something? I was bummed when I realized after you left that you didn't come down with us and grab some avocados. I'm pretty sure you heard us talking about it though, so you must have been tired! lol
Last edited by ChefYota4x4; Jul 16, 2013 at 11:01 AM.


