
Redeth's 1989 4Runner Resurrection
 Jun 24, 2013 | 10:49 PM
#1703
Thread Starter
Registered User
Joined: Apr 2012
Posts: 2,817
Likes: 2
From: Los Angeles CA
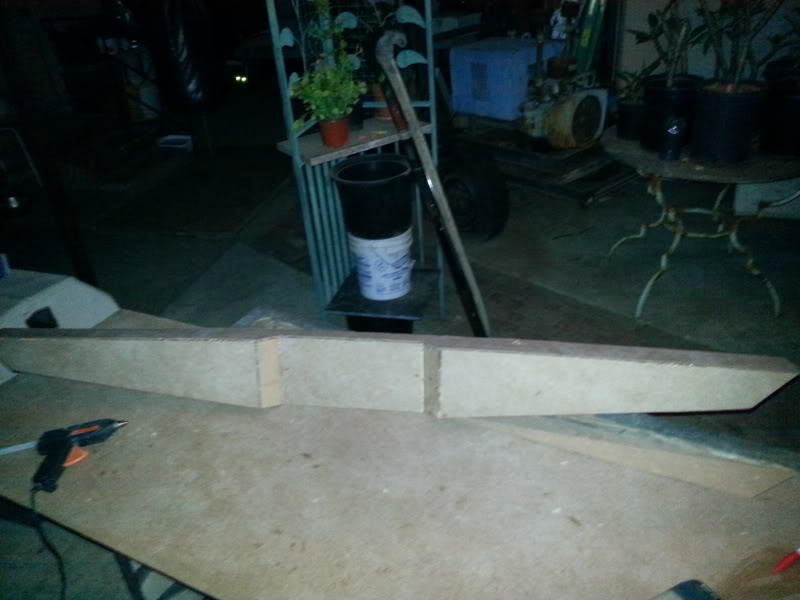
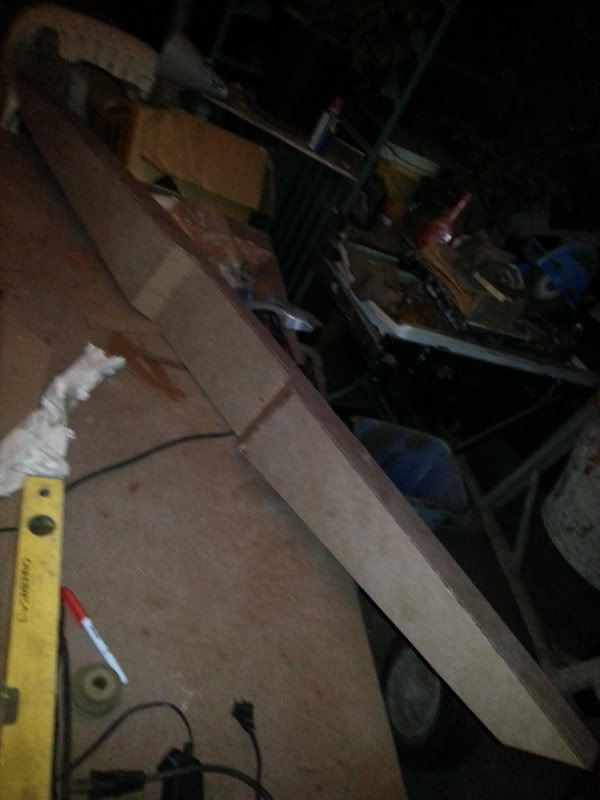
Here is some of today's progress.
I ended up shortening those squaredish pieces in the top to 1.5" I like it much more like that.
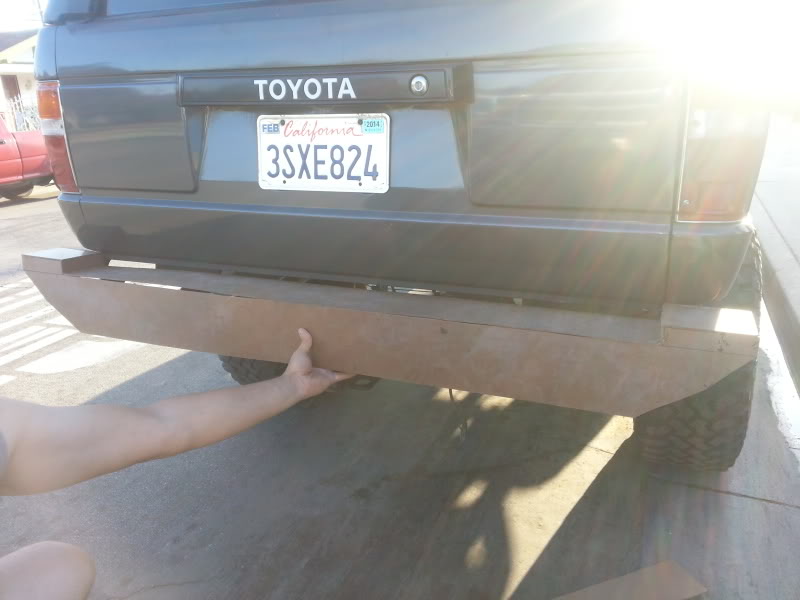
Mark did point something out to me today. I hace been wanting more of a similar look to the bumpers I've been posting lately and although this one looks similar the sides don't look anything like it. Mine has more of a flat face. I am really trying to make it look as close as I can and even with all these pix that I've found I have to hand it to these fab shops. Because it is pretty hard to make one look as clean and nice as they do lol
I have enough masonite board to make another template of the bumper. So who knows maybe ill be able to create one more better. But as for now this I'd what I accomplished today. I only got around to one side. Ill het to the other tonorrow. And maybe ill be able to give the corners of this one more of a slicker look vs the full front on flat face.


On my truck.
Hoping I wknt have to completely tear this one down to build another one. But I'd rather much re do it now that it is just masonite board and hot glue gun vs expensive plate and welds lol.
We'll see I have a good idea of what to do. But I ran out of sun light. So till tomorrow!
I ended up shortening those squaredish pieces in the top to 1.5" I like it much more like that.
Mark did point something out to me today. I hace been wanting more of a similar look to the bumpers I've been posting lately and although this one looks similar the sides don't look anything like it. Mine has more of a flat face. I am really trying to make it look as close as I can and even with all these pix that I've found I have to hand it to these fab shops. Because it is pretty hard to make one look as clean and nice as they do lol
I have enough masonite board to make another template of the bumper. So who knows maybe ill be able to create one more better. But as for now this I'd what I accomplished today. I only got around to one side. Ill het to the other tonorrow. And maybe ill be able to give the corners of this one more of a slicker look vs the full front on flat face.
On my truck.
Hoping I wknt have to completely tear this one down to build another one. But I'd rather much re do it now that it is just masonite board and hot glue gun vs expensive plate and welds lol.
We'll see I have a good idea of what to do. But I ran out of sun light. So till tomorrow!
Jun 25, 2013 | 12:36 AM
#1704
Registered User
Joined: Jul 2012
Posts: 2,365
Likes: 4
From: Idaho
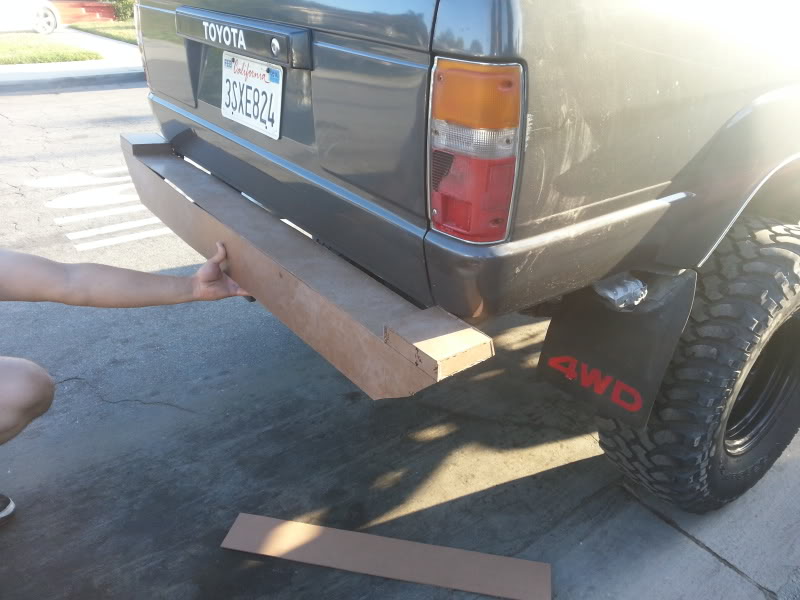
the side parts if you had tube going from the end to frame would make a good armor for the rear corners and provide a slide point off the bumper to the rear the rear face looks good plenty of room for the hitch box an couple holes with drops for safety chains when towing so nothing hangs out under the bumper
if ya need a picture of a chain hole rich let me know the thick steel of the bumper would hold it
if ya need a picture of a chain hole rich let me know the thick steel of the bumper would hold it


 Jun 25, 2013 | 12:14 PM
#1706
Thread Starter
Registered User
Joined: Apr 2012
Posts: 2,817
Likes: 2
From: Los Angeles CA
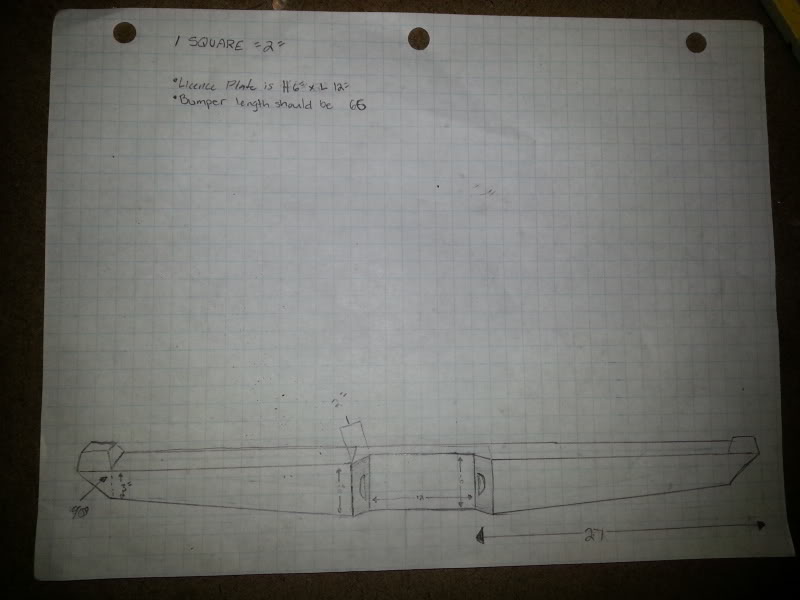
Hmm.... I've been looking at those pictures from the 2 links I linked and I've been doodling ob some graph paper here at work all day. I am definitely gonna come up with a different bumper. I know now what I'm looking for. And nore or less how to get the face that I want for the bumper. I wish I would have discovered these pictures before I started cutting this material. Gonna try to start on the new design today.
Jun 25, 2013 | 12:39 PM
#1707
Hey buddy, I just wanted to add that it might be cool to add one piece of tube welded to is backing plate coming out of the center of the back face of your plate bumper... Doing this will enable you to limit the amount that the bumper sticks out, and then you could also angle it backwards towards the tires on that back face, something like 30 degrees? This would probably give you at least some angle your desiring, giving it some form like you're wanting, and without trying to do several different angles .
Another way to do multiple angles would be to use a piece of 2 inch box tube across the top, basically where the step would go, and then do tangled steps from there. In other words weld plate to the outermost bottom-edge of the box tube, having it come under and toward the tires as I mentioned. Maybe even 1 and 1/2 inch boxtube.... you could also work with other box tube on the corners, giving you that more square look, limiting fabrication and material and allowing you to weld a couple pieces together and then use portal plate or something of the sort to fill the space. This would keep it close, and you would still be able to weld a larger piece of box to the corner that would enable you to mount your hinges. A one strip 2 X 2 piece of tube going across the back will allow you to build off of it in almost any direction. Possibly better would even be 3 by one and a half or 4 by 2. I believe that is what Jason and others were using for their projects. Along with adding a piece of round tube as a step you could very simply mount 2 D-ring hoops around center left and right. You could probably also mount a DOT hitch tube under that one piece of box tube and then build around that. Would have to probably run 2 pieces of DOM tube to the frame mounting rails from the center like my bumper from Adam? Just a thought to work on your brain with! Lol. I think starting with the box tube of some to mention or another would save you a lot of planning & fabrication instead of having to work with nothing but plate.... ? Just a thought. If you already mentioned that I apologize... I've been trying to keep up, hahahaha.
Another way to do multiple angles would be to use a piece of 2 inch box tube across the top, basically where the step would go, and then do tangled steps from there. In other words weld plate to the outermost bottom-edge of the box tube, having it come under and toward the tires as I mentioned. Maybe even 1 and 1/2 inch boxtube.... you could also work with other box tube on the corners, giving you that more square look, limiting fabrication and material and allowing you to weld a couple pieces together and then use portal plate or something of the sort to fill the space. This would keep it close, and you would still be able to weld a larger piece of box to the corner that would enable you to mount your hinges. A one strip 2 X 2 piece of tube going across the back will allow you to build off of it in almost any direction. Possibly better would even be 3 by one and a half or 4 by 2. I believe that is what Jason and others were using for their projects. Along with adding a piece of round tube as a step you could very simply mount 2 D-ring hoops around center left and right. You could probably also mount a DOT hitch tube under that one piece of box tube and then build around that. Would have to probably run 2 pieces of DOM tube to the frame mounting rails from the center like my bumper from Adam? Just a thought to work on your brain with! Lol. I think starting with the box tube of some to mention or another would save you a lot of planning & fabrication instead of having to work with nothing but plate.... ? Just a thought. If you already mentioned that I apologize... I've been trying to keep up, hahahaha.
Last edited by ChefYota4x4; Jun 25, 2013 at 12:42 PM.
Jun 25, 2013 | 08:15 PM
#1709
Thread Starter
Registered User
Joined: Apr 2012
Posts: 2,817
Likes: 2
From: Los Angeles CA
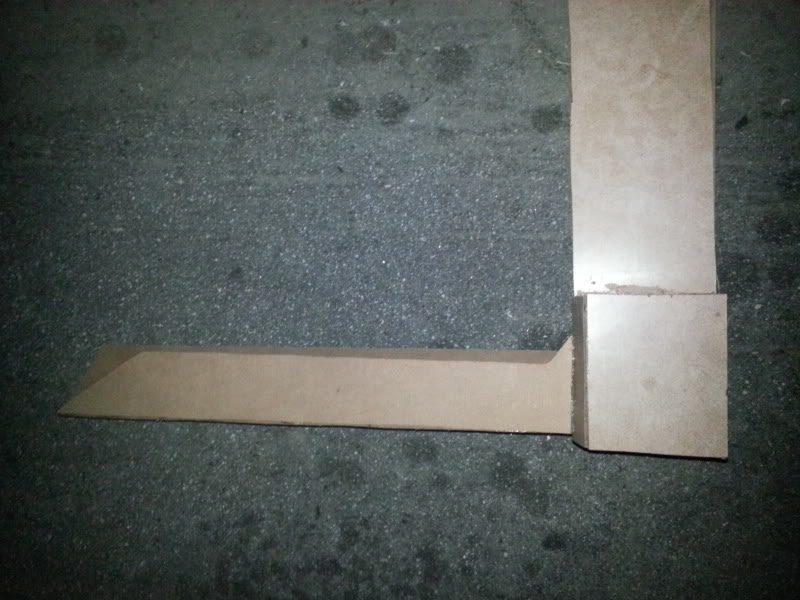
Sup guys. So i decided to abandon the last bumper for sure already because i made a much better design and looks a hell of a lot better. This is how i get down with the graph paper. It's all gonna be the same. Still debating on those 2 raised step like parts on the ends of the bumper. I might not do those.
Here is what i got done today.

As you can see this one is much better then my previous one. and ive already got a couple other cuts that i haven't attached onto this yet. It'll have more "triangle-ish) angles on the bumper ends. I'm trying my best to make the corners or ends look like the ones off this bumper here...
http://toyotaoff-road.com/threads/48...r-plate-bumper
I believe that i am pretty darn close to reaching that. I'm so excited. I really cant wait to work on this bad boy some more tomorrow after work.

Here is what i got done today.


As you can see this one is much better then my previous one. and ive already got a couple other cuts that i haven't attached onto this yet. It'll have more "triangle-ish) angles on the bumper ends. I'm trying my best to make the corners or ends look like the ones off this bumper here...
http://toyotaoff-road.com/threads/48...r-plate-bumper
I believe that i am pretty darn close to reaching that. I'm so excited. I really cant wait to work on this bad boy some more tomorrow after work.
Last edited by Redeth005; Jun 25, 2013 at 08:18 PM.
Jun 25, 2013 | 08:38 PM
#1711
Thread Starter
Registered User
Joined: Apr 2012
Posts: 2,817
Likes: 2
From: Los Angeles CA
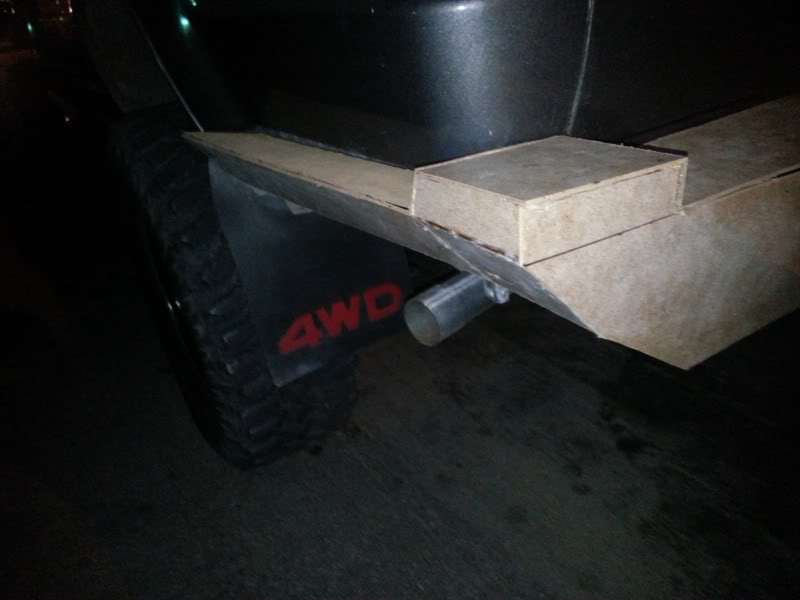
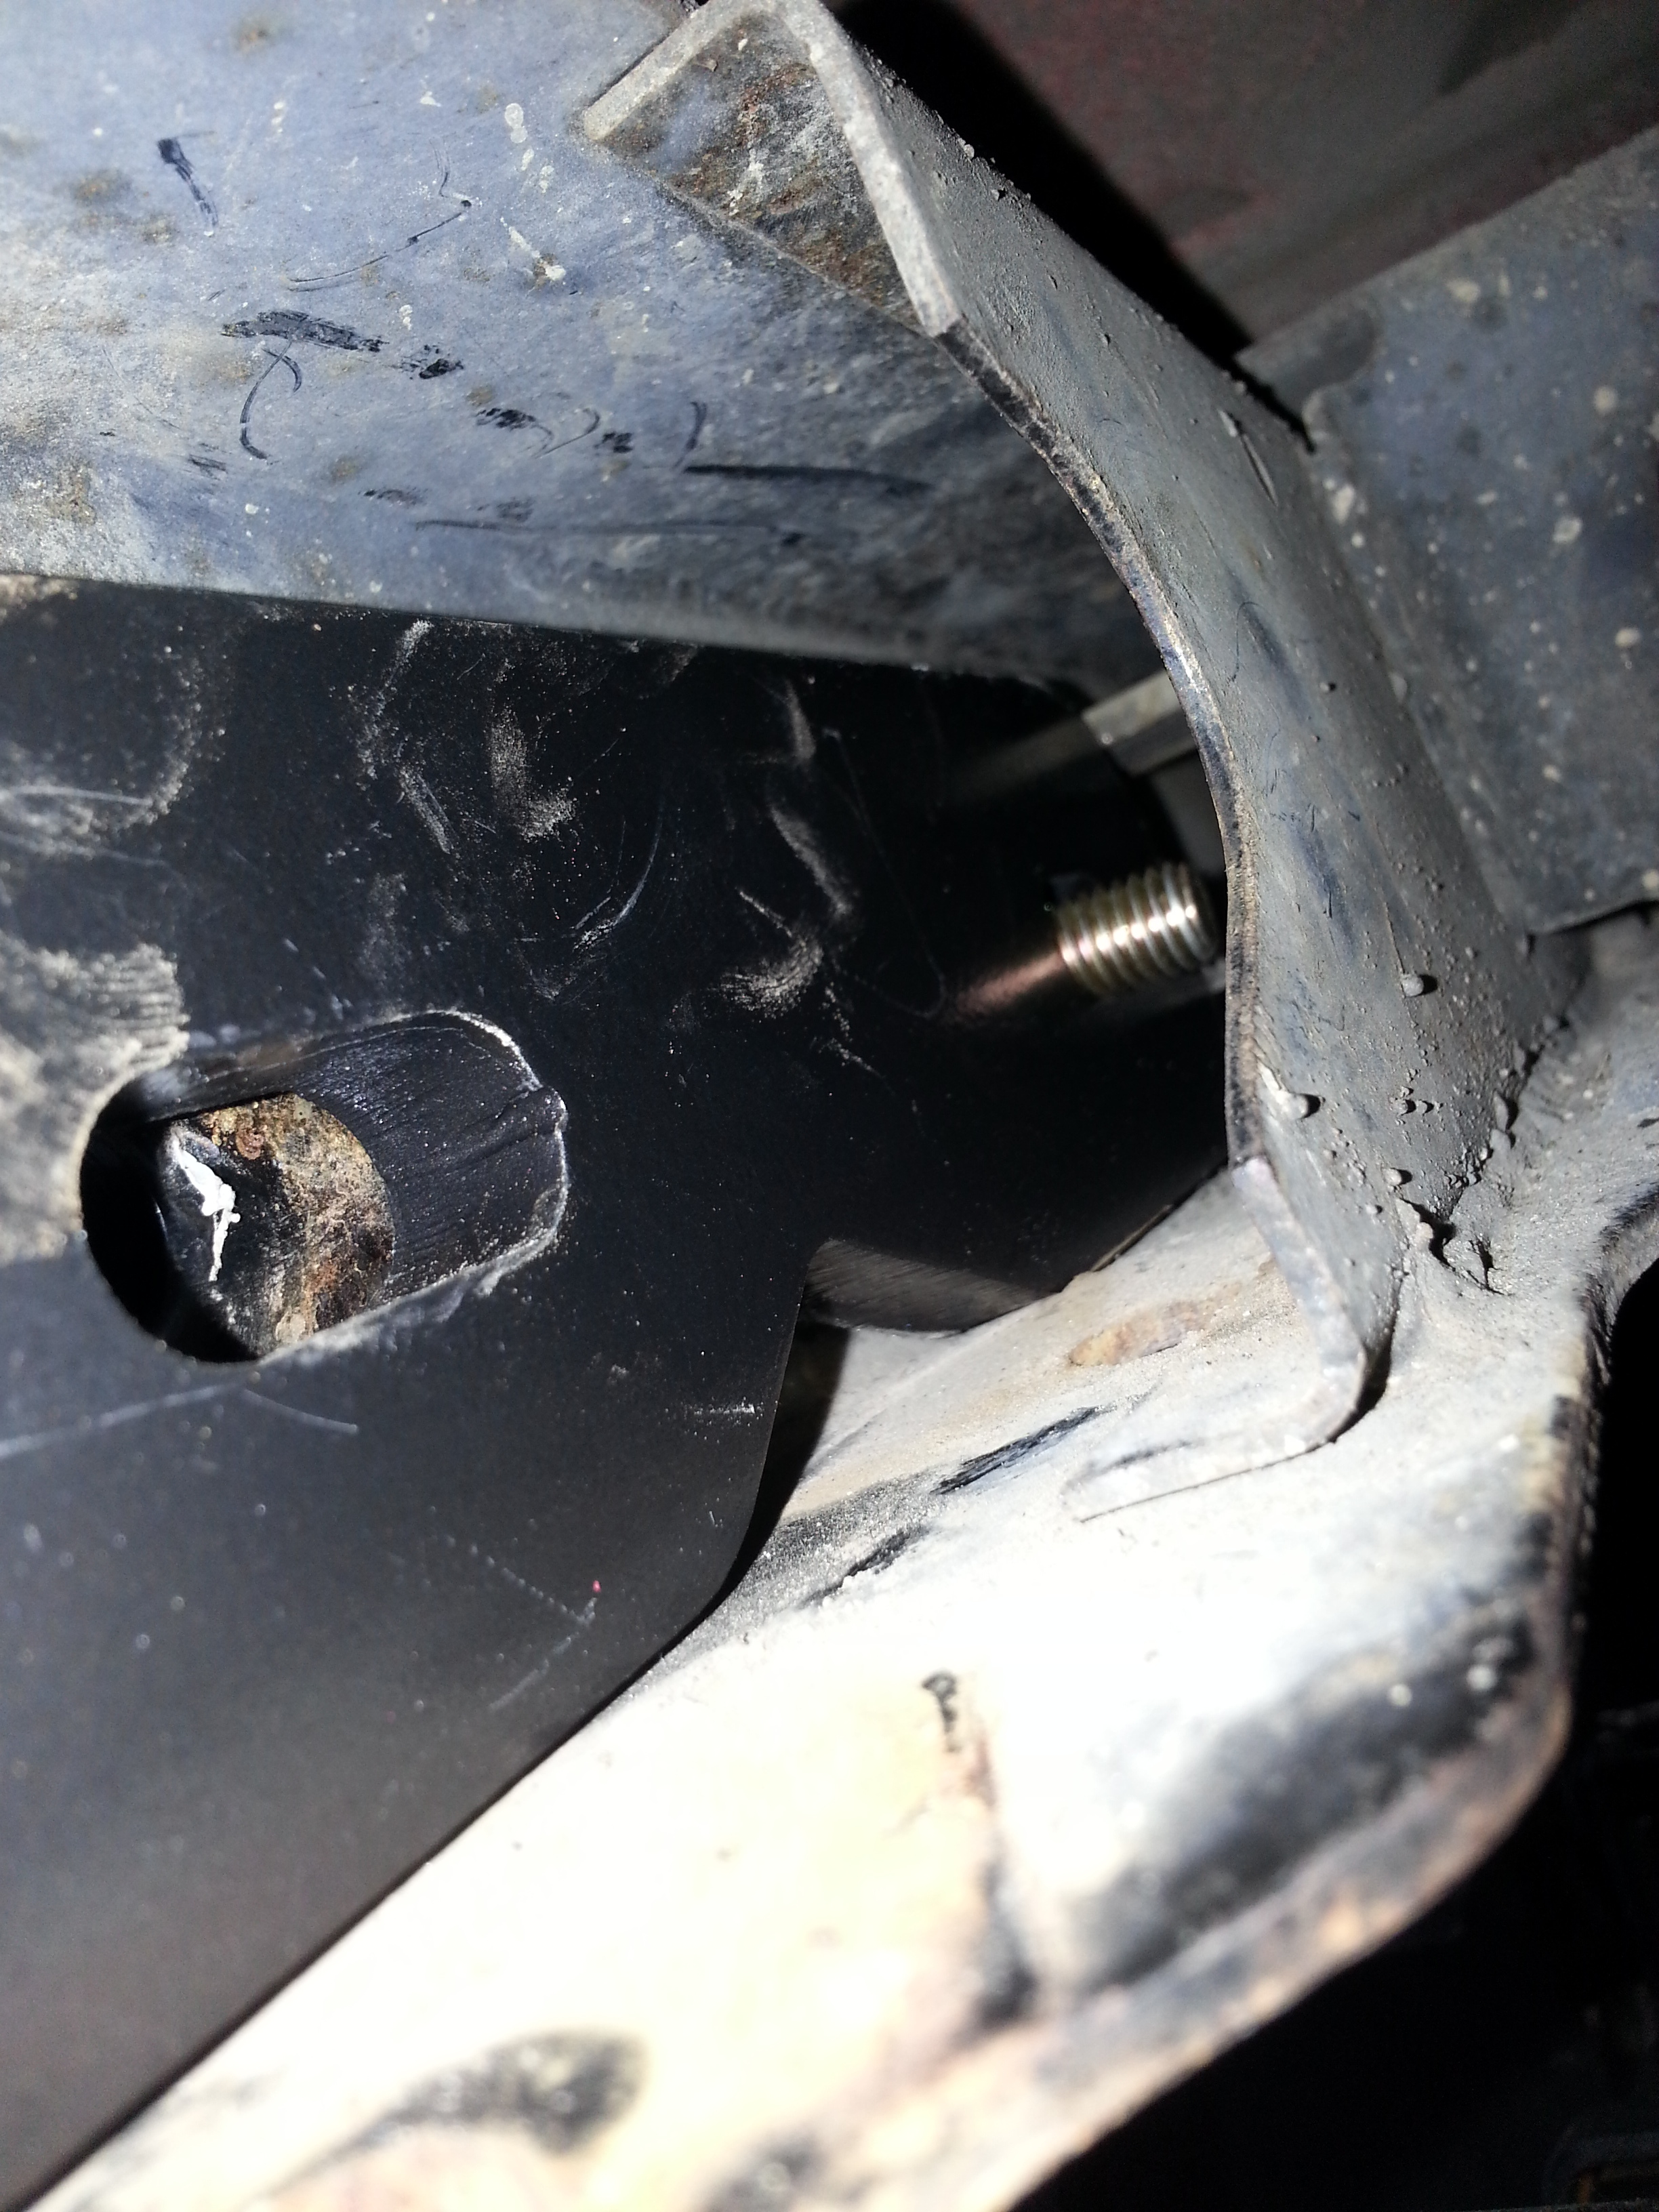
Yea the license plate is gonna fit there perfectly. As for the hitch, unfortunately i wont be raising the height like i previously predicted to do. The reason is because i cant really seem to find any way to incorporate that factory hitch with this bumper. I really want to raise that hitch for more ground clearance. But from the looks if it i might just be resting my bumper on top of that hitch lol
I guess my hitch will serve as protection to the bumper hahaha
----------------------------------------------------------------------------------------------------------------------------------
EDIT:
My hitch and bumper will pretty much look like this picturehere
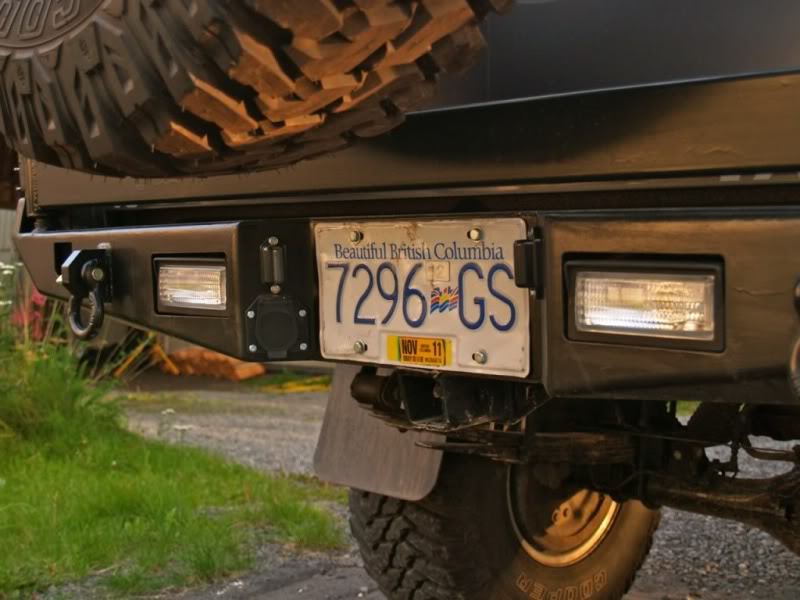
I guess my hitch will serve as protection to the bumper hahaha
----------------------------------------------------------------------------------------------------------------------------------
EDIT:
My hitch and bumper will pretty much look like this picturehere

Last edited by Redeth005; Jun 25, 2013 at 08:46 PM.
Jun 25, 2013 | 08:46 PM
#1712
Registered User
Joined: Dec 2009
Posts: 2,762
Likes: 1
why reuse the factory hitch:? if you are. than you gonna weld your bumper to the hitch? if your not. how else are you gonna mount the bumper, the mounting spots will be used for the factory hitch.. have you seen my rear bumper and hitch combo. saved me tons of clearance.
Jun 25, 2013 | 09:00 PM
#1713
Thread Starter
Registered User
Joined: Apr 2012
Posts: 2,817
Likes: 2
From: Los Angeles CA
Urgh.... god, i didnt even think about the freekin mounts lol dang.... time to start thinking about possibly raising that hitch and putting it where the license plate should go. Then when not in use the license plate will flap down and cover the hole. Might use a spring loaded hinge of some sort to hold the license in place; like this one: http://compare.ebay.com/like/400190859752?var=lv<yp=AllFixedPriceItemTypes&var=sbar
Thanks for that Toyo.
Thanks for that Toyo.
Last edited by Redeth005; Jun 25, 2013 at 09:03 PM.
Jun 25, 2013 | 09:23 PM
#1714
Registered User
Joined: Aug 2011
Posts: 1,507
Likes: 2
From: Fraser Valley, British Columbia
I love watching your mock ups. I've never fabricated before but have the tools so. I'm enjoying learning stuff while watching you learn stuff. 
I've got a little Lincoln 220 -mig15. Was missing parts when I got it second hand and Lincoln sent me the missing bits, small spools of copper coated and flux core, pair of gloves and odds and ends. This was all free.
If the welder is as good as their customer service the only problem with the welds will be my inexperience.
He teaching you some welding at the same time? Or do you know some already?
Jun 25, 2013 | 10:00 PM
#1715
Registered User
Joined: Jul 2012
Posts: 2,365
Likes: 4
From: Idaho
well the flop down (or lift up) plate is a good choice! heck its how many car makers in the 70's an 80's hid the fuel filler! BUT if its sitting on the ball when ya back in it'll get squished (or its hid under the ball also bad) an such since your doin all this work it'd be better on the jerry can part on the swing arm where it an the light required on it are out of the way
but to hide the hitch hole you could still make a plate
but to hide the hitch hole you could still make a plate
Jun 25, 2013 | 10:02 PM
#1716
My hitch mount.......
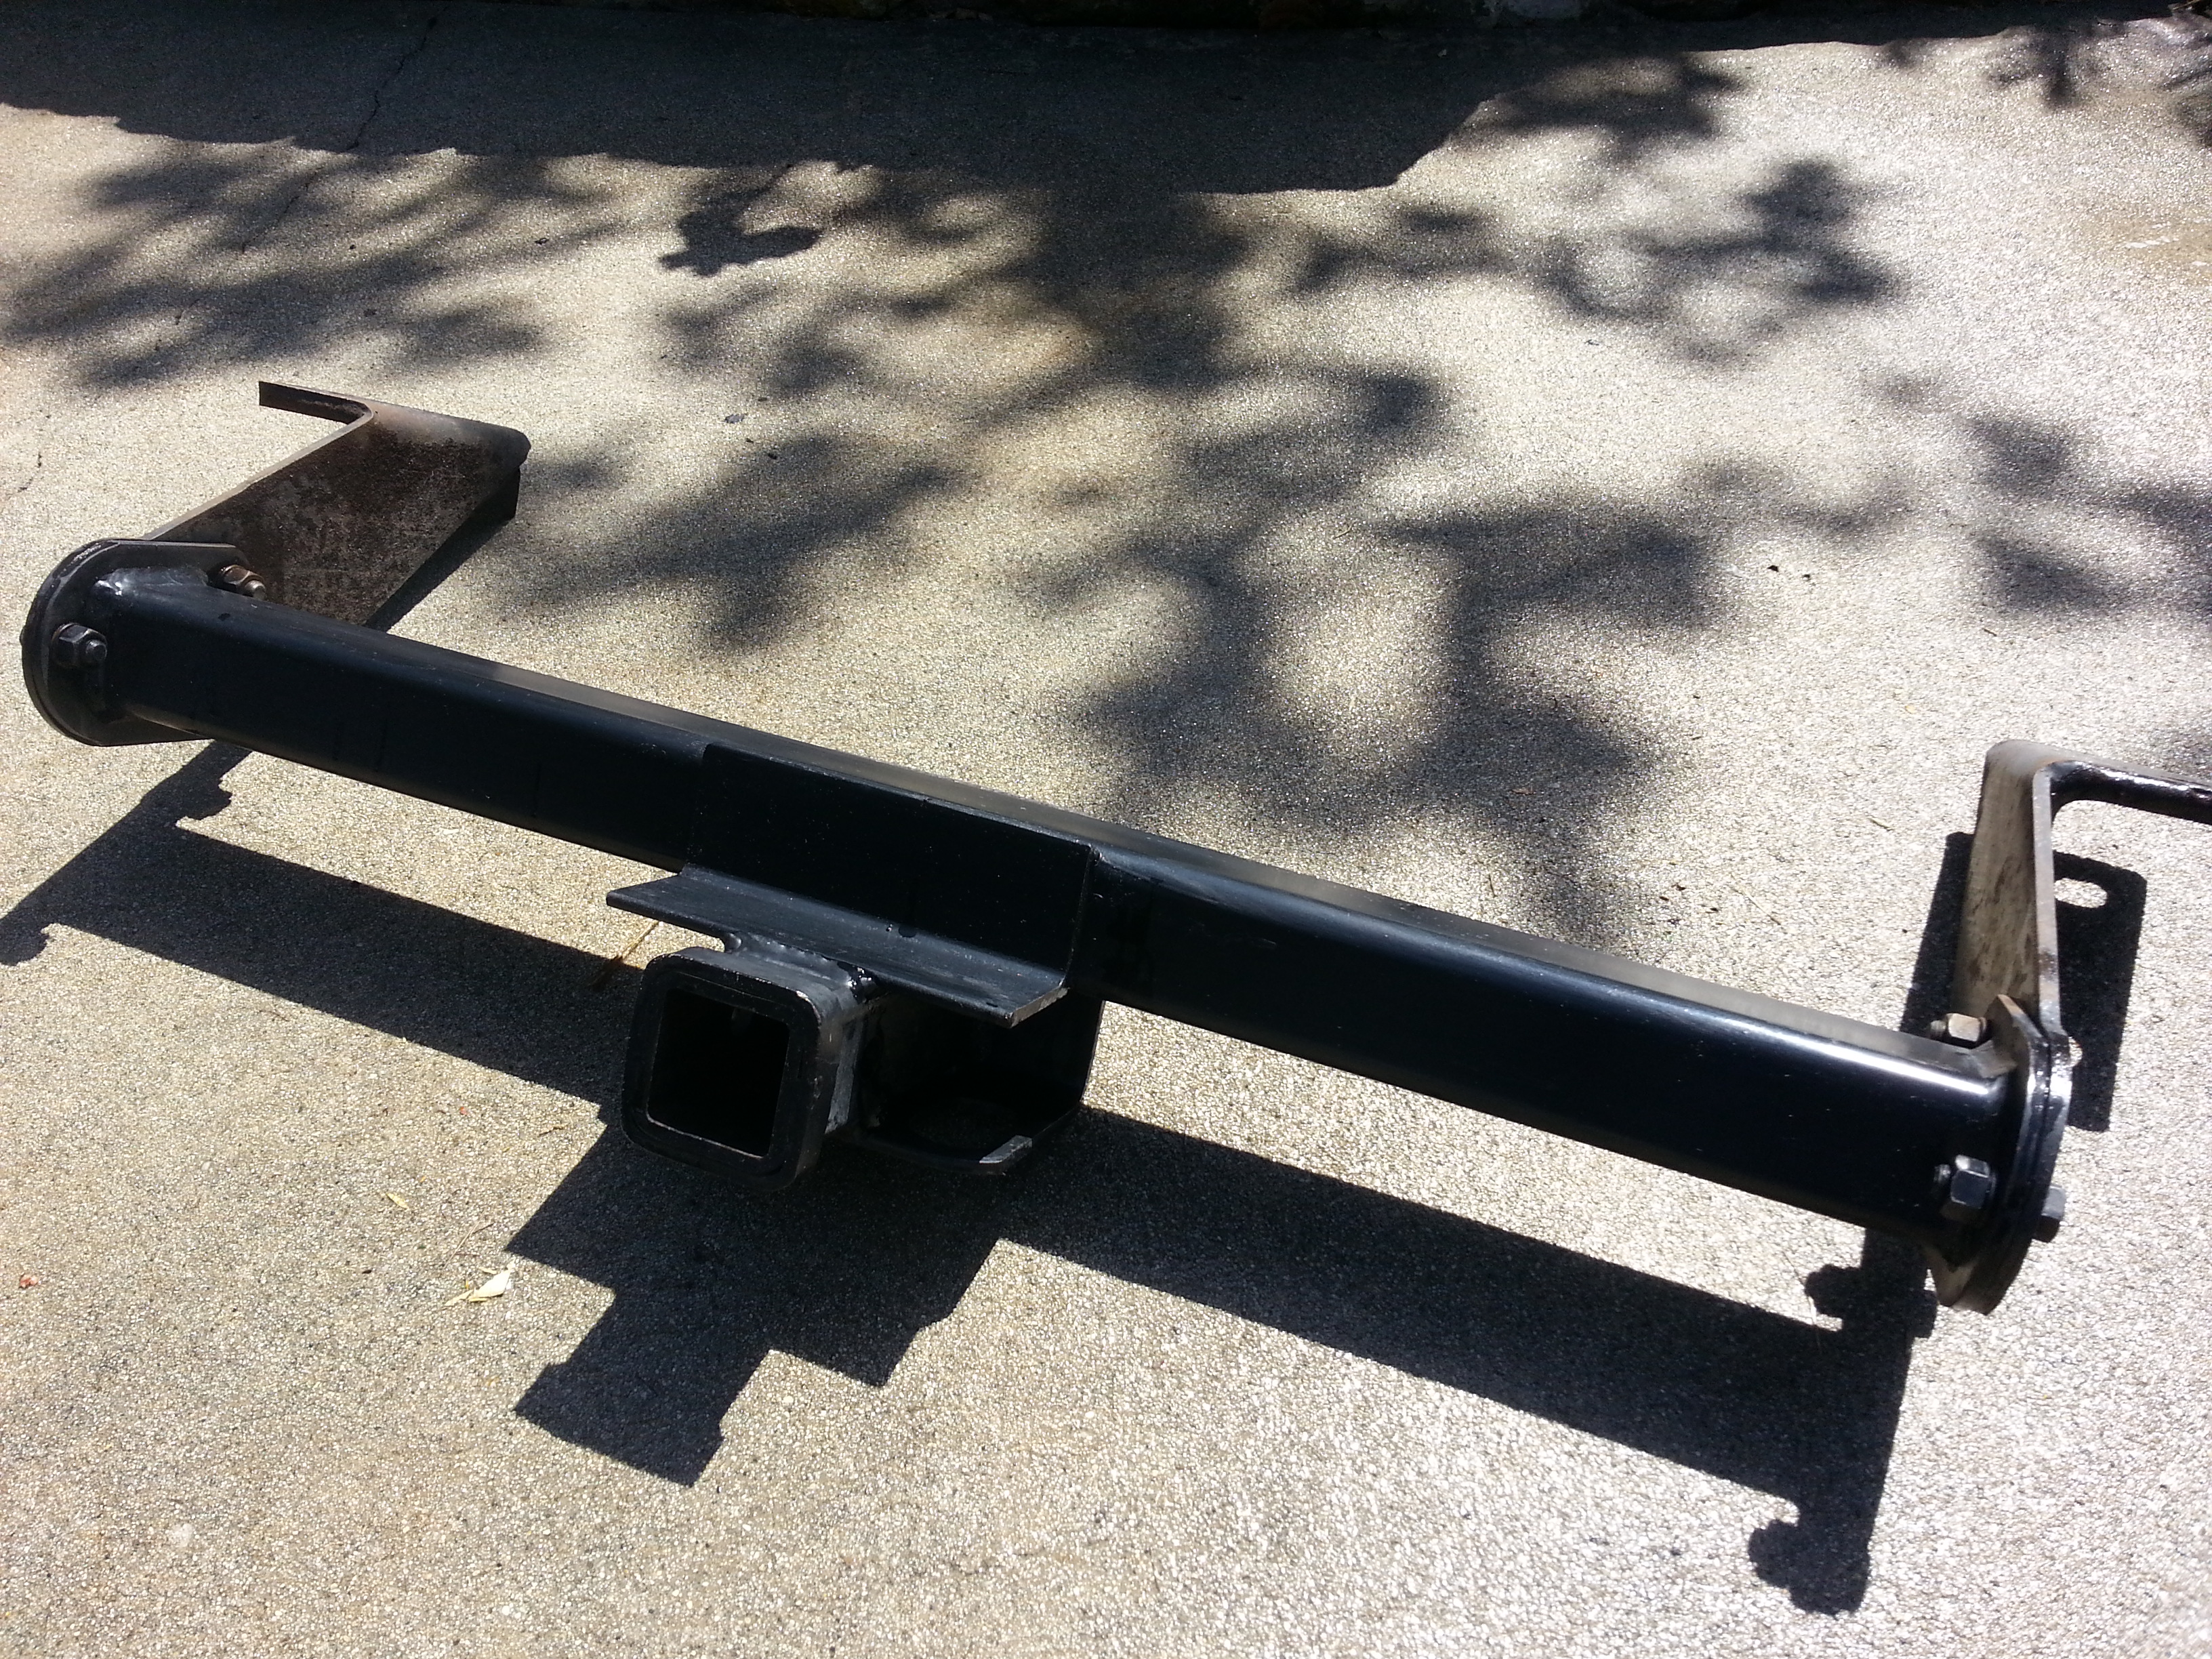
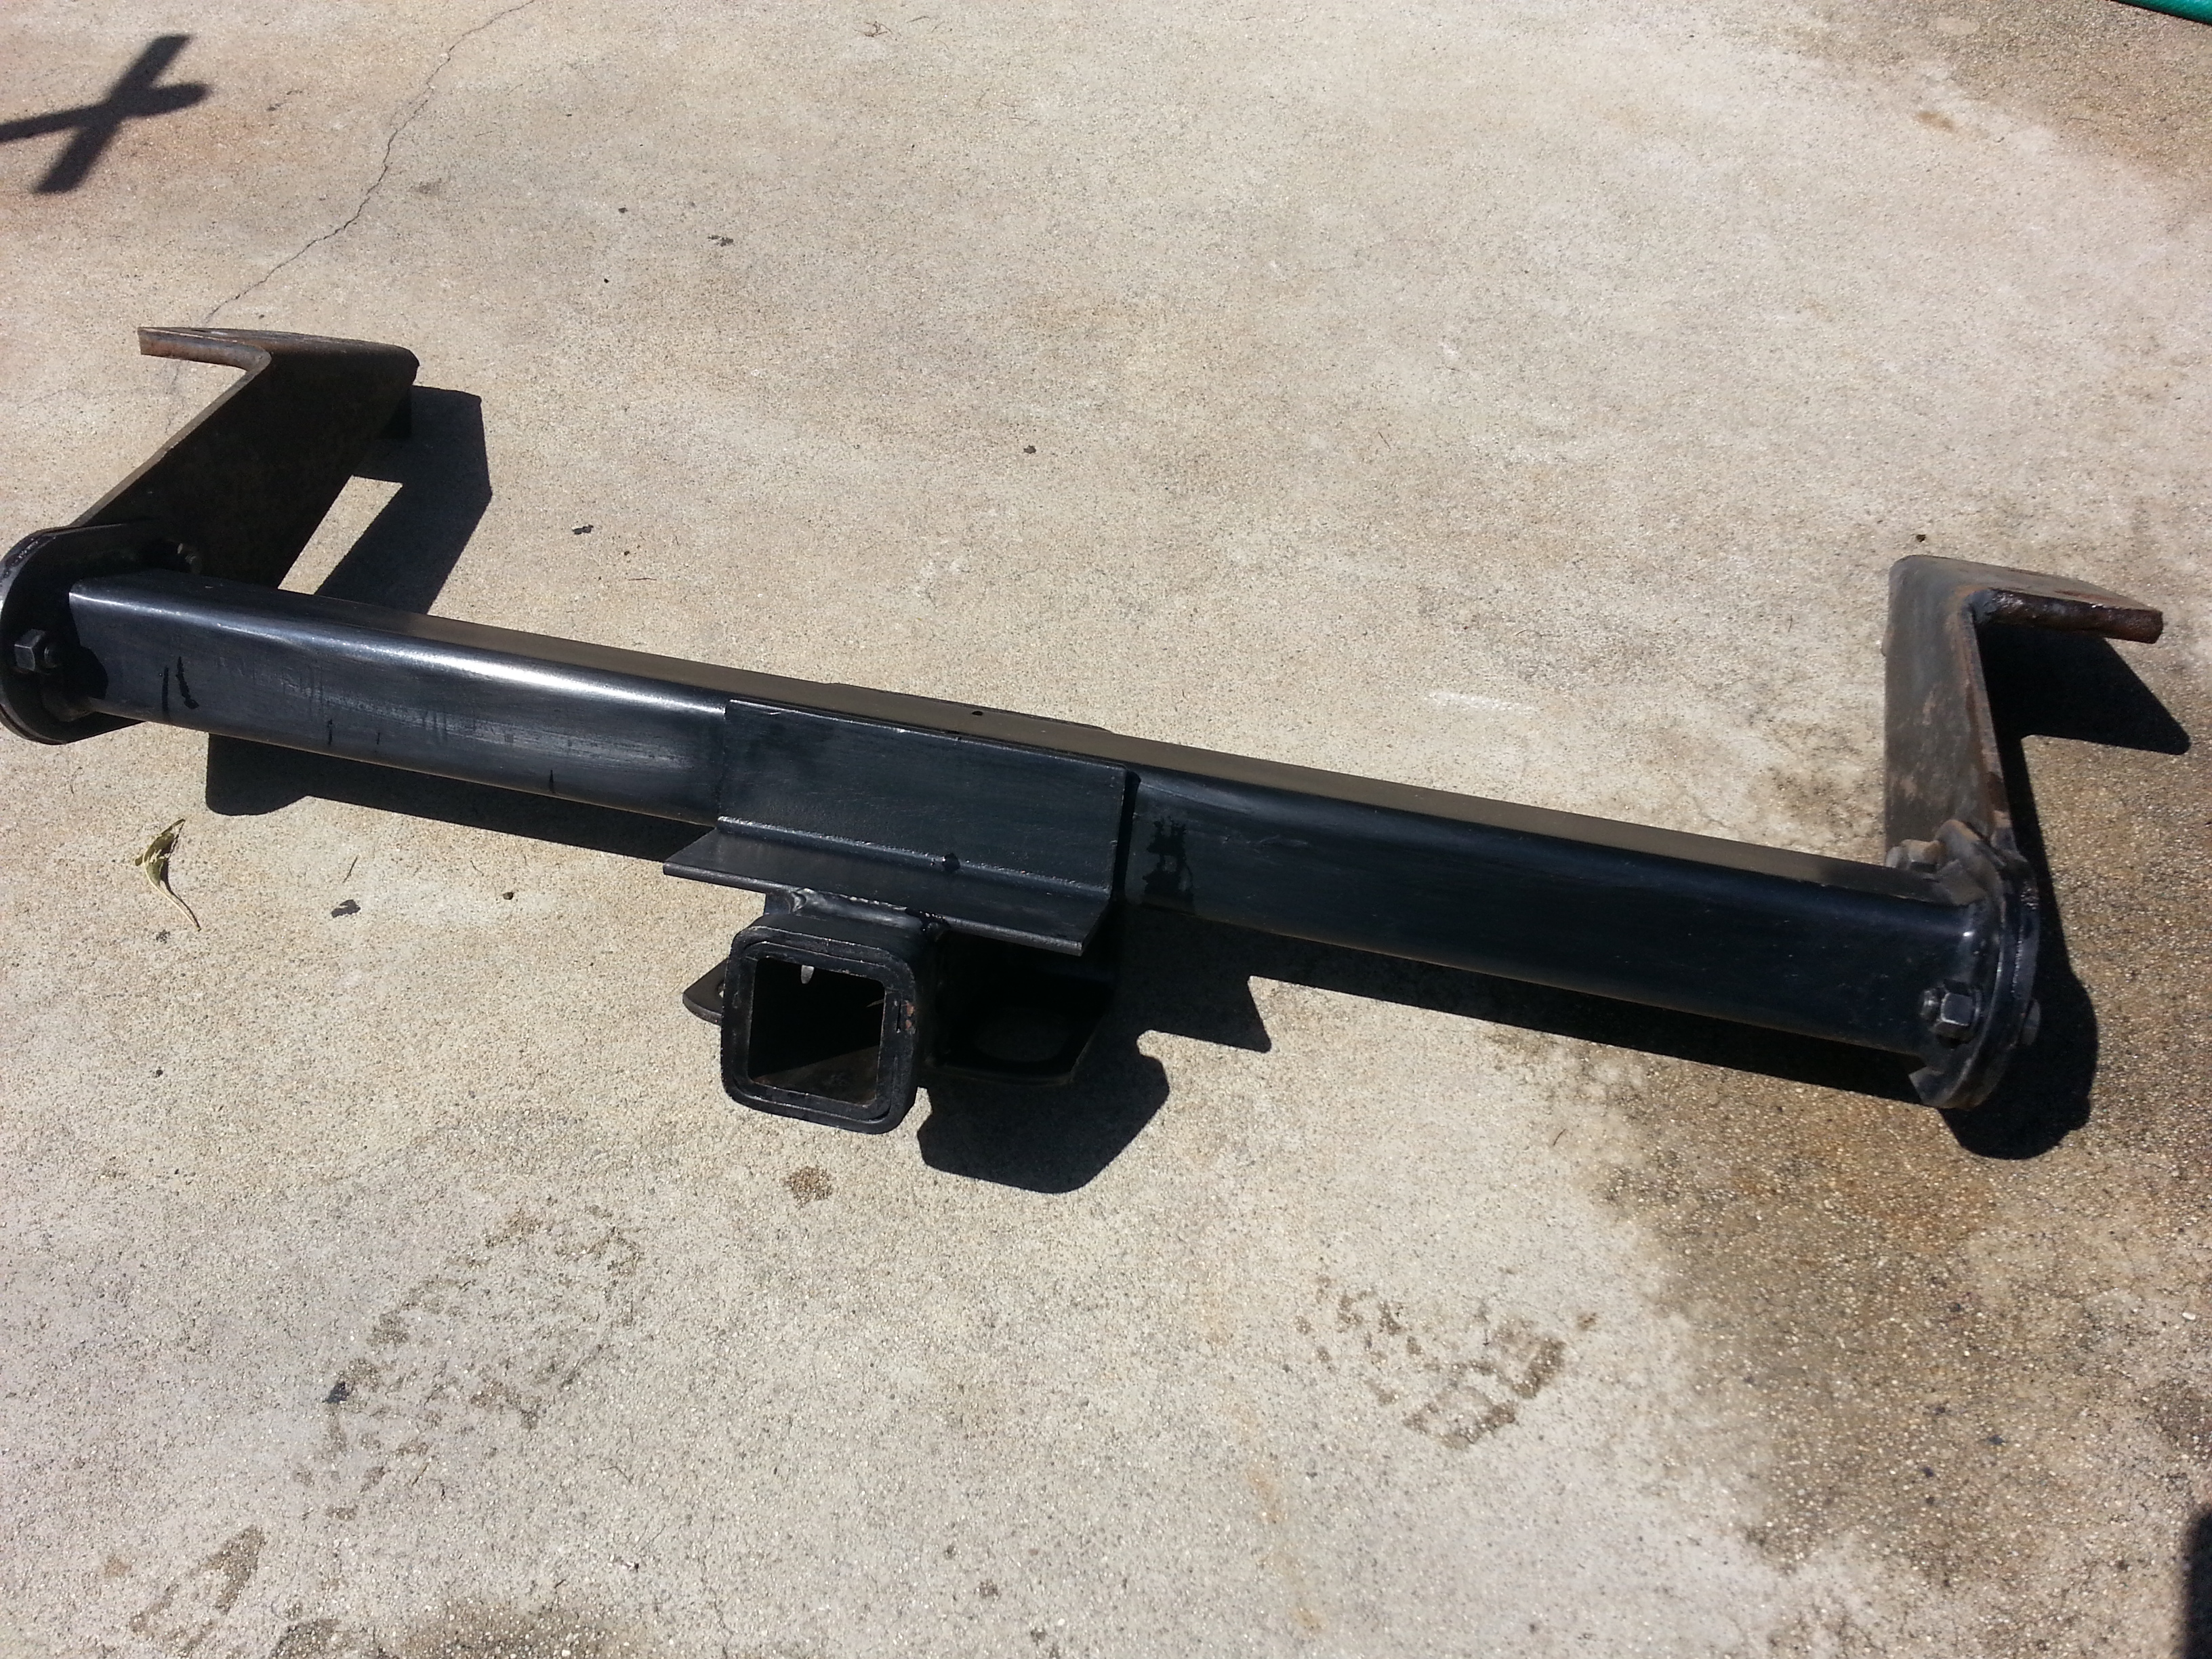
Is your hitch the same? I thought it mounted on the outside and through. ... from the top on the main mounts. ..... couldn't you weld it in and then have the inside of the frame rails free to slide in the mounting rails for the bumper? .....
Or does it cross the path of the bumpers mounting rails? I just removed it and can't remember. Grrrr! Haha.
That Taco bumper looks sick, nice mock up buddy!
Last edited by ChefYota4x4; Jun 25, 2013 at 10:04 PM.
Jun 25, 2013 | 10:41 PM
#1717
Orrrrr, unbolt the left to right portion from the hitch mounting bracket and then mount it to the bumper mounting brackets you come up with???? Then, you could intigrate it higher and have it come through the rear plate(If you do a cut out... Then weld the plate and box tube into the back plate.)
Last edited by ChefYota4x4; Jun 25, 2013 at 10:42 PM.
Jun 26, 2013 | 09:52 AM
#1719
Thread Starter
Registered User
Joined: Apr 2012
Posts: 2,817
Likes: 2
From: Los Angeles CA
I love watching your mock ups. I've never fabricated before but have the tools so. I'm enjoying learning stuff while watching you learn stuff.
I've got a little Lincoln 220 -mig15. Was missing parts when I got it second hand and Lincoln sent me the missing bits, small spools of copper coated and flux core, pair of gloves and odds and ends. This was all free.
If the welder is as good as their customer service the only problem with the welds will be my inexperience.
He teaching you some welding at the same time? Or do you know some already?
That lincoln sounds like they made a customer for life huh. I like it when companies do that. some people just dont realize how much that makes a customers day. I believe customer service is key to keeping long term customers happy and to bringing in more business.
As for welding goes. I have never welded a day in my life. I was actually hoping to learn from him on this bumper project. I really hope i dont jack it all up with bumpy welds but oh well, gonna have to learn at some point right. But my dad is gonna be the one that does the majority of the work. He just wants me to have all the pieces cut out to shape already so when he comes into the picture everything is all set and ready to be welded. I just wanna get the hang of it thats all. It'd be nice for us to make a matching front bumper in the future as well.

well the flop down (or lift up) plate is a good choice! heck its how many car makers in the 70's an 80's hid the fuel filler! BUT if its sitting on the ball when ya back in it'll get squished (or its hid under the ball also bad) an such since your doin all this work it'd be better on the jerry can part on the swing arm where it an the light required on it are out of the way
but to hide the hitch hole you could still make a plate
but to hide the hitch hole you could still make a plate
My hitch mount.......
Is your hitch the same? I thought it mounted on the outside and through. ... from the top on the main mounts. ..... couldn't you weld it in and then have the inside of the frame rails free to slide in the mounting rails for the bumper? .....
Or does it cross the path of the bumpers mounting rails? I just removed it and can't remember. Grrrr! Haha.
That Taco bumper looks sick, nice mock up buddy!
Orrrrr, unbolt the left to right portion from the hitch mounting bracket and then mount it to the bumper mounting brackets you come up with???? Then, you could intigrate it higher and have it come through the rear plate(If you do a cut out... Then weld the plate and box tube into the back plate.)
One thing one of the construction workers in my building (who rock crawls with a chevy something...) said to try to flip that squared tube that holds the hitch. so instead of making it droop down to make it raise upward instead. you follow? I just need to get a closer look on the bolts and see if that is even possible to do with my hitch.
Also I am thinking of just keeping the same tow hitch and just welding my bumper on to the hitch itself. So i will be welding onto both the hitch and the frame to make the bumper really solid. ya get me.
Last edited by Redeth005; Jun 26, 2013 at 10:15 AM.
Jun 26, 2013 | 01:57 PM
#1720
Registered User
Joined: Jul 2012
Posts: 2,365
Likes: 4
From: Idaho
Sorry i dont follow. Im trying to picture what you're saying but i dont understand what you mean by ball. Let me see if i understood. When the actual 'towing piece that mountsvon the hitch' is inside the square tube as im towing something the licence plate will be leaning on the ball. So when i make my turns the license will get crushed. Is that right?
the ball is on the hitch which goes into the trailers cup at the end of the tongue which gets locked on so it provides the pivot point,
now when you have the plate spring loaded it will be sitting on the ball when you back up to the trailer tongue ... crunch.. or yes when making turns the trailers lock will be grinding on the plate underside catching on it bending things
or if you hinge it so the plate is down under the hitch an ball which is safer for the plate it cant be seen by Mr police'y man which is bad they dont like that in calif
sorry didnt mean to be confusing i wrote that at like 3ish am lol


