
rattlewagon's 1992 Pickup Build-Up Thread
 Oct 16, 2012 | 09:25 AM
#223

Registered User
Joined: Sep 2012
Posts: 49
Likes: 0
man id love to, but my pops is coming up to help me work on the shop. My weekend are basically gone for the rest of the fall trying to get the work done. I def want to come check out your place sometime. Wheeling!!
Oct 21, 2012 | 03:48 PM
#224
Thread Starter
Registered User


Joined: Oct 2009
Posts: 4,832
Likes: 332
From: Northfield, Vermont
I got my fuel tank changed out and in the process I broke another rusted line up under the passenger side that will be addressed later.
And I started my chevy spring swap
Old parts out:


Skys kit with ubolt flip and new bushings:

Mock up:

Ill tack them in some night this week and hopefully have them burned in by next weekend to measure for shocks. I have some tender spots in the frame I need to address while I have the the welder out too.
And I started my chevy spring swap
Old parts out:
Skys kit with ubolt flip and new bushings:
Mock up:
Ill tack them in some night this week and hopefully have them burned in by next weekend to measure for shocks. I have some tender spots in the frame I need to address while I have the the welder out too.
Last edited by rattlewagon; Oct 21, 2012 at 04:19 PM.
Oct 21, 2012 | 05:24 PM
#226
Registered User
Joined: Dec 2009
Posts: 2,762
Likes: 1
nice 63s. im looking at doing the same once i get over to my friends place. he has a set on a parts truck i can i have. how far forward is the front hanger? im thinking of running double shackles just in case i wanna go back to stock for whatever reason
Oct 21, 2012 | 05:46 PM
#227
Thread Starter
Registered User
Joined: Oct 2009
Posts: 4,832
Likes: 332
From: Northfield, Vermont
My front hanger will be about 9" forward. Keeping the stock 122" wheel base for now.
Just dont cut the stock shackle hanger off. Im not a fan of the double shackle. They really do unload horribly going down steep drops.
Just dont cut the stock shackle hanger off. Im not a fan of the double shackle. They really do unload horribly going down steep drops.
Last edited by rattlewagon; Oct 21, 2012 at 05:47 PM.
Nov 1, 2012 | 08:34 AM
#228
Thread Starter
Registered User
Joined: Oct 2009
Posts: 4,832
Likes: 332
From: Northfield, Vermont

Front hanger 9" forward. We needed to drill out the front hanger for the larger bolt.

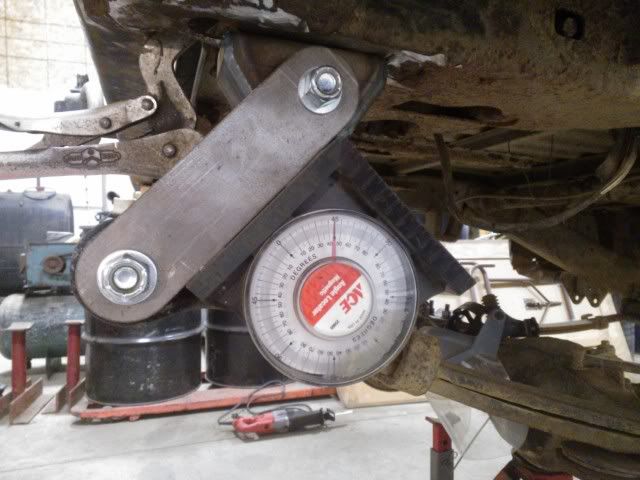
Playing with shackle angles. Rears are not tacked in yet, And thats not the final angle. I think in the end, the rear hanger will only be moved 2 inches back from stock.

And didnt get as much done as I wanted to because the drive shaft was frozen. Wouldn't move either way, so it got the heat and beat.
Nov 1, 2012 | 08:49 AM
#229
Registered User
Joined: Dec 2009
Posts: 2,762
Likes: 1
i wanna see how much lift you have now. let see them finished pictures. my runner i think will be a little different. i found online that i need to go 11 inches forward and 4 inches back. did the skys kit come with the flip u bolt kit too?
Nov 5, 2012 | 07:04 PM
#230
Thread Starter
Registered User
Joined: Oct 2009
Posts: 4,832
Likes: 332
From: Northfield, Vermont
Final shackle angle. Rear mount is about 2" back from stock.
Ride height.

Then a little handy work with the gas axe and we had the bed off


Now I can get at the spring hangers better to fully weld them in address my rusty frame. The bed isnt going back on. Ill be making some sort of small flat bed, or something like the old all pro bed kits.
Ride height.
Then a little handy work with the gas axe and we had the bed off
Now I can get at the spring hangers better to fully weld them in address my rusty frame. The bed isnt going back on. Ill be making some sort of small flat bed, or something like the old all pro bed kits.


 Nov 6, 2012 | 05:18 AM
#235
Thread Starter
Registered User
Joined: Oct 2009
Posts: 4,832
Likes: 332
From: Northfield, Vermont
Yeah I know, Haha. Its nice to have that much heated space to work in.
Toyo- So I think I ended up with about 2-3" of lift, just as all the faqs says I should. Could probably get a little more with a steeper shackle angle. I bought the kit second hand, and it already had the ubolts with it, so I think they were from sky?
The bed would go back on if it wasnt so rusty. I dont mind the dents, but it has several large holes in it as well as the bedframe is rotting off of the actual bed.
Last edited by rattlewagon; Mar 6, 2014 at 11:21 AM.
Nov 13, 2012 | 05:59 PM
#236
Thread Starter
Registered User
Joined: Oct 2009
Posts: 4,832
Likes: 332
From: Northfield, Vermont
Cutting out the bad spots, and pulled a hand full of mouse nest. Yuck.


I will be plating the inside from the front spring hanger to just past the bumpstop, and putting a thicker pipe across where the factory tank mount would be.
I will be plating the inside from the front spring hanger to just past the bumpstop, and putting a thicker pipe across where the factory tank mount would be.
Nov 18, 2012 | 04:50 PM
#238
Thread Starter
Registered User
Joined: Oct 2009
Posts: 4,832
Likes: 332
From: Northfield, Vermont
I stripped down my donor rear axle to replace the rusty one currently in the truck. It will get some TG axle armor before it goes in. (no pic yet)
Finished getting the rust out of the frame... compressed air and gravity cleaned it all out.


And cutting frame plates with the nibbler:
Finished getting the rust out of the frame... compressed air and gravity cleaned it all out.
And cutting frame plates with the nibbler:
Last edited by rattlewagon; Nov 18, 2012 at 04:51 PM.


