
85 Extra Cab Saved from Crusher
 Jan 9, 2015 | 10:49 AM
#601
Thread Starter
Super Moderator
iTrader: (1)
Joined: Aug 2008
Posts: 11,787
Likes: 28
From: Anderson Missouri
Hello Ed... It is funny how things come back around and pay you back for all the things you did as a kid. One of mine kids has been stitched up and broken arm way before I ever did anything like that. I was lucky on a few occasions.
Hello Cyberhorn.. For as weak on electrical as I am, I was really happy on getting everything to finally work. I have swapped in several harnesses and am now getting somewhere. A friend of mine pranked me one time. Some old man was accusing me of taking his newspaper and was coming over to kick my butt. The only guy in my neighbor hood I could think of and kind of know, could of passed for him. It was funny.
Hello Mark... I have taken a week off from work just to get some things caught up that I want to do. It has been cold but my little stove is great. Love that little thing. Got to seal up a draft at the bottom of the garage door and I think I could survive even colder.
Thanks Robb... I have to piece together several parts. I can only imagine what you first gen guy go thru trying to get parts. Now I need to come up with a heater core and pull the dash out againnn for the 50th and hopefully the last time. Once it is done, one more big task left to do on it. Its getting closer.
Last edited by Terrys87; Jan 9, 2015 at 10:51 AM.
Jan 9, 2015 | 10:55 AM
#602
Thread Starter
Super Moderator
iTrader: (1)
Joined: Aug 2008
Posts: 11,787
Likes: 28
From: Anderson Missouri
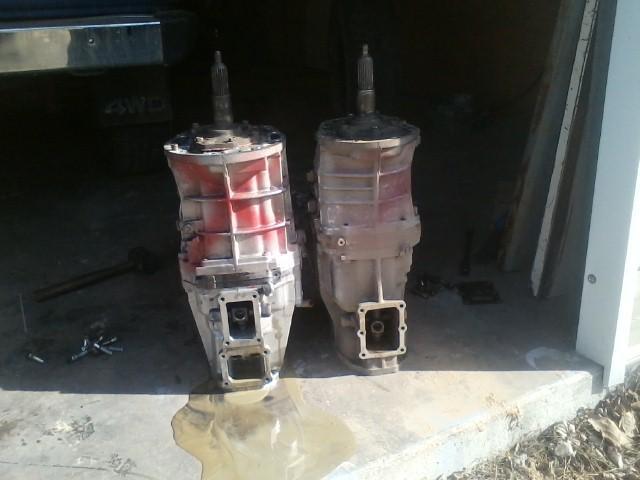
Here is the hole in the bottom of the transmission I was talking about earlier. A friend of mine was telling me the turbos are the only ones with this hole. Also he says the bell housing is great for heavier duty clutches. I am still learning some things on transmissions.
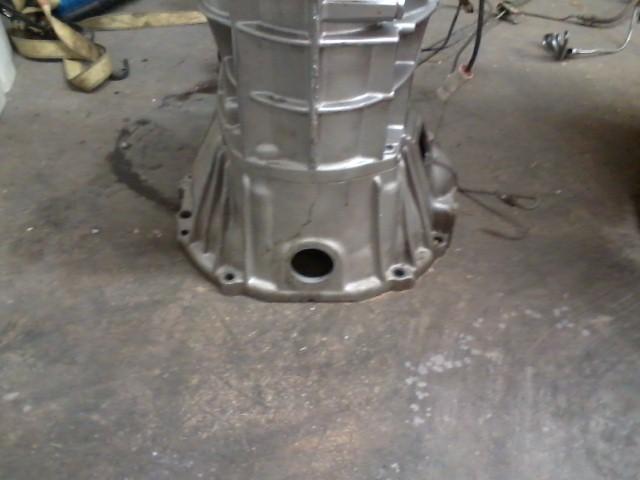
Also the nose piece for the shaft is larger then any other one I have seen. The nose piece I have sitting on the bell housing is typical of all the other transmissions I have seen. Also look at the bottom part of the nose piece on the transmission and you will see it is a larger square on the bottom of it. Lots of yucky oil come out of it that I get to clean up. Gear oil is the worse for cleaning.

Also the nose piece for the shaft is larger then any other one I have seen. The nose piece I have sitting on the bell housing is typical of all the other transmissions I have seen. Also look at the bottom part of the nose piece on the transmission and you will see it is a larger square on the bottom of it. Lots of yucky oil come out of it that I get to clean up. Gear oil is the worse for cleaning.
 Jan 9, 2015 | 11:06 AM
#603
Thread Starter
Super Moderator
iTrader: (1)
Joined: Aug 2008
Posts: 11,787
Likes: 28
From: Anderson Missouri
I took some time off from work to get several things done. One is get the shop finished like I want and get some side projects done. One that I have been tinkering with for some time that still has a ways to go is getting the front that I made from junk parts. The core support that I am using is the one I first used on my 86 Runner when it was in the beginning stages. When I got the runner, it did not have a core support. I used this one until I got a better one. It is rusted bad but it served its purpose until I got a good one.
The fenders that I used were dented and rotted that I was unable to repair them. About the only good things on this is the grill and head light buckets. The bumper is bent and one I used for awhile as well. I eventually want to hide my circulation fan and have a bench light hidden over head. Another long term goal is to turn the head lights into more shop light or some day when I get an electric garage door opener, have to light up the shop when pulling in. That will be a ways off.
Also got rid of my two metal shelves and made some shelves that heavier built and hold more. Doesn't look like much accomplished but I already have about 20 hours in the shop doing some things. It has been cold too and with heat, it is so much better then what I went thru last year. I couldn't even be in the shop due to the cold. Been in the single digits and so far no problems.
Front end still needs work but I need to run to the hardware store to get it mounted better and collect some more parts to finish the look of it. I eventually will just paint it to the color of my runner or pickup. Not sure just yet. Getting it up and mounted by myself was a real pain in the rear. Eventually I will add valance, marker lenses, hood, bumper caps, headlights and some Toyota license plate or a personal plate.
Added two blinkers and one headlight.

The fenders that I used were dented and rotted that I was unable to repair them. About the only good things on this is the grill and head light buckets. The bumper is bent and one I used for awhile as well. I eventually want to hide my circulation fan and have a bench light hidden over head. Another long term goal is to turn the head lights into more shop light or some day when I get an electric garage door opener, have to light up the shop when pulling in. That will be a ways off.
Also got rid of my two metal shelves and made some shelves that heavier built and hold more. Doesn't look like much accomplished but I already have about 20 hours in the shop doing some things. It has been cold too and with heat, it is so much better then what I went thru last year. I couldn't even be in the shop due to the cold. Been in the single digits and so far no problems.
Front end still needs work but I need to run to the hardware store to get it mounted better and collect some more parts to finish the look of it. I eventually will just paint it to the color of my runner or pickup. Not sure just yet. Getting it up and mounted by myself was a real pain in the rear. Eventually I will add valance, marker lenses, hood, bumper caps, headlights and some Toyota license plate or a personal plate.

Added two blinkers and one headlight.

Last edited by Terrys87; Jan 23, 2015 at 01:48 PM.
Jan 9, 2015 | 11:33 AM
#605
Thread Starter
Super Moderator
iTrader: (1)
Joined: Aug 2008
Posts: 11,787
Likes: 28
From: Anderson Missouri
That part I don't know the reason for. It is a bigger bell housing and he says is sought after just for the clutch issue. He also tells me it is the tranny most wheelers want as it is a heavy duty built tranny. If I understood him right the bell housing will interchange with other transmissions. Another thing he told me that I did not know of is "G" transmissions were used with carbed trucks. "W" transmissions are fuel injected trucks. That is something I did not know. I always thought "G"s were from the older model trucks like 85 and older. I am still looking into that.
Jan 12, 2015 | 12:26 PM
#607
Thread Starter
Super Moderator
iTrader: (1)
Joined: Aug 2008
Posts: 11,787
Likes: 28
From: Anderson Missouri
Hello Cyberhorn..Most of the ones I have seen are the W-56s. They have worked really well for me. I have driven a couple of trucks with the G's in them and they do alright for the kind of driving I do. I am really not sure what I have in my truck now as Toyota has 500 different transmissions for these trucks.
Jan 12, 2015 | 12:46 PM
#608
Thread Starter
Super Moderator
iTrader: (1)
Joined: Aug 2008
Posts: 11,787
Likes: 28
From: Anderson Missouri
I have been spending the past couple of days getting my shop organized to the way that I want it. When I went to Iraq several years ago on an all expense paid trip by Uncle Sam, my old garage roof started leaking while I was gone. I had my tools in a tool chest and of course the leak had to get into those tools and ruin a lot of them. Most of the sockets were not salvageable. I had a lot of those tools when I was single and could buy the good ones like Craftmans and Snap On. I just had them in a box and finally got around to seeing what I could save. Some of them I will be able to do an exchange with. That is the good thing of having some high quality tools as they do just exchange them right out.
I thought I would do some welding on my utility trailer. I had a set of goggles and for no more then I was doing, I didn't think I would get a sunburn from welding. Probably no more then 5-10 minutes worth of welding and my face is burnt. I went and got a welders helmet today and wont be welding without a mask again anytime soon. Lesson learned on that. I had eye protection on but what was exposed to the flash is a little tender.
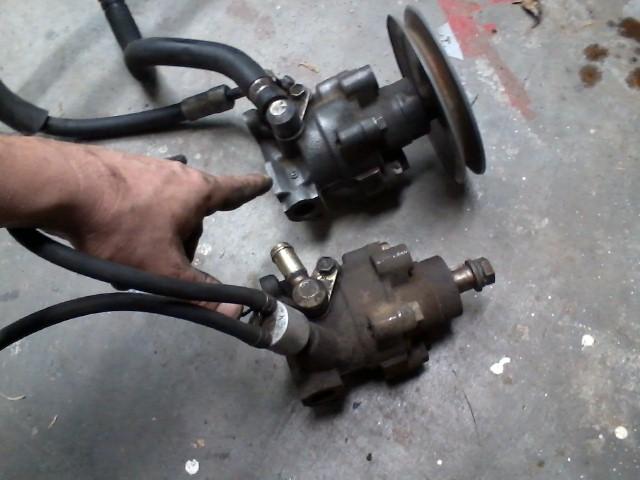
I am working on the 85 for a day or so and will be doing some work to my 86 and then will jump on the silver runner I have ready to get started on. On my 85, I left the power steering off until I had most of the bugs worked out and think I have for now. When I remove things from the motor, I remove luxuries first and necessities last. Luxuries are Power Steering and AC.
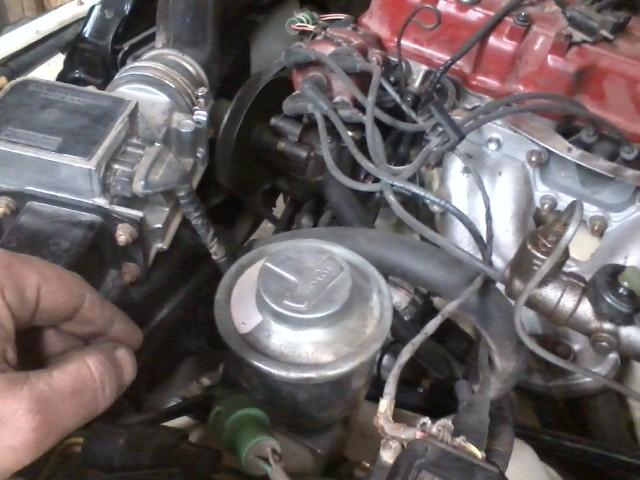
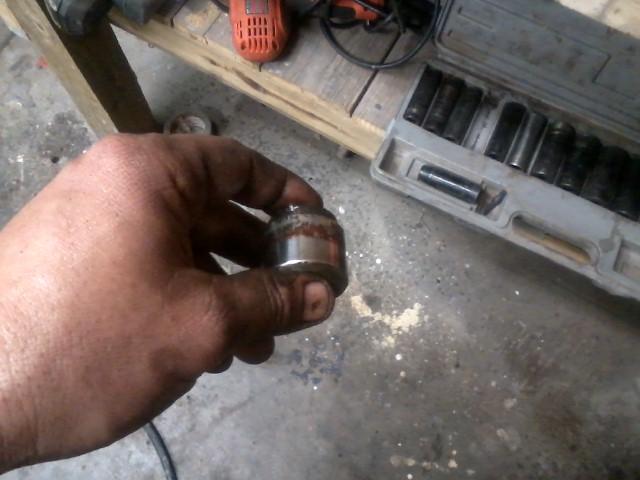
When installing things, I install necessities first. Water Pump and Alternator, then I install luxuries. Just a little way that works for me to know what goes or comes off first. I am installing the Power Steering. When I swapped Toms 86 pick up from carb to EFI. I did not have an EFI Power Steering pump and used a carb power steering pump. The EFI has a vacuum port to raise the idle up when turning.
Fairly recently there was a thread about the vacuum lines being removed from an EFI power steering pump. I had no issues with out the vac lines off and since the pump with the vac lines is bad. I am going with the carb power steering pump. I got to leave and will add more later.
Thumb is showing the EFI pump with vac port.
I thought I would do some welding on my utility trailer. I had a set of goggles and for no more then I was doing, I didn't think I would get a sunburn from welding. Probably no more then 5-10 minutes worth of welding and my face is burnt. I went and got a welders helmet today and wont be welding without a mask again anytime soon. Lesson learned on that. I had eye protection on but what was exposed to the flash is a little tender.
I am working on the 85 for a day or so and will be doing some work to my 86 and then will jump on the silver runner I have ready to get started on. On my 85, I left the power steering off until I had most of the bugs worked out and think I have for now. When I remove things from the motor, I remove luxuries first and necessities last. Luxuries are Power Steering and AC.
When installing things, I install necessities first. Water Pump and Alternator, then I install luxuries. Just a little way that works for me to know what goes or comes off first. I am installing the Power Steering. When I swapped Toms 86 pick up from carb to EFI. I did not have an EFI Power Steering pump and used a carb power steering pump. The EFI has a vacuum port to raise the idle up when turning.
Fairly recently there was a thread about the vacuum lines being removed from an EFI power steering pump. I had no issues with out the vac lines off and since the pump with the vac lines is bad. I am going with the carb power steering pump. I got to leave and will add more later.
Thumb is showing the EFI pump with vac port.
 Jan 14, 2015 | 01:55 PM
#609
Thread Starter
Super Moderator
iTrader: (1)
Joined: Aug 2008
Posts: 11,787
Likes: 28
From: Anderson Missouri
I got my power steering on, wahoo!!! It makes it so much easier to move around the house and getting it out of the shop to work on other things. To bleed the system of air, I raise the front end and go stop to stop several times. Your arm will thank you for raising the front end up and save some wear and tear on the steering. After I get as much air out as possible, I then start the truck to help get fluid thru the pump.
I was excited just to get it movable and that is great, but now having power steering for tight spots is so much easier. My drivers front tire has a slow leak, so that is the next quick fix. Still need to do the brakes, exhaust, and windshield. The 88 has been taking up the funds so it will be a while longer yet but one step closer to having the exterior finished and will start on interior after I get the outside finished.
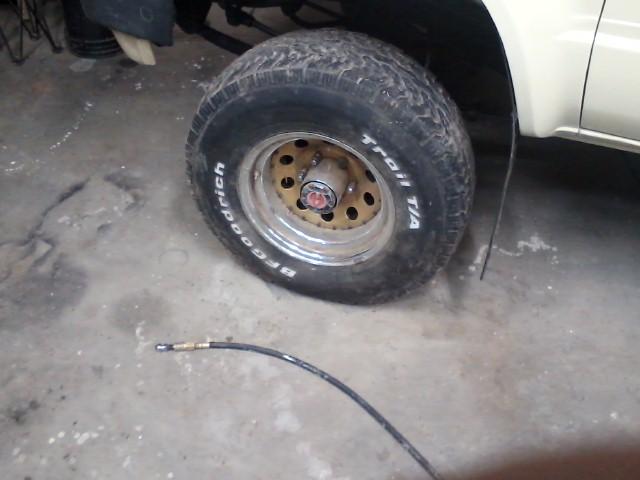
Anyone know what rim this is? I bought a set several years ago. These are 80s wheels but they are 80s trucks. I just want to find one to have a matching set until I come across what I want.
 Jan 15, 2015 | 02:48 PM
#610
Thread Starter
Super Moderator
iTrader: (1)
Joined: Aug 2008
Posts: 11,787
Likes: 28
From: Anderson Missouri
I took 9 days off from work to get things caught on things around the house, shop, and trucks. I spent 8-12 hours days trying to get things done. Some things went better then expected and some not as well. Overall was happy with what got done. I did not get to the 86 Silver Runner and still need to do some work on the 3rd Gen. Maybe tomorrow.
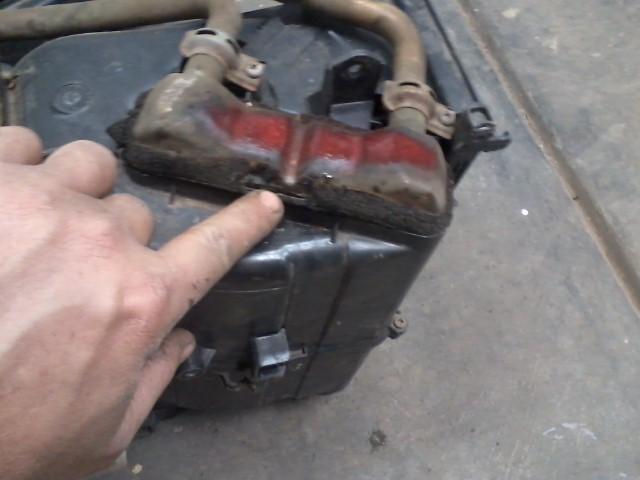
I get to pull the dash out of the 85 for the umpteenth time and hope this is the last time for it. The heater core in it for some reason just started leaking. Not sure why but will find out when I pull it in the morning. Luckily I had a spare setting in the shed and cleaned it up.
If you buy a new core, it wont come with the pipes and these c-clips are easy to get bent out of shape and will leak. Since this one is a spare I had I did not pull them off. These can get dirty but I gave this a good cleaning.

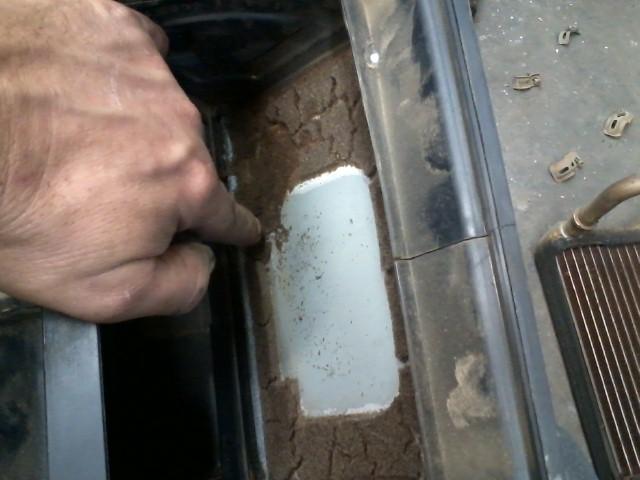
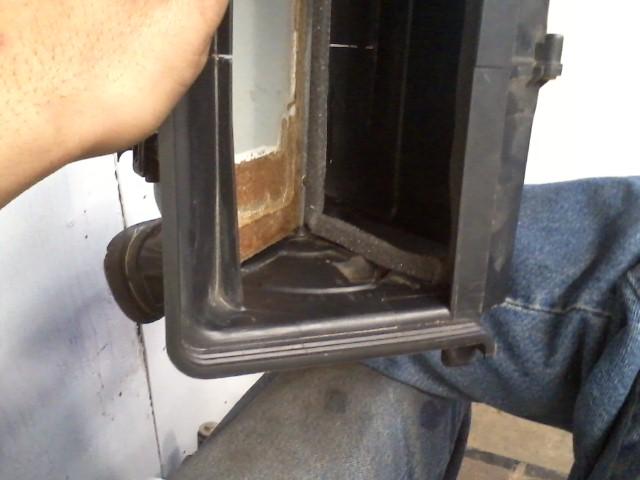
This used to be soft foam but now will turn to dust when touched. I just scraped it all off and used some foam seal around the edges.
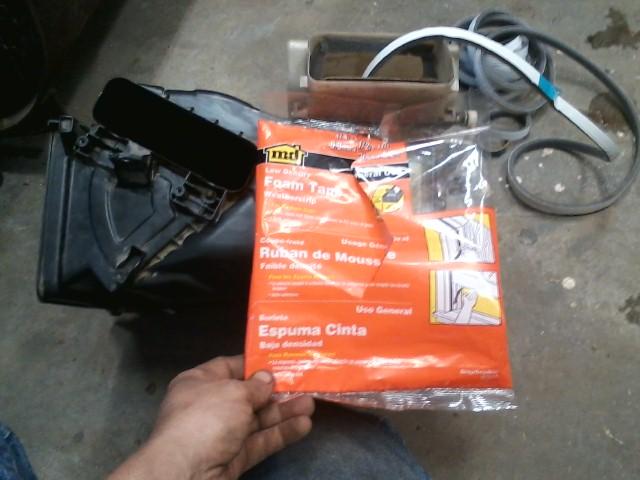
I got this from Lowes. Getting the white tape off can be a pain but when it comes off it looks like snake skin for the glue. I cut a little extra and just trimmed it once I got it in the vent.
What it looks like when installed on the plastic. It does not stick to the metal to well. One of the vents I was unable to seal around but it is not going to be a problem. Not much air will leak around the flap and it is inside the truck.
Jason in tn is planning on coming out here in the last week of February if all works out. He is having some issues with his heater and this picture is for him to let him know what one of the problems he is having could be. If all goes as planned, we are going to spend 2 days going thru his truck taking care of issues that we may come across. We may be changing the heater core in his.
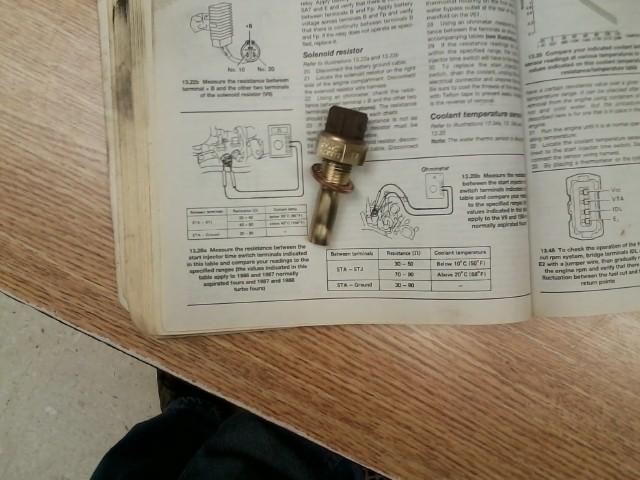
The 85 would not start due to it being cold. I used some starting fluid and fired right up. Usually a sign that the Cold Start Injector Timing Switch is bad. Never had the Cold Start Injector to fail.
Here is the new to me one.
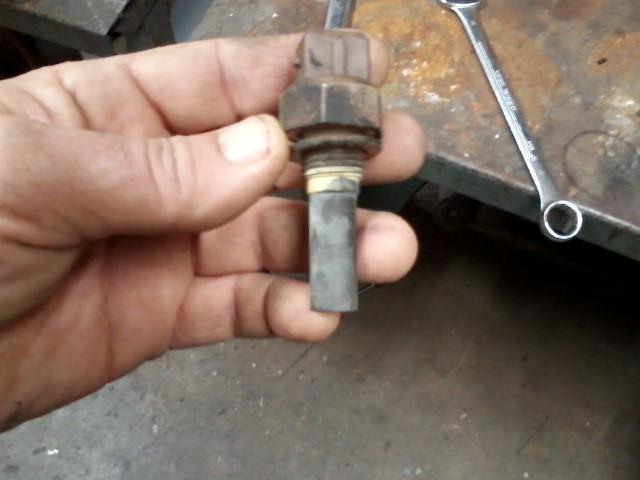
Cleaned up and passing test. Should fix the no start issue once I get it installed.
I moved my Electrolisis Tank outside. I soaked one of my brake calipers in it and it made disassembling it much quicker. Should of done the other one that way as well.
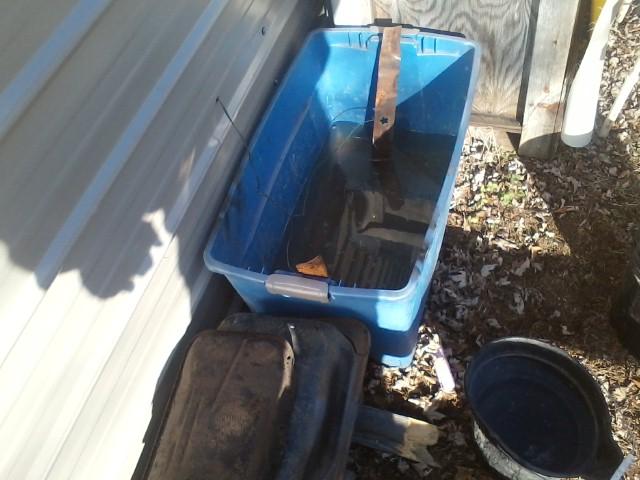
The calipers are frozen. No pad on the inside of the drivers side. If there is fluid involved, I am going to find a way to get it on the floor.
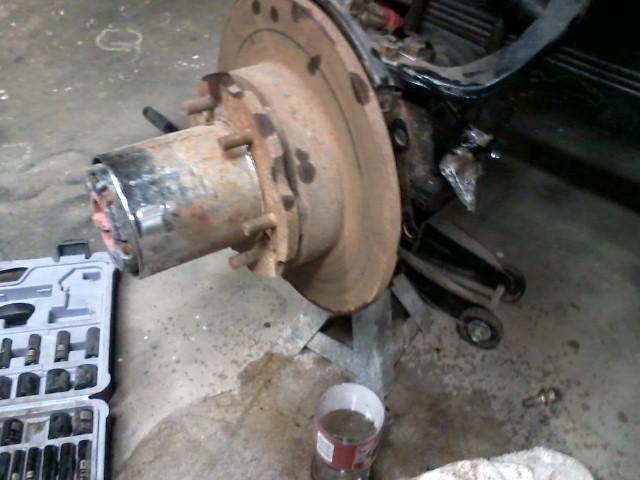
Here I am forcing the pistons out. The needle nose pliers simulates the rotor. This keeps the pistons from popping all the way out. If one doesnt pop out, keep air pressure on it and tap it lightly with a metal hammer and it usually will come out.
Here it is disassemled. This will clean up. What is behind the pistons is usually nasty!!!
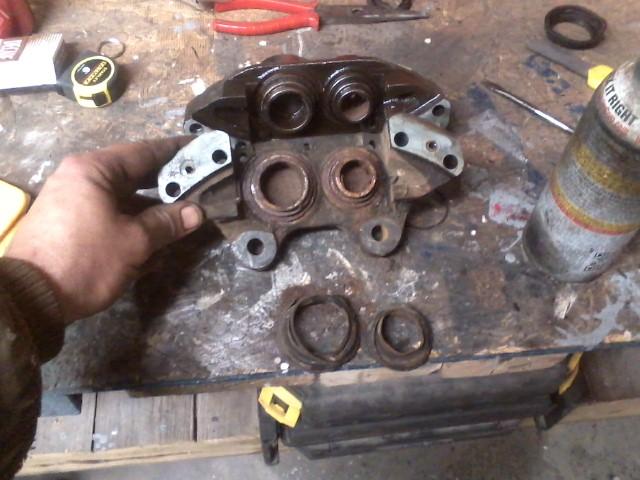
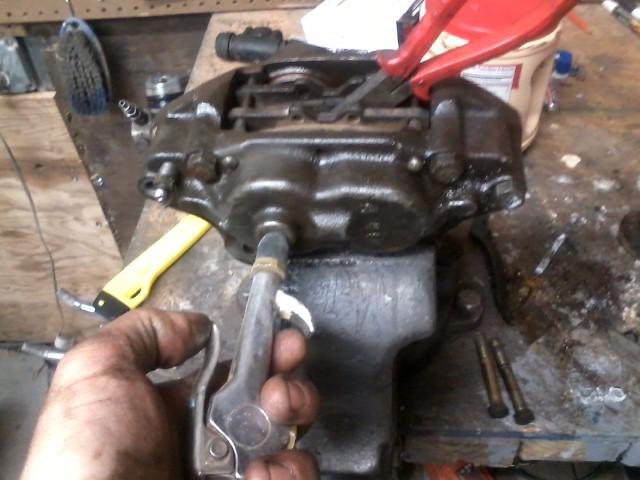
Here you can see where the piston stuck to the the cylinder. A good cleaning and it is working great. I did not get a picture of it reassembled. I replaced the inner seals and dust seals. Eventually I want to replace all the brake system with new. This will work great. I am still needing to order some new pads. At least now I can stop the truck. Before I had to watch it when moving it in and out of the shop.
I got my caliper rebuilt. Will be ordering brakes from Rockauto and get them installed when they get in. I can now stop the truck, was wondering how long it would be before I put it into my work bench.
I get to pull the dash out of the 85 for the umpteenth time and hope this is the last time for it. The heater core in it for some reason just started leaking. Not sure why but will find out when I pull it in the morning. Luckily I had a spare setting in the shed and cleaned it up.
If you buy a new core, it wont come with the pipes and these c-clips are easy to get bent out of shape and will leak. Since this one is a spare I had I did not pull them off. These can get dirty but I gave this a good cleaning.

This used to be soft foam but now will turn to dust when touched. I just scraped it all off and used some foam seal around the edges.

I got this from Lowes. Getting the white tape off can be a pain but when it comes off it looks like snake skin for the glue. I cut a little extra and just trimmed it once I got it in the vent.

What it looks like when installed on the plastic. It does not stick to the metal to well. One of the vents I was unable to seal around but it is not going to be a problem. Not much air will leak around the flap and it is inside the truck.

Jason in tn is planning on coming out here in the last week of February if all works out. He is having some issues with his heater and this picture is for him to let him know what one of the problems he is having could be. If all goes as planned, we are going to spend 2 days going thru his truck taking care of issues that we may come across. We may be changing the heater core in his.

The 85 would not start due to it being cold. I used some starting fluid and fired right up. Usually a sign that the Cold Start Injector Timing Switch is bad. Never had the Cold Start Injector to fail.
Here is the new to me one.

Cleaned up and passing test. Should fix the no start issue once I get it installed.

I moved my Electrolisis Tank outside. I soaked one of my brake calipers in it and it made disassembling it much quicker. Should of done the other one that way as well.

The calipers are frozen. No pad on the inside of the drivers side. If there is fluid involved, I am going to find a way to get it on the floor.

Here I am forcing the pistons out. The needle nose pliers simulates the rotor. This keeps the pistons from popping all the way out. If one doesnt pop out, keep air pressure on it and tap it lightly with a metal hammer and it usually will come out.

Here it is disassemled. This will clean up. What is behind the pistons is usually nasty!!!

Here you can see where the piston stuck to the the cylinder. A good cleaning and it is working great. I did not get a picture of it reassembled. I replaced the inner seals and dust seals. Eventually I want to replace all the brake system with new. This will work great. I am still needing to order some new pads. At least now I can stop the truck. Before I had to watch it when moving it in and out of the shop.

I got my caliper rebuilt. Will be ordering brakes from Rockauto and get them installed when they get in. I can now stop the truck, was wondering how long it would be before I put it into my work bench.

Last edited by Terrys87; Jan 7, 2016 at 10:34 AM.
Jan 22, 2015 | 12:27 PM
#611
Thread Starter
Super Moderator
iTrader: (1)
Joined: Aug 2008
Posts: 11,787
Likes: 28
From: Anderson Missouri
This is the 50th time I have pulled the dash assembly. The heater core for some reason went bad. Got most of it back in and marked this one as bad with red. Pipes, clips and box will come in handy someday. Here is where it split.
One option that is rare to find is the plug for a factory drop light. I have seen the plug a few times and got it installed on mine. Have seen pictures of the drop light and maybe one day I will have one. Eventually want to get all the options on this truck working. That will be a long process and this truck will be one loaded truck with factory options. I just lucked out on getting this harness.
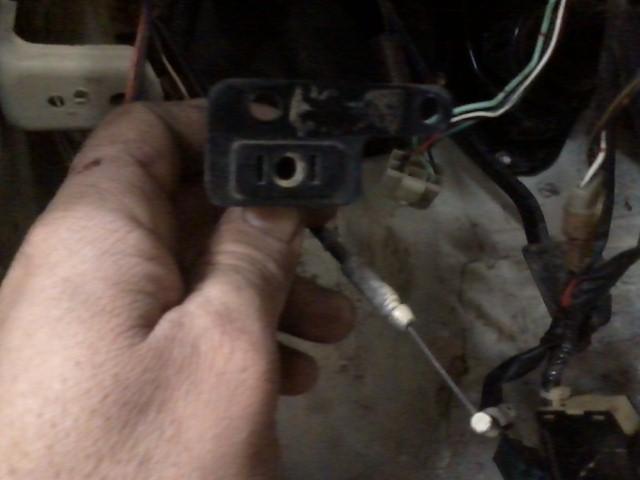

One option that is rare to find is the plug for a factory drop light. I have seen the plug a few times and got it installed on mine. Have seen pictures of the drop light and maybe one day I will have one. Eventually want to get all the options on this truck working. That will be a long process and this truck will be one loaded truck with factory options. I just lucked out on getting this harness.
 Jan 24, 2015 | 11:34 AM
#613
Thread Starter
Super Moderator
iTrader: (1)
Joined: Aug 2008
Posts: 11,787
Likes: 28
From: Anderson Missouri
Hello Jason... If everything goes well it should look alot more different then it does now and if all goes as planned, I am hoping ot be driving it by next Friday or early next week. Shop has went thru several changes as well.
Jan 24, 2015 | 11:39 AM
#614
Thread Starter
Super Moderator
iTrader: (1)
Joined: Aug 2008
Posts: 11,787
Likes: 28
From: Anderson Missouri
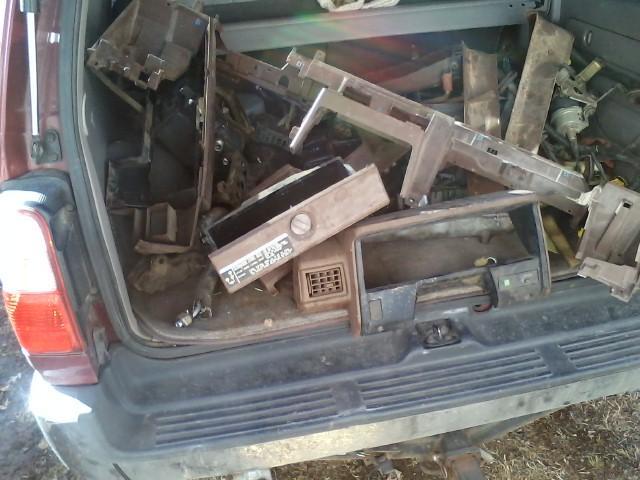
One reason I need to ge my truck running is to haul the good stuff. I got several brown interior pieces. I am going to re-paint them but I would rather use the same color and one of the pieces has the cruise control panel in it. The harness I got for my 85 is one of the most loaded optioned trucks I have seen. Long term goal is to get every option working.
I also have an 87 runner that is as loaded as Chef old red one that is just missing some pieces. I have a chance to have two fully loaded SR5s and that is a long term goal. I am debating on using my 86 runner to fix the 87. May be a sad day for the 86 for a while but I will eventually get it back together if I use it to fix the 87 runner. The 87 would mostly just cost me a paint job with what I have available.
Toyospearos Axle Rebuild thread... https://www.yotatech.com/forums/f115...ctures-180536/
Parts for the 85s interior.

Last edited by Terrys87; Jan 24, 2015 at 10:26 PM.
Jan 26, 2015 | 10:10 AM
#615
Thread Starter
Super Moderator
iTrader: (1)
Joined: Aug 2008
Posts: 11,787
Likes: 28
From: Anderson Missouri
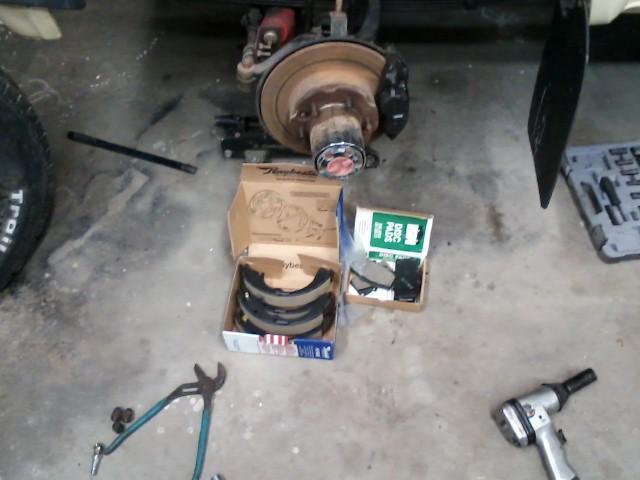
Got front and rear brake pads/shoes in from Rockauto today. Was not supposed to be here for a couple of more days so that always makes nice when parts show up earlier then expected. I just put the front pads on. I do have rear slave cylinders to go with the back brakes and will get to them later.
I am supposed to take it to the windshield shop tomorrow. I am tired right now so it may be Wednesday or if I get a second wind in me. I still need to hook up the heater core hoses and finish putting the dash back together from my broken heater core. I am going to be a few dollars short so will wait until Friday to get the exhaust on. Then I need to find the title, get it inspected and it should be legal. Just becuase it will be legal doesnt mean I am quite ready to start driving it very much. I have not gotten to drive it around on some back roads and I am sure there will be some bugs to work out of it. Will be starting on the interior very soon.
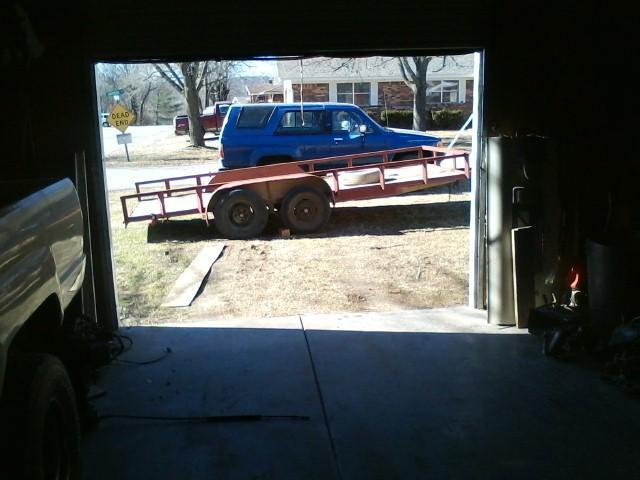
Not sure if I will use the 86 to haul it to the windshield shop and exhaust shop. It is only a couple of miles, but a trailer and truck is heavy on it. Getting close to getting this project wrapped up from what it was. This one will get hauled to the shops, usually I drive them. I am looking forward to driving it soonnnn!!!!

I am supposed to take it to the windshield shop tomorrow. I am tired right now so it may be Wednesday or if I get a second wind in me. I still need to hook up the heater core hoses and finish putting the dash back together from my broken heater core. I am going to be a few dollars short so will wait until Friday to get the exhaust on. Then I need to find the title, get it inspected and it should be legal. Just becuase it will be legal doesnt mean I am quite ready to start driving it very much. I have not gotten to drive it around on some back roads and I am sure there will be some bugs to work out of it. Will be starting on the interior very soon.
Not sure if I will use the 86 to haul it to the windshield shop and exhaust shop. It is only a couple of miles, but a trailer and truck is heavy on it. Getting close to getting this project wrapped up from what it was. This one will get hauled to the shops, usually I drive them. I am looking forward to driving it soonnnn!!!!

Last edited by Terrys87; Jan 26, 2015 at 09:54 PM.
Jan 26, 2015 | 06:38 PM
#616
Hey Terry, looks like you've been staying busy! I had a quick question on that turbo Trans you were talking about earlier. Do you know if the bolt pattern where the bellhousing bolts up to the trans is different compared to the G series or W series transmissions. I was just wondering, I know alot of people like to run the turbo trannys when doing V8 conversions because they're stronger, I was just curious if my current bellhousing adapter would bolt up to one.
I used to see wheels like you posted a pic of all the time, I haven't seen any with the gold centers in along time, US Wheel makes a similar style wheel, but it has a black center, or all chrome. Is that gold color an anodized finish? I wonder if you'd be able to paint it to match, or paint the other 3 black in the center...
http://www.summitracing.com/search/p...modular-wheels
Jan 26, 2015 | 07:21 PM
#617
Thread Starter
Super Moderator
iTrader: (1)
Joined: Aug 2008
Posts: 11,787
Likes: 28
From: Anderson Missouri
Hello Ed...I can look into it. I have that and a couple of other transmissions in there an I will see if it will interchange. I will try tomorrow or Wednesday to find out.
Last edited by Terrys87; Jan 26, 2015 at 09:55 PM.
Jan 28, 2015 | 11:39 AM
#619
Thread Starter
Super Moderator
iTrader: (1)
Joined: Aug 2008
Posts: 11,787
Likes: 28
From: Anderson Missouri
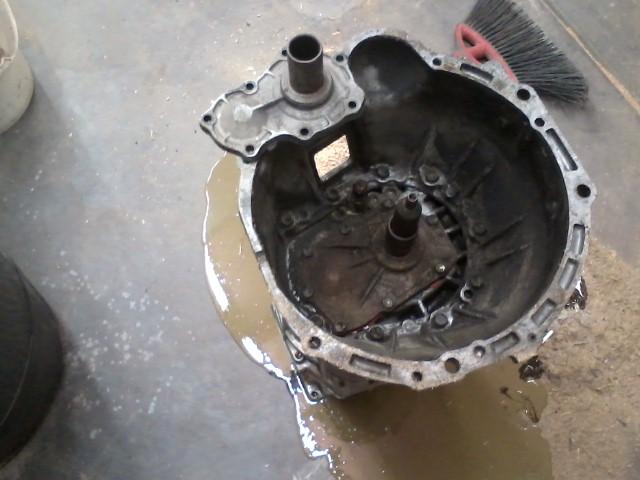
Hello Ed.. I will need to ask my friend what he was talking about. The transmissions are the same length. But the bell housings will not interchange. I swapped the turbo bell housing to a W56 ( Almost sure it is a W56) and it was way to big. I put the W56 bell housing on the turbo tranny and the bell housing was way to small.
Turbo bell housing ( hole in bell housing) on W56 tranny. If you look closely, you can see the W56 transmissions bolt holes ( on left side of transmission) and the bolt holes for the turbo bell housing are way off.
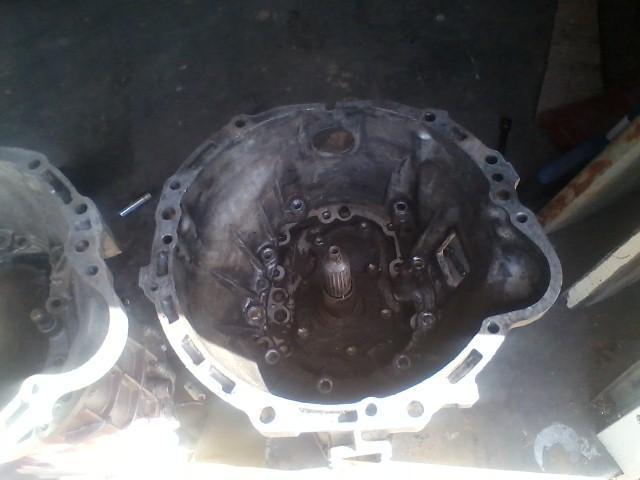
Trannys are same length.
Turbo bell housing ( hole in bell housing) on W56 tranny. If you look closely, you can see the W56 transmissions bolt holes ( on left side of transmission) and the bolt holes for the turbo bell housing are way off.

Trannys are same length.

Last edited by Terrys87; Jan 28, 2015 at 11:41 AM.
Jan 28, 2015 | 11:45 AM
#620
Thread Starter
Super Moderator
iTrader: (1)
Joined: Aug 2008
Posts: 11,787
Likes: 28
From: Anderson Missouri
Hello cyberhorn...The electrolisis tank is great. I cant geta good weld on the stud and not enough of it to grab on to. I broke my last easy out and still need to replace it. I did find another manifold while getting some information on the doors for you.
I may need to get a better picture but where my pointer finger is, those are closest to the rear of the door. I have used the yellow plugs to fix another door. These are the square quarter inch holes I was telling you about being pre punched in the door. You can go from the shorter arm rest to the longer arm rest just by moving the yellow plugs. Also the longer arm rest will hide your old hole.
There are two square holes on each side of my pointer finger. My pinky is for the front hole on either arm rest.


