
KawaZX636's 1983 Toyota Pickup Restoration
 Sep 18, 2013 | 11:00 AM
#281
Registered User
Joined: May 2009
Posts: 684
Likes: 1
From: Downingtown, PA
Just put your Multi Meter on Ohms and you can ring out the wires without power.
If you are going to install power blocks, install one for battery power and one for ignition power. The blue wire from the ignition switch can power your Ignition Block.
I purchased a compact Fuse / Distribution block system from Centech with part circuit for battery and part circuit for ignition already built in. It is very small and light so I mounted it in the dash above the glove box.
Last edited by suncomb1; Sep 18, 2013 at 11:03 AM.
Sep 18, 2013 | 07:19 PM
#282
Thread Starter
Super Moderator
iTrader: (3)
Joined: Jan 2012
Posts: 3,218
Likes: 26
From: Salisbury, MD
I'll definitely look into that. Is this the one you are talking about:
http://www.centechwire.com/Auxiliary...Panel-AP-2.htm
http://www.centechwire.com/Auxiliary...Panel-AP-2.htm
Sep 18, 2013 | 07:27 PM
#283
Thread Starter
Super Moderator
iTrader: (3)
Joined: Jan 2012
Posts: 3,218
Likes: 26
From: Salisbury, MD
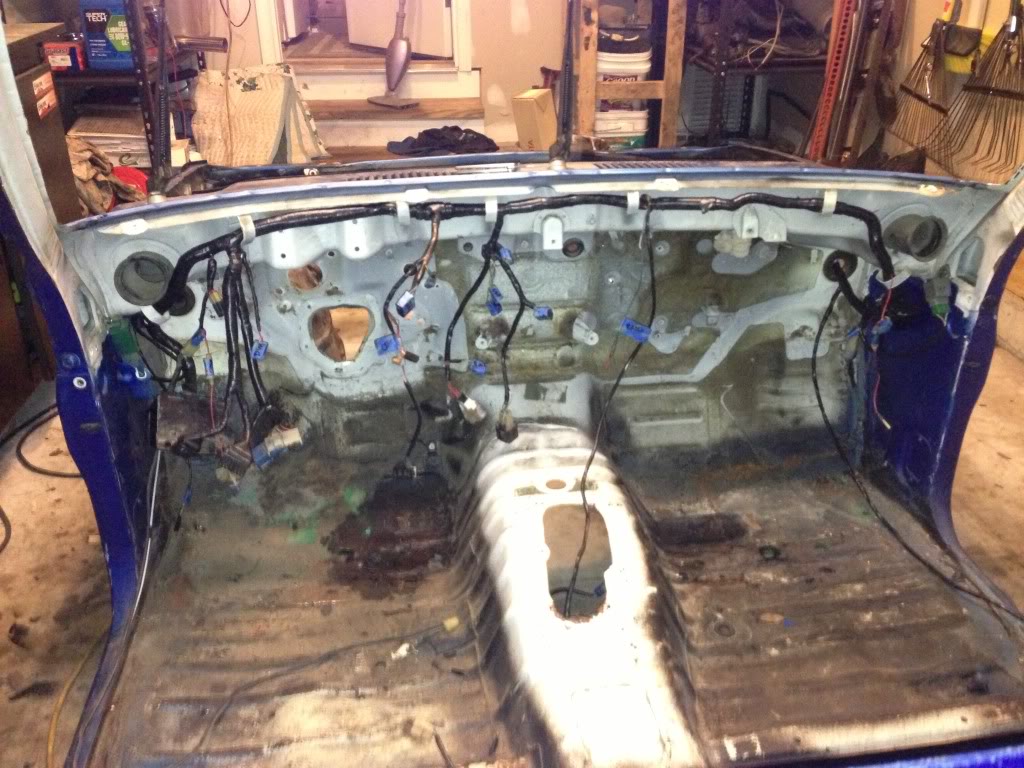
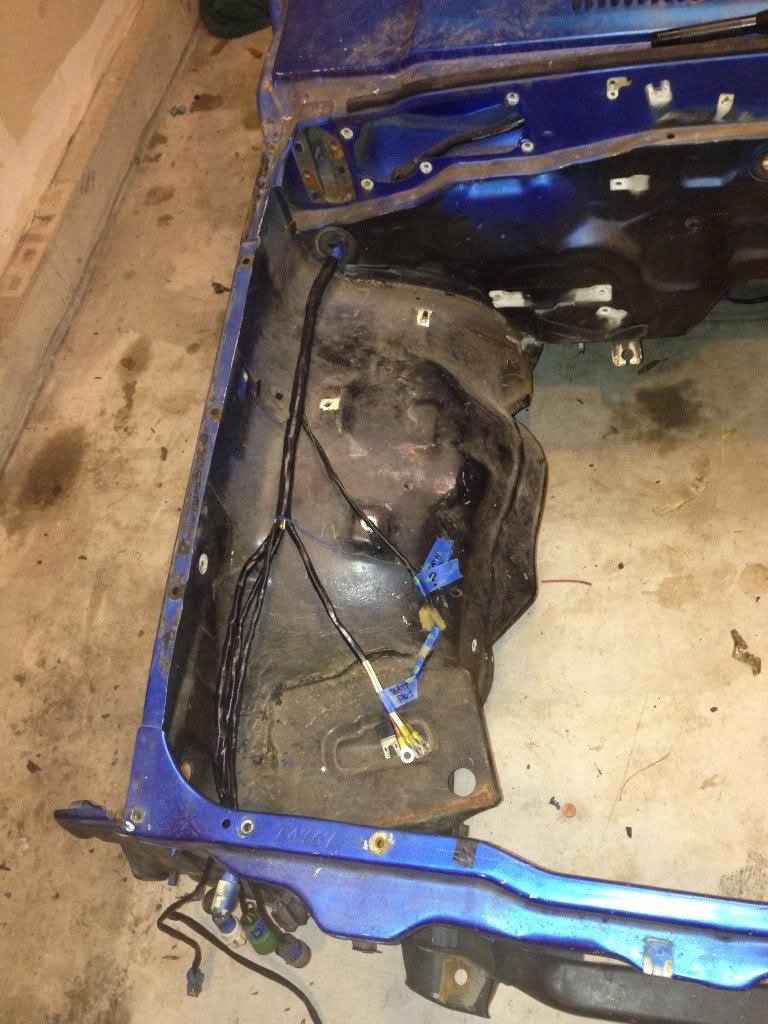
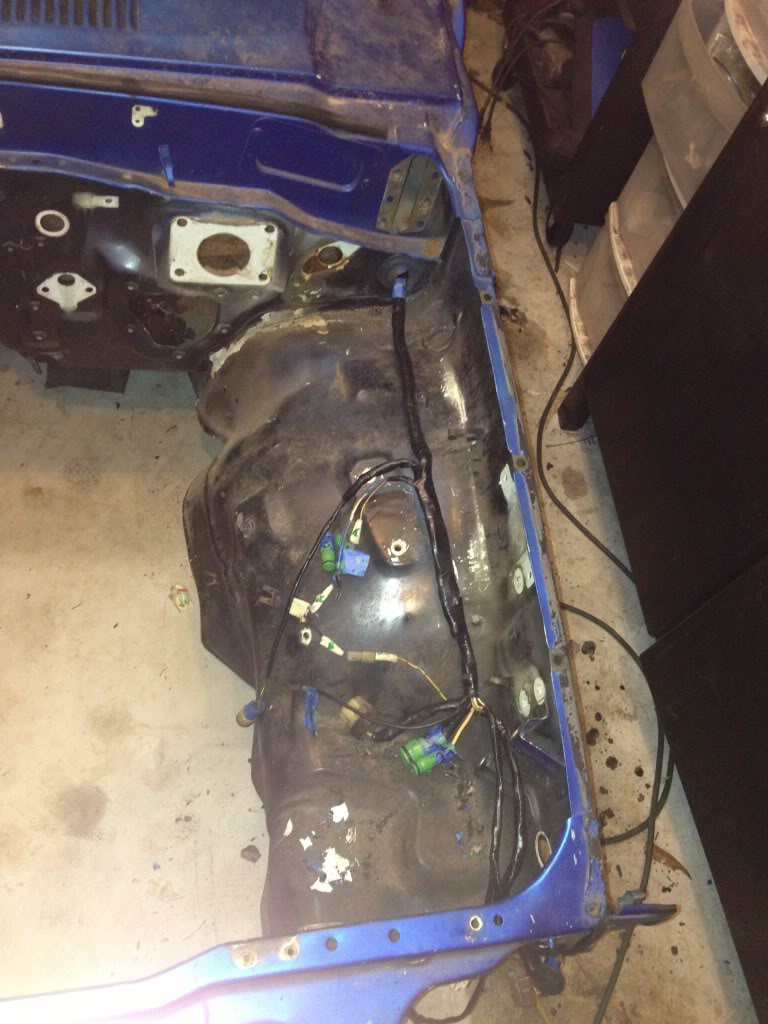
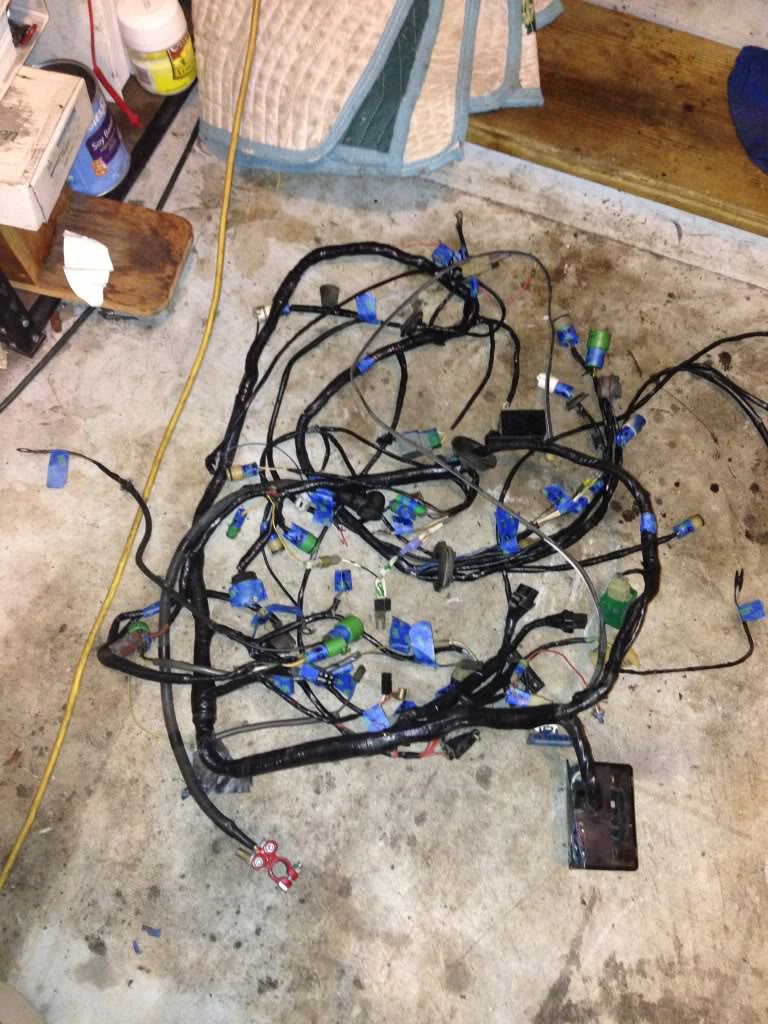
With the help of this great community we have here, I managed to get the wiring harness finished up. I got all of the emissions crap out and did a little house keeping on the harness. Removed all the factory tape and casing and re-wrapped it all with fresh tape. I'll put everything back in plastic casing when I go for the final install. All the plugs are labeled and should make the re-install go fairly painless. Looks much cleaner than the factory jumble.

Then I pulled it all out
Next step is to cut out the floor boards and tranny tunnel for replacement. Also need to fab up some new body mound brackets. Hopefully it goes pretty smooth...


Then I pulled it all out


Next step is to cut out the floor boards and tranny tunnel for replacement. Also need to fab up some new body mound brackets. Hopefully it goes pretty smooth...
Sep 20, 2013 | 10:45 AM
#285
Thread Starter
Super Moderator
iTrader: (3)
Joined: Jan 2012
Posts: 3,218
Likes: 26
From: Salisbury, MD
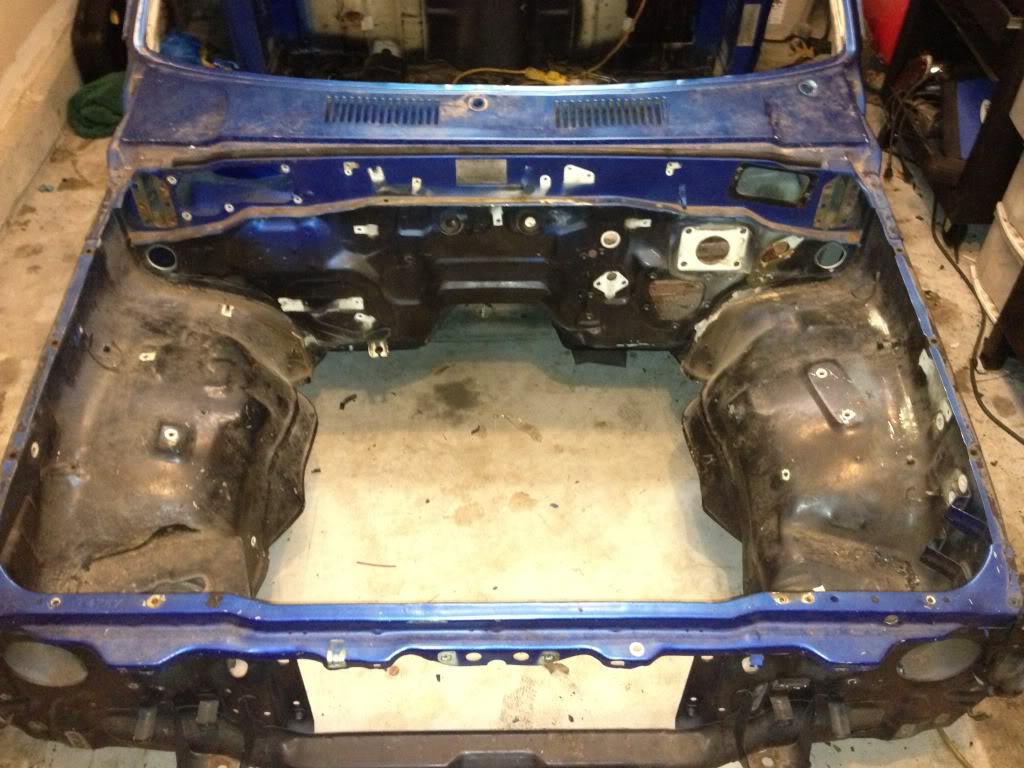
Last night I flip the cab up on its rear to assess the damage. It's not good... The majority of the rust is up around the middle body mounts where the firewall meets the floor pan. I'm hoping to be able to get away with cutting out the floor pan and not having to mess too much with the firewall - Hopefully there is enough there to weld to. The rockers look good from the outside, but the inside might tell a different story when I start cutting it out the floors - I'll probably end up replacing the sheet steel along the back of the rockers on the bottom of the cab.
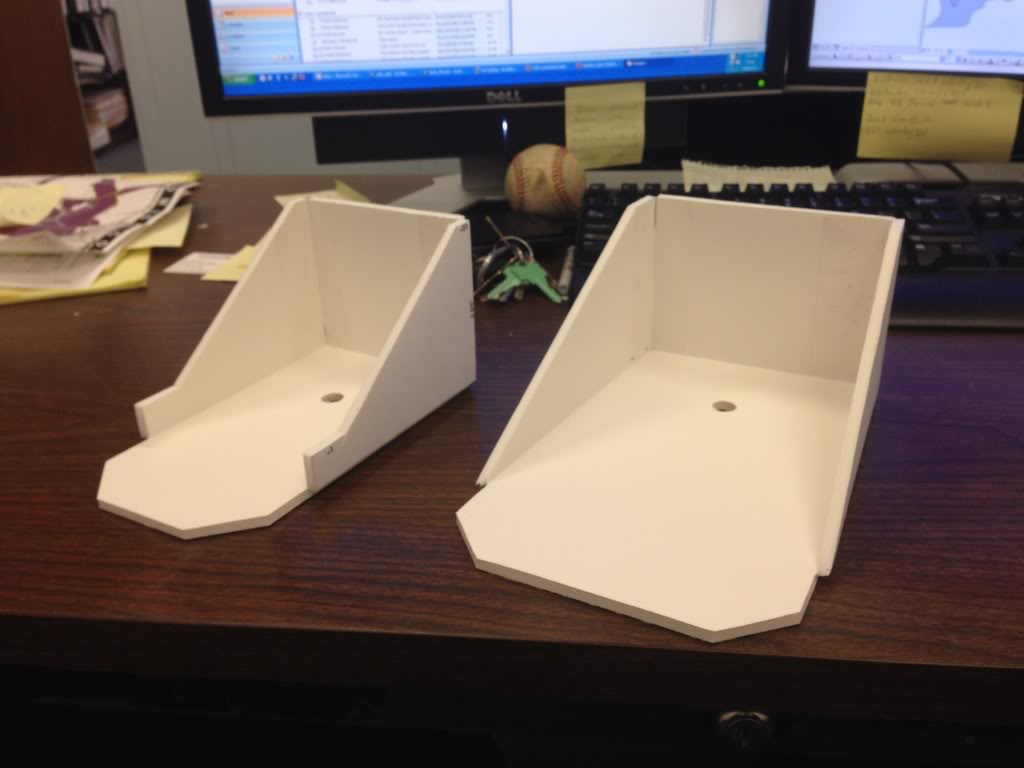
So first I am going to make some new body mounts. I'm figuring that if I cut the old ones out before I cut out the floor pan then I can get the body mounts properly aligned with minimal stress (again, assuming that I have enough metal to weld to the back of the rocker panels. Last night I took some measurement from the factory body mount brackets and visited my chassis to verify that I had no surprises. I'm simply going to replicate the factory brackets with new, more beefy 3/32" or 1/8" steel. The factory thickness seems to be a little thicker than 1/16" steel but it's pretty tattered and swollen with corrosion so I can't really get a good read with my calipers. I drew and printed a template for the brackets today at work. Slapped it on some foam core and bent it up (front and rear are two different designs. I'll take these and the body mount bushings over to the chassis tonight to see if there might be any clearance issues. Then it's off to the steel yard to grab some metal.
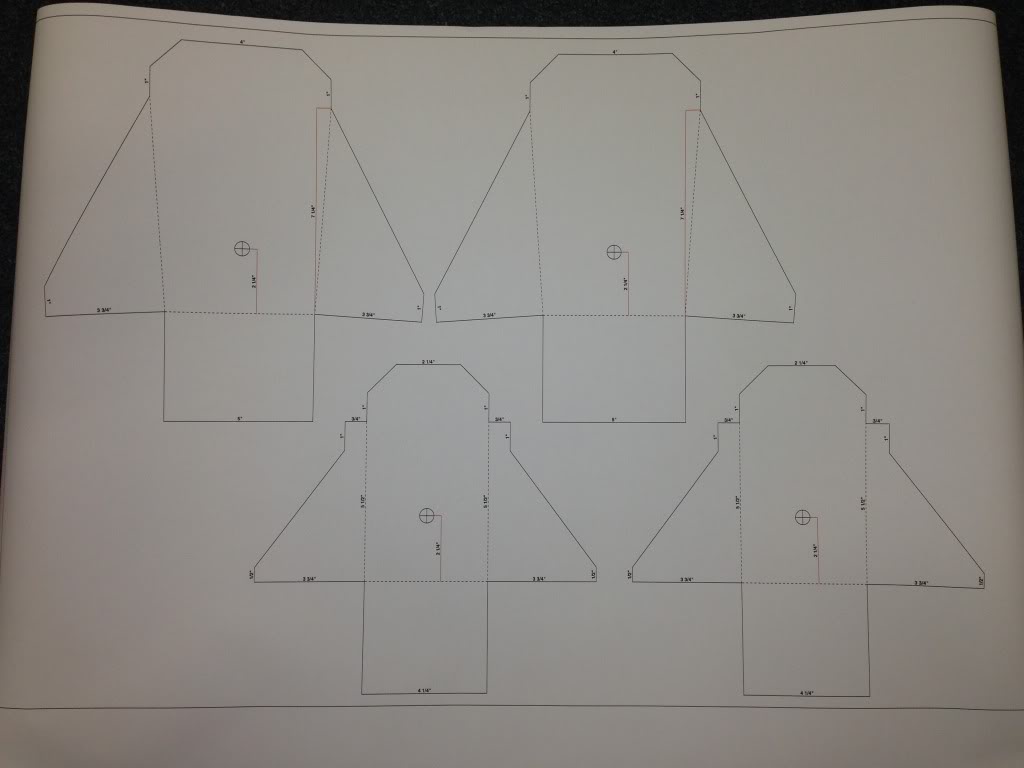
So first I am going to make some new body mounts. I'm figuring that if I cut the old ones out before I cut out the floor pan then I can get the body mounts properly aligned with minimal stress (again, assuming that I have enough metal to weld to the back of the rocker panels. Last night I took some measurement from the factory body mount brackets and visited my chassis to verify that I had no surprises. I'm simply going to replicate the factory brackets with new, more beefy 3/32" or 1/8" steel. The factory thickness seems to be a little thicker than 1/16" steel but it's pretty tattered and swollen with corrosion so I can't really get a good read with my calipers. I drew and printed a template for the brackets today at work. Slapped it on some foam core and bent it up (front and rear are two different designs. I'll take these and the body mount bushings over to the chassis tonight to see if there might be any clearance issues. Then it's off to the steel yard to grab some metal.


 Sep 20, 2013 | 10:56 AM
#287
Thread Starter
Super Moderator
iTrader: (3)
Joined: Jan 2012
Posts: 3,218
Likes: 26
From: Salisbury, MD
I also got a new tank of 75/25 Argon last night but when I went to hook it up I discovered that my regulator had kicked the bucket on me. So I ordered a new regulator online last night - The local shops had nothing but cheap regulators and the one I found online was higher quality, cost less and can also handle straight CO2 without freezing up. I learned a long time ago that cheap tools are way more expensive than high quality tools when you have to replace them two or three times. The regulator probably won't be here until Tuesday or Wednesday next week so I guess I'm stuck with cutting and cleaning this weekend.
Sep 21, 2013 | 05:30 AM
#288
Good luck with the floor and body mount repair, looks like you know what you're doing in the fab dept. I've tried to repair some smaller areas in my floor pan while the cab is on its back. No such luck, as I'm not a welder, so I blow a lot of holes. Cut it out,make new fillers and start over. ARRGGGhhhh  If I could get those done, then POR15 the whole bottom, then I would be just about in the same condition you are at.
Do you have a list of the smog wiring you cut out of the harness and ECU? My harness is on the bench, and will soon be ready to do the same surgery. Also plan to use an Aux power block, to upgrade the fuze block and have other additional wiring capabilities when the time comes.
Winter is coming and I hope to get the cab back on the chassis and roll back into the shop to get the body work completed, primed, ready for paint in the spring.
Keep up the great work you are doing, an inspiration to us all.
If I could get those done, then POR15 the whole bottom, then I would be just about in the same condition you are at.Do you have a list of the smog wiring you cut out of the harness and ECU? My harness is on the bench, and will soon be ready to do the same surgery. Also plan to use an Aux power block, to upgrade the fuze block and have other additional wiring capabilities when the time comes.
Winter is coming and I hope to get the cab back on the chassis and roll back into the shop to get the body work completed, primed, ready for paint in the spring.
Keep up the great work you are doing, an inspiration to us all.
Sep 21, 2013 | 04:29 PM
#289
Thread Starter
Super Moderator
iTrader: (3)
Joined: Jan 2012
Posts: 3,218
Likes: 26
From: Salisbury, MD
Thanks Lons. The emissions wiring is fairly easy to remove. Just start at the emissions control computer on the driverside kick panel and remove all the wires attached to it. You shouldn't have too many problems as long at the previous owners didn't hack too much up in the harness.
Sep 21, 2013 | 04:57 PM
#290
Thread Starter
Super Moderator
iTrader: (3)
Joined: Jan 2012
Posts: 3,218
Likes: 26
From: Salisbury, MD
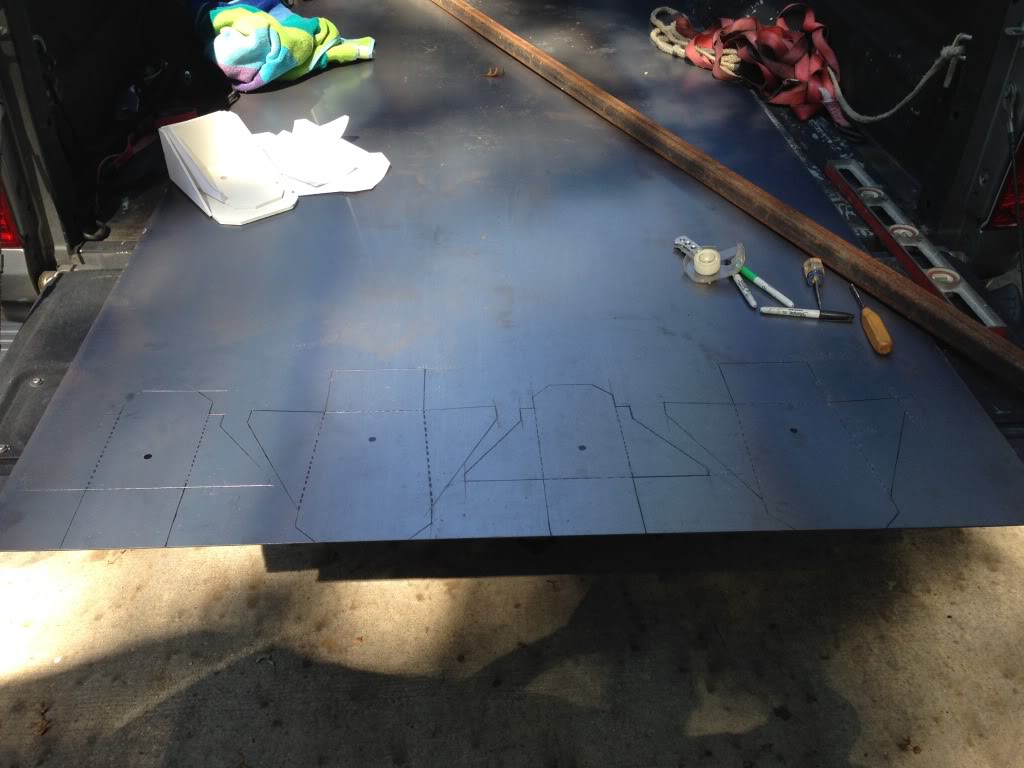
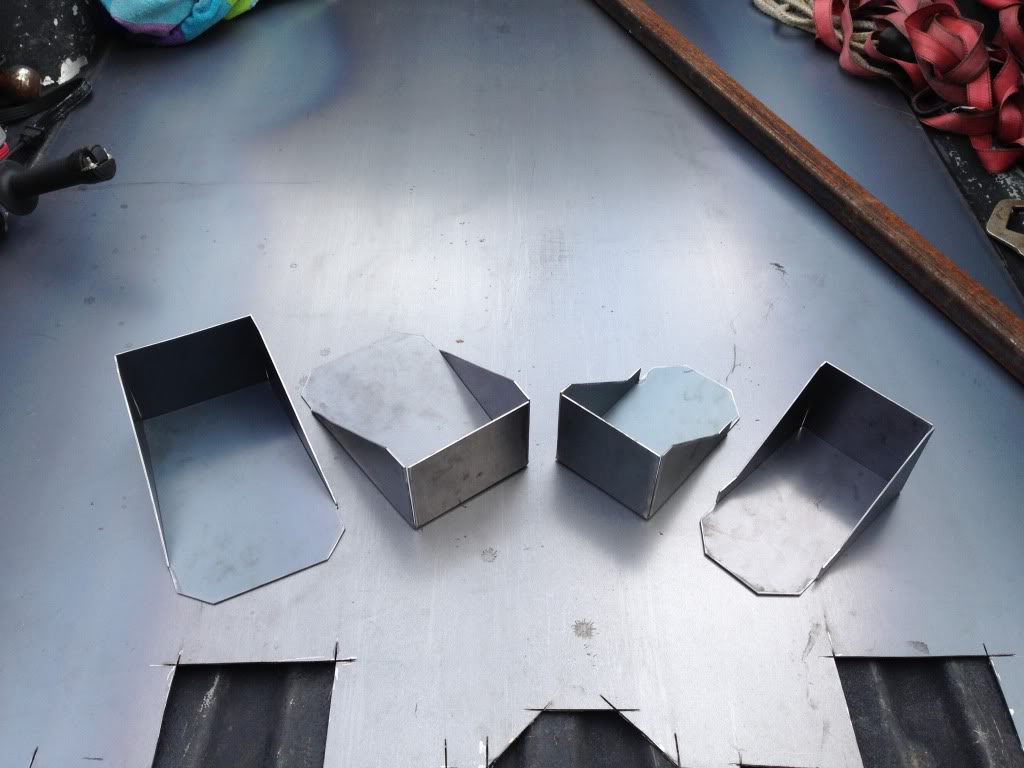
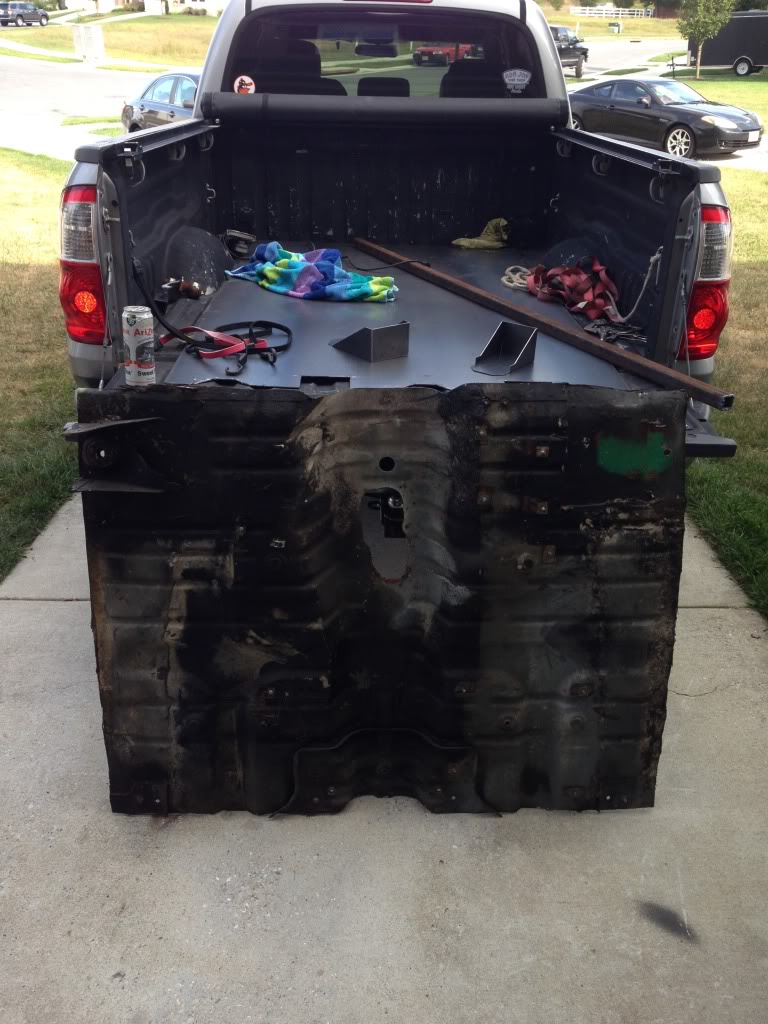
Here we go! Grabbed a big ole sheet of 14ga steel today from the metal yard up the road (they have EVERYTHING you will ever need when it comes to metal) and cut up some body mount brackets today. Bent them up and all I'm waiting for is a damn gas regulator so I can weld them up. So far I think they turned out pretty good.

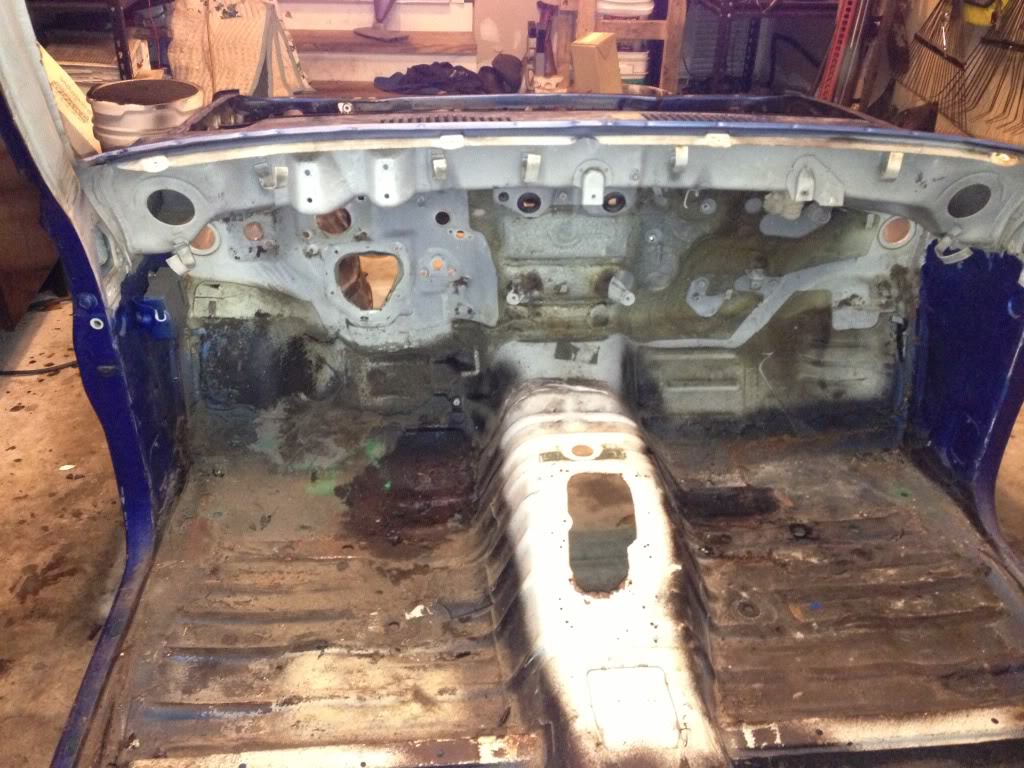
Also cut out the floor pan today. I'm going to have to replace the steel on the back of the rocker panels so my original plan of mounting the body mounts and then cutting out the floor pan isn't going to work out. I marked the original locations so I should still be ok when it comes to aligning everything. 6 cutting wheels later and a bunch of heat rash, here is my Flintstone mobile:
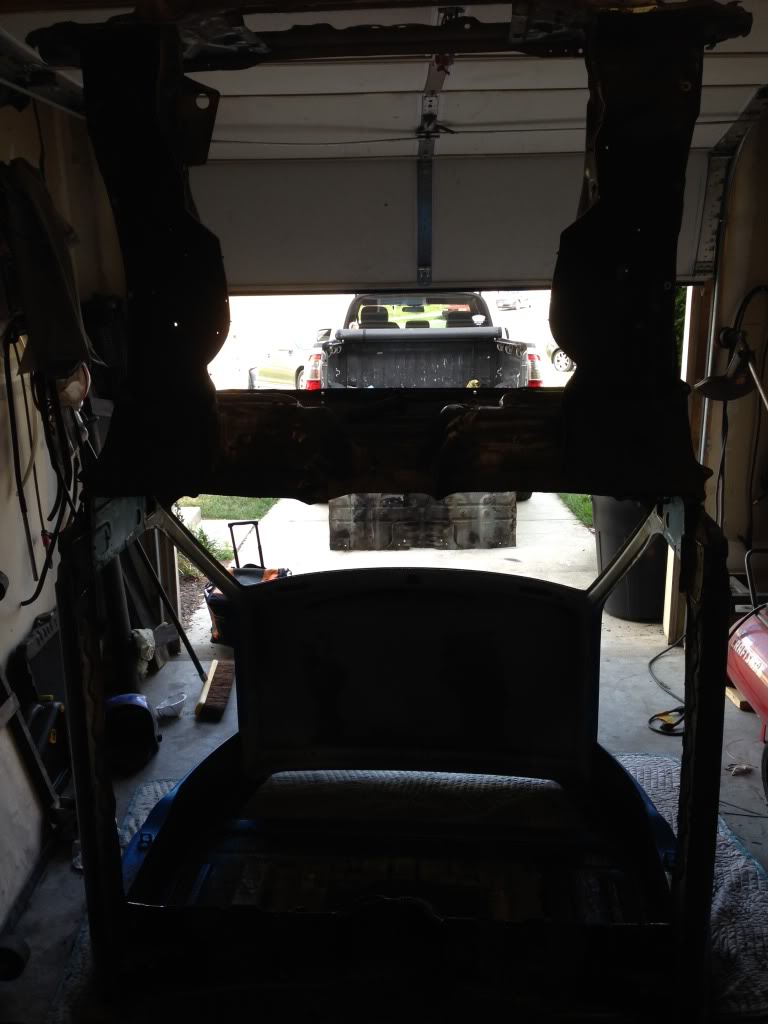
I didn't realize how much patchwork the PO did to it until I was cutting everything out. There were a couple steel patches and a BOATLOAD of Bondo in there - bad enough that I ended up putting a respirator on to do the cutting. Things don't look too bad though. I still have to clean up the cuts and get some templates made for the tunnel fab.


Also cut out the floor pan today. I'm going to have to replace the steel on the back of the rocker panels so my original plan of mounting the body mounts and then cutting out the floor pan isn't going to work out. I marked the original locations so I should still be ok when it comes to aligning everything. 6 cutting wheels later and a bunch of heat rash, here is my Flintstone mobile:


I didn't realize how much patchwork the PO did to it until I was cutting everything out. There were a couple steel patches and a BOATLOAD of Bondo in there - bad enough that I ended up putting a respirator on to do the cutting. Things don't look too bad though. I still have to clean up the cuts and get some templates made for the tunnel fab.
Last edited by kawazx636; Sep 21, 2013 at 05:03 PM.
Sep 22, 2013 | 05:39 PM
#293
Thread Starter
Super Moderator
iTrader: (3)
Joined: Jan 2012
Posts: 3,218
Likes: 26
From: Salisbury, MD
I hear ya Gmack. If anybody needs the template for the body mounts, I would be more than happy to email the file to them for free. They are pretty much exact replicas of the factory mounts. As far as the floors go, that may be a different story. I may try to measure it up and get a rough drawing for it, but I imagine this is probably going to be a modify as I go fab job. Besides, everybody's floor pan replacements will be different so having a template might not work so well for everybody. For instance, I'm replacing my floor pan from the about 2" up the bend into the firewall back to about 2" shy of the rear body mounts. The reason being is that my rear corners were not bad at all; however, the rear floor portion of the floor has an arch in it to clear the middle crossmember of the frame. So instead of trying to beat and bend metal to clear it I decided that it would be more practical to retain the original sheet metal and just tie into it. But I should be able to create a useful template for the tunnel though. I'll keep everybody posted as to information I creat and have available as I go. As always, if anybody needs help or needs to use my resources, feel free to ask.
Sep 23, 2013 | 06:12 AM
#295
Thread Starter
Super Moderator
iTrader: (3)
Joined: Jan 2012
Posts: 3,218
Likes: 26
From: Salisbury, MD
To bend them I just scored the sheet metal about half way through at each bend with a cutting wheel on my die grinder. I was then able to easily bend them into shape by clamping them in a vice and just folding the side to 90*. I bent them so that the score is on the outside of the bend. From there I will weld the seams together and weld a bead down each bend where the metal was scored. The reason that I scored the metal before bending was so that I could get a nice, straight, sharp 90* bend. I could have taken them to a sheet metal shop and had them use a press to bend them, but I wouldn't have gotten the corners in the bends as sharp plus once I weld the bends they will be cleaner and stronger. It literally took me less than 2 hours to cut out and bend the brackets.
Sep 23, 2013 | 08:07 PM
#296
Thread Starter
Super Moderator
iTrader: (3)
Joined: Jan 2012
Posts: 3,218
Likes: 26
From: Salisbury, MD
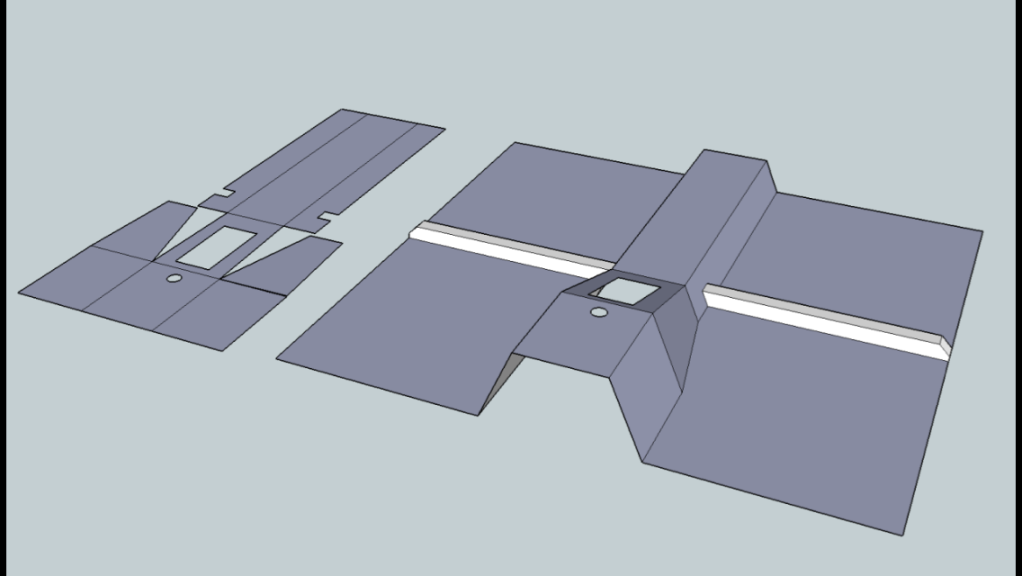
I was able to take some measurements tonight and draw a 3D model of the tranny tunnel. I needed to get some approximate measurements and geometry so that I can make a good template out of foam core to mock up and check for clearances around the tranny. Here's what I have come up with:
 Sep 24, 2013 | 04:50 PM
#297


 , JK
Sep 24, 2013 | 06:09 PM
, JK
Sep 24, 2013 | 06:09 PM
#298
Thread Starter
Super Moderator
iTrader: (3)
Joined: Jan 2012
Posts: 3,218
Likes: 26
From: Salisbury, MD
If you would start coming up with crappy ideas then I would quit copying you. LOL
I especially liked your tranny tunnel design, soooooo.... I made this:
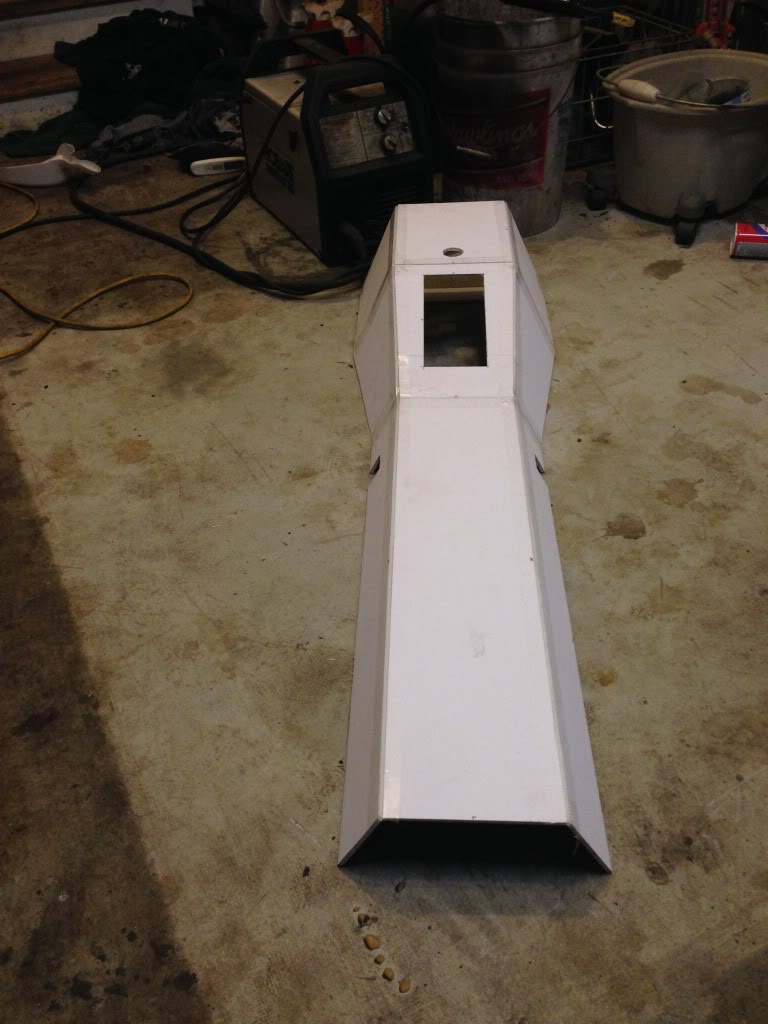
Mock up looked pretty good and turns out that I'm not as rusty at geometry/trig as I thought I was. It laid nice and flat as planned so once I get the floors down I should be able to just weld the tunnel together and lay it on top.
I also got my new argon regulator today so started to weld up the body mount brackets. I got one welded up before I ran out of friggin wire. All I have right now is about half a spool of flux core wire so I'll have to run out tomorrow night to get some solid wire.
I'm kind of stuck on doing the floor pans until I get time to do some sandblasting to remove the gobs of bondo the PO used and to see how much metal I'm working with. I'm in my best friend's wedding this weekend so this weekend is going to be a wash for getting things done.
Hey Corey, master of fiberglass, got any quick tricks for removing bondo??


