When you click on links to various merchants on this site and make a purchase, this can result in this site earning a commission. Affiliate programs and affiliations include, but are not limited to, the eBay Partner Network.
I finally fixed the spare tire winder. Much better than the bolted up tire it was before with threaded rod and a ratchet strap. This spare that I've held on to for a back up spare would just be used in a dire emergency like to get off the highway or something since it is such a big difference in size. Also it's really there to keep the driver behind us from going too far under us in an accident. It bailed me out in the woods of Maine one time when we were 10 miles away from the nearest town. I Was already using my spare due to a flat a few days earlier when a rock shaped like an arrow went through another tire. Beats walking 😃
I just got around to adding a warning buzzer for the lights, I don't know why I waited so long. It's so easy. Thanks to RAD4Runner for the excellent right up!
Originally Posted by RAD4Runner
Thanks, Terrys87!
I'm concerned about leaving my lights on and draining the battery. Per FSM, the light reminder relay is supposed to be here, but I only see a mounting hole on mine, confirming my suspicion that the light reminder circuit was only available on SR5 first-gens. Therefore, one lazy afternoon, I got busy
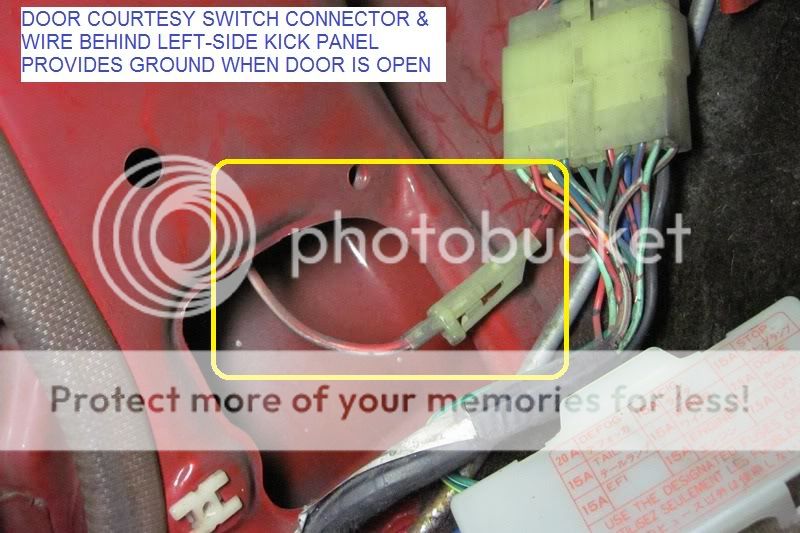
The circuit is simple. It will energize when there is positive voltage from the tail light circuit AND ground via the the driver side door courtesy switch when door is opened. (When headlights are on, there is also power to tail light circuit.)
Parts & Equipment Needed:
Buzzer PN 273-059 from Radioshack. I used an overhand knot and ran lead wire through mounting hole for strain relief. Also affixed foam-backed double-sided tape for mounting.
LED indicator light. (I used an LED lying around in my toolbox and appropriate resistor.) Easier to simply buy pre-assembled indicator LED light (i.e., from O'Reilly)
Remove Tail Fuse (15A). Verify that left terminal (marked below) is the supply side by measuring +12V when tail light switch is in ON position, 0 volt when tail light switch is OFF. It is important that you connect to supply side of fuse so that IF headlight is on and even if tail fuse is blown, this will still power the reminder circuit.
NOTE: The cleaner method would be to solder it into the circuit in the back of the fuse block, which I would do later.
Slip red wire into supply side, and re-install fuse. Be careful that you do not cut strands that might fall on other circuits and cause shorts.
NOTE: The cleaner method would be to solder it into the circuit in the back of the fuse block, which I would do later.
An option is to take positive voltage from this green wire (the section in yellow heat-shrink) that once supplied stock deck lamp circuit, but I disconnected in order to do my deck lamp retrofit. Verify that this green wire has 12V when, and only when, tail light is on.
Strip door courtesy switch wire at a convenient spot and connect ground side of circuit to that. Soldering then insulating with heat-shrink tubing or electrical tape is recommended.
Here's the circuit connected and properly labeled. Buzzer is stuck on fuse block with foam-backed tape. [Let us keep our wiring and and mods clean & properly documented to make it easy to troubleshoot or return to stock when needed/desired. This way our classic rigs can be considered improved, not molested. ]
been cleaning up some electical connections and decided to fix the AC compressor plug on the wiring harness. Somebody replaced it with a regular spade and I used an appropriate one that was part of a wiring harness from a tailgate that I picked up a while ago for a good price. I was able to unpin the connector and solder it to the wiring harness on the 4runner and put it back together.
as for the tailgate though it's a rusty mess but the window motor works well , the glass is better than our current back window plus it is a defroster window and I was able to scavenge some useful hardware. Also it's from a SR 5 so now we can have a SR5 lol.
It's getting harder every week to get away from people so we can social distance hike properly 😁 Next trip will involve 4 Wheel low. These pictures are from a less popular local place to hike and the photo through the windshield is a state road. Very few roads like that around us these days but when I was a kid and in my early teens there were places to go wheeling. Of course then I didn't have 4 wheel drive but it didn't stop us.
Last edited by Damion812; Apr 26, 2020 at 05:59 PM.
Yesterday we went out searching for a more out of the way hiking locations in Tunxis State Forrest (CT) but it was just too popular out that way. This did end up to be a real good shake down run test for the 4runner since the engine rebuild. Lots of big hills to put it through the paces and the absolute farthest we have taken it.
I also decided to do a tire rotation when we got back. I don't know if I've ever rotated them before. And here is a shot of the spare tire for the FJ Cruiser on if anyone was woundering if the wheels fit. Somewhere I read that the centers were too small for the hub. I didn't think that was true. It fit.
I finnely got the duel horns installed and rewired the original horn for a toggle switch. I found a relay plug I had from a Jeep Cherokee I used to own.
I still have some cleaning up the wiring to do yet but now have 3 functioning horns.
Nice to have so much room under that bumper!
AND lovely trip pics!
That bumper is one of the the things that caught my eye on this project! The best part of these trips is riding in the back with the top off ( not mine that's creepy ) it's as much fun as driving except I get to see more of the sceanerie. But I didn't figure in the tree branches hitting me in head when off road.
oh also found out the transfer case output seal isn't leaking since the replacement I over filled the gear oil. It seems like I do that all the time. It was cold when filling plus it's kinda hard to see in there, not as bad as the transmission though.
Last edited by Damion812; May 23, 2020 at 07:18 AM.
New fuel injectors in and tested. I know I should have done this when rebuilding the engine but it wasn't a bad job to go back and take care of buisnes.
oh also found out the transfer case output seal isn't leaking since the replacement I over filled the gear oil. It seems like I do that all the time. It was cold when filling plus it's kinda hard to see in there, not as bad as the transmission though.
Do you fill it through the top, where the shift levers are, or through the side, where the actual fill plug is? Drivers side, about 1/2 to 3/4 of the way up. Both the trans and transfer case have that set up. I think the bolt is a 22 or 24MM head. They're recessed into the case, with a circle of metal surrounding them.
I have a little, cheapie pump, that screws onto the top of the 1 GAL oil containers. It has a pretty long hose, plenty long enough to reach from the side of the truck to the fill plugs. You can sit on the side of the truck and fill 'er up!
It has a little device to hold it in the hole, and the actual pumping mechanism is on top of the oil container. You just plug it into the fill hole and pump the handle, until oil JUST starts to show up in the fill hole. Once it does, pull the hose out, put the bolt back in, and you're golden. Just the right amount of oil in the two locations. A small amount may leak out the fill hole until you get the bolt back in, but that's much better than the alternative. I believe the bolts have crush washers on them to seal things up, but I've only replaced mine once. They just don't leak, even a previously used crush washer, so I just never bothered replacing them. If it takes more than a gallon, and it will, just pump the first one dry, and swap the pump over to the next one.
Great way to prevent overfilling.
Just wanted to drop my 2 cents in...
Pat☺
Last edited by 2ToyGuy; May 23, 2020 at 12:26 PM.
Reason: Forgot a point or two...
with all that's going on lately I haven't been getting shots of everyday life as a daily driver. Here it is getting the garden. The seat folded forward is a nice holder!
Do you fill it through the top, where the shift levers are, or through the side, where the actual fill plug is? Drivers side, about 1/2 to 3/4 of the way up. Both the trans and transfer case have that set up. I think the bolt is a 22 or 24MM head. They're recessed into the case, with a circle of metal surrounding them.
I have a little, cheapie pump, that screws onto the top of the 1 GAL oil containers. It has a pretty long hose, plenty long enough to reach from the side of the truck to the fill plugs. You can sit on the side of the truck and fill 'er up!
It has a little device to hold it in the hole, and the actual pumping mechanism is on top of the oil container. You just plug it into the fill hole and pump the handle, until oil JUST starts to show up in the fill hole. Once it does, pull the hose out, put the bolt back in, and you're golden. Just the right amount of oil in the two locations. A small amount may leak out the fill hole until you get the bolt back in, but that's much better than the alternative. I believe the bolts have crush washers on them to seal things up, but I've only replaced mine once. They just don't leak, even a previously used crush washer, so I just never bothered replacing them. If it takes more than a gallon, and it will, just pump the first one dry, and swap the pump over to the next one.
Great way to prevent overfilling.
Just wanted to drop my 2 cents in...
Pat☺
sounds good! I started the refill from the top when the shifters were off but not all. I topped off from the fill plug. Yeah them crush washers last a long time. The problem I run into is it may not have been sitting level at the time and the hose moved when pumping the oil in stopping it from coming out once it was full.
The problem I run into is it may not have been sitting level at the time and the hose moved when pumping the oil in stopping it from coming out once it was full.
Yeah, that'll do it!
Well, all you can do is try to get it level, both front-back AND side-side. That will prevent the over-fill problem.
Alternatively, I guess you could drive it someplace that IS relatively level, and pull out the fill plugs. Pollute someone's parking lot with the excess
more fun in the sun. Lots of off roading back and forth looking for a good spot to take my son frogging . The main road in is getting smaller every time we go out there. It's getting grown over and I don't think many people know about the road these days.
Last edited by Damion812; May 28, 2020 at 02:50 PM.

 Apr 8, 2020 | 01:37 PM