
OEM mini header install for 2.7L*(Pics)*
 Mar 25, 2011 | 12:30 PM
#121
Registered User
Joined: Dec 2009
Posts: 646
Likes: 0
From: slc utah
2RZ and 3RZ use the same manifolds. But the manifolds are JUNK.
Shoot me a PM or call me when you want to upgrade to the header conversion. No more cracked headers, no more burned valves, no more cracked heads
If you ever talk to someone fixing a head issue on a 2RZ/3RZ, they are always repairing Cyls 2 or 3.
Shoot me a PM or call me when you want to upgrade to the header conversion. No more cracked headers, no more burned valves, no more cracked heads
If you ever talk to someone fixing a head issue on a 2RZ/3RZ, they are always repairing Cyls 2 or 3.
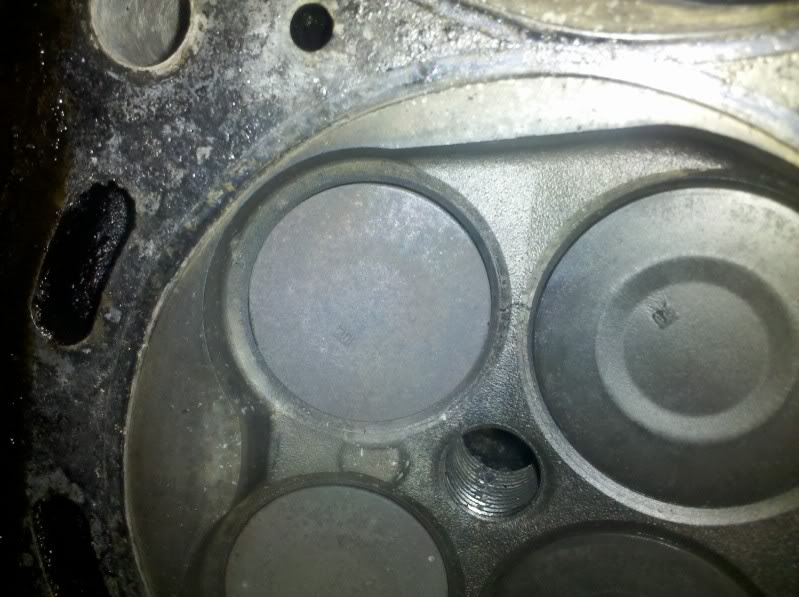
here is my head # 2 cyl
Last edited by 99 sas runner; Mar 25, 2011 at 12:32 PM.
Mar 25, 2011 | 02:25 PM
#123


Joined: Jan 2003
Posts: 17,692
Likes: 58
From: Marysville, WA
Yea, that should work just fine.
Do yourself a favor and order my "Hardware only" kit, which is all new studs, nuts, and gaskets. You will thank yourself when you try and install the new header.
Do yourself a favor and order my "Hardware only" kit, which is all new studs, nuts, and gaskets. You will thank yourself when you try and install the new header.
Mar 25, 2011 | 02:42 PM
#124
Registered User
Joined: Dec 2009
Posts: 646
Likes: 0
From: slc utah
 Oct 7, 2011 | 08:52 AM
#127

Registered User
Joined: Sep 2011
Posts: 9
Likes: 0
After reading this segment then finding out I had a cracked manifold as well. I started looking. I found one in a salvage that they say is a different part number than what I have seen. its a 1714175090 instead of the 5080. Do you guys know if this will fit a 99 4runner 2.7L.
Thanks
Thanks
Oct 7, 2011 | 09:48 AM
#128
Joined: Jan 2003
Posts: 17,692
Likes: 58
From: Marysville, WA
After reading this segment then finding out I had a cracked manifold as well. I started looking. I found one in a salvage that they say is a different part number than what I have seen. its a 1714175090 instead of the 5080. Do you guys know if this will fit a 99 4runner 2.7L.
Thanks
Thanks
I cannot confirm that the 2RZ part will work on a 3RZ motor. The header kits I sell use the 17141-75080 Mini-header.
Oct 22, 2011 | 09:45 PM
#129

Registered User
Joined: Aug 2011
Posts: 7
Likes: 0
From: Silverdale WA
Just did this install today myself. Definitely soak all the bolts down with some good penatrsiting oil. Also you will need to swap over the studs for the erg tube and exhaust flange, the correct sockets will save you a lot of trouble. Was an easy install, didn't even remove the intake to do it. Performance wise not really any difference but I would say it is quieter than the stock manifold with no cracks.
Dec 16, 2011 | 07:25 AM
#131
Registered User
Joined: Dec 2011
Posts: 2
Likes: 0
From: Colorado/Virginia
I'm convinced this manifold leak is limited my fuel economy. So Cougar, I'm gonna ring you the next few days to order one of these puppies. What I wanted to know from you guys is, are people having any appreciable gains performance/MPG wise? Sound different? Won't stop me from getting it, since I don't really mod for performance, I work toward longevity and fuel efficiency...at least until I get a truck with fewer than 195 K miles on it.
Dec 16, 2011 | 07:28 AM
#132
Joined: Jan 2003
Posts: 17,692
Likes: 58
From: Marysville, WA
I have had people report everything from a noticable difference, to no difference at all. The big gain is no more cracked manifold, which gets spendy over time.
Feb 4, 2012 | 06:44 PM
#134

Registered User
Joined: Jan 2012
Posts: 2
Likes: 0
Thanks yotatech!
Hi folks,
Just wanted to express appreciation to all contributors to this thread...
Also, wanted to give a tip to folks doing this in the future: the down-pipe does not need to be disconnected from the tranny bell housing, nor do the exhaust hangers (just downstream of the cat) need to be disconnected...if the following can be done:
1. Remove the six (6) E10 studs from the engine block (comes out super easy, but lots of threads/rotations)
2. Remove the three (3) E8 studs from the exhaust manifold that is to be changed out. These hold the header to the down-pipe. If you can sum up about 18" - 24" of extensions using ratchet extensions, deep sockets, etc, this is a cinch.
3. Leave the two (2) E7 studs to the EGR line in the manifold, and the exhaust manifold will pull right out.
Installation is equal and opposite. Some folks will probably find that lowering the exhaust is easier...I didn't because I've got a small stainless steel plate welded under my catalytic converter with spikes on it to protect it from theft!
Last edited by TacomaG; Feb 4, 2012 at 06:49 PM.
Feb 5, 2012 | 08:51 AM
#135
Joined: Jan 2003
Posts: 17,692
Likes: 58
From: Marysville, WA
Only thing I would do different is not remove the studs from the head. Reason being, I have seen many studs pull out the threads in the head itself. Then you have to helicoil the head.
 Feb 5, 2012 | 04:47 PM
#137
Registered User
Joined: Jan 2012
Posts: 2
Likes: 0
After mini-header install: water drip on cold start up
DC, I think you're right, I'd try it w/o taking the studs out of the block first also.
One thing is for sure: the EGR studs seem to be impossible to remove while the old manifold is installed b/c of a lack of clearance & the threads seem to smashed down inside the manifold by design.
Insight requested:
I just changed to a good condition/used mini-header w/ all new gaskets/hardware from DC.
I noticed two water condensation drops drip down from my exhaust manifold upon cold start up. The two drops of water fell from somewhere behind my modified heat shield (where the mini-header bolts to the block). The water dripped down to just in front of my right inner tie-rod bellows.
I'm sure it's water b/c I soaked it up w/ a napkin.
I torqued all 14 mm bolts to 37 ft-lb.
I torqued the EGR's 12 mm bolts to something around 30 ft-lb.
Do the 2 drops of water mean that I have a small exhaust leak from somewhere on my new mini-header/gaskets?
Note: the old, cracked, cast iron manifold leaked exhaust smells into the engine bay, but the freshly installed mini-header does not.
My gas mileage on a 200 mi drive at 70 mph is 25.5 mpg, about 1 mpg better than before and engine runs smooth as silk.
Thanks for any insights!
 Feb 26, 2012 | 03:52 PM
#139

Registered User
Joined: Feb 2008
Posts: 64
Likes: 0
I just did this mini header install and had a couple questions for you all:
1. I decided to paint mine with the same high temperature paint - 2 coats - and after getting everything back together and got her started the header started smoking a lot where it meets the main exhaust (the three bolt piece) and wondering if it was burning off the paint or some of the oil from when the header was made. It had a sweet smell - almost caramel-like. It seemed to stop after driving it for 15 minutes - but it got dark out and maybe I didn't see it
2. how important is it to get a heat shield for this one? I'm thinking its not a big deal but I do live in the South and it gets way hot here in the summer. Never had a problem before but wanted some input
Mar 13, 2012 | 06:37 PM
#140
Registered User
Joined: Mar 2012
Posts: 3
Likes: 0
From: Tacoma, WA
So, much thanks to all of the posters in this thread. It's been a great help! So, my 1995 Tacoma 3RZ (2.7l) cast iron header is badly cracked. I researched on this thread, and thought the consensus was that a 2001-2004 2RZ (2.4l) mini header would bolt right on my engine. I found one in a junkyard, and had it mailed to me. Upon inspection, it has a different (triangular) flange, and only one opening. Mine, and all the other ones I saw online, had two openings, and used two donut gaskets.
How did I screw up? Did I get a CALI header, which is somehow different than a federal header? Are they not actually interchangeable? Any advice would be greatly appreciated. Thanks!
My newly purchased header:

How did I screw up? Did I get a CALI header, which is somehow different than a federal header? Are they not actually interchangeable? Any advice would be greatly appreciated. Thanks!
My newly purchased header:


