
Terrys87 88 4Runner Restoration/Build thread
 Apr 23, 2014 | 07:22 AM
#1141


Looks good Terry! The white "Toyota" looks nice.
Saw you mention something about aluminum wheels, is hers the stock SR5 ones? If so, and you're up for a challenge, here's a little work I just finished doing myself. I was quoted nearly $700 to have them machined finish back to new. These are the oem/stock luxury alloys from a 88' camry. I spent $70 in sand paper, primer, paint, clear coat and some ingenuity from the internet (propped the front end up of my camry to use as a lathe).


Saw you mention something about aluminum wheels, is hers the stock SR5 ones? If so, and you're up for a challenge, here's a little work I just finished doing myself. I was quoted nearly $700 to have them machined finish back to new. These are the oem/stock luxury alloys from a 88' camry. I spent $70 in sand paper, primer, paint, clear coat and some ingenuity from the internet (propped the front end up of my camry to use as a lathe).


Terry, I know there is etching stuff that you can buy. When I used to work at a body shop in the early 2000's, we had this etching stuff we would spray on the rims that were a little tore up. Let them sit for awhile, it would foam a little, then you would simply wash it off and they would look new. You wold have to spray some sort of clear coat on it to keep it protected. I have never done this to anything of my own, and cannot remember where we used to get it. But I do know it can be had.
Apr 25, 2014 | 03:33 PM
#1143
Hahaha. Oh yes. I have many stories like that. Think back now and wonder how we didn't get killed.
Apr 27, 2014 | 10:38 PM
#1144
Thread Starter
Super Moderator
iTrader: (1)
Joined: Aug 2008
Posts: 11,787
Likes: 28
From: Anderson Missouri
Hello Grego..I will eventually be giving that a try on her rims as they are looking a little shabby lately. Thanks for posting that up.
Hello Gizzler.. I will look into the etching primer. Anything I do to her rims is only going to be an improvement. They are in need of some attention. I have been checking in on the weird issue on the third gen truck and also feel that it is just about likely a wire got damaged when removing the plenum as well. About the only thing left really. While having the harness apart, I would suggest removing those crimps in the harness. Those are a poor design.
Hello kornhuskerwizard... A friend of mine had a Nova and bald tires and did a power brake and with the basket ball size hole in the rear quarters, it will the car full of smoke and off we went at 120 mph or better on bald tires. I just knew we were going to blow a tire at that speed but some how survived those moments. Been plenty of other times that I did some things on my own thinking I was indestructible and now those broken bones are reminding me of it. To bad you cant stay young forever. That might be a good thing as well, might have more aches and pains to deal with.
Apr 27, 2014 | 10:47 PM
#1145
Thread Starter
Super Moderator
iTrader: (1)
Joined: Aug 2008
Posts: 11,787
Likes: 28
From: Anderson Missouri
Nothing major on Misty's runner, but have been taking care of some small issues. I was working on the rear heater cover as I just cant seem to get it to stay on, so I am going to try some Gorilla Glue the next time I work on it and see if that keeps it from coming off.
Last time I worked on it, I left the Window Lock button un hooked and her rear window wouldn't go down so got that figured back out. Of course I had it all back together before testing and seeing if I had all of the connections connected so got to go back and redo all of that. I have been working on some little details that I can on my lunch break and getting some of the things caught back up on it as I haven't really messed with hers for sometime.
Still have one small oil leak somewhere and I need to chase it down. Nothing much but I want it leak free. Alternator belt is loose and it is next on the list. Should be getting here air conditioner done up here in the next week or so. Nothing much, just little items on hers and just a little bit of time to get it where I want it to be.
I think I will start collecting the parts to rebuild her front end as well. I got all of the parts to rebuild my 86 and what I generally do one of the runners, I try and do to the other as well. I checked her front end and it seems to be okay but think one of her upper ball joints might have a little bit of play in it so that has me just going to do the whole front end.
Apr 28, 2014 | 05:10 AM
#1146
Nothing major on Misty's runner, but have been taking care of some small issues. I was working on the rear heater cover as I just cant seem to get it to stay on, so I am going to try some Gorilla Glue the next time I work on it and see if that keeps it from coming off.
Last time I worked on it, I left the Window Lock button un hooked and her rear window wouldn't go down so got that figured back out. Of course I had it all back together before testing and seeing if I had all of the connections connected so got to go back and redo all of that. I have been working on some little details that I can on my lunch break and getting some of the things caught back up on it as I haven't really messed with hers for sometime.
Still have one small oil leak somewhere and I need to chase it down. Nothing much but I want it leak free. Alternator belt is loose and it is next on the list. Should be getting here air conditioner done up here in the next week or so. Nothing much, just little items on hers and just a little bit of time to get it where I want it to be.
I think I will start collecting the parts to rebuild her front end as well. I got all of the parts to rebuild my 86 and what I generally do one of the runners, I try and do to the other as well. I checked her front end and it seems to be okay but think one of her upper ball joints might have a little bit of play in it so that has me just going to do the whole front end.
Last time I worked on it, I left the Window Lock button un hooked and her rear window wouldn't go down so got that figured back out. Of course I had it all back together before testing and seeing if I had all of the connections connected so got to go back and redo all of that. I have been working on some little details that I can on my lunch break and getting some of the things caught back up on it as I haven't really messed with hers for sometime.
Still have one small oil leak somewhere and I need to chase it down. Nothing much but I want it leak free. Alternator belt is loose and it is next on the list. Should be getting here air conditioner done up here in the next week or so. Nothing much, just little items on hers and just a little bit of time to get it where I want it to be.
I think I will start collecting the parts to rebuild her front end as well. I got all of the parts to rebuild my 86 and what I generally do one of the runners, I try and do to the other as well. I checked her front end and it seems to be okay but think one of her upper ball joints might have a little bit of play in it so that has me just going to do the whole front end.
I do not like leaks either. I still have a small one in the runner that leaves about a half dollar size drip after sitting overnight or for a few days. I have decided that I am going to replace the entire rear main housing with a different one or a new one, if I can get it.
May 10, 2014 | 11:15 AM
#1148
Thread Starter
Super Moderator
iTrader: (1)
Joined: Aug 2008
Posts: 11,787
Likes: 28
From: Anderson Missouri
Hello Gizzler00.. I was under there again yesterday and still have a small one. Get to find out where it is at now. Hoping to get them all stopped. The weather has gone from cold to hottt in a matter of a few days. I can take the heat, dont like the cold. Glad to be getting some things done. Got alot of things done but it is all small stuff.
Hello kornhuskerwizard.. I get alot parts off of Rockauto. For these trucks and the way I drive them I really dont need the heavier duty parts. There parts quality works great for me. I still have the stock sway bar on all of my trucks.
Hello kornhuskerwizard.. I get alot parts off of Rockauto. For these trucks and the way I drive them I really dont need the heavier duty parts. There parts quality works great for me. I still have the stock sway bar on all of my trucks.
May 10, 2014 | 11:24 AM
#1149
Thread Starter
Super Moderator
iTrader: (1)
Joined: Aug 2008
Posts: 11,787
Likes: 28
From: Anderson Missouri
What I thought was going to be a 5 minute job turned into a little longer then that yesterday on Mistys. I have installed a few Circuit Opening Relays but that is when I have had the dash out. This time I wanted to install another one in Mistys as hers has to go thru two revalutions before it fires up. Mine is much quicker. So I was hoping the COR I got out of a camper with only 50k miles on it would fix it. It didnt but surely it is in better shape then her 316k mile relay. I am going to swap my AFM with hers later and see if that makes a difference.
I thought I would just remove the speaker cover and speaker to replace the COR. I couldnt get the bolt, so I removed the glove box. I was able to get the bolt out with a ratchet and extention but could not undo the plug. So I then removed the kick panel and loosened the three bolts that hold the computer in and finally had the room I needed to replace the COR. Not a bad job but wasnt as quick as I had thought it would be. You can see the relay hanging down in the picture. Also got her loose alternator belt tightend back up so got some things done on hers as well.

I thought I would just remove the speaker cover and speaker to replace the COR. I couldnt get the bolt, so I removed the glove box. I was able to get the bolt out with a ratchet and extention but could not undo the plug. So I then removed the kick panel and loosened the three bolts that hold the computer in and finally had the room I needed to replace the COR. Not a bad job but wasnt as quick as I had thought it would be. You can see the relay hanging down in the picture. Also got her loose alternator belt tightend back up so got some things done on hers as well.
 May 11, 2014 | 12:48 AM
#1150
Thread Starter
Super Moderator
iTrader: (1)
Joined: Aug 2008
Posts: 11,787
Likes: 28
From: Anderson Missouri
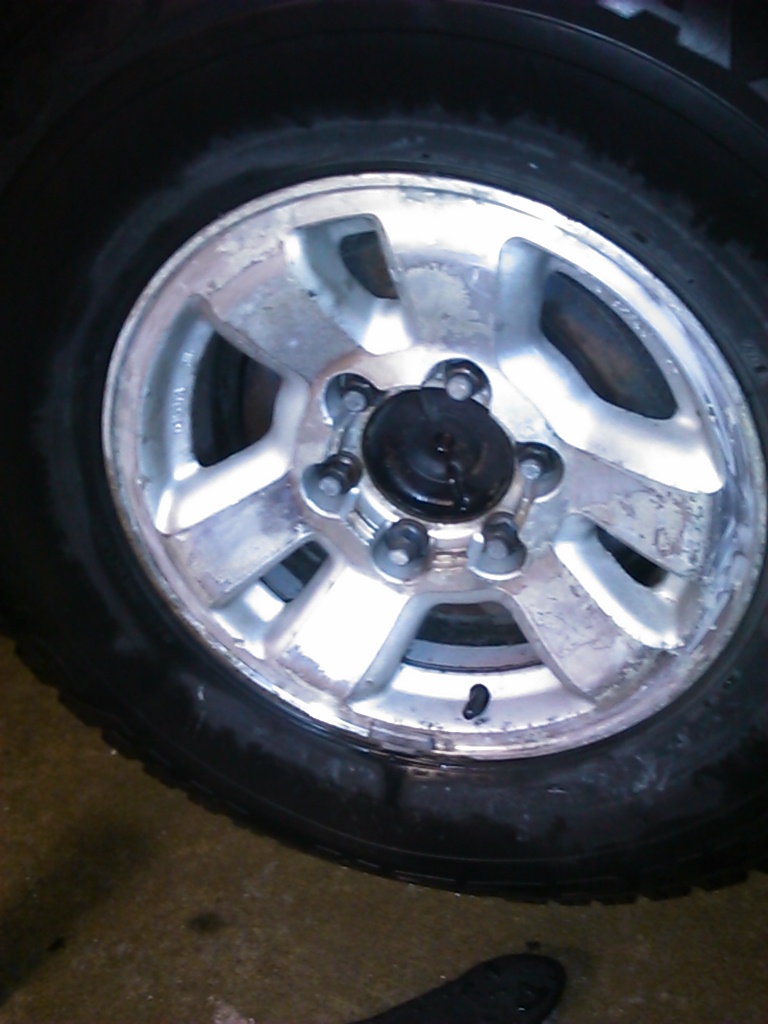
Grego and Cyberhorn have inspired me to try and get Mistys Rims looking better. I am starting on her worse one. It has several dings in it that I am going to have to use some filler on and get them smoothed out. I also seen on a car show on TV where they restored some rims as well. I used some Easy Off to get some of the clear coat and grime off and just getting a feel for it. I will soon pull the rim off of the truck to get better access to it. Just the quick sanding I have done so far has smoothed it out quite a bit.
 May 19, 2014 | 12:40 PM
#1151
Thread Starter
Super Moderator
iTrader: (1)
Joined: Aug 2008
Posts: 11,787
Likes: 28
From: Anderson Missouri
I finally got around to getting her one wheel painted. It looks alot better then it did as clear coat was peeling and had several knicks in it. I painted the back side of the rim as well as it had some black stuff that I just couldnt clean off. I was trying for the orginal color and this isnt what I want. I will do the other three and find a darker color to go over them with. The lug nuts looked like they were orginally black so painted them as well. I still need to go back and paint the Toyota emblem and the circle a darker gray as it was orginally from the factory as well.
This is just a test run and I have some gouges in the rims I want to fix when I get back to them. I will be able to fix the gouges in the flat part of the spokes. The ones in the rough texture will have to stay. Still better then it was. Also I touched up some the black areas under the truck while I had the tire off such as brake drum and leaf springs.
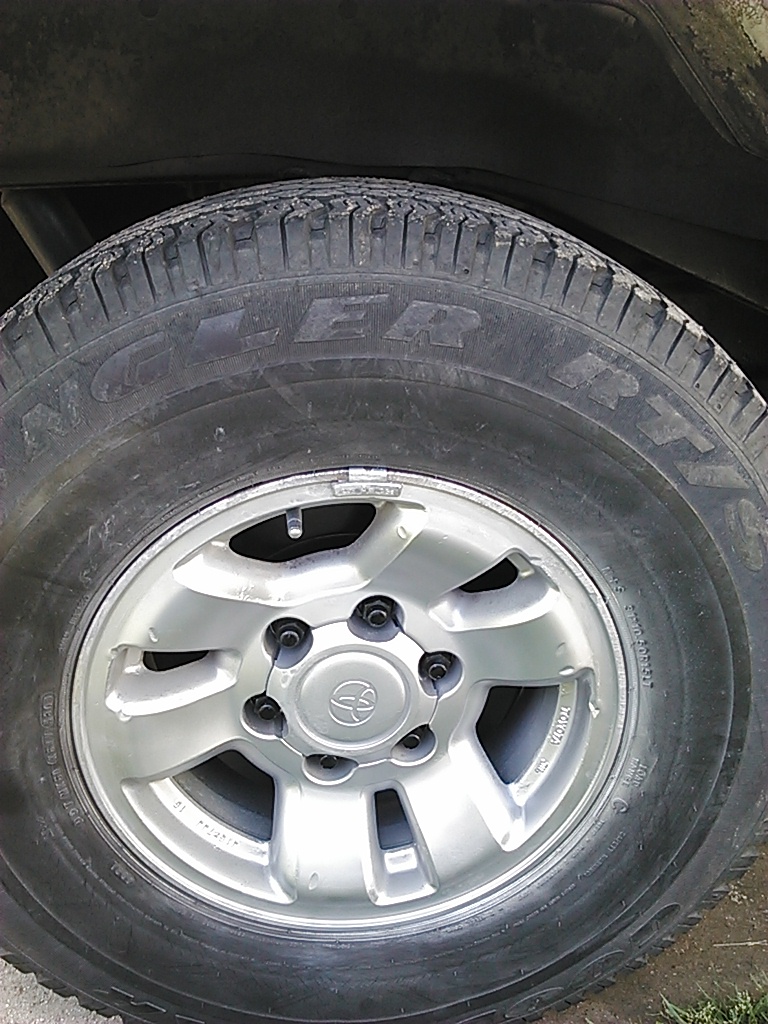
This is just a test run and I have some gouges in the rims I want to fix when I get back to them. I will be able to fix the gouges in the flat part of the spokes. The ones in the rough texture will have to stay. Still better then it was. Also I touched up some the black areas under the truck while I had the tire off such as brake drum and leaf springs.

Last edited by Terrys87; May 19, 2014 at 12:41 PM.
 May 30, 2014 | 12:23 PM
#1154
Thread Starter
Super Moderator
iTrader: (1)
Joined: Aug 2008
Posts: 11,787
Likes: 28
From: Anderson Missouri
Hello cyberhorn... I dont know why I never thought of that and did not see it on the Cheap Mods thread. I added it. Eventually I want to start going with LEDs on alot of things.
May 30, 2014 | 12:27 PM
#1155
Thread Starter
Super Moderator
iTrader: (1)
Joined: Aug 2008
Posts: 11,787
Likes: 28
From: Anderson Missouri
Misty has been wanting maplights in her runner for sometime. I finally got off of my back side and got them installed. Always worrisome when you have to cut the head liner. I started out with an "X" and eventually had to trim alot more out of the pockets. I have this listed on the first page on how to get the bracket in the headliner.
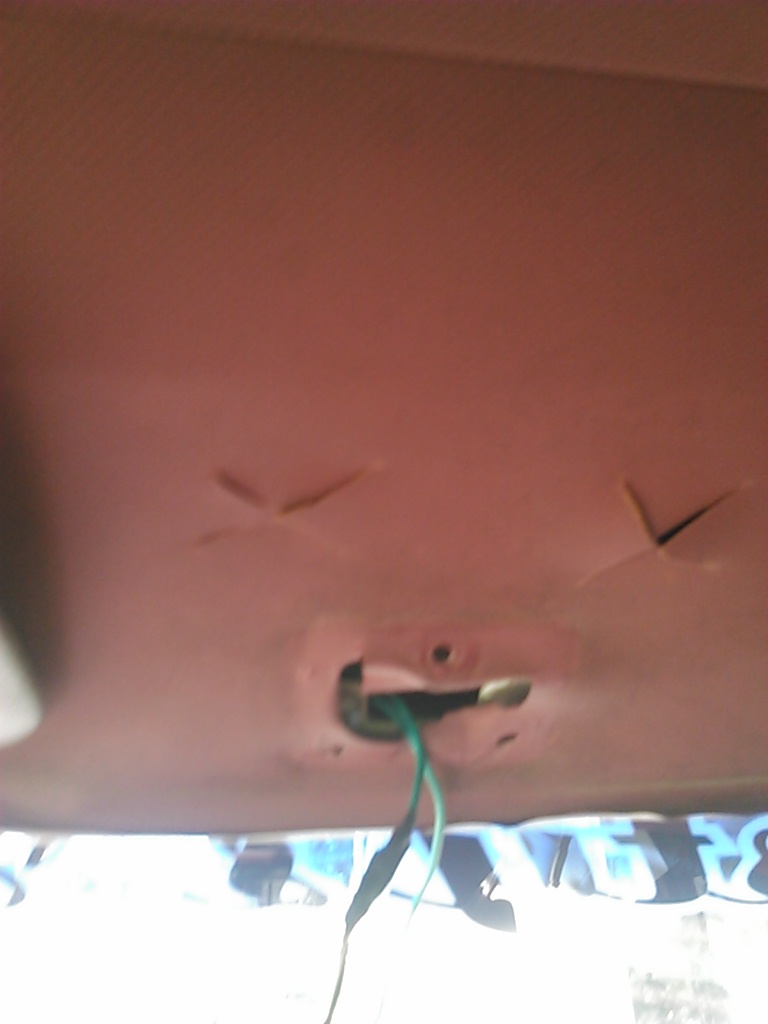
I also replaced her dome light. I will go back and paint it at a later time as soon as I can find what I did with her interior paint. Of course I had to blow a couple of fuses while doing all of this trying to make sure it went right. Electric is not my strongest point.
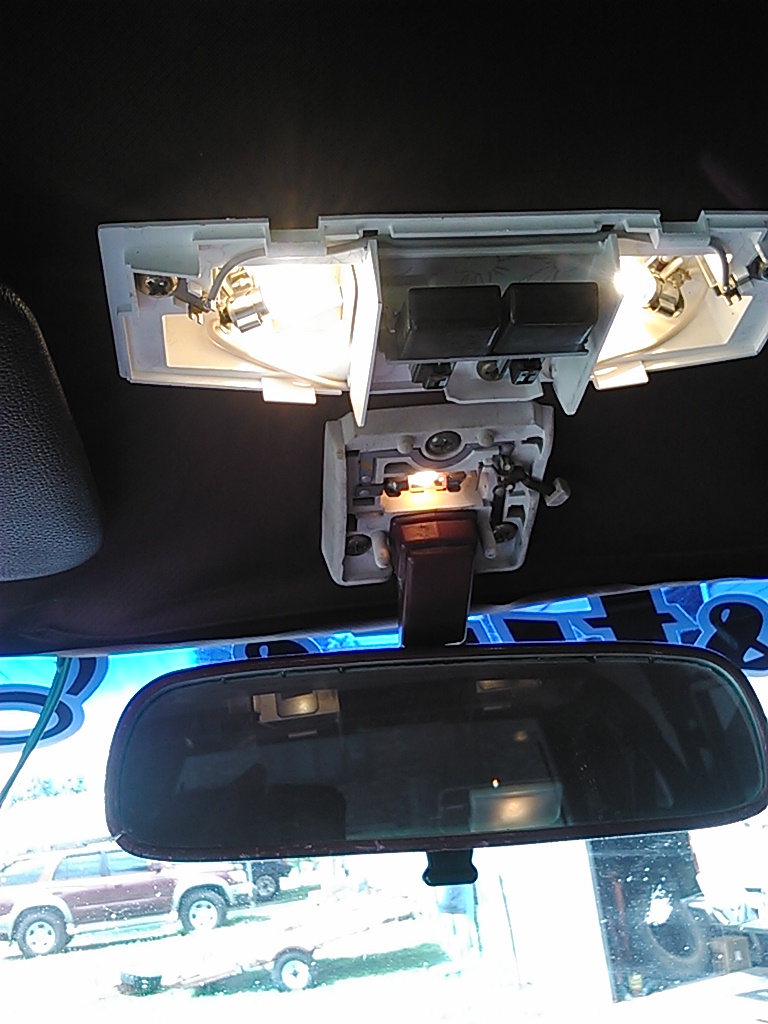

I also replaced her dome light. I will go back and paint it at a later time as soon as I can find what I did with her interior paint. Of course I had to blow a couple of fuses while doing all of this trying to make sure it went right. Electric is not my strongest point.
 May 30, 2014 | 01:32 PM
#1157
Registered User
Joined: Jul 2012
Posts: 2,365
Likes: 4
From: Idaho
not just you terry
i eventually would like to have the light in the mirror as well i used small LED panels in my map light aimed at the lense very bright
i eventually would like to have the light in the mirror as well i used small LED panels in my map light aimed at the lense very bright
Last edited by Cyberhorn The Dragon; May 30, 2014 at 01:37 PM.
May 30, 2014 | 08:33 PM
#1158
Registered User
Joined: Jun 2010
Posts: 1,448
Likes: 100
From: Virginia
My '89 DLX does not have a light on the rear view mirror. I got a lighted rear view from a '92 but haven't hooked it up. I have a map light and the bracket but was hesitant to hook it up. What does the bracket attach to? Does it just lay up there under the headliner? Are there holes for the screws?
Good tip on silvering the tail light separators. That's easy enough for me to not foul up.
Good tip on silvering the tail light separators. That's easy enough for me to not foul up.
May 31, 2014 | 07:04 AM
#1159
Thread Starter
Super Moderator
iTrader: (1)
Joined: Aug 2008
Posts: 11,787
Likes: 28
From: Anderson Missouri
Hello cyberhorn.. Can you post the part number for the LEDs? I eventually want to do those. Those bulbs get HOT!!!
Hello Nervo19... I havent tried the 89-95 maplights. Seems like I wanted to a few years ago and ran into some kind of issue. I didnt know the roof like I do now and when I go to the bone yard soon, I will experiment on one of those trucks and see if it can be done. I will add some more information tonite as there is some pictures that didnt turn out and an electrical connector that works great to connect the power to the maplights. The ground for the dome light and map lights is actually done thru the roof. I will see if I can find some other pictures to add to make it a little more understandable. These are from different trucks I have done in the past but is somewhat in order of the steps to do it in.
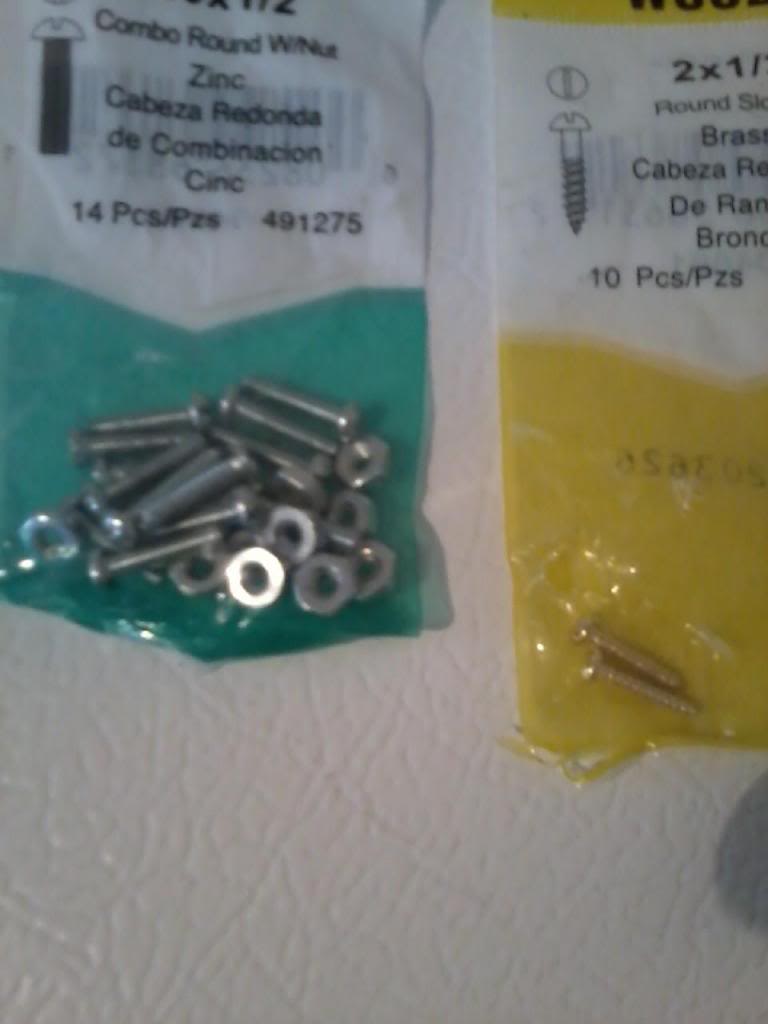
To use the ones I have yo will need to get the front dome light and wire clip from an 84-88 pickup. On a 4 Runner you will need to tap into the wire harness at the top left corner.
I intentionally left the front trim down for this picture. Remove it from one side or the other and a few inches past the mirror.
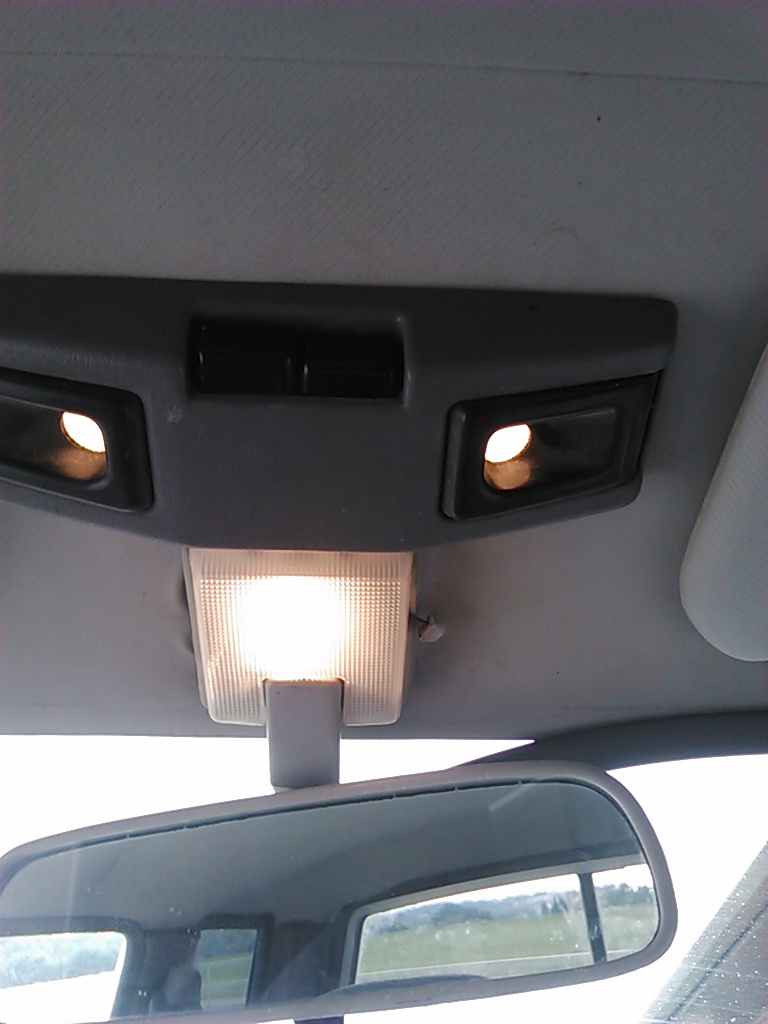
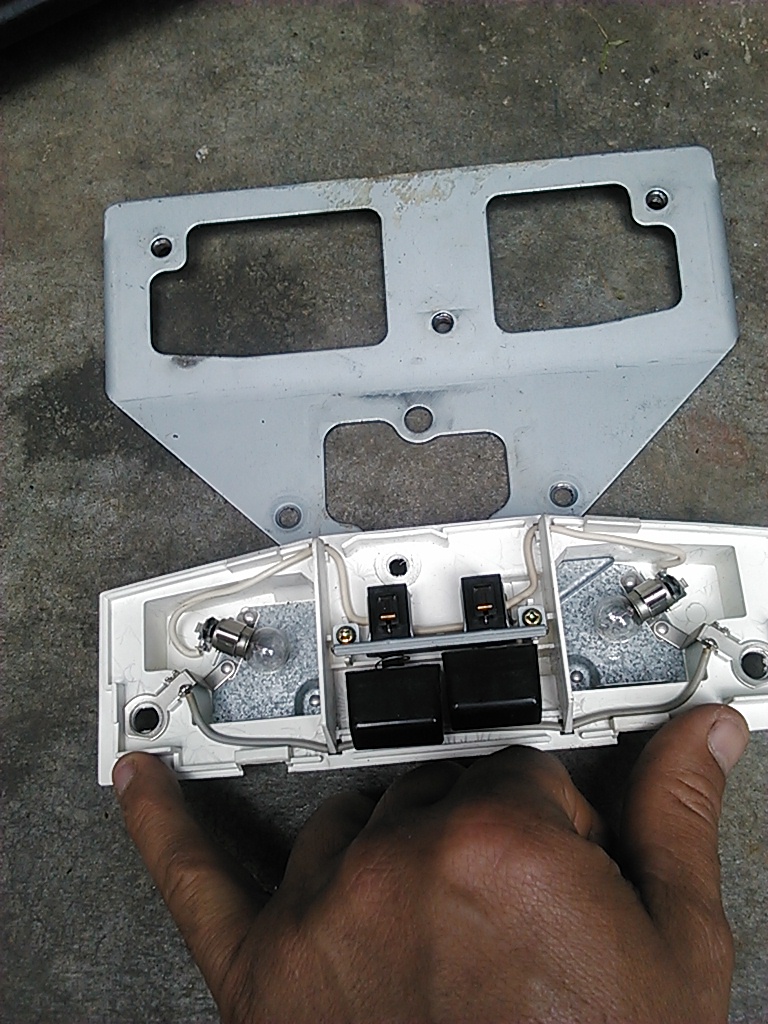
I peeled the headliner back a little and slid it in. Then put the trimming back in to hold the liner back in place. You will want the bend in the bracket to be pointing up. There are 2 small black screws that attach it to the roof. There are 3 gold screws that attach the domelight to the bracket and also help add more strength to the bracket and lights.

Then where the mirror goes I usd the mirror screws to hold it so I could cut the liner for the recess for the light assembly. Where the orginal maplight was at and where you see the gold screws, there is enough slack in the headliner, using a thin Phillips screw driver to install the 2 small black screws that are just like the door handle bezels.

Here it is mounted. I still need to run the wiring. I have always added a standard cab pick up to my 4runners or extended cab trucks as the light that mounts in the center isnt much use for the driver. I run the wire to the top left corner for electrical.
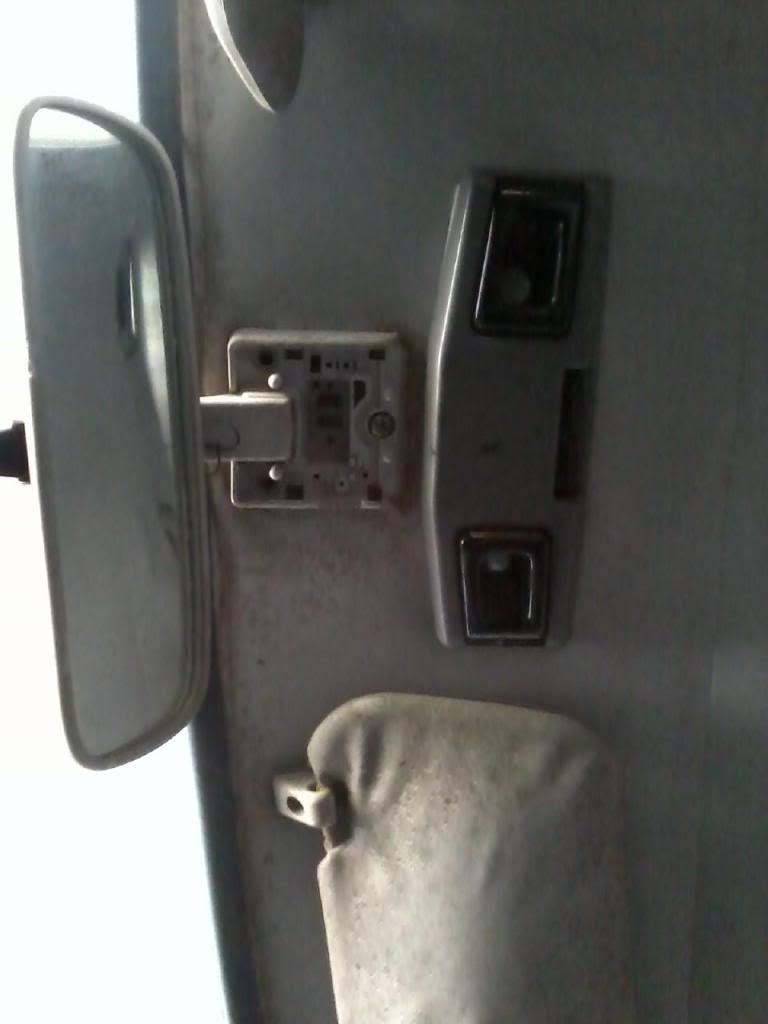
On the 2nd picture, the two small black screws go on the very out side. They will be the smallest holes. If you dont have these screws, you can get some screws out of the door handle bezels. They are the exact same screw. These black screws are under the headliner and attach the bracket to the roof.
On a 4Runner, you are going to need to run some wires from the top left corner. It will lay behind the rubber trim that is showing in the first picture. On an 84-88 pickup, you can just run a 8" inch wire to the maplights.
Where I tapped into wires.

Here is the terminals that you can use to run a wire from the black wire with a white stripe to the maplight. It only has one connection as the ground is in the body of the maplight to the roof. I will get a picture of the connection eventually.
I have some extra parts and wanted to try something that wouldnt cost a whole lot. Most of us have dealt with the broken rear view mirror and trying to find one in a salvage is lucky at best and when you do, they are expensive around here. Seen some on ebay from $40 and way on up before.
You can find the rear view mirror with out the light assembly a whole easier and since I had one broken with light and 2 dummy light holders, thought I would give it a try. Only have about 45 minutes in this.
Only tools I had in this is a small drill bit, small flat blade screw driver and a bench grinder to knock off the burr.
First I drilled out the rivet from the backside and did have to use a nail to tap out the rivet. Then I would have to grind the burr off and work the top of the rivet out with the screwdriver and moved the parts over.
I am going to glue the electrical runs down with super glue and see if I can find some small screws or rivets when I go to town. I might have to find a small screw and nut for the light switch but feel this will work. When I get this 100% done I will come back and edit this page. Might even add it to my fix list.
Typical of where the mirror breaks on the mount on the right mount, top-right hand corner.

I used some brass screws and glued the back of the electrical contacts down. Put a drop of glue on the back side of the screws.
Got it working and only had about $4 and 1 hour into it. Alot cheaper then getting a new one. Just covered the light some to cut down on the glare for the pic. That bulb gets hot.

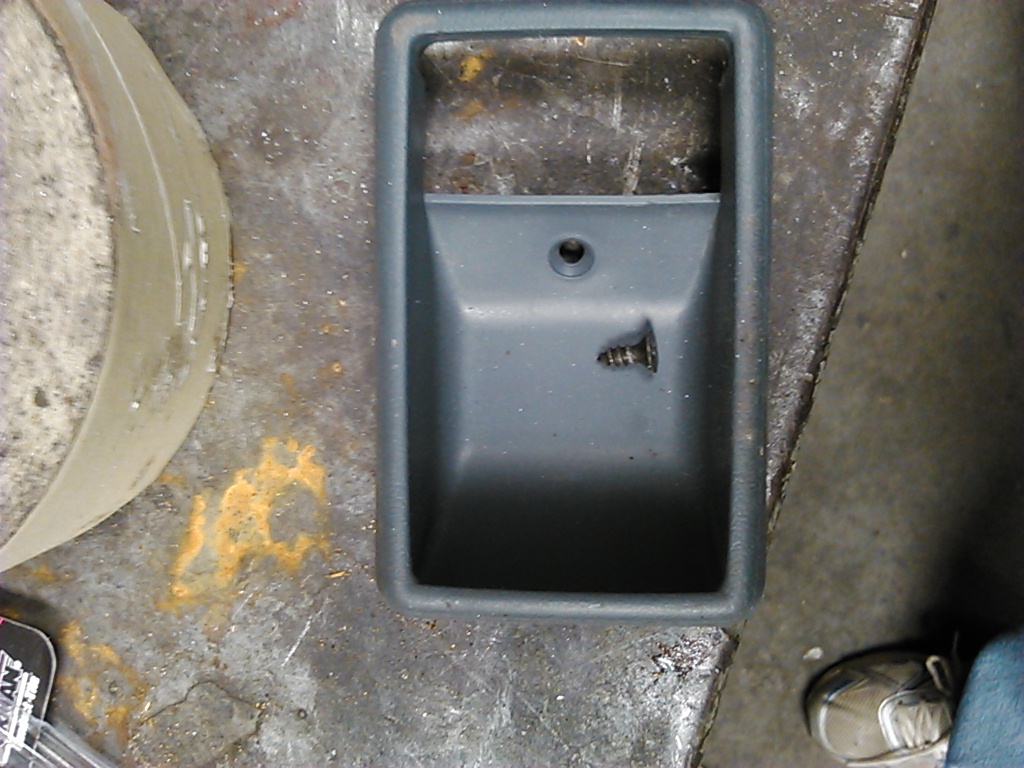
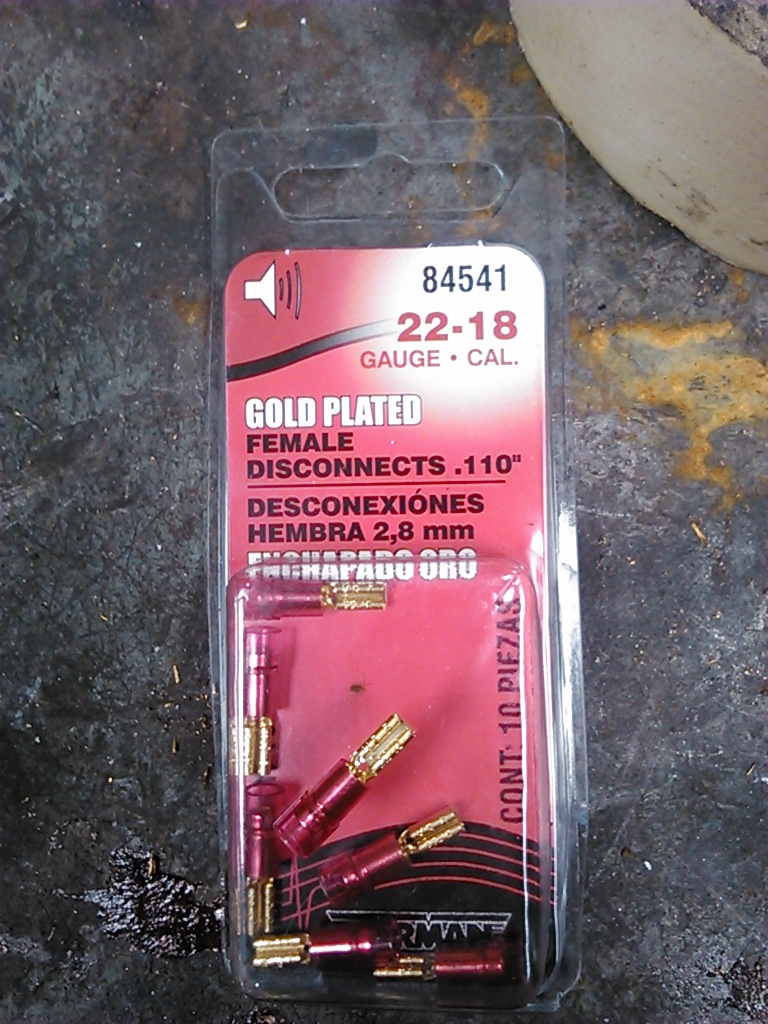
This is the Power Suppy wire. You will need a female connector from the red package above to attach to this point. If I recall right, You will need to tap into the black wire with the white stripe, but double check.
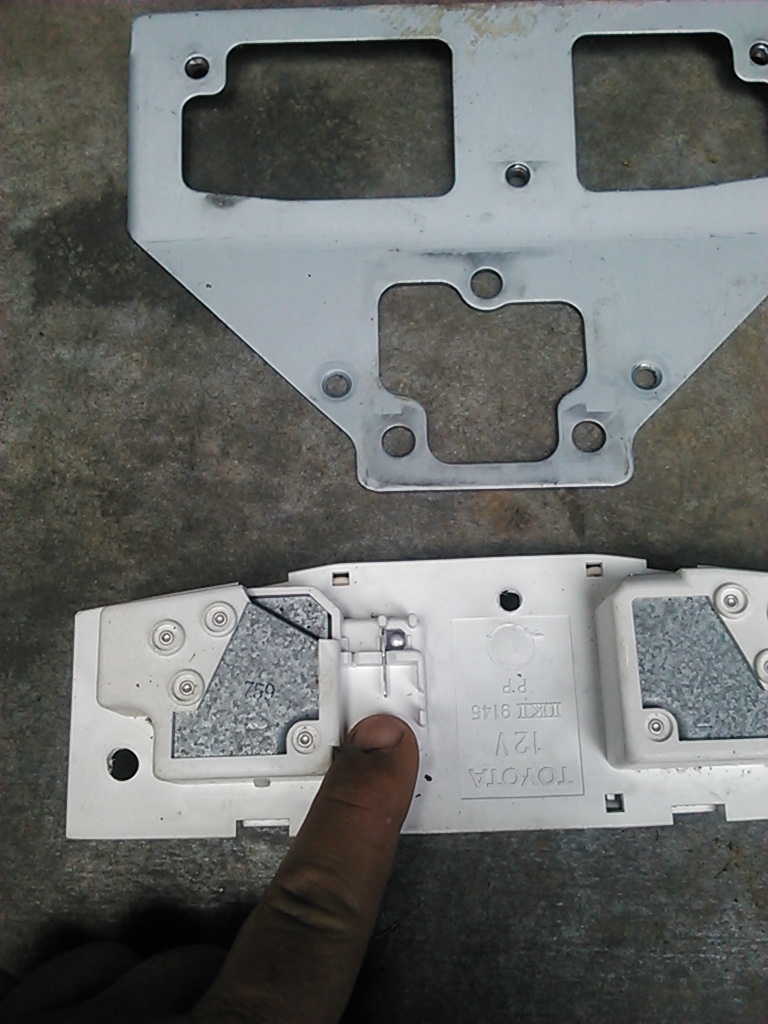
These two points will ground to the roof of the cab. The two holes just above the light assembly is where the black door screws go into to attach the bracket to the roof.
Hello Nervo19... I havent tried the 89-95 maplights. Seems like I wanted to a few years ago and ran into some kind of issue. I didnt know the roof like I do now and when I go to the bone yard soon, I will experiment on one of those trucks and see if it can be done. I will add some more information tonite as there is some pictures that didnt turn out and an electrical connector that works great to connect the power to the maplights. The ground for the dome light and map lights is actually done thru the roof. I will see if I can find some other pictures to add to make it a little more understandable. These are from different trucks I have done in the past but is somewhat in order of the steps to do it in.
To use the ones I have yo will need to get the front dome light and wire clip from an 84-88 pickup. On a 4 Runner you will need to tap into the wire harness at the top left corner.
I intentionally left the front trim down for this picture. Remove it from one side or the other and a few inches past the mirror.

I peeled the headliner back a little and slid it in. Then put the trimming back in to hold the liner back in place. You will want the bend in the bracket to be pointing up. There are 2 small black screws that attach it to the roof. There are 3 gold screws that attach the domelight to the bracket and also help add more strength to the bracket and lights.
Then where the mirror goes I usd the mirror screws to hold it so I could cut the liner for the recess for the light assembly. Where the orginal maplight was at and where you see the gold screws, there is enough slack in the headliner, using a thin Phillips screw driver to install the 2 small black screws that are just like the door handle bezels.
Here it is mounted. I still need to run the wiring. I have always added a standard cab pick up to my 4runners or extended cab trucks as the light that mounts in the center isnt much use for the driver. I run the wire to the top left corner for electrical.
On the 2nd picture, the two small black screws go on the very out side. They will be the smallest holes. If you dont have these screws, you can get some screws out of the door handle bezels. They are the exact same screw. These black screws are under the headliner and attach the bracket to the roof.

On a 4Runner, you are going to need to run some wires from the top left corner. It will lay behind the rubber trim that is showing in the first picture. On an 84-88 pickup, you can just run a 8" inch wire to the maplights.
Where I tapped into wires.
Here is the terminals that you can use to run a wire from the black wire with a white stripe to the maplight. It only has one connection as the ground is in the body of the maplight to the roof. I will get a picture of the connection eventually.

I have some extra parts and wanted to try something that wouldnt cost a whole lot. Most of us have dealt with the broken rear view mirror and trying to find one in a salvage is lucky at best and when you do, they are expensive around here. Seen some on ebay from $40 and way on up before.
You can find the rear view mirror with out the light assembly a whole easier and since I had one broken with light and 2 dummy light holders, thought I would give it a try. Only have about 45 minutes in this.
Only tools I had in this is a small drill bit, small flat blade screw driver and a bench grinder to knock off the burr.
First I drilled out the rivet from the backside and did have to use a nail to tap out the rivet. Then I would have to grind the burr off and work the top of the rivet out with the screwdriver and moved the parts over.
I am going to glue the electrical runs down with super glue and see if I can find some small screws or rivets when I go to town. I might have to find a small screw and nut for the light switch but feel this will work. When I get this 100% done I will come back and edit this page. Might even add it to my fix list.
Typical of where the mirror breaks on the mount on the right mount, top-right hand corner.
I used some brass screws and glued the back of the electrical contacts down. Put a drop of glue on the back side of the screws.
Got it working and only had about $4 and 1 hour into it. Alot cheaper then getting a new one. Just covered the light some to cut down on the glare for the pic. That bulb gets hot.
This is the Power Suppy wire. You will need a female connector from the red package above to attach to this point. If I recall right, You will need to tap into the black wire with the white stripe, but double check.

These two points will ground to the roof of the cab. The two holes just above the light assembly is where the black door screws go into to attach the bracket to the roof.

Last edited by Terrys87; Jun 3, 2014 at 11:17 AM.
May 31, 2014 | 09:50 AM
#1160
Registered User
Joined: Jul 2012
Posts: 2,365
Likes: 4
From: Idaho
they were just "9 SMD LED panel" the search will bring up all kinds an colors you'll want to narrow it down to the automotive section they come with various adapters for t10 196 sockets the search will bring up 12 SMD as well which are what i used cheap an very effective
DONT get the single bulb replacements they are terrible dim an not worth the cost the small LED panel very bright and you can adjust where it sticks to
DONT get the single bulb replacements they are terrible dim an not worth the cost the small LED panel very bright and you can adjust where it sticks to


