
Terrys87 88 4Runner Restoration/Build thread
 Nov 4, 2013 | 07:56 PM
#1121
Registered User
Joined: Apr 2012
Posts: 2,817
Likes: 2
From: Los Angeles CA
Dunno how i missed some of the updates but im abotu 3 months off on this thread lol Misty's new bumper looks nice n shiney man. I bet she was happy.
She is gonna love those matching shiney chrome new steps. Nice work dude.
She is gonna love those matching shiney chrome new steps. Nice work dude.
Nov 17, 2013 | 04:58 AM
#1122
Thread Starter
Super Moderator
iTrader: (1)
Joined: Aug 2008
Posts: 11,787
Likes: 28
From: Anderson Missouri
Hello kornhuskerwizard... I would be interested in the rear bumper.
Thanks Richard.. Things are starting to move along again. Been tied up with work and a few things. My laptop is acting up so getting on here is not as easy as it used to be.
L Trim Removal.
To get the L trims off, you have to remove the whole window from the inside. On Passneger Side, I have my feet in the floorboard and knees in the seat, I place my left arm across the top and apply pressure from my elbow to my fist. Applying a little more with my elbow and start breaking the glue tht holds the window in. I try to keep all of the glue on the glass portion. I use a putty knife to help. Once I get the top seperated from the cap. I hook my arm thru the window to keep it from falling to the ground. Once the glass is out, the L trims are just bolted to the window part which will be visble when out.
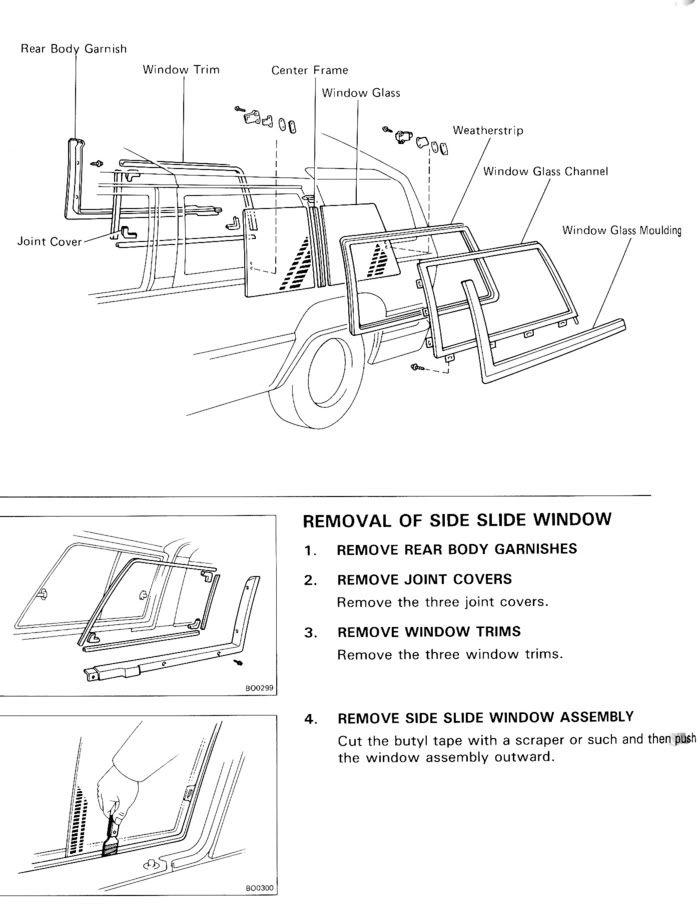
I see these windshield side trims broken all of the time. I am sure I know what happens. It when someone tries to remove them from the truck, they wind up snapping in half. Take a medium sized flatblade and slide until you hit the clips and twist on the top two. When they loosen just slide the trim piece up about half an inch. Where my finger is the bottom one and it just needs to be slid up to get the trim out.
You can then do what the FSM says to do which is put your foot on each side of the frame and pull then release the glass. Not as easy as it sounds or look as I tried several time to do it that way.
I got one of my retching clamps and reverse the head on it and used it to push out the frame.

Worked much easier as it only required me to pull up on one side and slip the glass out with the other hand, easy as pie.
Thanks Richard.. Things are starting to move along again. Been tied up with work and a few things. My laptop is acting up so getting on here is not as easy as it used to be.
L Trim Removal.
To get the L trims off, you have to remove the whole window from the inside. On Passneger Side, I have my feet in the floorboard and knees in the seat, I place my left arm across the top and apply pressure from my elbow to my fist. Applying a little more with my elbow and start breaking the glue tht holds the window in. I try to keep all of the glue on the glass portion. I use a putty knife to help. Once I get the top seperated from the cap. I hook my arm thru the window to keep it from falling to the ground. Once the glass is out, the L trims are just bolted to the window part which will be visble when out.
I see these windshield side trims broken all of the time. I am sure I know what happens. It when someone tries to remove them from the truck, they wind up snapping in half. Take a medium sized flatblade and slide until you hit the clips and twist on the top two. When they loosen just slide the trim piece up about half an inch. Where my finger is the bottom one and it just needs to be slid up to get the trim out.
You can then do what the FSM says to do which is put your foot on each side of the frame and pull then release the glass. Not as easy as it sounds or look as I tried several time to do it that way.
I got one of my retching clamps and reverse the head on it and used it to push out the frame.
Worked much easier as it only required me to pull up on one side and slip the glass out with the other hand, easy as pie.
Last edited by Terrys87; Mar 14, 2014 at 04:40 PM.
Nov 17, 2013 | 05:15 AM
#1123
Thread Starter
Super Moderator
iTrader: (1)
Joined: Aug 2008
Posts: 11,787
Likes: 28
From: Anderson Missouri
Found this on ebay..Door Seals.... http://www.ebay.com/itm/TOYOTA-OEM-6...1562df&vxp=mtr
I have been focused on my 85 pickup and it is giving me a few problems, so I am setting it aside for awhile and am getting involved on Mistys Runner. I have about 45k miles since doing the top end rebuild on it. It has 313,000 miles on it now, and the clutch is starting to have issues.
I have an Aisian Clutch on order from Rock Auto and it should be here in the early part of the week.
I added alot of information to the 88 Runners Threads first page and where to find it.
FSM's here. Use Wayback to find FSM's.
Page 1.#2 Rusted up Fuel tank. Cheap and has been working for over 30,000 miles.( As of 1/3/12)
..........#14 Acces to a fuel tank on 4Runner.
Page 2.#31-#33 How to check and fix horn.
..........#39 How to break the 22re Crankshaft bolt loose.
Page 3.#43 How I make an EGR block off plate. Keeps Intake alot cleaner. CEL 71 and EGR Cleaning
............#46 How to change Power Steering Pulley with Part Number.
Page 3.#51 My Cheap parts page. (If you know of some, let me know, thanks)
Page 5.#82 Track in rear window that will need lubed and temp fix for getting rear window working.
..........#88 Body/Frame Swap how to Steps.
..........#91 Silicon Spray to use on hard to operate windows. Use in tracks. Works GREAT!!!
Page 8.#152 How I got my Guage Lense clear. SR5 Guage Swap Info, Replacing cracked faceplate.
..........#169 How I got the Spare Tire Lift working.
Page 10. #185-#186 All the steps I did finally to get the Tailgate working.
...........#191 How I got my Door Light working and Door Buzzer from not chiming. (Not all trucks use the same box I have).
...........#199 Headlight Switch/Wiper delay repair
Page 11. #207 How to replace Shifter Bushing. Video provided. Well worth cost and benefit. Have done this in the past.
Page 11.#210 How I fixed my Washer Pump motor.
Page 13.#245 Installing Sound Deading Material.
Page 13.#251 How I upgraded my Extended Cab Dome Light and will do 4Runner.
Page 15.#296 How I fixed my broken antenna.
Page 18.#341 Battery Light Lit, No Guages working, No Blinkers..Fixed. #346 has more recent fixes for ENG fuse.
.............#341 Alternator Rebuild Link and Starter Rebuild Video. How to Clean Starter Relay.
............#343 Ground Wires Location link. ENG Fuse FIXED!!! Back up light switch wires rubbed bare at end of protective sleeve. 3.0 Grounds location from NCTTORA
.............#348 MY Personal Reminders Page.
Page 18. #352 Picture and location of Fusible Link.
.............#353 How I fixed my erratic water temp guage. Gates hose PN# 20801.
page 20. #382 Broken Mirror Mount Replacement.
..............#384 Interior Paint Code for Cranberry Red Interior ( 3P1 ). Also a link for Gray Interiors by DeathCougar.
..............#396 How to Jump TE1 and E1 to get Check Engine Light Codes. Codes are in Haynes starting on Page 6-36. Diagnostic port for 87 and newer is top picture. 86 and older is the bottom picture.
Page 22. #424 Zuk Mod info.
Page 22. #439 Drivers side kick panel fuses. How to remove Fusebox.
page 23.#451 How to Replace Dash Pad.
Page 26. #502 How to add Door Pockets.
Page 27. #530 Adding Rear Passenger Pockets.
Page 28. #551 Tail Light Conversion PN# 43315 and Part Numbers for Door Seals. Right Door PN# 6786189105 and Left Door PN# 6786289104 with wing glass.
Page 26. #636 MY TUNE UP PAGE.
Page 33. #660 Installing a distributor. Great Video provided.
.............#663 Installing a Maplight.
............#664 Location of Circuit Open Relay, Operates fuel pump.
............#664 Wiper Delay box and Cable needed to install Wiper Delay. Will need Multifunction Combo switch with delay.
...........#664 Troubleshooting steps for non firing fuel injectors. Most likely bad connections in the wiring harness. Remove factory clips and solder the wires together. Link to injector differences....https://www.yotatech.com/forums/f116...ectors-127606/
Page #42. #831 Diff Breather Extention
Page #45 #882 Old and New Style Block Differences.
............. #889 Front axle info page. Vacuum Line Link, Steering Gearbox linkage link. Rear Seal Replacement.
Page #57 "L" Trim Removal Steps.
Chefyotas V6 Brake upgrade write up. https://www.yotatech.com/forums/f199...l#post52043992
Last edited by Terrys87; Mar 22, 2014 at 09:52 PM.
Mar 22, 2014 | 10:15 PM
#1124
Thread Starter
Super Moderator
iTrader: (1)
Joined: Aug 2008
Posts: 11,787
Likes: 28
From: Anderson Missouri
Wow!!!I hadn't realized how long it has been since I have worked on Misty's truck. The clutch had been making some noise for a while. About a month ago she drove it to work and it was doing alright. When she came home it was squealing loudly. It was to cold to mess with it so we were down to my runner and the 3rd gen runner. She has been wanting to drive hers for some time and was actually missing driving it.
I took my 86 snow wheeling and she wanted to take hers and that didn't help out that hers was down. She really wanted to take hers snow wheeling but just didn't get to. I did offer to replace her clutch if she would help. My shop doesn't have heat in it and it was cold so she went out in the shop with me and didn't take her long to understand why I did not want to fix it when it was that cold. Funny how temperature helps break that man/woman miscommunication language barrier, hehe.
Today, I got to take it to a friends house and he has a lift and a tranny jack. That is so nice. The best I have ever gotten a tranny swapped out is 4 hours but 6 hours is the normal time it takes me laying on the floor and by myself.
In one hour we had the tranny down and was starting to put it back in. It took us about 2 1/2 hours to get it completed. While he was using an air wrench on the bell housing bolts, I was working on the driveshaft, clutch slave cylinder, speedometer cable, light harness wires and other odds and ends. With the right front tire at chest high, it made getting the starter out so much easier. The right tools makes the job so much better and you have two guys working on it, it may have spoiled me. Next time I have to swap a tranny out the old fashion way and I am 3 hours into it, I am going to be thinking of having a lift. No way could I have one as my shop is not big enough, but it is nice!!!
The problem turned out to be that the Throw Out Bearing had just seized. Neither one of us has ever seen one just seize up like that. Not sure what caused it to do that as I do not run our trucks thru water. It was locked up tight.
She didn't have much left on her clutch pad, maybe 1/16th of an inch till it got into the rivets. It is done now and running great. While we had it on the lift, we checked out everything underneath. Her front suspension is still in great shape. I did find that her drivers front shaft, the boot is leaking some grease so will have to change that out fairly soon. I did break a clip that holds the reverse light as it was so brittle and she has a little leaking around the oil pan that I think just needs the pan bolts tightened back up a little and will get to that soon as well. Other then a few small issues, it is back together and running great.
I had to replace the rotors and brake pads on the 3rd gen, brake booster on my runner and her clutch disk assembly and I just threw them into my scrap metal pile. That stuff is heavy and adds up quick. All 3 trucks have been getting some much needed maintainance.
Mar 23, 2014 | 10:23 AM
#1126
Awesome write up, once again! I'm going to have to hit you up on why my window on the driver side is so hard to roll up for the first few inches. I'm starting to wonder if this thing was in a little accident that bent the track or something.  lol....
Off-topic, but maybe stop by my thread and check in on something. I have a very sad update over there for everyone. Its regarding Philbert passing away in January.
lol....Off-topic, but maybe stop by my thread and check in on something. I have a very sad update over there for everyone. Its regarding Philbert passing away in January.
Mar 23, 2014 | 02:12 PM
#1127


Awesome write up, once again! I'm going to have to hit you up on why my window on the driver side is so hard to roll up for the first few inches. I'm starting to wonder if this thing was in a little accident that bent the track or something. lol....
Off-topic, but maybe stop by my thread and check in on something. I have a very sad update over there for everyone. Its regarding Philbert passing away in January.
lol....Off-topic, but maybe stop by my thread and check in on something. I have a very sad update over there for everyone. Its regarding Philbert passing away in January.
Apr 15, 2014 | 11:37 PM
#1128
Thread Starter
Super Moderator
iTrader: (1)
Joined: Aug 2008
Posts: 11,787
Likes: 28
From: Anderson Missouri
Hello cyberhorn..It is locked up tight. I put it in a vise and tried to break it free that way. Neither one of us have ever seen anything like that.
Hello Mark.. I think I may have mentioned it to you when we talked but just in case, the rubber guide likes to come out of the bottom of the track. Usually the rubber splits. I replace them and use the black 3M glue to get them to stay like they should.
Hello Gizzler00... Philbert was a great guy. I got to talk to him thru PMs and we need more Phils around here.
Apr 16, 2014 | 12:03 AM
#1129
Thread Starter
Super Moderator
iTrader: (1)
Joined: Aug 2008
Posts: 11,787
Likes: 28
From: Anderson Missouri
A little late getting posted up but have done quite a bit to Mistys Runner. Last Tuesday I was going to work in the 3rd Gen and working nights, I ran over a piece of iron. It didn't flatten the tires on the drivers side but it busted the belts. I had already replaced one tire on Monday then this happened. Wasn't sure if I was going to have time to get two more tires replaced and had to switch brands and was a tire short at the dealer so I figured that since I had to go to St. Louis, I would just take Mistys Runner instead. I hadn't had it on a good run in a while anyways.
Wednesday and Thursday was hectic. I had been putting off maintenance due to the cold and I do every year, I always play catch up during the warmer months. I knew she had a u-joint going out. I have pressed them out but sent the drive shaft to the shop and let them press it out. Got the drive shaft back in, changed fluids, fixed some oil leaks and some other things I cant recall right off. Also it took 2 days just get tires on the third gen and nearly down to the last moment to start on my trip to St. Louis.
We take it on Tulsa (125 miles) quite often and I have had it to Kansas City(180 miles) a couple of times but St. Louis is the longest trip I have had it on and it is 300 miles one way. Plus all the running I had to do up there in 4 days it got 900 miles put on it. Other then not having Cruise Control as I have gotten used to having that on long trips it was a great drive. I have a small noise in what I think is the rear differential and I will be swapping in another one just to see if it is the problem. Most would not notice the noise but I know it is so want it fixed. I am suspecting a bearing in the rear diff.
Got home and sky was clear, 30 minutes later we were getting a hail storm. I got it covered in time with rugs and haven't found any hail damage. Whew!!! One thing I did find out on the long trip is I need more power outlets for the different devices that I use on the road that on short trips I never needed before so that is on the list for both of our runners.
Got to visit Highlux while in St. Louis. Tangerine just looks great on one of these runners. I ever do another color, that is high on my list of colors. Had some long days and harder work then I am used to in a while and am just finally getting back to normal. Had great weather when I left and now it is cold. Winter go away!!!!
Longest trip yet in it and it was a great ride other then not having cruise control. 3 years ago from this week, I was just getting to take a first ride in it to the carwash and now I have the confidence it to go cross country. Every time I checked the miles per gallon it was 20 or 22 mpg, which was consistent with how fast or hard I was diving it at times.
Apr 16, 2014 | 10:46 AM
#1131
GO-GO-GO- GO-GO-GO- GO-GO-GO! LOL.... You're a dynamo, brother!
Gotta talk to ya.... Might not go with that ARB... But, the "stuff" could still go with Jason when he picks up his bumper and other stuff.
Gotta talk to ya.... Might not go with that ARB... But, the "stuff" could still go with Jason when he picks up his bumper and other stuff.
Apr 21, 2014 | 11:47 PM
#1132
Thread Starter
Super Moderator
iTrader: (1)
Joined: Aug 2008
Posts: 11,787
Likes: 28
From: Anderson Missouri
Hello cyberhorn.. I have dealt with bad valve stems before. Slow leakers are a pain to deal with. Now that the weather is starting to warm up, I am going to try to get moving on several different projects. Hopefully winter is out of here and can get caught up on a few things.
Thanks Mark...I hope to get things moving again. I am ready to get something done. I don't have one of the spare vents. Looking for one my self. I sent that guy an email about the locker. I wish they would post phone numbers on their c list when posting.
Thanks Mark...I hope to get things moving again. I am ready to get something done. I don't have one of the spare vents. Looking for one my self. I sent that guy an email about the locker. I wish they would post phone numbers on their c list when posting.
Apr 22, 2014 | 12:06 AM
#1133
Thread Starter
Super Moderator
iTrader: (1)
Joined: Aug 2008
Posts: 11,787
Likes: 28
From: Anderson Missouri
Misty mud flaps are looking faded. I am trying to get back in the habit of doing some daily or so even if it is something small. I got a marker from a friend and wanted to brighten up the "Toyota" and re blacken the mud flap. This one is a test but think I like how it is going to turn out. I used trim and bumper paint and then the marker. The marker is made by carmelindustries.com
Before
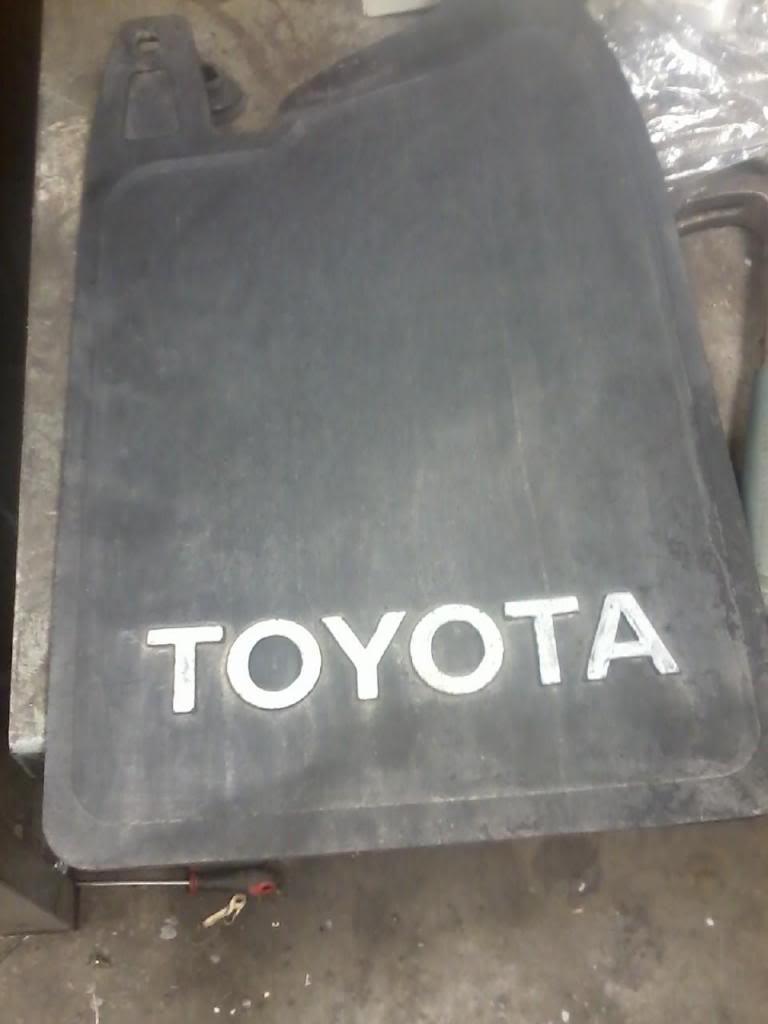
After, Looks better in person.

Before

After, Looks better in person.
 Apr 22, 2014 | 12:08 AM
#1134
Thread Starter
Super Moderator
iTrader: (1)
Joined: Aug 2008
Posts: 11,787
Likes: 28
From: Anderson Missouri
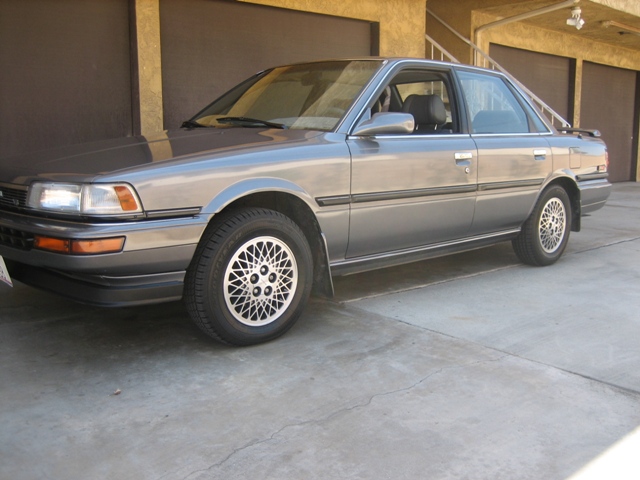
I eventually want to paint her rims as they were not in the best shape when I got them. I want something that looks similar to the color that they came with which is aluminum.
Apr 22, 2014 | 04:52 AM
#1135
Looks really good. Got any tips for plastic paint color for the grey interior of my truck? I took the rear cargo back side door into the stores the other day and found 3 color Dark Grey, Smoked Grey and charcoal Grey and sprayed the back side with it. None of the sprays comes even close to the grey. They are way off in color with the exception of the charcoal grey which came close just a lighter. I want to get as close as possible so if you got any hint as to brand and color, please do enlighten.
Apr 22, 2014 | 11:51 AM
#1136
Thread Starter
Super Moderator
iTrader: (1)
Joined: Aug 2008
Posts: 11,787
Likes: 28
From: Anderson Missouri
Is yours the dark gray or light gray. There isnt an off of the shelf that will match it. I can look later and show the brand I use for mine as it is off of the shelf. I had so many different color panels and had to piece mine toghether that I didnt mind straying from factory a little.
I get mine from Orielly but am sure Autozone or some other store could mix up some interior paint for you. You need to find the mother store or the store that supports the stores in its area. Not all of the Oriellys have paint mixing ability but rely on one in its area. If you ask them they will tell you which store it is. The mother store I have to go to is 35 miles away.
I get mine from Orielly but am sure Autozone or some other store could mix up some interior paint for you. You need to find the mother store or the store that supports the stores in its area. Not all of the Oriellys have paint mixing ability but rely on one in its area. If you ask them they will tell you which store it is. The mother store I have to go to is 35 miles away.
Apr 22, 2014 | 04:20 PM
#1137
Registered User
iTrader: (4)
Joined: May 2010
Posts: 720
Likes: 16
From: People's Republic of California
Looks good Terry! The white "Toyota" looks nice.
Saw you mention something about aluminum wheels, is hers the stock SR5 ones? If so, and you're up for a challenge, here's a little work I just finished doing myself. I was quoted nearly $700 to have them machined finish back to new. These are the oem/stock luxury alloys from a 88' camry. I spent $70 in sand paper, primer, paint, clear coat and some ingenuity from the internet (propped the front end up of my camry to use as a lathe).

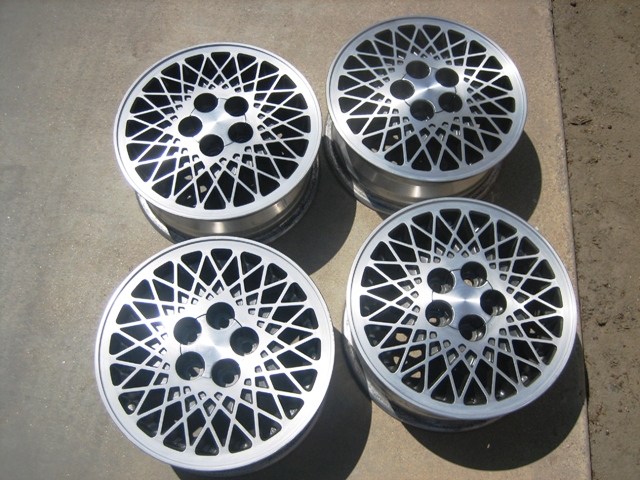
Saw you mention something about aluminum wheels, is hers the stock SR5 ones? If so, and you're up for a challenge, here's a little work I just finished doing myself. I was quoted nearly $700 to have them machined finish back to new. These are the oem/stock luxury alloys from a 88' camry. I spent $70 in sand paper, primer, paint, clear coat and some ingenuity from the internet (propped the front end up of my camry to use as a lathe).


Last edited by Grego92; Apr 22, 2014 at 04:21 PM.
Apr 22, 2014 | 06:00 PM
#1138
Registered User
Joined: Jul 2012
Posts: 2,365
Likes: 4
From: Idaho
best ive seen for the sr5 rims is paint stripper to get the failed clear coat off an then options are endless walnut blasting makes for a nice satin finish to get a brushed finish after would take sanding then a good two part clear or as we talked a bit about terry an old oven an clear powdercoat would be great you can even color the rims textured areas with some extra effort
Apr 22, 2014 | 11:45 PM
#1139
Thread Starter
Super Moderator
iTrader: (1)
Joined: Aug 2008
Posts: 11,787
Likes: 28
From: Anderson Missouri
Thanks cyberhorn...Getting set up for powder coating is moving up the list. I have seen it and it is better then paint and is something I hope to get started on soon. I am going to have get the rims looking better on the cheap for now but when I get an oven and the powder coat set up, it is something that I want to do.
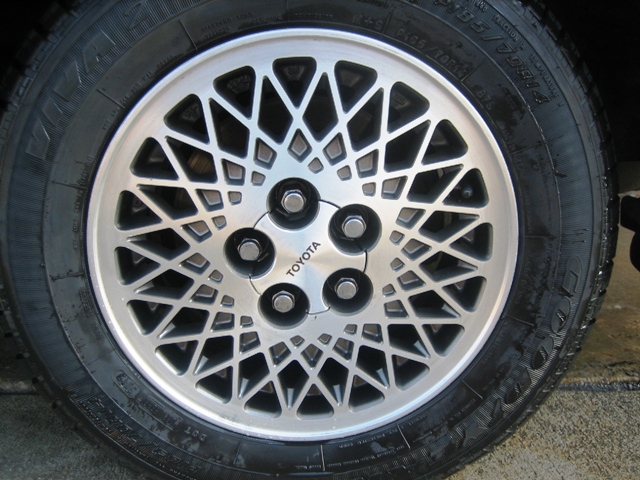
Hello Greogo...Your wheels turned out great. I did get a kick of how you used the front end to be a lathe. That is something I would of done as well. I have the tri spokes on hers and not sure if that would work to finish hers. With all of the gaps in those wheels, how did you clean them up while rotating the tires? They turned out great.
Even with the gaps you have in the design of the rim, was you able to use a sanding block to keep from getting caught in the gaps? You remember color and brand of paint? I am wanting as close to stock color as possible.
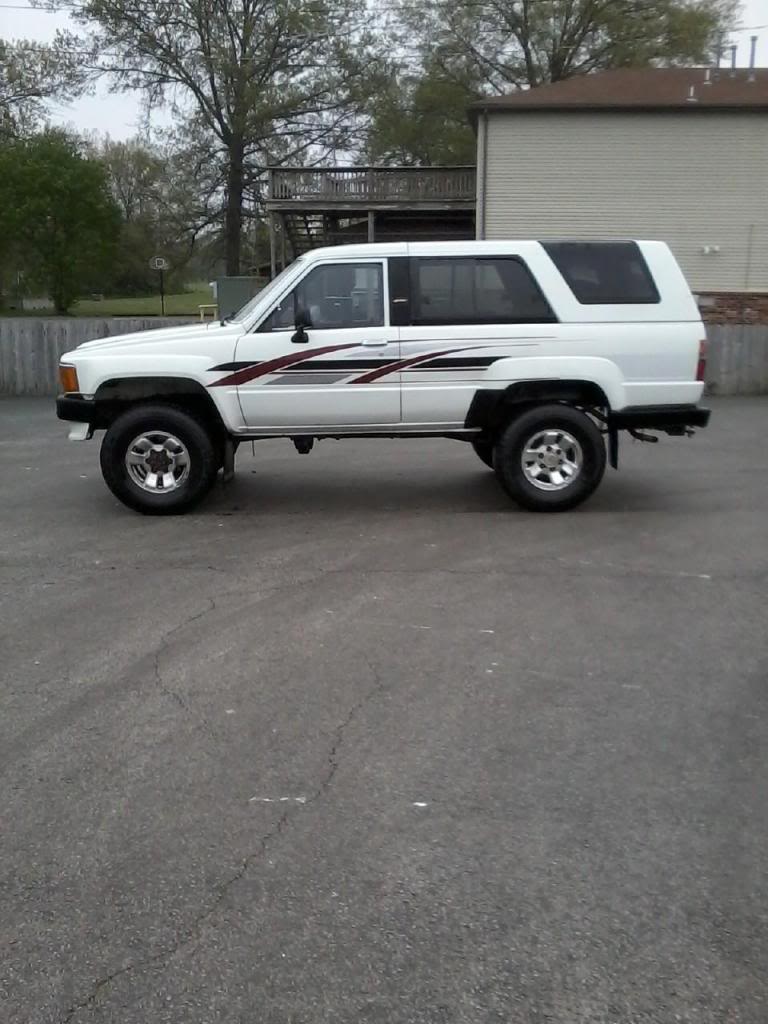
Her is what is on it now.
Hello Greogo...Your wheels turned out great. I did get a kick of how you used the front end to be a lathe. That is something I would of done as well. I have the tri spokes on hers and not sure if that would work to finish hers. With all of the gaps in those wheels, how did you clean them up while rotating the tires? They turned out great.
Even with the gaps you have in the design of the rim, was you able to use a sanding block to keep from getting caught in the gaps? You remember color and brand of paint? I am wanting as close to stock color as possible.
Her is what is on it now.

Last edited by Terrys87; Apr 22, 2014 at 11:48 PM.
Apr 23, 2014 | 07:03 AM
#1140
Registered User
iTrader: (4)
Joined: May 2010
Posts: 720
Likes: 16
From: People's Republic of California
Ah, those are newer style oem wheels. That wider gap may make it more difficult to do what I did. I had no problem holding the block while the wheels turned on mine. Here's a more detailed process that got me to the end result.
1. Purchased wheels from junk yard, terrible shape but minimal gauges in the aluminum.
2. Pressure washed the wheels to get as much grime as I could from the crevices and between the spokes.
3. Rust-oleum aircraft remover to remove the paint from between the spokes and the clear coat from the brushed aluminum surface.
4. Pressure washed again
5. Rust-oleum etching primer the wheels between the spokes (overspray on the surface)
6. Several coats of Rust-oleum Graphite Wheel Paint between the spokes (same as on my truck wheels and accidental overspray on the surface)
6. Using Coarse, Medium, Fine WET sand paper I hand sanded the surface area to a brushed aluminum finish.
5. Mounted the wheels up on the front end one-at-a-time.
6. Again using Coarse, Medium, Fine WET sand paper on a block (I used WD40 instead of water) to brush aluminum the finish on the surface so that the lines would all be even going around the wheel in a circular manner.
7. I preferred to finish with Medium paper to get the lines and brushed look on the surface of the wheels.
8. I then used a soft sponge and applied BriteKleen Briteplus MX aluminum trailer cleaner to remove any remaining oxidation and to give it a tiny bit more shine.
9. Used water decal paper to print out the "Toyota" logos and place on the inner hub caps. Similar decal paper we use to get in our Monogram/Revell model airplanes/cars/tanks kits.....remember those?!
9. Finally used several coats of Rust-oleum clear coat on the entire wheels.
Last edited by Grego92; Apr 23, 2014 at 07:05 AM.


