
Terrys87 88 4Runner Restoration/Build thread
 Aug 31, 2015 | 06:44 AM
#1321
Thread Starter
Super Moderator
iTrader: (1)
Joined: Aug 2008
Posts: 11,787
Likes: 28
From: Anderson Missouri
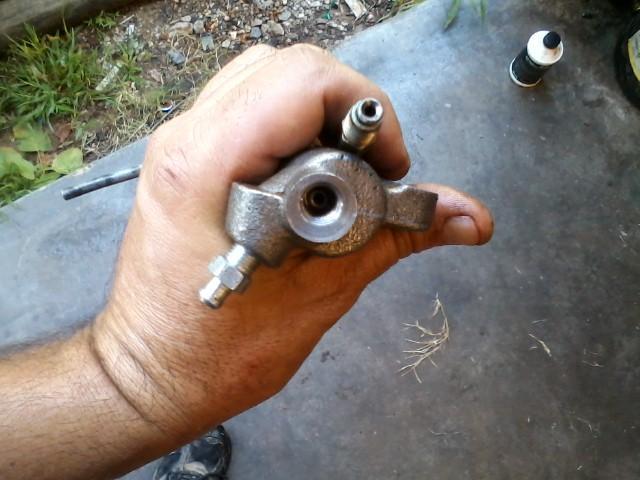
In another thread there was some talk about the poorer quality of brake and clutch cylinders from parts stores. Today I got bit with another poor part. My clutch slave cylinder was leaking around the seals on the piston of the cylinder and pouring fluid out the rubber skirt. I knew it was a bad cylinder and need the truck for work so I grabbed a part store replacement as I dont have the time to wait for a delivery.
I installed the cylinder and it started leaking at the threads. I was careful not to cross thread the nut to the cylinder. I took it apart and started looking at my old Aisin cylinder where the nut goes into the cylinder. I then compared the replacement cylinder and it looks as if the end of the metal line just cant seat againts the cylinder there by causing my leak.
I tried reseating the line to the replacement cylinder and then pressurized it with air making sure the piston was clamped and would not pop out under pressure and it would leak air.
Since I need the truck, I took the piston out of the replacement cylinder and stuck into my Aisian cylinder and so far no leaks. Not the best fix and would not really suggest doing it but I need the truck for work and am ordering an Aisin to replace my combo job.
Probably cant tell but here is a factory metal hose with the replacement cylinder and why I am getting a leak around the threads. My threads are perfect on the truck and the threads in the replacement cylinder are fine, I am suspecting that my threads on the metal line are metric and the replacement cylinder are SAE.
http://www.ebay.com/itm/For-Headlight-H4-9003-Ceramic-Controller-Harness-Relay-Wire-Adapter-Kit-/171559005371?hash=item27f1b6acbb&vxp=mtr&rmvSB=true
http://www.ebay.com/itm/Inside-Rearview-Mirror-3-Wire-Rear-View-Lighted-for-84-88-Toyota-Pickup-Truck-/231134015234?fits=Make%3AToyota%7CModel%3APickup&hash=item35d0a92f02&vxp=mtr
http://www.ebay.com/itm/Clutch-Master-Cylinder-AISIN-CMT-003-fits-84-89-Toyota-Pickup-/361247220483?hash=item541c032303&vxp=mtr
http://www.ebay.com/itm/Aisin-CRT-001-Clutch-Slave-Cylinder-/121757063325?hash=item1c5949589d&vxp=mtr
http://www.4x4wire.com/toyota/maintenance/cv_axle/
I installed the cylinder and it started leaking at the threads. I was careful not to cross thread the nut to the cylinder. I took it apart and started looking at my old Aisin cylinder where the nut goes into the cylinder. I then compared the replacement cylinder and it looks as if the end of the metal line just cant seat againts the cylinder there by causing my leak.
I tried reseating the line to the replacement cylinder and then pressurized it with air making sure the piston was clamped and would not pop out under pressure and it would leak air.
Since I need the truck, I took the piston out of the replacement cylinder and stuck into my Aisian cylinder and so far no leaks. Not the best fix and would not really suggest doing it but I need the truck for work and am ordering an Aisin to replace my combo job.
Probably cant tell but here is a factory metal hose with the replacement cylinder and why I am getting a leak around the threads. My threads are perfect on the truck and the threads in the replacement cylinder are fine, I am suspecting that my threads on the metal line are metric and the replacement cylinder are SAE.

http://www.ebay.com/itm/For-Headlight-H4-9003-Ceramic-Controller-Harness-Relay-Wire-Adapter-Kit-/171559005371?hash=item27f1b6acbb&vxp=mtr&rmvSB=true
http://www.ebay.com/itm/Inside-Rearview-Mirror-3-Wire-Rear-View-Lighted-for-84-88-Toyota-Pickup-Truck-/231134015234?fits=Make%3AToyota%7CModel%3APickup&hash=item35d0a92f02&vxp=mtr
http://www.ebay.com/itm/Clutch-Master-Cylinder-AISIN-CMT-003-fits-84-89-Toyota-Pickup-/361247220483?hash=item541c032303&vxp=mtr
http://www.ebay.com/itm/Aisin-CRT-001-Clutch-Slave-Cylinder-/121757063325?hash=item1c5949589d&vxp=mtr
http://www.4x4wire.com/toyota/maintenance/cv_axle/
Last edited by Terrys87; Sep 22, 2015 at 11:26 AM.
Sep 4, 2015 | 07:14 AM
#1322
Thread Starter
Super Moderator
iTrader: (1)
Joined: Aug 2008
Posts: 11,787
Likes: 28
From: Anderson Missouri
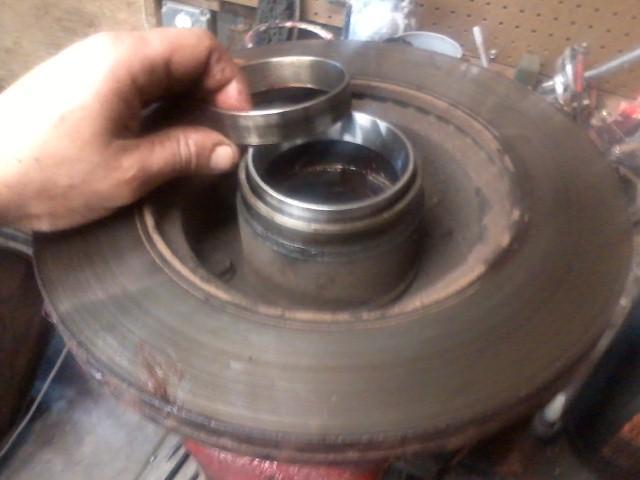
I have had a slight noise in the rear end or suspect it being in the rear end. The noise got a little louder the other day so am working on that. I have a spare diff so getting it cleaned up. I use Easy Off for cleaning grimey parts. Works better then the other cleaners out there. Ever since I was a kid, I have always spent about as much time at the carwash washing under a truck as I did the outside of it. So much nicer working on them when they are clean.
I am currently working on a system for cleaning that I think would make life much easier and cheaper when cleaning things. I have spent tons on cleaning materials and if what I am thinking would work, I would of bought one years ago. Will have to wait and see how that turns out.
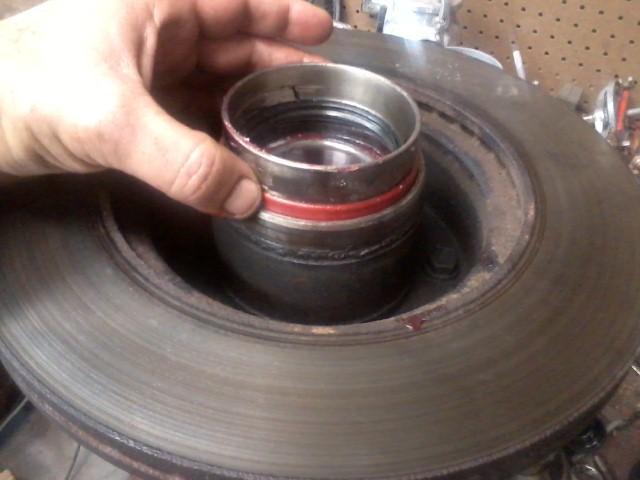
Soaking in Easy Off and cleaned it up quick.
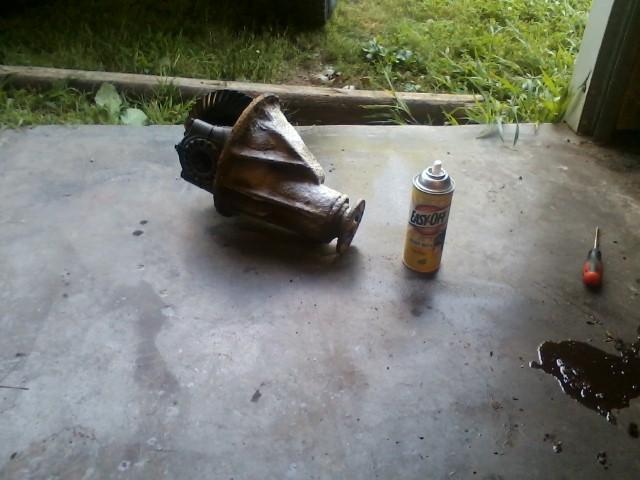
Seems like there is a thread where the color on the end of the spline indicates gear ratio. I need to look into that a little further but just to make you aware there is a reason for the color coding.
I am currently working on a system for cleaning that I think would make life much easier and cheaper when cleaning things. I have spent tons on cleaning materials and if what I am thinking would work, I would of bought one years ago. Will have to wait and see how that turns out.
Soaking in Easy Off and cleaned it up quick.

Seems like there is a thread where the color on the end of the spline indicates gear ratio. I need to look into that a little further but just to make you aware there is a reason for the color coding.

Last edited by Terrys87; Sep 4, 2015 at 10:58 AM.
Sep 4, 2015 | 07:27 AM
#1323
Registered User


Joined: May 2005
Posts: 1,979
Likes: 233
From: S. FL
Terry - good tip on the EasyOff! I'll have to try that. You can find a chart of the color codes here:
http://www.4crawler.com/4x4/4R_TechI...tml#DiffRatios
Your color looks pink to me, which would likely indicate 4.10.
http://www.4crawler.com/4x4/4R_TechI...tml#DiffRatios
Your color looks pink to me, which would likely indicate 4.10.
Sep 4, 2015 | 11:41 AM
#1324
Thread Starter
Super Moderator
iTrader: (1)
Joined: Aug 2008
Posts: 11,787
Likes: 28
From: Anderson Missouri
Thanks Cory.. I knew I had seen that chart somewhere. Just as soon as I can figure out how to get it posted to Photobucket I am going to post a picture of that chart. I was thinking pink was 4.10s.
The Easy Off is the best cleaner for grime I have found. Just watch rubber seals and use rubber gloves. Better then all the other cleaners out there. Wish I would of known of it earlier.
The Easy Off is the best cleaner for grime I have found. Just watch rubber seals and use rubber gloves. Better then all the other cleaners out there. Wish I would of known of it earlier.
Last edited by Terrys87; Sep 4, 2015 at 11:50 AM.
Sep 4, 2015 | 11:48 AM
#1325
Thread Starter
Super Moderator
iTrader: (1)
Joined: Aug 2008
Posts: 11,787
Likes: 28
From: Anderson Missouri
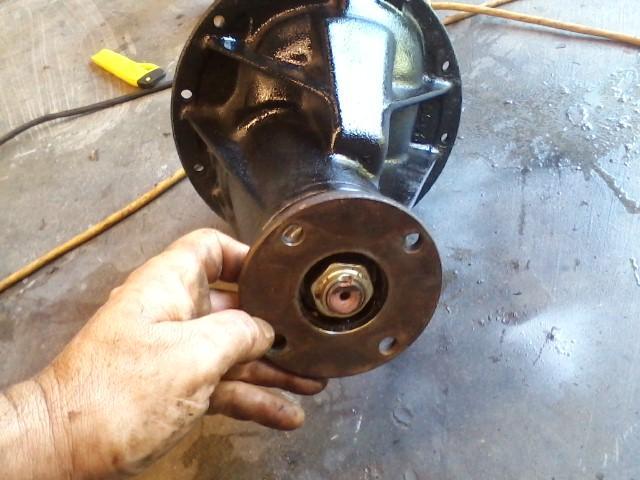
Removing a rear differential is easy on these trucks.
Disconnect the Brake Fluid Line.
Disconnect the Parking Brake cable which is just a cotter key and a pin.
Remove the 4 bolts that hold the Brake cover assembly to the axle.
Slide the axles out.
Remove rear drive shaft from Diff.
Remove the 12 or so bolts and remove diff from housing.
4 Bolts, Parking Cable and Brake Slave Cylinder all removed.
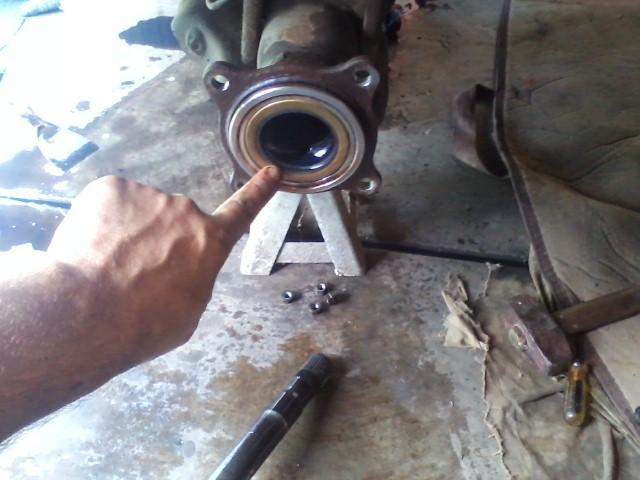
This seal you would need a press to remove and install. I have never done one of these. It would be best for a shop to do once you get axle out. Luckily mine are good.
This seal the home mechanic can easily change. Not sure if it is called the Inner or Outer Seal. I have changed these before. I pull the axle completely out to keep pressure off of this seal when pulling a diff. May not be needed but it is easy to install and remove.
Disconnect the Brake Fluid Line.
Disconnect the Parking Brake cable which is just a cotter key and a pin.
Remove the 4 bolts that hold the Brake cover assembly to the axle.
Slide the axles out.
Remove rear drive shaft from Diff.
Remove the 12 or so bolts and remove diff from housing.
4 Bolts, Parking Cable and Brake Slave Cylinder all removed.

This seal you would need a press to remove and install. I have never done one of these. It would be best for a shop to do once you get axle out. Luckily mine are good.

This seal the home mechanic can easily change. Not sure if it is called the Inner or Outer Seal. I have changed these before. I pull the axle completely out to keep pressure off of this seal when pulling a diff. May not be needed but it is easy to install and remove.
 Sep 4, 2015 | 11:53 AM
#1326
Thread Starter
Super Moderator
iTrader: (1)
Joined: Aug 2008
Posts: 11,787
Likes: 28
From: Anderson Missouri
I did get a little of the noise out that I am looking for but still not what I want. At 65 mph when it is not accelerating or decelerating it has some noise. I will be checking my front wheel bearings next and see if that is what I am hearing.
While working on the rear axle I am going to need to replace the shoes soon. They are getting thin but all else looks good on the brakes. I did get her parking brake adjusted which I have been needing to get done for some time. Just need to start using the parking brake more often as that is what adjust it.
While working on the rear axle I am going to need to replace the shoes soon. They are getting thin but all else looks good on the brakes. I did get her parking brake adjusted which I have been needing to get done for some time. Just need to start using the parking brake more often as that is what adjust it.
Sep 10, 2015 | 11:29 AM
#1327
Thread Starter
Super Moderator
iTrader: (1)
Joined: Aug 2008
Posts: 11,787
Likes: 28
From: Anderson Missouri
I am posting these pics for another member. I started looking at my front wheel bearings and the drivers side outer bearing is bad. I am going to get a part store replacement for a temporary fix and get some OEM on order online. Mine are KOYO and the only ones I can find are Timken and Beck Arnley which is a good brand. I do prefer KOYO. Will see what I can find.
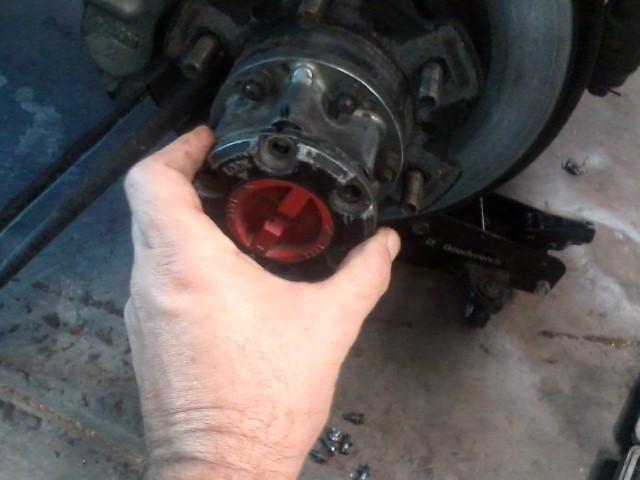
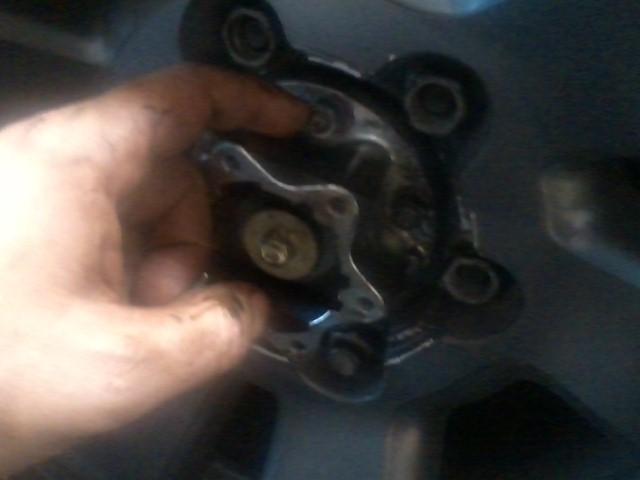
Remove the 6 bolts and remove the dial assembly. Dial at the FREE wheel position.
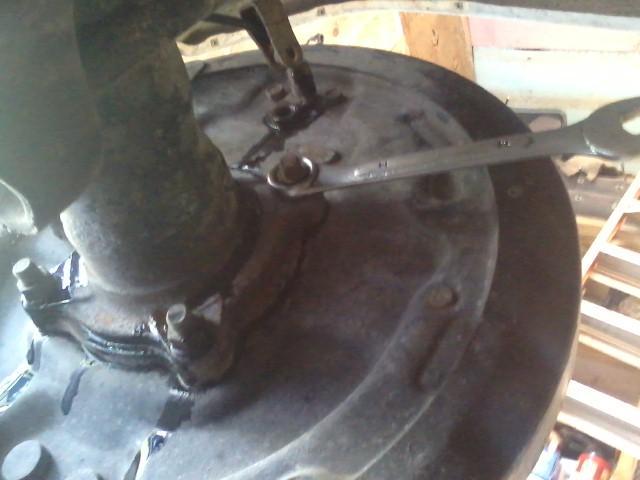
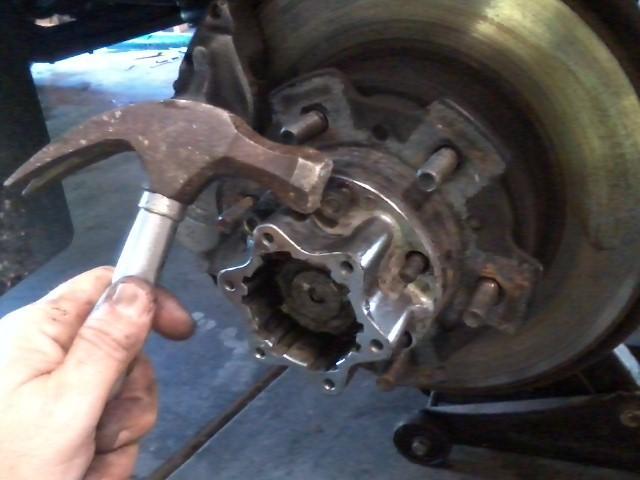
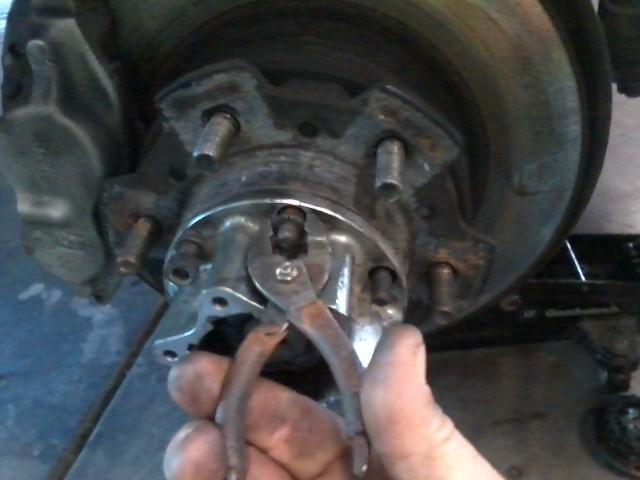
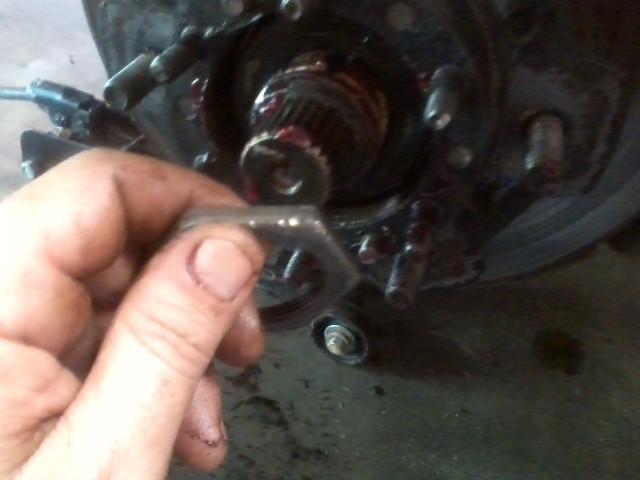
I see these hubs all banged up trying to get the cone washers off. They can be difficult but with a little patience you can do it without scarring the hub up. Some bang on the hub. I run the nut to the end of the stud and just gently tap my way around on the end of the stud on top of the nut.. If a cone doesnt come loose, just go to the next one. Eventually one will break loose and the others tend to follow. Using a oil spray a few days ahead of time helps. (Tap on top of the nut and not at the angle that the hammer is showing) A brass punch would be better but gentle strokes will get the cones loose.
Small pliers works great for getting to the conewasher.
I need to get a 54mm socket that is 3/8th driven but for now I have a 2 1/8th three quarter drive that is the same size to loosen the nut.
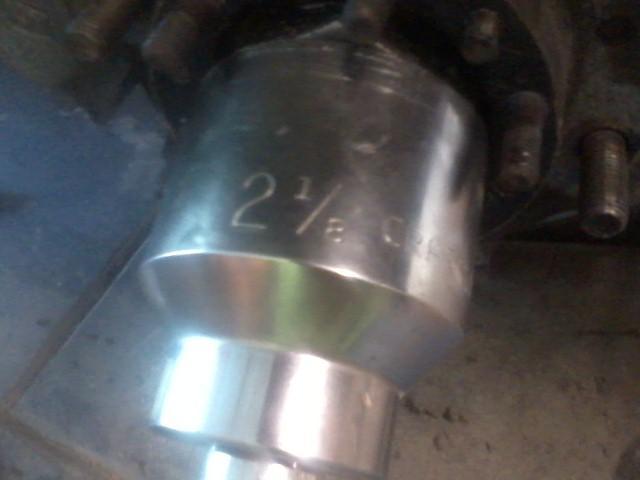
Bend the tab back on the lock ring to get access and remove the other nut that is behind the lock ring. Once you take the brake assembly off ( I should of done that ahead of time) you can remove the complete hub assembly. On the other side of the jack there is a jack stand.

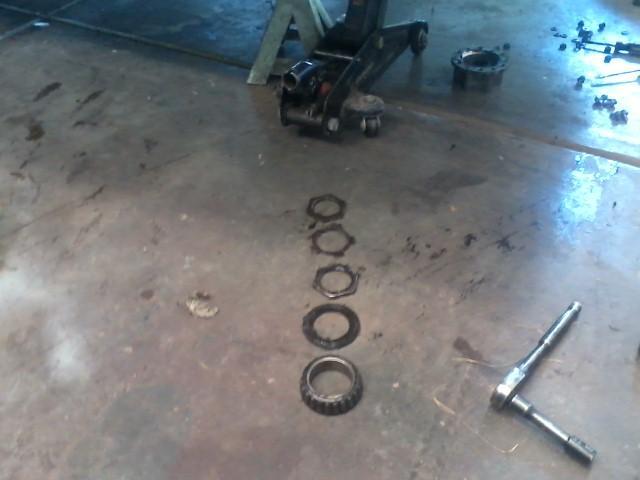
I like to have two sets of support. In the picture above it looks like it is only supported by the jack. Even with jack stands I dont trust them when using pry bars or something with alot of leverage. If I was doing something that took alot of leverage, I would put the tire under the frame. I have had trucks to come off of jack stands.
From top to bottom I have the parts off in the order they came off.
Remove the 6 bolts and remove the dial assembly. Dial at the FREE wheel position.

I see these hubs all banged up trying to get the cone washers off. They can be difficult but with a little patience you can do it without scarring the hub up. Some bang on the hub. I run the nut to the end of the stud and just gently tap my way around on the end of the stud on top of the nut.. If a cone doesnt come loose, just go to the next one. Eventually one will break loose and the others tend to follow. Using a oil spray a few days ahead of time helps. (Tap on top of the nut and not at the angle that the hammer is showing) A brass punch would be better but gentle strokes will get the cones loose.

Small pliers works great for getting to the conewasher.

I need to get a 54mm socket that is 3/8th driven but for now I have a 2 1/8th three quarter drive that is the same size to loosen the nut.

Bend the tab back on the lock ring to get access and remove the other nut that is behind the lock ring. Once you take the brake assembly off ( I should of done that ahead of time) you can remove the complete hub assembly. On the other side of the jack there is a jack stand.

I like to have two sets of support. In the picture above it looks like it is only supported by the jack. Even with jack stands I dont trust them when using pry bars or something with alot of leverage. If I was doing something that took alot of leverage, I would put the tire under the frame. I have had trucks to come off of jack stands.
From top to bottom I have the parts off in the order they came off.

Last edited by Terrys87; Sep 10, 2015 at 11:48 AM.
Sep 10, 2015 | 04:34 PM
#1328
Contributing Member
Joined: Sep 2005
Posts: 8,247
Likes: 497
From: mo
Thanks for the pics of the hub and bearings, it's cool to see there is a lot of difference between those and the ones on my 3rd gen. I knew they weren't the same, but didn't know how they were different.
Also yet another cool tip in the Easy-Off.
Also yet another cool tip in the Easy-Off.
Sep 11, 2015 | 02:29 PM
#1329
Thread Starter
Super Moderator
iTrader: (1)
Joined: Aug 2008
Posts: 11,787
Likes: 28
From: Anderson Missouri
Hello hab.. I will have to take a look at the hubs you have and see the difference. Got me curious now. The Easy Off works great on grime, wish I would of known of it earlier.
Sep 11, 2015 | 02:43 PM
#1330
Thread Starter
Super Moderator
iTrader: (1)
Joined: Aug 2008
Posts: 11,787
Likes: 28
From: Anderson Missouri
I got tied up today and finally got the drivers front bearing done. It helped with some of the noise I have been chasing but not all of it. It still needed to be done. PO stuck in the wrong bolt for the brake caliper so will be getting one of those from Toyota. Someone also buggered up the locking nuts since they did not have a 54mm socket.
After I pulled the brake caliper and then the hub off, I had to drive out the old race bearing. There are four notches that give you access to a punch it out.
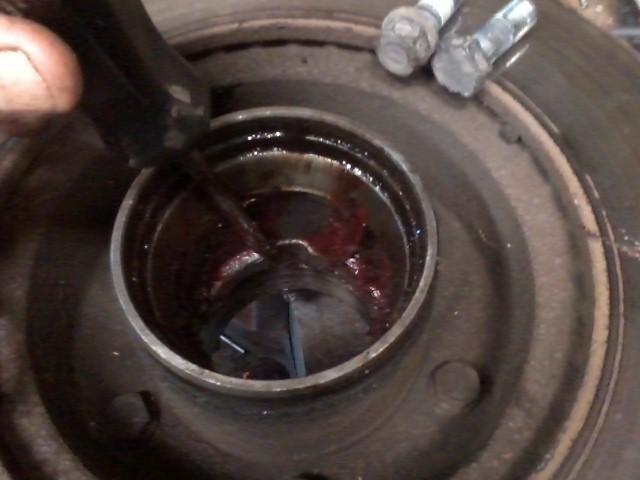
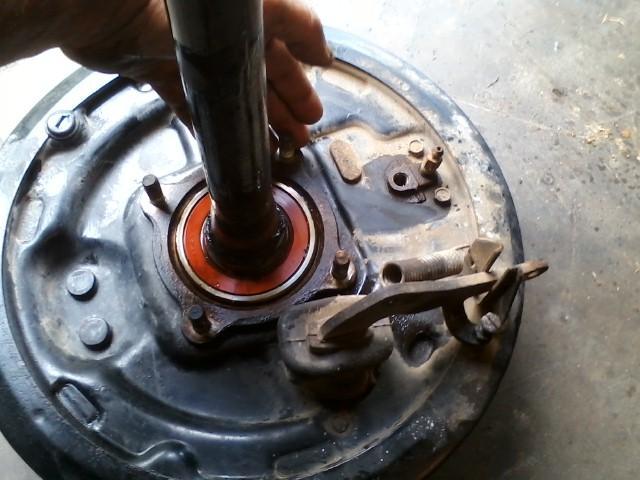
I need to get a press or a Race bearing drive kit but I used the old race bearing to drive in the Inner Bearing. I took the old race and run it across the grinder to give it a smaller diameter so as it would not stick in the hub.
I also used the old race to help press the seal in.
Here you can see some one used a puch to get the locking nut off. I have seen this before as a 54mm or a 2 1/8 socket can be hard to find. I just dressed the rough edge up on the bench grinder.
Put a little grease on the spindle, installed the hub and greased the bearing. I need to get a bearing greaser. Those are nice to have. Add it to the list of tools I will be getting.

I did not get a picture of it but I used the old outer race to drive in the new race for the outer bearing. Then I used my 54mm socket to finish driving that race in. Then I installed the outer bearing and the lock nut, lock washer, then lock nut.
After tightening the lock nuts to proper torue I installed the wheel to make tightening the hub easier. The manual says 43 pounds. Most of this is just to give an idea on how to do the bearings and to show it is not to bad to do but still have a manual to follow more step by step.
After I pulled the brake caliper and then the hub off, I had to drive out the old race bearing. There are four notches that give you access to a punch it out.

I need to get a press or a Race bearing drive kit but I used the old race bearing to drive in the Inner Bearing. I took the old race and run it across the grinder to give it a smaller diameter so as it would not stick in the hub.

I also used the old race to help press the seal in.

Here you can see some one used a puch to get the locking nut off. I have seen this before as a 54mm or a 2 1/8 socket can be hard to find. I just dressed the rough edge up on the bench grinder.

Put a little grease on the spindle, installed the hub and greased the bearing. I need to get a bearing greaser. Those are nice to have. Add it to the list of tools I will be getting.

I did not get a picture of it but I used the old outer race to drive in the new race for the outer bearing. Then I used my 54mm socket to finish driving that race in. Then I installed the outer bearing and the lock nut, lock washer, then lock nut.
After tightening the lock nuts to proper torue I installed the wheel to make tightening the hub easier. The manual says 43 pounds. Most of this is just to give an idea on how to do the bearings and to show it is not to bad to do but still have a manual to follow more step by step.

Last edited by Terrys87; Sep 15, 2015 at 02:03 PM.
Sep 14, 2015 | 10:41 AM
#1332
Thread Starter
Super Moderator
iTrader: (1)
Joined: Aug 2008
Posts: 11,787
Likes: 28
From: Anderson Missouri
Thanks Robb... A member on here was asking about the hubs and realized I did not have any good pictures to refer him to. Sometimes it is nice to see what you are getting into if someone is new to a task. Hope it helps someone in the future and not having all the available tools maybe they can see other ways of getting things done.
Sep 14, 2015 | 10:50 AM
#1333
Thread Starter
Super Moderator
iTrader: (1)
Joined: Aug 2008
Posts: 11,787
Likes: 28
From: Anderson Missouri
ARGHH!!!! Part store part bit me again. Wasn't that many miles ago I had to replace a U-Joint. I did not have the time to wait for a shipment online so I got one from the part store. It was what was causing my issue. I was sure it was not the U-joint or drive shaft. I know it is not the driveshaft as it is the original one and has never been damaged or abused.
I have installed U-joints but now I just pull the drive shaft and take it to a shop and let them do it since I don't have a press. It can be done at home but is something I will just have done and it only cost about $10 for a shop to do it right. A U-joint failing can have some bad consequences if it fails, well worth having a press to do the job.
I bought a guys parts a few years ago and have several drive shafts from 1st, 2nd, and 3rd gen trucks. I went a measured which one I needed and found one that fit. I installed it and right away I knew I had found the problem. I did eventually put it on jack stands and look for vibrations and it was the front that had failed.
Not all bad I guess as I did get a wheel bearing fixed that was going bad so some good come out of it. Parts stores need to bring up their quality.
Sep 15, 2015 | 01:52 PM
#1336
Thread Starter
Super Moderator
iTrader: (1)
Joined: Aug 2008
Posts: 11,787
Likes: 28
From: Anderson Missouri
Hello 87hoerunner...The U-joint I don't think had 2500 miles on them and still looked great. I was so sure it was something else that I spent a lot of time checking out everything else. I should of put it on jack stands and started testing it out the way I would of on a truck I had not worked on in the past. I was starting to think it was in the transfer case or even transmission. The first time the U-joint went bad, I had to get a part store part to fix it. They really need to get their quality up.
Hello GeoRoss..I am almost positive it is in the wiring somewhere. I swapped parts over to my 86 Runner and 85 truck and tested each part and none of them caused my the other two trucks to overheat. I bought new Denso TPS and O2 sensors on top of all of the tested parts. On top of every electrical part I ran test out of the FSM and each one passed as well.
Here is all the parts I tested and swapped to my other two trucks, TPS, O2 Sensor, Thermo Water Sensor, Cold Start Injector, CSI Timing Switch, Fuel Pump, Injectors, Tried 3 different 88 computers, Exhaust Manifold, removed Catalytic Converter, Plugs, Wires, Cap and rotor, AFM, Coil and Igniter, EGR, new vacuum line hoses, Fuel Filter. Even swapped in another 88 Injector Harness.
Then I took it to Toyota and had it put on their computer. They said everything checked out fine. I got it 15 miles from the dealer and the manifold was just cherry red. I took it back to them and they said it was no problem. I knew that was wrong. I then took it to several mechanics in Joplin and surrounding areas and some were just as baffled as I was.
It was a big job but I then stuck the 88s motor into my 85 pick up and it runs great and no cherry manifold.
So then I took the motor out of my 86 Runner and installed it into the 88 knowing it is in great shape with in 15 miles, the manifold started glowing. The 86s motor I have about 50k miles on it in over three years and it has never had a problem. I was really concerned about melting a piston running it with a cherry manifold.
After all of that I then took the wiring harness from bumper to bumper out of my 86 and installed it in the 88 and it is running great. I put on 1500 miles a month just in work miles and it has glowed once. My 86 is stripped down as of now but it is just reassembly. I know where some more 4Runner harnesses are at and I will pick one up here in the next few months and build it back up.
Misty likes her truck and I have my 85 so my 86 will have to go back into the build stage again. I just need to finish building a motor for it and install a new harness and it will be back on the road. I am getting hers back in tip top shape and when it is done, I am getting my 85 completely finished. Then I will get back on my 86.
One thing I did learn out of all of this when dealing with Toyota and other mechanics. There were some mechanics that were honest flat out told me I knew more about the 22re then they did and they work on trucks every day. Then there was the others that said to just drive it or it was okay. One said I needed to swap in a 350 Chevy motor into it.
I did meet one mechanic that said he had dealt with the same thing with 2 other trucks and never could find it and was hoping I would be able to let him know. We spent about 1 1/2 hours talking about the 22r/e motor and exchanging information. I showed him some test out of the FSM that he had never run or some things to check for. We showed each other how to do some quick checks on these motors and how to quickly identify some problems and what to look for. It was a great time and I learned a few things from him.
Last edited by Terrys87; Sep 15, 2015 at 01:54 PM.
Sep 15, 2015 | 07:07 PM
#1337

Registered User
Joined: Nov 2004
Posts: 130
Likes: 5
From: Arizona
That is some pretty awesome detective work. I'm glad you have it narrowed down and it is fixable. It really did take brute force to get it done. I don't think I could have done it myself. I am truly impressed.
I'm trying to figure out how a harness could cause this problem without throwing a code. I could see an ECM, but you tried three. This is a real stumper for sure.
I'm trying to figure out how a harness could cause this problem without throwing a code. I could see an ECM, but you tried three. This is a real stumper for sure.
Sep 17, 2015 | 03:19 AM
#1338
Thread Starter
Super Moderator
iTrader: (1)
Joined: Aug 2008
Posts: 11,787
Likes: 28
From: Anderson Missouri
Thanks GeoRoss... Toyota used some poorly designed wire crimps in all of the harnesses. The ones in the injector harness I have seen fail a couple of times. They can corrode and still pass voltage but not enough to fire the injector. I have been in the main harness and there are several more crimps in there. An easy one to find is in your tail light. Remove the tail light assembly and you will see a piece of black tape and under the tape is the crimp. It will either be shiny or corroded.
I suspect that maybe one of them was not passing all of the voltage that was needed to the computer. Like maybe the O2 sensor was sending a weak signal and the computer was adjusting for it. That is just one of the circuits. It could be any of them and taking the harnesses apart and getting each crimp would be a mess real quick. They combine so many branches off of the harness real quick.
There is like 5 within a foot of the computer in the main harness. There is several more thru out all of the harnesses. I think age is going to start taking their toll on the harnesses. Wires are just going to get brittle and the for running the computer and EFI system is going to be a problem in the future.
I have already had to chase an issue on my 85 due to a poor connection but did get it fixed but is one reason that build has stopped. I am collecting the parts to make it a carb truck. I plan on making it my daily driver as a pickup is more usable for me. The 22 motor is great but it is the EFI that is going to become the weak link in the long run.
The 22r is a basic set up and the wires just run the basic such as lights. Put a Weber on them and that eliminates a lot of the issues on the 22 motor. It is a set back but a friend told me along time ago that 22r was the way to go and I finally agree.
Sep 18, 2015 | 08:37 AM
#1339
Thread Starter
Super Moderator
iTrader: (1)
Joined: Aug 2008
Posts: 11,787
Likes: 28
From: Anderson Missouri
It has been a battle but today I took the runner out to Timbuktu having to replace my phone that I ruined. I was zipping down the highway and did not realize I was running 80 mph and it still had some speed left in it and it was running, driving, and riding probably about as good as it did when it was new. At 80 I did have one of the rear tires with a slight out of balance. I will take it to the tire shop this weekend if all goes well. I think it is running about as quiet as my 3rd gen. My only gripe with the older trucks is no Cruise Control but other then that I just soon take this one on a long distance road trip as I would my third gen.
I did try to fix a minor oil leak and thought I had it fixed. I looks like it is leaking on the rear half moon seal. I pulled it and added new sealant on the seal and it still had a small drip this morning. I will just replace the valve cover gasket and half moons and see if that fixes the leak. Once I get that leak fixed, I will be leak free. It is not much of a leak but I want it sealed up well.
For a truck that was advertised as a parts truck or rock crawler, I really enjoyed the long ride in it today. It really did not feel or look like I was driving a 27 year old truck. What makes building one so great and where the pay off is in the drive. It was a quiet ride so that made the new exhaust system a great investment. Of all the cars I have owned this one is my favorite. If I was buying a new one in 88, I am sure I would of never picked a white one with red interior, or a tan 85 with brown interior but things change as you get older.
Last edited by Terrys87; Sep 18, 2015 at 08:41 AM.


