
Terrys87 88 4Runner Restoration/Build thread
 Jul 20, 2011 | 01:15 AM
#381
Thread Starter
Super Moderator
iTrader: (1)
Joined: Aug 2008
Posts: 11,787
Likes: 28
From: Anderson Missouri
Thanks guys.. Things are getting better. Had a great time and caught some bass, it was worth it.
Went to change my drive train oils and thought I had more, but only had enough to do the rear end. So I started another small project, the mirror/light assembly. So far I feel good about how it has gone so far. Alot better then my tranny experiment.lol
Went to change my drive train oils and thought I had more, but only had enough to do the rear end. So I started another small project, the mirror/light assembly. So far I feel good about how it has gone so far. Alot better then my tranny experiment.lol
Last edited by Terrys87; Jul 20, 2011 at 01:35 AM.
Jul 20, 2011 | 01:26 AM
#382
Thread Starter
Super Moderator
iTrader: (1)
Joined: Aug 2008
Posts: 11,787
Likes: 28
From: Anderson Missouri
I have some extra parts and wanted to try something that wouldnt cost a whole lot. Most of us have dealt with the broken rear view mirror and trying to find one in a salvage is lucky at best and when you do, they are expensive around here. Seen some on ebay from $40 and way on up before.
You can find the rear view mirror with out the light assembly a whole easier and since I had one broken with light and 2 dummy light holders, thought I would give it a try. Only have about 45 minutes in this.
Only tools I had in this is a small drill bit, small flat blade screw driver and a bench grinder to knock off the burr.
First I drilled out the rivet from the backside and did have to use a nail to tap out the rivet. Then I would have to grind the burr off and work the top of the rivet out with the screwdriver and moved the parts over.
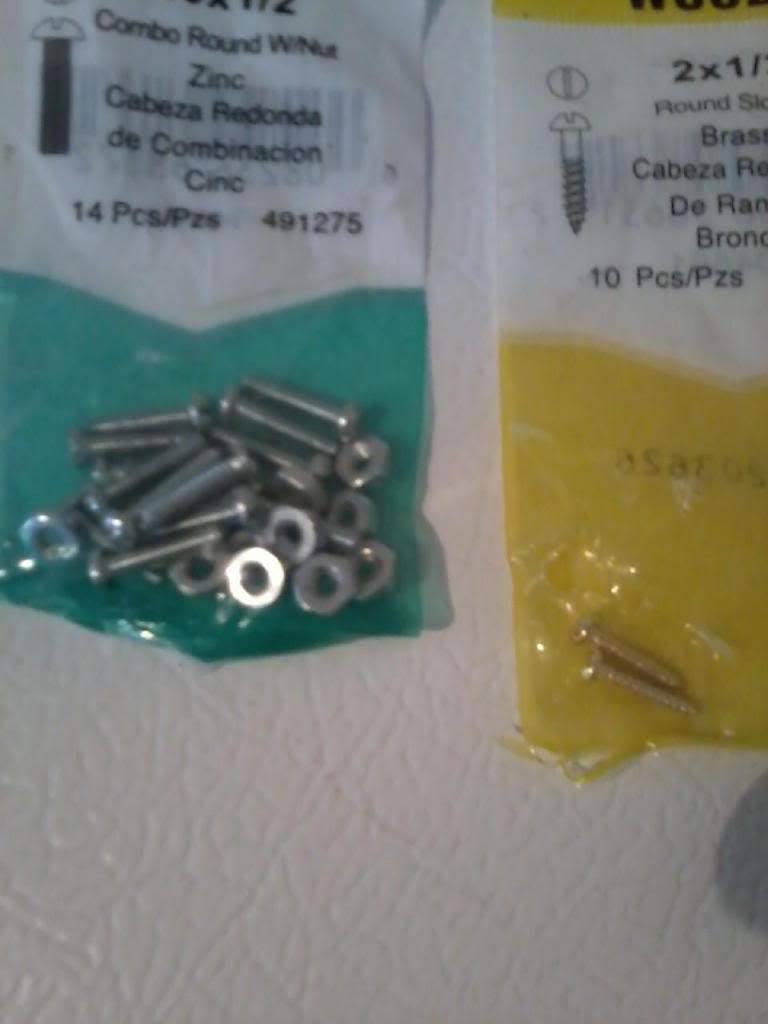
I am going to glue the electrical runs down with super glue and see if I can find some small screws or rivets when I go to town. I might have to find a small screw and nut for the light switch but feel this will work. When I get this 100% done I will come back and edit this page. Might even add it to my fix list.
Typical of where the mirror breaks on the mount on the right mount, top-right hand corner.
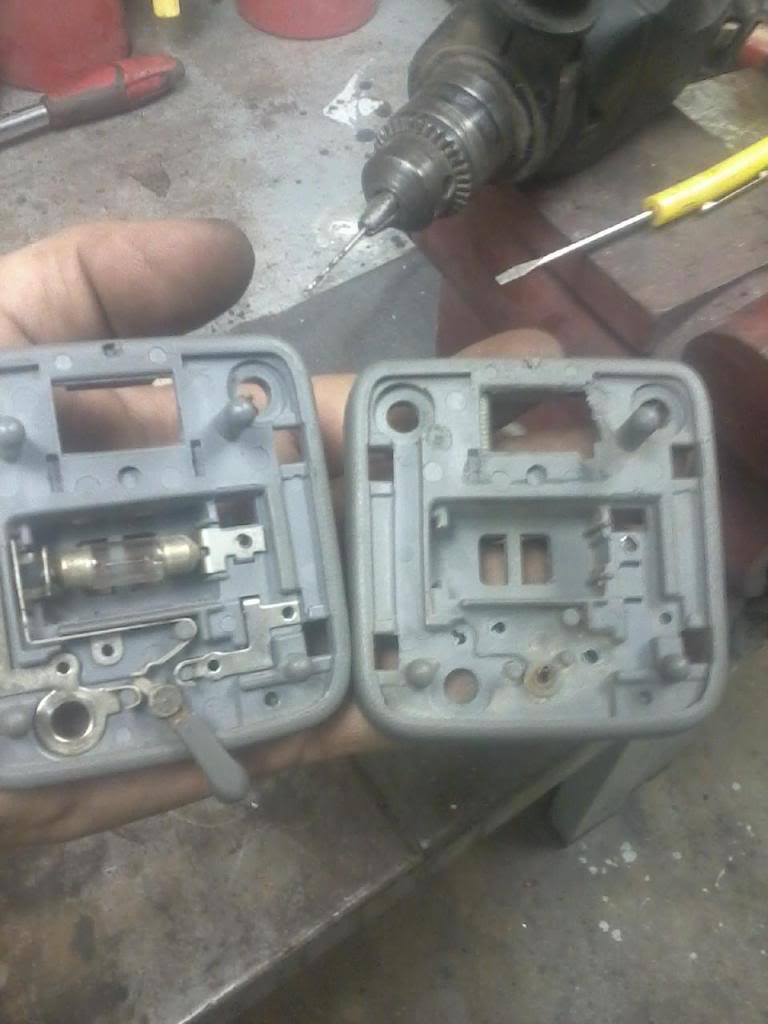
I used some brass screws and glued the back of the electrical contacts down. Put a drop of glue on the back side of the screws.
Got it working and only had about $4 and 1 hour into it. Alot cheaper then getting a new one. Just covered the light some to cut down on the glare for the pic. That bulb gets hot.

You can find the rear view mirror with out the light assembly a whole easier and since I had one broken with light and 2 dummy light holders, thought I would give it a try. Only have about 45 minutes in this.
Only tools I had in this is a small drill bit, small flat blade screw driver and a bench grinder to knock off the burr.
First I drilled out the rivet from the backside and did have to use a nail to tap out the rivet. Then I would have to grind the burr off and work the top of the rivet out with the screwdriver and moved the parts over.
I am going to glue the electrical runs down with super glue and see if I can find some small screws or rivets when I go to town. I might have to find a small screw and nut for the light switch but feel this will work. When I get this 100% done I will come back and edit this page. Might even add it to my fix list.
Typical of where the mirror breaks on the mount on the right mount, top-right hand corner.
I used some brass screws and glued the back of the electrical contacts down. Put a drop of glue on the back side of the screws.
Got it working and only had about $4 and 1 hour into it. Alot cheaper then getting a new one. Just covered the light some to cut down on the glare for the pic. That bulb gets hot.
Last edited by Terrys87; Jun 3, 2014 at 11:06 AM.
Jul 20, 2011 | 11:05 AM
#383
As always, ....great detail!
Far as the trans.... yeah, Now you got me worried! lol. I'ma ask them if they're let me sit in when it's time though, ...sign a waiver, whatever, ya know? lol. I'm REALLY wanting to learn every nook and cranny of the 'big stuff' on these.... so I'll have to ask if I don't do it myself. My machinist said, "If I have time, SOME DAY, you can bring it in and do it here, we'll make it like new in one day, granting you have the parts.... I have all the tools you'll need. Just let me know, but as you know, it can't always be 1-2 DAYS with me!" lol.
Far as the trans.... yeah, Now you got me worried! lol. I'ma ask them if they're let me sit in when it's time though, ...sign a waiver, whatever, ya know? lol. I'm REALLY wanting to learn every nook and cranny of the 'big stuff' on these.... so I'll have to ask if I don't do it myself. My machinist said, "If I have time, SOME DAY, you can bring it in and do it here, we'll make it like new in one day, granting you have the parts.... I have all the tools you'll need. Just let me know, but as you know, it can't always be 1-2 DAYS with me!" lol.
Jul 20, 2011 | 02:32 PM
#384
Thread Starter
Super Moderator
iTrader: (1)
Joined: Aug 2008
Posts: 11,787
Likes: 28
From: Anderson Missouri
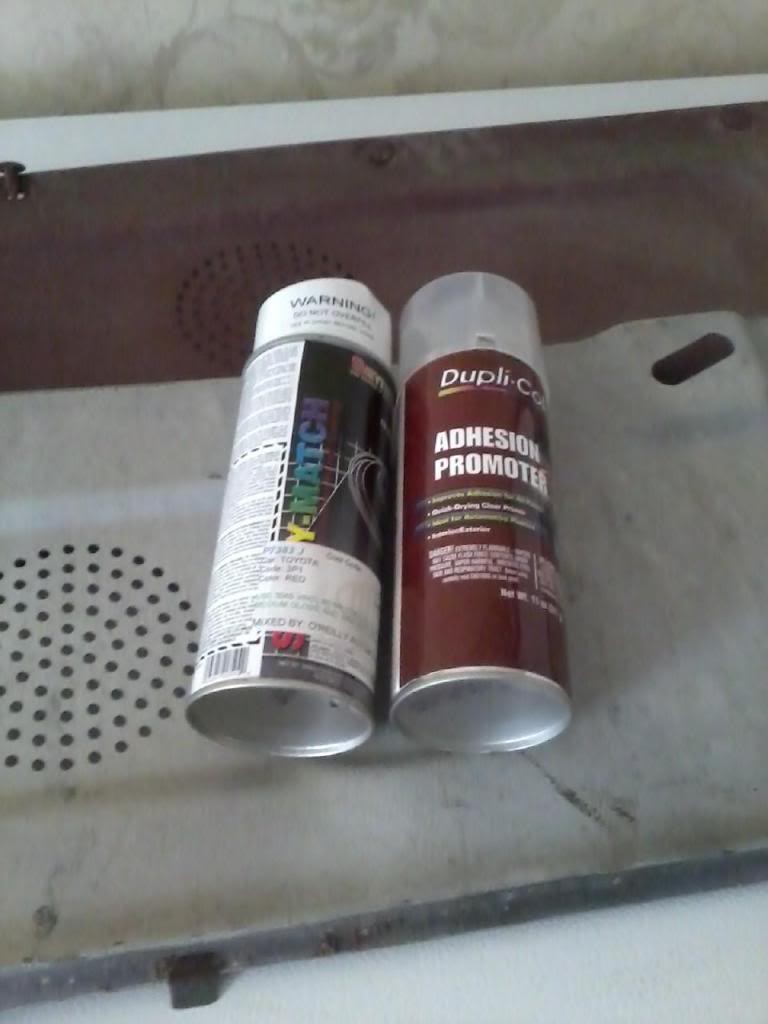
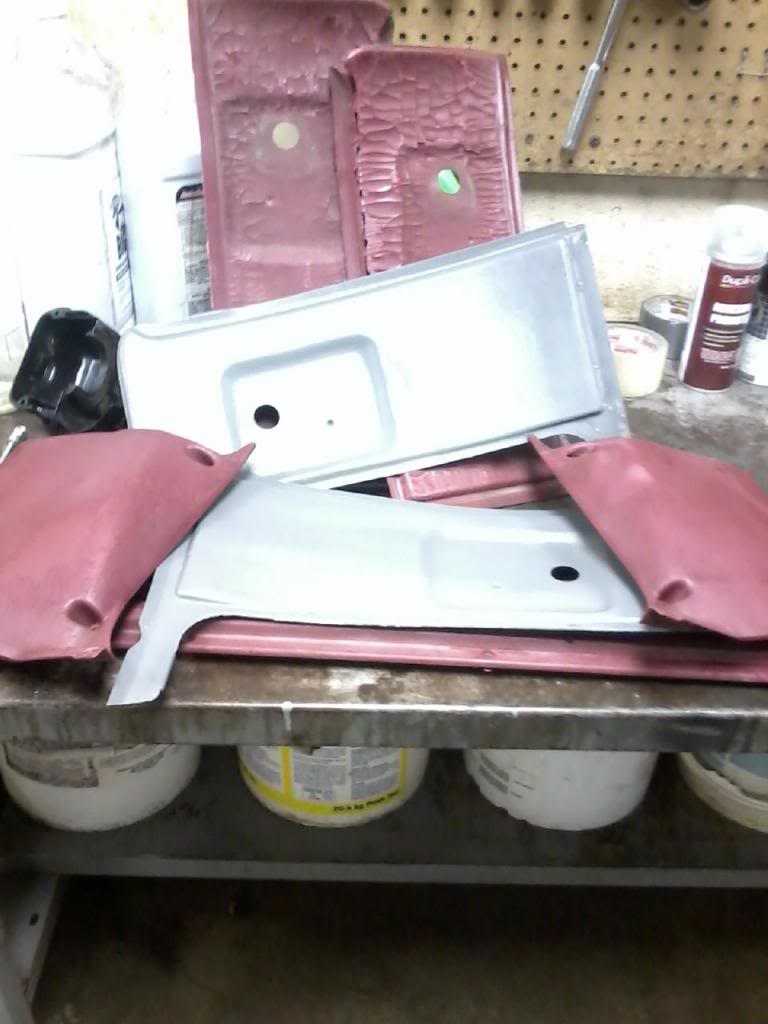
I have some rear interior panels that are really bad. I asked my paint guy at Oriellys if he could make up some Interior Paint and he said yes. He needed a sample piece. I took one out of the Runner and he mixed it up. He can make it for a spray gun or rattle can. I asked for rattle can.
It was $20 for a can of red and $8 for adhesion. One of my panels was a grey panel. If I was doing it over again, I would of primed it but really happy how it turned out.
I did some test spots on the seat and carpet. Think I will do them when I get more paint.
For the Cranberry Red Interior it is paint code 3P1 or is what I had mixed.
Link for Grey Interiors. Death Cougars thread. https://www.yotatech.com/forums/f116...on-how-167686/
The top right corner of the red panel is better then what the rest of the panel looked like. Some places were white from being faded so bad.
Finished panel next to the vinyl. The carpet I had used a off of the shelf paint along time ago to get it from Pink. Will go get some new clips and paint them. The panel is just setting there for now.
Last edited by Terrys87; Nov 7, 2012 at 12:15 AM.
Jul 22, 2011 | 02:14 AM
#387
Thread Starter
Super Moderator
iTrader: (1)
Joined: Aug 2008
Posts: 11,787
Likes: 28
From: Anderson Missouri
Hey Chef, sure wish I had somebody that could guide me on a tranny rebuild. Its expensive around here, be all over that. I was wanting to see how hard it would be to do as to what I been understanding the Pilot Bearing is what makes a noisey 5th gear. My extended cab is noisey. I have a tranny that I will swap out of it and will see on that one. May have to expand my tools.
Hello Jason..lol the panels was actually quite easy. Cleaning was the hardest part.
Hi Dutchbelly..I was really happy how it turned out. I think if I would of done a light coat of primer I wouldnt of needed so many coats of paint.
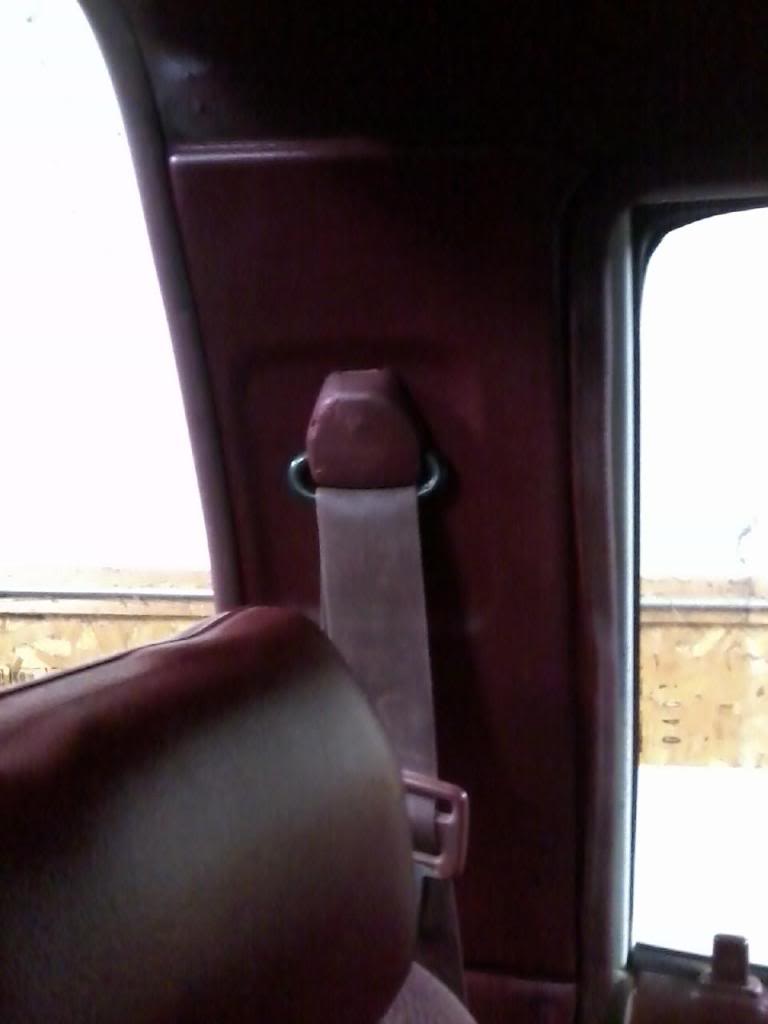
I got my dome light working. Updated it above. I used this one as test to see if how it would turn out. That dome light is for the 89-95, but it can be done on 84-89 Runners. Now I need to go find a broken dome light in the bone yard so as I can get a dome light for my mirror in the runner.
Boneyard wont charge me an arm and a leg for a broken one. I like a light at the mirror. The one that goes in between the front and back seats is good, but I like one further up.
I also need to come up with a fix for the one in between the two seats. My black switch was broken under neath the cover. I got one out of 2 of my partstruck and both broke also.
Hello Jason..lol the panels was actually quite easy. Cleaning was the hardest part.
Hi Dutchbelly..I was really happy how it turned out. I think if I would of done a light coat of primer I wouldnt of needed so many coats of paint.
I got my dome light working. Updated it above. I used this one as test to see if how it would turn out. That dome light is for the 89-95, but it can be done on 84-89 Runners. Now I need to go find a broken dome light in the bone yard so as I can get a dome light for my mirror in the runner.
Boneyard wont charge me an arm and a leg for a broken one. I like a light at the mirror. The one that goes in between the front and back seats is good, but I like one further up.
I also need to come up with a fix for the one in between the two seats. My black switch was broken under neath the cover. I got one out of 2 of my partstruck and both broke also.
Jul 23, 2011 | 06:37 AM
#389
Thread Starter
Super Moderator
iTrader: (1)
Joined: Aug 2008
Posts: 11,787
Likes: 28
From: Anderson Missouri
Hello Twisted... It was a 2WD tranny and I didnt have all of the tools to get it apart. When I change out my wife tranny, I am going to invest in the tools I need to do it. I wont destroy it. If I think I am going to get in over my head I will stop and let a pro do it.
My Snap rings just wouldnt get one clip. It had shavings in the tranny and wouldnt stay in gear, so I junked it out. I have been having to get things cleaned and organized around here. I will have a lot more patience with the 4WD.
My Snap rings just wouldnt get one clip. It had shavings in the tranny and wouldnt stay in gear, so I junked it out. I have been having to get things cleaned and organized around here. I will have a lot more patience with the 4WD.
Jul 23, 2011 | 06:50 AM
#390
Thread Starter
Super Moderator
iTrader: (1)
Joined: Aug 2008
Posts: 11,787
Likes: 28
From: Anderson Missouri
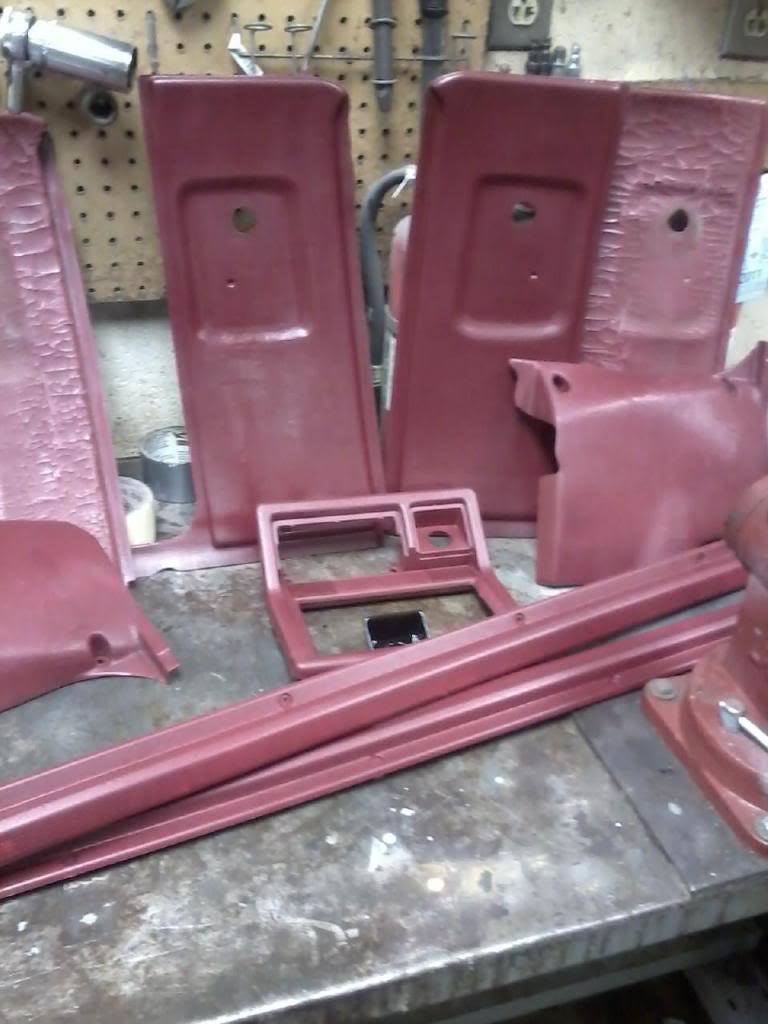
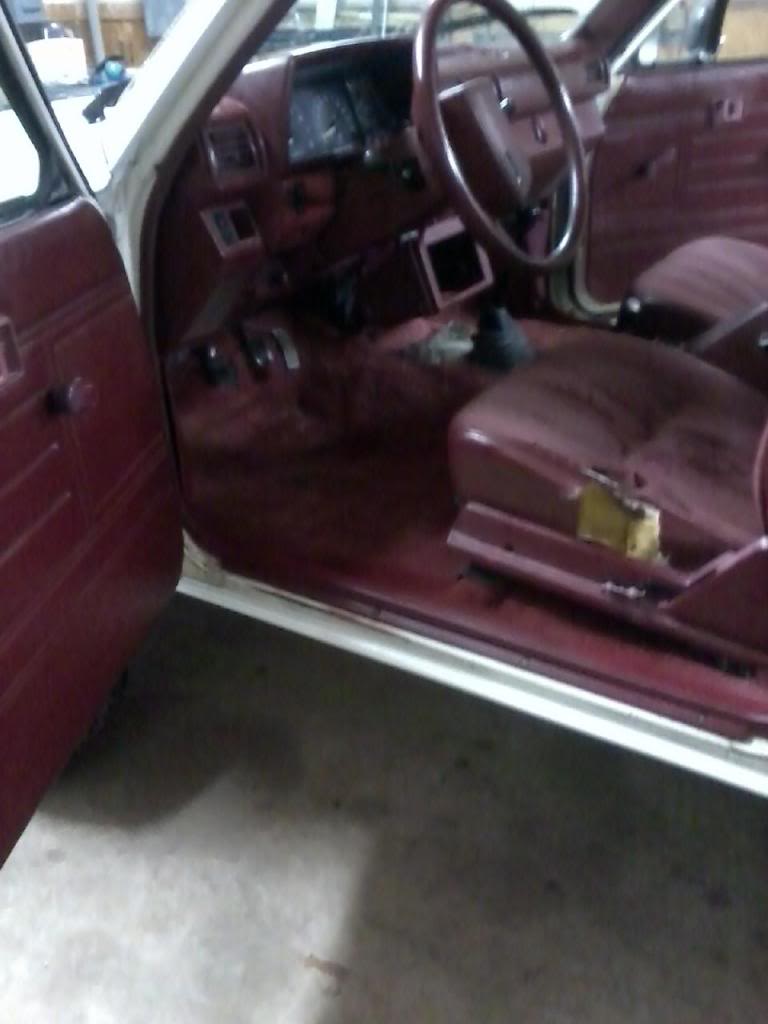
I have been doing some more interior painting. Wish I had a picture of the truck interior when I first got it. Hope this gives hope to someone that might have the red interior.
Some one on here did a thread on a Grey interior. I think it has turned out really well. It might look a shade off, but where I painted that wasnt faded, you could not tell the color difference. It has just faded that much. Also I think that the plastic and vinyl has some part in the shade difference.
Overall, it looks a lot cleaner.
Old pieces with the Grey ones getting ready for paint.
Newly painted pieces. Grey was covered up nicely.
Jul 24, 2011 | 07:56 PM
#391
Registered User
Joined: Apr 2011
Posts: 428
Likes: 0
From: Southern Ontario
Are those old pieces that warped from the sun? That's crazy what has happened to them. Be sure to throw up some pics of the truck after the painted pieces all get installed, they look worlds better than the old ones.
Jul 26, 2011 | 12:41 AM
#392
Thread Starter
Super Moderator
iTrader: (1)
Joined: Aug 2008
Posts: 11,787
Likes: 28
From: Anderson Missouri
Thanks Dutchbelly.. Those were the old pieces that warped and cracked from the sun. I also have some behind the seats below the center post that is getting bad. I have some grey pieces to replace them too. Just got to get them painted.
I should of gotten some photos when I first got the truck. Backglass was busted out for 2 years when the PO owned it and had moss growing in it. Took the carpet out of the trunk area and it had lots of oil in it. A cat had made it home in it and pee in it. It was embarrassing when I got it. I have come along way on it.
Still have a ways to go. Been getting the kids doctor bills paid off from his broken arm and the wife goes back to teaching again later this month so things should start to move on it here pretty soon. Plans are to focus on the interior. I have been doing small things. One more piece closer to getting it done.
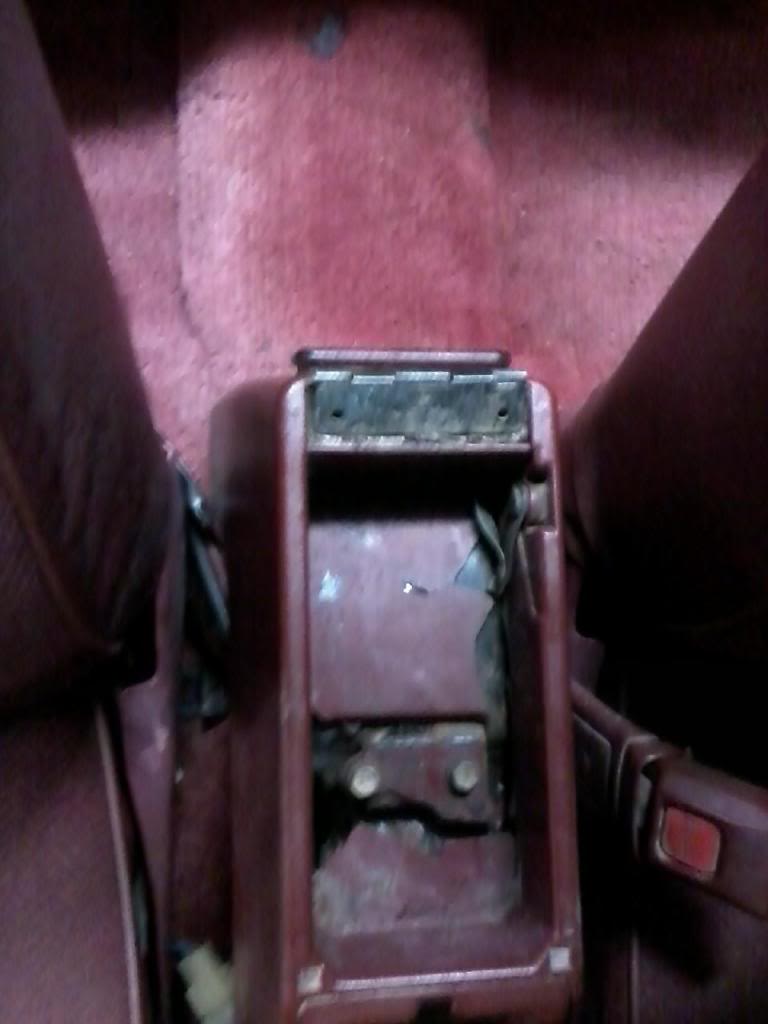
Here is the Center Console. Busted up. Plan on giving my try at fiberglass and cup holders. If it is a total failure, guess I will be finding a new one. Also a test spot behind the console to see how coloring the carpet would work out. I am replacing the carpet. If it wasnt so beat down it would work.
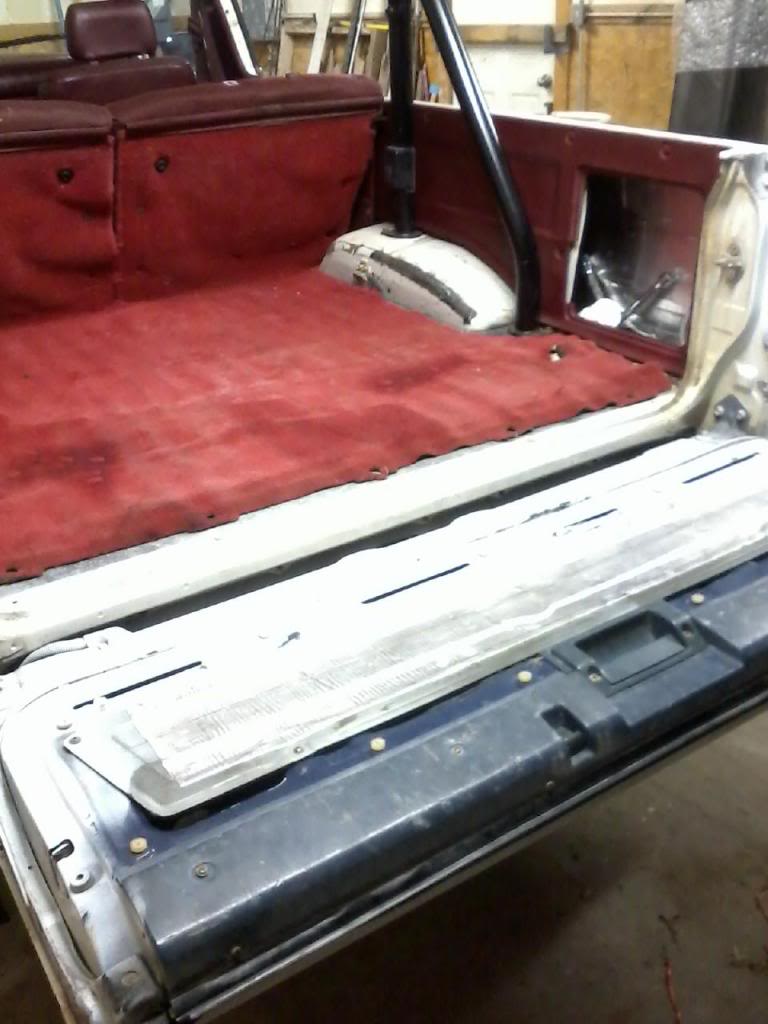
Here is the trunk area. I am missing the one foot square panels. This rear carpet probably had a gallon of oil in it and tree moss. Just washed at a carwash and used a red dye to help it out for a temp fix. I will eventually get the blue painted. I have some original pieces to put on.
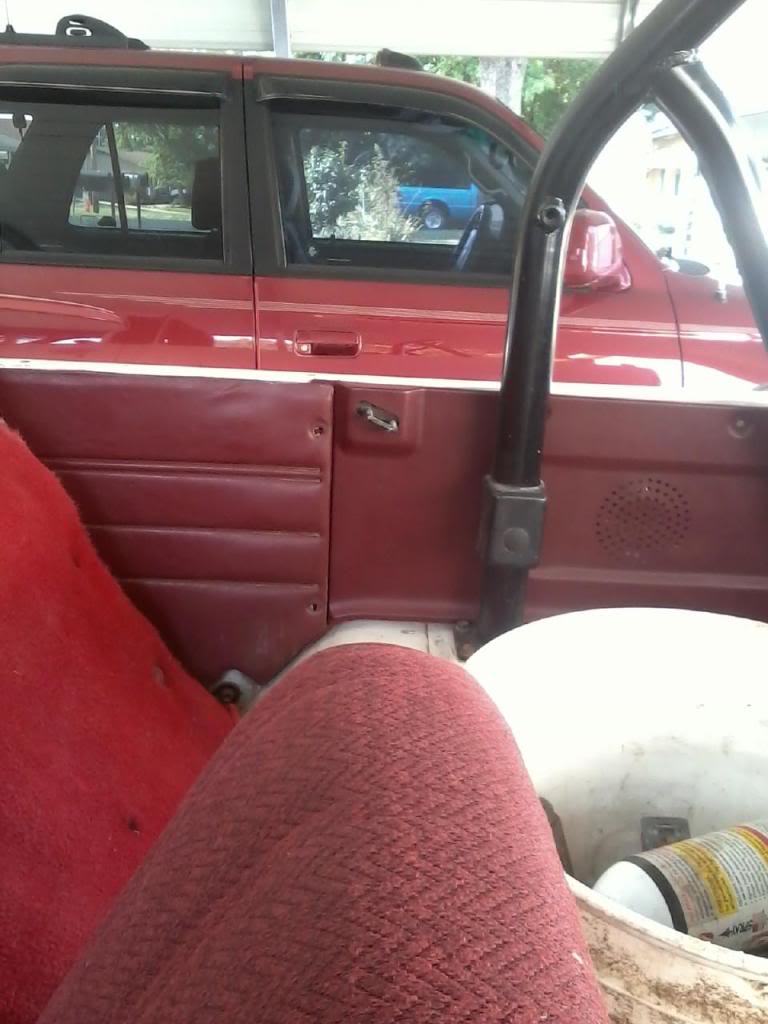
Here is a couple of the pieces I painted. The faceplate for the stereo and door trim. They turned out nice. This will make a good "before" pic.
Here is one of the post panels that were grey. It takes 3 or 4 coats but turns out great. May be poor picture quality, but they look new when up close.
I should of gotten some photos when I first got the truck. Backglass was busted out for 2 years when the PO owned it and had moss growing in it. Took the carpet out of the trunk area and it had lots of oil in it. A cat had made it home in it and pee in it. It was embarrassing when I got it. I have come along way on it.
Still have a ways to go. Been getting the kids doctor bills paid off from his broken arm and the wife goes back to teaching again later this month so things should start to move on it here pretty soon. Plans are to focus on the interior. I have been doing small things. One more piece closer to getting it done.
Here is the Center Console. Busted up. Plan on giving my try at fiberglass and cup holders. If it is a total failure, guess I will be finding a new one. Also a test spot behind the console to see how coloring the carpet would work out. I am replacing the carpet. If it wasnt so beat down it would work.
Here is the trunk area. I am missing the one foot square panels. This rear carpet probably had a gallon of oil in it and tree moss. Just washed at a carwash and used a red dye to help it out for a temp fix. I will eventually get the blue painted. I have some original pieces to put on.
Here is a couple of the pieces I painted. The faceplate for the stereo and door trim. They turned out nice. This will make a good "before" pic.
Here is one of the post panels that were grey. It takes 3 or 4 coats but turns out great. May be poor picture quality, but they look new when up close.
Last edited by Terrys87; Jul 26, 2011 at 06:38 AM.
Jul 26, 2011 | 09:07 AM
#393
Registered User
Joined: Jun 2010
Posts: 1,448
Likes: 100
From: Virginia
Wow that paint matched well. If you decide to fix the plastic console with fiberglass be sure to use EPOXY fiberglass not the more common POLYESTER fiberglass. Epoxy plays much better with plastic. Poly melts some plastics. I use West System from a boat store. It's very easy to mix and I've used it on the 4Runner and several home repairs. I rebuilt a fragile 30 year old plastic piece on my kids little sailboat and it worked great. It also does not make any stinky fumes. There are lots of YouTube vids on how to use the stuff.
Jul 26, 2011 | 01:07 PM
#394
Thread Starter
Super Moderator
iTrader: (1)
Joined: Aug 2008
Posts: 11,787
Likes: 28
From: Anderson Missouri
Thanks Nervo.. I didnt know there was a difference. I will be looking into it. I see it done on carshows all of the time, and figured I just need to jump in and do it. Thanks for the heads up on that. Would like to make an arm rest and at least one cup holder.
I am very happy how the painted interior pieces are turning out. Some of the pieces I just clean and put a vinyl protectant on. If is looking bad I will paint it. Long term goal is to get the interior looking as new as possible.
I will be gone for 2 weeks for my guard summer camp. Plan on taking my laptop with me but dont know if I will have time to keep up with others builds. Will be looking to see others progress.
Last edited by Terrys87; Jul 26, 2011 at 11:21 PM.
Jul 27, 2011 | 08:05 AM
#395
Thread Starter
Super Moderator
iTrader: (1)
Joined: Aug 2008
Posts: 11,787
Likes: 28
From: Anderson Missouri
ENG FUSE FIXED!!!! I was coming home from work and lost all of my guages again. No Tach, Alt, Water Temp,Blinkers and maybe some others I may have missed. I think the rear window is on that circuit too. Post #343 has other possibilities that you might want to check. Ground wires is a big one to look into.
I looked in Haynes and looked for the simplest circuit to check. Happened to be the backup light switch on the tranny. It has a protective sleeve and just under the sleeve 2 wires were bare. I had checked other circuits when I orginally had this problem so I didnt mess with them again.
I almost missed these wires, just happened to pull the sleeve just right to see them. This problem seems to come and go.
There are quite a few threads on this but not many answers. Apparently this is a fairly common problem but nobody leaves any answer for their fixes. I found some threads all the way to 2008.
This is what was shorting out. I seperated the two wires and wrapped each one and then wrapped them all the way to the plug. This plug is located on the drivers side.
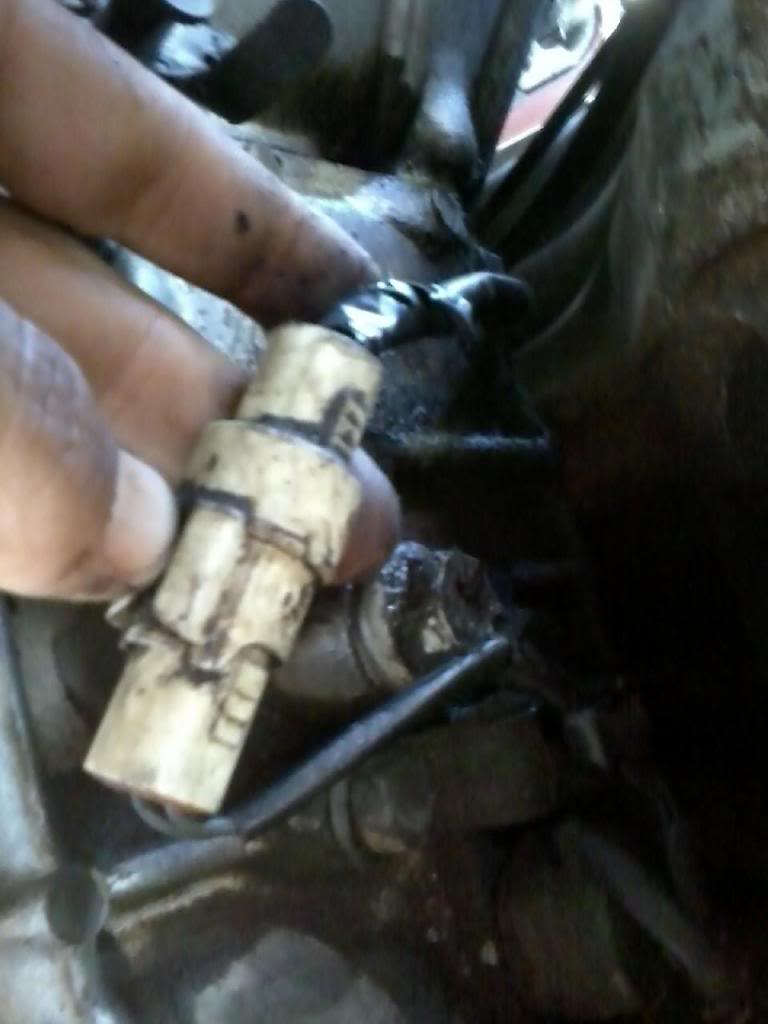
Last edited by Terrys87; Jul 28, 2011 at 10:17 AM.
Jul 27, 2011 | 08:26 AM
#396
Thread Starter
Super Moderator
iTrader: (1)
Joined: Aug 2008
Posts: 11,787
Likes: 28
From: Anderson Missouri
Codes... http://4crawler.com/4x4/CheapTricks/...es/index.shtml
How to get Check Engine Codes. I just put this up for others. Applies to 87 and up. 86 and older is the bottom picture. TE1/E1
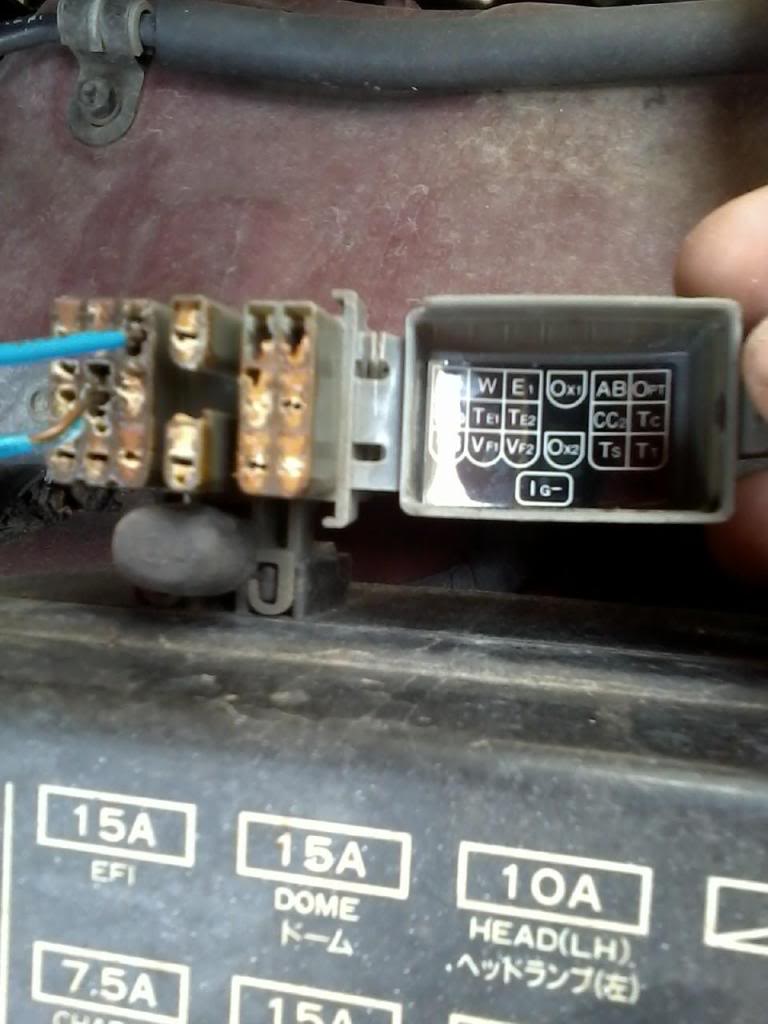
The Diagnostic port for the 85-86 is on the Drivers side inner fender and is nothing the same as the 87 and up. Here is T1 and E1 jumped. The codes and engine flashes are the same as the rest of the trucks on the dash.
Codes...http://4crawler.com/4x4/CheapTricks/...es/index.shtml
http://www.youtube.com/watch?v=9qEQM...ature=youtu.be
Here is how you do a Fuel Pump Bypass on the 85/86.
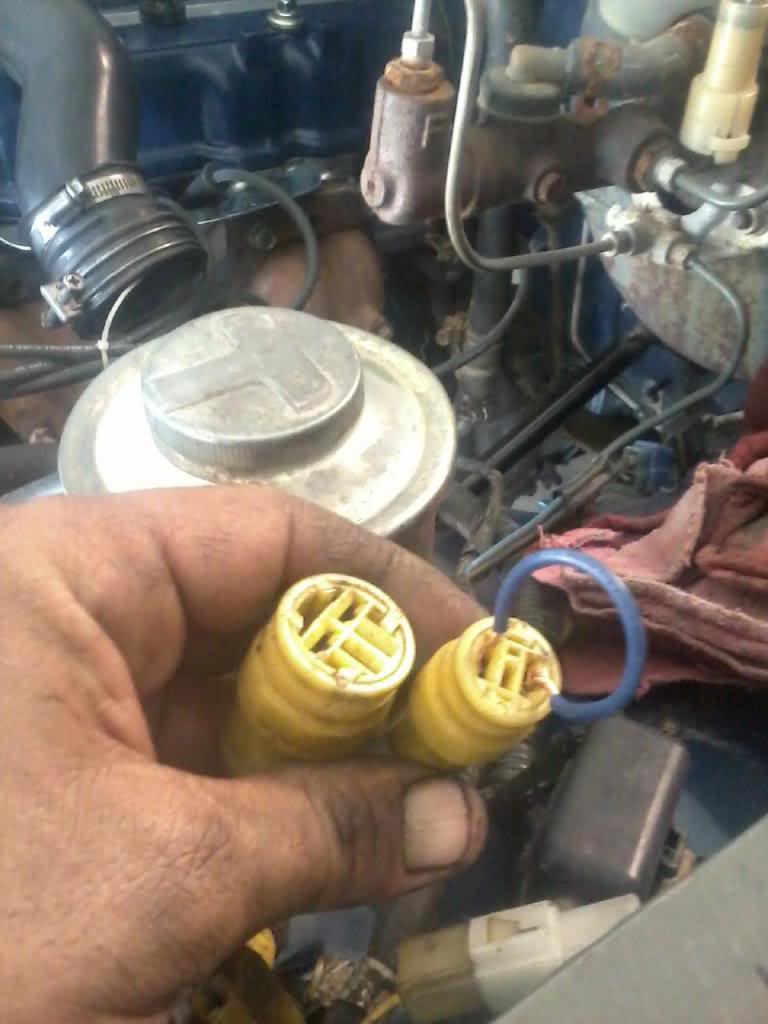
Jumper wire the Yellow Plug on Drivers side. ( Jumper wire should be in both contacts for testing, I just didnt have it in for picture purposes and mostly a referece for me at a later time.)
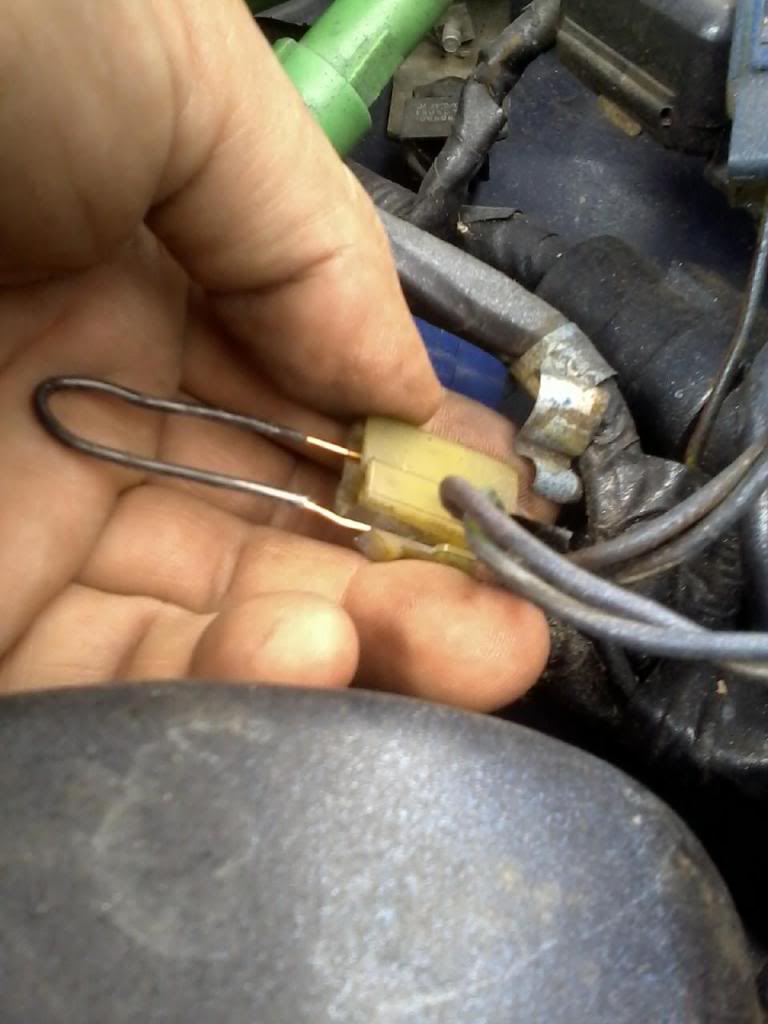
Fp +B Fuel Pump Test for 87 and newer. Use a paper clip for better results.
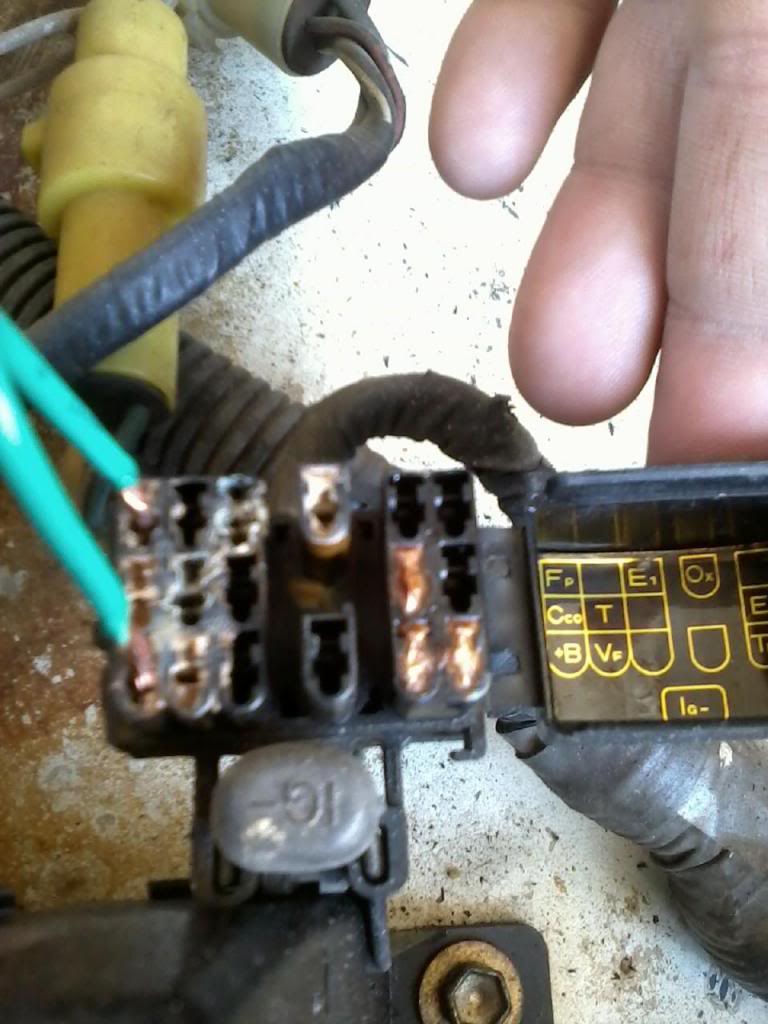
How to get Check Engine Codes. I just put this up for others. Applies to 87 and up. 86 and older is the bottom picture. TE1/E1
The Diagnostic port for the 85-86 is on the Drivers side inner fender and is nothing the same as the 87 and up. Here is T1 and E1 jumped. The codes and engine flashes are the same as the rest of the trucks on the dash.
Codes...http://4crawler.com/4x4/CheapTricks/...es/index.shtml
http://www.youtube.com/watch?v=9qEQM...ature=youtu.be
Here is how you do a Fuel Pump Bypass on the 85/86.
Jumper wire the Yellow Plug on Drivers side. ( Jumper wire should be in both contacts for testing, I just didnt have it in for picture purposes and mostly a referece for me at a later time.)

Fp +B Fuel Pump Test for 87 and newer. Use a paper clip for better results.

Last edited by Terrys87; Apr 14, 2016 at 12:22 PM.
Jul 27, 2011 | 10:00 AM
#397
DAYUMMMMMMMM, I missed a bit, eh? lol.
Nice work on the panels, etc., man! Sorry I missed it,...what is your plan again for the interior, besides 'cherry'n it out? lol. You're going red all over with new paint, etc.?
Maybe a pic of the trans wire stuffs? I'm a lil confused as to where your problem is, ....in the cab or the wiring that wraps round the trans from the harness for reverse and 4wd? Sorry man..... REALLY long days, and so the next ones, even by 11, are a lil "Heh?" hahaha.
Jul 28, 2011 | 10:11 AM
#398
Thread Starter
Super Moderator
iTrader: (1)
Joined: Aug 2008
Posts: 11,787
Likes: 28
From: Anderson Missouri
Hello Chef. I put a picture of it on the original post above. It is actually on the tranny. My pointer finger is pointing to the tape that I wrapped all the way to the plug. It is right on the edge of the protective sleeve and I nearly missed it.
Im not going to paint everything. If it wll shine with a good cleaning and protectant, I will leave it alone. I dont know how it is going to last for the long term, so I want to see how it goes before painting everything.
My brakes have been a little soft. I tried bleeding them an no change. So now I am waiting for the wife to get back and with a new Master Cylinder. I have a spare, but it was not working, I was hoping ole rusty would of helped pay for itself, not today, but it has plenty of times earlier.
I was wanting to eventually upgrade to a V6 setup as I will eventually be doing alot of towing. It will get changed out later, but need it running so I had to bite the bullet and get a new 4 cylinder master cylinder.
Last edited by Terrys87; Jul 28, 2011 at 10:15 AM.
 Let us know.
Jul 28, 2011 | 04:23 PM
Let us know.
Jul 28, 2011 | 04:23 PM
#400
Thread Starter
Super Moderator
iTrader: (1)
Joined: Aug 2008
Posts: 11,787
Likes: 28
From: Anderson Missouri
I got it installed and working great. It would be solid one minute and then soft the next. I was hoping it was just air in the system, but was suspecting the master cylinder as I had no leaks or anything.
It was a easy fix. One other thing that got done was new brake fluid in the system too. On top of getting my electrical problem fixed, it has been some small progress. Wasnt really wanting to mess with it as I am getting ready for my 2 week summer camp.
New Master Cylinder, new fluid, and ENG Fuse fixed. Small accomplishments that I will take.


