
Terrys87 88 4Runner Restoration/Build thread
 Jun 29, 2011 | 05:08 PM
#341
Thread Starter
Super Moderator
iTrader: (1)
Joined: Aug 2008
Posts: 11,787
Likes: 28
From: Anderson Missouri
Alternator Rebuild Link>> http://www.ae86drivingclub.com.au/fo...-22RE-4AGE-etc
Starter Brushes PN#DRK Rebuild Kit http://nationstarteralternator.com/
Another link>> http://www.4x4wire.com/toyota/mainte...nator_brushes/
Starter Rebuild Video.
I did have and fix a problem today. Just gong to list it so it may help somebody else.
Problem: was Battery Light lit, Amp Guage not working, Water Guage not working, No Blinkers, I could disconnect battery while it was running and truck would die.
Fix: Replaced Blue Fuse by Drivers kick panel (15 amp, I think it was)
Sounds simple, but I made a job a whole lot harder then it had to be. I immediately thought it was the alternator and pulled it. I checked the brushes and everything looked good. So I put one I had in the shed not knowing if it was good and same results. So I then took the one out of my flat bed which I KNOW is good. Same results.
I had check all of the fuses under the hood and guess I was looking for Instrument panel fuse or something like that in the fuses by drivers kick panel, but didnt actually pull and check the fuses.
I looked on YT and my Haynes manual and tried to follow the schematiocs, but alot of that is Greek to me. Everything was saying alternator and if you get a Battery Light AND Brake Light that does usually mean that the alternator is going bad. I have experienced that myself.
I couldnt find the fusible link that I have seen mentioned, but did finally visually look at all fuses and took my Ohm meter and checked them. All checked out from 1.5 to 2.5 ohms, when I finally found the one that said Engine fuse.
Could of saved my self alot of trouble by doing the simple checks first. Just thought I might save somebody else some troubles. I will list this on my first post where I put alot of my fixes listed.
I edited this. It is actually the ENG FUse.
Cleaning the Starter Relay.
I followed RAD4Runners write up on the starter relay as I have had it to not hit on a first turn of the ignition. I cleaned the contacts like he said, only I used 600 grit sandpaper. It does hit the on the first try and is a more solid, quicker response. Thanks RAD4Runner.
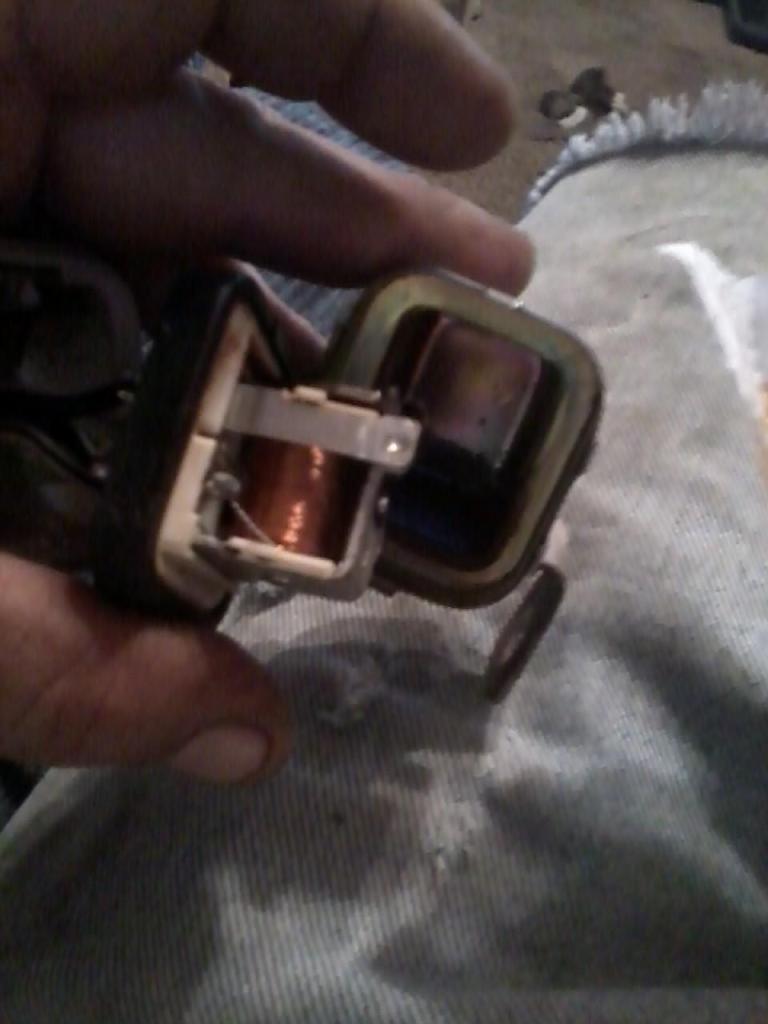
Getting cover off, I used wire cutters to bend the tabs up on the cover. The rubber seal really makes it tough to get off. Luckily the wires are soldered on real well, I used a screw driver to work around the edges of the seal to help free the cover.
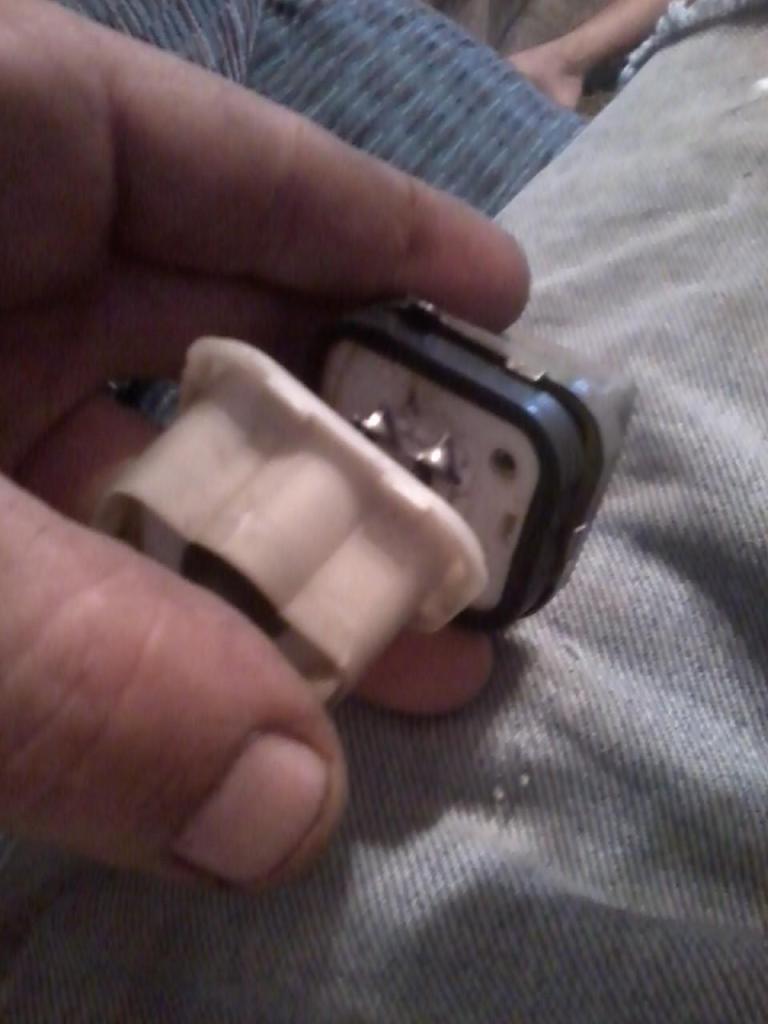
We got rain and I had this spare. Thought while I was at it I would clean it. It had rust in it. It cleaned up well and still works. I will take some electric contact cleaner to it and keep it as a spare.
I did Rays Starter Upgrade. Last week Misty had mine at the store and it would not start for her. I showed up and jumped in and it started right up. I asked her if she was turning the key, had the key in the ignition, and even had the keys, lol. It has done this to me before as well so I was just teasing her. I have replaced the Solenoid Contacts and cleaned the Starter Relay Contacts as well and it still will just click every once in awhile. For me I can usually start tapping on things and getting it going. Misty doesnt quite understand how to get around something like that and the clicking issue is frustrating.
I got Ray on the phone and he stepped me thru on doing the upgrade and what all was happening. He did a great job on explaining how the electric flowed that I could understand it. Thanks Ray for your help. I had just gotten anotherrr new phone as I dropped my other new phone and broke it. He had to contend with me trying to learn all of that as well. One time even trying to find the key pad to call back.
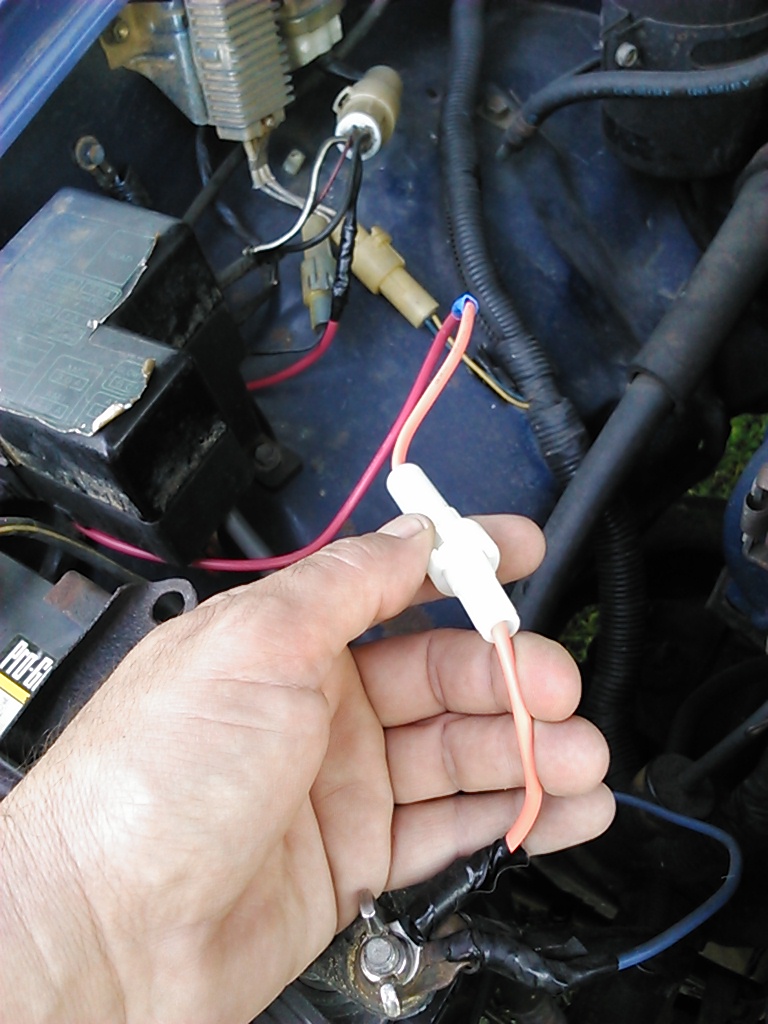
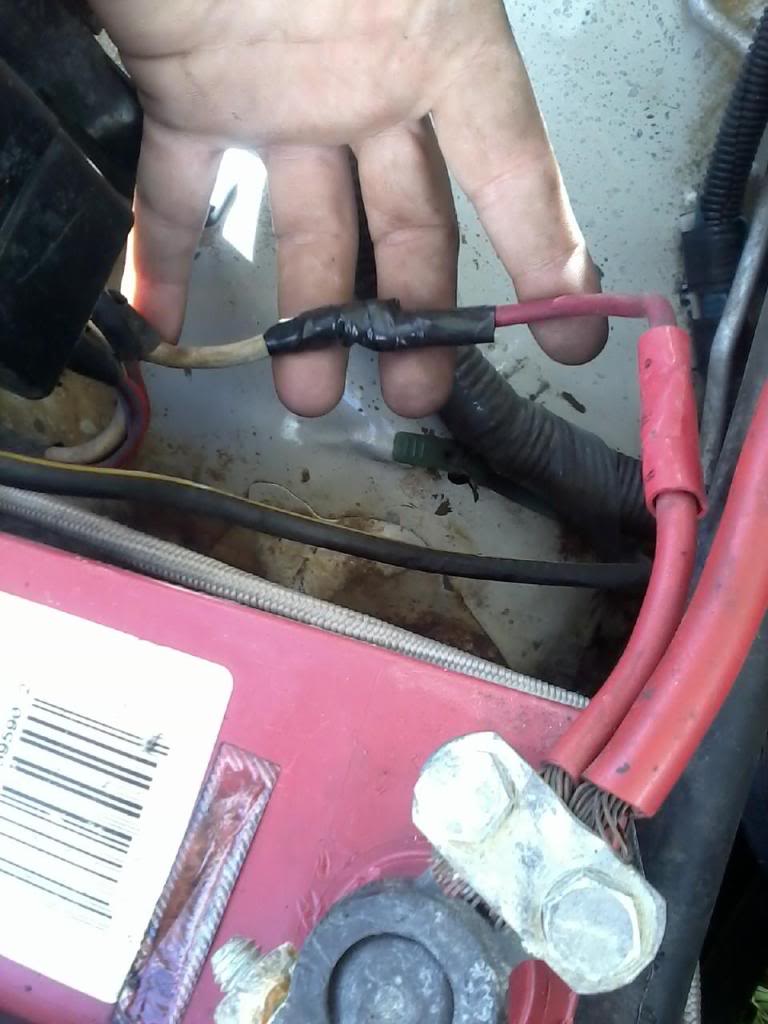
If you look at the plug with eyes, mustache and a smile, the one you need to cut is the right side of the mustache as you are looking at it, hehe
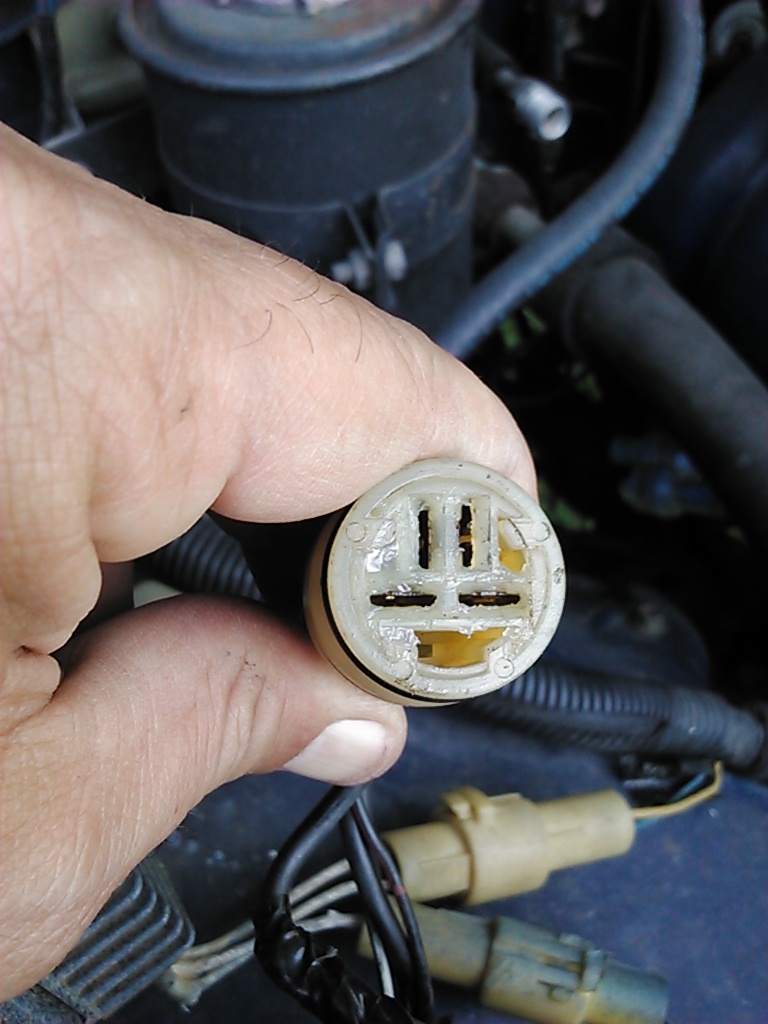
What I am trying to show here is the thinnest little black wire with the red stripe is on the left. The wire on the right is the one you want to cut which is diagonally across from the red stripe wire. Going from Left, Top, Right and Bottom, it is the Right one. The wire that I cut and is where my pinky is going to get wrapped back up into the wiring harness and will not be used again.
I eventually want to run a kill switch inside the cab and to do the AFM and Battery Swap. I also have an 82 Supra AFM that I want to install when I do all of that. I feel this will fix the click only issue and Thanks Ray for taking the time to step me thru it.
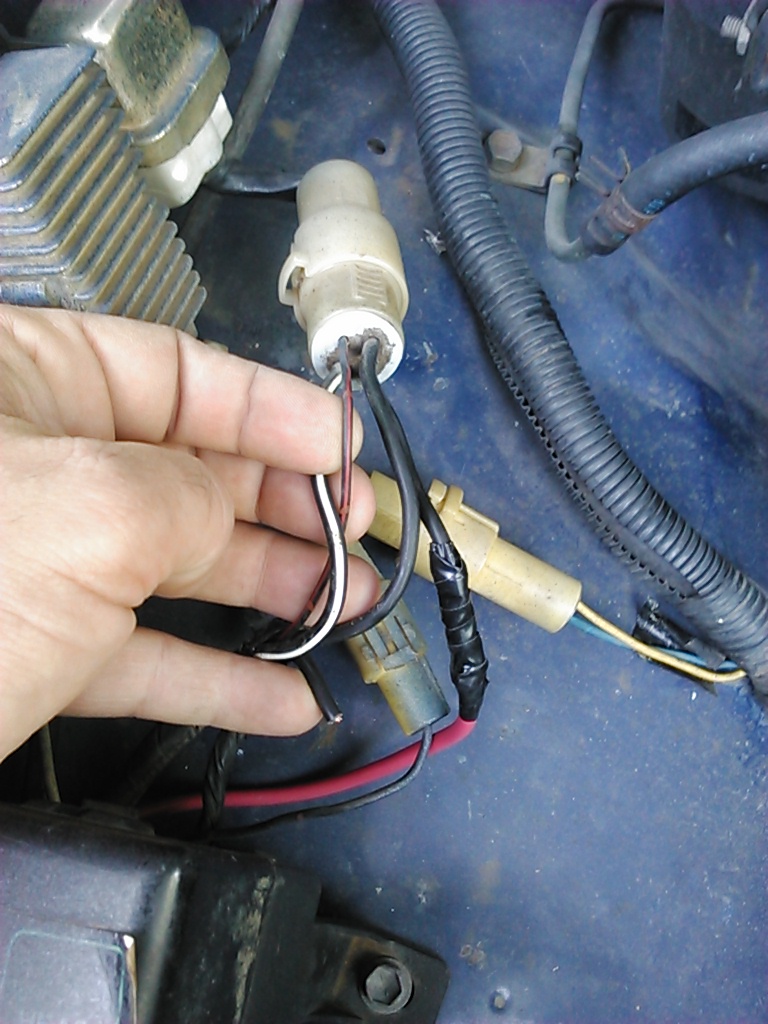
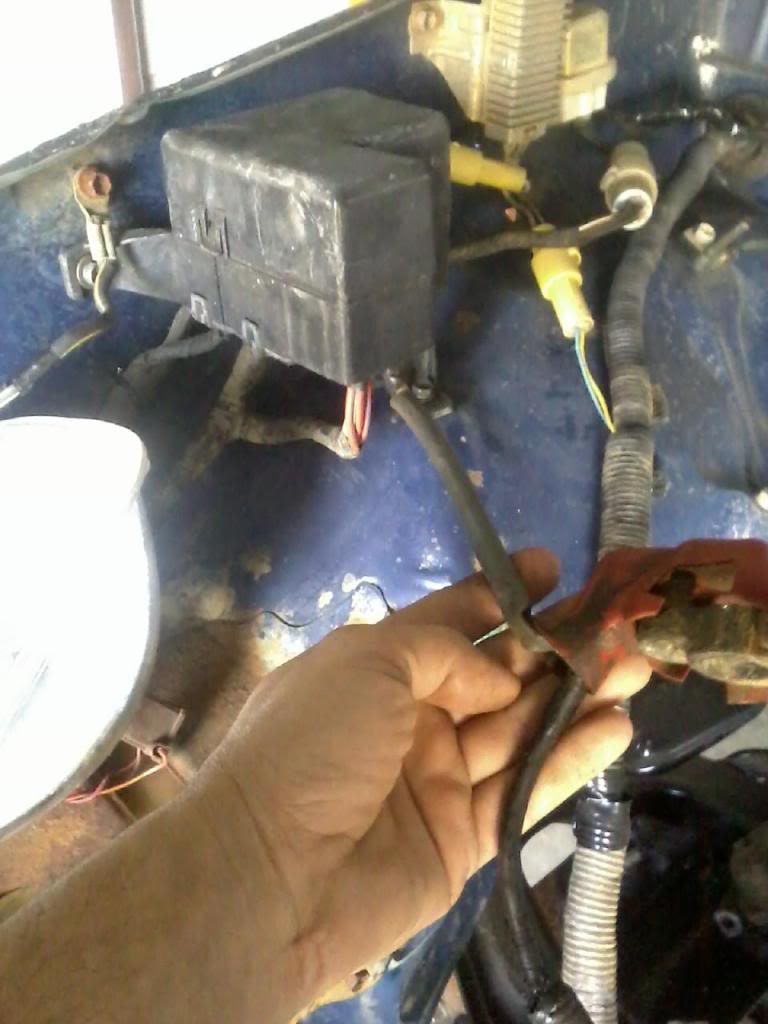
To try and show how I have it and how it is routed, it comes off of the batttery with a 30 Amp Fuse connector, along fender well to the Starter Relay Plug. I have left the wires loose just for explanation purposes but did route it tighter and cleaner.
Starter Brushes PN#DRK Rebuild Kit http://nationstarteralternator.com/
Another link>> http://www.4x4wire.com/toyota/mainte...nator_brushes/
Starter Rebuild Video.
Problem: was Battery Light lit, Amp Guage not working, Water Guage not working, No Blinkers, I could disconnect battery while it was running and truck would die.
Fix: Replaced Blue Fuse by Drivers kick panel (15 amp, I think it was)
Sounds simple, but I made a job a whole lot harder then it had to be. I immediately thought it was the alternator and pulled it. I checked the brushes and everything looked good. So I put one I had in the shed not knowing if it was good and same results. So I then took the one out of my flat bed which I KNOW is good. Same results.
I had check all of the fuses under the hood and guess I was looking for Instrument panel fuse or something like that in the fuses by drivers kick panel, but didnt actually pull and check the fuses.
I looked on YT and my Haynes manual and tried to follow the schematiocs, but alot of that is Greek to me. Everything was saying alternator and if you get a Battery Light AND Brake Light that does usually mean that the alternator is going bad. I have experienced that myself.
I couldnt find the fusible link that I have seen mentioned, but did finally visually look at all fuses and took my Ohm meter and checked them. All checked out from 1.5 to 2.5 ohms, when I finally found the one that said Engine fuse.
Could of saved my self alot of trouble by doing the simple checks first. Just thought I might save somebody else some troubles. I will list this on my first post where I put alot of my fixes listed.
I edited this. It is actually the ENG FUse.
Cleaning the Starter Relay.
I followed RAD4Runners write up on the starter relay as I have had it to not hit on a first turn of the ignition. I cleaned the contacts like he said, only I used 600 grit sandpaper. It does hit the on the first try and is a more solid, quicker response. Thanks RAD4Runner.
Getting cover off, I used wire cutters to bend the tabs up on the cover. The rubber seal really makes it tough to get off. Luckily the wires are soldered on real well, I used a screw driver to work around the edges of the seal to help free the cover.
We got rain and I had this spare. Thought while I was at it I would clean it. It had rust in it. It cleaned up well and still works. I will take some electric contact cleaner to it and keep it as a spare.
I did Rays Starter Upgrade. Last week Misty had mine at the store and it would not start for her. I showed up and jumped in and it started right up. I asked her if she was turning the key, had the key in the ignition, and even had the keys, lol. It has done this to me before as well so I was just teasing her. I have replaced the Solenoid Contacts and cleaned the Starter Relay Contacts as well and it still will just click every once in awhile. For me I can usually start tapping on things and getting it going. Misty doesnt quite understand how to get around something like that and the clicking issue is frustrating.
I got Ray on the phone and he stepped me thru on doing the upgrade and what all was happening. He did a great job on explaining how the electric flowed that I could understand it. Thanks Ray for your help. I had just gotten anotherrr new phone as I dropped my other new phone and broke it. He had to contend with me trying to learn all of that as well. One time even trying to find the key pad to call back.
If you look at the plug with eyes, mustache and a smile, the one you need to cut is the right side of the mustache as you are looking at it, hehe

What I am trying to show here is the thinnest little black wire with the red stripe is on the left. The wire on the right is the one you want to cut which is diagonally across from the red stripe wire. Going from Left, Top, Right and Bottom, it is the Right one. The wire that I cut and is where my pinky is going to get wrapped back up into the wiring harness and will not be used again.
I eventually want to run a kill switch inside the cab and to do the AFM and Battery Swap. I also have an 82 Supra AFM that I want to install when I do all of that. I feel this will fix the click only issue and Thanks Ray for taking the time to step me thru it.

To try and show how I have it and how it is routed, it comes off of the batttery with a 30 Amp Fuse connector, along fender well to the Starter Relay Plug. I have left the wires loose just for explanation purposes but did route it tighter and cleaner.

Last edited by Terrys87; Nov 20, 2015 at 11:02 PM.
Jun 30, 2011 | 09:09 AM
#343
Thread Starter
Super Moderator
iTrader: (1)
Joined: Aug 2008
Posts: 11,787
Likes: 28
From: Anderson Missouri
I blew the Engine fuse again. Doing some research. I havent found a 100% fix so am trying to come up with one. One link says to check Fuel pump harness. Also found that O2 sensor could case problem.
FIXED!!! Mine was the Reverse Lights on the Tranny. It has a protective sleeve and depending on how the sleeve slides, it can cover the wires where they rub against the tranny leaving them exposed. Below is other fixes for this problem.
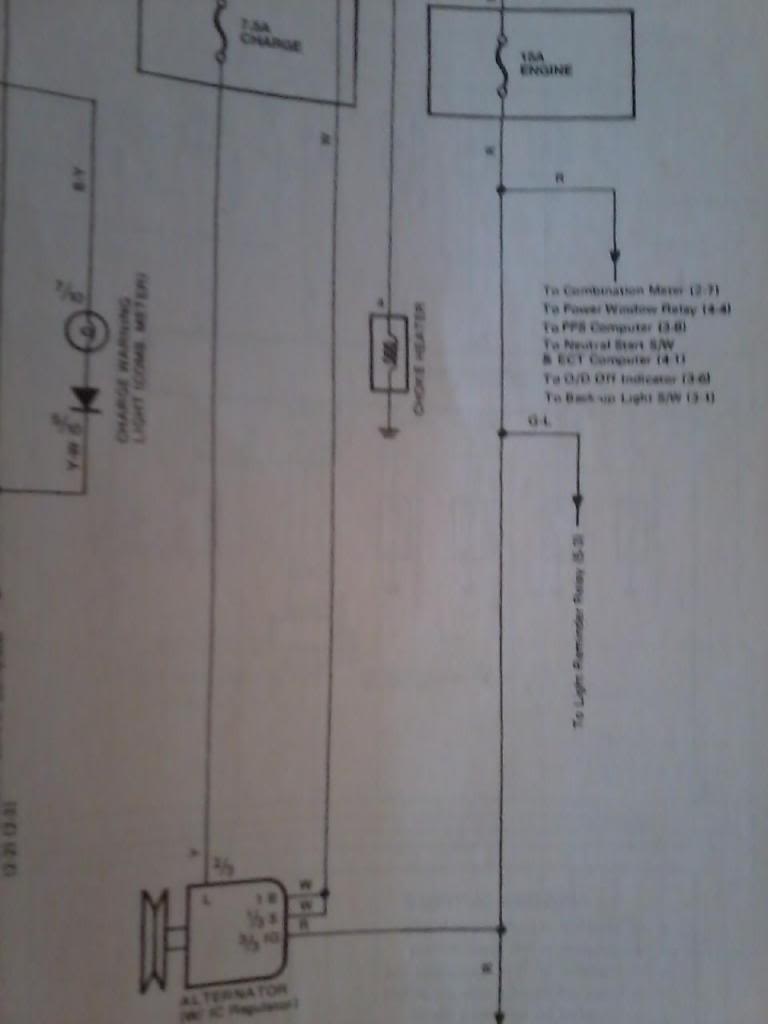
Haynes Manual page 12-11 shows what all is on this circuit.
https://www.yotatech.com/forums/f199/terrys87-88-4runner-restoration-build-thread-227399/f199/terrys87-88-4runner-restoration-build-thread-227399/f199/terrys87-88-4runner-restoration-build-thread-227399/f199/terrys87-88-4runner-restoration-build-thread-227399/f199/terrys87-88-4runner-restoration-build-thread-227399/f199/terrys87-88-4runner-restoration-build-thread-227399/f199/terrys87-88-4runner-restoration-build-thread-227399/f199/terrys87-88-4runner-restoration-build-thread-227399/f199/terrys87-88-4runner-restoration-build-thread-227399/f199/terrys87-88-4runner-restoration-build-thread-227399/f199/terrys87-88-4runner-restoration-build-thread-227399/f199/terrys87-88-4runner-restoration-build-thread-227399/f199/terrys87-88-4runner-restoration-build-thread-227399/f199/terrys87-88-4runner-restoration-build-thread-227399/f199/terrys87-88-4runner-restoration-build-thread-227399/f199/terrys87-88-4runner-restoration-build-thread-227399/f199/terrys87-88-4runner-restoration-build-thread-227399/f127/fusable-link-replacement-228833/...Fusible link replacement steps.
O2 Sensor. Checked
http://www.toyotanation.com/forum/sh...ad.php?t=62388 Fuel Pump Harness Checked
https://www.yotatech.com/forums/f116...ng-fix-213466/ Fusible link Checked
http://board.marlincrawler.com/index.php?topic=58658.0
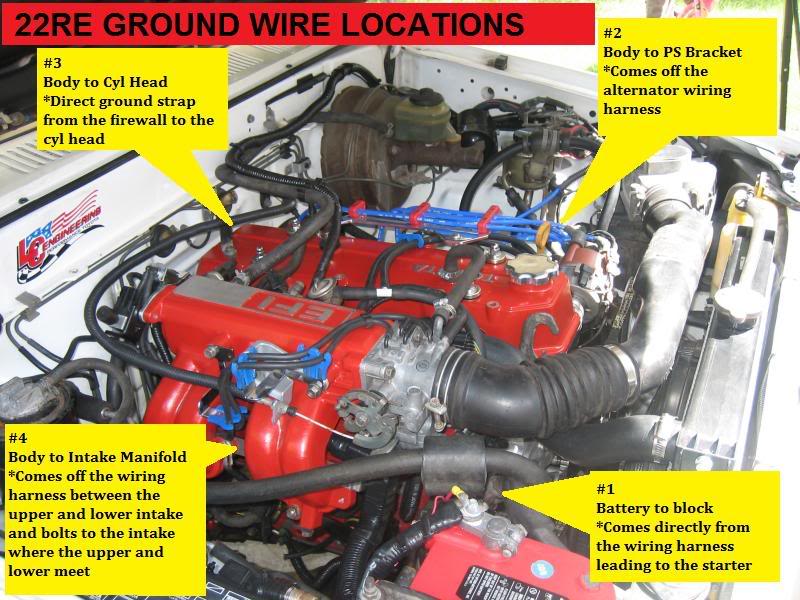
Need to check Engine, Body, Frame grounds. Possible pinched rear door wiring. Trans Reverse Light on Tranny.
https://www.yotatech.com/forums/f116...-guide-194413/ +++LINK TO CORRECT GROUNDS+++.
http://www.ncttora.com/FSM/1990-1995...c/connecto.pdf +++ 3.0 Grounds.
FIXED!!! Mine was the Reverse Lights on the Tranny. It has a protective sleeve and depending on how the sleeve slides, it can cover the wires where they rub against the tranny leaving them exposed. Below is other fixes for this problem.
Haynes Manual page 12-11 shows what all is on this circuit.
https://www.yotatech.com/forums/f199/terrys87-88-4runner-restoration-build-thread-227399/f199/terrys87-88-4runner-restoration-build-thread-227399/f199/terrys87-88-4runner-restoration-build-thread-227399/f199/terrys87-88-4runner-restoration-build-thread-227399/f199/terrys87-88-4runner-restoration-build-thread-227399/f199/terrys87-88-4runner-restoration-build-thread-227399/f199/terrys87-88-4runner-restoration-build-thread-227399/f199/terrys87-88-4runner-restoration-build-thread-227399/f199/terrys87-88-4runner-restoration-build-thread-227399/f199/terrys87-88-4runner-restoration-build-thread-227399/f199/terrys87-88-4runner-restoration-build-thread-227399/f199/terrys87-88-4runner-restoration-build-thread-227399/f199/terrys87-88-4runner-restoration-build-thread-227399/f199/terrys87-88-4runner-restoration-build-thread-227399/f199/terrys87-88-4runner-restoration-build-thread-227399/f199/terrys87-88-4runner-restoration-build-thread-227399/f199/terrys87-88-4runner-restoration-build-thread-227399/f127/fusable-link-replacement-228833/...Fusible link replacement steps.
O2 Sensor. Checked
http://www.toyotanation.com/forum/sh...ad.php?t=62388 Fuel Pump Harness Checked
https://www.yotatech.com/forums/f116...ng-fix-213466/ Fusible link Checked
http://board.marlincrawler.com/index.php?topic=58658.0
Need to check Engine, Body, Frame grounds. Possible pinched rear door wiring. Trans Reverse Light on Tranny.
https://www.yotatech.com/forums/f116...-guide-194413/ +++LINK TO CORRECT GROUNDS+++.
http://www.ncttora.com/FSM/1990-1995...c/connecto.pdf +++ 3.0 Grounds.
Last edited by Terrys87; Sep 15, 2016 at 04:52 PM.
Jun 30, 2011 | 10:45 AM
#345
Thread Starter
Super Moderator
iTrader: (1)
Joined: Aug 2008
Posts: 11,787
Likes: 28
From: Anderson Missouri
Thanks Twisted.. I am working on it. I do not like doing electrical and is a weak area of mine.
I checked my O2 sensor as one possibility. It isnt shorted or anything. Did learn it goes up through the body under the drivers seat. Something new to me on a runner.
Checked my Fuel Pump wiring. Looks and tested great. I had to fix my fuel tank when I got it and knew it was done right. But was listed a possibility.
I am currently replacing my Body to Head ground. I cant seem to find my engine to frame ground and will be doing that here soon.
I think I have found the Fusible link that seems to be elusive in my Haynes and on the net. It took some digging to find. I always thought that it was cut and spliced when someone used a parts store battery cable. If I understand right this is actually a Fusible Link and probably gets burned up and people bypass this. Not a good idea. As far as I understand, it comes off of the fuse box, basically bolted to the side of the 80 AMP.

I have found another poor job of wiring and will start looking into it. It had been spliced and went nowhere. I know it did at some time, so will need to look into it. It had a bare end sticking out and could possibly be shorting out and causing a problem, but I am not holding my breath. Still looking for other problems.
I checked my O2 sensor as one possibility. It isnt shorted or anything. Did learn it goes up through the body under the drivers seat. Something new to me on a runner.
Checked my Fuel Pump wiring. Looks and tested great. I had to fix my fuel tank when I got it and knew it was done right. But was listed a possibility.
I am currently replacing my Body to Head ground. I cant seem to find my engine to frame ground and will be doing that here soon.
I think I have found the Fusible link that seems to be elusive in my Haynes and on the net. It took some digging to find. I always thought that it was cut and spliced when someone used a parts store battery cable. If I understand right this is actually a Fusible Link and probably gets burned up and people bypass this. Not a good idea. As far as I understand, it comes off of the fuse box, basically bolted to the side of the 80 AMP.
I have found another poor job of wiring and will start looking into it. It had been spliced and went nowhere. I know it did at some time, so will need to look into it. It had a bare end sticking out and could possibly be shorting out and causing a problem, but I am not holding my breath. Still looking for other problems.
Last edited by Terrys87; Mar 29, 2016 at 12:19 AM.
Jun 30, 2011 | 01:53 PM
#346
Thread Starter
Super Moderator
iTrader: (1)
Joined: Aug 2008
Posts: 11,787
Likes: 28
From: Anderson Missouri
I havent found a definite fix for this Engine Fuse. Looking on the net, it jumps around to alot of different areas. Things I have done to try to elminate this will be listed . I understand that this can come back at a later time, just will have to wait and see. I will get a fusible link from Toyota as I want it done right. I will still be looking into this and see what other checks I can find. If you have any ideas I am intrested. Dont know why this problem took so long to come up.
Fix:
Removed the butchered up wire and taped it off for now.
Checked Fuel Pump wires.
Checked O2 Sensor wires.
Replaced the Head to Body Ground Wire. (Most likely cause)
Replaced the Block to Frame Wire. (Most likely cause)
Replaced the Alternator with a known good one and had it checked.
Post #343 has some good links.
Update: I found the cause for this, mine was the Backup Lights wire. It was at the edge of the protective sleeve of the White pug on the Drivers side of Tranny. Slide the sleeve back and you will find the bare wires, they rub on on the tranny, thus shorting out the ENG Fuse. There is some information on this but is very hard to find. I have located on post #343 as to where to find and fix this.
Last edited by Terrys87; Sep 14, 2011 at 11:20 AM.
Jul 1, 2011 | 05:28 AM
#348
Thread Starter
Super Moderator
iTrader: (1)
Joined: Aug 2008
Posts: 11,787
Likes: 28
From: Anderson Missouri
Just wanted to see how I was doing on my budget and how things were going for me up to this point. This is an update from post#150. Not to bad. If I can get a title for my 86 parts truck I have 95% of what I need to get it together and running.
I am hoping to get the 88 completed my the end of the year. I have the 86 that I wouldnt have a whole lot into and access to an 82 cab and 83 frame with axles.
The wife and kids have been dropping hints that they are wanting it when I am done. I was building it for myself, but I would want another project anyways so no biggie. That means at the end of the year one of the others will get sold. Just not sure which one. Even the 01 could be up for grabs if I can get one of the others to tow my camper.
I put actual numbers where I had them.
-------------------------------------------------------------------------------------
From 4/28/10
Updated 9/14/11
I want to do a break down on what has been done and what still needs to be done. I am allowing about $3000 for this build. It isnt going to happen over nite as that it started on January 10th of this year.
I bought a 86 4Runner with no title and no front end or tranny/transfer case for $400.
I went in half for an 87 4Runner for parts and Transfer Case.
I used the gas tank and backhatch off of it so buying those two things paid for it over out of salvage or other areas. I have used parts of it for my other trucks, starter, alternator, light switch assembly and nuts and bolts. The motor I could sell and pay for it, but I want to keep it for some other futurer projects.
What I have spent so far.
$500 for my 88.
$400 for 86 parts truck.
$300 for 87 parts truck.
$200 for head work and needed parts
$100 for paint (rattle can), sandpaper,bondo, odds and ends.
$100 for Cluster Guage.
$100 for Valance, headlight, and other small thigs I might have missed.
$100 Tune up.
$0 Backhatch and Bumper
$25 Gas tank cleaned and sealed.
$250 Paint (Auto Body)............................................. ..........................Done
$200 Tires............................................. ..........................Done
$60 Alighnment........................................ .........................Done
$140 Carpet............................................ .........................Done
$130 Interior Paint/Door Panels............................................ Done
$100 Shocks............................................ ........................Done
$45 Shifter Boot.............................................. .................Done
$10 MudFlap........................................... .........................Done
$10 Access Panels............................................ ................Done
$200 Stereo............................................ ........................Done
$20 Sunvisors and Armrest........................................... ......Done
$175 Reciever Hitch ($75),hardware($60), and harness($40)....Done
$35 Reciever and 2" ball.............................................. ......Done
$0 Door Seals $160 would of been cost. Used Reward points.....Done
$60 Carpet for trunk area.............................................. .....Done
3260
Still To Spend/Do
$??? Seats Not looking cheap.
$0 Transfer Case, 87 parts truck
$ ???AC
Some of this might fluctuate where I spend more in one area, I hope to save in another area. I will be doing the work myself which will save alot. I will have to shop for deals, ebay, craigslist, local ads, and since this isnt a daily driver yet, Im not in no hurry.
Hope this inspires others and it can be done. Im sure I have missed somethings and will update it as I find them. As I see it to buy a used car that would be dependable would cost me around $3000 and who really knows the condition of it anyways.
Im wanting it to where I can take this and the wife can take her 91 extended cab and we can go on mild trails with the kids, be a daily driver, camp in them as I have a cap for the truck and a pull behind camper.
I have put 20,000 miles on it since getting it running on short trips to work and errands without any problems. It is getting 18-20 miles per gallon if my math is right. Has 268xxx miles.(9/14/11 293,xxx miles) This coming winter I want to do a complete motor rebuild for it even though Im not worried about the motor that is in it.
Sometimes I can only spend $25 a week on it, but it is still cheaper than 1 years worth of car payments and I enjoy it.
Last edited by Terrys87; Oct 11, 2011 at 07:43 AM.
Jul 1, 2011 | 05:32 AM
#349
Thread Starter
Super Moderator
iTrader: (1)
Joined: Aug 2008
Posts: 11,787
Likes: 28
From: Anderson Missouri
Thanks Jason.. I do not care for doing electrical work. Seems like I have gotten my fair share on this one.
I drove it quite a bit yesterday and ran as much of the circuits as I could while driving down the road (blinkers, backhatch and such) trying to see if I could overload the circuit. The fuse held so maybe I got it. Still will have to wait and see. I plan on looking at other things on the circuit and see if I can find anything else.
I am sure the drivers behind me were wondering what my problem was.lol
Jul 1, 2011 | 09:04 AM
#351
I think that's your main power from battery to fusible link(WIRE), lol. I tore out two extra fusible link sections at the junk yard(that whole section, just not the whole box, ya know what I mean?).... and I've opened the fixed crimp and removed the wire, and now I plan to slap at least an 8Guage wire in there with fusible link, and a Bus Bar as well from the other side of the link, so I can run my lights, inverter, rear-waterproof aux. power outlet, etc., all off of it. Mine was in OK shape, not great, ...but I replaced that months ago and a TEENY bit of my idle bounce and power loading reduced.... I have plans.... just HATE ELECTRIC AS WELL! Can I join your club? hahaha. Actually, I LOVE the results when I stick with it... Like the lights, power antenna, ...etc., but GEESH! It's a lil intimidating for an ADHD guy like myself! hahaha.
Best wishes and great progress, Terry!
Best wishes and great progress, Terry!
Jul 3, 2011 | 02:41 AM
#352
Thread Starter
Super Moderator
iTrader: (1)
Joined: Aug 2008
Posts: 11,787
Likes: 28
From: Anderson Missouri
Hello Twisted and Chef.. I will be glad to get out of this electric club. I can usually stumble my thourgh it, but dont feel comfortable doing. Light bulbs I can handle.
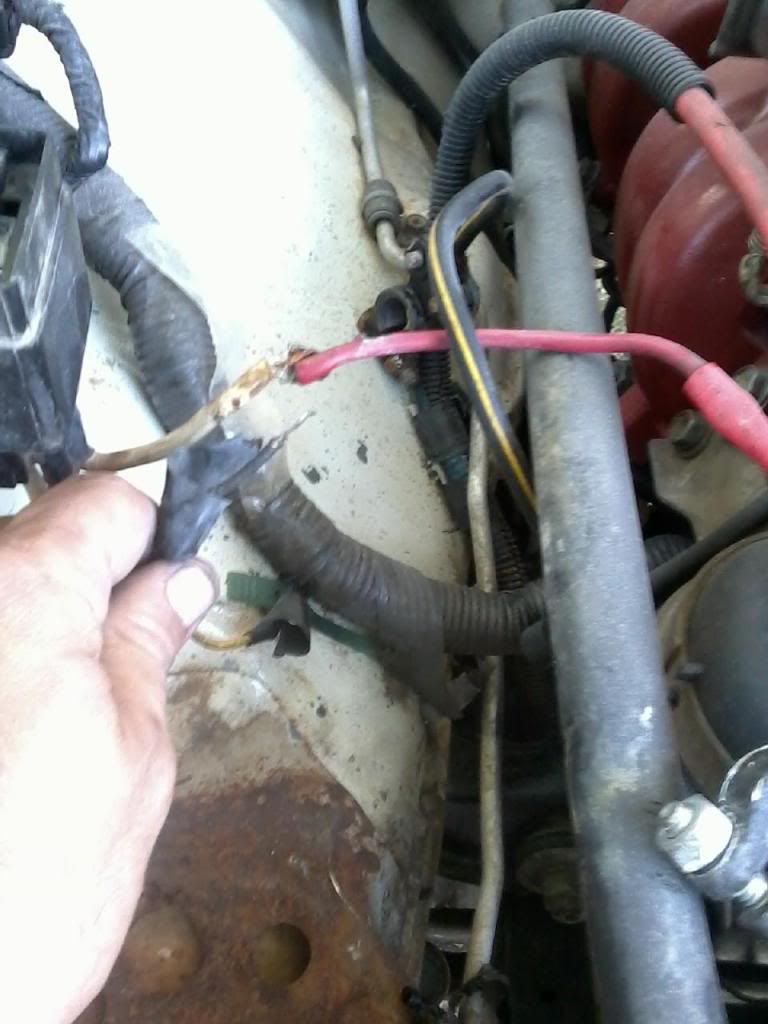
I dont know if this is a hack job or actually correct. Do one of you know?
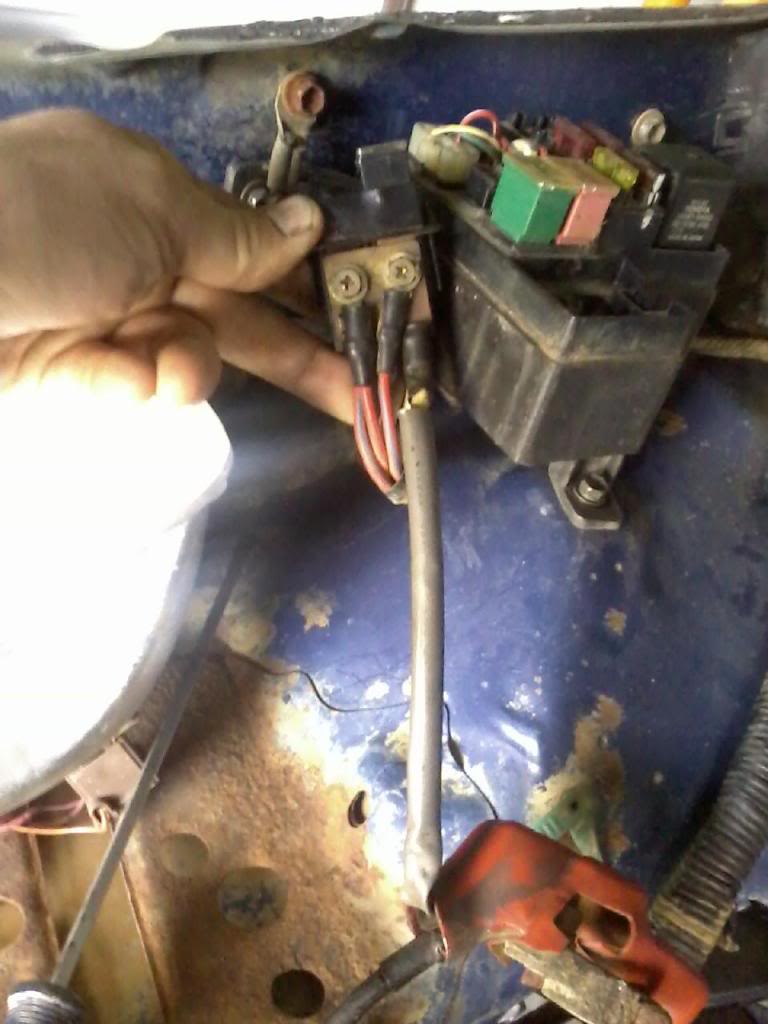
Here is a picture of the Fusible Link. It is connected to 80 amp fuse and to the positive battery cable. The white part is the actual link. Took me awhile to find this out.
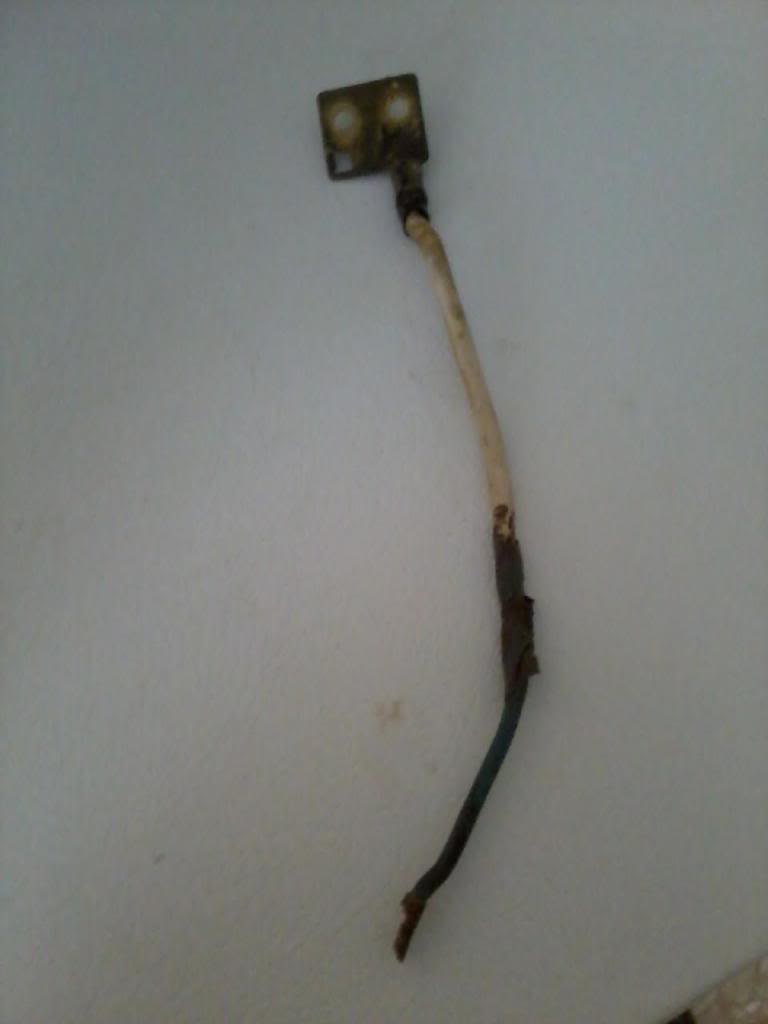
Here is the Fusible link attached. You can get the fuse at any part store. The screws hold it on are TIGHT!!!
-----------------------------------------------------------------------------------------------
Here is a better update of the Fusible Link..
When I ran into this on my 88, I thought someone had did a cheap repair job, but it is actually a factory Fusible Link. Chef helped me figure this out back then. It is crimped to the Positve pigtail coming off of your Postive Post.
All of the other fuses lift up and out. The 80 Amp you have to pry this tab to the firewall and push out the bottom.
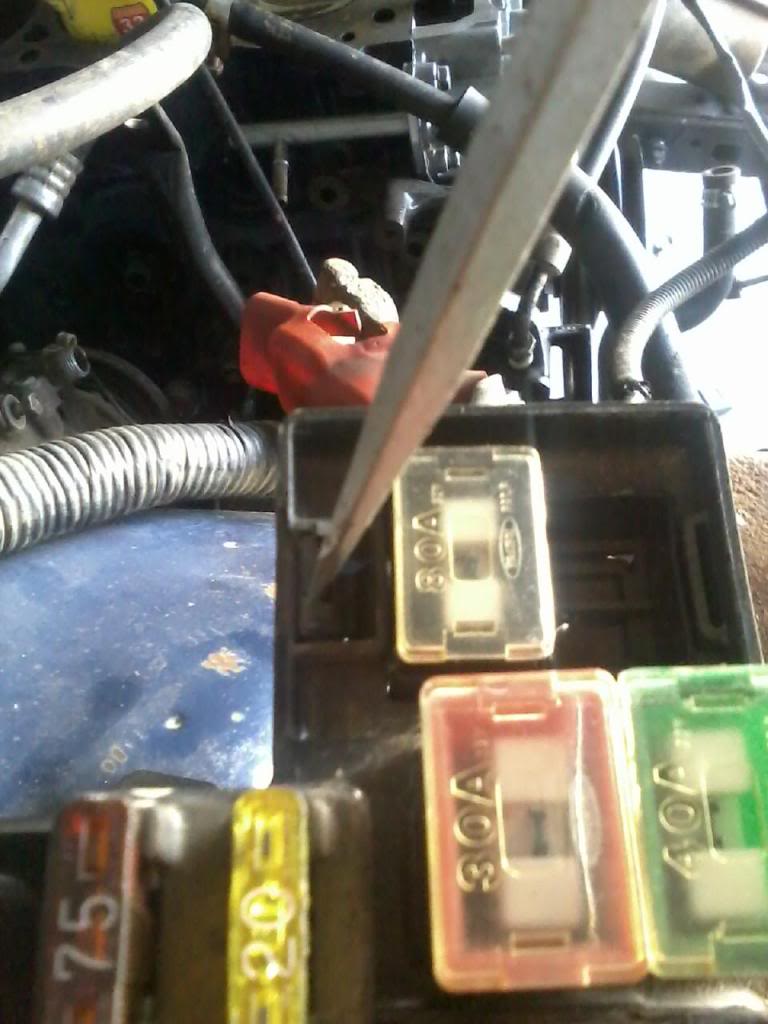
Here it is mounted to the Fuse. It mounts behind the wires. I usually have to take a 8mm socket to the screws the first time. They can be TIGHT.
I dont know if this is a hack job or actually correct. Do one of you know?
Here is a picture of the Fusible Link. It is connected to 80 amp fuse and to the positive battery cable. The white part is the actual link. Took me awhile to find this out.
Here is the Fusible link attached. You can get the fuse at any part store. The screws hold it on are TIGHT!!!
-----------------------------------------------------------------------------------------------
Here is a better update of the Fusible Link..
When I ran into this on my 88, I thought someone had did a cheap repair job, but it is actually a factory Fusible Link. Chef helped me figure this out back then. It is crimped to the Positve pigtail coming off of your Postive Post.
All of the other fuses lift up and out. The 80 Amp you have to pry this tab to the firewall and push out the bottom.
Here it is mounted to the Fuse. It mounts behind the wires. I usually have to take a 8mm socket to the screws the first time. They can be TIGHT.
Last edited by Terrys87; Apr 21, 2016 at 06:39 PM.
Jul 3, 2011 | 02:49 AM
#353
Thread Starter
Super Moderator
iTrader: (1)
Joined: Aug 2008
Posts: 11,787
Likes: 28
From: Anderson Missouri
I have been busy working on getting some of my parts cleaned up and organized that I got from the stripped out runner. Getting my new to me transfer case cleaned up. Still need to get seal and get it in.
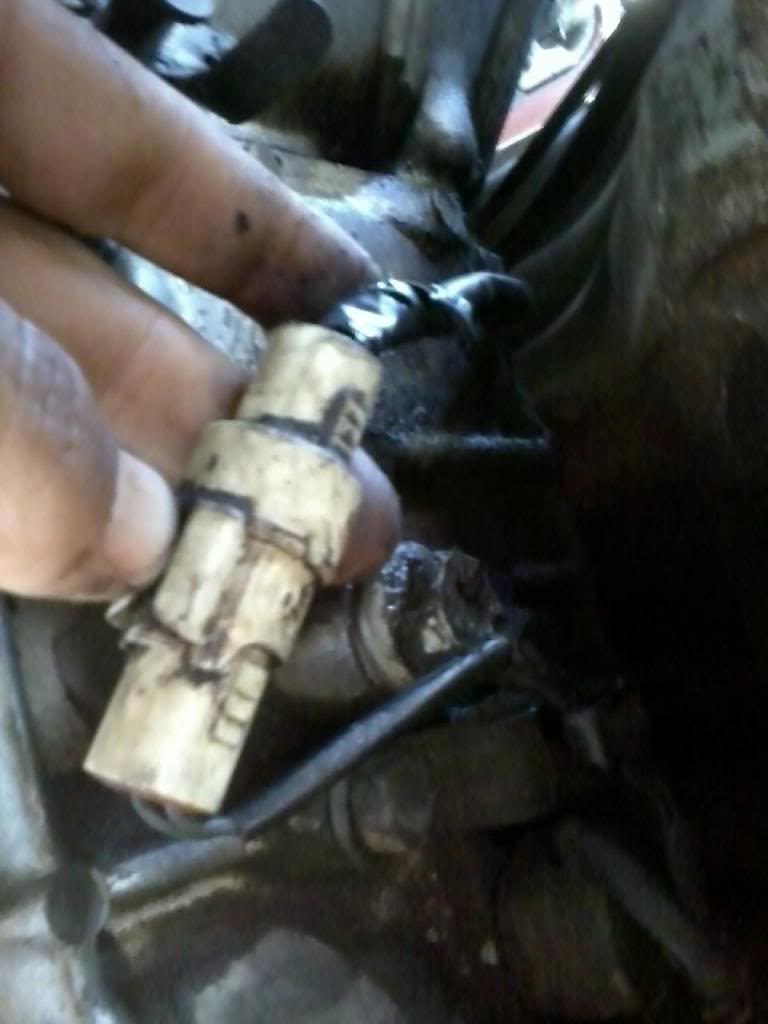
A while back I was mentioning that my wifes truck water temp guage was going from half way to cold. I actually forgot about it until I drove it today and it did it again. I pulled the water temp sensor and it had green corrosion on the sensor cleaned them with a brass wire brush and then I cleaned the contacts that goes to the wire as well with electrical contact cleaner. No more problems. Stays just below half as it usually does. I knew it wasnt overheating, but still like having a guage.
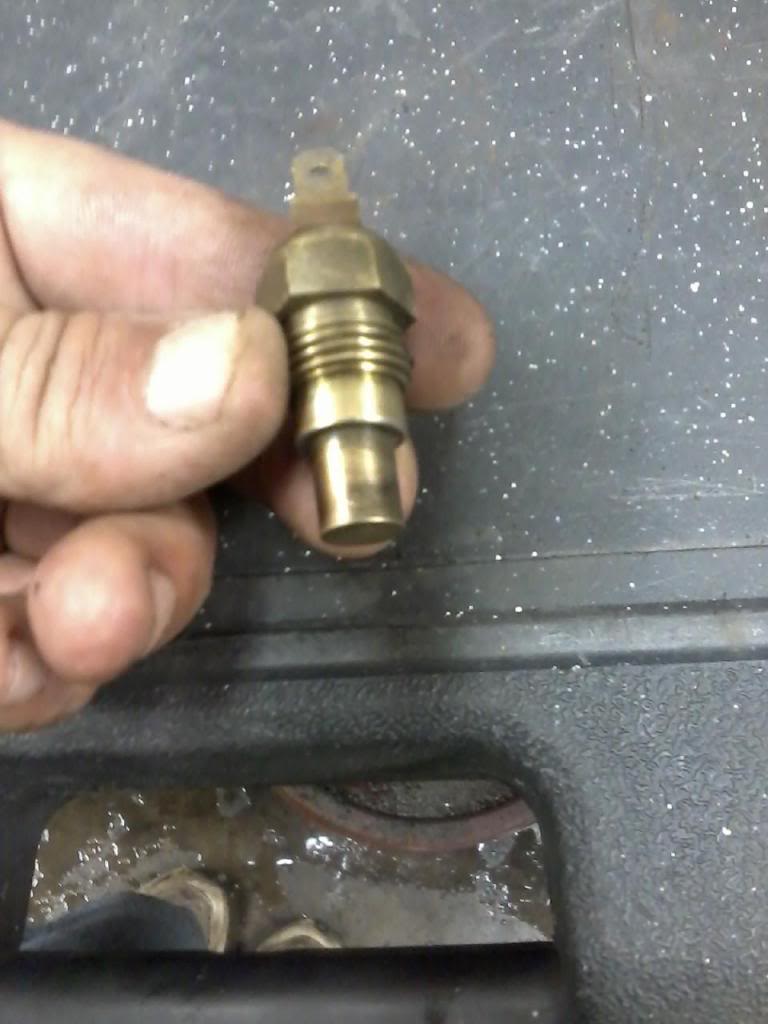
Here is a picture of a dirty Temperture Sensor. I have seen worse. I chipped some of the scale build up off so you could see a difference.
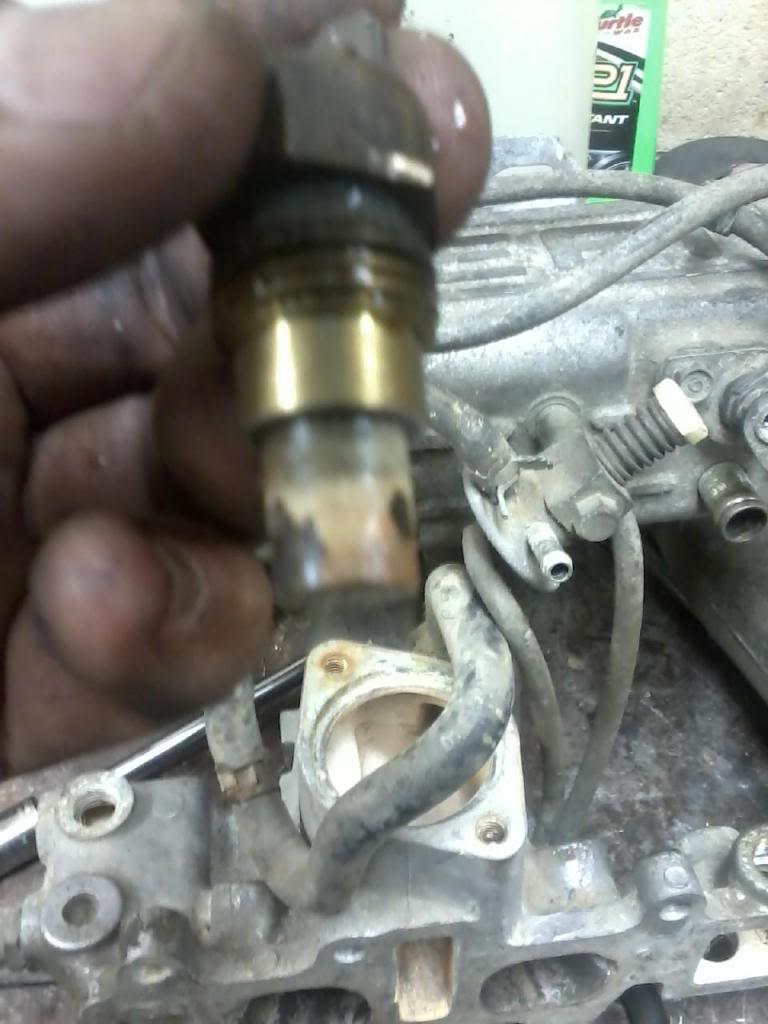
The sensor sits just below the Cold Start Injector in the Intake manifold. Uses a 17mm deepwell socket and is a 5 minute job.
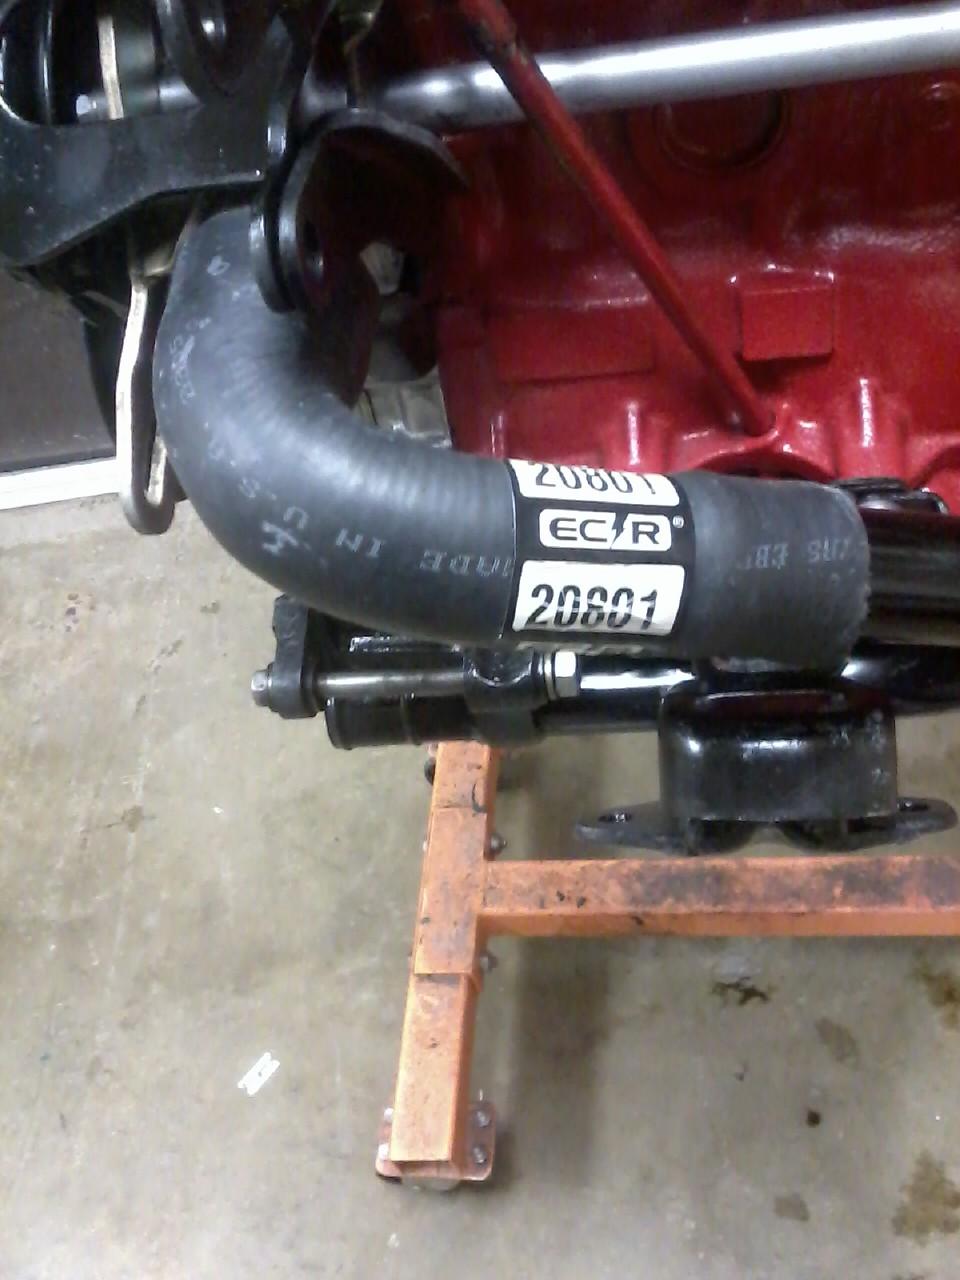
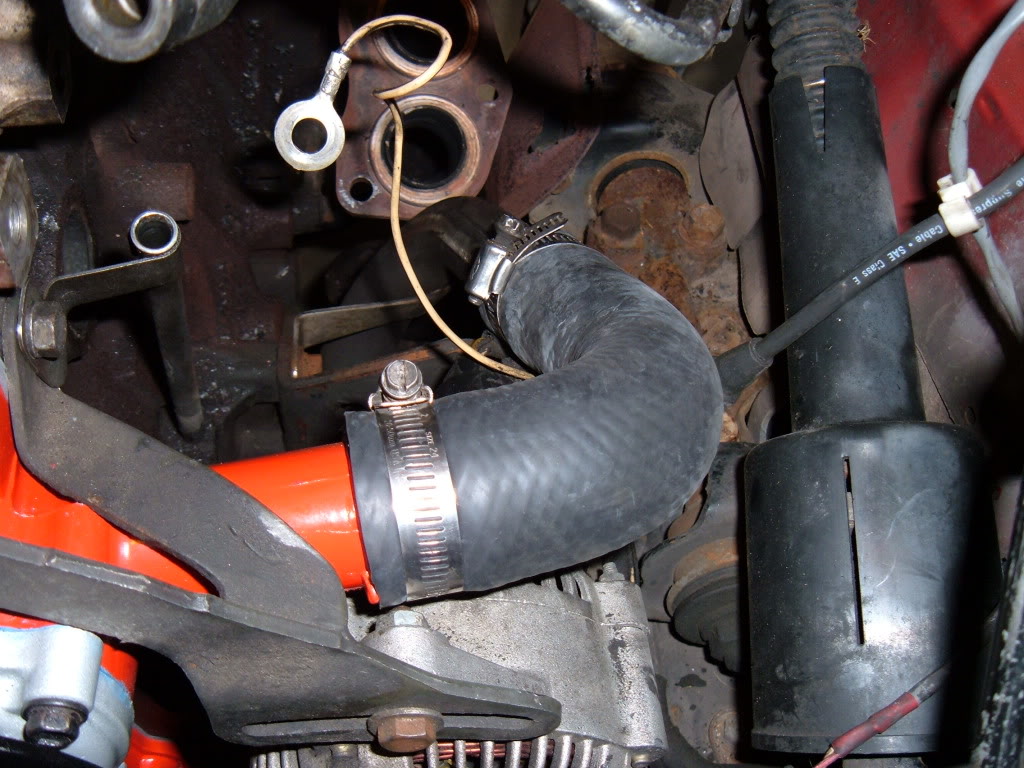
I use Gates Rubber hose PN# 20801, around $10. It comes is a "S" shaped form, but when you cut the lower part off, it looks identical to the orginal and has the larger opening coming off of the water pump and the smaller end for the horseshoe pipe.
Gates PN#20801, just cut off where my finger is at. Alot cheaper then the dealer.

Here it is cut to length and on. I need to get some new hose clamps to finish the job.
 [/QUOTE]
A while back I was mentioning that my wifes truck water temp guage was going from half way to cold. I actually forgot about it until I drove it today and it did it again. I pulled the water temp sensor and it had green corrosion on the sensor cleaned them with a brass wire brush and then I cleaned the contacts that goes to the wire as well with electrical contact cleaner. No more problems. Stays just below half as it usually does. I knew it wasnt overheating, but still like having a guage.
Here is a picture of a dirty Temperture Sensor. I have seen worse. I chipped some of the scale build up off so you could see a difference.
The sensor sits just below the Cold Start Injector in the Intake manifold. Uses a 17mm deepwell socket and is a 5 minute job.
I use Gates Rubber hose PN# 20801, around $10. It comes is a "S" shaped form, but when you cut the lower part off, it looks identical to the orginal and has the larger opening coming off of the water pump and the smaller end for the horseshoe pipe.
Gates PN#20801, just cut off where my finger is at. Alot cheaper then the dealer.
Here it is cut to length and on. I need to get some new hose clamps to finish the job.
[/QUOTE]
Last edited by Terrys87; Jun 26, 2016 at 10:33 PM.
Jul 3, 2011 | 11:55 AM
#354
I hear ya, buddy! GRRRR, electrical gremlins SUCK! LOL
Ok, ..... from everything I've learned from OLDER Guru's who actually have seen MANY of these things, from even day one, 'UNMOLESTED', ..... That line, in your hand, HAS a fusible link in it. I replaced mine, and now I feel like I need to go back and put a new Fusible link in it. I soldered and all, yadda yadda... but according to one of my 'older' buddies who knows these..."that is DEFINITELY a good thing, and Toyota put it there for a reason, to prevent overload back into your fusible link box through the battery, or vice verse, from a load in the system back through the link box IN TO the battery,...make sense? If you tear it off, the tape, you SHOULD see the link in there. It's a 'breaker' .....the type you can't switch back on! hahahaa.
That is also the wire that MANY guys talk about "I'M PUTTING IN 4G WIRE THERE!" ..... PROMISE ya! My wire was white as well..... I opened up the crimp, replaced it with 8G.... but BAD CHOICE...no one has 8G crimps! GRRR! lol. I could have figured it out, but I just went back to 10G like from the dealer, ......and yes, like in your pic. Mine was actually in really good shape, ...just the tape looked crappy. Thought about putting a bigger wire with a fusible link in there? 6G maybe?
Jul 5, 2011 | 01:11 PM
#355
Thread Starter
Super Moderator
iTrader: (1)
Joined: Aug 2008
Posts: 11,787
Likes: 28
From: Anderson Missouri
Hey Chef..Thanks on the fusible link. I just dont want no hack job under the hood.
Been doing alot. Got the all bulbs in my truck working. Tried to fix the heater control and it will need replaced.
My rear window switch was working great. When I was pulling the carpet, I thought I had all of the cables disconnected. Now I have a loose wire in the switch cable and having a tough time finding which one it is. Just move it a little and it works great. Another electrical gremlin. But one I created.
Chased down the tail light circuit and it looks great. It was part of the Engine fuse circuit, got all those bulbs done too.
Cleaned my new to me Tcase and just need to get the seals and get it in.
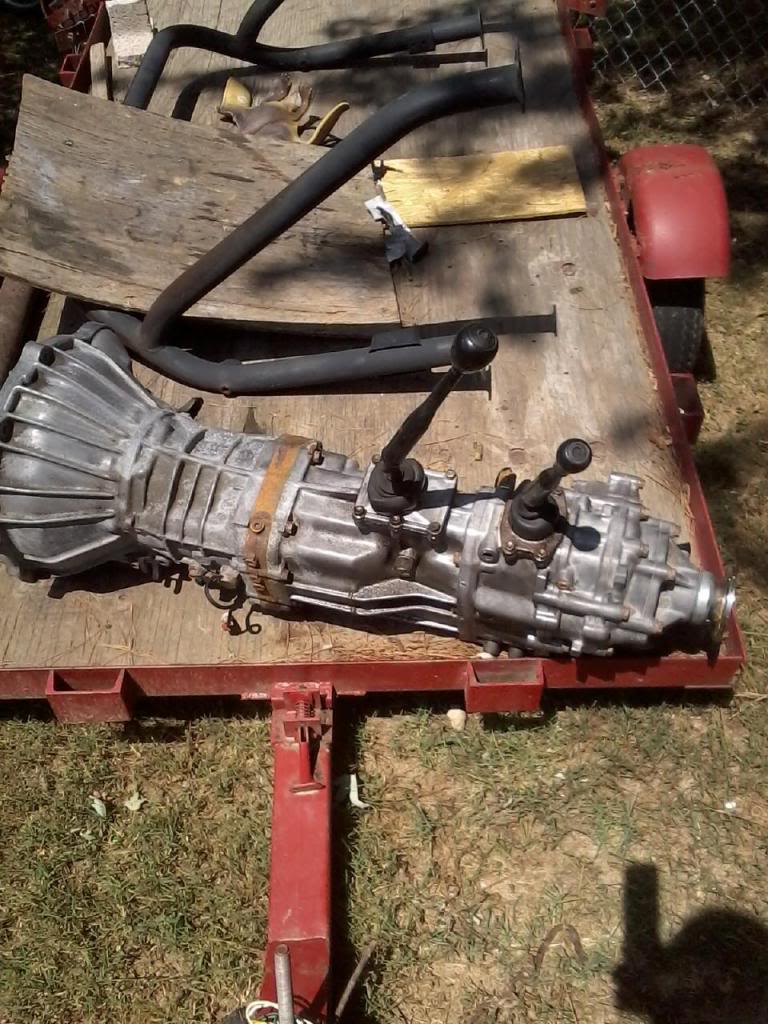
I have been spending some time getting my wife truck just doing odds and ends.While under there adding some Lucas oil in the tranny, I noticed the tranny appears to be the same as my rustd parts truck. Her tranny has a whine in 5th gear. Not bad but annoys me so I am hoping they are interchangeable and will have her truck nice and quite. My rust bucket has been paying off on all of my trucks.
New to me Tcase.
Been doing alot. Got the all bulbs in my truck working. Tried to fix the heater control and it will need replaced.
My rear window switch was working great. When I was pulling the carpet, I thought I had all of the cables disconnected. Now I have a loose wire in the switch cable and having a tough time finding which one it is. Just move it a little and it works great. Another electrical gremlin. But one I created.
Chased down the tail light circuit and it looks great. It was part of the Engine fuse circuit, got all those bulbs done too.
Cleaned my new to me Tcase and just need to get the seals and get it in.
I have been spending some time getting my wife truck just doing odds and ends.While under there adding some Lucas oil in the tranny, I noticed the tranny appears to be the same as my rustd parts truck. Her tranny has a whine in 5th gear. Not bad but annoys me so I am hoping they are interchangeable and will have her truck nice and quite. My rust bucket has been paying off on all of my trucks.
New to me Tcase.
Last edited by Terrys87; Jul 5, 2011 at 01:15 PM.
Jul 6, 2011 | 04:08 AM
#357
Registered User
Joined: Aug 2009
Posts: 2,173
Likes: 0
From: hohenwald tn.
I shoulda hired you to do the cleaning on mine, lookin good Terry hope tcase swap goes smooth. Be really cool if the trans will work in your wife's truck, boy that 4ruster is really paying off hu.
Jul 6, 2011 | 07:01 AM
#358
Thread Starter
Super Moderator
iTrader: (1)
Joined: Aug 2008
Posts: 11,787
Likes: 28
From: Anderson Missouri
Chef..lol..There was 40lbs of gunk and another 40 lbs of elbow grease involved. Carwash, engne cleaner, Purple Power, wire brush on a drill and carwash again.
Jason..That is one thing, there is always something that could use a cleaning. The 4ruster has paid for it self. If rust hadnt gotten ahold of it, it would of made a nice little truck.
There is always something to do that doesnt involve cost. I have been just doing the little things and it is starting to add up. I really like how quite it is. Really happy with the tires and Peel and Seal and how the cleaning is coming along.
Jul 7, 2011 | 02:23 PM
#360
Registered User
Joined: Apr 2011
Posts: 428
Likes: 0
From: Southern Ontario
Nice work on the cleaning Terry. I haven't done anything all week, and now I'm kicking myself for not getting some cleaning done while I wait for parts. The aluminum parts on these trucks look so darn good when they shine.


