
Terrys87 88 4Runner Restoration/Build thread
 May 16, 2011 | 06:49 AM
#181
Thread Starter
Super Moderator
iTrader: (1)
Joined: Aug 2008
Posts: 11,787
Likes: 28
From: Anderson Missouri
Ooops!! I missed Jason and Twisted. How you guys been doing?
Thanks Twisted, I have been working at it.
Jason.. Sure wish you did live closer. Our bodywork skills would make things go so much quicker. I enjoy working on others as much as I do mine. Cheaper too..lol
Thanks Twisted, I have been working at it.
Jason.. Sure wish you did live closer. Our bodywork skills would make things go so much quicker. I enjoy working on others as much as I do mine. Cheaper too..lol
May 16, 2011 | 09:03 AM
#182
Registered User
Joined: Aug 2009
Posts: 2,173
Likes: 0
From: hohenwald tn.
Yea Terry I enjoy working on other people's projects to, much easier to watch them spend money LOL. Sorry to hear about your window trouble. I have 2 tailgates but no switches, and I just sold the relay box to a Guy here local, if I have anything you think would help just let me know. The under carriage is lookin good but I hope you aren't crawling around under there without any stands I've got a good friend that now uses the parking spots closest to the door becouse of that safety first man.
May 16, 2011 | 11:42 AM
#183
lloking good terry you make me want to go and clean my frame up. on the relay i hate tht thing. mine broke on the scav and they wanted like 200 something for a new one so i cut the 4 window wires going to it and ran some wire and added my own 4prong switch now it goes up and down. the only bad thing about tht is my rear wiper wont work but i dont need tht
May 16, 2011 | 12:13 PM
#184
Thread Starter
Super Moderator
iTrader: (1)
Joined: Aug 2008
Posts: 11,787
Likes: 28
From: Anderson Missouri
Jason.. lol Its alot easier when they spend their money. I took the pictures when removing the jack stands.
I usually work on my projects by myself and it would take a good hour for someone to get to me if something goes wrong.
I busted through a floor in a barn carrying a 100 pound bag of feed in a barn before cell phones, and it took me a while to wiggle out of that one. Couldnt get no help then. I have had cars to fall just getting them up in the air. I have to take the safe route as I would be in a bad situation if something went wrong.
Hello Twisted.. Cleaning is a freebie and it is somethng I eventually want to get done anyways. Still have a lot more cleaning to do under there. That was quite a bit of cleaning when I had the chance. When the weather warms up, I will take a set of ramps to the carwash to reach places I havent been able to get to.
I tried my other switch and it was worse then what I have got. Tried to take it apart and clean the contacts and it was so brittle it just shattered. Will try to be more gentle on my next switch and see how it goes.
I have spent alot of time on this and dont want to wave the white flag just yet.
May 16, 2011 | 12:42 PM
#185
Thread Starter
Super Moderator
iTrader: (1)
Joined: Aug 2008
Posts: 11,787
Likes: 28
From: Anderson Missouri
This is going to be my notes page for the window switch.
https://www.yotatech.com/forums/f128...runner-137310/ Link I found for 89-95 Runners.
https://www.yotatech.com/forums/f116...l#post51400485 Wiring colors.
https://www.yotatech.com/forums/f116...cement-209572/ Replacement Motor
http://www.4crawler.com/4x4/CheapTri...CommonProblems Common problems, Lots of Info
http://forum.ih8mud.com/79-95-toyota...ay-repair.html Cleaning Relays
http://www.4crawler.com/4x4/CheapTri...arWindow.shtml Troubleshooting
https://www.yotatech.com/forums/f116...cement-209572/
http://www.4crawler.com/4x4/CheapTri...arWindow.shtml This page says you can get replacement relays from Radio Shack. I will evetually try it on my old one to see if it works. Would be alot cheaper way to go. As soon as I can get some relays, I will post the results an how to solder/desolder. It is easy if you have never done this before.
Last edited by Terrys87; Feb 16, 2014 at 11:43 PM.
May 17, 2011 | 07:22 AM
#186
Thread Starter
Super Moderator
iTrader: (1)
Joined: Aug 2008
Posts: 11,787
Likes: 28
From: Anderson Missouri
I got my rear window working. Wahoo!!
Some quick and easy test are 1. Make sure your rear wiper is in the stowed position. 2.Back gate is shut good, may even want to lean against it and try your key. 3. The plug in the drivers side corner in the back is hooked up good, by your rear windshield washer bottle. 4. That the bolt/pin on drivers side,by the roll bar is all the way in. There is a safety lock located there.
I wanted to see if my Motor was good so I ran 2 connectors right to the motor plug. It is a PITA to get that plug seperated and ran each wire to a battery. Just reverse polarity to control the direction of the window.
I could tell the motor was good right away but it was really struggling to move the window. I thought it was off track, but the metal track with rollers were pretty rusty and I just greased them.
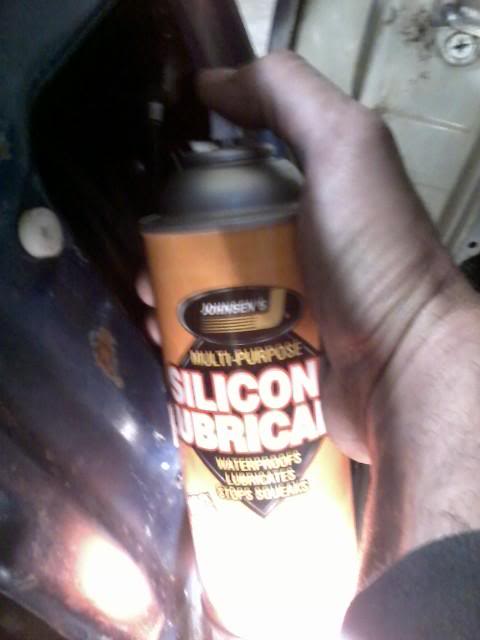
It still was struggling to move up and down, so I took some Silione Spray and got the window tracks. This made a big difference and was the biggest problem. Works great on your door windows too.
I then replaced the Window Relay Box, I got my Rear Wiper working and Defrost but no window control. Located behind the Drivers seat behind the vinyl panel. If your rear wiper and deforst work this is some indication the box is good, but a relay is in there that operates the window so you cant completely rule it out.

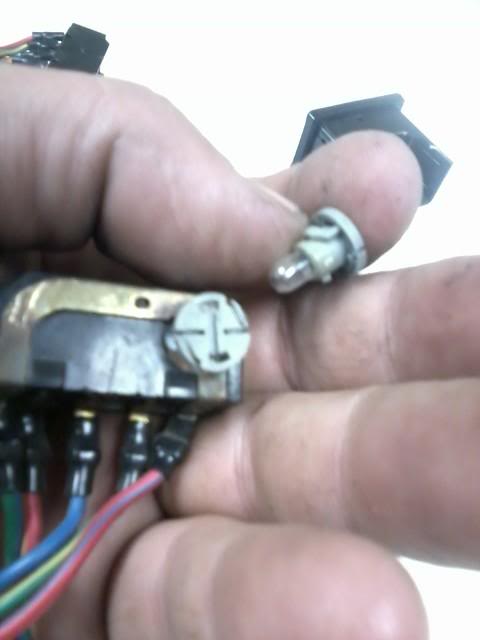
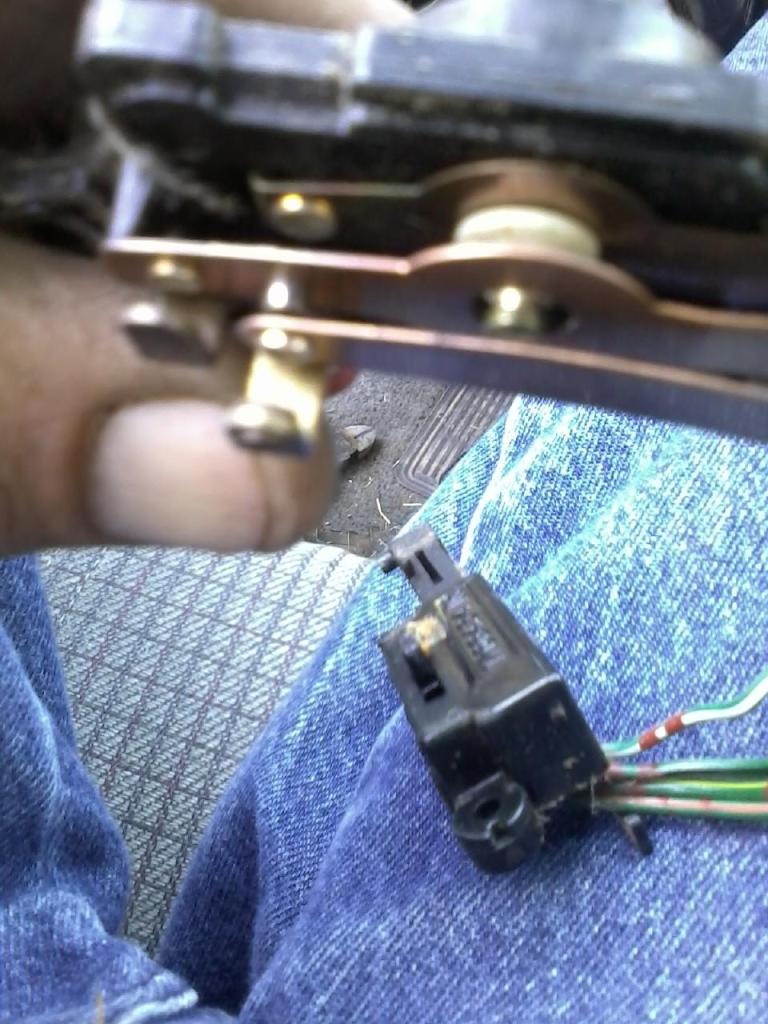
I then took the Switch apart. It comes apart easily if done right. First remove the gray plug. It is the light bulb. Then pull the cover away from 2 tabs on one side and then the 2 tabs on the other side.
I then washed the button with soap and water and air dried it with air hose and used electrical contact cleaner to get the corrosion, coffe, dirt and who knows what else out of there.
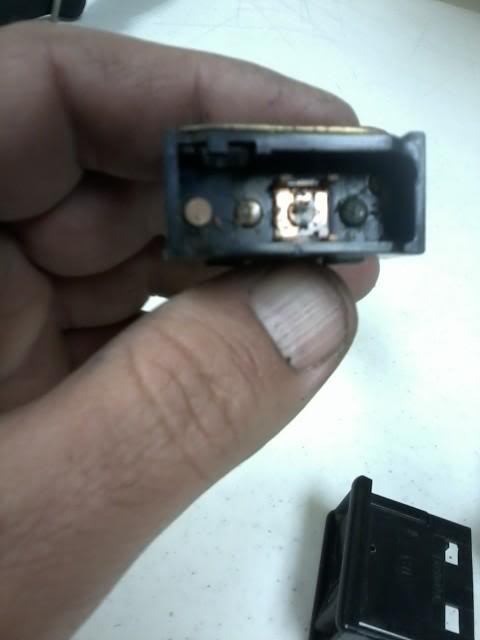
Here is another picture of how it should look before going back together. Make sure you dont lose the little white pin and the metal toggle piece. These are very brittle being 20 plus years old. On the rear wiper and safety lock, they are difficult to get seperated. I just take contact cleaner and hold the switch upside down and spray cleaner in there and blow it out with an air hose.
I put some links that I used to get to this point up in a previous post. The last link says you can use some relays from Radio Shack, but I havent tried it. I will later on with my old/bad relay.
Other things to look for is make sure your rear wiper is in the stow positon, the tail gate is completely closed.
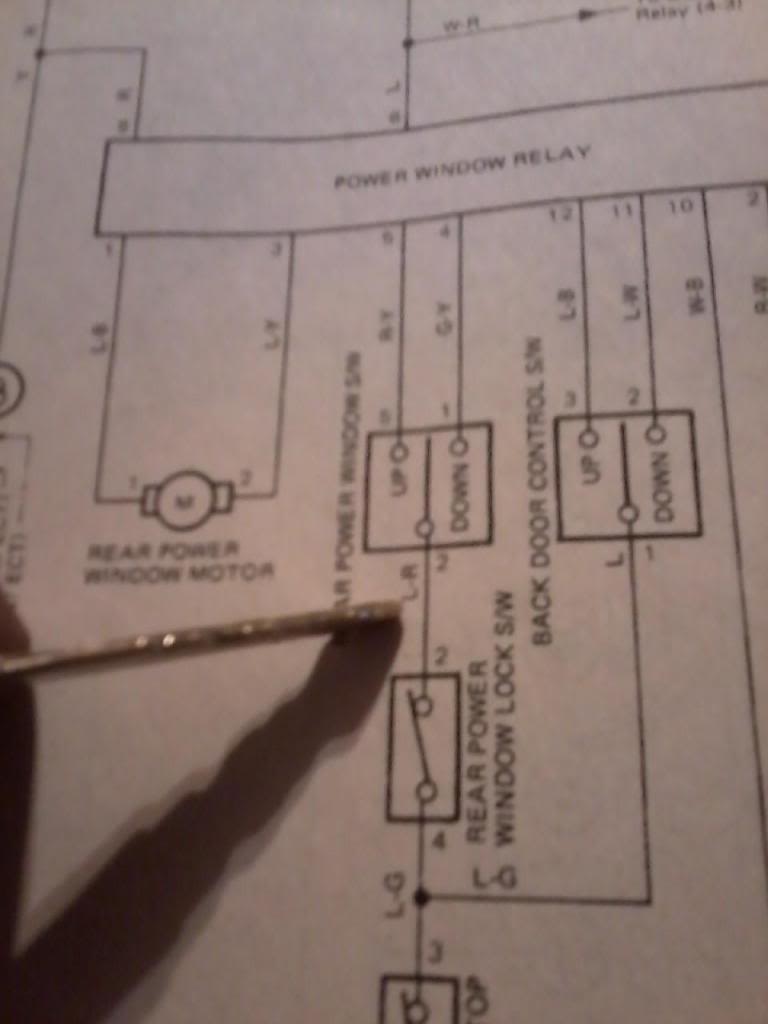
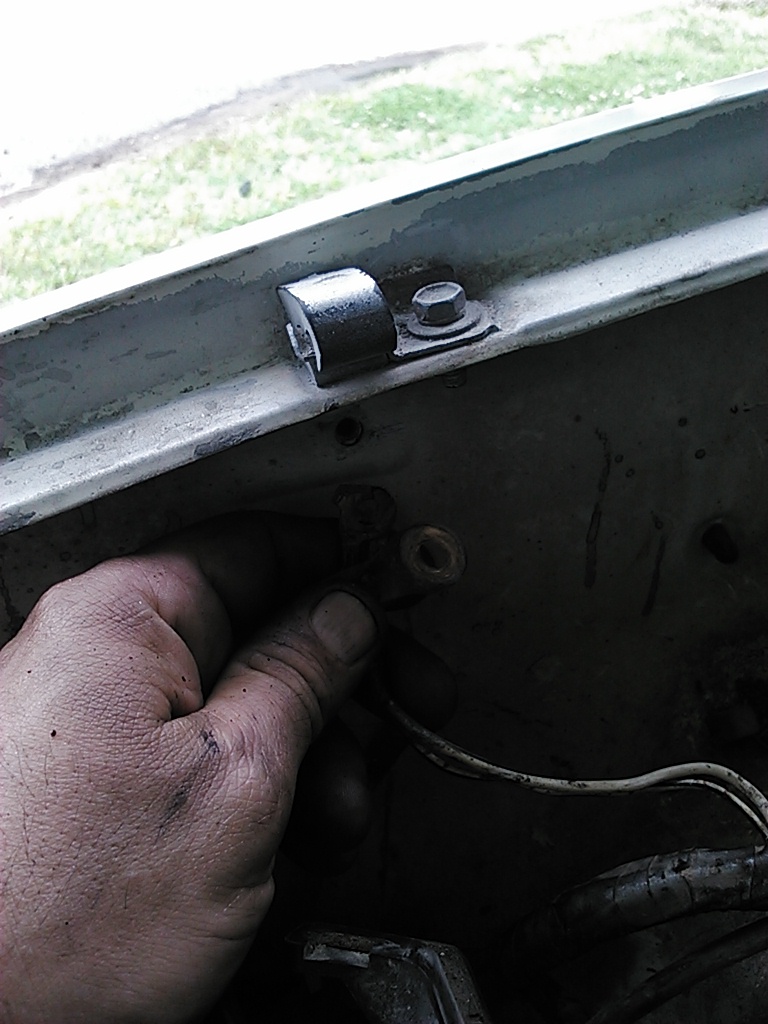
On post #361 I have a ground wire that bypasses the Cover Top Switch and Door Lock Detector Switch. #365 has a better electrical diagram view of the ground wire I by passed theses two switches.
I still havent tried the key. I didnt use my old key lock when I switched tailgates as it looks more involved then I want to get into. I will have a locksmith to make me one.
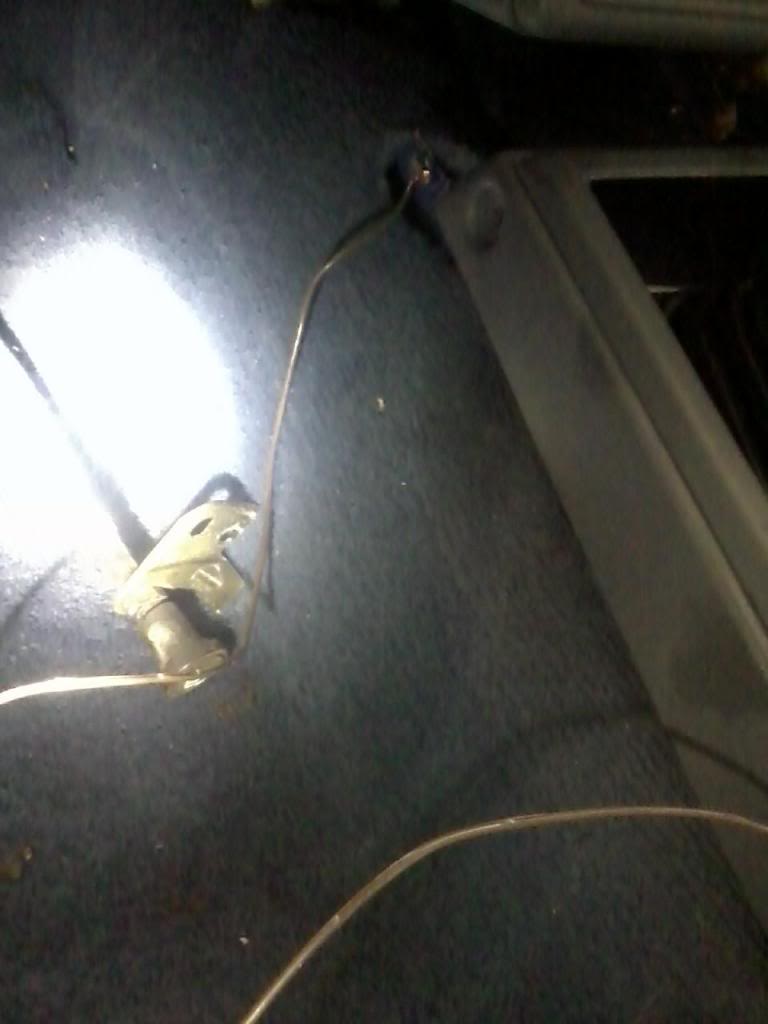
This is a switch that does give problems. I have cleaned it and it seems to be working better. I will light the Rear Door Ajar light.
Located behind driviers seat.
..........................
Running a ground wire from this wire on the plug, the blue wire to the place on the pic below elminates a lot of problems.
Ground to center consloe mounting tab.
The ground wire bypasses the following safety switches. Cover Top and Door Lock Detections switch. Your window will roll up with top off. This is on Page 12-23 of the Haynes Manual where the key is to the botom of the page.
Haynes "L" for Blue, "R" for Red. Key is pointing to wire.
..............................................
89-95 runner tailgate reassembly, but most applies to 1st gen Runner.
Some quick and easy test are 1. Make sure your rear wiper is in the stowed position. 2.Back gate is shut good, may even want to lean against it and try your key. 3. The plug in the drivers side corner in the back is hooked up good, by your rear windshield washer bottle. 4. That the bolt/pin on drivers side,by the roll bar is all the way in. There is a safety lock located there.
I wanted to see if my Motor was good so I ran 2 connectors right to the motor plug. It is a PITA to get that plug seperated and ran each wire to a battery. Just reverse polarity to control the direction of the window.
I could tell the motor was good right away but it was really struggling to move the window. I thought it was off track, but the metal track with rollers were pretty rusty and I just greased them.
It still was struggling to move up and down, so I took some Silione Spray and got the window tracks. This made a big difference and was the biggest problem. Works great on your door windows too.
I then replaced the Window Relay Box, I got my Rear Wiper working and Defrost but no window control. Located behind the Drivers seat behind the vinyl panel. If your rear wiper and deforst work this is some indication the box is good, but a relay is in there that operates the window so you cant completely rule it out.
I then took the Switch apart. It comes apart easily if done right. First remove the gray plug. It is the light bulb. Then pull the cover away from 2 tabs on one side and then the 2 tabs on the other side.
I then washed the button with soap and water and air dried it with air hose and used electrical contact cleaner to get the corrosion, coffe, dirt and who knows what else out of there.
Here is another picture of how it should look before going back together. Make sure you dont lose the little white pin and the metal toggle piece. These are very brittle being 20 plus years old. On the rear wiper and safety lock, they are difficult to get seperated. I just take contact cleaner and hold the switch upside down and spray cleaner in there and blow it out with an air hose.
I put some links that I used to get to this point up in a previous post. The last link says you can use some relays from Radio Shack, but I havent tried it. I will later on with my old/bad relay.
Other things to look for is make sure your rear wiper is in the stow positon, the tail gate is completely closed.
On post #361 I have a ground wire that bypasses the Cover Top Switch and Door Lock Detector Switch. #365 has a better electrical diagram view of the ground wire I by passed theses two switches.
I still havent tried the key. I didnt use my old key lock when I switched tailgates as it looks more involved then I want to get into. I will have a locksmith to make me one.
This is a switch that does give problems. I have cleaned it and it seems to be working better. I will light the Rear Door Ajar light.
Located behind driviers seat.
..........................
Running a ground wire from this wire on the plug, the blue wire to the place on the pic below elminates a lot of problems.
Ground to center consloe mounting tab.
The ground wire bypasses the following safety switches. Cover Top and Door Lock Detections switch. Your window will roll up with top off. This is on Page 12-23 of the Haynes Manual where the key is to the botom of the page.
Haynes "L" for Blue, "R" for Red. Key is pointing to wire.
..............................................
89-95 runner tailgate reassembly, but most applies to 1st gen Runner.
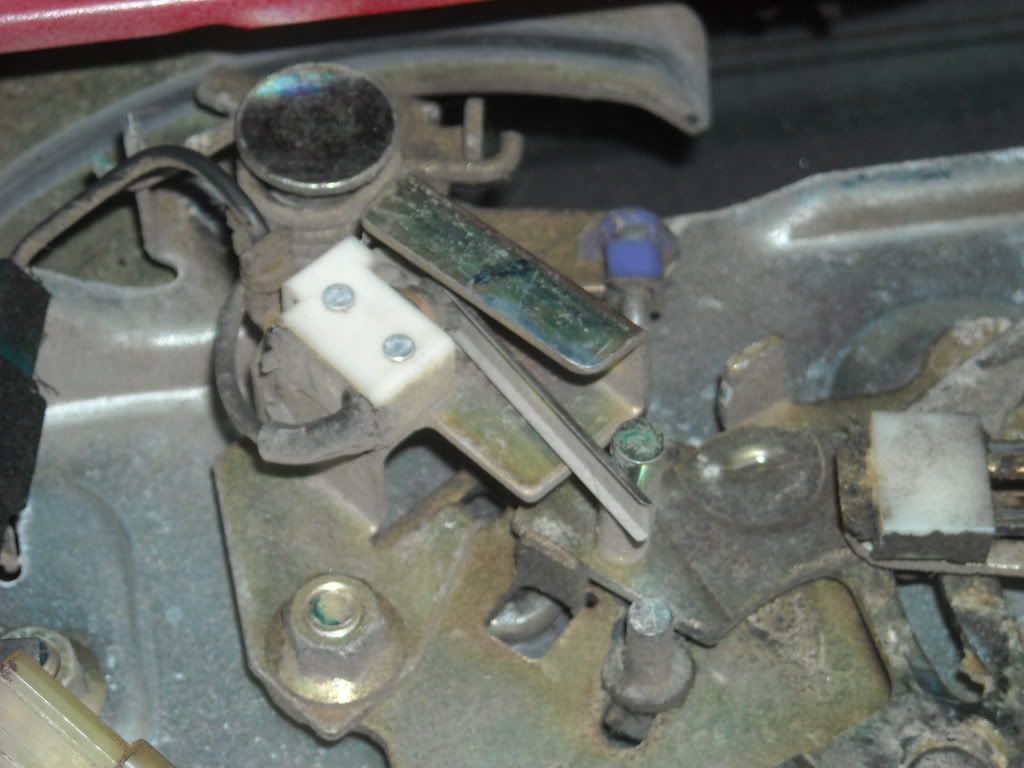
Bottom line, my tailgate wouldn't even latch on the pass. side, let alone lock. This is a very common problem, from what I've learned.... And the culprits, as I've also come to glean from great Yotatechy Brothers like Terrys_87 and others is these..........
The Tailgate Latch Release/Latch Cables...........
************************************************** ********
So let's get to it..........
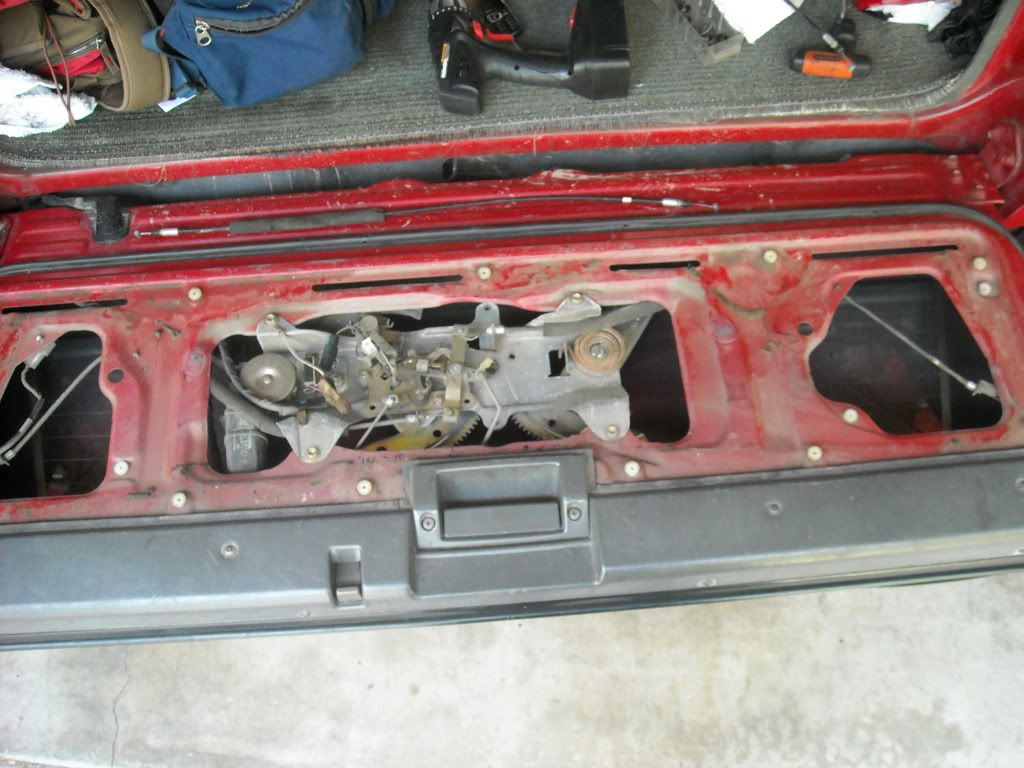
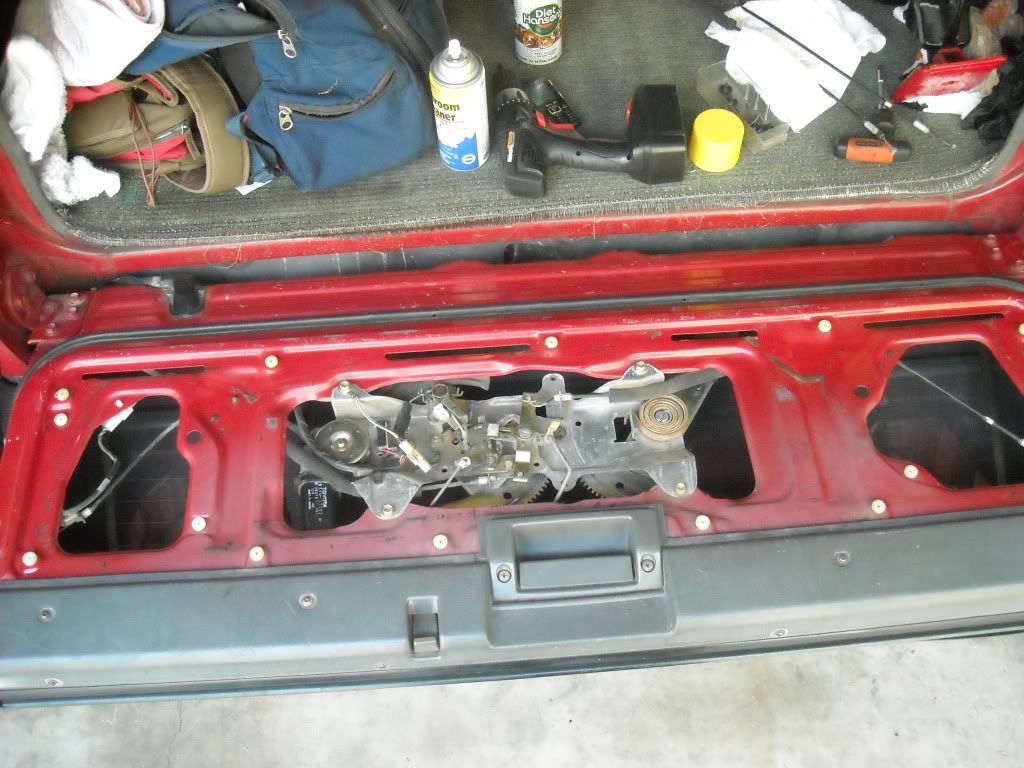
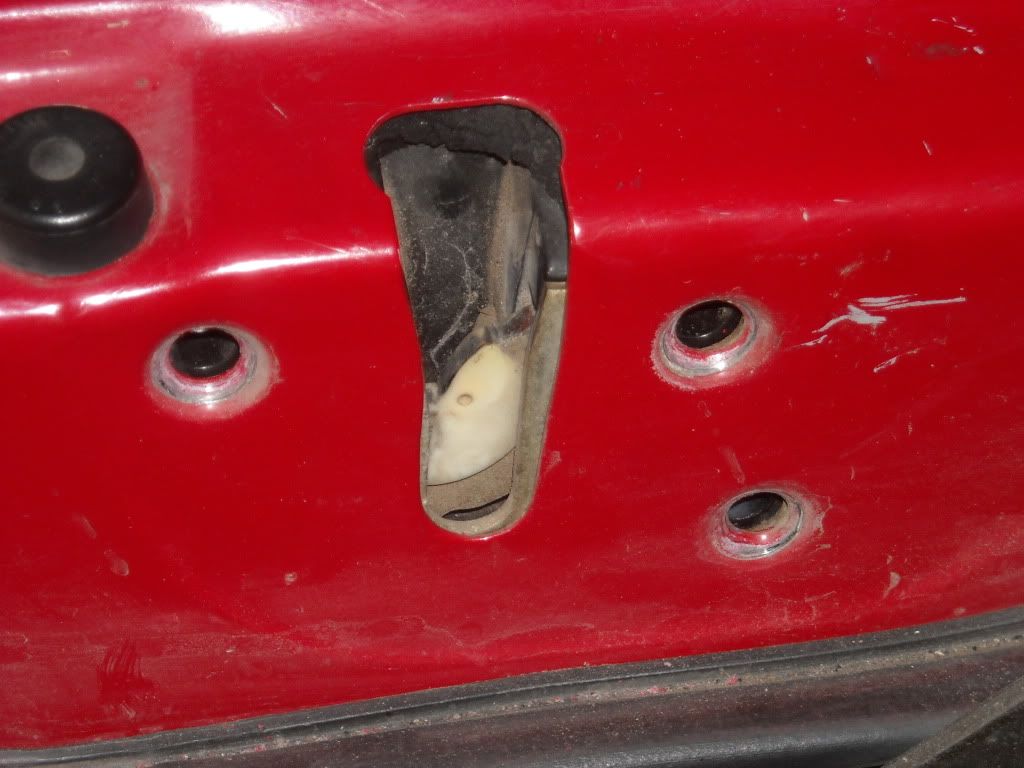
1st: Remove the Carpeted Panel, Metal Plate and then Plastic Film(The film can be brittle... Mine was solid.. Just a lil dried out on the corners. But pick a spot to start and peel it up and continue to peel it up all the way around until it's removed)...........
Mine was very dirty inside and on top.......
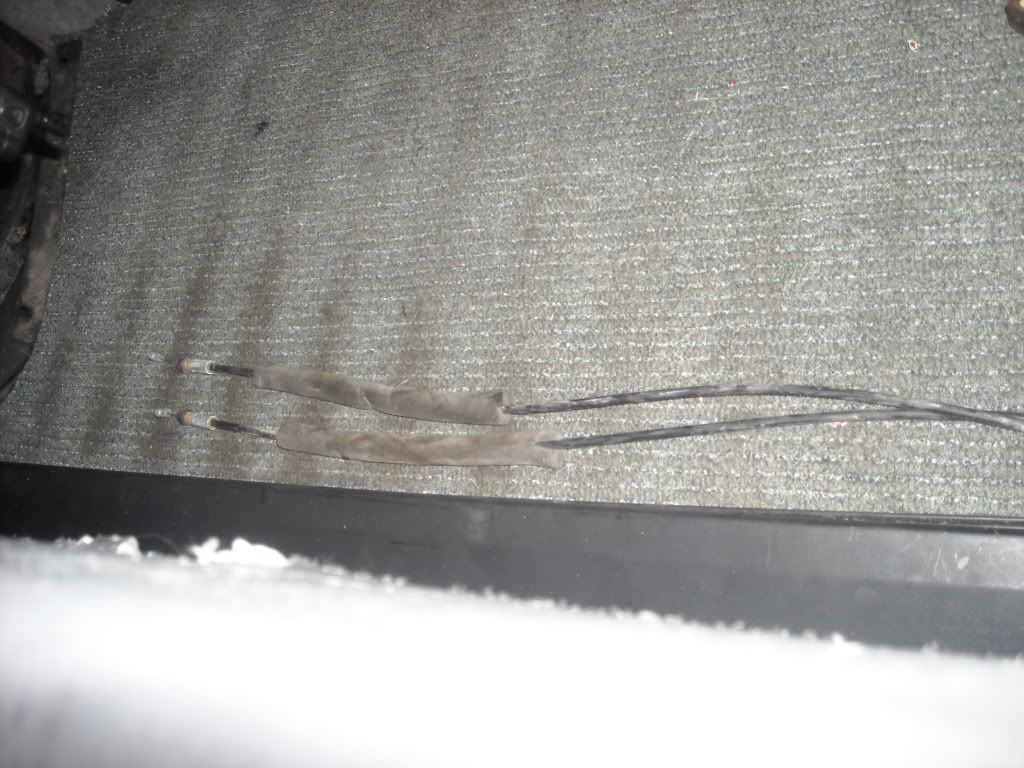
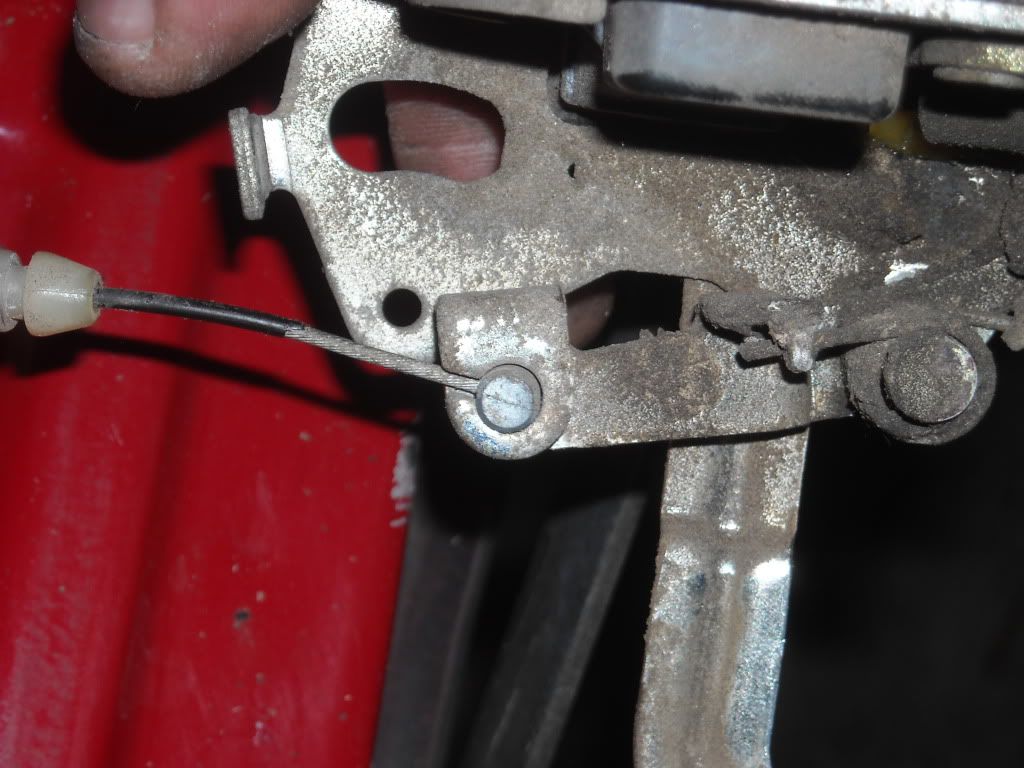
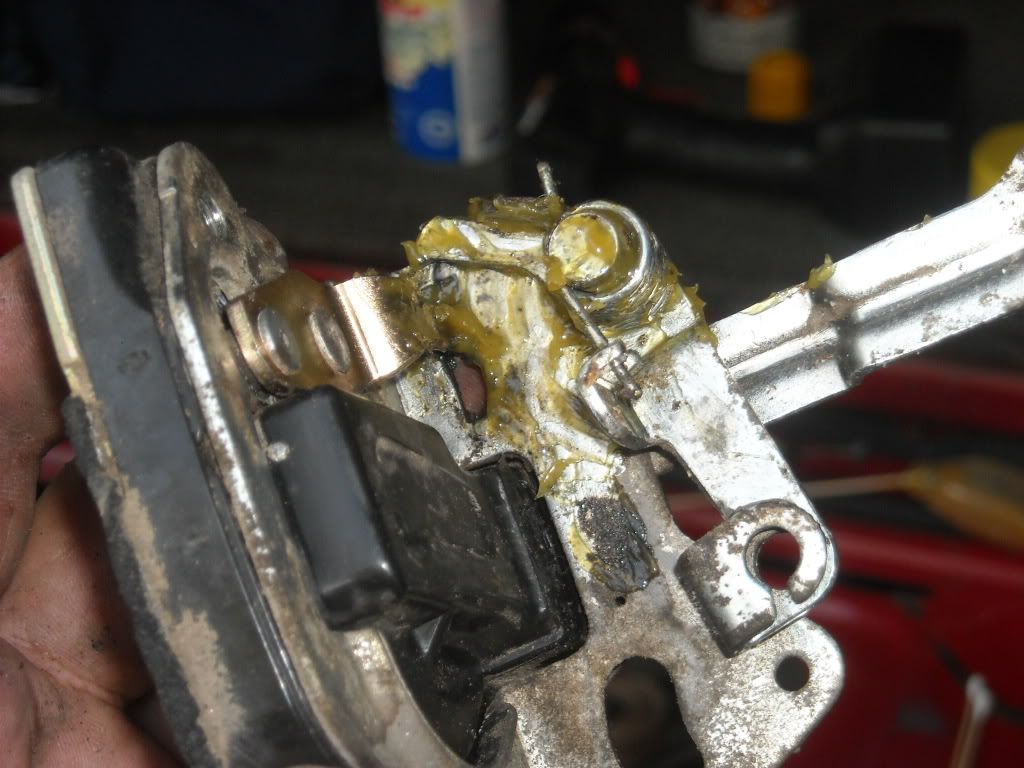
Here's a close up of the most common cable to wind up sticking/freezing up, passenger side... It can't enter the shaft to re-engage the latch mechanism...
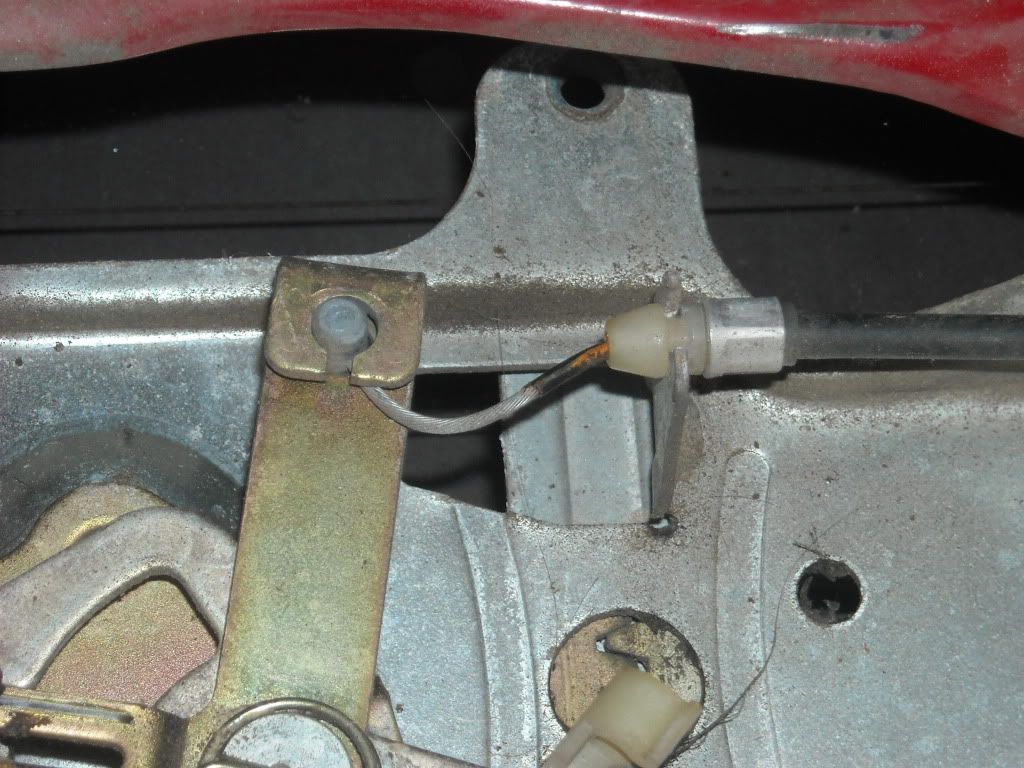
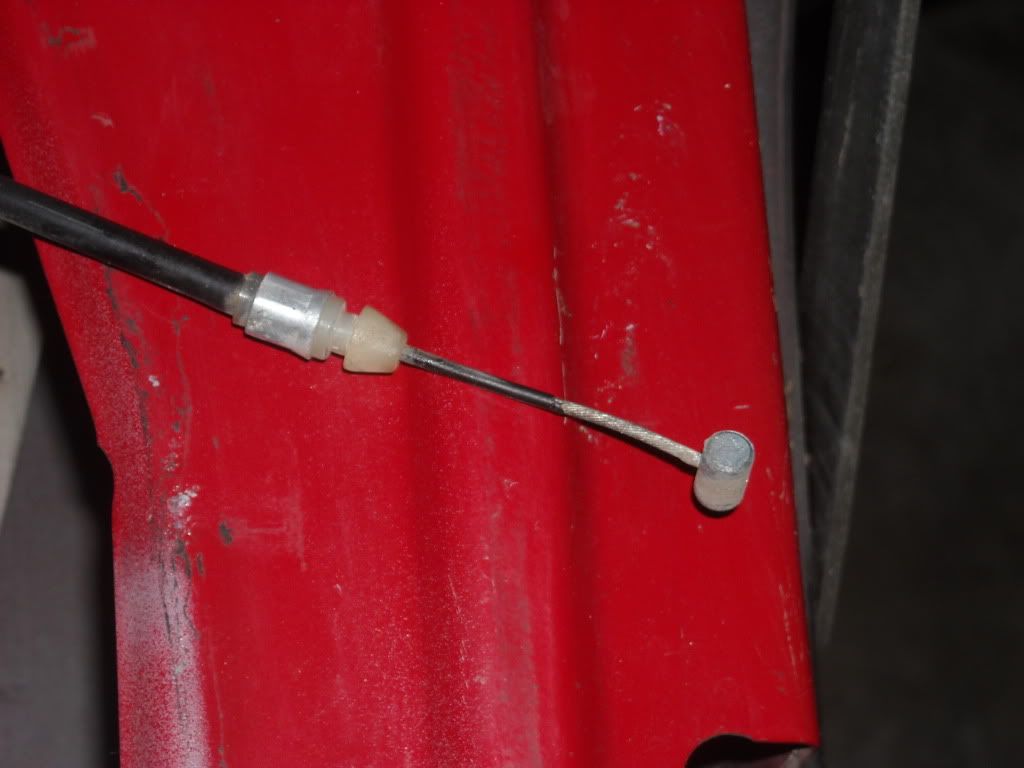
The cable going to the driver side latch seemed to move 'OK'... but I replaced them both, for reasons I'll explain in video, more so, later(but briefly; The 1st Gen cables ARE DIFFERENT, in more than one way. They DO NOT have a rubber boot on the end that the cable slides through.... Rather, the cable itself is 'rubberized'... It rusts right through the rubber and seizes up inside the shaft/guide)........Driver side Cable.......
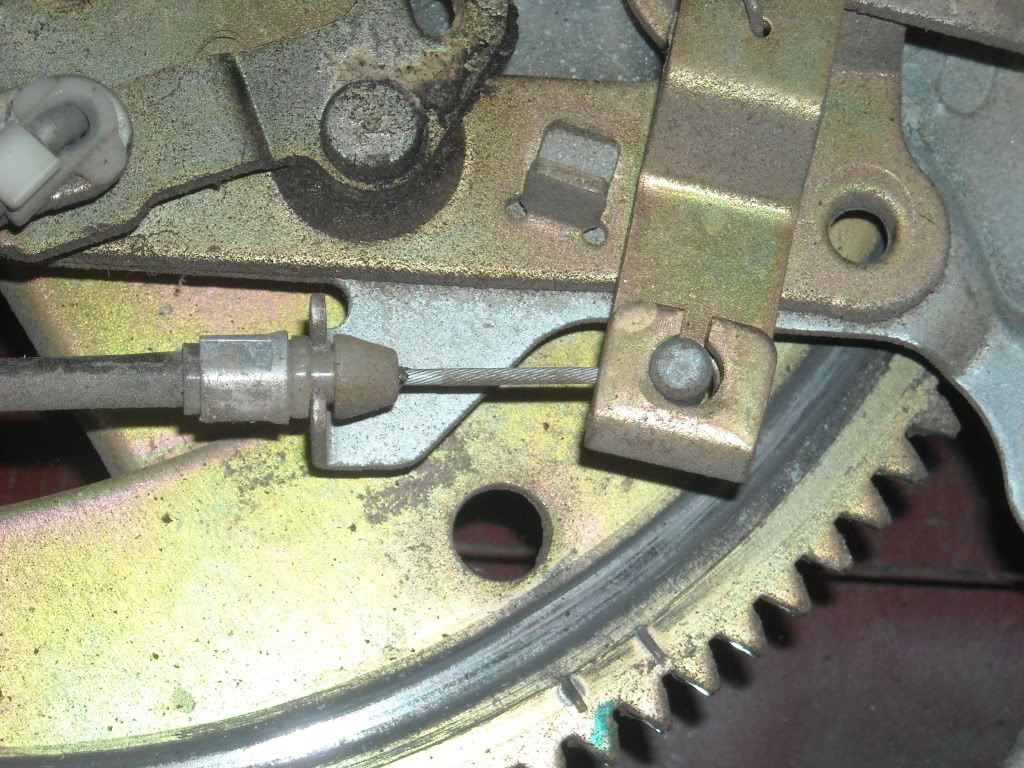
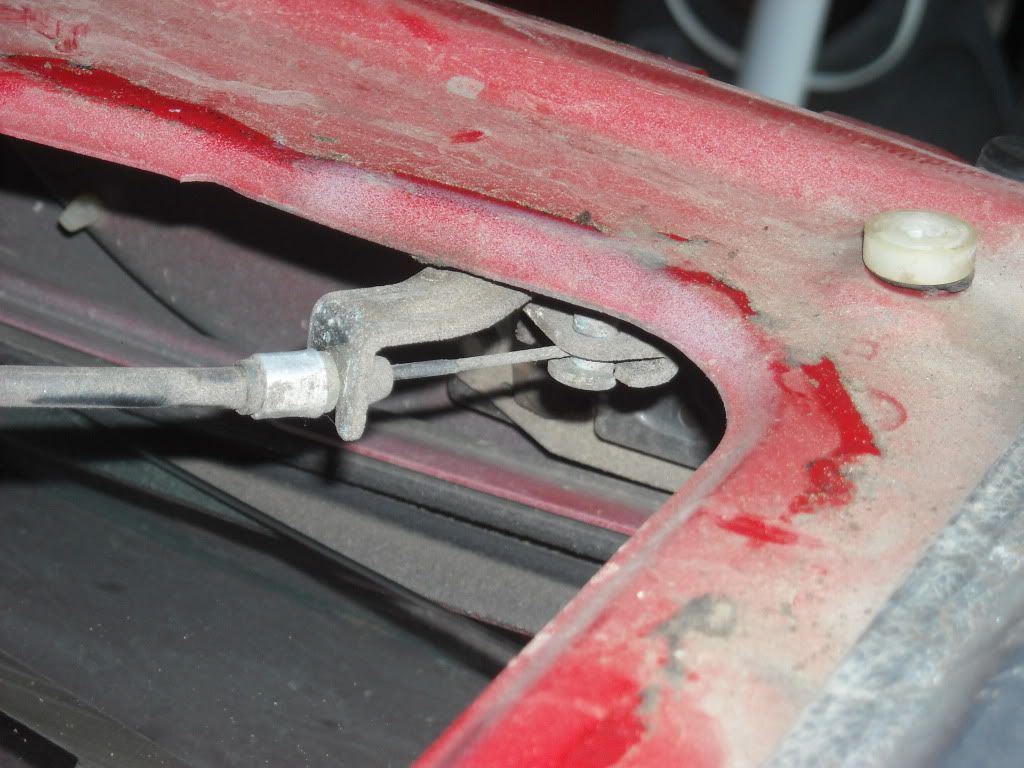
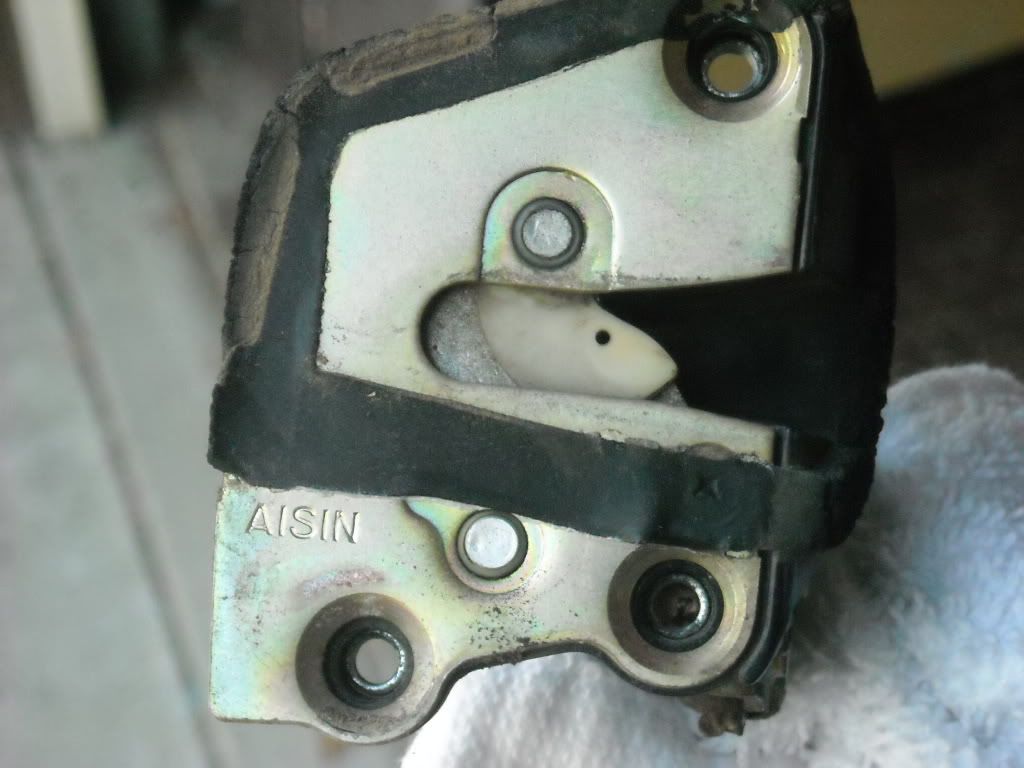
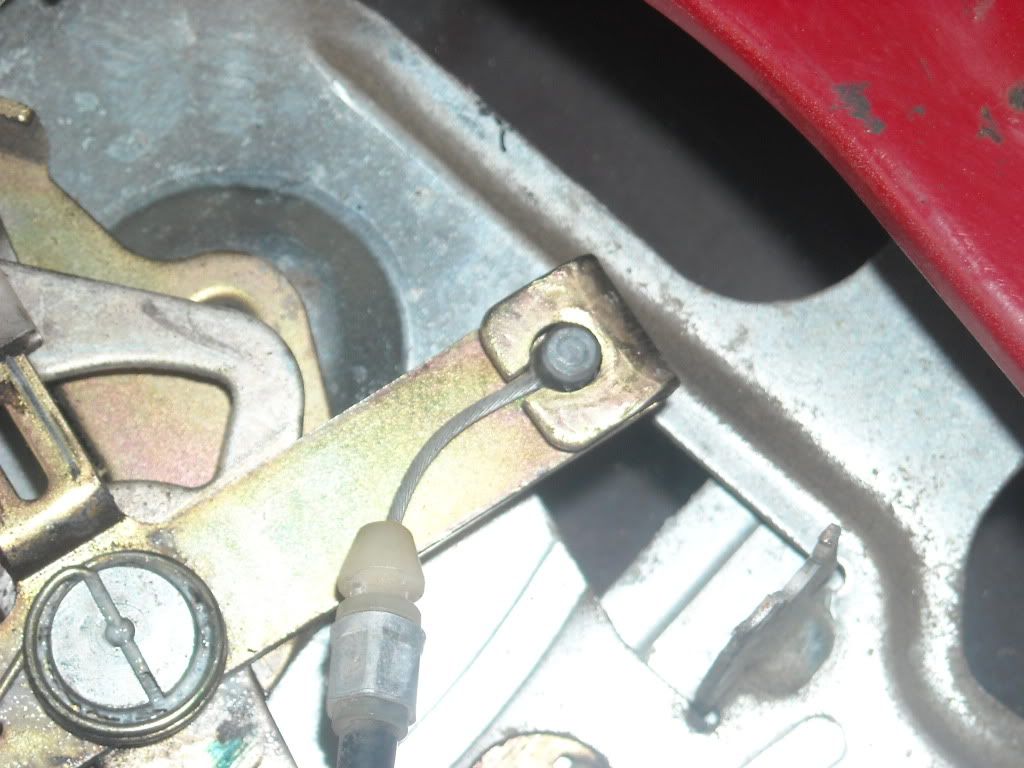
Here is the passenger side latch mechanism bracket, where the cable clips in/Second pic is the driver side one......

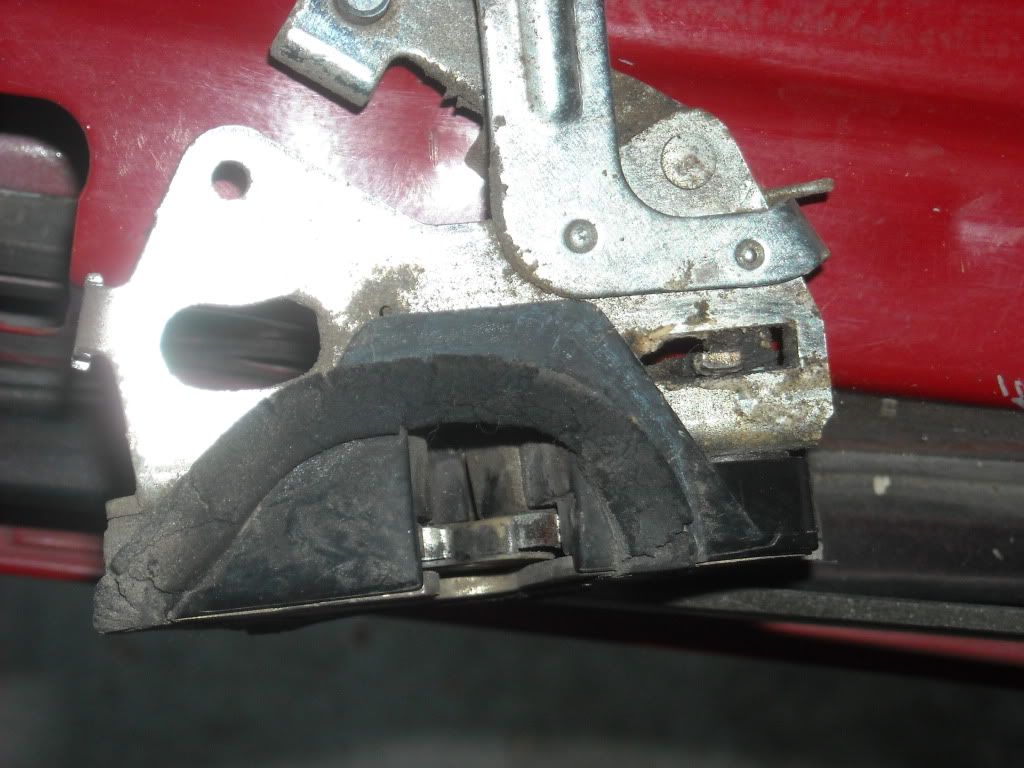
This is the Lock-Safety Switch Actuator in, first, the unlocked position, then locked.......
2nd: Clean up the Tailgate very well, inside I used a vacuum and on top I used some Bathroom Foaming Cleaner.........
Next, I prepared the NEW to me, 2nd Gen 4Runner Latch Release Cables by pulling off the boot and injecting silicone lubricant spray.....
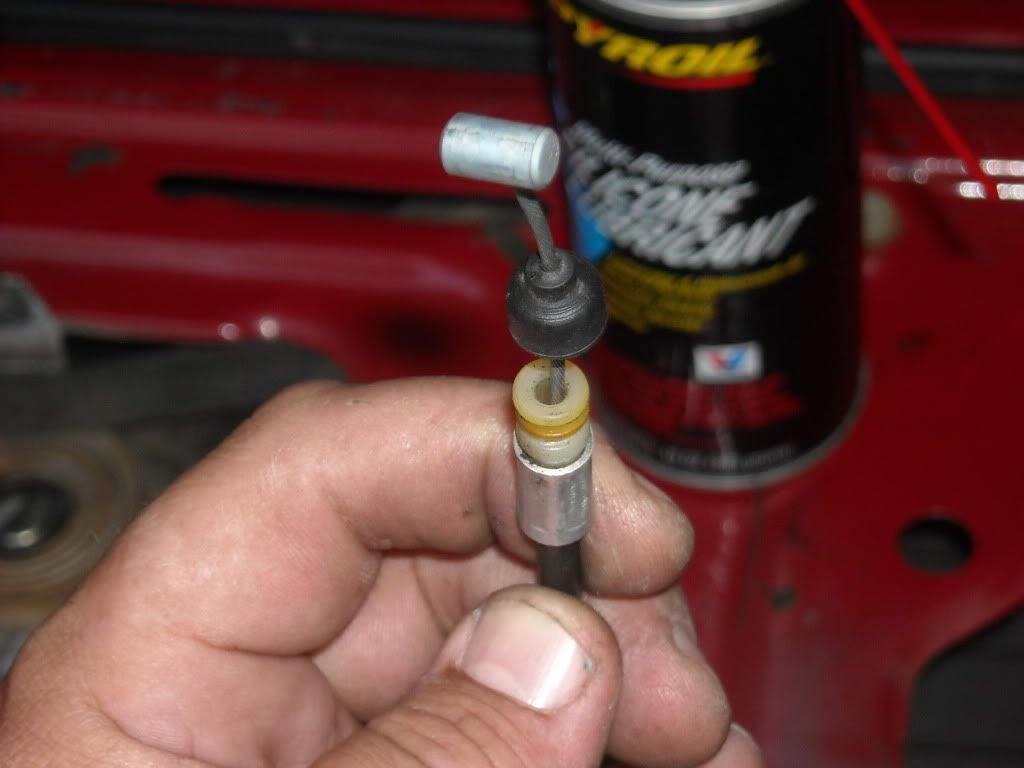
BELOW, notice the difference in the 1st Gen 4Runner Cable ends(and notice the rubberizing on the cable itself, plus the boots that they use, instead, on the 2nd Gen 4Runner cables...
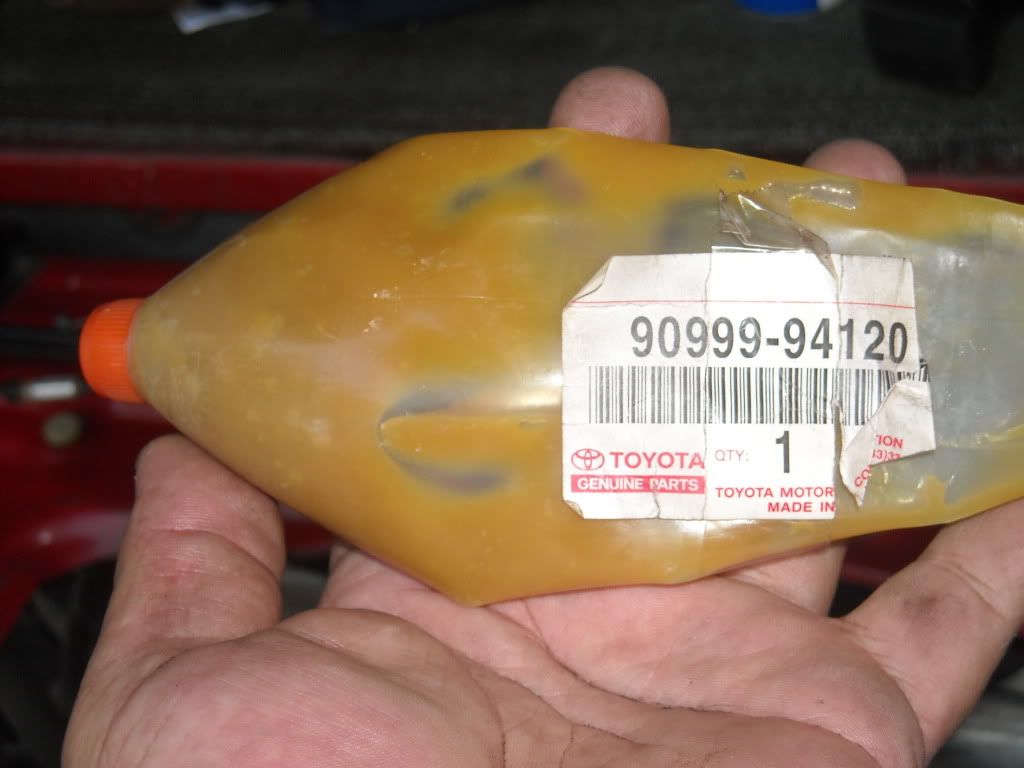
I then took some of the left over CV boot kit grease from Toyota, and used it on all the 'gliding' mechanisms and places it should be, including the latch on the driver side, which I removed and cleaned up, well.........
First pulled out the latch mechanism and removed the cable...
It was pretty nasty.. Then cleaned up and greased everything....
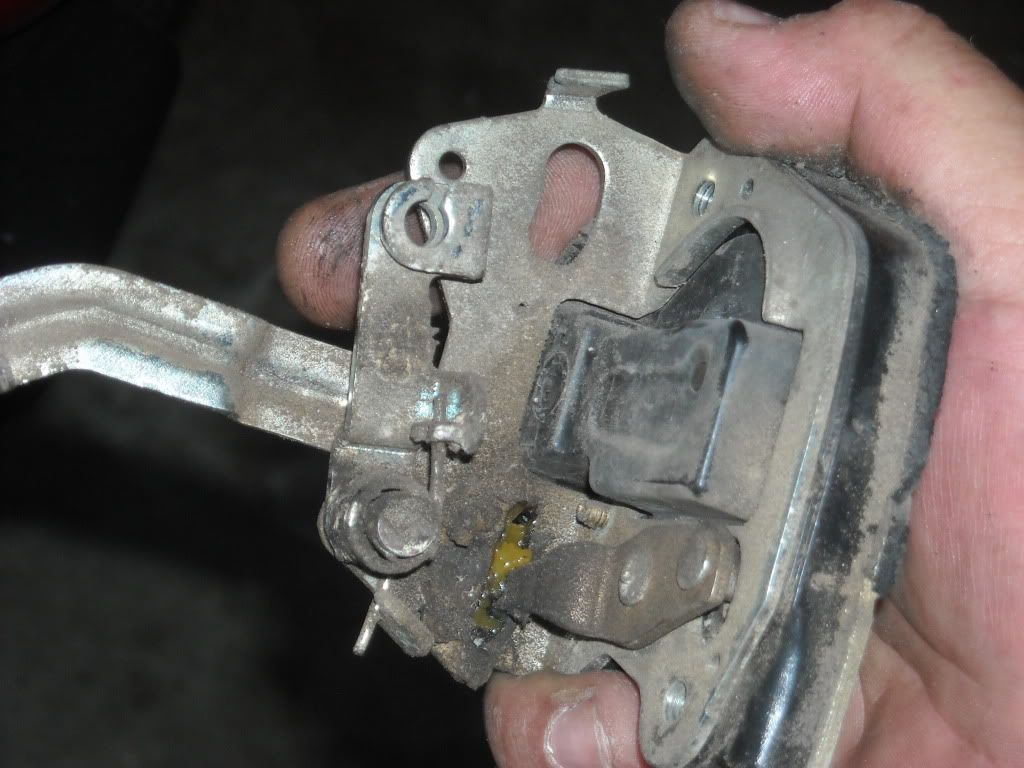
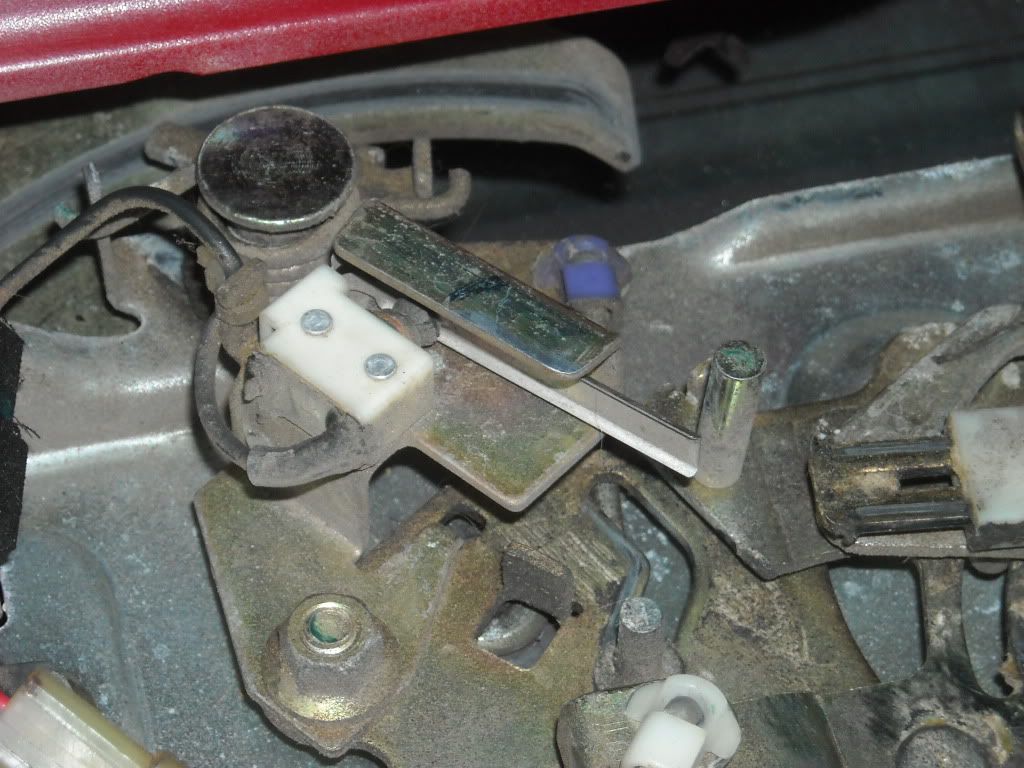
Then removed the other side on the Handle Cross Gear(Cross as in it looks like a Cross, haha).......
Put the latch back in..........
Installed the screws, then pushed up the gate, and to my GREAT BIG HEAPING SERVING OF DELIGHT.... it latches and locks!
************************************************** ********
Below is a couple of videos..... I make lots of fun of myself... And, some of it is bad lighting, etc. But all in all, it's not THAT bad, lol..... I hope they help someone............


The Tailgate Latch Release/Latch Cables...........
************************************************** ********
So let's get to it..........
1st: Remove the Carpeted Panel, Metal Plate and then Plastic Film(The film can be brittle... Mine was solid.. Just a lil dried out on the corners. But pick a spot to start and peel it up and continue to peel it up all the way around until it's removed)...........
Mine was very dirty inside and on top.......
Here's a close up of the most common cable to wind up sticking/freezing up, passenger side... It can't enter the shaft to re-engage the latch mechanism...
The cable going to the driver side latch seemed to move 'OK'... but I replaced them both, for reasons I'll explain in video, more so, later(but briefly; The 1st Gen cables ARE DIFFERENT, in more than one way. They DO NOT have a rubber boot on the end that the cable slides through.... Rather, the cable itself is 'rubberized'... It rusts right through the rubber and seizes up inside the shaft/guide)........Driver side Cable.......
Here is the passenger side latch mechanism bracket, where the cable clips in/Second pic is the driver side one......
This is the Lock-Safety Switch Actuator in, first, the unlocked position, then locked.......
2nd: Clean up the Tailgate very well, inside I used a vacuum and on top I used some Bathroom Foaming Cleaner.........
Next, I prepared the NEW to me, 2nd Gen 4Runner Latch Release Cables by pulling off the boot and injecting silicone lubricant spray.....
BELOW, notice the difference in the 1st Gen 4Runner Cable ends(and notice the rubberizing on the cable itself, plus the boots that they use, instead, on the 2nd Gen 4Runner cables...
I then took some of the left over CV boot kit grease from Toyota, and used it on all the 'gliding' mechanisms and places it should be, including the latch on the driver side, which I removed and cleaned up, well.........
First pulled out the latch mechanism and removed the cable...
It was pretty nasty.. Then cleaned up and greased everything....
Then removed the other side on the Handle Cross Gear(Cross as in it looks like a Cross, haha).......
Put the latch back in..........
Installed the screws, then pushed up the gate, and to my GREAT BIG HEAPING SERVING OF DELIGHT.... it latches and locks!
************************************************** ********
Below is a couple of videos..... I make lots of fun of myself... And, some of it is bad lighting, etc. But all in all, it's not THAT bad, lol..... I hope they help someone............
Last edited by Terrys87; May 9, 2016 at 09:13 PM.
May 17, 2011 | 09:11 AM
#187
Registered User
iTrader: (2)
Joined: Dec 2009
Posts: 2,159
Likes: 8
From: Pleasanton, CA - SF Bay Area
Good investigative work!
I went through a similar trial with my drivers side power window switch...had to take apart and "fix" to make it work.
For the rear window, also look for the coiled spring - a "return spring" I guess you'd call it - it counters the weight of the window and makes moving it up easier on the motor. Mine had fallen out and was resting the bottom of the tailgate - pretty easy to figure out how it goes back in
Good luck!
May 18, 2011 | 08:25 AM
#189
Registered User
Joined: Apr 2011
Posts: 428
Likes: 0
From: Southern Ontario
Nice work Terry. When the rear window stopped working in my first 4runner my initial reaction was "oh well, it's a small thing to live without" and I quickly learned what a huge pain in the rear it was not to be able to access the tailgate. I'm sure you're going through the same thing so it's good to see you making progress. My rear window on my daily driver is no longer working smoothly, so I'm glad I read your post; I'm guessing my helper spring isn't in there either because it really seems like it's working too hard when closing especially. I'll be off in the wilderness for a week, can't wait to see how far you've gotten when I get back. Cheers!
May 18, 2011 | 10:55 AM
#190
Thread Starter
Super Moderator
iTrader: (1)
Joined: Aug 2008
Posts: 11,787
Likes: 28
From: Anderson Missouri
Hello Philbert.. Thanks.. I hadnt noticed the spring , but am going to check it out. I had wanted to use my original gate but was afraid of not getting back together. Welcome to my thread.
Hi Jason.. Good to hear from you this morning. Sure hope you can make it this way.
Thanks Dutchbelly.. I try to make my repairs as straight forward as possible. So many have helped me here, and I know a lot of this information is elsewhere on the website, but maybe when ( if ever) lol... I am through this can have a little bit of everything in here that might help several others.
I am jealous.. I am waiting to do some camping myself. Have a fun and safe time.
May 18, 2011 | 11:05 AM
#191
Thread Starter
Super Moderator
iTrader: (1)
Joined: Aug 2008
Posts: 11,787
Likes: 28
From: Anderson Missouri
I thought I was going to fix a problem and created another. I always got tired of hearing my door buzzer alarm and first thing I did was find it under the Steering Column.
All was fine until I noticed that I did not have a dome light when I opened the drivers door. Passenger door worked and so did the switch on the cab. First thing I thought was the door switch was bad or dirty or corroded. I checked it out and it was good.
Did some looking around and you have to have the door alarm in for the drivers door light to work.
Also found the cure for the alarm on YT. Just bent the tab out a little so as not to make contact. If you ever want to hear it again, it can be bent back in.
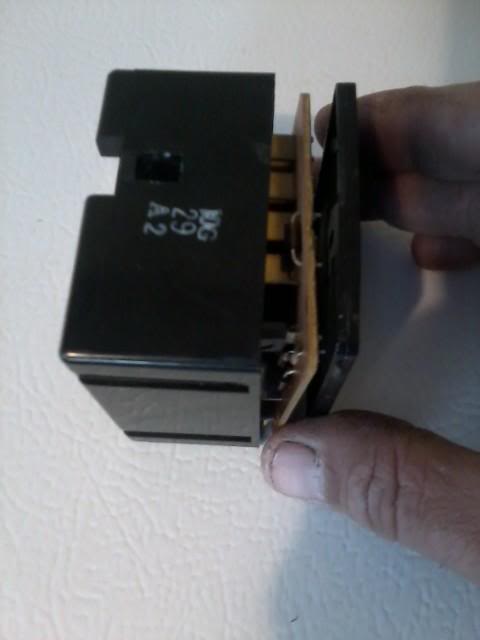
Here is the Buzzer Box under the Steering Column.
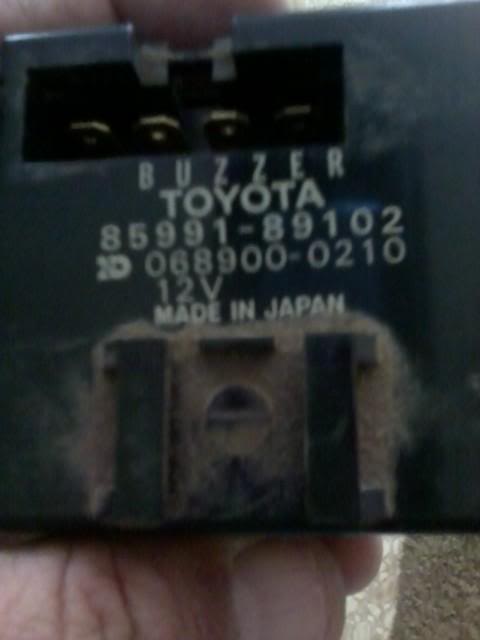
Just bend the tab out from the bottom a little bit.
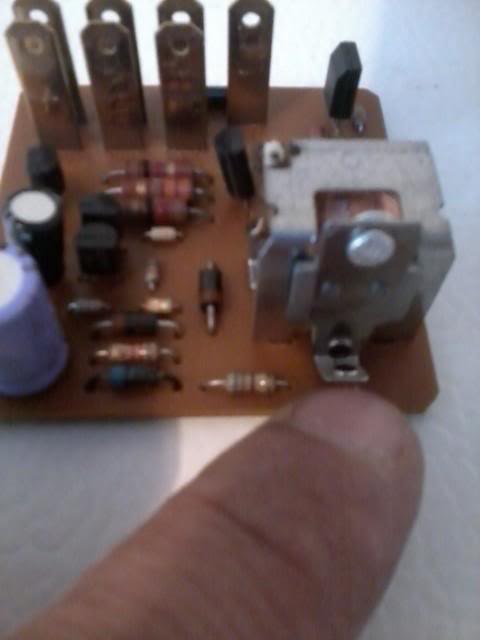
Here it is going back together. There are 2 tabs to the cover that I just pryed a pocket knife. Life is good now.
Apparently this is a fairly common problem. What I found on different threads is that a lot of the door switches and buzzers get removed. This was as far as I had to go to troubleshoot. Also I did find that by bending the tab you can control how loud the buzzer is.
All was fine until I noticed that I did not have a dome light when I opened the drivers door. Passenger door worked and so did the switch on the cab. First thing I thought was the door switch was bad or dirty or corroded. I checked it out and it was good.
Did some looking around and you have to have the door alarm in for the drivers door light to work.
Also found the cure for the alarm on YT. Just bent the tab out a little so as not to make contact. If you ever want to hear it again, it can be bent back in.
Here is the Buzzer Box under the Steering Column.
Just bend the tab out from the bottom a little bit.
Here it is going back together. There are 2 tabs to the cover that I just pryed a pocket knife. Life is good now.
Apparently this is a fairly common problem. What I found on different threads is that a lot of the door switches and buzzers get removed. This was as far as I had to go to troubleshoot. Also I did find that by bending the tab you can control how loud the buzzer is.
Last edited by Terrys87; Jul 14, 2015 at 08:17 AM.
May 18, 2011 | 05:29 PM
#194
Thread Starter
Super Moderator
iTrader: (1)
Joined: Aug 2008
Posts: 11,787
Likes: 28
From: Anderson Missouri
I get to mark another thing off of the list. Got my alighnment done today. I didnt do it, but it is a step closer.
I also edited my 1st page to show where and how I did things. It does jump around, but due to funds and time, this is how it goes.
I also edited my 1st page to show where and how I did things. It does jump around, but due to funds and time, this is how it goes.
Last edited by Terrys87; May 18, 2011 at 05:34 PM.
May 19, 2011 | 04:38 AM
#196
Thread Starter
Super Moderator
iTrader: (1)
Joined: Aug 2008
Posts: 11,787
Likes: 28
From: Anderson Missouri
Thanks Twisted..Im trying to get it to where the problems and fixes are easily found. I think by the time I get this project done, I am going to have every problem on these trucks have on mine. At least it is looking that way.
Jason.. I think you are right. I am looking for electrical on my wiper delay. Doing more electrical work than I really wanted to.
My next fix is for tomorrow is when I got the truck I didnt have Bright lights. I swapped out the light switch assembly and fixed that. Now I dont have wiper delay. I am not sure if my old one worked. If it does I am going to try and combine the two light assmeblies into one, or clean the wiper switch contacts. Still digging up info on wiper delay assemblies. Apparently there is a relay box by the Passneger kick panel.
I am gettting my electrical skills put to the test. Electrical is not my favorite area.
May 19, 2011 | 05:54 AM
#197
Registered User
Joined: Jun 2010
Posts: 1,448
Likes: 100
From: Virginia
Good work on the switch. I just might try to clean mine. I got my spare tire free last night. I think I soaked the works in a half can of PB Blaster. The spare now works great and it was not too rusty underneath. Thanks for the tips.
May 19, 2011 | 06:50 AM
#198
Thread Starter
Super Moderator
iTrader: (1)
Joined: Aug 2008
Posts: 11,787
Likes: 28
From: Anderson Missouri
Thanks Nervo.. I hoping these tips help others. I think you are right about the 1/2 can of PB Blaster. Glad that worked out for you. I soaked mine with a good dose of oil afterwards.
May 19, 2011 | 07:14 AM
#199
Thread Starter
Super Moderator
iTrader: (1)
Joined: Aug 2008
Posts: 11,787
Likes: 28
From: Anderson Missouri
I went to work on my Light Switch and Wiper delay. I plugged my old one in and the wiper delay worked. But not bright lights. I then tried to combine the 2 and was going to have cut wire and splice and didnt want to go that route.
MORE INFO>>> https://www.yotatech.com/forums/f116...icator-229946/
The Light Assembly I had before was from an 86 and it has another plug my 88 didnt have. I figured it was for some option mine didnt have so didnt think much about it. The white plug is what I am talking about on an 86 in this picture.

Today I got to looking at it (the white plug) and it runs to the wiper handle and I am guessing it is to the delay in the handle. So I then decided to see what I could do about my original Light assembly.
I took the Steering Wheel off. I have had mine off before and have it snug but not so tight I need a Steering Wheel Puller. If you havent had it off, dont bang on it as it will bulge the Steering shaft. Go rent a puller from the parts store. It is free.
You will need to drop the lower plastic panel and I diconnect the dimmer switch and just let it lay on the floor. Remove the Steering Wheel and the covers to the steering column.
There are 4 screws that hold the Light Switch Assembly on. They are recessed. Then disconnect the black clip that keeps all of the wire bundeled to the column and 2 screws that hold the blue connectors to the black tabs /clip.

Once I had it off, I had to take 2 screw out that hold the hazard light switch to the assembly, and set it out of the way. I then had to remove the clear plastic cover so as I could use my wife finger nail file (yeah.. she liked that idea) and went over the little copper tips on the copper layers. Just a couple of times to help make a good clean contact. Then I hit with some WD-40.


Here is a good picture of the contacts that need cleaned and more info if someone needs it.
https://www.yotatech.com/forums/f116...t-work-100088/
Put it back togther and everything works great. The 86 and 88 Light assemblys do have different part numbers on them and they interchanged and it got me thru. But it is nice having everything working as it should.
I did take my passenger kick panel off and didnt see a relay box there. Not saying it isnt, I just didnt want to pull the ECM and since I was able to test with a good wiper delay switch, I didnt need to go that far into it.
Found another link to a headlight problem I just wanted to add.
https://www.yotatech.com/forums/f116...icator-229946/
Here is how I fix my horn issue.
Got the horn to working. I used a .22 shell to make the contact to the steering wheel. I found this on Yotatech and like it better then how I used to fix my horns. I have it listed on my 88 4Runners build thread for more details about getting the horn to work on the first page. Will add this info at a later time.
Combo switch is around $40 at the boneyard here if you can find one. I just cleaned the contacts with some 1500 grit sand paper. Have it listed on the 88 runner build thread as well.
Dim Head light Fix.
I moved the headlight ground wire to the same point that the negative battery wire attaches to the body.
The bolt hole above I cleaned down to metal with a wire brush and cleaned the contacts. I did that in the past but just for reference for others. When I find the problem to this I will add it to my 88 Runners first page for trouble shooting and fix list.
You need to open the harness an inch or so to make them connect.

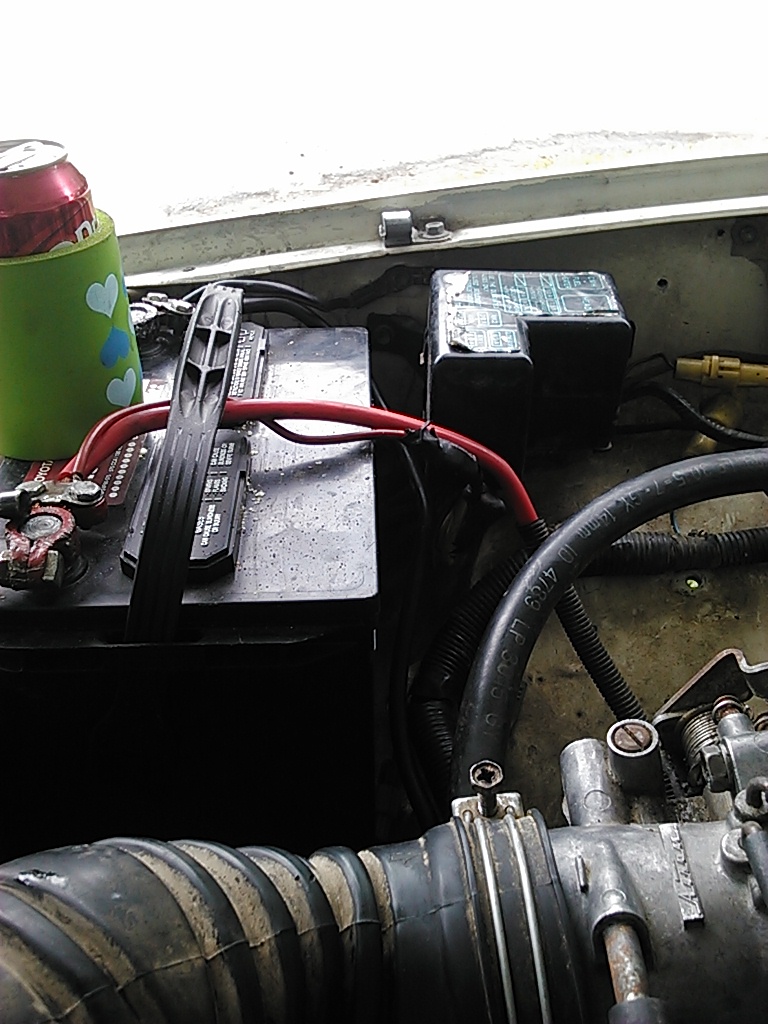
can see it just in the corner of the fuse box. I drink the hard stuff and that is Mistys cooler, cant find mine.
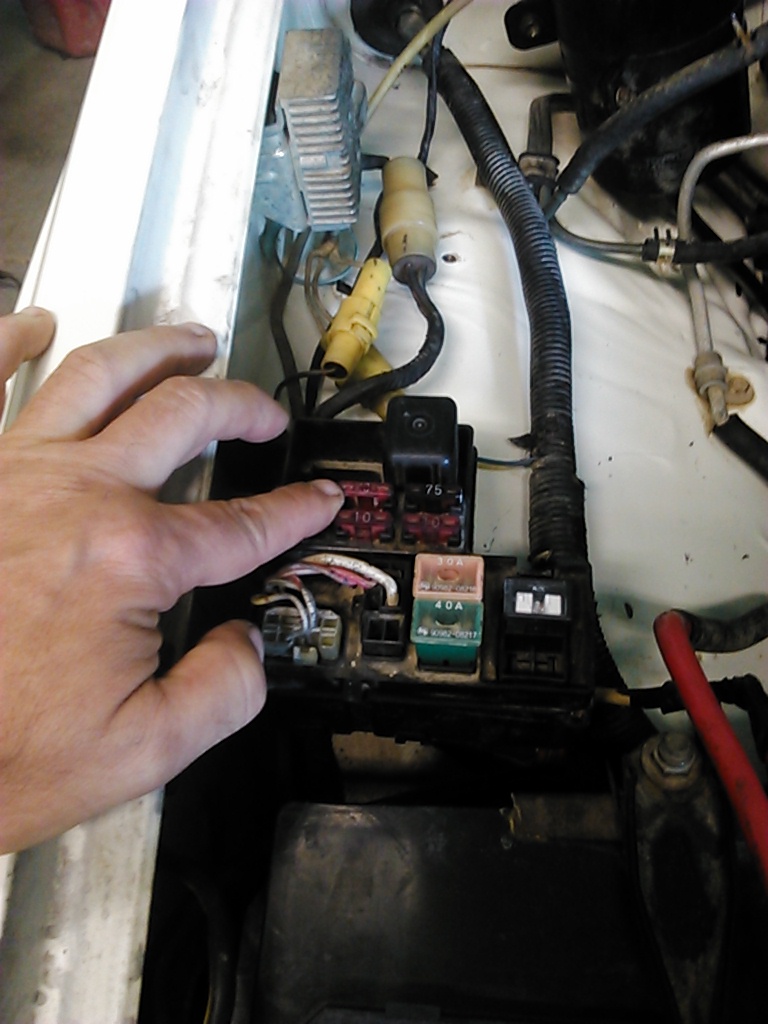
I did not know that each headlight has a fuse. Normally one fuse for all head lights but Toyota does it different. I also thought if one was working the fuse was good. That is not the case. I will see if it was just an old fuse or if there are other issues.
These are the headlight fuses. It is marked on the cover but is something that is easily overlooked.
MORE INFO>>> https://www.yotatech.com/forums/f116...icator-229946/
The Light Assembly I had before was from an 86 and it has another plug my 88 didnt have. I figured it was for some option mine didnt have so didnt think much about it. The white plug is what I am talking about on an 86 in this picture.
Today I got to looking at it (the white plug) and it runs to the wiper handle and I am guessing it is to the delay in the handle. So I then decided to see what I could do about my original Light assembly.
I took the Steering Wheel off. I have had mine off before and have it snug but not so tight I need a Steering Wheel Puller. If you havent had it off, dont bang on it as it will bulge the Steering shaft. Go rent a puller from the parts store. It is free.
You will need to drop the lower plastic panel and I diconnect the dimmer switch and just let it lay on the floor. Remove the Steering Wheel and the covers to the steering column.
There are 4 screws that hold the Light Switch Assembly on. They are recessed. Then disconnect the black clip that keeps all of the wire bundeled to the column and 2 screws that hold the blue connectors to the black tabs /clip.
Once I had it off, I had to take 2 screw out that hold the hazard light switch to the assembly, and set it out of the way. I then had to remove the clear plastic cover so as I could use my wife finger nail file (yeah.. she liked that idea) and went over the little copper tips on the copper layers. Just a couple of times to help make a good clean contact. Then I hit with some WD-40.
Here is a good picture of the contacts that need cleaned and more info if someone needs it.
https://www.yotatech.com/forums/f116...t-work-100088/
Put it back togther and everything works great. The 86 and 88 Light assemblys do have different part numbers on them and they interchanged and it got me thru. But it is nice having everything working as it should.
I did take my passenger kick panel off and didnt see a relay box there. Not saying it isnt, I just didnt want to pull the ECM and since I was able to test with a good wiper delay switch, I didnt need to go that far into it.
Found another link to a headlight problem I just wanted to add.
https://www.yotatech.com/forums/f116...icator-229946/
Here is how I fix my horn issue.
Got the horn to working. I used a .22 shell to make the contact to the steering wheel. I found this on Yotatech and like it better then how I used to fix my horns. I have it listed on my 88 4Runners build thread for more details about getting the horn to work on the first page. Will add this info at a later time.
Combo switch is around $40 at the boneyard here if you can find one. I just cleaned the contacts with some 1500 grit sand paper. Have it listed on the 88 runner build thread as well.
Dim Head light Fix.
I moved the headlight ground wire to the same point that the negative battery wire attaches to the body.
The bolt hole above I cleaned down to metal with a wire brush and cleaned the contacts. I did that in the past but just for reference for others. When I find the problem to this I will add it to my 88 Runners first page for trouble shooting and fix list.

You need to open the harness an inch or so to make them connect.

can see it just in the corner of the fuse box. I drink the hard stuff and that is Mistys cooler, cant find mine.

I did not know that each headlight has a fuse. Normally one fuse for all head lights but Toyota does it different. I also thought if one was working the fuse was good. That is not the case. I will see if it was just an old fuse or if there are other issues.
These are the headlight fuses. It is marked on the cover but is something that is easily overlooked.

Last edited by Terrys87; Apr 13, 2016 at 01:33 PM.
May 19, 2011 | 08:31 AM
#200
Thread Starter
Super Moderator
iTrader: (1)
Joined: Aug 2008
Posts: 11,787
Likes: 28
From: Anderson Missouri
I tried to Edit my Signature. Maybe it is not the right place. But how do you put your build link in when you post? Any help would be greatly appreciated. Thanks
Never mind guess it did.
Never mind guess it did.


