
rustED's 86' V8-Runner Build-up Thread
 Aug 23, 2014 | 08:45 PM
#1061
Thread Starter
Registered User
iTrader: (2)
Joined: Sep 2010
Posts: 2,716
Likes: 7
From: Tri-Cities, Wa
Thanks Mark. I really was not looking forward to pulling the dash pad, but like you said once you know where to find all nuts and bolts, its pretty easy. I wish I had the $30, I'd buy that dash pad off CL, its the same color as mine and in perfect shape, mines all cracked, lol.
Aug 25, 2014 | 12:08 PM
#1062
Thread Starter
Registered User
iTrader: (2)
Joined: Sep 2010
Posts: 2,716
Likes: 7
From: Tri-Cities, Wa
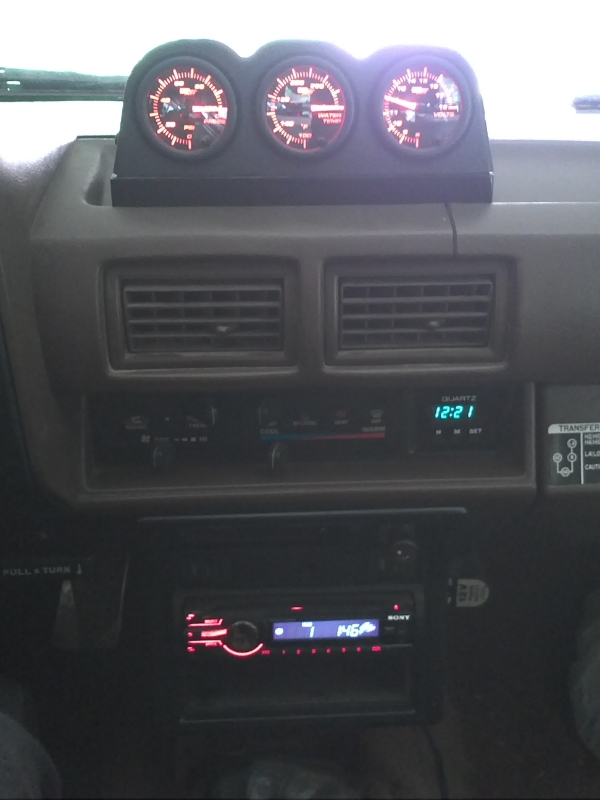
I got some of te wiring finished, just waiting to get some NPT fitttings to adapt my oil and water sending units, and wire them up. The Volts gauge is working, and the oil and water temp gauges illuminate, still need to hook up the wire to the light circuit so that the gauges dim down by 50% when the headlights are turned on. Here's afew pics.
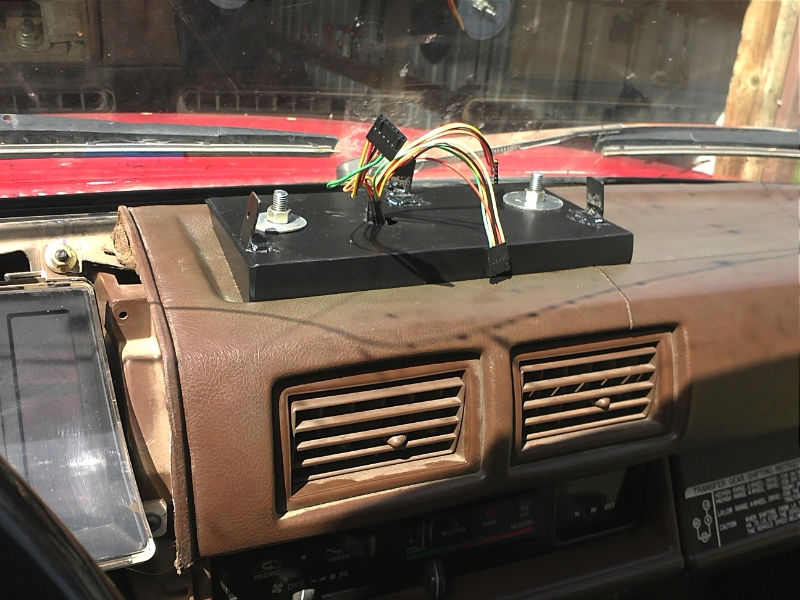
Kind of hard to tell, but I painted the stereo trim bezel, it was grey, painted it black, it matches the rest of the interior trim better now
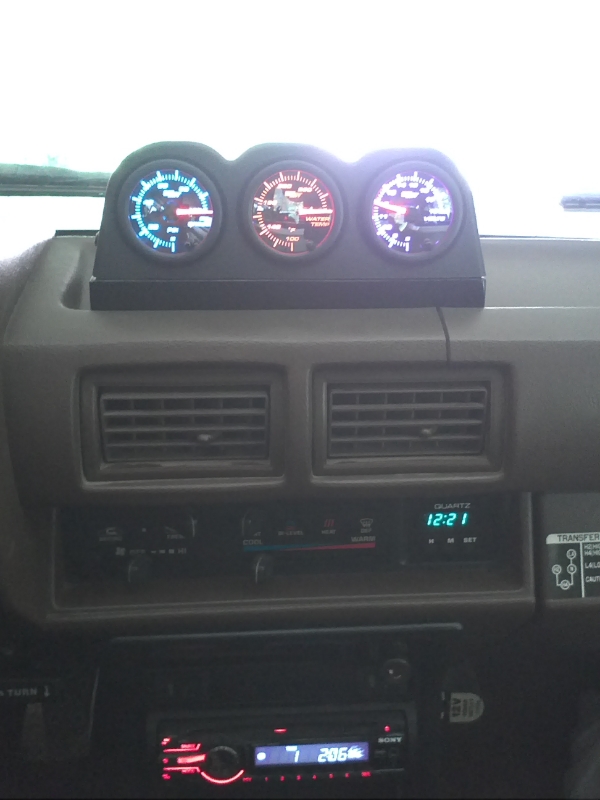
^^^The gauges have 7 different colors to choose from, kinda crappy pic, but gives you an idea


Kind of hard to tell, but I painted the stereo trim bezel, it was grey, painted it black, it matches the rest of the interior trim better now

^^^The gauges have 7 different colors to choose from, kinda crappy pic, but gives you an idea


Last edited by rustED; Aug 25, 2014 at 12:30 PM.


 Aug 26, 2014 | 11:35 AM
#1066
Thread Starter
Registered User
iTrader: (2)
Joined: Sep 2010
Posts: 2,716
Likes: 7
From: Tri-Cities, Wa
Thanks man! I had thought about trying to find an old inclinometer housing to mount the gauges in, but this pod only cost $10...I wasn't expecting to have to modify it this much though, lol
Aug 26, 2014 | 11:49 AM
#1067
Thread Starter
Registered User
iTrader: (2)
Joined: Sep 2010
Posts: 2,716
Likes: 7
From: Tri-Cities, Wa
Thanks Mark! I agree, it will be nice to be able to accurately keep tabs on what going on. I can't wait to get the rest of the gauges hooked up and working, hopefully tomorrow. I think I might eventually get a matching Tach, I was going to get an SR5 gauge cluster, but I think a matching Glow Shift tach would be pretty sweet.
Aug 26, 2014 | 03:50 PM
#1069
Thanks Mark! I agree, it will be nice to be able to accurately keep tabs on what going on. I can't wait to get the rest of the gauges hooked up and working, hopefully tomorrow. I think I might eventually get a matching Tach, I was going to get an SR5 gauge cluster, but I think a matching Glow Shift tach would be pretty sweet.
 Aug 27, 2014 | 09:01 AM
#1072
Thread Starter
Registered User
iTrader: (2)
Joined: Sep 2010
Posts: 2,716
Likes: 7
From: Tri-Cities, Wa
Yeah, I think so too! GlowShift makes a 2-1/8 diameter and a 3-3/4" diameter one, I think id probably go with the bigger one. It cost $99, so it will be down the road before I getit, I need to get my new radiator in first, lol.
Thanks chuckarhunt!
Thanks Terry! I agree, I'll feel much more comfortable driving once I get these gauges functioning!
Thanks Terry! I agree, I'll feel much more comfortable driving once I get these gauges functioning!
Aug 27, 2014 | 11:56 AM
#1073
Thread Starter
Registered User
iTrader: (2)
Joined: Sep 2010
Posts: 2,716
Likes: 7
From: Tri-Cities, Wa
Well I lucked out on the oil pressure gauge, I removed the old oil pressure gauge line from the engine block, the old gauge had the actual oil line that ran to the gauge, anyway the reducer fitting was the same thread size as what I needed to install the new oil sending unit, so I was able to install it and get the oil pressure gauge working. I was getting 75lbs of pressure idling, I think that will do!

^^^ I had to bend the fuel hard line out of the way, it ran right where the oil sending unit needed to go. Man I need to clean up my engine bad, back when I had the remote oil filter setup, one of the fitting to the hose that ran to the filter/adapter plate had a small leak, my electric fans blew the oil everywhere, glad I was able to eliminate that remote filter setup, now I just need to clean up the engine compartment!!!
Now I just need to go get the right fitting to install the water temp probe, and I need to run one wire to hook into my headlight switch to so the gauges dim at night.
Last edited by rustED; Aug 27, 2014 at 12:06 PM.
Aug 27, 2014 | 05:38 PM
#1074
Thread Starter
Registered User
iTrader: (2)
Joined: Sep 2010
Posts: 2,716
Likes: 7
From: Tri-Cities, Wa
Gauges are finished, and everything is working as it should. The fitting I needed to adapt the 1/8 NPT threads on the probe over to 3/8 NPT threads on the intake manifold cost me $2.50. Then I hooked up the dimmer wire into the fuse block and tied into the tail lights, so now the gauges dim when the headlights are turned on.
It kind of sucked, I came home from getting the threaded adapter, and I went to move my 4 runner into the shade because it was getting hot out, and I forgot that I had removed the old probe from the intake...ended up blowing antifreeze all over the engine compartment, had to get a bunch of rags to soak up all the puddles that filled up around the intake! Now I got to deal with burnt antifreeeze smell until it all burns off, lol.
It kind of sucked, I came home from getting the threaded adapter, and I went to move my 4 runner into the shade because it was getting hot out, and I forgot that I had removed the old probe from the intake...ended up blowing antifreeze all over the engine compartment, had to get a bunch of rags to soak up all the puddles that filled up around the intake! Now I got to deal with burnt antifreeeze smell until it all burns off, lol.
Last edited by rustED; Aug 27, 2014 at 05:47 PM.
Aug 28, 2014 | 02:28 PM
#1077
Registered User
Joined: Dec 2008
Posts: 2,391
Likes: 1
From: tecumseh nebraska
Go to superbriteleds.com,I picked mine up for like $16.hardest part is getting thespeedo cable unplugged and reinstalled correctly,iI also want them on my inclinometer.
Aug 30, 2014 | 01:38 AM
#1078
Don't feel bad ED, I did was setting the timing and had a ratchet and socket on the crankshaft and got everything done and went to start the truck and I heard a thunk. I knew instantly what I had done. Left that ratchet and socket on the crankshaft and did not hear it floor. I looked for 30 minutes trying to find it. Finally found it in the fan shroud between the it and the radiator, both pieces was there, what are the odds of that happening? Great to see you got the gauges working.
Chris...Unsnapping the speedometer cable at the fire wall and down by the exhaust cover just near the steering column makes getting the cluster out so much easier by giving you a lot of slack to push the cluster out of its location.
Chris...Unsnapping the speedometer cable at the fire wall and down by the exhaust cover just near the steering column makes getting the cluster out so much easier by giving you a lot of slack to push the cluster out of its location.
Sep 1, 2014 | 12:43 PM
#1079
Thread Starter
Registered User
iTrader: (2)
Joined: Sep 2010
Posts: 2,716
Likes: 7
From: Tri-Cities, Wa
Don't feel bad ED, I did was setting the timing and had a ratchet and socket on the crankshaft and got everything done and went to start the truck and I heard a thunk. I knew instantly what I had done. Left that ratchet and socket on the crankshaft and did not hear it floor. I looked for 30 minutes trying to find it. Finally found it in the fan shroud between the it and the radiator, both pieces was there, what are the odds of that happening? Great to see you got the gauges working.
Chris...Unsnapping the speedometer cable at the fire wall and down by the exhaust cover just near the steering column makes getting the cluster out so much easier by giving you a lot of slack to push the cluster out of its location.
Chris...Unsnapping the speedometer cable at the fire wall and down by the exhaust cover just near the steering column makes getting the cluster out so much easier by giving you a lot of slack to push the cluster out of its location.
Thats a good tip on the speedometer Terry, I haven't pull one out yet, I'll have to keep that trick in mind!
Last edited by rustED; Sep 1, 2014 at 03:40 PM.
Sep 1, 2014 | 02:01 PM
#1080
Registered User
Joined: Dec 2008
Posts: 2,391
Likes: 1
From: tecumseh nebraska
Don't feel bad ED, I did was setting the timing and had a ratchet and socket on the crankshaft and got everything done and went to start the truck and I heard a thunk. I knew instantly what I had done. Left that ratchet and socket on the crankshaft and did not hear it floor. I looked for 30 minutes trying to find it. Finally found it in the fan shroud between the it and the radiator, both pieces was there, what are the odds of that happening? Great to see you got the gauges working.
I have done this!!!
Chris...Unsnapping the speedometer cable at the fire wall and down by the exhaust cover just near the steering column makes getting the cluster out so much easier by giving you a lot of slack to push the cluster out of its location.
I have done this!!!
Chris...Unsnapping the speedometer cable at the fire wall and down by the exhaust cover just near the steering column makes getting the cluster out so much easier by giving you a lot of slack to push the cluster out of its location.


