
Redeth's 1989 4Runner Resurrection
 Jan 12, 2013 | 11:26 PM
#881
Thread Starter
Registered User
Joined: Apr 2012
Posts: 2,817
Likes: 2
From: Los Angeles CA
I got a ton accomplished today. We had mid 50's weather. (WOOOO hot for terry and William haha) jk
So i went to home Depot and grabbed a couple materials for the roof rack install. I bought some black silicone, different length bolts, nuts washers/lock-washers, flat metal plate, adhesive spray, and some charcoal grey carpeting.
Here's some of the hardware i got: [I didn't use the small bolts. they were too short.]

My dad works construction and makes lots of precise measured cuts/holes for his profession so rather then taking a chance and screwing up my roof rack i asked him to help me out and make the holes for me. I'd rather him get it right the first time then me take a chance of making my top look like Swiss cheese lol
Here is one of the pix.

I washed my truck 2ce to make sure it was clean. I have been wanting to wax my truck for the longest but laziness always takes over and i never get more then 1-2 coats of wax on which is nothing..... So because i had planned to install my roof rack today i bit my tongue and washed the truck haha. After the wash i began waxing the hard top(only) I know Mark and Ray seen the picture i sent but let me tell you guys, I NEVER KNEW HOW BAD OF CONDITION THE PAINT ON THE HARD TOP WAS TILL I WAXED IT. I was out waxing for a good 3 hours (no kidding) i put coats of wax on the hard top. And just out of curiosity i wanted to see the before and after condition of the top so i waxed the back half of my truck first. CHECK IT OUT! This picture taken when i was on the 8th coat of wax.

I wish i would have taken more pictures of the whole process but once again i found myself fighting against time to get as much done before the sun went down so i just kept at it and only took like 5 pix
I put silicone on both sides of this rubber under piece to the rack just to ensure that it is waterproofed.

I used the rounded topped (carriage bolts) for my roof rack install. I chose these to keep people from trying to unscrew them from the outside and taking off with the rack and Yakima basket. By doing this the only way to remove the rack would be from the inside.

Interior view (Rear Driver side):


Ray This previous one here is just for you. I know i sent you a text earlier today confirming that the thick piece on the sides of the hard top is NOT solid.
It is 2 layers. We noticed that when we drilled. once we got through the outer layer the drill went through a short drop then hit the bottom layer. Its not bad. but if i were you i would try to keep it on the 1 layer part (flat center). Just something to think about. You cant tighten the screws extremely tight because you might break the interior layer into that middle gap between the 2 layers. I still got the rack on pretty damn tight without breaking it. but just thought id tell you anyway. It's something to think about. Goes for you too Mark.
Here is the front driver side:

I plan to put some headliner on the roof of this to cover up these nuts and bolts in the front side of the truck. The ones on the far back side will end up being exposed because the headliner doesn't reach the part where i mounted it.
Once we got the rack all mounted up it was time to clean up. I used some acetone to clean up the silicone on my hands. I haven't touched the fresh silicone with it just yet. I'm letting it dry before i mess with it.
I would have gotten some pix of the finished job, but by the time i finished the sun had already gone down and it was already too dark for my camera to take good pix.
After waxing the top with those 10 coats of wax it really made me realize; If this wax can make my super faded (gray looking) hard top look like a original healthy black imagine what it could do if i gave my entire truck 10 coats of wax. lol I seriously thought that the previous owner had painted the hard top with house paint because of how crappy and faded the texture of the paint was. By the time i was done i was amazed at the transformation. Once it got that color back i seen that it was not house paint. It was just extremely faded. to tell you the truth I dont think that hard top has ever been waxed. Ive given it 1-2 coats in the past and used Armorall on it but that never made it look this good. I didnt have time to wax the whole truck so first thing tomorrow i'm gonna give the truck about 8 coats of wax.
I'll upload full view pictures of the newly waxed truck with the Rack and Yakima LoadWarrior once I'm done tomorrow.
Damn I've been busy this week lol. got 2 big projects out of the way Muahahahha I'm on a role. Gotta get those darn power windows/mirrors working next!!!!
So i went to home Depot and grabbed a couple materials for the roof rack install. I bought some black silicone, different length bolts, nuts washers/lock-washers, flat metal plate, adhesive spray, and some charcoal grey carpeting.
Here's some of the hardware i got: [I didn't use the small bolts. they were too short.]
My dad works construction and makes lots of precise measured cuts/holes for his profession so rather then taking a chance and screwing up my roof rack i asked him to help me out and make the holes for me. I'd rather him get it right the first time then me take a chance of making my top look like Swiss cheese lol
Here is one of the pix.
I washed my truck 2ce to make sure it was clean. I have been wanting to wax my truck for the longest but laziness always takes over and i never get more then 1-2 coats of wax on which is nothing..... So because i had planned to install my roof rack today i bit my tongue and washed the truck haha. After the wash i began waxing the hard top(only) I know Mark and Ray seen the picture i sent but let me tell you guys, I NEVER KNEW HOW BAD OF CONDITION THE PAINT ON THE HARD TOP WAS TILL I WAXED IT. I was out waxing for a good 3 hours (no kidding) i put coats of wax on the hard top. And just out of curiosity i wanted to see the before and after condition of the top so i waxed the back half of my truck first. CHECK IT OUT!
This picture taken when i was on the 8th coat of wax.I wish i would have taken more pictures of the whole process but once again i found myself fighting against time to get as much done before the sun went down so i just kept at it and only took like 5 pix
I put silicone on both sides of this rubber under piece to the rack just to ensure that it is waterproofed.
I used the rounded topped (carriage bolts) for my roof rack install. I chose these to keep people from trying to unscrew them from the outside and taking off with the rack and Yakima basket. By doing this the only way to remove the rack would be from the inside.
Interior view (Rear Driver side):
Ray This previous one here is just for you. I know i sent you a text earlier today confirming that the thick piece on the sides of the hard top is NOT solid.
It is 2 layers. We noticed that when we drilled. once we got through the outer layer the drill went through a short drop then hit the bottom layer. Its not bad. but if i were you i would try to keep it on the 1 layer part (flat center). Just something to think about. You cant tighten the screws extremely tight because you might break the interior layer into that middle gap between the 2 layers. I still got the rack on pretty damn tight without breaking it. but just thought id tell you anyway. It's something to think about. Goes for you too Mark.
Here is the front driver side:
I plan to put some headliner on the roof of this to cover up these nuts and bolts in the front side of the truck. The ones on the far back side will end up being exposed because the headliner doesn't reach the part where i mounted it.
Once we got the rack all mounted up it was time to clean up. I used some acetone to clean up the silicone on my hands. I haven't touched the fresh silicone with it just yet. I'm letting it dry before i mess with it.
I would have gotten some pix of the finished job, but by the time i finished the sun had already gone down and it was already too dark for my camera to take good pix.
After waxing the top with those 10 coats of wax it really made me realize; If this wax can make my super faded (gray looking) hard top look like a original healthy black imagine what it could do if i gave my entire truck 10 coats of wax. lol I seriously thought that the previous owner had painted the hard top with house paint because of how crappy and faded the texture of the paint was. By the time i was done i was amazed at the transformation. Once it got that color back i seen that it was not house paint. It was just extremely faded. to tell you the truth I dont think that hard top has ever been waxed. Ive given it 1-2 coats in the past and used Armorall on it but that never made it look this good. I didnt have time to wax the whole truck so first thing tomorrow i'm gonna give the truck about 8 coats of wax.
I'll upload full view pictures of the newly waxed truck with the Rack and Yakima LoadWarrior once I'm done tomorrow.
Damn I've been busy this week lol. got 2 big projects out of the way
Muahahahha I'm on a role. Gotta get those darn power windows/mirrors working next!!!!
Jan 13, 2013 | 01:28 AM
#883
Registered User


Joined: Mar 2012
Posts: 7,125
Likes: 681
I plan to put some headliner on the roof of this to cover up these nuts and bolts in the front side of the truck.
- 1/8-inch Ensolite from RAAMAudio directly on the fiberglas before you add the thin (Michael's arts n crafts caliber) headliner foam, OR
- As I''m planning, just mount bungee cord cargo net under roof from front to rear, put a closed-cell sleeping pad as wide as roof to fit between roof and net. Double-duty as sound insulation from wind noise when driving and sleeping pad when camped.
Jan 13, 2013 | 08:17 PM
#884
Thread Starter
Registered User
Joined: Apr 2012
Posts: 2,817
Likes: 2
From: Los Angeles CA
Today i while looking through my dad's pile of junk i found a buffer. WOOT
So went to AutoZone and bought some new cloths for the buffer, rubbing compound, and some wax. I figured id buy some quality stuff sinc that crap i used yesterday was one of those "Wax as you dry" kind of wax liquid in a spray bottle.
I buffed the hell out of my entire truck. Including the hard top. I was shocked. Just doing that alone really bought out some of the shine haha. After the buff i gave the whole truck 1 coat of wax. I wanted to give it at least 3 or 4. but i was running late and had to get to band practice already. So i only got away with one coat. Either way it made a huge difference. My trcuk looked freekin beautiful. SO Shiney! And rebuffing and waxing the hardtop with the new product i bought really brought out the shine even more then it was yesterday. I can only imagine how great it would look if i gave it a few more waxes.
Here are the pix after the wax job.


Also went ahead and used the grinder to cut the long bolts down.
Before:


So went to AutoZone and bought some new cloths for the buffer, rubbing compound, and some wax. I figured id buy some quality stuff sinc that crap i used yesterday was one of those "Wax as you dry" kind of wax liquid in a spray bottle.
I buffed the hell out of my entire truck. Including the hard top. I was shocked. Just doing that alone really bought out some of the shine haha. After the buff i gave the whole truck 1 coat of wax. I wanted to give it at least 3 or 4. but i was running late and had to get to band practice already. So i only got away with one coat. Either way it made a huge difference. My trcuk looked freekin beautiful. SO Shiney! And rebuffing and waxing the hardtop with the new product i bought really brought out the shine even more then it was yesterday. I can only imagine how great it would look if i gave it a few more waxes.
Here are the pix after the wax job.
Also went ahead and used the grinder to cut the long bolts down.
Before:
Jan 13, 2013 | 08:56 PM
#885
Freakin awesome, home slice! .... NICE! Glad you found some great deals, too! TOLD YA on the buffer, .... was I right? NIGHT AND DAY! They will make the hands numb a lil bit from the spinning, ...hahaha... but compared to the BY HAND NONSENSE? Oh, ... and SPRAY BOTTLE? lol..... I didn't know that was what you were doing... yeah, that's just like getting it wet... Doesn't work, HARDLY AT ALL.... (not as a protecting factor, anyhow)....
WOOT, great work, man! SERIOUSLY ROCKS to have a pops like that! ENJOY those times, EVERY TIME, while you can.... NOTHING is more rewarding in the memoirs!!!!
WOOT, great work, man! SERIOUSLY ROCKS to have a pops like that! ENJOY those times, EVERY TIME, while you can.... NOTHING is more rewarding in the memoirs!!!!
Jan 13, 2013 | 08:57 PM
#886
HEY, btw,.... did you put those handles in the back seat area, into the shell? Did I miss that? I got some from a 95 to do that.... but haven't pulled those plugs that most of us have... Maybe it was an 89 thing... Could you tell me? Thanks 
Jan 13, 2013 | 10:34 PM
#888
Registered User
Joined: Mar 2012
Posts: 7,125
Likes: 681
Now you need more theft-deterrent. How many kill-switches do you want? LOL!
On the handles, I just installed some on mine using improvised handles, but only threaded the fiberglas. Would you mind checking if you have same mounting (threads on fiberglas) or are there some nut-insert like Heli-Coil? TIA.
Jan 13, 2013 | 10:41 PM
#889
Registered User
Joined: Mar 2012
Posts: 7,125
Likes: 681
Now you need more theft-deterrent. How many kill-switches do you want? LOL!
On the handles, I just installed some on mine using improvised handles, but only threaded the fiberglas. Would you mind checking if you have same mounting (threads on fiberglas) or are there some nut-insert like Heli-Coil? TIA.
Jan 14, 2013 | 06:02 AM
#890
Thread Starter
Registered User
Joined: Apr 2012
Posts: 2,817
Likes: 2
From: Los Angeles CA
RAD I can go ahead and check when I get home from work today. I dont have a screwdriver on me atm.
Talking about work. I just barely pulled into the building parking. I was really scared. I kept having to get out of my truck to see how close it was to the roof lol. I was literally going about 3mph down the whole way and going over the speed bumps extra slow in case it were to fill that 2" gap that i had before reaching the water pipes lol. I know I'm good on the first 2 levels because the limit is 6'9. But the parking level I park on is 6'6. Wooo man that was a close call. I was about 1&1/2" to 2" away from the limit. Check it out
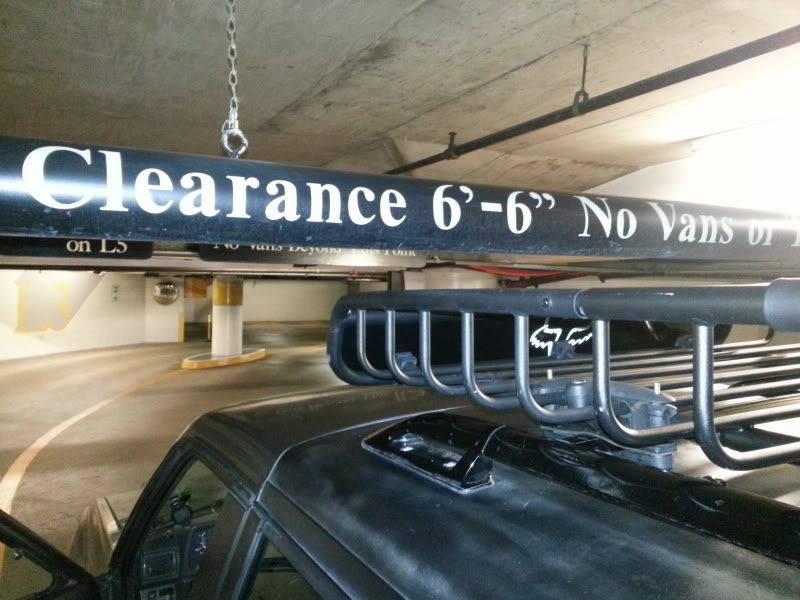
Well at least I know that once the lift is in with the sas and bigger tires I will still fit on the 2nd parking level; just without the rack. Yay. Good choice with going with the tahoe roof rack instead of mounting the Load Warrior permanently to the roof.
Talking about work. I just barely pulled into the building parking. I was really scared. I kept having to get out of my truck to see how close it was to the roof lol. I was literally going about 3mph down the whole way and going over the speed bumps extra slow in case it were to fill that 2" gap that i had before reaching the water pipes lol. I know I'm good on the first 2 levels because the limit is 6'9. But the parking level I park on is 6'6. Wooo man that was a close call. I was about 1&1/2" to 2" away from the limit. Check it out
Well at least I know that once the lift is in with the sas and bigger tires I will still fit on the 2nd parking level; just without the rack. Yay. Good choice with going with the tahoe roof rack instead of mounting the Load Warrior permanently to the roof.
Jan 14, 2013 | 09:48 AM
#891
Hey Richard, just wanted to make sure that you were taking into consideration the taller tires in the mix of things. Pretty sure you were. Just wanted to check. Have a good week man, and don't beat any stock brokers, hahahaha
Jan 14, 2013 | 11:39 AM
#892
Thread Starter
Registered User
Joined: Apr 2012
Posts: 2,817
Likes: 2
From: Los Angeles CA
As for the lift and tire size. Ive already taken everything into consideration. Thats actually the reason i went the roof rack route instead of mounting the yakima straight to the roof. Going this route means i'm able to remove the Yakima Load Warrior whenever i want.
Here is the calculations i did
Parking Levels 1-2 has a height limit of 6'8" (I can get away with parking on the 2nd level if i really wanted to. That wouldnt be a problem)
Parking Levels 3-5 has a hight limit of 6'6"
------------------------------------------------------------------
Based on that picture i posted i am about 1.5" - 2" under that 6.6" limit. So lets just go with the higher measurment to be on the safe side.
Truck with roof rack and load warrior is approx. 6'4.5"
Truck with out the Load Warrior is approx. 5'10"
-------------------------------------------------------------
I'm getting a 4 lift on my truck but I've read there's a slight difference of more height if you SAS. So because of that lets just call it a 5" lift just to be on the safe side, Even if its not 5". At least if it does end up sitting at 4" I know itll still fit since I calculated it to the higher height ya know.
Add 7" for the 4-5" lift/sas with 33's
Add 9" for the 4-5" lift with 35's
and total height of just the yakima basket is 6.5"
-------------------------------------------------------------
Lift with SAS(W/o the Load Warrior)
Truck height with 33's = 6'5"
Truck height with 35's = 6'7"
Lift with SAS(With the Load Warrior)
Truck height with 33's = 6'11.5"
Truck height with 35's = 7'1.5"
--------------------------------------------------------------
Once I get the lift I should still be able to fit in our parking lot. Id just have to remove the roof rack thats all. But either way. Thats what I have my car for. I just wanted to make sure it fits if in case someday I cant bring my car in.
Last edited by Redeth005; Jan 16, 2013 at 09:25 AM.
Jan 15, 2013 | 07:48 AM
#894
Seeing the clearance bar just above your rack reminded me when I seen someone try to take a Uhaul van into a parking garage. I actually have seen it more then once. I drive alot of big truck for the guards so am well aware of the hieghts of my loads, not everybody catches on til they learned the hard way.
Jan 15, 2013 | 12:07 PM
#896
Thread Starter
Registered User
Joined: Apr 2012
Posts: 2,817
Likes: 2
From: Los Angeles CA
Seeing the clearance bar just above your rack reminded me when I seen someone try to take a Uhaul van into a parking garage. I actually have seen it more then once. I drive alot of big truck for the guards so am well aware of the hieghts of my loads, not everybody catches on til they learned the hard way.
Last edited by Redeth005; Jan 15, 2013 at 12:22 PM.
Jan 15, 2013 | 07:04 PM
#897
Registered User
Joined: Aug 2011
Posts: 1,507
Likes: 2
From: Fraser Valley, British Columbia
Nice work. I wish mine was so rust free that a buffing wheel would make it look new like yours. Mine will take a bit more effort.
I'll get to it soon I hope.
Good looking 1st gen.
I'll get to it soon I hope.
Good looking 1st gen.
Jan 16, 2013 | 09:36 AM
#898
Thread Starter
Registered User
Joined: Apr 2012
Posts: 2,817
Likes: 2
From: Los Angeles CA
 Was actually just talking to Chefyota about possibly getting the rest of my SAS/lift, gear parts sooner then later. Tax season coming in. cant wait! but I gotta get my corolla painted. and 1 Day Paint & Body is having a special this weekend for the holidays. So i might spend some of the $$$ on that instead.
Jan 16, 2013 | 01:36 PM
Was actually just talking to Chefyota about possibly getting the rest of my SAS/lift, gear parts sooner then later. Tax season coming in. cant wait! but I gotta get my corolla painted. and 1 Day Paint & Body is having a special this weekend for the holidays. So i might spend some of the $$$ on that instead.
Jan 16, 2013 | 01:36 PM
#899
Registered User
Joined: Aug 2011
Posts: 1,507
Likes: 2
From: Fraser Valley, British Columbia
Where I live is so remote they want to charge 3k and that's with me fixing the holes and doing all the hard stuff......
Looks like I'll be figuring it out how to do it myself. My buddy might be able to get some aircraft paint close to my colour. I wonder if I can get some metal flake to mix in?
Looks like I'll be figuring it out how to do it myself. My buddy might be able to get some aircraft paint close to my colour. I wonder if I can get some metal flake to mix in?
Jan 16, 2013 | 01:53 PM
#900
Thread Starter
Registered User
Joined: Apr 2012
Posts: 2,817
Likes: 2
From: Los Angeles CA
Wow dude 3k?!?!? that sounds ridiculous. I'm going to drop my car off at "1 Day Paint & Body" They're having a sale this whole month. http://www.onedaypaint.com/our-proce...stems/Probably just gonna go with the stage 2 or 3. I figure i can baby the paint job with a stage 2 paint job and wax it once a month.. Should be good. I checked out the first page to your thread. I'll finished reading it later on today. But looks like me n you are on the same boat. Both knowing nothing yet both willing to learn as we do it ourselves. I really wish you luck bro.


