
RAD4Runner's 1986 4Runner dlx Build-up
 Dec 29, 2013 | 09:32 AM
#382
Thread Starter
Registered User


Joined: Mar 2012
Posts: 7,125
Likes: 681
External Temp Indicator
Vehicles have all the lights, buzzers, bells, whistles for non-critical things, yet there is no warning that catches one's attention for one of the most critical conditions- overheating. A vehicle can operate through many of other conditions for months, while it will have serious and costly damage within minutes when over-heated.
Brainstorming Specs/requirements:
Brainstorming Specs/requirements:
- Locate sensor/sender in most accurate location that will still sense coolant even when level goes low.
- Have switch to trigger alarm in case of overheat.
- Alarm to have flashing LED, and buzzer - so no minimal chance of missing it even while challenged on the trail or too busy watching out for crazy drivers.
- Need to figure out good set-point for alarm. Possibly 5% above normal operating temp?
Last edited by RAD4Runner; Sep 8, 2016 at 06:26 PM.
Dec 29, 2013 | 12:33 PM
#383
Hey buddy! Hope you had a Merry Christmas and that you also HAVE A HAPPY NEW YEAR!
I've thought about that idea before.....
Idea:
On the lower, I believe driver side of the block, there is a coolant port plug on the block... I've thought about using it to heat a shower, or what you're thinking of.... I used it as an out-out - port when air and SUPER high pressure blasting out this newer to me block....... I'll find pica asap. My stupid PAY PB account has turned my "bucket" 'random'.. .... grrrrrr!
Last edited by ChefYota4x4; Dec 29, 2013 at 12:35 PM.
Dec 29, 2013 | 01:43 PM
#384
Thread Starter
Registered User
Joined: Mar 2012
Posts: 7,125
Likes: 681
Yeah, lower on the block would mean it would be in contact with coolant even when level goes low. When I was driving through San Bernardino County the day before my HG blew, my temp gauge was reading cooler than normal, with outside in 3-digits. Coolant was probably already overflowing and level was low so coolant was not touching the temp sensor anymore.
 Dec 30, 2013 | 05:47 AM
#386
I already have a 90-amp alt.
When it's my turn to upgrade my wiring:
I would connect battery and alt directly to each other, via a fusible link, as shown below: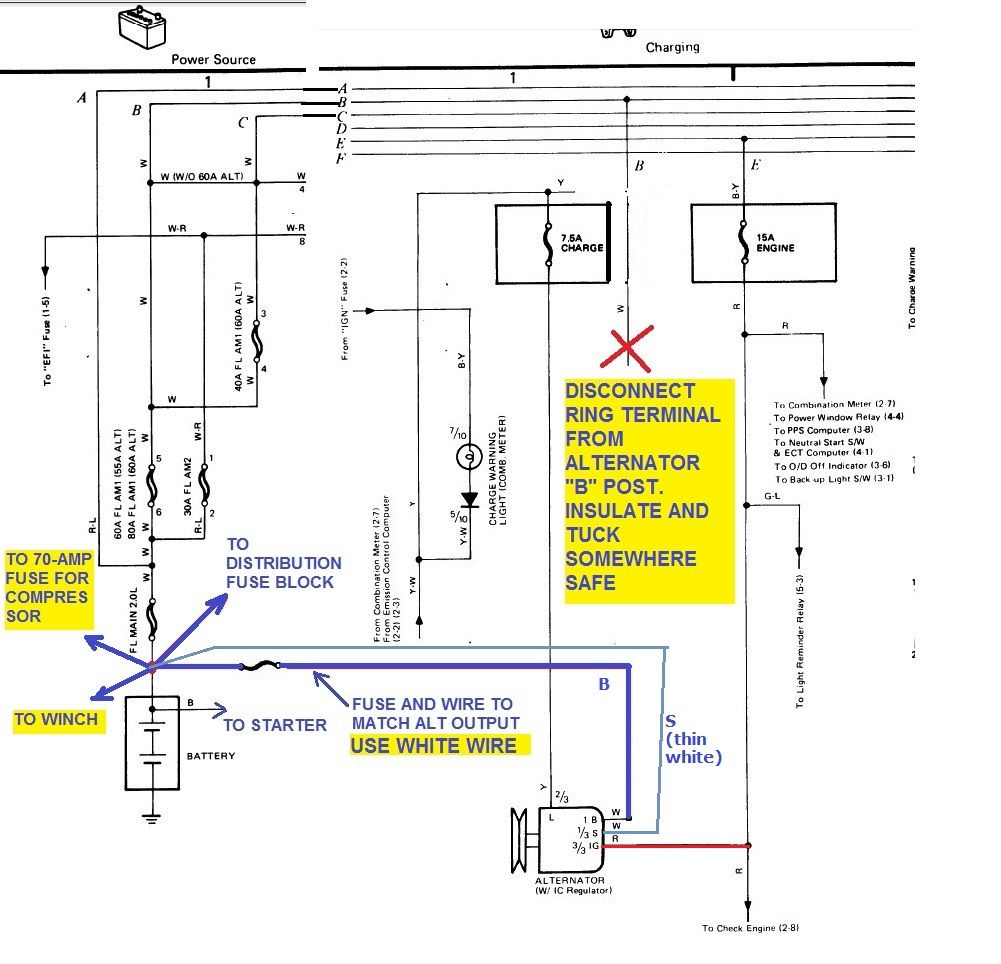
Why?
By "anything goes wrong with accessory circuits" I mean even worst-case scenarios like these:
When it's my turn to upgrade my wiring:
I would connect battery and alt directly to each other, via a fusible link, as shown below:
Why?
- With above configuration, battery and alt are are exactly electrically in tandem = side-by-side = hand-in-hand.
- Stock fusible link keeps its original duty- protecting critical stock circuits.
- Added Fusible Link (FL) is dedicated to protecting B wire and accessories.
- Except for relocation of "B" wire, this configuration will leave critical stock circuit protection (fusible links and fuses) alone; stock circuit does not take too much power than stock battery and stock capacity alt provide.
- Stock circuit protection is not broken- nothing wrong with it; hence no need to fix it. Wiring, alt and battery upgrades would be for mods & accessories added on top of stock circuit, including H4 conversion harness for headlights, winches, more lights, audio system, etc.
- All accessory circuits will take power directly from that "tandem", not through the fusible link-fuse block network. If anything goes wrong with accessory circuits none of the fuses/F/L's protecting the critical stock circuits (running ignition, fuel, cranking, ECU, etc) will blow.
By "anything goes wrong with accessory circuits" I mean even worst-case scenarios like these:
- Battery Goes Out or is Disconnected:
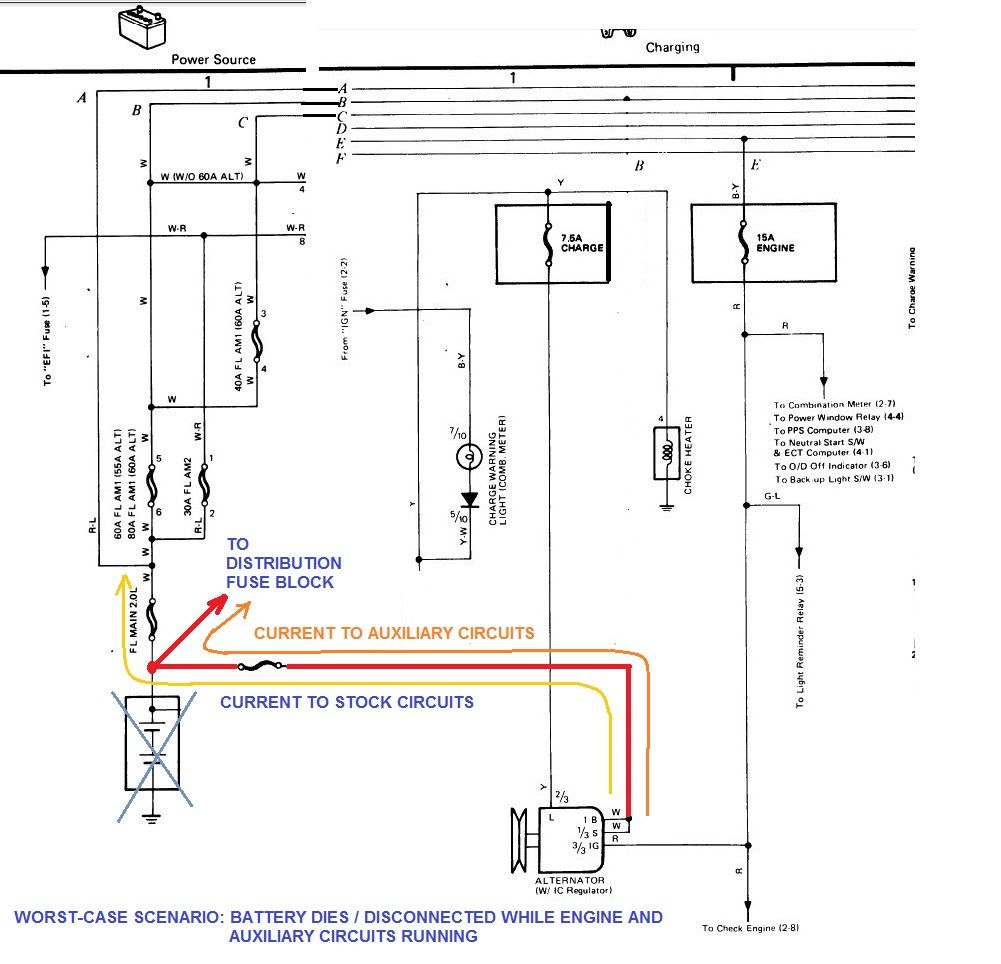
- Alternator Goes Out While Engine and Accessories Are drawing High Currents

- Specifically, I've had internal battery failure. Battery post came loose and lost connection with cells inside. IF and only IF I were winching with engine on, Battery would no longer supply current, alternator output would increase, try to provide winch current through B" wire, through stock fuses and fusible link and blow one or more of those parts.

If the worst case scenario happened when you were winching and battery went out, the high current would still pass through the stock circuits (fuse block under hood) because that is still hooked up to battery after the block. All those circuits are grounded so it is complete. Unhooking that stock charging cable would not prevent this because electrically, where the new charging cable goes to the battery and the power for the stock fuses are, it's the same point. Understand? But's that's why those fuses and the stock 80 amp fusible link is there...to protect those circuits.
What size cable for your new "B" line are you gonna use? Instead of going w the 90 amp fuse because of the 90 amp alt, you need to figure accordingly for the max current carrying capacity/rating (ampacity) of the cable you plan to use. The fuse is there to act as the weak point and blow before the wire gets too hot and starts a fire or damages something else under the hood.
I looked online and found these ratings here.
For Sae wire sizes, it said that 2 gauge has a max rating of 106 amps; 4 gauge was 77 amps and 6 gauge was 61 amps. If you went with 2 gauge, the 90 amp link would be good but for the smaller sizes, the wire would get hot and possibly cause damage because the link is rated too high.
Now, if you go with the AWG sizes, they are typically 12% (who knows exact number but they are bigger) bigger than SAE cable and have more strands which is better for flexibility and current flow. If you look online, AWG have bigger current ratings for the same comparable size in SAE cables.
I believe my max current rating on the 2 gauge AWG cable I have is around 200 amps or so, that is why I am going with a 175 amp megafuse and holder.
Hopefully we get a conversation going here. Great post though.
Dec 30, 2013 | 06:02 PM
#387
Registered User
iTrader: (2)
Joined: Dec 2009
Posts: 2,159
Likes: 7
From: Pleasanton, CA - SF Bay Area
Hey Ray, like Mark said there is a drain lug on the driver's side bottom if the block that you could tap into.
Curious to see what you do for the alarm as I may copy you. .I am always watching my autometer gauge . Maybe it's jus my me but my gauge seems to go between 180* and 210* pretty regularly, so I wouldn't use five percent as your trigger.
Good luck!
Curious to see what you do for the alarm as I may copy you. .I am always watching my autometer gauge
. Maybe it's jus my me but my gauge seems to go between 180* and 210* pretty regularly, so I wouldn't use five percent as your trigger.Good luck!
Jan 4, 2014 | 01:27 PM
#388
Registered User
Joined: Jun 2010
Posts: 1,448
Likes: 100
From: Virginia
Painting your hard top
I love this thread for all the excellent pictures. You were asking on Terry's thread about painting your hard top. You can google "4Runner Hard Top" and spend hours reading different forums about it. The best most recent thread was here:
https://www.yotatech.com/forums/f116...er-top-221434/
I'm guessing you're going to paint your top black. That'll look great with the red paint. Unless your top is really damaged I doubt you have to do any fiberglass repairs. I'd dewax it, scuff it with a 3M scrubber (kitchen pan scrubber works), rinse again , tape off windows, prime lightly (don't have to cover red color; it's only for adhesion) and either rattle can or roll on Krylon or Rustoleum. You probably know to use the same brand primer as the paint. The original tops were satin finish and it looks like a lot of people like the Krylon satin black spray paint. It looks like 1 can spray primer, three cans spray paint.
If you do end up going to Maaco make sure you dewax it and scuff it before you drop it off. They do not wash cars first. I had good experience with them on another car though.
Jan 4, 2014 | 03:34 PM
#389
Thread Starter
Registered User
Joined: Mar 2012
Posts: 7,125
Likes: 681
Temp Sender Location
Re temp range:
(My 5% was a guestimate, not knowing actual range that T-stat cycles through).
Phil,
T-Stat setting is 195�F, right? So it makes sense that when it cycles it swings between 180 & 210 (195�F is right in between).
I still need to research if there's an automotive temp gage with switch contacts set to close at a certain temp. If not, I'm sure I can find an industrial instrumentation caliber one that would work. Expensive , but nothing compared to cost of an overheated engine
.I wonder what temp the red line on gage corresponds to. A set point halfway between that and 210�F should plenty safe.
Also, might research Max Temp at which it's still safe to run, say for another 5-10 minutes in order to find a safe place to pull over.
Given my new rebuild and all-new cooling system components (except fan clutch), I'll take my time researching and will keep you posted.
Last edited by RAD4Runner; Jan 4, 2014 at 03:50 PM.
Jan 4, 2014 | 03:49 PM
#390
Thread Starter
Registered User
Joined: Mar 2012
Posts: 7,125
Likes: 681
Upgrade Alt-to-Batt Wiring
Re Worst-Case Scenario where Battery has internal failure OR battery connector fails while winching:
XRC8 winch takes 5.5 horsepower = 4.1 kWatts That's 342 Amps at 12V.
If batt3ry has internal failure or battery connector fails with stock wiring (even with up-sized B wire in yellow) while winching, the alt will attempt to supply your winch with that current (but top-out at 171-amps?). Those 170+ amps will follow orange path in schematic and blow your stock protective circuit.
Last edited by RAD4Runner; Apr 23, 2020 at 04:40 PM.
Jan 4, 2014 | 04:17 PM
#391
Thread Starter
Registered User
Joined: Mar 2012
Posts: 7,125
Likes: 681
Painting Hard -Top / Fiberglas Cap
Guys!
Some fiber is already showing on my shell, so I've started looking for a shop to paint my fiberglas cap/camper shell, and just realize I need to learn more details...
What coatings did you use on yours?
What would be minimum procedure that you'd recommend for Fiberglas to make it last a while? Primer then finish with urethane? Or just paint?
I'm not after any particular texture, just protection, so I don't really want to spend hundreds to have a cap that looks brand-new while the rest of the truck looks 27-YO
Maaco quotes $200 for primer then $300 for paint. Does that sound reasonable, or should I keep on looking?
Yep, I'm thinking same way too, I and don't want to spend that much...
... so you guys think it doesn't really need primer? Just sand down and paint? I wonder how they do it with commercially available shells?
Unfortunately I do not have the space for painting nor for the equipment, so I'll just have to pay a shop.
I got another more reasonable quote for $300. I'll ask what process they use, and will run it by you guys.
Terry, I hope your wife's agony is over. Did they at least give her some pain killers?
BTW, Re...
==============
ok heres the deal on fiberglass if its showing fibers loose you'll have to put fiberglass resin on an let it soak in then sand apply filler to fill any pits an pin holes primer which aids in paint adhesion and color depth then paint sand lightly (320 grit) second coat of paint will last for a very long time
=================
I love this thread for all the excellent pictures. You were asking on Terry's thread about painting your hard top. You can google "4Runner Hard Top" and spend hours reading different forums about it. The best most recent thread was here:
https://www.yotatech.com/forums/f116...er-top-221434/
I'm guessing you're going to paint your top black. That'll look great with the red paint. Unless your top is really damaged I doubt you have to do any fiberglass repairs. I'd dewax it, scuff it with a 3M scrubber (kitchen pan scrubber works), rinse again , tape off windows, prime lightly (don't have to cover red color; it's only for adhesion) and either rattle can or roll on Krylon or Rustoleum. You probably know to use the same brand primer as the paint. The original tops were satin finish and it looks like a lot of people like the Krylon satin black spray paint. It looks like 1 can spray primer, three cans spray paint.
If you do end up going to Maaco make sure you dewax it and scuff it before you drop it off. They do not wash cars first. I had good experience with them on another car though.
https://www.yotatech.com/forums/f116...er-top-221434/
I'm guessing you're going to paint your top black. That'll look great with the red paint. Unless your top is really damaged I doubt you have to do any fiberglass repairs. I'd dewax it, scuff it with a 3M scrubber (kitchen pan scrubber works), rinse again , tape off windows, prime lightly (don't have to cover red color; it's only for adhesion) and either rattle can or roll on Krylon or Rustoleum. You probably know to use the same brand primer as the paint. The original tops were satin finish and it looks like a lot of people like the Krylon satin black spray paint. It looks like 1 can spray primer, three cans spray paint.
If you do end up going to Maaco make sure you dewax it and scuff it before you drop it off. They do not wash cars first. I had good experience with them on another car though.
Don't want to do black- too hot.
I don't have the place to do the painting, but I don't trust the cheap paint places to do the prep, so I'm now considering:
1) Doing the prep myself using process from 87Runner's trhead, then taking it to cheap painter for coat of paint, OR
2) Since this is Fiberglas and I expect it to see saltwater from kayak/surf board someday, I'll ask around for boat painters with leftover paint (for fiberglas!
, if they can do the paintjob for me. Yep, Red 4Runner with a white hartop (cooler temp-wise)
Last edited by RAD4Runner; Jan 4, 2014 at 04:36 PM.
Jan 5, 2014 | 01:37 AM
#392
Painting isn't nearly as bad as you might think. You only need to prime when you break thru the old paint. Don't worry about hijacking my thread. I posted some answers on it for you. I have not ever used boat paint but cant see it being much different as far as spraying. From my experience, shooting primer, sealer and paint isn't much of a problem. It is the clear coat that I least like, but if you do make a mistake on clear coat, it can be wet sanded. You wont be able to on your top due to the rough texture, but that will work to your advantage due to the rough texture and the clear coat.
Soon as I get the chance I do want to do the ignition upgrade and headlight upgrade. Your explanation does show the poor design about the amount of current some to the harness has to carry.
Soon as I get the chance I do want to do the ignition upgrade and headlight upgrade. Your explanation does show the poor design about the amount of current some to the harness has to carry.
Jan 5, 2014 | 09:02 PM
#393
Registered User
Joined: Jun 2010
Posts: 1,448
Likes: 100
From: Virginia
I'm not sure where you live but some people might not live around a bunch of boat places. I have not painted a car but I have painted a boat, a 1972 Boston Whaler with a mahogany interior. Boat paint and paint services are way more expensive than comparable auto body paint. My boat is painted with Awlgrip which IIRC was about $200/quart for the "system" of reducers, activators, etc. I "rolled and tipped" it which means I rolled it and it looks sprayed. Very nerve wracking experience and even with safety gear I got a really bad headache.
There is another type of boat paint called Interlux Brightside and another similar paint by Petit called Easypoxy. I haven't used them but you can spray or roll them. They cost about $35 a quart and they have UV inhibitors that Rustoleum doesn't have. It's probably a good choice since it's designed for fiberglass.
http://www.jamestowndistributors.com...duct.do?pid=64
If you're going from red to white you will definitely need primer. Red is one of the hardest colors to cover. If you still can't do it at home maybe wait 'till Maaco is advertising one of their specials. I see a half price sale advertised about four times a year.
edit: I just remembered that Rustoleum has a comparable Marine Paint. I think it's cheaper than the above paints. I've seen it at Ace Hardware and some Home Depots.
Last edited by Nervo19; Jan 5, 2014 at 09:04 PM.
Jan 6, 2014 | 11:01 PM
#394
Thread Starter
Registered User
Joined: Mar 2012
Posts: 7,125
Likes: 681
Oil -Based Or Polyurethane?
Terry. Yes that's what I plan to do, just sand where paint is intact and prime otherwise. Vertical surfaces have paint intact, some horizontal surfaces have resin/fiberglas showing.
Nervo19,
Will probably stick to red (was just considering white IF I could find someone with leftover white boat paint.)
Interlux specs look good, and that and Rustoleum also come in red.
Do you guys know if both polyurethane (Interlux) or oil-based paints are compatible with original paint on shell?
Jan 7, 2014 | 01:04 PM
#396
Registered User
Joined: Jun 2010
Posts: 1,448
Likes: 100
From: Virginia
[QUOTE=RAD4Runner;52155743]
Do you guys know if both polyurethane (Interlux) or oil-based paints are compatible with original paint on shell?
QUOTE]
I'm pretty sure that's not paint on the tops. I think it's gel coat. The stuff they use on boats. It can be sprayed but you need a paint gun with a wide tip and you have to buy a matching system of reducers, primer activator etc. People online rave about Interlux so I'm thinking that would be a good choice. It has UV protection so it won't fade as fast as regular oil base. Both paints seem to work fine on the shells.
Jan 9, 2014 | 06:00 PM
#397
Thread Starter
Registered User
Joined: Mar 2012
Posts: 7,125
Likes: 681
Wiring Upgrade GM Alternator
Posting on my build thread for quick reference in the future...
GM Wiring:

This is how I would wire it:
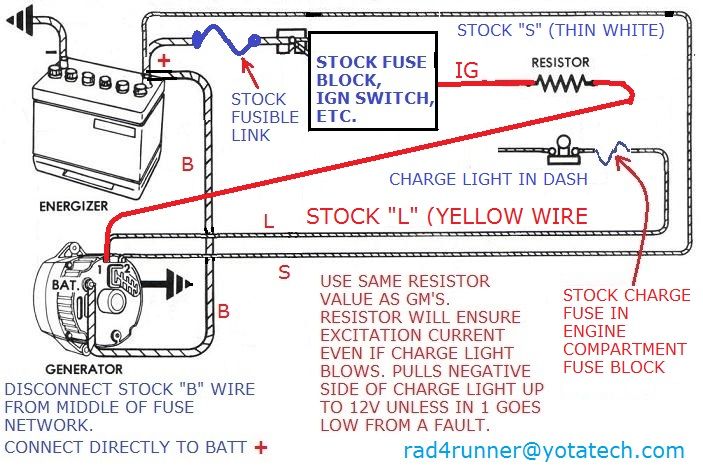
Single path for excitation current through Charge light bulb alone is not reliable; You know what happens to bulbs?
Resistor provides primary path for excitation current from engine fuse, and serves as "pull-up" resistor so negative side of charge light stays close to 12V (unless pin 1 goes low for actual charge fault condition). Without a pull-up resistor, excitation current may get high enough to turn on charge light and you'd get a false alarm. this is the reason for this:
Use same resistor value as GM's, and higher wattage if not same.
I would also move "B" wire from stock location in middle of fuse network to direct to battery positive. This will address "worst-case scenarios" I describe on my thread.
To maintain stock circuit protection scheme:
GM Wiring:
This is how I would wire it:
Single path for excitation current through Charge light bulb alone is not reliable; You know what happens to bulbs?
Resistor provides primary path for excitation current from engine fuse, and serves as "pull-up" resistor so negative side of charge light stays close to 12V (unless pin 1 goes low for actual charge fault condition). Without a pull-up resistor, excitation current may get high enough to turn on charge light and you'd get a false alarm. this is the reason for this:
Use same resistor value as GM's, and higher wattage if not same.
I would also move "B" wire from stock location in middle of fuse network to direct to battery positive. This will address "worst-case scenarios" I describe on my thread.
To maintain stock circuit protection scheme:
- Excitation current (through resistor) will be taken from stock IG wire coming from the engine fuse.
- Junction of IG resistor and Pin 1 will be on upstream side (away from wire going to dash) of charge fuse.
Last edited by RAD4Runner; Jan 10, 2014 at 09:28 PM.


