
kornhusker wizards 89 4runner build thread

 Dec 23, 2013 | 05:09 PM
#582
Thread Starter
Registered User
Joined: Dec 2008
Posts: 2,391
Likes: 1
From: tecumseh nebraska
Akk. I just typed a long winded post about how to use fiberglass mat to rebuild those rear quarters but it got deleted as I struggled to post pictures. You need gloves, fiberglass mat about a quart of two part epoxy, wax paper duct tape, and rust proofer to treat cut ends. I removed the rear interior panels of my 4Runner. Cut out bad metal, treat edges and smooched wetted layers of fiberglass mat from the inside. Put wax paper on the outside and used duct tape and paint sticks to hold it in place til it dries. With the wax paper you can smoosh it into the shape you need and it dries pretty quickly. Then I put on a second layer. You then wipe it down with Dawn or Purple Power and then a thin layer o Bondo. I wish I'd taken better pics. I'll put a couple in the next post.

 Dec 23, 2013 | 05:21 PM
#585
Registered User
Joined: Jun 2010
Posts: 1,448
Likes: 100
From: Virginia
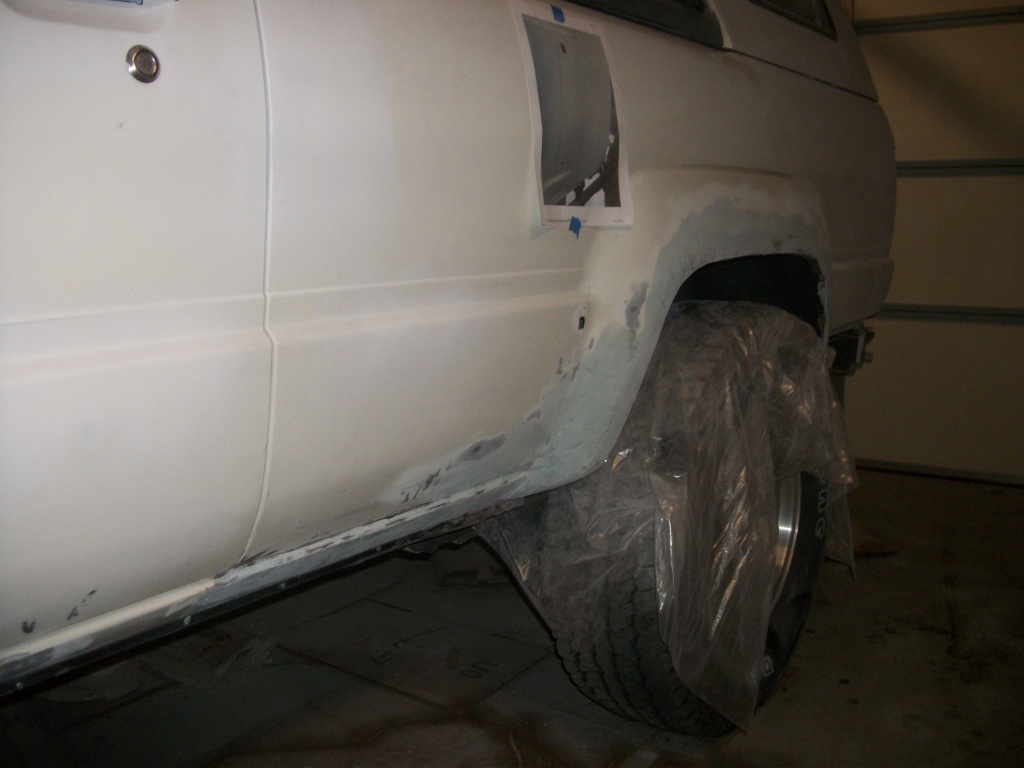
Sorry the pics are huge. I can't figure out how to make them smaller. I see you have the chrome strips on the wheel wells. I promise the fender will crumble quite a bit when you take them off. They're holding up some of the wheel well. You can use them to "mold" the correct radius into your repair. You can cover them with blue tape or wax paper and use them as a mold.
Dec 24, 2013 | 10:00 AM
#587
Thread Starter
Registered User
Joined: Dec 2008
Posts: 2,391
Likes: 1
From: tecumseh nebraska
Sorry the pics are huge. I can't figure out how to make them smaller. I see you have the chrome strips on the wheel wells. I promise the fender will crumble quite a bit when you take them off. They're holding up some of the wheel well. You can use them to "mold" the correct radius into your repair. You can cover them with blue tape or wax paper and use them as a mold.
Merry Christmas Rich!! Maybe youll wake up tomorrow and theyll be 4ft of snow in CALI and you can use that snowboard!!

MERRY CHRISTMAS to everyone on yotatech and to your freinds and familys as well!!
Ill be sporting my UGLY SWEATER today for the UGLY SWEATER PARTY!! I hope to spill some wine on it and maybe some ham too.
Dec 24, 2013 | 11:00 AM
#588
Wow Nervo!!! I remember what you had to start with and where it is now. You have done great. Congrats on your accomplishment. Looking good. Took me a minute to figure out the square on the side of your runner and seen it is a picture of a guide of what you are wanting.
kornhuskerwizard...A friend of mine just got an 85 runner and it has the same issues as you and Nervo are dealing with. I never tried Wolfs steel for this part. He is trying to buy a burnt runner that has descent panels that didnt burn and if that doesnt work out, we are going to go the way you guys are doing. I have actually ruined clothes I didnt like as well too.lol
Merry Christmas everybody.
Dec 25, 2013 | 01:22 PM
#589
Thread Starter
Registered User
Joined: Dec 2008
Posts: 2,391
Likes: 1
From: tecumseh nebraska
So ive saved up about $300 so far for body supplies. I need to find out exactly what i need and any tools also, i guess im dipping into the bodyman world (OH JESUS GOD NO!!!!DONT LET HIM DO IT!!!) hehe thats what my second person is saying to me.
NERVO you used RAGE filler?? Is that what i should get?? And then what types of epoxy and fiberglass supplies do i need???
NERVO you used RAGE filler?? Is that what i should get?? And then what types of epoxy and fiberglass supplies do i need???
Dec 26, 2013 | 06:32 AM
#590


I used the same technique on the underside of the rear quarters. I used the fiberglass filler to seal it all up then used bondo on top of that. Then I finished it off with some sealer and undercoating.
I think if done right, it will hold for a long time
I think if done right, it will hold for a long time
 Dec 26, 2013 | 01:18 PM
#592
Thread Starter
Registered User
Joined: Dec 2008
Posts: 2,391
Likes: 1
From: tecumseh nebraska
KyleB has some bushwacker fender flares for a truck, im gonna fit them up on the runner even though ill need them for a forerunner atleast it will give me an idea what they would look like. Ill try and post a pic when i get one fitted up. They are the wide big flares and i dunno how they will look with 32s and my mild lift, im thinking they will be too much and overpower the whole look off the rig. If it was sas'd and sitting on 35s it would look justifiable!!
Dec 26, 2013 | 02:31 PM
#594
Registered User
Joined: Jun 2010
Posts: 1,448
Likes: 100
From: Virginia
I am long over due for a build thread and was always going to do a write up. I'll try here. Supplies: Scissors (you will probably trash them), gloves, duct tape, wax paper, mixing trays (I use the bottoms of milk gallons and plastic Chinese take out trays) acetone (to clean right before application), Bondo fiberglass mat. Popsicle sticks for mixing and applying; 500 for $1 at Dollar Tree. Paint sticks free from Home Depot. One of those headlamp flashlights work great if you're working from behind or underneath. Grinder and cheap variable sander. Mail order 4" sanding discs in 80, 200, 400 grits. Finer grits of sand paper in sheets to wet sand later. I get it to 400 grit before priming. Lots of scrap cardboard for protecting the floor. Face mask for dust. A file thingy (name escapes me) to shape/file down the Bondo/Rage before it dries. It saves a lot of sanding. It looks like this and I got it at Big Lots for about $5:

edit: it's a RASP.
 The filler I use. Easy to sand.
 Pick up 3 or 4 packs like this at Walmart. About $6 each.
 I used the West System epoxy kit. It has metered measuring pumps which make it simple. It has no odor. I had it left over from another project. http://www.jamestowndistributors.com...stem_epoxy_kit_
It's expensive at $179 for the gallon kit. I mix "micoballons" with the resin to a peanut butter thickness. You might also use Bondo fiberglass but it's polyester and has fumes (I've heard). I found the following video on YouTube that shows the basic steps. Things I do different is cut the patch so it roughly fits, apply from the back when possible and don't stuff a ball of fiberglass in there. You want to preserve the hollow area so rain water will flow out. You could keep it hollow by putting a balloon or something temporary in the hole. And I use two layers of mat on every hole. So the fibers go /////// and are covered by more fibers going \\\\\\\\\ . This will make it very strong. I also completely wet out the mat with the resin before applying. On the other hand this guy is using Bondo glass and it holds its shape well right out of the can.
He has the smooch with wax paper technique down. I leave the wax paper 'til it dries and it peels right off. Get your patch thick enough so you need less than a dimes thickness of Bondo/Rage.
While you're on YouTube there are a zillion videos about West System , Bondo and all aspects of body work.
edit: it's a RASP.
The filler I use. Easy to sand. I used the West System epoxy kit. It has metered measuring pumps which make it simple. It has no odor. I had it left over from another project. http://www.jamestowndistributors.com...stem_epoxy_kit_It's expensive at $179 for the gallon kit. I mix "micoballons" with the resin to a peanut butter thickness. You might also use Bondo fiberglass but it's polyester and has fumes (I've heard). I found the following video on YouTube that shows the basic steps. Things I do different is cut the patch so it roughly fits, apply from the back when possible and don't stuff a ball of fiberglass in there. You want to preserve the hollow area so rain water will flow out. You could keep it hollow by putting a balloon or something temporary in the hole. And I use two layers of mat on every hole. So the fibers go /////// and are covered by more fibers going \\\\\\\\\ . This will make it very strong. I also completely wet out the mat with the resin before applying. On the other hand this guy is using Bondo glass and it holds its shape well right out of the can.
He has the smooch with wax paper technique down. I leave the wax paper 'til it dries and it peels right off. Get your patch thick enough so you need less than a dimes thickness of Bondo/Rage.
While you're on YouTube there are a zillion videos about West System , Bondo and all aspects of body work.
Dec 26, 2013 | 04:23 PM
#596
Thread Starter
Registered User
Joined: Dec 2008
Posts: 2,391
Likes: 1
From: tecumseh nebraska
I looked at wolf wheel arches again online. theyre $150 a peice. I was gonna only do one side but shipping would probalbly be cheaper if i picked up both sides. I think it would be a easier solution for me rather than epoxy fiberglass and filler. Im just not experienced with that stuff at all.
Dec 29, 2013 | 07:05 AM
#597
Yours sits up high enough they would look decent. On mine it looks like a turtle sliding acrost the highway.
I looked at wolf wheel arches again online. theyre $150 a peice. I was gonna only do one side but shipping would probalbly be cheaper if i picked up both sides. I think it would be a easier solution for me rather than epoxy fiberglass and filler. Im just not experienced with that stuff at all.
I looked at wolf wheel arches again online. theyre $150 a peice. I was gonna only do one side but shipping would probalbly be cheaper if i picked up both sides. I think it would be a easier solution for me rather than epoxy fiberglass and filler. Im just not experienced with that stuff at all.
I hear you on the flares. I need some for mine. I drive through a plate size puddle and I can't see out the side windows cause they are covered with crap. Haha. And I refuse to put mud flaps on.
I say we just make our own stuff man. That's what I did.
I have a plasma cutter we can use to cut the metal out and MIG it in.
Make her all nice and solid.
 Dec 29, 2013 | 08:01 AM
#599
Registered User
Joined: Apr 2012
Posts: 2,817
Likes: 2
From: Los Angeles CA
Dude I didmt realize your rug had that much rust. Wow! I look forward to seeing you fix this. Btw be. Careful with those bug shields. My neighbors pick up used to have one and water always got traped underneath it causing the hood to rust on the back side of that plastic.
Last edited by Redeth005; Dec 29, 2013 at 08:02 AM.
Dec 30, 2013 | 04:55 PM
#600
Thread Starter
Registered User
Joined: Dec 2008
Posts: 2,391
Likes: 1
From: tecumseh nebraska
I am long over due for a build thread and was always going to do a write up. I'll try here. Supplies: Scissors (you will probably trash them), gloves, duct tape, wax paper, mixing trays (I use the bottoms of milk gallons and plastic Chinese take out trays) acetone (to clean right before application), Bondo fiberglass mat. Popsicle sticks for mixing and applying; 500 for $1 at Dollar Tree. Paint sticks free from Home Depot. One of those headlamp flashlights work great if you're working from behind or underneath. Grinder and cheap variable sander. Mail order 4" sanding discs in 80, 200, 400 grits. Finer grits of sand paper in sheets to wet sand later. I get it to 400 grit before priming. Lots of scrap cardboard for protecting the floor. Face mask for dust. A file thingy (name escapes me) to shape/file down the Bondo/Rage before it dries. It saves a lot of sanding. It looks like this and I got it at Big Lots for about $5:
edit: it's a RASP.
The filler I use. Easy to sand.
Pick up 3 or 4 packs like this at Walmart. About $6 each.
I used the West System epoxy kit. It has metered measuring pumps which make it simple. It has no odor. I had it left over from another project. http://www.jamestowndistributors.com...stem_epoxy_kit_
It's expensive at $179 for the gallon kit. I mix "micoballons" with the resin to a peanut butter thickness. You might also use Bondo fiberglass but it's polyester and has fumes (I've heard). I found the following video on YouTube that shows the basic steps. Things I do different is cut the patch so it roughly fits, apply from the back when possible and don't stuff a ball of fiberglass in there. You want to preserve the hollow area so rain water will flow out. You could keep it hollow by putting a balloon or something temporary in the hole. And I use two layers of mat on every hole. So the fibers go /////// and are covered by more fibers going \\\\\\\\\ . This will make it very strong. I also completely wet out the mat with the resin before applying. On the other hand this guy is using Bondo glass and it holds its shape well right out of the can.
How to repair a large rusted out area on your vehicle - YouTube
He has the smooch with wax paper technique down. I leave the wax paper 'til it dries and it peels right off. Get your patch thick enough so you need less than a dimes thickness of Bondo/Rage.
While you're on YouTube there are a zillion videos about West System , Bondo and all aspects of body work.
edit: it's a RASP.
The filler I use. Easy to sand. I used the West System epoxy kit. It has metered measuring pumps which make it simple. It has no odor. I had it left over from another project. http://www.jamestowndistributors.com...stem_epoxy_kit_It's expensive at $179 for the gallon kit. I mix "micoballons" with the resin to a peanut butter thickness. You might also use Bondo fiberglass but it's polyester and has fumes (I've heard). I found the following video on YouTube that shows the basic steps. Things I do different is cut the patch so it roughly fits, apply from the back when possible and don't stuff a ball of fiberglass in there. You want to preserve the hollow area so rain water will flow out. You could keep it hollow by putting a balloon or something temporary in the hole. And I use two layers of mat on every hole. So the fibers go /////// and are covered by more fibers going \\\\\\\\\ . This will make it very strong. I also completely wet out the mat with the resin before applying. On the other hand this guy is using Bondo glass and it holds its shape well right out of the can.
How to repair a large rusted out area on your vehicle - YouTube
He has the smooch with wax paper technique down. I leave the wax paper 'til it dries and it peels right off. Get your patch thick enough so you need less than a dimes thickness of Bondo/Rage.
While you're on YouTube there are a zillion videos about West System , Bondo and all aspects of body work.


