
Dunkin's 1990 4Runner 2DR Build-Up Thread
 Feb 17, 2011 | 08:21 PM
#81
Thread Starter
Registered User
Joined: Oct 2009
Posts: 193
Likes: 1
From: Kirkland, WA
Which one did you use?
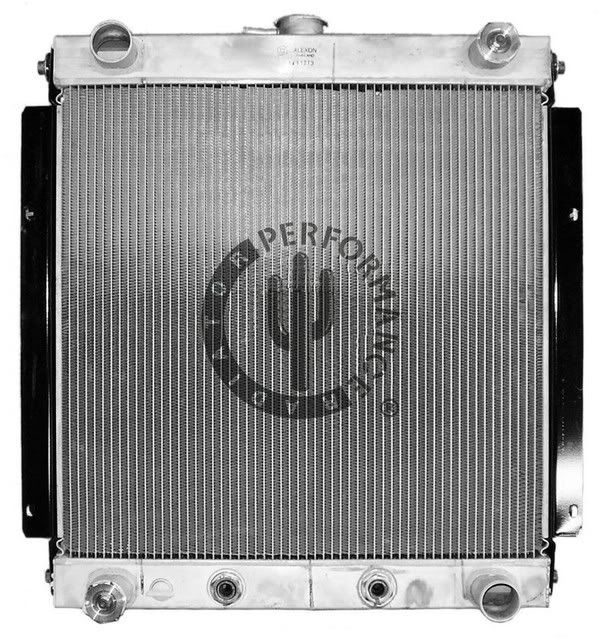
Oh, and the radiator is...
Core Dimensions:18 11/16 x 19 1/4 x 1 7/8
Thickness:1 7/8
Rows:1
Tank Construction:Aluminum
Core Construction:Aluminum
Inlet Diameter:1 5/8 (x2)
Outlet Diameter:1 5/8 (x2)
TOC:Concentric
TOC Length:6
Last edited by Dunkin; Feb 17, 2011 at 08:25 PM.
Feb 17, 2011 | 08:32 PM
#82
Contributing Member
Joined: Dec 2008
Posts: 2,505
Likes: 16
From: San Jose ,Ca
i used the 6pk1632.. and that radiator seems kind of small and only 1 row .. did you tell the guy whats it was gonna be used for .. i have a 2 row aluminum alot bigger that i wish i would have not used .. its doing fine now but its the second one i bought ..
the first one .. i forgot to install the fuse and the fans never turned on , i overheated and the radiator was garbage after that , the rows expanded and closed the fins .. nobody could fix it .. so i needed to buy a new one ..
the first one .. i forgot to install the fuse and the fans never turned on , i overheated and the radiator was garbage after that , the rows expanded and closed the fins .. nobody could fix it .. so i needed to buy a new one ..
Feb 17, 2011 | 08:40 PM
#83
Thread Starter
Registered User
Joined: Oct 2009
Posts: 193
Likes: 1
From: Kirkland, WA
i used the 6pk1632.. and that radiator seems kind of small and only 1 row .. did you tell the guy whats it was gonna be used for .. i have a 2 row aluminum alot bigger that i wish i would have not used .. its doing fine now but its the second one i bought ..
the first one .. i forgot to install the fuse and the fans never turned on , i overheated and the radiator was garbage after that , the rows expanded and closed the fins .. nobody could fix it .. so i needed to buy a new one ..
the first one .. i forgot to install the fuse and the fans never turned on , i overheated and the radiator was garbage after that , the rows expanded and closed the fins .. nobody could fix it .. so i needed to buy a new one ..
I think the specs I copied are wrong, because it is a 2 row, at nearly 2" thick.
Hmm, Ill let you know how that belt fitment goes, if yours was a 1632, thats almost 4 inches longer than mine.
How did you route it? Did you change the routing at all, or just remove the A/C loop and run the belt from the flat sided idler up to the small ribbed idler?
Feb 17, 2011 | 08:47 PM
#85
Contributing Member
Joined: Dec 2008
Posts: 2,505
Likes: 16
From: San Jose ,Ca
i have a pic in my thread .. theres 2 pics i ended up using the second one.
post 61 and 69 ..
https://www.yotatech.com/forums/f161...24/index3.html
post 61 and 69 ..
https://www.yotatech.com/forums/f161...24/index3.html
Feb 17, 2011 | 08:49 PM
#86
Contributing Member
Joined: Dec 2008
Posts: 2,505
Likes: 16
From: San Jose ,Ca
so im trying to make a bracket to switch the ac and the alt .. use the 3.0 compressor and lines .
Feb 17, 2011 | 09:04 PM
#88
Thread Starter
Registered User
Joined: Oct 2009
Posts: 193
Likes: 1
From: Kirkland, WA
i have a pic in my thread .. theres 2 pics i ended up using the second one.
post 61 and 69 ..
https://www.yotatech.com/forums/f161...24/index3.html
post 61 and 69 ..
https://www.yotatech.com/forums/f161...24/index3.html
Yep, thats exactly what I had thought up in my head. Damn, I really need to sit down and re-read your thread from start to finish.
Mar 3, 2011 | 07:02 AM
#90
Thread Starter
Registered User
Joined: Oct 2009
Posts: 193
Likes: 1
From: Kirkland, WA
Mar 12, 2011 | 07:03 PM
#93
Thread Starter
Registered User
Joined: Oct 2009
Posts: 193
Likes: 1
From: Kirkland, WA
I was able to get some work done today. My first time doing anything since the wreck.
I installed the 4Crawler aluminum engine mount spacers.
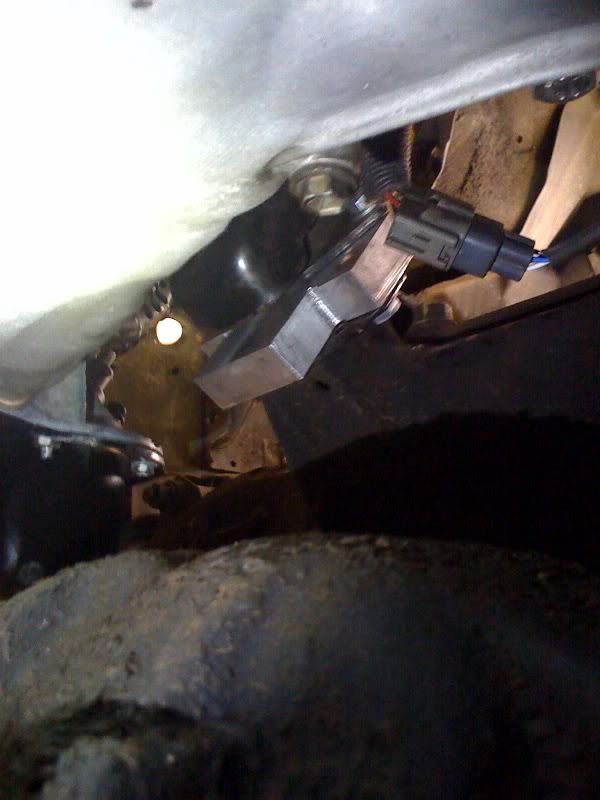
I got the flywheel back on Friday from being balanced and having the ring gear trued and welded. Bolted it up and installed the clutch and pressure plate, which was also balanced.
I haven't cut the transmission tunnel yet, so I can't install the shifters yet, but I threw the tranny up there anyway. The input shaft slid into the clutch splines and the pilot bearing with very little effort, and all of the bolts lined up perfectly. Thanks to KS Racing for that.
Then I bled the clutch. It's not as heavy feeling as I had expected, but still feels nice. Smooth pedal travel...
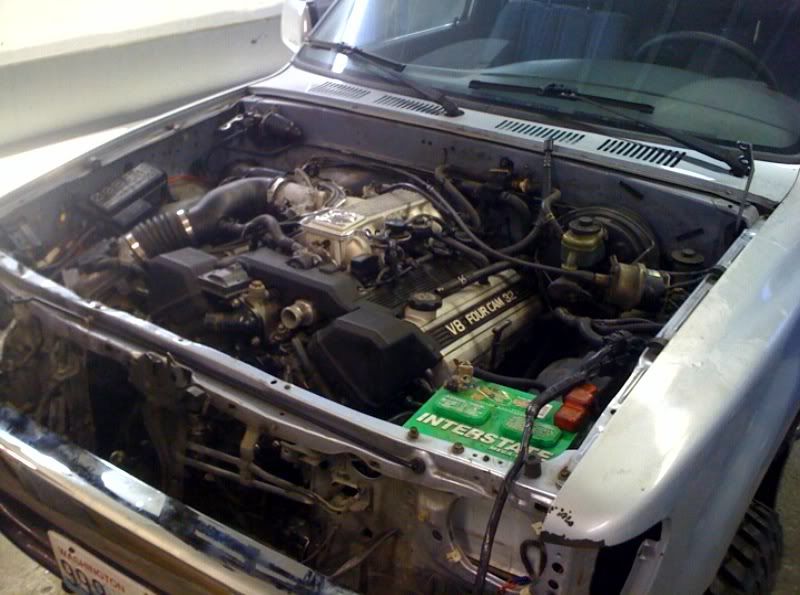
I connected the battery cables, and wired the complete charging system. That was the easy part. I basically just blended the entire SC400 system into the existing 4Runner system, using both power distribution blocks. The Lexus on the right and the original Toyota on the left. That way I only had to make four splices: The three for the alternator it's self, and shorten the heavy white cable and then bolt it to the block. Then I bolted the existing ring terminal power feed from the 4Runners existing fuse/relay box to the new Lexus power block and was done. It's nice that the Lexus has two fat cables running in parallel with a ring terminal on the end.
I couldn't wait, so I filled the engine with oil and put on a new filter. Then grabbed the starter wire and touched it to the positive terminal. Woohoo! This starter works! Plus the ring gear trick worked, whew...
I'm going in tomorrow to blend the rest of the EFI, Starter and other underhood relays. Then start on the under dash part.
I love progress.
I installed the 4Crawler aluminum engine mount spacers.
I got the flywheel back on Friday from being balanced and having the ring gear trued and welded. Bolted it up and installed the clutch and pressure plate, which was also balanced.
I haven't cut the transmission tunnel yet, so I can't install the shifters yet, but I threw the tranny up there anyway. The input shaft slid into the clutch splines and the pilot bearing with very little effort, and all of the bolts lined up perfectly. Thanks to KS Racing for that.
Then I bled the clutch. It's not as heavy feeling as I had expected, but still feels nice. Smooth pedal travel...
I connected the battery cables, and wired the complete charging system. That was the easy part. I basically just blended the entire SC400 system into the existing 4Runner system, using both power distribution blocks. The Lexus on the right and the original Toyota on the left. That way I only had to make four splices: The three for the alternator it's self, and shorten the heavy white cable and then bolt it to the block. Then I bolted the existing ring terminal power feed from the 4Runners existing fuse/relay box to the new Lexus power block and was done. It's nice that the Lexus has two fat cables running in parallel with a ring terminal on the end.
I couldn't wait, so I filled the engine with oil and put on a new filter. Then grabbed the starter wire and touched it to the positive terminal. Woohoo! This starter works! Plus the ring gear trick worked, whew...
I'm going in tomorrow to blend the rest of the EFI, Starter and other underhood relays. Then start on the under dash part.
I love progress.
Last edited by Dunkin; Mar 12, 2011 at 07:04 PM.

 Mar 17, 2011 | 09:51 PM
#95
Thread Starter
Registered User
Joined: Oct 2009
Posts: 193
Likes: 1
From: Kirkland, WA
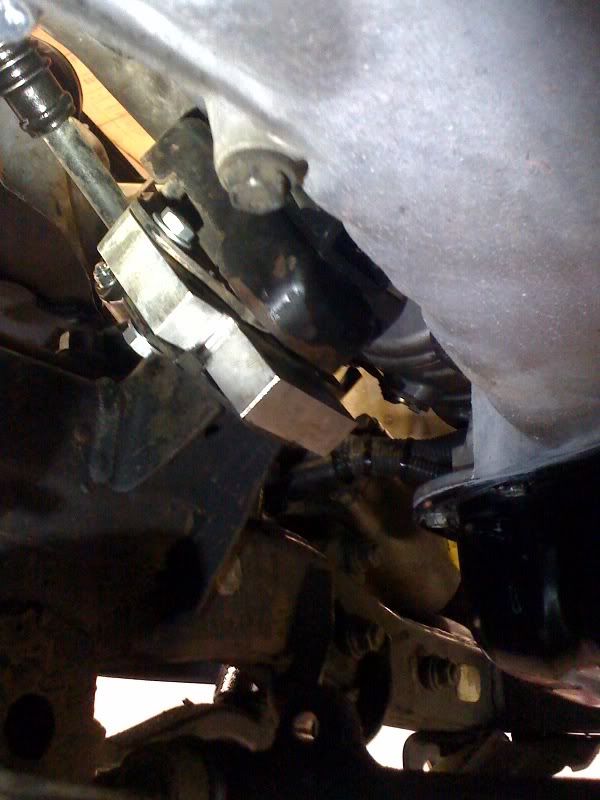
I'll take some more pictures this weekend, but more progress has been made.
I discovered that the factory fuel line connection at the frame rail is the same thread pitch and size as the original Lexus connection. So, all I need is another factory 22RE pre-filter rubber hose and have the two lengthened. Then I can bolt a stock fuel filter to the inner fender and run some bulk hose for the return.
I removed the A/C compressor and cured the last of my fitment issues. Also installed a 6PK-1610 serpentine belt. It fits nicely, and has the tensioner lining up at the last of the first three marks. I could go even shorter though.
I found I can connect the stock 4Runner power steering line from the box directly to the Lexus pressure hose. But, I think I want to get a V6 4Runner pressure hose from the box for a tidier fit. The return hose goes through the stock cooler from the 4Runner and the rest is bulk hose.
I'm going to cap off the old EGR tube since the Tundra exhaust manifold doesn't have a provision for it, and connect the heater hoses while I am there.
I ordered the adjustable t-case mount off E-bay, like mentioned in Shaggys thread. That should be here tomorrow, or early next week.
Even so, I thought I was going to have to shorten the rear drive shaft. Turns out the A/T was longer than the M/T, and even after the drive train has been moved back the stock driveshaft is too short. I'm hoping a stock M/T shaft will actually bolt up. We'll see...
And, I picked up a used hood to replaced the smashed pile of garbage that was on there. It almost the same color and even has matching rock chips.
 Mar 18, 2011 | 10:25 AM
#100
Registered User
iTrader: (2)
Joined: Oct 2009
Posts: 1,044
Likes: 6
From: Centeral Willamette Valley Oregon
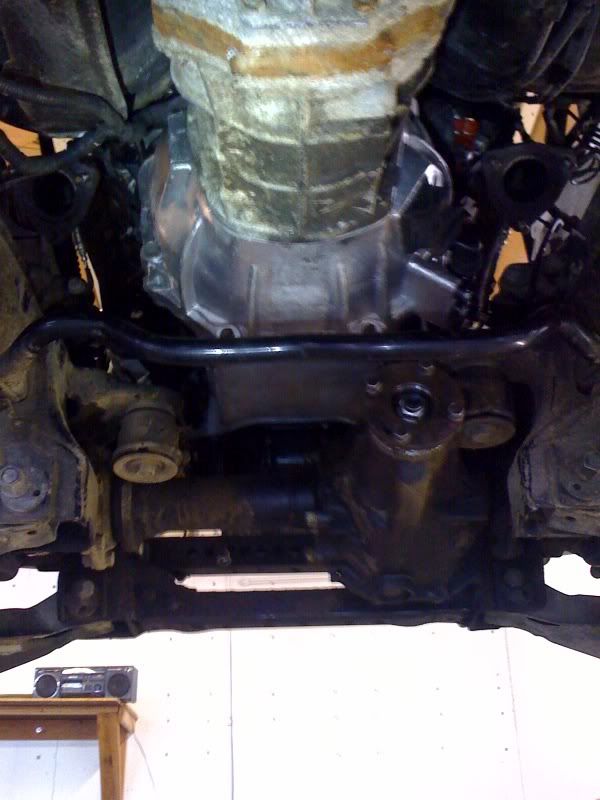
Looking good, that KS racing bell housing looks nice tucked up in there. Did you go with the motor mount spacers so you wouldn't hit the steering rod/front diff, I don't remember if you put a body lift on? Does the hood close with the motor in there?


