
the dragons 88 runner buildup/rebuild
 May 25, 2013 | 10:10 PM
#681
Nice work on that!
I got those Silverstar ones for 50% off amd they're great. Wasted the led ones but knew is be doing the led signal lights on Scotty's front bumper. .. So I held off... but I might do the running lights.
I got those Silverstar ones for 50% off amd they're great. Wasted the led ones but knew is be doing the led signal lights on Scotty's front bumper. .. So I held off... but I might do the running lights.
May 25, 2013 | 10:49 PM
#682
Thread Starter
Registered User
Joined: Jul 2012
Posts: 2,365
Likes: 4
From: Idaho
im still looking for a good bright yellow 1156 for turns i know which 1156 white i want for backups
May 26, 2013 | 12:38 AM
#684
Thread Starter
Registered User
Joined: Jul 2012
Posts: 2,365
Likes: 4
From: Idaho
they do! not only light wise being nearly bright as a bulb or in some even brighter but far less draw on the electrical side thus more amps to charge the battery
May 27, 2013 | 09:40 PM
#685
Registered User
Joined: Feb 2013
Posts: 121
Likes: 0
From: Central CA
Just caught up on your build Dragon. What great work you've done so far. She looks great and is all coming together for you.
I haven't done body work in years and have always wanted to learn to weld (for real, not just tacking stuff for fence type work). My dad even has a couple welding set ups and I almost have myself convinced to go ahead and give it a whirl after watching you and your friend. Inspiring stuff!
I haven't done body work in years and have always wanted to learn to weld (for real, not just tacking stuff for fence type work). My dad even has a couple welding set ups and I almost have myself convinced to go ahead and give it a whirl after watching you and your friend. Inspiring stuff!
May 27, 2013 | 11:46 PM
#686
Thread Starter
Registered User
Joined: Jul 2012
Posts: 2,365
Likes: 4
From: Idaho
Just caught up on your build Dragon. What great work you've done so far. She looks great and is all coming together for you.
I haven't done body work in years and have always wanted to learn to weld (for real, not just tacking stuff for fence type work). My dad even has a couple welding set ups and I almost have myself convinced to go ahead and give it a whirl after watching you and your friend. Inspiring stuff!
I haven't done body work in years and have always wanted to learn to weld (for real, not just tacking stuff for fence type work). My dad even has a couple welding set ups and I almost have myself convinced to go ahead and give it a whirl after watching you and your friend. Inspiring stuff!
my welding is poor an i need to practice more i understand the process far better than some welders though an when working in the Valve field around houston i quality checked all welds the shop made i admit i got lazy working there put tube in machine adjust settings for type of stainless an push button then QA the weld get the polishing shop to clean passivate an polish head it over to machining an add valve bodies fittings branches ect my boss sat at this desk an only came out when something wasnt workin right we all learned very quickly how to adapt on the fly
Kris long time friend he was a kid when he started welding we have out in the barn a Honda 80 3 wheeler racing frame just needs an engine he welded up around 13 yrs old he does appliance repair an the welders (mig an stick) are his so i let him do it an argue yell cuss an then be proud of the welds LOL
 i do the cleanup before an after the welding so it works out he is quite impatient so like when his door lock failed i told him get a beer i got this an sawed away at that U bolt for half an hour to get the door open
May 29, 2013 | 10:02 PM
i do the cleanup before an after the welding so it works out he is quite impatient so like when his door lock failed i told him get a beer i got this an sawed away at that U bolt for half an hour to get the door open
May 29, 2013 | 10:02 PM
#687
Thread Starter
Registered User
Joined: Jul 2012
Posts: 2,365
Likes: 4
From: Idaho
well took the runer out had dr appointment after the surgery i had 2 weeks ago
he likes the wound he made is clean 'beefy' red said the golf ball sized bit he removed was a knot of scar tissue likely left over from my numerous other surgeries an would never support skin over it wrong kind of blood sessile so JULY 1st i go in for another pre op then the 1th i go in an he's gona take a skin graft off my hip to put on the wound
lol i also sent a email to the PO just wanted to show off the ol'girl to him a bit he replied she looks great an would like to have her back now LOL
Jun 2, 2013 | 08:24 PM
#690
Thread Starter
Registered User
Joined: Jul 2012
Posts: 2,365
Likes: 4
From: Idaho
well today was a failed experiment (i think) i was trying to get my map lights which i installed today to come on with the door but not feed power back to the interior light when ya pushed the buttons
saw a writeup on this on a second gen
one way the door closed map lights came on faintly hmm... diodes in wrong? flipped it blew a fuse ahh well
ive got 2 wires up there i can use for a mirror light when i get one
the A pillar scared the crud outa me as the first clip kersnaped loudly i thought id broke things but no just came off the plastic but then i had to contend with the mastic they used on the windsheild which is newer keeping the trim stuck in the corner lol
mark said to just use the second gen dome light but darn it i will find away to keep using the original lol which has a broken selector switch
stubborn dragon is stubborn
Jun 2, 2013 | 08:47 PM
#692
Registered User
Joined: Apr 2012
Posts: 2,817
Likes: 2
From: Los Angeles CA
 LOL
Jun 3, 2013 | 12:21 AM
LOL
Jun 3, 2013 | 12:21 AM
#694
I have found perfect first gen lights and the first time I went to use the switch, SNAP, grrr. I am finally just going to do the 2nd gen upgrade. I got a couple, just need to get them installed.
Sounds like you are having some better luck with your foot.
I got the power supply the other day. Even as I am typing this out, I have some parts cooking. I dont want to post any pics up right now as it is not set up the safest way, I need to get a few things to make it hold the old lawn mower blades more stable. I am looking forward to getting it working the way that I want as that will save me a lot of time in cleaning. Thanks for the Power Supply and the idea of getting some time freed up on these projects.
Jun 3, 2013 | 01:31 AM
#695
Thread Starter
Registered User
Joined: Jul 2012
Posts: 2,365
Likes: 4
From: Idaho
I have found perfect first gen lights and the first time I went to use the switch, SNAP, grrr. I am finally just going to do the 2nd gen upgrade. I got a couple, just need to get them installed.
Sounds like you are having some better luck with your foot.
I got the power supply the other day. Even as I am typing this out, I have some parts cooking. I dont want to post any pics up right now as it is not set up the safest way, I need to get a few things to make it hold the old lawn mower blades more stable. I am looking forward to getting it working the way that I want as that will save me a lot of time in cleaning. Thanks for the Power Supply and the idea of getting some time freed up on these projects.
Sounds like you are having some better luck with your foot.
I got the power supply the other day. Even as I am typing this out, I have some parts cooking. I dont want to post any pics up right now as it is not set up the safest way, I need to get a few things to make it hold the old lawn mower blades more stable. I am looking forward to getting it working the way that I want as that will save me a lot of time in cleaning. Thanks for the Power Supply and the idea of getting some time freed up on these projects.
glad to help terry, im glad its working your gona find it flat blasts off rust i put a small dribble of mean green in the water when im tossing in parts ive used pen oil on as the oil will form a slick across the top if you dont
um plastic squeeze clamps zip ties ive got plastic C clamps from when i worked at the valve co in houston they'd toss them out after a few thousand valves course they're electro polishing using 20K -40K volts DC! blasting away atoms of steel to leave a layer of only chromium oxide
even screws will do to hold the blades to a plastic bucket tub ect long as they are above the solution you'll need to every so often knock the rust scale off the sacrificial anodes it speeds up the cleaning a lot
an dont use anything stainless! creates a toxic sludge just bad stuff but any thing else iron or steel works great
Jun 3, 2013 | 06:45 PM
#696
Thread Starter
Registered User
Joined: Jul 2012
Posts: 2,365
Likes: 4
From: Idaho
well ive been busy with paypal today LOL
parts parts WOOT parts
got my green LED dash lights in they look great an dim nicely also changed out the turn signal bulbs high beam indicator as well
got a LED bulb coming for behind the climate control
an for now got the 1st gen dome light is fixed too
oh an terry my old dash had the low fuel light but my sr5 one doesnt
Last edited by Cyberhorn The Dragon; Jun 3, 2013 at 06:47 PM.
Jun 3, 2013 | 11:48 PM
#697
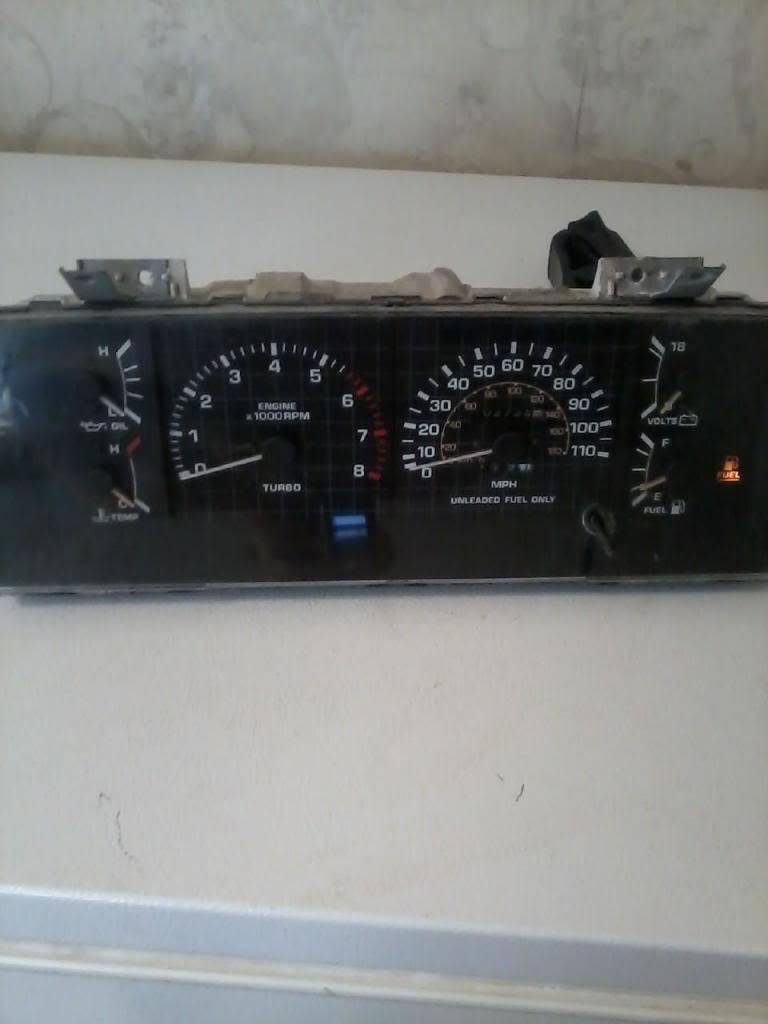
Here is where you fuel light should be. I dont know if there is something that needs to be added to other then the 3 wire float assembly to make it work. I still havent figured that one out.
My non SR5 guage fuel light worked but I still havent tried my SR5 Guage just because I need to swap out my float assembly. It stopped working on me since I first got it running. One of these days I need to drop the tank and swap it out. I connected my new to me fuel float up and it works. I havent checked to see if the light would work if I got it empty. Someday I hope to find out. It is a real pain not knowing how much fuel I have.grrrr
My non SR5 guage fuel light worked but I still havent tried my SR5 Guage just because I need to swap out my float assembly. It stopped working on me since I first got it running. One of these days I need to drop the tank and swap it out. I connected my new to me fuel float up and it works. I havent checked to see if the light would work if I got it empty. Someday I hope to find out. It is a real pain not knowing how much fuel I have.grrrr
 Jun 4, 2013 | 12:42 AM
#698
Thread Starter
Registered User
Joined: Jul 2012
Posts: 2,365
Likes: 4
From: Idaho
i took my dash out a shined a light through the available holes on that side an that wasnt there on mine they are solid black
now i wonder if i could cut out the fuel window from my old dash an put it into the new major work might not pay out an it ruins the old dash gauge cluster
now i wonder if i could cut out the fuel window from my old dash an put it into the new major work might not pay out an it ruins the old dash gauge cluster
Jun 8, 2013 | 06:08 PM
#699
Thread Starter
Registered User
Joined: Jul 2012
Posts: 2,365
Likes: 4
From: Idaho
well did some painting today
valence and bumper filler talked a bit with redeth
waiting for them to dry fully before putting them on they got the rattle can as the valence will be catching every rock on the road


valence and bumper filler talked a bit with redeth
waiting for them to dry fully before putting them on they got the rattle can as the valence will be catching every rock on the road


