
coryc85's 1988 4Runner Build-Up Thread
 May 2, 2013 | 05:12 AM
#281
Thread Starter
Registered User


Joined: May 2005
Posts: 1,977
Likes: 231
From: S. FL
Thanks Fellas. It's definitely some progress. I'm back in assembly mode versus teardown mode.
So in the next day or two, I'll put the carrier back in, set the backlash and throw some paint on the teeth to check the pattern.
I've sent some emails to the seller of the above axle bearing tool on eBay to make sure it will work on my axle. I'm leaning toward buying it versus paying someone else to press them off/on.
May 5, 2013 | 09:45 AM
#284
Thread Starter
Registered User
Joined: May 2005
Posts: 1,977
Likes: 231
From: S. FL
Ok, some major progress on the differential.
First of all, I used that OTC carrier bearing puller and the carrier bearings came off easy as pie. That tool is amazing.
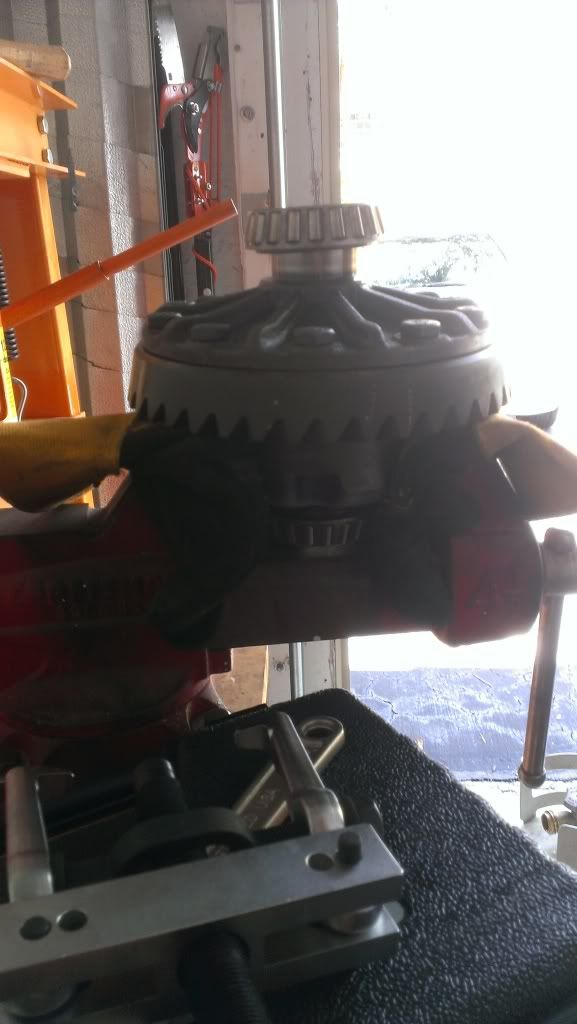
With the carrier bearings off, I cleaned the surfaces and then tapped the new bearings on with a 2x4. Then I put the diff housing into my little jig and clamped it down.
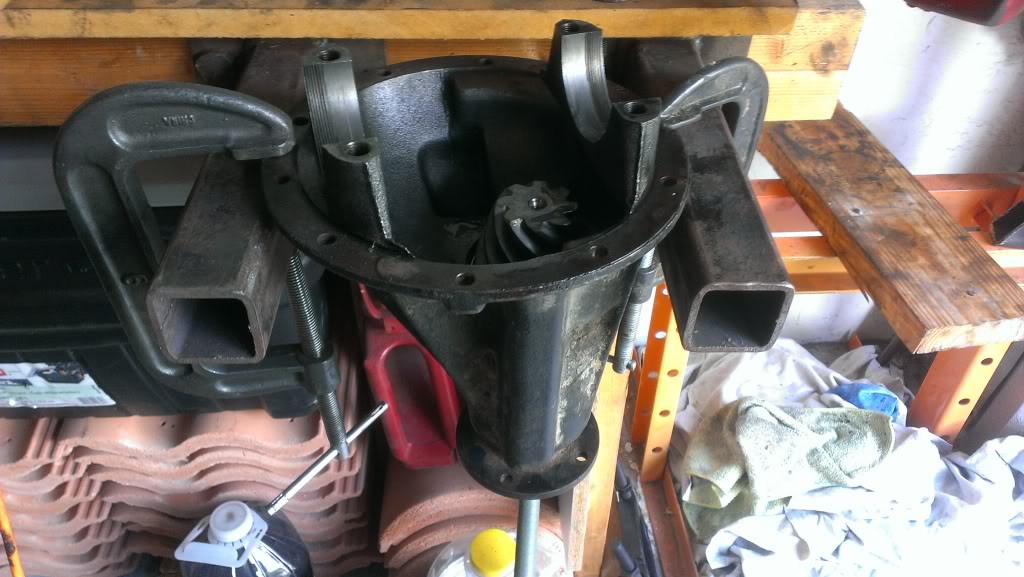
Put the races onto the carrier bearings and sat into place. Then carefully put the adjusters into the threads and put the adjuster caps on. I did not yet put any anti-seize, I'll do that later when I make sure my pattern is good and I set my final backlash and carrier bearing preload.
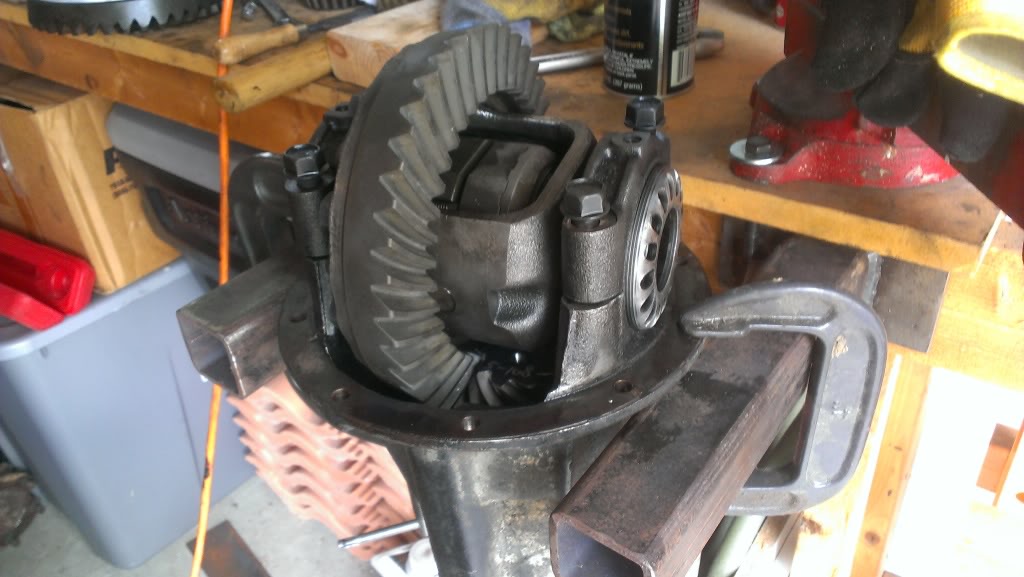
Next, I turned the adjusters until I got about .008" of backlash, tapping the bearing caps with a hammer all the while. Once it was set, I rotated the ring gear and check the BL in 4 places. All were within .001", so the run out seems fine.
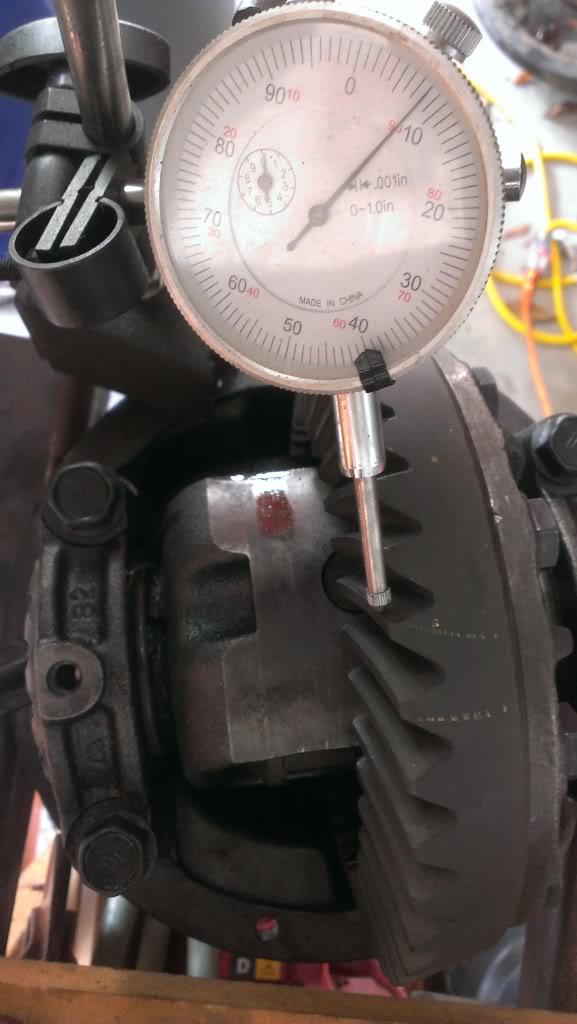
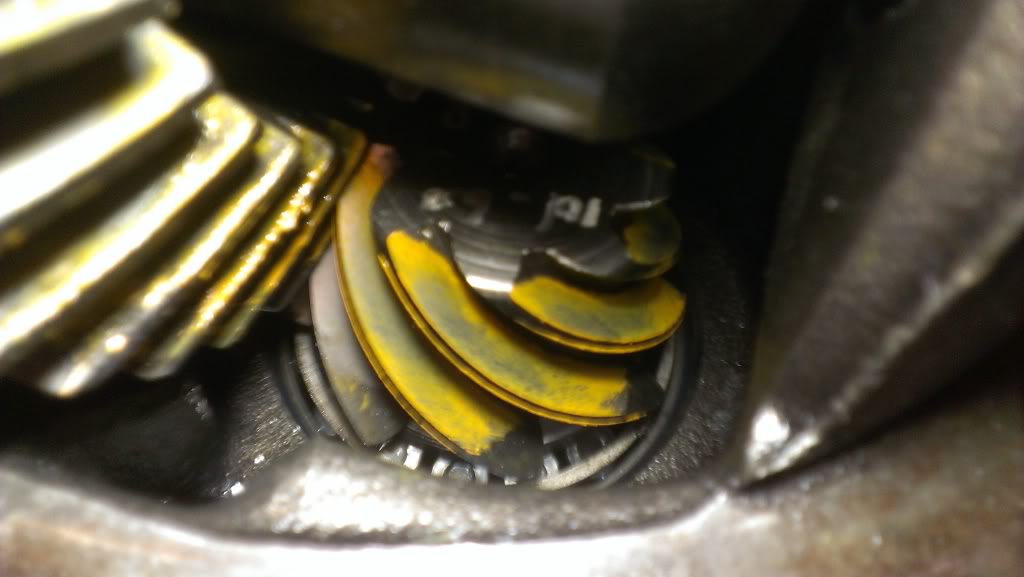
Tightened down my bearing caps, painted some ring gear teeth and went in for a pattern check.
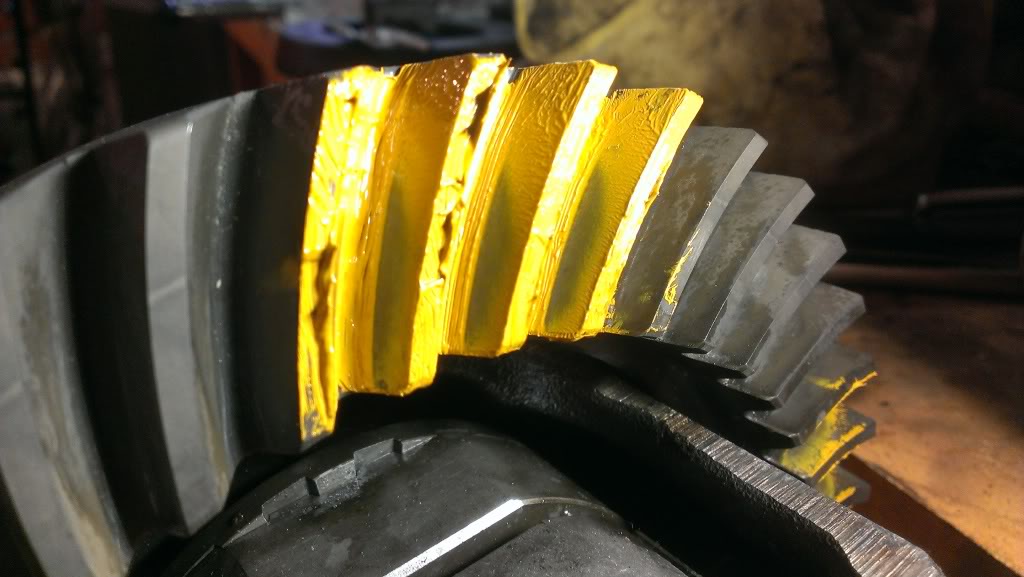
This is with the .081 shim, and in my opinion, looks a bit deep comparing it to patterns on Zuk's site. I think I'm gonna tear it down and go with the factory .077. If anybody has a different opinion, let me know.
First of all, I used that OTC carrier bearing puller and the carrier bearings came off easy as pie. That tool is amazing.
With the carrier bearings off, I cleaned the surfaces and then tapped the new bearings on with a 2x4. Then I put the diff housing into my little jig and clamped it down.
Put the races onto the carrier bearings and sat into place. Then carefully put the adjusters into the threads and put the adjuster caps on. I did not yet put any anti-seize, I'll do that later when I make sure my pattern is good and I set my final backlash and carrier bearing preload.
Next, I turned the adjusters until I got about .008" of backlash, tapping the bearing caps with a hammer all the while. Once it was set, I rotated the ring gear and check the BL in 4 places. All were within .001", so the run out seems fine.
Tightened down my bearing caps, painted some ring gear teeth and went in for a pattern check.
This is with the .081 shim, and in my opinion, looks a bit deep comparing it to patterns on Zuk's site. I think I'm gonna tear it down and go with the factory .077. If anybody has a different opinion, let me know.
May 5, 2013 | 11:13 AM
#285
Wow, I'm really enjoying watching this! Thank you very much, Corey, for sharing such great detail on the progress and work in general. I read lots of friends on this recently and it seems that they usually jump from let's say .081 to say .079 or so, in this sitch.... I haven't seen Zuk or others recommend jumping 4 points... But I'm interested to see if it comes out perfect, Hahahaha. The way things are going it looks like you are probably right on!
May 5, 2013 | 11:49 AM
#286
Thread Starter
Registered User
Joined: May 2005
Posts: 1,977
Likes: 231
From: S. FL
Wow, I'm really enjoying watching this! Thank you very much, Corey, for sharing such great detail on the progress and work in general. I read lots of friends on this recently and it seems that they usually jump from let's say .081 to say .079 or so, in this sitch.... I haven't seen Zuk or others recommend jumping 4 points... But I'm interested to see if it comes out perfect, Hahahaha. The way things are going it looks like you are probably right on!
Anyhow, since I had the .079, I disassembled everything and put that shim behind the pinion bearing. Took me a while to get one of the carrier bearing adjusters seated properly, but it's important not to cross thread it. You should be able to rotate it by fairly easily when the cap is lined up properly.
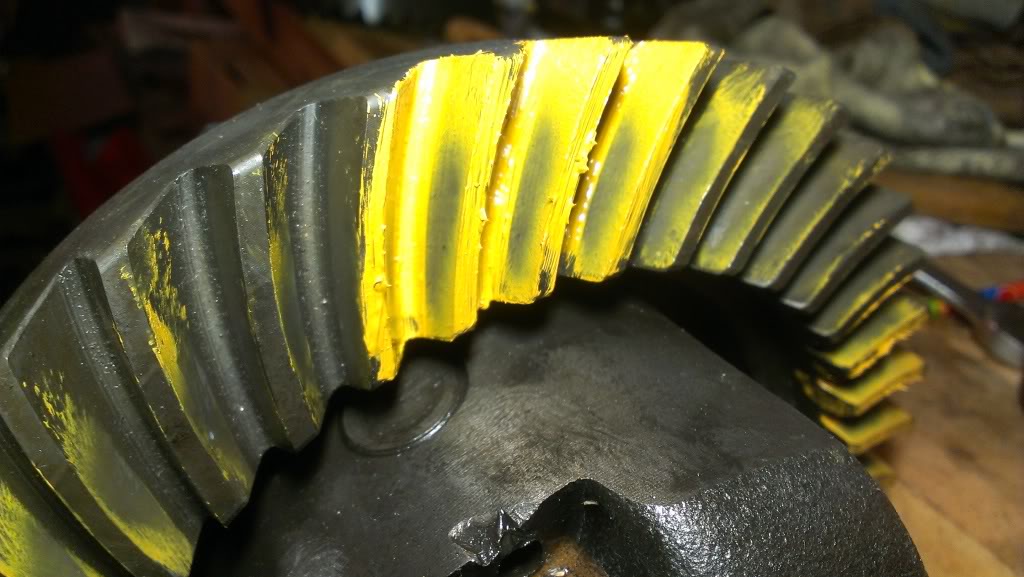
I didn't take any pics of the tear down or reassembly, but it's all the same as before. Here's the new pattern with the .077 shim.
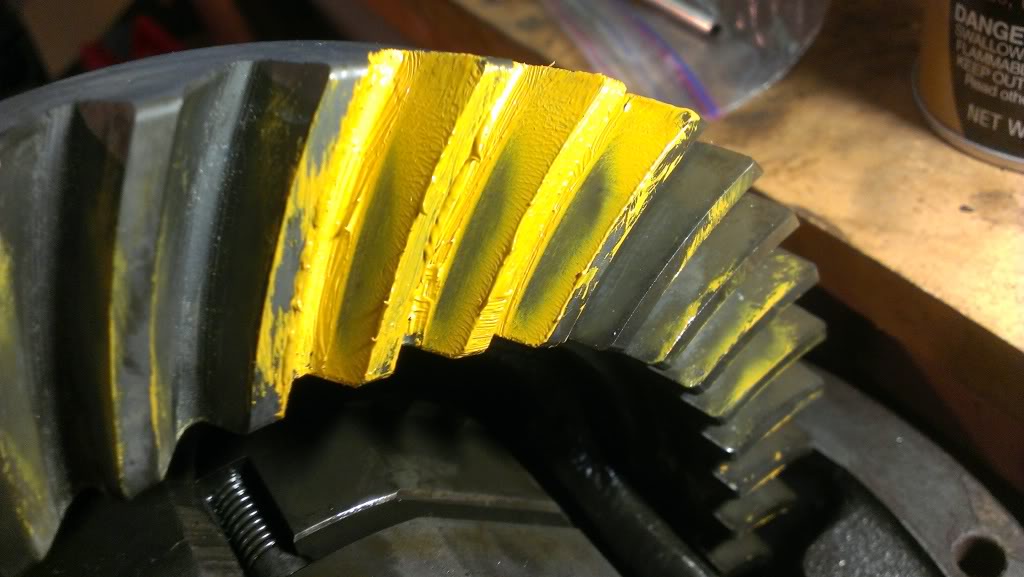
And here is the coast side...

To me, it still looks a bit deep, I'm gonna ping Zuk and see if he agrees.
May 5, 2013 | 12:32 PM
#287
No possible alternate idea that could beat the ZUKopedia input! From all the threads/pix I've seen, I agree that it MIGHT be a lil deep. But, better to inquire with the maestro! Lol
May 5, 2013 | 02:09 PM
#288
Thanks Chef, I always appreciate your comments. I jumped from .081 to .079 mostly because those were the only 2 thick factory shims I had. The other shims from the install kit would take a big stack to get up to the desired value, so in my opinion, fewer is better.
Anyhow, since I had the .079, I disassembled everything and put that shim behind the pinion bearing. Took me a while to get one of the carrier bearing adjusters seated properly, but it's important not to cross thread it. You should be able to rotate it by fairly easily when the cap is lined up properly.
I didn't take any pics of the tear down or reassembly, but it's all the same as before. Here's the new pattern with the .077 shim.
.................................................. .............
To me, it still looks a bit deep, I'm gonna ping Zuk and see if he agrees.
 May 6, 2013 | 02:10 AM
#291

Cory, it looks like you will have to use the shim stack so be careful when measuring the individual shims. The edges of the shims might need to be filed. I think they stamp these shims out and that edge can mess up your reading a little. 074 is ok to try also.
edit---looking at the 081 pattern and the rate of change of the 077 pattern, i bet 074 puts it in a good spot.
Last edited by ZUK; May 6, 2013 at 02:17 AM.
May 6, 2013 | 05:00 AM
#292
Thread Starter
Registered User
Joined: May 2005
Posts: 1,977
Likes: 231
From: S. FL
Cory, it looks like you will have to use the shim stack so be careful when measuring the individual shims. The edges of the shims might need to be filed. I think they stamp these shims out and that edge can mess up your reading a little. 074 is ok to try also.
edit---looking at the 081 pattern and the rate of change of the 077 pattern, i bet 074 puts it in a good spot.
May 6, 2013 | 08:32 PM
#293
Well, I do shave off a little on the solid collars like that....and all a solid collar is is just a super thick shim  If you had a way to properly hold a .077 shim and run it over 100 grit sandpaper then you could shave off .003" in a short time but it has to be checked and rotated to make sure it's shaved off evenly.
If you had a way to properly hold a .077 shim and run it over 100 grit sandpaper then you could shave off .003" in a short time but it has to be checked and rotated to make sure it's shaved off evenly.
Last edited by ZUK; May 6, 2013 at 08:33 PM.
May 6, 2013 | 08:54 PM
#294
Registered User
Joined: Jul 2012
Posts: 2,365
Likes: 4
From: Idaho
Well, I do shave off a little on the solid collars like that....and all a solid collar is is just a super thick shim If you had a way to properly hold a .077 shim and run it over 100 grit sandpaper then you could shave off .003" in a short time but it has to be checked and rotated to make sure it's shaved off evenly.
If you had a way to properly hold a .077 shim and run it over 100 grit sandpaper then you could shave off .003" in a short time but it has to be checked and rotated to make sure it's shaved off evenly.cant say my lapping CPU's to improve cooling several years ago didnt come in handy elsewhere
May 6, 2013 | 10:06 PM
#295
This one Cory? I still like it best and it matches my Ruby Redrum! Lol. ... >>>

I need a sticker guy! haha. ... maybe I will just try some good sticker paper? .......
I need a sticker guy!
haha. ... maybe I will just try some good sticker paper? .......
Last edited by ChefYota4x4; May 6, 2013 at 10:08 PM.
May 7, 2013 | 05:17 AM
#297
Thread Starter
Registered User
Joined: May 2005
Posts: 1,977
Likes: 231
From: S. FL
Well, I do shave off a little on the solid collars like that....and all a solid collar is is just a super thick shim If you had a way to properly hold a .077 shim and run it over 100 grit sandpaper then you could shave off .003" in a short time but it has to be checked and rotated to make sure it's shaved off evenly.
If you had a way to properly hold a .077 shim and run it over 100 grit sandpaper then you could shave off .003" in a short time but it has to be checked and rotated to make sure it's shaved off evenly.
Please Terry...Zuk makes it look easy, I'm just following his recipe. And I just want to say that I have been slowly accumulating the stuff to do this. You absolutely need a press, and the in-lb torque wrench sure is handy. The dial indicator is also a must, and the electric impact makes getting that pinion nut off pretty easy. So once you have the stuff, all you have to do is read Zuk's setups about 5000 times and you're ready to give it a try. The body work that you do is what amazes me, I will never be able to fix a dent like you can, let alone paint my whole truck. I'll have to leave that to the pros.
On to the gears...first, I dissassembled the entire diff.
Ok, so then I filed off the inner and outer edges of the shims. Stacked them up, a .020, 3x .015, and a .010...adds up to .075 so you would think. I measured them in my hand and they were like .083...then I got smart and clamped them in the vise, I read about .081. That was not gonna help since I was shooting for .074. I then took the .020 out and substituted a .015 clamped it all in the vise and measured .0735, rotated it in the vise and measured .074...so I used them. Put them on the pinion, pressed the bearing on, sat pinion on some 2x4s, sat diff on it, dropped in the spacer and shim, tapped outer bearing on, put on flange, tighted nut until about 15 in-lb preload, flip housing over, sit the carrier in, put in adjusters, then the caps. The caps take me forever by the way. Set backlash to .008...check the pattern...
Here's the coast side
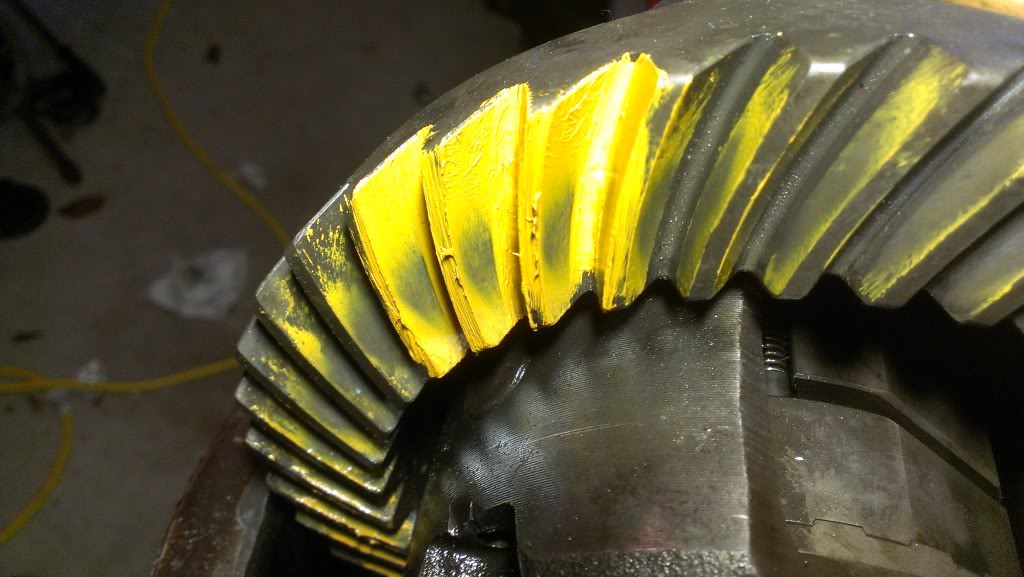
And the pinion for good measure
I'm no expert, but I think I like it. It has definitely moved in a good direction, but I think it might still be a tad on the deep side. We'll see if the Guru of Gears thinks it's good enough. If he concurs, then I will put the seal in (not forgetting to grease the spring and use RTV), crank the nut down with loctite, ding it, check the BL again, crank in some carrier bearing preload, loctite in the adjuster hold down tabs and call this baby done.
Last edited by coryc85; May 7, 2013 at 07:55 AM.
 Hehehe
May 7, 2013 | 04:12 PM
Hehehe
May 7, 2013 | 04:12 PM
#300
Hey Cory..... I am gonna do a home made office depot bumper sticker template job for now.... if I have enough ink, I will do at.least 4 for the few who have asked. They are supposedly soeciql adhesive that can be relocated w/out too much trouble. Cant wait to try, its worth a shot as office Depot had the kit on clearance for 5$ in store.
Link:
http://www.officedepot.com/a/product...mper-Stickers/
I might have to make sure it's not low resolution or do it again... but again. ..... worn a shot. I will have 28 sticker pull offs if it does and might try some others.
Link:
http://www.officedepot.com/a/product...mper-Stickers/
I might have to make sure it's not low resolution or do it again... but again. ..... worn a shot. I will have 28 sticker pull offs if it does and might try some others.


